


WiFi Portable Vibrometer
VM-2012 Air2
1/52
WIFI PORTABLE VIBROMETER
CARDVIBRO AIR2
USER’S GUIDE
VM-2012 AIR2
VM-2
012C AIR2 CONNECT
Document Number
: TVE-6-3852E
Issued on: Sept. 11, 2017
Pages: 52
Version: 2.5.0
WiFi Portable Vibrometer
VM-2012 Air2
2/52
Revision History
Date Rev Details
Feb 14, 2013 0.8.0 New Issue
Feb 21, 2013 0.8.1 Added a clause.
Feb 22, 2013 0.8.2 Added description of vibration criteria.
Feb 28, 2013 1.0.0 Added options of connectors.
Mar 18,2013 1.0.1 Added a status of charge completion
April 17, 2013
1.6.0 Added the functions, Cursor, Top5, Dictionary
Added the battery change,
Change Evaluation criteria for ISO & Bearing
April 19,2013 1.6.2 Added setting of Android Tablet
March 14,2014
2.0.1 Added IP Code, Manufactured Country,
Radio Certification, Distributor
Revised Application Screen
User Judgment and its criteria level editor
March 3,2017
2.0.2
Change
Corporate logo
Sept 11,2017
2.5.0
Improve graph manipulation
Add USB wired measurement

WiFi Portable Vibrometer
VM-2012 Air2
3/52
Table of Contents
1. INTRODUCTION ............................................................................................................................ 5
2. CONTENTS OF A PACKAGE ........................................................................................................... 6
2-1. Product and Parts ...................................................................................................................... 6
2-2. Free Data ................................................................................................................................... 6
2-3. Optional Accessories .................................................................................................................. 7
3. FRONT VIEW ................................................................................................................................. 8
3-1. Power Button ............................................................................................................................. 9
3-2. LED Indicator ............................................................................................................................. 9
3-3. USB Outlet ................................................................................................................................. 9
3-4. Battery ....................................................................................................................................... 9
3-5. Strap Mount ............................................................................................................................... 9
3-6. Vibration Sensor ........................................................................................................................ 9
3-7. Socket (M6 Thread) ................................................................................................................... 9
3-8. Sensor Connector ...................................................................................................................... 9
4. DIMENSIONS............................................................................................................................... 10
4-1. Standard Model ....................................................................................................................... 10
4-2. Connector Model ...................................................................................................................... 11
5. HOW TO INSTALL THE SOFTWARE ............................................................................................. 12
6. OPERATING INSTRUCTIONS ....................................................................................................... 12
6-1. Activation of the Software and Setting of the Tablet PC (Nexus 7) .......................................... 12
6-2. Measurement Method .............................................................................................................. 13
6-2-1. Connection with the Air2 ..................................................................................................... 14
6-2-2. OA Vibration Measurement ................................................................................................. 16
6-2-3. Quick Diagnosis ................................................................................................................... 16
6-2-4. Data Save............................................................................................................................ 19
6-2-5. FFT/Wav Analysis ................................................................................................................ 20
6-2-6. Cursor ................................................................................................................................. 22
6-2-7. Top5 .................................................................................................................................... 23
6-2-8. Route Settings ..................................................................................................................... 25
6-2-9. Settings ............................................................................................................................... 26
6-3. Battery Exchange ..................................................................................................................... 27
6-4. USB Connection ....................................................................................................................... 28
7. UTILITIES ................................................................................................................................... 29
7-1. Sensor ..................................................................................................................................... 29
7-2. Saved Data .............................................................................................................................. 30

WiFi Portable Vibrometer
VM-2012 Air2
4/52
7-3. Units ........................................................................................................................................ 32
7-4. Memory ................................................................................................................................... 33
7-5. A Filter ..................................................................................................................................... 33
7-6. Dictionary ................................................................................................................................ 34
7-7. Hierarchy ................................................................................................................................. 34
7-8. Tx Settings .............................................................................................................................. 35
7-9. User Judgment Edit ................................................................................................................. 36
8. SPECIFICATIONS ......................................................................................................................... 37
8-1. Basic Specifications ................................................................................................................. 37
8-2. Measurement Specifications .................................................................................................... 37
8-3. VM-2012 Air2 Specifications .................................................................................................... 40
8-4. VM-2012C Air2 Connector Model Specifications ...................................................................... 40
9. VIBRATION EVALUATION STANDARD ......................................................................................... 41
9-1. ISO Vibration Evaluation Standard – Vibration Evaluation Standard by Vibration Severity ...... 41
9-2. Bearing Evaluation ................................................................................................................... 42
10. VM-2012C CONNECTOR MODEL .............................................................................................. 43
10-1. VP-2012PS1 – Low Frequency Vibration Measurement Pickup ............................................. 43
10-2. CA-2012 Charge Amplifier .................................................................................................... 46
11. Advanced Setting of Android Tablet ......................................................................................... 48
12. RADIO CERTIFICATION ........................................................................................................... 50
13. NOTES ..................................................................................................................................... 51
14. CONTACT INFORMATION ........................................................................................................ 51
15. DISRIBUTOR ............................................................................................................................ 52

WiFi Portable Vibrometer
VM-2012 Air2
5/52
1. INTRODUCTION
We truly appreciate your purchase.
Please read this manual carefully before use and follow the cautions below for your safety.
Should you have any inquiries or find a problem during use, please consult our sales office near you or IMV
quality a
ssurance department.
1. If the subject of the measurement could be hot, rotating, or near the movable parts,
assure the safety and fix the pickup for measurement.
Do NOT hold the pickup manually in these cases to avoid any possible accidents;
including burning yourself, and entangled cables.
2. Follow the instructions printed on the battery for replacement and disposal of used
batteries. Pay attention to the polarity of the battery for installation.
CAUTION
WiFi Portable Vibrometer
VM-2012 Air2
6/52
2. CONTENTS OF A PACKAGE
2-1. Product and Parts
1. CardVibro Air2
(Image: Standard Model) 2. USB Battery Charger 3. USB Cable
4. Standard Probe 5. Ni-MH (Rechargeable) Batteries 6. Quick User’s Guide
2-2. Free Data
1. Android Application
/ Google Play
2. User’s Manual 3. User’s Manual Video /YouTube

WiFi Portable Vibrometer
VM-2012 Air2
7/52
2-3. Optional Accessories
1. Data Management Software 2. Equipment Diagnosis Software 3. Carrying Case
4. Magnet 5. Long Probe 6. Cable
Available for the VM-2012 only.
Available for the VM-2012C only.
7. Piezoelectric Acceleration Pickup
8. Low Frequency Vibration
Measurement Pickup
9. Charge Amplifier
Available for the VM-2012C only.
Available for the VM-2012C only.
Available for the VM-2012C only.
10. Holder 11. Sensor Input Cable
Available for the VM-2012C only.
Available for the VM-2012C only.
WiFi Portable Vibrometer
VM-2012 Air2
8/52
3. FRONT VIEW
(1) Power Button
(2) LED Indicator
(3) USB Outlet Cover
(4) Battery Cover
(5) Strap Mount
(6) Vibration Sensor
(7) Socket (M6 size screw)
(8) Sensor Connector
(1)
(2) (3)
(4)
(5)
(6)
(7)
Standard Model: VM-2012 Connector Model: VM-2012C
(8)

WiFi Portable Vibrometer
VM-2012 Air2
9/52
3-1. Power Button
Press the power button to turn on the device. When it is on, the LED is on.
Press the power button to turn off the device. When it is off, the LED is off.
When the device is on, WiFi goes standby and be ready to be connected.
3-2. LED Indica
tor
Below shows the meaning of LED indications:
Color Light Device
Red ●
Blinking Connection Standby/Complete Charging
On Error
Orange ●
Blinking Shutting Down or USB Connecting
On USB Connected
Green ●
Blinking Wi-Fi Connecting
On Wi-Fi Connected
Red & Orange ●● Blinking Charging
3-3. USB Outlet
Loosen two screws and slide the cover counterclockwise to open. You can connect a micro USB cable for
charging or vibration measurement with wired connection.
With the USB cover open, you may fail to attain waterproof effects.
3-4. Battery
Use a Philips screwdriver to loosen two screws to open the cover in order to replace batteries. Only AAA
rechargeable batteries can be used in the Air2. Do not use non-rechargeable batteries.
3-5. Strap Mou
nt
You can attach a strap to the device.
3-6. Vibration Sensor
Fix the sensor to the area where you want to measure the vibration. For direct measurement, screw the
standard probe in the socket at the tip of the sensor. You may screw the magnet in the socket for
hands-free measurement.
3-7. Socket (M6 Thread)
Air2 standard model has an M6 thread. The probe or the optional magnet that can be secured in position
with an M6 screw.
3-8. Sensor Conn
ector
You can use the external pickup by connecting it to the Air2 connector model.

WiFi Portable Vibrometer
VM-2012 Air2
10/52
4. DIMENSIONS
4-1. Standard Model

WiFi Portable Vibrometer
VM-2012 Air2
11/52
4-2. Connector Model

WiFi Portable Vibrometer
VM-2012 Air2
12/52
5. HOW TO INSTALL THE SOFTWARE
Refer to the quick user’s guide for software installation.
6. OPERATING INSTRUCTIONS
6-1. Activation of the Software and Setting of the Tablet PC (Nexus 7)
(1) T
urn on the tablet PC and get ready to activate WiFi connection.
(2) Press the power button of the Air2 to bring it to standby mode. (LED indicator: Red blinking)
(3) Go to the setting menu of the Android.
(4) Activate WiFi connection.
WiFi Portable Vibrometer
VM-2012 Air2
13/52
(5) Select the “Air-II-xxxxxx” listed in the networks as the access point.
(“xx” will be displayed arbitrary in hex notation).
(6) Once
the status of the “Air-II-xxxxxx” is indicated as connected, the connection is successfully done.
At this point, the LED indicator is still red and blinking.
6-2. Measurement Method
Air2 can measure the vibration in 2 modes:
(1) OA Measurement
OA values of vibration data, such as acceleration, velocity, and displacement can be measured
and displayed. This mode is loaded with ISO and bearing criteria for quick diagnosis.
(2) FFT/WV
The waveform data of the specified time can be gained. The waveform and FFT data are
displayed. Since this function accommodates continuous monitoring, real-time FFT analysis is
possible.
See the chapter 6-2-2 and after for more detailed description of each measurement mode.
WiFi Portable Vibrometer
VM-2012 Air2
14/52
6-2-1. Connection with the Air2
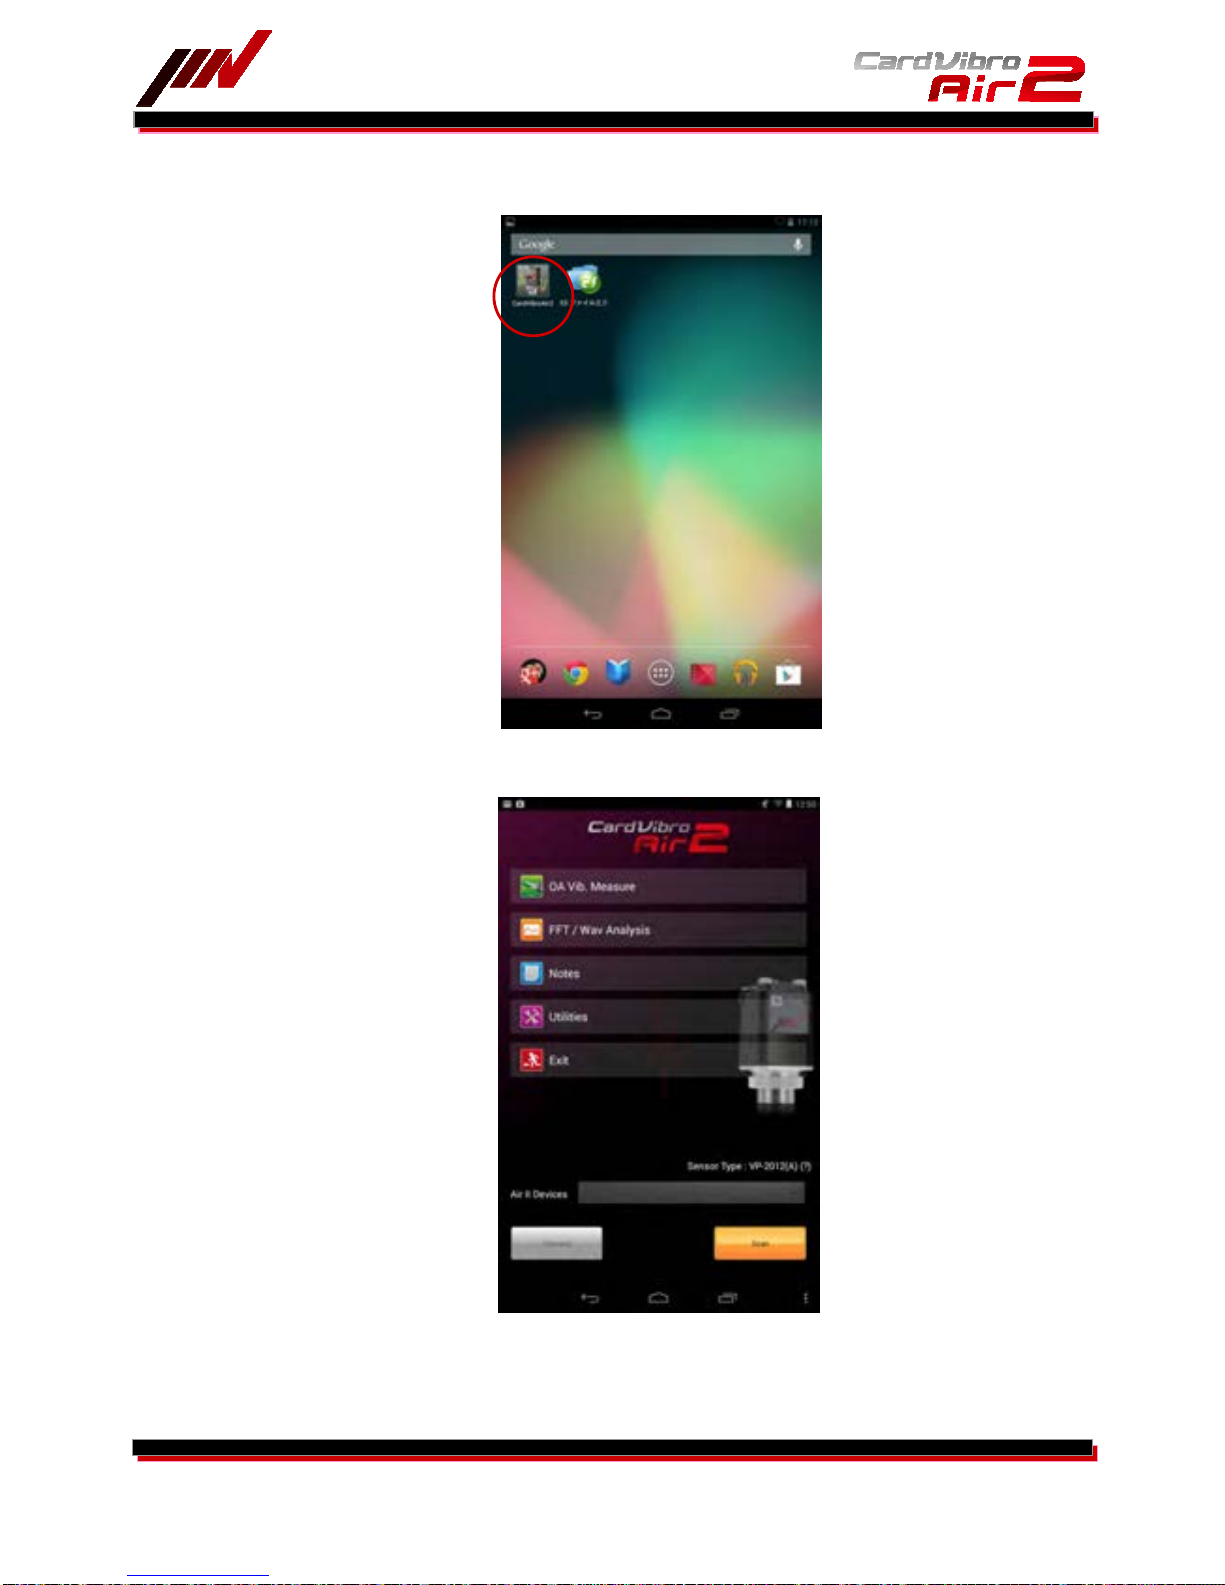
CardVibroAir2 icon will appear in the tablet PC display once the program is correctly installed.
Go to the CardVibroAir2 main menu by touching the icon.
WiFi Portable Vibrometer
VM-2012 Air2
15/52
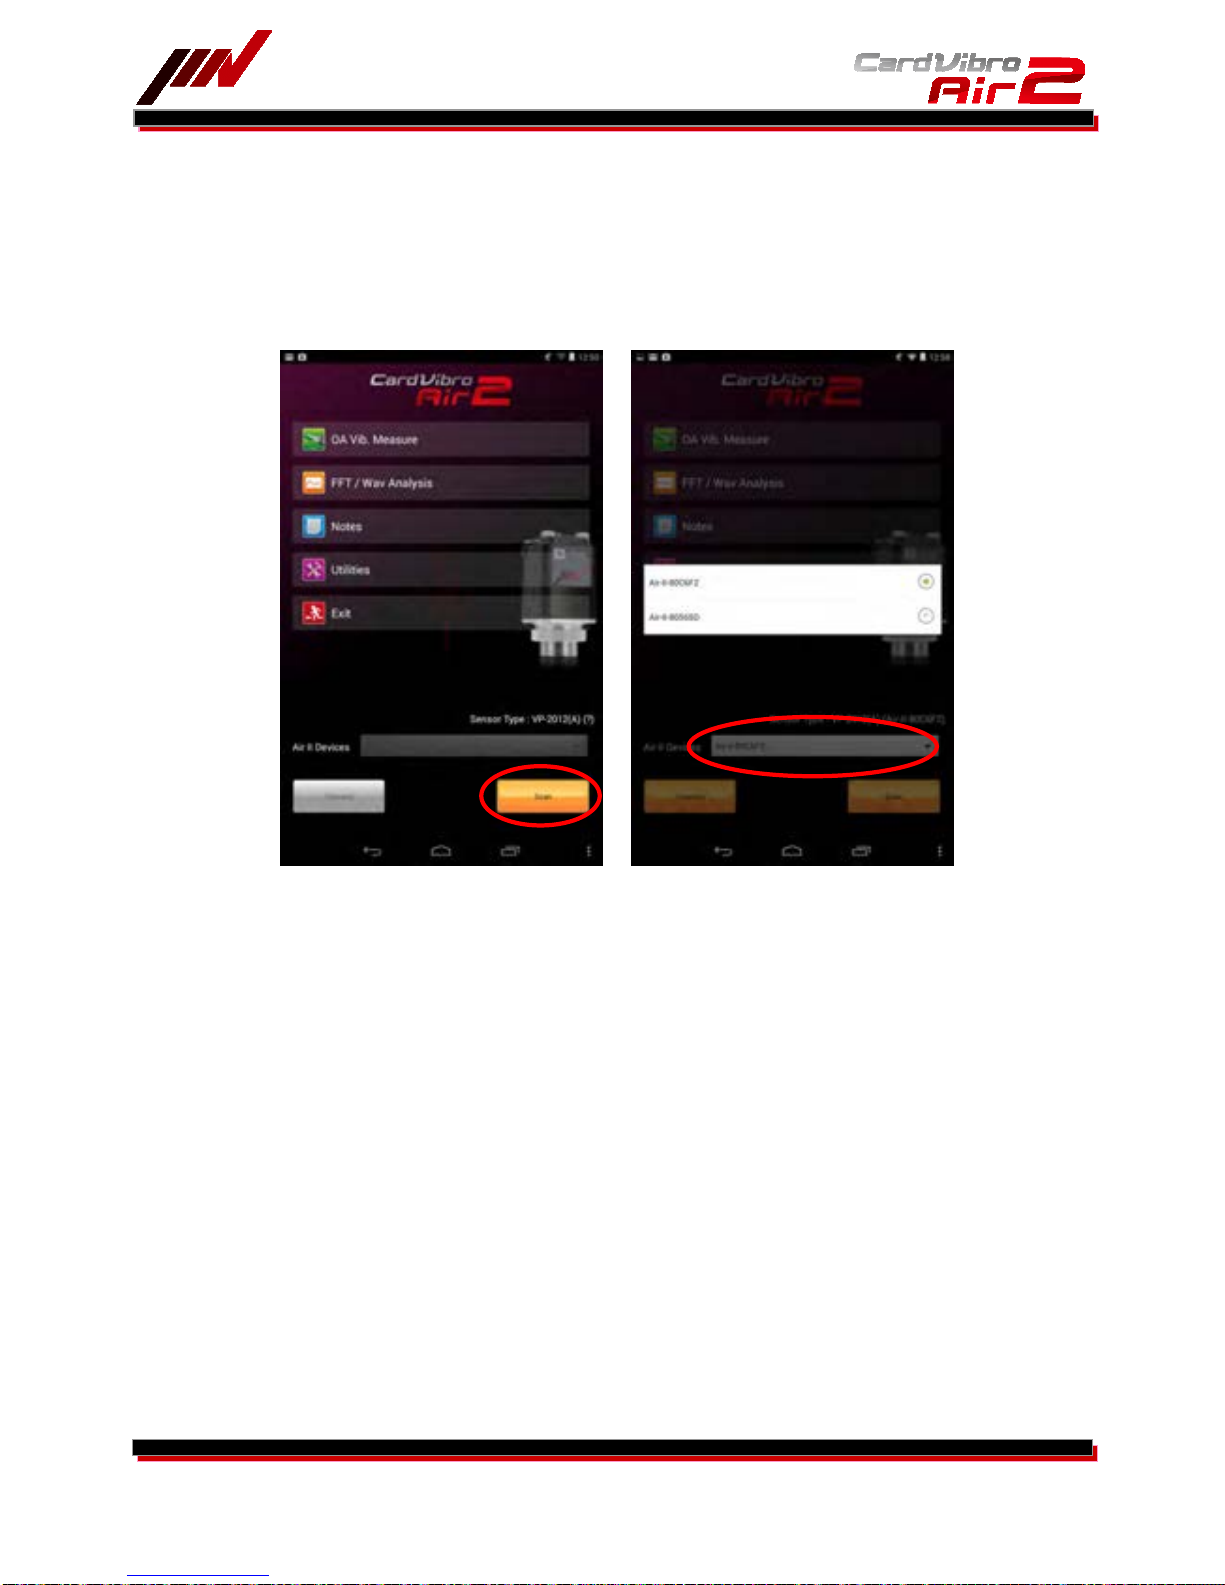
Touch “Scan” in the lower right corner of the main menu. Turn on the Air2 and make sure the red LED
indicator is blinking.
Active Air2 device number(s)* will appear. Select the device and touch “Connect.”
The selected device number will be indicated as Sensor Type in the top of main menu page.
*The device number is the SSID number indicated in the label on your Air2 body.
You can confirm the connection by the WiFi icon on the upper right corner of the display or in the
measurement page.
WiFi Portable Vibrometer
VM-2012 Air2
16/52
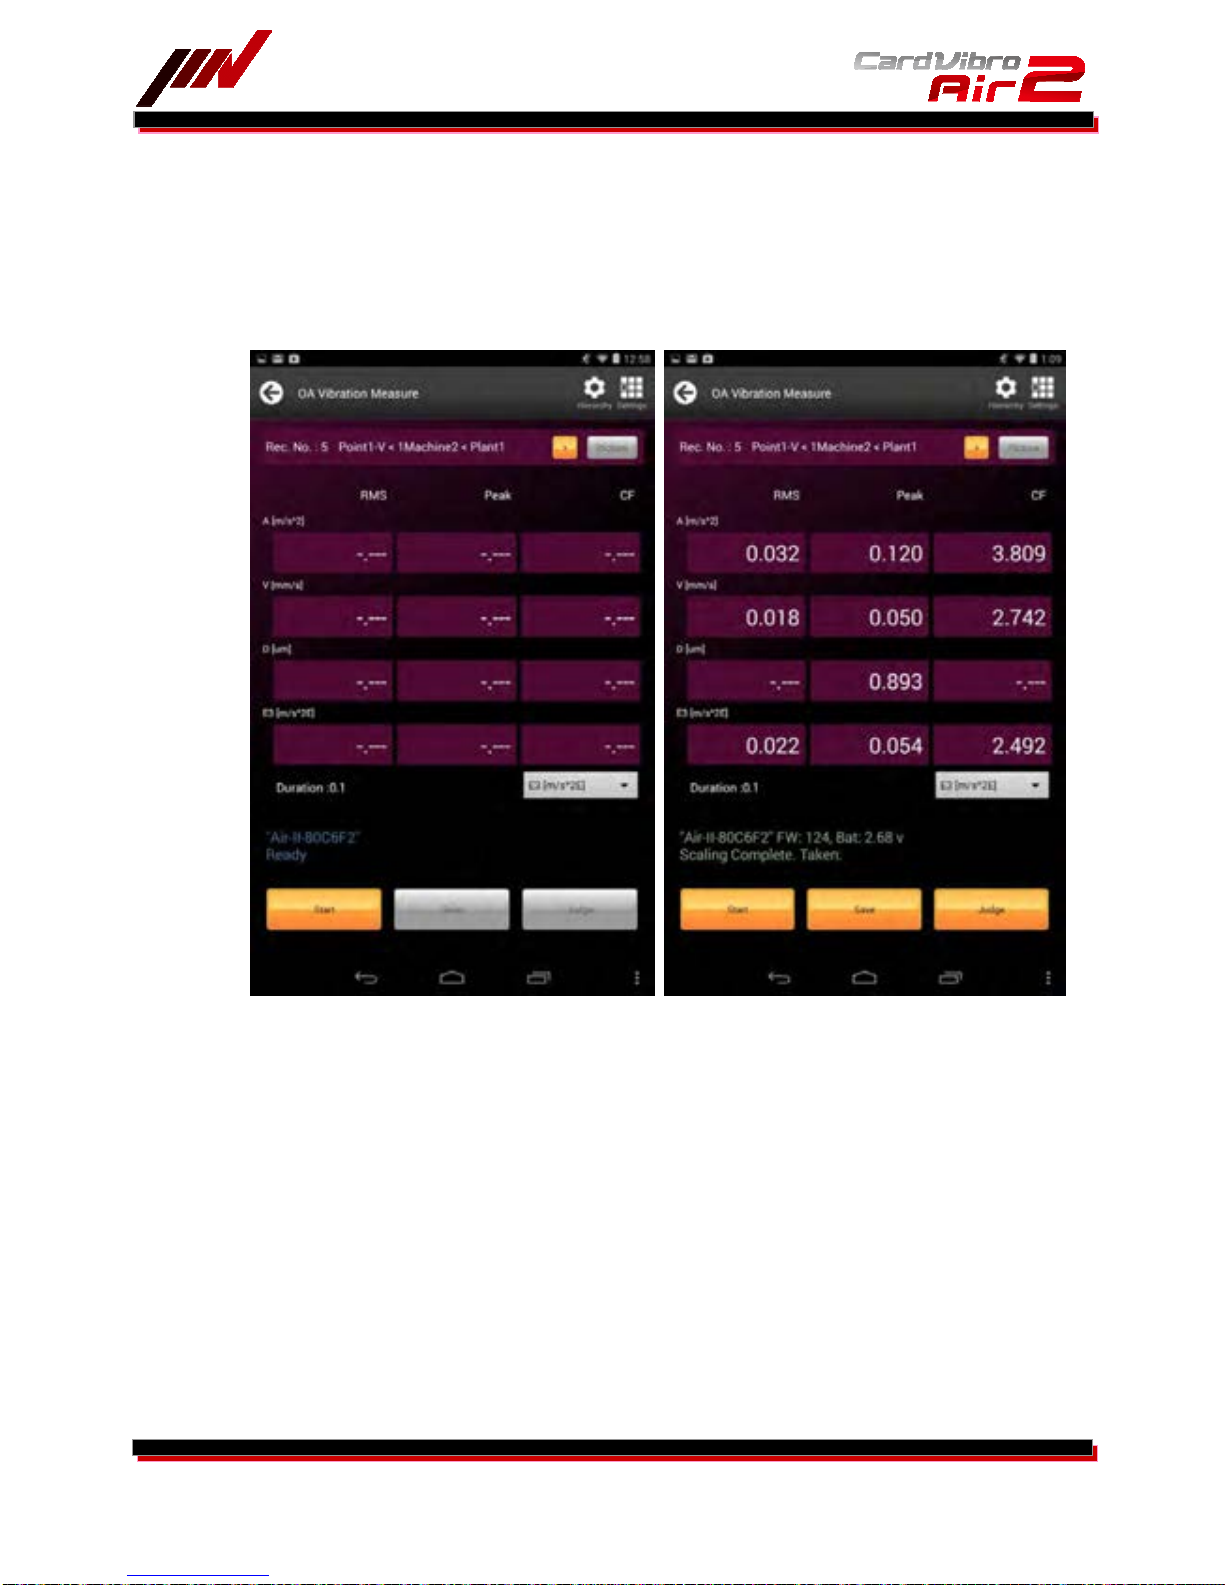
6-2-2. OA Vibration Measurement
Once the tablet PC is successfully connected to the Air2, touch the “OA Vib. Measure” icon in main menu.
Touching the icon will lead you to the OA vibration measurement page.
Be sure the message, “Ready,” is indicated below the device number in the display. If not, go back to the
main menu and establish the connection.
When the measurement is completed, the values of acceleration (A), velocity (V), displacement (D), and
either E1, E2, or E3 will be shown.
You can also save the results as you specify the information of the measured spot. Refer to the chapter
6-2-4 f
or more details. In addition, quick diagnosis function is available to evaluate the measurement
results based on the ISO standard.
6-2-3. Quick Diagnosis
You can go to the diagnosis menu by touching “Judge” button in the measurement result page.
You will see three evaluation criteria:
1. ISO Evaluation
2. Bearing Evaluation
3. User Evaluation
ISO evaluation is a judgment based on the ISO standard. On the other hand, bearing evaluation is a
judgment based on the envelope acceleration (E3).
And On User Evaluation, you can define the criteria level for each three functions, namely Acceleration,
Velocity and Displacement. How to define is showed in User Judgment Edit page.
Select and touch evaluation method to see the judgment.

WiFi Portable Vibrometer
VM-2012 Air2
17/52
Select the size of the machine to see the judgment.
And also User Judgment screen is showed at next page.

WiFi Portable Vibrometer
VM-2012 Air2
18/52
You can select A(Acceleration), V(Velocity) and D(Displacement).

WiFi Portable Vibrometer
VM-2012 Air2
19/52
6-2-4. Data Save
The measurement results can be saved by using the database of the measurement spots.
Touch “Save” to go the data save page. Then, touch “Hierarchy.”
Select the Plant, Machine, and Point from pull-down menu; then touch “Select” at the bottom of the page.
You may select these information before measurement. In that case, touch the “Hierarchy” button in the
initial OA Vibration Measure screen to go to the data save page.
Touch “Save” to save the data.
You can move on to the next measurement, if needed.
The saved data can be converted into a chart, etc by using the optional data management software
(available at IMV).

WiFi Portable Vibrometer
VM-2012 Air2
20/52
And also you can type a short sentence at the Note window, and you can find this note on the optional data
management software(DB-2012).
6-2
-5. FFT/Wav Analysis
Touch the “FFT/Wav Analysis” icon in the main menu.
Be sure the message, “Ready,” is indicated below the device number in the display at this point. If not, go
back to the main menu and establish the connection.
As you touch “Start,” the Air2 starts the measurement.
Once the measurement is completed, you will see the waveform or FFT data in the screen.
FFT and WV can be switched as you press the “FFT” or “WVE” button in the top of the screen.
Also, you can save the data just like the OA vibration measurement. Refer to the 6-2-4 to save the data.
By checking the checkbox of “Continuous” in the FFT/Wave analysis main menu before measurement, the
screen will display the waveform or FFT data continuously. However, please note you cannot save these
continuous data.

WiFi Portable Vibrometer
VM-2012 Air2
21/52

WiFi Portable Vibrometer
VM-2012 Air2
22/52
6-2-6. Cursor
When tapping the graph window at twice, the cursor is displayed on the screen, and also disappeared as
same way. You can move the cursor by using your finger and moving the finger on the screen.
Also, the value of position indicated by cursor, is displayed at the bottom of the graph window.
You can zoom in and out by two-finger swiping .

WiFi Portable Vibrometer
VM-2012 Air2
23/52
6-2-7. Top5
While the FFT graph is displayed, the “Top5” button is effective. This button identifies and displays
frequency and amplitude information for the FFT’s five highest amplitude frequency components.
On the Top5 screen, you can check the two checkboxes for displaying the cursors on the FFT graph.
We show the sample image at next page.

WiFi Portable Vibrometer
VM-2012 Air2
24/52

WiFi Portable Vibrometer
VM-2012 Air2
25/52
6-2-8. Route Settings
You can use a routing of measurement points from version “1.6.5”. This function shows the measurement
point which you assigned the order by the management software “DB-2012” on your PC. So please refer the
manual of “DB-2012” for details. When you download the database to Android Tablet, the Air2 software
shows a first measurement point ( see left-side figure ), and press the “ > “ button, the next measurement
points will be showed. ( see right-side figure ) Also, if you want to go backward, you can do by pressing “ <
“ button.
Also, you can attach the figure on “DB-2012” software for each measurement points. The
measurement point, which have a figure data, enable the “figure” button. You can see the figure data
by pressing the “Figure” button.
By pressing “Close” button, you can go back to a normal window.

WiFi Portable Vibrometer
VM-2012 Air2
26/52
6-2-9. Settings
You can set up the measurement conditions by going to settings menu in the FFT/Wave Analysis page.
You can change various conditions such as measurement mode, full scale, end frequency, and so on.
Mode: Select “Normal.”
“Recorder” can be used to record the waveform. Duration can be set from 1 second
up to 30 minutes depending on the end frequency.
Duration: Only “Recorder” mode needs this setting. You can specify the recording capacity.
Measurement Type: Select the physical quantity of the waveform; such as acceleration (A), or velocity
(V). When the mode is set at Recorder, the waveform of acceleration is recorded.
Full Scale:
Select “Auto.”
End Frequency: Specify the maximum frequency.
Lines: This is the number of lines in the FFT analysis. The larger the number is, the higher
the resolution to be shown becomes.
Averages: The method of data averaging, and the number of averaging data.
Window: Window function used in FFT process. Select “Hanning” in regular operation.
Defaults: Set the selected values to default values.

WiFi Portable Vibrometer
VM-2012 Air2
27/52
6-3. Battery Exchange
While measuring, the module identified number and battery voltage are displayed on the screen.
This color has battery information as following.
Blue : Waiting, not measuring once
Green : Full charged
Orange : Operatable voltage
Red : Volatge level is low, please recharge the batteries
When you find the “ Battery Low” on the screen, please shutdown the application, and after recharging,
connect the Air2 module again.
Also, if you find the no green color character after full recharging, it seems that the battery has damaged or
has no ability for full performance.
In such a case, please change the battery.

WiFi Portable Vibrometer
VM-2012 Air2
28/52
6-4. USB Connection
You can use USB Interface for measuring after the application version 2.6.0. If you want to get the data
through USB interface, you have to use “ USB Host Cable “ for a Tablet. But that’s’ all.
Connect a Tablet to Air2 device through USB Host Cable.
Air2 application shows [ Air-II(USB) ] on the “Air2 device window”.
Press the “connect” button.
The preparation has been finished by only above procedure. The operation of measurement is as
same as a wireless measurement.
But keep in your mind that,
It takes much time to measure by USB port at first time, because Air2 have to translate from
wireless to wired operation protocol.
After second measurement, it will take much same time as wireless measurement,
without shutdown application or remove USB cable.

WiFi Portable Vibrometer
VM-2012 Air2
29/52
7. UTILITIES
Touch “Utilities” in the main menu to go to utilities menu.
7-1. Sensor
You can set the sensitivity of the sensor/pickup.
F
or the Air2, a piezoelectric sensor, VP-2012(A), and a low frequency sensor, VP2012PS1, are
available. Use a piezoelectric pickup in regular operation. The VP2012PS1 can be used with the
VM-2012C only. It is possible to use the VP2012PS1 with the VM2012, yet, the result may not be
accurate.

WiFi Portable Vibrometer
VM-2012 Air2
30/52
7-2. Saved Data
You can see the saved data on the tablet PC. When you touched the “ save data “ button, the
following screen is displayed.
If saved data is not shown, please the “ All “ button is pressed, all saved data is displayed on the
screen as above.
And if you want to delete the data, please press the delete button, checking the data

WiFi Portable Vibrometer
VM-2012 Air2
31/52
You can display the saved data, by checking the check box of data and touch the “ View
“ button.
In case of OA display
In case of FFT/WV

WiFi Portable Vibrometer
VM-2012 Air2
32/52
Also, by checking the check box and pressing “ Find “ button as following, you can list the specified
kind of data.
7-3. Units
Specify the units to show acceleration by m/s^2 or G.
Metric : you can select “ m/s^2 “ or “ G “ for acceleration
Velocity -> mm/s
Displacement -> um
English : Unit is fixed to “ G “ for acceleration
Velocity -> inch/Sec
Displacement -> mil

WiFi Portable Vibrometer
VM-2012 Air2
33/52
7-4. Memory
You can see the data capacity used by Air2.
7-5. A Filter
Select FMax for overall vibration acceleration measurements.
And a High-Pass filter is to be set for Overall Displacement Measurement,
Fc :10Hz for setting Low ( default )
Fc :20Hz for setting Middle
Fc :30Hz for setting High

WiFi Portable Vibrometer
VM-2012 Air2
34/52
7-6. Dictionary
This is a simple way for knowing Vibration technical term. You can find and search the technical term by
input the keyword.
When you select a technical term and touch the “ View ” button, the explanation is displayed.
To quickly browse through available topics, enter the first letter of the topic you wish to explore.
All topics beginning with your entered letter display.
7-7. Hierarchy
You can add or delete the information about the points to measure. You can edit, add, or delete the
information.
Next figure is the data entry page to register the new point to measure.

WiFi Portable Vibrometer
VM-2012 Air2
35/52
7-8. Tx Settings
You can change the value of Tx Power, Channel. Default setting is fine for regular use. Inappropriate
set
ting may disable the wireless connection.
Default

WiFi Portable Vibrometer
VM-2012 Air2
36/52
Tx Power : Changeable from 1dB to 11dB, the default value is 1dB. Larger the Power setting, the
transmit power is lager. You have to care the battery life, when you set the large power.
Channel : Changeable from 1CH to 12CH, the default value is 1CH. If you find that Air2 Wifi channel
is interfered by another Wifi instrument, please change the channel and set the other
channel, pressing “ write setting “ button.
7-9. User Judgme
nt Edit
You can set the judgment criteria for Acceleration, Velocity and Displacement easily.
Call this function, touching the “User Judgment” button, and typing the values for each threshold values.

WiFi Portable Vibrometer
VM-2012 Air2
37/52
8. SPECIFICATIONS
8-1. Basic Specifications
Item Specs
Interface
Wireless LAN: IEEE802.11b/g; WiFi; 128bit WEP; WPA/WPA2
Cable USB: USB2.0, Visual COM Port; Direct Connection
Wireless Communication Infrastructure
Memory Capacity 4Mbit, 16bank
Power Supply 2 AAA rechargeable batteries
Consumption Current Approx. 150mA (during measurement; WiFi connection)
Ambient Temp From +5C to +50C (Guaranteed only with the attached batteries)
Ambient Humidity From 30 to 90%; No condensation
Sampling Frequency 76.8kHz (max)
AD Resolution 16bit
Operational Tablet OS
Android3.2, Android4.1, Android4.2
(See IMV website for update information).
Manufactured Country Japan
8-2. Measurement Specifications
Refer to the chapter 10-1 in the case you will use a low frequency vibration measurement pickup with the Air2
connector model.
Items Specs
Frequency Range
A
V
D
E1
E2
E3
Acceleration 10 to 10kHz (*1)
Velocity 10 to 1kHz
Displacement 10 to 150Hz
Envelope Accleration DC to 50Hz (5 to 100Hz[BPF])
Envelope Accleration DC to 500Hz (50 to 1kHz[BPF])
Envelope Accleration DC to 5kHz (500 to 10kHz[BPF])
Maximum Acceleration 500m/s^2
Sampling Frequency A, E3: 76.8 kHz
E1, E2, V, D: 38.4 kHz
Envelope Filter A, E3: 20kHz
E1, E2, V, D: 2kHz
Measurement Range:
A, E1, E2, and E3
Specified or Automatic
0 to 5m/s^2 (x200 Range)
0 to 10m/s^2 (x100 Range)
0 to 20m/s^2 (x50 Range)
0 to 50m/s^2 (x20 Range)
0 to 100m/s^2 (x10 Range)
0 to 200m/s^2 (x5 Range)
0 to 500m/s^2 (x2 Range)
0 to 1000m/s^2 (x1 Range)
Measurement
Range: V
Specified or Automatic
0 to 5mm/s (x200 Range)
0 to 10mm/s (x100 Range)
0 to 20mm/s (x50 Range)
0 to 50 mm/s (x20 Range)
0 to 100mm/s (x10 Range)
0 to 200 mm/s (x5 Range)
0 to 500 mm/s (x2 Range)
0 to1000 mm/s (x1 Range)

WiFi Portable Vibrometer
VM-2012 Air2
38/52
Items Specs
Measurement Range: D Specified or Automatic
0 to 25µm (x200 Range)
0 to 50µm (x100 Range)
0 to 100µm (x50 Range)
0 to 250µm (x20 Range)
0 to 500µm (x10 Range)
0 to1000µm (x5 Range)
0 to2500µm (x2 Range)
0 to5000µm (x1 Range)
OA Vibration
Measurement
(Overall)
Indicate the results of all modes (A, V, D, E1, E2, and E3)
simultaneously.
Automatic Range Setting
Measurement Time: 0.1, 0.5, or 1.0 sec
Measurement Data: RMS, PEAK,CF (Crest Factor)
4-Digit Display (ex, 9999, 999.9, 99.99, and 9.999)
Status Indicator: Execution, Complete
Evaluation Function Evaluation based on the vibration severity standard; ISO-10816
[JIS-B-0906].
Evaluation of the bearing based on the envelope acceleration (E3
mode).
FFT/Wave Analysis
Mode: A, V, D, E1, E2, or E3.
Range: Specified, or Automatic
FFT Measurement Conditions:
Frequency: Selectable from below options
A: 250, 500, 1k, 2k, 5k, 10k, 15k, 30k Hz
V: 250, 500, 1k Hz
D: 250 Hz
E1: 50 Hz
E2: 250, 500 Hz
E3: 250, 500, 1k, 2k, 5k Hz
Lines: 12800, 6400, 3200, 1600, 800, 400, 200, 100
Averaging : Stable, Exponential, Peak Hold
: 1, 2, 4, 8 times
Window: Hanning, Rectangular, Flat Top
Measurement Type: Normal, Recorder
Normal Measurement:
Recording time of waveform data is determined by FFT
measurement condition (analysis frequency, line number).
Executes the measurement for average cycle in FFT and records
the waveform for frame time (final frame time.)
Recorder Measurement:
Acceleration, velocity, and displacement will be recorded for the
specified duration. Max Recording Duration: 30min (different per
frequency).
Status Indicator: Execution, Complete
Graphic Indication FFT graph
Dominant frequency component highest High5 display
Cursor indication value display
Zoom scroll value display
Waveform graph
Cursor indication display
Zoom.scroll display

WiFi Portable Vibrometer
VM-2012 Air2
39/52

WiFi Portable Vibrometer
VM-2012 Air2
40/52
8-3. VM-2012 Air2 Specifications
Items Specs
Mass Approx. 145g
Dimensions 40.5mm (W) x 88.6mm (H) x 41.5mm (D)
Sensor Piezoelectric Accelerometer
Acc. Frequency Range From 10 to 10kHz
Vel. Frequency Range From 10 to 1kHz
Disp. Frequency Range From 10 to 150Hz
Max Measurement
Acceleration
500m/s²
IP Code IP65
8-4. VM-2012C Air2 Connector Model Specifications
Items Specks
Mass Approx. 130g (incl. batteries)
Dimensions 40.5mm (W) x 88mm (H) x 41.5mm (D)
Sensor Voltage Output Sensor, ICP Sensor
Voltage Output Port -5V, +5V
ICP Port
+24V (2mA))))
Voltage Input Port +/- 2.5V

WiFi Portable Vibrometer
VM-2012 Air2
41/52
9. VIBRATION EVALUATION STANDARD
Evaluation Standard Loaded in the Air2 are as follows:
Criteria Pickup (Sensor) Measurement Type
IS
O Vibration
Evaluation Standard
(Vibration Severity)
VM-2012
VP-2012 Acc. Pickup
(using VM-2012C)
Vibration level (OA value*)
measurement
Velocity (V) value
Bearing Evaluation
VM-2012
VP-2012A Acc. Pickup
(using the VM-2012C)
Vibration level (OA value)
measurement
9-1. ISO Vibration Evaluation Standard – Vibration Evaluation Standard by Vibration Severity
Quote from the Vibration Standard Evaluation (Velocity) ISO 10816-3 Second edition 2009-02-01
Group 1: Large machines with rated power above 300 kW;
electrical machines with shaft height H >= 315 mm.
These machines normally have sleeve bearings. The range of operating or nominal speeds is
relatively broad and ranges from 120 r/min to 15 000 r/min.
Group 2: Medium-sized machines with a rated power above 15 kW up to and including 300 kW;
electrical machines with shaft height 160 mm <= H < 315 mm.
These machines normally have rolling element bearings and operating speeds above 600 r/min.
Options are:
G2 and Rigid (default)
Alert: 2,8 mm/s (0.16 in./s)
Danger: 4,5 mm/s (0.25 in./s)
G2 and Flexible
Alert: 4,5 mm/s (0.25 in./s)
Danger: 7,1 mm/s (0.39 in./s)
G1 and Rigid
Alert: 4,5 mm/s (0.25 in./s)
Danger: 7,1 mm/s (0.39 in./s)
G1 and Flexible
Alert: 7,1 mm/s (0.39 in./s)
Danger: 11,0 mm/s (0.61 in./s)

WiFi Portable Vibrometer
VM-2012 Air2
42/52
9-2. Bearing Evaluation
In order to evaluate bearing, we have established the guideline using the value of the E3 envelope
acceleration.
The values in the chart below shall be applied only to the general guidelines. The best way to
make a judgment on the severity is to take the trend of measurement results into consideration.
Classes:
(a) Class 1
Inner Diameter of the Bearing: From 200 to 500 mm
Number of Rotations: Less than 500RPM
(b) Class 2
Inner Diameter of the Bearing: From 50 to 300 mm
Number of Rotations: From 500 to 1800 RPM
(c) Class 3
Inner Diameter of the Bearing: 20 to 150 mm
Number of Rotations: 1800 or 3600RPM
Judgment will be made based on the peak of the E3.
As shown in the diagram in the following page, the program will select the applicable criteria
based on the inner diameter of the bearing and the number of rotations of the concerned
machinery.
The Enveloped Acceleration Classification (CL1, CL2 or CL3) that best describes the general size
and speed of the bearings being measured should be selected.
Options are:
CL1: Bearings with a bearing bore diameter be-tween 200 and 500 mm(7.9 and 19.7
in.)and a shaft speed below 500 r/min.
Alert: 1 gE
Danger: 2 gE
CL2 (default): Bearings with a bearing bore diameter between 50 and 300 mm(2.0 and 11.8 in.)
and a shaft speed between 500 and 1 800 r/min.
Alert: 2 gE
Danger: 4 gE
CL3: Bearings with a bearing bore diameter be-tween 20 and 150 mm(0.8 and 5.9 in.)
and a shaft speed from 1 800 to 3 600 r/min.
Alert: 4 gE
Danger: 10 gE
1G=9.806m/s^2

WiFi Portable Vibrometer
VM-2012 Air2
43/52
10. VM-2012C CONNECTOR MODEL
VM-2012C does not have a built-in sensor. Instead, an external sensor (pickup) of your choice can be
connected for vibration measurement. Below accessories are available for this Air2.
・VP-2012PS1 – Low Frequency Vibration Measurement Pickup
・CA-2012 – Charge Amplifier
10-1. VP-2012PS1
– Low Frequency Vibration Measurement Pickup
Items Specs
Frequency Range
A
V
D
Acceleration 3 to 100Hz
Velocity 3 to 100Hz
Displacement 3 to 100Hz
Maximum Acceleration 20m/s^2
Sampling Frequency A, V, D: 9.6 kHz
Envelope Filter A, V, D: 2kHz
Measurement Range:
A, E1, E2, and E3
Specified or Automatic
0 to 0.1m/s^2 (x200 Range)
0 to 0.2m/s^2 (x100 Range)
0 to 0.4m/s^2 (x50 Range)
0 to 1m/s^2 (x20 Range)
0 to 2m/s^2 (x10 Range)
0 to 4m/s^2 (x5 Range)
0 to 10m/s^2 (x2 Range)
0 to 20m/s^2 (x1 Range)
Measurement Range: V Specified or Automatic
0 to 0.5mm/s (x200 Range)
0 to 1mm/s (x100 Range)
0 to 2mm/s (x50 Range)
0 to 5 mm/s (x20 Range)
0 to 10mm/s (x10 Range)
0 to 20 mm/s (x5 Range)
0 to 50 mm/s (x2 Range)
0 to 100 mm/s (x1 Range)
Measurement Range: D Specified or Automatic
0 to 2.5µm (x200 Range)
0 to 5µm (x100 Range)
0 to 10µm (x50 Range)
0 to 25µm (x20 Range)
0 to 50µm (x10 Range)
0 to 100µm (x5 Range)
0 to 250µm (x2 Range)
0 to 500µm (x1 Range)
OA Vibration
Measurement
(Overall)
Indicate the results of all modes (A, V, and D) simultaneously.
Automatic Range Setting
Measurement Time: 1, 5, or 10 sec
Measurement Data: RMS, PEAK,CF (Crest Factor)
4-Digit Display (ex, 9999, 999.9, 99.99, and 9.999)
Status Indicator: Execution, Complete

WiFi Portable Vibrometer
VM-2012 Air2
44/52
Items Specs
FFT/Wave Analysis Mode: A, V, or D
Range: Specified, or Automatic
FFT Measuremnt Conditions:
Frequency: Selectable from below options
A: 125 Hz
V: 125 Hz
D: 125 Hz
Averaging: Stable, Exponential, Peak Hold
: 1, 2, 4, 8 times
Window: Hanning, Rectangular, Flat Top
Measurement Type: Normal, Recorder
Normal Measurement:
Recording time of waveform data is determined by FFT
measurement condition (analysis frequency, line number).
Executes the measurement for average cycle in FFT and records
the waveform for frame time (final frame time.)
Recorder Measurement:
Acceleration, velocity, and displacement will be recorded for the
specified duration. Max Recording Duration: 30min (different per
frequency).
Status Indicator: Execution, Complete
Graphic Indication FFT graph
Dominant frequency component highest High5 display
Cursor indication value display
Zoom scroll value display
Waveform graph
Cursor indication display
Zoom.scroll display
VP-2012PS1 Specifications
Items
Specs
Measurement Range +/- 20m/s2
Sensitivity 102mV/m/s2 +/- 5%
Linearity +/- 0.5%
Frequency Range 1 to 100Hz (+/- 0.5dB)
Resolution Smaller than 0.06 m/s2
Temperature
Characteristic(Sensitivity)
Under 6mV/C
Power-Suplly Voltage +/- 5V to +/- 15V
Ambient Temp 0 to 50C
Mass 36g
Impact Resistance 4000m/s2
Size 19 x 19 x 16 mm
Cable 1m

WiFi Portable Vibrometer
VM-2012 Air2
45/52
Fig 1. VP-2012PS1

WiFi Portable Vibrometer
VM-2012 Air2
46/52
10-2. CA-2012 Charge Amplifier
Items
Specs
Gain
1m V/pC +/-0.3dB 以内
Capacitance 1000pF
Frequency Range 3 to 10kHz +/- 0.5dB
Max Output Voltage +/- 2V
Power Supply DC +/-5V
Output Impedance 100Ω
Ambient Temp -20 to 80C
Ground Case
Material (Case) SUS
Cable Length 1.5m
Connector Device Side: 6-pin Round
Sensor Side: BNC

WiFi Portable Vibrometer
VM-2012 Air2
47/52
Fig 2. CA-2012

WiFi Portable Vibrometer
VM-2012 Air2
48/52
11. Advanced Setting of Android Tablet
Android OS and applications backup and version up their program automatically through an access point,
it is very convenient for users. But our Air2 application have to connect to Air2 WiFi module, if the connect
ion is shut down by automatic access to another access point, Air2 application can not receive
measurement data.
For protecting such a situation, following setup is very suitable.
1) Account Sync
As above screenshots shows, please set all Sync Off. ( No check to check boxes )

WiFi Portable Vibrometer
VM-2012 Air2
49/52
2) Location Access
As above screenshots shows, please turn off Access to my location.
2) Backup & reset
As above screenshots shows, please no check to check boxes.
Regarding other Tablet PCs, they have same functions to control accessibility. please refer to their
document and set them like the same.

WiFi Portable Vibrometer
VM-2012 Air2
50/52
12. RADIO CERTIFICATION
R 005-100372(VM-2012) R 005-100373(VM-2012C)
FCC ID:T9J-RN171
IC ID:6514A-RN171
CMIIT ID:2013DJ7665(VM-2012) CMIIT ID:2013DJ7666(VM-2012C)
NCC ID: CCXXxxYYyyyZzW
< NCC声明>
第十二條 經型式認證合格之低功率射頻電機,非經許可,公司、商號或使用者均不得擅自變更頻率、
加大功率或變更原設計之特性及功能。
第十四條 低功率射頻電機之使用不得影響飛航安全及干擾合法通信;經發現有干擾現象時,應立即停
用,並改善至無干擾時方得繼續使用。
前項合法通信,指依電信法規定作業之無線電通信。低功率射頻電機須忍受合法通信或工業、科學及醫
療用電波輻射性電機設備之干擾。
MSIP-CRM-IMV-CardVibroAir2

WiFi Portable Vibrometer
VM-2012 Air2
51/52
13. NOTES
・ All rights reserved. No part of this document may be reproduced in any form, including photocopying without
the prior consent of IMV Corporation.
・ Information in this document is subject to change without notice.
・ Should you have any questions or comments, please contact our sales office.
・ Figures in this document are created based on the displays of the tablet, Google Nexus7. Displays may appear
differently depending on the device you use and/or the versions of the Android software.
・ The software was thoroughly tested before release. IMV assumes no responsibility whatsoever for any
damages in your data or tablet occurred during the use or installation.
・ Figures in this document are created based on the application of the latest version available as of the time of
product release. Indications are subject to change without notice.
・ Never use the device in the environment, which are not indicated in the specifications. Any error in the data or
damage in the device when it was used in a wrong environment will not be covered in the warranty.
・ Do not apply excess shock or pressure to the device.
・ Attach the device at appropriate area of the object of measurement. IMV accepts no responsibility for any
damages in the specimen or an accident during use caused by wrong attachment.
・ Annual calibration is highly recommended to keep the degree of precision.
・ Refer to our website for installation of the app and recommended tablet PCs.
14. CONTACT INFORMATION
IMV C
ORPORATION http://www.imv.co.jp/e/
<Tokyo Sales Office>
Kuretoishi-Bldg. F4 Hamamatsu-cho
Minato-ku, Tokyo, Japan 105-0013
TEL: +81 (3) 3436-3920 FAX: +81 (3) 3436-3921
<Osaka Sales Office>
2-6-10 Takejima, NishiYodogawa-ku
Osaka, Japan 555-0011
TEL: +81 (6) 6471-3155 FAX: +81 (6) 6471-3157

WiFi Portable Vibrometer
VM-2012 Air2
52/52
15. DISRIBUTOR
< China >
北京航天村技术研究所 http://www.bjhtc.com/
北京市丰台区马家堡西路 15 号时代风帆大厦 2-2602 室
TEL: +86(10)51662799
E-mail: bjhtc@vip.sina.com
< Taiwan >
志隆國際科技有限公司
10046 台北市中正區懷寧街 112 號 3 樓
TEL: +886-2-23702678
E-mail: steven@g-long.com.tw
< Korea >
韓國 TECH
41, Yeondeok-ro, 15beon-gil, Seongsan-gu,
Changwon-si, Gyeongnam, Korea 642-290
TEL: +82-55-263-2262
E-mail: kankokutech@gmail.com
 Loading...