


Sigma PowerLED Downlight
Installation and Operation Manual
OVERVIEW
Imtra PowerLED fixtures are uniquely suited for marine,
automotive and architectural lighting applications. They have
been engineered specifically to take advantage of the latest LED
(Light Emitting Diode) technology offering superior reliability,
minimal power consumption and far less radiated heat than
traditional incandescent light sources. When installed properly,
these products will provide years of flawless performance.
The Sigma series encompasses a common LSA (LED subassembly) platform with different bezel options allowing the user
to choose a model that can easily replace existing lights whether
these are traditional halogen or older LED lights. The flush mount
models are provided with stainless steel mounting springs which
may be easily removed if a screw mount installation is required.
Sigma
Small
Sigma
Large
Sigma
Surface-Mount
Sigma Surface-Mount shares the same light engine and features
a sleek mounting bezel for installation where recessing is not
possible.
Sigma is a 2-wire dimmable product that simplifies retrofit
installations by allowing the installer to take advantage of the
vessel’s existing two wires (or duplex cabling). Sigma is also
compatible with some existing halogen dimmers which may
further simplify installation and minimize the project’s wiring
complexity. Sigma’s integrated low voltage AC bridge rectifier
permits its use with either 10-40VDC or 12V/24VAC supplied by
magnetic transformers.
Sigma Small fits flush into a very common hole cutout size; may
be either screw or spring mounted.
Sigma Large shares the same light engine but is equipped with a
special adapter plate and larger diameter trim ring to fit a range
of larger hole cutout sizes; may be screw or spring mounted.
- 1 -
SPECIFICATIONS
Sigma Small Sigma Large
Trim Ring Diameter 3.57” (91mm) 4.35” (110mm) 3.57” (91mm)
Mounting Base Diam. N/A N/A 4.07” (103mm)
Bezel Height 0.34” (9mm) 0.34” (9mm) 1.25” (32mm)
Cutout Diameter 2.56” (65mm)
Recess Depth 0.90” (23mm) 0.90” (23mm) N/A
Input Voltage Range 10-40V (AC/DC)
Power Consumption 5.0 Watts
IP Rating IP65*
* IP65: “Protected from the ingress of dust and low pressure jets of water from all directions”
2.56” (65mm) to
3.65” (93mm)
Sigma
Surface-Mount
N/A
- 2 - - 3 -

2
1
PHYSICAL INSTALLATION
Whether the lights are installed using the springs provided or
by screw-mounting, it is imperative that the lights be mounted
in such a location that the fixtures are protected from the rear
against water exposure.
Also, it is important that the lights are mounted with airspace
around the heat sink housing to allow for convective cooling
of the lights. For recessed applications (this does not apply for
surface-mount installations), we recommend a distance of ½”
(13mm) of free space above the housing.
½”
(13mm)
- 4 - - 5 -
Installation Instructions (Recessed Mount)
Sigma Small and Sigma Large
come with mounting springs
installed. If your application
requires a screw-mount
installation, you will need to
remove the springs. This can be
done by first squeezing the coils
together and then angling the free
side up and away from the spring
retaining tabs. (See Figure 1)
1. If this is a new installation (i.e. no existing hole), then cut a
hole in the mounting surface according to the cutout diameter
required for the light (see chart on page 3). If this is a refit (i.e.
an existing hole), proceed to the next step.
2. Connect the light to a low voltage power source following the
wiring instructions in the next section of this guide.
3. Once all electrical connections are made and secure, proceed
accordingly:
Figure 1
A. Spring-Mount Version (Small or Large): With trim ring
attached, gently bend back the mounting springs on the
Sigma and insert the spring tips into the cutout hole in the
mounting surface (see Figure 2).
Figure 2
- 6 - - 7 -
B. Screw-Mount Version (Small or Large): Twist and remove
the trim ring on the Sigma and insert it into the cutout hole in
the mounting surface. Fasten with three #4 flat head screws
(see Figure 3). Place the trim ring over the light making sure
the tabs of the trim ring engage with the openings in the
housing. Twist the trim ring on to secure it.
Figure 3
Use #4 fl at head
screws only
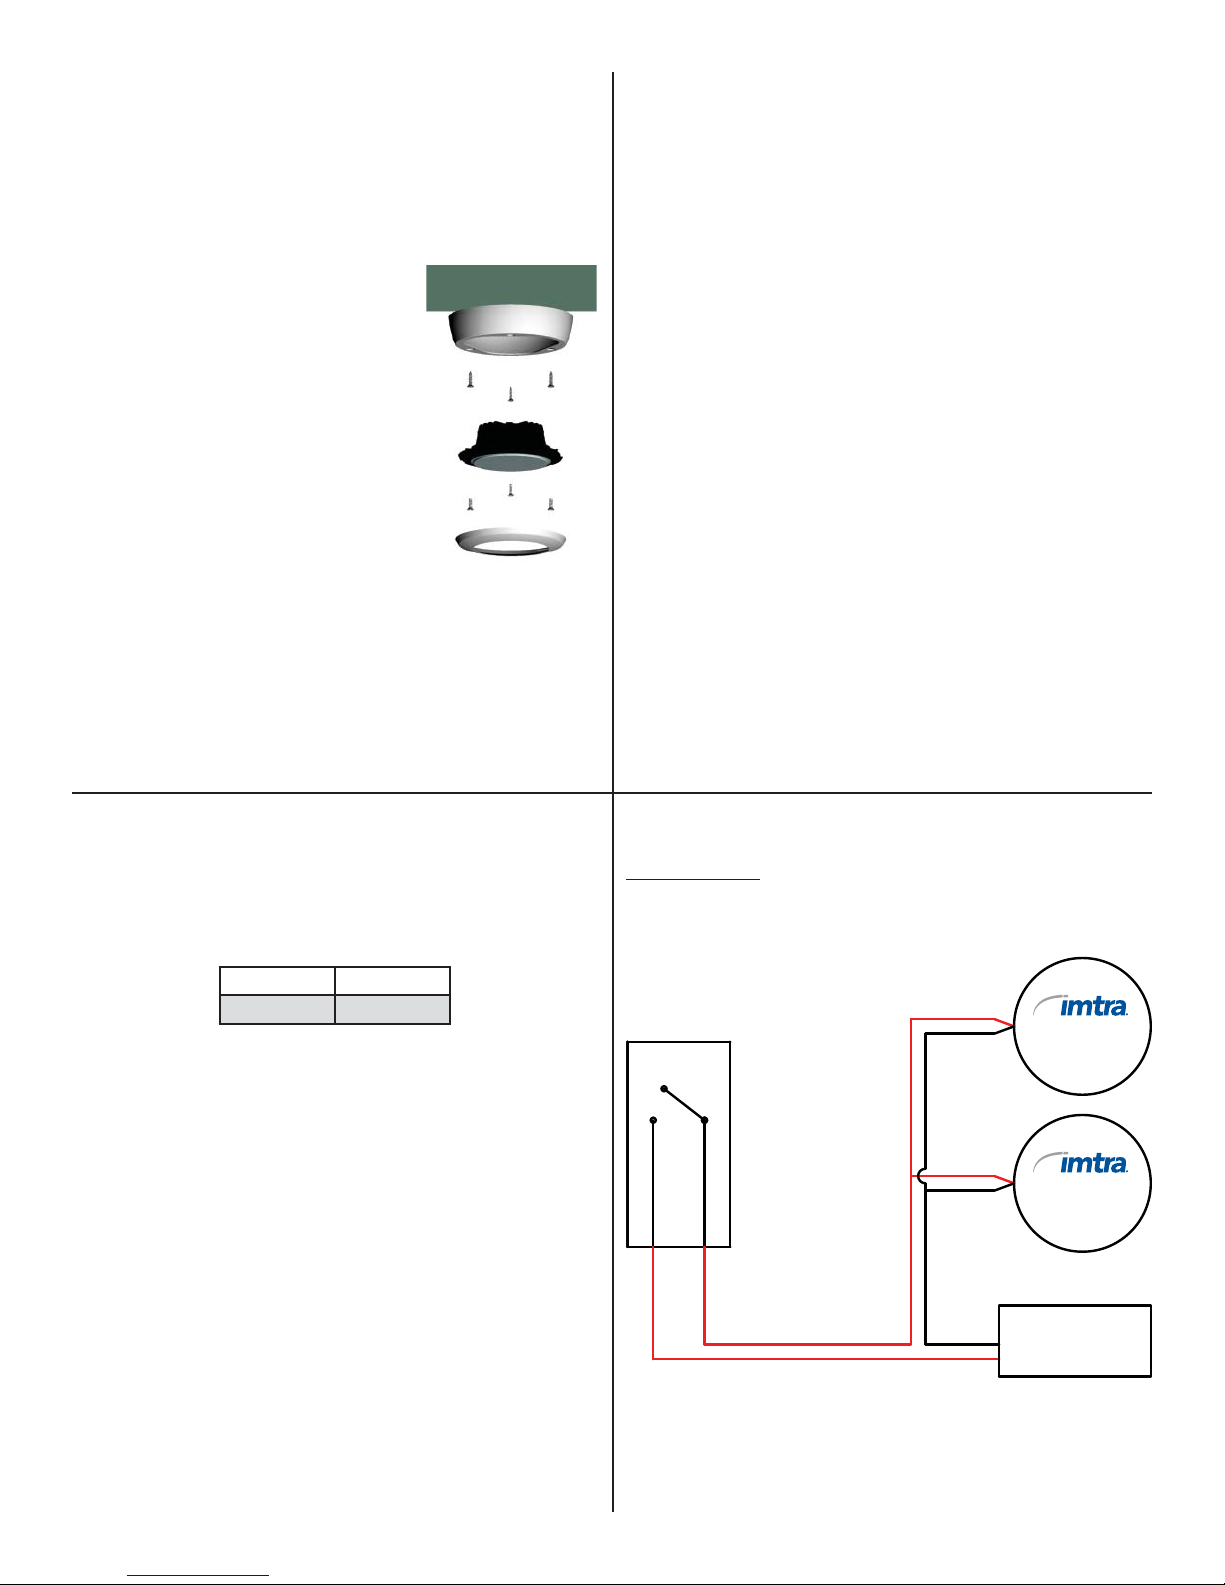
Installation Instructions (Surface-Mount)
WIRING INSTRUCTIONS
1. Position mounting base in desired location and secure using
(3) #4 flat head screws.
2. Twist and remove the trim ring from
the LED subassembly. Connect the
LED subassembly to a DC power
source by passing the wires through
the mounting base following the
wiring instructions in the next section
of this guide.
3. Once all electrical connections are
made, place the LED subassembly
housing into the mounting base,
line up the holes, and secure with
(3) machine screws (included). (see
Figure 4).
4. Place the trim ring over the light
making sure the tabs of the trim ring
Figure 4
engage with the openings in the
housing. Twist the trim ring on to
secure it.
- 8 - - 9 -
Sigma may be controlled by either basic on/off or by a remote
dimmer. Both the power (on/off) and dimming function is
achieved with the two lead wires provided.
1. Connect the light to a DC (or low voltage AC*) power source.
Connect the red wire to positive DC voltage and the black
wire to negative or ground.
*Note: Magnetic transformers only
2. Dimmer compatibility: If you are replacing halogen or
incandescent fixtures that use a remote DC dimmer, your new
lights will use the same power/control wires but may or may
not be compatible with the existing dimmer. If after testing
your lights with the existing DC dimmer you are not satisfied
with the performance, then we recommend the use of Imtra’s
Intervolt DC Dimmer which these lights have been optimized
for. Please contact Imtra or visit our website for details on this
dimmer.
3. Transformer compatibility: Sigma is designed to work with
10-40VDC as well as low voltage AC (from a magnetic
transformer) but on non-dimming circuits only. Electronic
transformers are not compatible. If dimming is required, then
the transformers may be replaced with LED converters sized
appropriately. Please contact Imtra for assistance.
Wire Function
Red + Dim/Power
Black – Dim/Power
NOTES ON WIRE SIZE
The PowerLED family of products comes equipped with
integrated driver electronics. These components are sensitive
to DC systems with voltage drops. Therefore, it is imperative to
select the correct wire size to supply DC voltage to the lights.
This prevents excessive impedance and voltage drops which can
cause premature failure in the PowerLEDs. It is recommended
that the supply wire size be selected according to the ABYC
Wiring Recommendations Chart for a 10% voltage drop. These
charts can be found at www.imtra.com.
- 10 - - 11 -
Wiring Diagram
No Dimming•
Single Switch Location•
1-Way Switch
1P/1T - On/Off
Sigma
PowerLED
Sigma
PowerLED
Voltage Supply
(battery, transformer,
converter, etc)

Wiring Diagram
No Dimming•
Multiple Switch Location•
Wiring Diagram
With Compatible Halogen Dimmer (IMTRA Intervolt or •
similar)
Sigma
3-Way Switch
1P/1T - On/On
3-Way Switch
1P/1T - On/On
PowerLED
Sigma
PowerLED
Voltage Supply
(battery, transformer,
converter, etc)
- 12 -
LIMITED WARRANTY
Imtra warrants the light-emitting LSA (LED subassembly) component
of our IML PowerLED spot lights & fixtures for 5 years from the date of
purchase. If the LSA should cease to function within 5 years, return the
complete spot light assembly to Imtra for repair or replacement.
This warranty does not apply to damage resulting from actions of the
user such as misuse, improper wiring/installation, operation outside of
specification, improper maintenance or repair, unauthorized modification,
lightning strike or damage from a power surge.
The trim ring (bezel) of the IML Power LED spot lights are warranted for
one year.
Imtra specifically disclaims any implied warranties, merchantability or
fitness for a specific purpose and will not be liable for any direct, indirect,
incidental or consequential damages. Imtra’s total liability is limited to
repair or replacement of the product.
The warranty set forth above is inclusive and no other warranty, whether
written or oral, is expressed or implied.
If it should become necessary to return a fixture for service during or
beyond the warranty period, please refer to Imtra’s standard Return Policy
as detailed on Imtra’s website (www.imtra.com) or call Imtra customer
service at (508) 995-7000.
No returns are accepted without a Return Authorization (RA) number.
Control
Interface
Compatible 2-Wire
Digital Halogen
Dimmer
- 13 -
30 Barnet Boulevard, New Bedford, MA 02745
(508) 995-7000 • www.imtra.com
Sigma
PowerLED
Sigma
PowerLED
Voltage Supply
(battery, transformer,
converter, etc)
- 14 -
 Loading...