

Page 1
0
Media Player
MPC1005
MPC1006
Operation Manual
Movie Photo Music
Page 2

1
Content
I. Main Features
.......................................................................................................
2
1.1.Applications
.......................................................................................................
2
1.2.Display format
..................................................................................................
2
1.3. Supported Languages
..................................................................................
5
II. Remote control
..................................................................................................
5
III.SETUP MENU
......................................................................................................
8
IV.Interface port
..................................................................................................
10
V. Operation Manual
...........................................................................................
12
5.1 Boot auto-play
...............................................................................................
12
5.2 Custom control display
...........................................................................................
12
5.3Pictures Sync playback(BGM)
........................................................................
13
5.4 Custom function
............................................................................................
14
5.5 Other functions’ operation manual
........................................................
15
5.5.1 RS232 control display
.............................................................................
15
5.5.2 Button control display………………………………………………………………23
5.5.3 Motion sensor display..................................................... 27
VI. Pin definition of button interface......................................... 28
VII. Setting of picture playback................................................ 29
Page 3

2
MPC1005/MPC1006 is a high performance 1080p Full HD media player. OS belongs
to the Linux operating system.
I. Main Features
1.1 Applications
Ideal replacement for Blue Ray and DVD video players.
Ideal playback unit for Large LCD and Plasma display.
Ideal for Synchronous playback.
High Definition Information Display for Resorts, Hotels, Restaurants,
Shopping Malls, Airports, etc.
HD Video player for Museums and Science Center exhibits.
HD Video player for Interactive traveling exhibit.
HD Video information system for Theme Parks, Go-Kart tracks, Family Fun Parks.
1.2 Display format
1.2.1 Supported audio code:
HE, LPCM, AC3, DTS, DTS-HD MA (degradable DTS output) digital coaxial 5.1
channels, stereo double track.
1.2.2 Supported audio files:
MP3, WMA, WAV, OGG, FLAC, AAC, LC-AAC, APE(below 128KHz
)
Page 4

3
1.2.3 Supported picture format:
JPEG,BMP,GIF,PNG,TIFF
1.2.4 Supported subtitles format:
SRT, SMI, SUB, SSA, IDX+SUB
1.2.5 Supported video code:
MPEG1/2/4, H.264, AVC, VC1, WMV, RM/RMVB, DivX3/4/5/6, Xvid3/4/5/6
1.2.6 Supported video files:
RM/RMVB, AVI, TS, M2TS, MTS, MKV, MOV, FLV, DVD-ISO, BD-ISO, VOB,
MPG, DAT, ASF, TP, TRP, WMV, IFO, SWF, 3GP, EVO, DIVX, MP4, OGM
1.2.7 Video Format:
A. Apple quick time AVC (xxx.mov) at up to 35 mbps:
The video size is up to 1080p (1920X1080) and average bit rate is 35mbps
with peaks at up to 50mbps.
B. Mpeg2 HD (xxx.ts, xxx.m2ts) at up to 40 mbps:
The player supports Mpeg2-HD xxx.ts and xxx.m2ts files (main profile@high
level).The video size is up to 1080p (1920X1080) and bit rate is 40mbps.The
player supports both CBR and VBR encoding.
Page 5

4
C. Windows media HD (xxx.avi,xxx.wmv) at up to 35 mbps:
The player supports windows media HD VC-1 files xxx.avi (AP@L3). The
video size is up to 1080p (1920X1080) and average bit rate is 35mbps with
peaks at up to 50mbps.For continuous 24/7 loop file only, limit the average bit
rate to 25mbps.
D. Panasonic and Sony HD camcorder (xxx.mp4):
The player plays files created by Panasonic and Sony HD camcorders. These
HD camcorders record video using AVC-HD file format (h.264).
E. Flip Video HD movie file (xxx.mp4):
The player supports movie files that have been created using Flip Video hand
held HD recorder. Files created are mpeg4 HD, xxx.mp4.
F. Digital camera movie file (xxx.mp4,xxx.avi):
The player supports movie files xxx.mp4,xxx.avi, xxx.mov that have been
created using regular Digital cameras (with movie recording capability).
G. DVD and Mpeg2 video:
The player supports standard DVD file xxx.vob and also regular Mpeg2 file.
H. VIDEO OUTPUT (all are ON simultaneously):
The player has 2 video output: HDMI and Composite. When playing, these
video outputs are s imultaneously ON regardless of the video setting and file
being played
Page 6
5
1.3 Supported Languages
English, Espaňol, Français, Deutsch, Italiano, Dutch.
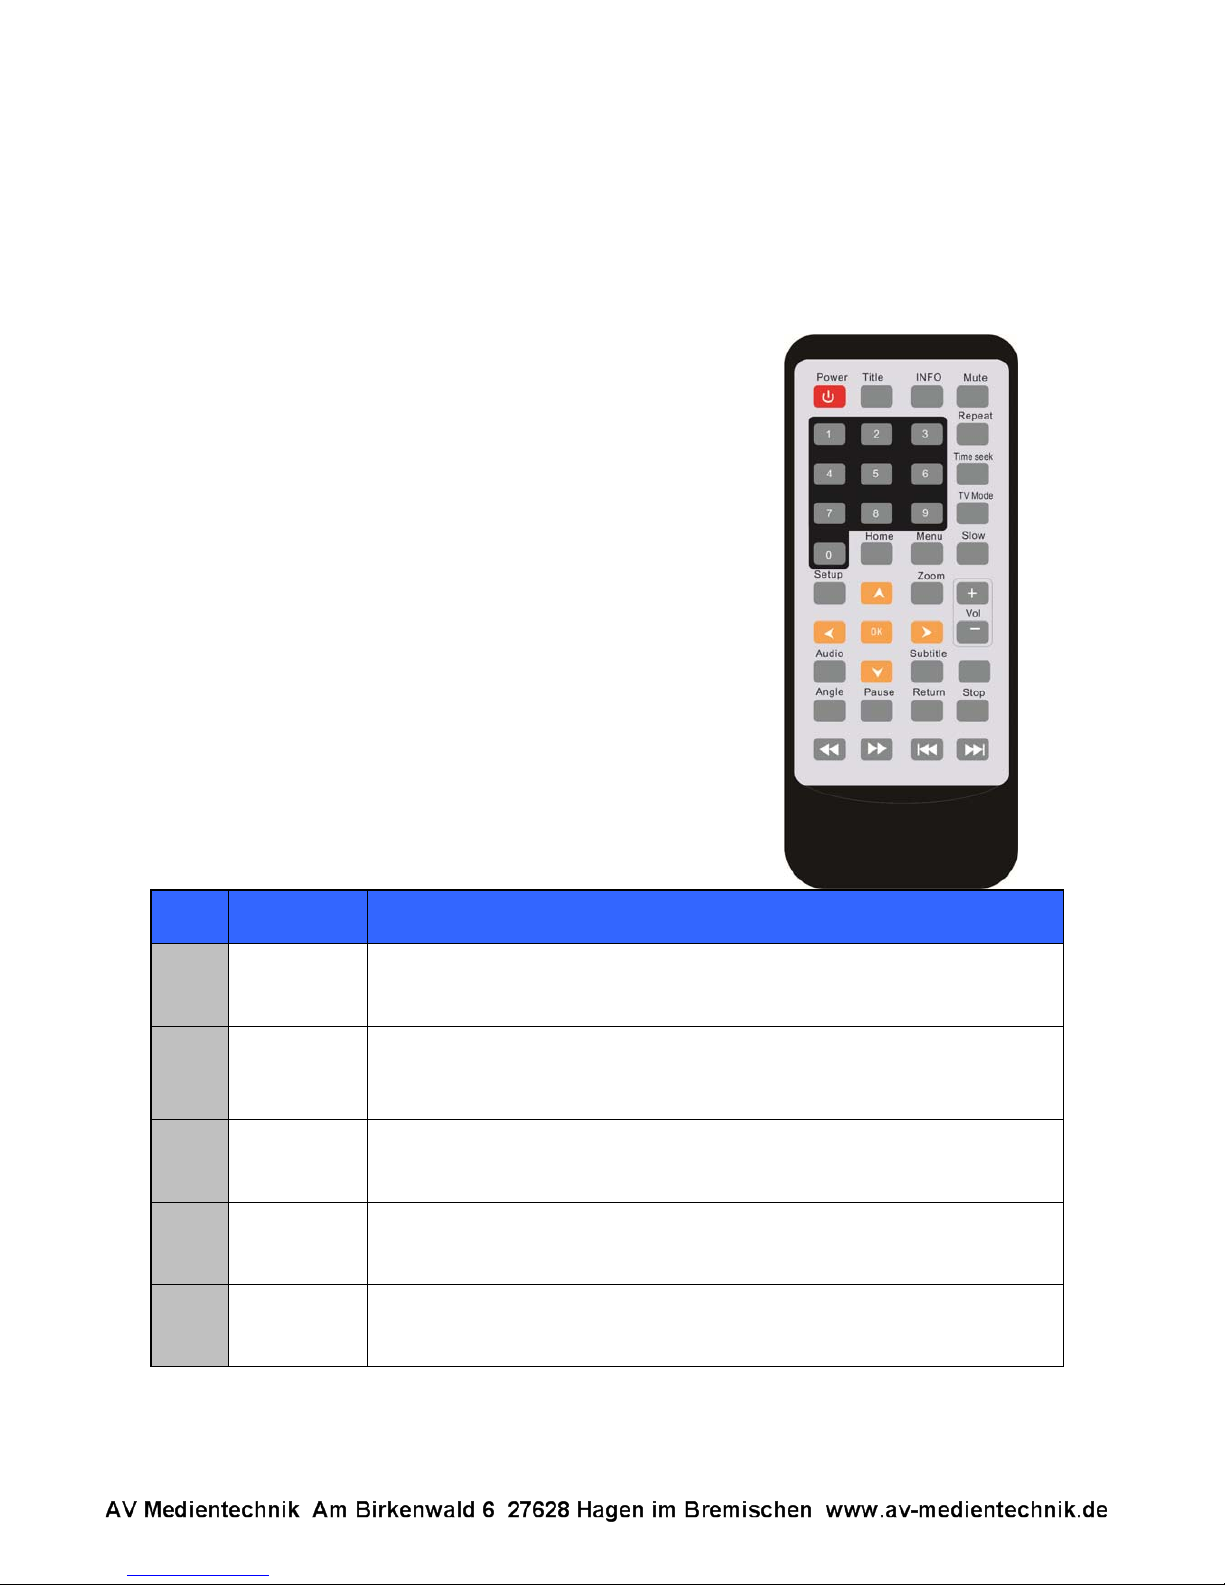
II. Remote control
All procedures in this manual can be carried out using th
e
remote control buttons.
See the following for details on each button and it
s
function:
No. Name Function
1Power
Power button:
Press to POWER on or off the device
2 Title
Title button:
Press to view the title of DVD
3Info
Info button:
Press to view the current channel information.
4Mute
Mute button:
Press to mute audio output, and press again to resume.
5Numeric
Numeric buttons:
Press to enter channel numbers or numeric input when changing settings
Page 7
6
6 Repeat
Repeat buttons:
Press REPEAT 1 / ALL to set repeat option - Chapter, Title or Off.
7Timeseek
Time seek buttons;
Press to jump to a specific point on the disc or title. Specify the point using
Title, Chapter and Time.
8TVMode
TV Mode button;
Press to switch between NTSC Interlaced, NTSC Progressive,
PAL Interlaced, and PAL Progressive.
9Home
Home buttons;
Press to Return the main menu
10 Menu
Menu buttons;
Press to enter the main menu
11 Slow
Slow button:
Press to playback in slow motion. Three motion settings are available.
Five slow motion levels (3/4, 1/2, 1/4, 1/8, 1/16x) are available.
Press to resume regular playback.
12 Setup
Setup button:
Press to access the Setup Menu directly to change system settings.
13 Zoom
Zoom button:
Press to zoom in/out when playing back photos or Video programs.
Photo zoom levels: 2X, 4X, 8X, 16X;
Video zoom levels: 2X, 3X, 4X, 8X.
14 Left (Arrow)
Press the arrow buttons to navigate the menus
15 Right (Arrow)
Press the arrow buttons to navigate the menus
16 Up (Arrow)
Press the arrow buttons to navigate the menus
17 Down (Arrow)
Press the arrow buttons to navigate the menus
18 OK
OK button:
Press to select confirm in menus.
19 Vol -
Vol - buttons:
Press to reduce the volume.
Page 8
7
20 Vol+
Vol + buttons:
Press to increase the volume.
21 Audio
Audio button:
Press to select an audio track on a HDD or USB file.
22 Subtitle
Subtitle button:
Press to activate available subtitles when play the DIVX file.
DivX subtitle supported: SRT,SMI,SUB,SSA format file
23 Resume
Resume buttons;
Press to resume play
24 Angle
Angle buttons:
Press to view angle of DVD
25 Pause
Pause button:
Press to pause playback of a DVD or HDD title.
26 Return
Return button:
Press to return to the previous screen when navigating the menus.
27 Stop
Stop button:
Presstostopplayback.
28 FR
Fast Rewind buttons:
Press to fast rewind the current playback.
Press repeatedly to select faster rewind speeds.
29 FF
Fast Forward buttons:
Press to fast forward the current playback.
Press repeatedly to select fast forward speeds.
30 Previous
Previous buttons:
1. Press to go the prev. on a HDD or USB file when playing music.
2. Press to page up the file list at Browser.
3. When play photo, the button is enable; play Movie and Mp3 file, the
button is disable.
31 Next
Next buttons:
1. Press t o go the next on a HDD or USB file when playing music.
2. Press to page down the file list at Browser.
3. When play photo, the button is enable; play Movie and Mp3 file, the
button is disable.
Page 9
8
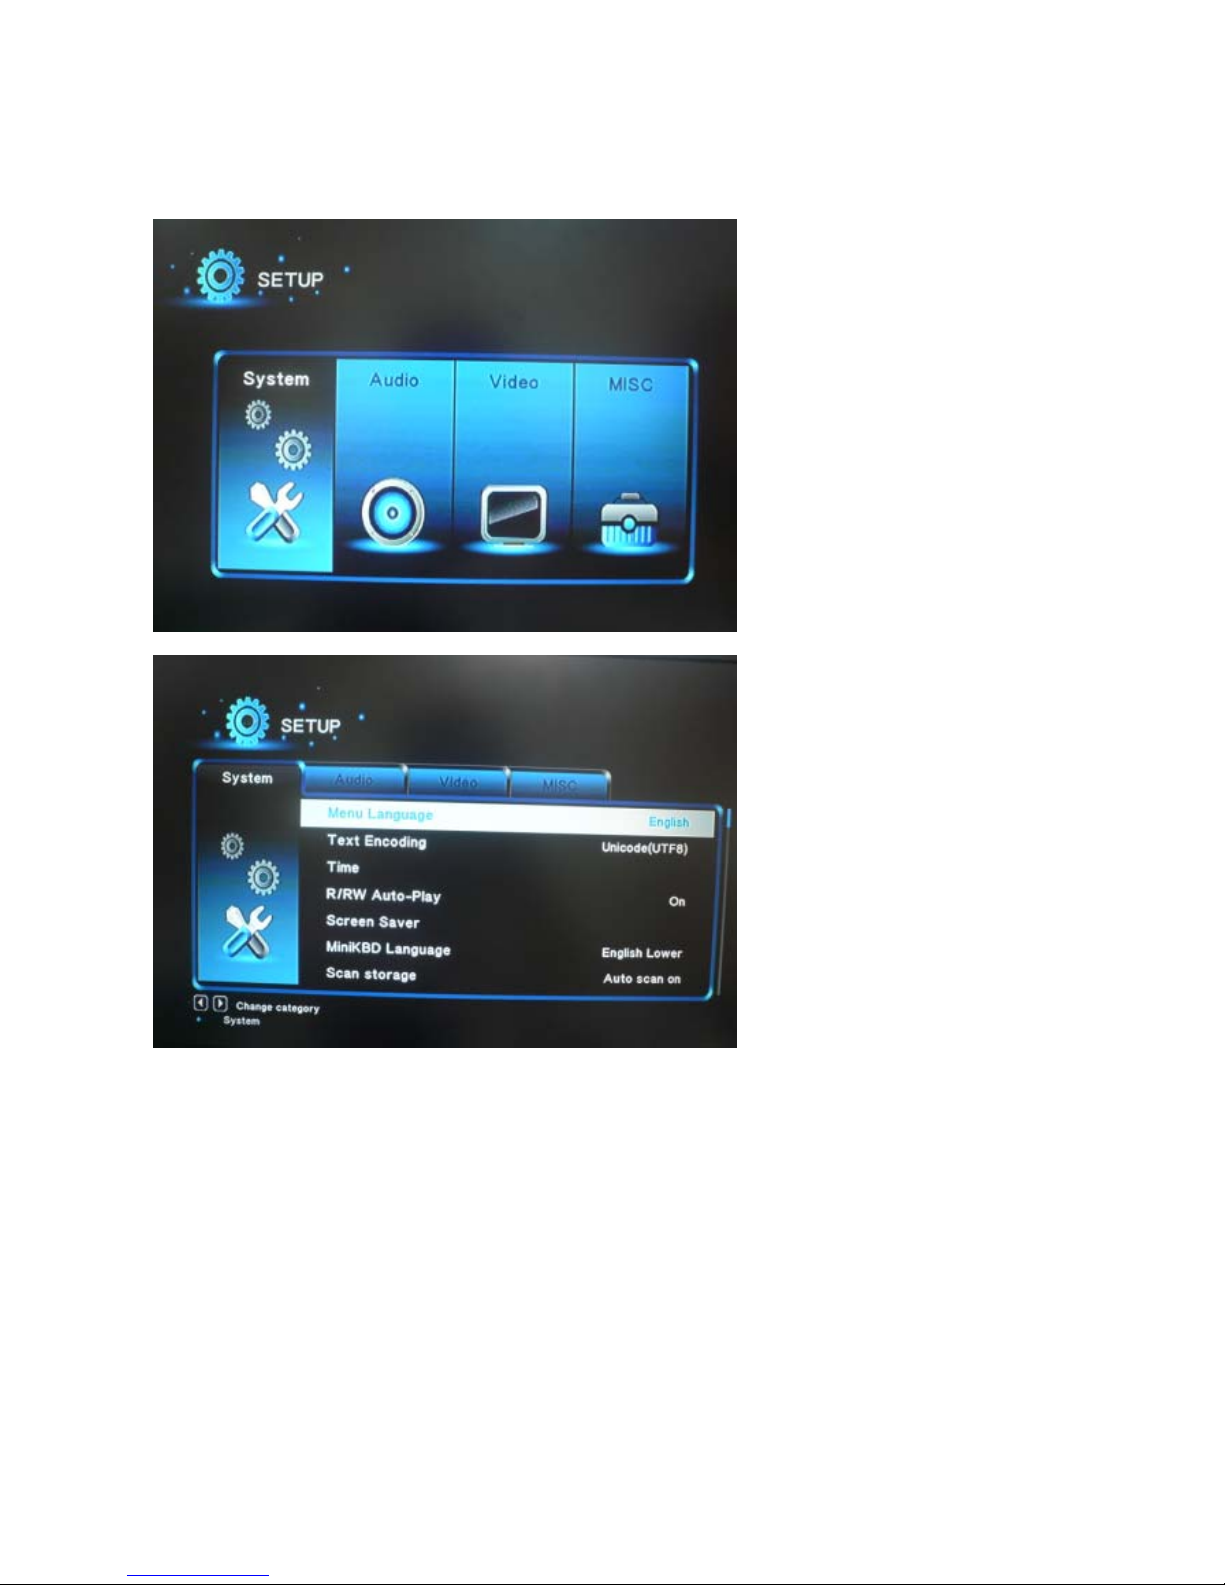
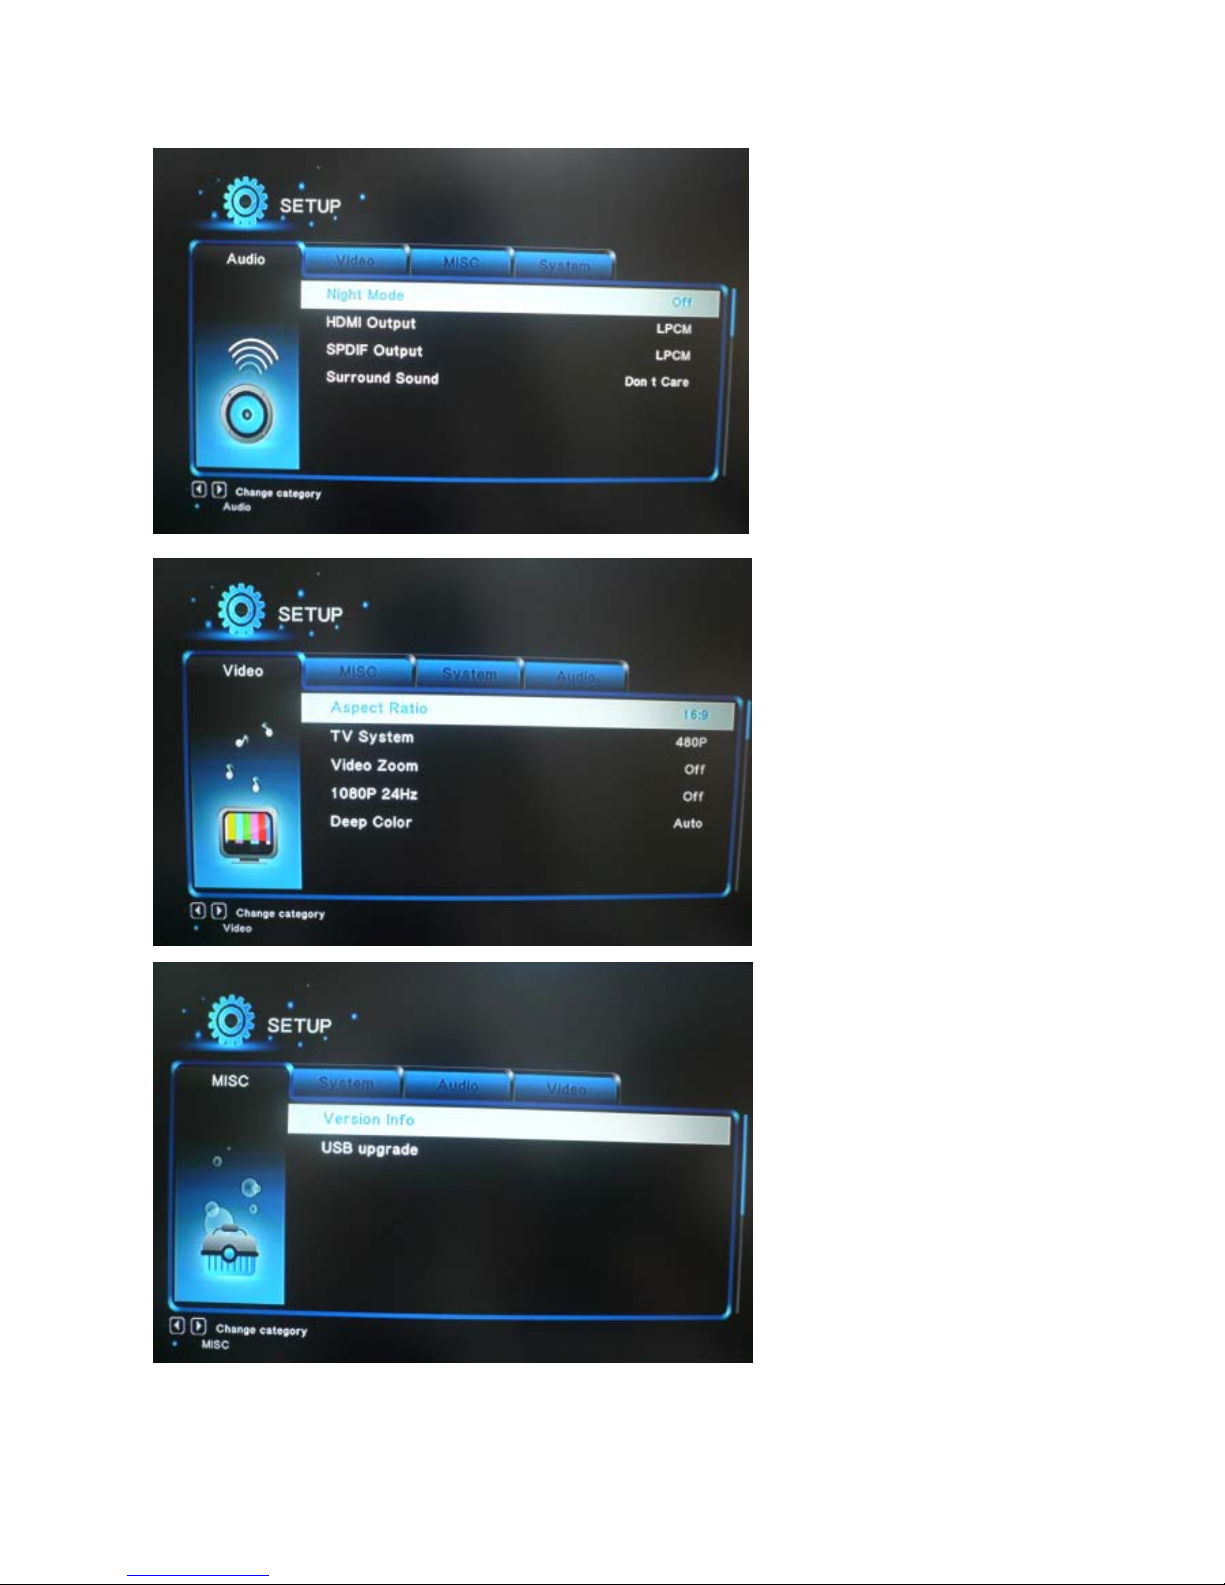
III. SETUP MENU
Page 10
9
Page 11
10
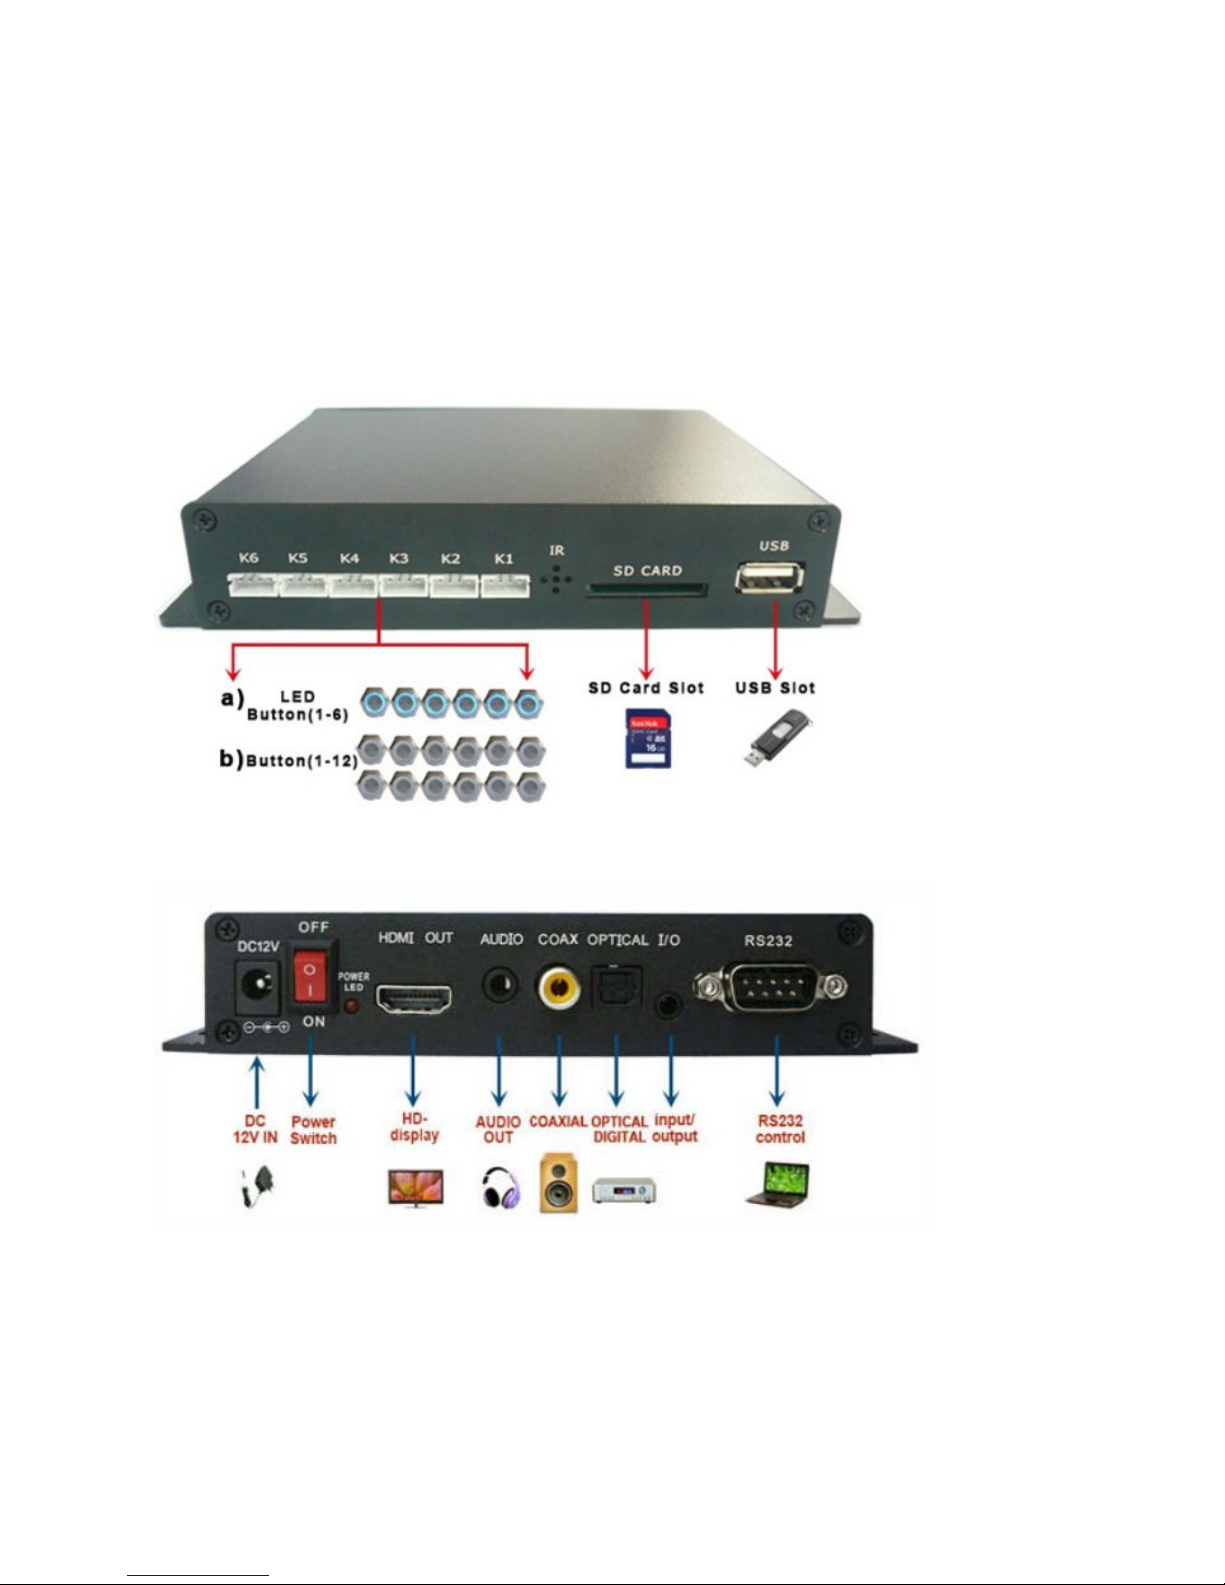
IV.Interface port
4.1 MPC1005 ports
:
Page 12
11
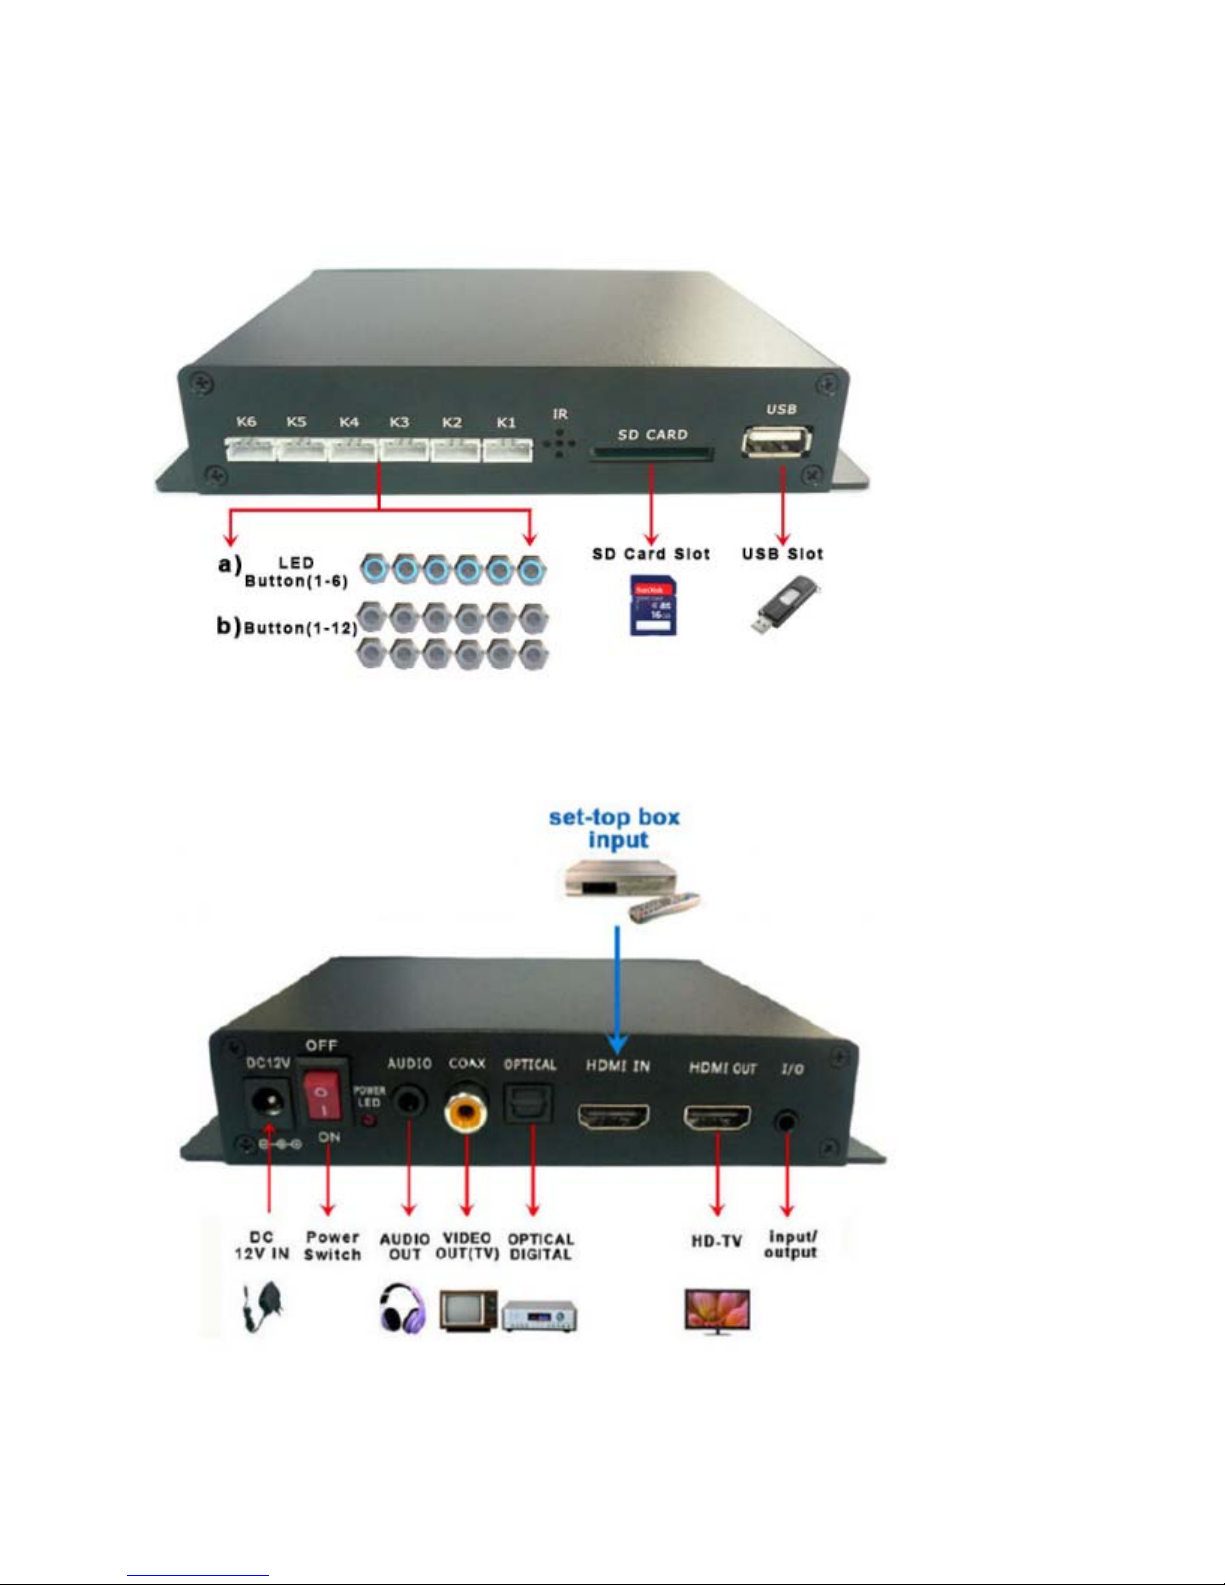
4.2 MPC1006 ports
:
Page 13
12
V. Operation Manual
5.1 Boot auto-play
The media player will auto-play all the files in root directory of USB/SD CARD.
But files that stored in the folder can’t be auto-played. The display files can be: video
files, picture files, and audio files.
Play sequence: video→picture→audio.
5.2 Custom control display
User can
define the function of each button. Define in the configuration file “autoplay.txt” as
below
:
Example 1:01=01/bird.avi
Instruction:Single file playback(play file “bird.avi” in folder 01
)
Example 2:01=Avatar.mp4
Instruction:Single file playback(play file “Avatar.mp4” in root directory
)
Example 3:02=02/
Instruction:Folder files playback (“02” represents folder name in memory card. “/ ” represents
all files in folder)
Example 4:01_01=01/
Instruction:Loop play files in folder 01
Page 14

13
5.3 Pictures Sync playback (BGM)
For pictures’ playback, you can define a background music folder. Here are two
ways.
5.3.1 The first way:
Music folder stored in the root directory, it will boot auto-play. In this case,
background music will play once playing pictures.
First, create a folder named “audio” in the root directory. Then copy the MP3 music
files to folder “audio”. When pictures in the root directory are played, it will auto-play
the music in folder “audio”.
Attention pls: Do not change the name of this audio folder.
5.3.2. The second way:
If the displaying folder files are pictures, you can define a folder to play the
background music of these pictures.
For example
,
05=photo/
In this case, you can create a folder named “photo_audio”. When you play the
pictures in folder “photo/”, music in “photo_audio” will be played at the same time.
5.3.3 When displaying pictures, two parameters can be set as well.
Page 15

14
A. Picture playing time and transition model from one picture to the next. Set as
follows:
Add below programme at the beginning of the configuration file “autoplay.txt”:
Transition=9 (Setting the transition model from one picture to another,
parameter range 1-13)
Slide time=5 (Setting the playing time of each picture)
B. Custom volume level
Define at the beginning of “autoplay.txt”, as below:
Volume=10 (Here “10” represents the boot volume level when power on.
Effective volume setting range is from 1 to 31.)
5.4 Custom function
First, define “irmode=1”at the beginning of “autoplay.txt”.
Format: [function key name]=[number key], this format should not be reversed.
For example, we define the keys “stop”, “return”, “next”, “prev” as below:
STOP=1, RETURN=3, NEXT=4, PREV=5
In this case, push button input 1, 3, 4, 5, they will be function keys.
The definable function keys are as follows (it is for the definition of button keys):
NEXT, PREV, STOP, RETURN, PLAY, UP, DOWN, LEFT, RIGHT, SETUP,
MENU, VOL_PLUS, VOL_MINUS, MUTE
Page 16
15
5.5 Other functions’ operation manual ( only specific models have these functions)
5.5.1 RS232 control display
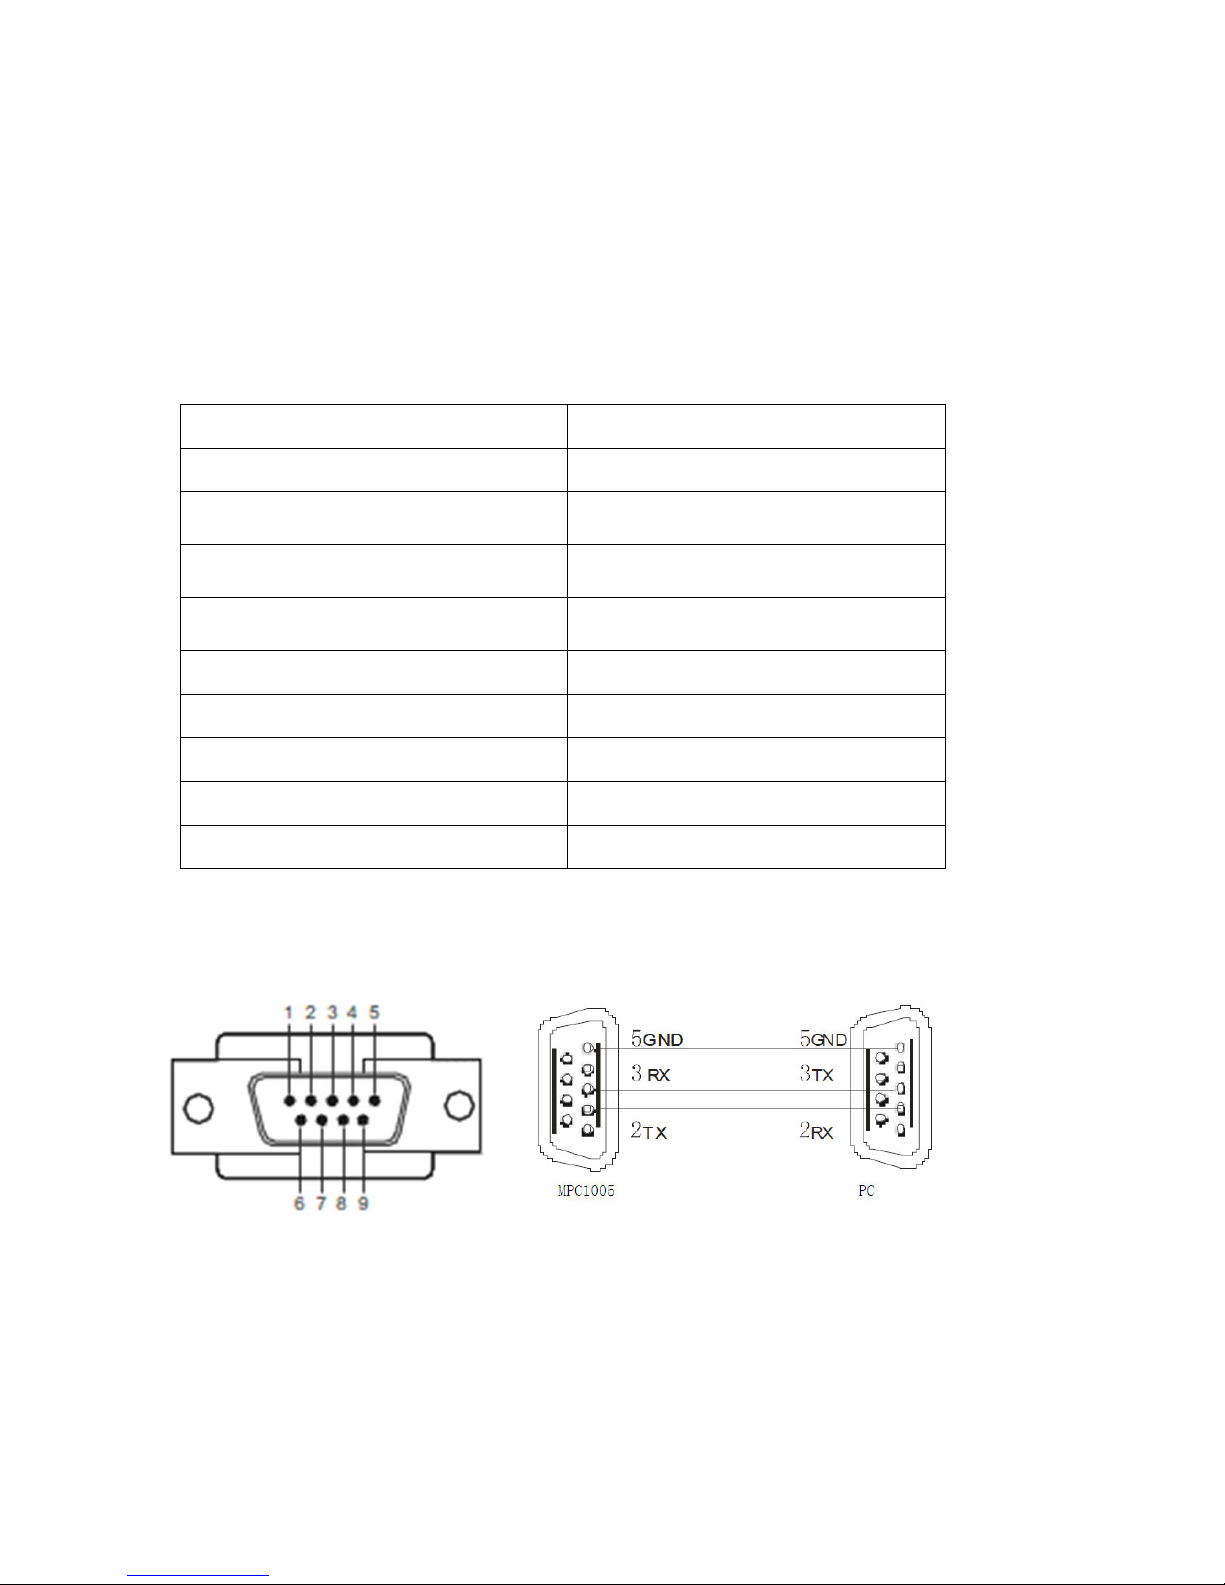
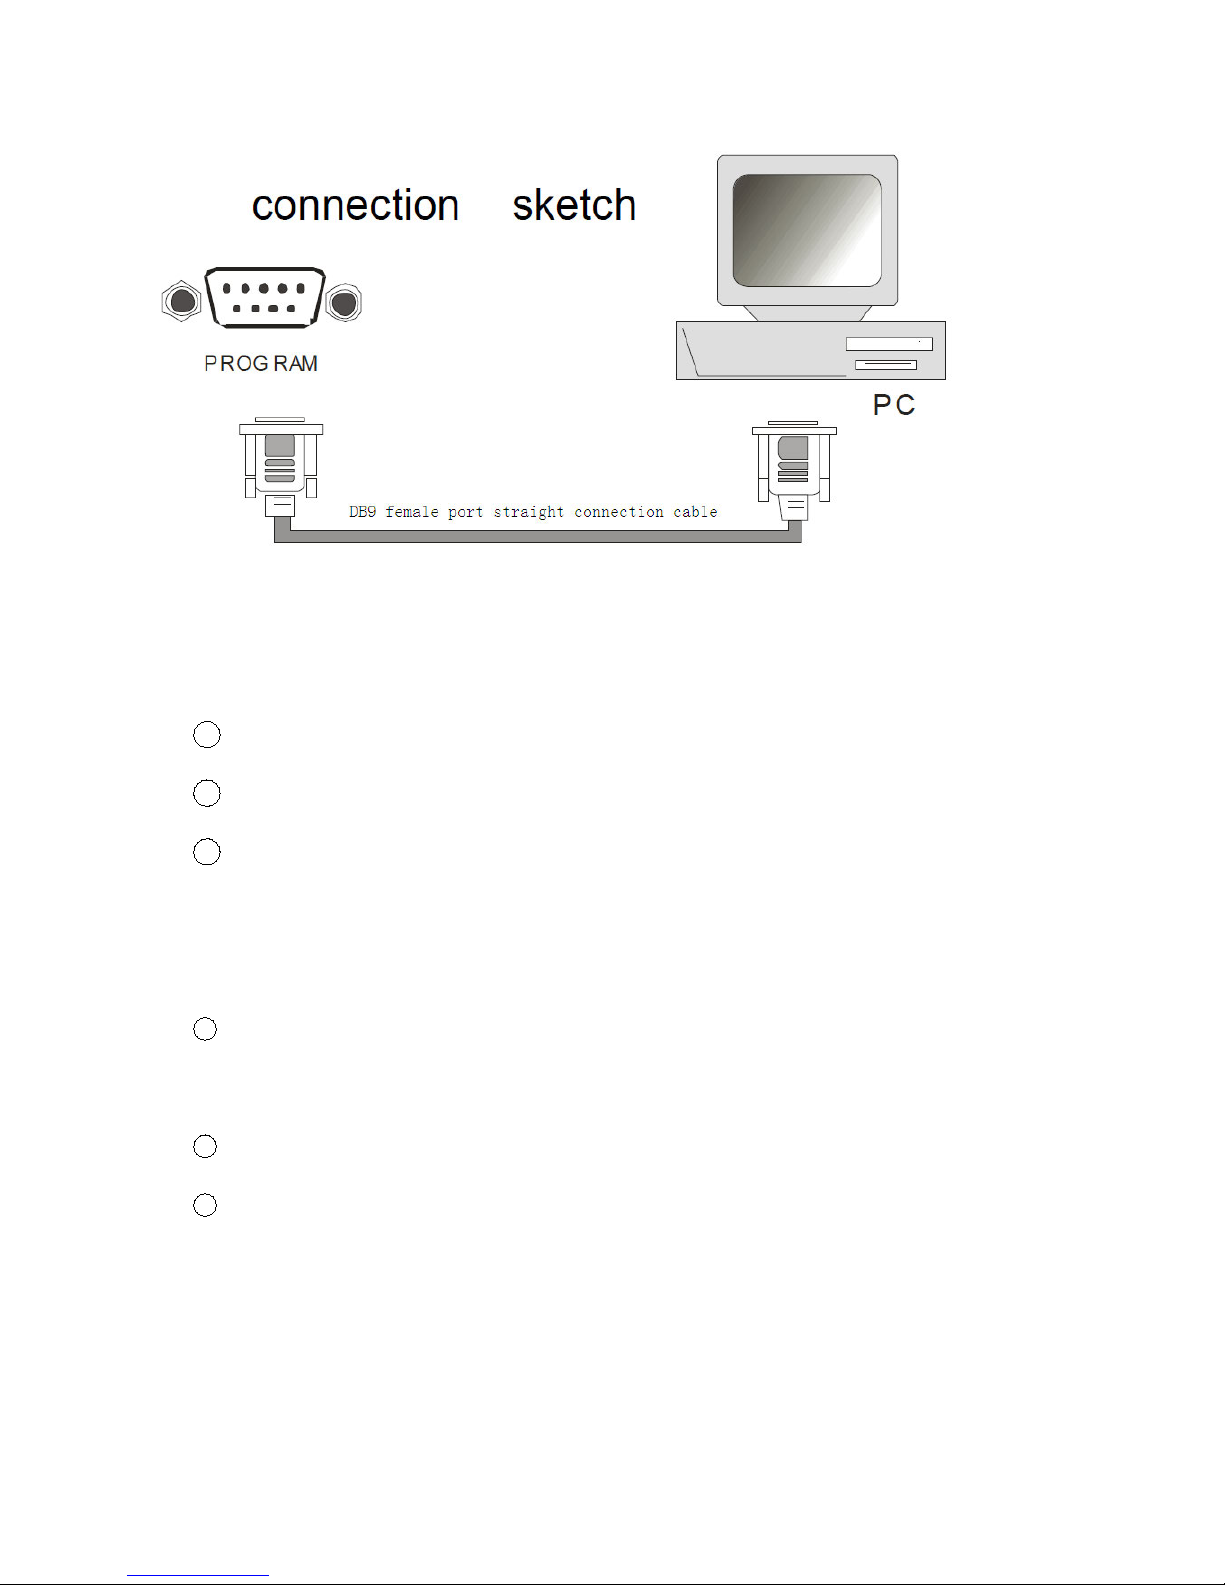
A. The MPC1005 provides a DB9 female port for communication with control PC
and program download. The pins are defined as below:
Interface RS232(9 pins)
RS-232 Pin Description
Pin 2 TxD (transmit data)
Pin 3 RxD (receive data)
Pin 5 GND (signal ground)
Bit rate 9600 bps
Data bits 8 bit
Parity None
Stop bit 1 bit
Flow control None
B. PORTS:
Pin assignment: Connection:
Page 17
16
C. Instruction of RS232 commands
a.
Examples of command format:
1
@00:VOL+$ Represents: Volume up
2
@00:NEXT$ Represents: Next file
3
@01:PREV$ Represents: Previous file (this command can only be accepted
by media player that set the address as “01”, all other media players will not act
on this command).
4 @00:03$ Represents: Play the files that stored in folder 03.
b.
The RS232 command consists of 5 parts, for example: “@00:VOL+$”
1 “@”: Beginning sign of the command.
2 “00”: Address code.
There are 2 kinds of address code: broadcast address “00” and user address “01-99”.
Broadcast address is the one that all the media players on the total data can act on the
Page 18

17
commands sent out from broadcast address. If it is user address, only defined media
player can act on this command. There is only one broadcast address “00”, and
addresses range from 01 to 99 is user address. User address can be defined in the
“autoplay.txt”. For example, add “address=5” into “autoplay.txt”, then the address of
media player is “5”.
3 “:” : This delimiter is p laced after address code.
4 “VOL+” is command input, you can also use number input.
Number input: 0, 1, 2,…99(the numbers represent playing folder 0-99)
Command input: You can refer to the command list. For example: STOP, NEXT,
VOL+, VOL- …
5 “$” is the end mark of command.
Note: There is another command format, the beginning sign can be “#”, and the end
mark of command can be “0x0d(HEX)”. For example: “#00:VOL+0x0d(HEX)”.
D. RS232 control tool
All the commands will be sent via a RS232 control tool, it is something like serial
debugging assistant on PC.
Page 19

18
E. Commands List (take broadcast address “00” as example )
No. Command Description
1 @00:OK$ OK
2 @00:UP$ Direction key, up
3 @00:REV$ Playback
4 @00:FWD$ Fast forward
5 @00:REP$ Repeat play
6 @00:MUTE$ No sound
7 @00:VOL+$ Volume up
8 @00:VOL-$ Volume down
9 @00:STOP$ Stop
10 @00:PREV$ Previous file
11 @00:NEXT$ Next file
12 @00:ENTER$ Enter
13 @00:LEFT$ Direction key, left
14 @00:DOWN$ Direction key, down
15 @00:SYNC$ Special key, once trigger it player will turn
to the beginning of file
16 @00:POWER$ Power on/off
17 @00:AUDIO$ Change the channel
18 @00:PAUSE$ Pause
19 @00:RIGHT$ Direction key, right
20 @00:01$ Play files in folder 01
21 @00:02$ Play files in folder 02
…… …
118 @00:99$ Play files in folder 99
Page 20
19
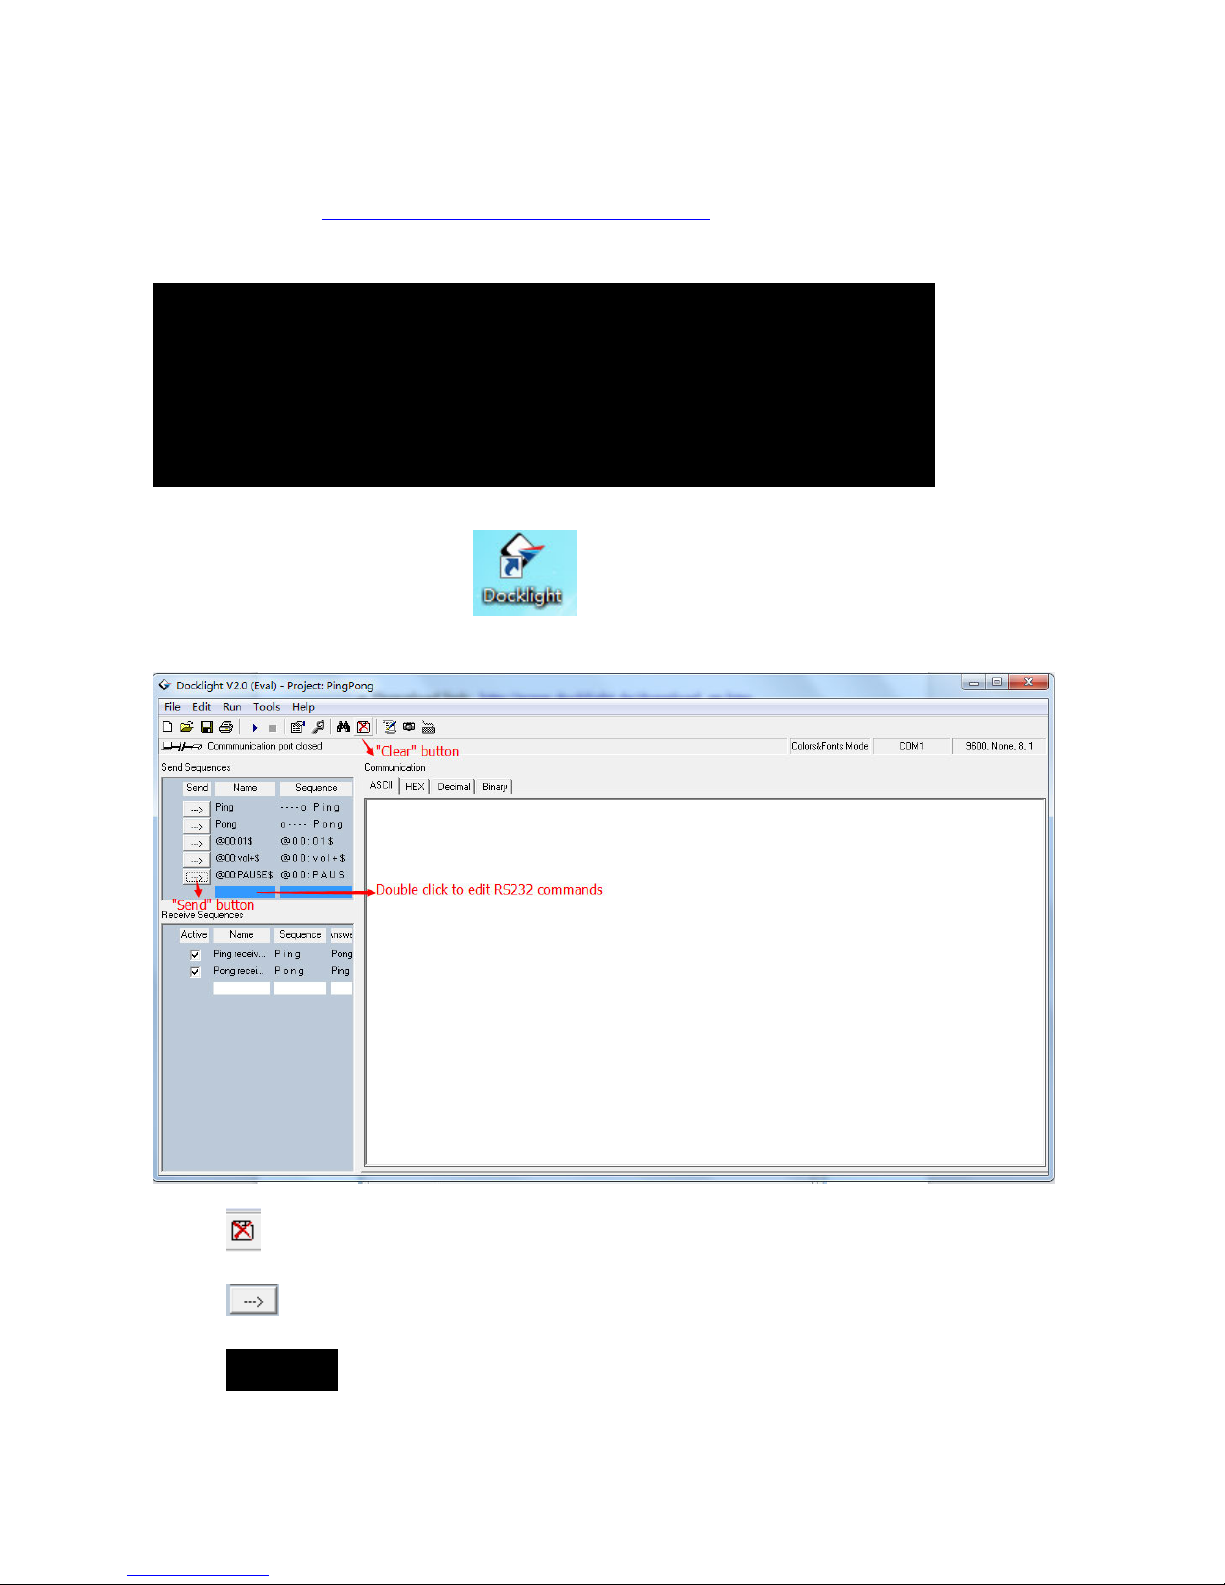
F. Software Download
a. Download link: http://www.docklight.de/download en.htm
b. Choose “Docklight V2.0” to download the RS232 controling software:
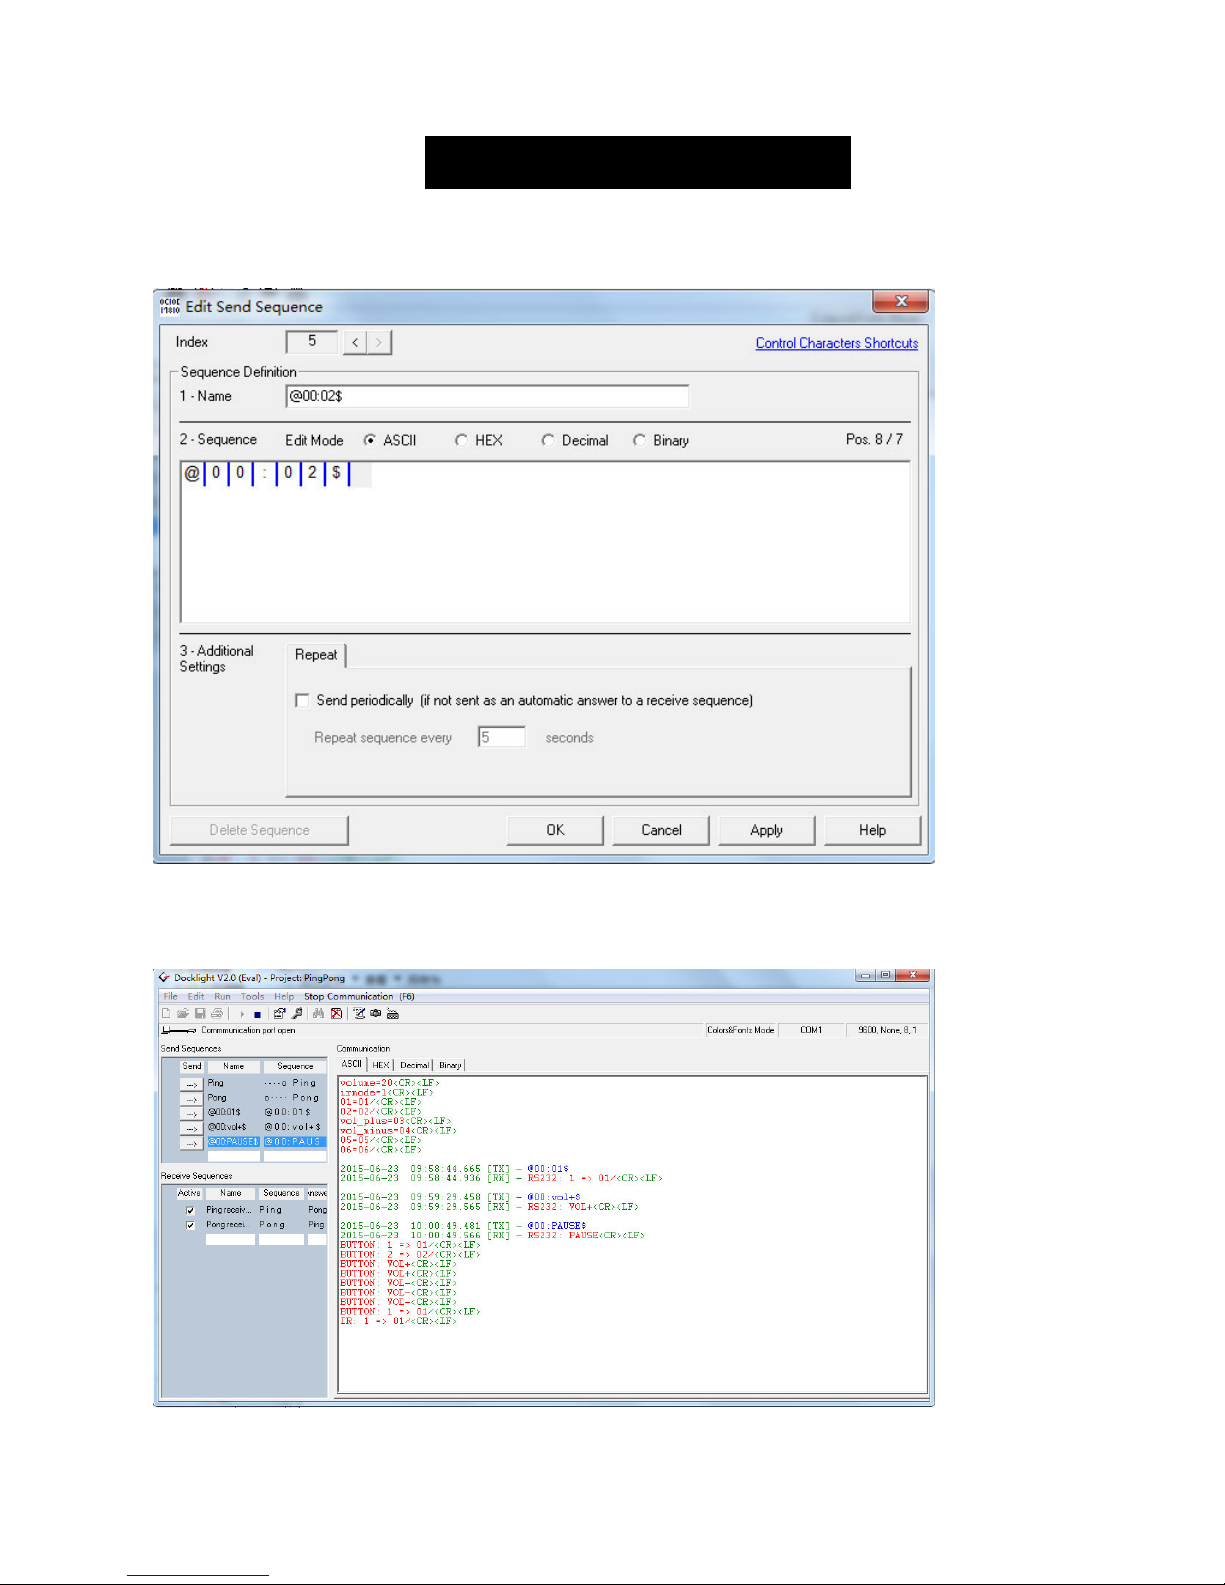
c. Click “Docklight V2.0” on PC
The windows:
Button : Clear
Button :Send
Button : Edit RS232 commands
Page 21
20
Take care of these settings:
d. Edit RS232 commands
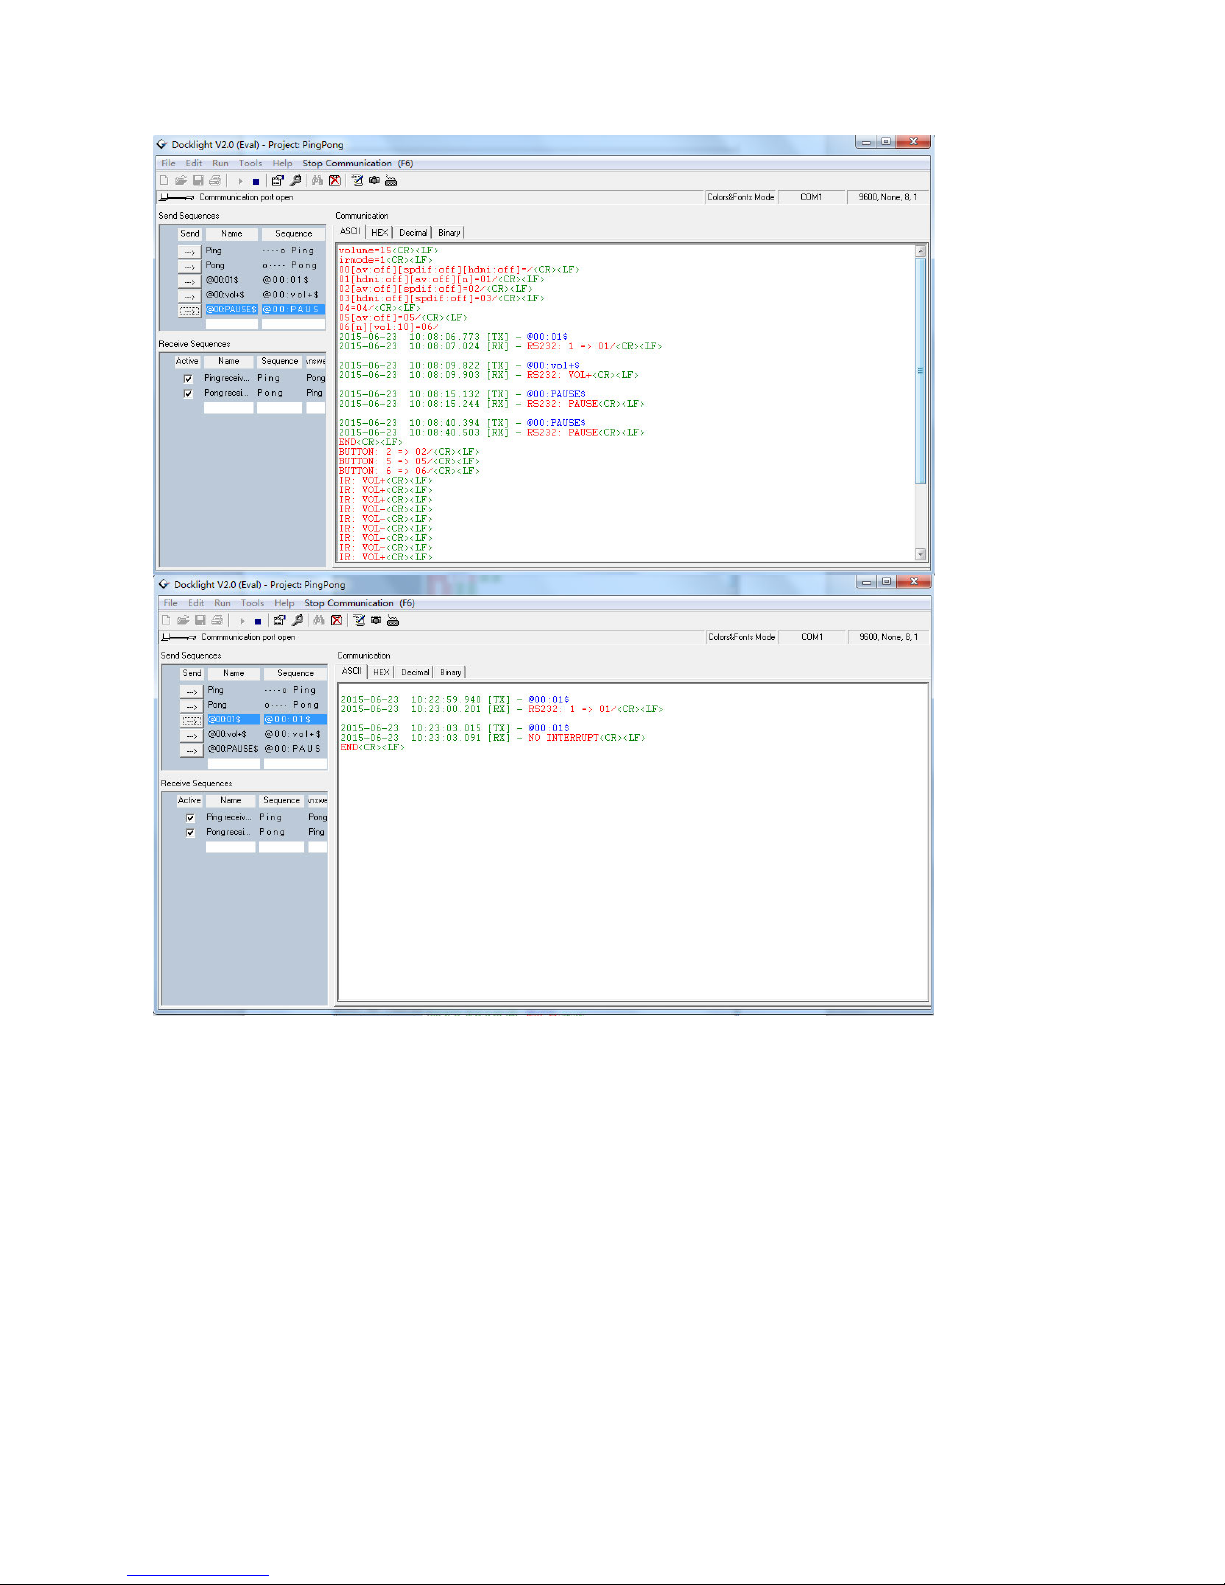
G.RS232ReturnMessage
Page 22
21
a. Auto read the definitions in "autoplay.txt" when power on
:
volume=15
irmode=1
00[av:off][spdif:off][hdmi:off]=/
01[hdmi:off][av:off][n]=01/
02[av:off][spdif:off]=02/
03[hdmi:off][spdif:off]=03/
04=04/
05[av:off]=05/
06[n][vol:10]=06/
( Here button 1 and folder 01 is defined "NO INTERRUPT" in configuration file“autoplay.txt”:
“01[hdmi:off][av:off][n]=01/”)
Page 23

22
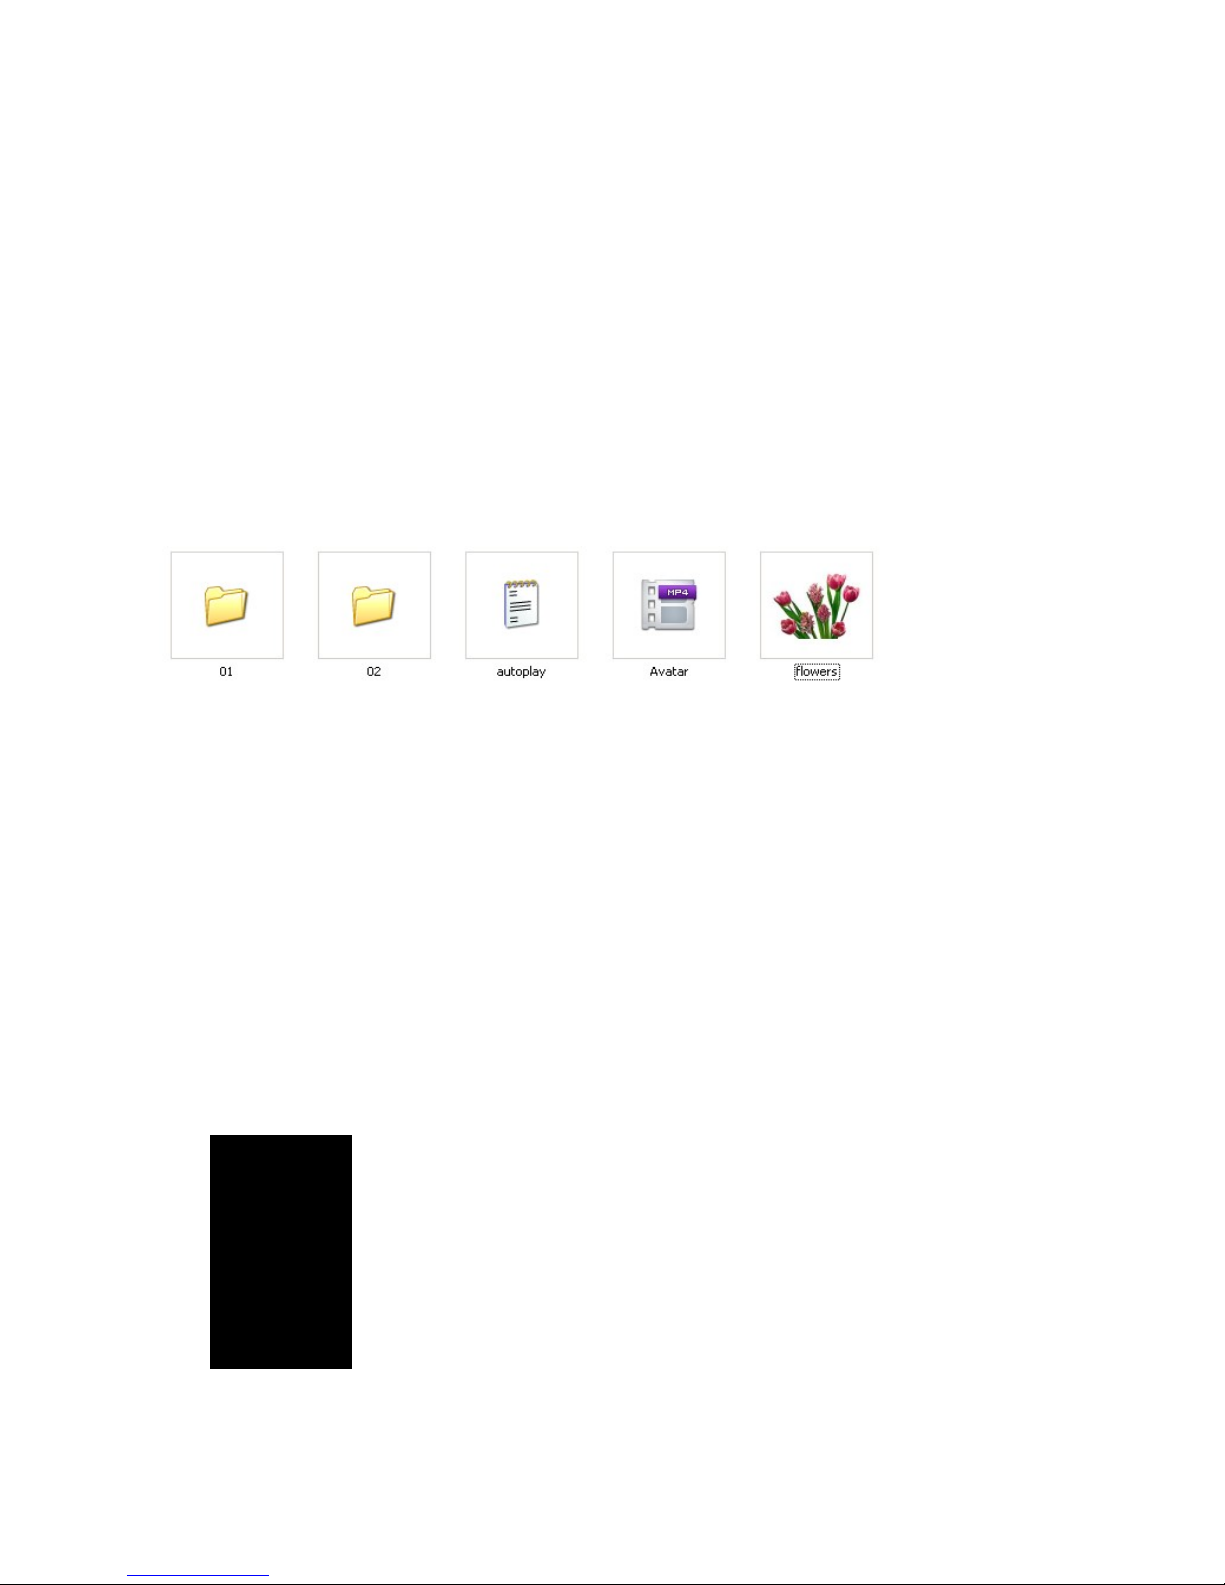
b. RS232 Return Message Format
①
RS232 command format
②
Remote control format
③
Push button control format
c. Description
Here take “RS232 command format” as an example:
①
Send RS232 command “@00:01$”, start to play folder 01, the RS232 Return Message is as
below:
② When folder 01 is displaying, send RS232 command “@00:01$” again, the display content will
not change and RS232 Return Message is as below:
③
When the current file is finished, RS232 Return Message is as below:
Page 24
23
H. Note
“@0:WHO?”: This is a signal that stand-alone media player ask the synchronization console to
confirm if this player is host machine or slave machine. If the player is host machine, it will
synchronize other machine. And if it is slave machine, it will wait for the sync signal. You can turn
off this finding by sending the string “@00:SLAVE$”.
5.5.2 Button control display
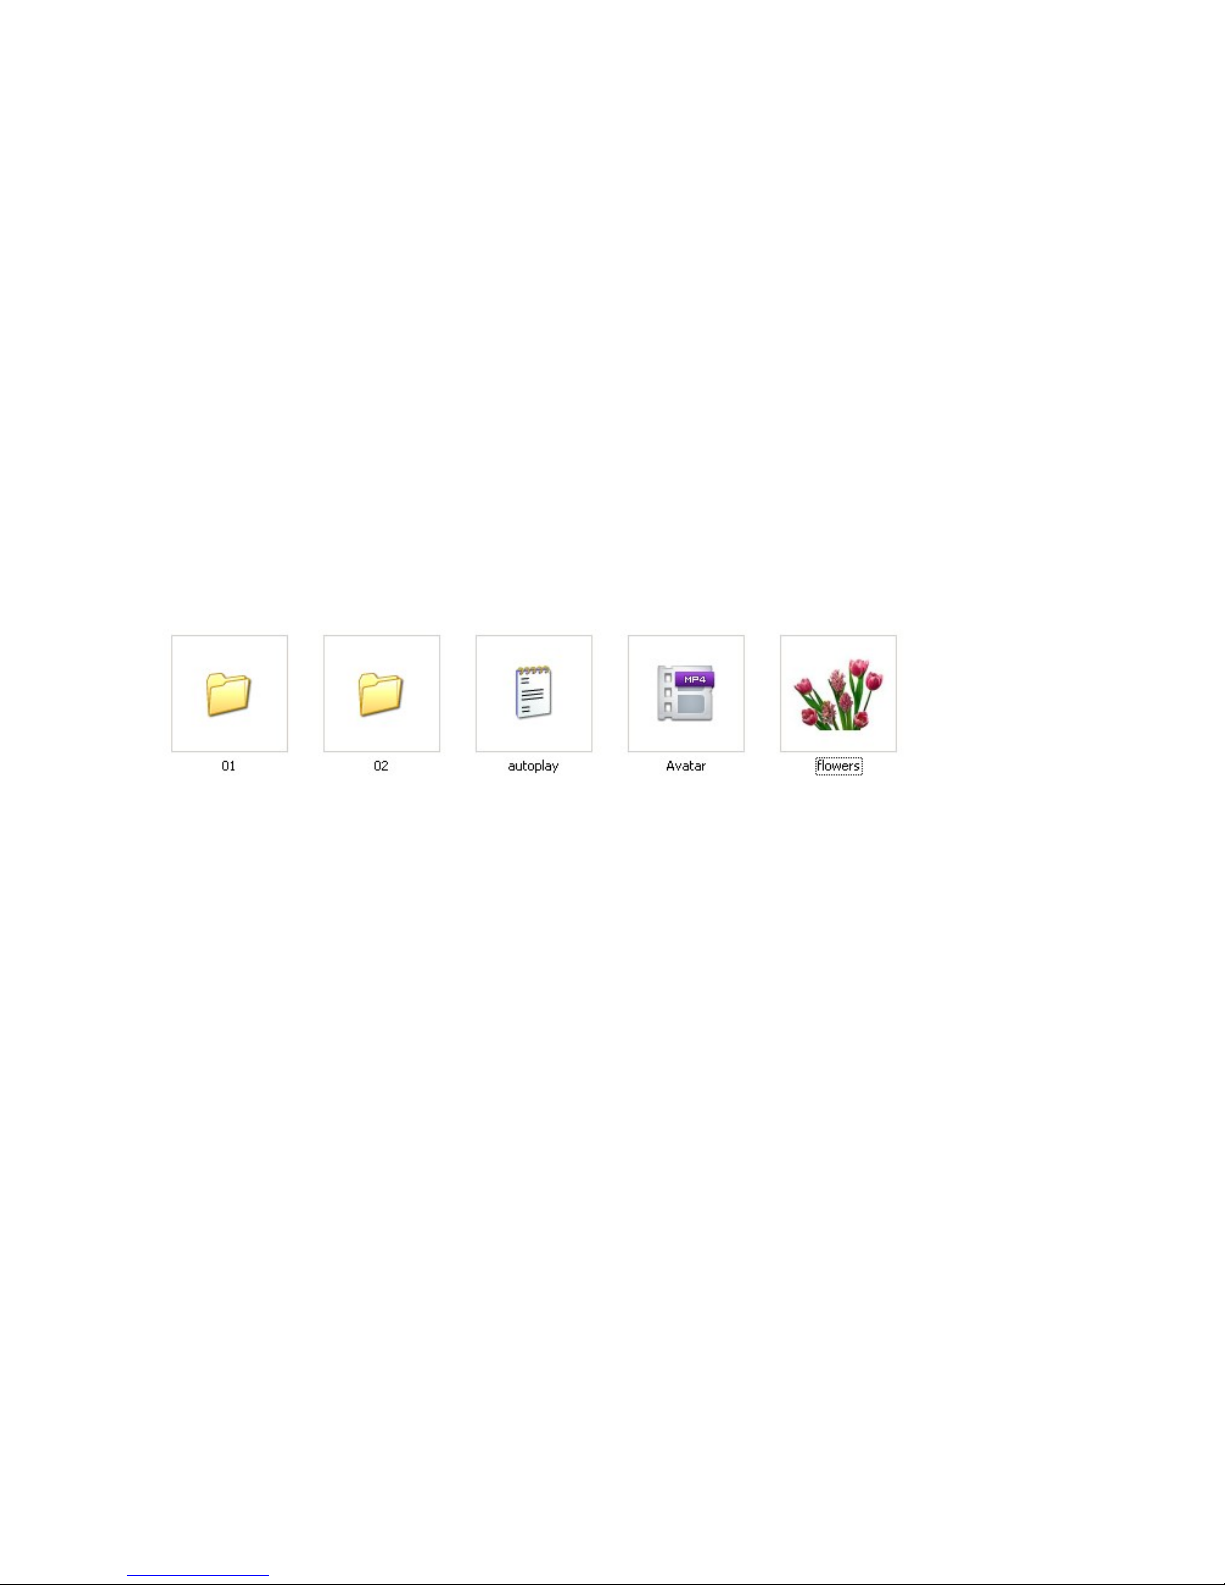
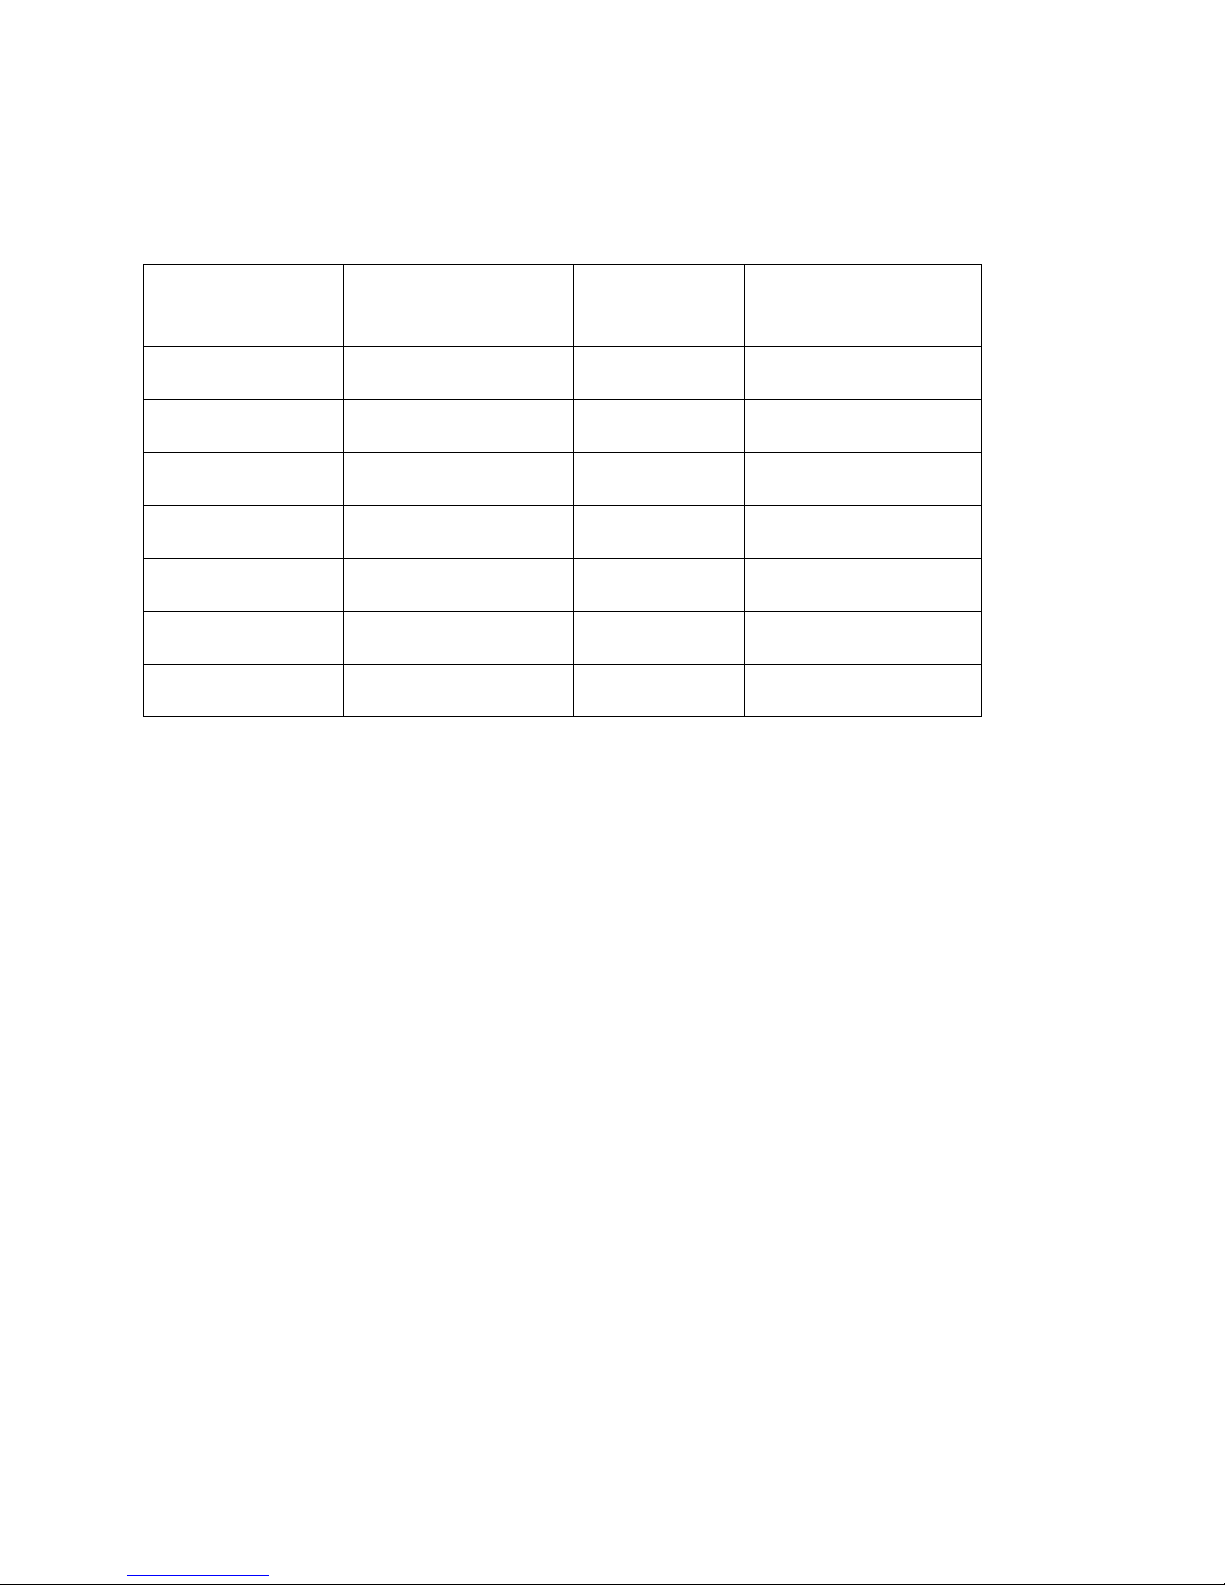
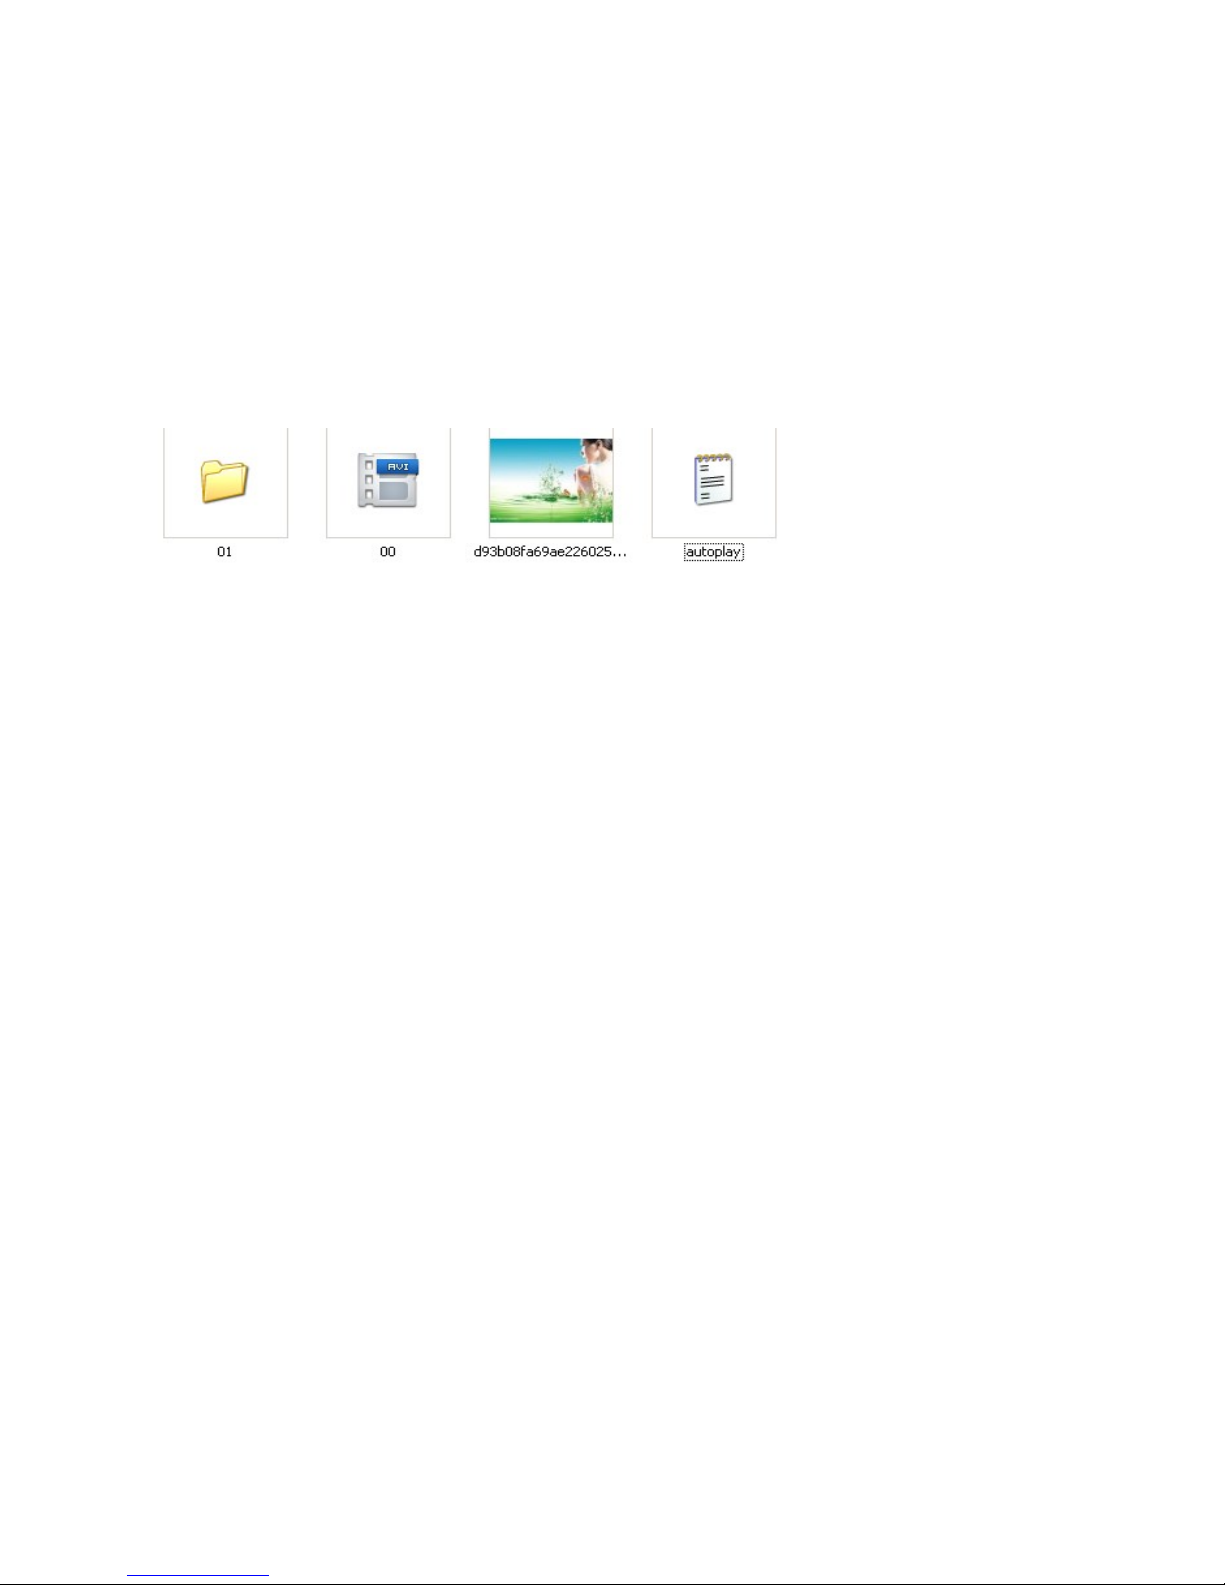
A. Store the displaying files in USB/SD CARD as follows:
a.Folder “01”, “02” must be controlled by push buttons;
b.“autoplay.txt” is a configuration file;
c.“Avatar” and “ flowers” are root directory files. They are boot auto-play, or loop play
after playing folder directory files (they can be displayed as homepage files). The
displaying content is from where it broke off.
B. “autoplay.txt” is a configuration file, as follows:
Page 25

24
Description:
volume=20
(Define the default volume)
irmode=1(Button function definition);
01=01/(“01” before “=” represents button number. “01” behind “=” represents
the folder or file path (“/” must be added after folder name)
vol_plus=03(Button 3:VOL+);
vol_minus=04(Button 4:VOL-);
NEXT=05
(
Button 5: play next file
)
PREV=06(Button 6: play previous file
)
C. Supper function
a. Define“NO INTERRUPT
”
You can define the “NO INTERRUPT” or “INTERRUPT”function in "autoplay.txt"
as below:
01=01/
02[n]=02/
(the "
[n]
" here represents "NO INTERRUPT". When the file of folder
02 is displaying, you push the button 1, the player will not switch to folder 01, just
continue the current file )
03=03/
b. Define sound output mode and volume
You can define the sound output mode and volume of each file folder in "autoplay.txt"
as below(default is all output):
Page 26

25
volume=15
irmode=1
00[av:off][spdif:off][hdmi:off]=/
01[hdmi:off][av:off][n]=01/
02[av:off][spdif:off]=02/
03[hdmi:off][spdif:off]=03/
04=04/
05[av:off]=05/
06[n][vol:10]=06/
Instruction:
Here "av" represents "audio output", "spdif" represents "optical and coaxial
output","hdmi" represents "HDMI output" , "off" represents no sound output.
1. volume=15(Define the default volume)
2. irmode=1(Button function definition
)
3. 06[n][vol:10]=06/
The "[n]" here represents "NO INTERRUPT". When the file of folder 06 is
displaying, you push the button 1, the player will not switch to folder 01, just
continue the current file.
4. "00[av:off][spdif:off][hdmi:off]=/", here says folder "00" is no sound from
audio&hdmi&optical&coaxial ports.
5. "06[n][vol:10]=06/" represents the folder 06 default volume is “10”.
Page 27
26
D. More button function definition in “autoplay.txt” , take button 1 as an
example:
Command Definition Command Definition
PLAY PLAY=01 UP UP=01
PAUSE PAUSE=01 DOWN DOWN=01
RETURN RETURN=01 SETUP SETUP=01
PREV PREV=01 STOP STOP=01
NEXT NEXT=01 VOL_PLUS VOL_PLUS=01
LEFT LEFT=01 VOL_MINUS VOL_MINUS=01
RIGHT RIGHT=01 MUTE MUTE=01
5.5.3 Motion Sensor display
The motion sensor can detect the approaching viewer within 118inches.
A. The motion sensor mode:
A. DISPLAY NEXT FILE---The player auto loop play root directory files when power
on, it switches to the next file(files in folder 01
)
when the IR body sensor detects
passer-by. When the file is finished, it switches to root directory files.
B. Define configuration file in “autoplay.txt”:
a. MPC1005-3
Sensor_mode=Nextfile
01=01/
Page 28
27
b. MPC1006-3
Sensor_mode=Nextfile
Sensor_file=01/
C. Store the displaying files in root directory as follows:
a. Files stored in root will be displayed as homepage;
b. Files in folder “01” will be displayed as next files when I R body sensor detects
passer-by.
c. “autoplay.txt” is a configuration file.
Page 29
28
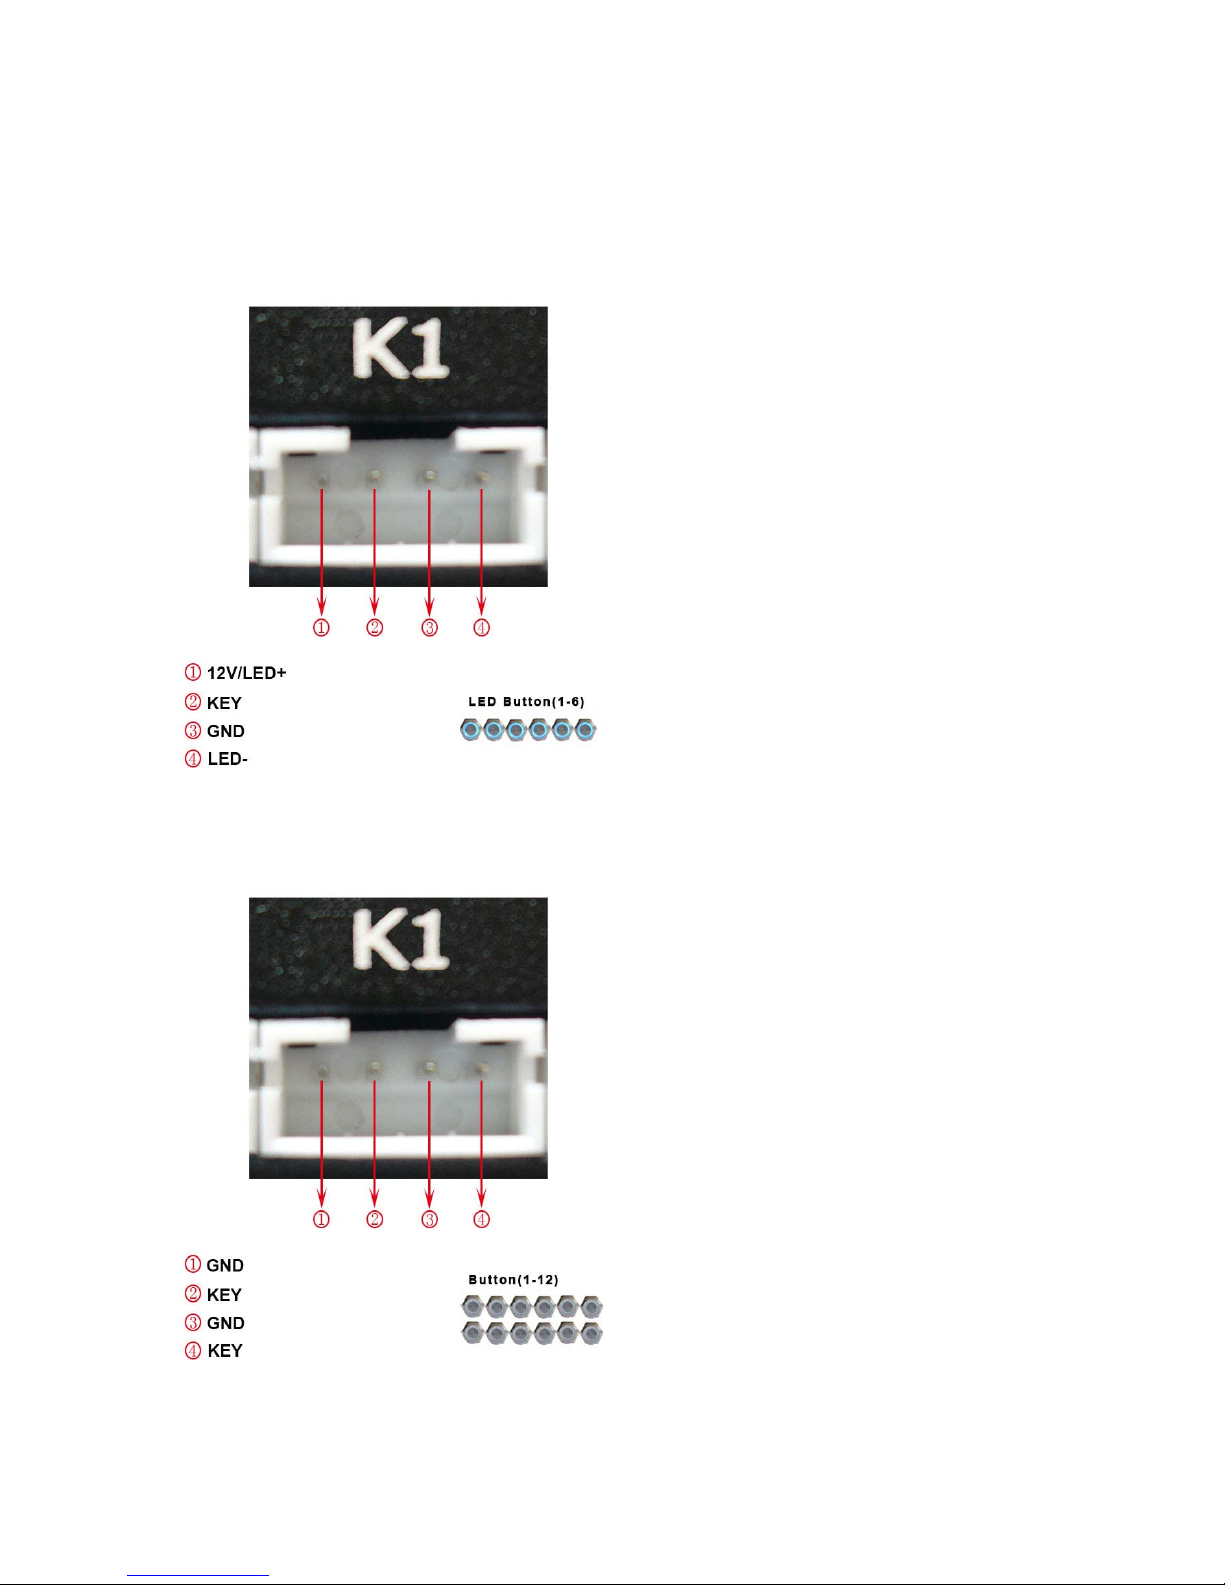
VI. Pin definition of button interface
6.1 Pin definition of LED button interface
6.2 Pin definition of no LED button interface
Page 30
29
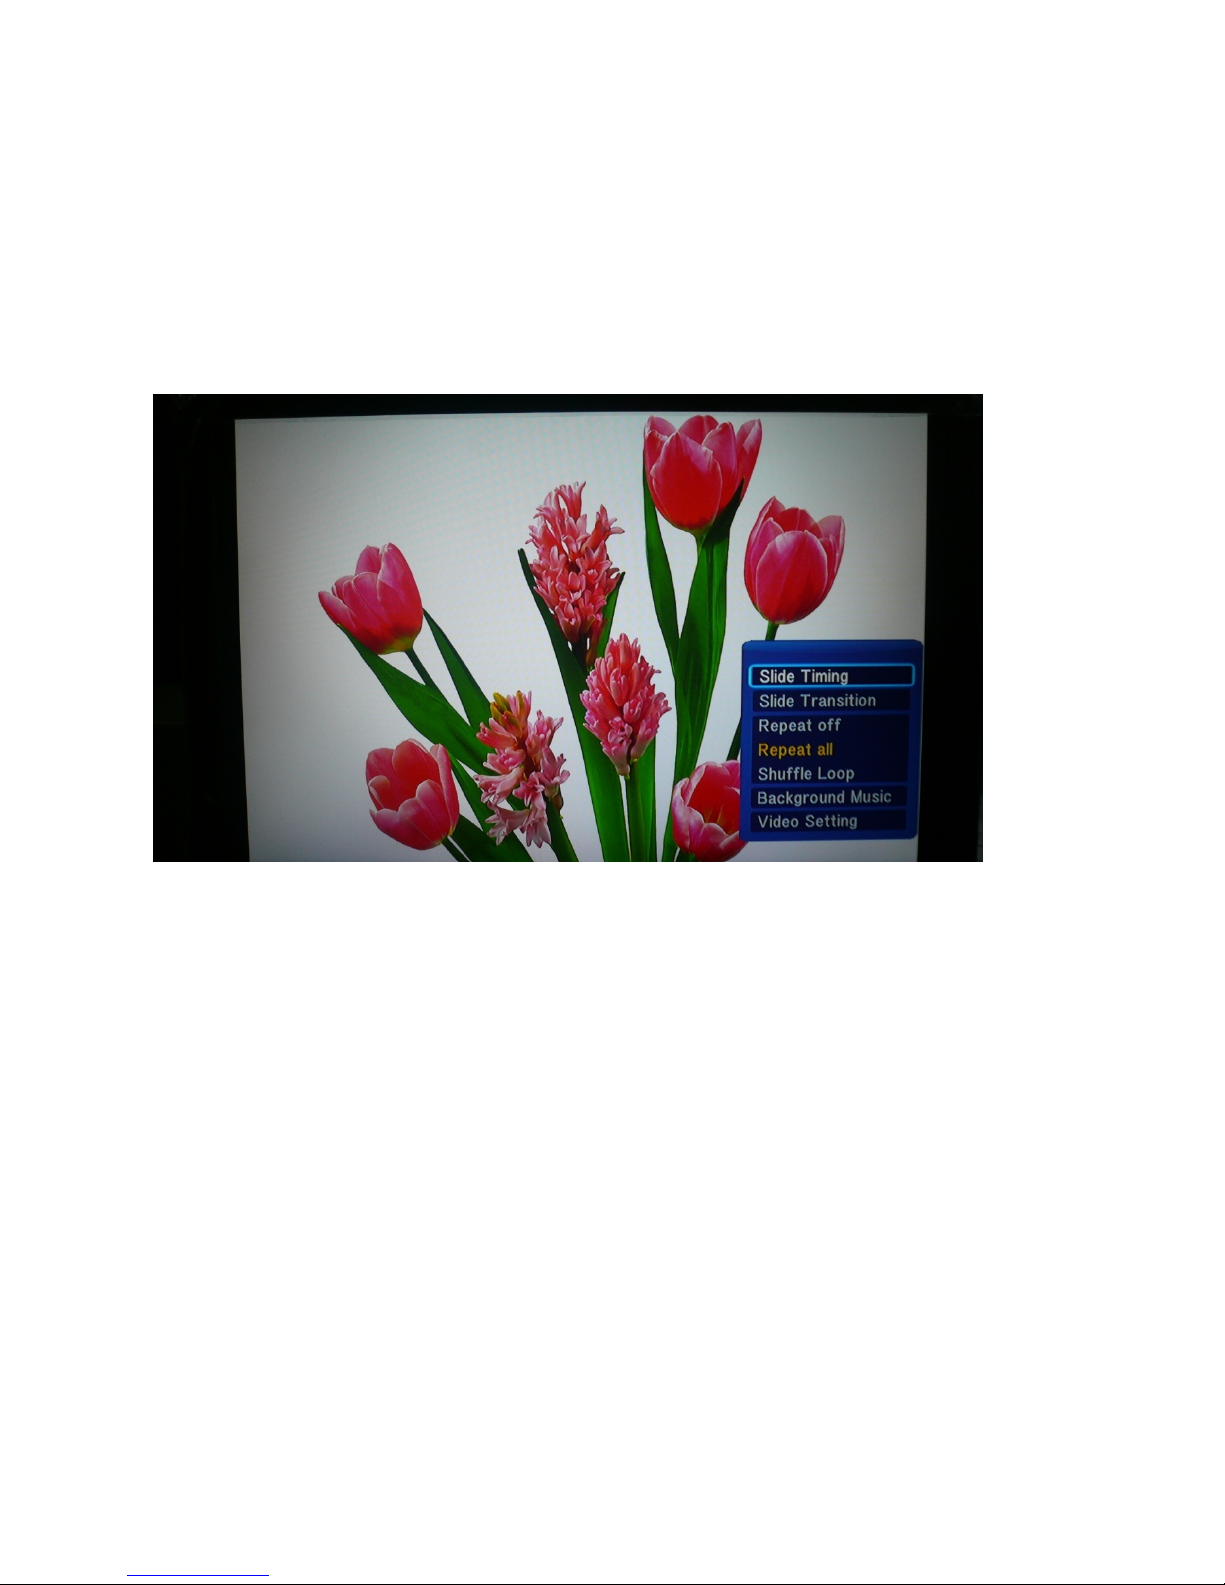
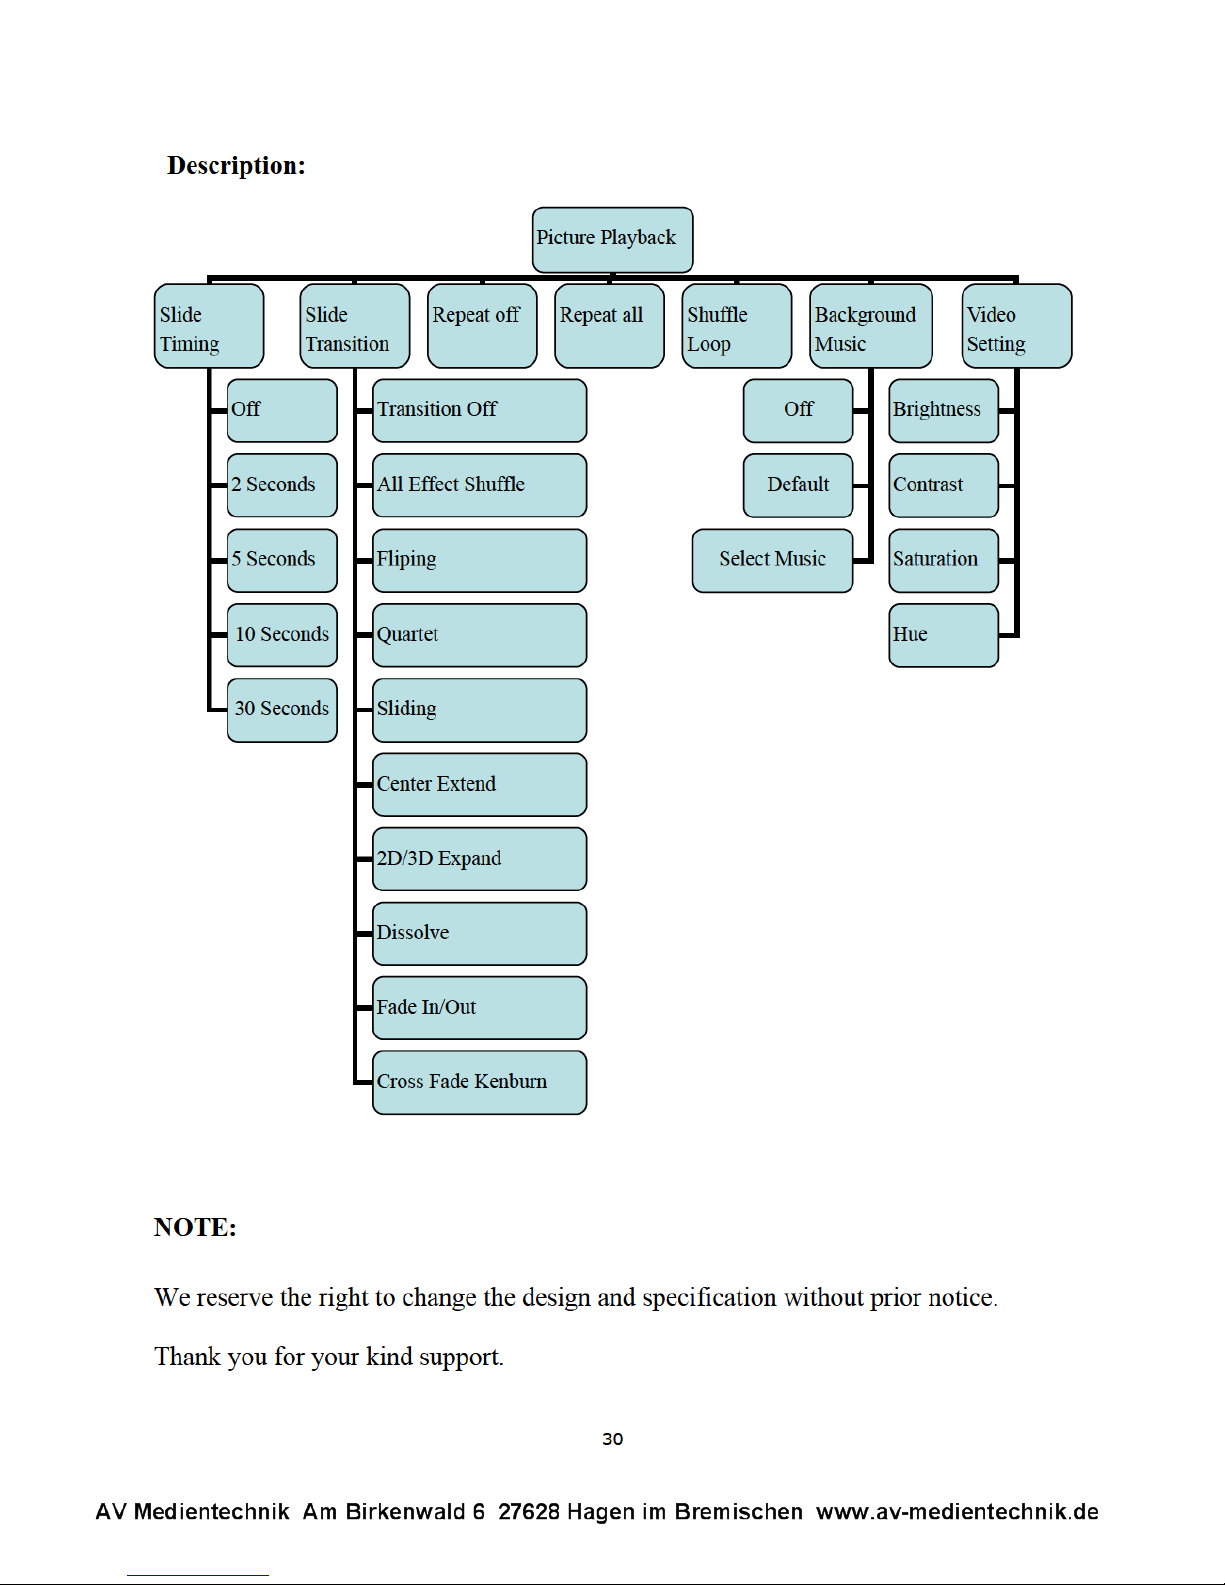
VII. Setting of picture playback
When picture is displaying on the screen, you can set picture playback by pressing
button “MENU” on remote control, and then use direction key and button “OK” to
carry on.
Page 31
 Loading...