

Page 1

SIO-104+16.485 User Manual
Part Number 3562
www.sealevel.com PO Box 830 Liberty, SC 29657 864.843.4343
Page 2

Table of Contents
INTRODUCTION......................................................................................................................... 1
THER SEALEVEL PC/104 SERIAL PRODUCTS............................................................................. 1
O
BEFORE YOU GET STARTED.................................................................................................2
W
HAT’S INCLUDED...................................................................................................................... 2
OPTIONAL ITEMS.......................................................................................................................... 2
HARDWARE SETUP ..................................................................................................................3
DDRESS SELECTION................................................................................................................... 3
A
I
NTERRUPT CONFIGURATION ....................................................................................................... 3
IRQ SELECTION........................................................................................................................... 4
CLOCK MODES............................................................................................................................. 4
RS-485 ENABLE .......................................................................................................................... 4
LINE TERMINATION ..................................................................................................................... 4
RS-485 ‘ECHO’ ........................................................................................................................... 4
BAUD RATES AND OSCILLATOR VALUE ....................................................................................... 5
SOFTWARE INSTALLATION.................................................................................................. 6
WINDOWS 98/ME/NT/2000/XP INSTALLATION.......................................................................... 6
RD
3
PARTY SOFTWARE SUPPORT .................................................................................................. 7
PHYSICAL INSTALLATION....................................................................................................8
PHYSICAL CONNECTION............................................................................................................... 9
CABLING OPTION....................................................................................................................... 10
CA338 DB25 PIN OUT.............................................................................................................. 11
ELECTRICAL CHARACTERISTICS....................................................................................12
FEATURES.................................................................................................................................. 12
PECIFICATIONS......................................................................................................................... 12
S
APPENDIX A – TROUBLESHOOTING................................................................................. 13
APPENDIX B – HOW TO GET ASSISTANCE...................................................................... 14
APPENDIX C – ELECTRICAL INTERFACE....................................................................... 15
RS-485 ...................................................................................................................................... 15
APPENDIX D – ASYNCHRONOUS COMMUNICATIONS................................................ 16
APPENDIX E – SILK SCREEN – 3562 PCB .......................................................................... 17
WARRANTY............................................................................................................................... 18
© Sealevel Systems, Inc.
SL9045 7/2006
SIO-104+16.485 User Manual
Page 3

Introduction
The SIO-104+16.485, Item Number 3562, is a PC/104 serial interface module with
sixteen 2-wire RS-485 serial interface ports, supporting data rates up to 921.6K bps.
The board is designed using four 16C954 UARTs with 128-byte FIFOs. The 16C954
features a flexible clock prescalar (from 1 to 31.875), 9-bit protocol support, and
isochronous mode.
RS-485 is optimized for ‘Multi-Drop’ or ‘Party-line’ operations selecting data from
multiple peripherals (as many as 31 devices can be connected on an RS-485 bus).
Optional terminal block adapters are available to simplify field-wiring connections.
The SIO-104+16.485 is designed to be used with a variety of Operating Systems
including Windows 98/NT/ME/2000/XP, Linux and DOS. The SeaCOM API
(Application Programmer Interface) included on CD with the SIO-104+16.485
provides a variety of useful high-level function calls implemented as a Windows
dynamic link library (DLL) and as a Linux kernel module and library. In addition to
the API, SeaCOM includes sample code and utilities to simplify software
development.
Other Sealevel PC/104 Serial Products
ULTRA SIO-104 (P/N 3550) - 1 Port RS-422/485
SIO-104 (P/N 3551) - 1 Port RS-232
SIO.104+2 (P/N 3502) - 2 Port RS-232/422/485
C4-104.ULTRA (P/N 3540) - 4 Port RS-232/422/485
SIO4-104.232 (P/N 3542) - 4 Port RS-232
SIO-104.485 (P/N 3543) - 4 Port RS-422/485
SIO4-104.2+2 (P/N 3544) - 2 Port RS-232 & 2 Port 422/485
SIO-104+8.485 (P/N 3588) - 8 Port 2-wire RS-485
© Sealevel Systems, Inc.
- 1 -
SIO-104+16.485 User Manual
Page 4

Before You Get Started
What’s Included
The SIO-104+16.485 is shipped with the following items. If any of these items is
missing or damaged please contact Sealevel for replacement.
Item# 3562 – SIO-104+16.485 PC/104 Adapter
Sealevel SeaCOM Software CD
Optional Items
Depending upon your application, you are likely to find one or more of the
following items useful for interfacing the SIO-104+16.485. All items can be
purchased from our website (http://www.sealevel.com/
Cabling Options
IDC40 Ribbon Cable to (2) DB25M, 30” in Length - (P/N CA338)
− Terminates a 40-pin header to two bulkhead mountable DB25 Male
connectors.
DB25F to DB25M Extension Cable, 72” in Length - (P/N CA104)
− Standard DB25 extension cable with full one-to-one pin out.
) or by calling 864-843-4343.
DB25F to 25 Screw Terminals - Terminal Block - (P/N TB04)
− Mountable terminal block with a DB25 Female connector wired to 25 screw
terminals. All screw terminals are labeled with the number corresponding to
the pin on the DB25 connector.
© Sealevel Systems, Inc.
- 2 -
SIO-104+16.485 User Manual
Page 5
Hardware Setup
Address Selection
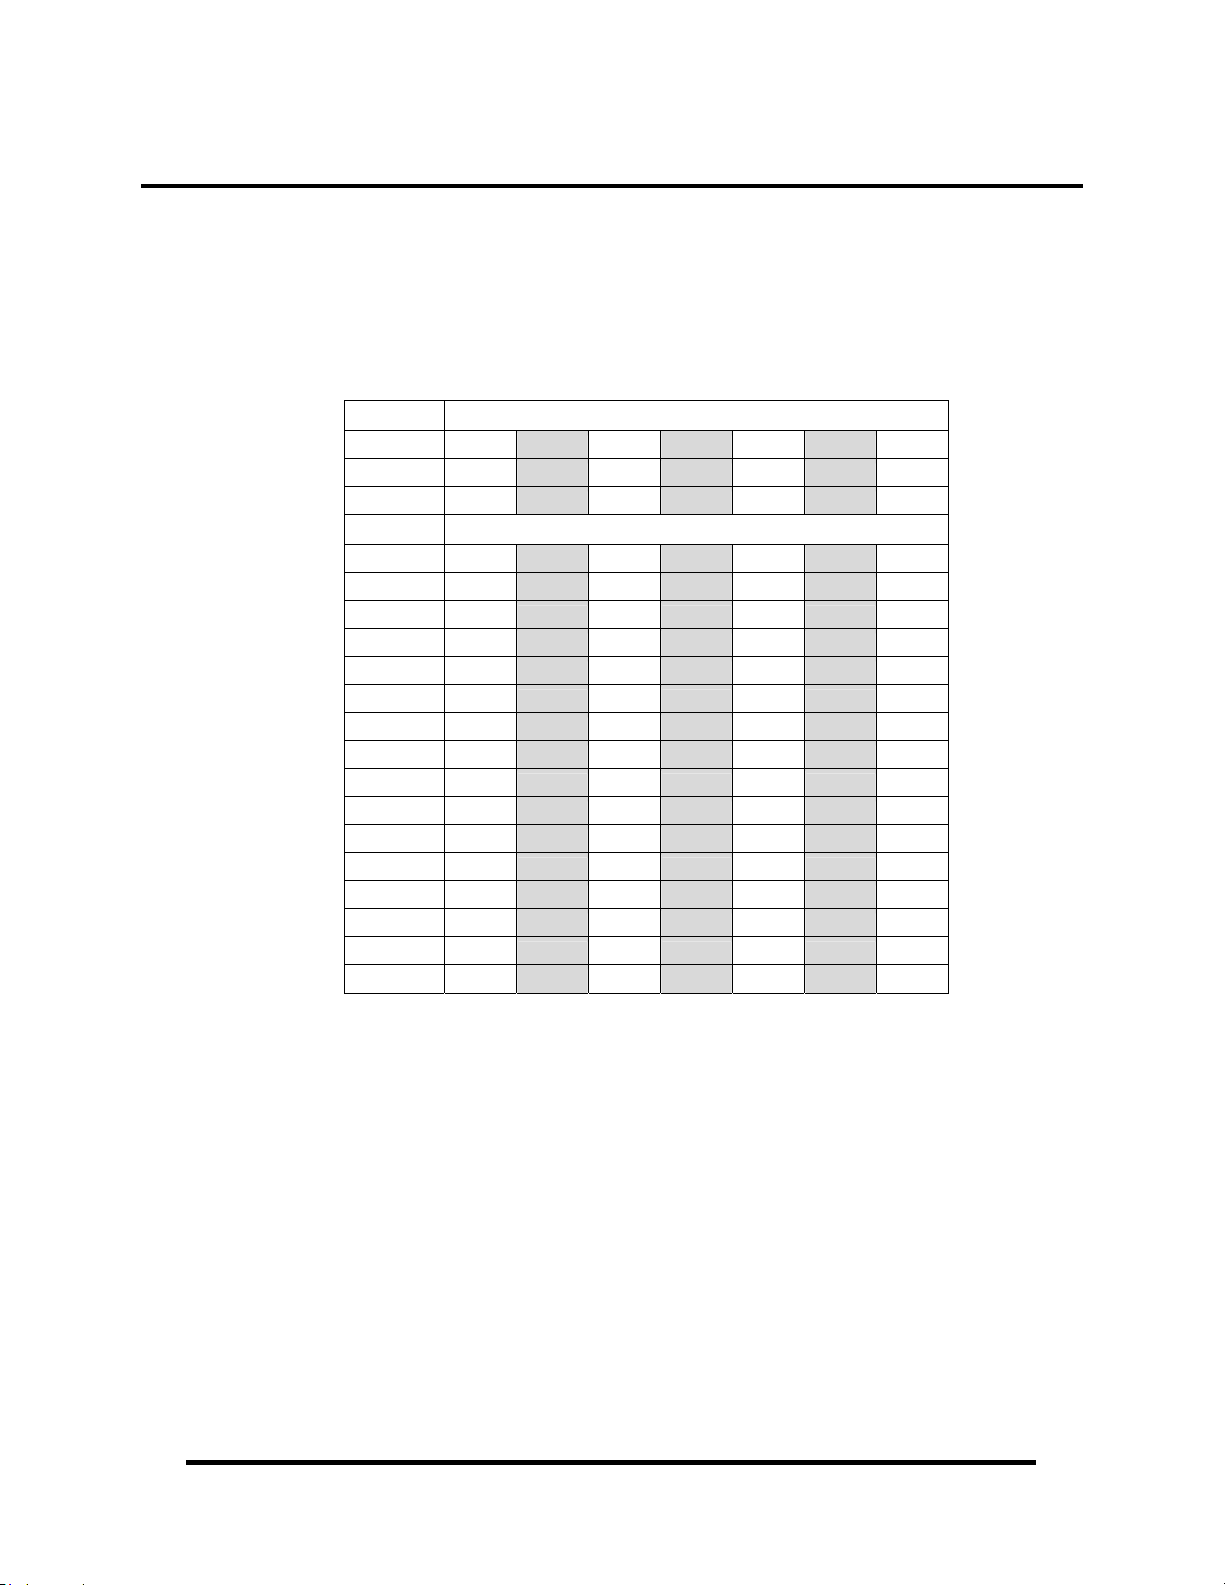
The SIO-104+16.485 occupies 16 consecutive I/O locations. The DIP-switch (SW1)
is used to set the base address for these locations. Be careful when selecting the base
address as some selections conflict with existing PC ports. The following table
shows the addressing options available. If different address options are required,
please contact Sealevel Systems Technical Support about a custom option.
Switch Settings
SW1-1
SW1-2
SW1-3
Ports Addresses
Port 1
Port 2
Port 3
Port 4
Port 5
Port 6
Port 7
Port 8
Port 9
Port 10
Port 11
Port 12
Port 13
Port 14
Port 15
Port 16
Note: Setting SW1-1, SW1-2, and SW1-3 all to OFF disables the card, which may be useful
for troubleshooting purposes.
OFF
OFF
ON
300
308
310
318
320
328
330
338
340
348
350
358
360
368
370
378
OFF OFF ON ON ON ON
ON ON OFF OFF ON ON
OFF ON OFF ON OFF ON
400 500 600 1500 3220 4220
408 508 608 1508 3228 4228
410 510 610 1510 3230 4230
418 518 618 1518 3238 4238
420 520 620 1520 3240 4240
428 528 628 1528 3248 4248
430 530 630 1530 3250 4250
438 538 638 1538 3258 4258
440 540 640 1540 3260 4260
448 548 648 1548 3268 4268
450 550 650 1550 3270 4270
458 558 658 1558 3278 4278
460 560 660 1560 3280 4280
468 568 668 1568 3288 4288
470 570 670 1570 3290 4290
478 578 678 1578 3298 4298
Interrupt Configuration
The board is set up to always share interrupts. There is a jumper labeled “PD” which
is located at (E1) on the SIO-104+16.485. Setting this jumper enables a 1K-ohm
pull-down (biasing) resistor required on one adapter when sharing interrupts. The
jumper should always be enabled on single SIO-104+16.485 installations (nonshared mode). In multiple SIO-104+16.485 installations, only one board should have
the jumper enabled.
© Sealevel Systems, Inc.
- 3 -
SIO-104+16.485 User Manual
Page 6

IRQ Selection
Clock Modes
RS-485 Enable
The SIO-104+16.485 has an interrupt selection jumper located at (E1), which should
be set prior to use, if an interrupt is required by your application software. Consult
the user manual for the application software being used to determine the proper
setting. The SIO-104+16.485 supports the following interrupts:
3, 4, 5, 7, 9, 10, 11, 12, and 15
The SIO-104+16.485 utilizes a 14.7456 MHz oscillator. This is eight times faster
than the standard COM: port oscillator, which typically is 1.8432 MHz. This allows
the adapter to achieve a maximum data rate of 921.6Kbps. The following sections
outline the baud rate calculations and instructions for achieving your desired baud
rate.
RS-485 is optimized for party line or multi-drop applications. The output of the RS485 driver is capable of being active (enabled) or tri-state (disabled). This capability
allows multiple PCs to be connected in a multi-drop bus and selectively polled.
Using the Sealevel SeaCOM driver, RS-485 enable is handled in hardware by the
UART. This allows the RS-485 driver to be tri-stated when inactive on a multi-drop
polled network. The SIO-104+16.485 is equipped with four 16C954 UARTs that
enable the RS-485 driver automatically.
Line Termination
Typically, each end of the RS-485 bus must have line-terminating resistors. The
SIO-104+16.485 features a 120Ω resistor across each RS-485 input and a 510Ω
pull-down resistor combination that biases the receiver inputs. The board is not
designed to have multiple adapters on the same RS-485 network. Contact Sealevel
Technical Support if you have questions on how to remove this termination.
RS-485 ‘Echo’
The RS-485 ‘Echo’ is the result of connecting the receiver inputs to the transmitter
outputs. Every time a character is transmitted, it is also received. The SIO104+16.485 automatically suppresses this ‘Echo’.
© Sealevel Systems, Inc.
- 4 -
SIO-104+16.485 User Manual
Page 7

Baud Rates and Oscillator value
The following table shows some common data rates and the rates you should choose
to achieve them when using the SIO-104+16.485. If using Windows 95, 98, ME,
2000, or XP, the oscillator value (14.7456 MHz) should be entered into the
‘Advanced’ tab on the Device Manager applet. Typically this is done automatically
when the Sealevel Software driver is loaded.
When using Windows NT, the ‘Advanced Ports’ applet in the Control Panel should
be launched and the oscillator value entered manually in the ‘Advanced’ tab, or all
data rates will be eight (8) times the selected rate. For example if a data rate of
19.2Kbps is selected, the actual data rate will be 153.6K bps. When using any other
OS (i.e. Linux or DOS) the following table should be used:
For this Data Rate Choose this Data Rate
1200 bps 150 bps
2400 bps 300 bps
4800 bps 600 bps
9600 bps 1200 bps
19.2K bps 2400 bps
38.4K bps 4800 bps
57.6K bps 7200 bps
115.2K bps 14.4K bps
230.4K bps 28.8K bps
460.8K bps 57.6 K bps
921.6K bps 115.2 K bps
If your communications package allows the use of Baud rate divisors, choose the
appropriate divisor from the following table:
For this Data Rate Choose this Divisor
1200 bps 768
2400 bps 384
4800 bps 192
9600 bps 96
19.2K bps 48
38.4K bps 24
57.6K bps 16
115.2K bps 8
230.4K bps 4
460.8K bps 2
921.6K bps 1
© Sealevel Systems, Inc.
- 5 -
SIO-104+16.485 User Manual
Page 8

Software Installation
Windows 98/ME/NT/2000/XP Installation
1. Start Windows.
2. Insert the Sealevel Systems CD in your CD drive.
3. If ‘Auto-Start’ is enabled for this drive the software will automatically launch. Otherwise,
launch the ‘autorun.exe’ file located in the root directory of the CD
4. Click the ‘Install’ button.
5. Type in or select the part number for the adapter from the listing.
6. The setup file will automatically detect the operating environment and install the proper
components. Follow the information presented on the screens that follow. After the software
is installed, you can close the CD interface window and proceed to the next step.
7. Run the Add/Remove Hardware utility located in Control Panel. Double click the icon to
launch the Wizard. When the Choose Hardware Task appears choose Add/Troubleshoot a
device. At that point Windows will search for Plug and Play devices. Since the ISA board is
not Plug and Play it will not be found. If Windows finds something you were not expecting,
cancel that install and click ‘Next’. When Choose a Hardware Device appears select ‘Add a
new device’. Windows will then ask if you want it to search and you select ‘No, I want to
select the hardware from a list’, then click ‘Next’. You will then see Hardware Type. If you
are installing a single port serial card select Ports (COM & LPT). If you are installing a
multi-port serial card (two or more ports), choose Multi-port serial adapters and click ‘Next’.
The Select a Device Driver window will appear. On the left side find Sealevel Systems, Inc.
and on the right side of the window select the card type you are installing.
8. Windows will now show a warning message that it could not detect the settings of the device
and that you must enter the settings manually. Click ‘OK’. The Add New Hardware Wizard
Properties window will appear. This window will show the default settings for the I/O
address and one IRQ. The one IRQ will mean that you will be sharing one IRQ for all ports
on the board for a multi-port card. You will only need one IRQ if installing a single port
card. Since Windows cannot detect the settings there may be a conflict with another device
or the settings shown may not be the settings you wish to use. To change the settings choose
‘Basic Configuration 0001’ next to the heading ‘Setting Based On’. When this configuration
is chosen the Resources window will appear with all question marks. Simply choose each
Input/Output Range and IRQ and change the settings to match the board settings. Make sure
there are no conflicts with other devices that would appear at the bottom of the window under
‘Conflicting Device List’. After you have either accepted the default settings or changed the
settings, the Start Hardware Installation window will appear. Click ‘Next’.
9. The next window that may appear will be the Digital Signature Not Found. Do not search for
digitally signed software and continue with installation. The Completing the Add/Remove
Hardware Wizard window will appear. You will be given a chance to change the resource
settings again at this point if necessary. Choose ‘Finish’. At this point you will need to
restart your computer. After restarting the Found New Hardware window will appear for
each port that you are installing. To confirm that the drivers installed, you can now look in
Device Manager under Ports (COM & LPT) and each of the ports should show with their
corresponding COM number.
© Sealevel Systems, Inc.
- 6 -
SIO-104+16.485 User Manual
Page 9

Linux Installation
Refer to D:\software\seacom\Other\Linux\Linux.serial.readme (where D: = your
CDROM driver letter) found on the Sealevel Systems CD. This file contains
valuable information on installing your adapter in the various Linux releases. Also in
this sub-directory is the Linux SerialHOWTO. These files explain typical Linux
serial implementations, as well as informing the user to Linux syntax and preferred
practices.
QNX
Refer to D:\software\seacom\Other\QNX6\Install.readme (where D: = your
CDROM driver letter) found on the Sealevel Systems CD. This file contains
valuable information on installing your adapter in the QNX6 Neutrino OS, as well as
the files required to ensure a flawless implementation. Also provided on the Sealevel
Systems CD are implementation instructions for QNX4. These are found in
D:\software\seacom\Other\QNX4\QNX_COM.txt.
3rd Party Software Support
Third party software support for many HMI/MMI and other process control software
is included on the product installation CD. For the most up to date information on
third party software support, please visit:
http://www.sealevel.com/thirdpartysoftware.asp
© Sealevel Systems, Inc.
- 7 -
SIO-104+16.485 User Manual
Page 10

Physical Installation
Extreme care should be taken when installing the SIO-104+16.485 to avoid causing
damage to the connectors. After the adapter is installed, connect your I/O cable to
the 40-pin header located at J1. Refer to Hardware Setup for information on setting
the address and jumper options before inserting the SIO-104+16.485 onto the stack.
Do not install the Adapter in the machine until the software has been fully
installed.
1. Turn off power. Disconnect the power cord.
2. Gently insert the SIO-104+16.485 connector noting proper key orientation of the
expansion connector on a PC/104 compatible card. The SIO-104+16.485 adapter
is keyed per the current PC/104 Specification. This will aid in preventing the
adapter from being inserted incorrectly.
3. Mounting hardware (nylon stand-offs and screws) is provided to ensure a good
mechanical connection. Retain any mounting hardware not used to allow for
future expansion.
4. Replace the cover.
5. Connect the power cord and power up the machine.
The SIO-104+16.485 is now ready for use.
© Sealevel Systems, Inc.
- 8 -
SIO-104+16.485 User Manual
Page 11

Physical Connection
The port signals for the SIO-104+16.485 are physically connected via a 40-pin box
header located at board position J1. The following table shows the connector pinout
for the 40-pin header.
PORT PINS RS-485
1
2
3
4
GND
5
6
7
8
GND
9
10
11
12
GND
13
14
15
16
GND
Ports 1 - 16 (J1)
1 Data +
2 Data 3 Data +
4 Data 5 Data +
6 Data 7 Data +
8 Data -
9 GND
10 GND
11 Data +
12 Data 13 Data +
14 Data 15 Data +
16 Data 17 Data +
18 Data 19 GND
20 GND
21 Data +
22 Data 23 Data +
24 Data 25 Data +
26 Data 27 Data +
28 Data 29 GND
30 GND
31 Data +
32 Data 33 Data +
34 Data 35 Data +
36 Data 37 Data +
38 Data 39 GND
40 GND
© Sealevel Systems, Inc.
- 9 -
SIO-104+16.485 User Manual
Page 12

Cabling Option
Sealevel provides the option to output the SIO-104+16.485 board’s signals via
DB25 Male connectors. Item number CA338 is a 40-pin ribbon cable with two (2)
DB25M connectors. The pinout for the CA338 is shown in the following table.
40-PIN SIGNAL DB25 #1 40-PIN SIGNAL DB25 #2
1 Data1 + 1 21 Data9 + 1
2 Data1 - 14 22 Data9 - 14
3 Data2 + 2 23 Data10 + 2
4 Data2 - 15 24 Data10 - 15
5 Data3 + 3 25 Data11 + 3
6 Data3 - 16 26 Data11 - 16
7 Data4 + 4 27 Data12 + 4
8 Data4 - 17 28 Data12 - 17
9 GND 5 29 GND 5
10 GND 18 30 GND 18
11 Data5 + 6 31 Data13 + 6
12 Data5 - 19 32 Data13 - 19
13 Data6 + 7 33 Data14 + 7
14 Data6 - 20 34 Data14 - 20
15 Data7 + 8 35 Data15 + 8
16 Data7 - 21 36 Data15 - 21
17 Data8 + 9 37 Data16 + 9
18 Data8 - 22 38 Data16 - 22
19 GND 10 39 GND 10
20 GND 23 40 GND 23
© Sealevel Systems, Inc.
- 10 -
SIO-104+16.485 User Manual
Page 13

CA338 DB25 Pin Out
The CA338 cable is designed to be used with item number TB04, a DB25 terminal
block. The TB04 has a DB25F connector that breaks out to 25 screw terminals. All
screw terminals are labeled with the number corresponding to the pin on the DB25
connector. The following table shows the signals as they are brought out on the
DB25M connectors. The pin numbers listed below correspond to the DB25M
connectors and the labels on the TB04 terminal block.
DB25 #1 (Ports 1-8)
PORT PIN RS-485 PORT PIN RS-485
1 Data + 1 Data +
1
2
3
4
GND
5
6
7
8
GND
14 Data -
2 Data + 2 Data +
15 Data -
3 Data + 3 Data +
16 Data -
4 Data + 4 Data +
17 Data -
5 GND 5 GND
18 GND
6 Data + 6 Data +
19 Data -
7 Data + 7 Data +
20 Data -
8 Data + 8 Data +
21 Data -
9 Data + 9 Data +
22 Data -
10 GND 10 GND
23 GND
DB25 #2 (Ports 9-16)
9
10
11
12
GND
13
14
15
16
GND
14 Data -
15 Data -
16 Data -
17 Data -
18 GND
19 Data -
20 Data -
21 Data -
22 Data -
23 GND
© Sealevel Systems, Inc.
- 11 -
SIO-104+16.485 User Manual
Page 14

Electrical Characteristics
Features
Sixteen 2-wire RS-485 serial ports
16C954 buffered UARTs with 128-byte FIFOs
Automatic RS-485 enable/disable
IRQ interrupt status port
Supports interrupt sharing
Data rates to 921.6K bps
Extended temperature range available (-40°C - +85°C)
Specifications
Environmental Specifications
Specification Operating Storage
Temperature Range
Humidity Range
0°C – 70°C
(32°F – 158°F)
10 to 90% R.H.
Non-Condensing
-50°C – 105°C
(-58°F – 221°F)
10 to 90% R.H.
Non-Condensing
Power Requirements
+5VDC @ 600mA
Dimensions
L W
3.775” 3.55”
9.59cm 9.02cm
Manufacturing
All Sealevel Systems Printed Circuit boards are built to UL 94V0 rating and are
100% electrically tested. These printed circuit boards are solder mask over bare
copper with either Electroless Nickel Immersion Gold (ENIG) or Hot Air Solder
Leveled (HASL) finish.
© Sealevel Systems, Inc.
- 12 -
SIO-104+16.485 User Manual
Page 15

Appendix A – Troubleshooting
Following these simple steps can eliminate most common problems.
1. Install software first. After installing the software then proceed to Physical
Installation section of the manual.
2. Identify all I/O adapters currently installed in your system. This includes
your on-board serial ports, controller cards, sound cards etc. The I/O
addresses used by these adapters, as well as the IRQ (if any) should be
identified.
3. Configure your Sealevel Sy stems adapter so that there is no conflict with
currently installed adapters. No two adapters can occupy the same I/O
address.
4. Try the Sealevel Systems adapter with a unique IRQ. While the Sealevel
Systems adapter does allow the sharing of IRQs, many other adapters (i.e.
SCSI adapters & on-board serial ports) do not.
5. Make sure the Sealevel Systems adapter is securely installed.
6. For Windows95/98/ME/NT/2000, the diagnostic tool ‘WinSSD’ is installed
in the SeaCOM folder on the Start Menu during the setup process. First find
the ports using the Device Manager, then use ‘WinSSD’ to verify that the
ports are functional.
7. Always use the Sealevel Systems diagnostic software when troubleshooting a
problem. This will eliminate any software issues from the equation.
If these steps do not solve your problem, please call Sealevel Systems’ Technical
Support, (864) 843-4343. Our technical support is free and available from 8:00AM5PM Eastern Time Monday through Friday. For email support contact
support@sealevel.com
.
© Sealevel Systems, Inc.
- 13 -
SIO-104+16.485 User Manual
Page 16

Appendix B – How To Get Assistance
Begin by reading through the Trouble Shooting Guide in Appendix A. If assistance
is still needed please see below.
When calling for technical assistance, please have your user manual and current
adapter settings. If possible, please have the adapter installed in a computer ready to
run diagnostics.
Sealevel Systems provides an FAQ section on its web site. Please refer to this to
answer many common questions. This section can be found at
http://www.sealevel.com/faq.asp
Sealevel Systems maintains a web site on the Internet. Our home page address is
http://www.sealevel.com
. The latest software updates, and newest manuals are
available via our web site.
Technical support is available Monday to Friday from 8:00 a.m. to 5:00 p.m. eastern
time. Technical support can be reached at (864) 843-4343.
RETURN AUTHORIZATION MUST BE OBTAINED FROM SEALEVEL
SYSTEMS BEFORE RETURNED MERCHANDISE WILL BE ACCEPTED.
AUTHORIZATION CAN BE OBTAINED BY CALLING SEALEVEL
SYSTEMS AND REQUESTING A RETURN MERCHANDISE
AUTHORIZATION (RMA) NUMBER.
© Sealevel Systems, Inc.
- 14 -
SIO-104+16.485 User Manual
Page 17

Appendix C – Electrical Interface
RS-485
RS-485 is backwardly compatible with RS-422; however, it is optimized for party
line or multi-drop applications. The output of the RS-422/485 driver is capable of
being Active (enabled) or Tri-State (disabled). This capability allows multiple ports
to be connected in a multi-drop bus and selectively polled. RS-485 allows cable
lengths up to 4000 feet and data rates up to 10 Megabits per second. The signal
levels for RS-485 are the same as those defined by RS-422. RS-485 has electrical
characteristics that allow for 32 drivers and 32 receivers to be connected to one line.
This interface is ideal for multi-drop or network environments. RS-485 tri-state
driver (not dual-state) will allow the electrical presence of the driver to be removed
from the line. Only one driver may be active at a time and the other driver(s) must
be tri-stated. RS-485 can be cabled in two ways, two wire and four wire mode. Twowire mode does not allow for full duplex communication, and requires that data be
transferred in only one direction at a time. For half-duplex operation, the two
transmit pins should be connected to the two receive pins (Tx+ to Rx+ and Tx- to
Rx-). Four wire mode allows full duplex data transfers. RS-485 does not define a
connector pin-out or a set of modem control signals. RS-485 does not define a
physical connector.
© Sealevel Systems, Inc.
- 15 -
SIO-104+16.485 User Manual
Page 18

Appendix D – Asynchronous Communications
r
Serial data communications implies that individual bits of a character are transmitted
consecutively to a receiver that assembles the bits back into a character. Data rate,
error checking, handshaking, and character framing (start/stop bits) are pre-defined
and must correspond at both the transmitting and receiving ends.
Asynchronous communications is the standard means of serial data communication
for PC compatibles and PS/2 computers. The original PC was equipped with a
communication or COM: port that was designed around an 8250 Universal
Asynchronous Receiver Transmitter (UART). This device allows asynchronous
serial data to be transferred through a simple and straightforward programming
interface. A starting bit followed by a pre-defined number of data bits (5, 6, 7, or 8)
defines character boundaries for asynchronous communications. The end of the
character is defined by the transmission of a pre-defined number of stop bits (usually
1, 1.5 or 2). An extra bit used for error detection is often appended before the stop
bits.
Idle state of
line
5 to 8 Data Bits
1
0
This special bit is called the parity bit. Parity is a simple method of determining if a
data bit has been lost or corrupted during transmission. There are several methods
for implementing a parity check to guard against data corruption. Common methods
are called (E)ven Parity or (O)dd Parity. Sometimes parity is not used to detect
errors on the data stream. This is refereed to as (N)o parity. Because each bit in
asynchronous communications is sent consecutively, it is easy to generalize
asynchronous communications by stating that each character is wrapped (framed) by
pre-defined bits to mark the beginning and end of the serial transmission of the
character. The data rate and communication parameters for asynchronous
communications have to be the same at both the transmitting and receiving ends.
The communication parameters are baud rate, parity, number of data bits per
character, and stop bits (i.e. 9600, N, 8, 1).
Odd, Even
or
Unused
P
BIT
STOP
1
1.5
2
Remain Idle o
next start bit
© Sealevel Systems, Inc.
- 16 -
SIO-104+16.485 User Manual
Page 19

Appendix E – Silk Screen – 3562 PCB
© Sealevel Systems, Inc.
- 17 -
SIO-104+16.485 User Manual
Page 20

Warranty
Sealevel's commitment to providing the best I/O solutions is reflected in the Lifetime
Warranty that is standard on all Sealevel manufactured products. We are able to
offer this warranty due to our control of manufacturing quality and the historically
high reliability of our products in the field. Sealevel products are designed and
manufactured at its Liberty, South Carolina facility, allowing direct control over
product development, production, burn-in and testing.
Sealevel Systems, Inc. (hereafter "Sealevel") warrants that the Product shall conform
to and perform in accordance with published technical specifications and shall be
free of defects in materials and workmanship for life. In the event of failure,
Sealevel will repair or replace the product at Sealevel's sole discretion. Failures
resulting from misapplication or misuse of the Product, failure to adhere to any
specifications or instructions, or failure resulting from neglect or abuse are not
covered under this warranty.
Warranty service is obtained by delivering the Product to Sealevel and providing
proof of purchase. Return authorization must be obtained from Sealevel Systems
before returned merchandise will be accepted. Authorization is obtained by
calling Sealevel Systems and requesting a Return Merchandise Authorization
(RMA) number. The Customer agrees to insure the Product or assume the risk of
loss or damage in transit, to prepay shipping charges to Sealevel, and to use the
original shipping container or equivalent. Warranty is valid only for original
purchaser and is not transferable.
Trademarks
Sealevel Systems assumes no liability for any damages, lost profits, lost savings or
any other incidental or consequential damage resulting from the use, misuse of, or
inability to use this product. Sealevel Systems will not be liable for any claim made
by any other related party.
This warranty applies to Sealevel manufactured Product. Product purchased through
Sealevel but manufactured by a third party will retain the original manufacturer's
warranty.
Sealevel Systems, Incorporated
2779 Greenville Highway
P.O. Box 830
Liberty, SC 24857 USA
(864) 843-4343 FAX: (864) 843-3067
www.sealevel.com
email: support@sealevel.com
Technical Support is available Monday - Friday from 8 a.m. to 5 p.m. Eastern time
Sealevel Systems, Incorporated acknowledges that all trademarks referenced in this
manual are the service mark, trademark, or registered trademark of the respective
company.
© Sealevel Systems, Inc.
- 18 -
SIO-104+16.485 User Manual
 Loading...