

Page 1

PT300PT300
22 0V 1 0T
Page 2

Table Of Contents
Read all precautions and instructions in this manual before using this
equipment.
! CAUT I O N
Important Safety Instructions-------------------------------------------------------------------- 3
Before you start-------------------------------------------------------------------------------------- 5
Main parts list---------------------------------------------------------------------------------------- 6
Warning------------------------------------------------------------------------------------------------ 7
Using Method---------------------------------------------------------------------------------------- 8
Warm Up Exercises---------------------------------------------------------------------------------- 9
Power Requirements------------------------------------------------------------------------------ 10
Console Information------------------------------------------------------------------------------- 11
Moving Instructions------------------------------------------------------------------------------- 12
Parts list----------------------------------------------------------------------------------------------- 13
Exploded View-------------------------------------------------------------------------------------- 16
Console Panel Functions------------------------------------------------------------------------- 18
Electrical Connection----------------------------------------------------------------------------- 24
Belt Adjustment and Maintenance------------------------------------------------------------ 25
Page 3

─ 3 ─
Impor tant Safety Instr uctions
WARNING! Before using this treadmill or star ting any exercise program,
consult your physician. This is especially important for persons over the age of
35 and or persons with pre-existing health problems. The manufacturer or
distributor assumes no responsibility for personal injury or property damage
sustained by or through the use of this product. To reduce the risk of electrical
shock, burns, fire, or other possible injuries to the user, it is important to review
this manual and the following precautions before operation.
This appliance is not intended for use by persons (including children) with
reduced physical, sensory or mental capabilities, or lack of experience and
knowledge, unless they have been given super vision or instruction concerning
use of the appliance by a person responsible for their safety.
Children should be supervised to ensure that they do not play with the appliance.
SAFETY PRECAUTIONS AND TIPS
1. It is the owner's responsibility to ensure that all users of this treadmill have
read the Owner's Manual and are familiar with warnings and safety precautions.
2. This treadmill has a user maximum capacity of 180 Kg/ 400 Pounds.
3. The treadmill should only be used on a level surface and is intended for indoor
use only. The treadmill should not be placed in a garage, patio, or near water
and should never be used while you are wet. Recommends a treadmill mat be
placed under the treadmill to protect floor or carpet and for easier cleaning.
4. Follow safety information in regards to plugging in your treadmill. Keep the
power cord away from the incline wheels and do not run the power cord
underneath your treadmill. Do not operate the treadmill with a damaged or
frayed power cord.
5. Wear comfor table, good-quality walking or running shoes and appropriate
clothing. Do not use the treadmill with bare feet, sandals, socks or stockings.
6. Always straddle the belt and allow it to start moving before stepping onto the
belt.
7. Hold on to handrail when adjusting speed, incline, or other controls.
8. Always examine your treadmill before using to ensure all parts are in working
order.
Page 4
─ 4 ─
Impor tant Safety Instr uctions
9. Allow the belt to fully stop before dismounting.
10. Pets should never be allowed near or on the treadmill.
11. Do not leave children unsupervised near or on the treadmill.
12. Never operate the treadmill where oxygen is being administered, or where
aerosol products are being used.
13. Never insert any object or body parts into any opening.
14. For safety and to prevent damage to your treadmill, no more than one person
should use the treadmill at a time.
15. Always unplug the treadmill before cleaning and/or servicing. Service to your
treadmill should only be per formed by an authorized service representative,
unless authorized and or instructed by the manufacturer.
16. Failure to follow these instructions will void the treadmill warranty.
17. If the supply cord is damaged, it must be replaced by the manufacturer or its
service agent or a similarly qualified person in order to avoid a hazard.
This marking indicates that this product should not be
disposed with other household wastes throughout the
EU. To prevent possible harm to the environment or
human health from uncontrolled waste disposal, recycle
it responsibly to promote the sustainable reuse of
material resources. To return your used device, please
use the return and collection systems or contact the
retailer where the product was purchased. They can take
this product for environmental safe recycling.
Correct Disposal of this product
Page 5

─ 5 ─
Before You Star t
Remember to take the time to review owner's manuals before you start.
1. Before using this treadmill or starting any exercise program, consult your
physician and accompanied by specialized person. Adjust the speed not
over 8KMH.
2. Take the time to perform the stretching exercise provided to avoid injury.
3. If you have heart problems, and/ or the other diseases, do not use the
treadmill programs without receiving approval from your physician.
4. Stop exercising or call physician if you feel uncomfortable.
5. Do not leave children unsupervised and disabled person near or on the
treadmill. Should be accompanied by supervisors.
6. Running is oxygen exercise, recommended 30 minutes per time is
reasonable.
7. Wear comfor table, good-quality walking or running shoes and appropriate
clothing. Do not with fibre clothing to avoid electrical shock and damage
the treadmill.
8. Do note us the treadmill with bare feet, sandals, socks of stockings to
avoid any risk of injuries. Wear comfortable shoes or cotton socks.
9. Failure to follow these instructions will void the treadmill warranty.
10. If the supply cord is damaged, it must be replaced by the manufacturer or
its service agent or a similarly qualified person in order to avoid a hazard.
Page 6

─ 6 ─
Main parts list
Page 7

Warning
─ 7 ─
Before using this treadmill or starting any exercise program, It is
important to review this manual and the following precautions.
1. Always unplug the treadmill after using to keep the life of treadmill and
avoid any risk of injuries.
2. In order to protecting your treadmill, spattering water on the machine
must be forbidden.
3. The equipment is Class SB and the max. user weight is 180kg.
Power switch
Adjustment and Use remote controller
If the ground in user's house is not level, please adjust the adjust support
properly which is marked as A in the below figure to make the machine at a level
place. After adjusting tighten the hex nut by using the Double-ended spanner.
Page 8
─ 8 ─
Using Method
Please read carefully and using follow the functions:
1. put the plug in the socket, turn on the on-off.
2. grasp the handle firmly, stand on the treadle.
3. clamp the clothes using the safe key clamp.
4. you can operate this device according as the manual At first you should set the
lowest speed, then increase the speed gradually.
5. you should grasp the handle firmly by one of your hands, when you operating
the console.
6. Take care to use treadmill. Start from low speed handed to the Uprights Leaving
from treadmill after reducing speed and stopping all functions.
7. Press Safety Switch on emergency.
8. Warm and relax your body after workout.
Exercise time and exercise frequency at a time:
Exercise time: 30minuates----Normal;
exercise frequency: Warm your body by 10---20minutes under 8Kph
Then increase speed accordingly.
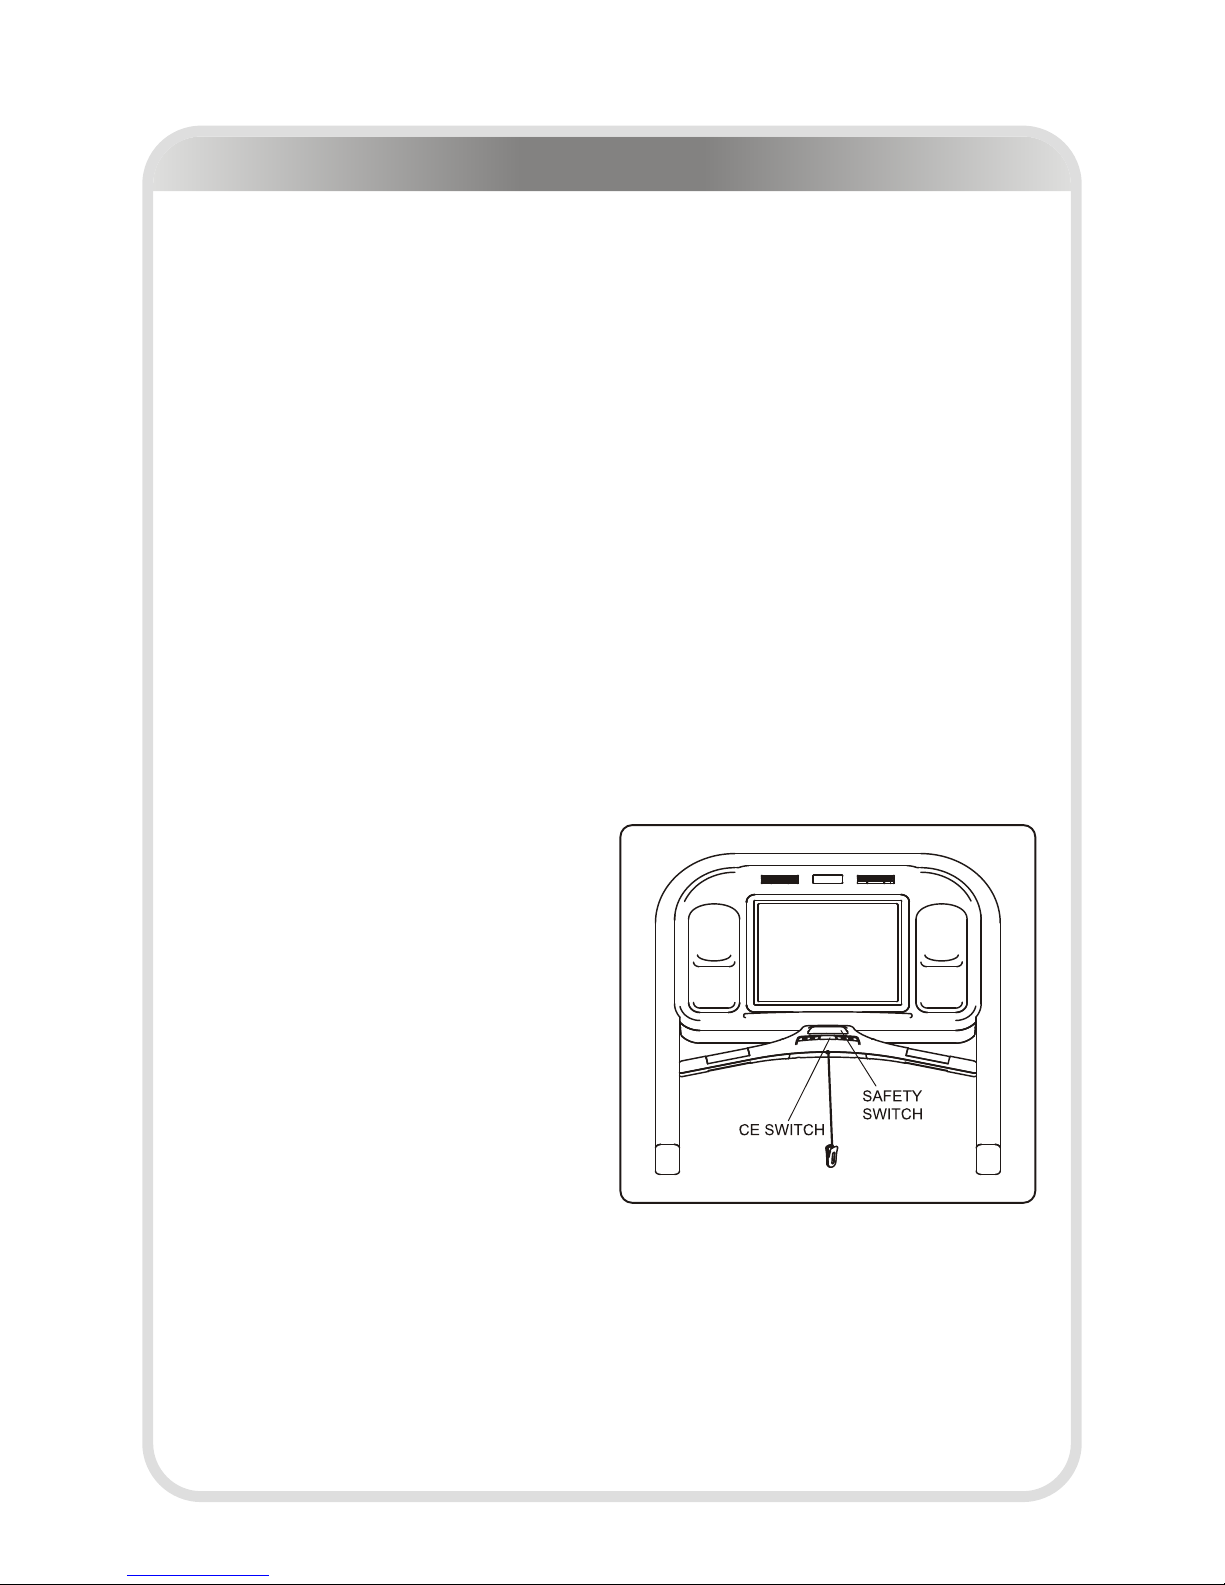
CE SWITCH INTRODUCTION
Except the safe key, there is still a CE
switch for user to operate under any
emergency condition.
The user can pull the CE switch code
to stop the treadmill. After you did
this, you should press the CE switch
at the low position before you start
the treadmill again.
Operation:
1. Press the CE switch and keep it at the low position, tie the CE switch code to
your cloth, then start the treadmill for exercise.
2. If there is any emergency condition, the code tied to your cloth will pull the CE
switch and it will come to the origal position. at the mean time, the treadmill will
stop completely and the main power will be cut.
Warning: Because of inertia, when use above switch to stop running, the running
belt will last running for several seconds before completely stop.
Page 9

─ 9 ─
Warm Up Exercises
EXERCISE GUIDELINES
WARNING! Before beginning this or any exercise program, you should consult your
physician. This is especially important for individuals over the age of 35 or individuals
with pre-existing health problems.
Warming up prepares the body for the exercise by increasing circulation, supplying more
oxygen to the muscles and raising body temperature. Begin each workout with 5 to 10
minutes of stretching and light exercise to warm up. The photos on this page show
several forms of basic stretching you may perform before your workouts. In order to
achieve an adequate warm-up, perform each stretch three times.
TOE TOUCH STRETCH
Stand, bending your knees slightly and slowly bend forward
from your hips. Allow your back and shoulders to relax as you
reach down toward your toes as far as possible. Hold for 15
counts, then relax. This will stretch your hamstrings, back of
knees, and back.
HAMSTRING STRETCH
Sit with one leg extended. Bring the sole of the opposite foot
toward you and rest it against the inner thigh of your
extended leg. Reach toward your toes as far as possible. Hold
for 15 counts, then relax. This will stretch your hamstrings,
lower back, and groin.
CALF/ACHILLES STRETCH
With one leg in front of the other, reach forward and place
your hands against a wall. Keep your back leg straight and
your back foot flat on the floor. Bend your front leg, lean
forward and move your hips toward the wall. Hold for 15
counts, then relax. To cause further stretching of the Achilles
tendon, bend your back leg as well. This will stretch your
calves, Achilles tendons, and ankles.
QUADRICEPS STRETCH
With one hand against a wall for balance, reach back and
grasp one foot with your other hand. Bring your heel as close
to your buttocks as possible. Hold for 15 counts, then relax.
This will stretch your quadriceps and hip muscles.
INNER THIGH STRETCH
Sit with the soles of your feet together and your knees
outward. Pull your feet toward your groin area as far as
possible. Hold for 15 counts, then relax. This will stretch your
quadriceps and hip muscles.
Page 10

Power Requirements
IMPROPER CONNECTION OF THE EQUIPMENT GROUNDING CONNECTOR
CAN RESULT IN A RISK OF AN ELECTRIC SHOCK. CHECK WITH A QUALIFIED
ELECTRICIAN OR SERVICE MAN IF YOU ARE IN DOUBT AS TO WHETHER THE
PRODUCT IS PROPERLY GROUNDED. DO NOT MODIFY THE PLUG PROVIDED
WITH THE PRODUCT. IF PLUG WILL NOT FIT THE OUTLET, HAVE A PROPER
OUTLET INSTALLED BY A QUALIFIED ELECTRICIAN.
This treadmill can be seriously damaged by sudden voltage changes in your
home's electrical power. Voltage spikes, surges, and noise interference can
result from weather conditions or from other appliances being turned on or off.
This treadmill must be grounded to reduce the risk of electrical shock.
Grounding provides a path of least resistance for electric current should the
treadmill malfunction. Always plug the power cord into an appropriate outlet
that is properly installed and grounded in accordance with all local codes and
ordinances.
─ 10 ─
Page 11

─ 11 ─
Conso l e Infor mat i on
Before beginning your workout, check your normal resting heart rate. Place your
fingers lightly against your neck, or against your wrist over the main artery. After
finding your pulse, count the number of beats in 10 seconds. Multiply the number
of beats by six to determine your pulse rate per minute. We recommend taking your
heart rate at these times; at rest, after warming up, during your workout and two
minutes into your cool down, to accurately track your progress as it relates to better
fitness.
During your first several months of exercising, the AHA recommends aiming for the
lower part of the target heart rate zone-60%, then gradually pro-gressing up to 75%.
According to the AHA, exercising above 75% of your maximum heart rate may be
too strenuous unless you are in top physical condition. Exercising below 60% of
your maximum will result in minimal cardiovascular conditioning.
Check your pulse recovery rate – If your pulse is over 100 bpm five minutes after you
stop exercising, or if it's higher than normal the morning after exercising, your
exertion may have been too strenuous for your current fitness level. Rest and reduce
the intensity next time.
Fitness Safety The target
heart rate chart indicates
average rate zones for
different ages. A variety of
different factors (including
medication, emotional
state, temperature and
other conditions) can
affect the target heart rate
zone that is best for you.
Your physician or health
care professional can help
you determine the exercise
intensity that is appropriate for your age and
condition.
Page 12

─ 12 ─
Moving Instructions
Caution! To avoid the risk of injury, never attempt to move the treadmill while it is
in the unfolded operating position. To reduce the possibility of injury while lifting,
bend your legs and keep your back straight. As you raise the treadmill, lift using
your legs, not your back. In order to raise or lower the treadmill safely, you must be
able to lift 220 pounds (100kg). It is suggested you always use the aid of a second
person when moving the treadmill.
Lift the treadmill back then move it to the desired location. Carefully put down it on
the position. Do not attempt to move the treadmill over an uneven or rough surface.
Note: The treadmill's angle can not exceed 15 degrees when lifted the treadmill back.
Page 13

─ 13 ─
Parts List
Item No. Part number Description QTY
1 PT3000100 CONSOLE 1
2 PT3000200 LEFT UPRIGHT 1
3 PT3000300 RIGHT UPRIGHT 1
4 PT3000500 DECK FRAME 1
5 PT3000600 ELEVATION FRAME 1
6 PT3000700 ADJUST FRAME 1
7 PT3000800 SAFE BOARD 1
10 PT3001200 COVERING PLATE 2
11 PT3001400 DUSTPROOF PLATE 1
12 PT3001600 LEFT SIDE BOARD 1
13 PT3001700 RIGHT SIDE BOARD 1
14 PT3001800 MOTOR COVER 1
15 PT3001900 PLATE FOR SWITCH 1
16 PT3002000 LEFT END CAP 1
17 PT3002100 RIGHT END CAP 1
18 AC32703100 FIX PLATE 2
19 STDP3400 ADJUST BUMPER 2
20 STDP3200 ELEVATION WHEEL 2
21 STDP4600 LINKING SHAFT 2
22 PT3003800 RUNNING BELT 1
23 PT3003900 RUNNING BOARD 1
24 AC29706700 INSULATION BUMPER 1
25 DXD660J12 V-BELT 1
26 PT3002200 FRONT ROLLER 1
27 STDP4200A REAR ROLLER 1
28 STDP2800 ACTUATOR BUMPER 1
29 STDP3600 INSULATION SPACER 6
32 IN-S21004800 CLIP NUT M8 2
33 AC32705800 CLIP NUT M6 2
34 STDP5500 CLIP NUT M5 2
35 AC31705200 RUBBER BUMPER 4
36 PT3002800 BUMPER(60) 4
37 PT3002900 BUMPER(50) 4
38 STDP5300 MOTOR COVER BUMPER 1
39 STDP4400 POWER CORD SPACER 1
40 PT3003000 END CAP BUMPER 1
41 GB5780M8*150DS2 Hex Head Bolt M8*150 2
42 GB5780M8*55DS2 Hex Head Bolt M8*55 1
44 GB70M8*45DHS18 Scohet Head Cap Screw M8*45 1
45 GB70M10*120DS18 Socket Head Cap Screw M10*120 5
50 GB70M10*50DS18 Socket Head Cap Screw M10*50 1
51 GB70M8*100DHS18 Socket Head Cap Screw M8*100 2
52 GB70M8*60DHS18 Socket Head Cap Screw M8*60 1
53 GB70M10*25DS18 Socket Head Cap Screw M10*25 4
54 GB70M10*40DS18 Socket Head Cap Screw M10*40 4
Page 14

─ 14 ─
Parts List
Item No. Part number Description QTY
55 GB70M8*35DS20 Socket Head Cap Screw M10*35 6
56 GB818M5*15DS2 PHILLIP SCREW M5*15 10
57 CNLM8*35DHS20 Flat Head Cap Screw M8*35 8
58 CNLM6*40DS2 Flat Head Cap Screw M6*40 4
59 GB17880.5M8*16.5DS2 HEX NUT M8 6
60 CLLM5DS2 CHAMFER BLIND NUT 12
61 GB818M3*10DS2 PHILLIP SCREW M3*10 6
62 GB41M3DS2 NUT M3 6
63 NM10DS2 NYLON NUT M10 6
65 GB6177M8DS2 JAM NUT M8 11
66 GB6177M16DS2 JAM NUT M16 2
67 STDP6800 K NUT M8 13
69 DQ10N19 WASHER Φ11*Φ23*2 10
71 DQ8DS2 WASHER Φ9*Φ22*1.6 8
72 GB894.125FH12 BEARING WSSHER d=25 2
73 GB9312DS12 SPRING WASHER Φ12 4
74 PT3005900 HARDWARE BAG 1
76 GB845ST4.2*13DS2 PHILLIP SCREW ST4.2*13 7
78 PNLM8*15*15DS2 Button Head Cap M8*15 2
79 GB6560M4*8DSG PHILLIP SCREW M4*8 3
80 GB6560M4*12DCS PHILLIP SCREW M4*12 2
81 CNLM10*75N19 Flat Head Cap Screw M10*75 2
82 AC32700636 WASHER Φ30*Φ9*3 4
83 GB9310DS12 SPRING WASHER Φ10 4
84 GB818M5*20DS2 PHILLIP SCREW M5*20 4
85 CLLM6DS2 COVER-PULLING NUT 3
101 PT3004000 HANDLE FRAME 1
101.1 PT3003100 HANDLE COVER UP 1
101.2 PT3003200 HANDLE COVER DOWN 1
101.3 PT3003300 REPOSITION SWITCH 1
101.4 PT3002400 REPOSITION RACK 1
101.5 PT3002500 RESTRICT SPRING 3
101.7 PT3003400 EMERGENCY SWITCH 1
101.8 PT3003500 SWITCH PLATE 1
101.9 PT3003600 NYLON SHAFT 1
111.1 STDP4009 PULSE PLATE UP 2
101.11 STDP4010 PULSE PLATE DOWN 2
101.12 STDP4012 SAFE KEY 1
101.13 AC32709921 SWITCH RACK 1
101.14 GB845ST2.9*6.5DS2 PHILLIP SCREW ST2.9*6.5 6
101.15 GB6560M4*12DCS PHILLIP SCREW M4*12 2
101.16 GB845ST4.2*13DS2 PHILLIP SCREW ST2.9*6.5 12
104 PT3002600 HANDLE BAR MAT 2
104.1 PT3002601 HANDLE BAR COVER UP 1
104.2 PT3002602 HANDLE BAR COVER DOWN 1
Page 15

─ 15 ─
Parts List
Item No. Part number Description QTY
104.3 CLLM6DS2 COVER-PULLING NUT 3
112 PT3004100 CONSOLE COVER UP 1
113 PT3004200 CONSOLE COVER DOWN 1
114 PT3004300 INSERT 1
115 PT3004400 BOTTLE HOLDER 2
116 PT3004500 FAN RACK 2
117 PT3004600 COSOLE HOLE COVER 3
123 E7DZB0800 FAN GRILL 2
125 GB70M6*60DS2 Flat Head Cap Screw M6*60 6
126 GB845ST2.9*6.5DS2 PHILLIP SCREW ST2.9*6.5 34
127 GB845ST4.2*13DS2 PHILLIP SCREW ST4.2*13 18
128 GB818M3*10DS2 APHILLIP SCREW M3*10 6
129 GB848M3DS2 SPRING WASHER Φ3 6
133 GB6560M4*8DSG PHILLIP SCREW M4*8 1
134 PT300MM01 CONSOLE OVERLAY 1
135 PT400MM02 SPEED OVERLAY 1
136 PT400MM03 INCLINE OVERLAY 1
137 PT300TZ03 CONSOLE LOGO 1
138 PT300TZ04 CONSOLE LABEL 1
139 B83-S-WX CONSOLE PCB 1
140 F26-S KEY PCB 1
141 L900SM/XHB/VHR-10 CONSOLE WIRE UP 1
142 07-0079H REMOTE PCB 2
143 F10 EMERGENCY SWITCH 2
144 DQXTJS01 RECEPTOR 1
145 K1NF-55(N) FERRITE 2
146 L600ST0/XHP-2 EMERGENCY SWITCH WIRE 2
147 L800ST0/XHP-2 PULSE CONNECT WIRE 2
148 L550SMR/VHR-4 FAN WIRE 1
149 L500XHP/XHP-3 SPD AND INCL HARNESS 2
150 08-0077 FERRITE 3
151 P06 FAN 2
152 GB845ST2.9*9.5DS2 PHILLIP SCREW ST2.9*9.5 8
153 DQBPQ2.2-S TRANSDUCER 1
154 L1600SM/XHP/XHB-10 CONSOLE WIRE DOWN 1
155 L100ST0/ST0 CONNECT WIRE 01 2
156 L250ST0/ST0 CONNECT WIRE 02 6
157 Z13 POWER SOCKET 1
158 F17 MAIN SWITCH 1
159 08-0004 CIRCUIT BREAKER 2
160 D40-64 MOTOR 1
162 08-0077 FERRITE 3
164 Q03 FILTER 1
165 Q02-S1 INDUCTANCE 1
166 R36 ACTUATOR 1
Page 16

─ 16 ─
Exploded View
Page 17

─ 17 ─
Exploded View
Page 18

─ 18 ─
Console Panel Functions
INPUT VOLTGAE:
220-240V~ 50/60Hz
HORSE POWER(CONSTANT):
3HP
SPEED RANGE:
1.0-20KPH
DISPLAY:
SPEED, TIME, PULSE, INCLINE,
CALORIE, DISTANCE, DOT MATRIX
INCLINE RANGE:
0-15%
Page 19

─ 19 ─
Console Panel Functions
Console Panel Functions
1. Speed window:
It displays preset speed when user mode.
It displays workout speed when the manual and program mode.
2. Time window:
It displays workout time when the manual and program mode.
It displays odd time when countdown time mode.
It displays preset time when user mode.
It displays Error Messages when trouble.
3. Incline window:
It displays workout incline.
It displays Error message "ER2" when trouble about incline system.
4. Distance window:
It displays workout distance when manual and program mode.
It displays odd distance when countdown distance mode.
It displays preset distance when user mode.
5. Pulse window:
It displays workout heart rate.
6. Calories window:
It displays workout calories when manual and program mode.
It displays odd calories when countdown calories.
It displays preset calories when user mode.
7. Dot matrix window:
It displays racetrack; It displays picture of speed and incline when user and
program mode.
It displays "Check Console PCB to Inverter connection" when the time window
displays "ER1".
It displays "Check incline system" when the time window displays "ER2".
It displays "Check safe-key" when the time window displays "ER3".
It displays "Check inverter and motor system" when the time window displays
"ER4".
It displays "Check supply power" when the time window displays "ER5".
It displays "Check lubrication system and Reset CE switch" when the window
displays "Er6".
Page 20

─ 20 ─
Console Panel Functions
BUTTONS
SPEED+, SPEED-; INCLINE+, INCLINE-;
SPEED ONE TOUCH 2, 4, 6, 8, 10, 12;
INCLINE ONE TOUCH 2, 4, 6, 8, 10, 12;
START; STOP; POWER; PROGRAM/ENTER;
PROGRAM+, PROGRAM-; FAN
AUTO. ADJUST MODE
1. Auto. adjust:
Hold "Incline+\- and Speed+\-" when stop, Through Auto. Adjust mode after 3S.
2. Switching Between Miles and Kilometers
Hold "Start" key, Reset safe-key, Through switch between miles and kilometers
mode to select "SI" or "Eng" by "Speed+" or "Speed-".
Program mode: total 14 kinds
Manual mode
Target mode 3 kinds: time mode, distance mode, calories mode
Preset mode 5 kinds: P1-P5
User mode 2 kinds: U1 and U2
HRC mode 3 kinds:
HR1 (HEALTH) Target heart rate pulse 60%~70% of max. heart rate pulse
HR2 (FITNESS) Target hear t rate pulse 70%~80% of max. heart rate pulse
HR3 (ADVANCED) Target heart rate pulse 80%~85% of max. heart rate pulse
Manual mode
1. Plug into a surge protector outlet. Reset the "CE Switch" (Yellow pan)
2. Stand on the treadmill and straddle belt. Attach "CE Switch" clip to your clothes.
3. Press POWER button. There will be an eight (3) second delay after pressing the
POWER button before data can be entered.
4. Press START button. Belt will begin to move after 5 seconds. Step on belt slowly
after the belt starts moving. Speed or incline can be adjusted by using the
appropriate + (increase) or - (decrease) button.
5. To end your workout, press STOP button. Belt will gradually slow down to zero.
Page 21

─ 21 ─
Console Panel Functions
Time goal
Program allows user to set desired TIME of workout. Once the desired TIME is
accomplished, the treadmill will enter Cool Down.
1. Press PROGRAM UP button or PROGRAM DOWN button until P2 is selected.
Press PROG/ENTER. The Time window will then blink. Use the SPEED + or - arrows
to select your workout time.
2. To start your workout, press the START.
Distance goal
Program will allow user to set desired DISTANCE for workout. Distance will count
up to desired Distance. Once the desired DISTANCE is accomplished, the treadmill
will enter Cool Down.
1. Press PROGRAM UP button or PROGRAM DOWN button until P3 is selected.
Press ENTER. The Distance window will then blink Use the SPEED + or - to select
your workout distance.
2. To start your workout, press the START button.
Calories goal
Program allows user to set desired CALORIES of workout. Once the desired
CALORIES is accomplished, the treadmill will enter Cool Down.
1. Press PROGRAM UP button or PROGRAM DOWN button until P4 is selected.
Press ENTER. The Calories window will then blink Use the SPEED + or - arrows to
select your workout CALORIES.
2. To start your workout, press the START button.
Preset Program
These are five pre-set programs with predefined values.
1. Press PROGRAM UP or PROGRAM DOWN until desired program is selected.
2. The Time window will then blink Use the SPEED + or - arrows or toggles to select
your workout TIME. Press ENTER.
3. The Speed window will now then blink Use the SPEED + or - arrows or toggles
to select the speed for your workout.
4. To start your workout, press the START button.
Page 22

P1
P3
P5
P2
P4
─ 22 ─
Console Panel Functions
Custom programs
These are fully customizable programs that will record changes made to Speed
and Incline during use. These changes made to Speed and Incline will be used in
subsequent running of the program.
1. Press PROGRAM UP button or PROGRAM DOWN button until desired program
is selected. Press ENTER. The Time window will then blink if the values of the
program are ready to be set. Once the values have been entered, there will be
no then blink If the program has already been programmed, but you wish to
re-program values, press the Pause key at this time and the Time window will
then blink indicating that the program is ready to be re-programmed.
2. When the Time window becomes then blink use the SPEED + or - to select your
workout time. Press ENTER.
3. The Speed window will now then blink Use the SPEED + or - to select the initial
speed for your workout. Press ENTER.
4. The Incline window will now then blink Use the INCLINE + or - to set your initial
workout incline. Press ENTER.
5. To start the program, press the START button.
SPEED 3 3 3 5 5 6 6 6 6 5 5 5 4 4 3 3
INCLINE 0 1 2 2 2 2 2 2 2 2 1 1 0 0 0 0
SPEED 3 3 3 4 4 5 5 5 6 6 6 6 5 5 4 4
INCLINE 0 1 2 2 4 4 4 4 3 3 3 3 2 1 1 0
SPEED 3 4 5 6 7 8 9 10 10 10 9 8 7 6 5 4
INCLINE 0 1 2 2 2 2 2 2 2 2 1 1 0 0 0 0
SPEED 3 3 4.5 4.5 4.5 4.5 4.5 4.5 4.5 4.5 4.5 4.5 4.5 4.5 3 3
INCLINE 0 0 0 1 2 3 4 5 6 6 5 4 3 2 1 0
SPEED 3 4 5 6 7 6 5 4 5 6 7 8 7 6 5 4
INCLINE 0 0 0 0 0 0 0 0 0 0 0 0 0 0 0 0
P5
P1
P2
P3
P4
Page 23

─ 23 ─
Console Panel Functions
% Target Heart Rate
These programs allow the user to select the percentage of your Maximum Hear t
Rate (See section titled MONITORING YOUR HEART RATE for more information)
that you would like to maintain during your exercise session. HR1 is 65% of
maximum. HR2 is 75% of maximum. HR3 is 85% of maximum. For example, HR1
maintains your Target Heart Rate at 65% of Max HR by automatically adjusting
the incline levels. This will occur in HR2 and HR3 at increasing percentage levels
of maximum heart rate. These programs provide a high intensity, cardiovascular
workout.
Error Messages
ER-01: Check Console PCB to Inverter connection, Communication trouble
ER-02: Check incline system
ER-03: Check safe-key
ER-04: Check inverter and motor system
ER-05: Check supply power
ER-06: Check lubrication system
Troubleshooting
When show "ER-01"
1. Check CE switch
2. Check CE switch to Inverter cable
3. Check Inver ter power
When show "ER-03"
1. Check safe-key
2. Check safe-key to Console PCB cable
When show "ER-04"
1. Check Motor
2. Check Inver ter
When show "ER-05"
1. Check supply power
2. Check Inver ter
When show "ER-06"
1 Check Motor
2 Check lubrication
3 Check Inverter
Page 24

Electrical Connection
─ 24 ─
Page 25

─ 25 ─
Belt Adjustment and Maintenance
A B
1. Belt Adjustment:
Belt adjustment and tension per forms two functions:
*The distance between belt and motor cover from left to right within +/-5MM,
then needed to be adjusted.
*Adjust belt by speed not more than 4KMH.
A. Walking Belt is shifting to the right:
Using hex key provided, turn the right rear roller adjustment bolt turn in the
clockwise direction shown as below or on the contrary direction.
B. Walking Belt is shifting to the right:
Using hex key provided, turn the right rear roller adjustment bolt turn in the
clockwise direction shown as below or on the contrary direction.
Walking belt is Slipping during use:
Slight walking belt slipping is on normal
while using for a period Using the hex key
provided, turn both left and right rear roller
adjustment bolts in the same distance.
See the correct walking belt shown as below:
A. The distance between walking belt and board is within
15-20mm----Normal
Over 20mm----needed to be adjustded
Under 15mm----needed to be adjustded
Page 26

─ 26 ─
Belt Adjustment and Maintenance
B. The speed for walking belt is 5KMH, hold on the handrail, stand on the side
rail, one foot on the belt but without slipping----it's normal.
2. CLEANING:
Routine cleaning of your unit will extend extend the life of your unit.
Warning! To prevent electrical shock, be sure the power to the treadmill is OFF
and the unit is unplugged form the wall electrical outlet before attempting any
cleaning or mainteance.
After Each Workout: Wipe off the console and other treadmill surfaces with a
clean, water dampened soft cloth to remove excess perspiration. After each
workout.
3. LUBRICATION:
It is recommended that the walking board be checked peridically (around 3
months) for lubrication to ensure optimal treadmill performance.
Using hex lift the belt and insert the silicone about 20 gram to spray smoothly
(adjust belt without slipping after lubrication).
Page 27

 Loading...