

Implen NanoPhotometer NP80, NanoPhotometer N60, NanoPhotometer C40, NanoPhotometer N50 User Manual

NanoPhotometer® NP80/N60/N50/C40
User Manual
Version 3.1.1
Software Version 3.1.13220

NanoPhotometer® NP80/N60/N50/C40 User Guide Version 3.1.1
Declaration of conformity for the NanoPhotometer® (C40/N50/N60/NP80)
This is to certify that the Implen NanoPhotometer® conforms to the requirements of the
following directives:
2014/35/EU Low Voltage Equipment Safety Directive
2014/30/EU Electromagnetic compatibility (EMC) directive
IEC 60529 Protection class IP20
2011/65/EU Restrictions on the use of certain Hazardous Substances
in Electrical and Electronic Equipment (ROHS)
2012/19/EU EC Directive on Waste Electrical and Electronic Equipment (WEEE)
2003/108/EC & 2008/34/EC. By ensuring this product is disposed of
correctly, you will help prevent potential negative consequences for the
environment and human health, which could otherwise be caused by
inappropriate waste handling of this product.
FCC 47 CFR Part15 §15.107 and §15.109
EN 301 489-1 V1.9.2 Radio and ancillary equipment for portable use (portable equipment); EUT
Operating frequency range: 2.4 – 2.4835 GHz
EN 300 328 V1.8.1 Electromagnetic compatibility and Radio spectrum Matters (ERM);
Wideband transmission systems; Data transmission equipment operating
in the 2,4 GHz ISM band and using wide band modulation techniques;
Harmonized EN covering the essential requirements of article 3.2 of the
R&TTE Directive
EN 301 489-17 V2.2.1 Electromagnetic compatibility and Radio Spectrum Matters (ERM)
IEC 62133 and UN38.3 Battery certification and transport test
Standards to which conformity is declared, where relevant, are as follows:
IEC/EN 61010-1:2012 Safety requirements for electrical equipment for measurement, control,
and laboratory use. General requirements.
EN61326-1:2013 Electromagnetic compatibility- generic emission standard electrical
equipment for measurement, control, and laboratory use.
Signed:
Dr. Thomas Sahiri
Managing Director
Implen GmbH
2

NanoPhotometer® NP80/N60/N50/C40 User Guide Version 3.1.1
Contents
1. NANOPHOTOMETER
NANOPHOTOMETER
NANOPHOTOMETER
NANOPHOTOMETER
NANOPHOTOMETER
NANOPHOTOMETER
®
OVERVIEW .............................................................................................. 8
®
NP80 ................................................................................................................ 9
®
N60 ................................................................................................................. 10
®
N50 ................................................................................................................. 11
®
C40 ................................................................................................................. 12
®
AT A GLANCE ....................................................................... 8
INSTRUMENT REAR PANEL (NP80/N60/N50/C40) .............................................................................. 13
INSTRUMENT BOTTOM VIEW (NP80/N60/N50/C40) ............................................................................ 13
ACCESSORIES ....................................................................................................................... 14
STANDARD ACCESSORIES ................................................................................................................. 14
OPTIONAL ACCESSORIES .................................................................................................................. 14
CONNECTIVITY....................................................................................................................... 18
NANOPHOTOMETER
®
SPECIFICATIONS .................................................................................... 19
2. GETTING STARTED .............................................................................................. 21
SPECTROPHOTOMETER INSTALLATION .................................................................................... 21
SAFETY INFORMATION ...................................................................................................................... 21
UNPACKING AND POSITIONING .......................................................................................................... 22
SOFTWARE INSTALLATION ...................................................................................................... 23
NPOS OVERVIEW ................................ ................................................................ ............................. 23
REQUIREMENTS AND COMPATIBILITY ................................................................................................. 23
INSTALLING SOFTWARE ON COMPUTER ................................ .............................................................. 24
INSTALLING NANOPHOTOMETER
®
APP ON TABLET OR SMARTPHONE .................................................. 25
FIRST STEPS AND CONFIGURATION WIZARD ........................................................................................ 26
PRINTER INSTALLATION .................................................................................................................... 26
3. NANOPHOTOMETER
®
BASICS .............................................................................. 27
APPLICATIONS OVERVIEW ...................................................................................................... 27
ICONS ................................................................................................................................... 29
BUTTONS .............................................................................................................................. 30
SIDE TAB BAR .................................................................................................................................. 31
DATA PROCESSING DIALOGS ................................ ............................................................................. 33
BASIC OPERATION ................................................................ ................................ ................. 36
NANOVOLUME MEASUREMENT BASICS (N50/N60/NP80) ................................................................... 36
CUVETTE MEASUREMENT BASICS (C40/NP80) .................................................................................. 37
SUBMICROLITER CELL MEASUREMENTS BASICS (C40)....................................................................... 39
SAMPLE HANDLING TIPS ................................................................................................................... 40
DATA TRANSFER .............................................................................................................................. 42
3

NanoPhotometer® NP80/N60/N50/C40 User Guide Version 3.1.1
BATTERY OPERATION ............................................................................................................ 43
4. NANOPHOTOMETER
®
APPLICATIONS ................................................................... 44
NUCLEIC ACIDS .................................................................................................................. 44
METHOD OVERVIEW ................................................................................................ .......................... 44
MEASUREMENT PROTOCOL ............................................................................................................... 44
CALCULATIONS ................................................................................................ ................................ 48
PROTEIN UV ...................................................................................................................... 54
METHOD OVERVIEW ................................................................................................ .......................... 54
MEASUREMENT PROTOCOL ............................................................................................................... 56
CALCULATIONS ................................................................................................ ................................ 59
PROTEIN ASSAYS ............................................................................................................... 64
METHOD OVERVIEW ................................................................................................ .......................... 64
MEASUREMENT PROTOCOL ............................................................................................................... 65
CALCULATIONS ................................................................................................ ................................ 69
KINETICS .......................................................................................................................... 69
METHOD OVERVIEW ................................................................................................ .......................... 69
MEASUREMENT PROTOCOL ............................................................................................................... 69
CALCULATIONS ................................................................................................ ................................ 71
OD600 .......................................................................................................................... 71
METHOD OVERVIEW ................................................................................................ .......................... 71
MEASUREMENT PROTOCOL ............................................................................................................... 73
CALCULATIONS ................................................................................................ ................................ 75
MORE APPS ....................................................................................................................... 76
MORE APPS: WAVELENGTH ................................................................................................ 76
METHOD OVERVIEW ................................................................................................ .......................... 76
MEASUREMENT PROTOCOL ............................................................................................................... 76
CALCULATIONS ................................................................................................ ................................ 79
MORE APPS: WAVESCAN ................................................................................................... 79
METHOD OVERVIEW ................................................................................................ .......................... 79
MEASUREMENT PROTOCOL ............................................................................................................... 79
CALCULATIONS ................................................................................................ ................................ 82
MORE APPS: ABSORBANCE RATIO ..................................................................................... 82
METHOD OVERVIEW ................................................................................................ .......................... 82
MEASUREMENT PROTOCOL ............................................................................................................... 82
CALCULATIONS ................................................................................................ ................................ 85
MORE APPS: CONCENTRATION ........................................................................................... 85
METHOD OVERVIEW ................................................................................................ .......................... 85
MEASUREMENTS PROTOCOL ............................................................................................................. 85
CALCULATIONS ................................................................................................ ................................ 88
4

NanoPhotometer® NP80/N60/N50/C40 User Guide Version 3.1.1
MORE APPS: STANDARD CURVE ........................................................................................ 89
METHOD OVERVIEW ................................................................................................ .......................... 89
MEASUREMENTS PROTOCOL ............................................................................................................. 89
CALCULATIONS ................................................................................................ ................................ 92
CUSTOM APPS ................................................................................................................. 93
STORED RESULTS .............................................................................................................. 93
STORED METHODS ............................................................................................................. 94
5. PREFERENCES .................................................................................................... 95
GENERAL .............................................................................................................................. 95
DATE AND TIME ................................................................................................................................ 95
DISPLAY .......................................................................................................................................... 95
ABOUT ............................................................................................................................................. 96
LANGUAGE ................................................................................................................................ ....... 96
ILLUMINATION SAMPLE WINDOW ....................................................................................................... 97
ENABLE NANOVOLUME ..................................................................................................................... 97
DYES …………………………………………………………………………………………………97
WARNING MESSAGES ............................................................................................................ 98
BLANK CONTROL ............................................................................................................................. 98
SAMPLE QUALITY CONTROL.............................................................................................................. 98
NETWORK ............................................................................................................................. 99
WIFI ………………………………………………………………………………………………..100
NETWORK PRINTER ............................................................................................................. 100
REPORT CONFIGURATION ..................................................................................................... 101
6. TROUBLESHOOTING .......................................................................................... 102
SELF-CALIBRATION TEST ...................................................................................................... 102
MESSAGES ......................................................................................................................... 102
IMPORTANT WARNING MESSAGES: .................................................................................................. 102
IMPORTANT ALERT MESSAGES: ...................................................................................................... 104
SYSTEM FREEZE .................................................................................................................. 105
7. ASSISTANCE ..................................................................................................... 106
SUPPORT ............................................................................................................................ 106
REPORT PROBLEM .............................................................................................................. 106
SOFTWARE MAINTENANCE ................................................................................................... 107
RESET ........................................................................................................................................... 107
SOFTWARE UPDATE ........................................................................................................................ 107
CREATE LOG FILE ................................ ................................................................ .......................... 107
5

NanoPhotometer® NP80/N60/N50/C40 User Guide Version 3.1.1
INSTALL PRINTER DRIVER ............................................................................................................... 108
LEGAL ........................................................................................................................................... 108
TRADEMARKS...................................................................................................................... 108
CONTACT IMPLEN ................................................................................................................ 109
8. MAINTENANCE .................................................................................................. 110
MAINTENANCE FREE TECHNOLOGY ....................................................................................... 110
REPLACEMENT PARTS ......................................................................................................... 110
CLEANING AND GENERAL CARE ........................................................................................... 111
9. WARRANTY....................................................................................................... 111
10. APPENDIX 1- INSTALACE SPEKTROFOTOMETRU ................................................. 112
BEZPEČNOSTNÍ INFORMACE ................................................................................................. 112
VYBALENÍ A UMÍSTĚNÍ .......................................................................................................... 113
11. APPENDIX 2 - INSTALLATIE SPECTROFOTOMETER .............................................. 114
VEILIGHEIDSINFORMATIE ...................................................................................................... 114
UITPAKKEN EN PLAATSEN .................................................................................................... 115
12. APPENDIX 3 - INSTALLATION DU SPECTROPHOTOMÈTRE ..................................... 116
INFORMATIONS DE SÉCURITÉ ................................................................................................ 116
DÉBALLAGE ET POSITIONNEMENT ......................................................................................... 117
13. APPENDIX 4 – INSTALLATION SPECTROPHOTOMETER ......................................... 119
SICHERHEITSINFORMATIONEN ............................................................................................... 119
AUSPACKEN UND PLATZIEREN .............................................................................................. 119
14. APPENDIX 5 – INSTALLAZIONE DELLO SPETTROFOTOMETRO .............................. 121
INFORMAZIONI DI SICUREZZA ................................................................................................. 121
DISIMBALLAGGIO E COLLOCAZIONE ....................................................................................... 122
15. APPENDIX 6 – INSTALACJA SPEKTROFOTOMETRU .............................................. 123
INFORMACJE DOTYCZĄCE BEZPIECZEŃSTWA .......................................................................... 123
ROZPAKOWYWANIE I UMIEJSCOWIENIE .................................................................................. 124
16. APPENDIX 7 – INSTALACIÓN DEL ESPECTROFOTÓMETRO .................................... 126
INFORMACIÓN DE SEGURIDAD ............................................................................................... 126
6

NanoPhotometer® NP80/N60/N50/C40 User Guide Version 3.1.1
DESEMBALAJE E INSTALACIÓN ............................................................................................. 127
17. APPENDIX 8 – SPEKTROFOTOMETERINSTALLATION ............................................ 128
SÄKERHETSINFORMATION .................................................................................................... 128
UPPACKNING OCH PLACERING .............................................................................................. 129
18. APPENDIX 9 – INSTALAÇÃO DE ESPECTROFOTÓMETRO ...................................... 130
INFORMAÇÕES DE SEGURANÇA ............................................................................................ 130
DESEMBALAMENTO E POSICIONAMENTO ............................................................................... 131
19. ALPHABETICAL APPENDIX ................................................................................. 133
7

NanoPhotometer® NP80/N60/N50/C40 User Guide Version 3.1.1
1. NANOPHOTOMETER
NANOPHOTOMETER
The Implen NanoPhotometer® spectrophotometer is a mobile, simple to use UV/Visible instrument
with a CCD array detector with options ranging from nanovolume to standard cuvette and all-in-one
solutions. The N50, N60, and NP80 spectrophotometers measure sample volumes ranging from 0.3 2 µl. The NP80 model also has the capability to measure samples using a standard cuvette. The C40
is a mobile standard cuvette solution with the option to upgrade to accommodate nanovolume
measurements.
The NanoPhotometer® runs on a Linux-based operating system (NPOS) that is designed for the use
of pre-programmed and custom applications with a high degree of flexibility and processing power.
Sample Compression Technology™ provides easy sample handling which is independent of surface
tension. This technology squeezes the sample between two quartz surfaces allowing for unmatched
precision and accuracy without the need for dilutions. Combined with our True Path Technology™ the
system offers lifetime accuracy and precision without the need for maintenance or recalibration.
Note: It is recommended to use a properly calibrated pipette with high-quality tips to ensure delivery
of appropriate sample volumes for nanovolume sample applications.
®
®
AT A GLANCE
OVERVIEW
Sample Control™ is a quality control technology that identifies air bubbles, sample impurities,
turbidity, lint residues and potential contaminations. Sample Control™ monitors handling
characteristics and sample quality in real time to ensure that the measured concentrations are
reproducible and most precise.
Blank Control™ gives a warning message for blanks with high background. High background
absorbance can be caused by a contaminated blank, blank buffer or by residues from previous users.
Insuficient blank readings are the main cause for inaccurate measurements. Blank Control™ will
protect the user from wasting time and precious sample on inaccurate readings caused by high
background blanks or inappropriate cleaning. For more detailed information see also Technical Note
#1 Blank Control™.
8

NanoPhotometer® NP80/N60/N50/C40 User Guide Version 3.1.1
Item Number
Touchscreen
Battery Pack
NP80
-
-
NP80-Touch + -
NP80-Mobile + +
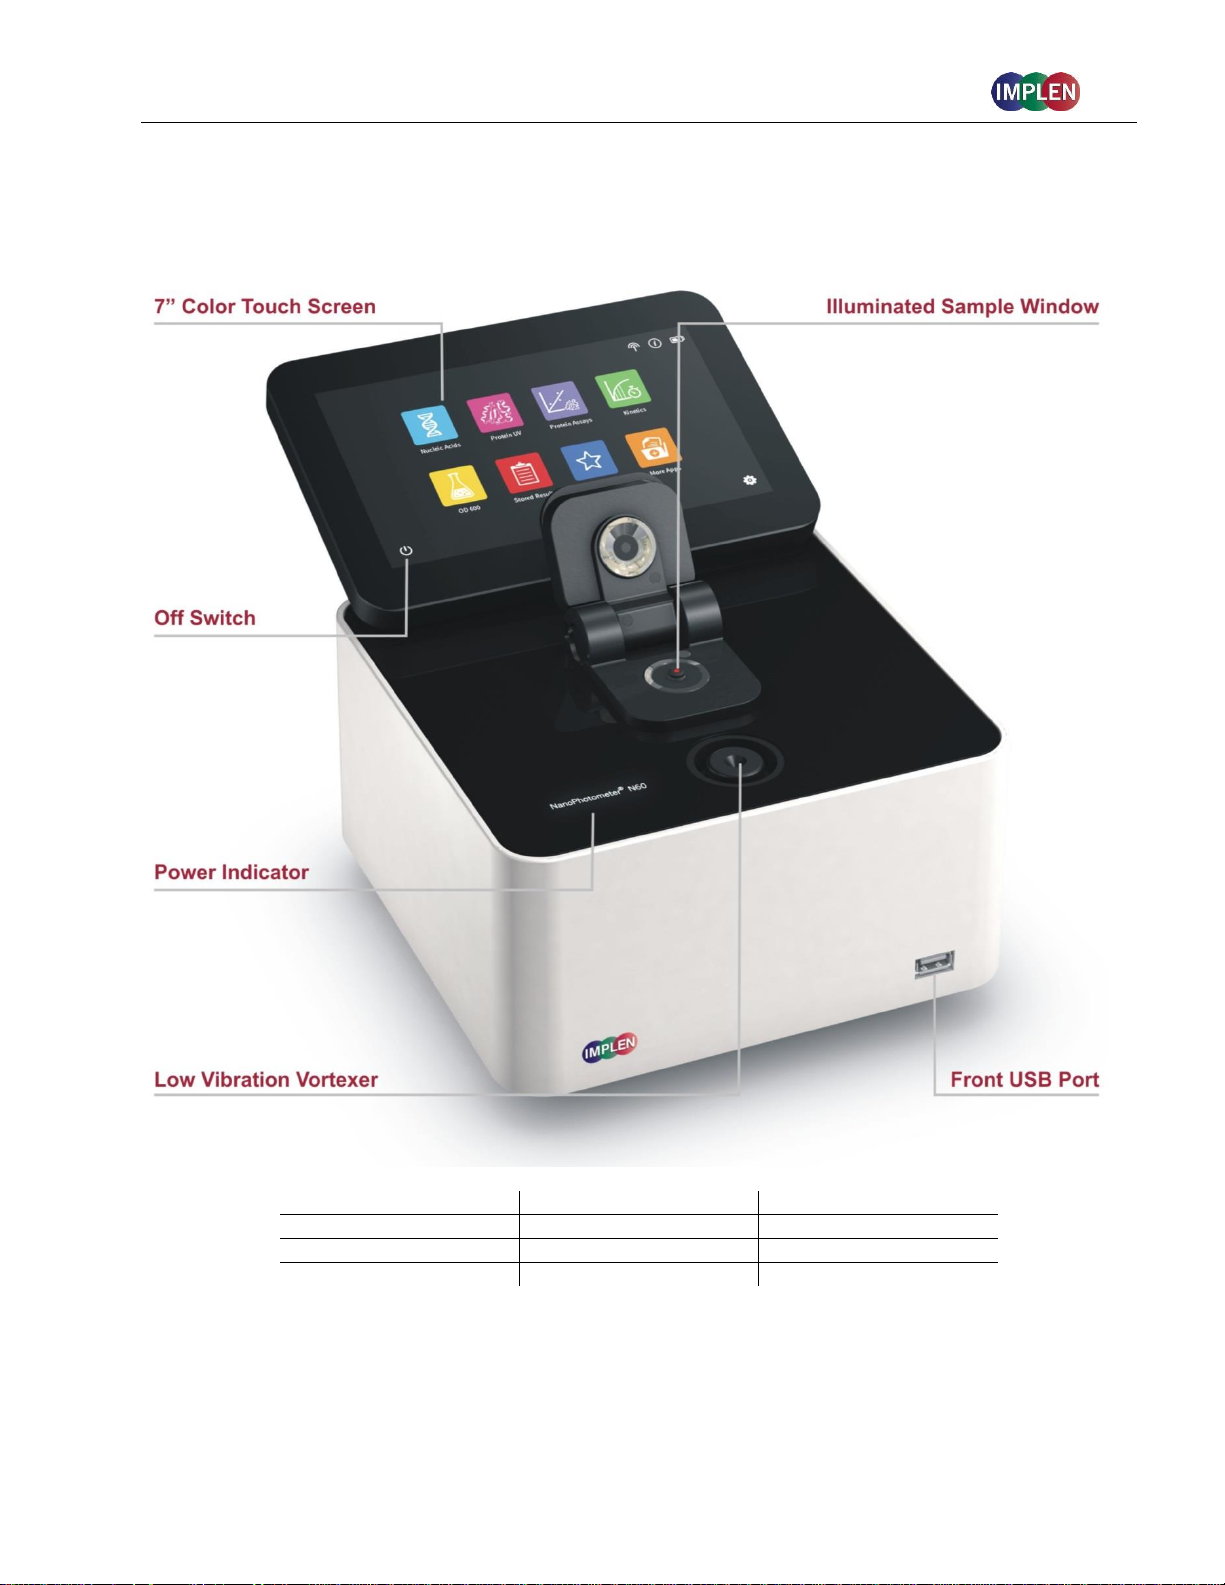
NANOPHOTOMETER
®
NP80
9
NanoPhotometer® NP80/N60/N50/C40 User Guide Version 3.1.1
Item Number
Touchscreen
Battery Pack
N60
-
-
N60-Touch + -
N60-Mobile + +
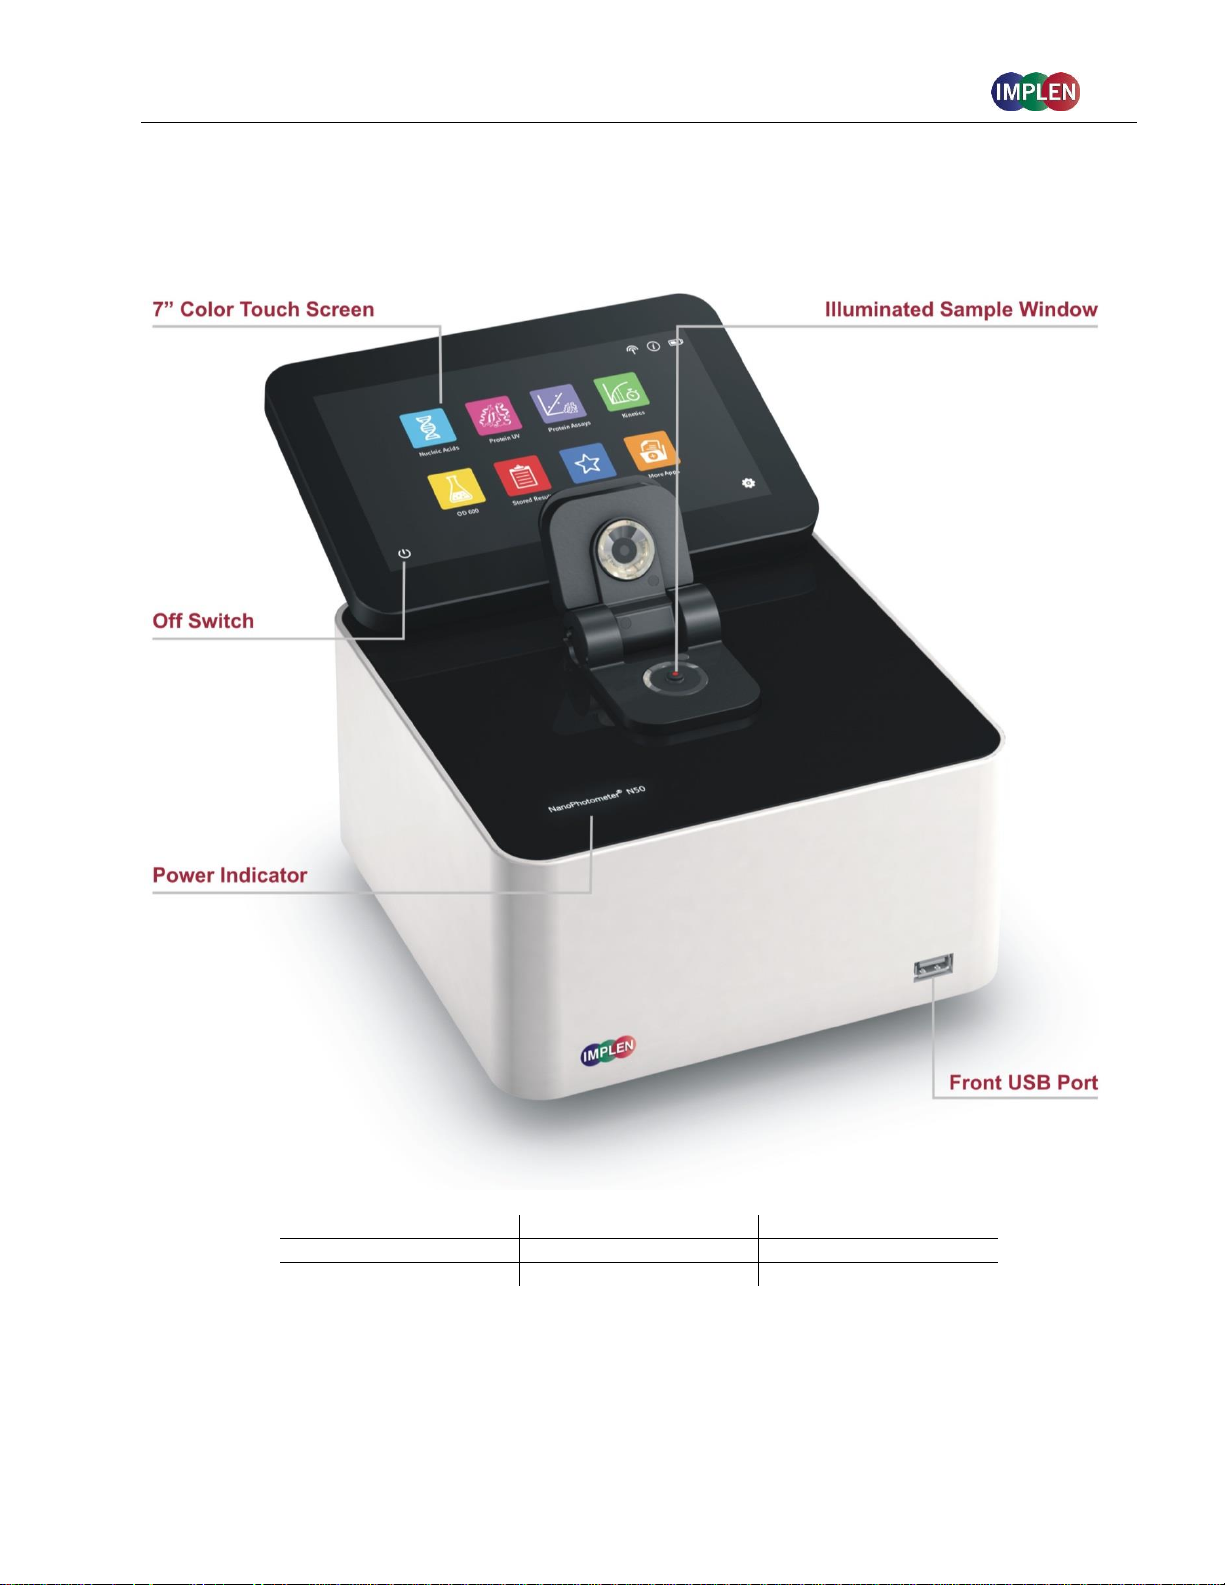
NANOPHOTOMETER
®
N60
10
NanoPhotometer® NP80/N60/N50/C40 User Guide Version 3.1.1
Item Number
Touchscreen
Battery Pack
N50
-
-
N50-Touch + -
NANOPHOTOMETER
®
N50
11
NanoPhotometer® NP80/N60/N50/C40 User Guide Version 3.1.1
Item Number
Touchscreen
Battery Pack
C40
-
-
C40-Touch + -
C40-Mobile + +
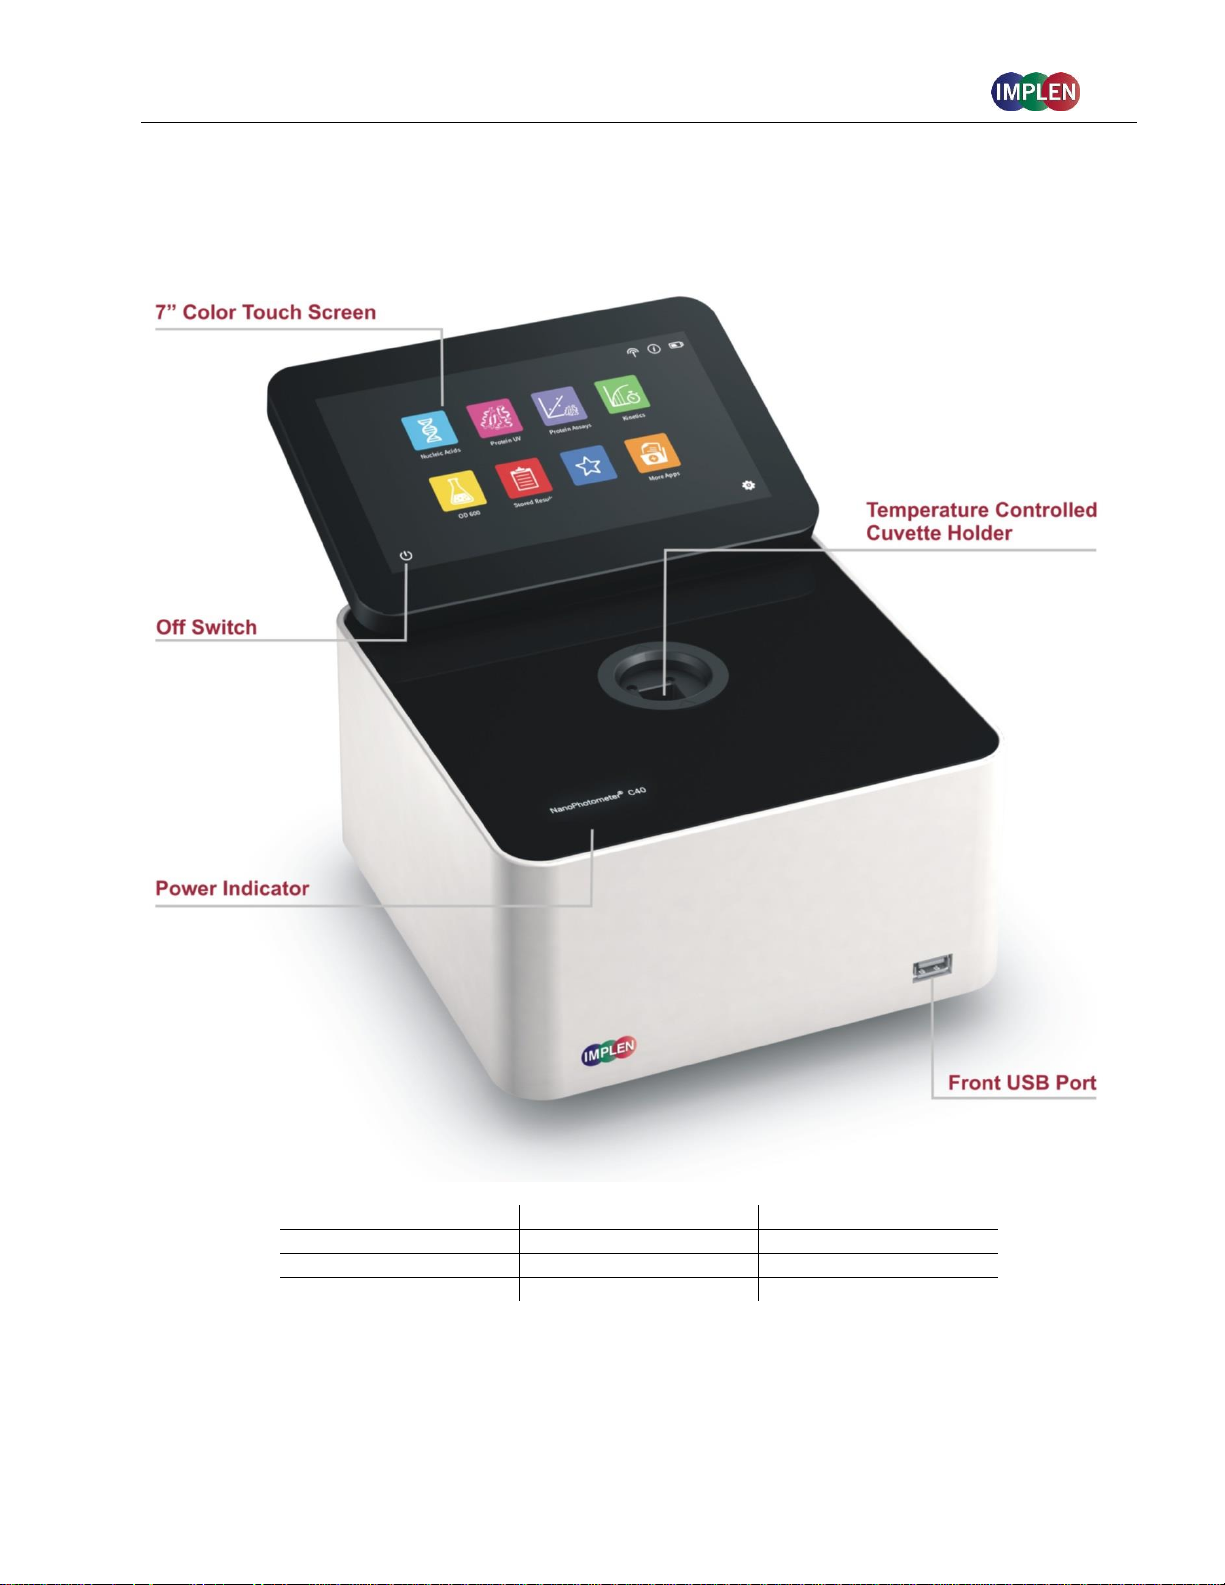
NANOPHOTOMETER
®
C40
12
NanoPhotometer® NP80/N60/N50/C40 User Guide Version 3.1.1
INSTRUMENT REAR PANEL (NP80/N60/N50/C40)
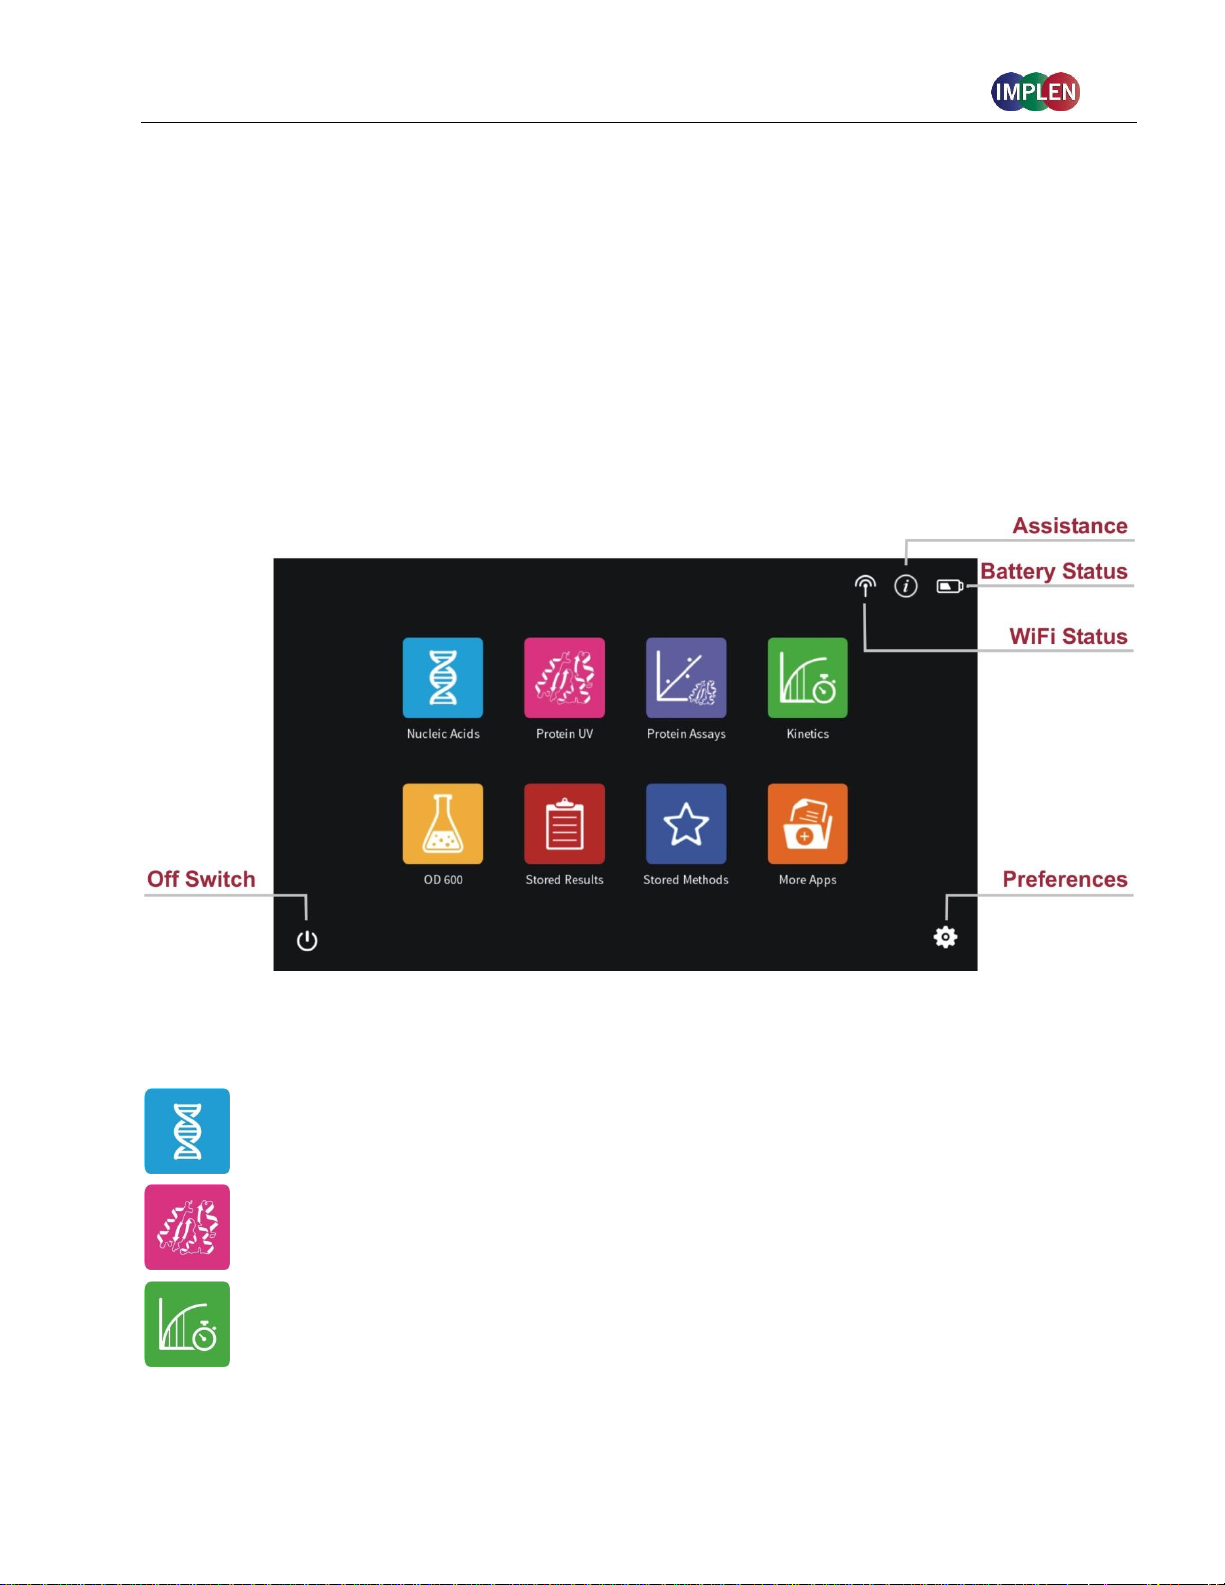
To boot/shut down the NanoPhotometer® click shortly (< 1 second) on the power on/off button.
Note: Long clicks (> 3 seconds) initiate a hard reset. Only activate a hard reset of the unit when
necessary. To avoid excess hard reboots, it is recommended to power down the unit from the
onboard touch screen by clicking on the power button in the bottom left corner.
INSTRUMENT BOTTOM VIEW (NP80/N60/N50/C40)
Model name, device serial number and FCC ID are located on the identification plate on the bottom of
the instrument.
13
NanoPhotometer® NP80/N60/N50/C40 User Guide Version 3.1.1
ACCESSORIES
STANDARD ACCESSORIES
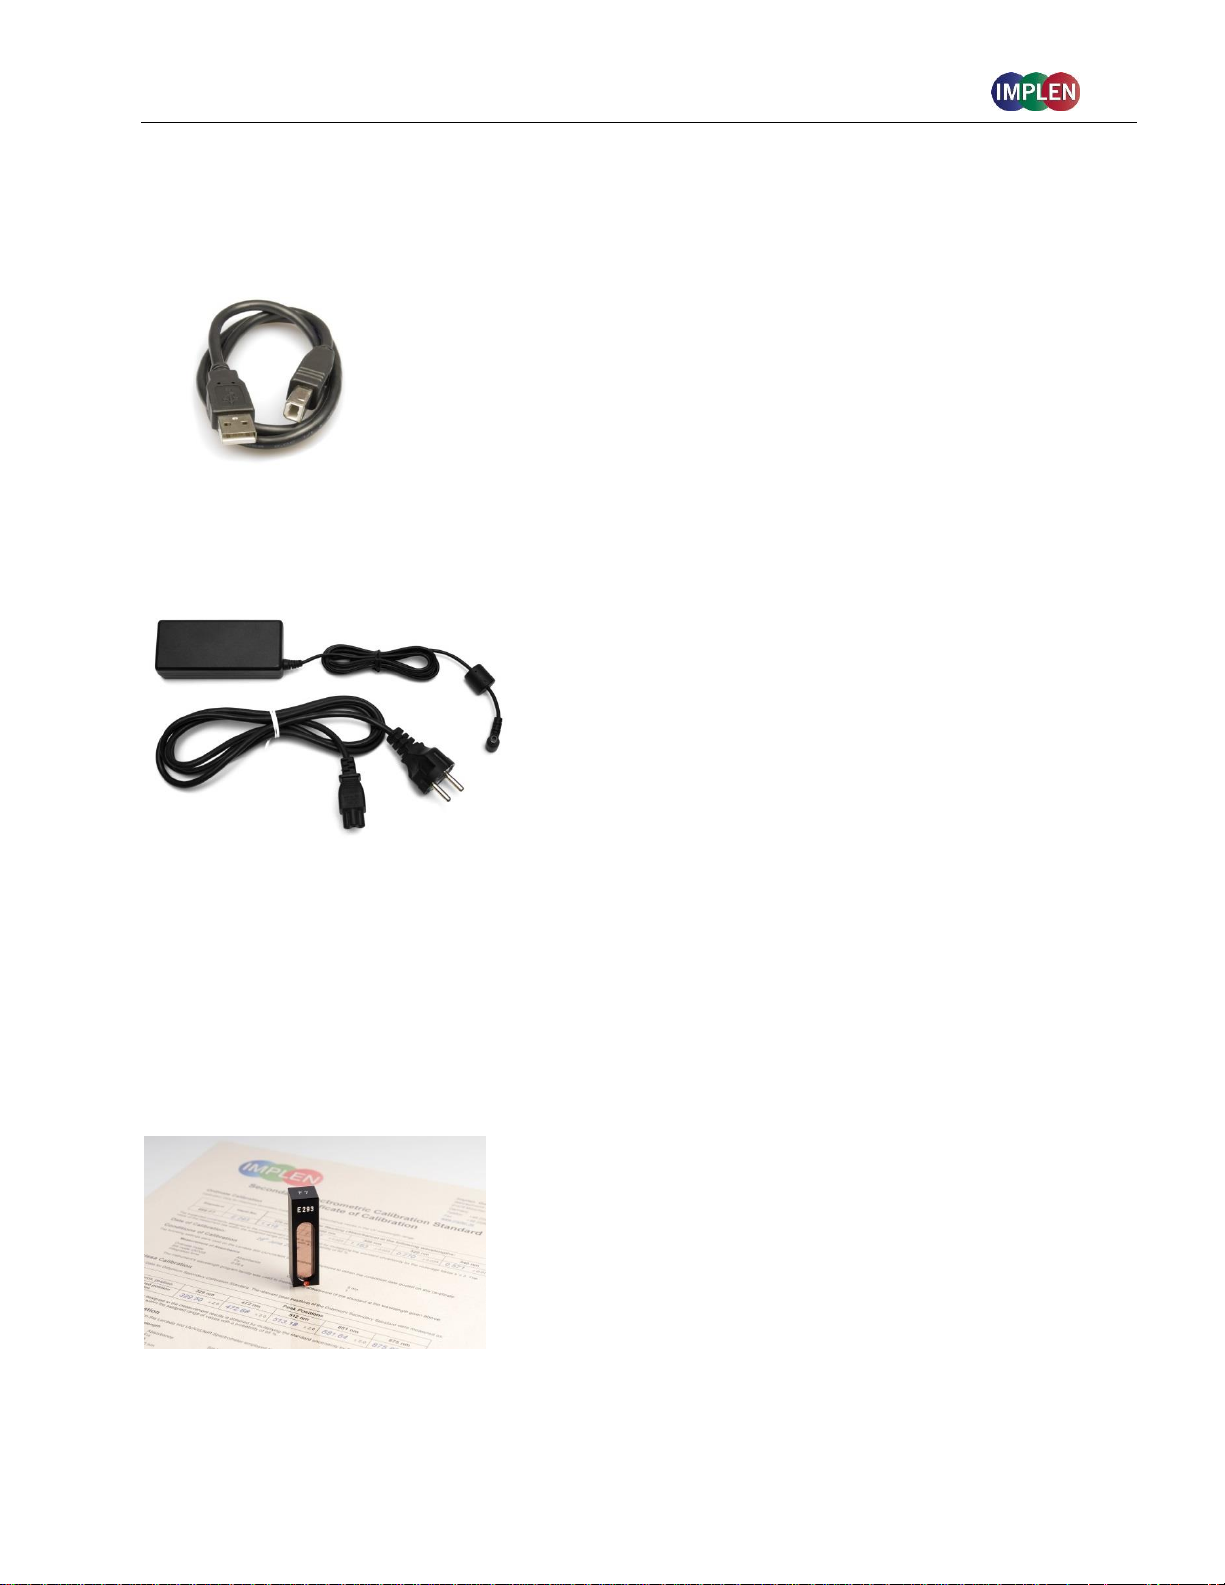
Connecting Cable
USB connecting cable to connect the NanoPhotometer® to a computer to control the
NanoPhotometer® via computer (please see page 23 Software Installation).
NanoPhotometer® Power Adapter
Power adapter for the NanoPhotometer® and for charging the optional built-in battery pack.
Note: Use only the power adapter supplied with your instrument or a replacement part from the
manufacturer or your supplier.
Dust Cover
OPTIONAL ACCESSORIES
Didymium Glass Filter (C40/NP80)
The certified didymium glass filter can be used to verify the
wavelength and photometric accuracy of the NanoPhotometer®
cuvette applications.
14

NanoPhotometer® NP80/N60/N50/C40 User Guide Version 3.1.1
Standard Solution (NP80, N60, N50)
The NanoPhotometer® is recalibration free therefore it is not
necessary to review the photometric accuracy on a regular basis.
If the SOPs of a laboratory require a routine control of the
photometric accuracy standard solutions can be used.
Note: Specifications of the standard solution are guaranteed for at least one year. Please see
expiration date. Once a vail is opened it can be used for 30 minutes.
Note: Please read the Material Safety Data Sheet carefully prior to using this product.
IQ/OQ documentation (NP80, N60, C40)
The NanoPhotometer® IQOQ package consists of a Standard Solution and/or a Didymium Glass
Filter and a corresponding Excel-based software tool depending on the type of instrument. The Excelbased software produces an automated report displaying all relevant data for an audit.
Note: The IQ/OQ documentation is not available for the NanoPhotometer® N50.
Submicroliter Cell (C40 only)
The submicroliter cell provides the option of upgrading the
NanoPhotometer® C40 to a device that handles nanovolume samples as
well as cuvette samples. The sample volume range of the submicroliter
cell ranges from a minimum of 0.3 µl to 5.0 µl with the path length
options including 0.04 mm, 0.1 mm, 0.2 mm, 1 mm and 2 mm which
correspond to virtual dilution factors of 1:250, 1:100, 1:50, 1:10, and 1:5
respectively.
DiluCell (C40/NP80 only)
The DiluCell is a disposable cuvette with shortened path length for virtual
dilution of cuvette-based samples. Due to the reduced path length the
DiluCell provides an automatic dilution without the need of a physical
dilution of higher concentration samples. There are two different sizes of
DiluCells available DC 10 and DC 20 which allow an automatic 1/10 and
1/20 dilution of the sample respectively. Bypassing manual sample
dilutions reduces dilution errors and cross-contamination making DiluCell
ideal for GLP. Combined with small sample volume requirements and
bubble free filling, the DiluCell allows for convenient spectrophotometric
analysis from 340 - 950 nm.
15

NanoPhotometer® NP80/N60/N50/C40 User Guide Version 3.1.1
Field Kit
Implen aluminum roller case for safe transportation, designed to fit in most airplane overhead bins;
special compartments for all necessary accessories, cleaning tools and samples.
Note: Delivered w/o NanoPhotometer® and accessories
Note: Operate the NanoPhotometer® only in the roller case when cover is open. Ensure that air
circulation is possible. Always switch the NanoPhotometer® off for transportation.
Barcode Reader
It is possible to import sample names from 1D and 2D barcodes. Connect a compatible barcode
reader to the USB port of the NanoPhotometer® and click on the sample name input window. After
scanning a barcode the sample name will be shown in the input window. The imported name can
then be edited or replaced completely.
Barcode readers that have been tested and verified compatible:
1D: Honeywell Voyager 95X0 Single-Line Laser Scanner
Datalogic Touch65
1D & 2D: AGPtEK SC36
Honeywell Xenon 1900g
DYMO Label Printer
It is possible to connect a DYMO Label printer to the NanoPhotometer® for direct printing on standard
or cryo labels. Recommended and tested printers are the DYMO LabelWriter 4XL (label size 10.3 x
15.8 cm) and the DYMO LabelWriter 450 (5.4 x 10 cm). Cryo labels can be printed with both DYMO
printers using the following label format: 26 x 12.7 mm and 9.5 mm circle.
Note: After starting the NanoPhotometer, plug in the DYMO printer. The home screen will be shown.
Wait at least for 30 seconds for driver installation.
Cryo labels (26 x 12.7 mm and 9.5 mm circle):
Note: Orientation of cryo labels on carrier foil changed from portrait to landscape. Portrait format was
discontinued by the supplier.
16

NanoPhotometer® NP80/N60/N50/C40 User Guide Version 3.1.1
Printout for DYMO LabelWriter 4XL Printout for DYMO LabelWriter 450
Note: The printouts are optimized for the label size of the DYMO LabelWriter 4XL. All other DYMO
printers can be used. However, the font size will be zoomed to utilized paper size.
17

NanoPhotometer® NP80/N60/N50/C40 User Guide Version 3.1.1
Printer
Printing from the NanoPhotometer® is possible via USB and through network connection.
Network printing should be possible with AirPrint® / IPP compatible printers supporting PDF format.
Note: IPP version 2.2 is required and some printer configuration settings might need to be changed in
order to allow communication with the NanoPhotometer®
The following HP printers have been tested and deemed compatible to print via USB connection:
HP LaserJet 3030
HP LaserJet m1522nf MFP
HP LaserJet 400 color M451nw
Further HP printers are available upon request.
Note: After starting the NanoPhotometer®, plug in the HP printer. The home screen will be shown.
Wait at least for 30 seconds for driver installation.
HP DeskJet 2543
HP DeskJet 1110
CONNECTIVITY
USB A
There is a USB A port on the front as well as the rear panel of the NanoPhotometer® which is
compatible with standard portable USB 2.0 storage devices for direct data transfer in a variety of
formats including Excel. It is also possible to connect a mouse, keyboard, barcode reader, DYMO
printer or HP printer directly to the NanoPhotometer®.
Note: We recommend using FAT/FAT32 formatted 2.0 USB flash drives. Encrypted USB flash drives
are not compatible with the NanoPhotometer®.
Note: Cordless Bluetooth mice are not supported. Use wired mice only.
Note: Connect mouse and keyboard before starting the NanoPhotometer®.
USB B
There is a USB B port located on the rear panel of the instrument which is compatible with the USB
cable provided to connect the NanoPhotometer® to a computer. This USB connection can be used to
control the NanoPhotometer® via computer.
LAN
There is an Ethernet (LAN) connection port on the rear panel of the instrument which enables the
NanoPhotometer® to connect with computers within close proximity. This Ethernet connection can be
used for data transfer from the NanoPhotometer® to a computer or to control the NanoPhotometer®
via a Windows computer. To access the directory of the NanoPhotometer® from a Windows computer
via LAN enter the serial number or IP (\\serial number / \\IP) of the NanoPhotometer® in the WindowsExplorer and confirm with the enter key. For Mac OS X open the "Connect to Server" dialog in the
"Go" menu of the Mac OS X Finder. Enter the instrument serial number or the active
NanoPhotometer® IP address in the server address field to connect.
Note: Plug in the LAN cable before starting the NanoPhotometer®.
Note: The maximum LAN cable length is 10 meters. Bit rate is 1 Gbit/s
18

NanoPhotometer® NP80/N60/N50/C40 User Guide Version 3.1.1
NanoVolume Performance
Detection Range dsDNA
1 ng/µl to 16,500 ng/µl (N50: 5 ng/µl to 7,500 ng/µl)
Detection Range BSA
0.03 mg/ml to 478 mg/ml (N50: 0.15 mg/ml to 217 mg/ml)
Minimum Sample Size
0.3 µl
Photometric Range
(10 mm equivalent)
0.02 - 330 A (N50: 0.1 – 150A)
Path length
0.67 and 0.07 mm
Dilution Factor
15 and 140
Vortexer
2,800 rpm; tube size up to 2.0 ml
Cuvette Performance
Detection Range dsDNA
0.1 ng / µl to 130 ng / µl
Detection Range BSA
0.003 mg / ml to 3.7 mg / ml
Photometric Range
0 - 2.6 A
Center Height (Z-Height)
8.5 mm
Cell Types
outside dimension 12.5 x 12.5 mm
Heating
37°C ± 0.5°C
WiFi
The NanoPhotometer® is equipped with WiFi, which can be used as a WiFi network or as a WiFi
Hotspot. The WiFi network allows data transfer and direct printing via AirPrint® / IPP compatible
printers supporting PDF format.
Note: IPP version 2.2 is required and some printer configuration settings might need to be changed in
order to allow communication with the NanoPhotometer®
The WiFi Hotspot provides the option to control the NanoPhotometer® by other WiFi devices like
Windows computer, smartphones or tablets.
WiFi Hotspot connection details:
SSID: NanoPhotometer® serial number
Password: Implenuser
Note: Due to the limitations of some handheld devices saving to a wireless device is limited to 40
measurements per dataset. Larger datasets can be saved on the NanoPhotometer® itself.
HDMI
There is an HDMI port located on the rear panel of the NanoPhotometer® which is compatible with
HDMI 1.4 cables (or better) to connect the NanoPhotometer® to HDMI compatible monitors.
Note: The maximum HDMI cable length is 5 meters.
NANOPHOTOMETER
®
SPECIFICATIONS
19

NanoPhotometer® NP80/N60/N50/C40 User Guide Version 3.1.1
Optical Specifications
Wavelength Scan Range
200 – 900 nm (N50: 200 - 650 nm)
Time for Full Scan Range
3.5 – 6.0 seconds
Wavelength Reproducibility
± 0.2 nm (N50: ± 1nm)
Wavelength Accuracy
± 0.75 nm (N50: ± 1.5 nm)
Bandwidth
1.8 nm (N50: 5 nm)
Stray Light
< 0.5% at 240 nm using NaI (N50: < 2%) and
< 1% at 280 nm using Acetone (N50: < 2%)
Absorbance Reproducibility
< 0.002 A (0.67 mm path) @ 280 nm
(N50: < 0.004 A (0.67 mm path) @ 280 nm)
Absorbance Accuracy
< 1.75 % @ 0.7 A (0.67 mm path) @ 280 nm of the reading
Zero Stability
±0.003 A/hour after 20 min warm up @ 280 nm
Noise
0.002 A rms at 0 A @ 280 nm; 0.002 A (pk to pk) at 0 A @ 280 nm
Optical Arrangement
1 x 3648 CCD Array (N50: 1 x 1024 CCD Array)
Lamp
Xenon flash lamp
Lifetime
109 flashes, up to 10 years
Processing Power and Compatibility
Operating System
Linux based OS
Onboard Processor
Quad Core 1 GHz
Internal Storage
32 GB
Control Options
Onboard with built-in touchscreen, computer, smartphone,
and tablet
Software Compatibility
Windows 7 (32 and 64 bit), Windows 8 (32 and 64 bit), OS X, iOS
and Android
Min. Requirement
Smartphone/Tablet
4 inch screen; Apple: iPad 2, iPhone 5 and iOS 6;
Android Phone: OS version 4.4; Android Tablet: OS version 5.0,
Quad core 1.2 GHz with 1 GB RAM
General Specifications
Size
200 mm x 200 mm x 140 mm
Weight
3.8 – 5.2 kg depending on configuration
Operating Voltage
90-250 V, 50/60 Hz, 60 W (90 W with battery pack), 18/19 VDC
Display
1024 x 600 pixels; touchscreen glove compatible
Certifications
CE, IEC/EN 61010-1:2012 and EN 61326-1:2013
Battery Pack
optional rechargeable lithium ion battery; 95Wh, 6,6Ah;
Operation time: up to 10 h; min. charging cycles: 800
Battery Certification
IEC 62133 and UN38.3 transport test
In- and Output Ports
2x USB A, USB B, HDMI, Ethernet, WLAN
Additional Data Input
Mouse and keyboard options
Security
Slot for Kensington lock
Features and specifications are subject to change without notice.
US Patents 20080204755 and 20080106742
Windows is a trademark of Microsoft. Mac OS & iOS are trademarks of Apple, Inc. Android OS is a trademark of Google. Linux is a
trademark of Linus Torvalds.
20

NanoPhotometer® NP80/N60/N50/C40 User Guide Version 3.1.1
2. GETTING STARTED
SPECTROPHOTOMETER INSTALLATION
Note: Translations of the Safety Information and Unpacking and Positioning are available in Appendix
1 (Czech), Appendix 2 (Dutch), Appendix 3 (French), Appendix 4 (German), Appendix 5 (Italian),
Appendix 6 (Polish), Appendix 7 (Spanish), Appendix 8 (Swedish) and Appendix 9 (Portuguese)
SAFETY INFORMATION
Before commencing installation, please take time to familiarize yourself with warning labels and
symbols on your instrument and their meaning. These are to inform you where potential danger exists
or particular caution is required. Improper use may cause personal injuries or damage to the
instrument. The instrument must only be operated by appropriately trained and experienced
personnel. Please read the complete user manual prior to use.
direct current
Do not open the instrument as this can expose the operator to electrical power, UV light, and delicate
fiber optics or damage the instrument.
If the submicroliter cell is used with the NanoPhotometer® C40 make sure that the lid is placed on the
measurement head prior to the measurement.
WARNING: UV exposure when measuring without lid.
Do not use damaged power cords, accessories, and other peripherals with your NanoPhotometer®.
Use only the delivered and specified power supply/charger.
Do not expose the NanoPhotometer® to strong magnetic, electrical fields, water, chemicals or any
type of liquid as heavy rain or moisture.
Do not put the instrument into fire, as it may swell or explode (battery). Do not store at or use near
any type of heat source, especially temperatures above 60°C or in an explosive atmosphere.
Do not leave your NanoPhotometer® on your lap or near any part of your body to prevent discomfort
or injury from heat exposure.
Do not place objects on top of the NanoPhotometer®.
The NanoPhotometer® with battery pack (mobile version) has to be switched off during transportation.
The on/off button has to be protected during transportation from turning on itself caused by shock or
vibration.
Biological samples may contain or have the potential to transmit infectious diseases. Be aware of the
health hazard presented by such samples and wear appropriate protective equipment. Handle such
samples with the greatest of care and according to applicable regulatory and organization
requirements before working with such potential infectious materials.
Note: Do not spill any biological samples on instrument components. If spill occurs, disinfect the
21

NanoPhotometer® NP80/N60/N50/C40 User Guide Version 3.1.1
instrument immediately following your laboratory protocols and the cleaning instruction of the
instrument (see page 110 Maintenance).
The symbol on the product, or on the documents accompanying the product, indicates that this
appliance may not be treated as household waste. Instead it shall be handed over to the applicable
collection point for the recycling of electrical and electronic equipment. Disposal must be carried out
in accordance with local environmental regulations for waste disposal.
UNPACKING AND POSITIONING
Note: Translations of the Safety Information and Unpacking and Positioning are available in Appendix
1 (Czech), Appendix 2 (Dutch), Appendix 3 (French), Appendix 4 (German), Appendix 5 (Italian),
Appendix 6 (Polish), Appendix 7 (Spanish), Appendix 8 (Swedish) and Appendix 9 (Portuguese
Check the contents of the package against the delivery note. If any shortages are discovered, inform
your supplier immediately.
Inspect the instrument for any signs of damage caused in transit. If any damage is discovered, inform
your supplier immediately.
Ensure your proposed installation site conforms to the environmental conditions for safe operation:
indoor use or dry environment.
Note: Do not expose your NanoPhotometer® near liquids, chemicals, rain, moisture or dusty
environments.
Temperature range 10-40°C; If the cuvette heating is used the range is 10-30°C.
If the instrument is subjected to extreme temperature changes, it may be necessary to allow the
instrument to equilibrate. Turn the instrument off and then on again once thermal equilibrium has
been established (~2-3 hours).
Maximum relative humidity (non-condensing) of 80% and up to 31°C decreasing linearly to 50% at
40°C.
The instrument must be placed on a stable, level surface that can support 4-5 kg. Ensure that air can
circulate freely around the instrument. Confirm while powered on that no materials reduce air
circulation. Avoid direct sunlight as it may bleach parts of the instrument and can cause damage to
plastic parts.
The equipment should be positioned such that in the event of an emergency the main plug can be
easily located and removed.
Always carry the instrument by holding the main corpus of the instrument and not e.g. on the optional
attached display or NanoVolume pedestal.
The equipment must be connected to power with the 60W power supply/cord supplied by Implen
(90W with battery pack). The power outlet must have a protective conductor (earth/ground). It can be
used on 90-250 V, 50-60 Hz power supply system.
For mobile models please load the battery pack at least for 3 hours prior to the first use.
Turn the instrument on using the power button on the rear panel after it has been plugged in. The
instrument will perform a series of self-diagnostic checks.
Please contact original supplier immediately if technical or sample handling difficulties are
experienced.
22

NanoPhotometer® NP80/N60/N50/C40 User Guide Version 3.1.1
Note: If this equipment is used in a manner not specified or in environmental condition not suitable for
safe operation, the protection provided by the equipment may be impaired and the instrument
warranty voided.
SOFTWARE INSTALLATION
NPOS OVERVIEW
NPOS is a Linux-based operating system designed for the NanoPhotometer®.
NPOS can store data either to a common directory or be configured to save to independent
directories according to file format and/or instrument.
NPOS can save data in an Implen .IDS format, PDF or as an Excel format file.
Note: PDF and Excel files cannot be opened on the NanoPhotometer®. The files need to be
transferred to a computer or device where Excel or a PDF reader is installed.
Note: Please do not connect the instrument to a computer until the NanoPhotometer® NPOS software
is installed on the computer.
REQUIREMENTS AND COMPATIBILITY
The NPOS user interface is designed that all features can be operated by using a touchscreen. If the
software is installed on a computer without touchscreen, the user interface can be operated by using
a keyboard and a mouse. Before starting the installation process ensure the device is compatible with
the requirements for installation.
Compatible Control Devices
Computer:
PC: Windows 7 / Windows 8 (32 bit or 64 bit)
Mac: OS X
Tablets (minimum requirements):
iPad 2: iOS6
Android (quad core 1.2 GHz with 1 GB RAM): Android version 4.4
Smartphones (minimum requirements):
iPhone 5: iOS6
Android (quad core 1.2 GHz with 1 GB RAM): Android version 4.4
Windows is a trademark of Microsoft. Mac OS & iOS are trademarks of Apple. Android OS is a trademark of Google. Linux is a trademark of
Linus Torvalds.
Note: There are two user interfaces of the software available; one for built-in touchscreen, computer
and tablets and one for smartphones.
23
NanoPhotometer® NP80/N60/N50/C40 User Guide Version 3.1.1
INSTALLING SOFTWARE ON COMPUTER
The NanoPhotometer® software can be installed on compatible PC and Mac computer systems.
Various operating systems and PC hardware may cause the set-up procedure to differ from that
described here. This process is given as guidance only; it may need adaptation for other systems.
Note: Do not connect the NanoPhotometer® to the PC/Mac before NPOS installation.
Note: If a previous version of the NPOS software is already installed on the PC, remove the USB
cable and uninstall the NPOS software before installing the new software version.
Note: The Windows and Mac installation file is provided on the Implen USB flash drive which is
included with the NanoPhotometer® at time of delivery. The files are always available for free
download in the download section of the Implen webpage.
NPOS installation for single user on Windows computer
1. First update the firmware of your NanoPhotometer® (NPOS.bin) before starting the update on
your computer.
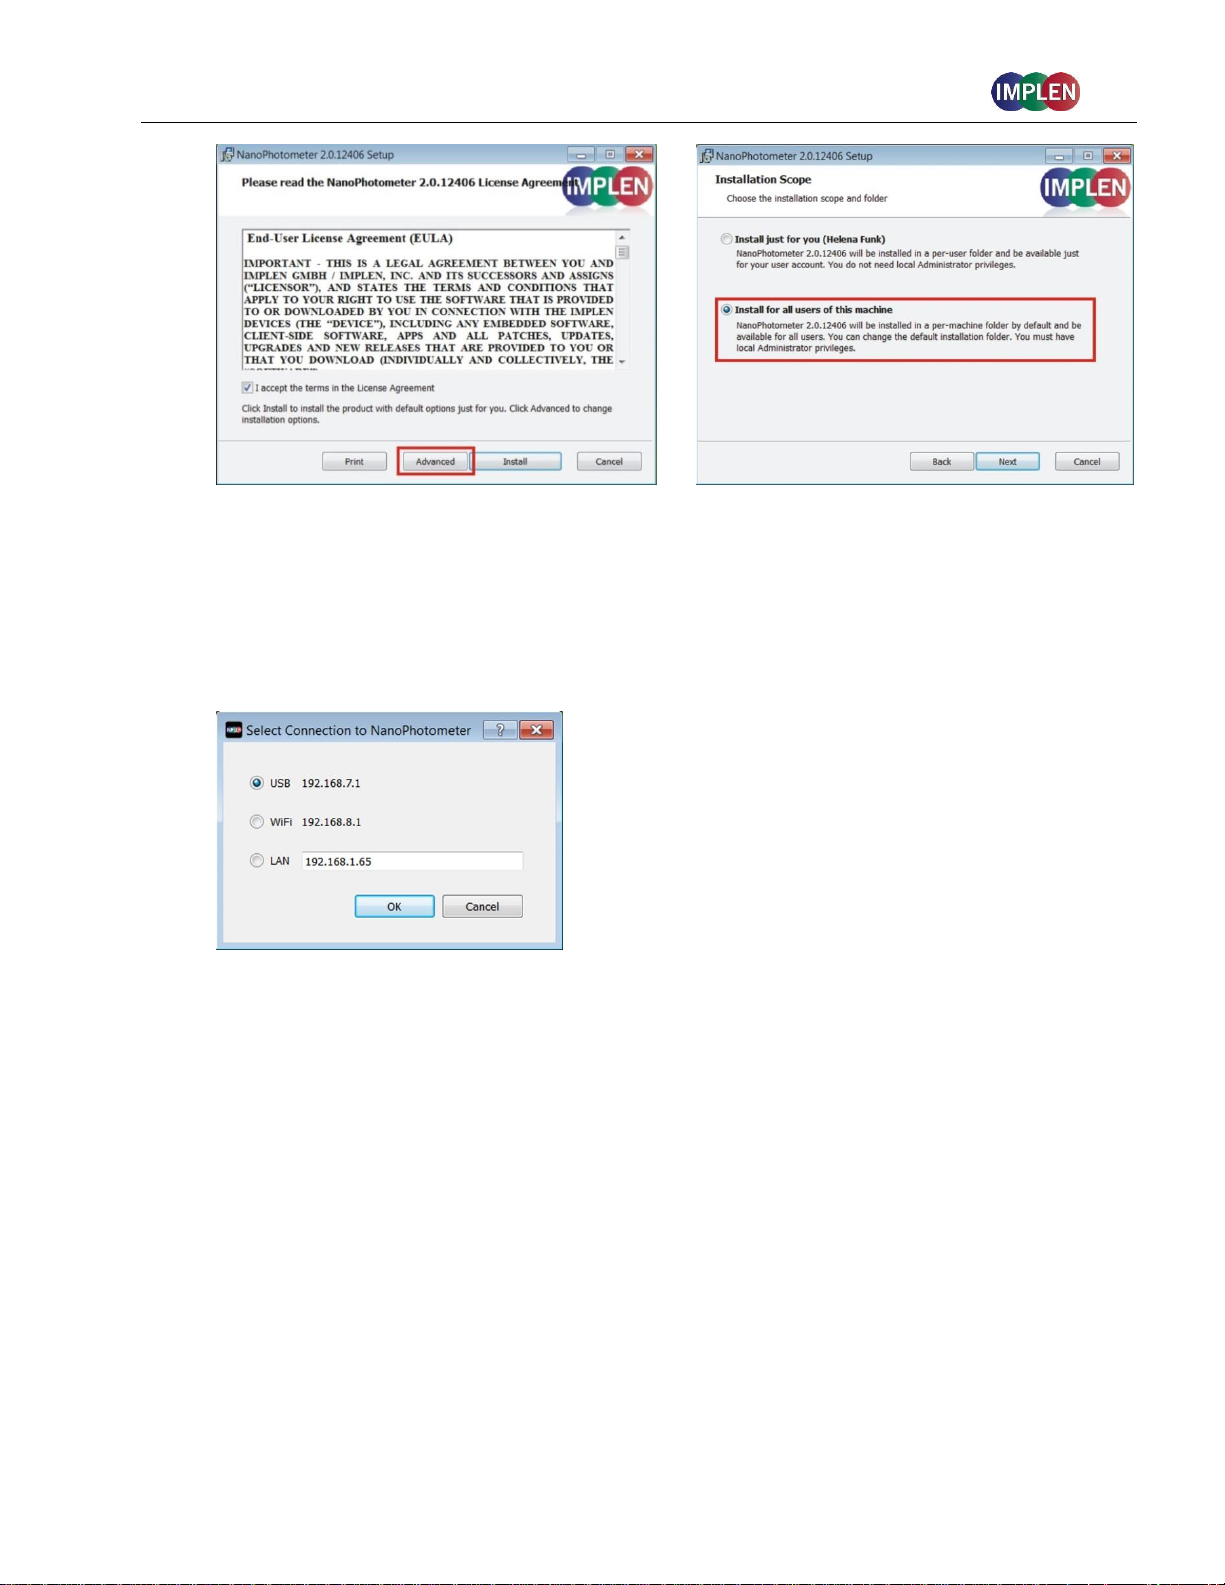
2. Launch the NPOS installation file (NanoPhotometer®.msi) and follow the installation routine.
The installer should be logged in with full administration rights. If you have insufficient
privileges, installation may fail. If in doubt consult your PC administrator.
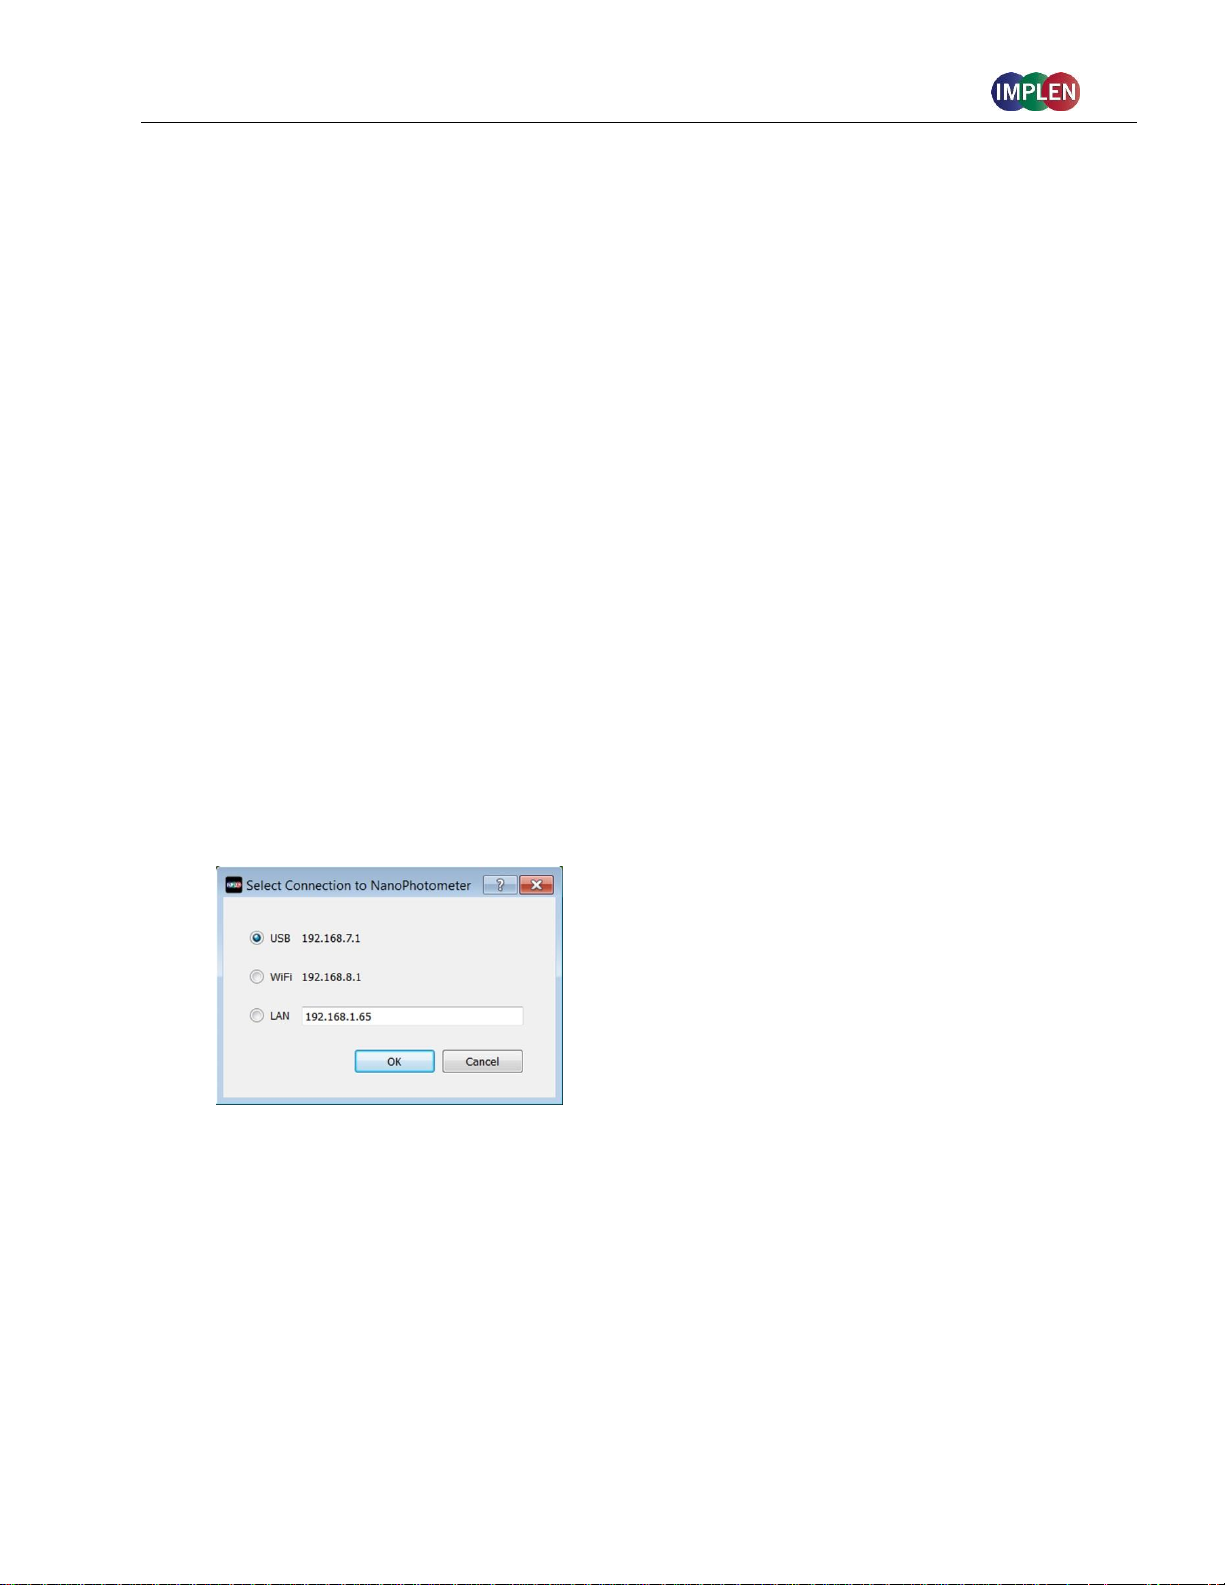
3. Open the NPOS software and choose the preferred connection. For USB, connect the
NanoPhotometer® with the provided USB cable to the PC, for WiFi Hotspot connection ensure
stable WiFi connection between PC and the NanoPhotometer® WiFi Hotspot (SSID: Serial
number, password: Implenuser) and for LAN connect the NanoPhotometer® to the local
network via Ethernet cable or WiFi network.
Note: If there is Avira installed on your computer, it is recommended to switch off the browser
safety. This may interfere with the NPOS running on your computer.
NPOS installation for multi-user on Windows computer
1. Update first the firmware of your NanoPhotometer® (NPOS.bin) before starting the update on
your computer.
2. Launch the NPOS installation file (NanoPhotometer®.msi) and follow the installation routine.
Choose on the License Agreement dialog the option “Advanced” and on the following dialog
“Install for all users of this machine”
24
NanoPhotometer® NP80/N60/N50/C40 User Guide Version 3.1.1
The installer should be logged in with full administration rights. If you have insufficient
privileges, installation may fail. If in doubt consult your PC administrator.
3. Open the NPOS software and choose the preferred connection. For USB, connect the
NanoPhotometer® with the provided USB cable to the PC, for WiFi Hotspot connection ensure
stable WiFi connection between PC and NanoPhotometer® (SSID: Serial number, password:
Implenuser) and for LAN connect the NanoPhotometer® to the local network via Ethernet
cable or WiFi network.
Note: If there is Avira installed on your computer, it is recommended to switch off the browser
safety. This may interfere with the NPOS running on your computer.
INSTALLING NANOPHOTOMETER
The NanoPhotometer® App can be installed as an application on tablets and smartphones with
compatible Android and iOS operating systems. The NanoPhotometer® App is available for free
download in the app store (Apple Store and Google Play Store).
1. Download and install the NanoPhotometer® App from the app store
2. Connect the tablet or smartphone via WiFi Hotspot to the NanoPhotometer®.
SSID: Serial number, password: Implenuser
3. Open the NanoPhotometer® App
4. When connected via WiFi Hotspot the NanoPhotometer® will recognize the tablet/smartphone
as a remote control device and measurements can be initiated from the tablet or smartphone.
5. Results will be shown on the tablet or smartphone once measurements have been taken
®
APP ON TABLET OR SMARTPHONE
25

NanoPhotometer® NP80/N60/N50/C40 User Guide Version 3.1.1
Note: In order to install the NanoPhotometer® App on a tablet or smartphone, the device must have
an established internet connection to access the app store for app download.
Note: The version of the app and the software of the NanoPhotometer® should be the same. Different
versions may have not full functionality.
FIRST STEPS AND CONFIGURATION WIZARD
When starting the Implen NPOS the first time an Implen configuration wizard is shown. Please accept
the End User License Agreement (EULA) and select the country in which the NanoPhotometer® is
used and confirm.
PRINTER INSTALLATION
For NanoPhotometer® with software version 1.1.11147 or higher NO driver installation is necessary.
1. Switch NanoPhotometer® on / home screen
2. Connect DYMO/HP printer via USB cable
3. DYMO/HP printer is ready to use after 30 seconds
For NanoPhotometer® with previous software versions printer driver installation is necessary.
1. Switch NanoPhotometer® on / home screen
2. Update to newest firmware version
Update Process:
a. Copy NPOS.bin to a USB flash drive into the root folder
b. Insert the USB flash drive into your NanoPhotometer®
c. Select: “Assistance / Software Maintenance”
d. Click on “Update”
e. Wait until the NanoPhotometer® reboots
Note: Always update the firmware on the NanoPhotometer® first, then update the client software
(PC/Mac, tablet, smartphone).
3. Go to “Assistance / Software Maintenance”
4. Start driver installation by a click to the “Install Driver for Printers” button
5. Wait until the following message is shown: “Installed driver for printer successfully.”
6. Go to home screen
7. Connect DYMO/HP printer via USB cable
8. Wait for 30 seconds
9. DYMO/HP printer is ready to use
Note: In order to connect a printer to the NanoPhotometer®, please do so from the Home Screen.
Printers will not properly function if USB connection of printer is done from within a method. Always
return to the Home Screen before connecting a printer.
26
NanoPhotometer® NP80/N60/N50/C40 User Guide Version 3.1.1
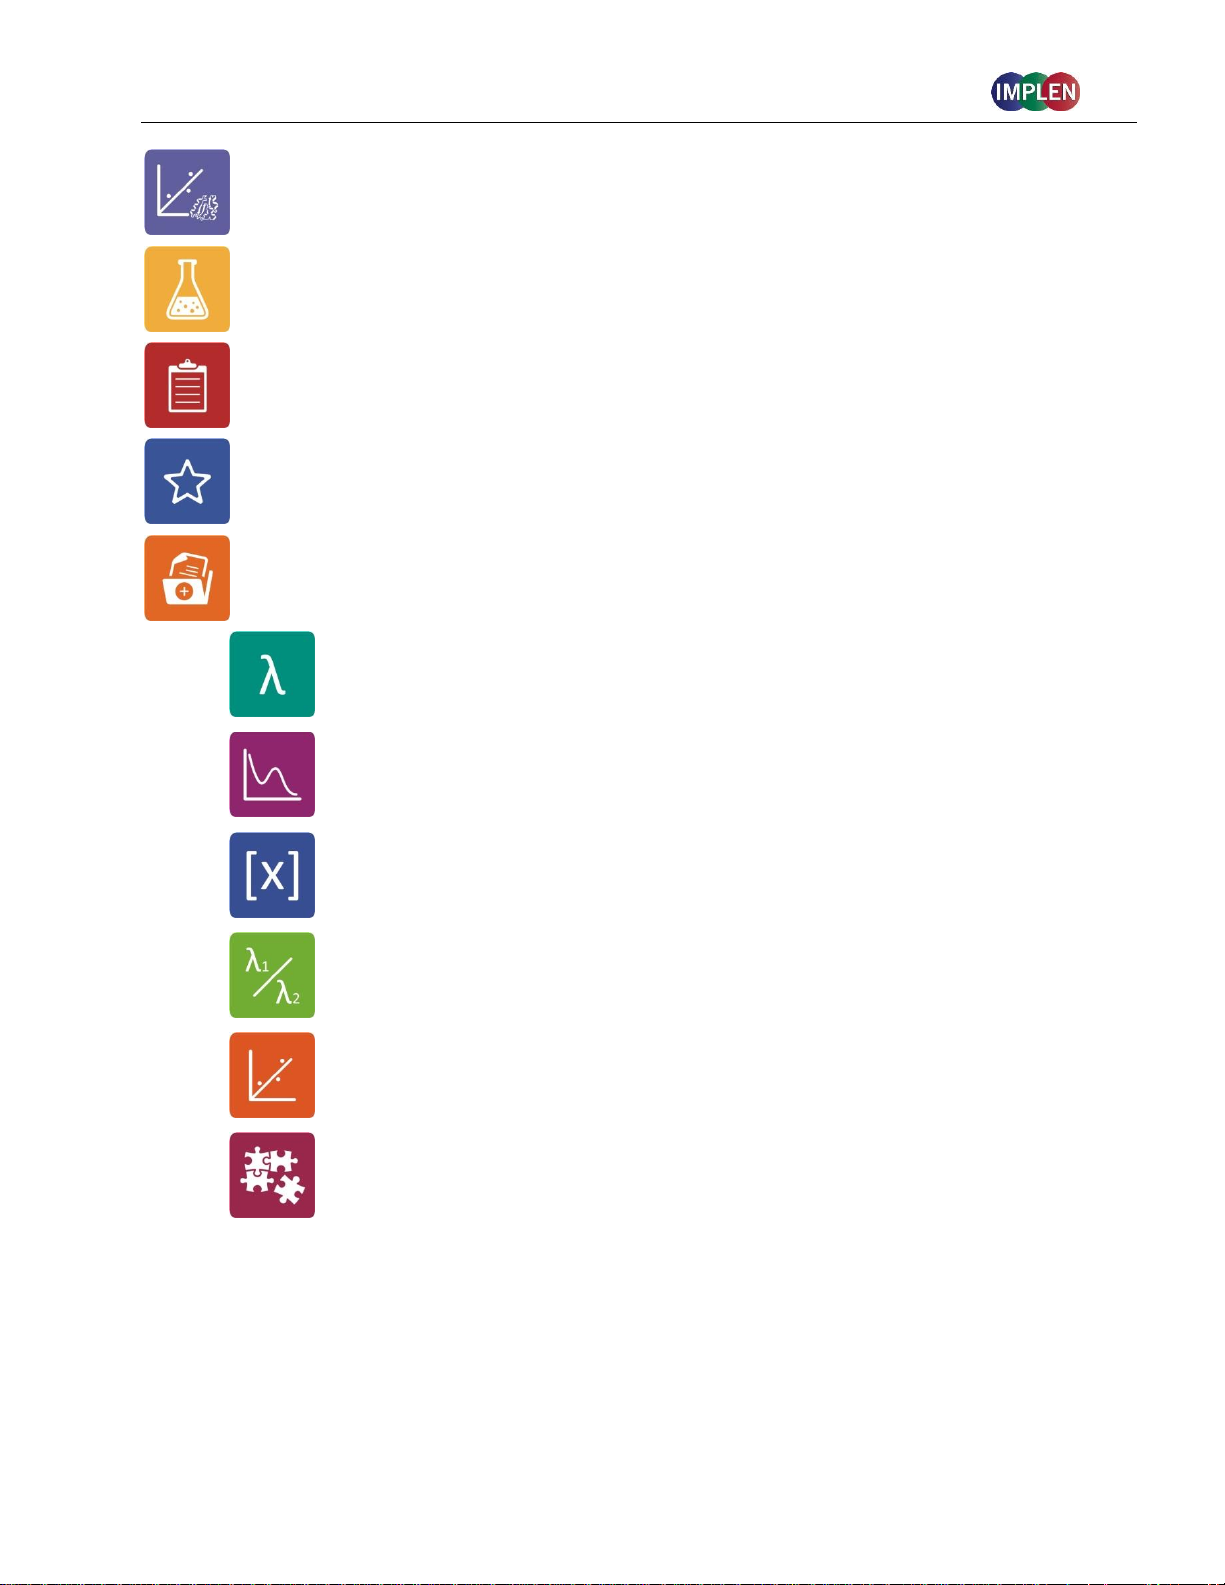
Method Icons
Description
Nucleic Acids
Concentration, purity, and dye incorporation for DNA, RNA,
Oligo, and other nucleic acids
Protein UV
Protein UV determination at 280 nm (or in a range of 200 330 nm), purity and dye incorporation
Kinetics
Time vs. Absorbance readings
3. NANOPHOTOMETER
The NanoPhotometer® product line offers a complete solution for Nanovolume (NP80/N60/N50/C40)
and standard cuvette (C40/NP80) applications. With the NanoPhotometer® NanoVolume applications,
sample volume ranges from a minimum of 0.3 μl to a maximum sample volume of 2.0 µl (5 µl for
using the submicroliter cell/C40). Standard cuvette applications can be performed with 10 mm, 5 mm,
2 mm, 1 mm and 0.5 mm path length quartz, glass, or plastic cuvettes with a center height of 8.5 mm.
®
BASICS
APPLICATIONS OVERVIEW
The NanoPhotometer® comes with pre-programmed applications as well as the ability to create
custom applications. To select a method click/tap on the corresponding icon and the method will open
immediately.
27
NanoPhotometer® NP80/N60/N50/C40 User Guide Version 3.1.1
Protein Assays
BCA (562 nm), Bradford (595 nm), Lowry (750 nm), and Biuret
Assays (546 nm)
OD600
Measures cell density at 600 nm (or in a range of 200 – 900
nm)
Stored Results
Archive of stored results
Stored Methods
Collection of stored custom methods
More Apps
Additional applications found on a secondary method screen
Wavelength
Define one or multiple wavelength between
200 – 900 nm (N50: 200 – 650 nm) for absorbance
measurements
Wavescan
Define desired full scan range anywhere between
200 - 900 nm (N50: 200 - 650 nm)
Concentration
Define extinction coefficient for automatic
concentration calculations
Absorbance/
Ratio
Define two wavelengths absorbance/ ratio calculation
Standard Curve
Create a standard curve at a defined wavelength
Custom Apps
Optional custom applications for personalized
methods tailored to individual spectroscopy needs
28

NanoPhotometer® NP80/N60/N50/C40 User Guide Version 3.1.1
Icon
Name
Action
WiFi Network
WiFi network active; status of WiFi connection
WiFi Hotspot
WiFi hotspot active
Assistance
Opens the assistance page
Battery Status
Shows the actual battery status (only shown with optional battery pack)
Preferences
Opens the preferences page
Home Screen
Returns to the home screen with application icons for method selection.
Leave Method
Returns to the previous application selection
Back
Returns to the previous page (smartphone only)
Next/Confirm
Confirms parameter and opens the next screen (smartphone only)
Delete
Deletes added functions in parameter; empties input windows
Delete Data
Opens a delete dialog pop up
Email Data
Opens an email dialog pop up (computer and tablet versions only)
Save Data
Opens a save dialog pop up
Print Data
Opens a print dialog pop up (only shown when DYMO/HP printer is
successfully installed and connected)
Add Folder
Adds a new folder to the directory
Manage Data
Opens a dialog pop up with several action options including delete, rename
or import folders/files/data as well as copying or move folders/files/data to
defined directories
Store Method
Opens a dialog pop up with the possibility to store the actual method
parameter to a custom method
Full Scale
Restores graph to original size without zoom
Cancel
Returns to the previous screen without implementing any changes
ICONS
29
NanoPhotometer® NP80/N60/N50/C40 User Guide Version 3.1.1
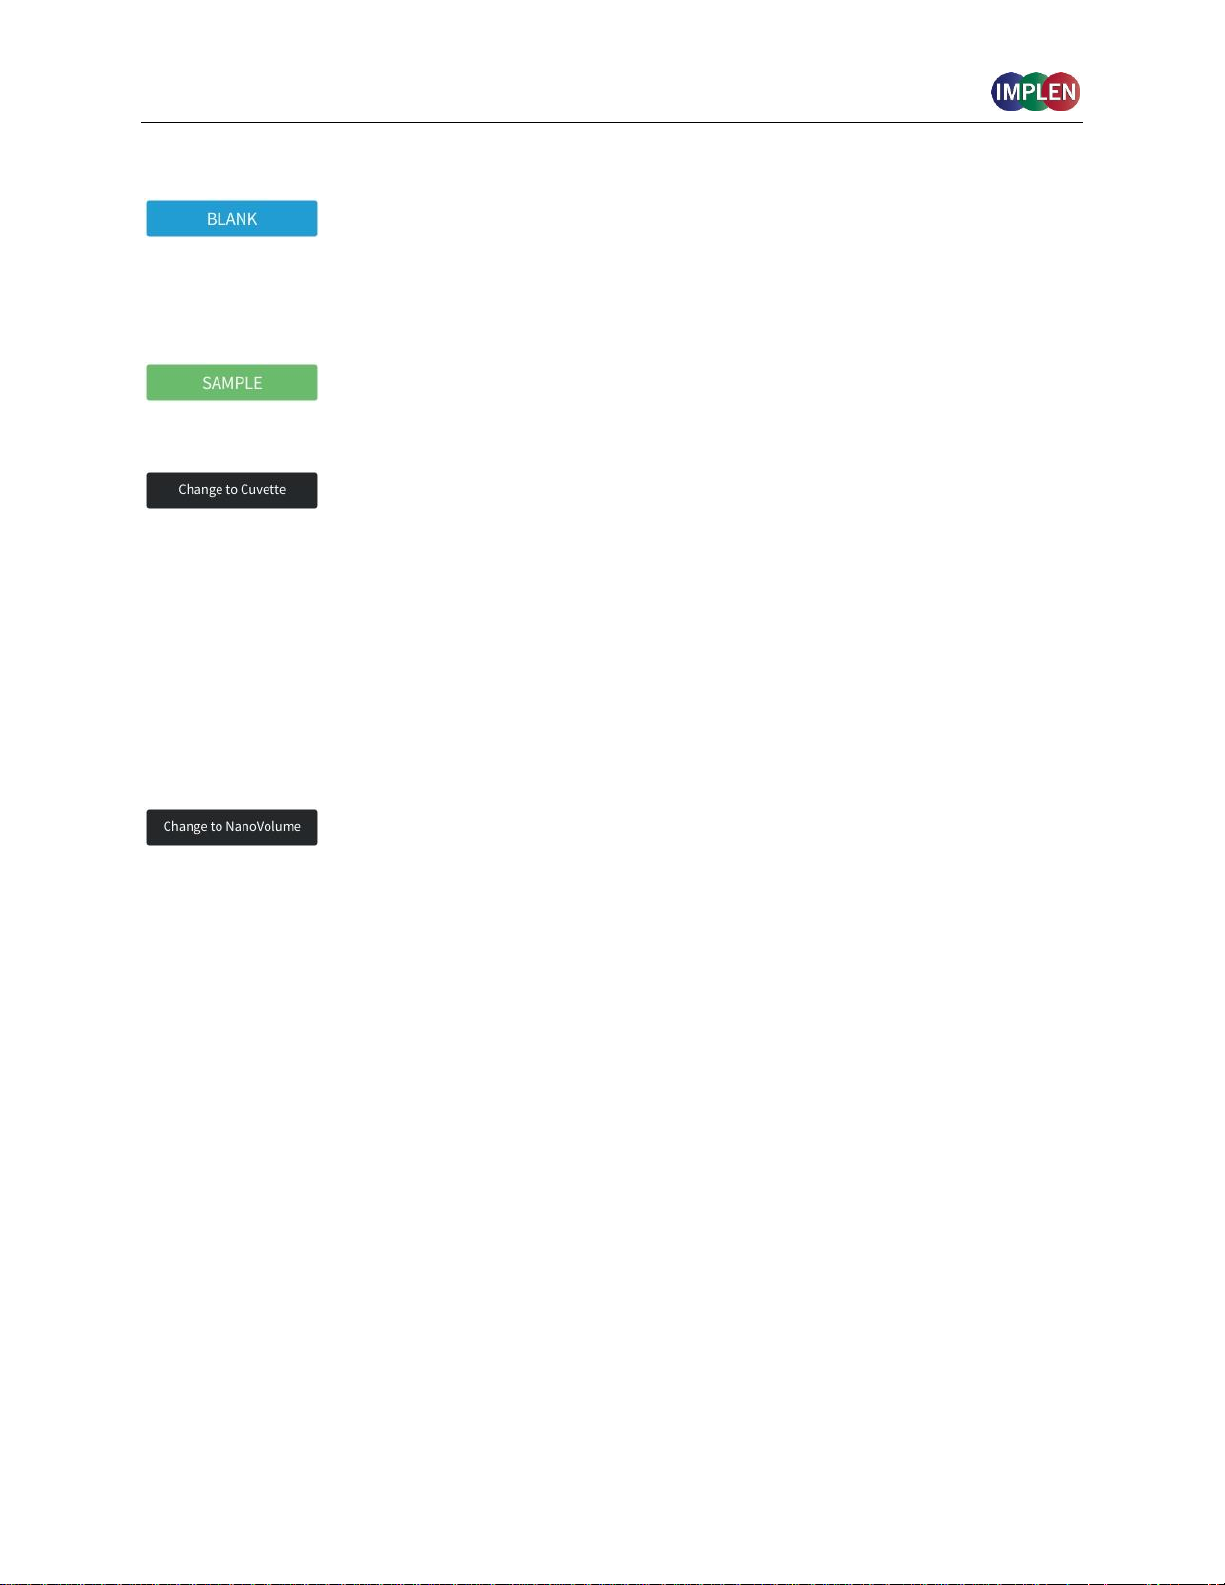
BUTTONS
Prior to any sample measurement at the start of a new method a blank
measurement of either water or the buffer of the samples is required to give
the NanoPhotometer® a reference of what zero should be. It is
recommended to re-apply the blank and measure it as a sample to ensure
the graph of the blank spectra is a flat line.
To initiate the spectral scan of the sample press the sample button. The
data will be temporarily stored until the method is exited; at this time the
user needs to define if the samples should be saved or deleted.
The Change to Cuvette button (NP80) is located at the bottom of the
parameter window. The change to cuvette/nanovolume button toggles
between nanovolume and cuvette applications. Selecting the Change to
Cuvette button activates the cuvette compartment (opens the sliding cover
and switches the red arrow LED on). Only cuvette measurements are
possible when this mode is selected. Selecting the Change to
NanoVolumebutton while the cuvette port is activated will deactivate the
cuvette compartment (closes the sliding cover and switches the LED off)
and only nanovolume measurements are possible.
Note: Please make sure that the nanovolume arm is closed during cuvette measurements.
The Change to NanoVolume button (C40) is only shown when submicroliter
cell applications are enabled in the preferences. The Change to
NanoVolume/Cuvette button toggles between cuvette and submicroliter cell
applications. With the NanoVolume submicroliter cell application the
parameter of each method shows a list for lid selection (Lid 5, 10, 50, 100
and 250). Choose the correct lid and the results are automatically
calculated considering the virtual dilution.
30
 Loading...