

Imperial WH1960BKSS, WH1960B8SS Installation Manual
Wall Pyramid—WHP1900
Wall Mount—WH1900
Installation Instructions
&
Warranty Information
WALL/3.18
425 Apollo Street
Brea, CA 92821
www.imperialhoods.com
(800) 851-4192
DO NOT THROW AWAY,
PROPERTY OF THE HOME OWNER!

Imperial Cal Products, Inc.
Any cosmetic defects must be reported to us prior to installation.
Once this hood is installed, ICP will NOT accept any responsibility
for any cosmetic blemishes, scratches or dents in the Canopy.
Save all original packaging if you wish to return for any reason!
FIRST:
Check your local building and electrical codes.
WARNING:
To reduce the risk of fire or electrical shock, Do Not use any two speed motor units with a Solid
State control devise.
CAUTION:
To reduce the risk of fire or personal injury and to properly exhaust air, be sure to duct air to the
outside. DO NOT vent exhaust air into spaces within wall, attics, ceilings, crawl spaces or
garages. When venting to the outside make duct run as short and straight as possible.
Avoid using elbows if at all possible as this will reduce your performance. Every elbow will
decrease the performance and we will not guarantee the effectiveness of the range hood.
No Performance Warranty when used above BBQ Style Grills.
DO NOT use duct pipe smaller than the outlet duct opening on the hood, this will reduce
performance and void the warranty. DO NOT use flex ducting. Also, use either a Roof Cap or
Wall Cap to end run. Be sure that all joints are taped securely in place. It is essential to have the
proper distance between the bottom of the range hood and the cooking surface below. In most
cases the cooking appliance manufacturers specifications will establish the fire safe minimum
distance required, although there are other factors to consider:
Local Building Codes
Cross directional air movements ie: open windows, air conditioning/heating outlets, cooling
fans, etc.
Overall size of the cooking appliance and surrounding countertop surfaces.
Range hood model selected.
For best performance distance between cooking surface and the bottom of the hood is 30” and
36”. Check local codes and appliance specifications. Keep in mind, increasing the distance will
decrease the performance.
THERMOSTAT: PS or BP Units ONLY. When cooking surface reaches 130 degrees, the unit will
automatically turn ON to the highest setting and won’t be able to be turned off until the area has
cooled down. For safety, it’s best to have unit on while cooking. (This thermostat will NOT prevent
fires. Fires are most often cause by excessive grease build up.)
TWIN UNITS ONLY - Transitioning two pipes into one is NOT recommended. CFMs are reduced
by 25% and the Performance Warranty will be void.
DISCLAIMER
Imperial assumes no liability regarding the improper installation or misapplication of its products. It
is the installer’s responsibility to check for proper installation. Under no circumstances will Imperial
be liable for any labor charged or travel time incurred installation of its products. Damage caused
by improper installation is the installers responsibility and Imperial assumes no liability.
Read Before Starting Installation!
Inspect your range hood prior to installing!
MODELS: MODELS: MODELS:
WHP1936PSSB* WHP1900PSB WHP1900PS1-TWB
WHP1900BP1* WH1900PSB WH1900PS1-TWB
WH1900PSR
CAUTION: Be sure that incoming power is turned off.
1. Position the Wall Canopy on it’s back and remove the filters.
2. Remove the Powered Liner (C2000) assembly from the canopy shell by un
screwing the Four (4) mounting nuts with washers located at each corner
of the insert.
3. Install canopy shell to the wall by securing it to a minimum of two (2)
structural wall studs. Caution; Pre-Punched installation key holes in the rear
of the canopy to be used only if they line up with the exiting wall studs. If
needed, drill additional mounting holes and secure to existing wall studs or
remove the dry wall and install proper backing to match pre-punched
mounting holes.
Note: In the case of the “Rear Vented” series use the two vertical
support pieces on the back side to temporarily attach the canopy to
the wall. Locate the wall studs and using the four small (4) metal
mounting brackets secure the canopy to the wall.
Duct Sizes Indicated in Model # (Ex: WH1948PS-K)
** - 8 = 8” DUCT PIPE
** - K
=10” DUCT PIPE
If not indicated by an 8 or a K, duct pipe is 7” Round.
(Rear Vented) WH1900PS1-TWR (Rear Vented)
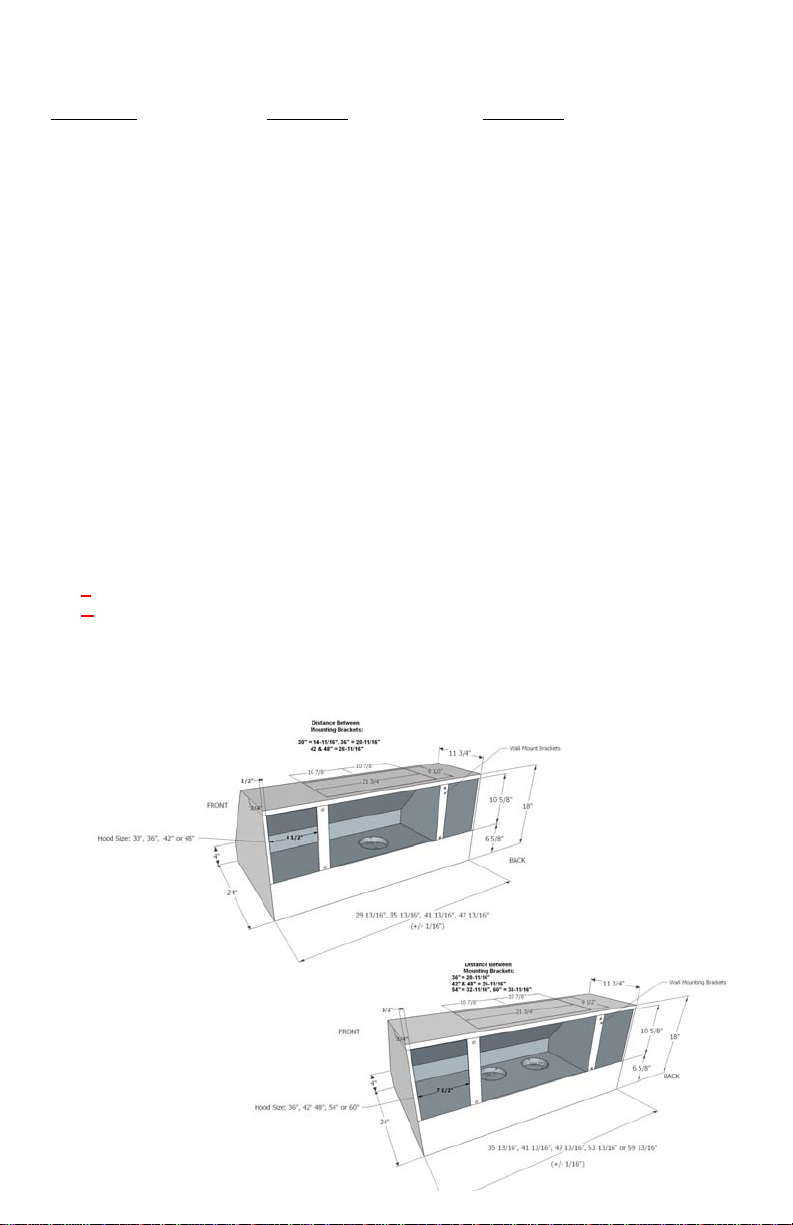
Wall Mount Installation Detail:
Note: Transition or baffle options not available on Rear Vented units. Slim Baffle Filters
Optional.
WH1900PSR
WH1900PS1-TWR

Wall Mount Installation Detail:
4. Bring conduit down and feed through 7/8” hole on
top of the canopy, at least 18” to 24” long. Be sure
that the conduit hangs 4” past the bottom of the
canopy. Remove junction box cover from the
C2000. BP1 does not have C2000, junction box is
on the inside top of unit. (Be sure to comply with all
local electrical and safety codes) Remove Black
Tape that holds the Damper Blades in closed
WH1900PSB
position. *It is NOT recommended to use 2
dampers during installation. You have the
option to put a external damper or use the
existing damper already on the unit.
5. Attach special length of vent pipe to the vent
opening on the C2000 (using Automatic Vent
Collar) to extend through opening in the top of the
WH1900PS1-TWB
canopy.
6. Position the C2000 (with vent pipe in the Collar)
into the canopy, with support bolts through the
holes in the top of the C2000. Secure washers and
nuts on all weld Studs, tighten securely.
7. Hook up electrical wires and secure electrical
cover.
8. Replace filters. For Baffle Filters, in stall grease
WHP1900PSB
tray towards the back of liner. Take one baffle,
slide between steel strips towards the front of the
liner and push back into grease tray grooves, then
slide to one side. Insert second baffle the same
way and slide to opposite side. (Grease holes, on
bottom of baffle must be inserted into grease tray)
Take Center Panel and slide in towards the front of
WHP1900PS1-TWB
the liner and push back into grease tray.
9. Duct Cover - Peel brown tape on brackets located on top of
range hood. Line up duct cover to brackets and press
against brackets. You can caulk back flanges to wall if
you desire, but it’s not necessary.
TWIN UNITS ONLY
Transitioning two pipes into one is NOT recommended. CFMs
are reduced by 25% and the Performance warranty will be void.
Black Tape on Damper
*WHP1936PSSB & WHP1900BP1—Come with Slim Baffle Filters only.
Units are to be hard wired
. It is not recommended to add a power-cord. Adding a
power cord can loosen existing wires inside junction box causing electrical
failure.
BP1 does not have C2000 Liner. Junction box is
on the inside top of unit.
BP1 Includes: 10-1/4”-3-1/2” rectangle to 7” round
transition with adapter piece. If you have
rectangular piping, no need to use transition piece.
WHP1900BP1

Imperial Cal Products, Inc.
To order replace parts or schedule service please call our office at (800) 851-4192
or use our website… www.imperialhoods.com.
PARTS:
When ordering Parts we need the following information:
Model Number (not serial number) found on UL label inside hood.
Exact dimensions (in the case of filters)
You can find the model number on the inside of your hood on our UL label. There will be
a several model numbers listed, your model number should have a colored dot or mark
next to it to indicate the exact model you have.
In the case of Filters, we will need the exact dimensions of the filter needed.
Indicate which side has the pull tabs on it. Filters are not a warranty replacement part.
With care your filters should last many years.
Payment on Parts is handled one of three ways: PrePaid (you send a check prior to our
Shipping), call with credit card information, VISA or MasterCard, COD or Cash if you
decide to “Will Call”. Our Will Call hours are 8:30 to 3:30, Monday through Friday.
SERVICE:
When calling in for Service we need the following information:
Model Number (not serial number)
Proof of Purchase
Name of company you purchased the hood through.
Name & Phone number of the person to contact to set up the service call.
Full address of the location where service is to be done.
Warranty is Seven Years, Parts and Labor.
 Loading...