

Page 1

INSTRUCT29
REV120111 B/MM
General Installation Instructions for Oban Basin Stands
Important Information:
Please check the products for transport damage and that contents are complete
before installation.
Consult a qualified plumber if you have any problems installing this product.
Complaints made following installation regarding the above cannot be accepted.
Page 2
Installation Guide - Introduction
Thank you for purchasing this imperial product. These instructions relate to the following products.
Oban Marble Console
Before you start: Check you have the necessary tools for the installation.
It is advisable to prepare a clear area to assemble the products. Lay a soft
blanket or sheet to protect the metal finish from scratches.
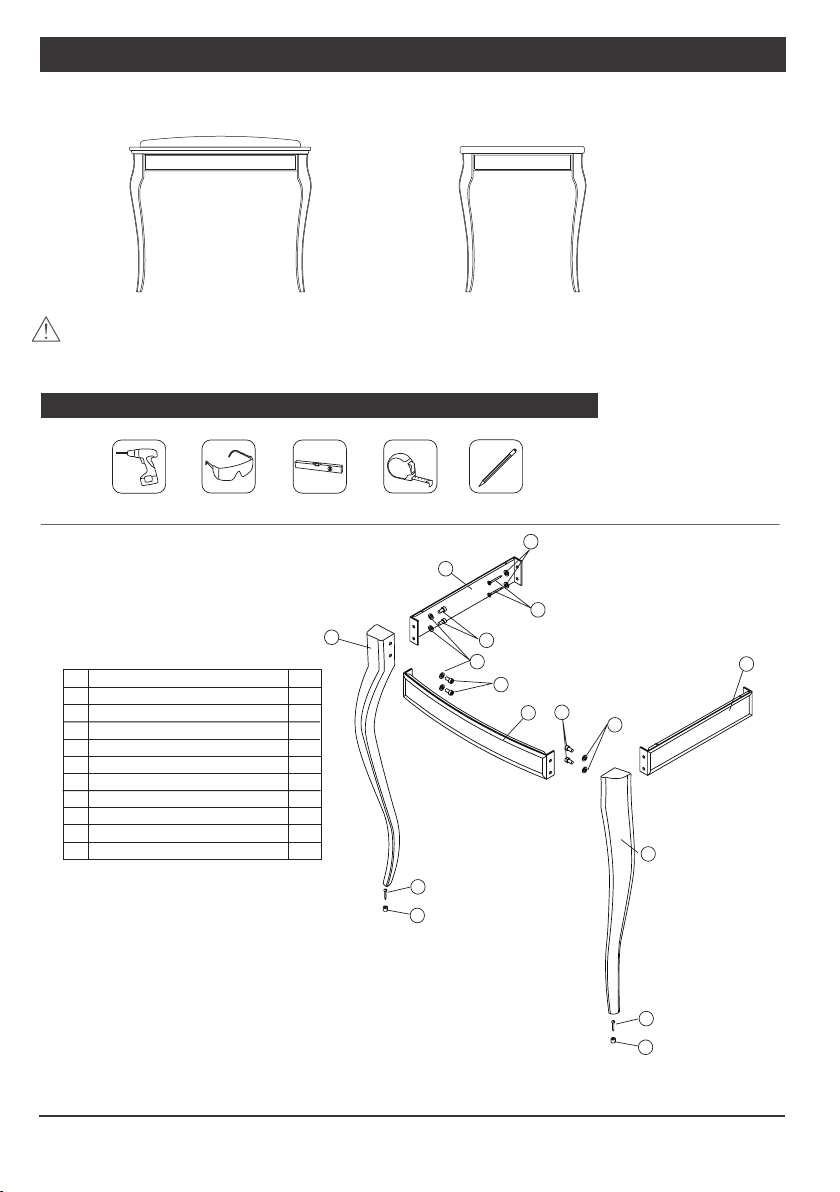
Tools Required
Hand Held Drill Safety Goggles Spirit Level Tape Measure Pencil
h
Assembly Instructions
a
Ref Part Qty
a Left Leg x1
b Right Leg x1
c Front Trim x1
d Side Trim x2
f Wall Screws x4
g Hex Head Screws x8
h Washers x12
i Floor Screw x2
j Floor Peg x2
N/a Hexagonal Key Tool x1
d
g
h
g
C
i
j
f
Oban Basin Stand
g
d
h
b
* Please Note: The illustration shown relates to
the Oban Basin Stand however assembly of the
marble console components are typically the same.
** Towel rail is not available on Troon stands
2 of 4
i
j
Page 3

Assembly Instructions
1: Fix Left Leg (a) to Side Trim (d) using Hex Head Screws (g) and
Washers (h). Ensure that the top surface of the side trim is level with the
top surface of the leg. Repeat this proceedure for the Right Leg.
2: Position Front Trim (c) to the Left Leg (a) and fix into place with Hex
Head Screws (g) and Washers (h).
3: Move the Right Leg (b) into position and fix to the Front Trim (c) with
Hex Head Screws (g) and Washers (h).
4: Position the assembled stand in the required position against the wall
to which it is to be attached.
6: Ensure that the legs are standing fully upright and perpindicualr to the
floor. Also ensure that the side trims are sitting square and true to the wall.
7: Mark the wall where the screw holes will need to be drilled. Mark the
floor around the foot of the unit.
CAUTION: Before carrying out the following steps ensure there is no
hidden pipework or cables in the area that you intend to drill.
Always ensure that you take the necessary safety precautions.
8: Remove the stand from the wall and drill appropriate sized holes for
the insertion of screw plugs. Insert plugs into wall.
9: If necessary drill pilot holes into the floor where the location of the
floor pegs will be.
10: Position the floor pegs carefully and screw them into position.
NOTE: It may be wise at this stage to double check that the holes and
markings for fixing are correct. Ensure that the stand will stand square
and true to the wall and floor.
CAUTION: Affixing the floor pegs is a critical measure in ensuring the
safe and proper installation of this product. This is a health and safety
measure and must be carried out in order to maintain the structural
integrity of the stand.
11: Locate the stand onto the floor pegs and align the holes in the side
trim with the plugs in the wall. Using the screws and washers fix the
stand into position.
NOTE: If you have purchased the Marble Console
version of this stand please omit step 12 and follow
the steps 13 - 15.
3 of 4
Page 4

Assembly Instructions
12: Carefully lower the basin into location and check that the product sits
level. Fine adjustments can be made by rotating the adjustor sections of the
side trims. Once you are fully happy with the fit of the basin on the stand run
a bead of silicon along the back face of the basin and ensure contact with the
wall is made. At this stage please complete the necessary plumbing in of taps
and waste fittings.
13: Position the marble countertop upside down on foam padding (or any
soft protective surface) to protect the marble surface. Secure the anchor into
the pre drilled holes inserting the largest end first into the marble as shown
below. It may be necessary to tap the anchor into the hole using a mallet. If
this is the case do so very carefully taking care not to chip or crack the
marble. It is advisable to use a rubber mallet or use a piece of wood between
the anchor and the mallet to prevent accidental contact with the marble
surface.
14: Apply a continous bead of sealant to the top surface of the basin rim
where it will contact the marble countertop. Carefully position the basin into
location and using the clamps and screws provided secure into position.
Allow the sealant to cure for an adequete amount of time before carefully
turning the marble over and positioning onto the stand.
15: Check that the marble top sits level. Fine adjustments can be made by
rotating the adjustor sections on the side trim sections.
Once you are fully happy with the fit of the marble surface on the stand
complete the necessary plumbing in of taps and waste fittings.
Marble Anchor
Marble
Ceramic
Anchor
Bracket
Screw
Care & Maintainance
Ceramic
The glazed finish of your sanitary ware should be cleaned after use by
applying a little cream type cleaner. Apply using a sponge or damp cloth and
rinse thoroughly with clean water. Cleaners containing abrasive materials
should be avoided.
Metal
Parts with Chrome/Gold finish should be cleaned with a damp soft cloth only.
The use of detergents and abraisive cleaning agents should be avoided as
these will cause damage to the finish of the metal.
Marble
Little maintenance should be necessary other than regular cleaning. This
should be done with clean warm water and a soapless detergent of near
neutral ph. Buff up with clean dry cloth. The use of strong detergents and
abrasives should be avoided as these can damage the natural stone.
4 of 4
 Loading...