

Page 1
WARNING: Improper installation, adjustment,
alteration, service or maintenance can cause property
damage, injury or death. Read the installation,
operating and maintenance instructions thoroughly
before installing or servicing this equipment.
FOR YOUR SAFETY
DO NOT STORE OR USE GASOLINE OR OTHER
FLAMMABLE VAPORS OR LIQUIDS IN THE
VICINITY OF THIS OR ANY OTHER
APPLIANCE.
SHIPPING DAMAGE CLAIM PROCEDURE
The equipment is inspected & crated carefully by skilled personnel before leaving factory. The transportation company
assumes full responsibility for safe delivery upon acceptance of this equipment. If shipment arrives damaged:
1. Visible loss or damage: Note on freight bill or express delivery and have signed by person making delivery.
2. File claim for damages immediately: Regardless of extent of damages.
3. Concealed loss or damage: If damage is noticed after unpacking, notify transportation company immediately and file
“Concealed Damage” claim with them. This should be done within fifteen (15) days from date delivery is made to
you. Retain container for inspection.
OWNERS MANUAL
INSTALLATION, OPERATION, & MAINTENANCE INSTRUCTIONS
®
1128 Sherborn Street ▪ Corona, CA 92879-2089 ▪ (951) 281-1830 ▪ FAX (951) 281-1879
ITGE HEAVY DUTY ELECTRIC GRIDDLES
THERMOSTAT CONTROLLED
PLEASE RETAIN THIS MANUAL FOR FUTURE REFERENCE
IMPORTANT
Electrical wiring from the electric meter, main control box or service outlet to appliance must be
electrically grounded in accordance with local codes, or in the absence of service of local codes, with the National
Electrical Code ANSI/NFPA 70-(latest edition). Canada, conform with Canadian Electrical Code CSA-C22.2.
IMPORTANT
Installing, Operating and Service Personnel:
Installation of the equipment should be performed by qualified, certified, licensed and/or authorized
personnel who are familiar with and experienced in state/local installation codes. Operation of the equipment should
be performed by qualified or authorized personnel who have read this manual and are familiar with the function of
the equipment. Service of the equipment should be performed by qualified personnel who are knowledgeable with
Imperial Ranges.
1
Page 2

KEEP THESE INSTRUCTIONS FOR FUTURE USE
SIDES 6 0
BACK 6 0
LEFT 6 0
GENERAL
Imperial suggests that you thoroughly read this entire manual and carefully follow all of the instructions
provided. Your Imperial unit is produced with high quality workmanship and material. Proper installation, usage
and maintenance of your unit will result in many years of satisfactory performance.
INSTALLATION
Before installing, check the electrical service to make sure it agrees with the specifications on the rating
plate located on rear of unit. If the supply and equipment voltages do not agree, do not proceed with the installation.
Contact your dealer or Imperial Commercial Cooking Equipment immediately.
INSTALLATION CODES AND STANDARDS
Your Imperial range must be installed in accordance with:
In the United States of America:
1. State and local codes
Batterymarch Park, Quincy, MA 02269.
2. NFPA Standard #96 Vapor Removal from Cooking Equipment, (latest edition) available from the National
Fire Protection Association, Batterymarch Park, Quincy, MA 02269.
In Canada:
1. Local code
2. Canadian Electrical Code C22.1 Part 1 (latest edition) available from the Canadian Standard Association,
5060 Spectrum Way, Suite 100, Mississauga, Ontario, Canada, L4W 5N6.
LEG ASSEMBLY
Attach the legs to the body by threading the exposed leg stud into the threaded holes located on the
underside of the unit. Tighten each leg so that the top face of the leg is pressed firmly against the body bottom. Do
not operate griddle without legs or integrated stand as damage will occur.
LEVELING
Position the griddle in the desired location. Level the griddle so the rear is 1/8” to ¼” higher than the front
by using a wrench to turn the adjustable feet. You must hold the leg while turning the foot so that its attachment to
the range is not loosened.
LOCATION
The installation location must be kept free and clear of combustibles. Do not permit air to blow directly at
the griddle. Avoid open windows next to the griddle wherever possible. Avoid wall-type fans which create air
cross-currents within the room.
This griddle is Design Certified for installation on a non-combustible counter with 4” legs or combustible
floor with 25” high stand.
INSTALLATION CLEARANCES
COMBUSTIBLES NONCOMBUSTIBLES
2
Page 3
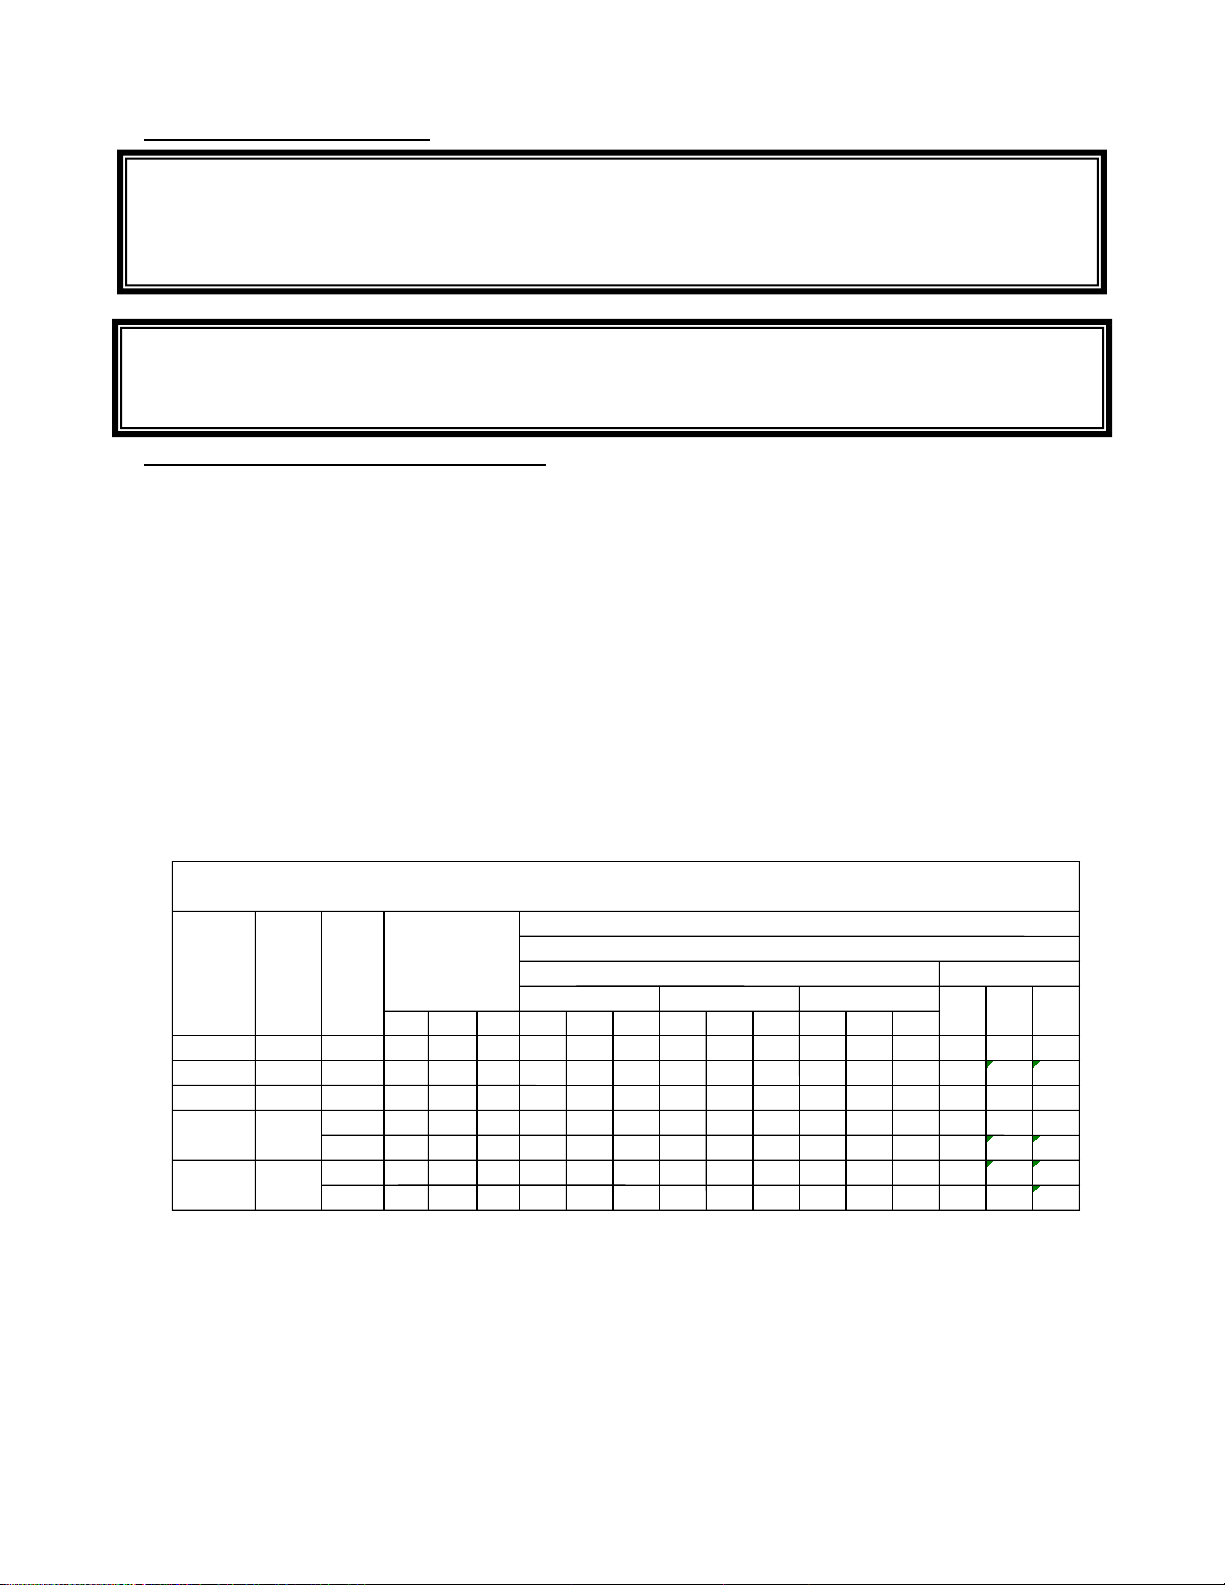
STANDARD VOLTAGES-208 VOLTS OR 240 VOLTS 50/60 Hz-SINGLE OR THREE PHASE
480 VOLTS 50/60 Hz-THREE PHASE ONLY
3 PHASE
TOTAL
TOTAL
LOADING
NOMINAL AMPS PER LINE WIRE CONN.*
MODEL
CONN.
KW
KW PER PHASE
3 PHASE
1 PHASE
NO.
KW
PER
PER CONN.*
208 VOLT
240 VOLT
480 VOLT
208
240
CONN.
X-Y
Y-Z
X-Z X Y Z X Y Z X Y Z VOLT
VOLT
ITG-24-E
8 8 4 0 4
22.2
22.2
22.2
19.3
19.3
19.3
9.63
9.63
9.63
38.5
33.3 ITG-36-E
12
12 4 4 4 33.3
33.3
33.3
28.9
28.9
28.9
14.5
14.5
14.5
57.7
50.0
ITG-48-E
16
16 8 4 4 44.5
44.5
44.5
38.5
38.5
38.5
19.3
19.3
19.3
76.9
66.7
**
ITG-60-E
20 8 4 0 4
22.2
22.2
22.2
19.3
19.3
19.3
9.63
9.63
9.63
38.5
33.3 12 4 4 4 33.3
33.3
33.3
28.9
28.9
28.9
14.5
14.5
14.5
57.7
50.0
*
ITG-72-E
24
12 4 4 4 33.3
33.3
33.3
28.9
28.9
28.9
14.5
14.5
14.5
57.7
50.0
12 4 4 4 33.3
33.3
33.3
28.9
28.9
28.9
14.5
14.5
14.5
57.7
50.0'
WARNING
ELECTRICAL AND GROUNDING CONNECTIONS MUST COMPLY WITH THE APPLICATION
PORTIONS OF THE NATIONAL ELECTRICAL CODE AND / OR OTHER LOCAL ELECTRICAL
CODES.
WARNING
DISCONNECT ELECTRICAL POWER SUPPLY AND PLACE A TAG AT THE DISCONNECT SWITCH
TO INDICATE THAT UNIT IS BEING WORKED ON.
ELECTRICAL CONNECTIONS
STANDARD ELECTRICAL CONNECITONS
1. Remove the small cover plate on the back of the unit. This exposes the built-in junction box and griddle
line leads.
2. Select a suitable knockout on the rear or bottom of the junction box.
3. Connect the griddle’s line leads to the appropriate location on the terminal block as shown in the applicable
wiring diagrams.
4. Push the excess wire into the junction box and replace the cover plate. Never operate griddle without cover
in place.
NOTICE: Do not lift the griddle top too high, as thermostat and unit terminals may be damaged beyond repair.
Since the griddle is not fused, you must connect it to a fused circuit equipped with a suitable disconnecting means as
required by local authorities.
*NOTE: Two separate conduit connections must be made: each connection carries one-half of the rated load.
** NOTE: Two separate conduit connections must be made: each connection carries 8.0 KW, the other connection
carries 12.0 KW.
3
Page 4
OPERATION
WARNING
THE GRIDDLE AND ITS PARTS ARE HOT. BE VERY CAREFUL WHEN OPERATING, CLEANING OR
SERVICING THE RANGE.
WARNING
DISCONNECT POWER SUPPLY AND FOLLOW LOCKOUT/TAGOUT PROCEDURES BEFORE
CLEANING AND SERVICING THE APPLIANCE.
SEASONING THE GRIDDLE:
New griddles should be seasoned following this sequence:
(1) Clean the griddle surface thoroughly with hot, soapy water to remove the protective oil coating wiped
on at the factory.
(2) Rinse with a mixture of ¼ cup vinegar to one quart water.
(3) Spread unsalted solid shortening or liquid frying compound evenly over the entire griddle surface.
(4) Turn all thermostats to 350 degrees and wait until the shortening begins to smoke, then turn the
thermostats “off”.
(5) Rub the now-melted shortening into the griddle surface with burlap, moving in the direction of the
surface’s polish marks and covering the entire surface.
(6) Let the griddle cool, then repeat steps 3,4, & 5.
(7) When the griddle is cool after the second seasoning, wipe it once again with a thin film of shortening
or cooking oil.
CONTROLS:
Each thermostat independently controls a 12” wide griddle section.
USING THE GRIDDLE:
To preheat, set the thermostats for the desired temperatures 10-12 minutes before cooking. A uniform and
systematic approach to loading the griddle will produce the most consistent product results.
The griddle plate is engineered to provide a high heat transfer rate to the food. The steel surface can be scored or
dented by careless use of a spatula or scraper. Be careful not to dent, scratch, or gouge the plate surface. Do not try
to knock off loose food that may be on the spatula by tapping the corner or the edge of it on the griddle surface.
Don’t use hardened steel spatulas only mil steel with rounded corners.
DOMAIN COOKING:
This griddle features one tubular heating element in each 12’ section. Each section is controlled by an independent
thermostat. Each 12” section is a separate cooking domain and allows for cooking a wide variety of pro ducts over a
single griddle plate.
When domain cooking, it is suggested that you start with your lowest temperature setting at either side of the
griddle, increasing the zone temperature as you move up the domain line. These domain cooking guidelines will
vary depending on product temperatures, size and shape.
4
Page 5
CLEANING THE GRIDDLE
DOMAIN 1 DOMAIN 2 DOMAIN 3 DOMAIN 4
300°F 350°F 350°F 400°F
PRODUCT PRODUCT PRODUCT PRODUCT
SAUSAGE PANCAKES OMELET STEAK (RARE)
EGGS (HARD FRIED) FRENCH TOAST HASH BROWNS STIR FRY
EGGS (SCRAMBLED) BACON CANADIAN BACON VEGETABLES
BURGER (WELL DONE) EGGS (SUNNY SIDE UP) SALMON
STEAK (WELL DONE) BOILED HAM FISH CAKES
CHICKEN BREAST STEAK (MEDIUM WELL) LOBSTER
FROZEN FOODS FRESH BURGER (MEDIUM WELL) SCAMPI
PORK CHOPS SMALL FROZEN BURGER (MEDIUM WELL)
WARNING
The griddle and its parts are hot. Use care when operating, cleaning, or servicing.
Empty the grease drawer as needed throughout the day and regularly clean at least once daily.
Clean the griddle regularly. A clean griddle always looks better, lasts longer and performs better. To produce
evenly cooked, perfectly browned griddle products keep the griddle plate clean and free of carbonized grease.
Carbonized grease on the surface hinders the transfer of heat from th griddle surface to the food, resulting in spotty
browning and loss of cooking efficiency. Carbonized grease tends to cling to griddle foods, giving them a highly
unsatisfactory and unappetizing appearance.
To keep the griddle clean and operating at peak efficiency, follow these procedures:
AFTER EACH USE
Clean the griddle with a griddle scraper during the work shift.
ONCE PER DAY
Thoroughly clean the griddle back splash, sides and front. Turn the griddle off and allow it to cool down between
275°F - 300°F, apply some water and clean it with a griddle scraper. Remove, empty and wash the grease drawer in
the same manner as an ordinary cooking utensil.
ONCE PER WEEK
Clean the griddle surface thoroughly. A detergent safe for steel may be used on the plate surface to help clean it, but
be sure the detergent is thoroughly removed by flushing with clear water. After removal of detergent, the surface of
the griddle plate should be seasoned according to the instructions in this manual. Clean stainless steel surfaces with
a damp cloth and polish with a soft dry cloth. To remove discoloration, use a griddle cleaner. If the griddle usage is
very high, consider conducting this weekly cleaning procedure more than once a week.
1. Do not use a brick or griddle stone for cleaning.
2. Do not use water-jet to clean the griddle.
3. Do not use chlorine sanitizer in contact with griddle. Contact can cause discoloration, corrosion and
permanent damage.
4. Do not use cleaning agents with Sodium Hydroxide in them, which is common in household oven cleaners.
5
Page 6

SHUTDOWN OF GRIDDLE
Turn all thermostats to the OFF position. This will shut down the griddle completely.
EXTENDED SHUTDOWN
Shut off the main electrical supply. Apply a heavy coat of vegetable oil over the griddle plate to inhibit rust.
SERVICE AND PARTS INFORMATION
Contact the Service Agency in your area to obtain service and parts information. For a complete listing of Service
and Parts depots refer to www.imperialrange.com.
When calling for service the following information should be available from the appliance serial plate: Model
Number, Serial Number and voltage.
6
Page 7

TROUBLESHOOTING
PROBLEM
POSSIBLE CAUSES
Heat does not come on
1. Problem with thermostats. (Call for service)
when the temperature
2. Problem with heating elements. (Call for service)
controller is turned on
3. Main power supply disconnected. (Call for service)
Fat appears to smoke
1. Temperature set too high.
excessively
2. Moisture in food may be turning into steam.
Food sticks to griddle or
1. Temperature set too high.
burned around edges or
2. Griddle surface requires cleaning and/or seasoning.
contains dark specs
3. Surface under food not covered with enough cooking oil.
Food under-cooked
inside
1. Temperature set too high.
2. Food not cooked for long enough time.
1. Food itself may have off-flavor.
Food tastes greasy or has
2. Food stored improperly before cooking.
objectionable off-flavor
3. Too much griddle fat used.
4. Temperature set too low.
1. Temperature set too high.
Noticeable build-up of
2. Griddle surface needs cleaning and/or seasoning.
gum on griddle
3. Too much griddle fat used.
7
 Loading...