

Page 1

ASSEMBLY INSTRUCTIONS
WITH TELESCOPIC RODS
Page 2

Pag. 4
WARNING, READ AND KEEP
This product is not suitable for use by children under 3 years.
Small balls might be swallowed or inhaled.
Car
e and maintenance instructions for your table
Congratulations! You have bought a first quality table.
It is an indoor table: please assemble it and use it indoors only.
IMPORTANT: Once assembled your table is quite wide and may not fit through
your doors. For this reason you should assemble it in the room you intend it to be
used. Should you wish to move your table to another room, it might be necessary
to remove its legs.
In order to ensure its long life and continued playing appeal, we recommend that
you follow the simple instructions below:
1. Your table has been manufactured for indoor playing: do not leave it outdoors.
Rain, snow and high humidity may damage its materials. Prolonged exposure
to the sun is to be avoided too, due to its ultraviolet effects which will ruin the
colours.
2. Clean your table periodically. It is sufficient to wipe its surfaces using a damp
cloth. For a deeper cleaning you can use any household detergent which does
not contain wax or abrasives. Should you wish to furtherly improve bars
smoothness, only employ a good quality silicone spray. Please be careful not
to use any vegetal or any other type of grease or you run the risk of attracting
dirt.
Page 3

Pag. 5
TABLE SETUP
Important: children should be kept away of the table during the assembling operations
fig. 1
Fig. 2 – Remove the wood panel keeping the table
items : this is a part of the packing only and will not
be needed anymore.
fig. 2
List of tools needed
a screwdriver or a battery screwer (not supplied)a hammer (not supplied)a spanner (supplied) (fig. 3)
Page 4
Pag. 6
In
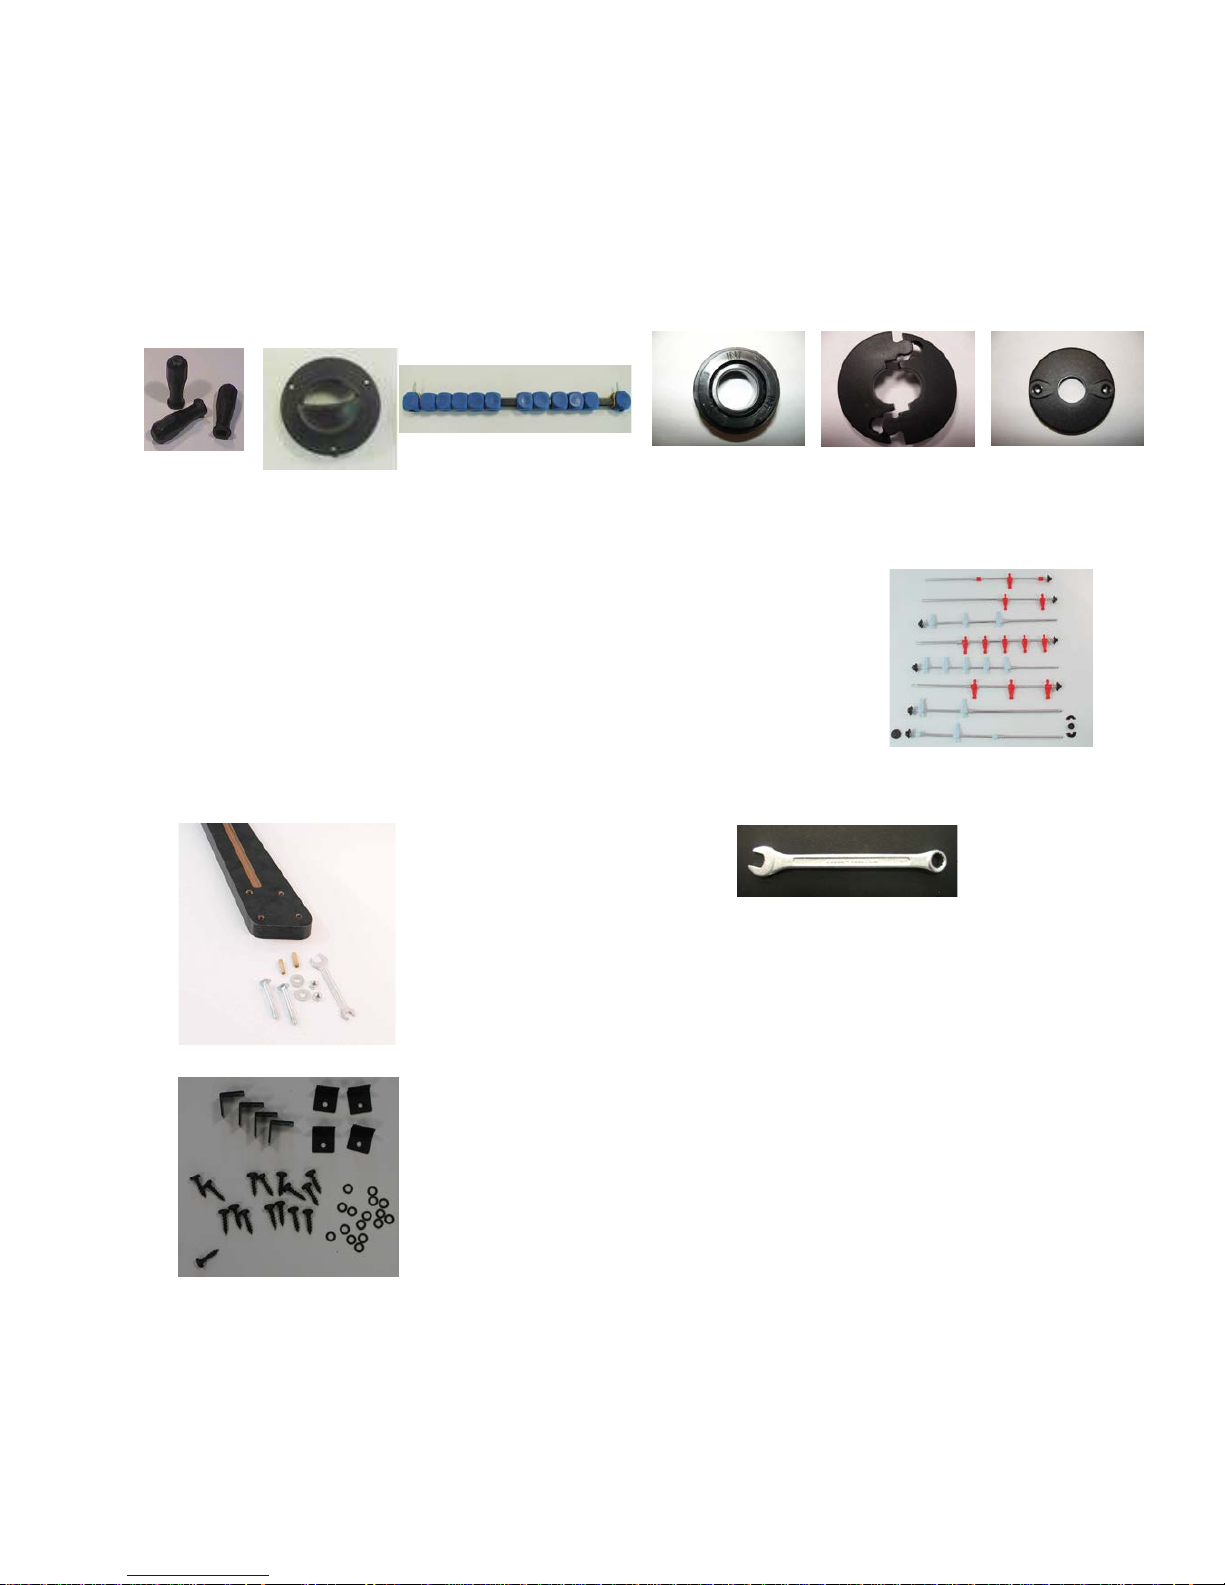
side the football-table cabinet you can find a plastic bag which includes:
8 black plastic handles (fig.4), 2 ball entry fillers (fig.5), 2 score counters (fig.6),
8 roller bearings (fig.8a), 16 inside bearing retainers (fig.8b), 8 outside bearing retainers (fig.8c)
10 white plastic balls, fixing screws
a)
Eine Stange 3 Spieler (Strumstange); Eine Stange 5 Spieler (Mittelfeldstange).
b)
a plastic bag containing the bars with players and springs (fig. 7)
one (1) Goalie each (1 player / rod), one (1) Defense each (2 players / rod) one
(1)
Mid Fielder each (5 players / rod), one (1) Forward each (3 players / rod)
Hardware pouch including 8 bolts, 8 washers,
8 nuts, 8 wood pins, 1 spanner,
8 hinges with the relevant screws .
fig. 7
fig. 6
fig. 10
fig. 9
fig. 4 fig. 5 fig. 8a fig. 8b fig. 8c
Page 5

Pag. 7
d) the table legs (fig. 11)
Take all the items off the cabinet and start the assembly by setting the legs.
Leg Assembly
Legs should be attached with an outward angle for stability.
Keep the table upside down (fig. 12). Take one leg and insert two wooden pins into the blind holes (fig. 13). Using
the pins as guides, rest the leg against the cabinet wall and insert two bolts into the holes (fig. 14). Hammer them
until they are completely in (fig. 15).
fig. 11
fig. 13 fig. 14
fig. 12
fig. 15
Page 6

Pag. 8
Working in the inside cabinet, first insert the washer (rounded shaped) and then the nut (fig.16) and tighten them
up using the spanner (fig. 17). The first two legs should be attached at the same table side, to make sure you use
the right ones (fig. 18). Put on the third leg without tightening the bolts.
Fit in the central panel into the leg grooves (fig. 19), making sure that the panel has its curve upward and that the
holes in the panel are inwards (fig. 20).
fig.
19
fig. 20 fig. 18
fig. 17
fig. 16
Page 7

Pag. 9
fig. 21 fig. 22 fig. 23
Now you can tighten the leg bolts
fig. 24
C
Fit the plastic foot and
Rest one hinge in correspondence on the panel holes (fig.21 22) and screw it up (figg. 23-24).
Page 8

Pag. 10
Ball Entry Fillers
You may want to leave this to the end but it is preferable to put on the ball fillers when no rods are on yet.
Manually fit the ball entry filler (fig. 25), insert screws into the holes and tighten them (fig. 26). Do the same with
the other ball filler.
Caution: under any circumstance do not use a drill, which could damage the cabinet wall.
fig. 25 fig. 26
Page 9

Pag. 11
BEWARE NEW MODEL
Please follow these assembly instructions:
Roller bearing
INT =
Side of the bearing that must look towards the playfield
Outside Bearing retainers Indside bearings retainers “A” “B”
To match the two bearings, rest them on the bar while keeping them slanting so that the protruding
part “A” is in front of the hollow part “B”, then bring them vertical by a slight pression.
N.B. If you use an electric screw driver, set the torque at the minimum.
Page 10

Pag. 12
Page 11

Pag. 13
Handles Assembly
Caution: do not put on handles if the plastic feels cold. If this should be the case, warm them a little before
installing them.
Start by manually inserting a handle onto the bar without covering the knurl (distinctly marked in fig. 41). Delicately
hammer it (fig. 42) until the handle completely hides the knurl (fig. 43).
fig. 44
fig. 43 fig. 41
fig. 42
End assembly by fixing the score counters,
making sure that at each side of the score
counter color is the same as the goalkeeper
(fig. 44).
Your table is now ready for playing: enjoy it !
Page 12

Pag. 14
FOOTBALL-TABLE DEMOLITION AND HARMFUL MATERIAL REMOVAL
Demolition:
The football table doesn’t require any particular care for the demolition since it doesn’t have any parts produced with
dangerous materials. The materials are:
Wood, MDF, steel, aluminium, ABS, PP (moplen), PE, PVC, Glass.
These materials are present in the following parts:
Frame: Wood, MDF, Steel.
Legs: Wood, Steel.
Playfield: Wood, Glass.
Rods: Steel, PP (moplen).
Accessories: ABS, PE, PVC.
Finishing: Aluminium, ABS.
During football-table demolition we suggest the sharing of the different materials and their removal in authorized collection
centre for their recycling.
The football-table may contain cards, electronic components and fluorescent pipes.
Removal of harmful materials
The football-table doesn’t produce any harmful substances.
Th
e fluorescent pipes and the electronic components on the control cards may contain dangerous materials and therefore
these parts must be collected by an authorized removal and recycling centre.
Shop for other sports equipment on our website.
 Loading...