

Page 1
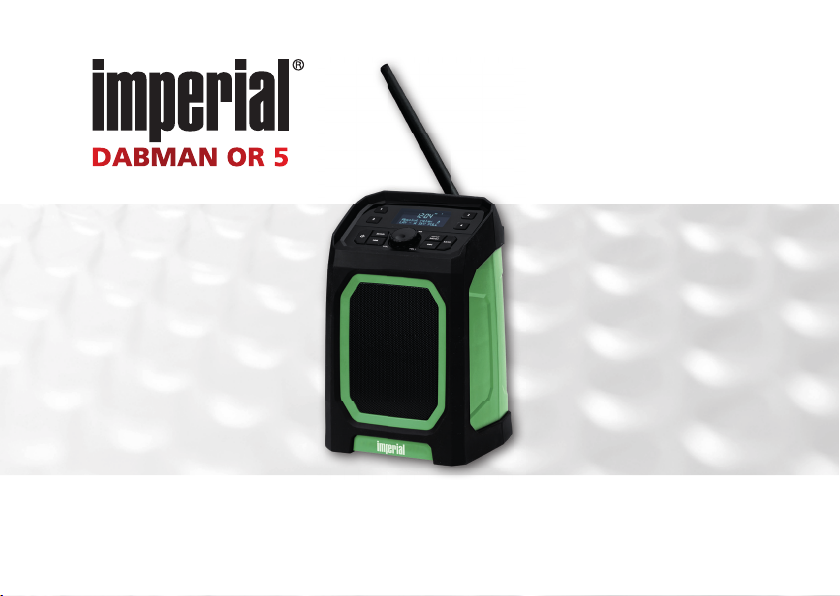
DABMAN OR 5
User Manual
V1_24_04_2024
Page 2
Operating instructions available in digital form via QR code
All technical data and functions described in these operating instructions are correct at the time of
printing and are subject to change without prior notice. We accept no liability for printing errors and
mistakes. Copying and reproduction is only permitted with the express authorisation of TELESTAR-DIGITAL
GmbH. Status: 05/2024
DE
2
Page 3

1. CONTENTS
1 Introduction ......................................6
1.1 Information on these operating instructions ..........6
1.2 Explanation of notes and warning symbols ...........6
2. SAFETY INSTRUCTIONS .............................8
3. SCOPE OF DELIVERY ..............................15
4. OPERATION ....................................16
4.1 Operating elements and connections ..............16
4.2 Preparing the device for operation ................19
4.3 Switching on the device ........................20
4.4 Switching the device off (power save mode) ........20
4.5 Switching the device off (standby mode) ...........20
4.6 Source selection ..............................21
4.7 Controlling functions ..........................21
4.8 Display information ...........................22
5 . DAB RADIO OPERATION ...........................23
5.1 First start-up .................................23
5.1.1 Automatic DAB search after initial start-up ........23
5.2 Radio station selection . . . . . . . . . . . . . . . . . . . . . . . . . 24
DE
3
Page 4

1. CONTENTS
5.3 Storing radio stations on the preset button .........24
5.4 Calling up a preset radio station ..................25
5.5 Calling up radio information ....................25
5.6 Manual station search DAB/DAB+ ................25
5.7 DRC .......................................26
6 FM RADIO MODE ................................27
6.1 FM mode ...................................27
6.2 Automatic scan ..............................27
6.3 Storing FM radio stations on the preset button ......27
6.4 Scan settings ................................28
7 BLUETOOTH MODE ...............................29
7.1 Switching on Bluetooth® mode ..................29
7.2 Pairing an external device .......................29
7.3 Controlling an external device via Bluetooth® .......30
8 AUX MODE .....................................31
9. SYSTEM SETTINGS ...............................32
9.1 Clock . . . . . . . . . . . . . . . . . . . . . . . . . . . . . . . . . . . . . . 32
9.2 Setting the alarm clock .........................34
9.3 Lighting ....................................35
9.4 Sleep timer ..................................36
9.5 Equaliser ....................................36
DE
4
Page 5

1. CONTENTS
9.6 Language ...................................37
9.7 Factory settings ..............................37
9.8 SW version ..................................37
10 TROUBLESHOOTING .............................38
11 DISPOSAL .....................................39
11.1 Disposal of the packaging .....................39
11.2 Disposal of the device ........................39
12 TECHNICAL DATA ...............................40
13 SERVICE AND SUPPORT ...........................41
14. TRADE MARK ..................................42
15. DECLARATION OF CONFORMITY ...................42
DE
5
Page 6
1. INTRODUCTION
1.1 Information on these operating instructions
Dear customer, thank you for purchasing this product.
Please read these instructions carefully and keep them for future reference. These operating
instructions are an integral part of the appliance! If you sell or pass on the appliance, you must
also hand over these operating instructions.
1.2 Explanation of notes and warning symbols
Symbol Meaning
DE
6
DANGER!
CAUTION!
NOTICE!
This signal word indicates a hazard with a high degree of risk that will result in
death or serious injury if the warning is ignored.
This signal word indicates a hazard with a medium degree of risk which, if the
warning is not observed, can result in death or serious injury.
This signal word indicates a hazard with a low level of risk which, if the warning
is ignored, may result in minor or moderate injury if the warning is ignored.
Page 7
1. INTRODUCTION
1.2 Explanation of notes and warning symbols
Symbol Meaning
HINWEIS!
This signal word warns of possible material damage and refers to
descriptions for the operation of the appliance.
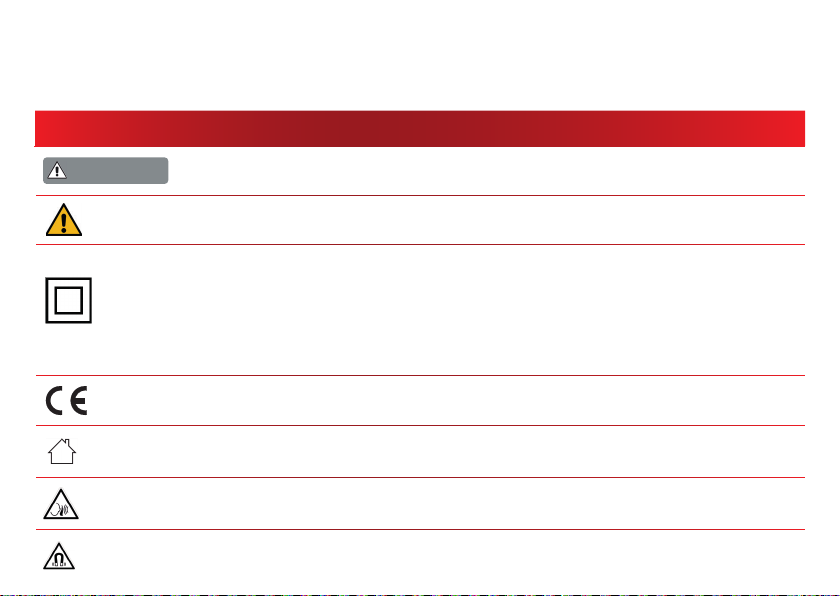
This symbol warns of dangers
Protection class II Electrical appliances with protection class II have reinforced
or double insulation in the amount of the rated insulation voltage between
active and touchable parts (VDE 0100 Part 410, 412.1). They usually have no
connection to the protective conductor. Even if they have electrically conductive
surfaces, these are protected from contact with other live parts by reinforced or
double insulation.
The products marked with this symbol fulfil the requirements of the
European Community directives.
Appliances with this symbol may only be used indoors in a dry environment.
dry environment.
Warning of danger due to high volume.
Warning of danger due to electromagnetic field.
DE
7
Page 8

2. SAFETY INSTRUCTIONS
2.1 Intended use
This product is a consumer electronics device. The device is used to play audio files from a device connected via Bluetooth® , an external audio device connected via cable and to receive radio signals via DAB+
and FM. Any other operation or use of the device is considered improper and may result in personal injury
or property damage. Do not use the device for any other purpose.
Only operate the device indoors. The appliance is intended for private use only and not for commercial
use. We assume that the operator of the device has general knowledge of handling consumer electronics
devices. Liability expires in the event of improper improper use.
2.2 Safety instructions
DANGER!
Check the appliance before use. In the event of damage or a defect, the appliance must not be put into
operation.
Risk of injury!
Risk of injury for children and persons with reduced physical, sensory or mental capabilities (e.g. partially
disabled persons, elderly persons with reduced physical and mental capabilities) or lack of experience and
knowledge.
> Only store the appliance in places that are inaccessible to children.
DE
8
Page 9

2. SAFETY INSTRUCTIONS
2.2 Safety instructions
> This appliance can be used by children aged from 8 years and above and persons with reduced physical,
sensory or mental capabilities or lack of experience and/or knowledge if they have been given supervision or instruction concerning use of the appliance in a safe way and understand the hazards involved.
> Never allow children to use the appliance unsupervised.
Choking hazard!
> Packaging material is not a toy!
> Do not store the packaging materials used (bags, polystyrene pieces, etc.) within the reach of children.
Children must not play with the packaging. There is a risk of suffocation, especially with packaging film.
2.3 Operational safety
DANGER!
Risk of injury!
Risk of injury due to electric shock from live parts.
There is a risk of electric shock or fire due to unintentional short circuits.
> Check the appliance for damage before each use. If you notice visible damage or the appliance is visibly
damaged, do not use it.
DE
9
Page 10

2. SAFETY INSTRUCTIONS
2.3 Operational safety
> If you notice a technical or mechanical problem, please contact TELESTAR Service.
> Never open the housing of the device.
> Disconnect the device from the power source immediately in the event of malfunctions.
> Only use spare parts and accessories supplied or authorised by us. > Do not modify the device or use
any additional devices or spare parts that have not been explicitly authorised or supplied by us.
> Do not use the appliance in potentially explosive atmospheres. These include, for example, fuel storage
areas, tank systems or areas where solvents are stored or processed.
> Do not operate the device in areas with particle-laden air (e.g. flour or wood dust). Malfunctions
may be noticeable in the form of the appliance heating up or smoke developing from the appliance.
Loud or atypical noises can also be a sign of a malfunction.
> In this case, disconnect the appliance from the power source.
The appliance must not be used after a malfunction until it has been checked or repaired by a qualified
person.
> If you move the appliance from a cold to a warm environment, moisture may condense inside the
appliance.
> In this case, wait about an hour before putting it into operation.
> Unplug the appliance from the power source if you are going to be away for a long time or during a
thunderstorm.
DE
10
Page 11
2. SAFETY INSTRUCTIONS
2.3 Operational safety
Ensure that contact with moisture, water or splash water is avoided and that no objects filled with liquid
are placed on the appliance.
> If foreign bodies or liquid get into the appliance, disconnect the appliance from the power source
immediately.
Have the appliance checked by qualified specialists before putting it back into operation. Otherwise
there is a risk of electric shock.
> Ensure that the appliance is not exposed to dripping or splashing water and that there are no open
sources of fire (e.g. burning candles) in the vicinity of the appliance.
DANGER!
Risk of injury!
There is a risk of hearing damage.
Excessive sound pressure can lead to damage or loss of hearing. Listening at high volume levels can cause
hearing damage. Set the volume to a low level and only increase the volume to a level that is still comfortable for you.
DE
11
Page 12

2. SAFETY INSTRUCTIONS
2.4 Connecting the device
> Only connect a mains adapter to supply the device with power to a professionally installed, earthed and
electrically fused socket outlet Mains socket outlet 220-240 V
alternating voltage, 50-60 Hz.
> Please ensure that the power source (socket outlet) is easily accessible.
> Do not kink or crimp any cable connections.
> Before using the appliance, check that the voltage specification on the appliance corresponds to the
local mains voltage.
> Place the appliance on a firm, level surface.
2.5 Protecting the device from defects
NOTE!
> Unfavourable ambient conditions such as humidity, excessive heat or lack of ventilation can damage the
device.
> Only use the device in dry rooms. Avoid direct proximity to: Heat sources, such as radiators, open fla-
mes, such as candles, devices with strong magnetic fields.
> Do not expose the device to extreme conditions, e.g. direct sunlight, high humidity, moisture, extremely
high or low temperatures, naked flames.
> Ensure a sufficient distance from other objects so that the device is not covered, so that adequate venti-
lation is always guaranteed.
DE
12
Page 13

2. SAFETY INSTRUCTIONS
2.5 Protecting the device from defects
> Avoid direct sunlight and locations with an unusually high level of dust.
> Do not place any heavy objects on the device.
> Do not use the device in potentially explosive areas.
These include, for example, fuel storage areas, tank systems or areas where solvents are stored or
processed.
> Do not operate the device in areas with particle-laden air (e.g. flour or wood dust).
2.6 Notes on the radio interface
The device generates an electromagnetic field.
Please pay attention to notices in your environment that prohibit or restrict the operation of electronic
devices. This may be the case, for example, in hospitals, at petrol stations and filling stations or at airports.
If such warnings are present, disconnect the device from the power supply immediately. The components
contained in the device generate electromagnetic energy and magnetic fields. These can affect medical
devices such as pacemakers or defibrillators. Therefore, please maintain a safe and sufficient distance between medical devices and the speaker. If you have reason to believe that the speaker is causing interference with a medical device, switch off the speaker immediately or disconnect it from the power supply.
DE
13
Page 14

2. SAFETY INSTRUCTIONS
2.7 Cleaning the device
Unplug the device from the socket before cleaning.
Use a dry, soft cloth to clean the device. Please do not use any liquids to clean the appliance. Do not use
any solvents or cleaning agents, as these can damage the surface and/or labelling of the appliance. Cleaning must not be carried out by children.
2.8 Behaviour in the event of malfunctions
If the appliance malfunctions, disconnect it from the power supply and wait a few seconds. Reconnect the
appliance to the power supply. It may be necessary to reset the device to the factory settings; if this is not
successful, please contact your dealer or contact TELESTAR Digital GmbH directly. Further information can
be found in chapter 13.
2.9 Using the device
Switzerland, Norway, Liechtenstein and Iceland.
If the appliance is to be operated in another country, the laws of the country of use must be observed and
complied with.
DE
14
Page 15
3. SCOPE OF DELIVERY
Please remove all parts from the packaging and completely remove all packaging materials. If one or more
of the specified parts are missing, please contact:
TELESTAR Service Centre,
Am Weiher 14, 56766 Ulmen
e-mail: [email protected]
Quantity Description
1 DABMAN OR 5
1 USB-C cable
1 User Manual
DE
15
Page 16
4. OPERATION
4.1 Operating elements and connections
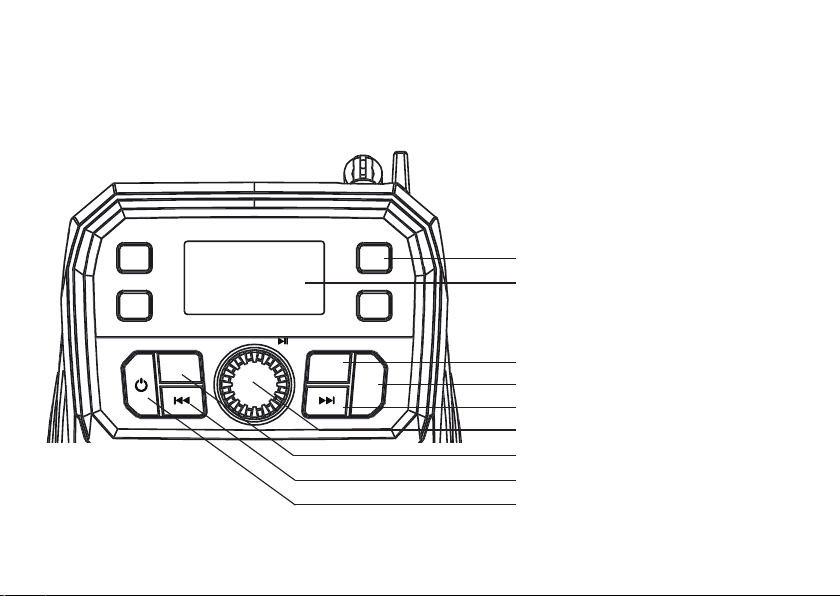
Front view
16
I
2
1
2
3
SELECT/SNOOZE/
SCAN
VOL+VOL-
INFO/
MENU
MODE
4
3
4
5
6
7
8
9
DE
Page 17

4. OPERATION
4.1 Operating elements and connections
1 1,2,3,4 Station memory buttons 1-4
2 Display
3 MENU/INFO Press and hold: Calls up menu
Press: Displays radio information.
4 MODE Switches between operating modes.
5
Fast forward/next track
6 VOL- Turn to the left: Decrease volume.
VOL+ Turn to the right: Increase volume.
SELECT Press: Confirm selection in the menu.
SNOOZE Press: Pauses active alarm clock
Press: Play/pause
7 SCAN Starts station search
8
Fast rewind/previous track
9
Press and hold: Switch on
Press and hold to switch on: Switch off
DE
17
Page 18
4. OPERATION
4.1 Operating elements and connections
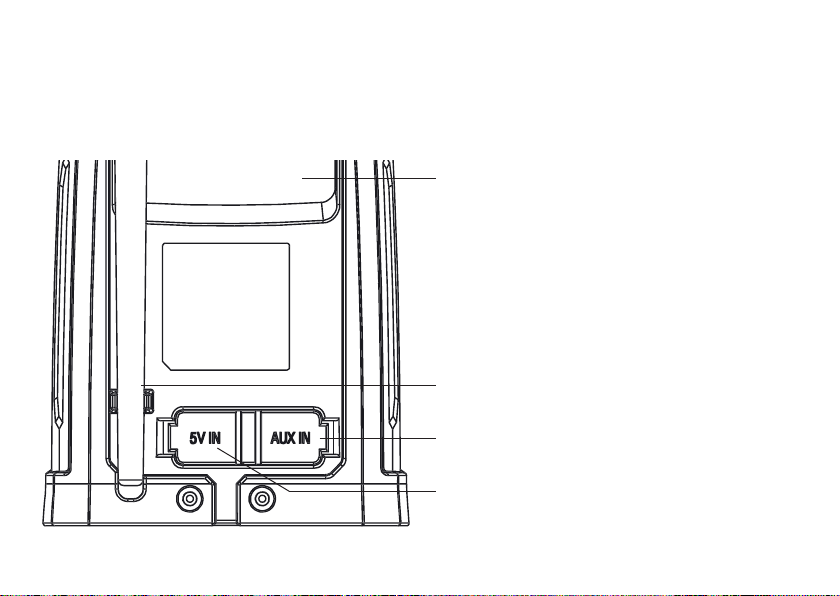
Rear view
DE
18
10 Carrying handle
10
11 Antenna
12 AUX 3.5 mm jack stereo
audio input
13 USB-C charging port
11
12
13
Page 19
EN
EN
GETTING STARTED
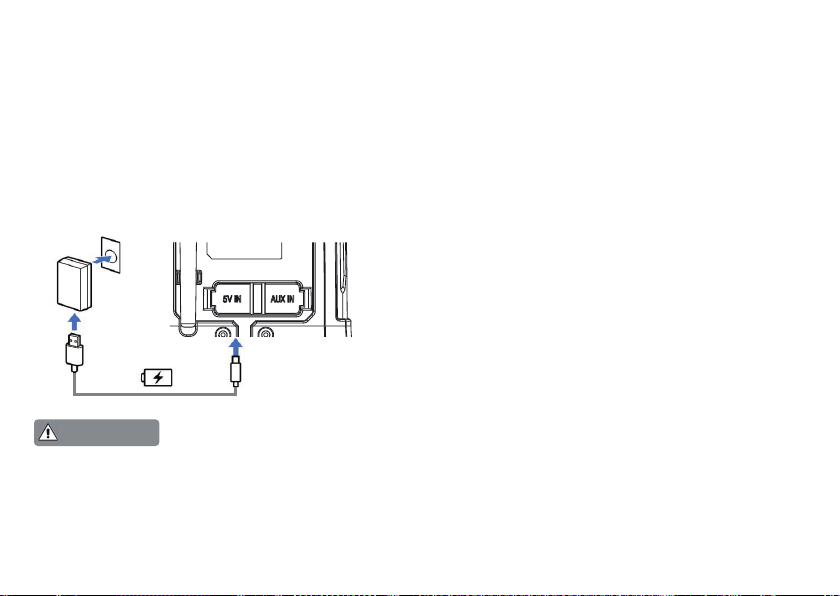
Carefully remove the unit and all accessories from the package.
1. Connect one end of the supplied USB Type-C cable to the DC IN 5V port
on the speaker and the other end to a USB AC adaptor (commercially
available), and then connect the USB AC adaptor to an AC outlet.
The speaker supports USB AC adaptors that are capable of delivering an
output current of 1.5 A. Use of any other devices is not guaranteed for
battery charging.
4. OPERATION
4.2. Preparing the device for operation
Before using the device for the first time, you should fully charge the built-in battery.
> Connect the device to a USB power supply, e.g. a PC, USB charger or notebook, using the USB charging
cable included in the scope of delivery. As soon as the power supply is established and the charging
process starts, the red charging status LED below the USB-C socket lights up. Once fully charged, the
red status LED goes out.
NOTE
The charging time of the device depends on the power of the USB power source. With a USB power supply of 1.5 A, the charging time for a fully depleted battery is approx. 4 hours. The charging time increases
if the power output of the USB power source is lower. The battery life depends on how the device is used.
More energy is required at high volume than at low volume.
Disconnect the device from the power source as soon as it is fully charged.
DE
19
Page 20
SCAN
VOL-
SCAN
VOL-
SCAN
VOL-
4. OPERATION
4.3. Switching on the device
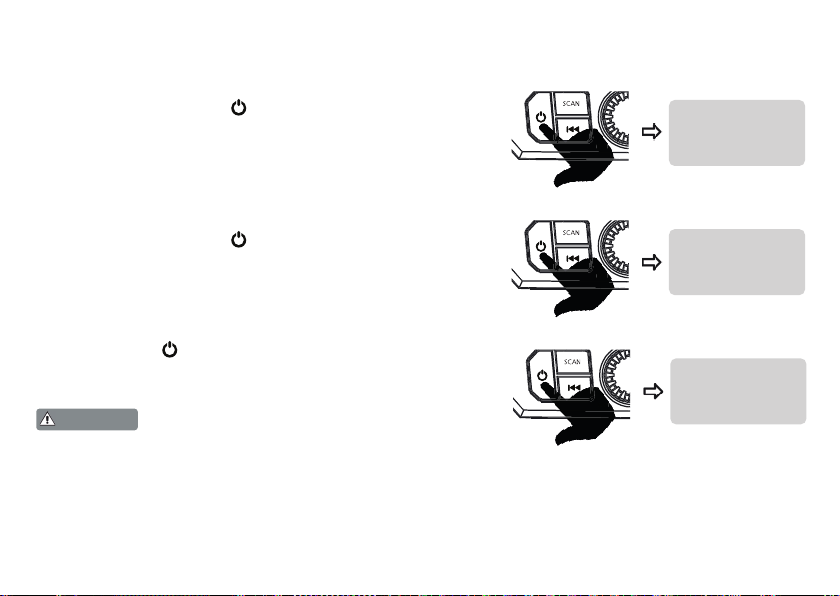
Press and hold the button
to switch on the device. The device starts up.
(9) for approx. 2 seconds,
Press and hold
SCAN
VOL-
Willkommen
Digitalradio
4.4. Switch off the device (power save mode)
Press and hold the button
(9) for approx. 2 seconds,
to switch off the appliance. After the message „Power off“
appears on the display, the appliance switches off completely.
4.5. Switching the appliance off (standby mode)
Press the button
(9) briefly during operation.
The appliance switches to standby mode.
The display remains active.
NOTE!
The appliance continues to consume power in this mode.
If you do not use the appliance for a longer period of time,
switch it off completely as described in section 4.4.
DE
20
Press and hold
SCAN
VOL-
Press briefly
SCAN
VOL-
Power off
Standby
Page 21

MODE
4. OPERATION
4.6 Source selection
The MODE button (4) can be used to switch between the Bluetooth
DAB+ and FM radio sources. To do this, briefly press the MODE button (4)
repeatedly until the desired source is selected.
4.7 Controlling functions
You can use the rotary control to select menu items by turning it to the right
or left.
Entries can be confirmed by pressing the rotary control (SELECT).
®
, AUX,
INFO/
MENU
MODE
Press
turn turn
DE
21
Page 22
4. OPERATION
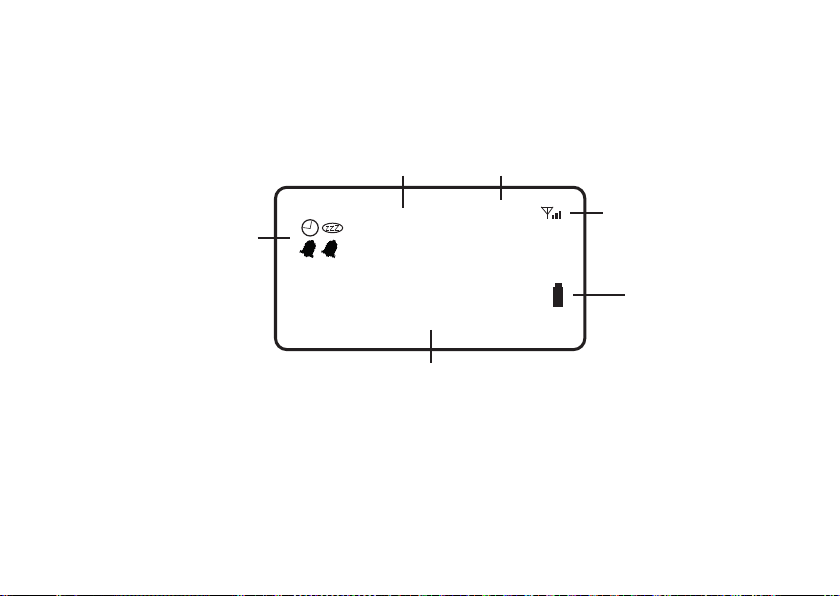
4.8 Display information
22
Snooze status,
Sleep, Alarm
Current
time
AM
FM
15:39
15:10:05
Radio
Mode
DAB
FM
AUX
Reception signal
strength
Battery
status
28-3-2024
Text display
(time or radio information)
DE
Page 23
5. DAB RADIO OPERATION
5.1 Initial start-up
> Switch on the device as described in chapter 4.3.
When you switch on the device for the first time, a DAB/DAB+ station search starts automatically.
5.1.1 Automatic DAB search after initial start-up
The DAB+ station scan starts automatically when the device is first switched on.
A display provides information on the progress of the search and the number of stations found is also
displayed. The device saves all DAB stations found in a station list and stores the stations in alphabetical
order. Once the station search is complete, the radio starts playing the first DAB+ station in the DAB
station list.
You can repeat the station scan at any time.
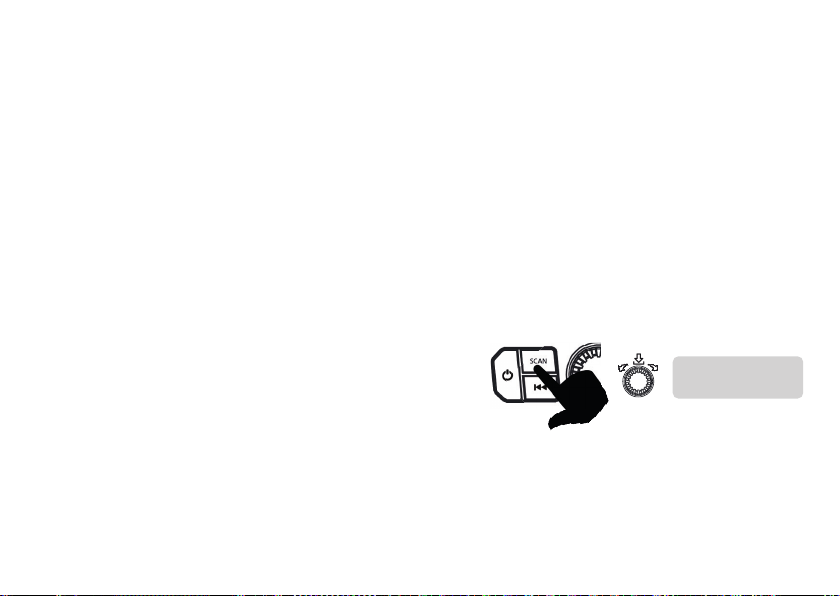
> To do this, press the SCAN button and use the rotary control
select the „Complete scan“ option using the rotary control.
> Confirm by pressing the rotary control.
Complete
search
DE
23
Page 24
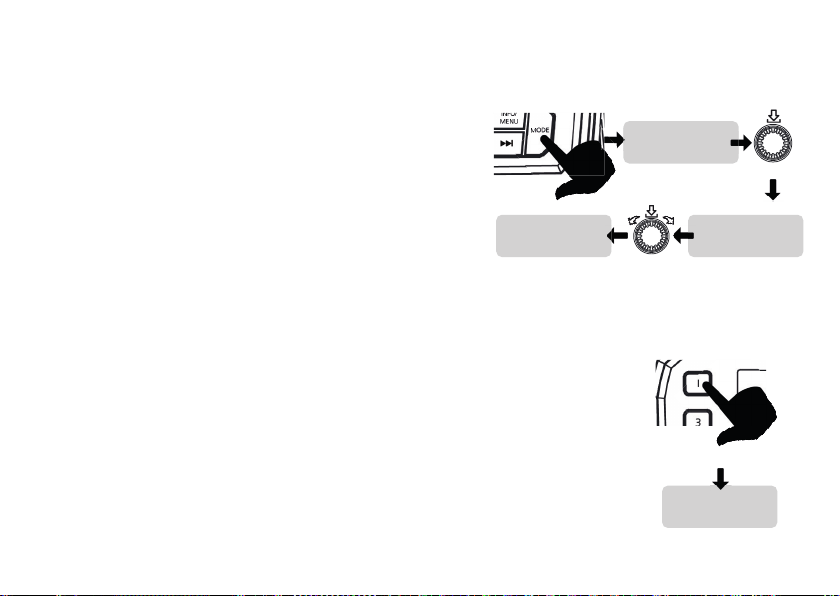
5. DAB RADIO OPERATION
5.2 Radio station selection
> Press the MODE button as often as necessary until the
DAB mode is activated (check the display).
> Press the rotary control to access the radio list.
> Use the rotary control to select the station from the list
that you would like to listen to.
> Confirm your selection by pressing the rotary control.
SWR 1
connecting....
5.3 Saving radio stations to the preset button
Both in analogue FM reception as well as in DAB+ mode, you can store radio stations on the preset
buttons 1-4.
> Press the rotary control to access the radio list.
> Use the rotary control to select the station that you want to save.
> Confirm your selection by pressing the rotary control.
> Press and hold the station preset button on which you want to save
the radio station for 2 seconds.
> „Saved“ appears on the display.
DE
24
DAB
Station list
< SWR 1 >
Press and hold 1-4
Saved
Page 25
5. DAB RADIO OPERATION
5.4 Calling up a preset radio station
In radio mode, press one of the 4 preset station buttons to call up a
preset radio station.
Display message „EMPTY“ if the memory location is empty.
5.5 Calling up radio information
> Press the MENU/INFO button several times during operation if necessary.
Various information is available to you, provided that this is made
available by the station.
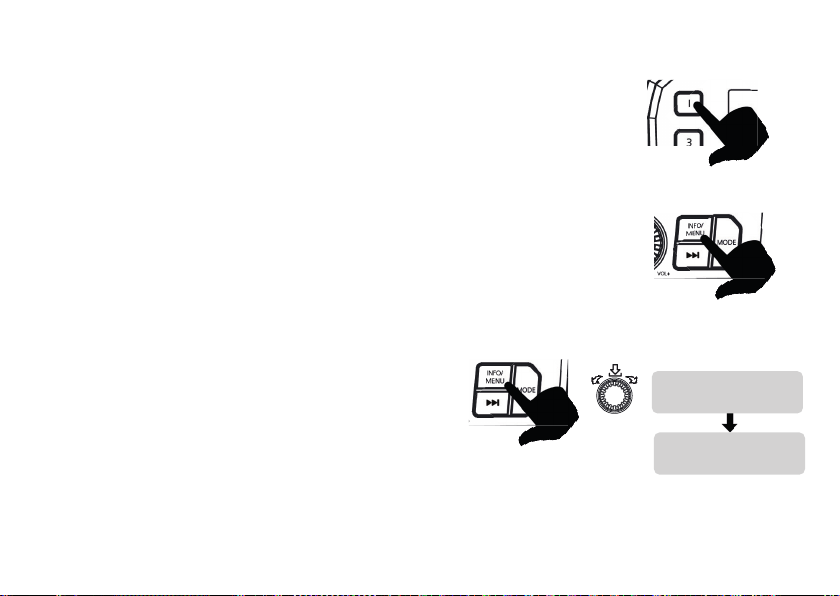
5.6 Manual station search DAB/DAB+
You can use the manual station search to tune to a specific DAB radio station,
whose reception parameters are known.
> In DAB mode, press and hold the INFO/MENU button
for 2 seconds.
> Use the rotary control to select the menu item
„Tune manually“
> Confirm the selection by pressing the rotary control.
> When you have reached the frequency of the desired station,
press the rotary control. The radio will then attempt to tune to this frequency.
1-4 Press briefly
DAB
<Set manually>
Set manually
<13E 239.200MHz>
DE
25
Page 26
5. DAB-RADIOBETRIEB
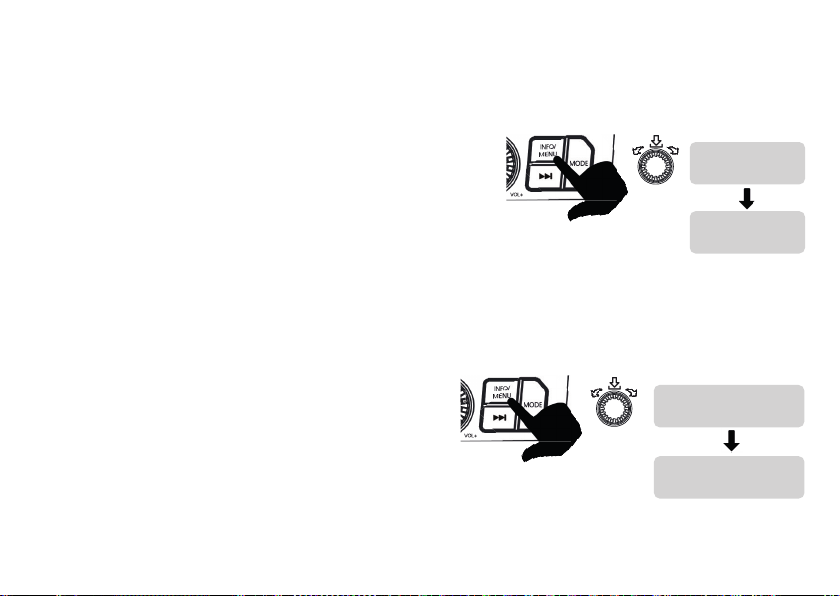
5.7 DRC
In DAB radio reception, you can change the difference between soft and loud sounds.
(Dynamic Range Control).
> In DAB mode, press and hold the INFO/MENU button for
2 seconds and use the rotary control knob to select the
to select the „DRC“ menu item.
> Select DRC low, high or off.
5.8 Deleting inactive stations
You can remove stations from the station list that are marked with a „?“ in front of the station name.
These are stations that are either no longer broadcasting, whose frequency has been changed or which
can no longer be received due to a change in the location of the radio.
> In DAB mode, press and hold the INFO/MENU button for
2 seconds and use the rotary control to select the
rotary control to select the „Inactive stations“ menu item.
> Press the rotary control.
< Inactive stations >
> Select the <Yes> field and confirm by pressing the
by pressing the rotary control.
DE
26
DAB
< DRC >
DRC
< DRC off >
DAB
Empty?
<No > Yes
Page 27
6. FM-RADIOBETRIEB
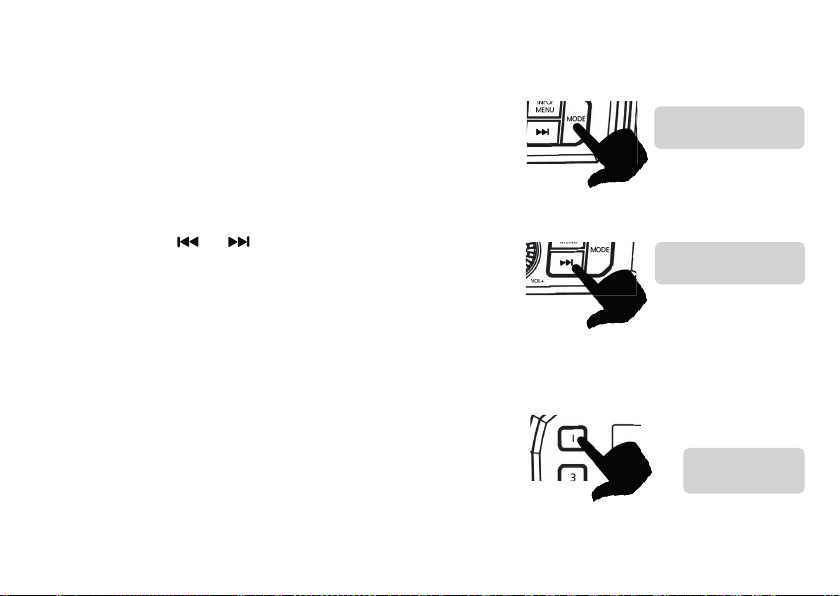
6.1 FM mode
To switch to FM mode, repeatedly press the
„MODE“ button repeatedly until „FM“ appears on the display.
6.2 Automatic scan
Press and hold the
or button for 2 seconds to start the
automatic FM scan in the forward or backward direction of
the frequency range. The scan stops at the next strong signal
received. If the scan continues without stations are found,
you must tune the radio manually.
6.3 Storing FM radio stations on the preset button
In analogue FM reception, you can store radio stations on
the preset buttons 1-4 in analogue FM reception.
> Press and hold the preset button on which you want to
save the radio station for 2 seconds.
> „Saved“ appears on the display.
Press and hold for 2 seconds
Press and hold 1-4
FM
FM
101.50 MHz
Scan....
Programme 1
saved
DE
27
Page 28
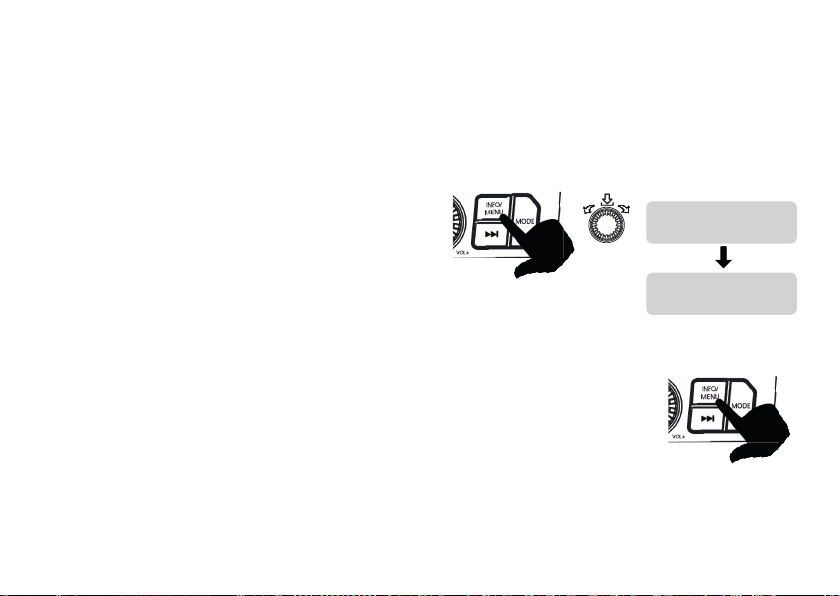
6. FM RADIO MODE
6.4 Scan settings
You can customise the automatic FM search in the search settings. You can choose between „Only strong
stations“ or all stations. If you select „Only strong stations“, only stations with a good reception signal will
be included in the search. If you select „All stations“, weaker stations are also taken into account.
> In DAB mode, press and hold the INFO/MENU button for
2 seconds and use the rotary control to select the
menu item„Scan settings“ menu item using the rotary
control.
> Press the rotary control.
> Select <All stations> or <Strong stations only and
confirm by pressing the rotary control.
6.5 Calling up radio information
> During FM operation, press the MENU/INFO button several times if necessary.
Various information is available to you, provided that this is made available
by the station.
DE
28
FM
< Scan settings >
Scan settings*
< All stations >
Page 29
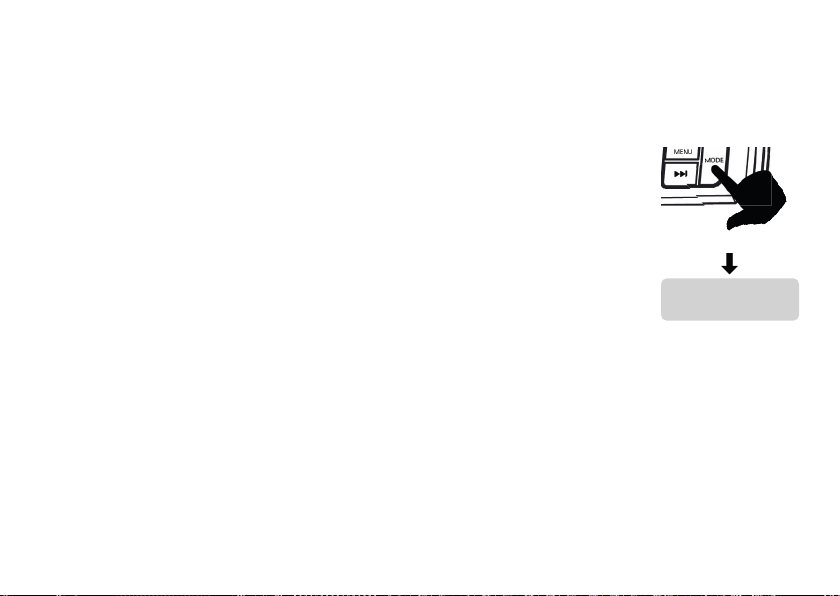
7. BLUETOOTH MODE
®
In Bluetooth
DABMAN OR 5 to play their audio content via the loudspeaker.
mode You can connect any Bluetooth® devices (phones, tablets, etc.) to the
7.1 Switching on Bluetooth
®
mode
Briefly press the MODE button several times if necessary.
When switching on for the first time, an external device
(smartphone/tablet) must be paired first. If an external device has already been
external device has already been paired, the connection is established automatically.
Press several times
Depending on the connected device, music playback may start automatically.
Bluetooth
Not connected
7.2 Pairing an external device
To pair an external device, e.g. a smartphone or tablet, with the DABMAN OR 5, please proceed as follows:
> Start Bluetooth
> Now start the search for Bluetooth
You may need to activate the Bluetooth
To find out how to activate the Bluetooth
®
mode as described in section 6.1.
®
devices in the vicinity on your external device.
®
function on your external device first.
®
function on your external device and carry out a search,
Please refer to the operating instructions for your external device.
During the pairing process, both devices should be within 10 metres of each other.
In the list of Bluetooth
®
devices found on your external device, the entry DABMAN OR 5 should now
appear.
DE
29
Page 30

7. BLUETOOTH MODE
7.2 Pairing an external device
> Tap to complete the pairing process.
As soon as the Bluetooth
®
connection has been established, you will receive a message on the display.
Bluetooth
Connected
7.3 Controlling an external device via Bluetooth
®
Depending on the Bluetooth® protocol of your external device, you can control the music playback using
the playback buttons on the DABMAN OR 5:
Play/pause: press briefly
Next track: press briefly
Previous track: press briefly
DE
30
Page 31
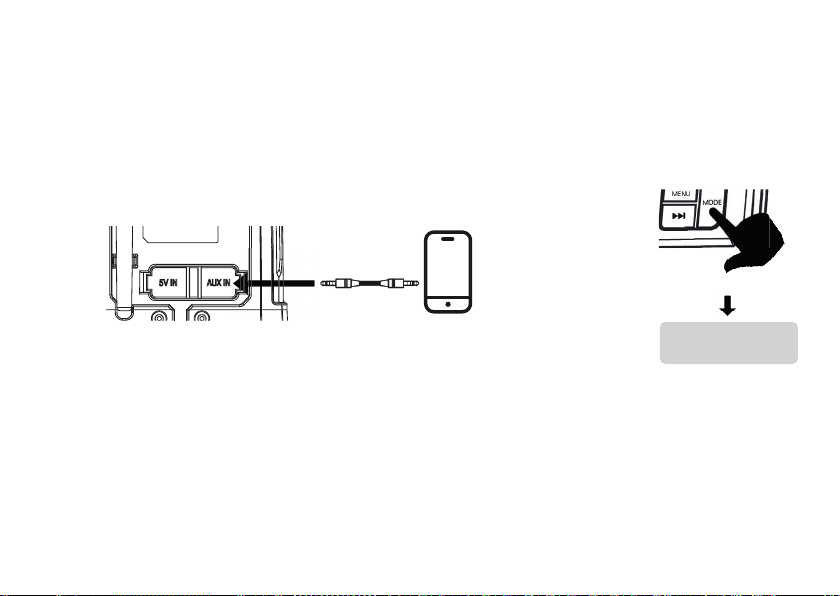
8. AUX MODE
You can also play back an external device via the analogue AUX input device. Connect the external device
to the AUX connection of the DABMAN OR5 using a 3.5 mm stereo jack cable. Set the volume of the
external device to a high level and then adjust the volume of the DABMAN OR5. If the volume on the
external device is too low, noise may occur during playback.
Press several times
Aux -In
Battery 100
DE
31
Page 32
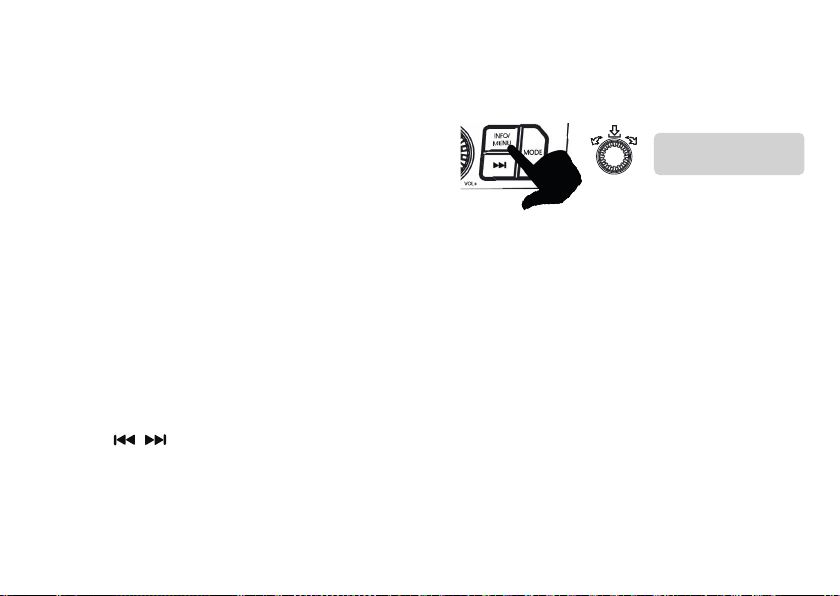
9. SYSTEM SETTINGS
All system settings are listed in the System submenu.
> Press and hold the MENU/INFO button for 2 seconds and
use the rotary control to select the „System“
menu item.
> Press the rotary control.
Press and hold for two seconds
This procedure is assumed for the settings described below.
The available options are:
Time > Alarm clock > Lighting > Sleep timer > Equaliser > Language > Factory setting > SW version
9.1 Clock
9.1.1 Automatic update
In this submenu, you can specify whether the time should be updated automatically via DAB+ or FM (FM)
or whether you want to enter it manually.
> Select the [Auto. update] entry in the [Time] submenu.
> Use the
, buttons to select the following options:
[Update all] (update via DAB+ and FM)
[Update from DAB] (update only via DAB+)
[Update FM] (update only via FM)
[No update] (time/date must be entered manually)
Press the rotary control to save the setting.
DE
32
DAB
<System >
Page 33

9. SYSTEM SETTINGS
9.1.2 Setting the time/date
You can set the current time and date in this submenu.
Note: The date and time are automatically updated at the factory when a DAB station is received.
> In the [Time] submenu, use the
> Press the rotary control.
The first digits (hours) of the time flash and can be changed using the
> Press the rotary control to accept the setting.
> The next digits (minutes) of the time then flash and can also be changed as described above.
> After each further setting, press the rotary control to jump to the next setting.
After all settings have been made and OK has been pressed for the last time, [Saved] appears on the
display.
9.1.3 Setting 12/24 hours
In the Set 12/24 hours submenu, you can activate the 12 or 24 hour format.
> In the [Time] submenu, use the <, > buttons to select the [Set 12/24 hours] entry.
> Press the rotary control.
> Use
, to select one of the following options: [Set 24 hours] [Set 12 hours]
, buttons to select the [Set time/date] entry.
, buttons.
DE
33
Page 34
9. SYSTEM SETTINGS
9.1.4 Setting the date format
In the Set date format submenu, you can set the format for displaying the date.
> In the [Time] submenu, use the
> Press the rotary control.
9.2 Setting the alarm clock
In the Alarm clock submenu, you can set 2 alarm times at which the device switches on and starts with an
FM or DAB station.
> In the System menu, select the [Alarm clock] entry.
> Press the rotary control.
> Select [Set alarm clock 1] or [Set alarm clock 2].
> Press the rotary control to display the available alarm information and options.
> Use the
buttons to change each setting and press the rotary control to confirm.
> Check whether you have switched on the alarm clock before leaving the menu
> If an alarm clock has been set, an alarm clock symbol appears on the left edge of the display.
In standby mode, the display shows you the alarm time ( Alarm 1 and / or Alarm 2 )
NOTE!
In power saving mode (see chapter 4.4) an alarm clock that is switched on is not active.
DE
34
buttons to select the [Set date format] entry.
Page 35

9. SYSTEM SETTINGS
9.3 Backlighting
In the Backlighting submenu, you can set the time limit for the display backlighting and the brightness for
the „On“ or „Dim“ level.
The following backlighting options are available:
Permanently on, 10, 20, 30, 45, 60, 90, 120 and 180 seconds.
The following brightness options are available: High, Medium and Low.
> Select the [Backlight] entry in the System menu.
> Press the rotary control.> Select the [Timeout] entry.
> Select the desired backlight option.> Press the rotary control.
> Select the [On setting] entry.> Press the rotary control.
> Select the backlight intensity.
Choose between High, Medium and Low.
> Press the rotary control to confirm your selection.
> Select [Dimming level].
In this setting, you can determine how much the display lighting is dimmed after the time set at the
beginning.
> Press the rotary control knob to confirm your selection.
DE
35
Page 36

9. SYSTEM SETTINGS
9.4 Sleep Timer
This function switches the radio off automatically after a set period of time.
> Select the [Sleep timer] entry in the System menu.
> Press the rotary control.
> Use the buttons to select the time between 15, 30, 45, 60 or 90 minutes after which the device swit-
ches off automatically.
> Press the rotary control to confirm your selection.
9.5 Equalizer
In this area, you can select certain sound presets. In addition to several sound presets, you can also
customise the sound of your radio and save this setting under My EQ. > Select the [Equaliser] entry in the
System menu.
> Press the rotary control.
> Use the buttons
> Press the rotary control to confirm your selection.
DE
36
to select between [Normal], [Rock], [Flat], [Pop], [Jazz], [Classic], [My EQ].
Page 37

9. SYSTEM SETTINGS
9.6 Language
In this section, you can change the menu language of the device.
> Select the [Language] entry in the System menu.
> Press the rotary control.
> Use the
> Press the rotary control to confirm your selection.
9.7 Factory settings
If you change the location of the device, e.g. when moving or travelling, you may no longer be able to
receive the stored channels. In this case, you can reset to factory settings to delete all saved channels and
then start a new channel scan.
> Select the [Factory settings] entry in the System menu.
> Select [Yes] or [No] using the
> Press the rotary control to confirm your selection.
9.8 SW version
In this menu item, you can view information on the firmware version installed on the device.
> Select the [SW Version] entry in the System menu.
buttons to select the desired language.
buttons.
DE
37
Page 38
10. TROUBLESHOOTING
Symptom Possible cause and remedy
The device is not supplied with power. Connect the
Device cannot be switched on.
No sound can be heard. Increase the volume.
DAB+ reception disrupted.
Connect the power supply correctly. Charge the battery.
No stations available: Carry out a search.
Antenna not fully extended. If necessary, change the location of
the radio.
AUX playback
does not work.
Poor Bluetooth
connection.
DE
38
Cable connection faulty. Check the cable connection between the
radio and external device.
®
The maximum range via Bluetooth® is 10 metres and should not
be should not be exceeded.
Page 39

Entsorgung
Verpackung
Ihr Gerät befi ndet sich zum Schutz vor Transport-
schäden in einer Verpackung, Verpackungen sind
Rohmaterialien und können wiederverwertet
Entsorgung
11. DISPOSAL
11.1 Disposal of the packaging
The packaging of your device consists exclusively of recyclable materials.
Please sort it accordingly and return it to the „Dual System“.
11.2 Disposal of the appliance
The symbol of a crossed-out wheeled bin shown on the right indicates that this appliance
is subject to Directive 2012 / 19 / EU.
This directive states that you must not dispose of this appliance with normal household
waste at the end of its service life but must be disposed of in specially organised collection points,
recycling centres or waste disposal companies. This disposal is free of charge for you.
Protect the environment and dispose of it properly.
You can obtain further information from your local waste disposal company or the city or municipal administration.
DE
39
Page 40

12. TECHNICAL DATA
Reception DAB+, FM, Bluetooth®, AUX
USB-C power supply 5V, min. 500mA
Power supply
Internal Li-Ion battery 5000mAh
Bluetooth
®
frequency range: 2402-2480Mhz/ Transmission power: -6.81dbm (EIRP)
Reception frequencies
Operating
temperature
Storage conditions 0
Dimensions and
weight
DE
40
FM (FM): 87.5 - 108.0 MHz
DAB+: 174 - 240 MHz
0
0
C - 400 C
0
C - 350 C / 40-75% relative humidity
19 x 10 x 12 cm, 839g
Page 41

13. SERVICE AND SUPPORT
Dear customer!
Thank you for choosing a product from our company.
Our product fulfils the legal requirements and was manufactured under constant quality control. The
technical data correspond to the current status at the time of printing.
We reserve the right to make changes. The warranty period for the appliance corresponds to the statutory
provisions at the time of purchase.
We also offer you our telephone HOTLINE service with professional assistance.
In our service area, professional experts are available to answer your questions. Here you can ask any
questions you may have about the product and get tips on localising the cause of a possible fault.
Our technicians are available from Monday to Friday from
8.00 a.m. to 4.45 p.m. on the following telephone number:
02676 / 95 20 101or by e-mail at: [email protected]
If the service hotline is unable to help you, please send your radio to the following address, preferably in
the original packaging, but packed securely for transport:
TELESTAR - DIGITAL GmbH
Service Centre
Am Weiher 14 (industrial estate)
56766 Ulmen
DE
41
Page 42

14. TRADE MARK
The Bluetooth® word mark and logos are registered trademarks owned by Bluetooth SIG, Inc. and any use
of such marks by TELESTAR-DIGITAL GmbH is under licence. The other trademarks and brand names are
the property of their respective owners.
15 DECLARATION OF CONFORMITY
Your device bears the CE mark and fulfils all required EU standards.
The IMPERIAL DABMAN OR 5 device complies with the essential protection requirements of the
Radio Directive 2014/53/EU (RED - Radio Equipment Devices), the Low Voltage Directive 2014/35/EU, the
RoHS Directive (2011/65/EU) and the REACH Regulation 1907/2006
The declaration of conformity for this product can be found at
www.telestar.de/de_DE/Konformitaetserklaerung/352-529/?productID=25261
Distributor:
TELESTAR DIGITAL GmbH
Am Weiher 14
56766 Ulmen
DE
42
Page 43

Page 44

 Loading...