

Page 1
4.4 CU. FT. Compact Refrigerator - User’s Guide
Refrigerador Compacto de 4.4 Pies Cúbicos – Manual de Usuario
Réfrigérateur compacte de 4.4. pi3 – Guide de l’utilisateur
Model: RC-1446
www.impecca.com
v .1.0
Page 2

ENGLISH ESPAÑOL FRANÇAIS
TABLE OF CONTENTS
Refrigerator Safety .......................................................................................................................................iii
Important Safety instructions ................................................................................................................... iv
Getting Started .............................................................................................................................................. 5
Installing Your Appliance ............................................................................................................................5
Unit Diagram .................................................................................................................................................6
Operation ....................................................................................................................................................... 6
Door Reversal ................................................................................................................................................ 7
Cleaning & Caring For Your Appliance ......................................................................................................7
Customer Support ........................................................................................................................................8
Troubleshooting ........................................................................................................................................... 8
SPANISH ....................................................................................................................................................... 10
FRENCH ........................................................................................................................................................ 18
–ii–
Page 3

ENGLISHESPAÑOLFRANÇAIS
REFRIGERATOR SAFETY
Your safety and the safety of others is very important to us.
PLEASE SAVE THESE INSTRUCTIONS. YOU MAY NEED THEM IN THE FUTURE.
I
This is the Safety Alert Symbol. When this symbol appears take alert to potential hazards that
can injure or kill you or others around this appliance. All safety messages will follow the Safety
Alert Symbol and either the words “DANGER”, “Warning”, or “Caution”.
I DANGER I
DANGER MEANS THAT FAILURE TO HEED THE SAFETY ADVICE MAY RESULT IN SEVERE PERSONAL INJURY OR DEATH.
I WARNING I
WARNING MEANS THAT FAILURE TO HEED THE SAFETY ADVICE MAY RESULT IN EXTENSIVE
PRODUCT DAMAGE OR SERIOUS PERSONAL INJURY, OR DEATH.
I CAUTION I
CAUTION MEANS THAT FAILURE TO HEED THIS SAFETY ADVICE MAY RESULT IN MINOR OR MODERATE PERSONAL INJURY, PROPERTY OR EQUIPMENT DAMAGE.
All safety message will alert you of potential hazards. Instructions are provided to guide you on
how to reduce your chances of injury.
I FLAMMABLE REFRIGERANT GAS I
DANGER - Risk of fire or explosion. Flammable refrigerant used in unit. Repairs to be performed by trained service professional
only.
DO NOT use mechanical devices to defrost refrigerator. DO NOT puncture refrigerant tubing.
CAUTION - Risk of fire or explosion. Flammable refrigerant used in unit. Dispose of property in accordance with federal or local
regulations.
CAUTION - CHILD ENTRAPMENT WARNING - To prevent children from being trapped inside, when disposing of unit remove
door and keep shelves inside the unit.
PROPOSITION 65 WARNING FOR CALIFORNIA RESIDENTS
WARNING
Cancer and Reproductive Harm
I
www.p65warnings.ca.gov
–iii–
Page 4

ENGLISH ESPAÑOL FRANÇAIS
IMPORTANT SAFETY INSTRUCTIONS
PLEASE SAVE THESE INSTRUCTIONS. YOU MAY NEED THEM IN THE FUTURE.
1. This refrigerator must be properly installed and located in accordance with the Installation Instructions before it is used.
2. Do not allow children to climb, stand or hang on the shelves in the refrigerator. They could damage the refrigerator and seriously
injure themselves.
3. Do not store or use gasoline or other flammable vapors and liquids in the vicinity of this or any other appliance.
4. Keep fingers out of the space between the doors and cabinet. Be careful closing doors when children are in the area.
5. Unplug the refrigerator before cleaning and making repairs.
6. We strongly recommend that any servicing be performed by a qualified individual.
7. Do not leave refrigerator in extremely cold or warm temperatures.
8. Do not place refrigerator near heat sources or open flames.
9. Clean the refrigerator with a so, damp cloth. Remove stains with a mild soap. Do not clean the unit with industrial grade solvents, or abrasive chemicals.
10. Do not place heavy items on top of the refrigerator.
11. Never install the refrigerator where there is a lot of moisture or in areas where water can splash.
12. Do not allow children to hang on the doors; the refrigerator may be tipped over and hurt children.
13. Never eat food that may have spoiled because it was stored too long in the refrigerator or was stored in an out-of-order refrigerator.
14. Do not use sharp tools inside the refrigerator (such as an ice pick to remove ice) as damage may occur.
15. Unplug and remove food from the refrigerator if not used for a long period of time.
16. Aer your refrigerator is in operation, do not touch the cold surfaces in the freezer compartment, particularly when hands are
damp or wet. Skin may adhere to these extremely cold surfaces.
17. Do not refreeze foods that have been thawed completely. You can safely re-freeze defrosted food if it is still cold and ice crystals
are still present.
18. This refrigerator should not be recessed or built-in in an enclosed cabinet. It is designed for freestanding installation only.
CHILD ENTRAPMENT WARNING:
Risk of child entrapment. Before you throw away your old refrigerator or freezer:
1. Take o the doors.
2. Leave the shelves in place so that children may not easily climb inside.
CAUTION: USE OF AN EXTENSION CORD IS NOT RECOMMENDED.
CAUTION: RISK OF FIRE OR EXPLOSION
Dispose of property in accordance with Federal or Local Regulations. Flammable refrig-
erant use, which under federal law must be removed prior to product disposal.
FOR HOUSEHOLD USE ONLY
SAVE THESE INSTRUCTIONS
–iv–
Page 5
ENGLISHESPAÑOLFRANÇAIS
GETTING STARTED
Note: All images in this instruction manual are for indication only;
the physical appearance and options on your model may vary.
SERIAL AND MODEL NUMBER
Please record your model number and serial number below.
You can find the number plate on the outside rear of the refrigerator.
Model Number: ______________________________
Serial Number: ______________________________
Date of Purchase: ____________________________
BEFORE DISCARDING YOUR OLD REFRIGERATOR:
• Remove the door(s), leave the shelves in place (to help prevent children from crawling in) and have it removed from
your premises by a qualified technician.
• Check with your retailer to find out if they’ll take away and
responsibly dispose of or recycle your old refrigerator.
• See www.epa.gov/rad for more information on Responsible
Appliance Disposal.
SAFETY NOTICES
This appliance is intended to be used in household and similar
applications such as:
• Sta kitchen areas in shops, oices and other working environments;
• Individual use in hotel rooms and other residential type environments;
INSTALLING YOUR APPLIANCE
UNPACKING YOUR REFRIGERATOR
1. Remove all packaging material. This includes the foam
base and all adhesive tape holding the refrigerator accessories inside and outside.
2. Inspect and remove any remains of packing, tape or printed materials before powering on the refrigerator.
CAUTION: Risk of Fire or Explosion due to puncture of refrigerant tubing. Flammable refrigerant used. Handle with care
when moving refrigerator to avoid either damaging the refrigerant tubing or increasing the risk of a leak.
LOCATION
garage or outdoor installation. Do not place any covering such
as a drape or sheet on the unit.
When installing the unit, ensure that a minimum of 4 inches of
free space is le at both sides and in the rear, and 4 inches of
space at the top of the unit. This will allow cold air to circulate
around the refrigerator and improve the eiciency of the cooling process.
Do not install your refrigerator in any location not properly insulated or heated, e.g. garage, etc. Your refrigerator was not
designed to operate in temperature settings below 12 degrees
Celsius.
LEVELING THE UNIT
It’s very important to keep the unit level, so that the door will
close properly and prevent problem that will cause eective
cooling to fail. To level the unit, turn the two adjustable feet at
the front base of the refrigerator clockwise or counterclockwise
to respectively raise or lower the corner.
Tip: Having someone push against the top of the refrigerator will
take some weight o the leveling leg. This makes it easier to adjust the leveling leg.
CLEANING BEFORE USE
Wipe the inside of the unit with a weak solution of baking
soda (bicarbonate). Then rinse with warm water using a damp
sponge or cloth. Wash the shelves and bins in warm soapy water
and dry completely before putting back in the unit.
Note: This unit is shipped with a protective plastic-wrap
around the exterior. Remove completely before use.
POWER SUPPLY
• Be sure to plug in to suitable power outlet (115 volts, 15
amps outlet) grounded outlet.
• You must make sure all three prongs are in a 3-pronged
outlet.
Notes: When plugging in to wall, it should have a dedicated outlet.
When selecting a position for your unit, ensure the floor is a flat,
level surface and the room is well ventilated. Avoid locating your
unit near a heat source, such as an oven, stove top, boiler, or radiator. Also avoid direct sunlight as it may increase the electrical
consumption.
Extremely cold ambient temperatures may also prevent the unit
from operating eectively. This unit is not designed for use in a
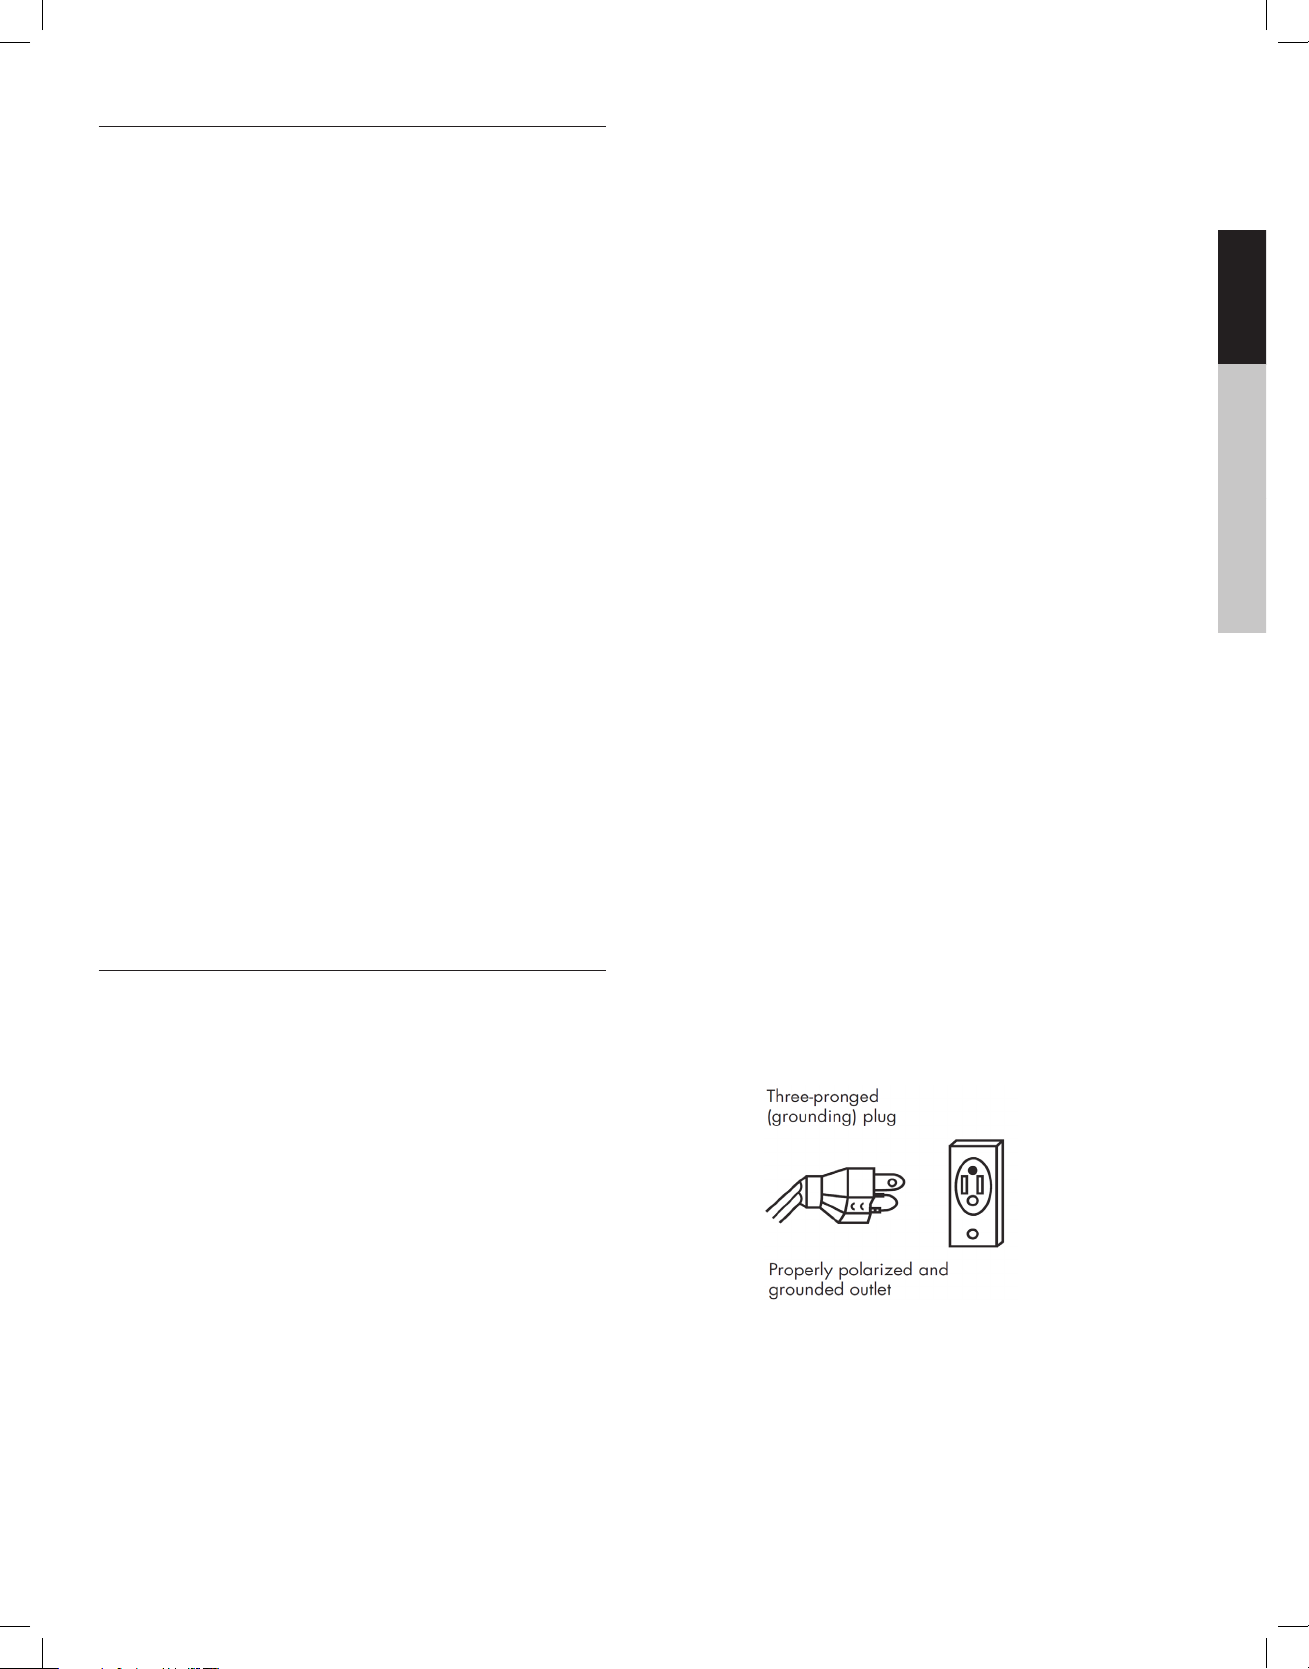
GROUNDING INSTRUCTIONS
This appliance must be grounded. This is accomplished by
ensuring the plug is inserted into a properly grounded outlet.
This way, in the event of an electrical short circuit, the risk of
electric shock is reduced by providing an escape wire for the
–5–
Page 6
ENGLISH ESPAÑOL FRANÇAIS
electric current. This appliance is equipped with a cord having a grounding wire with a grounding plug.
WARNING: Improper use of the grounding plug can result in
a risk of electric shock. Consult a qualified electrician or service person if the grounding instructions are not completely
understood, or if doubt exists as to whether the appliance is
properly grounded.
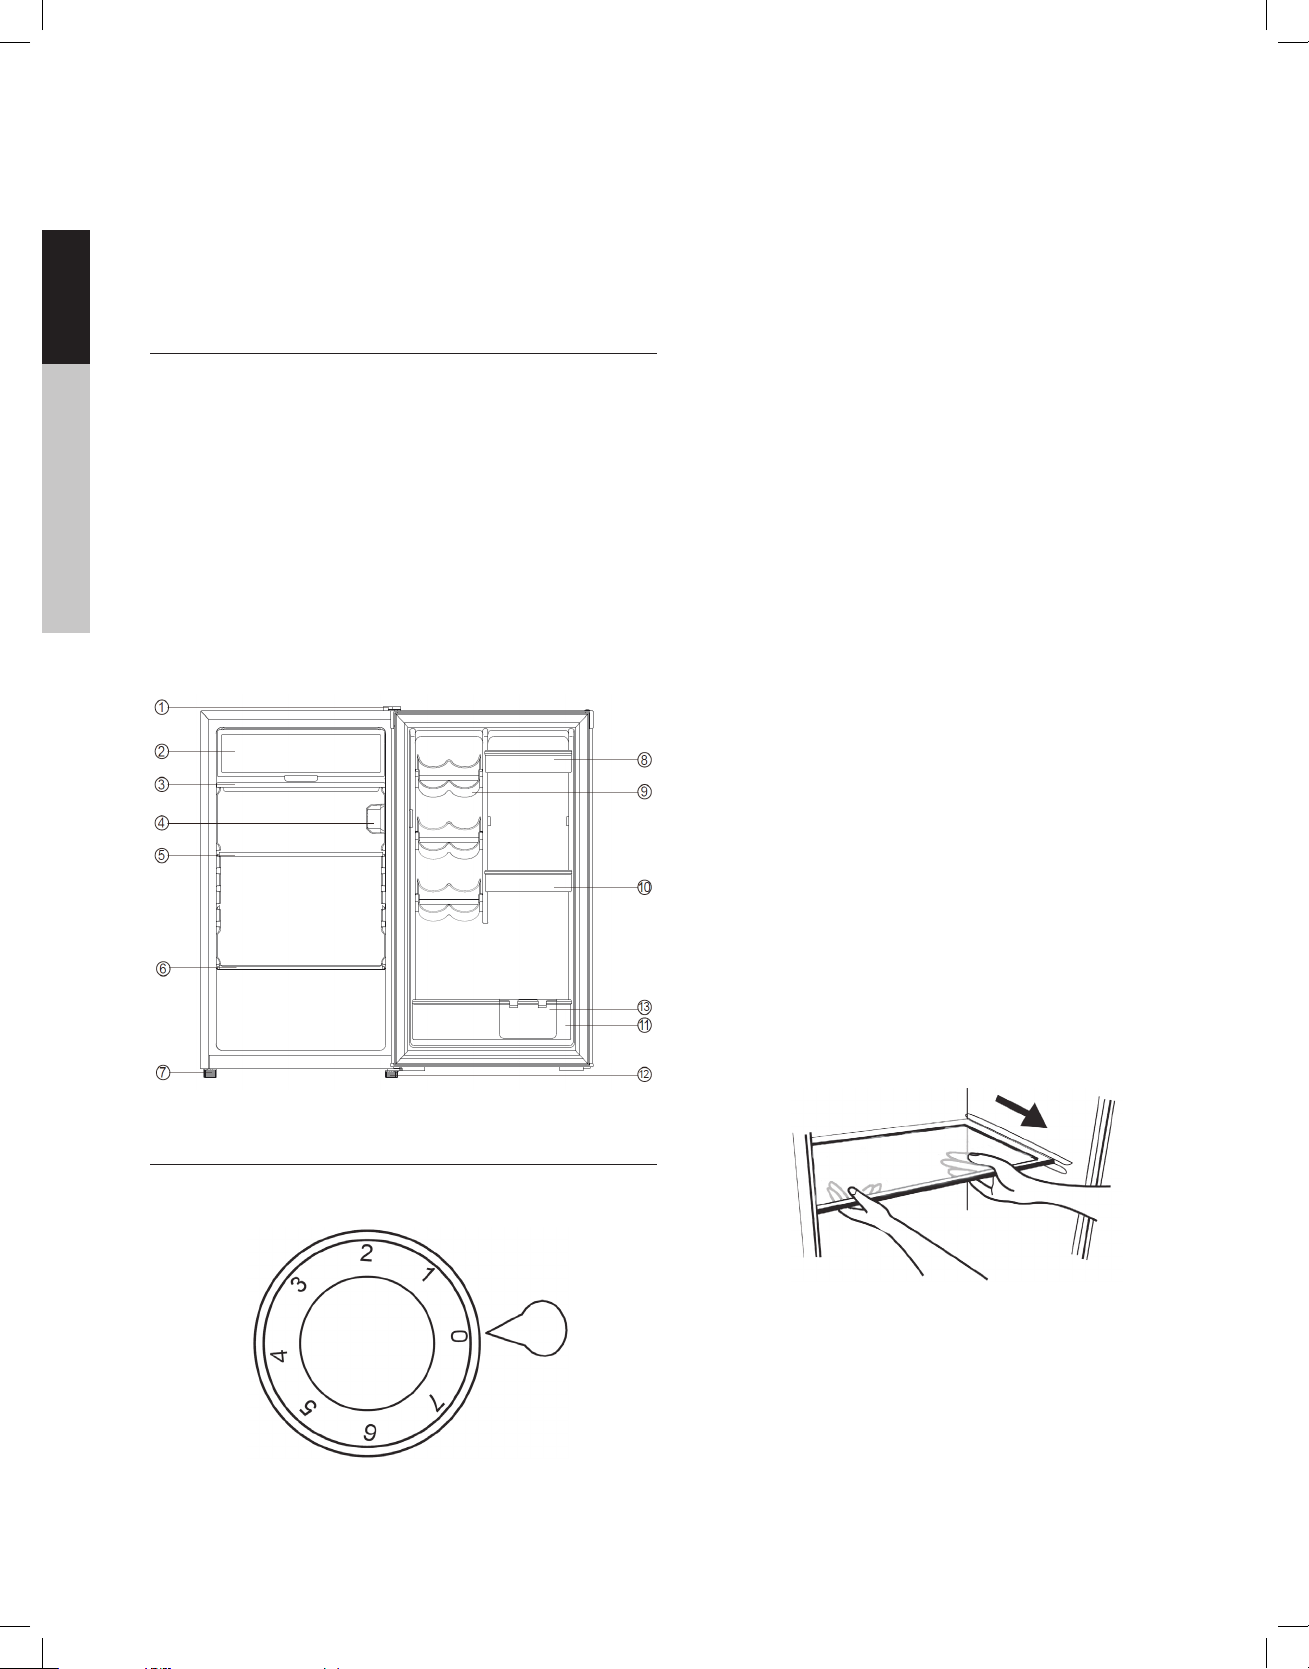
UNIT DIAGRAM
1. Top hinge with cover
2. Freezer compartment
3. Drip tray
4. Temperature control with manual defrost button
5. Full shelf
6. Half shelf
7. Leveling leg
8. Removable door bin
9. Can holders (Total 3)
10. Removable door bin
11. 1 gallon and 2L bottle door bin
12. Bottom hinge with leveling leg
13. Candy box
the upper right hand side of the compartment.
The first time you turn the unit on, set the temperature control
to “5”. The range of the temperature control is from position
“0” to “5”. Aer 24 to 48 hours, adjust the temperature control
to the setting that best suits your needs. The setting of “3 - 4”
should be appropriate for home or oice use.
To turn the refrigerator o, turn the temperature control to ”0”.
NOTE:
• Turning the temperature control to “0” position stops the
cooling cycle but does not shut o the power to the unit.
• If the unit is unplugged, has lost power, or is turned o, you
must wait 3 to 5 minutes before restarting the unit. If you attempt to restart before this time delay, the unit will not start.
(Note: If the refrigerator has been placed in a horizontal
or tilted position for any period of time return to upright
position and wait 24 hours before plugging the unit in.)
FREEZER COMPARTMENT / USE OF THE ICE CUBE
TRAYS
This compartment is designed for making ice cubes and for
short-term food storage (a few days at most).
WARNING: This compartment is not cold enough to freeze
foods safely for more than 5 days.
If ice cube tray freezes to the bottom of the compartment, pour
a little warm water around it to loosen it. Do not use boiling
water, which can damage plastic parts, or sharp metal objects
such as a knife or screwdriver, which can damage the cooling
system tubing. Wash the ice cube tray in lukewarm water only.
Do not wash in the dishwasher.
REFRIGERATOR INTERIOR SHELVES
To remove or replace a full-width slide-out shelf:
1. Gently tilt the shelf up and slide forward until the shelf has
been completely removed.
2. To replace the shelf, gently slide the shelf back.
OPERATION
ADJUSTABLE TEMPERATURE DIAL:
Your unit has only one control for regulating the temperature
in the compartment. The temperature control is located on
FOOD STORAGE INFORMATION
FRESH FOOD
• When storing fresh food that is not prepackaged, be sure to
wrap or store food in airtight and moisture proof material
unless otherwise noted. This will ensure proper shelf life
and prevent the transfer of odors and tastes.
• Wipe containers before storing to avoid needless spills.
–6–
Page 7
ENGLISHESPAÑOLFRANÇAIS
• Eggs should be stored in an upright position in their original
carton to maximize shelf life.
• Fruit should be washed and dried, then stored in sealed
plastic bags before storing in the refrigerator.
• Vegetables with skins should be stored in plastic bags or
containers.
• Leafy vegetables should be washed and drained and then
stored in plastic bags or containers.
• Hot food should be allowed to cool before storing in the
refrigeration. This will prevent unnecessary energy use.
• Fresh seafood should be used the same day as purchased.
• When storing meats in the fresh food section, keep in the
original packaging or re-wrap as necessary. Follow the suggestions below for safe storage:
• Chicken 1-2 Days
• Ground Beef 1-2 Days
• Cold Cuts 3-5 Days
• Steaks/Roasts 3-5 Days
• Smoked/Cured Meats 7-10 Days
• All others 1-2 Days
NORMAL OPERATING SOUNDS
• Boiling water, gurgling sounds or slight vibrations that are
the result of the refrigerant circulating through the cooling
coils.
• The thermostat control will click when it cycles on and o.
ENERGY SAVING TIPS
• The refrigerator should be located in the coolest area of
the room, away from heat-producing appliances or heating
ducts, and out of direct sunlight.
• Let hot foods cool to room temperature before placing in
the refrigerator. Over loading the refrigerator forces the
compressor to run longer and thus increases energy consumption. Foods that refrigerate too slowly may lose quality
or spoil
• Be sure to wrap foods properly, and wipe containers dry
before placing in the refrigerator.
• The shelves should not be lined with aluminum foil, wax paper, or paper towels. Liner interfere with cold air circulation,
making the refrigerator less eicient.
• Organize food to reduce door openings and extended
searches. Remove as may items as needed at one time, and
close the door as soon as possible.
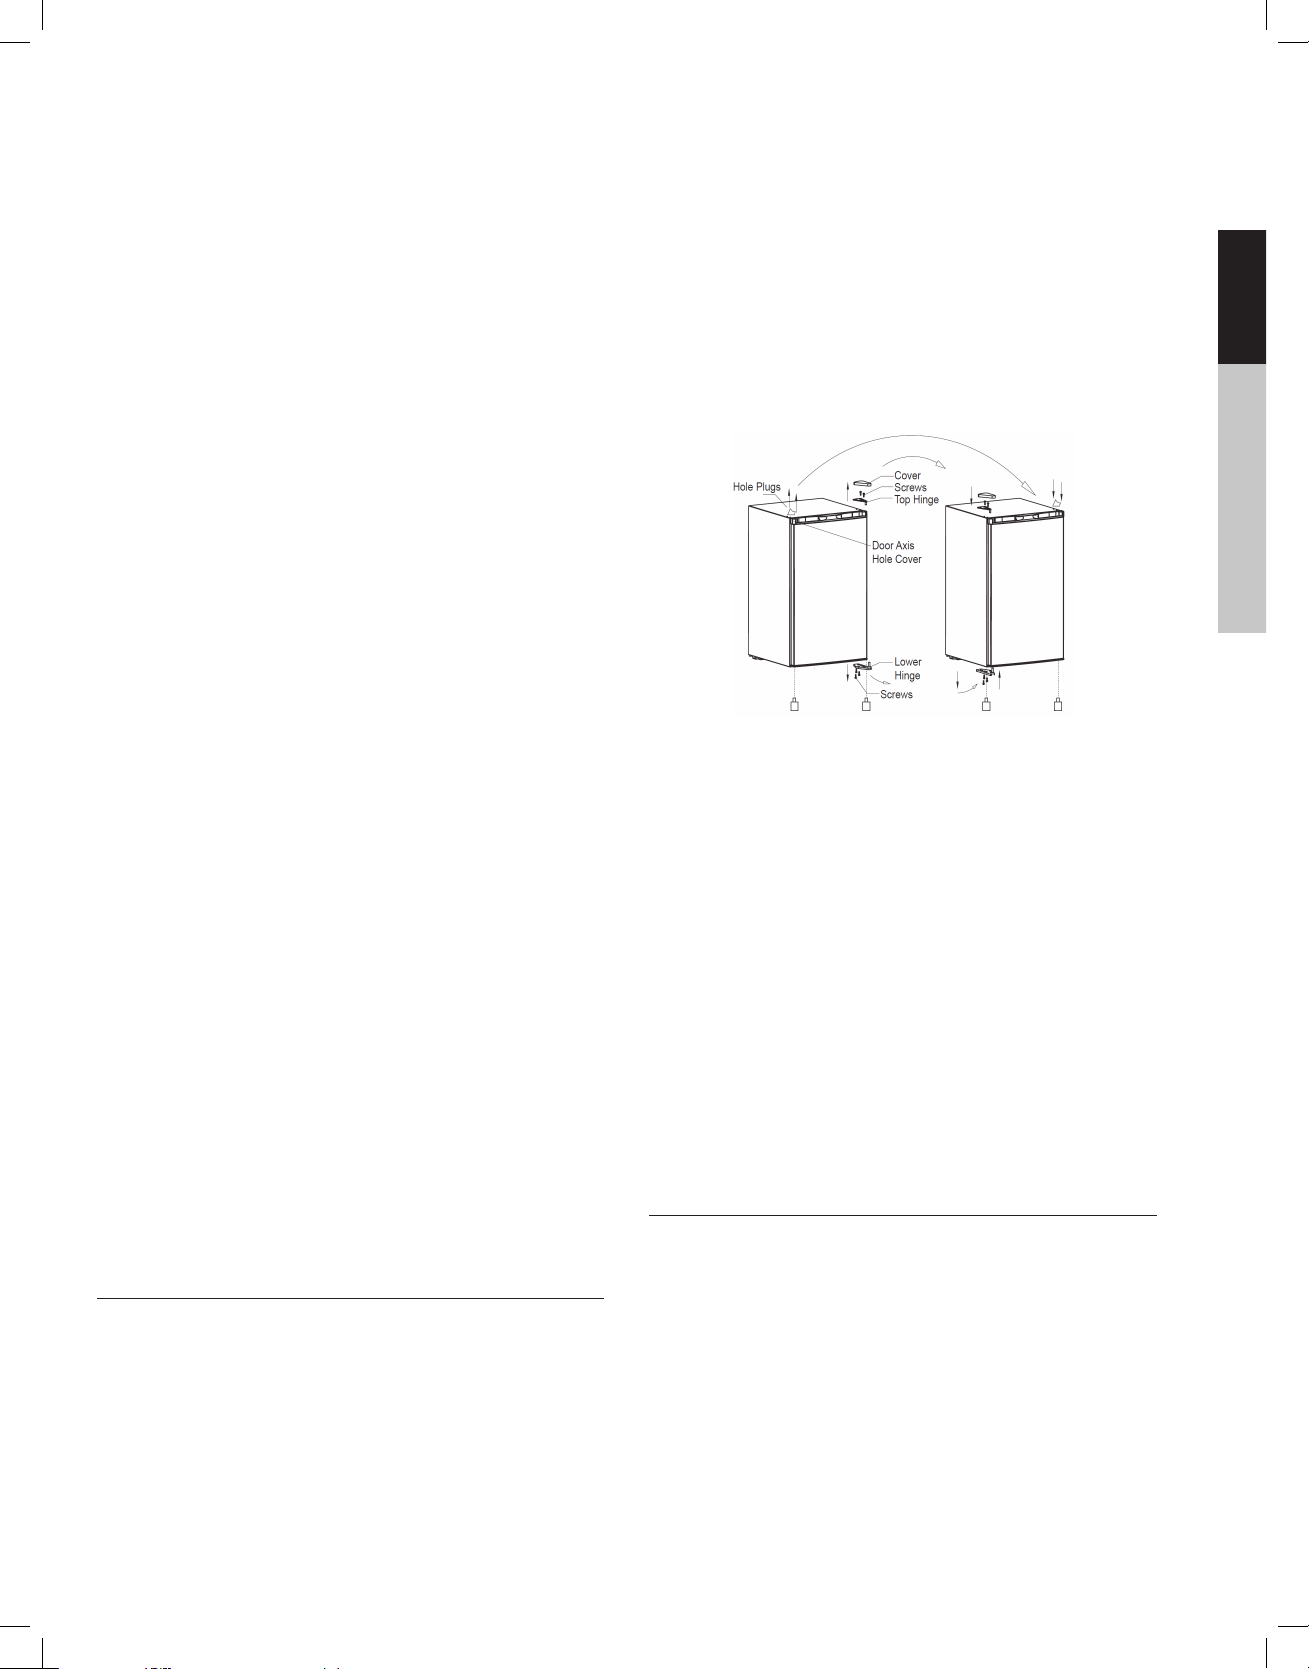
DOOR REVERSAL
1. Remove any loose items in the refrigerator and carefully
turn refrigerator on its back.
2. Remove the top hinge cover using a flat head screw driver
and gently push up.
3. Using a Phillips head screwdriver, loosen and remove the
screws holding the top hinge in place.
4. Remove top hinge and carefully li o the door.
5. Remove the screw hole plugs from the opposite side and
insert the plugs in the screw hole openings of the previous-
ly removed screws.
6. Remove both front leveling legs.
7. Loosen the screws holding the lower hinge bracket to the
refrigerator and remove screws and bracket.
8. Align lower hinge bracket on opposite side and insert
screws into the holes.
9. Align hole in the door with the door pin in lower hinge and
gently push down until firm.
10. Re-install both leveling legs.
11. Align upper hinge bracket with screw holes, insert screws
and partially secure, check that door and cabinet are properly aligned and then secure tightly.
12. Replace top hinge cover.
NOTE: As the door gets pressed in during shipping, aer reversing the door, the gasket may have to be reset. This is done
to prevent the cool refrigerated air from escaping. If there is a
gap between the door gasket and the cabinet, set the gasket
by gently pulling it out to seal the gap.
DOOR ALIGNMENT
1. Remove the top hinge cover by using a flathead screwdriver. Place the head under the front edge of the cap and
gently li.
2. Loosen the top hinge screws using a Phillips head screw
driver.
3. Adjust the door or put a spacer in between and tighten the
screws.
4. Replace the top hinge cover by aligning the rear of the
cover with the rear of the hinge. Press firmly on the front of
the cover until it snaps in place.
CLEANING & CARING FOR YOUR APPLIANCE
A clean, damp cloth with mild detergent or water and baking
soda should be used to clean the interior of the unit, aer it is
defrosted or before use.
Go over once more with a damp cloth (sans soap) to ensure
there is no residue le inside aer cleaning. Clean the gasket
carefully as well for best performance.
WARNING
To avoid electric shock, always unplug your refrigerator before
cleaning. Ignoring this warning may result in death or injury.
CAUTION
Before using cleaning products, always read and follow manu-
–7–
Page 8

ENGLISH ESPAÑOL FRANÇAIS
facturer’s instructions and warnings to avoid personal injury or
product damage.
TROUBLESHOOTING
Refrigerator does not operate:
• Check if thermostat control is not in the “0” position.
• Check if refrigerator is plugged in.
• Check if there is power at the wall outlet, by checking the
circuit breaker.
Food temperature appears too warm:
• Frequent door openings. Reduce the times you open the
door.
• Allow time for recently added warm food to reach fresh food
temperature.
• Check gaskets for proper seal.
• Adjust temperature control to colder setting.
Food temperature is too cold:
• If temperature control setting is too cold, adjust to a warmer
setting and allow several hours for temperature to adjust.
Refrigerator runs too frequently:
• This may be normal to maintain constant temperature during
high temperature and humid days.
• Doors may have been opened frequently or for an extended
period of time.
• Check gasket for proper seal.
• Check to see if doors are completely closed.
Moisture build up on interior of exterior of the refrigerator:
• This is normal during high humidity periods.
• Prolonged or frequent door openings.
• Check door gasket for proper seal.
Refrigerator has an odor:
• Interior needs cleaning.
• Foods improperly wrapped of sealed are giving o odors.
Refrigerator door does not shut properly:
• Level the refrigerator.
• Re-align refrigerator door.
• Check for blockages, e.g. food containers, crisper cover,
shelves, bins, etc.
Popping or cracking sound when the compressor comes on:
• Check to ensure the refrigerator is level.
• The floor may be uneven or weak. The refrigerator rocks
on the floor when it is moved slightly. Be sure the floor can
adequately support the refrigerator. Level the refrigerator by
putting wood or metal shims under part of the refrigerator.
• The refrigerator is touching the wall. Re-level the refrigerator
and move it from the wall. See the “Installing Your Refrigerator” section.
CUSTOMER SUPPORT
Before contacting customer support, please see the troubleshooting guide above.
Visit our website to contact us, find answers to Frequently Asked Questions, and for other resources which may include an updated
version of this user’s manual.
WWW.IMPECCA.COM
–8–
Page 9

ENGLISHESPAÑOLFRANÇAIS
ONE-YEAR LIMITED APPLIANCE WARRANTY (US)
Impecca™ warrants this product against defects in
material and workmanship to the original purchaser
as specified below.
PARTS AND LABOR– if the product is determined to have a manufacturing defect, within
a period of one year from the date of the original purchase, Impecca™, at its own discretion,
will repair or replace the product parts at no
charge to you in the U.S.A.
To obtain warranty service by an authorized Impecca™ service center, please email us at: service@impecca.com to obtain a Repair and Maintenance Authorization (RMA) number and received instructions
on how the repair and/or replacement procedure will
take place.
Any glass materials included with the appliance will be covered for a period of 60 days
from purchase.
Impecca™ specifically excludes from this warranty
any non-electric/mechanical attachments, accessories and disposable parts including but not limited
to outside case, connecting cables, batteries and AC
adapters. Impecca™ reserves the right to repair or replace defective products with the same, equivalent or
newer models.
We reserve the right to either repair or replace product at our discretion. Replacement may be either
new or refurbished and while every endeavor will be
made to ensure it is the same model, if not possible it
will be equal or higher specification.
Normal “Wear and Tear” is not covered by this warranty. Further, Impecca™ hereby reserves the right to
determine “Wear and Tear” on any and all products.
Tampering or opening the product casting or shell
will void this warranty in its entirety.
Exclusions: This warranty does not cover the following:
1. Any product that has a defaced or covered serial
number.
2. Products that have been transferred to a second
owner.
3. Rust on the interior or exterior of the unit.
4. Products listed as “As-Is” or “Refurbished.”
5. Food loss due to any product failure.
6. Window air conditioners installed in a wall.
7. The product if used in a commercial setting.
8. Service calls that do not involve product malfunction.
9. Service calls for a product ruined by not following
the provided instructions.
10. Service calls to correct improper installation.
11. Costs associated with making the product accessible for servicing (including but not limited to
removal of trim/molding/cabinetry, etc.)
12. Service calls to replace any consumables such as
light bulbs, filters, etc.
13. Surcharges that may apply to service calls on
weekends, nights, holidays. Damages to the finish of appliance or household furnishings due to
installation of appliance.
14. Damages caused by any of the following: Acts
of God; fires; misuse; accidents; incorrect power
supply; service performed by unauthorized persons; use of non-genuine Impecca parts, etc.
ALL IMPLIED WARRANTIES, INCLUDING IMPLIED WARRANTIES OF MERCHANTABILITY AND FITNESS FOR A
PARTICULAR PURPOSE ARE LIMITED IN DURATION
TO 1 YEAR FROM THE DATE OF THE ORIGINAL RETAIL
PURCHASE OF THIS PRODUCT.
THESE WARRANTIES AND REMEDIES ARE THE SOLE
AND EXCLUSIVE WARRANTIES AND REMEDIES IN
CONNECTION WITH THE SALE AND USE OF THE
PRODUCT. NO OTHER WARRANTIES, ORAL OR WRITTEN, EXPRESSED OR IMPLIED, ARE GIVEN.
IMPECCA™ IS NOT RESPONSIBLE OR LIABLE FOR ANY
DAMAGE, WHETHER SPECIAL, INCIDENTAL, CONSEQUENTIAL, DIRECT OR OTHERWISE, OR WHETHER
KNOWN OR SHOULD HAVE BEEN KNOWN TO IMPECCA™, INCLUDING LOST PROFITS, GOODWILL, AND
PROPERTY AND PERSONAL INJURY RESULTING FROM
ANY BREACH OF WARRANTY, THE INABILITY TO USE
THE PRODUCT OR UNDER ANY LEGAL THEORY IN
CONTRACT OR TORT. IMPECCA LIABILITY IS LIMITED
TO THE ACTUAL PURCHASE PRICE PAID TO THE RETAIL SELLER OF THE DEFECTIVE PRODUCT.
No Impecca™ dealer, agent or employee is authorized to make any modification, extension, change
or amendment to this warranty without the written
consent and authorization from Impecca™.
Some states do not allow the exclusion or limitation
of implied warranties or liability for incidental or consequential damages, or do not allow a limitation on
how long an implied warranty lasts, so the above
limitations or exclusions may not apply to you. This
warranty gives you specific legal rights, and you have
other rights, which vary from state to state.
Note: Our Warranty center services only to Continental
U.S.A.
–9–
Page 10

ENGLISH ESPAÑOL FRANÇAIS
TABLA DE CONTENIDO
Seguridad Del Refrigerador ............................................................................................................................11
Instrucciones Importantes De Seguridad ....................................................................................................12
Iniciando ............................................................................................................................................................13
Instalando Su Electrodoméstico ...................................................................................................................13
Diagrama De La Unidad ..................................................................................................................................14
Operación ..........................................................................................................................................................14
Inversión De La Puerta ....................................................................................................................................15
Soporte Al Cliente.............................................................................................................................................16
Limpieza Y Cuidados De Su Electrodoméstico ...........................................................................................16
Solución De Problemas ...................................................................................................................................16
–10–
Page 11

ENGLISHESPAÑOLFRANÇAIS
SEGURIDAD DEL REFRIGERADOR
Su seguridad y la de los demás es muy importante para nosotros.
CONSERVE ESTAS INSTRUCCIONES. PUEDE NECESITARLAS EN EL FUTURO.
I
Este es el Símbolo de Alerta de Seguridad. Cuando se muestra este símbolo, esté alerta a posibles
riesgos que pueden lastimarlo o matarlo, a usted u otros alrededor de este electrodoméstico. Todos
los mensajes de seguridad seguirán a continuación del Símbolo de Alerta de Seguridad y cualquiera
de las palabras “DANGER” (Peligro), “WARNING” (Advertencia) o “CAUTION” (Precaución).
I DANGER I
DANGER (PELIGRO) SIGNIFICA QUE LA FALTA DE ATENCIÓN AL AVISO DE SEGURIDAD PUEDE RESULTAR EN DAÑOS PERSONALES SEVEROS O LA MUERTE.
I WARNING I
WARNING (ADVERTENCIA) SIGNIFICA QUE LA FALTA DE ATENCIÓN AL AVISO DE SEGURIDAD PUEDE
RESULTAR EN UN DAÑO IMPORTANTE AL PRODUCTO O SERIOS DAÑOS PERSONALES O LA MUERTE.
I CAUTION I
CAUTION (PRECAUCIÓN) SIGNIFICA QUE LA FALTA DE ATENCIÓN A ESTE DISPOSITIVO DE SEGURIDAD
PUEDE RESULTAR EN DAÑOS PERSONALES MENORES O MODERADOS O DAÑOS A LA PROPIEDAD O
EQUIPO.
Todos los mensajes de seguridad lo alertarán de posibles riesgos. Se proporcionan instrucciones
para guiarlo en cómo reducir sus probabilidades de lesión.
I GAS REFRIGERANTE INFLAMABLE I
PELIGRO – Riesgo de incendio o explosión. En esta unidad se utiliza refrigerante inflamable. Las reparaciones deben ser
realizadas únicamente por parte de un servicio profesional capacitado.
NO utilice dispositivos mecánicos para descongelar el refrigerador. NO perfore los tubos del refrigerante.
PRECAUCIÓN – Riesgo de incendio o explosión. En esta unidad se utiliza refrigerante inflamable. Disponga de este apara-
to de acuerdo con las normas federales o locales.
PRECAUCIÓN – ADVERTENCIA DE NIÑOS ATRAPADOS – Para evitar que los niños se queden atrapados adentro, cuando se
deshaga de la unidad retire las puertas y conserve los entrepaños dentro de la unidad.
Proposición 65 advertencia para los residentes de California
Advertencia
Cáncer y daño en la reproducción
I
www.p65warnings.ca.gov
–11–
Page 12

ENGLISH ESPAÑOL FRANÇAIS
INSTRUCCIONES IMPORTANTES DE SEGURIDAD
CONSERVE ESTAS INSTRUCCIONES. PUEDE NECESITARLAS EN EL FUTURO.
1. Este refrigerador debe instalarse y ubicarse de acuerdo con las instrucciones de instalación antes de ser utilizado.
2. No permita que los niños trepen, se paren o se cuelguen de los entrepaños del refrigerador, pueden dañarlo y resultar lesionados
severamente.
3. No almacene o use gasolina ni otros vapores y líquidos inflamables en las cercanías de este o cualquier otro electrodoméstico.
4. Mantenga los dedos lejos del espacio entre las puertas y el gabinete. Tenga cuidado al cerrar las puertas cuando hay niños en el área.
5. Desconecte el refrigerador antes de limpiarlo o hacerle reparaciones.
6. Le recomendamos ampliamente que cualquier servicio sea realizado por un técnico calificado.
7. No instale el refrigerador en lugares con temperaturas extremadamente frías o calientes.
8. No coloque el refrigerador cerca de fuentes de calor o flamas abiertas.
9. Limpie el refrigerador con un paño suave y húmedo. Elimine las manchas con jabón suave. No limpie la unidad con solventes de tipo
industrial o químicos abrasivos.
10. No coloque objetos pesados en la parte superior del refrigerador.
11. Nunca instale el refrigerador donde hay mucha humedad o en áreas donde pueda haber salpicaduras de agua.
12. No permita que los niños se cuelguen de las puertas; el refrigerador puede volcarse y lastimarlos.
13. Nunca coma alimentos que se hayan estropeado por haber estado almacenados demasiado tiempo en el refrigerador o dentro de un
refrigerador descompuesto.
14. No utilice herramientas filosas dentro del refrigerador (como un picahielos para retirar el hielo) ya que puede ocasionar daños.
15. Si no va a usar el refrigerador por un periodo de tiempo largo, retire todos los alimentos del refrigerador y desconéctelo.
16. Una vez que su refrigerador está en funcionamiento, no toque las superficies frías en el compartimiento del congelador, particularmente cuando las manos están húmedas o mojadas. La piel puede adherirse a las superficies extremadamente frías.
17. No vuelva a congelar alimentos que han sido descongelados completamente. Puede volver a congelar alimentos descongelados si
aún están fríos y tienen cristales de hielo.
18. Este refrigerador no debe empotrarse o embutirse en un gabinete cerrado. Está diseñado para una instalación independiente.
ADVERTENCIA SOBRE NIÑOS ATRAPADOS
Existe el riesgo de que los niños queden atrapados dentro de un refrigerador. Antes de desechar su refrigerador o congelador viejo:
1. Quite las puertas.
2. Deje los entrepaños colocados en su lugar para que los niños no puedan meterse fácilmente.
PRECAUCIÓN: NO SE RECOMIENDA EL USO DE CABLES DE EXTENSIÓN.
PRECAUCIÓN: RIESGO DE FUEGO O EXPLOSIÓN.
DESHÁGASE DE ESTA UNIDAD ADECUADAMENTE DE ACUERDO A LOS REGLAMENTOS FEDERALES O LOCALES. LA UNI-
DAD UTILIZA REFRIGERANTE INFLAMABLE, LO CUAL DE ACUERDO A LAS LEYES FEDERALES DEBEN SER ELIMINADOS
ANTES DE DESHACERSE DE LA UNIDAD.
PARA USO DOMÉSTICO
ÚNICAMENTE
GUARDE ESTAS INSTRUCCIONES
–12–
Page 13

ENGLISHESPAÑOLFRANÇAIS
INICIANDO
calentador de agua o radiador. También evite la luz directa del sol
ya que puede incrementar el consumo eléctrico.
INSTRUCCIONES DE CONEXIÓN A TIERRA
Este electrodoméstico debe conectarse a tierra. Esto se logra al asegurarse que el enchufe se conecte en un tomacorrientes aterrizado.
De esta forma, en caso de un corto circuito, se reduce el riesgo de
una descarga eléctrica al proveer un cable de escape para la corriente eléctrica. Este electrodoméstico viene equipado con un cable que cuenta con un alambre para la tierra física y una clavija con
tres patas, una de ellas para la conexión a tierra física.
ADVERTENCIA: El uso inadecuado del enchufe aterrizado puede
resultar en el riesgo de descarga eléctrica. Consulte con un electricista o persona de servicio calificados si no ha comprendido bien
las instrucciones de conexión a tierra o si existen dudas sobre si el
electrodoméstico está adecuadamente conectado a tierra. Si es necesario utilizar una extensión, utilice únicamente una extensión de
tres alambres que cuente con una clavija de tres patas y conecte a
un tomacorrientes con tres orificios en donde pueda conectar la extensión. El calibre marcado en el cable de extensión debe ser mayor
o igual que el calibre especificado para el electrodoméstico.
Nota, todas las imágenes en este manual de instrucciones son
para propósitos indicativos, la apariencia física y opciones de su
modelo pueden variar.
NÚMERO DE SERIE Y MODELO
Por favor, a continuación registre su número de serie y modelo.
Puede encontrar la placa del número de serie en la pared superior
izquierda en la parte interna del refrigerador.
Número de Modelo: _________________________
Número de Serie: ___________________________
Fecha de Compra: __________________________
ANTES DE DESHACERSE DE SU REFRIGERADOR VIEJO
• Retire la(s) puerta(s) y deje los entrepaños (para evitar que los
niños trepen dentro del refrigerador) y pida que sea retirado de
su casa por un técnico calificado
• Revise con su vendedor si ellos se pueden llevar su aparato viejo y deshacerse de él o reciclarlo en forma responsable.
• Vaya a www.epa.gov/rad para tener mayor información sobre
el Deshecho Responsable de Electrodomésticos
Las temperaturas extremadamente frías también pueden evitar
que el electrodoméstico funcione eficientemente. Esta unidad no
está diseñada para se en una cochera o en exteriores. No coloque
ninguna cubierta como cortina o sábana sobre la unidad.
Cuando instale la unidad asegúrese que hay al menos 5 pulgadas
de espacio libre a ambos lados del refrigerador y en la parte trasera, así como 5 pulgadas en la parte superior de la unidad. Esto
permitirá que el aire circule alrededor del refrigerador y mejorar la
eficiencia del proceso de enfriamiento.
NIVELANDO LA UNIDAD
Es importante que mantenga la unidad nivelada de modo que la
puerta cierre correctamente y evite problemas que pueden causar
que falle la refrigeración efectiva. Para nivelar la unidad gire las dos
patas ajustables al frente del refrigerador en el sentido de las manecillas del reloj o al contrario para levantar o bajar las esquinas.
Consejo: Si alguien puede empujar el refrigerador hacia atrás y hacia arriba permitirá quitar peso del refrigerador y hacer más fácil y
rápido el ajuste.
LIMPIEZA ANTES DEL USO
Limpie dentro de la unidad con una solución ligera de bicarbonato
y agua. Después enjuague con agua tibia usando un paño o esponja
húmedos. Lave los entrepaños y charolas con agua tibia y jabonosa
y seque completamente antes de colocarlos dentro de la unidad.
Limpie el exterior de la unidad con un trapo húmedo.
Nota: Esta unidad se envía con un protector de plástico-wrap
alrededor del exterior. Eliminar por completo antes de su uso.
SUMINISTRO DE ENERGÍA
• Asegúrese de conectar esta unidad en un tomacorrientes
adecuado (115 voltios, 15 amperios) y conectado a tierra.
• Debe asegurarse que la clavija de tres patas esté conectada
a un tomacorrientes con tres entradas.
•
AVISOS DE SEGURIDAD
Este electrodoméstico está destinado para ser utilizado en una casa
o en aplicaciones como:
• Área de alimentos para el personal en tiendas, oficinas u otros
ambientes de trabajo
• Uso individual en habitaciones de hotel y otro tipo de ambientes residenciales
INSTALANDO SU ELECTRODOMÉSTICO
UBICACIÓN
Cuando seleccione la ubicación de su unidad asegúrese que el piso
esté plano, nivelado y la habitación está bien ventilada. Evite colocar la unidad cerca de una fuente de calor como un horno, estufa,
–13–
Page 14

ENGLISH ESPAÑOL FRANÇAIS
DIAGRAMA DE LA UNIDAD
1. Bisagra superior con tapa
2. Compartimento del congelador
3. Charola de escurrimientos
4. Control de temperatura con botón para descongelado manual
5. Entrepaño completo
6. Medio entrepaño
7. Pata niveladora
8. Charola desmontable de la puerta
9. Soporte para latas (3 en total)
10. Compartimento desmontable de la puerta
11. Compartimento en la puerta para botellas de 1 galón y 2 litros
12. Bisagra inferior con pata niveladora
13. Cajón para dulces
NOTA:
• Al colocar el control de temperatura en la posición “0” se
detiene el ciclo de enfriamiento pero no apaga la energía en
la unidad.
• Si la unidad está desconectada, ha perdido potencia o está
apagada, debe esperar de 3 a 5 minutos antes de reconectar la unidad. Si intenta encender la unidad antes de este
tiempo de espera, la unidad no se encenderá.
(Nota: Si el refrigerador ha sido colocado en una posición
horizontal o inclinada durante cualquier periodo de tiempo
vuélvalo a colocar en posición vertical y espere 24 horas antes
de conectar la unidad).
COMPARTIMENTO CONGELADOR / USO DE LAS CHAROLAS DE HIELO
Estos compartimentos están diseñados para hacer cubos de hielo
y para almacenamiento de alimentos por corto tiempo (unos
cuantos días a lo mucho).
ADVERTENCIA: Este compartimiento no está lo suficientemente
frío para congelar alimentos en forma segura por más de 5 días.
OPERACIÓN
CONTROL AJUSTABLE DE TEMPERATURA:
Su unidad solo tiene un control para regular la temperatura en el
compartimento. El control de temperatura está localizado en el
lado superior derecho del compartimento.
La primera vez que prenda la unidad, fije el control de temperatura en “5”. El rango del control de temperatura va desde la posición
“0” a la “5”. Después 24 a 48 horas, ajuste el control de temperatura a la posición que mejor se ajuste a sus necesidades. El ajuste
“3-4” debe ser apropiado para uso en casa u oficina.
Para apagar el refrigerador, coloque el control de temperatura a
“0”.
Si la charola de hielos se congelan en la parte inferior del compartimento, vierta un poco de agua tibia alrededor de ella para
aflojarlos. No utilice agua hirviendo, lo cual puede dañar las partes
de plástico, u objetos metálicos como un cuchillo o destornillador,
lo cual puede dañar el sistema de tubos del refrigerante. Lave la
charola de hielos únicamente en agua tibia. No lave en la lavadora
de platos.
ENTREPAÑOS INTERIORES DEL REFRIGERADOR
Para retirar o colocar un entrepaño desmontable completo:
1. Incline suavemente el entrepaño hacia arriba y deslice hacia
delante hasta que el entrepaño se ha retirado.
2. Para volver a colocar el entrepaño, deslice suavemente el
entrepaño hacia adentro.
INFORMACIÓN DE ALMACENAMIENTO DE ALIMENTOS
• Al almacenar alimentos frescos que no están pre-empacados, asegúrese de envolver o almacenar los alimentos en
recipientes herméticos y a prueba de humedad a menos
que se diga otra cosa. Esto asegurará una vida útil adecuada
y evita la transferencia de olores y sabores.
• Limpie los contenedores antes de guardarlos para evitar
–14–
Page 15

ENGLISHESPAÑOLFRANÇAIS
derramamientos inútiles.
• Los huevos deben mantenerse en una posición vertical en
su empaque original para maximizar su vida útil.
• La fruta debe ser lavada y secada, y después almacenada
en bolsas de plástico selladas antes de guardarlas en el refrigerador.
• Las verduras con cáscara deben guardarse en bolsas de
plástico o contenedores.
• Las verduras con hojas deben lavarse y escurrirse y luego
almacenarlas en bolsas de plástico o contenedores.
• Debe permitirse que los alimentos calientes se enfríen antes
de guardarlos en el refrigerador. Esto evitará un uso innecesario de energía.
• Los pescados y mariscos frescos deben usarse el mismo día
en que se compran.
• Cuando almacene carne en la sección de alimentos frescos,
mantenga el empaque original o vuelva a envolverlos conforme sea necesario. Siga las siguientes sugerencias para un
almacenamiento seguro:
• Pollo 1-2 días
• Carne molida 1-2 días
• Cortes fríos 3-5 días
• Filetes/Asados 3-5 días
• Carnes ahumadas/Curadas 7-10 días
• Todo lo demás 1-2 días
INVERSIÓN DE LA PUERTA
1. Retire cualquier artículo suelto en el refrigerado y con cuidado recline el refrigerador ligeramente hacia atrás.
2. Retire la tapa de la bisagra superior usando un destornillador
de cabeza plana y empuje hacia arriba con cuidado.
3. Utilizando un destornillador Phillips, afloje y retire los tornillos que mantienen la bisagra superior en su lugar.
4. Retire la bisagra inferior y levante la puerta con cuidado.
5. Retire los tapones de los orificios de los tornillos en el lado
opuesto e inserte esos tapones en las aperturas de los orificios de los tornillos que acaba de retirar.
6. Retire ambas patas niveladoras.
7. Afloje los tornillos que sostienen el soporte de la bisagra inferior en el refrigerador y retire los tornillos y el soporte.
8. Alinee el soporte inferior de la bisagra en el lado opuesto e
inserte los tornillos en los orificios.
9. Alinee el orificio en la puerta con el pin de la puerta en el
soporte inferior y presione hacia abajo suavemente hasta que
quede firme.
10. Reinstale ambas patas niveladoras.
11. Alinee el soporte superior con los orificios de los tornillos,
inserte los tornillos y atorníllelos de forma parcial, revise que
la puerta y los gabinetes están alineados adecuadamente y
después apriete los tornillos.
12. Coloque la tapa de la bisagra superior.
SONIDOS NORMALES DE OPERACIÓN
• Sonidos de agua hirviendo, sonidos de gorgoteos o ligeras
vibraciones que son el resultado del refrigerante circulando
a través de los tubos del refrigerante.
• El control del termostato hará clic cuando se encienda y se
apague.
CONSEJOS DE AHORRO DE ENERGÍA
• El refrigerador debe ser colocado en el área más fría de una
habitación, lejos de aparatos productores de calor o ductos
de la calefacción y lejos de la luz directa del sol.
• Permita que los alimentos calientes se enfríen a temperatura ambiente antes de colocarlos en el refrigerador. Al
sobrecargar de alimentos el refrigerador se fuerza a que la
compresora funcione más tiempo y por lo tanto incrementar el consumo de energía. Los alimentos que se enfrían
muy despacio pueden perder calidad o echarse a perder.
• Asegúrese de envolver los alimentos adecuadamente, y limpie los contenedores antes de colocarlos en el refrigerador.
• Los entrepaños no deben ser cubiertos con papel aluminio,
papel encerado o toallas de papel. La envoltura interfiere
con la circulación de aire frío, haciendo que el refrigerador
sea menos eficiente.
• Organice los alimentos para reducir las aperturas de la
puerta y las búsquedas largas. Saque tantos artículos como
sea posible en cada ocasión, y cierre la puerta lo más pronto
posible.
NOTA: Ya que la puerta se presiona durante el envío, después
de invertir la puerta, se debe restaurar el empaque. Esto se hace
para evitar que el aire refrigerado escape. Si hay un hueco entre el
empaque de la puerta y el gabinete, ajuste el empaque jalándolo
suavemente hacia fuera para sellar el hueco.
ALINEACION DE LA PUERTA
1. Retire la cubierta de la bisagra superior usando un destornillador de cabeza plana. Coloque la cabeza debajo de la orilla
frontal de la tapa y levante con cuidado.
2. Afloje los tornillos de la bisagra superior utilizando un destornillador Phillips.
3. Ajuste la puerta o ponga un espaciador y apriete los tornillos.
4. Vuelva a colocar la cubierta de la bisagra superior alineando
la parte posterior de a cubierta con la parte posterior de la
bisagra. Presione con firmeza en la parte frontal de la cubierta
hasta que encaje en su lugar.
–15–
Page 16

ENGLISH ESPAÑOL FRANÇAIS
Impecca™ garantiza al comprador original este producto contra
defectos en su material y mano de obra como se especifica a con-
tinuación.
PARTES Y MANO DE OBRA– Si se determina que el pro-
ducto tiene defectos de fabricación, dentro del periodo
de un (1) año a partir de la fecha de compra original,
Impecca™, a su discreción, reparará o reemplazara las
partes del producto sin ningún costo para usted en los
Estados Unidos.
Para obtener el servicio de garantía de un distribuidor autorizado
de Impecca™ envíenos un correo electrónico a: service@impecca.
com para obtener un número de Autorización de Reparación y
Mantenimiento (RAM) y recibir las instrucciones de cómo se llevará
a cabo el procedimiento de reparación o reemplazo.
Cualquier material de vidrio incluido en el electrodomés-
tico estará cubierto por un periodo de sesenta (60) días a
partir de la fecha de compra.
Impecca™ excluye de esta garantía accesorios no eléctricos o
mecánicos, accesorios y partes desechables incluyendo, pero no
limitado, a la carcaza, cables de conexión, baterías, adaptadores
A/C. Impecca™ se reserva el derecho de reparar o reemplazar un
producto defectuoso con un modelo igual, equivalente o nuevo
modelo.
Nos reservamos el derecho ya sea de reparar o reemplazar el
producto a nuestra discreción. El reemplazo puede ser nuevo o
reacondicionado tratando de asegurar de que se trate del mismo
modelo, si el mismo modelo no está disponible, se reemplazará
con un modelo de especificaciones iguales o superiores.
El “desgaste” normal no está cubierto por esta ni por ninguna
otra garantía. Adicionalmente, Impecca™ se reserva el derecho de
determinar el “desgaste” de cualquiera o todos los productos. El
violar o abrir el chasis del producto invalidará esta garantía por
completo.
Excepciones: Esta garantía no cubre lo siguiente:
1. Cualquier producto que tenga un número de serie defectuo-
sos o cubierto
2. Productos que han sido transferidos a un segundo propieta-
rio
3. Óxido en la parte interna o externa de la unidad
4. Los productos listados como “Tal cual” o “Reformados”
5. Pérdida de alimentos debido a la falla del producto
6. Aires acondicionados que han sido instalados en un muro.
7. El producto si este ha sido utilizado en una ubicación comer-
cial
8. Llamadas de servicio que no involucren el mal funciona-
miento del producto
9. Llamadas de servicio de un producto estropeado por no se-
guir las instrucciones proporcionadas
10. Llamadas de servicio para corregir una instalación incorrecta
11. Costos asociados por hacer el producto accesible al servicio
(incluido pero no limitado a la remoción de ajustes/moldeo/
gabinete, etc.)
12. Llamadas de servicio para reemplazar consumibles como
bombillas, filtros, etc.
13. Recargos que pueden aplicar a llamadas de servicio los fines
de semana, por las noches, o durante las festividades. Daños
al acabado del electrodoméstico o muebles de la casa debi-
do a la instalación del electrodoméstico.
14. Daños causados por cualquiera de las siguientes causas:
Actos de Dios, incendios, mal uso. accidentes, suministro de
energía incorrecto, servicio realizado por personal no autori-
zado, el uso de partes no originales Impecca.
TODAS LAS GARANTÍAS IMPLÍCITAS, INCLUYENDO LAS GARANTÍAS
IMPLÍCITAS DE MERCADOTECNIA E IDONEIDAD PARA UN PROPÓ-
SITO EN PARTICULAR ESTÁN LIMITADAS A UNA DURACIÓN DE (1)
AÑO EN PARTES Y NOVENTA (90) DÍAS EN MANO DE OBRA DESDE
LA FECHA ORIGINAL DE COMPRA DEL PRODUCTO.
ESTAS GARANTÍAS Y MEDIDAS SON ÚNICAS Y EXCLUSIVAS EN RE-
LACIÓN CON LA VENTA Y USO DEL PRODUCTO. NO SE OTORGA
NINGUNA OTRA GARANTÍA, ORAL O ESCRITA, EN FORMA EXPRESA
O IMPLÍCITA.
IMPECCA™ NO SE HACE RESPONSABLE DE NINGÚN DAÑO, YA
SEA ESPECIAL, INCIDENTAL, CONSECUENTE, DIRECTO O DE
CUALQUIER OTRA NATURALEZA, YA SEA CONOCIDO O POR DAR
A CONOCER A IMPECCA™, INCLUYENDO LA PÉRDIDA DE GANAN-
CIAS, PLUSVALÍA, DAÑOS PERSONALES O EN LA PROPIEDAD RE-
SULTANTES DE CUALQUIER INCUMPLIMIENTO DE LA GARANTÍA,
LA INCAPACIDAD DE UTILIZAR EL PRODUCTO O BAJO NINGUNA
TEORÍA LEGAL EN CONTRATO O AGRAVIO. LA RESPONSABILIDAD
DE IMPECCA SE LIMITA AL PRECIO ACTUAL DE COMPRA PAGADO
AL VENDEDOR DEL PRODUCTO DEFECTUOSO.
Ningún distribuidor, agente o empleado de Impecca™ está au-
torizado para hacer ninguna modificación, extensión, cambio o
enmienda de esta garantía sin el consentimiento y autorización
escrita de Impecca™.
Algunos estados no permiten la exclusión o limitación de garan-
tías implícitas o la responsabilidad por daños incidentales o con-
secuentes, y no permiten una limitación en la duración de una
garantía implícita, de modo que las anteriores limitaciones o ex-
clusiones pueden no aplicarse a usted. Esta garantía le otorga de-
rechos específicos, y puede usted tener otros derechos, los cuales
varían de estado a estado.
Nota: El Centro de Servicio de Garantía hace envíos solo dentro del
territorio continental de E.U.
GARANTÍA LIMITADA POR UN AÑO
LIMPIEZA Y CUIDADOS DE SU
para que la temperatura se ajuste.
• El refrigerador se echa a andar muy seguido:
ELECTRODOMÉSTICO
• Esto puede ser normal para mantener la temperatura constante durante días con alta temperatura y humedad.
Se debe utilizar un paño limpio y humedecido en una solución de
agua con detergente suave o bicarbonato para limpiar el interior de
la unidad, después de descongelar o antes de usarlo.
Limpie nuevamente con un paño húmedo (sin jabón) para asegurar
de que no queden residuos adentro después de limpiar. Limpie el
empaque cuidadosamente para que pueda tener el mejor desempeño.
ADVERTENCIA
Para evitar descargas eléctricas siempre desconecte su refrigerador
antes de limpiarlo. Ignorar esta advertencia puede resultar en la
muerte o lesiones.
PRECAUCIONES
Antes de usar productos de limpieza, siempre lea y siga las instrucciones del fabricante y advertencias para evitar daños personales o
daños al producto.
SOLUCIÓN DE PROBLEMAS
EL REFRIGERADOR NO FUNCIONA
• Revise si el control del termostato no se encuentra en la
posición “0”
• Revise si el refrigerador está conectado
• Revise si hay electricidad en el tomacorrientes, revisando el
cortacircuitos
LA TEMPERATURA DE LOS ALIMENTOS PARECE ESTAR
MUY CALIENTE
• Apertura frecuente de la puerta. Reduzca las veces que abre
la puerta.
• Permita un tiempo para que los alimentos tibios recién guardados alcancen una temperatura fresca.
• Revise el empaque del refrigerador, debe sellar bien.
• Ajuste el control de temperatura a una temperatura más alta.
LA TEMPERATURA DE LOS ALIMENTOS ES DEMASIADO
FRÍA:
SOPORTE AL CLIENTE
Antes de entrar en contacto con soporte al cliente, vea nuestra guía de solución de problemas presentada anteriormente.
Visite nuestro sitio web para entrar en contacto con nosotros, encontrar respuestas a las Preguntas Más Frecuentes y para otros recursos
entre los cuales podría encontrar una actualización a este manual.
• Si el ajuste del control de temperatura es demasiado fría,
ajuste a una temperatura más baja y permita algunas horas
• Las puertas pueden haberse abierto con frecuencia o por un
periodo de tiempo largo.
• Revise que el empaque selle bien.
• Revise si la puerta está bien cerrada.
• Se ha generado humedad en el interior y exterior del refrigerador:
• Esto es normal en periodos de operación de gran humedad.
• Apertura prolongada o frecuente de las puertas
• Revise que el empaque selle bien.
EL REFRIGERADOR HUELE:
• El interior necesita limpieza.
• Los alimentos no están bien tapados y están produciendo
olor.
LA PUERTA DEL REFRIGERADOR NO CIERRA APROPIADAMENTE.
• Nivele el refrigerador.
• Alinee nuevamente la puerta del refrigerador.
• Revise si hay algún bloqueo, i.e., recipientes de alimentos,
tapaderas, entrepaños, cajones, etc.
SE ESCUCHAN ESTALLIDOS O CRUJIDOS CUANDO EL
COMPRESOR SE PONE EN FUNCIONAMIENTO:
• Revise que el refrigerador esté nivelado.
• El piso puede estar desnivelado o débil. El refrigerador puede
brincar en el suelo cuando se mueve ligeramente. Asegúrese
que el piso puede soportar adecuadamente el refrigerador.
Nivele el refrigerador poniéndole una cuña de madera o
metal por debajo.
• El refrigerador está tocando el muro. Nivele nuevamente el
refrigerador y aléjelo de la pared. Vea la sección “Instalado su
electrodoméstico”.
WWW.IMPECCA.COM
–16–
Page 17

ENGLISHESPAÑOLFRANÇAIS
GARANTÍA LIMITADA POR UN AÑO
Impecca™ garantiza al comprador original este producto contra
defectos en su material y mano de obra como se especifica a continuación.
PARTES Y MANO DE OBRA– Si se determina que el producto tiene defectos de fabricación, dentro del periodo
de un (1) año a partir de la fecha de compra original,
Impecca™, a su discreción, reparará o reemplazara las
partes del producto sin ningún costo para usted en los
Estados Unidos.
Para obtener el servicio de garantía de un distribuidor autorizado
de Impecca™ envíenos un correo electrónico a: service@impecca.
com para obtener un número de Autorización de Reparación y
Mantenimiento (RAM) y recibir las instrucciones de cómo se llevará
a cabo el procedimiento de reparación o reemplazo.
Cualquier material de vidrio incluido en el electrodoméstico estará cubierto por un periodo de sesenta (60) días a
partir de la fecha de compra.
Impecca™ excluye de esta garantía accesorios no eléctricos o
mecánicos, accesorios y partes desechables incluyendo, pero no
limitado, a la carcaza, cables de conexión, baterías, adaptadores
A/C. Impecca™ se reserva el derecho de reparar o reemplazar un
producto defectuoso con un modelo igual, equivalente o nuevo
modelo.
Nos reservamos el derecho ya sea de reparar o reemplazar el
producto a nuestra discreción. El reemplazo puede ser nuevo o
reacondicionado tratando de asegurar de que se trate del mismo
modelo, si el mismo modelo no está disponible, se reemplazará
con un modelo de especificaciones iguales o superiores.
El “desgaste” normal no está cubierto por esta ni por ninguna
otra garantía. Adicionalmente, Impecca™ se reserva el derecho de
determinar el “desgaste” de cualquiera o todos los productos. El
violar o abrir el chasis del producto invalidará esta garantía por
completo.
Excepciones: Esta garantía no cubre lo siguiente:
1. Cualquier producto que tenga un número de serie defectuosos o cubierto
2. Productos que han sido transferidos a un segundo propietario
3. Óxido en la parte interna o externa de la unidad
4. Los productos listados como “Tal cual” o “Reformados”
5. Pérdida de alimentos debido a la falla del producto
6. Aires acondicionados que han sido instalados en un muro.
7. El producto si este ha sido utilizado en una ubicación comercial
8. Llamadas de servicio que no involucren el mal funcionamiento del producto
9. Llamadas de servicio de un producto estropeado por no seguir las instrucciones proporcionadas
10. Llamadas de servicio para corregir una instalación incorrecta
11. Costos asociados por hacer el producto accesible al servicio
(incluido pero no limitado a la remoción de ajustes/moldeo/
gabinete, etc.)
12. Llamadas de servicio para reemplazar consumibles como
bombillas, filtros, etc.
13. Recargos que pueden aplicar a llamadas de servicio los fines
de semana, por las noches, o durante las festividades. Daños
al acabado del electrodoméstico o muebles de la casa debido a la instalación del electrodoméstico.
14. Daños causados por cualquiera de las siguientes causas:
Actos de Dios, incendios, mal uso. accidentes, suministro de
energía incorrecto, servicio realizado por personal no autorizado, el uso de partes no originales Impecca.
TODAS LAS GARANTÍAS IMPLÍCITAS, INCLUYENDO LAS GARANTÍAS
IMPLÍCITAS DE MERCADOTECNIA E IDONEIDAD PARA UN PROPÓSITO EN PARTICULAR ESTÁN LIMITADAS A UNA DURACIÓN DE (1)
AÑO EN PARTES Y NOVENTA (90) DÍAS EN MANO DE OBRA DESDE
LA FECHA ORIGINAL DE COMPRA DEL PRODUCTO.
ESTAS GARANTÍAS Y MEDIDAS SON ÚNICAS Y EXCLUSIVAS EN RELACIÓN CON LA VENTA Y USO DEL PRODUCTO. NO SE OTORGA
NINGUNA OTRA GARANTÍA, ORAL O ESCRITA, EN FORMA EXPRESA
O IMPLÍCITA.
IMPECCA™ NO SE HACE RESPONSABLE DE NINGÚN DAÑO, YA
SEA ESPECIAL, INCIDENTAL, CONSECUENTE, DIRECTO O DE
CUALQUIER OTRA NATURALEZA, YA SEA CONOCIDO O POR DAR
A CONOCER A IMPECCA™, INCLUYENDO LA PÉRDIDA DE GANANCIAS, PLUSVALÍA, DAÑOS PERSONALES O EN LA PROPIEDAD RESULTANTES DE CUALQUIER INCUMPLIMIENTO DE LA GARANTÍA,
LA INCAPACIDAD DE UTILIZAR EL PRODUCTO O BAJO NINGUNA
TEORÍA LEGAL EN CONTRATO O AGRAVIO. LA RESPONSABILIDAD
DE IMPECCA SE LIMITA AL PRECIO ACTUAL DE COMPRA PAGADO
AL VENDEDOR DEL PRODUCTO DEFECTUOSO.
Ningún distribuidor, agente o empleado de Impecca™ está autorizado para hacer ninguna modificación, extensión, cambio o
enmienda de esta garantía sin el consentimiento y autorización
escrita de Impecca™.
Algunos estados no permiten la exclusión o limitación de garantías implícitas o la responsabilidad por daños incidentales o consecuentes, y no permiten una limitación en la duración de una
garantía implícita, de modo que las anteriores limitaciones o exclusiones pueden no aplicarse a usted. Esta garantía le otorga derechos específicos, y puede usted tener otros derechos, los cuales
varían de estado a estado.
Nota: El Centro de Servicio de Garantía hace envíos solo dentro del
territorio continental de E.U.
–17–
Page 18

ENGLISH ESPAÑOL FRANÇAIS
TABLE DES MATIÈRES
Sécurité Du Réfrigérateur ................................................................................................................................19
Consignes De Sécurité Importantes .............................................................................................................20
Démarrage .........................................................................................................................................................21
Installation De L’appareil .................................................................................................................................21
Diagramme De L’unité .....................................................................................................................................22
Opération ...........................................................................................................................................................22
Reversal De Porte .............................................................................................................................................23
Soutien Technique ...........................................................................................................................................24
Nettoyage & Entretien De Votre Appareil .....................................................................................................24
Dépannage ........................................................................................................................................................24
–18–
Page 19

ENGLISHESPAÑOLFRANÇAIS
SÉCURITÉ DU RÉFRIGÉRATEUR
Votre sécurité et celle des autres sont très importantes pour nous.
VEUILLEZ CONSERVER CES INSTRUCTIONS. VOUS POURRIEZ EN AVOIR BESOIN DANS LE FUTUR.
I
C’est le symbole d’alerte de sécurité. Lorsque ce symbole apparaît, prenez garde aux dangers potentiels qui peuvent blesser ou vous tuer ou blesser d’autres personnes autour de cet appareil. Tous les
messages de sécurité auront le symbole d’alerte et les mots «DANGER», «Avertissement» ou «Attention».
I DANGER I
DANGER SIGNIFIE QUE LE NON-RESPECT DES CONSIGNES DE SÉCURITÉ PEUT ENTRAÎNER DES PERSONNES SÉVÈRES BLESSURE OU DÉCÈS.
I WARNING I
AVERTISSEMENT SIGNIFIE QUE LE NON-RESPECT DES CONSIGNES DE SÉCURITÉ PEUT ENTRAÎNER
DES DOMMAGES EXTENSIFS AU PRODUIT OU BLESSURES GRAVES OU MORTELLES.
I CAUTION I
ATTENTION SIGNIFIE QUE LE NON-RESPECT DES CONSIGNES DE SÉCURITÉ PEUT ENTRAÎNER DES
BLESSURES, DES DOMMAGES MATÉRIELS OU DES DOMMAGES MATÉRIELS MINEURS OU MODÉRÉS.
Tout message de sécurité vous alertera des risques potentiels. Des instructions sont fournies pour
vous guider sur la façon de réduire vos risques de blessures.
I GAZ RÉFRIGÉRANT INFLAMMABLE I
DANGER - Risque d’incendie ou d’explosion. Réfrigérant inflammable utilisé dans l’unité. Les réparations doivent être eectuées
uniquement par un professionnel formé.
N’utilisez PAS d’appareils mécaniques pour dégivrer le réfrigérateur. NE PAS percer le tuyau de réfrigérant.
ATTENTION - Risque d’incendie ou d’explosion. Réfrigérant inflammable utilisé dans l’unité. Éliminer la propriété conformément aux
règlements fédéraux ou locaux.
ATTENTION - PIÉAGAGE D’ENFANTS AVERTISSEMENT - Pour éviter que des enfants ne soient coincés à l’intérieur, lors de la mise au
rebut de l’appareil, enlevez la porte et conservez les étagères à l’intérieur de l’appareil.
AVERTISSEMENT DE PROPOSITION 65 POUR LES RÉSIDENTS DE LA CALIFORNIE
ATTENTION
Cancer et eets nocifs sur la reproduction
I
www.p65warnings.ca.gov
–19–
Page 20

ENGLISH ESPAÑOL FRANÇAIS
CONSIGNES DE SÉCURITÉ IMPORTANTES
VEUILLEZ CONSERVER CES INSTRUCTIONS. VOUS POURRIEZ EN AVOIR BESOIN DANS LE FUTUR.
1. Ce réfrigérateur doit être correctement installé et situé conformément aux instructions d’installation avant d’être utilisé.
2. Ne laissez pas les enfants grimper, se tenir debout ou accrocher sur les étagères du réfrigérateur. Ils pourraient endommager le réfrigérateur et se blesser gravement.
3. Ne stockez pas ou n’utilisez pas d’essence ou d’autres vapeurs et liquides inflammables à proximité de cet appareil ou de tout autre appareil.
4. Gardez les doigts hors de l’espace entre les portes et l’armoire. Soyez prudent en fermant les portes lorsque les enfants sont dans la région.
5. Débranchez le réfrigérateur avant de le nettoyer et de le réparer.
6. Nous recommandons fortement que tout entretien soit eectué par une personne qualifiée.
7. Ne laissez pas le réfrigérateur dans des températures extrêmement froides ou chaudes.
8. Ne placez pas le réfrigérateur à proximité de sources de chaleur ou de flammes nues.
9. Nettoyez le réfrigérateur avec un chion doux et humide. Enlever les taches avec un savon doux. Ne nettoyez pas l’unité avec des solvants
de qualité industrielle ou des produits chimiques abrasifs.
10. Ne placez pas d’objets lourds sur le dessus du réfrigérateur.
11. N’installez jamais le réfrigérateur dans un endroit où il y a beaucoup d’humidité ou dans des endroits où l’eau peut éclabousser.
12. Ne laissez pas les enfants accrocher aux portes; le réfrigérateur peut être renversé et blesser les enfants.
13. Ne mangez jamais d’aliments qui pourraient s’être gâtés parce qu’ils ont été conservés trop longtemps dans le réfrigérateur ou entreposés
dans un réfrigérateur hors service.
14. N’utilisez pas d’outils tranchants à l’intérieur du réfrigérateur (comme un pique pour enlever la glace) car des dommages pourraient survenir.
15. Débranchez et retirez les aliments du réfrigérateur s’ils ne sont pas utilisés pendant une longue période.
16. Après le fonctionnement du réfrigérateur, ne touchez pas les surfaces froides du compartiment congélateur, en particulier lorsque les
mains sont humides ou mouillées. La peau peut adhérer à ces surfaces extrêmement froides.
17. Ne recongelez pas les aliments qui ont été complètement décongelés. Vous pouvez recongeler en toute sécurité les aliments décongelés
s’il est encore froid et si des cristaux de glace sont toujours présents.
18. Ce réfrigérateur ne doit pas être encastré ou encastré dans une armoire fermée. Il est conçu pour une installation autonome uniquement.
AVERTISSEMENT RISQUE DE PIÉGEAGE D’ENFANTS:
Risque de piégeage d’enfant. Avant de jeter votre ancien réfrigérateur ou congélateur:
1. Enlevez les portes.
2. Laissez les étagères en place afin que les enfants ne puissent pas facilement monter à l’intérieur.
ATTENTION: L’UTILISATION D’UN CORDON D’EXTENSION N’EST PAS RECOMMANDÉE.
ATTENTION: RISQUE D’INCENDIE OU D’EXPLOSION
ÉLIMINER LA PROPRIÉTÉ CONFORMÉMENT AUX RÈGLEMENTS FÉDÉRAUX OU LOCAUX. UTILISATION DE RÉFRIGÉRANT
INFLAMMABLE QUI, EN VERTU DE LA LOI FÉDÉRALE, DOIT ÊTRE ÉLIMINÉE AVANT L’ÉLIMINATION DU PRODUIT.
POUR USAGE DOMESTIQUE
SEULEMENT
CONSERVEZ CES INSTRUCTIONS
–20–
Page 21

ENGLISHESPAÑOLFRANÇAIS
DÉMARRAGE
INSTRUCTIONS POUR LA MISE À LA TERRE
Cet appareil doit être mis à la terre. Cette tâche est accomplie
en assurant que le connecteur est adéquatement branché dans
une prise de courant mise à la terre. Advenant un court-circuit,
le risque d’une décharge électrique est diminué en fournissant
un fil d’échappement au courant électrique. Cet appareil est
équipé d’un cordon d’alimentation avec un connecteur détenant un fil pour la mise à terre.
électrique.
Des températures extrêmement froides peuvent également empêcher l’appareil de fonctionner adéquatement. Cet appareil n’est
pas conçu pour une utilisation dans un garage ou une installation
extérieure. Ne placez aucun drap ou couverture sur l’appareil.
Au cours de l’installation, assurez-vous de garder un espacement
libre de 5 pouces minimum de chaque côté ainsi qu’à l’arrière et
au-dessus de l’appareil. Ceci permettra à de l’air froid de circuler
autour du réfrigérateur et ainsi permettre une meilleure eicacité.
AVERTISSEMENT: Une mauvaise utilisation d’une fiche de mise
à la terre peut causer une décharge électrique. Veuillez consulter
un électricien qualifié ou un technicien si les instructions pour la
mise à la terre ne sont pas complètement comprises ou s’il y a
un doute quant à la mise à la terre de l’appareil. S’il est nécessaire d’utiliser une corde de rallonge, assurez-vous d’utiliser une
rallonge à trois fils avec mise à la terre ainsi qu’une prise de courant adaptée. La puissance électrique indiquée sur la rallonge
doit être au moins aussi élevée que la puissance de l’appareil.
Note : Les images à l’intérieur de ce manuel y sont à titre indicatif
uniquement; l’apparence physique et les options sur votre modèle
peuvent varier.
NUMÉRO DE SÉRIE ET DE MODÈLE
Veuillez prendre en notre le numéro de série et le numéro du
modèle ci-dessous. Vous trouverez la plaque de renseignements
au coin gauche supérieur du mur d’intérieur du réfrigérateur.
Numéro du modèle : __________________________
Numéro de série : ____________________________
Date d’achat : ____________________________
AVANT DE JETER VOTRE ANCIEN RÉFRIGÉRATEUR
• Enlever toutes les portes, mais laissez les étagères à l’intérieur (cela empêchera les enfants d’y entrer), faites déplacer
l’unité de votre domicile par un technicien qualifié.
• Vérifiez avec votre revendeur si celui peut reprendre et disposer de manière responsable ou recycler l’unité pour vous.
• Visitez le www.epa.gov/rad pour plus de renseignements sur
la disposition responsable d’électroménagers.
CONSIGNES DE SÉCURITÉ
Cet appareil est destiné à un usage domestique et à des
applications similaires tels que :
• Cuisine en milieu de travail;
• Utilisation individuelle dans une chambre d’hôtel ou tout
autre type d’environnement résidentiel.
NIVELLEMENT DE L’APPAREIL
Il est important de garder l’appareil à niveau afin que la porte se
referme adéquatement. Ceci préviendra des problèmes au niveau
du refroidissement. Afin de niveler l’appareil, ajuster les quatre
pieds réglables dans le sens horaire ou antihoraire pour ajuster la
hauteur de chaque coin.
Conseil : Avoir quelqu’un pousser contre le haut du réfrigérateur
permettra un contrepoids et un accès plus facile ou pieds réglables.
NETTOYAGE AVANT UTILISATION
Essuyez l’intérieur de l’appareil avec une solution dissoute de bicarbonate de soude. Rincez ensuite avec de l’eau tiède en utilisant
une éponge ou un linge humide. Lavez les étagères et bacs dans
de l’eau savonneuse chaude et séchez-les complètement avant de
les remettre dans l’appareil. Nettoyez l’extérieur de l’appareil avec
un linge humide.
Remarque: Cet appareil est livré avec un plastique enveloppe
protectrice autour de l’extérieur. Retirer complètement avant
de l’utiliser.
SOURCE DE COURANT
• Assurez-vous de brancher la prise de mise à la terre appropriée (prise de 115 volts, prise de 15 ampères) mise à la terre.
• Vous devez vous assurer que les trois broches sont dans une
prise à trois branches.
INSTALLATION DE L’APPAREIL
EMPLACEMENT
Assurez-vous de définir un endroit au plancher plat, nivelé et bien
ventilé pour l’emplacement de votre appareil. Évitez de l’installer
près d’une source de chaleur telle qu’un four, un poêle, un radiateur ou une chaudière. Évitez également une exposition directe
au soleil, car cela pourrait aecter le niveau de consommation
Remarques: Lors de la connexion au mur, il devrait y avoir une
prise dédiée.
INSTRUCTIONS DE MISE À LA TERRE
Cet appareil doit être mis à la terre. Ceci est accompli en s’assurant
que la prise est insérée dans une prise correctement mise à la terre.
De cette façon, en cas de court-circuit électrique, le risque
–21–
Page 22

ENGLISH ESPAÑOL FRANÇAIS
d’électrocution est réduit en prévoyant un fil d’échappement
pour le courant électrique. Cet appareil est équipé d’un cordon
ayant un fil de mise à la terre avec une fiche de mise à la terre.
Votre appareil n’a qu’un seul contrôle pour réguler la température
dans le compartiment. Le contrôle de la température est situé sur
le côté supérieur droit du compartiment.
AVERTISSEMENT: Une mauvaise utilisation de la fiche de mise
à la terre peut entraîner un risque d’électrocution. Consultez un
électricien qualifié ou un technicien d’entretien si les instructions de mise à la terre ne sont pas complètement comprises
ou s’il existe un doute quant à la mise à la terre de l’appareil.
DIAGRAMME DE L’UNITÉ
1. Charnière supérieure avec couvercle
2. Compartiment congélateur
3. Bac d’égouttage
4. Contrôle de la température avec le bouton de dégivrage
manuel
5. Tablette complète
6. Demi-étagère
7. Pied de nivellement
8. Poubelle de porte amovible
9. Porte canettes (Total 3)
10. Contenant amovible de porte
11. Contenant de porte pour 1 gallon et 2L
12. Charnière inférieure avec pied de nivellement
13. Boîte à bonbons
La première fois que vous allumez l’appareil, réglez la commande
de température sur «5». La plage du contrôle de température est
à partir de la position «0» à «5». Après 24 à 48 heures, réglez le
contrôle de la température sur le réglage qui convient le mieux à
vos besoins. Le réglage de «3 - 4» devrait être approprié pour la
maison ou le bureau.
Pour éteindre le réfrigérateur, tournez la commande de température sur «0».
REMARQUE:
• Le fait de mettre la commande de température en position
«0» arrête le cycle de refroidissement mais ne coupe pas
l’alimentation de l’unité.
• Si l’unité est débranchée, a perdu son alimentation ou est
éteinte, vous devez attendre 3 à 5 minutes avant de redémarrer l’unité. Si vous tentez de redémarrer avant cette temporisation, l’appareil ne démarre pas.
(Remarque: Si le réfrigérateur a été placé en position horizontale ou inclinée pendant une certaine période, revenez en
position verticale et attendez 24 heures avant de brancher
l’appareil.)
COMPARTIMENT CONGELATEUR / UTILISATION DU PLATEAU À CUBE DE GLACE
OPÉRATION
CADRAN DE TEMPÉRATURE RÉGLABLE:
Ce compartiment est conçu pour la fabrication de glaçons et pour
le stockage alimentaire à court terme (quelques jours au maximum).
AVERTISSEMENT: Ce compartiment n’est pas suisamment froid
pour congeler les aliments en toute sécurité pendant plus de 5
jours.
Si le bac à glaçons gèle au fond du compartiment, versez un peu
d’eau chaude autour de celui-ci pour le desserrer. N’utilisez pas
d’eau bouillante, qui pourrait endommager les pièces en plastique, ou des objets métalliques tranchants, comme un couteau
ou un tournevis, qui pourraient endommager le circuit de refroidissement. Laver le bac à glaçons dans de l’eau tiède seulement.
Ne pas laver au lave-vaisselle.
ÉTAGÈRES D’INTÉRIEUR DE RÉFRIGÉRATEUR
Pour retirer ou remplacer une tablette coulissante pleine largeur:
1. Inclinez doucement l’étagère vers le haut et faites-la glisser vers
l’avant jusqu’à ce que l’étagère ait été complètement retirée.
2. Pour remplacer l’étagère, faites glisser doucement l’étagère vers
l’arrière.
–22–
Page 23

ENGLISHESPAÑOLFRANÇAIS
INFORMATION SUR LE STOCKAGE DES ALIMENTS
NOURRITURE FRAÎCHE
• Lorsque vous stockez des aliments frais qui ne sont pas
préemballés, assurez-vous d’emballer ou de ranger les
aliments dans un matériau étanche à l’air et à l’humidité, sauf
indication contraire. Cela garantira une durée de conservation
appropriée et empêchera le transfert des odeurs et des goûts.
• Essuyez les contenants avant de les entreposer pour éviter les
déversements inutiles.
• Les œufs doivent être conservés en position verticale dans
leur carton d’origine pour maximiser leur durée de conservation.
• Les fruits doivent être lavés et séchés, puis stockés dans des
sacs en plastique scellés avant d’être conservés au réfrigérateur.
• Les légumes avec des peaux doivent être conservés dans des
sacs en plastique ou des récipients.
• Les légumes à feuilles doivent être lavés et égouttés, puis
conservés dans des sacs ou des contenants en plastique.
• Les aliments chauds doivent être refroidis avant d’être
conservés dans la réfrigération. Cela empêchera l’utilisation
d’énergie inutile.
• Les fruits de mer frais devraient être utilisés le jour même de
l’achat.
• Lorsque vous stockez des viandes dans la section des aliments frais, conservez-les dans leur emballage d’origine ou
remballez-les au besoin. Suivez les suggestions ci-dessous
pour un stockage sûr:
• Poulet 1-2 jours
• Boeuf haché 1-2 jours
• Coupes à froid 3-5 jours
• Steaks / rôtis 3-5 jours
• Viandes fumées / fumées 7-10 jours
• Tous les autres 1-2 jours
SONS DE FONCTIONNEMENT NORMAUX
• Les étagères ne doivent pas être garnies de papier d’aluminium, de papier ciré ou de serviettes en papier. La doublure
interfère avec la circulation de l’air froid, rendant le réfrigérateur moins eicace.
• Organisez la nourriture pour réduire les ouvertures de portes
et les recherches prolongées. Retirer autant d’articles que
nécessaire en même temps, et fermer la porte le plus tôt
possible.
REVERSAL DE PORTE
1. Enlevez tout objet en vrac dans le réfrigérateur et tournez délicatement le réfrigérateur sur le dos.
2. Retirez le couvercle de la charnière supérieure à l’aide d’un
tournevis à tête plate et poussez doucement vers le haut.
3. À l’aide d’un tournevis cruciforme, desserrez et retirez les vis qui
maintiennent la charnière supérieure en place.
4. Retirez la charnière supérieure et soulevez délicatement la
porte.
5. Retirez les bouchons du trou de vis du côté opposé et insérez
les bouchons dans les ouvertures des trous de vis des vis précédemment retirées.
6. Retirez les deux pattes de mise à niveau avant.
7. Desserrez les vis retenant le support de la charnière inférieure
au réfrigérateur et retirez les vis et le support.
8. Alignez le support inférieur de la charnière du côté opposé et
insérez les vis dans les trous.
9. Alignez le trou de la porte avec l’axe de la porte dans la charnière inférieure et poussez doucement vers le bas jusqu’à ce
qu’il soit ferme.
10. Réinstallez les deux pieds de nivellement.
11. Alignez le support de la charnière supérieure avec les trous de
vis, insérez les vis et fixez-les partiellement, vérifiez que la porte
et l’armoire sont alignées correctement, puis fixez fermement.
12. Replacez le couvercle de la charnière supérieure.
• De l’eau bouillante, des gargouillis ou de légères vibrations qui
résultent de la circulation du réfrigérant à travers les serpentins de refroidissement.
• Le contrôle du thermostat cliquera lorsqu’il s’allume ou
s’éteint.
CONSEILS D’ÉCONOMIE D’ÉNERGIE
• Le réfrigérateur doit être situé dans la zone la plus froide de la
pièce, à l’écart des appareils produisant de la chaleur ou des
conduits de chauage, et à l’abri des rayons directs du soleil.
• Laissez les aliments chauds refroidir à température ambiante
avant de les placer dans le réfrigérateur. En cas de surcharge,
le réfrigérateur force le compresseur à fonctionner plus longtemps et augmente ainsi la consommation d’énergie.
• Les aliments qui réfrigèrent trop lentement peuvent perdre de
la qualité
• ou gâcher
• Veillez à emballer correctement les aliments et à essuyer les
récipients avant de les placer dans le réfrigérateur.
REMARQUE: Lorsque la porte est enfoncée pendant l’expédition,
après l’inversion de la porte, il se peut que le joint doive être réinitialisé. Ceci est fait pour empêcher l’air froid réfrigéré de s’échapper. S’il y a un espace entre le joint de la porte et l’armoire, mettez
le joint en le tirant délicatement pour sceller l’espace.
ALIGNEMENT DE PORTE
1. Retirez le couvercle de la charnière supérieure en utilisant
un tournevis à tête plate. Placez la tête sous le bord avant du
–23–
Page 24

ENGLISH ESPAÑOL FRANÇAIS
bouchon et soulevez doucement.
2. Desserrez les vis de la charnière supérieure à l’aide d’un tournevis cruciforme.
3. Ajustez la porte ou placez une entretoise entre les deux et serrez
les vis.
4. Replacez le couvercle de la charnière supérieure en alignant
l’arrière du couvercle avec l’arrière de la charnière. Appuyez fermement sur le devant du couvercle jusqu’à ce qu’il s’enclenche.
NETTOYAGE & ENTRETIEN DE VOTRE
APPAREIL
Un chion propre et humide avec un détergent doux ou de l’eau et
du bicarbonate de soude doit être utilisé pour nettoyer l’intérieur
de l’appareil, après le dégivrage ou avant l’utilisation.
Passez une fois de plus avec un chion humide (sans savon)
pour vous assurer qu’il ne reste aucun résidu à l’intérieur après le
nettoyage. Nettoyez également soigneusement le joint pour de
meilleures performances.
ATTENTION
Pour éviter les chocs électriques, débranchez toujours votre réfrigérateur avant de le nettoyer. Ignorer cet avertissement peut entraîner la mort ou des blessures.
MISE EN GARDE
Avant d’utiliser des produits de nettoyage, toujours lire et suivre
les instructions du fabricant et les avertissements pour éviter des
blessures corporelles ou des dommages au produit.
DÉPANNAGE
LE RÉFRIGÉRATEUR NE FONCTIONNE PAS:
• Vérifiez si la commande du thermostat n’est pas dans la position «0».
• Vérifiez si le réfrigérateur est branché.
• Vérifiez s’il y a du courant à la prise murale, en vérifiant le
disjoncteur.
LA TEMPÉRATURE DES ALIMENTS SEMBLE TROP
CHAUDE:
• Ouvertures de porte fréquentes. Réduisez les temps d’ouverture de la porte.
• Prévoyez du temps pour que les aliments chauds récemment
ajoutés atteignent la température des aliments frais.
• Vérifiez les joints pour une bonne étanchéité.
• Réglez le contrôle de la température sur un réglage plus froid.
LA TEMPÉRATURE DES ALIMENTS EST TROP FROIDE:
• Si le réglage du contrôle de température est trop froid, réglez
un réglage plus chaud et attendez plusieurs heures pour que la
température s’ajuste.
LE RÉFRIGÉRATEUR FONCTIONNE TROP FRÉQUEMMENT:
• Cela peut être normal pour maintenir une température
constante pendant les jours de température élevée et humide.
• Les portes peuvent avoir été ouvertes fréquemment ou pendant une période prolongée.
• Vérifiez le joint pour une bonne étanchéité.
• Vérifiez si les portes sont complètement fermées.
L’HUMIDITÉ S’ACCUMULE À L’INTÉRIEUR DE L’EXTÉRIEUR
DU RÉFRIGÉRATEUR:
• Ceci est normal pendant les périodes d’humidité élevée.
• Ouvertures de porte prolongées ou fréquentes.
• Vérifiez le joint d’étanchéité de la porte pour un joint approprié.
LE RÉFRIGÉRATEUR A UNE ODEUR:
• L’intérieur a besoin de nettoyage.
• Les aliments emballés de façon inappropriée dégagent des
odeurs.
LA PORTE DU RÉFRIGÉRATEUR NE FERME PAS CORRECTEMENT:
• Mettez le réfrigérateur à niveau.
• Aligner à nouveau la porte du réfrigérateur.
• Vérifiez les blocages, par ex. contenants alimentaires, couvercle
à légumes, étagères, bacs, etc.
BRUIT OU BRUIT DE CRAQUEMENT QUAND LE COMPRESSEUR S’ALLUME:
• Vérifiez que le réfrigérateur est de niveau.
• Le sol peut être inégal ou faible. Le réfrigérateur bascule sur le
sol lorsqu’il est légèrement déplacé. Assurez-vous que le plancher peut supporter adéquatement le réfrigérateur. Mettez le
réfrigérateur à niveau en plaçant des cales en bois ou en métal
sous la partie du réfrigérateur.
• Le réfrigérateur touche le mur. Re-niveler le réfrigérateur et le
déplacer du mur. Voir la section «Installation de votre réfrigérateur».
SOUTIEN TECHNIQUE
Avant de contacter le service client, veuillez consulter le guide de dépannage ci-dessus.
Visitez notre site Web pour nous contacter, trouver des réponses aux questions fréquemment posées et pour d’autres ressources qui
peuvent inclure une version mise à jour de ce manuel de l’utilisateur.
WWW.IMPECCA.COM
–24–
Page 25

ENGLISHESPAÑOLFRANÇAIS
GARANTIE LIMITÉE D’UN AN
Impecca™ garantie auprès de l’acheteur original cet appareil
contre toutes défectuosités liées au matériel et à la fabrication
tel que spécifié ci-dessous.
PIÈCES ET MAIN D’ŒUVRE- S’il est déterminé que l’appareil a un problème lié à la fabrication, à l’intérieur d’une
période d’un an de la date d’achat originale, Impecca™,
à sa discrétion, pourra remplacer ou réparer les pièces
de l’appareil sans frais pour vous aux États-Unis.
Afin d’obtenir des services sous garantie par un fournisseur autorisé par le centre de service d’Impecca™, veuillez nous rejoindre
par courriel : service@impecca.com afin d’obtenir un numéro
d’autorisation d’entretien et réparation (Repair and Maintenance
Authorization – RMA). Vous recevrez également des détails liés au
processus de réparation et/ou remplacement.
Tout matériau en vitre inclus avec l’appareil est couvert
par une garantie de 60 jours à compter de la date d’achat
(lorsque applicable).
Impecca™ exclus spécifiquement de cette garantie tout attachement non électrique / mécanique, accessoires ou pièce jetable
incluant, mais non limité au boîtier externe, les câbles connecteurs, les piles et les adaptateurs secteurs. Impecca™ se réserve
le droit de réparer ou remplacer les appareils défectueux par un
modèle pareil, équivalent ou plus récent.
Nous nous réservons le droit de réparer ou de remplacer l’appareil à notre discrétion. Le remplacement pourrait être par un
appareil nouveau ou remis à neuf. Bien que tous les e orts soient
mis de l’avant pour assurer qu’il s’agisse du même modèle, s’il
s’avère impossible, le remplacement sera de qualité similaire ou
supérieure.
L’usure normale de l’appareil n’est pas couverte par cette garantie. Impecca™ se réserve le droit de déterminer le niveau d’usure
sur l’ensemble de ses appareils. Ouvrir le boîtier ou modifier
l’appareil annule dans son entièreté la présente garantie.
Exclusions : la garantie présente exclut les points suivants :
1. Tout appareil dont le numéro de série est e acé ou rendu
illisible.
2. Tout appareil transféré à un second propriétaire.
3. La rouille formée à l’intérieur ou à l’extérieur de l’unité.
4. Les appareils marqués « Tel quel » ou « Remis à neuf ».
5. Pertes d’aliments dus à un mauvais fonctionnement de
l’appareil.
6. Climatiseur à fenêtre installés au mur.
7. Si l’appareil est utilisé à des fins commerciales.
8. Appels de service qui ne sont pas en lien avec un mal fonctionnement de l’appareil.
9. Appels de service pour un appareil endommagé suite au
non-respect des instructions fournies.
10. Appels de service liés à une installation défectueuse.
11. Coûts entraînés à rendre l’appareil accessible pour l’entretien (incluant, mais non limité à l’enlèvement de moulures,
plinthes, armoires, etc.)
12. Appels de service pour le remplacement de pièces consommables tels que des ampoules, filtres, etc.
13. Des frais additionnels peuvent s’appliquer aux appels de
service en soirée, en fin de semaine, les jours fériés. Des
dommages à la finition de l’appareil ou à des ameublements
suite à l’installation de l’appareil.
14. Dommages causés par : des circonstances exceptionnelles;
incendie; mauvaise utilisation; accident; alimentation
électrique inappropriée; entretien e ectué par une personne
non autorisée; utilisation de pièces non d’origine d’Impecca,
etc.
TOUTE GARANTIE IMPLICITE, Y COMPRIS LES GARANTIES DE
QUALITÉ MARCHANDE ET D’ADAPTATION À UN USAGE PARTICULIER EST LIMITÉ POUR UNE DURÉE DE 1 AN À COMPTER DE LA
DATE DE L’ACHAT ORIGINAL DE CE PRODUIT.
CES GARANTIES ET RECOURS DEMEURENT EXCLUSIFS À LA
VENTE ET L’UTILISATION DE CE PRODUIT. AUCUNE AUTRE
GARANTIE, ORALE OU ÉCRITE, EXPLICITE OU IMPLICITE, NE SERA
ÉMISE.
IMPECCA™ NE PEUT PAS ÊTRE TENU RESPONSABLE POUR DES
DOMMAGES SPÉCIAUX, ACCIDENTELS, CONSÉQUENTS, DIRECTS
OU AUTRES CONNUS OU QUI AURAIENT PU ÊTRE COMMUNIQUÉS À IMPECCA™, Y COMPRIS LA PERTE DE PROFITS, DE
BIENVEILLANCE, DE BIENS ET DE BLESSURES RÉSULTANT D’UNE
VIOLATION DE LA GARANTIE, L’INCAPACITÉ D’UTILISER LE PRODUIT OU EN VERTU DE TOUTE THÉORIE JURIDIQUE EN CONTRAT
OU DÉLIT. LA RESPONSABILITÉ D’IMPECCA EST LIMITÉE AU PRIX
D’ACHAT PAYÉ AU VENDEUR EN DÉTAIL DU PRODUIT DÉFECTUEUX.
Aucun revendeur, agent ou employé d’Impecca™ n’est autorisé
à e ectuer une modification, une extension, un changement ou
un amendement de cette garantie sans le consentement écrit et
l’autorisation d’Impecca™.
Certains états ne permettent pas l’exclusion ou la limitation
des garanties implicites ou de responsabilité en lien avec des
dommages accidentels or des dommages conséquents ou ne
permettent pas une limitation sur la durée de la garantie implicite. Donc, les limitations ou exclusions ci-dessus peuvent ne pas
s’appliquer à vous. Cette garantie vous donne des droits légaux
spécifiques et vous détenez d’autres droits, qui peuvent varier
d’état en état.
Note : Notre centre de la garantie e ectue la livraison uniquement qu’aux États-Unis continentaux.
–25–
 Loading...