

Page 1

USER MANUAL • MANUAL DE USUARIO • MODE D’EMPLOI
3.3 CU. FT. Refrigerator
Model RC-1335
RC-1335W (White / Blanco / Blanc) RC-1335K (Black / Negro / Noir)
RC-1335SL (Stainless Look / Aspecto de Aluminio / Aspect inoxydable)
www.impecca.com
v 1.1
Page 2

TABLE OF CONTENTS
Important Safety Instructions iii
Getting Started 4
Unit Overview and Features 5
Operation 5
Care & Cleaning 5
Door Reversal 6
Additional Tips and Suggestions 7
Troubleshooting Guide 8
Customer Support 9
Warranty 10
Spanish 12
French 22
Notes 32
Page 3

PLEASE READ ALL OF THESE
INSTRUCTIONS,
AS THEY MAY NOT ALL
BE OBVIOUS
INITIAL SAFETY GUIDELINES
• This appliance is not intended for use by persons (including children) with reduced physical,
sensory or mental capabilities that may lead
to improper use or injury from operating the
appliance.
• Do not lubricate any part of the refrigerator.
RISK OF ELECTRIC SHOCK
• This refrigerator must be properly installed
and located in accordance with the installation
instructions in this guide before it is used.
• Turning the temperature control dial to the “0”
position will stop cooling, but it does not cut o
power to the refrigerator.
• Do not allow children to climb, stand or hang
on the shelves in the refrigerator. They could
damage the refrigerator and seriously injure
themselves.
• Do not allow children to hang on the doors, as
the refrigerator may be tipped over, causing
serious injury. Children should be supervised to
ensure that they do not play with the appliance.
• Keep fingers out of the space between the door
and refrigerator cabinet. Be careful closing the
door when children are present.
• Unplug the refrigerator before any cleaning or
repairs.
• If the power cable is damaged, it should be
replaced by the manufacturer or a qualified
service technician. Do not use the appliance if
the cable is damaged.
• Do not leave the refrigerator in extremely cold
or warm temperatures.
• Make sure that any ventilation openings on the
unit are free of obstruction at all times.
• This appliance should only be serviced by an
authorized technician using genuine spare parts
only. To avoid the risk of electric shock, do not
attempt to repair the unit yourself.
FLAMMABLE REFRIGERANT GAS
• Do not puncture the refrigerant tubing.
• Do not use any electrical devices anywhere
inside the unit unless they are recommended
by the manufacturer. This includes devices kept
in the food storage compartment, or to aid in
defrosting.
• Do not store or use gasoline or other flammable
vapors and liquids in the vicinity of this or any
other appliance.
• Do not place the refrigerator near any heat
sources or open flames.
CAUTION: DO NOT USE AN
EXTENSION CORD WITH THIS
APPLIANCE
• Do not clean the unit with industrial grade
solvents, or abrasive chemicals. Clean the unit
before first use, using the instructions in this
guide.
• Do not place heavy items on top of the refrigerator.
• Never install the refrigerator where there is a lot
of moisture, or in areas where water can splash.
• Never eat food that may have spoiled because
it was stored too long before eating, or if the
refrigerator has lost power or malfunctioned.
• Do not use sharp metal tools inside the refrigerator (such as an ice pick to remove ice), as
damage may occur.
• If the refrigerator is not used for a long period of
time, empty it completely and unplug it.
FOR INDOOR USE
ONLY
SAVE THESE
INSTRUCTIONS
–iii–
Page 4
ENGLISH ESPAÑOL FRANÇAIS
3-pronged
Receptacle
3-pronged
Plug
GETTING STARTED
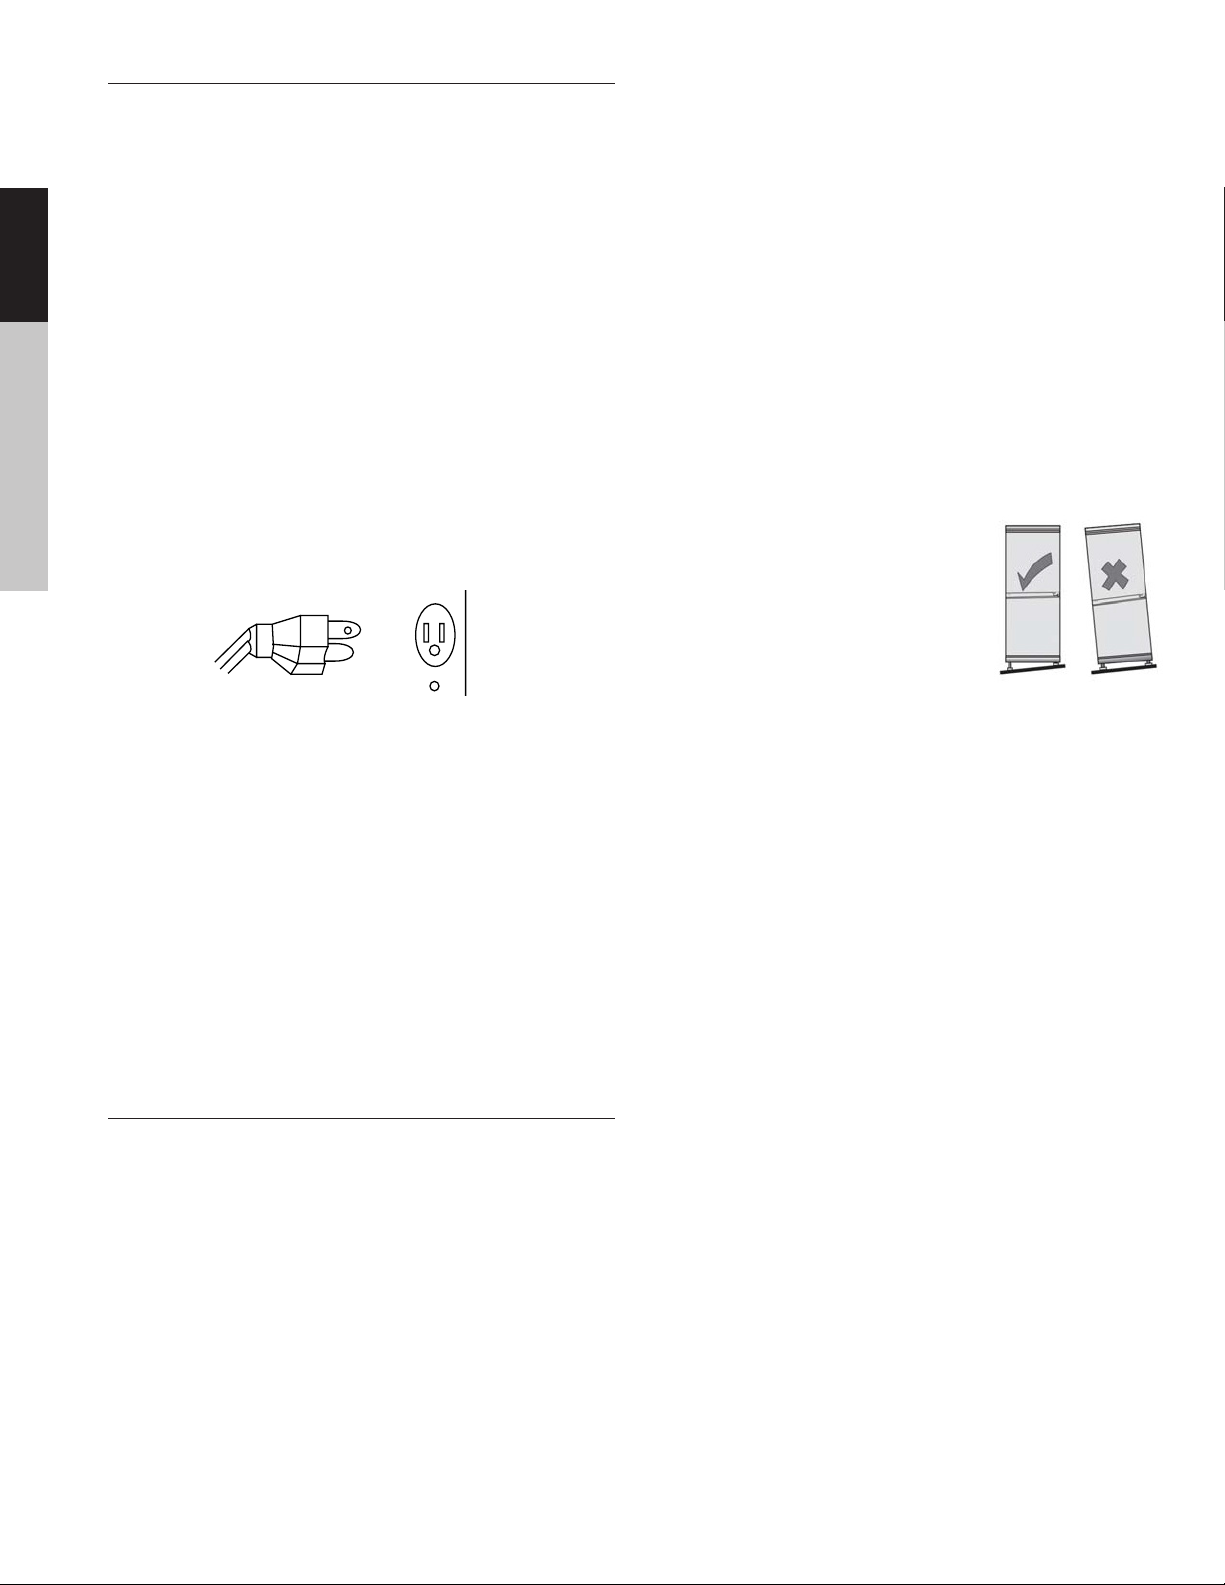
GROUNDING INSTRUCTIONS
This appliance must be grounded. This is accomplished by
ensuring the plug is inserted into a properly grounded outlet.
The appliance is equipped with a cord that has a grounding
wire and plug. When grounded, the risk of electric shock is
reduced by providing an escape wire for the electrical current.
increase electrical consumption. This unit is not designed for
use in a garage, or for outdoor installation. Extremely cold ambient temperatures may also prevent the unit from operating
eectively. This appliance is intended to be used in household
and similar applications, such as individual use in hotel rooms.
in kitchen areas inside shops and oices, or for catering and
other non-retail applications.
WARNING: Improper use of the grounding plug can result in
electric shock. Consult a qualified electrician or service person
if the grounding instructions are not completely understood, or
if there is any doubt that the appliance or outlet is not properly
grounded.
POWER SUPPLY
You must plug the appliance into a 110V-120V (60Hz)
3-pronged, grounded outlet.
3-Pronged
Plug
Note: This appliance should have its own dedicated outlet.
BEFORE DISCARDING YOUR OLD REFRIGERATOR:
Remove the door(s), leave the shelves in place (to help prevent
children from crawling in) and have it removed from your
premises by a qualified technician, in accordance with the
instructions provided with the old unit.
3-pronged
receptacle
When installing the unit, ensure that there is adequate space for
the front door to fully open. Ensure that a minimum of 4 inches
of free space is le at the sides, front and rear. At the top of the
unit, ensure there is a minimum of 8 inches free space. This will
allow cold air to circulate around the refrigerator and improve
the eiciency of the cooling process. Do not place any covering
such as a drape or sheet on the unit. Clean the appliance before
first use.
LEVELING THE UNIT
It’s very important to keep the unit level
to prevent unnecessary movement
and vibration. This also helps to
ensure that the door closes properly.
If the door does not close securely,
this will prevent eective cooling and
possibly damage the refrigerator.
To level the unit, turn the adjustable feet at the front of the
refrigerator clockwise or counterclockwise to raise or lower the
corner respectively.
Having a second person push carefully against the top of the
refrigerator will relieve some weight o of the leveling legs and
make them easier to adjust. However, ensure that the unit has a
wall to rest against so that it does not tip over and cause damage or injury.
INSTALLING YOUR APPLIANCE
MOVING THE APPLIANCE
CAUTION: To avoid serious injury, always ensure that any relocation of the unit is always performed by two people. Use caution when moving the unit to ensure that the refrigeration circuit is not damaged. Never allow the unit to be tilted more than
45°, as this will damage the appliance. Handle the unit around
its sides and base. Never li the unit by holding the edges of the
top surface.
INSTALL LOCATION
When selecting a location for your unit, ensure the floor is a
flat, level surface (indoors) and that the room is well ventilated,
maintaining a temperature between 60.8°F and 90°F. Avoid locating your unit near a heat source such as an oven, stove top,
boiler, or radiator. Avoid exposure to direct sunlight, as this may
• Confirm with your retailer if they’ll remove and responsibly dispose of (or recycle) your old refrigerator.
• Visit www.epa.gov/rad for more information on
responsible appliance disposal.
SERIAL AND MODEL NUMBER
Please record your model number and serial number below.
You can find the serial number on a sticker on the back of the
refrigerator, or on the product box.
Model Number: RC-1335
Serial Number: ______________________________
Date of Purchase: ____________________________
–4–
Page 5
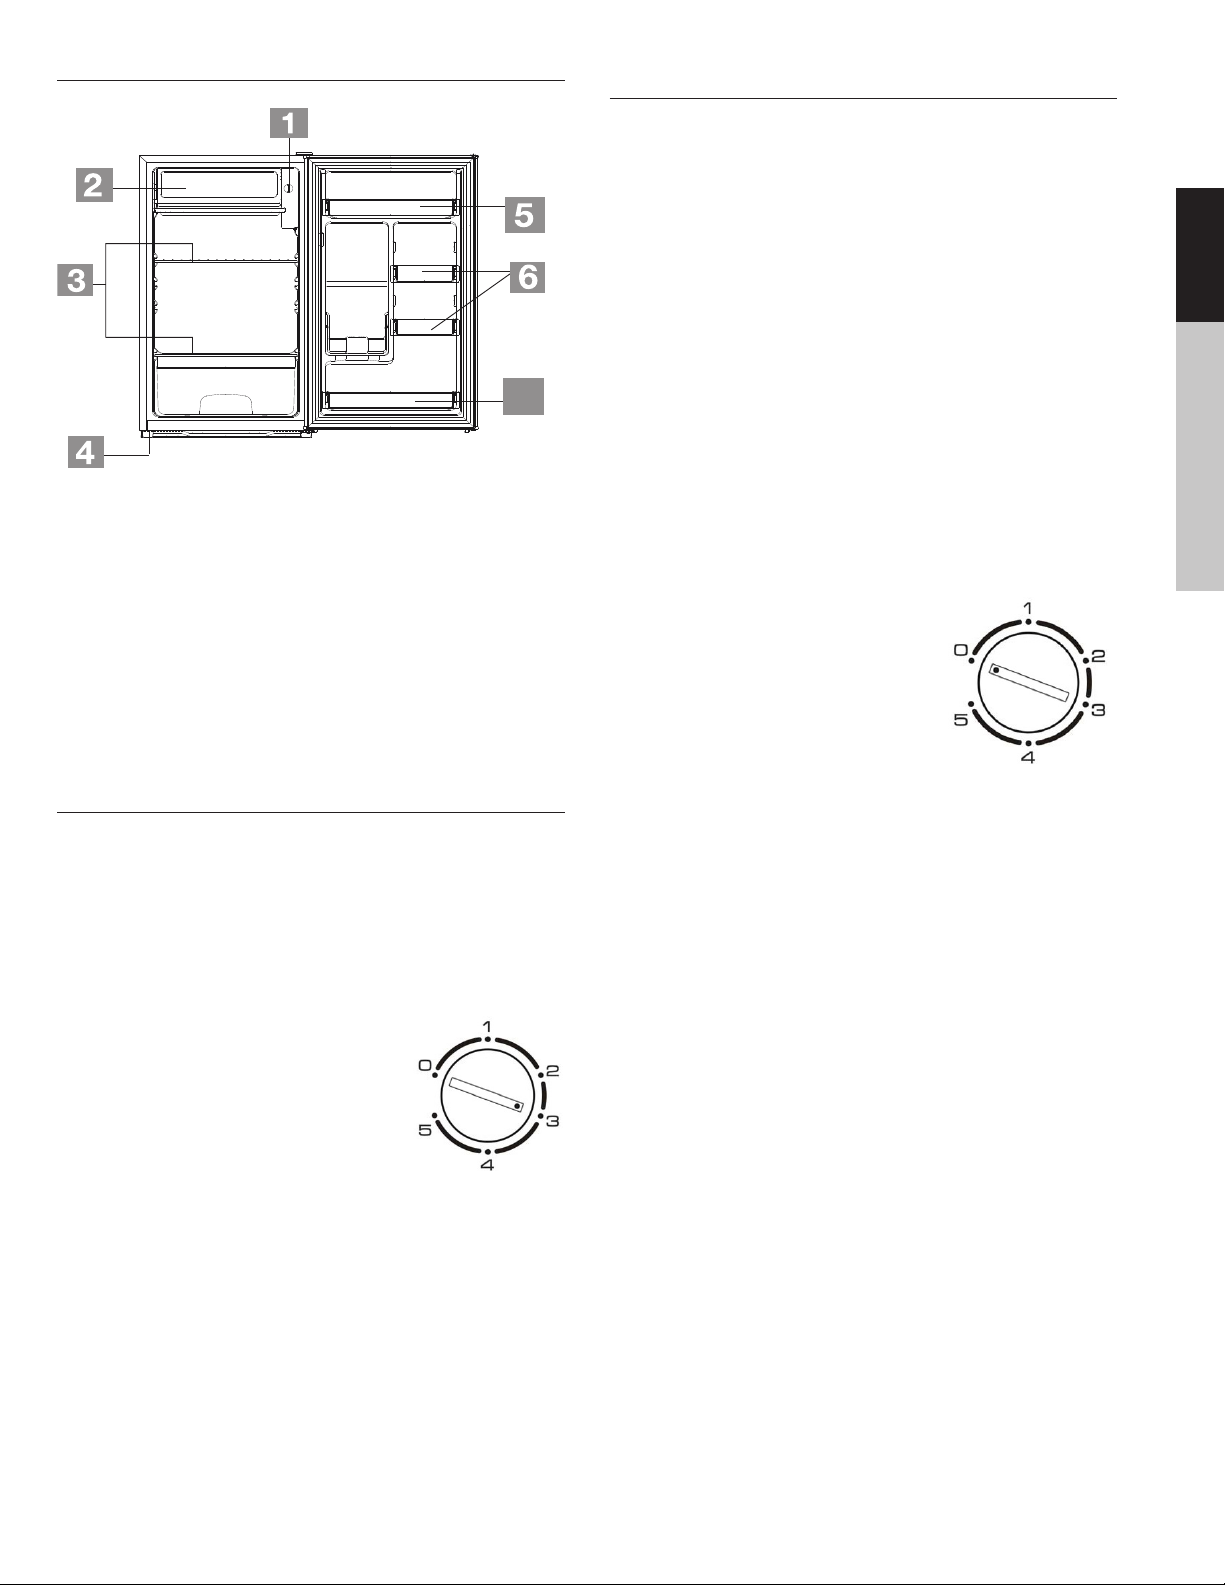
UNIT OVERVIEW AND FEATURES
7
1. Thermostat Control
Dial
2. Chiller Compartment
3. Glass Shelves
4. Leveling Feet
The images in this instruction manual are for illustrative purposes. The physical appearance and options on your particular
model may vary.
5. Upper Door Bin
6. Can Rack
7. Lower Door Bin
OPERATION
Clean the unit before first use (see the next section for cleaning
instructions). Plug the unit into its power source. Do not turn
on the unit if it has been moved within the past 2 hours, as the
coolant fluid needs time to settle.
The thermostat control knob for the refrigerator and the chiller
is located near the chiller compartment. (see picture above).
CLEANING & CARING FOR YOUR APPLIANCE
CLEANING
Wipe the inside of the unit with a weak solution of baking soda
(bicarbonate). Then rinse with warm water using a damp sponge
or cloth. Wash the shelves and bins in warm soapy water and
dry completely before putting them back in the unit. Clean the
exterior of the unit with a damp cloth. For best performance,
carefully clean the door gasket/seal as well.
Do not splash water on the outside or inside of the unit when
cleaning it.
DEFROSTING
Your refrigerator may require manual defrosting. It should be
defrosted in the following scenarios:
• The refrigerator will not be used for an extended period
of time.
• An ice layer is built-up around the chiller compartment
of than 1/4 inch.
To Defrost:
1. Turn the thermostat knob to the
“OFF” position and leave the door
open.
2. Unplug the unit.
3. Remove all food from both compartments. Ideally, the food
should be placed in another refrigerator.
4. Place a towel or two under the refrigerator to collect the
water from the melting frost.
5. Leave the door open until all the frost is melted. Usually,
several hours (or overnight) will suice.
6. Clean and wipe out the interior of the unit using the instructions in the “cleaning” section above
ENGLISHESPAÑOLFRANÇAIS
The first time you turn the unit on, adjust
the thermostat control knob to the middle
setting and give your refrigerator time to
cool down completely before adding food;
a full 24 hours is recommended.
Aer it is fully cooled, adjust the knob to
best suit your needs. “1” is the least cool
and “5” is the coolest setting. However, a
setting of “3” should be appropriate for most home or oice
refrigerator use. Warmer environments may be more likely to
require higher settings (4 or 5). Cooler or winter environments
are likely to use a lower setting.
NOTE: Turning the thermostat control knob to the “0” or
“OFF” position will stop the cooling cycle but does not shut
o the power to the unit.
–5–
Page 6
ENGLISH ESPAÑOL FRANÇAIS
Screw
Unscrew
DOOR REVERSAL
This refrigerator has been built with the door hinges on the right.
It is recommended to contact a qualified technician to reverse the
door. Do not reverse the door unless you feel you are qualified to
do so.
CAUTION:
To avoid injury to yourself and/or property, a second person
should assist you during the door reversal process.
• Ensure the appliance is unplugged and empty.
• Do not lay the refrigerator on its back or tilt it more than
45° when reversing the door, as this damages the cooling
system.
• Make sure to have a second person available, and a strong,
solid surface/wall against which to lean the appliance so
that it does not slip. This will be necessary when taking o
the door.
WARNING: As stated above, ensure that the refrigerator is powered
o and unplugged before reversing the door.
TOOLS REQUIRED:
• Hexagonal Spanner
• Phillips style screwdriver
• Flathead screwdriver
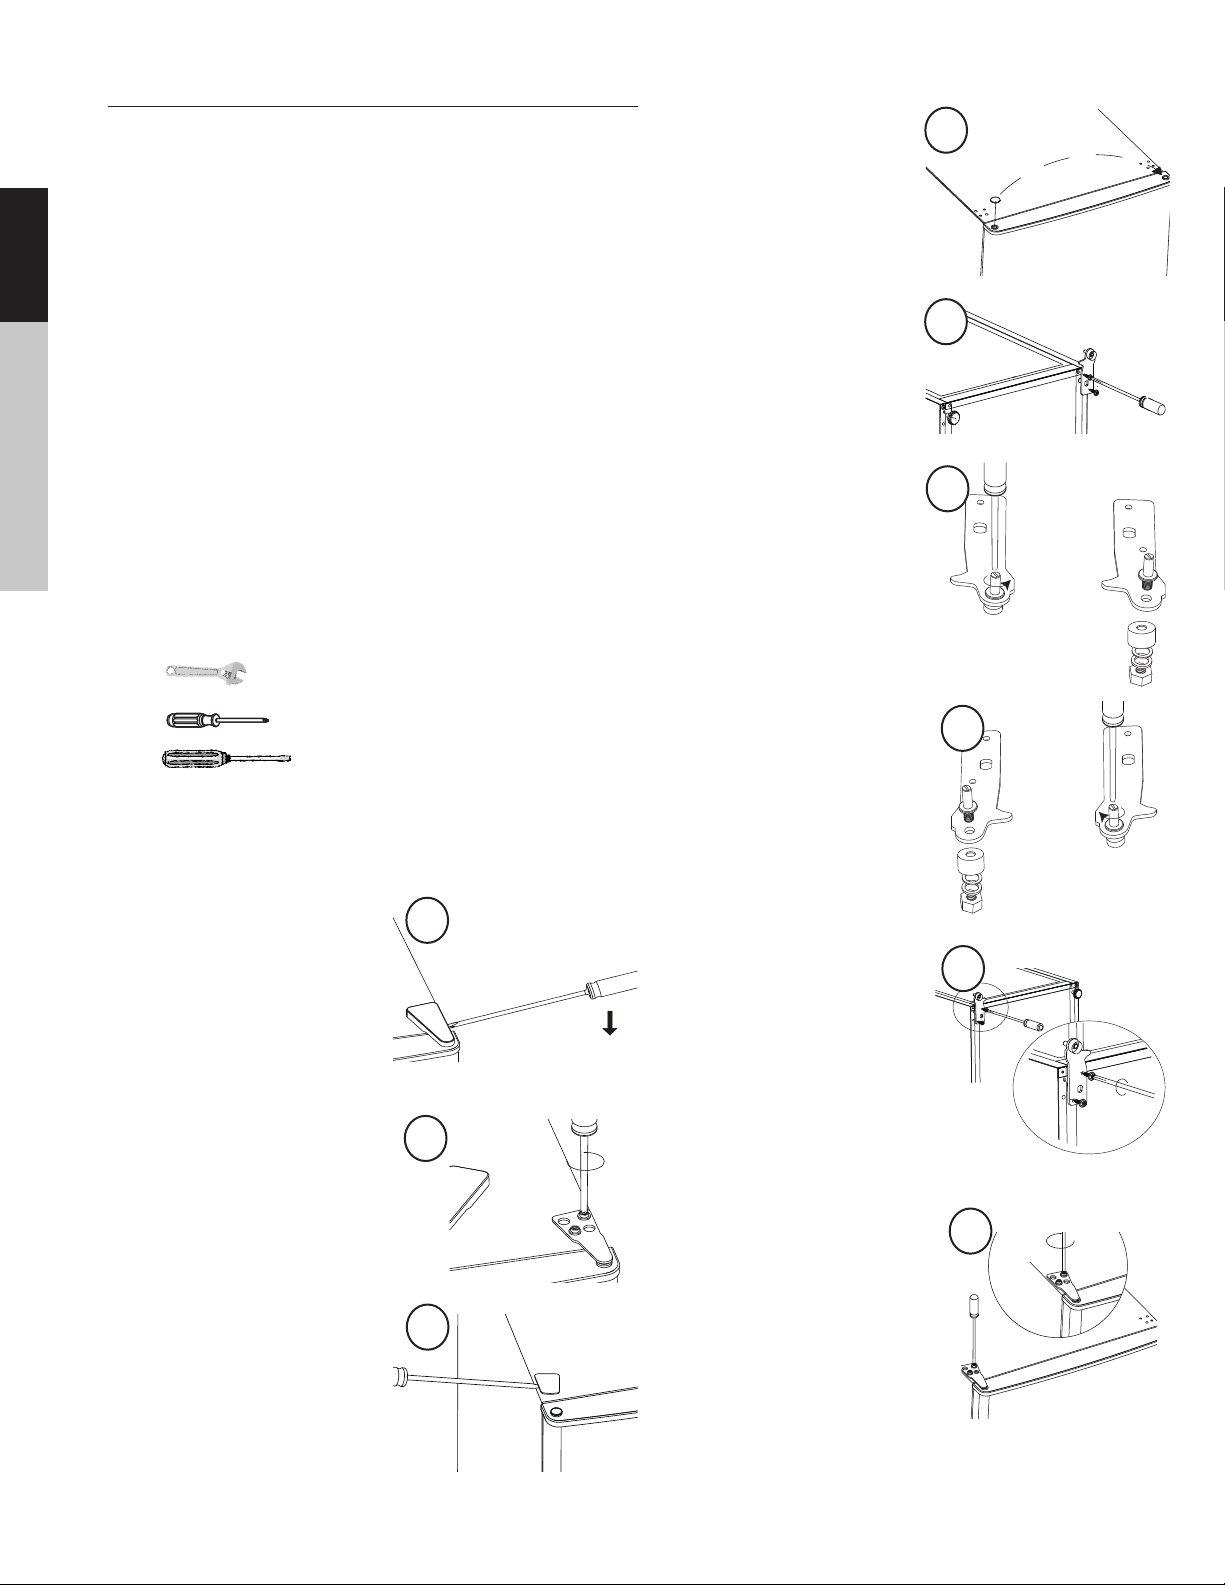
To reverse the side on which the door opens, follow these instructions:
1. Tilt the unit slightly toward
the rear and prop it securely.
2. Adjust the two leveling feet
to their highest position.
3. Remove the top right hinge
cover.
4. Unscrew the screws, then
remove the top hinge bracket.
3
4
5
5. Remove the top le screw
cover using a flathead
screwdriver.
–6–
6. Move the hole cover from
the le side to the right side.
7. Li the door up and detach
it from the unit. Place it on
a padded surface to prevent
any scratching.
8. Remove the screws and bottom hinge. Then, remove
the adjustable feet from
each side.
9. Unscrew and remove the
bottom hinge pin.
10. Turn the bracket over and put
the hinge pin back in.
11. With the hinge pin back in the
bracket, screw the bottom
bracket back into the le side.
12. Replace the adjustable feet.
13. Place the door back onto the
unit. Ensure that the door is
aligned both horizontally and
vertically so that the seal closes
properly on all sides. When the
seal is good, replace and tighten
the top hinge. Use a spanner to
tighten if necessary.
6
8
9
10
11
13
Page 7

14. Replace the hinge cover and
screw cover (now on the
opposite side from where
they were).
14
• Store raw meat and fish on the lowest shelf to prevent
contamination.
• When purchasing chilled food, store all chilled food together while transporting it back from the store. Place it in the
fridge as soon as possible, before the other items.
CHANGING THE INTERNAL LIGHT
• Before beginning to replace the bulb, turn the thermostat
knob to 0 and unplug the refrigerator.
• Use a flathead screwdriver to gently pry o the light bulb
cover.
• Remove the old bulb by unscrewing it counter-clockwise.
• Replace it with a new, 10W SES bulb of the same size.
• Put the light bulb cover back into place and reconnect the
power supply.
• Adjust the thermostat back to the desired setting.
ADDITIONAL TIPS AND SUGGESTIONS
• Do not let any fats come into contact with the plastic parts
of the refrigerator.
• Food that has been le at room temperature for a prolonged period can cause the food to develop bacteria.
• To maintain temperature, only open the fridge door to
put food in or take food out. Allow hot food to cool down
before putting it into the refrigerator.
• Ensure that bottles and food containers are clean and dry
before storing them in the refrigerator.
• Turning the temperature control dial to the “0” position will
stop cooling but it does not cut o power to the refrigerator.
• When the appliance is not in use for a long period of time,
turn it o and disconnect it from the power supply. Empty
all food items and clean it using the instructions in this
manual. Leave the door ajar to prevent odors from being
trapped in.
ENGLISHESPAÑOLFRANÇAIS
• Glass and plastic bottles should not be placed in the chiller
compartment unless recommended by the product manufacturer.
• Freeze fresh foods by packaging them correctly and placing
them in the chiller compartment, but do not place carbonated beverages here.
• Many whole foods such as radishes, bananas, pumpkins
and onions are not necessary to refrigerate.
• During a power outage, do not open the refrigerator unless
absolutely necessary.
• Do not store canned items, as they can expand and burst.
• The chiller compartment is not cold enough to keep frozen
treats such as ice cream or popsicles. Those items require
a freezer.
• Do not overfill the refrigerator, as this blocks proper circulation and increases consumption of energy. Leave space
around the food to allow proper air circulation.
• There are multiple shelves in the fridge that can be removed or changed as needed to accommodate the fridge
items according to your use. However, always keep one
of the shelves installed into the lowest slot, just above the
fruit and vegetable containers.
• Keep foods well-sealed to prevent them from drying out
and to keep odors from mixing together.
–7–
Page 8
ENGLISH ESPAÑOL FRANÇAIS
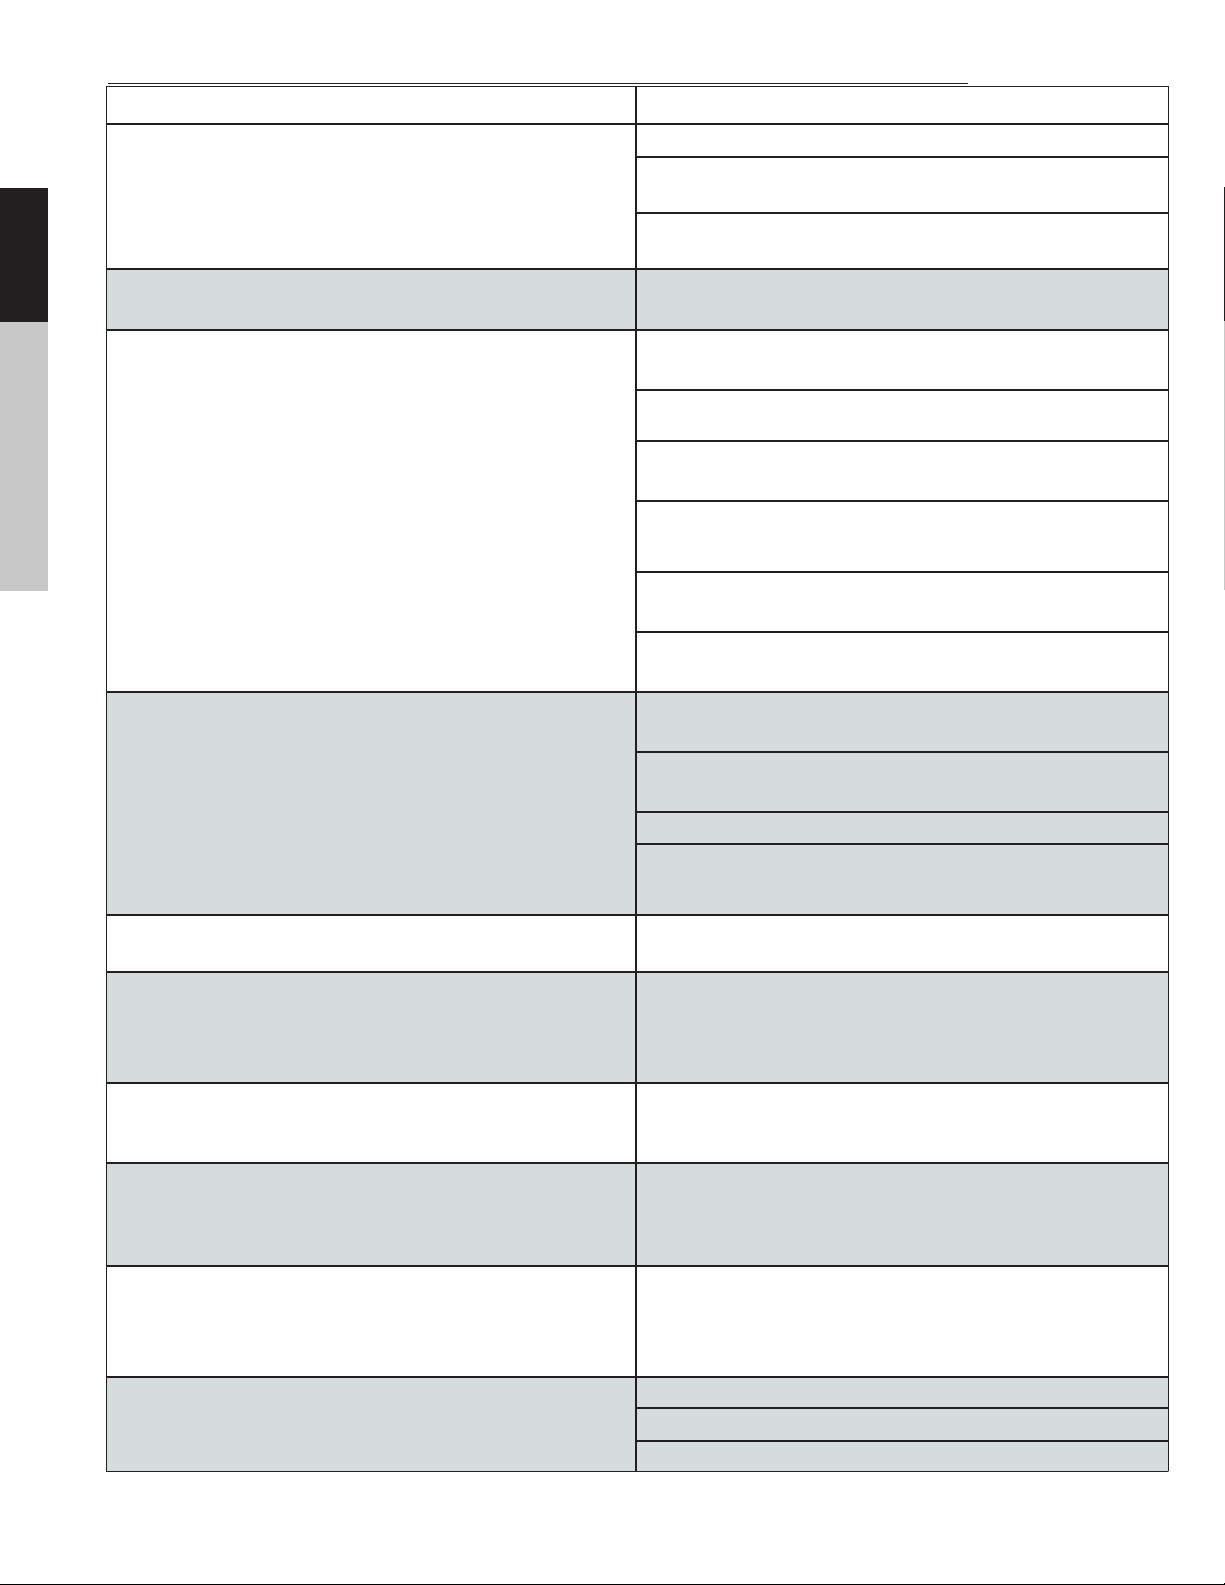
TROUBLESHOOTING
PROBLEM SOLUTION
Make sure that the plug is in all the way
Make sure that the thermostat knob is not set to 0 (o)
Refrigerator is not getting any power (no hum, etc.)
Check that the fuse hasn’t blown, or that a household fuse or
circuit breaker hasn’t tripped.
Food in the refrigerator is freezing when it shouldn’t.
Food in the refrigerator is not cold enough.
The temperature inside the refrigerator is too warm.
The outside of the unit is warm.
Lower the number of the thermostat (higher numbers are colder).
Make sure that the door to the refrigerator is closed all the way
and that the refrigerator is level.
Check the ambient temperature of the room. If it’s very warm,
this may be expected.
If you recently put very warm food in the refrigerator, this is
normal.
Make sure that the gasket/seal around the door is free of debris.
If the seal is not tight, warm air from the environment may seep
in.
This is also normal when the unit is turned on aer being o an
extended time.
If food is tightly packed, make sure the food is more evenly
distributed. Do not over-pack the fridge unit.
Make sure that the temperature setting is at the desired selection. See “Using Your Appliance” for more details.
This could be caused by opening the door too frequently and
letting in too much warm air.
This can be caused by warm food.
It can take at least four hours for your refrigerator to get to its
target temperature setting if it is being used for the first time or
has been o for an extended period of time.
This is normal and expected behavior. Warmth prevents the
formation of moisture.
There are many dierent noises heard emanating from the refrigerator at dierent times. This includes loud sounds when
it is first turned on, fans running, popping, boiling, gurgling
or cracking sounds
There are vibrating or rattling sounds when the unit runs.
There is moisture appearing on the inside of the refrigerator
walls.
There is moisture appearing on the outside of the refrigerator
walls.
The door will not close completely.
–8–
All of these noises are typical during normal operation and cycles, especially when the door has been opened. These noises
are caused by the compressor motor and the refrigerant which
is circulated through the system.
Make sure the unit is level and that is not touching a wall. See
the “Leveling the Unit” section above.
This can be caused by debris in the door gasket/seal preventing
a tight seal. As well, it is a normal occurrence if the ambient air
is humid. This can also occur if the door is opened very frequently.
Make sure that your door is closing properly and that there is
no debris in the door gasket/seal. This may also be due to a
fluctuation in room temperature. Wipe the residue away. If this
continues to happen, contact a qualified technician for assistance.
Make sure that the unit is not overstued with food.
Make sure that the shelves are properly in position.
Make sure the door gasket/seal is clean.
Page 9

CUSTOMER SUPPORT
Before contacting customer support, please see the troubleshooting section
on the previous page.
Visit our website to contact us, find answers to Frequently Asked Questions, and for other re-
sources which may include an updated version of this user’s manual.
WWW.IMPECCA.COM
If you wish to contact us by phone, please be sure to have your model number and serial number
ready and call us between 9:00am and 6:00pm ET, at +1 866-954-4440.
Keep tabs on Impecca’s newest innovations & enter contests via our social network feeds:
www.facebook.com/Impecca/
www.instagram.com/impecca/
@impeccausa
ENGLISHESPAÑOLFRANÇAIS
–9–
Page 10

ENGLISH ESPAÑOL FRANÇAIS
MAJOR APPLIANCE ONE-YEAR LIMITED WARRANTY (US)
V1.0
Impecca™ warrants this product against defects in
material and workmanship to the original purchaser as
specified below.
PARTS AND LABOR– if the product is
determined to have a manufacturing
defect, within a period of one year
from the date of the original purchase,
Impecca™, at its own discretion, will
repair or replace the product parts at
no charge to you in the Continental
U.S.A.
To obtain warranty service by an authorized Impecca™
service center, please email us at:
service@impecca.com to obtain a Repair and
Maintenance Authorization (RMA) number and received
instructions on how the repair and/or replacement
procedure will take place.
Any glass materials included with the appliance will
be covered for a period of 60 days from purchase
(where applicable).
Impecca™ specifically excludes from this warranty any
non-electric/mechanical attachments, accessories and
disposable parts including but not limited to outside
case, connecting cables, batteries and AC adaptors.
Impecca™ reserves the right to repair or replace
defective products with the same, equivalent or newer
models.
We reserve the right to either repair or replace product
at our discretion. Replacement may be either new or
refurbished and while every endeavor will be made to
ensure it is the same model, if not possible it will be
equal or higher specification.
Normal “Wear and Tear” is not covered by this
warranty. Further, Impecca™ hereby reserves the right
to determine “Wear and Tear” on any and all products.
Tampering or opening the product casting or shell will
void this warranty in its entirety.
Exclusions: This warranty does not cover the following:
1. Any product that has a defaced or covered
serial number.
2. Products that have been transferred to a
second owner.
3. Rust on the interior or exterior of the unit.
4. Products listed as “As-Is” or “Refurbished.”
5. Food loss due to any product failure.
6. Window air conditioners installed in a wall.
7. The product if used in a commercial setting.
8. Service calls that do not involve product
malfunction.
9. Service calls for a product ruined by not
following the provided instructions.
10. Service calls to correct improper installation.
11. Costs associated with making the product
accessible for servicing (including but not
limited to removal of
trim/molding/cabinetry, etc.)
12. Service calls to replace any consumables
such as light bulbs, filters, etc.
13. Surcharges that may apply to service calls on
weekends, nights, holidays. Damages to the
finish of appliance or household furnishings
due to installation of appliance.
14. Damages caused by any of the following: Acts
of God; fires; misuse; accidents; incorrect
power supply; service performed by
unauthorized persons; use of non-genuine
Impecca parts, etc.
ALL IMPLIED WARRANTIES, INCLUDING IMPLIED
WARRANTIES OF MERCHANTABILITY AND FITNESS FOR
A PARTICULAR PURPOSE ARE LIMITED IN DURATION TO
1 YEAR FROM THE DATE OF THE ORIGINAL RETAIL
PURCHASE OF THIS PRODUCT.
THESE WARRANTIES AND REMEDIES ARE THE SOLE AND
EXCLUSIVE WARRANTIES AND REMEDIES IN
CONNECTION WITH THE SALE AND USE OF THE
PRODUCT. NO OTHER WARRANTIES, ORAL OR
WRITTEN, EXPRESSED OR IMPLIED, ARE GIVEN.
IMPECCA™ IS NOT RESPONSIBLE OR LIABLE FOR ANY
DAMAGE, WHETHER SPECIAL, INCIDENTAL,
CONSEQUENTIAL, DIRECT OR OTHERWISE, OR
WHETHER KNOWN OR SHOULD HAVE BEEN KNOWN TO
IMPECCA™, INCLUDING LOST PROFITS, GOODWILL,
AND PROPERTY AND PERSONAL INJURY RESULTING
FROM ANY BREACH OF WARRANTY, THE INABILITY TO
USE THE PRODUCT OR UNDER ANY LEGAL THEORY IN
CONTRACT OR TORT. IMPECCA LIABILITY IS LIMITED
TO THE ACTUAL PURCHASE PRICE PAID TO THE RETAIL
SELLER OF THE DEFECTIVE PRODUCT.
No Impecca™ dealer, agent or employee is authorized
to make any modification, extension, change or
amendment to this warranty without the written
consent and authorization from Impecca™.
Some states do not allow the exclusion or limitation
of implied warranties or liability for incidental or
consequential damages, or do not allow a limitation
on how long an implied warranty lasts, so the above
limitations or exclusions may not apply to you. This
warranty gives you specific legal rights, and you have
other rights, which vary from state to state.
Note: Our Warranty center services only to
Continental U.S.A.
Impecca™ USA Wilkes-Barre, PA www.impecca.com866.954.4440
*Do not send any returns to this address, as it might get lost and this will delay your repair and service process.
–10–
Page 11

ENGLISHESPAÑOLFRANÇAIS
–11–
Page 12

TABLA DE CONTENIDO
Instrucciones importantes de seguridad 13
ENGLISH ESPAÑOL FRANÇAIS
Comenzando 14
Resumen y características de la unidad 15
Operación 15
Cuidados y limpieza 15
Proceso de inversión de puerta 16
Consejos adicionales y sugerencias 17
Guía de solución de problemas 18
Soporte al cliente 19
Garantía 20
–12–
Page 13

POR FAVOR LEA TODAS ESTAS IN-
STRUCCIONES, YA QUE NO TODAS
PUEDEN SER OBVIAS
INSTRUCCIONES DE SEGURIDAD INICIALES
• Antes de ser utilizado, este refrigerador debe ser
adecuadamente instalado y colocado de acuerdo con las instrucciones de operación y esta
guía.
• Al girar la perilla de control de temperatura a
“0” el refrigerador dejará de enfriar, pero NO
corta la energía del refrigerador.
• No permita que los niños trepen, se paren o se
cuelguen de los entrepaños del refrigerador,
pueden dañarlo y resultar lesionados severamente.?
• No permita que los niños se cuelguen de la
puerta, ya que pueden volcar el refrigerador
causando daños severos. Los niños deben ser
supervisados para asegurar que no jueguen con
el electrodoméstico.
• Mantenga los dedos lejos del espacio entre las
puertas y el gabinete. Tenga cuidado al cerrar
las puertas cuando hay niños en el área.?
• Desconecte el refrigerador antes de limpiar y
hacer reparaciones.?
• Si el cable de suministro de energía está dañado, debe ser reemplazado por el fabricante o
técnico de servicio calificado. No utilice este
electrodoméstico si el cable está dañado.
ya que puede ocasionar daños.
• Si no va a usar el refrigerador por un periodo
de tiempo largo, retire todos los alimentos del
refrigerador y desconéctelo.
• Este electrodoméstico no está diseñado para
ser usado por personas (incluyendo niños) con
capacidades físicas, sensoriales o mentales reducidas que puedan causar un uso inapropiado
o daños al operar la unidad.
• No lubrique ninguna parte del refrigerador.
RIESGO DE DESCARGA ELÉTRICA
• A este electrodoméstico solo le debe dar servicio un técnico autorizado usando partes y refacciones genuinas únicamente. Evite el riesgo
de descarga eléctrica, no intente reparar usted
mismo la unidad.
GAS REFRIGERANTE INFLAMABLE
• No perfore los tubos del refrigerante.
• No utilice ningún dispositivo eléctrico adentro a
menos que sea recomendado por el fabricante.
Esto incluye dispositivos que se mantienen en el
compartimento de almacenamiento de alimentos, o para ayudar a descongelar.
• No almacene o use gasolina ni otros vapores y
líquidos inflamables en las cercanías de este o
cualquier otro electrodoméstico.
• No coloque el refrigerador cerca de fuentes de
calor o flamas abiertas.
ENGLISHESPAÑOLFRANÇAIS
• No deje el refrigerador en el frío extremo o en
temperaturas calientes.
• Asegúrese de que las aperturas de ventilación
en la unidad estén libres de obstáculos en todo
momento.
• No limpie la unidad con solventes de tipo industrial o químicos abrasivos.? Limpie la unidad
antes de usarla por primera vez, usando las
instrucciones en esta guía.
• No coloque objetos pesados en la parte superior
del refrigerador.?
• Nunca instale el refrigerador donde hay mucha
humedad o en áreas donde pueda haber salpicaduras de agua.?
• Nunca coma alimentos que se hayan estropeado por haber estado almacenados demasiado
tiempo en el refrigerador o dentro de un refrigerador descompuesto.?
• No utilice herramientas filosas dentro del refrigerador (como un picahielos para retirar el hielo)
PRECAUCIÓN: NO UTILICE
CABLES DE EXTENSIÓN CON ESTE
ELECTRODOMÉSTICO
ÚNICAMENTE PARA SU
USO EN INTERIORES
GUARDE ESTAS
INSTRUCCIONES
–13–
Page 14

INICIANDO
3-pronged
Receptacle
3-pronged
Plug
UBICACIÓN DE INSTALACIÓN
ENGLISH ESPAÑOL FRANÇAIS
INSTRUCCIONES DE CONEXIÓN A TIERRA
Este electrodoméstico debe estar conectado a tierra. Esto se
logra asegurando que el enchufe está insertado en un tomacorrientes adecuadamente conectado a tierra. El cable de
suministro de energía del electrodoméstico está equipado
con una clavija y cable para su conexión a tierra. Cuando está
conectado a tierra, se reduce el riesgo de descarga eléctrica al
proporcionar un cable de escape para la corriente eléctrica.
ADVERTENCIA: El uso inadecuado de la conexión a tierra
puede resultar en la posibilidad de una descarga eléctrica.
Consulte con un electricista calificado o personal de servicio si
no ha comprendido bien las instrucciones de conexión a tierra
o si tiene dudas sobre si el electrodoméstico está adecuadamente conectado a tierra
SUMINISTRO DE ENERGÍA
El refrigerador debe estar conectado a un tomacorrientes de
tres patas y con conexión a tierra de 110V-120V(60Hz).
Enchufe de 3
patas
Tomacorrientes de 3
patas
Al seleccionar un lugar para su unidad asegúrese que la superficie del piso esté nivelada y plana (interiores) y que la habitación
está bien ventilada manteniendo una temperatura entre 60.8°F
y 90°F. Evite ubicar su unidad cerca de una fuente de calor como
el horno, estufa, asador o radiador. También evite la luz directa del sol ya que puede incrementar el consumo eléctrico. La
unidad no está diseñada para utilizarse en una cochera o en exteriores. Los ambientes extremadamente fríos también pueden
causar que la unidad no funcione adecuadamente. Este electrodoméstico está diseñado para usarse en casa o en aplicaciones
similares como uso individual en cuartos de hotel o en áreas de
cocina en talleres u oficinas, o para el ser vicio de catering y otras
aplicaciones no comerciales.
Cuando instale la unidad asegúrese de que haya un espacio
adecuado para que la puerta abra completamente. Asegure un
mínimo de 4 pulgadas de espacio libre a ambos lados, izquierda y derecha, y en la parte trasera de la unidad, y 8 pulgadas de
espacio libre en la parte superior de la unidad. Esto permitirá
que el aire fresco circule alrededor del refrigerador y mejore la
eficiencia del proceso de enfriamiento. No coloque ninguna
cubierta como una cortina o sábana sobre la unidad. Limpie el
electrodoméstico antes de usarlo por primera vez.
NIVELANDO LA UNIDAD
Nota: Este electrodoméstico debe tener un tomacorrientes
dedicado.
ANTES DE DESHACERSE DE SU REFRIGERADOR VIEJO
Retire la(s) puerta(s), deje los entrepaños puestos (para evitar
que los niños se trepen) y haga que un técnico calificado lo
retire de sus instalaciones, de acuerdo a las instrucciones provistas con la vieja unidad.
INSTALANDO SU ELECTRODOMÉSTICO
MOVIENDO LA UNIDAD
PRECAUCIÓN: Para evitar daños severos, siempre asegúrese
que cualquier reubicación de la unidad siempre se lleva a cabo
entre dos personas. Sea precavido cuando mueva la unidad
para asegurar que el circuito del refrigerador no se dañe. Nunca
permita que la unidad sea inclinada a más de 45 grados, esto
dañará el dispositivo. Maneje la unidad tomándola de su base o
los lados. Nunca levante la unidad sosteniendo las orillas de la
superficie superior.
• Confirme con su vendedor si ellos retiran y se deshacen
(o reciclan) responsablemente su refrigerador viejo
• Visite www.epa.gov/rad para mayor información sobre
el desecho responsable de electrodomésticos
–14–
Es muy importante mantener nivelada la
unidad para evitar movimientos y vibraciones innecesarias. Esto también ayuda
a asegurar que la puerta cierra adecuadamente. Si la puerta no cierra de forma
segura, evitará el enfriamiento efectivo y
causará un daño posible al refrigerador.
Para nivelar la unidad gire las patas al frente del refrigerador
ya sea en la dirección de las manecillas del reloj o en sentido
contrario de las manecillas del reloj para levantar o bajar el refrigerador.
Contar con una segunda persona que empuje cuidadosamente
la parte superior del refrigerador ayudará a aliviar el peso de las
patas niveladoras y hará que puedan ajustarse más fácilmente.
Sin embargo, asegúrese que la unidad cuenta con un muro en
donde pueda recargarse de modo que no se voltee y cause
daños o lesiones.
A continuación, registre su número de modelo y de serie. Puede
encontrar la placa con esta información en la pared superior izquierda dentro del refrigerador.
Número de Modelo: RC-1335
Número de Serie: _________________________
Fecha de Compra:_________________________
Page 15

RESUMEN Y FUNCIONES DE LA UNIDAD
7
1. Perilla de control del
termostato
2. Compartimento del
congelador
3. Entrepaños de vidrio
4. Patas niveladoras
Las imágenes en esta manua de instrucciones son para
propósitos iustrativos. La apariencia física y as opciones de su
modeo en particuar pueden variar.
5. Estante superior de la
puerta
6. Estante para latas
7. Estante inferior de la
puerta
OPERACIÓN
Limpie la unidad antes del primer uso (vea la siguiente sección
para las instrucciones de limpieza). Conecte la unidad al suministro de energía. No prenda la unidad si esta ha sido movida
en las últimas dos horas, ya que el líquido refrigerante necesita
tiempo para asentarse.
La perilla de control del termostato del refrigerador y congelador se localizan cerca del compartimento del congelador (ver
imagen anterior).
La primera vez que encienda la unidad,
ajuste la perilla del control del termostato
en el nivel medio y dele tiempo a su refrigerador para que se enfríe completamente
antes de meter alimentos. Se recomienda
24 horas.
LIMPIEZA Y CUIDADOS DE SU ELECTRODOMÉSTICO
LIMPIEZA
Limpie la parte interna de la unidad con una solución ligera de
agua con bicarbonato. Después enjuague con con agua tibia
usando una esponja o paño húmedo. Lave los entrepaños y estantes con agua tibia jabonosa y seque completamente antes
de colocarlos de regreso en la unidad. Limpie el exterior de la
unidad con un paño húmedo. Para un mejor funcionamiento,
también limpie con cuidado el sello/empaque de la puerta.
No salpique agua en la parte externa o interna de la unidad
cuando la limpie.
DESCONGELADO
Su refrigerador puede requerir descongelado manual. Debe descongelarlo en los siguientes escenarios:
• El refrigerador no va a ser usado por periodos tiempo
largos
• Se forma una capa de hielo alrededor del compartimento de la nevera de cerca de ¼ de pulgada
Para descongelar:
1. Gire la perilla del termostato a la
posición “o” u “OFF” y deje la puerta
abierta
2. Desconecte la unidad
3. Retire todos los alimentos de ambos
compartimentos. Idealmente, los alimentos deben ser almacenados en
otro refrigerador
4. Coloque una toalla o dos debajo del
refrigerador para recoger el agua de la descongelación
5. Deje la puerta abierta hasta que el hielo se haya descongelado. Normalmente por varias horas (o toda la noche) será
suficiente.
6. Limpie y seque el interior de la unidad siguiendo las instrucciones de limpieza de la sección anterior.
ENGLISHESPAÑOLFRANÇAIS
Ya que el refrigerador está completamente
frío, ajuste la perilla al nivel que se ajuste a sus necesidades. “1”
es el nivel menos frío y “5” el nivel más frío. Sin embargo, el nivel
“3” debe ser apropiado para la mayoría de los usos de refrigeración en casa y oficina. Puede ser más probable que los ambientes más cálidos requieran niveles más altos (4 o 5). Es más
probable que los ambientes más fríos o invernales requieran de
un nivel más bajo.
NOTA: Girar la perilla del control del termostato a la posición “0”
u “OFF” detendrá el ciclo de enfriamiento pero apaga la unidad.
–15–
–15–
Page 16

ENGLISH ESPAÑOL FRANÇAIS
Screw
Unscrew
PROCEDIMIENTO PARA INVERTIR LA
PUERTA
Este refrigerador ha sido fabricado con las bisagras de la puerta en
el lado derecho. Se recomienda entrar en contacto con un técnico
calificado para invertir la puerta. No invierta la puerta a menos que
se sienta calificado para hacerlo.
PRECAUCION
Para evitarse daños a usted mismo o a la propiedad, se recomienda que le ayude una segunda persona para realizar este proceso.
• -Asegúrese de que el electrodoméstico está desconectado y
vacío
• -No recueste el electrodoméstico sobre la parte posterior o
incline a más de 45 grados al invertir la puerta, ya que esto
dañará el sistema de enfriamiento
• -Asegúrese de que haya una segunda persona disponible, y
una superficie/muro fuerte y sólido contra el cual pueda recargar el electrodoméstico para que no se resbale. Esto será
necesario al quitar la puerta.
ADVERTENCIA. Como se indicó anteriormente, asegúrese de que
el refrigerador esté apagado y desconectado antes de invertir la
puerta.
HERRAMIENTAS REQUERIDAS:
• Llave hexagonal
• Destornillador Phillipsv
• Destornillador de cabeza plana
Para invertir el lado donde se abre la puerta del refrigerador,
siga estas instrucciones:
6. Mueva la cubierta del
orificio del lado izquierdo al
lado derecho.
7. Levante la puerta y retírela
de la unidad. Colóquela en
una superficie acojinada
para evitar rayones.
8. Retire los tornillos y la bisagra inferior. Después retire
las patas ajustables de cada
lado.
9. Desatornille y retire el perno
inferior.
10. Voltee el soporte y vuelva a
colocar el perno de la bisagra.
6
8
9
10
1. Incline la unidad ligeramente
hacia atrás y asegúrela
2. Ajuste las dos patas niveladoras
a su posición más alta
3. Retire la cubierta de la bisagra superior derecha
4. Desatornille los tornillos,
después retire el soporte
de la bisagra superior
5. Retire la cubierta del tornillo
superior izquierdo usando
un destornillador de cabeza
plana
3
4
5
–16–
11. Con el perno de la bisagra
nuevamente en el soporte,
atornille el soporte inferior de
regreso al lado izquierdo
12. Reemplace la pata ajustable
13. Coloque la puerta nuevamente
en la unidad. Asegúrese de que
la puerta está alineada, horizontal y verticalmente de modo que
el empaque de la puerta selle
correctamente. Cuando el empaque esté sellando bien, coloque y apriete la bisagra superior.
Utilice una llave hexagonal si es
necesario.
11
13
Page 17

frutas y verduras
14. Reemplace la cubierta de la
bisagra y atornille la cubierta
(ahora en el lado opuesto de
donde estaba).
14
CAMBIANDO LA BOMBILLA DE LUZ INTERIOR
Antes de comenzar a reemplazar la bombilla, gire la perilla del
termostato a 0 y desconecte el refrigerador.
• Utilice un destornillador de cabeza plana para jalar
cuidadosamente la cubierta de la bombilla
• Retire la vieja bombilla al desatornillarla en sentido contrario a las manecillas del reloj.
• Reemplácela por una bombilla nueva de 10W SES del
mismo tamaño.
• Coloque la cubierta de la bombilla en su lugar y conecte
nuevamente el refrigerador a la fuente de energía.
• Ajuste la perilla del termostato al nivel deseado.
• Mantenga los alimentos bien sellados para evitar que se
sequen y para evitar que se mezclen los olores
• Almacene carne cruda o pescado en los entrepaños inferiores para evitar la contaminación
• Cuando compre alimentos congelados, almacénelos juntos mientras los trae de la tienda. Colóquelos en el refrigerador lo más pronto posible, antes que otros alimentos.
• Los alimentos que han sido dejados a temperatura ambiente por un periodo prolongado de tiempo pueden causar
que el alimento desarrolle bacterias.
• Para mantener la temperatura, sólo abra la puerta del
refrigerador para meter y sacar alimentos. Permita que la
comida caliente se enfríe antes de meterla al refrigerador.
• Asegúrese de que las botellas y contenedores estén limpios
y secos antes de meterlos al refrigerador
• Al colocar la perilla de control de temperatura en la
posición “0” hará que el refrigerador deje de enfriar, pero
no corta la energía del refrigerador.
• Cuando el electrodoméstico no se use por un periodo
prolongado de tiempo, apáguelo y desconecte del suministro de energía. Saque todos los alimentos y limpie la
unidad siguiendo las instrucciones de este manual. Deje la
puerta del refrigerador abierta para evitar que los olores se
queden atrapados.
ENGLISHESPAÑOLFRANÇAIS
• No deje que ningún tipo de grasa entre en contacto con las
partes de plástico del refrigerador.
• Las botellas de plástico y vidrio no deben colocarse
en el compartimento del congelador a menos que lo
recomiende el fabricante del producto
• Congele alimentos frescos al empacarlos correctamente y
colocándolos en el compartimento del congelador, pero
no coloque bebidas carbonatadas ahí
• No es necesario refrigerar alimentos enteros como nabos,
plátanos, calabazas y cebollas
• Durante un apagón no abra el refrigerador a menos que
sea absolutamente necesario
• No almacene artículos enlatados ya que pueden expandirse y explotar
• El compartimento de la nevera no está lo suficientemente
frío para mantener congeladas alimentos como paletas
heladas o helado. Esos alimentos requieren un congelador
• No sobrellene el refrigerador ya que esto bloquea la circulación e incrementa el consumo de energía. Deje espacio
alrededor de los alimentos para permitir la circulación
adecuada de aire
• Hay múltiples entrepaños en el refrigerador que pueden
ser retirados o cambiados conforme necesite acomodar los
alimentos en el refrigerador de acuerdo a su uso. Sin embargo, siempre mantenga uno de los entrepaños instalado
en la ranura más baja, justo arriba de los contenedores de
–17–
Page 18

ENGLISH ESPAÑOL FRANÇAIS
SOLUCIÓN DE PROBLEMAS
PROBLEMA SOLUCIÓN
Asegúrese de que el enchufe está bien conectado
Asegúrese de que la perilla del termostato no está en el nivel 0
El refrigerador no tienen nada de energía (no hace ruido, etc).
(OFF)
Revise que el fusible no se ha volado, o que algún fusible de la
casa o cortacircuitos no se ha disparado
Los alimentos en el refrigerador se están congelando cuando
no deberían
Los alimentos en el refrigerador no están lo suficientemente
fríos
La temperatura interna del refrigerador está demasiado tibia
La parte exterior de la unidad está tibia
Baje el nivel del termostato (los números más altos son los más
fríos)
Asegúrese de que la puerta de refrigerador está bien cerrada y
que la unidad está nivelada
Revise la temperatura ambiente de la habitación. Si está muy
caliente, esto es de esperarse
Esto es normal, si recientemente metió comida caliente al
refrigerador
Asegúrese de que el empaque/sello alrededor de la puerta no
está sucio. Si el empaque/sello no está apretado, se meterá el
aire caliente del exterior
Esto es normal cuando se enciende la unidad después de haber
estado apagada por un tiempo prolongado
Si los alimentos están demasiado apretados, asegúrese de
distribuirlos mejor. No sobrellene el refrigerador.
Asegúrese de que el nivel de temperatura está en el nivel deseado. Vea “Operación” para mayor información
Esto puede causarse por abrir la puerta del refrigerador frecuentemente dejando que entre demasiado aire caliente
Puede deberse a comida caliente
Se puede llevar hasta 4 horas para que el refrigerador llegue a
la temperatura deseada si se está usando por primera vez o ha
estado apagado por un tiempo prolongado
Esto es un comportamiento normal y esperado. El calor evita la
formación de humedad.
Hay muchos ruidos diferentes que emanan del refrigerador
en diferentes momentos. Esto incluye sonidos fuertes cuando
la unidad se enciende por primera vez, ventiladores funcionando, estallidos, sonido de ebullición, gorgoteo o sonido de
grietas.
Se escuchan vibraciones o cascabeleos cuando la unidad está
funcionando
Hay humedad apareciendo en la parte interior del refrigerador
Hay humedad apareciendo en la parte interior del refrigerador
La puerta no cierra completamente
–18–
Esto puede ser causado por suciedad en el empaque/sello
de la puerta lo que evita que el sellado sea firme. También, es
un evento normal si el aire ambiental es húmedo. Esto puede
suceder también si la puerta se abre frecuentemente.
Asegúrese de que la unidad está nivelada y que no esté en contacto con un muro. Vea “Nivelando la Unidad”.
Esto puede ser causado por suciedad en el empaque/sello
de la puerta lo que evita que el sellado sea firme. También, es
un evento normal si el aire ambiental es húmedo. Esto puede
suceder también si la puerta se abre frecuentemente.
Asegúrese de que la puerta está cerrando adecuadamente y que
no hay suciedad en el empaque/sello de la puerta. Esto también puede deberse a una fluctuación en la temperatura de la
habitación. Limpie los residuos. Si continúa sucediendo, entre
en contacto con un técnico calificado.
Asegúrese que la unidad no está sobrellena de alimentos
Asegúrese de que los entrepaños estén en una posición adec-
uada
Asegúrese de que el empaque/sello de la puerta esté limpio
Page 19

SOPORTE AL CLIENTE
Antes de entrar en contacto con soporte al cliente, vea nuestra guía de solución de problemas
presentada anteriormente.
Visite nuestro sitio web para entrar en contacto con nosotros, encontrar respuestas a las Pregun-
tas Más Frecuentes y para otros recursos entre los cuales podría encontrar una actualización a
este manual
WWW.IMPECCA.COM
Si desea contactarnos por teléfono, por favor asegúrese de tener a la mano su número de mod-
elo y número de serie y llamenos entre 9:00am y 6:00pm, tiempo del Este, al +1 866 954-4440.
Manténgase al día en las innovaciones más recientes de Impecca y participe en nuestros concur-
sos en nuestras redes sociales:
ENGLISHESPAÑOLFRANÇAIS
www.facebook.com/Impecca/
www.instagram.com/impecca/
@impeccausa
–19–
Page 20

ENGLISH ESPAÑOL FRANÇAIS
GARANTÍA LIMITADA DE UN AÑO EN ELECTRODOMÉSTICOS MAYORES
I
mpecca™ garantiza al comprador original este producto contra
defectos en su material y mano de obra como se especifica a
continuación.
PARTES Y MANO DE OBRA– Si se determina que el
producto tiene defectos de fabricación, dentro del
periodo de un (1) año a partir de la fecha de compra
original, Impecca™, a su discreción, reparará o
reemplazara las partes del producto sin ningún costo
para usted en el territorio continental de Estados
Unidos.
Para obtener el servicio de garantía de un distribuidor
autorizado de Impecca™ envíenos un correo electrónico a:
service@impecca.com para obtener un número de Autorización
de Reparación y Mantenimiento (RMA) y recibir las
instrucciones de cómo se llevará a cabo el procedimiento de
reparación o reemplazo.
Cualquier material de vidrio incluido en el electrodoméstico
estará cubierto por un periodo de sesenta (60) días a partir
de la fecha de compra.
Impecca™ excluye de esta garantía accesorios no eléctricos o
mecánicos, accesorios y partes desechables incluyendo, pero
no limitado, a la carcaza, cables de conexión, baterías,
adaptadores A/C. Impecca™ se reserva el derecho de reparar o
reemplazar un producto defectuoso con un modelo igual,
equivalente o nuevo modelo.
Nos reservamos el derecho ya sea de reparar o reemplazar el
producto a nuestra discreción. El reemplazo puede ser nuevo o
reacondicionado tratando de asegurar de que se trate del
mismo modelo, si el mismo modelo no está disponible, se
reemplazará con un modelo de especificaciones iguales o
superiores.
El “desgaste” normal no está cubierto por esta ni por ninguna
otra garantía. Adicionalmente, Impecca™ se reserva el derecho
de determinar el “desgaste” de cualquiera o todos los
productos. El violar o abrir el chasis del producto invalidará
esta garantía por completo.
Excepciones: Esta garantía no cubre lo siguiente:
1. Cualquier producto que tenga un número de serie
defectuosos o cubierto
2. Productos que han sido transferidos a un segundo
propietario
3. Óxido en la parte interna o externa de la unidad
4. Los productos listados como “Tal cual” o
“Reformados”
5. Pérdida de alimentos debido a la falla del producto
6. Aires acondicionados que han sido instalados en un
muro.
7. El producto si este ha sido utilizado en una ubicación
comercial
8. Llamadas de servicio que no involucren el mal
funcionamiento del producto
9. Llamadas de servicio de un producto estropeado por
no seguir las instrucciones proporcionadas
10. Llamadas a servicios para corregir instalaciones
inapropiadas.
11. Costos asociados por hacer el producto accesible
al servicio (incluido pero no limitado a la remoción
de ajustes/moldeo/gabinete, etc.)
12. Llamadas de servicio para reemplazar consumibles
como bombillas, filtros, etc.
13. Recargos que pueden aplicar a llamadas de
servicio los fines de semana, por las noches, o
durante las festividades. Daños al acabado del
electrodoméstico o muebles de la casa debido a la
instalación del electrodoméstico.
14. Daños causados por cualquiera de las siguientes
causas: Actos de Dios, incendios, mal uso.
accidentes, suministro de energía incorrecto,
servicio realizado por personal no autorizado, el
uso de partes no originales Impecca.
TODAS LAS GARANTÍAS IMPLÍCITAS, INCLUYENDO LAS
GARANTÍAS IMPLÍCITAS DE MERCADOTECNIA E IDONEIDAD
PARA UN PROPÓSITO EN PARTICULAR ESTÁN LIMITADAS A
UNA DURACIÓN DE (1) AÑO A PARTIR DE LA FECHA ORIGINAL
DE COMPRA DEL PRODUCTO.
ESTAS GARANTÍAS Y MEDIDAS SON GARANTÍAS Y MEDIDAS
ÚNICAS Y EXCLUSIVAS EN RELACIÓN CON LA VENTA Y USO DEL
PRODUCTO. NO SE OTORGA NINGUNA OTRA GARANTÍA, ORAL
O ESCRITA, EN FORMA EXPRESA O IMPLÍCITA.
IMPECCA™ NO SE HACE RESPONSABLE DE NINGÚN DAÑO, YA
SEA ESPECIAL, INCIDENTAL, CONSECUENTE, DIRECTO O DE
CUALQUIER OTRA NATURALEZA, YA SEA CONOCIDO O POR
DAR A CONOCER A IMPECCA™, INCLUYENDO LA PÉRDIDA DE
GANANCIAS, PLUSVALÍA, DAÑOS PERSONALES O EN LA
PROPIEDAD RESULTANTES DE CUALQUIER INCUMPLIMIENTO
DE LA GARANTÍA, LA INCAPACIDAD DE UTILIZAR EL
PRODUCTO O BAJO NINGUNA TEORÍA LEGAL EN CONTRATO O
AGRAVIO. LA RESPONSABILIDAD DE IMPECCA SE LIMITA AL
PRECIO ACTUAL DE COMPRA PAGADO AL VENDEDOR DEL
PRODUCTO DEFECTUOSO.
Ningún distribuidor, agente o empleado de Impecca™ está
autorizado para hacer ninguna modificación, extensión,
cambio o enmienda de esta garantía sin el consentimiento y
autorización escrita de Impecca™.
Algunos estados no permiten la exclusión o limitación de
garantías implícitas o la responsabilidad por daños
incidentales o consecuentes, y no permiten una limitación
en la duración de una garantía implícita, de modo que las
anteriores limitaciones o exclusiones pueden no aplicarse a
usted. Esta garantía le otorga derechos específicos, y puede
usted tener otros derechos, los cuales varían de estado a
estado.
Nota: El Centro de Servicio de Garantía hace envíos solo
dentro del territorio continental de E.U.
V1.0
Impecca™ USA ● Wilkes-Barre, PA ● www.impecca.com ● 866-954.4440
*No haga ningún envío a esta dirección ya que podría extraviarse y esto demoraría el proceso de servicio y reparación.
–20–
Page 21

ENGLISHESPAÑOLFRANÇAIS
–21–
Page 22

TABLE DES MATIÈRES
Consignes de sécurité importantes 23
ENGLISH ESPAÑOL FRANÇAIS
Démarrer 24
Vue d’ensemble et caractéristiques de l’unité 25
Opération 25
Entretien et nettoyage 25
Inversion de la porte 26
Conseils et suggestions supplémentaires 27
Guide de dépannage 28
Service technique 29
Garantie 30
–22–
Page 23

VEUILLEZ LIRE TOUT CES
INSTRUCTIONS,
COMME ILS NE PEUVENT PAS
TOUTES
ÊTRE ÉVIDENTES
DIRECTIVES DE SÉCURITÉ INITIALES
• Ce réfrigérateur doit être correctement installé
et situé conformément aux instructions d’installation de ce guide avant de pouvoir être utilisé.
• Si vous tournez le cadran de réglage de la
température sur “0”, le refroidissement est
arrêté, mais le réfrigérateur n’est pas mis hors
tension.
né.
• N’utilisez pas d’outils métalliques tranchants à
l’intérieur du réfrigérateur (tels qu’un pic à glace
pour retirer la glace), vous risqueriez de les
endommager.
• Si le réfrigérateur n’est pas utilisé pendant
une longue période, videz-le complètement et
débranchez-le.
• Cet appareil n’est pas destiné à être utilisé par
des personnes (y compris des enfants) ayant
des capacités physiques, sensorielles ou mentales réduites pouvant entraîner une mauvaise
utilisation ou des blessures dues à l’utilisation
de l’appareil.
• Ne lubrifiez aucune partie du réfrigérateur.
RISQUE DE CHOC ELECTRIQUE
ENGLISHESPAÑOLFRANÇAIS
• Ne laissez pas les enfants grimper, se tenir debout ou se suspendre aux étagères du réfrigérateur. Ils pourraient endommager le réfrigérateur
et se blesser gravement.
• Ne laissez pas les enfants pendre aux portes, car
le réfrigérateur pourrait se renverser et causer
des blessures graves. Les enfants doivent être
surveillés pour s’assurer qu’ils ne jouent pas
avec l’appareil.
• Gardez les doigts à l’écart de l’espace entre la
porte et le réfrigérateur. Faites attention en fermant la porte quand des enfants sont présents.
• Débranchez le réfrigérateur avant tout nettoyage ou réparation.
• Si le câble d’alimentation est endommagé, il
doit être remplacé par le fabricant ou par un
technicien qualifié. N’utilisez pas l’appareil si le
câble est endommagé.
• Ne laissez pas le réfrigérateur dans des températures extrêmement froides ou chaudes.
• Assurez-vous que les orifices de ventilation de
l’appareil ne sont pas obstrués à tout moment.
• Ne nettoyez pas l’appareil avec des solvants
industriels ou des produits chimiques abrasifs.
Nettoyez l’appareil avant la première utilisation,
en suivant les instructions de ce guide.
• Cet appareil ne doit être réparé que par un technicien agréé utilisant uniquement des pièces
de rechange d’origine. Pour éviter tout risque
d’électrocution, n’essayez pas de réparer l’appareil vous-même.
GAZ RÉFRIGÉRANT INFLAMMABLE
• Ne perforez pas le tuyau de réfrigérant.
• N’utilisez aucun appareil électrique à l’intérieur
de l’appareil, sauf si cela est recommandé par
le fabricant. Cela inclut les dispositifs conservés
dans le compartiment de stockage des aliments
ou pour faciliter le dégivrage.
• N’entreposez pas et n’utilisez pas d’essence
ou d’autres liquides ou vapeurs inflammables
à proximité de cet appareil ou de tout autre
appareil.
• Ne placez pas le réfrigérateur à proximité de
sources de chaleur ou de flammes nues.
ATTENTION: N’UTILISEZ PAS DE
CABLE EXTENSION AVEC CET
APPAREIL
• Ne placez pas d’objets lourds sur le réfrigérateur.
• N’installez jamais le réfrigérateur dans des
endroits très humides ou dans des endroits où
l’eau pourrait éclabousser.
• Ne mangez jamais d’aliments qui pourraient
s’être gâtés parce qu’ils ont été stockés trop
longtemps avant de manger, ou si le réfrigérateur a perdu de la puissance ou a mal fonction-
POUR UNE UTILISATION EN
INTÉRIEUR UNIQUEMENT
CONSERVEZ CES INSTRUCTIONS
–23–
Page 24

ENGLISH ESPAÑOL FRANÇAIS
3-pronged
Receptacle
3-pronged
Plug
DÉMARRAGE
INSTRUCTIONS DE MISE À LA TERRE
Cet appareil doit être mis à la terre. Pour ce faire, assurez-vous
que la fiche est insérée dans une prise correctement mise à la
terre. L’appareil est équipé d’un cordon avec un fil de terre et une
fiche. Lors de la mise à la terre, le risque de choc électrique est
réduit en fournissant un fil de fuite pour le courant électrique.
AVERTISSEMENT: une utilisation incorrecte de la fiche de mise
à la terre peut provoquer un choc électrique. Consultez un électricien qualifié ou un réparateur si les instructions de mise à la
terre ne sont pas complètement comprises, ou
en cas de doute sur le fait que l’appareil ou la prise n’est pas
correctement mis à la terre.
SOURCE D’ALIMENTATION
Vous devez brancher l’appareil sur une prise de courant mise à
la terre à 3 broches de 110V-120V (60Hz).3-pronged, grounded
outlet.
Fiche à 3
branches
Réceptacle à
3 branches
une température comprise entre 60,8 et 90 ° F. Évitez de placer
votre appareil près d’une source de chaleur telle qu’un four, une
cuisinière, une chaudière ou un radiateur. Évitez l’exposition directe au soleil, car cela pourrait augmenter la consommation
électrique. Cet appareil n’est pas conçu pour être utilisé dans un
garage ou pour une installation en extérieur. Des températures
ambiantes extrêmement basses peuvent également empêcher
l’appareil de fonctionner eicacement. Cet appareil est destiné
à être utilisé dans des applications domestiques et similaires,
telles que l’utilisation individuelle dans des chambres d’hôtel,
dans des cuisines dans des magasins et des bureaux, ou dans
des applications de restauration et autres que celles de vente
au détail.
Lors de l’installation de l’unité, assurez-vous qu’il y a suisamment d’espace pour que la porte d’entrée s’ouvre complètement.
Assurez-vous qu’il reste au moins 4 pouces d’espace libre sur
les côtés, à l’avant et à l’arrière. En haut de l’unité, assurez-vous
qu’il y a au moins 8 pouces d’espace libre. Cela permettra à l’air
froid de circuler autour du réfrigérateur et améliorera l’eicacité
du processus de refroidissement. Ne placez aucun revêtement
tel qu’un drapé ou une feuille sur l’appareil. Nettoyez l’appareil
avant la première utilisation.
REMARQUE: Cet appareil doit avoir sa propre prise dédiée.
AVANT DE JETER VOTRE ANCIEN RÉFRIGÉRATEUR:
Retirez la (les) porte (s), laissez les étagères en place (pour éviter que les enfants ne rampent) et faites-les sortir de vos locaux
par un technicien qualifié, conformément aux instructions
fournies avec l’ancienne unité.
INSTALLER VOTRE APPAREIL
DÉMÉNAGEMENT DE L’APPAREIL
ATTENTION: pour éviter des blessures graves, veillez à ce que
tout déplacement de l’unité soit toujours eectué par deux
personnes. Faites attention lorsque vous déplacez l’unité pour
vous assurer que le circuit de réfrigération n’est pas endommagé. Ne laissez jamais l’appareil incliné à plus de 45 °, cela
endommagerait l’appareil. Manipulez l’appareil sur ses côtés et
sa base. Ne jamais soulever l’appareil en tenant les bords de la
surface supérieure.
INSTALLER L’EMPLACEMENT
Lorsque vous choisissez un emplacement pour votre appareil, assurez-vous que le sol est une surface plane et à niveau
(à l’intérieur) et que la pièce est bien ventilée, en maintenant
• Confirmez auprès de votre revendeur s’il va retirer et recycler votre ancien réfrigérateur.
• Visitez www.epa.gov/rad pour plus d’informations sur
la mise au rebut des appareils.
–24–
NIVELLEMENT DE L’UNITÉ
Il est très important de maintenir l’unité
à niveau pour éviter les mouvements
et les vibrations inutiles. Cela aide
également à s’assurer que la porte se
ferme correctement. Si la porte ne ferme
pas correctement, cela empêchera un
refroidissement eicace et endommagera
éventuellement le réfrigérateur. Pour
mettre l’appareil à niveau, tournez les pieds réglables situés à
l’avant du réfrigérateur dans le sens des aiguilles d’une montre
ou dans le sens inverse des aiguilles d’une montre pour
augmenter ou réduire l’angle.
Si une seconde personne appuie avec précaution contre le
haut du réfrigérateur, vous soulagerez un peu le poids des
pieds de mise à niveau et faciliterez leur réglage. Cependant,
assurez-vous que l’unité dispose d’un mur contre le mur afin
qu’il ne se renverse pas et ne provoque pas de dommages ou
de blessures.
NUMÉRO DE SÉRIE ET DE MODÈLE
Veuillez enregistrer votre numéro de modèle et votre numéro de
série ci-dessous. Vous pouvez trouver le numéro de série sur un
autocollant au dos du réfrigérateur ou sur la boîte du produit.
Numéro de modèle: RC-1335
Numéro de série: ______________________________
Date d’achat: ____________________________
Page 25

SURVOL DE L’UNITÉ ET CARACTÉRIS-
7
TIQUES
1. Cadran du thermostat
2. Compartiment refroidisseur
3. Étagères en verre
4. Pieds de nivellement
Les images de ce manue d’instructions sont fournies à titre
iustratif. L’apparence physique et es options de votre modèe
peuvent varier.
5. Bac de porte
supérieur
6. Porte cannettes
7. Bac de porte inférieur
OPÉRATION
Nettoyez l’appareil avant la première utilisation (voir la section
suivante pour les instructions de nettoyage). Branchez l’appareil
à sa source d’alimentation. Ne mettez pas l’appareil en marche
s’il a été déplacé au cours des 2 dernières heures, car le liquide
de refroidissement a besoin de temps pour se déposer.
Le bouton de commande du thermostat du réfrigérateur et du
refroidisseur est situé près du compartiment du refroidisseur.
(voir photo ci-dessus).
La première fois que vous allumez l’appareil, réglez le cadran
du thermostat sur la position centrale et laissez à votre réfrigérateur le temps de refroidir complètement avant d’ajouter des aliments. 24 heures complètes sont recommandées.
Une fois qu’il est complètement refroidi, réglez le bouton en
fonction de vos besoins. “1” est le moins
froid et “5” le plus froid. Cependant, un
réglage de «3» devrait convenir à la plupart
des réfrigérateurs domestiques ou professionnels. Les environnements plus chauds
peuvent être plus susceptibles de nécessiter des paramètres plus élevés (4 ou 5). Les
environnements plus froids ou hivernaux
utiliseront probablement un réglage plus bas.
REMARQUE: Le fait de tourner le bouton de commande
du thermostat sur la position «0» ou «OFF» arrêtera le cycle
de refroidissement mais ne coupera pas l’alimentation de
l’appareil.
NETTOYAGE ET ENTRETIEN DE VOTRE APPAREIL
NETTOYAGE
Essuyez l’intérieur de l’appareil avec une solution de bicarbonate de soude (bicarbonate). Puis rincez à l’eau tiède avec une
éponge ou un chion humide. Lavez les étagères et les bacs
dans de l’eau chaude savonneuse et séchez-les complètement
avant de les remettre dans l’appareil. Nettoyez l’extérieur de
l’appareil avec un chion humide. Pour des performances optimales, nettoyez soigneusement le joint de la porte.
Ne projetez pas d’eau à l’extérieur ou à l’intérieur de l’appareil
lors de son nettoyage.
DÉGIVRAGE
Votre réfrigérateur peut nécessiter un
dégivrage manuel. Il devrait être dégivré
dans les scénarios suivants:
• Le réfrigérateur ne sera pas utilisé
pendant une période prolongée.
• Une couche de glace de plus de
1/4 de pouce est formée autour
du compartiment du refroidisseur.
Pour décongeler:
Tournez le bouton du thermostat sur «OFF» et laissez la porte
ouverte.
1. Débranchez l’appareil.
2. Retirez tous les aliments des deux compartiments.
3. Idéalement, les aliments devraient être placés dans un
autre réfrigérateur.
4. Placez une serviette ou deux sous le réfrigérateur pour
récupérer l’eau du givre qui fond.
5. Laissez la porte ouverte jusqu’à ce que tout le givre soit
fondu. Habituellement, plusieurs heures (ou une nuit)
suiront.
6. Nettoyez et nettoyez l’intérieur de l’appareil en suivant
les instructions de la section «Nettoyage» ci-dessus.
ENGLISHESPAÑOLFRANÇAIS
–25––25–
Page 26

ENGLISH ESPAÑOL FRANÇAIS
Screw
Unscrew
REVERSAL DE PORTE
Ce réfrigérateur a été construit avec les charnières de porte à droite. Il est recommandé de contacter un technicien qualifié pour inverser la porte. N’inversez pas la porte à moins que vous ne pensiez être qualifié pour le faire.
MISE EN GARDE:
Pour éviter tout risque de blessure et / ou de dommage aux biens,
une seconde personne doit vous aider pendant le processus d’inversion de la porte.
• Assurez-vous que l’appareil est débranché et vide.
• Ne posez pas le réfrigérateur sur le dos et ne l’inclinez pas à
plus de 45 ° lors de l’inversion de la porte car cela endommagerait le système de refroidissement.
• Assurez-vous d’avoir une deuxième personne disponible et
une surface / un mur solide et solide contre lequel appuyer
l’appareil afin qu’il ne glisse pas. Cela sera nécessaire pour
enlever la porte.
AVERTISSEMENT: comme indiqué ci-dessus, assurez-vous que le
réfrigérateur est éteint et débranché avant d’inverser la porte.
OUTILS NÉCESSAIRES:
• Clé hexagonale
• Tournevis Philips
• Tournevis à tête plate
Pour inverser le côté sur lequel la porte s’ouvre, suivez ces instructions:
1. Inclinez l’appareil légèrement vers l’arrière et maintenez-le fermement.
2. Ajustez les deux pieds de
nivellement au maximum.
3. Retirez le cache de charnière supérieur droit.
3
4
4. Dévissez les vis, puis retirez le support de charnière supérieure.
5. Retirez le cache-vis
supérieur gauche à l’aide
d’un tournevis à tête plate.
5
–26–
6. Déplacez le couvercle du
trou de gauche à droite.
7. Soulevez la porte et détachez-la de l’appareil. Placezle sur une surface matelassée pour éviter les rayures.
8. Retirez les vis et la charnière
inférieure. Ensuite, retirez les
pieds réglables de chaque
côté.
9. Dévissez et retirez l’axe de la
charnière inférieure.
10. Retournez le support et replacez l’axe de la charnière.
11. Avec l’axe de charnière dans
le support, revissez le support
inférieur dans le côté gauche.
12. Replacez les pieds réglables.
13. Replacez la porte sur l’appareil. Assurez-vous que la porte
est alignée horizontalement et
verticalement afin que le joint se
ferme correctement de tous les
côtés. Lorsque le joint est bon,
remplacez et serrez la charnière
supérieure. Utilisez une clé pour
serrer si nécessaire.
6
8
9
10
11
13
Page 27

14. Replacez le cache de
charnière et le cache de vis
(maintenant du côté opposé
à celui où ils se trouvaient).
14
CHANGER LA LUMIÈRE INTERNE
Avant de commencer à remplacer l’ampoule, tournez le cadran
du thermostat sur 0 et débranchez le réfrigérateur.
• Utilisez un tournevis à tête plate pour dégager doucement
le couvercle de l’ampoule.
accueillir les éléments du réfrigérateur en fonction de
votre utilisation. Cependant, conservez toujours l’une des
étagères dans le logement le plus bas, juste au-dessus des
contenants de fruits et légumes.
• Gardez les aliments bien fermés pour éviter qu’ils ne se
dessèchent et empêcher les odeurs de se mélanger.
• Rangez la viande et le poisson crus sur le plateau le plus
bas pour éviter toute contamination.
• Lorsque vous achetez des aliments réfrigérés, rangez-les
ensemble pendant que vous les rapportez du magasin.
Placez-le au réfrigérateur dès que possible, avant les autres
éléments.
• Les aliments laissés à la température ambiante pendant
une période prolongée peuvent provoquer le développement de bactéries.
ENGLISHESPAÑOLFRANÇAIS
• Retirez l’ancienne ampoule en la dévissant dans le sens
contraire des aiguilles d’une montre.
• Remplacez-la par une nouvelle ampoule SES 10 W de
même taille.
• Remettez le couvercle de l’ampoule en place et rebranchez
l’alimentation électrique.
• Réglez le thermostat sur le réglage souhaité.
CONSEILS ET SUGGESTIONS SUPPLÉMENTAIRES
• Ne laissez aucune matière grasse entrer en contact avec les
pièces en plastique du réfrigérateur.
• Les bouteilles en verre et en plastique ne doivent pas être
placées dans le compartiment du refroidisseur à moins que
cela ne soit recommandé par le fabricant du produit.
• Congelez les aliments frais en les emballant correctement
et en les plaçant dans le compartiment du refroidisseur,
mais n’y placez pas de boissons gazeuses.
• De nombreux aliments entiers tels que les radis, les bananes, les citrouilles et les oignons n’ont pas besoin d’être
réfrigérés.
• Pour maintenir la température, ouvrez la porte du réfrigérateur uniquement pour y déposer ou en retirer des aliments.
Laissez les aliments chauds refroidir avant de les mettre au
réfrigérateur.
• Assurez-vous que les bouteilles et les contenants pour
aliments sont propres et secs avant de les ranger dans le
réfrigérateur.
• Si vous tournez le cadran de contrôle de la température sur
«0», le refroidissement est arrêté mais le réfrigérateur n’est
pas mis hors tension.
• Lorsque l’appareil n’est pas utilisé pendant une longue
période, éteignez-le et débranchez-le du secteur. Videz tous
les aliments et nettoyez-les en suivant les instructions de
ce manuel. Laissez la porte entrouverte pour éviter que les
odeurs ne restent emprisonnées.
• En cas de panne de courant, n’ouvrez pas le réfrigérateur
sauf en cas d’absolue nécessité.
• Ne stockez pas d’articles en conserve, car ils pourraient se
dilater et éclater.
• Le compartiment du refroidisseur n’est pas assez froid pour
conserver des friandises glacées telles que des glaces ou
des sucettes glacées. Ces articles nécessitent un congélateur.
• Ne remplissez pas excessivement le réfrigérateur, car cela
bloquerait la circulation et augmenterait la consommation
d’énergie. Laissez un espace autour de la nourriture pour
permettre une bonne circulation de l’air.
• Le réfrigérateur comporte plusieurs tablettes qui peuvent
être retirées ou modifiées en fonction des besoins pour
–27–
Page 28

ENGLISH ESPAÑOL FRANÇAIS
DÉPANNAGE
PROBLÈME SOLUTION
Assurez-vous que la fiche est bien enfoncée
Le réfrigérateur ne reçoit pas d’électricité (pas de bourdonnement, etc.)
Assurez-vous que le bouton du thermostat n’est pas réglé sur 0
(o)
Vérifiez que le fusible n’a pas fondu ou qu’un fusible ou un disjoncteur n’a pas sauté.
Les aliments dans le réfrigérateur gèlent alors qu’il ne devrait
pas.
Les aliments dans le réfrigérateur ne sont pas assez froids.
La température à l’intérieur du réfrigérateur est trop chaude.
L’extérieur de l’unité est chaud
Abaissez le numéro du thermostat (les chires les plus élevés
sont plus froids).
Assurez-vous que la porte du réfrigérateur est complètement
fermée et que le réfrigérateur est à niveau.
Vérifiez la température ambiante de la pièce. Si il fait très chaud,
on peut s’y attendre.
Si vous avez récemment mis des aliments très chauds dans le
réfrigérateur, cela est normal.
Assurez-vous que le joint / la garniture d’étanchéité autour de
la porte est exempt de débris. Si le joint n’est pas étanche, l’air
chaud de l’environnement peut s’infiltrer
Ceci est également normal lorsque l’appareil est allumé après
une longue période d’inactivité.
Si les aliments sont bien emballés, assurez-vous qu’ils sont distribués plus uniformément. Ne surchargez pas le réfrigérateur.
Assurez-vous que le réglage de la température correspond à la
sélection souhaitée. Voir «Utilisation de votre appareil» pour
plus de détails.
Cela peut être dû à une ouverture trop fréquente de la porte et à
une trop grande quantité d’air chaud.
Cela peut être causé par des aliments chauds.
Il peut s’écouler au moins quatre heures avant que votre ré-
frigérateur atteigne sa température cible s’il est utilisé pour la
première fois ou s’il a été éteint pendant une période prolongée.
C’est un comportement normal et attendu. La chaleur empêche
la formation d’humidité.
On entend beaucoup de bruits diérents émanant du réfrigérateur à diérents moments. Cela inclut les sons forts lors
de la première mise en marche, les ventilateurs en marche,
les sons éclatants, bouillant, gargouillant ou craquant.
Il y a des bruits de vibration ou de cliquetis lorsque l’unité
fonctionne.
De l’humidité apparaît à l’intérieur des parois du réfrigérateur.
De l’humidité apparaît à l’extérieur des parois du réfrigérateur.
La porte ne se fermera pas complètement.
–28–
Tous ces bruits sont typiques pendant le fonctionnement normal et les cycles, en particulier lorsque la porte a été ouverte.
Ces bruits sont causés par le moteur du compresseur et le
réfrigérant qui circule dans le système.
Assurez-vous que l’appareil est de niveau et qu’il ne touche pas
un mur. Voir la section «Mise à niveau de l’appareil» ci-dessus.
Cela peut être causé par des débris dans le joint de la porte qui
empêchent l’étanchéité. De plus, il est normal que l’air ambiant
soit humide. Cela peut également se produire si la porte est
ouverte très fréquemment.
Assurez-vous que votre porte se ferme correctement et qu’il n’y
a pas de débris dans le joint de la porte. Cela peut également
être dû à une fluctuation de la température ambiante. Essuyez
les résidus. Si cela continue, contactez un technicien qualifié
pour obtenir de l’aide.
Assurez-vous que l’appareil n’est pas trop bourré d’aliments.
Assurez-vous que les étagères sont bien en place.
Assurez-vous que le joint de la porte est propre.
Page 29

SUPPORT TECHNIQUE
Avant de contacter le support client, veuillez consulter la section Dépannage de la page précé-
dente.
Visitez notre site Web pour nous contacter, trouver des réponses aux questions fréquemment
posées et pour d’autres ressources pouvant inclure une version mise à jour de ce manuel de l’util-
isateur.
WWW.IMPECCA.COM
Si vous souhaitez nous contacter par téléphone, assurez-vous d’avoir votre numéro de modèle et
votre numéro de série à portée de main et appelez-nous entre 9h00 et 18h00 HE, au +1 866-954-
4440.
Gardez un œil sur les dernières innovations d’Impecca et participez à des concours via nos ré-
seaux sociaux:
ENGLISHESPAÑOLFRANÇAIS
www.facebook.com/Impecca/
www.instagram.com/impecca/
@impeccausa
–29–
Page 30

ENGLISH ESPAÑOL FRANÇAIS
GARANTIE LIMITÉE UN AN GROS APPAREILS ÉLECTROMÉNAGERS
–
Impecca™ garantie auprès de l’acheteur original cet appareil
contre toutes défectuosités liées au matériel et à la
fabrication tel que spécifié ci-dessous.
PIÈCES ET MAIN D’ŒUVRE- S’il est déterminé que
l’appareil a un problème lié à la fabrication, à
l’intérieur d’une période d’un an de la date
d’achat originale, Impecca™, à sa discrétion,
pourra remplacer ou réparer les pièces de
l’appareil sans frais pour vous aux États-Unis.
Afin d’obtenir des services sous garantie par un fournisseur
autorisé par le centre de service d’Impecca™, veuillez nous
rejoindre par courriel : service@impecca.com
afin d’obtenir
un numéro d’autorisation d’entretien et réparation (Repair
and Maintenance Authorization – RMA). Vous recevrez
également des détails liés au processus de réparation et/ou
remplacement.
Tout matériau en vitre inclus avec l’appareil est
couvert par une garantie de 60 jours à compter
de la date d’achat (lorsque applicable).
Impecca™ exclus spécifiquement de cette garantie tout
attachement non électrique / mécanique, accessoires ou
pièce jetable incluant, mais non limité au boîtier externe, les
câbles connecteurs, les piles et les adaptateurs secteurs.
Impecca™ se réserve le droit de réparer ou remplacer les
appareils défectueux par un modèle pareil, équivalent ou plus
récent.
Nous nous réservons le droit de réparer ou de remplacer
l’appareil à notre discrétion. Le remplacement pourrait être
par un appareil nouveau ou remis à neuf. Bien que tous les
efforts soient mis de l’avant pour assurer qu’il s’agisse du
même modèle, s’il s’avère impossible, le remplacement sera
de qualité similaire ou supérieure.
L’usure normale de l’appareil n’est pas couverte par cette
garantie. Impecca™ se réserve le droit de déterminer le
niveau d’usure sur l’ensemble de ses appareils. Ouvrir le
boîtier ou modifier l’appareil annule dans son entièreté la
présente garantie.
Exclusions : la garantie présente exclut les points suivants :
1. Tout appareil dont le numéro de série est effacé ou
rendu illisible.
2. Tout appareil transféré à un second propriétaire.
3. La rouille formée à l’intérieur ou à l’extérieur de
l’unité.
4. Les appareils marqués « Tel quel » ou « Remis à
neuf ».
5. Pertes d’aliments dus à un mauvais fonctionnement
de l’appareil.
6. Climatiseur à fenêtre installés au mur.
7. Si l’appareil est utilisé à des fins commerciales.
8. Appels de service qui ne sont pas en lien avec un
mal fonctionnement de l’appareil.
9. Appels de service pour un appareil endommagé
suite au non-respect des instructions fournies.
10. Appels de service liés à une installation
défectueuse.
11. Coûts entraînés à rendre l’appareil accessible
pour l’entretien (incluant, mais non limité à
l’enlèvement de moulures, plinthes, armoires,
etc.)
12. Appels de service pour le remplacement de
pièces consommables tels que des ampoules,
filtres, etc.
13. Des frais additionnels peuvent s’appliquer aux
appels de service en soirée, en fin de semaine,
les jours fériés. Des dommages à la finition de
l’appareil ou à des ameublements suite à
l’installation de l’appareil.
14. Dommages causés par : des circonstances
exceptionnelles; incendie; mauvaise utilisation;
accident; alimentation électrique inappropriée;
entretien effectué par une personne non
autorisée; utilisation de pièces non d’origine
d’Impecca, etc.
TOUTE GARANTIE IMPLICITE, Y COMPRIS LES GARANTIES DE
QUALITÉ MARCHANDE ET D’ADAPTATION À UN USAGE
PARTICULIER EST LIMITÉ POUR UNE DURÉE DE 1 AN À
COMPTER DE LA DATE DE L’ACHAT ORIGINAL DE CE
PRODUIT.
CES GARANTIES ET RECOURS DEMEURENT EXCLUSIFS À LA
VENTE ET L’UTILISATION DE CE PRODUIT. AUCUNE AUTRE
GARANTIE, ORALE OU ÉCRITE, EXPLICITE OU IMPLICITE, NE
SERA ÉMISE.
IMPECCA™ NE PEUT PAS ÊTRE TENU RESPONSABLE POUR DES
DOMMAGES SPÉCIAUX, ACCIDENTELS, CONSÉQUENTS,
DIRECTS OU AUTRES CONNUS OU QUI AURAIENT PU ÊTRE
COMMUNIQUÉS À IMPECCA™, Y COMPRIS LA PERTE DE
PROFITS, DE BIENVEILLANCE, DE BIENS ET DE BLESSURES
RÉSULTANT D’UNE VIOLATION DE LA GARANTIE,
L’INCAPACITÉ D’UTILISER LE PRODUIT OU EN VERTU DE
TOUTE THÉORIE JURIDIQUE EN CONTRAT OU DÉLIT. LA
RESPONSABILITÉ D’IMPECCA EST LIMITÉE AU PRIX D’ACHAT
PAYÉ AU VENDEUR EN DÉTAIL DU PRODUIT DÉFECTUEUX.
Aucun revendeur, agent ou employé d’Impecca™ n’est
autorisé à effectuer une modification, une extension, un
changement ou un amendement de cette garantie sans le
consentement écrit et l’autorisation d’Impecca™.
Certains états ne permettent pas l’exclusion ou la
limitation des garanties implicites ou de responsabilité en
lien avec des dommages accidentels or des dommages
conséquents ou ne permettent pas une limitation sur la
durée de la garantie implicite. Donc, les limitations ou
exclusions ci-dessus peuvent ne pas s’appliquer à vous.
Cette garantie vous donne des droits légaux spécifiques et
vous détenez d’autres droits, qui peuvent varier d’état en
état.
Note : Notre centre de la garantie effectue la livraison
uniquement qu’aux États-Unis continentaux.
V1.0
Impecca™ USA ● Wilkes-Barre, PA ● www.impecca.com ● 866-954.4440
–30–
Page 31

ENGLISHESPAÑOLFRANÇAIS
–31–
Page 32

NOTES
–32–
Page 33

NOTES
–33–
 Loading...