

Page 1
1.7 CU. FT. Compact Refrigerator - User’s Guide
Refrigerador Compacto de 1.7 Pies Cúbicos- Manual de usuario
1.7 pieds cubes Réfrigérateur compact- Manuel de l’utilisateur
Models:
RC-1172W (White)
RC-1172K (Black)
www.impecca.com
v 2.6.4
Page 2

TABLE OF CONTENTS
Important Safety Instructions iii
ENGLISH ESPAÑOL FRANÇAIS
Getting Started 4
Unit Overview & Features 5
Operation 5
Care & Cleaning 5
Door Reversal 6
Troubleshooting Guide 7
Technical Support 6
Spanish 10
French 18
Notes 26
–ii–
Page 3

PLEASE SAVE THESE INSTRUCTIONS. YOU MAY NEED THEM IN THE
FUTURE.
1. This refrigerator must be properly installed and located in accordance with the Installation Instructions before it is used.
2. Do not allow children to climb, stand or hang on the shelves in the refrigerator. They could damage the refrigerator and seriously injure themselves.
3. Do not store or use gasoline or other flammable vapors and liquids in the vicinity of this or any other appliance.
4. Keep fingers out of the space between the doors and cabinet. Be careful closing doors when children are in the area.
5. Unplug the refrigerator before cleaning and making repairs.
6. We strongly recommend that any servicing be performed by a qualified individual.
7. Turning the temperature control dial to the “0” position stops cooling but does not shut o power to the refrigerator.
8. Do not leave refrigerator in extremely cold or warm temperatures.
9. Do not place refrigerator near heat sources or open flames.
10. Clean the refrigerator with a so, damp cloth. Remove stains with a mild soap. Do not clean the unit with industrial grade solvents, or abrasive chemicals.
11. Do not place heavy items on top of the refrigerator.
12. Never install the refrigerator where there is a lot of moisture or in areas where water can splash.
13. Do not allow children to hang on the doors; the refrigerator may be tipped over and hurt children.
14. Never eat food that may have spoiled because it was stored too long in the refrigerator or was stored in an out-of-order refrigerator.
15. Do not use sharp tools inside the refrigerator (such as an ice pick to remove ice) as damage may occur.
16. Unplug and remove food from the refrigerator if not used for a long period of time.
ENGLISHESPAÑOLFRANÇAIS
CHILD ENTRAPMENT WARNING:
Risk of child entrapment. Before you throw away your old refrigerator or freezer:
1. Take o the doors.
2. Leave the shelves in place so that children may not easily climb inside.
CAUTION: USE OF AN EXTENSION CORD IS NOT RECOMMENDED.
FOR HOUSEHOLD USE ONLY
SAVE THESE INSTRUCTIONS
–iii–
Page 4

ENGLISH ESPAÑOL FRANÇAIS
GETTING STARTED
GROUNDING INSTRUCTIONS
This appliance must be grounded. This is accomplished by
ensuring the plug is inserted into a properly grounded outlet.
This way, in the event of an electrical short circuit, the risk of
electric shock is reduced by providing an escape wire for the
electric current. This appliance is equipped with a cord having a grounding wire with a grounding plug.
WARNING: Improper use of the grounding plug can result in a risk
of electric shock. Consult a qualified electrician or service person
if the grounding instructions are not completely understood, or
if doubt exists as to whether the appliance is properly grounded.
If it is necessary to use an extension cord, use only a three wire
extension cord that has a three blade grounding plug, and a
three slot receptacle that will accept the plug on the appliance.
The marked rating of the extension cord should be equal to or
greater than the electrical rating of the appliance.
Note: All images in this instruction manual are for indication only;
the physical appearance and options on your model may vary.
SERIAL AND MODEL NUMBER
Please record your model number and serial number below.
You can find the 11 digit number on a sticker on the back of the
refrigerator.
Model Number: RC-1172
Serial Number: ______________________________
Date of Purchase: ____________________________
BEFORE DISCARDING YOUR OLD REFRIGERATOR:
• Remove the door(s), leave the shelves in place (to help
prevent children from crawling in) and have it removed
from your premises by a qualified technician.
• Check with your retailer to find out if they’ll take away
and responsibly dispose of or recycle your old refrigerator.
• See www.epa.gov/rad for more information on Responsible Appliance Disposal.
Extremely cold ambient temperatures may also prevent the unit
from operating eectively.. This unit is not designed for use in a
garage or outdoor installation. Do not place any covering such
as a drape or sheet on the unit.
When installing the unit, ensure that a minimum of 5 inches of
free space is le at both sides and in the rear, and 5 inches of
space at the top of the unit. This will allow cold air to circulate
around the refrigerator and improve the eiciency of the cooling process.
LEVELING THE UNIT
It’s very important to keep the unit level, so that the door will
close properly and prevent problem that will cause eective
cooling to fail. To level the unit, turn the two adjustable feet at
the front of the refrigerator clockwise or counterclockwise to respectively raise or lower the corner.
Tip: Having someone push against the top of the refrigerator will
take some weight o the leveling leg. This makes it easier to adjust the leveling leg.
CLEANING BEFORE USE
Wipe the inside of the unit with a weak solution of baking
soda (bicarbonate). Then rinse with warm water using a damp
sponge or cloth. Wash the shelves and bins in warm soapy water
and dry completely before putting back in the unit. Clean the
exterior of the unit with a damp cloth.
POWER SUPPLY
• Be sure to plug in to 110V-120V (60Hz) grounded outlet.
• You must make sure all three prongs are in a 3-pronged
outlet (see note below).
• You may use extension cords only if they marked electrical rating of the cord is at least as great as the rating of
this appliance, and is properly grounded as well.
• If using an extension cord, ensure that any excess does
not become a trip hazard.
Notes: When plugging in to wall, it should have a dedicated outlet. (see Fig1. ). If you only have a two-pronged outlet, adapters
are available but must be used properly (see Fig.2 ).
SAFETY NOTICES
This appliance is intended to be used in household and similar
applications such as:
• sta kitchen areas in shops, oices and other working
environments;
• individual use in hotel rooms and other residential type
environments;
INSTALLING YOUR APPLIANCE
LOCATION
When selecting a position for your unit, ensure the floor is a flat,
level surface and the room is well ventilated. Avoid locating your
unit near a heat source, such as an oven, stove top, boiler, or radiator. Also avoid direct sunlight as it may increase the electrical
consumption.
–4–
When using a 3-pronged outlet
3-pronged
Receptacle
3-pronged
plug
Receptacle
Box Cover
Fig. 1 Fig. 2
When using a grounding adapter,
make sure the receptacle box is fully
Grounding
Adapter
grounded.
Grounding Lead
Receptacle
Box
Cover
Screw
Receptacle
Page 5
UNIT OVERVIEW & FEATURES
• Compact Refrigerator
• 1.7 Cu. Ft.
• Slide Out Wire Shelf
• Chiller Compartment
• Adjustable Mechanical Control
• Adjustable Feet
• Reversible Door
• Energy Star Rating
• Eco-Friendly R600a Refrigerant
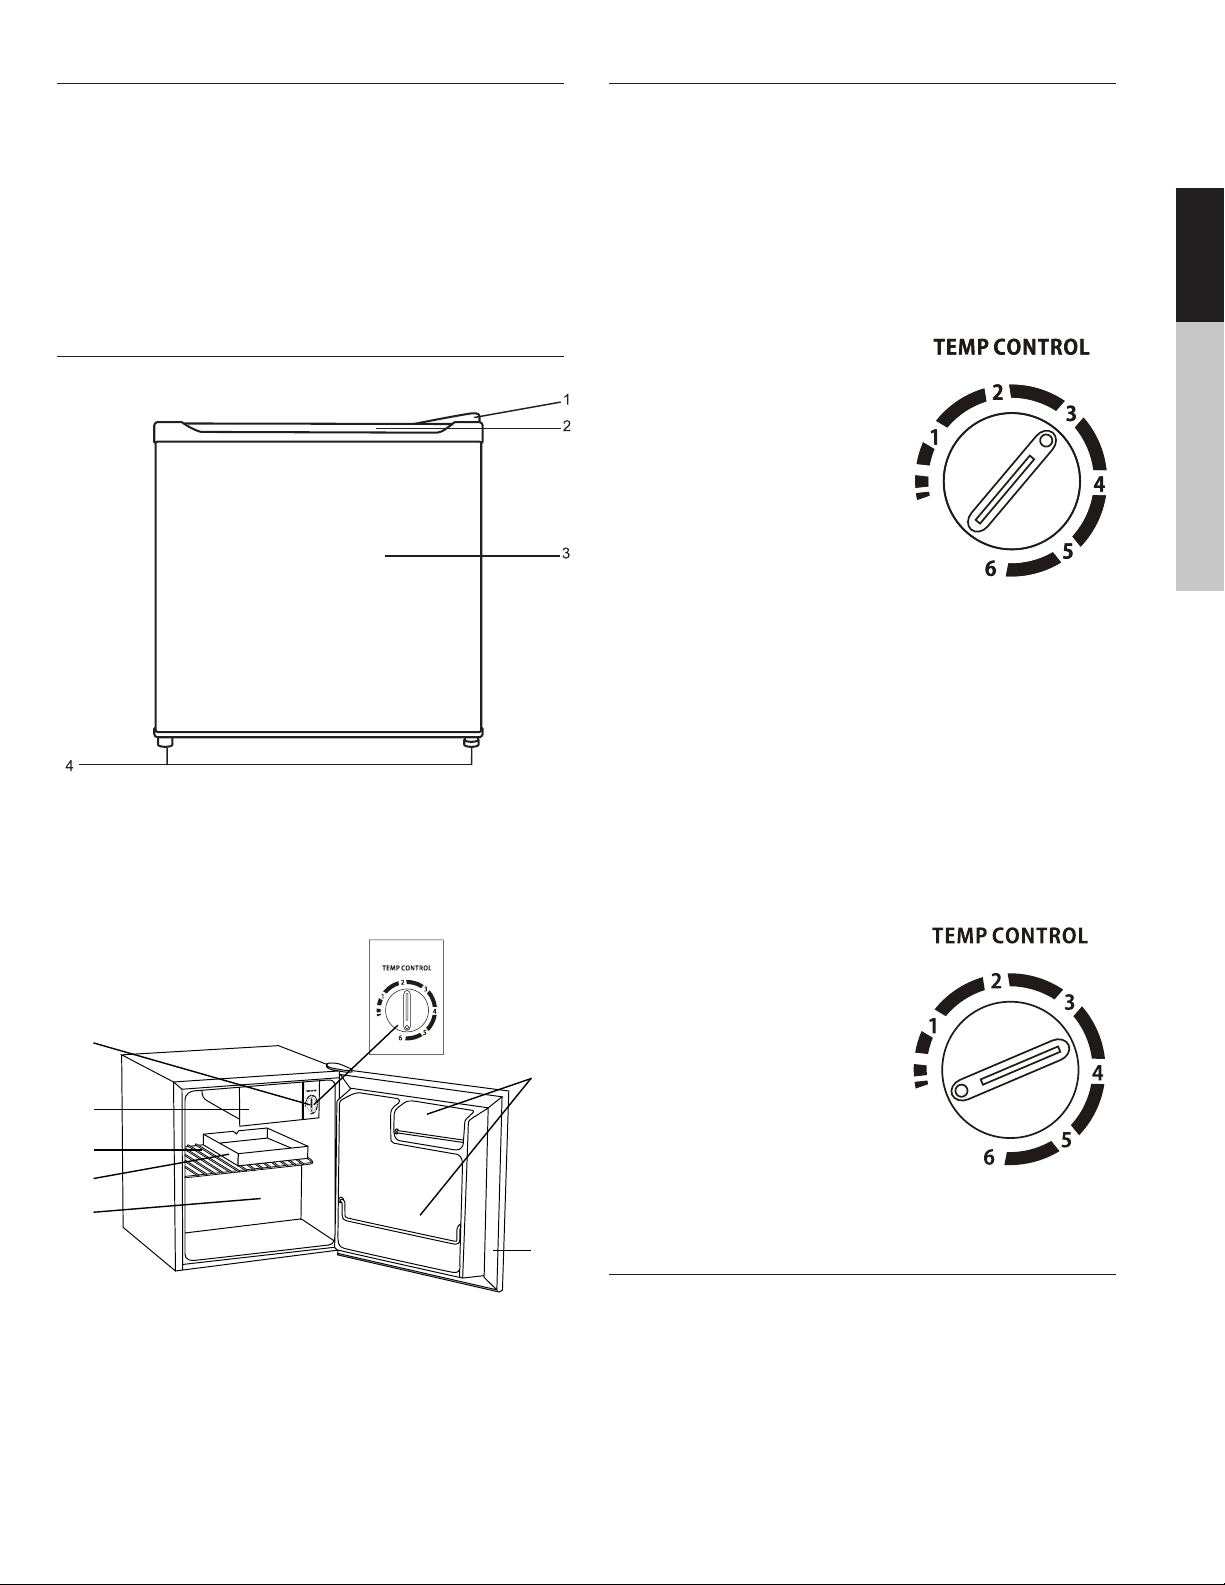
UNIT DIAGRAM
DOOR CLOSED
OPERATION
Note: The chiller compartment has a temperature range of 30°F
to 48°F (in a room with a temperature of 77°F (25°C)). Ice cream
and Popsicles should be kept cool at -5°F to 0°F, hence this
chiller compartment is not suitable to store these types of items.
The thermostat control knob for the refrigerator and chiller is
located next to the chiller compartment.
The first time you turn the unit on, adjust the thermostat control
knob to “3” and give your refrigerator time to cool down completely before adding food; a full 24
hours is recommended.
Aer it is fully cooled, test it and adjust towards “1” to make less cool or
towards “6” to cool more to best suit
your needs. However, the setting of
“3” should be appropriate for home
or oice refrigerator use.
NOTE: Turning the thermostat control knob to the “OFF” position will
stop the cooling cycle but does not
shut o the power to the unit.
FF
FF
O
O
ENGLISHESPAÑOLFRANÇAIS
1. Top Hinge
2. Handle
3. Refrigerator Door
4. Leveling Feet
DOOR OPEN
1
2
3
4
5
DEFROSTING
Your refrigerator requires manual defrosting. You should defrost
your refrigerator in the following scenario:
• You’re not going to use it for an extended period of time.
• You notice excessive ice built-up around the chiller.
It’s also a good idea to defrost occasionally in any event.
To Defrost:
• Turn the thermostat knob to the “OFF” position and
leave the door open.
• Unplug the unit.
• Remove all food from both
compartments.
• Place a towel or two under
FF
O
the refrigerator to collect the
water from the melting frost.
• Leave open until all the frost
6
OFF
is melted. (Usually a number of hours or overnight will
FF
O
suice.)
• Clean and wipe out the interior of the unit with soapy
water and a non-abrasive cloth.
7
CLEANING & CARING FOR YOUR APPLIANCE
1. Thermostat Control Knob
2. Chiller Compartment
3. Wire Shelf
4. Drip Tray
5. Refrigerator Compartment
6. Bottle Storage
7. Door Gasket
A clean, damp cloth with mild detergent or water and baking
soda should be used to clean the interior of the unit, aer it is
defrosted or before use.
Go over once more with a damp cloth (sans soap) to ensure
there is no residue le inside aer cleaning. Clean the gasket
carefully as well for best performance.
–5–
Page 6
ENGLISH ESPAÑOL FRANÇAIS
DOOR REVERSAL
CAUTION:
To avoid injury to yourself and/or property, we recommend
someone assist you during the door reversal process.
• Ensure the appliance is unplugged and empty.
• Have something solid against which to rest the appliance. This will be necessary when it comes to taking o
the door
• Avoid laying the refrigerator completely flat on its back
as this may damage the cooling system.
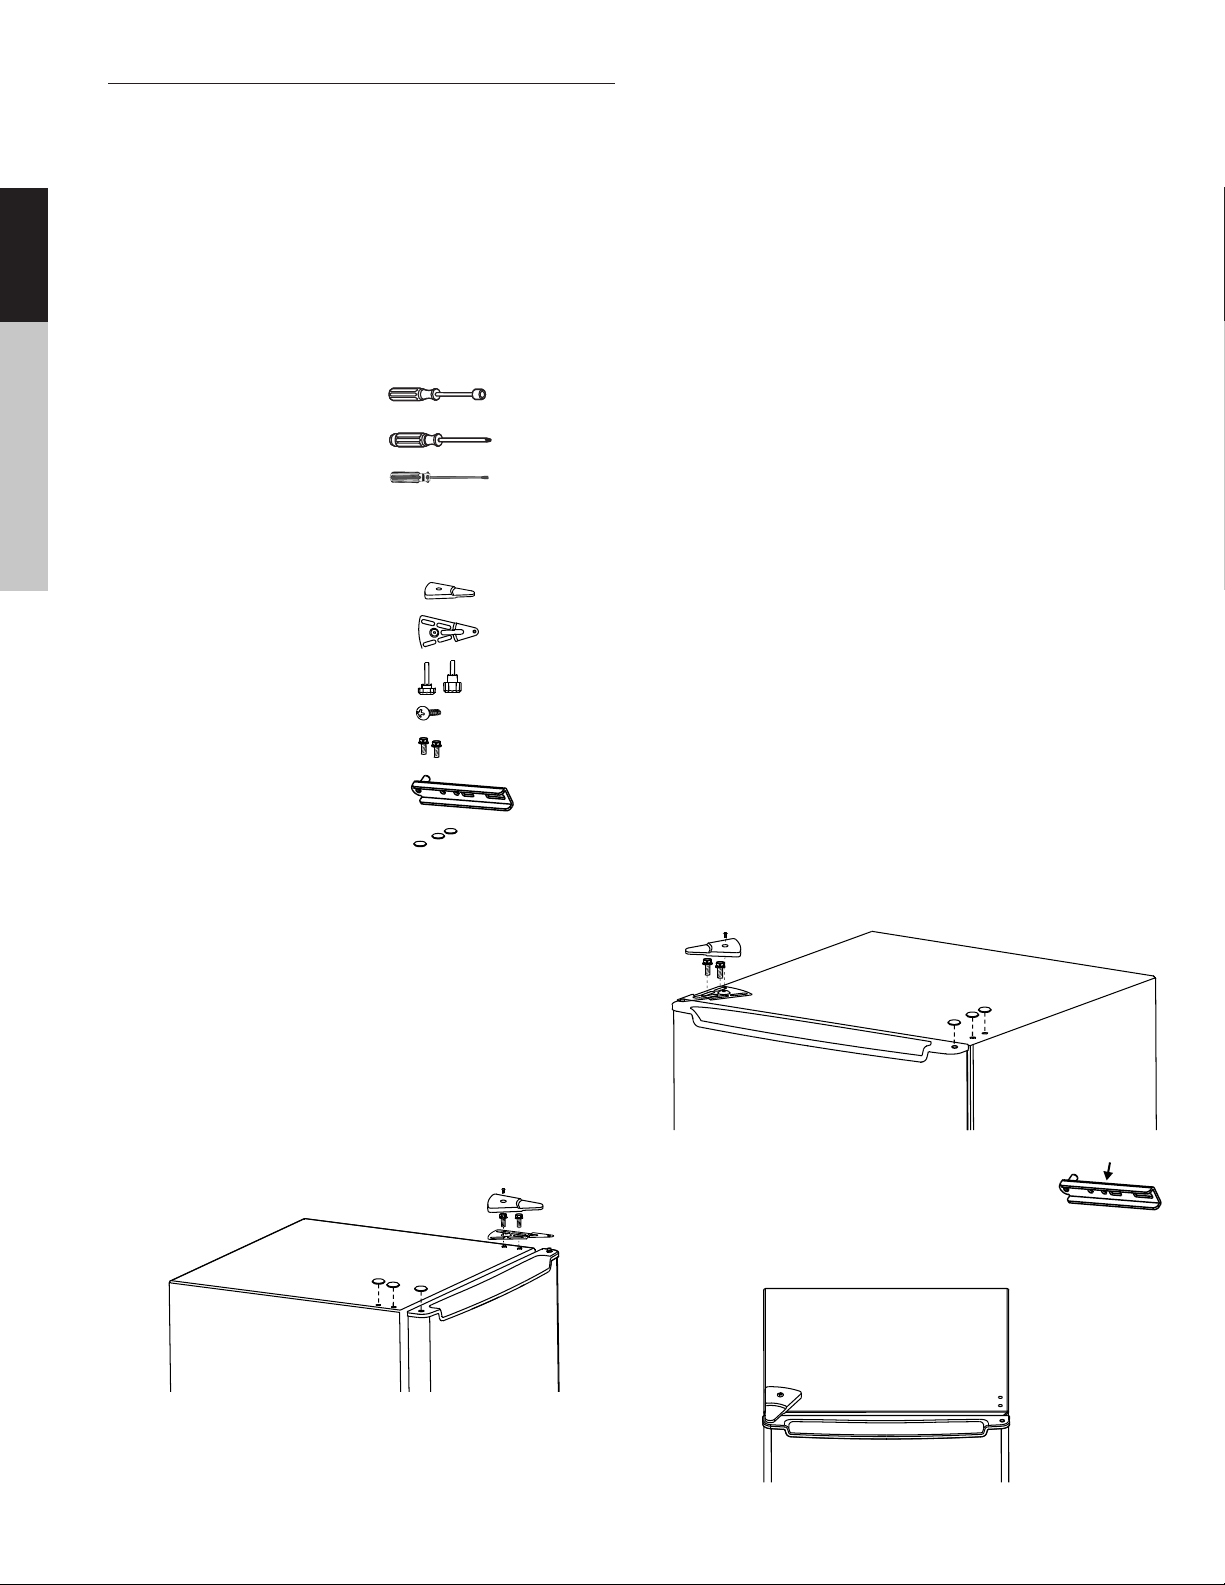
TOOLS REQUIRED:
• 10 mm socket screw driver
• Phillips style screw driver
• Flathead screw driver
ALREADY INSTALLED PARTS YOU’LL BE WORKING WITH
(NOT TO SCALE):
• Upper Hinge Cover (plastic)
STEP 2 - REMOVE REMAINING PARTS
• Tilt the refrigerator back so that you can access the bottom
front section.
• Note in which holes each of the two types of Leveling Feet
are currently screwed.
• Remove them both, noting that the one with a greater
amount metal thread showing is for the side opposite the
door hinge.
• Unscrew the two Socket Screws from the Bottom Hinge
Bracket using the 10mm socket driver
• Remove Bottom Hinge Bracket.
STEP 3 - REINSTALLING PARTS AND REATTACHING DOOR
• Install the Leveling Foot (with more metal thread showing)
on the side where the hinge used to be.
• Screw in the Bottom Hinge Bracket on the new side. Use
the two wide holes on the bracket for this purpose. Keep it
somewhat loose so that you can still slide the bracket front
and back.
• Slide the door into the bottom hinge pin so that you can
adjust the Bottom Hinge Bracket to a suitable position but
don’t completely tighten the two Socket Screws.
• Upper Hinge Bracket (metal)
• Leveling Foot (x2)
• Machine Screw (x1)
• Socket Screws (x4)
• Bottom Hinge Bracket (metal)
• Screw Covers (plastic)
STEP 1 - PARTS AND DOOR REMOVAL
• Unscrew the screw of the Upper Hinge Cover, using the
Phillips screwdriver.
• Remove Upper Hinge Cover
• Unscrew the two socket screws of the metal Upper Hinge
Bracket using the 10mm socket driver
• Remove Upper Hinge Bracket.
• Note the Screw Covers on the opposite side.
• Remove two Screw Covers from the top of the refrigerator
housing and one from the top of the door using the flathead screwdriver.
• Pull the door upward, remove it and put it in a safe place.
STEP 4 - SECURING DOOR
• Move the Upper Hinge Bracket to the new side.
• Screw in the Upper Hinge Bracket Socket Screws.
• Check the fitting between the door and hinge to ensure
smooth movement, and that the door is aligned horizontally and vertically and that the seals are closed on all sides.
• Make any necessary adjustments, and then tighten Bottom
and Upper Hinge Bracket Socket Screws.
• Replace the Upper Hinge Cover and use the Phillips driver
to tighten the Machine Screw.
• Replace the three Screw Covers now on the opposite side
of the hinge.
STEP 5 - LEVELING UNIT
• Screw in the other Leveling Foot to the Bottom Hinge Bracket into the hole shown here:
• Readjust the leveling feet to desired height.
–6–
Page 7

TROUBLESHOOTING GUIDE
PROBLEM SOLUTION
Make sure that the plug is in all the way
Make sure that the thermostat knob is set to a number from
My refrigerator is not getting any power (no hum, etc.)
1-6.
Check to see that a household fuse or circuit breaker hasn’t
tripped.
ENGLISHESPAÑOLFRANÇAIS
Food in the refrigerator compartment is freezing.
Food in the refrigerator is not cold enough.
Inside refrigerator temperature is too warm.
The outside of the unit is warm
Lower the number of the thermostat. (A higher number is
colder.)
Make sure that the door to the refrigerator is closed all the
way.
Check the ambient temperature. If it’s very warm, this is
normal.
If you recently put very warm food in the refrigerator, this is
normal.
Make sure that the gasket around the door is free of debris. If
the seal is not tight, warm air from the environment may seep
in, causing it to run longer.
This is also normal aer being turned on for the first time aer
an extended time
Make sure that the temperature setting is at the desired selections. See “Using Your Appliance” for more details.
This could be caused by opening the door very oen and
letting in warm air frequently.
This can be caused by warm food.
It can take at least four hours for your refrigerator to get to
its target temperature setting aer being o for an extended
period of time.
This is a normal part of how a refrigerator works and is nothing to be concerned about.
There are many dierent noises we hear emanating from the
refrigerator at dierent times, including: loud sounds when it
is first turned on; fans running when the temperature is below
45°F; popping and/or cracking sounds; boiling or gurgling
sounds and snapping sounds.
There are vibrating or rattling sounds when the unit runs.
There is moisture appearing on the inside of the refrigerator
walls.
There is moisture appearing on the outside of the refrigerator
walls.
The door will not close completely.
All of these noises are typical during normal operation and
cycles
Make sure the unit is level, it’s not touching a wall and the drip
tray is placed properly. See the “Leveling The Unit” section
above.
This can be caused by debris in the door gasket preventing
a tight seal. As well, it is a normal occurrence if the ambient
air is humid. This can also occur if the door is opened very
frequently.
Make sure that your door is closing properly.
Make sure that the unit is not overstued with food packages.
Make sure that the shelves are in position.
Make sure the gaskets are clean.
–7–
Page 8

ENGLISH ESPAÑOL FRANÇAIS
CUSTOMER SUPPORT
Before contacting customer support, please see the troubleshooting guide above.
Visit our website to contact us, find answers to Frequently Asked Questions, and for other resources which may include an updated
version of this user’s manual.
WWW.IMPECCA.COM
If you wish to contact us by phone, please be sure to have your model number and serial number ready and call us between 9:00am
and 6:00pm ET, at +1 866-954-4440.
Keep tabs on Impecca’s newest innovations & enter contests via our social network feeds:
www.facebook.com/Impecca/
www.instagram.com/impecca/
@impeccausa
–8–
Page 9

ONE-YEAR LIMITED APPLIANCE WARRANTY (US)
Impecca™ warrants this product against defects in material
and workmanship to the original purchaser as specified below.
PARTS AND LABOR– if the product is determined to
have a manufacturing defect, within a period of one
year from the date of the original purchase, Impecca™, at its own discretion, will repair or replace the
product parts at no charge to you in the U.S.A.
To obtain warranty service by an authorized Impecca™ service center, please email us at: service@impecca.com to obtain a Repair and Maintenance Authorization (RMA) number
and received instructions on how the repair and/or replacement procedure will take place.
Any glass materials included with the appliance will
be covered for a period of 60 days from purchase.
Impecca™ specifically excludes from this warranty any
non-electric/mechanical attachments, accessories and
disposable parts including but not limited to outside case,
connecting cables, batteries and AC adapters. Impecca™ reserves the right to repair or replace defective products with
the same, equivalent or newer models.
We reserve the right to either repair or replace product at our
discretion. Replacement may be either new or refurbished
and while every endeavor will be made to ensure it is the
same model, if not possible it will be equal or higher specification.
Normal “Wear and Tear” is not covered by this warranty. Further, Impecca™ hereby reserves the right to determine “Wear
and Tear” on any and all products. Tampering or opening the
product casting or shell will void this warranty in its entirety.
Exclusions: This warranty does not cover the following:
trim/molding/cabinetry, etc.)
12. Service calls to replace any consumables such as light
bulbs, filters, etc.
13. Surcharges that may apply to service calls on weekends,
nights, holidays. Damages to the finish of appliance or
household furnishings due to installation of appliance.
14. Damages caused by any of the following: Acts of God;
fires; misuse; accidents; incorrect power supply; service
performed by unauthorized persons; use of non-genuine Impecca parts, etc.
ALL IMPLIED WARRANTIES, INCLUDING IMPLIED WARRANTIES OF MERCHANTABILITY AND FITNESS FOR A PARTICULAR PURPOSE ARE LIMITED IN DURATION TO 1 YEAR FROM
THE DATE OF THE ORIGINAL RETAIL PURCHASE OF THIS
PRODUCT.
THESE WARRANTIES AND REMEDIES ARE THE SOLE AND
EXCLUSIVE WARRANTIES AND REMEDIES IN CONNECTION
WITH THE SALE AND USE OF THE PRODUCT. NO OTHER
WARRANTIES, ORAL OR WRITTEN, EXPRESSED OR IMPLIED,
ARE GIVEN.
IMPECCA™ IS NOT RESPONSIBLE OR LIABLE FOR ANY DAMAGE, WHETHER SPECIAL, INCIDENTAL, CONSEQUENTIAL,
DIRECT OR OTHERWISE, OR WHETHER KNOWN OR SHOULD
HAVE BEEN KNOWN TO IMPECCA™, INCLUDING LOST PROFITS, GOODWILL, AND PROPERTY AND PERSONAL INJURY RESULTING FROM ANY BREACH OF WARRANTY, THE INABILITY
TO USE THE PRODUCT OR UNDER ANY LEGAL THEORY IN
CONTRACT OR TORT. IMPECCA LIABILITY IS LIMITED TO THE
ACTUAL PURCHASE PRICE PAID TO THE RETAIL SELLER OF
THE DEFECTIVE PRODUCT.
No Impecca™ dealer, agent or employee is authorized to
make any modification, extension, change or amendment to
this warranty without the written consent and authorization
from Impecca™.
1. Any product that has a defaced or covered serial number.
2. Products that have been transferred to a second owner.
3. Rust on the interior or exterior of the unit.
4. Products listed as “As-Is” or “Refurbished.”
5. Food loss due to any product failure.
6. Window air conditioners installed in a wall.
7. The product if used in a commercial setting.
8. Service calls that do not involve product malfunction.
9. Service calls for a product ruined by not following the
provided instructions.
10. Service calls to correct improper installation.
11. Costs associated with making the product accessible
for servicing (including but not limited to removal of
–9–
Some states do not allow the exclusion or limitation of implied warranties or liability for incidental or consequential
damages, or do not allow a limitation on how long an implied warranty lasts, so the above limitations or exclusions
may not apply to you. This warranty gives you specific legal
rights, and you have other rights, which vary from state to
state.
Note: Our Warranty center services only to Continental U.S.A.
Page 10

TABLA DE CONTENIDO
Instrucciones Importantes de Seguridad 11
ENGLISH ESPAÑOL FRANÇAIS
Iniciando 12
Vistazo General Y Funciones de la Unidad 13
Operación 13
Limpiando Y Cuidando Su Electrodoméstico 13
Invirtiendo La Puerta 14
Guía De Solución De Problemas 15
Atención al Cliente 16
French 18
Notes 26
–10–
Page 11

POR FAVOR CONSERVE ESTAS INSTRUCCIONES. LAS NECESITARÁ EN
UN FUTURO.
1. Antes de poner en funcionamiento este refrigerador debe quedar instalado y ubicado de acuerdo con las instrucciones de
instalación.
2. No permite que los niños trepen, se paren o se cuelguen de los entrepaños del refrigerador. Pueden dañarlo y lastimarse severamente.
3. No almacene ni utilice gasolina u otros vapores o líquidos inflamables cerca de este electrodoméstico o de cualquier otro
electrodoméstico.
4. Mantenga los dedos fuera del espacio entre las puertas y el gabinete. Tenga cuidado de cerrar las puertas cuando haya niños
en el área.
5. Desconecte el refrigerador antes de limpiarlo o efectuar reparaciones.
6. Le recomendamos ampliamente que cualquier servicio de mantenimiento lo realice un técnico calificado.
7. Al colocar el control de temperatura en la posición OFF detendrá el enfriamiento pero no apagará el refrigerador.
8. No deje el refrigerador en temperaturas extremadamente calientes o frías.
9. No coloque el refrigerador cerca de fuentes de calor o del fuego abierto.
10. Limpie el refrigerador con un paño suave y húmedo. Retire las manchas con jabón suave. No limpie la unidad con solventes de
grado industrial o químicos abrasivos.
11. No coloque objetos pesados en la parte superior del refrigerador.
12. Nunca instale el refrigerador donde hay mucha humedad o en áreas donde el agua puede salpicar.
13. No permita que los niños se cuelguen de las puertas; el refrigerador puede volcarse y lastimar a los niños.
14. Nunca coma alimentos que pudieran haberse estropeado porque estuvieron largo tiempo almacenados en el refrigerador o
estuvieron dentro de un refrigerador descompuesto.
15. No use objetos filosos, como picahielos para retirar el hielo, dentro del refrigerador, ya que puede dañarlo.
16. Desconecte y retire los alimentos del refrigerador si este no va a utilizarse por un largo periodo de tiempo.
ENGLISHESPAÑOLFRANÇAIS
ADVERTENCIA SOBRE EL ATRAPAMIENTO DE NIÑOS
Existe el riesgo de atrapamiento de niños. Antes de deshacerse de su refrigerador antiguo o congelador:
1. Quite las puertas
2. Deje los entrepaños en su lugar de modo que los niños no puedan meterse fácilmente
NO SE RECOMIENDA EL USO DE EXTENSIONES.
ÚNICAMENTE PARA USO DOMÉSTICO
CONSERVE ESTAS INSTRUCCIONES
–11–
Page 12

ENGLISH ESPAÑOL FRANÇAIS
INICIANDO
INSTRUCCIONES DE CONEXIÓN A TIERRA
Este electrodoméstico debe conectarse a tierra. Esto se logra
al asegurarse que el enchufe se conecte en un tomacorrientes
aterrizado. De esta forma, en caso de un corto circuito, se reduce el riesgo de una descarga eléctrica al proveer un cable de
escape para la corriente eléctrica. Este electrodoméstico viene
equipado con un cable que cuenta con un alambre para la tierra
física y una clavija con tres patas, una de ellas para la conexión
a tierra física.
ADVERTENCIA: El uso inadecuado del enchufe aterrizado puede resultar en el riesgo de descarga eléctrica. Consulte con un
electricista o persona de servicio calificados si no ha comprendido bien las instrucciones de conexión a tierra o si existen dudas
sobre si el electrodoméstico está adecuadamente conectado a
tierra. Si es necesario utilizar una extensión, utilice únicamente
una extensión de tres alambres que cuente con una clavija de
tres patas y conecte a un tomacorrientes con tres orificios en
donde pueda conectar la extensión. El calibre marcado en el
cable de extensión debe ser mayor o igual que el calibre especificado para el electrodoméstico.
Nota, todas las imágenes en este manual de instrucciones son
para propósitos indicativos, la apariencia física y opciones de su
modelo pueden variar.
NÚMERO DE SERIE Y MODELO
Por favor, a continuación registre su número de serie y modelo.
Puede encontrar el número de 11 dígitos que aparece en una
etiqueta en la parte posterior del refrigerador.
Número de Modelo: RC-1172
Número de Serie: ______________________________
Fecha de Compra: ____________________________
ANTES DE DESHACERSE DE SU REFRIGERADOR VIEJO
• Retire la(s) puerta(s) y deje los entrepaños (para evitar
que los niños trepen dentro del refrigerador) y pida que
sea retirado de su casa por un técnico calificado
• Revise con su vendedor si ellos se pueden llevar su aparato viejo y deshacerse de él o reciclarlo en forma responsable.
• Vaya a www.epa.gov/rad para tener mayor información
sobre el Deshecho Responsable de Electrodomésticos
AVISOS DE SEGURIDAD
Este electrodoméstico está destinado para ser utilizado en una
casa o en aplicaciones como:
• Área de alimentos para el personal en tiendas, oficinas u
otros ambientes de trabajo
• Uso individual en habitaciones de hotel y otro tipo de
ambientes residenciales
INSTALANDO SU ELECTRODOMÉSTICO
UBICACIÓN
Cuando seleccione la ubicación de su unidad asegúrese que el
piso esté plano, nivelado y la habitación está bien ventilada. Evite colocar la unidad cerca de una fuente de calor como un horno, estufa, calentador de agua o radiador. También evite la luz
directa del sol ya que puede incrementar el consumo eléctrico.
Las temperaturas extremadamente frías también pueden evitar
que el electrodoméstico funcione eficientemente. Esta unidad
no está diseñada para se en una cochera o en exteriores. No coloque ninguna cubierta como cortina o sábana sobre la unidad.
Cuando instale la unidad asegúrese que hay al menos 5 pulgadas de espacio libre a ambos lados del refrigerador y en la parte
trasera, así como 5 pulgadas en la parte superior de la unidad.
Esto permitirá que el aire circule alrededor del refrigerador y
mejorar la eficiencia del proceso de enfriamiento.
NIVELANDO LA UNIDAD
Es importante que mantenga la unidad nivelada de modo que
la puerta cierre correctamente y evite problemas que pueden
causar que falle la refrigeración efectiva. Para nivelar la unidad
gire las dos patas ajustables al frente del refrigerador en el sentido de las manecillas del reloj o al contrario para levantar o bajar
las esquinas.
Consejo: Si alguien puede empujar el refrigerador hacia atrás y
hacia arriba permitirá quitar peso del refrigerador y hacer más
fácil y rápido el ajuste.
LIMPIEZA ANTES DEL USO
Limpie dentro de la unidad con una solución ligera de bicarbonato y agua. Después enjuague con agua tibia usando un paño
o esponja húmedos. Lave los entrepaños y charolas con agua
tibia y jabonosa y seque completamente antes de colocarlos
dentro de la unidad. Limpie el exterior de la unidad con un trapo húmedo.
SUMINISTRO DE ENERGÍA
• Asegúrese de conectar la unidad en un tomacorrientes
aterrizado de 110V-120V (60Hz)
• Asegúrese que las 5 patas del enchufe se conecten en un
tomacorrientes con tres orificios (vea el diagrama más
adelante)
• Puede utilizar una extensión siempre y cuando el calibre
del cable es igual o mayor al solicitado por este electrodoméstico y existe la conexión adecuada a tierra.
• Si usa una extensión asegúrese que el exceso en el largo
de la extensión no constituya un riesgo de tropiezo.
Nota: Cuando conecte a la pared, debe asegurarse que el tomacorrientes es dedicado (ver Figura 1). Si sólo cuenta con un
tomacorrientes con 2 orificios, existen
Utilizando un tomacorrientes de 3
orificios
Clavija con 3 patas
Receptáculo de 3 orificios
Utilizando un adaptador, asegúrese
de conectar este adaptador
adecuadamente a tierra
Adaptador
Cable para tierra
Cubierta
del tomacorrientes
Tornillo
Tomacorriente
Fig. 1 Fig. 2
–12–
Page 13

VISTAZO GENERAL Y FUNCIONES DE L A UNIDAD
• Refrigerador compacto
• Capacidad de 1.7 pies cúbicos
• Entrepaño de alambre deslizable
• Compartimento de congelación
• Control mecánico ajustable
• Patas ajustables
• Puerta reversible
• Eficiencia Superior de Energía
• Refrigerante amable con el ambiente R600a
DIAGRAMA DE LA UNIDAD
PUERTA CERRADA
OPERACIÓN
Nota:El compartimento congelador tiene un rango de temperatura de 30°F a 48°F (en una habitación con temperatura de 77°F
(25°C)). Los helados y paletas heladas deben de mantenerse
congelados a una temperatura de -5°F a 0°F, por lo tanto este
compartimento congelador no es adecuado para almacenar
este tipo de artículos.
La perilla de control del termostato para el refrigerador y congelador se encuentra cerca del compartimento congelador.
La primera vez que usted encienda su unidad, ajuste el control
del termostato en el número “3” y dele tiempo a su refrigerador
para que enfríe completamente antes de añadir alimentos; se
recomienda un periodo de 24 horas.
Una vez que el congelador ya enfrió,
ajústelo hacia el número “1” para
una temperatura menos fría o hacia
el “6” para una temperatura más fría,
lo que usted prefiera. Sin embargo el
número “3” debe ser apropiado para
la refrigeración en casa u oficina.
FF
FF
O
Nota: Al colocar la perilla del termostato en la posición OFF detendrá el
ciclo de enfriamiento pero la unidad
no se apagará.
DEFROSTING
Su refrigerador requiere descongelarse en forma manual. Debe
descongelar su refrigerador cuando suceda lo siguiente:.
O
ENGLISHESPAÑOLFRANÇAIS
1. Bisagra superior
2. Manija
3. Puerta del refrigerador
4. Patas niveladoras
PUERTA ABIERTA
1
2
3
4
5
OFF
1. Perilla del control del termostato
2. Compartimento congelador
3. Rejilla de alambre
4. Charola para goteo
5. Compartimento del refrigerador
6. Almacenamiento pata botellas
7. Empaque de la puerta
• No vaya a utilizarlo por un periodo largo de tiempo
• Note una formación de hielo excesiva alrededor del compartimento
También es recomendable descongelarlo de vez en cuando
Para descongelar:
• Coloque la perilla del termostato en la posición “OFF” y
deje la puerta abierta
• Desconecte la unidad
• Retire todos los alimentos
de todos los compartimentos y del interior del refrige-
FF
O
rador
• Coloque una o dos toallas
debajo del refrigerador para
6
recoger el agua del hielo al
descongelarse
• Deje abierto el refrigerador
hasta que descongele por
completo (Usualmente por
FF
O
varias horas o puede dejarlo
así toda la noche)
• Limpie el interior del refrigerador agua jabonosa y un
7
paño no abrasivo
LIMPIANDO Y CUIDANDO SU ELECTRODOMÉSTICO
Se debe utilizar un paño limpio y suave con agua jabonosa o una mezcla de agua con bicarbonato para limpiar el interior de la unidad, después de descongelar o antes de usar. Limpie nuevamente con un paño
limpio y húmedo (sin jabón o bicarbonato) para asegurar que no queden residuos dentro del refrigerador antes de limpiar. Limpie el empaque de la puerta para un mejor desempeño de su unidad.
–13–
Page 14

ENGLISH ESPAÑOL FRANÇAIS
INVERSIÓN DE LA PUERTA
PRECAUCIÓN:
Para evitarse daños a usted mismo y/o a la propiedad, le recomendamos que alguien le ayude durante el proceso de inversión de la puerta.
• Asegúrese que el electrodoméstico esté desconectado y
vacío
• Tenga algo sólido sobre el cual recargar el electrodoméstico. Esto será necesario cuando se deba quitar la
puerta
• Evite recostar totalmente el refrigerador sobre un costado, ya que eso dañará el sistema de enfriamiento
HERRAMIENTAS REQUERIDAS:
• Un destornillador Allen de 10 mm
• Un destornillador Philips
• Un destornillador de cabeza plana
PARTES YA INSTALADAS CON LAS QUE ESTARÁ TRABAJANDO
(NO PARA DESCARTAR):
• Cubierta de la bisagra superior (plástico)
• Soporte de la bisagra superior (metal)
• Para niveladora (x2)
• Tornillo de cruz (x1)
• Tornillo Allen (x4)
• Soporte de la bisagra inferior (metal)
• Cubiertas de tornillos (plástico)
PASO 2 - REMOCIÓN DE LAS PARTES RESTANTES
• Incline hacia atrás el refrigerador de modo que usted tenga
acceso a la sección inferior frontal
• Localice en qué orificio están atornilladas actualmente las
patas niveladoras
• Retírelas, y dándose cuenta que una tiene una cantidad
metálica mayor que indica que va en el lado opuesto de
donde se encuentra la bisagra de la puerta
• Desatornille los dos tornillos Allen del soporte de la bisa-
gra inferior utilizando el destornillador Allen de 10 mm
• Retire el soporte de la bisagra inferior
PASO 3 – REINSTALANDO LAS PARTES Y RECOLOCANDO LA PUERTA
• Instale la pata niveladora (con la parte metálica más gran-
de mostrándose) del lado donde solía estar la bisagra
• Atornille el soporte de la bisagra inferior en el nuevo lado.
Utilice los dos orificios grandes en el soporte para este propósito. Déjela un poco floja de modo que pueda deslizar el
soporte hacia adelante y atrás
• Deslice la puerta en el pin de la bisagra inferior de modo
que pueda ajustar el soporte de la bisagra inferior a una
posición conveniente pero sin apretar fuertemente los dos
tornillos Allen
PASA 4 - ASEGURANDO LA PUERTA
• Mueva el soporte de la bisagra superior al nuevo lado
• Atornille los tornillos Allen del soporte de la bisagra su-
perior
• Revise el ajuste entre la puerta y la bisagra para asegurar
un movimiento suave y que la puerta quede alineada horizontal y verticalmente y que los sellos cierren alrededor de
toda la puerta
• Haga cualquier ajuste innecesario y después apriete los
tornillos Allen de los soportes de las bisagras superior e
inferior
• Ahora coloque las cubiertas de los tornillos en los lados
opuestos de la bisagra
PASO 1 – PARTES Y REMOCIÓN DE LA PUERTA
• Desatornille el tornillo de la cubierta de la bisagra superior, usando el destornillador Phillips
• Retire la cubierta de la bisagra superior
• Desatornille los dos tornillos Allen del soporte de la bisa-
gra superior de metal
• Retire el soporte de la bisagra superior
• Localice las cubiertas de los tornillos en la parte superior
del refrigerador
• Retire las cubiertas de los tornillos de la parte superior de
la carcaza del refrigerador y uno de la parte superior de la
puerta utilizando el destornillador de cabeza plana
• Jale la puerta hacia arriba, retírela y colóquela en un lugar
seguro
–14–
PASO 5 – NIVELANDO LA UNIDAD
• Atornille la otra pata niveladora en el soporte de
la bisagra inferior en el orificio mostrado aquí
• Reajuste la pata niveladora a la altura deseada
Page 15

GUÍA DE SOLUCIÓN DE PROBLEMAS
PROBLEMA SOLUCIÓN
Asegúrese que el enchufe está conectado hasta el fondo
Asegúrese que la perilla del termostato está ajustada a un
Mi refrigerador no recibe energía (no hace ruido, etc.)
La comida en el compartimento del refrigerador se congela
La comida dentro del refrigerador no está o suficientemente
fría
número del “1” al “6”
Revise para ver si no se ha botado un fusible de la casa o el
cortacircuitos
Ajuste la perilla del termostato a un número más bajo (un
número más alto es mas frío)
Asegúrese que la puerta del refrigerador está completamente
cerrada.
Revise la temperatura ambiente. Si está muy caliente, es
normal.
Si recientemente puso comida caliente, esto es normal.
Asegúrese que el empaque alrededor de la puerta esté libre
de suciedad. Si el sello no está apretado, puede colarse el aire
caliente, provocando que se forcé el uso.
Es normal que después de haber encendido por primera vez
su unidad o después de un periodo de tiempo.
ENGLISHESPAÑOLFRANÇAIS
Asegúrese que el ajuste de temperatura está colocado en la
selección deseada. Vea “Utilizando su Electrodoméstico” para
mayores detalles.
Esto puede causarse al abrir al puerta muy seguido dejando
La temperatura dentro del refrigerador está demasiado caliente
La parte de afuera de la unidad está caliente
Escucho muchos ruidos diferentes que salen del refrigerador
en diferentes momentos, incluyendo: sonidos fuertes cuando
se prende por primera vez; ventiladores funcionando cuando
la temperatura es inferior a los 45°F; sonidos de tronidos o
agrietamientos; sonidos de gorgoteos, borbotones y chasquidos.
Hay ruidos de vibraciones o cascabeleos cuando la unidad
está funcionando
Hay humedad dentro en las paredes dentro del refrigerador
Hay humedad dentro en las paredes fuera del refrigerador Asegúrese que la puerta está cerrando adecuadamente.
entrar aire caliente frecuentemente
Esto es causado por comida caliente
Puede llevarse hasta cuatro horas para que su refrigerador
tenga la temperatura deseada después de estar apagado por
un periodo largo de tiempo
Esto es una parte normal del funcionamiento y no tiene porque preocuparse.
Todos estos ruidos son típicos durante la operación y ciclos
normales
Asegúrese que la unidad está nivelada y no esté tocando la
pared y que la charola de escurrimiento esté colocada adecuadamente. Vea la sección “Nivelando la Unidad”
Esto puede ser causado por suciedad en el empaque de la
puerta lo cual evita que la puerta selle bien. También, es una
correncia normal si el aire del ambiente es húmedo. Esto también sucede si la puerta se abre constantemente.
La puerta no está cerrando por completo
Asegúrese que la unidad no esté sobrellenada con paquetes
de alimentos.
Asegúrese que los entrepaños están colocados en su lugar.
Asegúrese que el empaque de la puerta está limpio.
–15–
Page 16

ATENCIÓN AL CLIENTE
Antes de entrar en contacto con soporte al cliente, vea la guía de solución de problemas que se ha proporcionado anteriormente
Visite nuestro sitio web para entrar en contacto con nosotros, encontrar la respuesta a las Preguntas Más Frecuentes y otros recur-
sos que pueden incluir una versión actualizada de esta guía de usuario.
ENGLISH ESPAÑOL FRANÇAIS
Si desea entrar en contacto con nosotros por teléfono, asegúrese de tener a la mano el número de modelo y el número de serie y
llámenos entre las 9:00am y las 6:00pm hora del Este, al +1 866-954-4440.
Manténgase al tanto de las innovaciones más recientes de Impecca y participe en concursos por medio de nuestras redes sociales.
WWW.IMPECCA.COM
www.facebook.com/Impecca/
www.instagram.com/impecca/
@impeccausa
–16–
Page 17

GARANTÍA LIMITADA POR UN AÑO
Impecca™ garantiza al comprador original este producto contra
defectos en su material y mano de obra como se especifica a continuación.
PARTES Y MANO DE OBRA– Si se determina que el producto tiene defectos de fabricación, dentro del periodo
de un (1) año a partir de la fecha de compra original,
Impecca™, a su discreción, reparará o reemplazara las
partes del producto sin ningún costo para usted en los
Estados Unidos.
Para obtener el servicio de garantía de un distribuidor autorizado
de Impecca™ envíenos un correo electrónico a: service@impecca.
com para obtener un número de Autorización de Reparación y
Mantenimiento (RAM) y recibir las instrucciones de cómo se llevará
a cabo el procedimiento de reparación o reemplazo.
Cualquier material de vidrio incluido en el electrodoméstico estará cubierto por un periodo de sesenta (60) días a
partir de la fecha de compra.
Impecca™ excluye de esta garantía accesorios no eléctricos o
mecánicos, accesorios y partes desechables incluyendo, pero no
limitado, a la carcaza, cables de conexión, baterías, adaptadores
A/C. Impecca™ se reserva el derecho de reparar o reemplazar un
producto defectuoso con un modelo igual, equivalente o nuevo
modelo.
Nos reservamos el derecho ya sea de reparar o reemplazar el
producto a nuestra discreción. El reemplazo puede ser nuevo o
reacondicionado tratando de asegurar de que se trate del mismo
modelo, si el mismo modelo no está disponible, se reemplazará
con un modelo de especificaciones iguales o superiores.
El “desgaste” normal no está cubierto por esta ni por ninguna
otra garantía. Adicionalmente, Impecca™ se reserva el derecho de
determinar el “desgaste” de cualquiera o todos los productos. El
violar o abrir el chasis del producto invalidará esta garantía por
completo.
Excepciones: Esta garantía no cubre lo siguiente:
1. Cualquier producto que tenga un número de serie defectuosos o cubierto
2. Productos que han sido transferidos a un segundo propietario
3. Óxido en la parte interna o externa de la unidad
4. Los productos listados como “Tal cual” o “Reformados”
5. Pérdida de alimentos debido a la falla del producto
6. Aires acondicionados que han sido instalados en un muro.
7. El producto si este ha sido utilizado en una ubicación comercial
8. Llamadas de servicio que no involucren el mal funcionamiento del producto
9. Llamadas de servicio de un producto estropeado por no seguir las instrucciones proporcionadas
10. Llamadas de servicio para corregir una instalación incorrecta
11. Costos asociados por hacer el producto accesible al servicio
(incluido pero no limitado a la remoción de ajustes/moldeo/
gabinete, etc.)
12. Llamadas de servicio para reemplazar consumibles como
bombillas, filtros, etc.
13. Recargos que pueden aplicar a llamadas de servicio los fines
de semana, por las noches, o durante las festividades. Daños
al acabado del electrodoméstico o muebles de la casa debido a la instalación del electrodoméstico.
14. Daños causados por cualquiera de las siguientes causas:
Actos de Dios, incendios, mal uso. accidentes, suministro de
energía incorrecto, servicio realizado por personal no autorizado, el uso de partes no originales Impecca.
TODAS LAS GARANTÍAS IMPLÍCITAS, INCLUYENDO LAS GARANTÍAS
IMPLÍCITAS DE MERCADOTECNIA E IDONEIDAD PARA UN PROPÓSITO EN PARTICULAR ESTÁN LIMITADAS A UNA DURACIÓN DE (1)
AÑO EN PARTES Y NOVENTA (90) DÍAS EN MANO DE OBRA DESDE
LA FECHA ORIGINAL DE COMPRA DEL PRODUCTO.
ESTAS GARANTÍAS Y MEDIDAS SON ÚNICAS Y EXCLUSIVAS EN RELACIÓN CON LA VENTA Y USO DEL PRODUCTO. NO SE OTORGA
NINGUNA OTRA GARANTÍA, ORAL O ESCRITA, EN FORMA EXPRESA
O IMPLÍCITA.
IMPECCA™ NO SE HACE RESPONSABLE DE NINGÚN DAÑO, YA
SEA ESPECIAL, INCIDENTAL, CONSECUENTE, DIRECTO O DE
CUALQUIER OTRA NATURALEZA, YA SEA CONOCIDO O POR DAR
A CONOCER A IMPECCA™, INCLUYENDO LA PÉRDIDA DE GANANCIAS, PLUSVALÍA, DAÑOS PERSONALES O EN LA PROPIEDAD RESULTANTES DE CUALQUIER INCUMPLIMIENTO DE LA GARANTÍA,
LA INCAPACIDAD DE UTILIZAR EL PRODUCTO O BAJO NINGUNA
TEORÍA LEGAL EN CONTRATO O AGRAVIO. LA RESPONSABILIDAD
DE IMPECCA SE LIMITA AL PRECIO ACTUAL DE COMPRA PAGADO
AL VENDEDOR DEL PRODUCTO DEFECTUOSO.
Ningún distribuidor, agente o empleado de Impecca™ está autorizado para hacer ninguna modificación, extensión, cambio o
enmienda de esta garantía sin el consentimiento y autorización
escrita de Impecca™.
Algunos estados no permiten la exclusión o limitación de garantías implícitas o la responsabilidad por daños incidentales o consecuentes, y no permiten una limitación en la duración de una
garantía implícita, de modo que las anteriores limitaciones o exclusiones pueden no aplicarse a usted. Esta garantía le otorga derechos específicos, y puede usted tener otros derechos, los cuales
varían de estado a estado.
Nota: El Centro de Servicio de Garantía hace envíos solo dentro del
territorio continental de E.U.
Page 18

TABLE DES MATIÈRES
Consignes De Sécurité Importantes 19
ENGLISH ESPAÑOL FRANÇAIS
Démarrage 20
Aperçu Et Caractéristiques De L’unité 21
Opération 21
Entretien Et Nettoyage 21
Inversion De La Porte 22
Guide De Dépannage 23
Assistance Technique 24
Notes 26
–18–
Page 19

S’IL VOUS PLAÎT CONSERVER CES INSTRUCTIONS . VOUS POUVEZ
LES BESOIN DANS L’AVENIR .
1. Ce réfrigérateur doit être adéquatement installé et positionné selon les instructions d’installation avant son utilisation.
2. Ne laissez pas les enfants monter, grimper ou s’accrocher aux étagères du réfrigérateur. Cela pourrait endommager l’unité et causer des blessures.
3. Il ne faut pas entreposer ou utiliser de la gazoline ou tous autres liquides ou vapeurs inflammables près de l’unité ou
autres électroménagers.
4. Tenez les doigts loin de l’espacement entre la porte et le boîtier. Usez de caution en fermant la porte lorsque des enfants
sont près.
5. Débranchez le réfrigérateur avant de le nettoyer ou pour l’entretien.
6. Nous recommandons fortement d’utiliser les services d’un professionnel qualifié pour l’entretien.
7. Tournez le cadran de régulation de température à « 0 », cesse le refroidissement, mais n’éteint pas complètement l’appareil.
8. Ne laissez pas le réfrigérateur dans des températures extrêmement froides ou chaudes.
9. Ne placez pas le réfrigérateur près de flammes ou d’une source de chaleur.
10. Nettoyez le réfrigérateur avec un linge doux et humide. Enlevez les taches avec un savon doux. N’utilisez pas de solvants
industriels ou de produits chimiques abrasifs pour le nettoyage.
11. Ne placez aucun objet lourd sur le réfrigérateur.
12. N’installez pas le réfrigérateur dans un lieu propice à la moisissure ou aux éclats d’eau.
13. Ne laissez pas les enfants s’accrocher à la porte, l’unité pourrait renverser et les blesser.
14. Ne mangez aucune nourriture gâtée causée par un stockage trop long dans le réfrigérateur ou dû à un stockage dans un
réfrigérateur non fonctionnel.
15. N’utilisez pas d’outils pointus (tel qu’un pic à glace), car cela pourrait causer des dommages.
16. Débranchez et videz le réfrigérateur si celui-ci n’est pas utilisé pour une longue période.
ENGLISHESPAÑOLFRANÇAIS
AVERTISSEMENT RISQUE D’ENFERMEMENT POUR ENFANTS
Il y a un risque d’enfermement pour enfants. Avant de jeter votre vieux réfrigérateur ou congélateur aux ordures :
1. Enlevez les portes.
2. Laissez les étagères à l’intérieur de l’unité afin d’éviter que les enfants puissent y grimper.
AVERTISSEMENT : L’UTILISATION D’UNE EXTENSION ÉLECTRIQUE N’EST PAS RECOMMANDÉE.
POUR USAGE DOMESTIQUE UNIQUEMENT
GARDEZ CES INSTRUCTIONS
–19–
Page 20

DÉMARRAGE
ENGLISH ESPAÑOL FRANÇAIS
INSTRUCTIONS POUR LA MISE À LA TERRE
Cet appareil doit être mis à la terre. Cette tâche est accomplie
en assurant que le connecteur est adéquatement branché dans
une prise de courant mise à la terre. Advenant un court-circuit,
le risque d’une décharge électrique est diminué en fournissant
un fil d’échappement au courant électrique. Cet appareil est
équipé d’un cordon d’alimentation avec un connecteur détenant un fil pour la mise à terre.
AVERTISSEMENT: Une mauvaise utilisation d’une fiche de mise
à la terre peut causer une décharge électrique. Veuillez consulter
un électricien qualifié ou un technicien si les instructions pour
la mise à la terre ne sont pas complètement comprises ou s’il y
a un doute quant à la mise à la terre de l’appareil. S’il est nécessaire d’utiliser une corde de rallonge, assurez-vous d’utiliser une
rallonge à trois fils avec mise à la terre ainsi qu’une prise de courant adaptée. La puissance électrique indiquée sur la rallonge
doit être au moins aussi élevée que la puissance de l’appareil.
Note : Les images à l’intérieur de ce manuel y sont à titre indicatif uniquement; l’apparence physique et les options sur votre
modèle peuvent varier.
NUMÉRO DE SÉRIE ET DE MODÈLE
Veuillez prendre en notre le numéro de série et le numéro du modèle ci-dessous. Vous pouvez trouver le numéro
à 11 chires sur un autocollant à l’arrière du réfrigérateur.
Numéro du modèle : RC-1172
Numéro de série : ______________________________
Date d’achat : ____________________________
AVANT DE JETER VOTRE ANCIEN RÉFRIGÉRATEUR
• Enlever toutes les portes, mais laissez les étagères à
l’intérieur (cela empêchera les enfants d’y entrer), faites
déplacer l’unité de votre domicile par un technicien qualifié.
• Vérifiez avec votre revendeur si celui peut reprendre et
disposer de manière responsable ou recycler l’unité
pour vous.
• Visitez le www.epa.gov/rad pour plus de renseignements
sur la disposition responsable d’électroménagers.
CONSIGNES DE SÉCURITÉ
Cet appareil est destiné à un usage domestique et à des applications similaires tels que :
• Cuisine en milieu de travail;
• Utilisation individuelle dans une chambre d’hôtel ou
tout autre type d’environnement résidentiel.
INSTALLATION DE L’APPAREIL
EMPLACEMENT
Assurez-vous de définir un endroit au plancher plat, nivelé et
bien ventilé pour l’emplacement de votre appareil. Évitez de
l’installer près d’une source de chaleur telle qu’un four, un
poêle, un radiateur ou une chaudière. Évitez également une exposition directe au soleil, car cela pourrait aecter le niveau de
consommation électrique.
Des températures extrêmement froides peuvent également
empêcher l’appareil de fonctionner adéquatement. Cet appareil n’est pas conçu pour une utilisation dans un garage ou une
installation extérieure. Ne placez aucun drap ou couverture sur
l’appareil.
Au cours de l’installation, assurez-vous de garder un espacement
libre de 5 pouces minimum de chaque côté ainsi qu’à l’arrière et
au-dessus de l’appareil. Ceci permettra à de l’air froid de circuler
autour du réfrigérateur et ainsi permettre une meilleure eicacité.
NIVELLEMENT DE L’APPAREIL
Il est important de garder l’appareil à niveau afin que la porte
se referme adéquatement. Ceci préviendra des problèmes au
niveau du refroidissement. Afin de niveler l’appareil, ajuster les
quatre pieds réglables dans le sens horaire ou antihoraire pour
ajuster la hauteur de chaque coin.
Conseil : Avoir quelqu’un pousser contre le haut du réfrigérateur
permettra un contrepoids et un accès plus facile ou pieds réglables.
NETTOYAGE AVANT UTILISATION
Essuyez l’intérieur de l’appareil avec une solution dissoute de
bicarbonate de soude. Rincez ensuite avec de l’eau tiède en
utilisant une éponge ou un linge humide. Lavez les étagères et
bacs dans de l’eau savonneuse chaude et séchez-les complètement avant de les remettre dans l’appareil. Nettoyez l’extérieur
de l’appareil avec un linge humide.
ALIMENTATION ÉLECTRIQUE
• Assurez-vous de brancher l’appareil dans une prise mise
à la terre de 100V-120V (60Hz).
• La fiche tripolaire doit être branchée dans une prise
adaptée (voir note ci-dessous).
• Il est possible d’utiliser une rallonge si la puissance électrique indiquée sur celle-ci est au moins aussi élevée que
la puissance de l’appareil et qu’elle est également mise
à la terre.
• Si vous utilisez une rallonge, assurez-vous que le surplus
ne causera pas de risque de trébucher.
Note : Au moment de brancher l’appareil, assurez-vous d’avoir
une prise dédiée (fig.1). Si vous n’avez qu’une prise à double
fiche, il existe des adaptateurs, mais ceux-ci doivent être utilisés adéquatement. (fig.2).
Utilisation d’une prise tripolaire
Fiche électrique tripolaire
Prise électrique tripolaire
Lorsque vous utilisez un adaptateur
de mise à la terre, assurez-vous que
la boîte électrique est mise à la terre.
Adaptateur de
mise à la terre
Câble de mise à la terre
Boîte électrique
Couvercle boîte électrique
Vis
Fig. 1 Fig. 2
–20–
Page 21

FONCTIONS ET APERÇU DE L’APPAREIL
• Réfrigérateur compact
• 1.7 pieds cubes
• Étagère en grillage amovible
• Compartiment refroidissant
• Contrôle mécanique ajustable
• Pieds réglables
• Porte réversible
• Certification Energy Star
• Réfrigérant écologique R600a
DIAGRAMME DE L’APPAREIL
PORTE FERMÉE
1. Charnière supérieure
2. Poignée
3. Porte du réfrigérateur
4. Pieds réglables
OPÉRATION
Note : la température du compartiment congélateur peut varier
entre 30°F à 48°F (dans une pièce avec une température ambiante de 77°F (25°C)). La crème glacée ainsi que les popsicles
doivent être maintenus à une température entre 5°F à 0°F. Le
compartiment congélateur n’est donc pas adapté à ce type de
produit.
Le bouton de contrôle du thermostat pour le réfrigérateur et le
congélateur est situé à côté du compartiment congélateur.
Lors de la première utilisation du réfrigérateur, ajustez le thermostat à « 3 » et laissez suisamment de temps au réfrigérateur
pour se refroidir avant d’y ajouter des aliments. Une période de
24 heures est recommandée.
Lorsque l’appareil est pleinement
refroidi, vérifiez si le niveau est satisfaisant. Vous pouvez ajuster au
besoin en réglant le thermostat vers
« 1 » pour un refroidissement moins
intense ou vers « 6 » pour augmenter.
Néanmoins, la position « 3 » devrait
être adéquate pour une utilisation à
la maison ou au bureau.
FF
FF
O
NOTE : En tournant le cadran de régulation de température à « OFF »,
cela cesse le refroidissement, mais
n’éteint pas complètement l’appareil.
DÉCONGÉLATION
La décongélation manuelle est requise pour votre réfrigérateur.
Vous devriez procéder à la décongélation pour les raisons
suivantes :
• Vous n’utiliserez pas votre réfrigérateur pour une longue
période.
• Vous remarquez une accumulation de glace autour du
congélateur.
Il est aussi recommandé de tout de même décongeler occasionnellement
Pour décongeler :
O
ENGLISHESPAÑOLFRANÇAIS
PORTE OUVERTE
1
2
3
4
5
OFF
1. Bouton de contrôle du thermostat
2. Compartiment congélateur
3. Étagère en grillage
4. Bac récepteur
5. Compartiment réfrigéré
6. Stockage pour bouteilles
7. Joint d’étanchéité de porte
• Ajuster le bouton de contrôle du thermostat à la position «
OFF » et laissez la porte ouverte.
• Débranchez l’appareil.
• Retirez toute nourriture des différents compartiments.
FF
O
• Placez une ou deux serviettes
sous le réfrigérateur afin d’absorber l’eau causée par la fonte
6
de glace.
• Laissez la porte ouverte jusqu’à
la fonte complète de la glace
(habituellement quelques
heures ou une nuit complète
suisent.)
FF
O
• Nettoyez et essuyez l’intérieur
de l’appareil avec une eau savonneuse et un linge non abrasif.
7
NETTOYAGE ET ENTRETIEN DE VOTRE APPAREIL
Un linge propre et humide en combinaison avec un détergent doux ou
un mélange d’eau et de bicarbonate de soude peut être utilisé pour
nettoyer l’intérieur de l’appareil une fois la décongélation complétée et
avant la remise en fonction. Essuyez de nouveau avec un linge humide,
sans savon, afin de vous assurer qu’il ne reste aucun résidu suite au
nettoyage. Nettoyez attentivement le joint pour une meilleure eicacité.
–21–
Page 22

ENGLISH ESPAÑOL FRANÇAIS
INVERSION DE LA PORTE
AVERTISSEMENT :
Afin d’éviter de vous blesser ou de causer des dommages à la
propriété, nous recommandons que vous obteniez de l’aide
pour l’exécution de cette tâche.
• Assurez-vous que l’appareil est débranché et vide.
• Ayez un objet solide sur lequel reposer l’appareil. Ceci
sera nécessaire lorsque viendra le temps d’enlever la
porte.
• Évitez de coucher le réfrigérateur à plat sur le dos, car
ceci pourrait causer des dommages au système de refroidissement.
OUTILS REQUIS
• Clé à douille 10 mm
• Tournevis Phillips
• Tournevis à tête plate
PIÈCES DÉJÀ INSTALLÉES QUE VOUS UTILISEREZ (PAS À
L’ÉCHELLE)
• Couvercle de la charnière supérieure (plastique)
• Charnière supérieure
• Pieds réglables (x2)
• Vis d’assemblage (x1)
• Vis à tête creuse (x4)
• Charnière inférieure (métal)
• Couvercles de vis (plastique)
ÉTAPE 1 – PIÈCES ET EXTRACTION DE LA PORTE
• Dévissez la vis du couvercle de la charnière supérieure
en utilisant le tournevis Philips.
• Retirez le couvercle de la charnière supérieure.
• Dévissez les deux vis à tête creuses de la charnière su-
périeure en utilisant la clé à douille 10 MM.
• Retirez la charnière supérieure.
• Notez les couvercles de vis du côté opposé.
• Retirez les deux couvercles de vis du dessus du boîtier
du réfrigérateur et l’autre sur le dessus de la porte en utilisant un tournevis à tête plate.
• Tirez la porte vers le haut, retirez-la et placez la porte
dans un endroit sécuritaire.
ÉTAPE 2 – RETIREZ LES PIÈCES RESTANTES
• Basculer le réfrigérateur vers l’arrière afin de vous donner
accès à la partie inférieure de la section avant.
• Notez bien dans quels trous sont visés les deux types de
pieds réglables.
• Retirez-les tous les deux en notant que celle qui est la
plus longue se situe à l’opposé de la charnière de porte.
• Dévissez les deux vis à tête creuses de la charnière infé-
rieures en utilisant la clé à douille 10 MM.
• Retirez la charnière inférieure.
ÉTAPE 3 – RÉINSTALLATION DES PIÈCES ET DE LA PORTE
• Installez le pied réglable (le plus long), du côté où sera
installée la charnière.
• Vissez la charnière inférieure sur le nouveau côté. Utilisez les deux grands trous sur la charnière destinée à cet
eet. Laissez un peu de mou afin d’être en mesure d’ajuster la charnière.
• Insérez la porte dans l’axe de pivot de la charnière infé-
rieure afin de permettre un ajustement de la porte dans
la bonne position – mais ne serez pas trop les deux vis à
tête creuses.
ÉTAPE 4 – SÉCURISER LA PORTE
• Déplacez la charnière supérieure vers le nouveau côté.
• Vissez les vis à tête creuses de la charnière supérieure.
• Vérifiez le raccord entre la porte et la charnière afin d’assurer un mouvement adéquat; que la porte soit bien alignée horizontalement et verticalement et que les joints
de porte se referment bien de tous les côtés.
• Faites les ajustements nécessaires et ensuite, resserrez
les vis à têtes creuses des charnières supérieure et inférieure.
• Replacez le couvercle de la charnière supérieure et utili-
sez un tournevis Philips pour serrer la vis d’assemblage.
• Remplacez les trois couvercles de vis, maintenant situés
du côté opposé de la charnière.
ÉTAPE 5 - NIVELLEMENT DE L’UNITÉ
• Installez l’autre pied réglable dans le bas
de la charnière inférieure dans le trou démontré ici :
• Ajustez le pied réglable à la hauteur désirée.
–22–
Page 23

GUIDE DE DÉPANNAGE
PROBLÈME SOLUTION
Assurez-vous que la fiche du cordon d’alimentation est bien
insérée dans la prise de courant.
Mon réfrigérateur ne semble pas recevoir de courant (ne
produis pas de bruit, etc.)
La nourriture dans le compartiment réfrigéré congèle.
La nourriture dans le réfrigérateur n’est pas suisamment
froide.
Assurez-vous que le thermostat est réglé à un numéro entre 1
et 6.
Vérifiez s’il ne s’agit pas d’un fusible ou d’un disjoncteur
déclenché.
Diminuez le numéro du thermostat. (Un numéro supérieur
équivaut à une température plus froide).
Assurez-vous que la porte du réfrigérateur est fermée adéquatement.
Vérifiez la température ambiante; s’il fait chaud, ceci est
normal.
Si vous avez déposé de la nourriture encore chaude dans le
réfrigérateur, c’est tout à fait normal.
Assurez-vous que le joint autour de la porte est libre de tout
débris. Si celui-ci n’est pas complètement étanche, de l’air
chaud environnante pourrait pénétrer à l’intérieur, causant
une période de refroidissement plus longue.
C’est tout à fait normal après une mise en fonction suite à une
longue période hors tension.
Assurez-vous que la température est ajustée au degré désiré.
Voir la section « Opération » pour de plus amples détails.
ENGLISHESPAÑOLFRANÇAIS
Ceci pourrait être causé par l’ouverture fréquente de la porte
La température interne du réfrigérateur est trop chaude.
L’extérieur de l’unité est chaud
Le réfrigérateur émet diérents sons à divers moments
incluant des bruits forts lorsqu’il est allumé, le ventilateur
qui tourne lorsque la température est sous les 45°F, des pétillements, des craquellements, des gargouillements et des
bruits de bouillonnement.
Il y a des vibrations ou des bruits de cliquetis lorsque l’appareil est en fonction.
De la moisissure est apparue à l’intérieur des murs du réfrigérateur.
Il y a de la moisissure qui se forme sur l’extérieur des murs
du réfrigérateur.
La porte ne se ferme pas complètement. Assurez-vous que le réfrigérateur n’est pas trop plein.
qui laisse entrer de l’air chaude.
Possiblement causé par de la nourriture chaude.
Votre appareil peut prendre jusqu’à quatre heures pour
atteindre la température désirée suite à une longue période
hors tension.
Il s’agit d’une caractéristique normale d’un réfrigérateur duquel il ne faut pas se soucier.
Tous ces bruits sont normaux et typiques aux divers cycles et
opérations.
Assurez-vous que l’appareil est à niveau, qu’il ne touche pas
un mur et que le bac récepteur est installé adéquatement. Voir
la section « Nivellement de l’appareil » ci-dessus.
Ceci pourrait être causé par des débris situés dans le joint
de la porte, ce qui empêche une étanchéité complète. C’est
également normal si l’air ambiant est humide. Si la porte est
ouverte fréquemment cela pourrait également être une des
causes.
Assurez-vous de bien refermer la porte.
Assurez-vous que les étagères sont bien posionnées.
Assurez-vous que les joints sont propres.
–23–
Page 24

ENGLISH ESPAÑOL FRANÇAIS
SUPPORT TECHNIQUE
Avant de contacter le support technique, veuillez consulter le guide de dépannage ci-dessus.
Consultez notre site Web pour nous rejoindre, pour trouver les réponses à vos questions fréquentes et pour des ressources addition-
nelles telles qu'une version mise à jour de ce guide de l'utilisateur.
WWW.IMPECCA.COM
Pour nous rejoindre par téléphone, veuillez avoir en main le numéro de modèle et de série de votre appareil. Nos lignes sont ouvertes entre 9 h et 18 h HE au 1- 866-954-4440.
Tenez-vous à jour sur les plus récentes innovations chez Impecca et pour participer à nos concours via nos médias sociaux:
www.facebook.com/Impecca/
www.instagram.com/impecca/
@impeccausa
–24–
Page 25

GARANTIE LIMITÉE D’UN AN
Impecca™ garantie auprès de l’acheteur original cet appareil
contre toutes défectuosités liées au matériel et à la fabrication
tel que spécifié ci-dessous.
PIÈCES ET MAIN D’ŒUVRE- S’il est déterminé que l’appareil a un problème lié à la fabrication, à l’intérieur d’une
période d’un an de la date d’achat originale, Impecca™,
à sa discrétion, pourra remplacer ou réparer les pièces
de l’appareil sans frais pour vous aux États-Unis.
Afin d’obtenir des services sous garantie par un fournisseur autorisé par le centre de service d’Impecca™, veuillez nous rejoindre
par courriel : service@impecca.com afin d’obtenir un numéro
d’autorisation d’entretien et réparation (Repair and Maintenance
Authorization – RMA). Vous recevrez également des détails liés au
processus de réparation et/ou remplacement.
Tout matériau en vitre inclus avec l’appareil est couvert
par une garantie de 60 jours à compter de la date d’achat
(lorsque applicable).
Impecca™ exclus spécifiquement de cette garantie tout attachement non électrique / mécanique, accessoires ou pièce jetable
incluant, mais non limité au boîtier externe, les câbles connecteurs, les piles et les adaptateurs secteurs. Impecca™ se réserve
le droit de réparer ou remplacer les appareils défectueux par un
modèle pareil, équivalent ou plus récent.
Nous nous réservons le droit de réparer ou de remplacer l’appareil à notre discrétion. Le remplacement pourrait être par un
appareil nouveau ou remis à neuf. Bien que tous les e orts soient
mis de l’avant pour assurer qu’il s’agisse du même modèle, s’il
s’avère impossible, le remplacement sera de qualité similaire ou
supérieure.
11. Coûts entraînés à rendre l’appareil accessible pour l’entretien (incluant, mais non limité à l’enlèvement de moulures,
plinthes, armoires, etc.)
12. Appels de service pour le remplacement de pièces consommables tels que des ampoules, filtres, etc.
13. Des frais additionnels peuvent s’appliquer aux appels de
service en soirée, en fin de semaine, les jours fériés. Des
dommages à la finition de l’appareil ou à des ameublements
suite à l’installation de l’appareil.
14. Dommages causés par : des circonstances exceptionnelles;
incendie; mauvaise utilisation; accident; alimentation
électrique inappropriée; entretien e ectué par une personne
non autorisée; utilisation de pièces non d’origine d’Impecca,
etc.
TOUTE GARANTIE IMPLICITE, Y COMPRIS LES GARANTIES DE
QUALITÉ MARCHANDE ET D’ADAPTATION À UN USAGE PARTICULIER EST LIMITÉ POUR UNE DURÉE DE 1 AN À COMPTER DE LA
DATE DE L’ACHAT ORIGINAL DE CE PRODUIT.
CES GARANTIES ET RECOURS DEMEURENT EXCLUSIFS À LA
VENTE ET L’UTILISATION DE CE PRODUIT. AUCUNE AUTRE
GARANTIE, ORALE OU ÉCRITE, EXPLICITE OU IMPLICITE, NE SERA
ÉMISE.
IMPECCA™ NE PEUT PAS ÊTRE TENU RESPONSABLE POUR DES
DOMMAGES SPÉCIAUX, ACCIDENTELS, CONSÉQUENTS, DIRECTS
OU AUTRES CONNUS OU QUI AURAIENT PU ÊTRE COMMUNIQUÉS À IMPECCA™, Y COMPRIS LA PERTE DE PROFITS, DE
BIENVEILLANCE, DE BIENS ET DE BLESSURES RÉSULTANT D’UNE
VIOLATION DE LA GARANTIE, L’INCAPACITÉ D’UTILISER LE PRODUIT OU EN VERTU DE TOUTE THÉORIE JURIDIQUE EN CONTRAT
OU DÉLIT. LA RESPONSABILITÉ D’IMPECCA EST LIMITÉE AU PRIX
D’ACHAT PAYÉ AU VENDEUR EN DÉTAIL DU PRODUIT DÉFECTUEUX.
L’usure normale de l’appareil n’est pas couverte par cette garantie. Impecca™ se réserve le droit de déterminer le niveau d’usure
sur l’ensemble de ses appareils. Ouvrir le boîtier ou modifier
l’appareil annule dans son entièreté la présente garantie.
Exclusions : la garantie présente exclut les points suivants :
1. Tout appareil dont le numéro de série est e acé ou rendu
illisible.
2. Tout appareil transféré à un second propriétaire.
3. La rouille formée à l’intérieur ou à l’extérieur de l’unité.
4. Les appareils marqués « Tel quel » ou « Remis à neuf ».
5. Pertes d’aliments dus à un mauvais fonctionnement de
l’appareil.
6. Climatiseur à fenêtre installés au mur.
7. Si l’appareil est utilisé à des fins commerciales.
8. Appels de service qui ne sont pas en lien avec un mal fonctionnement de l’appareil.
9. Appels de service pour un appareil endommagé suite au
non-respect des instructions fournies.
10. Appels de service liés à une installation défectueuse.
–25–
Aucun revendeur, agent ou employé d’Impecca™ n’est autorisé
à e ectuer une modification, une extension, un changement ou
un amendement de cette garantie sans le consentement écrit et
l’autorisation d’Impecca™.
Certains états ne permettent pas l’exclusion ou la limitation
des garanties implicites ou de responsabilité en lien avec des
dommages accidentels or des dommages conséquents ou ne
permettent pas une limitation sur la durée de la garantie implicite. Donc, les limitations ou exclusions ci-dessus peuvent ne pas
s’appliquer à vous. Cette garantie vous donne des droits légaux
spécifiques et vous détenez d’autres droits, qui peuvent varier
d’état en état.
Note : Notre centre de la garantie e ectue la livraison uniquement qu’aux États-Unis continentaux.
Page 26

NOTES
Page 27

NOTES
Page 28

© 2016 Impecca, a division of LT Inc., Wilkes Barre, PA.
 Loading...