

Page 1
18 CU. FT. Refrigerator - User Manual
Refrigerador de 18 Pies Cúbicos - Manual de usuario
Réfrigérateur de 18 Pieds Cubes - Manuel de l’utilisateur
Models:
RA-2185W - White/Blanco/Blanc
RA-2185K - Black/Negro/Noir
RA-2185ST - Stainless Steel/Acero Inoxidable/Acier Inoxydable
www.impecca.com
v 1.6
Page 2

ENGLISH ESPAÑOL FRANÇAIS
TABLE OF CONTENTS
Important Safety Instructions ......................................................................................................................................................................................... 3
Getting Started ................................................................................................................................................................................................................... 4
Installing Your Appliance ................................................................................................................................................................................................. 4
Unit Diagram ...................................................................................................................................................................................................................... 5
Door Handle Installation .................................................................................................................................................................................................. 5
Door Swing Reversal (Optional) ..................................................................................................................................................................................... 5
Operation ............................................................................................................................................................................................................................ 8
Cleaning Your Appliance .................................................................................................................................................................................................. 9
Maintenance .......................................................................................................................................................................................................................9
Troubleshooting .............................................................................................................................................................................................................. 10
Customer Support ...........................................................................................................................................................................................................10
One-Year Limited Appliance Warranty (US) ................................................................................................................................................................11
SPANISH ............................................................................................................................................................................................................................12
FRENCH ............................................................................................................................................................................................................................. 22
–ii–
Page 3

IMPORTANT SAFETY INSTRUCTIONS
PLEASE SAVE THESE INSTRUCTIONS. YOU MAY NEED THEM IN THE FUTURE.
1. This refrigerator must be properly installed and located in accordance with the Installation Instructions before it is used.
2. Do not allow children to climb, stand or hang on the shelves in the refrigerator. They could damage the refrigerator and seriously
injure themselves.
3. Do not store or use gasoline or other flammable vapors and liquids in the vicinity of this or any other appliance.
4. Keep fingers out of the space between the doors and cabinet. Be careful closing doors when children are in the area.
5. In refrigerators with automatic ice makers, avoid contact with the moving parts of the ejector mechanism, or with the heating
element that releases the cubes. Do not place fingers or hands near or on the automatic ice-making mechanism while the refrigerator is plugged in.
6. Unplug the refrigerator before cleaning and making repairs.
7. We strongly recommend that any servicing be performed by a qualified individual.
8. Turning the temperature control dial to the “0” position stops cooling but does not shut o power to the refrigerator.
9. Do not leave refrigerator in extremely cold or warm temperatures.
10. Do not place refrigerator near heat sources or open flames.
11. Clean the refrigerator with a so, damp cloth. Remove stains with a mild soap. Do not clean the unit with industrial grade solvents, or abrasive chemicals.
12. Do not place heavy items on top of the refrigerator.
13. Never install the refrigerator where there is a lot of moisture or in areas where water can splash.
14. Do not allow children to hang on the doors; the refrigerator may be tip over and hurt children.
15. Never eat food that may have spoiled because it was stored too long in the refrigerator or was stored in an out-of-order refrigerator.
16. Do not use sharp tools inside the refrigerator (such as an ice pick to remove ice) as damage may occur.
17. If not using for a long period of time, remove all food from the refrigerator and unplug the unit.
ENGLISHESPAÑOLFRANÇAIS
BEFORE DISCARDING YOUR OLD REFRIGERATOR:
Your old refrigerator may have a cooling system that used CFCs (chlorofluoocarbons) or HCFCs (hydrochlorofluoocarbons). CFCs
and HCFCs are believed to harm stratospheric ozone if released to the atmosphere. If you are throwing away your old refrigerator,
make sure the refrigerant is removed for proper disposal by a qualified technician. Check with your retailer to find out if they’ll take
away and responsibly dispose of or recycle your old refrigerator.
See www.epa.gov/rad for more information on Responsible Appliance Disposal.
CHILD ENTRAPMENT WARNING:
Risk of child entrapment. Before you throw away your old refrigerator or freezer:
1. Take o the doors.
2. Leave the shelves in place so that children may not easily climb inside.
CAUTION: USE OF AN EXTENSION CORD IS NOT RECOMMENDED.
FOR HOUSEHOLD USE ONLY
SAVE THESE INSTRUCTIONS
–3–
Page 4

ENGLISH ESPAÑOL FRANÇAIS
Receptacle
3-pronged
Receptacle
Box Cover
3-pronged
plug
When using a 3-pronged outlet
GETTING STARTED
Thank you for purchasing this Impecca 18 Cubic Foot Refrigerator.
Please follow these operating instructions carefully. Keep these instructions in a safe place and consult them as needed.
Note: All images in this instruction manual are for indication
only; the physical appearance and options on your model may
var y.
SERIAL AND MODEL NUMBER
Please record your model number and serial number below.
You can find the number plate in the upper-le wall inside the
refrigerator.
Model Number: ______________________________
LEVELING THE UNIT
It is very important to keep the unit level, so that the door will
close properly and prevent problems that will cause eective
cooling to fail. To level the unit, turn the two adjustable feet
clockwise or counterclockwise to respectively raise or lower
the corner.
Note: If the unit is not level, the door and magnetic seal alignments will not be covered properly.
CLEANING BEFORE USE
Wipe the inside of the unit with a weak solution of baking
soda (bicarbonate). Then rinse with warm water using a damp
sponge or cloth. Wash the shelves and bins in warm soapy water and dry completely before putting back in the unit. Clean
the exterior of the unit with a damp cloth.
Serial Number: ______________________________
Date of Purchase: ____________________________
SAFETY NOTICES
This appliance is intended to be used in household and similar
applications such as:
• Sta kitchen areas in shops, oices and other working environments;
• Individual use in hotel rooms and other residential type
environments;
INSTALLING YOUR APPLIANCE
LOCATION
When selecting a position for your unit, ensure the floor is a
flat, level surface and the room is well ventilated. Avoid locating your unit near a heat source, such as an oven, stove top,
boiler, or radiator. Also avoid direct sunlight as it may increase
the electrical consumption.
Extremely cold ambient temperatures may also prevent the
unit from operating eectively.. This unit is not designed for
use in a garage or outdoor installation. Do not place any covering such as a drape or sheet on the unit.
When installing the unit, ensure that a minimum of 3 inches of
free space is le at both sides and in the rear, and 1 inch at the
top of the unit. This will allow cold air to circulate around the
refrigerator and improve the eiciency of the cooling process.
The unit’s door must be able to open fully as shown.
GROUNDING INSTRUCTIONS
This appliance must be grounded. The refrigerator must be
plugged into its own dedicated 115 Volt, 60 Hz., 15 Amp, AC
only electrical outlet. Performance may be aected if the
voltage varies by 10% or more. Operating the refrigerator with
insuicient power can damage the compressor. Such damage
is not covered under your warranty The power cord of the
appliance is equipped with a three-prong grounding plug for
your protection against electrical shock hazards. It must be
plugged directly into a properly grounded three prong receptacle. The receptacle must be installed in accordance with
local codes and ordinances. Do not use an extension cord or
adapter plug.
WARNING: Improper use of the grounding plug can result in
a risk of electric shock. Consult a qualified electrician or service person if the grounding instructions are not completely
understood, or if doubt exists as to whether the appliance is
properly grounded.
You must make sure all three prongs are in a 3-pronged outlet
(see figure below).
W×D ≥ 50.8 inches × 58.5 inches
–4–
Page 5
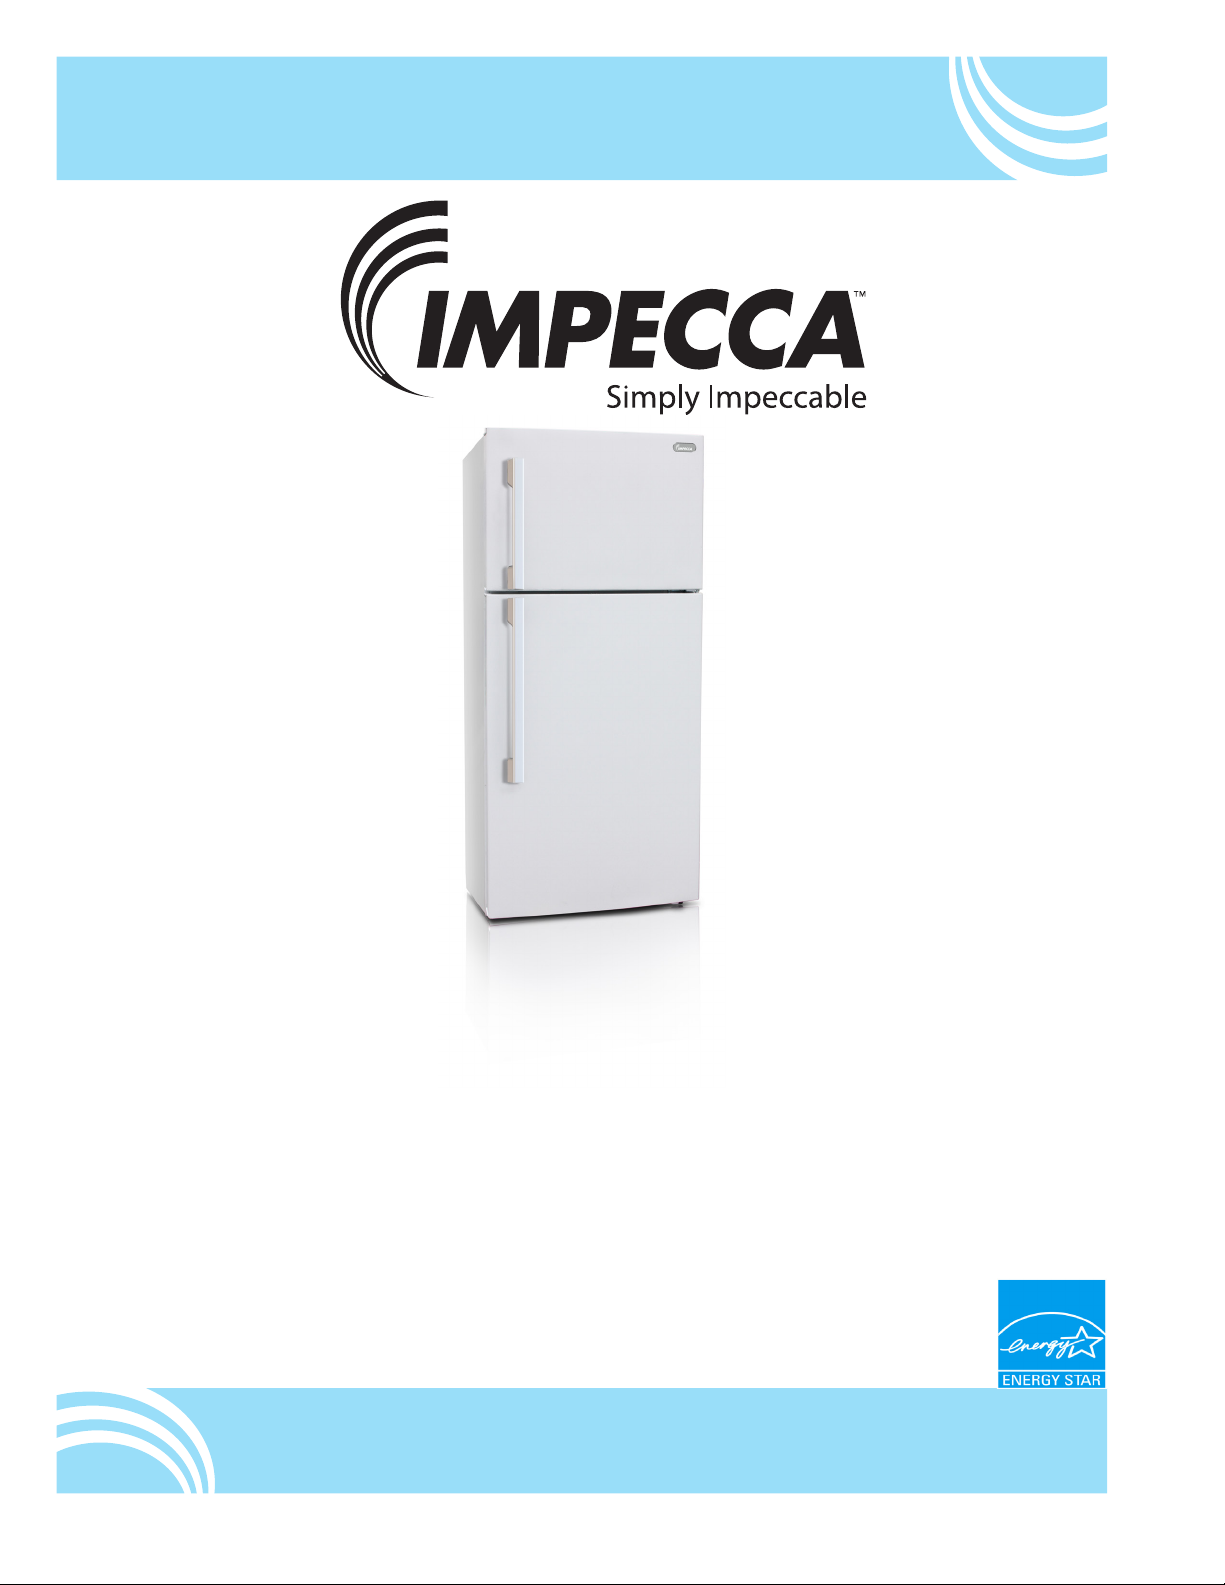
UNIT DIAGRAM
Right top
hinge cover
Le cover
plate
1
2
3
4
5
6
7
8
9
DOOR SWING REVERSAL (OPTIONAL)
1. Control Dial
2. Temperature Control Panel
3. Adjustable Glass Shelves
4. Salad Bin Cover
5. Salad Bins
6. Freezer Door Shelves
7. Butter Compartment
8. Refrigerator Door Shelves
9. Leveling Feet
It is advised that you determine if you need to reverse the door
swing and complete this procedure prior to installing
and turning on your refrigerator.
Note: These instructions are for changing the hinges from the
right side to the le side. If you wish to change the hinges back
to the right side, follow these same instructions and reverse all
references to le and right.
CAUTION:
To avoid injury to yourself and/or property, we recommend
someone assist you during the door reversal process.
• Ensure the appliance is unplugged and empty.
• Adjust the two leveling feet to their highest position.
• Have something solid against which to rest the appliance.
This will be necessary when it comes to taking o the door
• Avoid laying the refrigerator completely flat on its back as
this may damage the cooling system.
TOOLS REQUIRED:
• Phillips screwdriver
• Allen Key
ENGLISHESPAÑOLFRANÇAIS
DOOR HANDLE INSTALLATION
The refrigerator must be disconnected before attempting the
installation of door handles.
• Flathead screwdriver
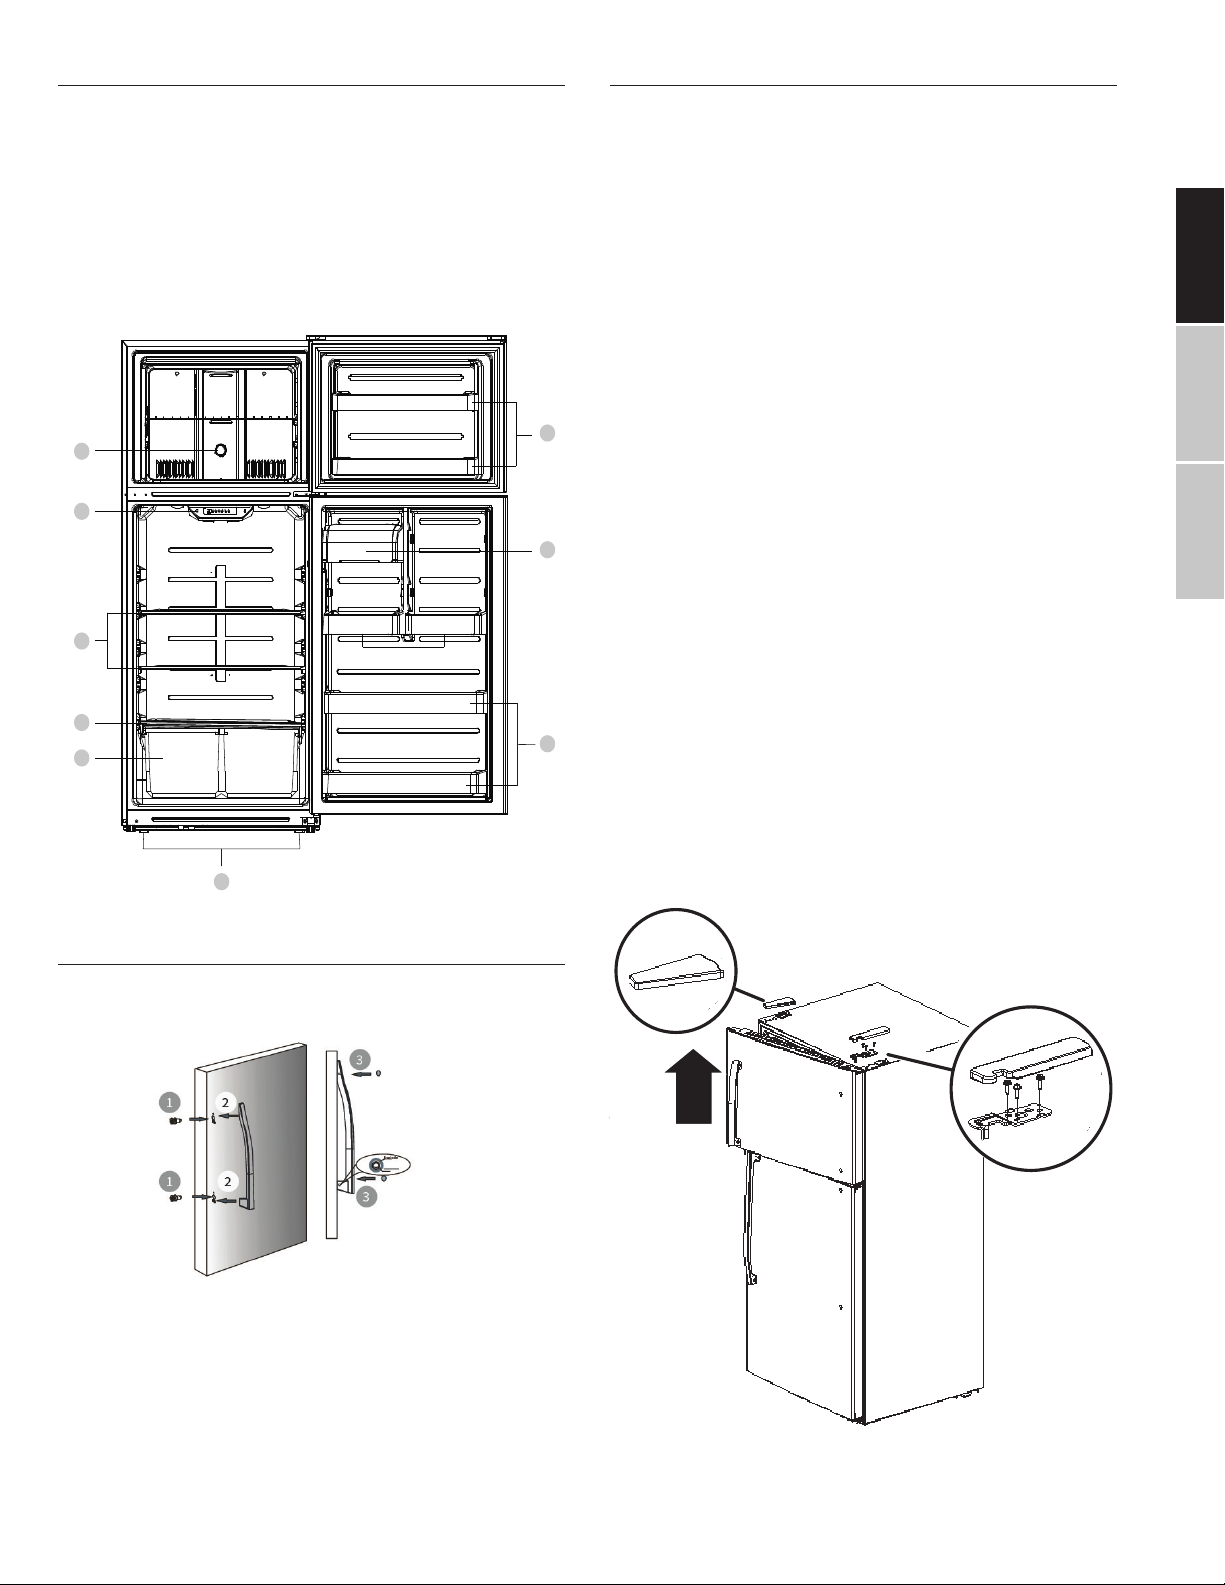
STEP 1: REMOVE THE FREEZER DOOR
Using a flathead screwdriver, gently pry and li the right top
hinge cover and the le cover plate. Using a Phillip’s screwdriver, unscrew the screws of the right top hinge. Remove the
upper hinge. Raise the freezer door upward to detach.
Step 1: Install the two Phillips head screws into the door holes
and turn screws until fully in place.
Step 2: Position the door handle on the screws installed in
Step 1.
Step 3: Install screws at the hole located on the side of the
handle and turn screws until completely tight. Install
screw caps as shown in the figure above.
–5–
Page 6
ENGLISH ESPAÑOL FRANÇAIS
Center Hinge
STEP 2 REMOVE THE REFRIGERATOR DOOR
Unscrew the three screws holding the center hinge with a Phillip’s screwdriver. Remove the hinge and save the screws and
hinge. Raise the refrigerator door upward, as shown.
STEP 3 REPLACING THE BOTTOM HINGE
Unscrew the two screws holding the bottom hinge and remove
the bottom hinge from the bottom right side of the refrigerator.
Unscrew the hinge pin from the right side of the bottom hinge
and move it to the le side of the refrigerator. Secure the bottom hinge to the bottom le side of the refrigerator using the
screws you removed previously.
Remove the hole plug from the top le of the refrigerator door
and insert it in the top right side of the refrigerator door.
Insert the plastic hole plugs into the le sides of the
freezer and refrigerator doors.
Reattach the bottom hinge
Hinge Pin
Remove the
bottom hinge
Hinge Pin
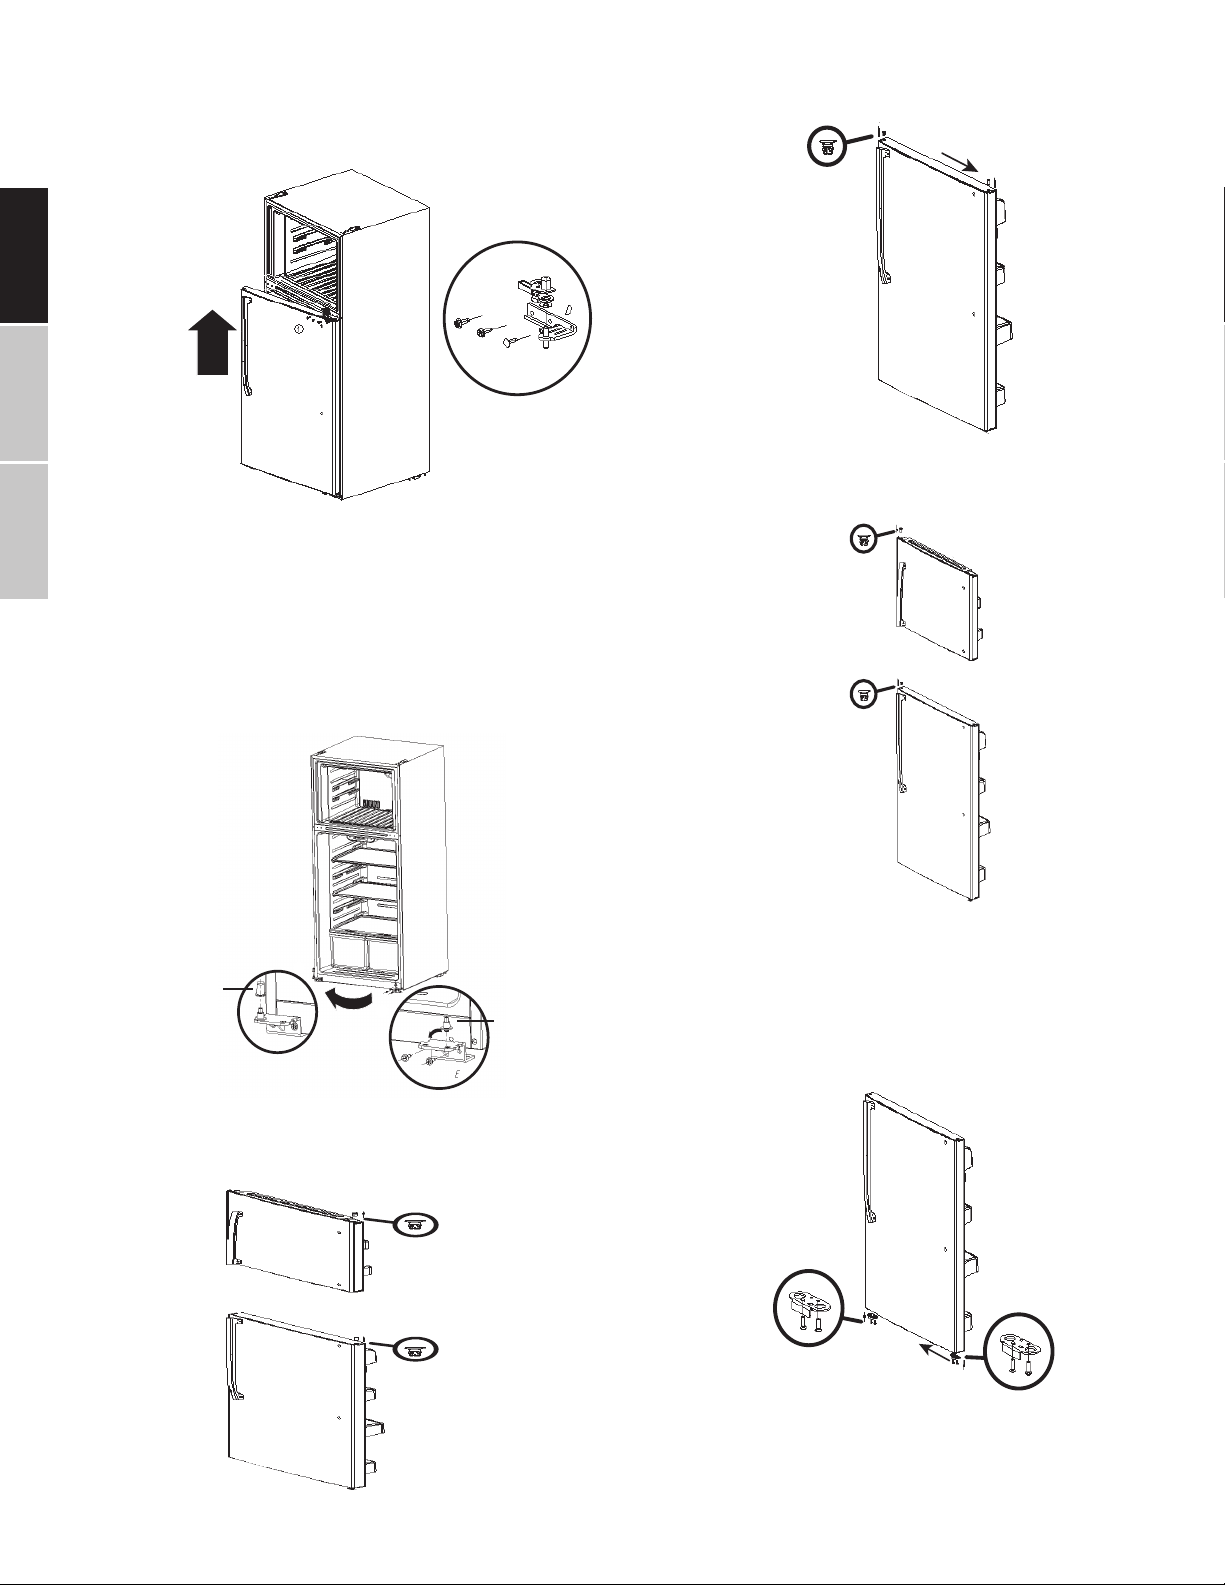
STEP 4 REFITTING THE DOOR HARDWARE
Remove the plastic bushing from the top right side of the
freezer and cold storage doors.
STEP 5 REINSTALLING THE REFRIGERATOR DOOR
Remove the door block from the bottom right side of the cold
storage door and attach it to the le side of the door.
–6–
Page 7
Attach the le upper door self-locking block and the le door-
Upper door
self-locking block
Le door-open
stopper
open stopper to the le side of the freezer door.
Remove the right upper door self-locking block and the right
door-open stopper. Store in a safe place in case you need to
reverse the door position again.
Remove the two hole caps from the le side, where the center
hinge will go, and insert them into the right side.
Attach the refrigerator door on the bottom hinge and then
attach the le center hinge to the le side of the refrigerator.
STEP 7 REMOVING DOOR HANDLES
Remove the screw caps on the door handles. Use an Allen
wrench to remove the four Allen-screws securing the handles
to the le side of the freezer and refrigerator doors. Remove
the handles.
ENGLISHESPAÑOLFRANÇAIS
Attach the le center hinge
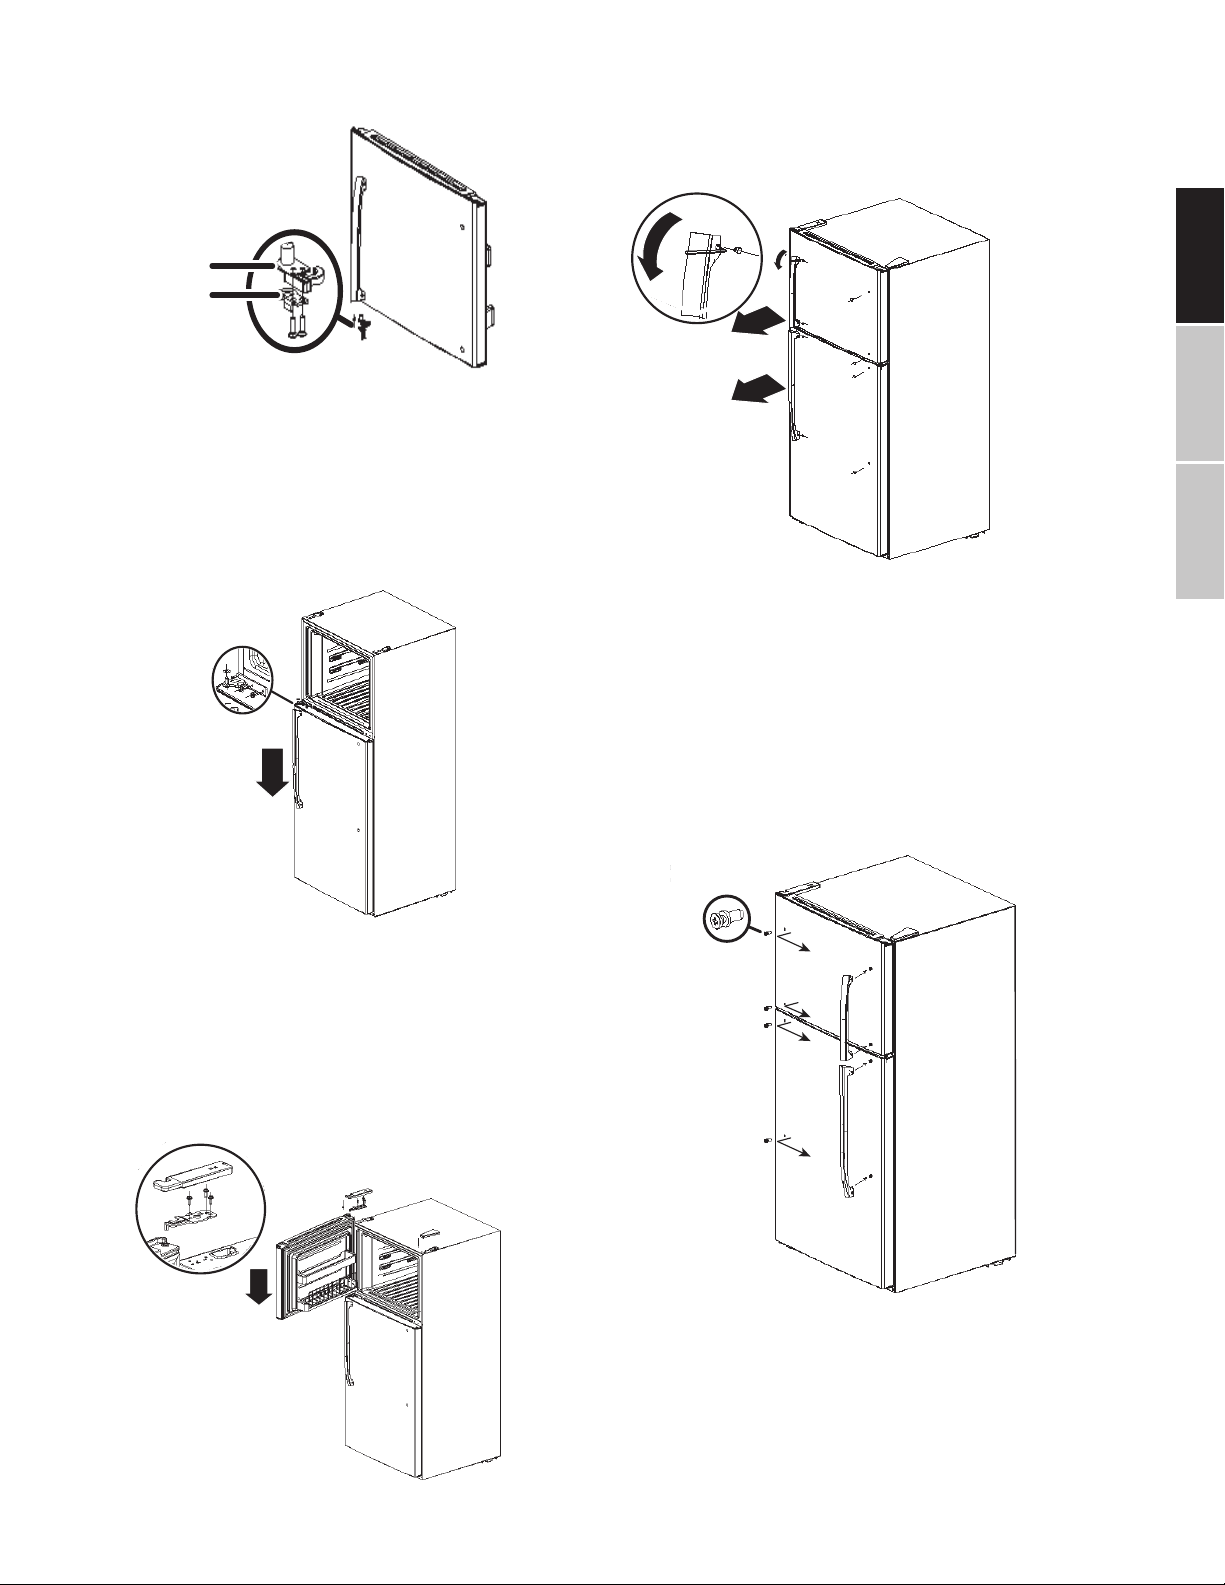
STEP 6 REINSTALLING THE FREEZER DOOR
Put the freezer door onto the le center hinge and then attach
the top le hinge to the top of the refrigerator. Cover the hinge
with the top le hinge cover and cover the screw holes on the
right side of the top with the cover plate (removed in a previous step).
Attach the top le hinge
STEP 8 REINSTALLING THE DOOR HANDLES
Remove the four Phillips-head screws from the le side of the
freezer and refrigerator doors. Screw the four Phillips-head
screws into the holes on the right side of the freezer and refrigerator doors.
Attach the handles to the right side of the freezer and refrigerator doors with the Allen-head screws removed in a previous
step. Tighten with the Allen wrench and replace the screw
caps.
STEP 9 REFITTING HOLE PLUGS AND HANDLE CAPS
Replace all handle hole plugs into the remaining holes on the
le side. Refit the handle caps onto the ends of handles to
cover screw holes.
–7–
Page 8

ENGLISH ESPAÑOL FRANÇAIS
OPERATION
Display screen - Cold Storage
A. SET key
1 Level 1
2 Level 2
3 Level 3
4 Level 4
5 Level 5
6 Standby indicator
Press the SET key to change the Temperature Level. Each time the SET key is pressed the Temperature level setting will change
one time. Temperature settings are coldest from le to right. Approximately 5 seconds aer the temperature level setting has been
selected the refrigerator will operate according to the selected value.
Temperature Control Dial - Freezer
THE STANDBY CONTROL FUNCTION
While the refrigerator is powered on, push and hold the SET key for approximately 3 seconds to place the refrigerator into standby
function mode. The Standby indicator will light up and the unit will be in standby mode.
To deactivate Standby mode, press the SET key. The Standby indicator light will turn o and the refrigerator will return to normal
working condition.
FAULT INDICATOR
In case of a failure, the appropriate Shi LED lights will flash in combination to indicate the failure codes as listed below:
Display Malfunction
LED 1 and LED 2 lit Refrigerator temperature sensor circuit
LED 1 and LED 3 lit Freezer defrost sensor
LED 1 and LED 4 lit Ambient temperature sensor
TEMPERATURE CONTROL OPERATION
The Initial setting of the refrigerator compartment temperature is Level 3. For the freezer compartment, the initial setting is Mid
position.
If the ambient temperature is lower than 10°C for a long period of time, use the SET key and set the refrigerator control panel to
Level 4 or Level 5 position. For the freezer compartment, turn the dial to the MID~COLDER position.
If the ambient temperature is higher than 43°C for a long period of time, use the SET key and set the refrigerator control panel to
Level 4 or Level 5 position. For the freezer compartment, turn the dial to the COLD position.
Note: When the freezer compartment setting is placed in COLD position, the freezer compartment can be rapid cooled, but if
placed in the COLD position for a long time, the temperature inside the freezer compartment may be reduced to below 0°C.
–8–
Page 9

CLEANING YOUR APPLIANCE
Remove all the shelves and the salad bin. To remove the salad bin first remove the lower shelf.
Wipe the inside of the unit with a weak solution of bicarbonate soda and then rinse with warm water using a “wrung-out” sponge or
cloth. Wipe completely dry before replacing the shelves and salad bin.
Use a damp cloth to clean the exterior, and then wipe with a standard general purpose cleanser. Make sure that the door is closed
to avoid the cleanser from getting on the magnetic door seal or inside the unit.
Condensation may appear on the outside of the unit. This may be due to a change in room temperature. Wipe o any moisture
residue. If the problem continues, please contact a qualified technician for assistance.
MAINTENANCE
CHANGING THE INTERNAL LIGHT
This unit uses a MAX 40W lamp located at the top of the compartment near the opening.
Note: Light bulb may be extremely hot.
1. Unplug the refrigerator
2. Locate and remove the faulty light bulb
3. Replace with an appliance bulb of the same or lower
wattage.
4. Plug the refrigerator back in.
ENGLISHESPAÑOLFRANÇAIS
MOVING YOUR UNIT
Hold the unit around its sides or base when moving it. Under no circumstances should it be lied by holding the edges of the top
surface.
SERVICING
The unit should only be serviced by an authorized technician and only genuine spare parts should be used. Repairs carried out by
inexperienced persons may cause injury or serious malfunction.
SWITCHING ON AND OFF FOR LONG PERIODS OF TIME
When the unit is not in use for a long period of time, disconnect it from the main power supply, empty all food and clean the appliance. Leave the door ajar to prevent unpleasant smells.
–9–
Page 10

ENGLISH ESPAÑOL FRANÇAIS
TROUBLESHOOTING
The following simple issues can be handled by the user. Please contact customer support if the issues are not resolved.
Problem What to Check
Unit does not function at
all
Odor
Long-term operation of
compressor
Internal light does not
illuminate
The refrigerator door can
not be properly closed.
Loud noises
• Check to be sure the unit is plugged into a working electrical outlet;
• Check the outlet to ensure proper voltage;
• Check to see if the power circuit has been tripped.
• Odorous foods should be wrapped well;
• Check for rotten food;
• Clean the interior surfaces.
• It is normal for the refrigerator to operate for longer times during the summer when the ambient
temperature is higher;
• Do not store too much food in the freezer at one time;
• Do not put hot or warm foods into the refrigerator until they are cooled;
• Frequent opening of refrigerator door can cause the compressor to operate more frequently.
• Check whether the refrigerator is connected to power,
• Inspect the light bulb and replace if damaged.
• The freezer door may be obstructed by items stored in the shelves. Rearrange food items and
ensure that the door can close properly;
• Use the leveling feet to adjust the refrigerator.
• Check the leveling feet to be sure that the refrigerator is balanced;
• Inspect the unit to ensure that all parts are properly installed.
Additional notes:
• Condensation may be detected on the exterior surface and door seals of the freezer when the ambient humidity is high. This is
a normal phenomenon, and the condensation can be wiped away with a dry towel.
• A slight buzzing noise will be generated by the compressor, especially when starting up or shutting down.
CUSTOMER SUPPORT
Before contacting customer support, please see the trouble- shooting guide above.
Visit our website to contact us, find answers to Frequently Asked Questions, and for other resources which may include an updated
version of this user’s manual.
WWW.IMPECCA.COM
If you wish to contact us by phone, please be sure to have your model number and serial number ready and call us between 9:00am
and 6:00pm ET, at +1 866-954-4440.
Keep tabs on Impecca’s newest innovations & enter contests via our social network feeds:
www.facebook.com/Impecca/
www.instagram.com/impecca/
@impeccausa
–10–
Page 11

ONE-YEAR LIMITED APPLIANCE WARRANTY (US)
Impecca™ warrants this product against defects in
material and workmanship to the original purchaser
as specified below.
PARTS AND LABOR– if the product is determined to have a manufacturing defect, within
a period of one year from the date of the original purchase, Impecca™, at its own discretion,
will repair or replace the product parts at no
charge to you in the U.S.A.
To obtain warranty service by an authorized Impecca™ service center, please email us at: service@impecca.com to obtain a Repair and Maintenance Authorization (RMA) number and received instructions
on how the repair and/or replacement procedure will
take place.
Any glass materials included with the appliance will be covered for a period of 60 days
from purchase.
Impecca™ specifically excludes from this warranty
any non-electric/mechanical attachments, accessories and disposable parts including but not limited
to outside case, connecting cables, batteries and AC
adapters. Impecca™ reserves the right to repair or replace defective products with the same, equivalent or
newer models.
We reserve the right to either repair or replace product at our discretion. Replacement may be either
new or refurbished and while every endeavor will be
made to ensure it is the same model, if not possible it
will be equal or higher specification.
Normal “Wear and Tear” is not covered by this warranty. Further, Impecca™ hereby reserves the right to
determine “Wear and Tear” on any and all products.
Tampering or opening the product casting or shell
will void this warranty in its entirety.
Exclusions: This warranty does not cover the following:
1. Any product that has a defaced or covered serial
number.
2. Products that have been transferred to a second
owner.
3. Rust on the interior or exterior of the unit.
4. Products listed as “As-Is” or “Refurbished.”
5. Food loss due to any product failure.
6. Window air conditioners installed in a wall.
7. The product if used in a commercial setting.
8. Service calls that do not involve product malfunction.
9. Service calls for a product ruined by not following
the provided instructions.
10. Service calls to correct improper installation.
11. Costs associated with making the product accessible for servicing (including but not limited to
removal of trim/molding/cabinetry, etc.)
12. Service calls to replace any consumables such as
light bulbs, filters, etc.
13. Surcharges that may apply to service calls on
weekends, nights, holidays. Damages to the finish of appliance or household furnishings due to
installation of appliance.
14. Damages caused by any of the following: Acts
of God; fires; misuse; accidents; incorrect power
supply; service performed by unauthorized persons; use of non-genuine Impecca parts, etc.
ALL IMPLIED WARRANTIES, INCLUDING IMPLIED WARRANTIES OF MERCHANTABILITY AND FITNESS FOR A
PARTICULAR PURPOSE ARE LIMITED IN DURATION
TO 1 YEAR FROM THE DATE OF THE ORIGINAL RETAIL
PURCHASE OF THIS PRODUCT.
THESE WARRANTIES AND REMEDIES ARE THE SOLE
AND EXCLUSIVE WARRANTIES AND REMEDIES IN
CONNECTION WITH THE SALE AND USE OF THE
PRODUCT. NO OTHER WARRANTIES, ORAL OR WRITTEN, EXPRESSED OR IMPLIED, ARE GIVEN.
IMPECCA™ IS NOT RESPONSIBLE OR LIABLE FOR ANY
DAMAGE, WHETHER SPECIAL, INCIDENTAL, CONSEQUENTIAL, DIRECT OR OTHERWISE, OR WHETHER
KNOWN OR SHOULD HAVE BEEN KNOWN TO IMPECCA™, INCLUDING LOST PROFITS, GOODWILL, AND
PROPERTY AND PERSONAL INJURY RESULTING FROM
ANY BREACH OF WARRANTY, THE INABILITY TO USE
THE PRODUCT OR UNDER ANY LEGAL THEORY IN
CONTRACT OR TORT. IMPECCA LIABILITY IS LIMITED
TO THE ACTUAL PURCHASE PRICE PAID TO THE RETAIL SELLER OF THE DEFECTIVE PRODUCT.
No Impecca™ dealer, agent or employee is authorized to make any modification, extension, change
or amendment to this warranty without the written
consent and authorization from Impecca™.
Some states do not allow the exclusion or limitation
of implied warranties or liability for incidental or consequential damages, or do not allow a limitation on
how long an implied warranty lasts, so the above
limitations or exclusions may not apply to you. This
warranty gives you specific legal rights, and you have
other rights, which vary from state to state.
Note: Our Warranty center services only to Continental
U.S.A.
ENGLISHESPAÑOLFRANÇAIS
–11–
Page 12

TABLA DE CONTENIDO
Instrucciones Importantes De Seguridad ........................................................................................................................................................................... 13
Comenzando ............................................................................................................................................................................................................................14
ENGLISH ESPAÑOL FRANÇAIS
Instalando Su Electrodoméstico .......................................................................................................................................................................................... 14
Diagrama De La Unidad .........................................................................................................................................................................................................15
Instalación De La Manija De La Puerta ........................................................................................................................................................................................15
Inversión De La Puerta (Opcional) .......................................................................................................................................................................................15
Operación .................................................................................................................................................................................................................................18
Limpiando Su Electrodoméstico..........................................................................................................................................................................................19
Mantenimiento ........................................................................................................................................................................................................................19
Solución De Problemas ..........................................................................................................................................................................................................20
Soporte Al Cliente....................................................................................................................................................................................................................20
Garantía Limitada Por Un Año .............................................................................................................................................................................................. 21
–12–
Page 13

INSTRUCCIONES IMPORTANTES DE SEGURIDAD
GUARDE ESTAS INSTRUCCIONES. PUEDE LLEGAR A NECESITARLAS EN EL FUTURO.
1. Este refrigerador debe instalarse y ubicarse de acuerdo con las instrucciones de instalación antes de ser utilizado.
2. No permita que los niños trepen, se paren o se cuelguen de los entrepaños del refrigerador, pueden dañar el refrigerador y resultar
lesionados severamente.
3. No almacene o use gasolina ni otros vapores y líquidos inflamables en las cercanías de este o cualquier otro electrodoméstico.
4. Mantenga los dedos lejos del espacio entre las puertas y el gabinete. Tenga cuidado al cerrar las puertas cuando hay niños en el
área.
5. En refrigeradores con fábrica de hielo, evite el contacto con las partes móviles del mecanismo de expulsión, o con el elemento
calentador que libera los cubos. No coloque los dedos o manos cerca o sobre el mecanismo automático de fabricación de hielo
mientras el refrigerados se encuentre conectado.
6. Desconecte el refrigerador antes de limpiar y hacer reparaciones.
7. Le recomendamos ampliamente que cualquier servicio sea realizado por un técnico calificado.
8. Al colocar la perilla de control de temperatura en la posición “0” se detendrá la función de enfriamiento pero no se apagará el refrigerador.
9. No deje el refrigerador en temperaturas extremadamente frías o calientes.
10. No coloque el refrigerador cerca de fuentes de calor o flamas abiertas.
11. Limpie el refrigerador con un paño suave y húmedo. Elimine las manchas con jabón suave. No limpie la unidad con solventes de
tipo industrial o químicos abrasivos.
12. No coloque objetos pesados en la parte superior del refrigerador.
13. Nunca instale el refrigerador donde hay mucha humedad o en áreas donde pueda haber salpicaduras de agua.
14. No permita que los niños se cuelguen de las puertas; el refrigerador puede volcarse y lastimar a los niños.
15. Nunca coma alimentos que se hayan arruinado por haber estado almacenados demasiado tiempo en el refrigerador o dentro de un
refrigerador descompuesto.
16. No utilice herramientas filosas dentro del refrigerador (como un picahielos para retirar el hielo) ya que puede ocasionar daños.
17. Si no va a usar el refrigerador por un periodo de tiempo largo, retire todos los alimentos del refrigerador y desconéctelo.
ENGLISHESPAÑOLFRANÇAIS
ANTES DE DESHACERSE DE SU VIEJO REFRIGERADOR:
Su antiguo refrigerados puede contar con un sistema de enfriamiento que usa CFC (clorofluorocarbonos) y HCF (hidroclorofluorocarbonos). Se cree que los CFC y HCF dañan el ozono estratosférico si son liberados a la atmósfera. Si va a desechar su refrigerador viejo,
asegúrese de que el refrigerante ha sido eliminado para su desecho adecuado por un técnico calificado. Revise si su vendedor puede
llevarse su viejo refrigerador y desecharlo o reciclarlo adecuadamente.
Vea www.epa.gov/rad para obtener mayor información en la aplicación responsable de desechos.
ADVERTENCIA SOBRE NIÑOS ATRAPADOS
Existe el riesgo de que los niños queden atrapados dentro del refrigerador. Antes de desechar su refrigerador o congelador viejo:
1. Quite las puertas
2. Deje los entrepaños colocados en su lugar para que los niños no puedan meterse fácilmente
PRECAUCIÓN: NO SE RECOMIENDA EL USO DE CABLES DE EXTENSIÓN.
PARA USO DOMÉSTICO ÚNICAMENTE
GUARDE ESTAS INSTRUCCIONES
–13–
Page 14

COMENZANDO
Tapa del
tomacorrientes
Clavija con 3 patas
Usando un tomacorrientes de 3 orificios
Tomacorrientes de 3 orificios
Gracias por adquirir este Refrigerador Impecca de 18 Pies Cúbicos.
Siga estas instrucciones de operación cuidadosamente. Mantenga
estas instrucciones en un lugar seguro para consultarlas cuando lo
ENGLISH ESPAÑOL FRANÇAIS
necesite.
Nota: Todas las imágenes en este manual de instrucciones se ofrecen con propósitos indicativos; la apariencia física y opciones de su
modelo pueden variar.
NUMERO DE SERIE Y MODELO
Registre su número de modelo y de serie a continuación. Puede
encontrar la placa del número en la pared superior izquierda
dentro del refrigerador.
Número de Modelo: ______________________________
Número de Serie: ______________________________
Fecha de Compra: ____________________________
AVISOS DE SEGURIDAD
Este electrodoméstico está hecho para ser usado en aplicaciones
caseras y similares como;
• Cocinetas en tiendas, oficinas y otros ambientes de trabajo
• Uso individual en cuartos de hotel y otro tipo de ambientes
residenciales
INSTALANDO SU ELECTRODOMÉSTICO
NIVELANDO LA UNIDAD
Es muy importante mantener nivelada la unidad, de modo que
la puerta cierre adecuadamente y evitar problemas que causarán
que falle el enfriamiento efectivo. Para nivelar la unidad gire las
dos patas al frente del refrigerador ya sea en la dirección de las
manecillas del reloj o al contrario de las manecillas del reloj para
levantar o bajar el refrigerador.
Nota: Si la unidad no está nivelada, la puerta y el sello magnético
no funcionarán adecuadamente.
LIMPIANDO ANTES DEL USO
Limpie la parte interior de la unidad con una solución ligera de
bicarbonato y agua. Luego enjuague con agua tibia utilizando
una esponja o trapo húmedo. Lave los entrepaños y cajones con
agua jabonosa tibia y seque completamente antes de colocarlos
dentro de la unidad. Limpie la parte externa de la unidad con un
trapo húmedo.
INFORMACIÓN ELÉCTRICA
El refrigerador debe estar conectado a un tomacorrientes de
115V. 60Hz, 15Amp AC dedicado. El desempeño puede verse
afectado si el voltaje varía en un 10% o más. La operación del
refrigerados con energía insuficiente puede dañar el compresor.
El cable de suministro de energía del electrodoméstico está
equipado con una clavija que tiene una tercera pata de conexión
a tierra para su protección en contra de descargas. Debe estar
conectado directamente en un tomacorrientes con tres orificios
adecuadamente conectado a tierra. El tomacorrientes debe
estar instalado de acuerdo con los códigos y ordenanzas locales.
No utilice un cable de extensión o adaptador.
UBICACIÓN
Cuando seleccione una posición para su unidad asegúrese que
el piso es una superficie nivelada y plana y que la habitación
está bien ventilada. Evite ubicar su unidad cerca de una fuente
de calor como el horno, estufa, calentador o radiador. También
evite la luz directa del sol ya que puede incrementar el consumo
eléctrico.
Los ambientes extremadamente fríos también pueden causar
que la unidad no funcione adecuadamente. La unidad no está
diseñada para utilizarse en una cochera o en exteriores. No
coloque ninguna cubierta como una cortina o sábana sobre la
unidad.
Cuando instale la unidad asegúrese que haya un mínimo de 3
pulgadas de espacio libre a ambos lados y en la parte trasera
de la unidad, y 3 pulgadas de espacio de la parte superior de la
unidad. Esto permitirá que el aire fresco circule alrededor del
refrigerador y mejore la eficiencia del proceso de enfriamiento.
La puerta de la unidad debe poder abrirse totalmente como se
muestra:
ADVERTENCIA: El uso inadecuado de la conexión a tierra puede
resultar en riesgo de descarga eléctrica. Consulte con un electricista calificado o personal de servicio si no ha comprendido bien
las instrucciones de conexión a tierra o si tiene dudas de si el
electrodoméstico está adecuadamente conectado a tierra:
Debe asegurarse de que las tres patas están conectadas a un
tomacorrientes con 3 entradas (vea la siguiente figura).
WxD ≥ 50.8 pulgadas x 58.5 pulgadas
–14–
Page 15

DIAGRAMA DE LA UNIDAD
Cubierta de la bisagra
superior derecha
Placa de la
cubierta
izquierda
1
2
3
4
5
6
7
8
9
INVERSIÓN DE LA PUERTA (OPCIONAL)
1. Perilla de control
2. Panel de control de temperatura
3. Entrepaños ajustables de vidrio
4. Cubierta del compartimento de ensaladas
5. Compartimento de ensaladas
6. Entrepaños de la puerta del congelador
7. Compartimento de mantequilla
8. Entrepaños de la puerta del refrigerador
9. Patas niveladoras
Se le aconseja que determine si necesita invertir el giro de las
puertas y que realice este procedimiento antes de instalar y
poner en funcionamiento su refrigerador.
Nota: Estas instrucciones son para cambiar las bisagras del lado
derecho al izquierdo. Si después desea regresar las bisagras al
lado derecho, siga estas mismas instrucciones y revierta todas
las referencias a la derecha e izquierda.
PRECAUCIÓN:
Para evitar daños a usted mismo o a su propiedad, le recomendamos que alguien la ayude durante el proceso de inversión de
puertas.
• Asegúrese de que el electrodoméstico está vacío y desconectado.
• Ajuste las dos patas niveladoras a su posición más alta
• Tenga algo sólido sobre lo cual pueda recargar el electrodoméstico. Esto será necesario cuando deba quitar la puerta
• Evite recargar el refrigerador totalmente de costado ya que
esto dañará el sistema de enfriamiento.
HERRAMIENTAS REQUERIDAS:
ENGLISHESPAÑOLFRANÇAIS
INSTALACIÓN DE LA MANIJA DE LA PUERTA
Debe desconectarse el refrigerador antes de intentar colocar las
manijas de las puertas.
Paso 1. Instale los dos tornillos de cruz en los orificios de las
puertas y atorníllelos totalmente en su lugar
Paso 2. Coloque la manija en los dos tornillos instalados en el
paso 1
Paso 3: Instale los tornillos en los orificios localizados en el lado
de la manija y atornille hasta que estén bien apretados.
Instale las tapas de los tornillos como se muestra en la
figura anterior.
• Destornillador Philips
• Llave Allen
• Destornillador de cabeza plana
PASO 1: RETIRE LA PUERTA DEL CONGELADOR
Utilizando un destornillador de cabeza plana, haga palanca y
levante la cubierta de la bisagra del lado derecho y la placa de la
cubierta del lado izquierda. Utilizando un destornillador Phillips
desatornille los tornillos de la bisagra del lado derecho. Quite la
bisagra superior. Levante la puerta del congelador hacia arriba
para separarla del refrigerador.
–15–
Page 16

PASO 2: RETIRE LA PUERTA DEL COMPARTIMIENTO DE
Bisagra central
ENFRIAMIENTO
Con un destornillador Phillips desatornille los tres tornillos que
sostienen la bisagra central. Retire la bisagra y guarde los tornillos y bisagra. Levante hacia arriba la puerta del compartimento,
como se muestra.
ENGLISH ESPAÑOL FRANÇAIS
PASO 3: COLOCANDO LA BISAGRA INFERIOR
Desatornille los dos tornillos que sostienen la bisagra inferior y
retírela de la parte derecha del refrigerador.
Desatornille el eje de la bisagra del lado derecho de la bisagra
inferior y muévalo al lado izquierdo del refrigerador. Asegure la
bisagra a la parte inferior izquierda del refrigerador usando los
tornillos que previamente retiró.
Retire la tapa del orificio del lado de la puerta del refrigerador e
insértela del lado derecho.
Inserte los casquillos de plástico en el lado izquierdo de las
puertas del congelador y compartimento de enfriamiento.
Recolocar la bisagra derecha
Eje de la bisagra
Retirar la bisagra
inferior
Eje de la bisagra
PASO 4: REPOSICIONAMIENTO DE LAS PARTES
DE LA PUERTA
Retire los casquillos de plástico de la parte superior derecha de
las puertas del congelador
y compartimento de
enfriamiento.
PASO 5: REINSTALANDO LA PUERTA DEL
COMPARTIMIENTO DE ENFRIAMIENTO
Retire el bloque de la puerta de la parte inferior derecha de la
puerta del compartimento de enfriamiento e insértela en el lado
izquierdo de la puerta.
–16–
Page 17

Fije el bloque izquierdo del seguro automático de la puerta su-
Fije la bisagra
central izquierda
perior y el tope izquierdo de puerta abierta a la parte izquierda
de la puerta del congelador.
Bloque de seguro
automático de la
puerta superior
PASO 7: RETIRANDO LAS MANIJAS DE LAS PUERTAS
Retire las tapas de los tornillos de las manijas de las puertas. Utilice una llave Allen para retirar los cuatro tornillos Allen que aseguran las manijas al lado derecho de las puertas del congelador
y del compartimento de enfriamiento. Retire las manijas.
Tope izquierdo
de puerta abierta
Retire el bloque derecho del seguro automático de la puerta
superior y el tope derecho de puerta abierta. Guárdelos por si
necesita volver a invertir la puerta.
Retire las dos tapas de los orificios del lado izquierdo donde irá
la bisagra izquierda e insértelos en el lado derecho.
Fije la puerta del refrigerador en la bisagra inferior y después fije
la bisagra central izquierda en la parte izquierda del refrigerador.
ENGLISHESPAÑOLFRANÇAIS
PASO 8: REINSTALANDO LAS MANIJAS DE LAS PUERTAS
Retire los cuatro tornillos de cabeza Phillips del lado izquierdo
de las puertas del congelador y del compartimento de enfriamiento.
Fije las manijas del lado derecho de las puertas del congelador y
del compartimento de enfriamiento con los tornillos de cabeza
Allen que retiró en el paso anterior. Apriete con la llave Allen y
coloque las tapas de los tornillos.
PASO 6: REINSTALANDO LA PUERTA DEL CONGELADOR
Coloque la puerta del refrigerador en la bisagra central y después fije la bisagra superior izquierda a la parte superior del refrigerador. Cubra la bisagra con la cubierta de la bisagra y cubra
los orificios de los tornillos en la parte superior derecha con la
placa de la cubierta (que retiró en el paso 1).
Fije la bisagra superior izquierda
PASO 9: REPOSICIONAMIENTO DE LOS TAPONES DE LOS
ORIFICIOS Y DE LAS TAPAS DE AS MANIJAS
Recoloque todos los tapones de los orificios en los orificios restantes en el lado izquierdo. Coloque las tapas en los extremos de
las manijas para cubrir los tornillos.
–17–
Page 18

OPERACIÓN
Pantalla de Despliegue – Del Almacenamiento Frío
A. Tecla SET (Ajuste)
1 Nivel 1
ENGLISH ESPAÑOL FRANÇAIS
2 Nivel 2
3 Nivel 3
4 Nivel 4
5 Nivel 5
6 Indicador de Espera
(STANDBY)
Oprima la tecla SET para cambiar el nivel de temperatura. Cada vez que la tecla SET se oprime, el ajuste de nivel de temperatura cambiará un paso. El ajuste de temperatura va de frío a más frío de izquierda a derecha. Aproximadamente 5 segundos después de que se
ha cambiado el nivel de temperatura el refrigerador operará en el nivel de temperatura seleccionado.
Perilla de Control de Temperatura – Congelador
LA FUNCIÓN DE CONTROL DE ESPERA
ntras el refrigerador esté conectado, mantenga presionada la tecla SET por aproximadamente por 3 segundos para colocar el refrigerador en el modo de espera. El indicador de espera (STANDBY) se iluminará mientras que el refrigerador esté en modo de espera.
Para desactivar el modo de espera, presione la tecla SET. El indicador de espera (STANDBY) se apagará y el refrigerador regresará al
modo de operación normal.
INDICADOR DE FALLAS
En caso de falla, ciertos focos LED comenzarán a parpadear para indicar los siguientes códigos de error:
PANTALLA FALLA EN:
LED 1 y LED 2 encendidos Circuito sensor de temperatura del refrigerador
LED 1 y LED 3 encendidos Sensor de descongelamiento del congelador
LED 1 y LED 4 encendidos Sensor de temperatura ambiente
OPERACIÓN DEL CONTROL DE TEMPERATURA
El ajuste inicial de temperatura del compartimento de almacenamiento frío es el nivel 3. Para el compartimento el congelador, el ajuste
inicial es la posición Mid (medio).
Si la temperatura ambiente es menor a 10°C por un largo periodo de tiempo, utilice la tecla SET para cambiar al nivel 4 o 5. Para el congelador, gire la perilla a una posición entre Mid y COLDER (Más frío).
Si la temperatura ambiente es mayor a 43°C por un largo periodo de tiempo, utilice la tecla SET para cambiar al nivel 4 o 5. Para el congelador, gire la perilla a la posición COLD (Frío).
Nota: Cuando el ajuste del congelador se coloca en la posición COLD, el compartimento se enfría rápidamente, pero si se coloca en la
posición COLD por largo tiempo la temperatura dentro del congelador será reducida a menos 0°C.
–18–
Page 19

LIMPIANDO SU ELECTRODOMÉSTICO
Retire todos los entrepaños y compartimento de ensalada. Para quitar el compartimento de ensaladas primero quite la puerta
inferior del compartimento.
Limpie la parte interior de la unidad con una solución ligera de bicarbonato y agua. Luego enjuague con agua tibia utilizando una
esponja o trapo húmedo. Seque perfectamente las superficies antes de volver a colocar los entrepaños y compartimento de ensalada.
Limpie la parte externa de la unidad con un trapo húmedo y pula con un pulidor normal de muebles. Asegúrese que la puerta está
cerrada para evitar que el pulidor se meta en el cierre magnético de la unidad o dentro de la unidad.
Puede formarse condensación en la parte exterior de la unidad. Este puede deberse a un cambio de la temperatura ambiente. Limpie cualquier residuo de humedad. Si el problema persiste, entre en contacto con un técnico calificado.
MANTENIMIENTO
CAMBIANDO EL FOCO INTERNO
Esta unidad utiliza focos de máximo 40W localizado en la parte superior del compartimento cerca de la abertura.
NOTA: El foco puede estar muy caliente.
1. Desconecte el refrigerador
2. Localice y retire el foco
3. Reemplace con un foco con los mismos watts o inferior
4. Vuelva a conectar el refrigerador
ENGLISHESPAÑOLFRANÇAIS
MOVIENDO SU UNIDAD
Sostenga la unidad alrededor de los lados y de la base al moverlo. Bajo ninguna circunstanciá el refrigerador debe ser levantado al
sujetar las orillas de la superficie superior de la unidad.
SERVICIO DE MANTENIMIENTO
La unidad debe recibir servicio de mantenimiento por parte de un técnico de servicio autorizado y utilizar partes de repuesto genuinas. Las reparaciones por parte de personas inexpertas pueden causar daños o descomposturas serias.
SIN USO POR PERIODOS PROLONGADOS
Cuando no use la unidad por periodos prologados, desconéctela del suministro eléctrico, saque todos los alimentos y limpie la
unidad. Deje la puerta abierta para evitar que se formen olores o moho.
–19–
Page 20

SOLUCIÓN DE PROBLEMAS
Los siguientes problemas pueden ser manejados por el usuario. Entre en contacto con servicio al cliente, si los problemas no se resuelven.
ENGLISH ESPAÑOL FRANÇAIS
La unidad no
funciona para
nada
Olor
Operación del
compresor por
largo tiempo
La luz interna
no prende
No se puede
cerrar la puerta
del refrigerador
Problema Qué hay que revisar
• Verifique que la unidad está conectada a un tomacorrientes que funciona
• Revise el tomacorrientes para asegurar que el voltaje es el adecuado
• Revise si el circuito de energía se ha disparado
• Los alimentos olorosos deben taparse muy bien
• Revise si no hay alimentos echados a perder
• Limpie las superficies interiores
• Es normal que el refrigerador opere por más tiempo durante la época del verano cuando la temperatura
ambiente es más alta
• No almacene muchos alimentos en el congelador
• No coloque alimentos calientes o tibios en el refrigerador hasta que se enfríen
• Abrir frecuentemente el refrigerador puede causar que el compresor trabaje más seguido
• Revise si el refrigerador está conectado
• Revise el foco y reemplácelo si ya se ha fundido
• El congelador está demasiado lleno. Acomode el contenido y asegúrese de que la puerta cierra adecuadamente
• Use las patas niveladoras para ajustar el refrigerador
Ruidos fuertes
Notas adicionales:
• Se puede detectar condensación en la superficie externa y sellos de la puerta del congelador cuando la humedad del ambiente es
alta. Esto es un fenómeno natural y la humedad puede limpiarse con un paño seco.
• Puede ocurrir un ligero zumbido generado por el compresor, especialmente cuando arranca y se apaga.
• Revise las patas niveladoras para asegurar que el refrigerador está balanceado
• Inspeccione la unidad para asegurar que todas sus piezas está bien instaladas
SOPORTE AL CLIENTE
Antes de entrar en contacto con soporte al cliente, lea nuestra guía de solución de problemas presentada anteriormente en este manual.
Visite nuestro sitio web para entrar en contacto con nosotros, encontrar respuestas a las Preguntas Más Frecuentes y otros recursos entre
los cuales podría encontrar una actualización a este manual.
WWW.IMPECCA.COM
Si desea entrar en contacto con nosotros por teléfono, asegúrese de tener a la mano el número de modelo y el número de serie de su
electrodoméstico y llámenos entre 9:00am y 6:00pm Tiempo del Este al +1 888-945-4440.
Manténgase al tanto de las más recientes innovaciones de Impecca y participe de nuestros concursos por medio de los medios sociales:
www.facebook.com/Impecca/
www.instagram.com/impecca/
@impeccausa
–20–
Page 21

GARANTÍA LIMITADA POR UN AÑO
Impecca™ garantiza al comprador original este producto
contra defectos en su material y mano de obra como se especifica a continuación.
PARTES Y MANO DE OBRA– Si se determina que el
producto tiene defectos de fabricación, dentro del
periodo de un (1) año a partir de la fecha de compra
original, Impecca™, a su discreción, reparará o reemplazara las partes del producto sin ningún costo
para usted en los Estados Unidos.
Para obtener el servicio de garantía de un distribuidor autorizado de Impecca™ envíenos un correo electrónico a:
service@impecca.com para obtener un número de Autorización de Reparación y Mantenimiento (RAM) y recibir las
instrucciones de cómo se llevará a cabo el procedimiento
de reparación o reemplazo.
Cualquier material de vidrio incluido en el electrodoméstico estará cubierto por un periodo de sesenta (60) días a partir de la fecha de compra.
Impecca™ excluye de esta garantía accesorios no eléctricos
o mecánicos, accesorios y partes desechables incluyendo,
pero no limitado, a la carcaza, cables de conexión, baterías,
adaptadores A/C. Impecca™ se reserva el derecho de reparar o reemplazar un producto defectuoso con un modelo
igual, equivalente o nuevo modelo.
Nos reservamos el derecho ya sea de reparar o reemplazar
el producto a nuestra discreción. El reemplazo puede ser
nuevo o reacondicionado tratando de asegurar de que se
trate del mismo modelo, si el mismo modelo no está disponible, se reemplazará con un modelo de especificaciones
iguales o superiores.
como bombillas, filtros, etc.
13. Recargos que pueden aplicar a llamadas de servicio
los fines de semana, por las noches, o durante las festividades. Daños al acabado del electrodoméstico o
muebles de la casa debido a la instalación del electrodoméstico.
14. Daños causados por cualquiera de las siguientes causas: Actos de Dios, incendios, mal uso. accidentes, suministro de energía incorrecto, servicio realizado por
personal no autorizado, el uso de partes no originales
Impecca.
TODAS LAS GARANTÍAS IMPLÍCITAS, INCLUYENDO LAS GARANTÍAS IMPLÍCITAS DE MERCADOTECNIA E IDONEIDAD
PARA UN PROPÓSITO EN PARTICULAR ESTÁN LIMITADAS
A UNA DURACIÓN DE (1) AÑO EN PARTES Y NOVENTA (90)
DÍAS EN MANO DE OBRA DESDE LA FECHA ORIGINAL DE
COMPRA DEL PRODUCTO.
ESTAS GARANTÍAS Y MEDIDAS SON ÚNICAS Y EXCLUSIVAS
EN RELACIÓN CON LA VENTA Y USO DEL PRODUCTO. NO
SE OTORGA NINGUNA OTRA GARANTÍA, ORAL O ESCRITA,
EN FORMA EXPRESA O IMPLÍCITA.
IMPECCA™ NO SE HACE RESPONSABLE DE NINGÚN DAÑO,
YA SEA ESPECIAL, INCIDENTAL, CONSECUENTE, DIRECTO O
DE CUALQUIER OTRA NATURALEZA, YA SEA CONOCIDO O
POR DAR A CONOCER A IMPECCA™, INCLUYENDO LA PÉRDIDA DE GANANCIAS, PLUSVALÍA, DAÑOS PERSONALES O EN
LA PROPIEDAD RESULTANTES DE CUALQUIER INCUMPLIMIENTO DE LA GARANTÍA, LA INCAPACIDAD DE UTILIZAR EL
PRODUCTO O BAJO NINGUNA TEORÍA LEGAL EN CONTRATO O AGRAVIO. LA RESPONSABILIDAD DE IMPECCA SE LIMITA AL PRECIO ACTUAL DE COMPRA PAGADO AL VENDEDOR
DEL PRODUCTO DEFECTUOSO.
ENGLISHESPAÑOLFRANÇAIS
El “desgaste” normal no está cubierto por esta ni por ninguna otra garantía. Adicionalmente, Impecca™ se reserva el
derecho de determinar el “desgaste” de cualquiera o todos
los productos. El violar o abrir el chasis del producto invalidará esta garantía por completo.
Excepciones: Esta garantía no cubre lo siguiente:
1. Cualquier producto que tenga un número de serie defectuosos o cubierto
2. Productos que han sido transferidos a un segundo propietario
3. Óxido en la parte interna o externa de la unidad
4. Los productos listados como “Tal cual” o “Reformados”
5. Pérdida de alimentos debido a la falla del producto
6. Aires acondicionados que han sido instalados en un
muro.
7. El producto si este ha sido utilizado en una ubicación
comercial
8. Llamadas de servicio que no involucren el mal funcionamiento del producto
9. Llamadas de servicio de un producto estropeado por
no seguir las instrucciones proporcionadas
10. Llamadas de servicio para corregir una instalación incorrect
11. Costos asociados por hacer el producto accesible al
servicio (incluido pero no limitado a la remoción de
ajustes/moldeo/gabinete, etc.)
12. Llamadas de servicio para reemplazar consumibles
Ningún distribuidor, agente o empleado de Impecca™ está
autorizado para hacer ninguna modificación, extensión,
cambio o enmienda de esta garantía sin el consentimiento
y autorización escrita de Impecca™.
Algunos estados no permiten la exclusión o limitación de
garantías implícitas o la responsabilidad por daños incidentales o consecuentes, y no permiten una limitación en
la duración de una garantía implícita, de modo que las anteriores limitaciones o exclusiones pueden no aplicarse a
usted. Esta garantía le otorga derechos específicos, y puede
usted tener otros derechos, los cuales varían de estado a
estado.
Nota: El Centro de Servicio de Garantía hace envíos solo
dentro del territorio continental de E.U.
–21–
Page 22

TABLE DES MATIÈRES
Consignes De Sécurité Importantes ....................................................................................................................................................................................23
Démarrage ................................................................................................................................................................................................................................24
ENGLISH ESPAÑOL FRANÇAIS
Installation De L’appareil ........................................................................................................................................................................................................24
Schéma De L’appareil ............................................................................................................................................................................................................. 25
Installation De La Poignée De Porte ............................................................................................................................................................................................25
Inversion De L’ouverture De La Porte (Optionnel).............................................................................................................................................................25
Opérations ................................................................................................................................................................................................................................28
Nettoyage De L’appareil .........................................................................................................................................................................................................29
Entretient ..................................................................................................................................................................................................................................29
Dépannage ...............................................................................................................................................................................................................................30
Support Technique .................................................................................................................................................................................................................30
Garantie Limitée D’un An .......................................................................................................................................................................................................31
–22–
Page 23

CONSIGNES DE SÉCURITÉ IMPORTANTES
CONSERVEZ CES INSTRUCTIONS POUR RÉFÉRENCES FUTURES.
1. Ce réfrigérateur doit être adéquatement installé et positionné selon les instructions d’installation avant son utilisation.
2. Ne laissez pas les enfants monter, grimper ou s’accrocher aux étagères du réfrigérateur. Cela pourrait endommager l’unité et causer
des blessures.
3. Il ne faut pas entreposer ou utiliser de la gazoline ou tous autres liquides ou vapeurs inflammables près de l’unité ou autres électroménagers.
4. Tenez les doigts loin de l’espacement entre la porte et le boîtier. Usez de caution en fermant la porte lorsque des enfants sont près.
5. Dans des réfrigérateurs avec une machine à glace automatique, évitez d’entrer en contact avec les pièces amovibles du mécanisme
d’éjection ou avec avec l’élément chauant qui les relâche. Ne placez pas les doigts ou mains près du mécanisme de la machine à
glace alors que le réfrigérateur est branché.
6. Débranchez le réfrigérateur avant de le nettoyer ou pour l’entretien.
7. Nous recommandons fortement d’utiliser les services d’un professionnel qualifié pour l’entretien.
8. Tournez le cadran de régulation de température à « 0 », cesse le refroidissement, mais n’éteint pas complètement l’appareil.
9. Ne laissez pas le réfrigérateur dans des températures extrêmement froides ou chaudes.
10. Ne placez pas le réfrigérateur près de flammes ou d’une source de chaleur.
11. Nettoyez le réfrigérateur avec un linge doux et humide. Enlevez les taches avec un savon doux. N’utilisez pas de solvants industriels
ou de produits chimiques abrasifs pour le nettoyage.
12. Ne placez aucun objet lourd sur le réfrigérateur.
13. N’installez pas le réfrigérateur dans un lieu propice à la moisissure ou aux éclats d’eau.
14. Ne laissez pas les enfants s’accrocher à la porte, l’unité pourrait renverser et les blesser.
15. Ne mangez aucune nourriture gâtée causée par un stockage trop long dans le réfrigérateur ou dû à un stockage dans un réfrigérateur
non fonctionnel.
16. N’utilisez pas d’outils pointus (tel qu’un pic à glace), car cela pourrait causer des dommages.
17. Débranchez et videz le réfrigérateur si celui-ci n’est pas utilisé pour une longue période.
ENGLISHESPAÑOLFRANÇAIS
AVANT DE JETER VOTRE ANCIEN RÉFRIGÉRATEUR :
Votre ancien réfrigérateur pourrait être équipé d’un système qui utilisait des CFC (chlorofluocarbone) ou des HCFC (hydrochlorofluocarbone). Les CFC et HCFC sont soupçonnés de nuire à l’ozone stratosphérique si relâché dans l’atmosphère. Si vous vous débarrassez de
votre ancien réfrigérateur, assurez-vous que le réfrigérant et proprement retiré par un technicien qualifié. Vérifiez avec votre détaillant
s’il peuvent reprendre votre ancien appareil pour en disposer de manière responsable ou pour le recycler.
Visitez le www.epa.gov/rad pour plus de renseignements sur le programme Responsible Appliance Disposal.
AVERTISSEMENT RISQUE D’ENFERMEMENT POUR ENFANTS
Il y a un risque d’enfermement pour enfants. Avant de jeter votre vieux réfrigérateur ou congélateur aux ordures :
1. Enlevez les portes.
2. Laissez les étagères à l’intérieur de l’unité afin d’éviter que les enfants puissent y grimper.
AVERTISSEMENT: L’UTILISATION D’UNE RALLONGE ÉLECTRIQUE N’EST PAS RECOMMANDÉE.
POUR USAGE DOMESTIQUE UNIQUEMENT
GARDE CES INSTRUCTIONS
–23–
Page 24

DÉMARRAGE
Boîtier de la prise
Fiche à 3 bronches
Lorsque vous utilisez une prise à 3
bronches
Prise à 3 bronches
Merci pour votre achat de ce réfrigérateur Impecca de 18 pieds
cubes. Veuillez suivre ces instructions d’opération attentivement.
Gardez ces instructions dans un endroit sécure afin de les consulter
ENGLISH ESPAÑOL FRANÇAIS
lorsque requis.
Note: Les images à l’intérieur de ce manuel y sont à titre indicatif
uniquement; l’apparence physique et les options sur votre modèle
peuvent varier.
NUMÉRO DE SÉRIE ET MODÈLE
Veuillez noter le numéro de série et de modèle ci-Veuillez
prendre en notre le numéro de série et le numéro du modèle
ci-dessous. Vous trouverez la plaque de renseignements au coin
gauche supérieur du mur d’intérieur du réfrigérateur.
Numéro de modèle: ______________________________
Numéro de série: ______________________________
Date de l’achat: ____________________________
CONSIGNES DE SÉCURITÉ
Cet appareil est destiné à un usage domestique et à des applications similaires tels que :
• Cuisine en milieu de travail;
• Utilisation individuelle dans une chambre d’hôtel ou tout
autre type d’environnement résidentiel.
INSTALLATION DE L’APPAREIL
NIVELLEMENT DE L’APPAREIL
Il est important de garder l’appareil à niveau afin que la porte
se referme adéquatement. Ceci préviendra des problèmes au
niveau du refroidissement. Afin de niveler l’appareil, ajuster les
deux pieds réglables dans le sens horaire ou antihoraire pour
ajuster la hauteur de chaque coin.
Note : Si l’appareil n’est pas à niveau, la porte et l’alignement du
sceau magnétique ne seront pas adéquatement couverts.
NETTOYAGE AVANT UTILISATION
Essuyez l’intérieur de l’appareil avec une solution dissoute de
bicarbonate de soude. Rincez ensuite avec de l’eau tiède en
utilisant une éponge ou un linge humide. Lavez les étagères et
bacs dans de l’eau savonneuse chaude et séchez-les complètement avant de les remettre dans l’appareil. Nettoyez l’extérieur
de l’appareil avec un linge humide.
INSTRUCTIONS MISE À LA TERRE
Cet appareil doit être mis à la terre. Le réfrigérateur doit être
branché dans sa propre prise dédiée de 115 volts, 60 Hz, 15
AMP, de courant AC. La performance de l’appareil pourrait être
aectée si le voltage varie de 10% ou plus. La mise en fonction
de l’appareil sans la puissance nécessaire pourrait endommager
le compresseur. Un tel bris n’est pas couvert par la garantie. Le
cordon d’alimentation est équipé d’une fiche de mise à la terre
tripolaire afin de vous protéger contre le risque de décharges
électriques. Celle-ci doit être correctement branchée dans une
prise à trois bronches mise à la terre. La prise doit être installée
en respectant les règlements et codes locaux. N’utilisez pas de
rallonge ou d’adaptateur.
EMPLACEMENT
Assurez-vous de définir un endroit au plancher plat, nivelé et
bien ventilé pour l’emplacement de votre appareil. Évitez de
l’installer près d’une source de chaleur telle qu’un four, un poêle,
un radiateur ou une chaudière. Évitez également une exposition
directe au soleil, car cela pourrait aecter le niveau de consommation électrique.
Des températures extrêmement froides peuvent également
empêcher l’appareil de fonctionner adéquatement. Cet appareil n’est pas conçu pour une utilisation dans un garage ou une
installation extérieure. Ne placez aucun drap ou couverture sur
l’appareil.
Au cours de l’installation, assurez-vous de garder un espacement
libre de 3 pouces minimum de chaque côté ainsi qu’à l’arrière
ainsi que 1 pouce au-dessus de l’appareil. Ceci permettra à de
l’air froid de circuler autour du réfrigérateur et ainsi permettre
une meilleure eicacité.
La porte de l’appareil doit être en mesure d’ouvrir pleinement tel
qu’illustrée.
AVERTISSEMENT: L’utilisation inappropriée de la fiche de mise
à la terre pourrait résulter en risque de décharge électrique.
Consultez un électricien qualifié ou un technicien de service si
les instructions de mise à la terre ne sont pas complètement
comprises ou si vous avez des doutes que l’appareil n’est pas
proprement mis à la terre.
Vous devez vous assurer que les trois bronches sont dans une
prise à trois bronches (voir illustration ci-dessous).
Largeur x Profondeur ≥ 50.8 pouces x 58.5 pouces
–24–
Page 25

SCHÉMA DE L’APPAREIL
Couvercle de la
charnière de droite
Couvercle
de la plaque
gauche
1
2
3
4
5
6
7
8
9
INVERSION DE L’OUVERTURE DE LA PORTE
1. Cadran de réglage
2. Panneau de contrôle de la température
3. Étagères en verre ajustables
4. Couvercle bac à salade
5. Bacs à salade
6. Étagères de la porte de congélateur
7. Compartiment du beurre
8. Étagères de la porte du réfrigérateur.
9. Pieds ajustables
(OPTIONNEL)
Il est recommandé de déterminer si vous devez inverser le côté
d’ouverture de la porte et de compléter cette procédure avant
d’installer et mettre sous tension votre réfrigérateur.
Note : Ces instructions sont pour changer les charnières de la
droite vers le côté gauche de l’appareil. Si vous désirez remettre
les charnières à droite, suivez ces mêmes instructions et inversez
toutes les références de la gauche vers la droite.
AVERTISSEMENT:
Afin d’éviter de vous blesser ou de causer des dommages à la
propriété, nous recommandons que vous obteniez de l’aide pour
l’exécution de cette tâche.
• Assurez-vous que l’appareil est débranché et vide.
• Ajustez les deux pieds ajustables à leur plus haute position.
• Ayez un objet solide sur lequel reposer l’appareil. Ceci sera
nécessaire lorsque viendra le temps d’enlever la porte.
• Évitez de coucher le réfrigérateur à plat sur le dos, car ceci
pourrait causer des dommages au système de refroidisse-
ment.
OUTILS REQUIS:
ENGLISHESPAÑOLFRANÇAIS
INSTALLATION DE LA POIGNÉE DE PORTE
Le réfrigérateur doit être débranché avant de tenter d’installer
les poignées de porte.
Étape 1 : Installez les deux vis entrecroisées dans les trous de la
porte et viser jusqu’à ce qu’elles soient fermement en
place.
Étape 2 : Positionner la poignée de porte sur les vis installées à
l’étape 1.
Étape 3 : Installez les vis dans le trou situé sur le côté de la poig
née et visez jusqu’à ce qu’elles soient complètement
serrées. Installez les bouchons de vis telle qu’illustrée
ci-dessus.
• Tournevis Phillips
• Clé Allen
• Tournevis à tête plate
ÉTAPE 1 : RETIRER LA PORTE DU CONGÉLATEUR
En utilisant un tournevis à tête plate, forcez et levez doucement
le couvercle de la charnière de droite ainsi que le couvercle de la
plaque de gauche. Avec le tournevis Phillips, dévissez les vis de
la charnière supérieure de droite. Retirez la charnière supérieure.
Soulevez la porte du congélateur vers le haut pour la retirer.
–25–
Page 26

ÉTAPE 2: RETRAIT DE LA PORTE DU RÉFRIGÉRATEUR
Charnière centrale
Dévissez les trois vis qui tiennent la charnière centrale avec un
tournevis Phillips. Retirez la charnière et mettez de côté les vis et
la charnière. Soulevez la porte du réfrigérateur vers le haut, tel
qu’illustré.
ENGLISH ESPAÑOL FRANÇAIS
ÉTAPE 3: REPLACER LA CHARNIÈRE INFÉRIEURE
Dévissez les deux vis qui tiennent la charnière inférieure et retirez-la du côté droit inférieur du réfrigérateur.
Dévissez la fiche de la charnière du côté droit de la charnière
inférieure et déplacez-la vers le côté gauche du réfrigérateur.
Sécurisez la charnière inférieure au côté gauche du réfrigérateur
en utilisant les vis enlevées auparavant.
Retirez le bouchon du côté supérieur gauche de la porte du réfrigérateur et insérez-le du côté droit de la porte.
Insérez la bague de plastique du côté gauche des portes du
congélateur et du réfrigérateur.
Attachez de nouveau
la fiche de charnière
Fiche de charnière
Retirez la charnière
inférieure
Fiche de charnière
ÉTAPE 4: REPLACER LE MATÉRIEL DE PORTE
Retirez la bague de plastique du côté supérieur droit des portes
du congélateur et du réfrigérateur.
ÉTAPE 5: RÉINSTALLATION DE LA PORTE DU
RÉFRIGÉRATEUR
Retirez le bloc porte du bas du côté droit de la porte du
réfrigérateur et attachez-le au côté gauche du côté de la porte.
–26–
Page 27

Attachez le bloc autobloquant au coin supérieur gauche et le
Attachez la charnière
centre-gauche
bloc porte de gauche au côté gauche de la porte du congélateur.
Porte supérieure
bloc autobloquant
Bloc porte
de gauche
Retirez le bloc autobloquant du coin supérieur droit et le bloc
porte de droite. Gardez-les dans un endroit certain si jamais vous
devez inverser de nouveau la position de la porte.
Retirez les deux bouchons de trous du côté gauche, où sera
placée la charnière centrale et insérez-les du côté droit.
Installez la porte sur la fiche de charnière inférieure et ensuite
attachez la charnière de centre gauche du côté gauche du réfrigérateur.
ÉTAPE 7: RETIRER LES POIGNÉES DE PORTE
Retirez les couvercles de vis sur les poignées de porte. Utilisez
une clé Allen pour retirer les quatre vis Allen qui retiennent les
poignées du côté gauche du congélateur et du réfrigérateur. Retirez les poignées.
ENGLISHESPAÑOLFRANÇAIS
ÉTAPE 8: RÉINSTALLATION DES POIGNÉES DE PORTE
Retirez les quatre vis Phillips du côté gauche des portes du
congélateur et du réfrigérateur. Vissez les quatre vis Phillips dans
les trous sur le côté droit des portes du congélateur et du réfrigérateur.
Installez les poignées de porte du côté droit du congélateur et
du réfrigérateur avec les vis Allen retirées à l’étape précédente.
Serrez-les avec la clé Allen et replacez les couvercles de vis.
ÉTAPE 6: RÉINSTALLATION DE LA PORTE DU CONGÉLATEUR
Installez la porte du congélateur sur la fiche de la charnière
centre-gauche et puis sécurisez la charnière supérieure gauche
au-dessus du réfrigérateur. Couvrez la charnière avec les couvercles de charnière ainsi que les trous des vis du côté droit avec
les couvercles de plaque (retirés à l’étape précédente).
Fixer la charnière supérieure gauche
ÉTAPE 9: REPLACER LES BOUCHONS DE TROUS ET
COUVERCLES DE POIGNÉE
Replacez tous les bouchons de trous dans les trous restant du
côté gauche. Replacez les couvercles de poignée aux extrémités
des poignées pour recouvrir les trous des vis.
–27–
Page 28

OPÉRATIONS
Écran de visualisation – Réfrigérateur
A. Touche SET
1 Niveau 1
ENGLISH ESPAÑOL FRANÇAIS
2 Niveau 2
3 Niveau 3
4 Niveau 4
5 Niveau 5
6 Indicateur STANDBY
(Mode veille)
Appuyez sur la touche SET pour changer le niveau de température. À chaque fois que la touche SET est appuyée, le niveau changera
une fois. Le réglage de température est du plus froid de gauche à droite. Le réfrigérateur ajustera sa température environ 5 secondes
après que le niveau ait été sélectionné.
Cadran de température – Congélateur
FONCTION STANDBY (MODE VEILLE)
Pendant que le réfrigérateur fonctionne, appuyez et tenez le bouton SET pendant 3 secondes pour placer l’appareil en mode veille
(Standby). Le témoin lumineux s’allumera et l’appareil sera en mode veille.
Pour désactiver le mode veille, appuyez sur SET. Le témoin lumineux s’éteindra et le réfrigérateur retournera en fonctionnement normal.
INDICATEUR DE DÉFAUT
En cas de mauvais fonctionnement, les témoins lumineux DEL clignoteront en combinaison pour indiquer le défaut selon la liste suivante :
Aichage Défaut
DEL 1 et DEL 2 allumées Senseur de température du réfrigérateur
DEL 1 et DEL 3 allumées Senseur de décongélation du congélateur
DEL 1 et DEL 4 allumées Senseur de température ambiante
OPÉRATION DE CONTRÔLE DE TEMPÉRATURE
Le réglage initial de température du réfrigérateur est au niveau 3. Pour le congélateur, le réglage est à la position du milieu.
Si la température ambiante est plus basse que 10°C pour une longue période, utilisez le bouton SET et réglez la température du réfrigérateur à la position 4 ou 5. Pour le congélateur, tournez le cadran de réglage à la position MID-COLDER.
Si la température ambiante est plus haute que 43°C pour une longue période, utilisez le bouton SET et réglez la température du réfrigérateur à la position 4 ou 5. Pour le congélateur, tournez le cadran de réglage à la position COLD.
Note : Lorsque le congélateur est réglé à COLD, le compartiment peut être rapidement refroidi. Mais si le réglage demeure à COLD pour
une longue période de temps, la température à l’intérieur du congélateur pourrait être diminuée sous 0°C.
–28–
Page 29

NETTOYAGE DE L’APPAREIL
Retirez les étagères et le bac à salade. Pour sortir le bac à salade, vous devez retirer en premier l’étagère de la porte du bas.
Essuyez l’intérieur de l’appareil avec une faible solution de bicarbonate de soude et puis ensuite rincez avec de l’eau chaude et une
éponge ou un linge. Essuyez pour sécher complètement avant de remettre les étagères et le bac à salade.
Utilisez un linge humide pour nettoyer le boîtier et ensuite un linge avec un vernis à appareils standard. Assurez-vous que la porte est
bien fermée afin d’éviter d’épandre du vernis sur le scellage magnétique de la porte ou à l’intérieur de l’appareil.
Il pourrait se former de la condensation à l’extérieur de l’appareil. Ceci est possiblement causé par un changement de température
dans la pièce. Essuyez l’humidité résiduelle. Si le problème persiste, veuillez contacter un technicien qualifié pour assistance.
ENTRETIENT
CHANGER LA LUMIÈRE INTERNE
Cet appareil utilise une ampoule MAX 40W située sur le plafond du compartiment près de l’ouverture.
Note : L’ampoule pourrait être extrêmement chaude.
1. Débranchez le réfrigérateur
2. Trouvez et retirez l’ampoule défectueuse
3. Remplacer avec une ampoule pour électros du même voltage ou plus bas
4. Rebranchez le réfrigérateur
ENGLISHESPAÑOLFRANÇAIS
DÉPLACER L’APPAREIL
Tenez l’appareil par les deux côtés ou par la base lorsqu’en déplacement. Sous aucune circonstance l’appareil ne devrait être soulevé
par les extrémités du dessus du boîtier.
RÉPARATIONS
L’entretien et les réparations sur l’appareil devraient être eectués uniquement par un technicien qualifié et seulement des pièces authentiques devraient être utilisées. Les réparations eectuées par une personne sans expérience, pourraient résulter en blessures ou
un mauvais fonctionnement.
METTRE HORS OU SOUS TENSION POUR UNE LONGUE PÉRIODE DE TEMPS
Quand l’unité n’est pas en utilisation pour une longue période de temps, débranchez-la, videz l’appareil de toute nourriture et nettoyez
l’intérieur. Laissez la porte entrouverte afin d’éviter les mauvaises odeurs.
–29–
Page 30

DÉPANNAGE
Les questions simples suivantes peuvent être traitées par l’utilisateur. S’il vous plaît contacter le support client si les problèmes ne sont
pas résolus .
ENGLISH ESPAÑOL FRANÇAIS
L’appareil ne
fonctionne pas
du tout
Odeur
Le compres
fonctionne
longuement
La lumière
interne ne
fonctionne pas
Le réfrigérateur
ne se ferme pas
adéquatement
Problème Quoi vérifier
• Assurez-vous que l’appareil est branché dans une prise murale fonctionnelle;
• Vérifiez la prise pour le bon voltage;
• Vérifiez si le circuit n’a pas été disjoncté.
• La nourriture odorante devrait bien enveloppé / entreposé;
• Vérifiez pour de la nourriture pourrie;
• Nettoyez les surfaces intérieures.
• Il est normal pour le réfrigérateur d’opérer plusieurs fois au cours de l’été quand la température ambiante
seur
s’élève;
• Ne pas entreposer trop de nourriture dans le réfrigérateur et le congélateur en même temps;
• Ne pas mettre des aliments trop chauds dans le réfrigérateur, attendez qu’ils refroidissent;
• Ouvrir la porte fréquemment peut causer le démarrage plus fréquent du compresseur.
• Assurez-vous que le réfrigérateur est branché;
• Vérifier l’ampoule et la remplacer au besoin.
• La porte du congélateur est bloquée par des emballages d’aliments. Réarrangez-les pour assurer que la
porte se ferme bien.
• Utilisez les pieds ajustables pour bien niveler l’appareil.
Des bruits forts
Notes supplémentaires
• De la condensation peut être détectée sur la surface extérieure et sur le scellage de porte du congélateur quand l’air ambiant est
très humide. Il s’agit d’un phénomène normal et la condensation peut être essuyée avec un linge sec.
• Un petit son bourdonnant est produit par le générateur au démarrage ou lors de la fermeture.
• Vérifiez les pieds ajustables pour vous assurer que le réfrigérateur est bien à niveau;
• Inspectez l’appareil pour vous assurer que toutes les pièces sont bien installées.
SUPPORT TECHNIQUE
Avant de contacter le support technique, veuillez consulter le guide de dépannage ci-dessus.
Consultez notre site Web pour nous rejoindre, pour trouver les réponses à vos questions fréquentes et pour des ressources additionnelles telles qu’une version mise à jour de ce guide de l’utilisateur.
WWW.IMPECCA.COM
Pour nous rejoindre par téléphone, veuillez avoir en main le numéro de modèle et de série de votre appareil. Nos lignes sont ouvertes
entre 9 h et 18 h HE au 1- 866-954-4440.
Tenez-vous à jour sur les plus récentes innovations chez Impecca et pour participer à nos concours via nos médias sociaux:
www.facebook.com/Impecca/
www.instagram.com/impecca/
@impeccausa
–30–
Page 31

GARANTIE LIMITÉE D’UN AN
Impecca™ garantie auprès de l’acheteur original cet appareil
contre toutes défectuosités liées au matériel et à la fabrication tel que spécifié ci-dessous.
PIÈCES ET MAIN D’ŒUVRE- S’il est déterminé que
l’appareil a un problème lié à la fabrication, à l’intérieur d’une période d’un an de la date d’achat originale, Impecca™, à sa discrétion, pourra remplacer ou
réparer les pièces de l’appareil sans frais pour vous
aux États-Unis.
Afin d’obtenir des services sous garantie par un fournisseur
autorisé par le centre de service d’Impecca™, veuillez nous
rejoindre par courriel : service@impecca.com afin d’obtenir un
numéro d’autorisation d’entretien et réparation (Repair and
Maintenance Authorization – RMA). Vous recevrez également
des détails liés au processus de réparation et/ou remplacement.
Tout matériau en vitre inclus avec l’appareil est couvert par une garantie de 60 jours à compter de la date
d’achat (lorsque applicable).
Impecca™ exclus spécifiquement de cette garantie tout attachement non électrique / mécanique, accessoires ou pièce
jetable incluant, mais non limité au boîtier externe, les câbles
connecteurs, les piles et les adaptateurs secteurs. Impecca™
se réserve le droit de réparer ou remplacer les appareils défectueux par un modèle pareil, équivalent ou plus récent.
Nous nous réservons le droit de réparer ou de remplacer l’appareil à notre discrétion. Le remplacement pourrait être par
un appareil nouveau ou remis à neuf. Bien que tous les eorts
soient mis de l’avant pour assurer qu’il s’agisse du même modèle, s’il s’avère impossible, le remplacement sera de qualité
similaire ou supérieure.
L’usure normale de l’appareil n’est pas couverte par cette
garantie. Impecca™ se réserve le droit de déterminer le niveau
d’usure sur l’ensemble de ses appareils. Ouvrir le boîtier ou
modifier l’appareil annule dans son entièreté la présente
garantie.
Exclusions : la garantie présente exclut les points suivants :
1. Tout appareil dont le numéro de série est eacé ou rendu
illisible.
2. Tout appareil transféré à un second propriétaire.
3. La rouille formée à l’intérieur ou à l’extérieur de l’unité.
4. Les appareils marqués « Tel quel » ou « Remis à neuf ».
5. Pertes d’aliments dus à un mauvais fonctionnement de
l’appareil.
6. Climatiseur à fenêtre installés au mur.
7. Si l’appareil est utilisé à des fins commerciales.
8. Appels de service qui ne sont pas en lien avec un mal
fonctionnement de l’appareil.
9. Appels de service pour un appareil endommagé suite au
non-respect des instructions fournies.
10. Appels de service liés à une installation défectueuse.
11. Coûts entraînés à rendre l’appareil accessible pour
l’entretien (incluant, mais non limité à l’enlèvement de
moulures, plinthes, armoires, etc.)
12. Appels de service pour le remplacement de pièces
consommables tels que des ampoules, filtres, etc.
13. Des frais additionnels peuvent s’appliquer aux appels de
service en soirée, en fin de semaine, les jours fériés. Des
dommages à la finition de l’appareil ou à des ameublements suite à l’installation de l’appareil.
14. Dommages causés par : des circonstances exceptionnelles; incendie; mauvaise utilisation; accident; alimentation électrique inappropriée; entretien eectué par
une personne non autorisée; utilisation de pièces non
d’origine d’Impecca, etc.
TOUTE GARANTIE IMPLICITE, Y COMPRIS LES GARANTIES DE
QUALITÉ MARCHANDE ET D’ADAPTATION À UN USAGE PARTICULIER EST LIMITÉ POUR UNE DURÉE DE 1 AN À COMPTER DE
LA DATE DE L’ACHAT ORIGINAL DE CE PRODUIT.
CES GARANTIES ET RECOURS DEMEURENT EXCLUSIFS À LA
VENTE ET L’UTILISATION DE CE PRODUIT. AUCUNE AUTRE
GARANTIE, ORALE OU ÉCRITE, EXPLICITE OU IMPLICITE, NE
SERA ÉMISE.
IMPECCA™ NE PEUT PAS ÊTRE TENU RESPONSABLE POUR
DES DOMMAGES SPÉCIAUX, ACCIDENTELS, CONSÉQUENTS,
DIRECTS OU AUTRES CONNUS OU QUI AURAIENT PU ÊTRE
COMMUNIQUÉS À IMPECCA™, Y COMPRIS LA PERTE DE
PROFITS, DE BIENVEILLANCE, DE BIENS ET DE BLESSURES
RÉSULTANT D’UNE VIOLATION DE LA GARANTIE, L’INCAPACITÉ
D’UTILISER LE PRODUIT OU EN VERTU DE TOUTE THÉORIE
JURIDIQUE EN CONTRAT OU DÉLIT. LA RESPONSABILITÉ
D’IMPECCA EST LIMITÉE AU PRIX D’ACHAT PAYÉ AU VENDEUR
EN DÉTAIL DU PRODUIT DÉFECTUEUX.
Aucun revendeur, agent ou employé d’Impecca™ n’est autorisé à eectuer une modification, une extension, un changement ou un amendement de cette garantie sans le consentement écrit et l’autorisation d’Impecca™.
Certains états ne permettent pas l’exclusion ou la limitation
des garanties implicites ou de responsabilité en lien avec des
dommages accidentels or des dommages conséquents ou
ne permettent pas une limitation sur la durée de la garantie implicite. Donc, les limitations ou exclusions ci-dessus
peuvent ne pas s’appliquer à vous. Cette garantie vous donne
des droits légaux spécifiques et vous détenez d’autres droits,
qui peuvent varier d’état en état.
Note : Notre centre de la garantie eectue la livraison uniquement qu’aux États-Unis continentaux.
ENGLISHESPAÑOLFRANÇAIS
–31–
Page 32

© 2016 Impecca, a division of LT Inc., Wilkes Barre, PA
 Loading...