

Page 1

10.2 CU. FT. Bottom Mount Freezer Refrigerator – User Manual
10.2 CU. FT. Refrigerador con Congelador de Montaje Inferior – Manual de Usuario
10.2 CU. FT. Réfrigérateur de congélateur à montage en dessous – Manuel d’utilisation
Model: RA-2107
Modelo: RA-2107
Modèle: RA-2107
www.impecca.com
v 1.0
Page 2

ENGLISH ESPAÑOL FRANÇAIS
TABLE OF CONTENTS
IMPORTANT SAFETY INSTRUCTIONS .............................................................................................................................................................................3
PARTS AND FEATURES ...................................................................................................................................................................................................... 4
GETTING STARTED ............................................................................................................................................................................................................ 4
FRESH FOOD COLD WALL (REAR WALL OF REFRIGERATOR COMPARTMENT) .......................................................................................................4
INSTALLATION REQUIREMENTS ..................................................................................................................................................................................... 4
ELECTRICAL REQUIREMENTS .......................................................................................................................................................................................... 5
UNPACK THE REFRIGERATOR .........................................................................................................................................................................................5
REVERSE DOOR SWING (OPTIONAL) ..............................................................................................................................................................................6
LEVELING AND DOOR ADJUSTMENT (IF NEEDED) ...................................................................................................................................................... 7
COMPLETE THE INSTALLATION ...................................................................................................................................................................................... 7
TEMPERATURE CONTROL ................................................................................................................................................................................................ 8
STORAGE ............................................................................................................................................................................................................................. 8
DOOR BINS ......................................................................................................................................................................................................................... 8
FREEZER .............................................................................................................................................................................................................................. 8
FREEZER STORAGE ...........................................................................................................................................................................................................9
REFRIGERATOR CARE ........................................................................................................................................................................................................ 9
DEFROSTING ...................................................................................................................................................................................................................... 9
POWER FAILURE ...............................................................................................................................................................................................................10
LIGHT ................................................................................................................................................................................................................................. 10
VACATION AND MOVING CARE ...................................................................................................................................................................................... 10
MOVING .............................................................................................................................................................................................................................10
TROUBLESHOOTING ......................................................................................................................................................................................................11
Customer Support ...........................................................................................................................................................................................................12
One-Year Limited Appliance Warranty (Us) ................................................................................................................................................................ 13
DEFROSTING ....................................................................................................................................................................................................................33
ASSISTANCE À LA CLIENTÈLE ........................................................................................................................................................................................36
–ii–
Page 3

ENGLISHESPAÑOLFRANÇAIS
IMPORTANT SAFETY INSTRUCTIONS
PLEASE SAVE THESE INSTRUCTIONS. YOU MAY NEED THEM IN THE FUTURE.
1. This refrigerator must be properly installed and located in accordance with the Installation Instructions before it is used.
2. Do not allow children to climb, stand or hang on the shelves in the refrigerator. They could damage the refrigerator and seriously
injure themselves.
3. Do not store or use gasoline or other flammable vapors and liquids in the vicinity of this or any other appliance.
4. Keep fingers out of the space between the doors and cabinet. Be careful closing doors when children are in the area.
5. In refrigerators with automatic ice makers, avoid contact with the moving parts of the ejector mechanism, or with the heating
element that releases the cubes. Do not place fingers or hands near or on the automatic ice-making mechanism while the refrigerator is plugged in.
6. Unplug the refrigerator before cleaning and making repairs.
7. We strongly recommend that any servicing be performed by a qualified individual.
8. Turning the temperature control dial to the “0” position stops cooling but does not shut o power to the refrigerator.
9. Do not leave refrigerator in extremely cold or warm temperatures.
10. Do not place refrigerator near heat sources or open flames.
11. Clean the refrigerator with a so, damp cloth. Remove stains with a mild soap. Do not clean the unit with industrial grade solvents, or abrasive chemicals.
12. Do not place heavy items on top of the refrigerator.
13. Never install the refrigerator where there is a lot of moisture or in areas where water can splash.
14. Do not allow children to hang on the doors; the refrigerator may be tip over and hurt children.
15. Never eat food that may have spoiled because it was stored too long in the refrigerator or was stored in an out-of-order refrigerator.
16. Do not use sharp tools inside the refrigerator (such as an ice pick to remove ice) as damage may occur.
17. If not using for a long period of time, remove all food from the refrigerator and unplug the unit.
BEFORE DISCARDING YOUR OLD REFRIGERATOR:
Your old refrigerator may have a cooling system that used CFCs (chlorofluoocarbons) or HCFCs (hydrochlorofluoocarbons). CFCs
and HCFCs are believed to harm stratospheric ozone if released to the atmosphere. If you are throwing away your old refrigerator,
make sure the refrigerant is removed for proper disposal by a qualified technician. Check with your retailer to find out if they’ll take
away and responsibly dispose of or recycle your old refrigerator.
See www.epa.gov/rad for more information on Responsible Appliance Disposal.
CHILD ENTRAPMENT WARNING:
Risk of child entrapment. Before you throw away your old refrigerator or freezer:
1. Take o the doors.
2. Leave the shelves in place so that children may not easily climb inside.
CAUTION: USE OF AN EXTENSION CORD IS NOT RECOMMENDED.
FOR HOUSEHOLD USE ONLY
SAVE THESE INSTRUCTIONS
–3–
Page 4
ENGLISH ESPAÑOL FRANÇAIS
PARTS AND FEATURES
Note: All images in this instruction manual are for indication
only; the physical appearance and options on your model may
var y.
SERIAL AND MODEL NUMBER
Please record your model number and serial number below.
You can find the number plate in the upper-le wall inside the
refrigerator.
Model Number: ______________________________
Serial Number: ______________________________
Date of Purchase: ____________________________
SAFETY NOTICES
This appliance is intended to be used in household and similar
applications such as:
• Sta kitchen areas in shops, oices and other working environments;
• Individual use in hotel rooms and other residential type
environments;
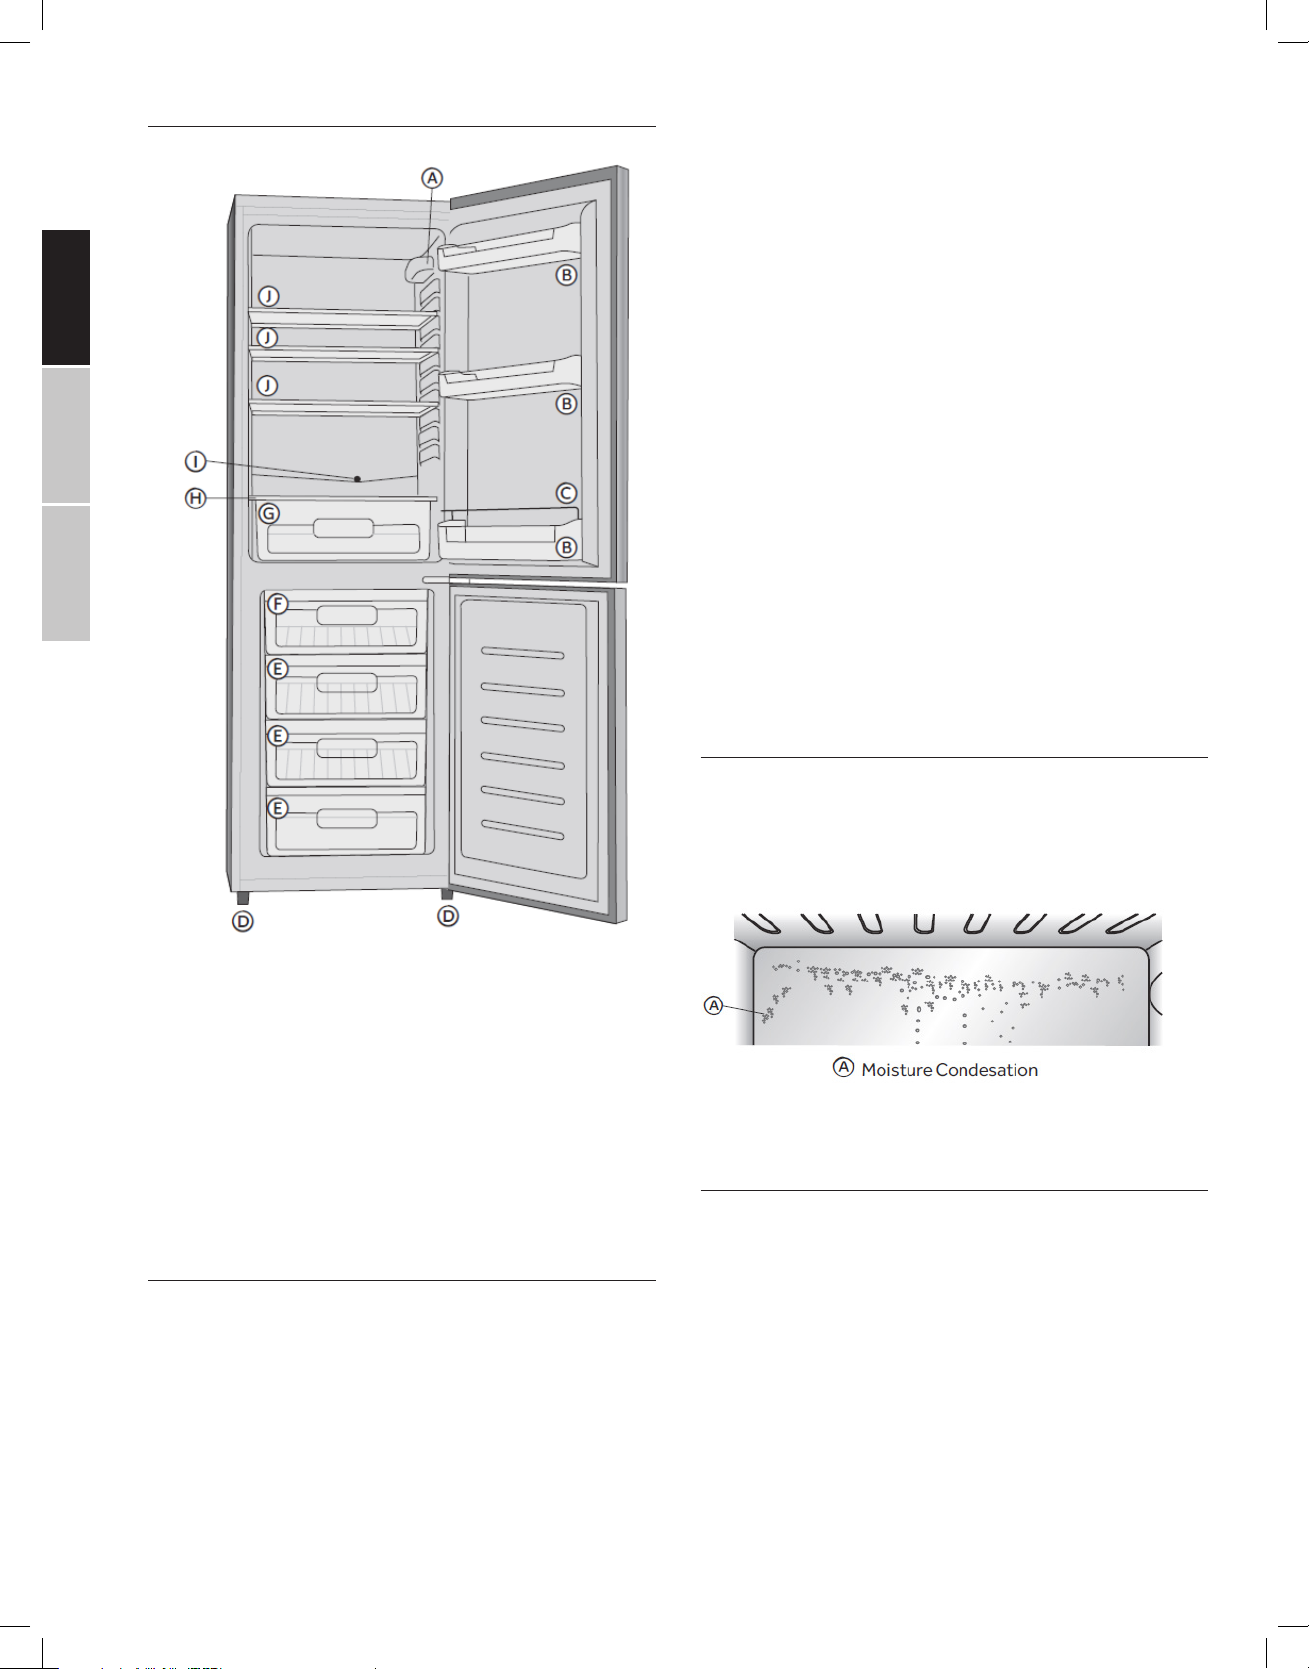
A. CONTROL DIAL AND INTERIOR LIGHT
B. DOOR BINS (3)
C. BOTTLE RETAINER
D. ADJUSTABLE FEET
E. FROZEN FOOD STORAGE DRAWERS (3)
F. FROZEN FOOD STORAGE COMPARTMENT
G. CRISPER COMPARTMENT
H. CRISPER COMPARTMENT COVER
I. DRAIN
J. FULL-WIDTH SHELVES (3)
GETTING STARTED
Thank you for choosing this quality Impecca refrigerator. This appliance is designed for consumer, household use. Please carefully
read this manual before using this product. Be sure to keep the
manual for later consultation.
FRESH FOOD COLD WALL (REAR WALL
OF REFRIGERATOR COMPARTMENT)
Your new refrigerator features Cold Wall technology to better
store perishable food.
The rear wall of the refrigerator compartment promotes moisture condensation, similar to what you see in the produce
aisles of a grocery store.
The excess moisture will drip into the drain at the bottom of
the wall.
INSTALLATION REQUIREMENTS
LOCATION REQUIREMENTS
IMPORTANT: This refrigerator is designed for indoor, house-
hold use only. This refrigerator should not be recessed or
built-in an enclosed cabinet. It is designed for freestanding
installation only.
–4–
Page 5
ENGLISHESPAÑOLFRANÇAIS
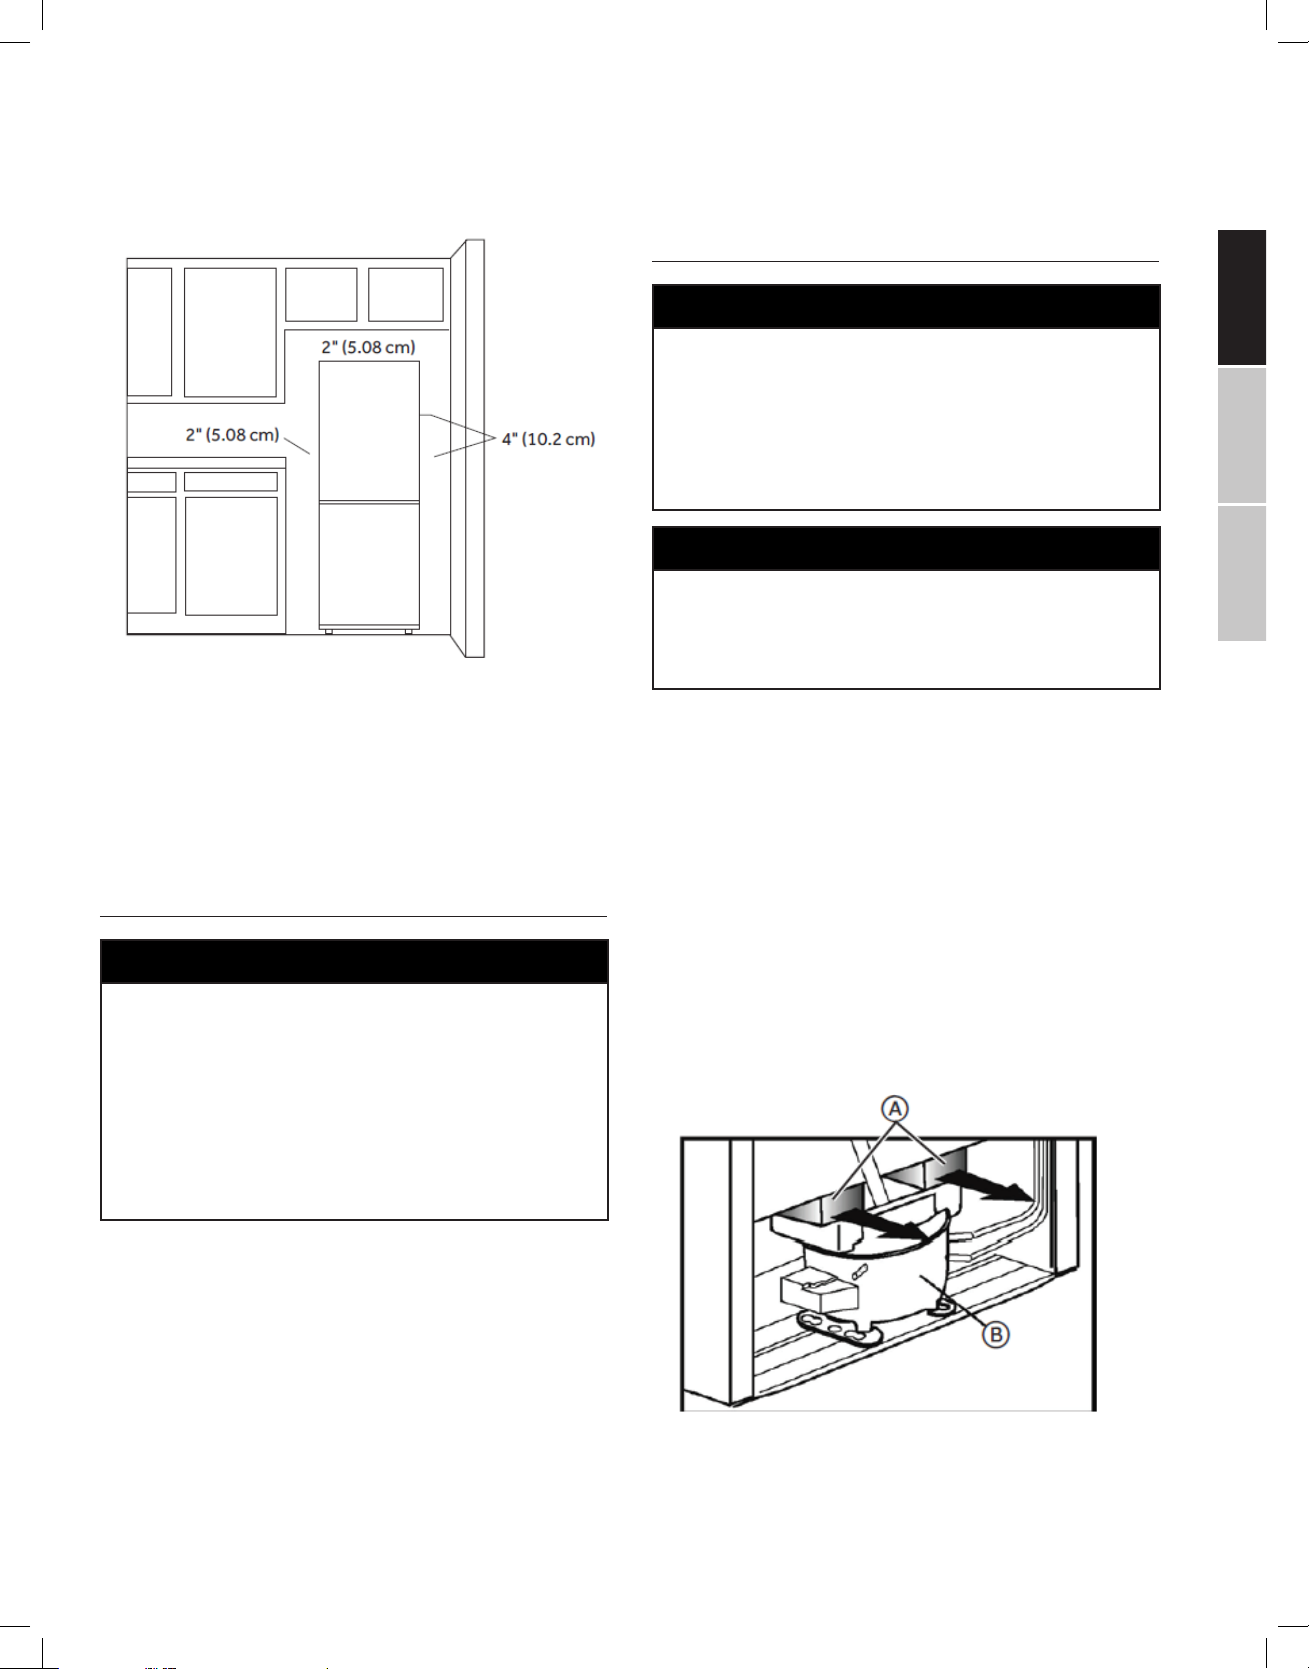
To ensure proper ventilation for your refrigerator, allow for 2”
(5.08 cm) of space on each side and at the top. Allow for 4” (10
cm) of space behind the refrigerator. When installing your refrigerator next to a fixed wall, leave 4” (10 cm) minimum to
allow for the door to swing open.
NOTE: This refrigerator is intended for use in a location where
the temperature ranges from a minimum of 55°F (13°C) to a
maximum of 110°F (43°C). The preferred room temperature
range for optimum performance, which reduces electricity
usage and provides superior cooling, is between 60°F (16°C)
and 90°F (32°C). It is recommended that you do not install the
refrigerator near a heat source, such as an oven or radiator, or
in direct sunlight.
ELECTRICAL REQUIREMENTS
I WARNING
ELECTRICAL SHOCK HAZARD
PLUG INTO A GROUNDED 3 PRONG OUTLET.
DO NOT REMOVE THE GROUND PRONG FROM THE POWER
CORD PLUG.
DO NOT USE AN ADAPTER.
DO NOT USE AN EXTENSION CORD.
FAILURE TO DO SO CAN RESULT IN DEATH, FIRE OR ELECTRI-
CAL SHOCK.
NOTE: Before performing any type of installation or cleaning,
disconnect the refrigerator from the electrical source. When
you are finished, reconnect the refrigerator to the electrical
source and reset the temperature controls to the desired setting.
UNPACK THE REFRIGERATOR
I WARNING
FIRE OR EXPLOSION HAZARD
DO NOT PUNCTURE REFRIGERANT TUBING.
FOLLOW HANDLING INSTRUCTIONS CAREFULLY.
FLAMMABLE REFRIGERANT USED.
FAILURE TO DO SO CAN RESULT IN DEATH, EXPLOSION OR
FIRE.
I WARNING
EXCESSIVE WEIGHT HAZARD
USE TWO OR MORE PEOPLE TO MOVE AND INSTALL REFRIGER ATOR.
FAILURE TO DO SO CAN RESULT IN BACK OR OTHER INJURY.
REMOVE THE PACKAGING
• Remove tape and glue residue from surfaces before turning
on the refrigerator. Rub a small amount of liquid dish soap
over the adhesive with your fingers. Rinse with warm water
and dry.
• Do not use sharp instruments, rubbing alcohol, flammable
fluids, or abrasive cleaners to remove tape or glue. These
products can damage the surface of your refrigerator. For
more information, see “Refrigerator Safety.”
• Remove foam block(s) inserted between the compressor
motor and the cabinet, as shown.
• Dispose of/recycle all packaging materials.
NOTE: Do not remove the plastic drain tray located above the
compressor motor on models with auto-defrost.
Before you move your refrigerator into its final location, it is
important to make sure you have the proper electrical connection.
RECOMMENDED GROUNDING METHOD
A 115 volt, 60 Hz, AC only 15- or 20-amp fused, grounded electrical supply is required. It is recommended that a separate
circuit serving only your refrigerator be provided. Use an outlet
that cannot be turned o by a switch. Do not use an extension
cord.
A. Foam Blocks
B. Compressor
–5–
Page 6
ENGLISH ESPAÑOL FRANÇAIS
WHEN MOVING YOUR REFRIGERATOR:
Your refrigerator is heavy. When moving the refrigerator for
cleaning or service, be sure to cover the floor with cardboard
or hardboard to avoid floor damage. Always pull the refrigerator straight out when moving it. Do not wiggle or “walk” the refrigerator when trying to move it, as floor damage could occur.
CLEAN BEFORE USING
Aer you remove all of the packaging materials, clean the inside of the refrigerator before using it. See the cleaning instructions in “Refrigerator Care.”
IMPORTANT INFORMATION TO KNOW ABOUT GLASS
SHELVES AND COVERS:
Do not clean glass shelves or covers with warm water when
they are cold. Shelves and covers may break if exposed to sudden temperature changes or impact, such as bumping. Tempered glass is designed to shatter into many small, pebble-size
pieces. This is normal. Glass shelves and covers are heavy. Use
both hands when removing them to avoid dropping.
REVERSE DOOR SWING (OPTIONAL)
If you want to reverse the door swing so that the doors open
from the opposite side see the following instructions.
IMPORTANT: The graphics referenced in the following instructions are included later in this section. See “Reverse Door
Swing” graphic.
REMOVE THE DOORS
I WARNING
EXCESSIVE WEIGHT HAZARD
USE TWO OR MORE PEOPLE TO MOVE AND INSTALL REFRIGER ATOR.
FAILURE TO DO SO CAN RESULT IN BACK OR OTHER INJURY.
1. Unplug refrigerator or disconnect power.
2. Remove all food, shelves, drawers, trays and bins from the
interior refrigerator cabinet and the door.
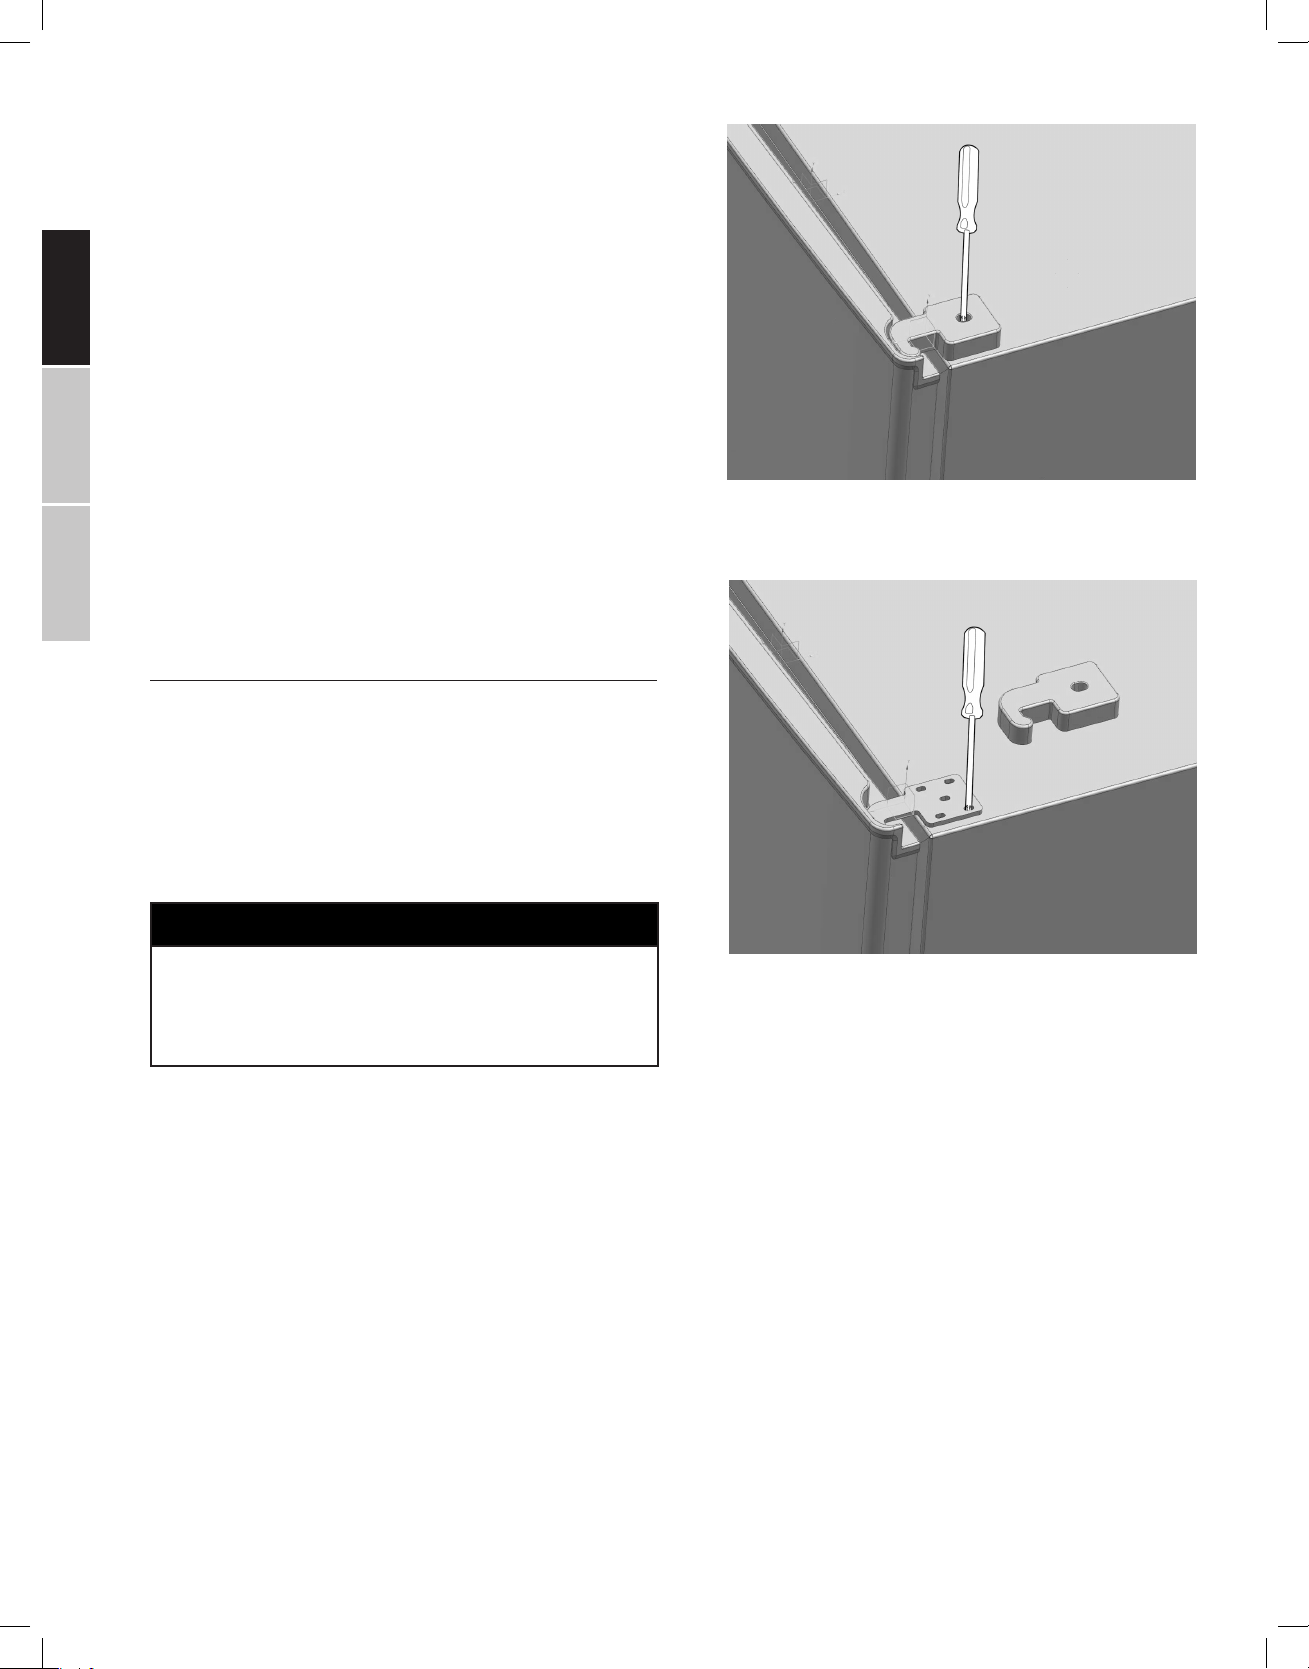
3. While someone holds the doors, unscrew the bolts and
remove the center hinge (1).
4. Lower the refrigerator door from the top hinge (2).
5. Lift the freezer door from the bottom hinge (3).
Remove the bolts from the top hinge and remove top
6.
hinge (5).
7. Using two or more people, tilt the refrigerator toward the
back at a 45° angle to access and remove the leveling foot (7
& 8).
8. Remove the bottom door hinge and leveling foot (9).
NOTE: The leveling foot on the hinge side must be moved to
the opposite side with the door hinge.
–6–
Page 7

ENGLISHESPAÑOLFRANÇAIS
REVERSE THE DOORS
1. Remove the hole plugs from the center divider and place
the plugs in the holes remaining aer removing the center
hinge (6).
2. Remove the plastic cover. Install the stopper (provided in
the parts bag), to the opposite side (10).
3. Unscrew and remove the middle hinge bushing from the
bottom of the refrigerator door (11).
4. Install the middle hinge bushing (provided in the parts
bag) to the opposite side. (12)
5. Remove the hinge bushing and the stopper from the
freezer door and reinstall each to the opposite side of the
door. (13)
6. Remove the bottom hinge bushing from the freezer door
and reinstall it on the opposite side. (14)
REPLACE THE DOORS
1. Reassemble and install the bottom hinge on the opposite
side. (15)
2. Using two or more people, reinsert the leveling foot to the
opposite side with the bottom door hinge. (16)
3. Rotate the top hinge 180°. Unscrew the hinge pin and reinstall it to the opposite side. (17)
4. Reinstall the top hinge and tighten the bolts. (18)
5. Reinstall the plastic cover on the front, top trim. (19)
6. Place the freezer door onto the bottom hinge and close the
door. (20)
7. Place the center hinge on top of the freezer door. (21)
8. Insert the refrigerator door between the top and center
hinges. (22)
9. Fasten the center hinge to the cabinet, and then align and
adjust the doors.
10. Completely tighten all bolts. (23)
11. Using two or more people, stand the refrigerator completely upright, and adjust the front feet to level. See “Leveling
and Door Adjustment.”
12. Return all removable parts to the cabinet and door.
REVERSE DOOR SWING
LEVELING AND DOOR ADJUSTMENT (IF NEEDED)
The refrigerator must be level to maintain optimal performance and appearance, and to
avoid excess vibration and noise.
LEVELING
Move the refrigerator to its final location on a flat, even floor. Turn the feet on the bottom, front of the cabinet to raise or lower that side of the refrigerator until the refrigerator is level side-to-side.
NOTE: Having someone push against the top of the refrigerator takes some weight o
the leveling screws. This makes it easier to turn the screws.
Turn both front legs, by the same amount, to slightly raise the front of the refrigerator.
This will make it easier for the doors to close.
COMPLETE THE INSTALLATION
1. Wait a minimum of 4 hours to allow the cooling system to settle before turning on cooling.
2. Plug into a grounded 3 prong outlet.
3. Wait until the refrigerator has cooled to the recommended temperatures, before adding food.
–7–
Page 8
ENGLISH ESPAÑOL FRANÇAIS
TEMPERATURE CONTROL
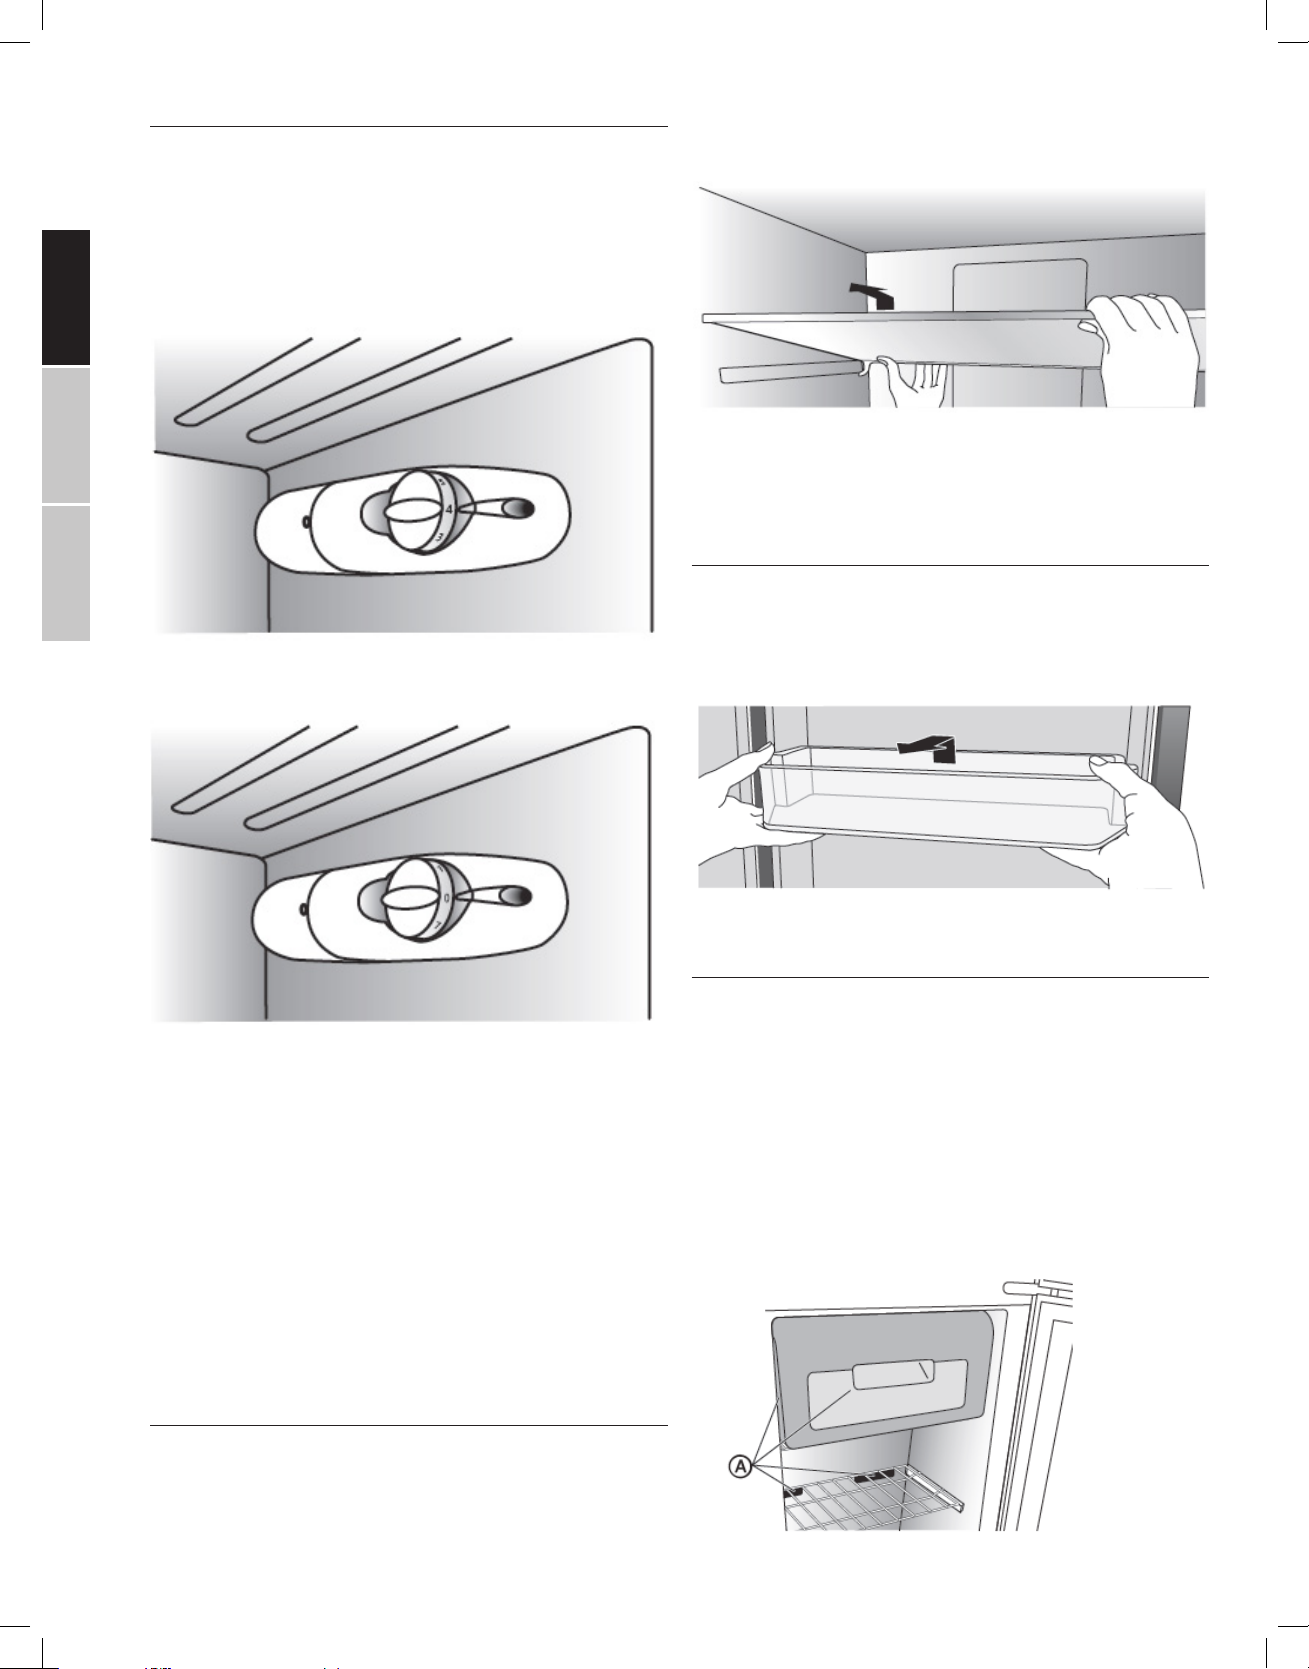
Set the Temperature Control dial to the recommended setting
“4” on the dial.
Using an accurate thermometer, monitor the compartment
temperature to ensure the proper storage temperature is maintained. Adjust the temperature, if necessary.
Recommended Setting “4”
TO TURN OFF COOLING:
Turn the Temperature Control dial to the “0” OFF position.
1. To remove a shelf, li up on both the front and back edge to
disengage the shelf hooks from the shelf supports along the
refrigerator wall and pull it out.
2. To reinstall a shelf, rest the shelf on both the front and rear
supports. Push the shelf toward the rear of the refrigerator until the back of the shelf hooks around the rear shelf
supports.
DOOR BINS
The door bins can be removed for cleaning.
TO REMOVE A DOOR BIN:
1. Place hands on both sides of the bin and li upward.
2. Pull out to remove.
TO ADJUST THE TEMPERATURE:
Temperatures are controlled by the Temperature Control dial.
The control can be set at any position between 1 (least cold)
and 7 (coldest).
The average temperature inside the refrigerator compartment
should be approximately 37°F (2.8°C). You may need to adjust
the temperature control to obtain the desired temperature.
NOTE: Sections of the refrigerator compartment may be cooler
or warmer (such as salad crisper and top part of the cabinet)
which is normal.
Frequent door openings cause internal temperatures to rise, so
close the door as soon as possible aer use.
STORAGE
FULL-WIDTH SHELVES
The height of the shelves can be adjusted to fit your storage
needs.
FREEZER
The freezer compartment is suitable for the long-term storage
of commercially frozen foods and also can be used to freeze
fresh food.
IMPORTANT: The fan inside the freezer compartment circulates
the cold air this is essential to the performance of the freezer.
Make sure the air ducts are not blocked by food items or packaging. Blocking the air ducts can result in an increase in the
internal freezer temperature (Thawing may occur if temperature
increases too much).
A. AIR DUCTS
–8–
Page 9
ENGLISHESPAÑOLFRANÇAIS
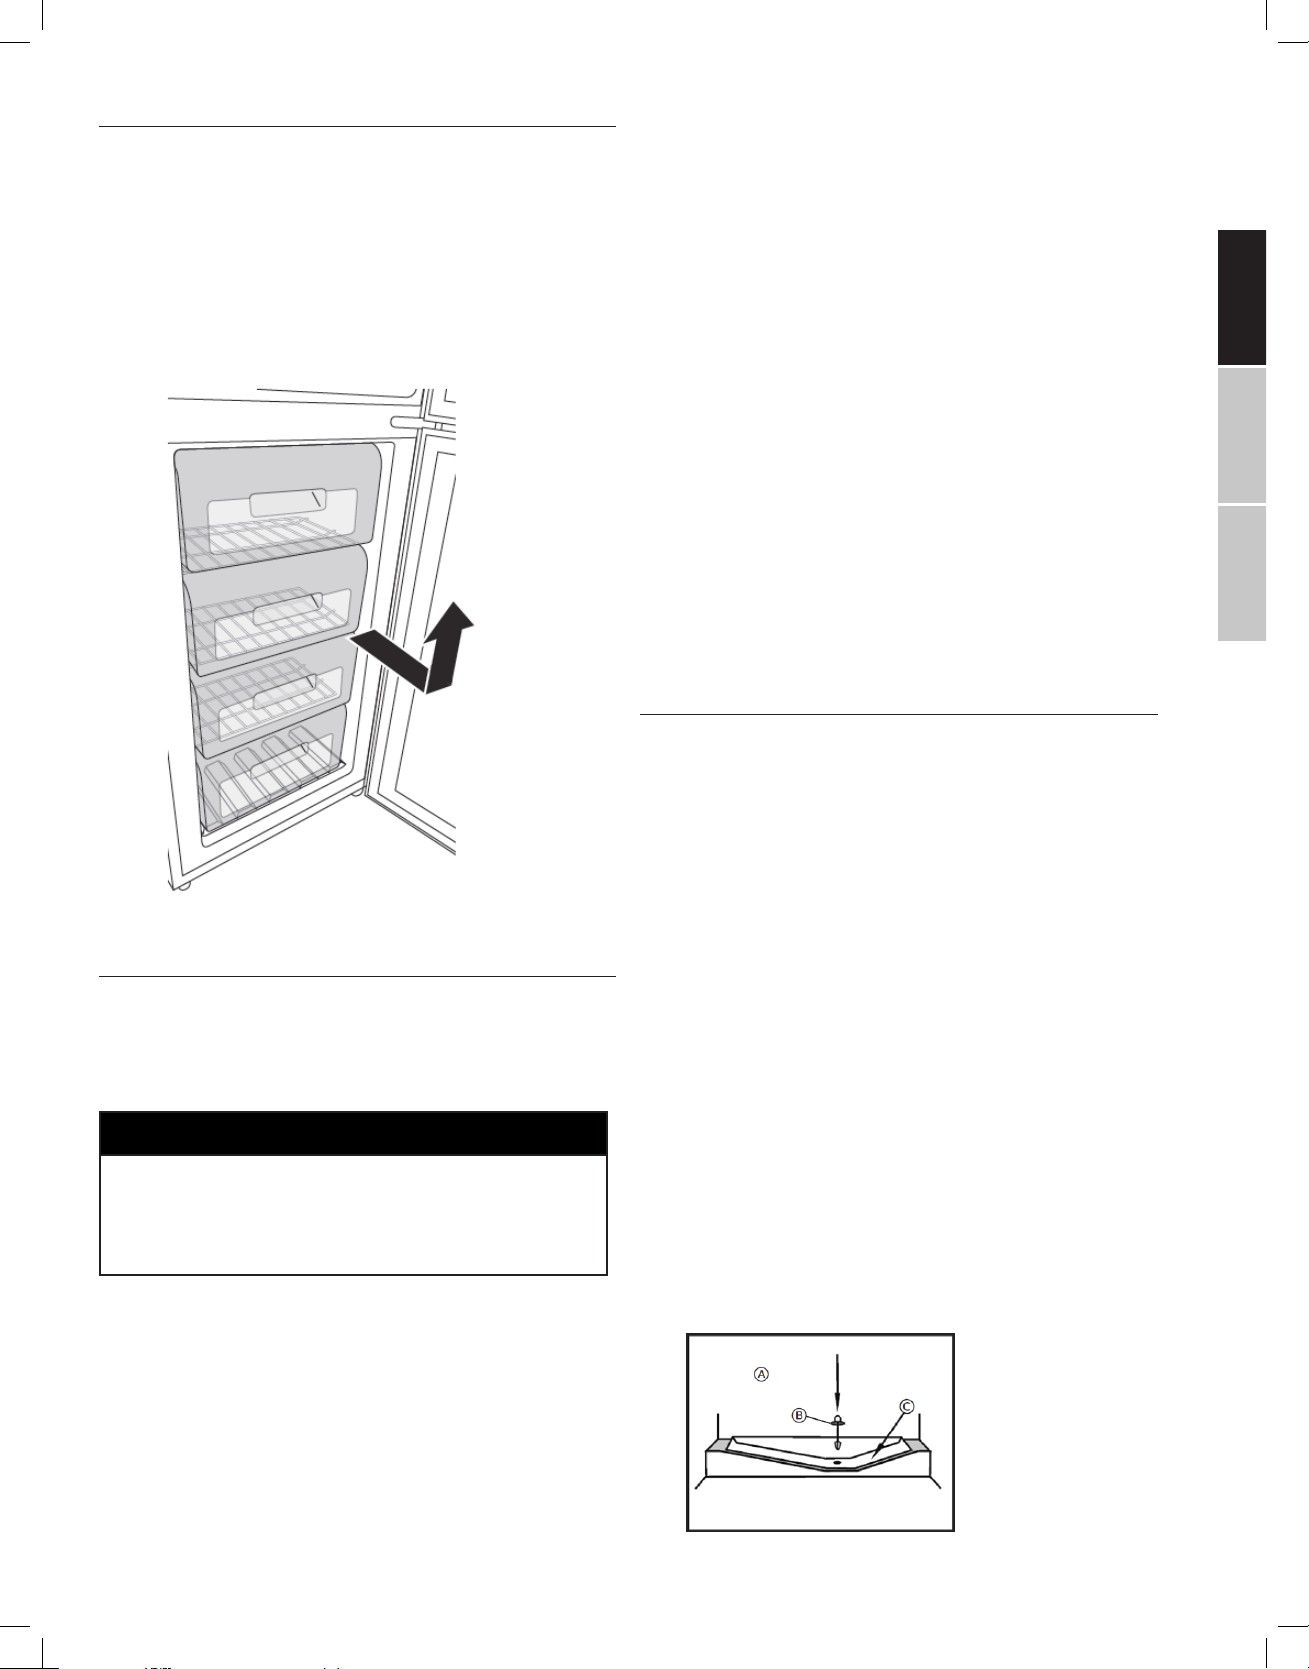
FREEZER STORAGE
Your new refrigerator oers the flexibility of either drawer or
shelf storage for your freezer storage needs. Remove any freezer
drawer to use the shelf underneath.
1. To Remove a Drawer:
2. Pull out the drawer as far as possible.
3. Tilt the drawer upward to remove.
Store the drawer, for future use, in a location where it will not be
damaged.
1. Unplug refrigerator or disconnect power.
2. Using a clean sponge or so cloth and a mild detergent
dissolved in warm water, wash removable parts and the
interior surfaces. Rinse well and dry thoroughly.
3. Clean the exterior surfaces.
Painted metal: Wash painted metal exteriors with a clean,
so cloth or sponge and a mild detergent in warm water.
Rinse surfaces with clean, warm water and dry immediately
to avoid water spots.
Stainless steel: Stainless steel is corrosion resistant and
not corrosion-proof. To help avoid corrosion of your stainless steel, wash stainless steel surfaces with a clean, so
cloth or sponge and a mild detergent in warm water. Rinse
surfaces with clean, warm water and dry immediately to
avoid water spots.
NOTE: When cleaning stainless steel, always wipe in the
direction of the grain to avoid cross-grain scratching.
4. Clean the condenser at least once a year. Using a vacuum
cleaner, remove the dust that has accumulated on the
condenser.
NOTE: The condenser is located at the back of the refrigerator.
5. Plug in refrigerator or reconnect power.
REFRIGERATOR CARE
CLEANING
Clean both the freezer and refrigerator compartments about
once a month to avoid buildup of odors. Wipe up spills immediately.
I WARNING
EXPLOSION HAZARD
USE NONFLAMMABLE CLEANER.
FAILURE TO DO SO CAN RESULT IN DEATH, EXPLOSION OR
FIRE.
IMPORTANT:
• Do not use harsh chemicals, ammonia, chlorine bleach, concentrated detergent, solvents, abrasives or metal scouring pads
to clean your refrigerator inside or out. They can damage and/or
discolor the refrigerator finish.
• Do not use warm water to clean glass shelves while they are
still cold. Glass may break when exposed to sudden temperature changes or impact.
DEFROSTING
The refrigerator and freezer compartments defrost automatically. A small amount of frost buildup on the Fresh Food Cold Wall
is normal. If the amount of frost becomes excessive, you may
need to raise the temperature by adjusting the Temperature
Control dial to a lower setting (less cold). See “Control.”
The defrost water goes through a collection channel and into
the drain tube which is attached to the drain tray at the back of
the refrigerator. To avoid water spilling onto the floor, it is important to make sure the end of the drain tube is inserted fully
into the drain tray.
If the defrost water does not drain from the collection channel,
check that the drain tube is clear. The drain tube can be cleared
with a pipe cleaner or by pushing the plastic plunger (provided)
down the drain tube.
During defrosting, water droplets may form at the back of the
refrigerator compartment where a concealed evaporators located. Some moisture will remain on the Fresh Food Cold Wall
(rear wall) and refreeze when defrosting is completed. Do not
use pointed or sharp-edged objects such as knives or forks to
remove the frozen droplets.
A. REAR REFRIGERATOR WALL
B. PLASTIC PLUNGER
C. DEFROST WATER COLLECTION CHANNEL
–9–
Page 10

ENGLISH ESPAÑOL FRANÇAIS
POWER FAILURE
MOVING
If there is a power failure, do not open the freezer door. Frozen
food should not be aected if the power is restored within several hours.
If power is out for an extended period of time, check the food
for thawing.
LIGHT
TO REPLACE A LIGHT BULB:
NOTE: You may need to remove the top shelf to access the light
bulb.
1. Unplug refrigerator or disconnect power.
2. Remove the screw fastening the light shield, and then remove the light shield.
3. Remove the burned-out bulb and replace it with an appliance bulb of the same size, shape and wattage.
• Replace with a 1.2 Watt (25 Watt Incandescent equivalent)
LED Bulb with candelabra base.
IMPORTANT: DO NOT replace with an incandescent bulb
greater than 10 Watts.
• The refrigerator compartment is considered to be a wet/
damp environment, and some LED replacement bulbs
are not recommended for wet/damp environments. Before installation, read and follow all instructions on the
LED packaging.
4. Replace the light shield.
5. Plug in refrigerator or reconnect power.
VACATION AND MOVING CARE
VACATION
If You Choose to Leave the Refrigerator On While You’re
Away:
1. Use up any perishables and freeze other items.
If You Choose to Turn O the Refrigerator Before You Leave:
1. Remove all food from the refrigerator and freezer.
2. Unplug refrigerator or disconnect power.
3. Clean refrigerator, wipe it, and dry well.
4. Tape rubber or wood blocks to the tops of both doors to
prop them open far enough for air to get in. This stops odor
and mold from building up.
I WARNING
EXCESSIVE WEIGHT HAZARD
USE TWO OR MORE PEOPLE TO MOVE AND INSTALL REFRIGER ATOR.
FAILURE TO DO SO CAN RESULT IN BACK OR OTHER INJURY.
When you are moving your refrigerator to a new home, follow
these instructions to prepare it for the move.
IMPORTANT:
• If possible, move the refrigerator in an upright position. If the
refrigerator must be moved horizontally, it must be placed
only on its right-hand side (as you are facing the front of the
refrigerator). Aer standing the refrigerator upright, wait at
least 12 hours to allow the system to settle before plugging in
the refrigerator.
1. Remove all food from the refrigerator and pack all frozen
food in dry ice.
2. Unplug refrigerator.
3. Empty any water in the drain tray.
4. Make sure that the defrost water drain tube at the back of
the refrigerator is attached to the drain tray on the top of the
compressor, to avoid defrost water spilling onto the floor.
5. Take out all removable parts, wrap them well, and tape
them together so they will not shi and rattle during the
move.
6. Wash and rinse the interior, and then dry thoroughly.
7. Raise the leveling legs so they don’t scrape the floor. See
“Leveling.”
8. Tape the doors closed and tape the power cord to the back
of the refrigerator.
9. When you get to your new home, put everything back and
refer to the “Installation Instructions” section.
–10–
Page 11
ENGLISHESPAÑOLFRANÇAIS
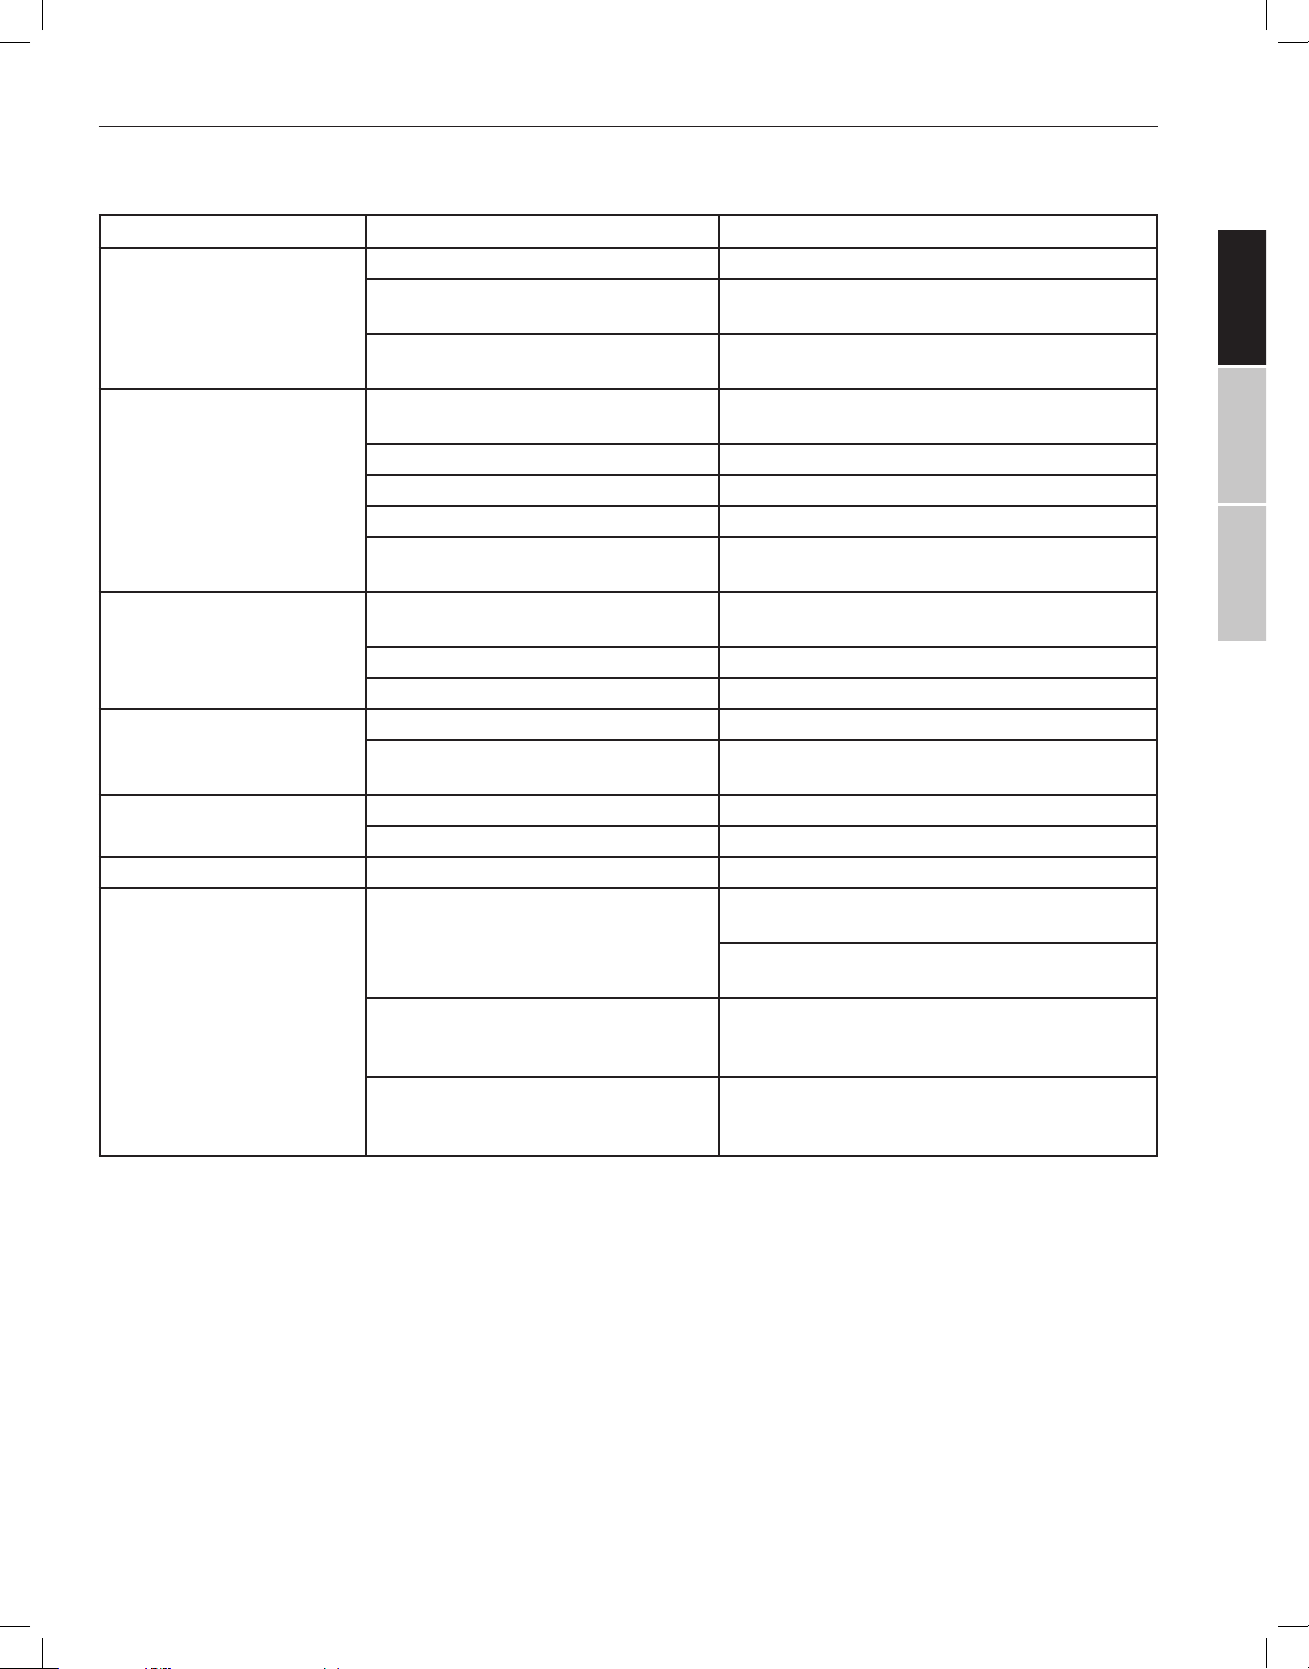
TROUBLESHOOTING
The following simple issues can be handled by the user. Please contact customer support if the issues are not resolved.
REFRIGERATOR IS NOT OPERATING
PROBLEM POSSIBLE CAUSE(S) SOLUTION
Refrigerator does not run Refrigerator is unplugged. Plug power cord into power source.
Breaker is tripped or turned o / Fuse is
blown.
Refrigerator is in defrost mode. Wait about 40 minutes for defrost cycle to end and
Refrigerator compressor runs
frequently or for long periods
of time
NOTE: This refrigerator is designed to run for longer periods of time at a lower energy
usage.
Refrigerator has an odor Food is not sealed or packaged properly. Reseal packaging. Place an opened box of baking
Light does not come on Refrigerator is unplugged. Plug refrigerator in to power source.
Doors do not close properly Refrigerator is not level. See “Leveling.”
Vibration or rattling Refrigerator is not resting firmly on floor. See “Leveling.”
Normal Sounds It sounds like water is flowing from the
Refrigerator is first plugged in. This is normal. Allow 24 hours for the refrigerator to
Warm or large amounts of food added. This is normal.
Door is le open. Ensure that door is not being held open by an item.
Hot weather or frequent openings This is normal.
Temperature control set to coldest set-
ting.
Interior needs to be cleaned. Clean the interior. See “Cleaning.”
Food stored too long. Dispose of spoiled food.
LED light is burned out. Contact a qualified technician to replace the burned
Something is obstructing door closure. Check for and remove obstructions.
refrigerator.
Humming or buzzing sounds The compressor and fans for cold air circulation can
Cracking or clicking sounds The interior parts will make this sound as they
Reset / Turn on breaker or replace fuse.
cooling system to restart.
cool down.
Adjust temperature to a warmer setting.
soda in the refrigerator, replace every 3 months.
out LED
Refrigerant flowing in the lines will make this sound
when the compressor starts and stops.
The refrigerator has an automatic defrosting system. The defrosted water will make this sound.
make this sound. If the refrigerator is not level, the
sound will be louder.
contract and expand in response to temperature
changes.
–11–
Page 12
ENGLISH ESPAÑOL FRANÇAIS
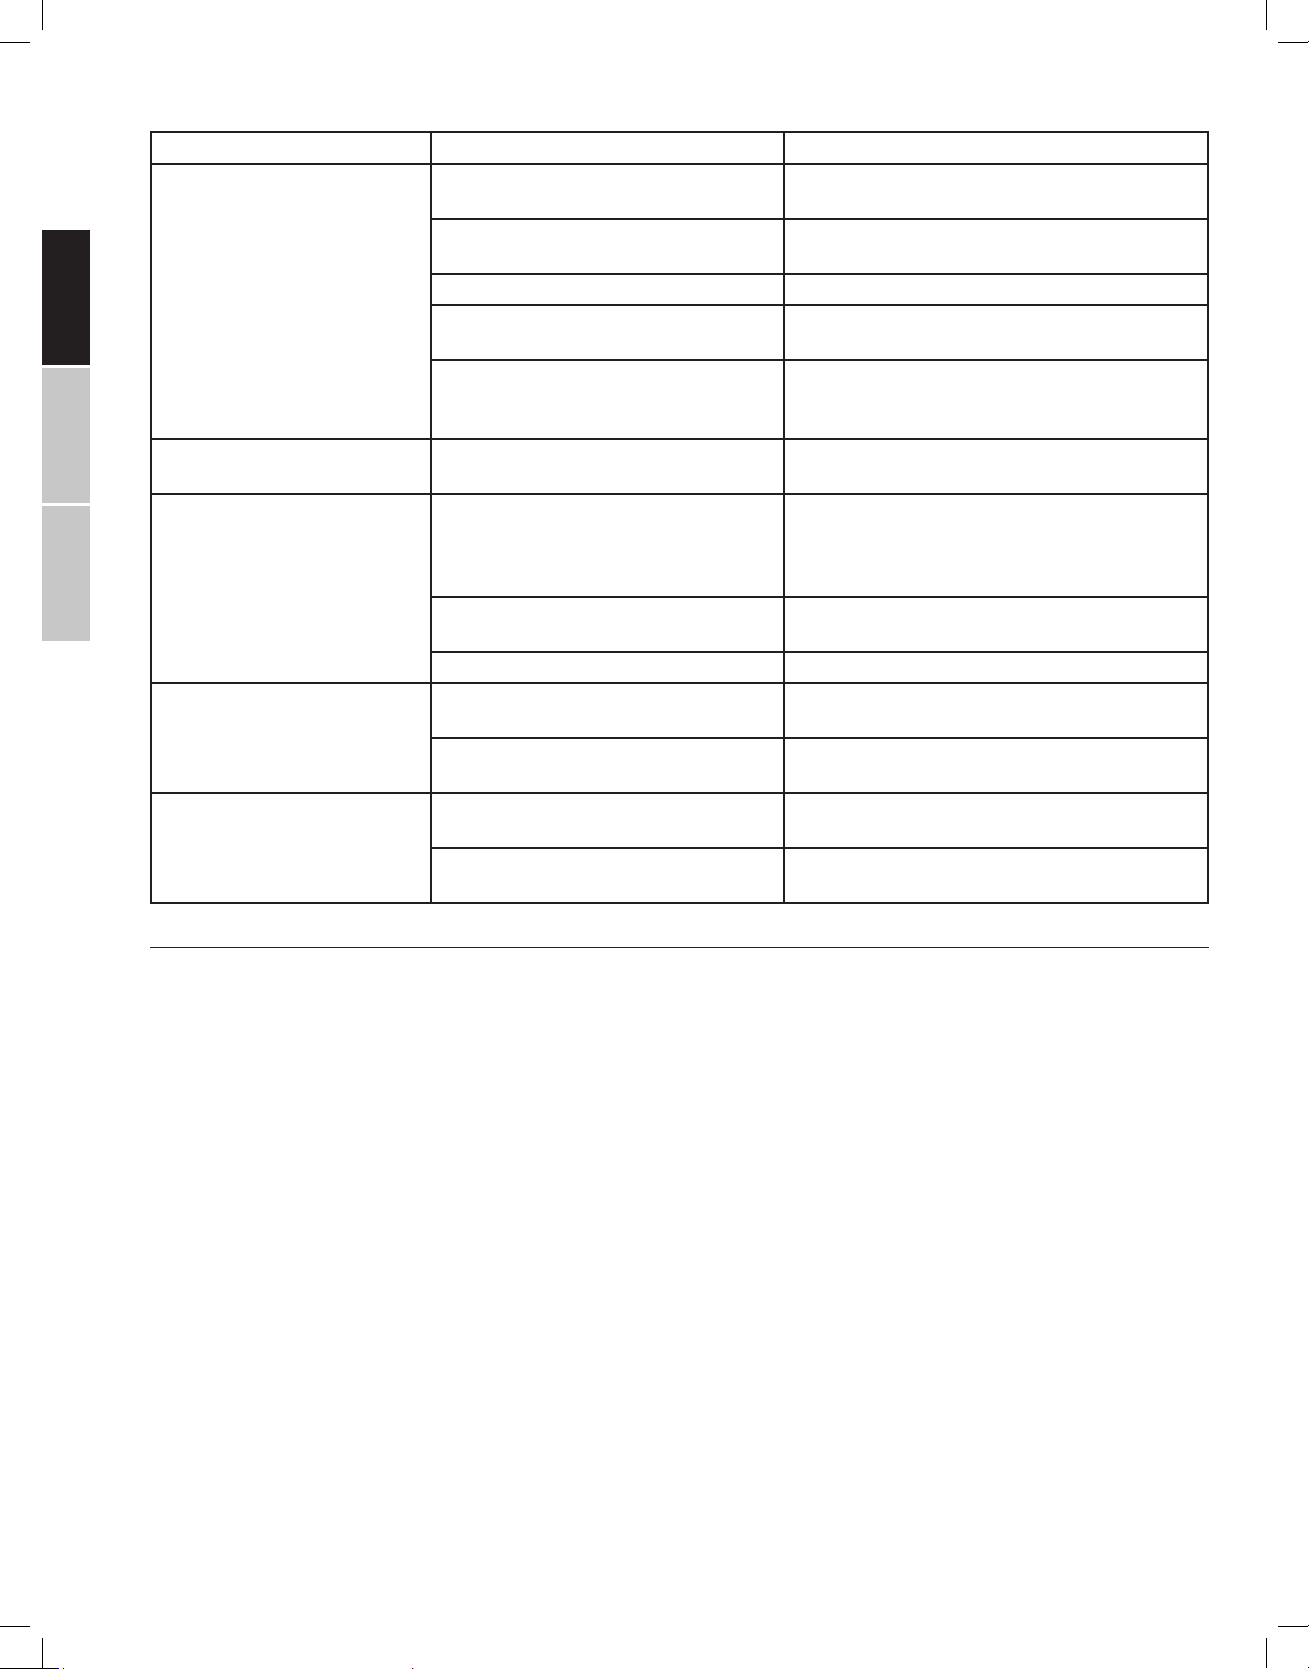
TEMPERATURE AND MOISTURE
PROBLEM POSSIBLE CAUSE(S) SOLUTION
Refrigerator or freezer is too
warm
Refrigerator or freezer is too
cold
Moisture on exterior/interior of
refrigerator
Frost or ice crystals on frozen
food
Food freezing in refrigerator Food placed too close to the air vent. Move items away from back and top of the refrig-
Temperature control is not set low
enough.
Doors opened frequently or le open. Keep door closed / Check that a package is not
Warm food added recently. Allow time for food and refrigerator to cool.
The space between the back of the refrig-
erator and the wall is too close.
Items against back of compartments are
blocking proper airflow.
Temperature control is set too low. Adjust temperature in the compartment to the
High humidity This is normal. Condensation on the rear wall of
Doors opened frequently or le open. Keep door closed. Check that a package is not
Open container of water in refrigerator Cover or seal container
Freezer door le open or opened fre-
quently.
Items blocking freezer air vents and pre-
venting proper air flow.
Temperature control set too cold. Adjust the temperature to a lower number (less
Adjust the compartment to a colder setting; allow
24 hours for the temperature to adjust.
preventing door from closing.
Allow 4” (10 cm) space between the back of the
refrigerator and the wall.
Store items only inside the trim of the glass
shelves; don’t place items against sides of the
compartments or directly in front of any vents.
next warmer setting; allow 24 hours to adjust.
the refrigerator compartment is due to the use of
Fresh Food Cold Wall technology. See “Parts and
Features.”
preventing door from closing.
Check that a package is not preventing the door
from closing completely. Limit door openings.
Move items away from rear wall.
erator.
cold) setting.
CUSTOMER SUPPORT
Before contacting customer support, please see the trouble- shooting guide above.
Visit our website to contact us, find answers to Frequently Asked Questions, and for other resources which may include an updated
version of this user’s manual.
WWW.IMPECCA.COM
–12–
Page 13

ENGLISHESPAÑOLFRANÇAIS
ONE-YEAR LIMITED APPLIANCE WARRANTY (US)
Impecca™ warrants this product against defects in
material and workmanship to the original purchaser
as specified below.
PARTS AND LABOR– if the product is determined to have a manufacturing defect, within
a period of one year from the date of the original purchase, Impecca™, at its own discretion,
will repair or replace the product parts at no
charge to you in the U.S.A.
To obtain warranty service by an authorized Impecca™ service center, please email us at: service@impecca.com to obtain a Repair and Maintenance Authorization (RMA) number and received instructions
on how the repair and/or replacement procedure will
take place.
Any glass materials included with the appliance will be covered for a period of 60 days
from purchase.
Impecca™ specifically excludes from this warranty
any non-electric/mechanical attachments, accessories and disposable parts including but not limited
to outside case, connecting cables, batteries and AC
adapters. Impecca™ reserves the right to repair or replace defective products with the same, equivalent or
newer models.
We reserve the right to either repair or replace product at our discretion. Replacement may be either
new or refurbished and while every endeavor will be
made to ensure it is the same model, if not possible it
will be equal or higher specification.
Normal “Wear and Tear” is not covered by this warranty. Further, Impecca™ hereby reserves the right to
determine “Wear and Tear” on any and all products.
Tampering or opening the product casting or shell
will void this warranty in its entirety.
Exclusions: This warranty does not cover the following:
1. Any product that has a defaced or covered serial
number.
2. Products that have been transferred to a second
owner.
3. Rust on the interior or exterior of the unit.
4. Products listed as “As-Is” or “Refurbished.”
5. Food loss due to any product failure.
6. Window air conditioners installed in a wall.
7. The product if used in a commercial setting.
8. Service calls that do not involve product malfunction.
9. Service calls for a product ruined by not following
the provided instructions.
10. Service calls to correct improper installation.
11. Costs associated with making the product accessible for servicing (including but not limited to
removal of trim/molding/cabinetry, etc.)
12. Service calls to replace any consumables such as
light bulbs, filters, etc.
13. Surcharges that may apply to service calls on
weekends, nights, holidays. Damages to the finish of appliance or household furnishings due to
installation of appliance.
14. Damages caused by any of the following: Acts
of God; fires; misuse; accidents; incorrect power
supply; service performed by unauthorized persons; use of non-genuine Impecca parts, etc.
ALL IMPLIED WARRANTIES, INCLUDING IMPLIED WARRANTIES OF MERCHANTABILITY AND FITNESS FOR A
PARTICULAR PURPOSE ARE LIMITED IN DURATION
TO 1 YEAR FROM THE DATE OF THE ORIGINAL RETAIL
PURCHASE OF THIS PRODUCT.
THESE WARRANTIES AND REMEDIES ARE THE SOLE
AND EXCLUSIVE WARRANTIES AND REMEDIES IN
CONNECTION WITH THE SALE AND USE OF THE
PRODUCT. NO OTHER WARRANTIES, ORAL OR WRITTEN, EXPRESSED OR IMPLIED, ARE GIVEN.
IMPECCA™ IS NOT RESPONSIBLE OR LIABLE FOR ANY
DAMAGE, WHETHER SPECIAL, INCIDENTAL, CONSEQUENTIAL, DIRECT OR OTHERWISE, OR WHETHER
KNOWN OR SHOULD HAVE BEEN KNOWN TO IMPECCA™, INCLUDING LOST PROFITS, GOODWILL, AND
PROPERTY AND PERSONAL INJURY RESULTING FROM
ANY BREACH OF WARRANTY, THE INABILITY TO USE
THE PRODUCT OR UNDER ANY LEGAL THEORY IN
CONTRACT OR TORT. IMPECCA LIABILITY IS LIMITED
TO THE ACTUAL PURCHASE PRICE PAID TO THE RETAIL SELLER OF THE DEFECTIVE PRODUCT.
No Impecca™ dealer, agent or employee is authorized to make any modification, extension, change
or amendment to this warranty without the written
consent and authorization from Impecca™.
Some states do not allow the exclusion or limitation
of implied warranties or liability for incidental or consequential damages, or do not allow a limitation on
how long an implied warranty lasts, so the above
limitations or exclusions may not apply to you. This
warranty gives you specific legal rights, and you have
other rights, which vary from state to state.
Note: Our Warranty center services only to Continental
U.S.A.
–13–
Page 14

ENGLISH ESPAÑOL FRANÇAIS
TABLA DE CONTENIDO
Instrucciones Importantes De Seguridad ........................................................................................................................................................................... 15
PIEZAS Y CARACTERÍSTICAS ..................................................................................................................................................................................................16
EMPEZAR ...................................................................................................................................................................................................................................16
PARED FRÍA PARA LA COMIDA FRESCA (PARED TRASERA DEL COMPARTIMENTO DEL REFRIGERADOR) 16
REQUERIMIENTOS DE INSTALACIÓN ...................................................................................................................................................................................16
REQUISITOS ELÉCTRICOS .....................................................................................................................................................................................................17
DESEMPAQUE EL REFRIGERADOR .......................................................................................................................................................................................17
GIRO DE LA PUERTA INVERSA (OPCIONAL) ........................................................................................................................................................................18
NIVELACIÓN Y AJUSTE DE LA PUERTA (SI ES NECESARIO) ............................................................................................................................................19
COMPLETE LA INSTALACIÓN ................................................................................................................................................................................................. 19
CONTROL DE TEMPERATURA ............................................................................................................................................................................................... 20
ALMACENAMIENTO .................................................................................................................................................................................................................20
CONTENEDORES DE PUERTA................................................................................................................................................................................................20
CONGELADOR ..........................................................................................................................................................................................................................20
ALMACENAMIENTO DEL CONGELADOR ..............................................................................................................................................................................21
CUIDADO DEL REFRIGERADOR .............................................................................................................................................................................................21
DESCONGELACIÓN..................................................................................................................................................................................................................21
FALLO DE ENTRADA DE ENERGÍA ELÉCTICA .....................................................................................................................................................................22
LUZ ............................................................................................................................................................................................................................................. 22
CUIDADO DE VACACIONES Y MUDANZA .............................................................................................................................................................................. 22
MUDANZA ..................................................................................................................................................................................................................................22
SOLUCIÓN DE PROBLEMAS ...................................................................................................................................................................................................23
Soporte Al Cliente....................................................................................................................................................................................................................24
Garantía Limitada Por Un Año .............................................................................................................................................................................................. 25
–14–
Page 15

ENGLISHESPAÑOLFRANÇAIS
INSTRUCCIONES IMPORTANTES DE SEGURIDAD
GUARDE ESTAS INSTRUCCIONES. PUEDE LLEGAR A NECESITARLAS EN EL FUTURO.
1. Este refrigerador debe instalarse y ubicarse de acuerdo con las instrucciones de instalación antes de ser utilizado.
2. No permita que los niños trepen, se paren o se cuelguen de los entrepaños del refrigerador, pueden dañar el refrigerador y resultar
lesionados severamente.
3. No almacene o use gasolina ni otros vapores y líquidos inflamables en las cercanías de este o cualquier otro electrodoméstico.
4. Mantenga los dedos lejos del espacio entre las puertas y el gabinete. Tenga cuidado al cerrar las puertas cuando hay niños en el
área.
5. En refrigeradores con fábrica de hielo, evite el contacto con las partes móviles del mecanismo de expulsión, o con el elemento
calentador que libera los cubos. No coloque los dedos o manos cerca o sobre el mecanismo automático de fabricación de hielo
mientras el refrigerados se encuentre conectado.
6. Desconecte el refrigerador antes de limpiar y hacer reparaciones.
7. Le recomendamos ampliamente que cualquier servicio sea realizado por un técnico calificado.
8. Al colocar la perilla de control de temperatura en la posición “0” se detendrá la función de enfriamiento pero no se apagará el refrigerador.
9. No deje el refrigerador en temperaturas extremadamente frías o calientes.
10. No coloque el refrigerador cerca de fuentes de calor o flamas abiertas.
11. Limpie el refrigerador con un paño suave y húmedo. Elimine las manchas con jabón suave. No limpie la unidad con solventes de
tipo industrial o químicos abrasivos.
12. No coloque objetos pesados en la parte superior del refrigerador.
13. Nunca instale el refrigerador donde hay mucha humedad o en áreas donde pueda haber salpicaduras de agua.
14. No permita que los niños se cuelguen de las puertas; el refrigerador puede volcarse y lastimar a los niños.
15. Nunca coma alimentos que se hayan arruinado por haber estado almacenados demasiado tiempo en el refrigerador o dentro de un
refrigerador descompuesto.
16. No utilice herramientas filosas dentro del refrigerador (como un picahielos para retirar el hielo) ya que puede ocasionar daños.
17. Si no va a usar el refrigerador por un periodo de tiempo largo, retire todos los alimentos del refrigerador y desconéctelo.
ANTES DE DESHACERSE DE SU VIEJO REFRIGERADOR:
Su antiguo refrigerados puede contar con un sistema de enfriamiento que usa CFC (clorofluorocarbonos) y HCF (hidroclorofluorocarbonos). Se cree que los CFC y HCF dañan el ozono estratosférico si son liberados a la atmósfera. Si va a desechar su refrigerador viejo,
asegúrese de que el refrigerante ha sido eliminado para su desecho adecuado por un técnico calificado. Revise si su vendedor puede
llevarse su viejo refrigerador y desecharlo o reciclarlo adecuadamente.
Vea www.epa.gov/rad para obtener mayor información en la aplicación responsable de desechos.
ADVERTENCIA SOBRE NIÑOS ATRAPADOS
Existe el riesgo de que los niños queden atrapados dentro del refrigerador. Antes de desechar su refrigerador o congelador viejo:
1. Quite las puertas
2. Deje los entrepaños colocados en su lugar para que los niños no puedan meterse fácilmente
PRECAUCIÓN: NO SE RECOMIENDA EL USO DE CABLES DE EXTENSIÓN.
PARA USO DOMÉSTICO ÚNICAMENTE
GUARDE ESTAS INSTRUCCIONES
–15–
Page 16

ENGLISH ESPAÑOL FRANÇAIS
PIEZAS Y CARACTERÍSTICAS
Nota: Todas las imágenes en este manual de instrucciones son
solo para indicación; la apariencia física y las opciones en su modelo pueden variar.
NÚMERO DE SERIE Y MODELO
Por favor, registre su número de modelo y de serie a continuación. Puede encontrar la matrícula en la pared superior izquierda
dentro del refrigerador.
Número de modelo: __________________________
Número de serie: ____________________________
Fecha de compra: ___________________________
AVISOS DE SEGURIDAD
Este dispositivo está destinado a ser utilizado en aplicaciones
domésticas y similares, tales como:
• Áreas de cocina del personal en tiendas, oficinas y otros
entornos de trabajo;
• Uso individual en habitaciones de hotel y otros entornos de
tipo residencial;
1. DIAL DE CONTROL Y LUZ INTERIOR
2. CONTENEDORES DE PUERTAS (3)
3. RETENEDOR DE BOTELLA
4. PIES AJUSTABLES
5. CAJONES DE ALMACENAMIENTO DE ALIMENTOS CONGELADOS (3)
6. COMPARTIMENTO DE ALMACENAMIENTO DE ALIMENTOS
CONGELADOS
7. COMPARTIMENTO CAJÓN
8. TAPA DEL COMPARTIMIENTO DE CAJÓN
9. DRENAJE
10. ESTANTERÍAS DE ANCHURA COMPLETA (3)
EMPEZAR
Gracias por elegir este refrigerador Impecca de calidad. Este
electrodoméstico está diseñado para el consumo doméstico. Lea
atentamente este manual antes de usar este producto. Asegúrese
de guardar el manual para consultas posteriores.
PARED FRÍA PARA LA COMIDA FRESCA
(PARED TRASERA DEL COMPARTIMENTO
DEL REFRIGERADOR)
Su nuevo refrigerador tiene tecnología “Cold Wall” (pared fría)
para almacenar mejor los alimentos perecederos.
La pared posterior del compartimiento del refrigerador promueve
la condensación de humedad, similar a lo que se ve en los pasillos
de productos agrícolas de una tienda de comestibles.
El exceso de humedad caerá en el drenaje en la parte inferior de
la pared.
REQUERIMIENTOS DE INSTALACIÓN
REQUISITOS DE UBICACIÓN
IMPORTANTE: Este refrigerador está diseñado solo para uso
doméstico en interiores. Este refrigerador no debe empotrarse ni
colocarse en un gabinete cerrado. Está diseñado solo para instalación independiente.
–16–
Page 17

ENGLISHESPAÑOLFRANÇAIS
Para garantizar una ventilación adecuada para su refrigerador,
deje 2” (5,08 cm) de espacio en cada lado y en la parte superior.
Deje espacio para 4” (10 cm) detrás del refrigerador. Cuando
instale su refrigerador junto a una pared fija, deje 4” (10 cm) como
mínimo para que la puerta se abra.
NOTA: Este refrigerador está diseñado para ser utilizado en un
lugar donde la temperatura varía desde un mínimo de 55° F (13°
C) hasta un máximo de 110° F (43° C). El rango de temperatura
ambiente preferido para un rendimiento óptimo, que reduce el
consumo de electricidad y proporciona un enfriamiento superior,
está entre 60° F (16° C) y 90° F (32° C). Se recomienda no instalar el
refrigerador cerca de una fuente de calor, como un horno o radiador, ni a la luz solar directa.
REQUISITOS ELÉCTRICOS
I ADVERTENCIA
PELIGRO DE DESCARGA ELÉCTRICA
ENCHUFE A UNA TOMA DE CORRIENTE DE 3 PUNTAS A TIERRA.
NO RETIRE LA PUNTA A TIERRA DEL ENCHUFE DEL CABLE DE ENTRADA DE ENERGÍA.
NO USE UN ADAPTADOR. NO UTILICE UN CABLE DE EXTENSIÓN.
EL NO REALIZAR ESTO PUEDE RESULTAR EN MUERTE, INCENDIO O
DESCARGA ELÉCTRICA.
NOTA: antes de realizar cualquier tipo de instalación o limpieza,
desconecte el refrigerador de la fuente de electricidad. Cuando
termine, vuelva a conectar el refrigerador a la fuente de electricidad y restablezca los controles de temperatura a la configuración
deseada.
DESEMPAQUE EL REFRIGERADOR
I ADVERTENCIA
PELIGRO DE INCENDIO O EXPLOSIÓN
NO PERFORAR LA TUBERÍA DEL REFRIGERANTE.
SIGA LAS INSTRUCCIONES DE MANIPUL ACIÓN CUIDADOSAMENTE.
REFRIGERANTE INFLAMABLE UTILIZADO.
EL NO HACERLO PUEDE RESULTAR EN MUERTE, EXPLOSIÓN O
INCENDIO.
I ADVERTENCIA
PELIGRO DE PESO EXCESIVO
USE DOS O MÁS PERSONAS PARA MOVER E INSTALAR EL
REFRIGERADOR.
EL NO REALIZAR ESTO PUEDE RESULTAR EN UNA LESIÓN EN
LA ESPALDA U OTRO LUGAR.
QUITAR EL EMBALAJE
• Retire la cinta y los residuos de pegamento de las superficies antes de encender el refrigerador. Frote una pequeña
cantidad de jabón líquido sobre el adhesivo con los dedos.
Enjuague con agua tibia y seque.
• No utilice instrumentos filosos, alcohol, líquidos inflamables
o limpiadores abrasivos para eliminar la cinta o el pegamento. Estos productos pueden dañar la superficie de su refrigerador. Para obtener más información, consulte “Seguridad
del refrigerador”.
• Retire los bloques de espuma insertados entre el motor del
compresor y el gabinete, como se muestra.
• Elimine/recicle todos los materiales de embalaje.
NOTA: No retire la bandeja de drenaje de plástico ubicada sobre
el motor del compresor en los modelos con autodescongelamiento.
Antes de mover el refrigerador a su ubicación final, es importante
asegurarse de tener la conexión eléctrica adecuada.
MÉTODO RECOMENDADO DE CONEXIÓN A TIERRA
Se requiere un suministro eléctrico con conexión a tierra con
un fusible de 115 voltios, 60 Hz, CA de solo 15 o 20 amperios. Se
recomienda que se proporcione un circuito separado que sirva
solo a su refrigerador. Use una salida que no pueda apagarse con
un interruptor. No utilice un cable de extensión.
A. Bloques de espuma
B. Compresor
–17–
Page 18

ENGLISH ESPAÑOL FRANÇAIS
CUANDO MUEVA SU REFRIGERADOR:
Su refrigerador es pesado. Cuando mueva el refrigerador para
limpiarlo o repararlo, asegúrese de cubrir el piso con cartón o
madera prensada para evitar daños en el piso. Siempre jale el
refrigerador hacia afuera cuando lo mueva. No mueva o “camine”
el refrigerador cuando trate de moverlo, ya que podría dañarse el
piso.
LIMPIE ANTES DE UTILIZAR
Después de quitar todos los materiales de embalaje, limpie el
interior del refrigerador antes de usarlo. Consulte las instrucciones
de limpieza en “Cuidado del refrigerador”.
INFORMACIÓN IMPORTANTE ACERCA DE ESTANTES Y
CUBIERTAS DE VIDRIO:
No limpie los estantes o cubiertas de vidrio con agua tibia cuando
estén fríos. Los estantes y las cubiertas pueden romperse si están
expuestos a cambios repentinos de temperatura o a un impacto,
como golpes. El vidrio templado está diseñado para romperse
en muchas piezas pequeñas del tamaño de una pequeña piedra.
Esto es normal. Los estantes y las cubiertas de vidrio son pesados.
Use ambas manos cuando las quite para evitar que caigan.
GIRO DE LA PUERTA INVERSA (OPCIONAL)
Si desea invertir el movimiento de la puerta para que las puertas
se abran desde el lado opuesto, vea las siguientes instrucciones.
IMPORTANTE: Los gráficos a los que se hace referencia en las
siguientes instrucciones se incluyen más adelante en esta sección.
Vea el gráfico “Giro de Puerta Inversa”.
QUITAR LAS PUERTAS
I ADVERTENCIA
PELIGRO DE PESO EXCESIVO
USE DOS O MÁS PERSONAS PARA MOVER E INSTALAR EL
REFRIGERADOR.
EL NO REALIZAR ESTO PUEDE RESULTAR EN UNA LESIÓN EN
LA ESPALDA U OTRO LUGAR.
1. Desenchufe el refrigerador o desconecte la energía.
2. Retire todos los alimentos, estantes, cajones, bandejas y
papeleras del ga
3. Mientras alguien sujeta las puertas, desatornille los pernos y
retire la bisagra central (1).
4. Baje la puerta del refrigerador de la bisagra superior (2).
5. Levante la puerta del congelador de la bisagra inferior (3).
binete interior del refrigerador y la puerta.
6. Retire los per
superior (5).
7. Usando dos o más personas, incline el refrigerador hacia la
parte posterior en un ángulo de 45° para acceder y quitar el pie
de nivelación (7 y 8).
8. Retire la bisagra de la puerta inferior y el pie de nivelación (9).
NOTA: El pie de nivelación en el lado de la bisagra debe moverse
al lado opuesto con la bisagra de la puerta.
nos de la bisagra superior y retire la bisagra
–18–
Page 19

ENGLISHESPAÑOLFRANÇAIS
VOLTEAR LAS PUERTAS
1. Retire los tapones de orificios del divisor central y coloque los
tapones en los orificios restantes después de retirar la bisagra
central (6).
2. Retire la cubierta de plástico. Instale el tope (provisto en la
bolsa de partes), en el lado opuesto (10).
3. Desatornille y quite el casquillo de la bisagra central de la
parte inferior de la puerta del refrigerador (11).
4. Instale el casquillo de la bisagra del medio (provisto en la
bolsa de partes) al lado opuesto. (12)
5. Retire el casquillo de la bisagra y el tapón de la puerta del
congelador y vuelva a instalarlos en el lado opuesto de la
puerta. (13)
6. Retire el casquillo de la bisagra inferior de la puerta del congelador y vuelva a instalarlo en el lado opuesto. (14)
REEMPLACE LAS PUERTAS
1. Vuelva a montar e instale la bisagra inferior en el lado opuesto. (15)
2. Con dos o más personas, vuelva a insertar el pie de nivelación en el lado opuesto con la bisagra de la puerta inferior.
(16)
3. Gire la bisagra superior 180°. Desatornille el pasador de la
bisagra y vuelva a instalarlo en el lado opuesto. (17)
4. Vuelva a instalar la bisagra superior y apriete los pernos. (18)
5. Vuelva a instalar la cubierta de plástico en el frente del borde
superior. (19)
6. Coloque la puerta del congelador en la bisagra inferior y
cierre la puerta. (20)
7. Coloque la bisagra central en la parte superior de la puerta
del congelador. (21)
8. Inserte la puerta del refrigerador entre las bisagras superior y
central. (22)
9. Asegure la bisagra central al gabinete, y luego alinee y ajuste
las puertas.
10. Apriete completamente todos los pernos. (23)
11. Con dos o más personas, coloque el refrigerador completa-
mente en posición vertical y ajuste las patas delanteras para
nivelarlas. Ver “Nivelación y ajuste de la puerta”.
12. Devuelva todas las piezas extraíbles al gabinete y a la puerta..
GIRO DE LA PUERTA INVERSA
NIVELACIÓN Y AJUSTE DE LA PUERTA (SI ES NECESARIO)
El refrigerador debe estar nivelado para mantener un rendimiento y apariencia óptimos, y
para evitar el exceso de vibración y ruido.
NIVELACIÓN
Mueva el refrigerador a su ubicación final en un piso plano y uniforme. Gire los pies en la parte inferior, en la parte frontal del gabinete para subir o bajar ese lado del refrigerador hasta
que el refrigerador esté nivelado de lado a lado.
NOTA: Hacer que alguien empuje contra la parte superior del refrigerador quita algo de
peso de los tornillos niveladores. Esto hace que sea más fácil girar los tornillos. Gire ambas
patas delanteras la misma cantidad de veces para elevar ligeramente la parte frontal del
refrigerador. Esto facilitará el cierre de las puertas.
COMPLETE LA INSTALACIÓN
1. Espere un mínimo de 4 horas para permitir que el sistema de enfriamiento se asiente antes de encender el mismo.
2. Enchufe a un tomacorriente de 3 terminales conectado a tierra.
3. Espere hasta que el refrigerador se haya enfriado a las temperaturas recomendadas antes de agregar alimentos.
–19–
Page 20

ENGLISH ESPAÑOL FRANÇAIS
CONTROL DE TEMPERATURA
Ajuste el dial de control de temperatura a la configuración recomendada “4”.
Con un termómetro preciso, controle la temperatura del compartimiento para garantizar que se mantenga la temperatura de almacenamiento adecuada. Ajuste la temperatura, si es necesario.
Configuración recomendada “4”
estante a lo largo de la pared del refrigerador y extráigalo.
2. Para volver a instalar un estante, coloque el estante tanto en
los soportes delanteros como traseros. Empuje el estante hacia
la parte posterior del refrigerador hasta que la parte posterior
del estante se enganche alrededor de los soportes del estante
posterior.
CONTENEDORES DE PUERTA
PARA APAGAR EL ENFRIAMIENTO:
Gire el selector de control de temperatura a la posición “0” APAGADO (OFF).
PARA AJUSTAR LA TEMPERATURA:
Las temperaturas son controladas por el dial de control de temperatura. El control se puede configurar en cualquier posición entre 1
(menos frío) y 7 (más frío).
La temperatura promedio dentro del compartimento del refrigerador debe ser de aproximadamente 37° F (2.8° C). Es posible que
deba ajustar el control de temperatura para obtener la temperatura
deseada.
NOTA: Las secciones del compartimiento del refrigerador pueden
ser más frías o más calientes (como la gaveta para ensalada y la
parte superior del gabinete) lo cual es normal.
Las aperturas frecuentes de las puertas hacen que las temperaturas internas aumenten, por lo tanto, cierre la puerta lo antes posible
después del uso.
ALMACENAMIENTO
Los compartimientos de la puerta se pueden quitar para la limpieza.
PARA QUITAR UNA BANDEJA DE PUERTA:
1. Coloque las manos en ambos lados del contenedor y levántelo
hacia arriba.
2. Tire para quitar.
CONGELADOR
El compartimento del congelador es adecuado para el almacenamiento a largo plazo de alimentos comercialmente congelados y
también se puede utilizar para congelar alimentos frescos.
IMPORTANTE: el ventilador dentro del compartimento del congelador hace circular el aire frío, que es esencial para el funcionamiento del congelador. Asegúrese que los conductos de aire no estén
bloqueados por los alimentos o el empaque. El bloqueo de los
conductos de aire puede provocar un aumento de la temperatura
interna del congelador (puede producirse un deshielo si la temperatura aumenta demasiado).
A. CONDUCTOS DE AIRE
ESTANTERÍAS DE ANCHURA COMPLETA
La altura de los estantes puede ajustarse para adaptarse a sus
necesidades de almacenamiento.
1. Para quitar un estante, levante el borde frontal y posterior para
desenganchar los ganchos de la estantería de los soportes del
–20–
Page 21

ENGLISHESPAÑOLFRANÇAIS
ALMACENAMIENTO DEL CONGELADOR
Su nuevo refrigerador ofrece la flexibilidad de almacenamiento en
cajones o estantes para sus necesidades de almacenamiento en
el congelador. Retire cualquier cajón del congelador para usar el
estante debajo.
1. Para quitar un cajón:
2. Saque el cajón lo más lejos posible.
3. Incline el cajón hacia arriba para quitarlo.
Guarde el cajón para uso futuro en un lugar donde no se dañe.
trapo limpio o esponja suave y un detergente suave en agua
tibia. Enjuague las superficies con agua limpia y tibia y seque
inmediatamente para evitar manchas de agua.
Acero inoxidable: el acero inoxidable es resistente a la corrosión y no es a prueba de corrosión. Para ayudar a evitar la
corrosión de su acero inoxidable, lave las superficies de acero
inoxidable con un paño o esponja suave y limpia y un detergente suave en agua tibia. Enjuague las superficies con agua
limpia y tibia y seque inmediatamente para evitar manchas de
agua.
NOTA: Cuando limpie el acero inoxidable, siempre limpie en la
dirección de la veta para evitar que se raye.
6. Limpie el condensador al menos una vez al año. Para ello, use
una aspiradora y elimine el polvo acumulado en el condensador.
NOTA: El condensador está ubicado en la parte posterior del
refrigerador.
7. Enchufe el refrigerador o vuelva a conectar la corriente.
DESCONGELACIÓN
Los compartimientos del refrigerador y del congelador se descongelan automáticamente. Una pequeña cantidad de acumulación
de escarcha en la pared fría de alimentos frescos es normal. Si la
cantidad de escarcha se vuelve excesiva, es posible que deba elevar
la temperatura ajustando el control de temperatura a un ajuste
más bajo (menos frío). Ver “Control”.
CUIDADO DEL REFRIGERADOR
LIMPIEZA
Limpie los compartimentos del congelador y el refrigerador aproximadamente una vez al mes para evitar la acumulación de olores.
Limpie los derrames inmediatamente.
I ADVERTENCIA
PELIGRO DE EXPLOSIÓN
USE UN LIMPIADOR NO INFLAMABLE.
EL NO HACERLO PUEDE RESULTAR EN MUERTE, EXPLOSIÓN O
INCENDIO.
IMPORTANTE:
• No utilice productos químicos fuertes, amoníaco, blanqueador de
cloro, detergente concentrado, solventes abrasivos o estropajos
metálicos para limpiar el refrigerador dentro o fuera. Pueden dañar
y/o decolorar el acabado del refrigerador.
• No use agua tibia para limpiar los estantes de vidrio cuando aún
estén fríos. El vidrio puede romperse cuando se expone a cambios
repentinos de temperatura o impacto.
Desenchufe el refrigerador o desconecte la energía.
El agua de descongelación pasa a través de un canal de recolección
y dentro del tubo de drenaje que está conectado a la bandeja de
drenaje en la parte posterior del refrigerador. Para evitar que el
agua se derrame en el piso, es importante asegurarse de que el
extremo del tubo de drenaje se inserte por completo en la bandeja
de drenaje.
Si el agua de descongelación no drena del canal de recolección,
verifique que el tubo de drenaje esté limpio. El tubo de drenaje se
puede limpiar con un limpiador de tuberías o empujando el desatascador de plástico (provisto) hacia abajo del tubo de drenaje.
Durante la descongelación, pueden formarse gotas de agua en
la parte posterior del compartimento del refrigerador donde se
encuentran los evaporadores ocultos. Parte de la humedad permanecerá en la pared fría de alimentos frescos (pared posterior) y
se volverá a congelar cuando se complete la descongelación. No
utilice objetos puntiagudos o de bordes afilados, como cuchillos u
horquillas, para eliminar las gotas congeladas.
A. PARED REFRIGERADOR TRASERO
B. DESATASCADOR PLÁSTICO
C. CANAL DE RECOLECCION DE AGUA DESCONGELADA
4. Con una esponja limpia o un paño suave y un detergente
suave disuelto en agua tibia, lave las partes removibles y las
superficies interiores. Enjuague bien y seque completamente.
5. Limpie las superficies exteriores.
Metal pintado: Lave los exteriores de metal pintados con un
–21–
Page 22

ENGLISH ESPAÑOL FRANÇAIS
FALLO DE ENTRADA DE ENERGÍA ELÉCTICA
Si hay un corte de energía, no abra la puerta del congelador. La
comida congelada no debe verse afectada si la energía se restablece dentro de varias horas. Si no hay energía durante un período prolongado de tiempo, verifique que los alimentos se hayan
descongelado.
LUZ
PARA REEMPLAZAR UNA BOMBILLA DE LUZ:
MUDANZA
I ADVERTENCIA
PELIGRO DE PESO EXCESIVO
USE DOS O MÁS PERSONAS PARA MOVER E INSTALAR EL
REFRIGERADOR.
EL NO REALIZAR ESTO PUEDE RESULTAR EN UNA LESIÓN EN
LA ESPALDA U OTRO LUGAR.
NOTA: Es posible que deba quitar el estante superior para acceder
a la bombilla.
1. Desenchufe el refrigerador o desconecte la energía.
2. Retire el tornillo que sujeta la pantalla de la luz, y luego retire la
pantalla de la luz.
3. Retire la bombilla fundida y reemplácela con una bombilla
para electrodomésticos del mismo tamaño, forma y potencia.
• Reemplace con una bombilla LED de 1,2 vatios (equivalente
incandescente de 25 vatios) con base de candelabros. IMPORTANTE: NO reemplace con una bombilla incandescente de
más de 10 vatios.
• Se considera que el compartimiento del refrigerador es un
ambiente húmedo/mojado, y algunas bombillas de reemplazo
LED no se recomiendan para entornos húmedos o mojados.
Antes de la instalación, lea y siga todas las instrucciones en el
paquete de LED.
4. Reemplace el escudo de luz.
5. Enchufe el refrigerador o vuelva a conectar la corriente.
CUIDADO DE VACACIONES Y MUDANZA
VACACIONES
Si elige dejar el refrigerador encendido mientras está ausente:
1. Use cualquier producto perecedero y congele otros artículos.
Si elige apagar el refrigerador antes de irse:
1. Retire toda la comida del refrigerador y el congelador.
2. Desenchufe el refrigerador o desconecte la energía eléctrica.
3. Limpie el refrigerador, pásele un trapo húmedo y séquelo bien.
4. Pegue bloques de goma o madera en la parte superior de ambas puertas para mantenerlas abiertas lo suficiente como para
que entre aire. Esto evita que el olor y el moho se acumulen.
Cuando traslade su refrigerador a un nuevo hogar, siga estas instrucciones para prepararlo para el traslado.
IMPORTANTE:
• Si es posible, mueva el refrigerador en posición vertical. Si el
refrigerador debe moverse horizontalmente, debe colocarse
solo en el lado derecho (cuando mira hacia la parte delantera del refrigerador). Después de colocar el refrigerador en
posición vertical, espere al menos 12 horas para permitir que
el sistema se asiente antes de enchufar el refrigerador.
1. Retire todos los alimentos del refrigerador y empaquete todos
los alimentos congelados en hielo seco.
2. Desenchufe el refrigerador.
3. Vacíe cualquier agua en la bandeja de drenaje.
4. Asegúrese de que el tubo de drenaje del agua de descongelación en la parte posterior del refrigerador esté conectado a la
bandeja de drenaje en la parte superior del compresor para
evitar que el agua de descongelación se derrame en el piso.
5. Saque todas las piezas extraíbles, envuélvalas bien y péguelas
con cinta adhesiva para que no se muevan durante la mudanza.
6. Lave y enjuague el interior, y luego séquelo completamente.
7. Levante las patas niveladoras para que no raspen el piso. Ver
“Nivelación”.
8. Cierre con cinta adhesiva las puertas y pegue el cable de entrada de energía a la parte posterior del refrigerador con cinta
adhesiva de igual forma.
9. Cuando llegue a su nuevo hogar, coloque como antes y consulte la sección “Instrucciones de instalación”.
–22–
Page 23

ENGLISHESPAÑOLFRANÇAIS
SOLUCIÓN DE PROBLEMAS
El usuario puede manejar los siguientes problemas simples. Por favor, póngase en contacto con soporte al cliente si los problemas no se
resuelven.
EL REFRIGERADOR NO FUNCIONA
PROBLEMA POSIBLE(S) CAUSA(S) SOLUCIÓN
El refrigerador no funciona El refrigerador está desenchufado. Enchufe el cable de energía en la fuente de energía
eléctrica.
El interruptor está disparado o apagado/el
fusible está fundido.
El refrigerador está en modo de descongelación.
El compresor del refrigerador
funciona con frecuencia o
durante largos periodos de
tiempo.
NOTA: Este refrigerador está
diseñado para funcionar por
períodos de tiempo más largos
con un menor consumo de
electricidad.
El refrigerador tiene un olor Los alimentos no están sellados ni empa-
La luz no se enciende El refrigerador está desenchufado. Enchufe el refrigerador a la fuente eléctrica.
Las puertas no se cierran correctamente.
Vibración o movimiento El refrigerador no está estable sobre el
Sonidos normales Parece que fluye agua del refrigerador. El refrigerante que fluye en las líneas emitirá este
El refrigerador se enchufa por primera vez. Esto es normal. Espere 24 horas para que el refrigera-
Se agregaron cantidades calientes o grandes de alimentos.
La puerta se deja abierta. Asegúrese de que un artículo no abra la puerta.
Clima cálido o aperturas frecuentes. Esto es normal.
Control de temperatura establecido en la
configuración más fría.
cados adecuadamente.
El interior necesita ser limpiado. Limpie el interior. Consulte "Limpieza".
Comida almacenada demasiado tiempo. Deseche los alimentos en mal estado.
La luz LED está quemada. Póngase en contacto con un técnico calificado para
El refrigerador no está nivelado. Consulte "Nivelación".
Algo está obstruyendo el cierre de la
puerta.
suelo.
Sonidos de zumbido El compresor y los ventiladores para la circulación de
Sonidos de chasquido Las partes interiores emitirán este sonido a medida
Restablecer /encender el interruptor o reemplazar el
fusible.
Espere aproximadamente 40 minutos para que finalice el ciclo de descongelación y reinicie el sistema de
enfriamiento.
dor se enfríe.
Esto es normal.
Ajuste la configuración para una temperatura más
cálida.
Vuelva a empacar los alimentos. Coloque una caja
abierta de bicarbonato de sodio en el refrigerador,
reemplácela cada 3 meses.
reemplazar el LED quemado.
Verifique y elimine obstrucciones.
Consulte “Nivelación”.
sonido cuando el compresor arranque y se detenga.
El refrigerador tiene un sistema de descongelación
automático. El agua descongelada hará que este
sonido.
aire frío pueden hacer este sonido. Si el refrigerador
no está nivelado, el sonido será más fuerte.
que se contraen y se expanden en respuesta a los
cambios de temperatura.
–23–
Page 24

ENGLISH ESPAÑOL FRANÇAIS
TEMPERATURA Y HUMEDAD
PROBLEMA POSIBLE(S) CAUSA(S) SOLUCIÓN
El refrigerador o el congelador
está demasiado caliente.
El refrigerador o congelador está
demasiado frío
Humedad en el exterior/ interior
del refrigerador
Cristales de escarcha o hielo en
los alimentos congelados
Congelación de alimentos en el
refrigerador
El control de temperatura no está lo suficientemente bajo.
Las puertas se abrieron con frecuencia o
se dejaron abiertas.
Comida caliente agregada recientemente. Deje que se enfríe la comida y el refrigerador.
El espacio entre la parte posterior del refri-
gerador y la pared está demasiado cerca.
Los elementos contra la parte posterior de
los compartimentos están bloqueando el
flujo de aire adecuado.
El control de temperatura está demasiado
bajo.
Alta humedad Esto es normal. La condensación en la pared
Las puertas se abrieron con frecuencia o
se dejaron abiertas.
Recipiente de agua abierto en el refrigerador.
La puerta del congelador se dejó abierta o
se abrió con frecuencia.
Elementos bloquean las salidas de aire
del congelador y evitan el flujo de aire
adecuado.
Los alimentos se colocan demasiado
cerca de la salida de aire.
El control de temperatura está demasiado
frío.
Ajuste el compartimiento a una configuración más
fría; permita 24 horas para que la temperatura se
ajuste.
Mantenga la puerta cerrada/Verifique que un paquete no impida que se cierre la puerta.
Deje un espacio de 4" (10 cm) entre la parte posterior del refrigerador y la pared.
Almacene los artículos solo dentro del borde de los
estantes de vidrio; no coloque elementos contra los
costados de los compartimientos o directamente
frente a las rejillas de ventilación.
Ajuste la temperatura en el compartimiento al
siguiente ajuste más cálido; permita 24 horas para
adaptarse.
posterior del compartimiento del refrigerador se
debe al uso de la tecnología Fresh Food Cold Wall
(Pared Fría para la Comida Fresca). Consulte "Piezas
y características".
Mantenga la puerta cerrada. Verifique que un paquete no impida que se cierre la puerta.
Cubra o tape el contenedor.
Verifique que un paquete no impida que la puerta
se cierre por completo. Limite las aperturas de
puertas.
Mueva los artículos lejos de la pared posterior.
Mueva los artículos lejos de la parte posterior y
superior del refrigerador.
Configure la temperatura a un ajuste de número
más bajo (menos frío).
SOPORTE AL CLIENTE
Antes de entrar en contacto con soporte al cliente, lea nuestra guía de solución de problemas presentada anteriormente en este manual.
Visite nuestro sitio web para entrar en contacto con nosotros, encontrar respuestas a las Preguntas Más Frecuentes y otros recursos entre
los cuales podría encontrar una actualización a este manual.
WWW.IMPECCA.COM
–24–
Page 25

ENGLISHESPAÑOLFRANÇAIS
GARANTÍA LIMITADA POR UN AÑO
Impecca™ garantiza al comprador original este producto
contra defectos en su material y mano de obra como se especifica a continuación.
PARTES Y MANO DE OBRA– Si se determina que el
producto tiene defectos de fabricación, dentro del
periodo de un (1) año a partir de la fecha de compra
original, Impecca™, a su discreción, reparará o reemplazara las partes del producto sin ningún costo
para usted en los Estados Unidos.
Para obtener el servicio de garantía de un distribuidor autorizado de Impecca™ envíenos un correo electrónico a:
service@impecca.com para obtener un número de Autorización de Reparación y Mantenimiento (RAM) y recibir las
instrucciones de cómo se llevará a cabo el procedimiento
de reparación o reemplazo.
Cualquier material de vidrio incluido en el electrodoméstico estará cubierto por un periodo de sesenta (60) días a partir de la fecha de compra.
Impecca™ excluye de esta garantía accesorios no eléctricos
o mecánicos, accesorios y partes desechables incluyendo,
pero no limitado, a la carcaza, cables de conexión, baterías,
adaptadores A/C. Impecca™ se reserva el derecho de reparar o reemplazar un producto defectuoso con un modelo
igual, equivalente o nuevo modelo.
Nos reservamos el derecho ya sea de reparar o reemplazar
el producto a nuestra discreción. El reemplazo puede ser
nuevo o reacondicionado tratando de asegurar de que se
trate del mismo modelo, si el mismo modelo no está disponible, se reemplazará con un modelo de especificaciones
iguales o superiores.
como bombillas, filtros, etc.
13. Recargos que pueden aplicar a llamadas de servicio
los fines de semana, por las noches, o durante las festividades. Daños al acabado del electrodoméstico o
muebles de la casa debido a la instalación del electrodoméstico.
14. Daños causados por cualquiera de las siguientes causas: Actos de Dios, incendios, mal uso. accidentes, suministro de energía incorrecto, servicio realizado por
personal no autorizado, el uso de partes no originales
Impecca.
TODAS LAS GARANTÍAS IMPLÍCITAS, INCLUYENDO LAS GARANTÍAS IMPLÍCITAS DE MERCADOTECNIA E IDONEIDAD
PARA UN PROPÓSITO EN PARTICULAR ESTÁN LIMITADAS
A UNA DURACIÓN DE (1) AÑO EN PARTES Y NOVENTA (90)
DÍAS EN MANO DE OBRA DESDE LA FECHA ORIGINAL DE
COMPRA DEL PRODUCTO.
ESTAS GARANTÍAS Y MEDIDAS SON ÚNICAS Y EXCLUSIVAS
EN RELACIÓN CON LA VENTA Y USO DEL PRODUCTO. NO
SE OTORGA NINGUNA OTRA GARANTÍA, ORAL O ESCRITA,
EN FORMA EXPRESA O IMPLÍCITA.
IMPECCA™ NO SE HACE RESPONSABLE DE NINGÚN DAÑO,
YA SEA ESPECIAL, INCIDENTAL, CONSECUENTE, DIRECTO O
DE CUALQUIER OTRA NATURALEZA, YA SEA CONOCIDO O
POR DAR A CONOCER A IMPECCA™, INCLUYENDO LA PÉRDIDA DE GANANCIAS, PLUSVALÍA, DAÑOS PERSONALES O EN
LA PROPIEDAD RESULTANTES DE CUALQUIER INCUMPLIMIENTO DE LA GARANTÍA, LA INCAPACIDAD DE UTILIZAR EL
PRODUCTO O BAJO NINGUNA TEORÍA LEGAL EN CONTRATO O AGRAVIO. LA RESPONSABILIDAD DE IMPECCA SE LIMITA AL PRECIO ACTUAL DE COMPRA PAGADO AL VENDEDOR
DEL PRODUCTO DEFECTUOSO.
El “desgaste” normal no está cubierto por esta ni por ninguna otra garantía. Adicionalmente, Impecca™ se reserva el
derecho de determinar el “desgaste” de cualquiera o todos
los productos. El violar o abrir el chasis del producto invalidará esta garantía por completo.
Excepciones: Esta garantía no cubre lo siguiente:
1. Cualquier producto que tenga un número de serie defectuosos o cubierto
2. Productos que han sido transferidos a un segundo propietario
3. Óxido en la parte interna o externa de la unidad
4. Los productos listados como “Tal cual” o “Reformados”
5. Pérdida de alimentos debido a la falla del producto
6. Aires acondicionados que han sido instalados en un
muro.
7. El producto si este ha sido utilizado en una ubicación
comercial
8. Llamadas de servicio que no involucren el mal funcionamiento del producto
9. Llamadas de servicio de un producto estropeado por
no seguir las instrucciones proporcionadas
10. Llamadas de servicio para corregir una instalación incorrect
11. Costos asociados por hacer el producto accesible al
servicio (incluido pero no limitado a la remoción de
ajustes/moldeo/gabinete, etc.)
12. Llamadas de servicio para reemplazar consumibles
Ningún distribuidor, agente o empleado de Impecca™ está
autorizado para hacer ninguna modificación, extensión,
cambio o enmienda de esta garantía sin el consentimiento
y autorización escrita de Impecca™.
Algunos estados no permiten la exclusión o limitación de
garantías implícitas o la responsabilidad por daños incidentales o consecuentes, y no permiten una limitación en
la duración de una garantía implícita, de modo que las anteriores limitaciones o exclusiones pueden no aplicarse a
usted. Esta garantía le otorga derechos específicos, y puede
usted tener otros derechos, los cuales varían de estado a
estado.
Nota: El Centro de Servicio de Garantía hace envíos solo
dentro del territorio continental de E.U.
–25–
Page 26

ENGLISH ESPAÑOL FRANÇAIS
TABLE DES MATIÈRES
Consignes De Sécurité Importantes ....................................................................................................................................................................................27
PIÈCES ET FONCTIONS ..........................................................................................................................................................................................................28
POUR DÉBUTER ....................................................................................................................................................................................................................... 28
PAROI FROIDE DES ALIMENTS FRAIS (PAROI ARRIÈRE DU COMPARTIMENT RÉFRIGÉRATEUR) 28
EXIGENCES D’INSTALLATION ................................................................................................................................................................................................28
BESOINS EN ÉLECTRICITÉ .....................................................................................................................................................................................................29
DÉBALLER LE RÉFRIGÉRATEUR ............................................................................................................................................................................................29
PIVOTEMENT DE PORTE ARRIÈRE (EN OPTION) ................................................................................................................................................................ 30
MISE À NIVEAU ET RÉGLAGE DE LA PORTE (SI NÉCESSAIRE) .........................................................................................................................................31
TERMINER L’INSTALLATION ................................................................................................................................................................................................... 31
CONTRÔLE DE TEMPÉRATURE .............................................................................................................................................................................................32
ESPACE DE RANGEMENT........................................................................................................................................................................................................32
CORBEILLE DE PORTE ............................................................................................................................................................................................................32
CONGÉLATEUR .........................................................................................................................................................................................................................32
ENTREPOSAGE AU CONGÉLATEUR ......................................................................................................................................................................................33
ENTRETIEN DU RÉFRIGÉRATEUR .........................................................................................................................................................................................33
PANNE DE COURANT ..............................................................................................................................................................................................................34
LUMIERE ....................................................................................................................................................................................................................................34
VACANCES ET DÉMÉNAGEMENT ..........................................................................................................................................................................................34
MOUVEMENT ............................................................................................................................................................................................................................ 34
DÉPANNAGE .............................................................................................................................................................................................................................35
Garantie Limitée D’un An .......................................................................................................................................................................................................37
–26–
Page 27

ENGLISHESPAÑOLFRANÇAIS
CONSIGNES DE SÉCURITÉ IMPORTANTES
CONSERVEZ CES INSTRUCTIONS POUR RÉFÉRENCES FUTURES.
1. Ce réfrigérateur doit être adéquatement installé et positionné selon les instructions d’installation avant son utilisation.
2. Ne laissez pas les enfants monter, grimper ou s’accrocher aux étagères du réfrigérateur. Cela pourrait endommager l’unité et causer
des blessures.
3. Il ne faut pas entreposer ou utiliser de la gazoline ou tous autres liquides ou vapeurs inflammables près de l’unité ou autres électroménagers.
4. Tenez les doigts loin de l’espacement entre la porte et le boîtier. Usez de caution en fermant la porte lorsque des enfants sont près.
5. Dans des réfrigérateurs avec une machine à glace automatique, évitez d’entrer en contact avec les pièces amovibles du mécanisme
d’éjection ou avec avec l’élément chauant qui les relâche. Ne placez pas les doigts ou mains près du mécanisme de la machine à
glace alors que le réfrigérateur est branché.
6. Débranchez le réfrigérateur avant de le nettoyer ou pour l’entretien.
7. Nous recommandons fortement d’utiliser les services d’un professionnel qualifié pour l’entretien.
8. Tournez le cadran de régulation de température à « 0 », cesse le refroidissement, mais n’éteint pas complètement l’appareil.
9. Ne laissez pas le réfrigérateur dans des températures extrêmement froides ou chaudes.
10. Ne placez pas le réfrigérateur près de flammes ou d’une source de chaleur.
11. Nettoyez le réfrigérateur avec un linge doux et humide. Enlevez les taches avec un savon doux. N’utilisez pas de solvants industriels
ou de produits chimiques abrasifs pour le nettoyage.
12. Ne placez aucun objet lourd sur le réfrigérateur.
13. N’installez pas le réfrigérateur dans un lieu propice à la moisissure ou aux éclats d’eau.
14. Ne laissez pas les enfants s’accrocher à la porte, l’unité pourrait renverser et les blesser.
15. Ne mangez aucune nourriture gâtée causée par un stockage trop long dans le réfrigérateur ou dû à un stockage dans un réfrigérateur
non fonctionnel.
16. N’utilisez pas d’outils pointus (tel qu’un pic à glace), car cela pourrait causer des dommages.
17. Débranchez et videz le réfrigérateur si celui-ci n’est pas utilisé pour une longue période.
AVANT DE JETER VOTRE ANCIEN RÉFRIGÉRATEUR :
Votre ancien réfrigérateur pourrait être équipé d’un système qui utilisait des CFC (chlorofluocarbone) ou des HCFC (hydrochlorofluocarbone). Les CFC et HCFC sont soupçonnés de nuire à l’ozone stratosphérique si relâché dans l’atmosphère. Si vous vous débarrassez de
votre ancien réfrigérateur, assurez-vous que le réfrigérant et proprement retiré par un technicien qualifié. Vérifiez avec votre détaillant
s’il peuvent reprendre votre ancien appareil pour en disposer de manière responsable ou pour le recycler.
Visitez le www.epa.gov/rad pour plus de renseignements sur le programme Responsible Appliance Disposal.
AVERTISSEMENT RISQUE D’ENFERMEMENT POUR ENFANTS
Il y a un risque d’enfermement pour enfants. Avant de jeter votre vieux réfrigérateur ou congélateur aux ordures :
1. Enlevez les portes.
2. Laissez les étagères à l’intérieur de l’unité afin d’éviter que les enfants puissent y grimper.
AVERTISSEMENT: L’UTILISATION D’UNE RALLONGE ÉLECTRIQUE N’EST PAS RECOMMANDÉE.
POUR USAGE DOMESTIQUE UNIQUEMENT
GARDE CES INSTRUCTIONS
–27–
Page 28

ENGLISH ESPAÑOL FRANÇAIS
PIÈCES ET FONCTIONS
modèle peuvent varier.
NUMÉRO DE SÉRIE ET NUMÉRO DE MODÈLE
Veuillez noter votre numéro de modèle et votre numéro de série
ci-dessous. La plaque d’immatriculation se trouve en haut à
gauche à l’intérieur du réfrigérateur.
Numéro de modèle: __________________________
Numéro de série : ___________________________
Date d’achat: ______________________________
AVIS DE SÉCURITÉ
• Cet appareil est destiné à être utilisé dans des applications
domestiques et des applications similaires telles que :
• Cuisine du personnel dans les magasins, bureaux et autres
environnements de travail ;
• Utilisation individuelle dans les chambres d’hôtel et autres
environnements de type résidentiel;
PAROI FROIDE DES ALIMENTS FRAIS
(PAROI ARRIÈRE DU COMPARTIMENT
RÉFRIGÉRATEUR)
Votre nouveau réfrigérateur est doté de la technologie des parois
de morue pour mieux entreposer les aliments périssables.
A. CADRAN DE COMMANDE ET ÉCLAIRAGE INTÉRIEUR
B. BAGES DE PORTE (3)
C. PORTE-BOUTEILLE
D. PIEDS RÉGLABLES
E. TIROIRS D’ENTREPOSAGE D’ALIMENTS CONGELÉS (3)
F. COMPARTIMENT DE CONSERVATION DES ALIMENTS CONGE-
LÉS
G. COMPARTIMENT DU BAC À LÉGUMES
H. COUVERCLE DU COMPARTIMENT DU BAC À LÉGUMES
I. ÉVACUATION
J. ÉTAGÈRES PLEINE LARGEUR (3)
POUR DÉBUTER
Merci d’avoir choisi ce réfrigérateur Impecca de qualité. Cet appareil
est conçu pour un usage domestique. Veuillez lire attentivement
ce manuel avant d’utiliser ce produit. Assurez-vous de conserver le
manuel pour la consultation des mangeurs.
L’ondulation arrière du compartiment du réfrigérateur favorise la
condensation de l’humidité, semblable à ce que l’on voit dans les
allées des fruits et légumes d’une épicerie.
L’excès d’humidité s’égouttera dans le drain au fond de l’eau
EXIGENCES D’INSTALLATION
EXIGENCES DE LOCALISATION
IMPORTANT: Ce réfrigérateur est conçu pour une utilisation à l’in-
térieur de la maison. Ce réfrigérateur ne doit pas être encastré ou
encastré dans une armoire fermée. Il est conçu pour une installation autoportante seulement.
Note: Toutes les images de ce mode d’emploi sont données à titre
indicatif seulement ; l’apparence physique et les options de votre
–28–
Page 29

ENGLISHESPAÑOLFRANÇAIS
Pour assurer une bonne ventilation de votre réfrigérateur, prévoyez un espace de 2” (5,08 cm) de chaque côté et sur le dessus.
Laissez un espace de 4” (10 cm) derrière le réfrigérateur. Lorsque
vous installez votre réfrigérateur à côté d’un mur fixe, laissez un
minimum de 4” (10 cm) pour permettre à la porte de s’ouvrir.
NOTE : Ce réfrigérateur est destiné à être utilisé dans un endroit où la température varie d’un minimum de 55°F (13°C) à un
maximum de 110°F (43°C). La plage de température ambiante
préférée pour un rendement optimal, qui réduit la consommation
d’électricité et assure un refroidissement supérieur, se situe entre
16 °C (60 °F) et 32 °C (90 °F). Il est recommandé de ne pas installer
le réfrigérateur près d’une source de chaleur, comme un four ou un
radiateur, ou à la lumière directe du soleil.
BESOINS EN ÉLECTRICITÉ
I PRÉCAUTIONS
RISQUE D’ÉLECTROCUTION DANS UNE
PRISE DE COURANT À 3 BROCHES MISE À LA TERRE.
NE PAS RETIRER LA BROCHE DE MISE À LA TERRE DE LA FICHE
DU CORDON D’ALIMENTATION.
N’UTILISEZ PAS D’ADAPTATEUR.
N’UTILISEZ PAS DE RALLONGE.
avez terminé, reconnectez le réfrigérateur à la source électrique et
réinitialisez les commandes de température au réglage désiré.
DÉBALLER LE RÉFRIGÉRATEUR
I PRÉCAUTIONS
RISQUE D’INCENDIE OU D’EXPLOSION
NE PAS PERCER LES TUBES DE RÉFRIGÉRANT.
SUIVRE SCRUPULEUSEMENT LES INSTRUCTIONS DE MANIPULATION.
RÉFRIGÉRANT INFLAMMABLE UTILISÉ.
I PRÉCAUTIONS
RISQUE DE POIDS EXCESSIF
UTILISER DEUX PERSONNES OU PLUS POUR DÉPLACER ET
INSTALLER LE RÉFRIGÉRATEUR.
LE NON-RESPECT DE CETTE CONSIGNE PEUT ENTRAÎNER
DES BLESSURES AU DOS OU D’AUTRES BLESSURES.
RETIRER L’EMBALLAGE
• Enlevez les résidus de ruban adhésif et de colle des surfaces
avant d’allumer le réfrigérateur. Frotter une petite quantité de
savon liquide à vaisselle sur l’adhésif avec les doigts. Rincer à
l’eau tiède et sécher.
• N’utilisez pas d’instruments tranchants, d’alcool à friction, de
liquides inflammables ou de nettoyants abrasifs pour enlever
le ruban adhésif ou la colle. Ces produits peuvent endommager la surface de votre réfrigérateur. Pour plus d’informations,
voir “Sécurité du réfrigérateur”.
• Retirez le(s) bloc(s) de mousse inséré(s) entre le moteur du
compresseur et l’armoire, tel qu’illustré.
• Éliminer/recycler tous les matériaux d’emballage.
NOTE: Ne retirez pas le bac de vidange en plastique situé au-dessus du moteur du compresseur sur les modèles avec dégivrage
automatique.
LE NON-RESPECT DE CETTE CONSIGNE PEUT ENTRAÎNER LA
MORT, UN INCENDIE OU UN CHOC ÉLECTRIQUE.
Avant de déplacer votre réfrigérateur à son emplacement final,
il est important de vous assurer d’avoir la connexion électrique
appropriée.
MÉTHODE DE MISE À LA TERRE RECOMMANDÉE
Une alimentation électrique de 115 volts, 60 Hz, c.a. seulement
15 ou 20 ampères avec fusible et mise à la terre est requise. Il est
recommandé de prévoir un circuit séparé desservant uniquement
votre réfrigérateur. Utilisez une prise qui ne peut pas être coupée
par un interrupteur. N’utilisez pas de rallonge.
NOTE: Avant d’eectuer tout type d’installation ou de nettoyage,
débranchez le réfrigérateur de la source électrique. Lorsque vous
–29–
A. Blocs de mousse
B. Compresseur
Page 30

ENGLISH ESPAÑOL FRANÇAIS
LORSQUE VOUS DÉPLACEZ VOTRE RÉFRIGÉRATEUR:
Votre réfrigérateur est lourd. Lorsque vous déplacez le réfrigérateur pour le nettoyage ou l’entretien, assurez-vous de couvrir le
plancher avec du carton ou du carton dur pour éviter d’endommager le plancher. Tirez toujours le réfrigérateur en position droite
lorsque vous le déplacez. Ne pas remuer ou “marcher” le réfrigérateur en essayant de le déplacer, car le plancher pourrait être
endommagé.
NETTOYER AVANT D’UTILISER
Après avoir retiré tous les matériaux d’emballage, doyennez l’intérieur du réfrigérateur avant de l’utiliser. Voir les instructions de
nettoyage dans “Entretien du réfrigérateur”.
INFORMATIONS IMPORTANTES À SAVOIR SUR LES ÉTAGÈRES ET LES COUVERCLES EN VERRE:
Ne pas couvrir d’eau tiède les étagères en verre ou les couvercles
avec de l’eau chaude lorsqu’ils sont froids. Les tablettes et les
couvercles peuvent se briser s’ils sont exposés à des changements
soudains de température ou à des chocs, tels que des chocs.
Le verre trempé est conçu pour se briser en de nombreux petits
morceaux de la taille d’un caillou. C’est normal. Les étagères et les
couvercles en verre sont lourds. Utilisez les deux mains lorsque
vous les enlevez pour éviter de tomber.
l’armoire frigorifique intérieure et de la porte.
3. Pendant que quelqu’un tient les portes, dévisser les boulons et
etirer la charnière centrale (1).
r
4. Abaissez la porte du réfrigérateur par la charnière supérieure
(2).
5. Soulevez la porte du congélateur à partir de la charnière infé-
rieure (3).
PIVOTEMENT DE PORTE ARRIÈRE (EN
OPTION)
Si vous voulez inverser l’oscillation de la porte de sorte que les
portes s’ouvrent du côté opposé, consultez les instructions suivantes.
IMPORTANT: Les graphiques mentionnés dans les instructions
suivantes sont inclus dans cette section. Voir le graphique “ Porte
battante inversée”
RETIRER LES PORTES
I PRÉCAUTIONS
RISQUE DE POIDS EXCESSIF
UTILISER DEUX PERSONNES OU PLUS POUR DÉPLACER ET
INSTALLER LE RÉFRIGÉRATEUR.
LE NON-RESPECT DE CETTE CONSIGNE PEUT ENTRAÎNER
DES BLESSURES AU DOS OU D’AUTRES BLESSURES.
1. Débrancher le réfrigérateur ou débrancher l’alimentation
électrique.
2. Retirez tous les aliments, étagères, tiroirs, plateaux et bacs de
6. Retirer les boulons de la char
charnière (5).
7. En utilisant deux personnes ou plus, inclinez le réfrigérateur
vers l’arrière à un angle de 45° pour accéder et retirer le pied de
mise à niveau (T&B).
8. Retirer la charnière inférieure de la porte et le pied de mise à
niveau (9).
NOTE: Le pied de nivellement du côté des charnières doit être
déplacé du côté opposé avec la charnière de la porte.
nière supérieure et retirer le haut
–30–
Page 31

ENGLISHESPAÑOLFRANÇAIS
INVERSER LES PORTES
1. Retirez les ergots de la cloison centrale et placez les bouchons
dans les trémies restantes après avoir retiré la charnière centrale (6).
2. Retirer le couvercle en plastique. Installez le bouchon (fourni
dans le sac de pièces), du côté opposé (10).
3. Dévisser et retirer la douille de charnière intermédiaire du bas
de la porte du réfrigérateur (11).
4. Insérez la douille de charnière centrale (fournie dans le sac de
pièces) du côté opposé. (12)
5. Retirez la bague de charnière et le bouchon de la porte du
congélateur et réinstallez chacun d’eux du côté opposé de la
porte. (13)
6. Retirer la bague de charnière inférieure de la porte du congélateur et la réinstaurer du côté opposé. (14)
REMPLACER LES PORTES
1. Remontez et installez la charnière inférieure du côté opposé.
(15)
2. l’aide de deux personnes ou plus, réinsérez le pied de nivellement du côté opposé avec la charnière inférieure de la porte.
(16)
3. Faites pivoter la charnière supérieure de 180°. Dévissez l’axe de
charnière et réinstallez-le du côté opposé. (17)
4. Réinstallez la charnière supérieure et serrez les boulons. (18)
5. Réinstallez le couvercle en plastique sur la garniture supérieure
avant. (19)
6. Placez la porte du congélateur sur la charnière inférieure et
dosez la porte. (20)
7. Placez la charnière centrale sur le dessus de la porte du
congélateur. (21)
8. Insérez la porte du réfrigérateur entre les charnières supérieure
et centrale. (22)
9. Fixez la charnière centrale à l’armoire, puis alignez et ajustez les
portes.
10. Serrez bien tous les boulons. (23)
11. En utilisant deux personnes ou plus, placez le réfrigérateur à la
verticale et réglez les pieds avant sur le niveau. Voir “Réglage du
niveau et de la porte”.
12. Retournez toutes les pièces amovibles à l’armoire et à la porte.
PORTE ARRIÈRE BATTANTE
MISE À NIVEAU ET RÉGLAGE DE LA PORTE (SI NÉCESSAIRE)
Le réfrigérateur doit être de niveau afin de maintenir une performance et une apparence
optimale et d’éviter les vibrations et le bruit excessifs.
NIVEAU
Déplacez le réfrigérateur à son emplacement finaL sur un plancher plat et uniforme. Tourner
les pieds en bas, à l’avant de l’armoire pour soulever ou abaisser ce côté du réfrigérateur
jusqu’à ce que le réfrigérateur soit au niveau latéral.
NOTE: Faire pousser quelqu’un contre le dessus du réfrigérateur enlève un peu de poids des
vis de mise à niveau. Il est ainsi plus facile de tourner les vis.
Tournez les deux pattes avant, de la même quantité, pour soulever légèrement l’avant du
réfrigérateur. Il sera ainsi plus facile pour les portes de doser.
TERMINER L’INSTALLATION
1. Attendre au moins 4 heures pour que le système de refroidissement se stabilise avant d’activer le refroidissement.
2. Brancher dans une prise de courant à 3 broches mise à la terre.
3. Attendez que le réfrigérateur ait refroidi aux températures recommandées avant d’ajouter des aliments.
–31–
Page 32

ENGLISH ESPAÑOL FRANÇAIS
CONTRÔLE DE TEMPÉRATURE
ESPACE DE RANGEMENT
Réglez le cadran de contrôle de la température sur le réglage recommandé “4” sur le cadran.
À l’aide d’un thermomètre précis, surveillez la température du compartiment pour vous assurer que la bonne température de stockage
est maintenue. Ajuster la température, si nécessaire.
Réglage recommandé “4”
POUR DÉSACTIVER LE REFROIDISSEMENT :
Tournez le cadran de contrôle de la température à la position “0”
OFF.
ÉTAGÈRES PLEINE LARGEUR
La hauteur des étagères peut être ajustée pour répondre à vos
besoins de rangement.
1. Pour retirer une tablette, soulevez les deux bords avant et arrière
pour dégager les crochets des supports de tablette le long de la
paroi du réfrigérateur et tirez-les vers le haut.
2. Pour réinstaller une tablette, posez la tablette sur les supports
avant et arrière. Poussez la tablette vers l’arrière du réfrigérateur
jusqu’à ce que l’arrière de la tablette s’accroche autour des supports de la tablette arrière.
CORBEILLE DE PORTE
Les corbeilles de porte peuvent être enlevées pour le nettoyage.
POUR RÉGLER LA TEMPÉRATURE :
Les températures sont contrôlées par le cadran de contrôle de
température.
La commande peut être réglée à n’importe quelle position entre 1
(le moins froid) et 7 (le plus froid).
La température moyenne à l’intérieur du compartiment réfrigérateur devrait être d’environ 2,8 °C (37 °F). Il se peut que vous ayez
besoin d’ajuster le contrôle de température pour obtenir la température désirée.
NOTE: Les sections du compartiment du réfrigérateur peuvent être
plus froides ou plus chaudes (comme le bac à salade et la partie
supérieure de l’armoire), ce qui est normal.
POUR ENLEVER UNE CORBEILLE : Placez les mains des deux côtés
du bac et soulevez vers le haut.
CONGÉLATEUR
Le compartiment congélateur convient au stockage à long terme
d’aliments congelés et peut également être utilisé pour la congélation d’aliments frais.
IMPORTANT: Le ventilateur à l’intérieur du compartiment congélateur fait circuler l’air froid, ce qui est essentiel à la performance
du congélateur. Assurez-vous que les conduits d’air ne sont pas
obstrués par les aliments ou le vieillissement de l’emballage. Le
blocage des conduits d’air peut entraîner une augmentation de la
température du congélateur international (la décongélation peut se
produire si la température augmente trop).
A. AIR DOUX
Les ouvertures de porte fréquentes provoquent une augmentation
de la température internationale, il faut donc doser la porte le plus
tôt possible après l’utilisation.
–32–
Page 33

ENGLISHESPAÑOLFRANÇAIS
ENTREPOSAGE AU CONGÉLATEUR
Votre nouveau réfrigérateur ore la flexibilité d’un tiroir ou d’une
étagère pour vos besoins d’entreposage au congélateur. Retirez le
tiroir du congélateur pour utiliser l’étui en dessous.
1. Pour retirer un tiroir :
2. Sortir le tiroir le plus loin possible.
3. Inclinez le tiroir vers le haut pour le retirer.
Rangez le tiroir, pour une utilisation future, dans un endroit où il ne
sera pas endommagé.
2. A l’aide d’une mousse propre ou d’un chion doux et d’un
détergent doux dissous dans de l’eau tiède, laver les parties
amovibles et les surfaces intérieures. Bien rincer et sécher soigneusement.
3. Nettoyer les surfaces extérieures.
Métal peint : Laver l’extérieur du métal peint avec une éponge
ou un chion doux et un détergent doux dans de l’eau tiède. Rincer les surfaces avec de l’eau chaude et sécher immédiatement
pour éviter les taches d’eau.
Acier inoxydable : l’acier moins taché est résistant à la corrosion
et n’est pas résistant à la corrosion. Pour éviter la corrosion de
votre acier inoxydable, lavez les surfaces en acier inoxydable
avec un chion ou une éponge propre et doux et un détergent
doux dans de l’eau tiède. Rincer les surfaces avec de l’eau propre
et chaude et sécher immédiatement pour éviter les taches d’eau.
NOTE: Lors du nettoyage de l’acier inoxydable Moins d’acier,
toujours essuyé dans le sens du grain pour éviter les égratignures
croisées.
4. Nettoyer le condenseur au moins une fois par an. À l’aide d’un
aspirateur, enlevez la poussière qui s’est accumulée sur le
condenseur.
NOTE: Le condenseur est situé à l’arrière du réfrigérateur
5. Branchez le réfrigérateur ou rebranchez le courant..
DEFROSTING
ENTRETIEN DU RÉFRIGÉRATEUR
NETTOYAGE
Nettoyez les compartiments du congélateur et du réfrigérateur
environ une fois par mois pour éviter la formation d’odeurs. Essuyer
immédiatement les déversements.
I PRÉCAUTIONS
RISQUE D’EXPLOSION
UTILISER UN NETTOYANT NON INFLAMMABLE.
LE NON-RESPECT DE CETTE CONSIGNE PEUT ENTRAÎNER LA
MORT, UNE EXPLOSION OU UN INCENDIE.
IMPORTANT:
• N’utilisez pas de produits chimiques agressifs, d’ammoniaque,
d’eau de Javel, de détergent concentré, de solvants, d’abrasifs ou
de tampons à récurer pour nettoyer l’intérieur ou l’extérieur de
votre réfrigérateur. Ils peuvent endommager et/ou décolorer le fini
du réfrigérateur.
• N’utilisez pas d’eau tiède sur les étagères en verre de doyen tant
qu’elles sont encore froides. Le verre peut se briser lorsqu’il est
exposé à des changements soudains de température ou à un
impact.
1. Débrancher le réfrigérateur ou débrancher l’alimentation électrique.
Les compartiments du réfrigérateur et du congélateur dégèlent
automatiquement. Il est normal qu’une petite quantité de givre
s’accumule sur le mur des aliments frais. Si la quantité de givre
devient excessive, vous devrez peut-être augmenter la température
en réglant le régulateur de température à un niveau plus bas (moins
froid). Voir “contrôle”.
L’eau de dégivrage passe par un canal de collecte et dans le tube de
drainage qui est fixé au plateau de drainage à l’arrière du réfrigérateur. Pour éviter que l’eau ne se répande sur le sol, il est important
de s’assurer que l’extrémité du tube de vidange est insérée complètement dans le bac de vidange.
Si l’eau de dégivrage ne s’écoule pas du canal de collecte, vérifiez
que le tube de drainage est cher. Le tube de vidange peut être nettoyé à l’aide d’un cure-pipe ou en poussant le piston en plastique
(fourni) dans le tube de vidange.
Pendant le dégivrage, des gouttelettes d’eau peuvent se former à
l’arrière du compartiment du réfrigérateur où se trouvent des évaporateurs dissimulés. Un peu d’humidité restera sur la paroi froide
des aliments frais (paroi arrière) et recongèlera lorsque le dégivrage
sera terminé. N’utilisez pas d’objets pointus ou tranchants tels
que des couteaux ou des fourchettes pour retirer les gouttelettes
congelées.
A. PAROI ARRIÈRE DU RÉFRIGÉRATEUR
B. POUSSOIR EN PLAS-
TIQUE
C. CANAL DE COLLECTE DE
L’EAU DE DÉGIVRAGE
–33–
Page 34

ENGLISH ESPAÑOL FRANÇAIS
PANNE DE COURANT
En cas de panne de courant, n’ouvrez pas la porte du congélateur.
Les aliments congelés ne devraient pas être aectés si le courant
est rétabli dans les sept heures.
Si le courant est coupé pendant une période prolongée, vérifiez la
nourriture pour la décongélation.
LUMIERE
POUR REMPLACER UNE AMPOULE:
NOTE : Il se peut que vous ayez besoin de retirer la tablette supé-
rieure pour accéder à l’ampoule.
1. Débrancher le réfrigérateur ou débrancher l’alimentation électrique.
2. Retirez la vis de fixation du bouclier photoélectrique, puis retirez
le bouclier photoélectrique.
3. Retirez l’ampoule brûlée et remplacez-la par une ampoule de
même taille, de même forme et de même puissance.
• Remplacer par une ampoule à DEL de 1,2 Watt (équivalent à
incandescence de 25 Watt) avec culot candélabre.
• IMPORTANT : NE PAS remplacer par une ampoule à
incandescence de plus de 10 watts.
• Le compartiment du réfrigérateur est considéré comme un
environnement humide, et certaines ampoules LED de remplacement ne sont pas recommandées pour les environnements humides. Avant l’installation, lisez et suivez toutes les
instructions sur l’emballage des LED.
4. Remplacez le bouclier lumineux.
5. Branchez le réfrigérateur ou rebranchez le courant.
VACANCES ET DÉMÉNAGEMENT
VACATION
Si vous choisissez de laisser le réfrigérateur en marche pendant
que vous êtes à l’extérieur:
1. Utilisez tous les aliments périssables et congelez d’autres
articles.
Si vous décidez d’éteindre le réfrigérateur avant de partir:
1. Retirez tous les aliments du réfrigérateur et du congélateur.
2. Débrancher le réfrigérateur ou débrancher l’alimentation électrique.
3. Nettoyez le réfrigérateur, essuyez-le et séchez-le bien.
4. Collez des blocs de caoutchouc ou de bois sur le dessus des
deux portes pour qu’elles s’ouvrent assez loin pour que l’air
puisse y pénétrer. Cela empêche la formation d’odeurs et de
moisissures.
MOUVEMENT
I PRÉCAUTIONS
RISQUE DE POIDS EXCESSIF
UTILISER DEUX PERSONNES OU PLUS POUR DÉPLACER ET
INSTALLER LE RÉFRIGÉRATEUR.
LE NON-RESPECT DE CETTE CONSIGNE PEUT ENTRAÎNER
DES BLESSURES AU DOS OU D’AUTRES BLESSURES.
Lorsque vous déménagez votre réfrigérateur dans une nouvelle
maison, suivez ces instructions pour le préparer au déménagement.
IMPORTANT:
• Si possible, déplacez le réfrigérateur en position verticale. Si le
réfrigérateur doit être déplacé horizontalement, il ne doit être
placé que sur son côté droit (car vous êtes face à l’avant du
réfrigérateur). Après avoir mis le réfrigérateur debout, attendez
au moins 12 heures pour permettre au système de se stabiliser
avant de brancher le réfrigérateur.
1. Retirez tous les aliments du réfrigérateur et emballez tous les
aliments congelés dans de la glace sèche.
2. Débrancher le réfrigérateur.
3. Videz l’eau du bac de vidange.
4. Assurez-vous que le tube de vidange de l’eau de dégivrage à l’arrière du réfrigérateur est fixé au plateau de vidange sur le dessus
du compresseur, afin d’éviter que l’eau de dégivrage ne déborde
sur le plancher.
5. Enlevez toutes les pièces amovibles, emballez-les bien et collez-les ensemble pour qu’elles ne se déplacent pas et qu’il n’y ait
pas de tirage au sort pendant le déménagement.
6. Lavez et rincez l’intérieur, puis séchez soigneusement.
7. Soulevez les pieds de nivellement pour qu’ils ne raclent pas le
sol. voir “nivellement”.
8. Fermez les portes avec du ruban adhésif et fixez le cordon d’alimentation à l’arrière du réfrigérateur.
9. Lorsque vous arrivez dans votre nouvelle maison, remettez tout
en place et reportez-vous à la section “Instructions d’installation”.
–34–
Page 35

ENGLISHESPAÑOLFRANÇAIS
DÉPANNAGE
Les questions simples suivantes peuvent être traitées par l’utilisateur. Veuillez contacter le service clientèle si les problèmes ne sont pas
résolus.
LE RÉFRIGÉRATEUR NE FONCTIONNE PAS
PROBLEME CAUSE(S) ÉVENTUELLE(S) SOLUTION
Le réfrigérateur ne fonctionne
pas.
Le compresseur du réfrigérateur fonctionne fréquemment
ou pour de longues périodes
de temps.
NOTE : Ce réfrigérateur est signé pour fonctionner pendant
de plus longues périodes de
temps à une consommation
d’énergie plus basse.
Le réfrigérateur a une odeur Les aliments ne sont pas scellés ou embal-
La lumière ne s'allume pas Le réfrigérateur n'est pas branché. Branchez le réfrigérateur à la source d'alimentation.
Les portes ne se ferment pas
correctement.
Vibration ou claquement Le réfrigérateur ne repose pas fermement
Sons normaux On dirait que de l'eau s'écoule du réfrigé-
Le réfrigérateur n'est pas branché. Branchez le cordon d'alimentation dans la source
d'alimentation.
Le disjoncteur est déclenché ou éteint / Le
fusible est grillé.
Le réfrigérateur est en mode dégivrage. Attendre environ 40 minutes pour que le cycle de
Le réfrigérateur est d’abord branché. C'est normal. Laisser refroidir le réfrigérateur pendant
Chaud ou Grandes quantités d'aliments
ajoutés.
La porte est ouverte. Assurez-vous que la porte n'est pas maintenue ou-
Temps chaud ou ouvertures fréquentes. C’est normal.
Le contrôle de la température est réglé sur
le réglage le plus froid.
lés correctement.
L'intérieur doit être nettoyé. Nettoyez l'intérieur. Voir "Nettoyage".
Aliments entreposés trop longtemps. Jetez les aliments abîmés.
La lumière LED est grillée. Contacter un technicien qualifié pour la réparation
Le réfrigérateur n'est pas de niveau. Voir "nivellement".
Quelque chose obstrue la fermeture de la
porte.
sur le sol.
rateur.
Ronflement ou bruits de bourdonnement Le compresseur et les ventilateurs pour la circulation
Sons de craquement ou de cliquetis Les parties intérieures émettront ce son au fur et
Réinitialiser / Allumer le disjoncteur ou remplacer le
fusible.
dégivrage se termine et que le système de refroidissement redémarre.
24 heures.
C'est normal.
verte par un objet.
Ajustez la température à un réglage plus chaud.
Refermer l'emballage. Placez une boîte ouverte de
bicarbonate de soude dans le réfrigérateur, reLacez
tous les 3 mois.
de la LED grillée.
Vérifiez s'il y a des obstructions et enlevez-les.
Voir «nivellement».
Le fluide frigorigène qui circule dans les conduites
émet ce son lorsque le compresseur démarre et
s'arrête.
Le réfrigérateur dispose d'un système de dégivrage
automatique. L'eau dégivrée fera ce bruit.
d'air froid peuvent faire ce bruit. Si le réfrigérateur
n'est pas de niveau, le son sera plus fort.
à mesure qu'elles se contractent et se dilatent en
réponse aux changements de température.
–35–
Page 36

ENGLISH ESPAÑOL FRANÇAIS
LA TEMPÉRATURE ET L’HUMIDITÉ
PROBLEME CAUSE(S) ÉVENTUELLE(S) SOLUTION
Le réfrigérateur ou le congélateur
est trop chaud.
Le réfrigérateur ou le congélateur
est trop froid.
Humidité à l'extérieur/intérieur
du réfrigérateur
Cristaux de glace ou de givre sur
les aliments congelés
Congélation des aliments dans le
réfrigérateur
Le réglage de la température n'est pas
assez bas.
Portes ouvertes fréquemment ou laissées
ouvertes.
Des aliments chauds ont été ajoutés
récemment.
L'espace entre l'arrière du réfrigérateur et
le mur est trop étroit.
Les éléments situés à l'arrière des compartiments bloquent la circulation de l'air.
Le réglage de la température est trop bas. Ajustez la température du compartiment au réglage
Humidité élevée C'est normal. La condensation à l'arrière du com-
Portes ouvertes fréquemment ou laissées
ouvertes.
Ouvrir le récipient d'eau dans le réfrigérateur.
Porte du congélateur Ouverte à gauche ou
ouverte librement.
Les articles qui bloquent les bouches d'aération du congélateur et qui pré-ventilent
le flux d'air approprié.
Aliments placés trop près de la bouche
d'aération.
Réglage de la température trop froid. Réglez la température à un chire inférieur (moins
Ajustez le compartiment à un réglage plus froid ; attendez 24 heures pour que la température s'ajuste.
Garder la porte dosée / Vérifier qu'un emballage
n'empêche pas la porte de se refermer.
Laissez le temps aux aliments et au réfrigérateur de
refroidir.
Laissez un espace de 4" (10 cm) entre l'arrière du
réfrigérateur et le mur.
Ne placez pas les articles contre les côtés des compartiments ou directement devant les évents.
du réchaueur suivant ; attendez 24 heures pour
l'ajuster.
partiment réfrigérateur est due à l'utilisation de la
technologie aliments frais paroi froide.Voir "Pièces
et caractéristiques".
Garder la porte dosée. Vérifiez qu'un emballage
n'empêche pas la porte de se refermer.
Couvercle ou récipient scellé
Vérifiez qu'un emballage n'empêche pas la porte de
se refermer complètement.
Éloignez les objets du mur arrière.
Éloignez les articles de l'arrière et du haut du réfrigérateur.
froid).
ASSISTANCE À LA CLIENTÈLE
Avant de contacter le service clientèle, veuillez consulter le guide de dépannage ci-dessus.
Visitez notre site Web pour nous contacter, trouver des réponses aux questions fréquemment posées, et pour d’autres ressources qui
peuvent inclure une version mise à jour de ce manuel de l’utilisateur.
WWW.IMPECCA.COM
–36–
Page 37

ENGLISHESPAÑOLFRANÇAIS
GARANTIE LIMITÉE D’UN AN
Impecca™ garantie auprès de l’acheteur original cet appareil
contre toutes défectuosités liées au matériel et à la fabrication tel que spécifié ci-dessous.
PIÈCES ET MAIN D’ŒUVRE- S’il est déterminé que
l’appareil a un problème lié à la fabrication, à l’intérieur d’une période d’un an de la date d’achat originale, Impecca™, à sa discrétion, pourra remplacer ou
réparer les pièces de l’appareil sans frais pour vous
aux États-Unis.
Afin d’obtenir des services sous garantie par un fournisseur
autorisé par le centre de service d’Impecca™, veuillez nous
rejoindre par courriel : service@impecca.com afin d’obtenir un
numéro d’autorisation d’entretien et réparation (Repair and
Maintenance Authorization – RMA). Vous recevrez également
des détails liés au processus de réparation et/ou remplacement.
Tout matériau en vitre inclus avec l’appareil est couvert par une garantie de 60 jours à compter de la date
d’achat (lorsque applicable).
Impecca™ exclus spécifiquement de cette garantie tout attachement non électrique / mécanique, accessoires ou pièce
jetable incluant, mais non limité au boîtier externe, les câbles
connecteurs, les piles et les adaptateurs secteurs. Impecca™
se réserve le droit de réparer ou remplacer les appareils défectueux par un modèle pareil, équivalent ou plus récent.
Nous nous réservons le droit de réparer ou de remplacer l’appareil à notre discrétion. Le remplacement pourrait être par
un appareil nouveau ou remis à neuf. Bien que tous les eorts
soient mis de l’avant pour assurer qu’il s’agisse du même modèle, s’il s’avère impossible, le remplacement sera de qualité
similaire ou supérieure.
L’usure normale de l’appareil n’est pas couverte par cette
garantie. Impecca™ se réserve le droit de déterminer le niveau
d’usure sur l’ensemble de ses appareils. Ouvrir le boîtier ou
modifier l’appareil annule dans son entièreté la présente
garantie.
Exclusions : la garantie présente exclut les points suivants :
1. Tout appareil dont le numéro de série est eacé ou rendu
illisible.
2. Tout appareil transféré à un second propriétaire.
3. La rouille formée à l’intérieur ou à l’extérieur de l’unité.
4. Les appareils marqués « Tel quel » ou « Remis à neuf ».
5. Pertes d’aliments dus à un mauvais fonctionnement de
l’appareil.
6. Climatiseur à fenêtre installés au mur.
7. Si l’appareil est utilisé à des fins commerciales.
8. Appels de service qui ne sont pas en lien avec un mal
fonctionnement de l’appareil.
9. Appels de service pour un appareil endommagé suite au
non-respect des instructions fournies.
10. Appels de service liés à une installation défectueuse.
11. Coûts entraînés à rendre l’appareil accessible pour
l’entretien (incluant, mais non limité à l’enlèvement de
moulures, plinthes, armoires, etc.)
12. Appels de service pour le remplacement de pièces
consommables tels que des ampoules, filtres, etc.
13. Des frais additionnels peuvent s’appliquer aux appels de
service en soirée, en fin de semaine, les jours fériés. Des
dommages à la finition de l’appareil ou à des ameublements suite à l’installation de l’appareil.
14. Dommages causés par : des circonstances exceptionnelles; incendie; mauvaise utilisation; accident; alimentation électrique inappropriée; entretien eectué par
une personne non autorisée; utilisation de pièces non
d’origine d’Impecca, etc.
TOUTE GARANTIE IMPLICITE, Y COMPRIS LES GARANTIES DE
QUALITÉ MARCHANDE ET D’ADAPTATION À UN USAGE PARTICULIER EST LIMITÉ POUR UNE DURÉE DE 1 AN À COMPTER DE
LA DATE DE L’ACHAT ORIGINAL DE CE PRODUIT.
CES GARANTIES ET RECOURS DEMEURENT EXCLUSIFS À LA
VENTE ET L’UTILISATION DE CE PRODUIT. AUCUNE AUTRE
GARANTIE, ORALE OU ÉCRITE, EXPLICITE OU IMPLICITE, NE
SERA ÉMISE.
IMPECCA™ NE PEUT PAS ÊTRE TENU RESPONSABLE POUR
DES DOMMAGES SPÉCIAUX, ACCIDENTELS, CONSÉQUENTS,
DIRECTS OU AUTRES CONNUS OU QUI AURAIENT PU ÊTRE
COMMUNIQUÉS À IMPECCA™, Y COMPRIS LA PERTE DE
PROFITS, DE BIENVEILLANCE, DE BIENS ET DE BLESSURES
RÉSULTANT D’UNE VIOLATION DE LA GARANTIE, L’INCAPACITÉ
D’UTILISER LE PRODUIT OU EN VERTU DE TOUTE THÉORIE
JURIDIQUE EN CONTRAT OU DÉLIT. LA RESPONSABILITÉ
D’IMPECCA EST LIMITÉE AU PRIX D’ACHAT PAYÉ AU VENDEUR
EN DÉTAIL DU PRODUIT DÉFECTUEUX.
Aucun revendeur, agent ou employé d’Impecca™ n’est autorisé à eectuer une modification, une extension, un changement ou un amendement de cette garantie sans le consentement écrit et l’autorisation d’Impecca™.
Certains états ne permettent pas l’exclusion ou la limitation
des garanties implicites ou de responsabilité en lien avec des
dommages accidentels or des dommages conséquents ou
ne permettent pas une limitation sur la durée de la garantie implicite. Donc, les limitations ou exclusions ci-dessus
peuvent ne pas s’appliquer à vous. Cette garantie vous donne
des droits légaux spécifiques et vous détenez d’autres droits,
qui peuvent varier d’état en état.
Note : Notre centre de la garantie eectue la livraison uniquement qu’aux États-Unis continentaux.
–37–
 Loading...