

Page 1
10.2 CF Bottom Freezer Apartment Refrigerator
Refrigerador con Compartimento de Congelador Inferior 10.2 Pies Cúbicos
Réfrigérateur d’appartement de 10,2 pieds cubes avec congélateur au bas
Manuel de l’utilisateur
User Manual
Manual de usuario
Model: RA-2105
www.impecca.com
Page 2

PLEASE SAVE THESE INSTRUCTIONS. YOU MAY NEED THEM IN
THE FUTURE.
i DANGER at
THERE IS A RISK OF FIRE: THIS REFRIGERATOR CONTAINS A FLAMMABLE REFRIGERANT. DO NOT PUNCTURE REFRIGERANT TUBING.
RISK OF EXPLOSION: THE REFRIGERANT IS FLAMMABLE. UNIT MUST BE REPAIRED BY A TRAINED SERVICE TECHNICIAN
ONLY. USE CARE NOT TO PUNCTURE ANY TUBING THAT HOUSES THE REFRIGERANT.
I WARNING
ELECTRICAL INFORMATION
The refrigerator must be plugged into its own dedicated 115V, 60Hz, 15 Amp electrical outlet. Be sure not to circumvent the
grounding plug (third prong) on the outlet as it protects against electrical shock hazards.
NOTE: Keep these points in mind as well:
• Do not use an extension cord with this appliance. If the power cord is too short, have a qualied electrician or service
technician install an outlet near the appliance. Use of an extension cord can negatively aect the performance of the unit
and create a re hazard.
• Avoid plugging a refrigerator into a GFCI outlet as it may cause the outlet to trip and is NOT recommended.
• Avoid electrical outlets controlled by a wall switch.
• Avoid plugging the unit into an outlet that has insuicient power. This could damage the compressor and void the warranty.
I NO USER SERVICEABLE PARTS INSIDE ANY COVERED AREA OF YOUR UNIT. TO AVOID THE RISK OF AN ELECTRICAL
SHOCK, DO NOT ATTEMPT REPAIRS YOURSELF.
I WARNING
• When refrigerator is empty, be sure to remove the doors, since it is an attractive place for children to play. This is so even
if it’s being discarded.
• Be careful to throw out any plastic aer installation that could cause a suocation hazard.
Page 3
INTRODUCTION
Thank you for choosing this quality Impecca refrigerator. This
appliance is designed for consumer, household use. Please
carefully read this manual before using this product. Be sure to
keep the manual for later consultation.
Note: All images in this instruction manual are for indication only;
the physical appearance and options on your model may vary.
SERIAL AND MODEL NUMBER
Please record your model number and serial number below.
You can nd the number plate in the upper-le wall inside the
refrigerator.
Model Number: RA-2105
Serial Number: ______________________________
Date of Purchase: ____________________________
BEFORE DISCARDING YOUR OLD REFRIGERATOR:
• Remove the door(s), leave the shelves in place (to help
prevent children from crawling in) and have it removed
from your premises by a qualied technician.
• Check with your retailer to nd out if they’ll take away
and responsibly dispose of or recycle your old refrigerator.
• See www.epa.gov/rad for more information on Responsible Appliance Disposal.
magnetic seal will not function properly.
CLEANING BEFORE USE
Wipe the inside of the unit with a weak solution of baking
soda (bicarbonate). Then rinse with warm water using a damp
sponge or cloth. Wash the shelves and bins in warm soapy water and dry completely before replacing in the unit. Clean the
exterior of the unit with a damp cloth.
If you require more information refer to the Cleaning section.
UNIT OVERVIEW & FEATURES
• Bottom freezer
• Totally frost-free design
• Adjustable legs
• 2 liter bottle rack
• Large fruit and vegetable storage bin
• Glass storage bin cover
• 2 Congurable glass shelves in refrigerator
• Electronic refrigerator thermostat
• Separate freezer thermostat
• Recongurable door shelves
• Freezer door storage
• Egg tray
USING YOUR APPLIANCE
ENGLISHESPAÑOLFRANÇAIS
SAFETY NOTICES
This appliance is intended to be used in household and similar
applications such as:
• sta kitchen areas in shops, oices and other working
environments;
• individual use in hotel rooms and other residential type
environments;
INSTALLING YOUR APPLIANCE
LOCATION
When selecting a position for your unit, ensure the oor is a
at, level surface and the room is well ventilated. Avoid locating
your unit near a heat source, such as an oven, stove top, boiler, or radiator. Also avoid direct sunlight as it may increase the
electrical consumption.
Extreme cold ambient temperatures may also cause the unit
not to perform properly. This unit is not designed for use in a
garage or outdoor installation. Do not place any covering such
as a drape or sheet on the unit.
When installing the unit, ensure that a minimum of 3 inches of
free space is le at both sides and in the rear, and 3 inches of
space at the top of the unit. This will allow cold air to circulate
around the refrigerator and improve the eiciency of the cooling process.
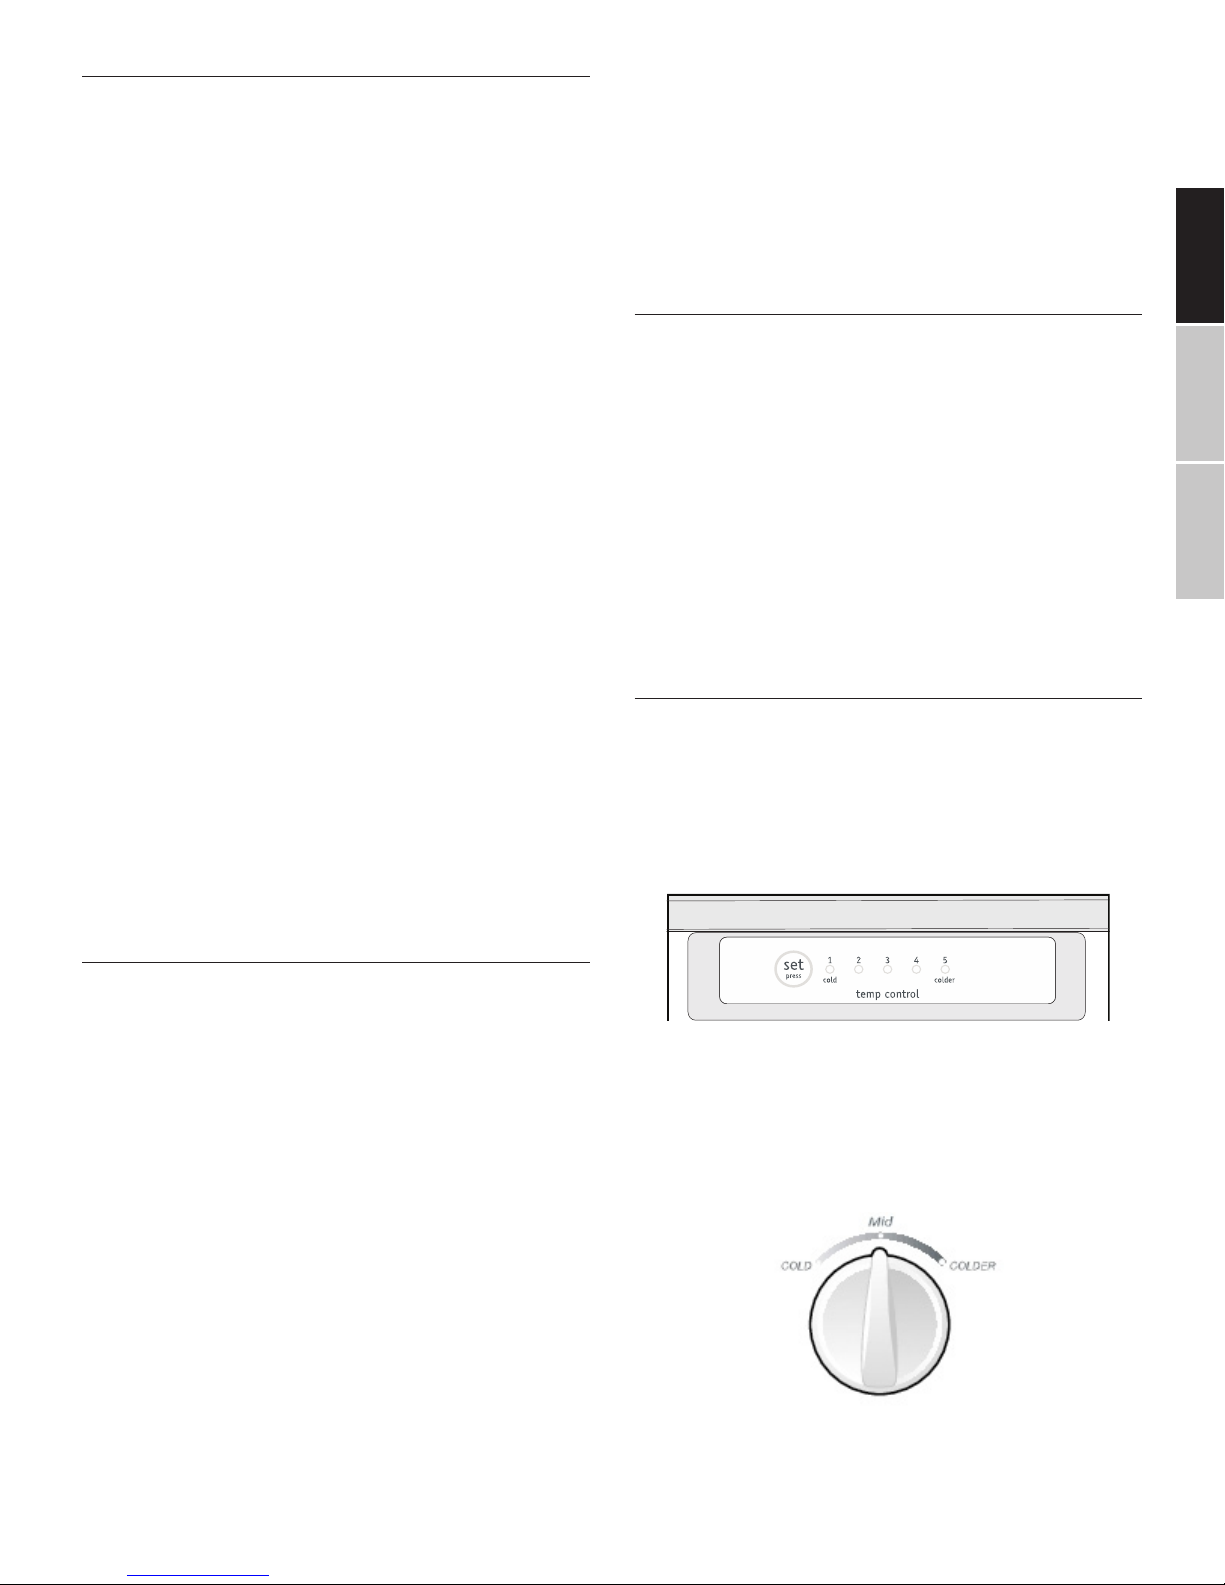
TEMPERATURE CONTROL AND INDICATOR:
You will nd the temperature control and indicator module in
the upper-middle section of your refrigerator section. Press the
SET button to adjust the temperature control between dierent
cooling temperatures ranging from 1 (cold) to 5 (coldest). To
turn unit o, hold SET for 3 seconds.
RELATIVE FREEZER CONTROL:
The freezer also has a control knob which can be found on the
back wall of the refrigerator directly above the fruit and vege-
table bin. This aects the freezer temperature relative to the
refrigerator temperature setting. Simply turn the knob to the
desired relative temperature.
LEVELING THE UNIT
To level the unit, turn the two adjustable feet at the front of the
refrigerator to clockwise or counterclockwise to respectively
raise or lower the corner. If the unit is not level, the door and
NOTE FOR ALL TEMPERATURE CHANGES, ALLOW 24 HOURS
FOR FULL ADJUSTMENT.
–1–
Page 4
CLEANING & CARING FOR YOUR APPLIANCE
perienced persons may cause injury or serious malfunction.
ENGLISH ESPAÑOL FRANÇAIS
DEFROSTING
The refrigerator defrosts automatically. There is no need to do
defrost manually.
CLEANING THE INTERIOR AND THE EXTERIOR OF THE UNIT
• Remove all the shelves and the fruit and vegetable bin.
Wipe the inside of the unit with a weak solution of baking soda (bicarbonate) and then rinse with warm water
using a damp sponge or cloth. Wipe the surfaces completely dry to prevent buildup of frost before replacing
the shelves and salad bin.
• Use a damp cloth to clean the exterior, and wipe down
with standard furniture polish. Ensure sure that the door
is closed to avoid the polish getting on the magnetic
door seal or inside the unit.
• The grille of the condenser at the back of the unit and
the adjacent components can be vacuumed using a so
brush attachment.
INTERIOR ACCESSORIES
Slide one of the full size glass storage shelves into the lowest set
of guides, above the fruit and vegetable containers, and keep it
in this position. To do this, pull the storage shelf forward until it
can be tilted upwards or downwards and removed.
According to your needs, feel free to remove one or more shelves
or drawers from the unit and store them in a safe location for
later re-use.
REVERSING THE DOOR
Only try to reverse the door hinges if you feel capable of doing
so. Ask someone to assist you during the process. If you are un-
sure if you are able to reverse the hinges, contact a qualied,
authorized technician.
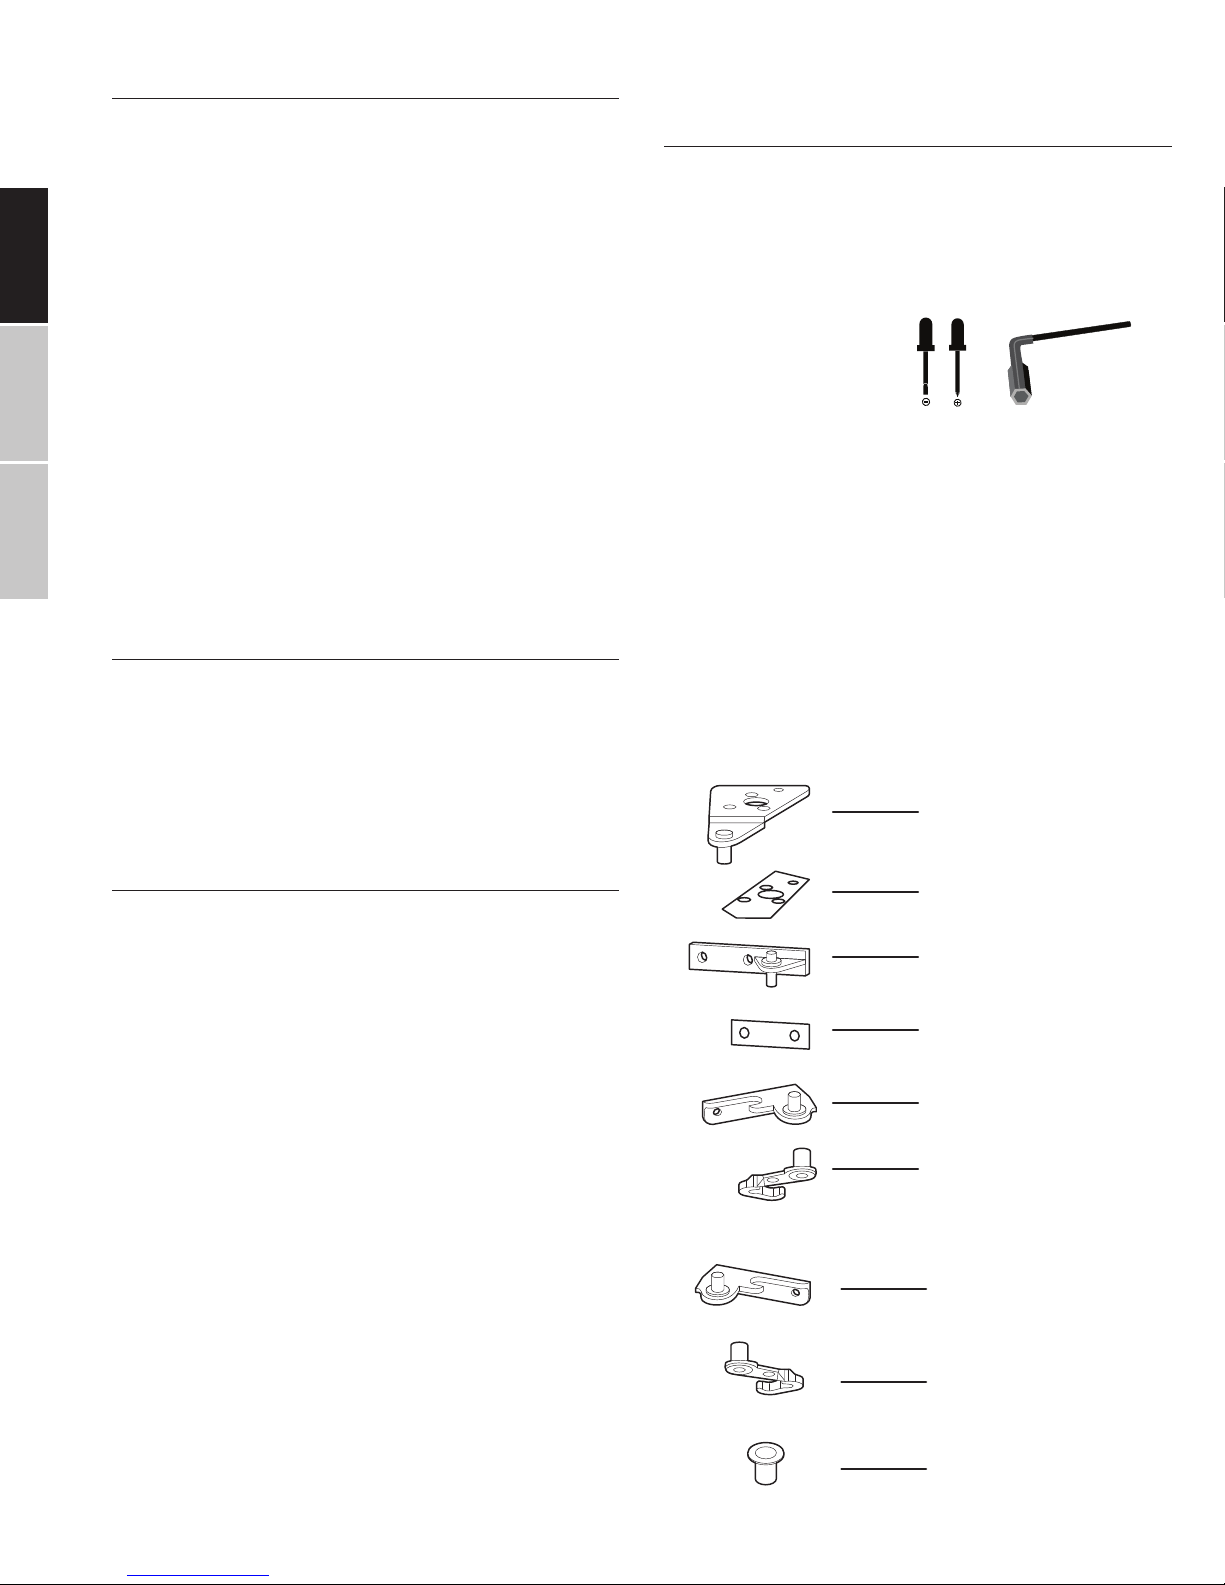
TOOLS REQUIRED (NOT INCLUDED):
• Phillips screwdriver
• Flat-head screwdriver
• Hexagonal spanner
BEFORE REVERSING THE DOOR:
• Ensure the unit is unplugged and empty.
• Adjust the two leveling feet to their highest position.
• To take the door o, you will need to tilt the unit backwards. You should rest the unit against something solid
and block the base so that it will not slide out during the
door reversal process.
• All parts removed must be carefully put aside and reused to do the re-installation of the door.
• Do not lay the unit at as this may damage the coolant
system.
Door Parts
Top Hinge
MAINTENANCE
CHANGING THE LIGHT
Only use a 40W MAX light bulb. Disconnect power to the unit,
unscrew the old light bulb and screw in the new one in its place.
HANDLING / MOVING YOUR UNIT
Under no circumstances should it be lied by holding the edges
of the top area of the unit. Hold the unit around its sides or base
when moving it. .
Do not turn the refrigerator upside down, horizontally, or vibrate
the refrigerator. Do not carry at an angle greater than 45°.
NOT USING FOR EXTENDED PERIODS
When the unit is not in use for a long period of time, disconnect
it from the power supply, empty all food and clean the appliance. Prop the door open somewhat with an object to avoid
unpleasant smells and the buildup of mold.
SERVICING
The unit should be serviced by an authorized technician and
with genuine spare parts. Under no circumstances should you
attempt to repair the unit yourself. Repairs carried out by inex-
–2–
Top Hinge Shim
Center Hinge
Center Hinge Shim
Bottom Right Hinge
Right Pin Assembly (2)
Parts included with Hinge Kit (packed inside unit)
Bottom Le Hinge
Le Pin Assembly (2)
Hole Plug (3)
Page 5
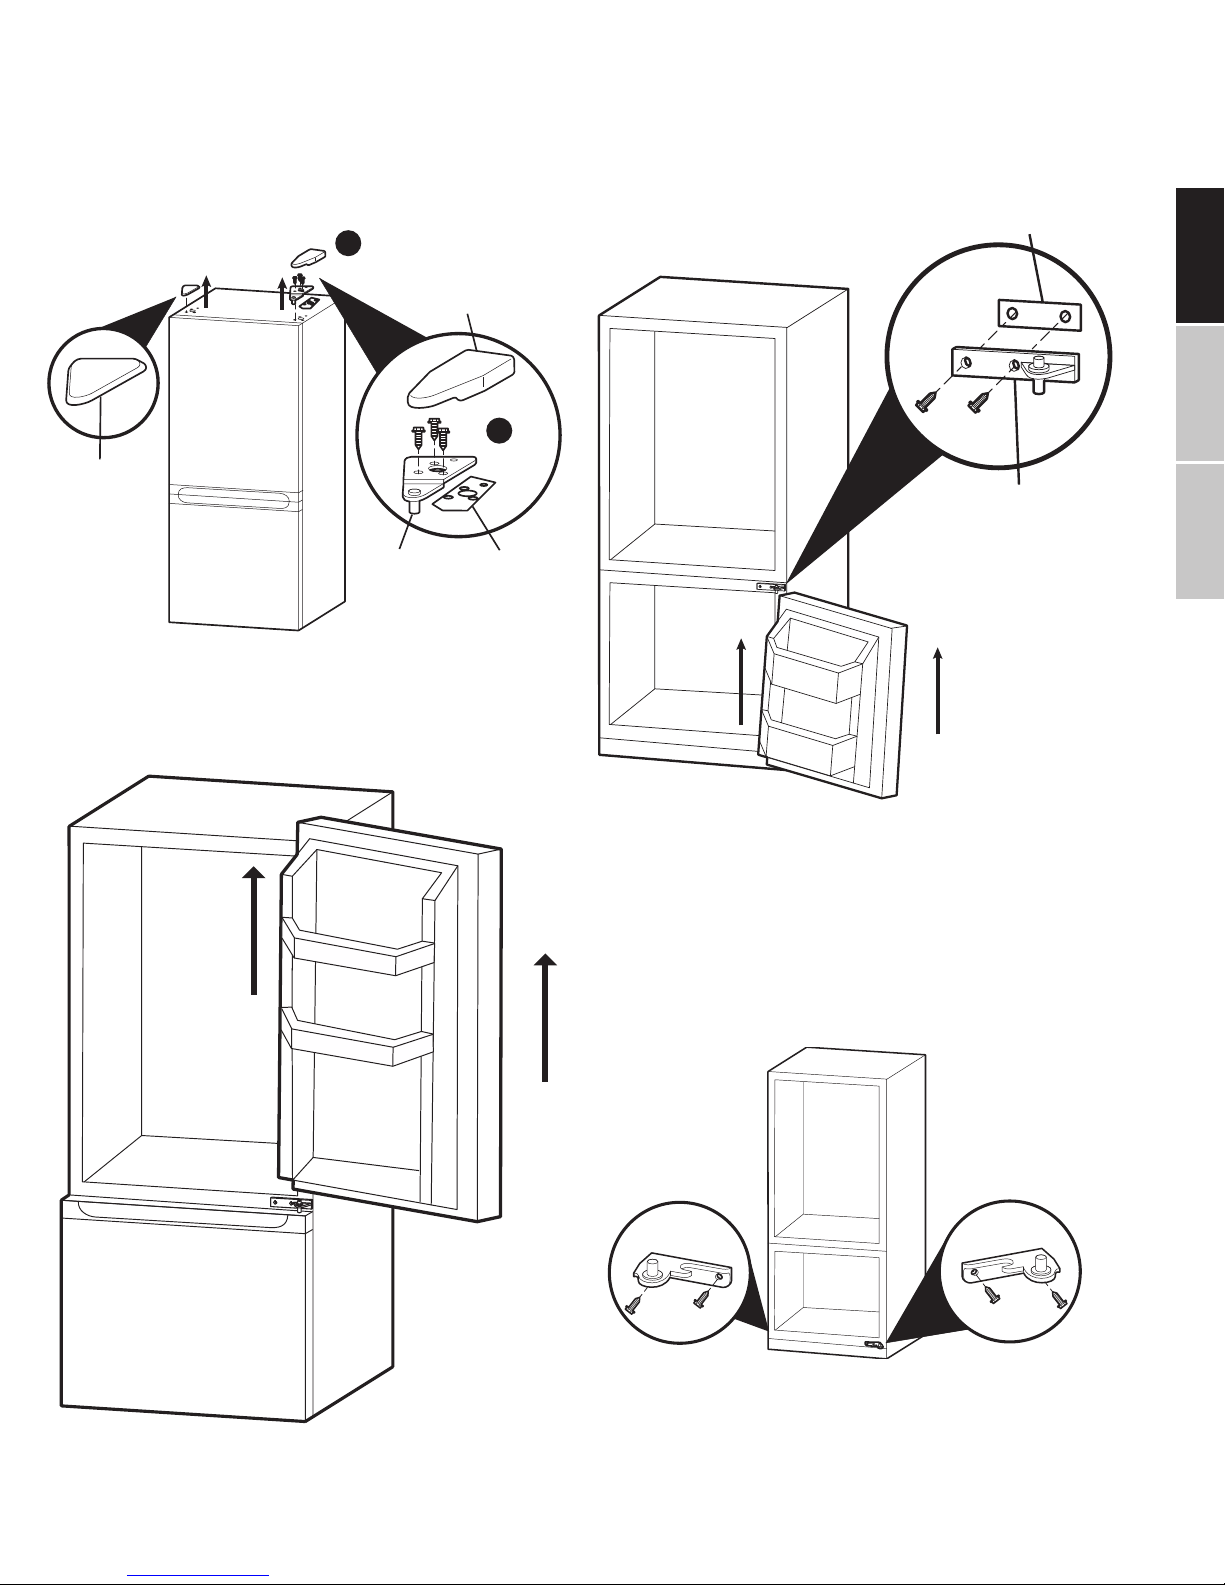
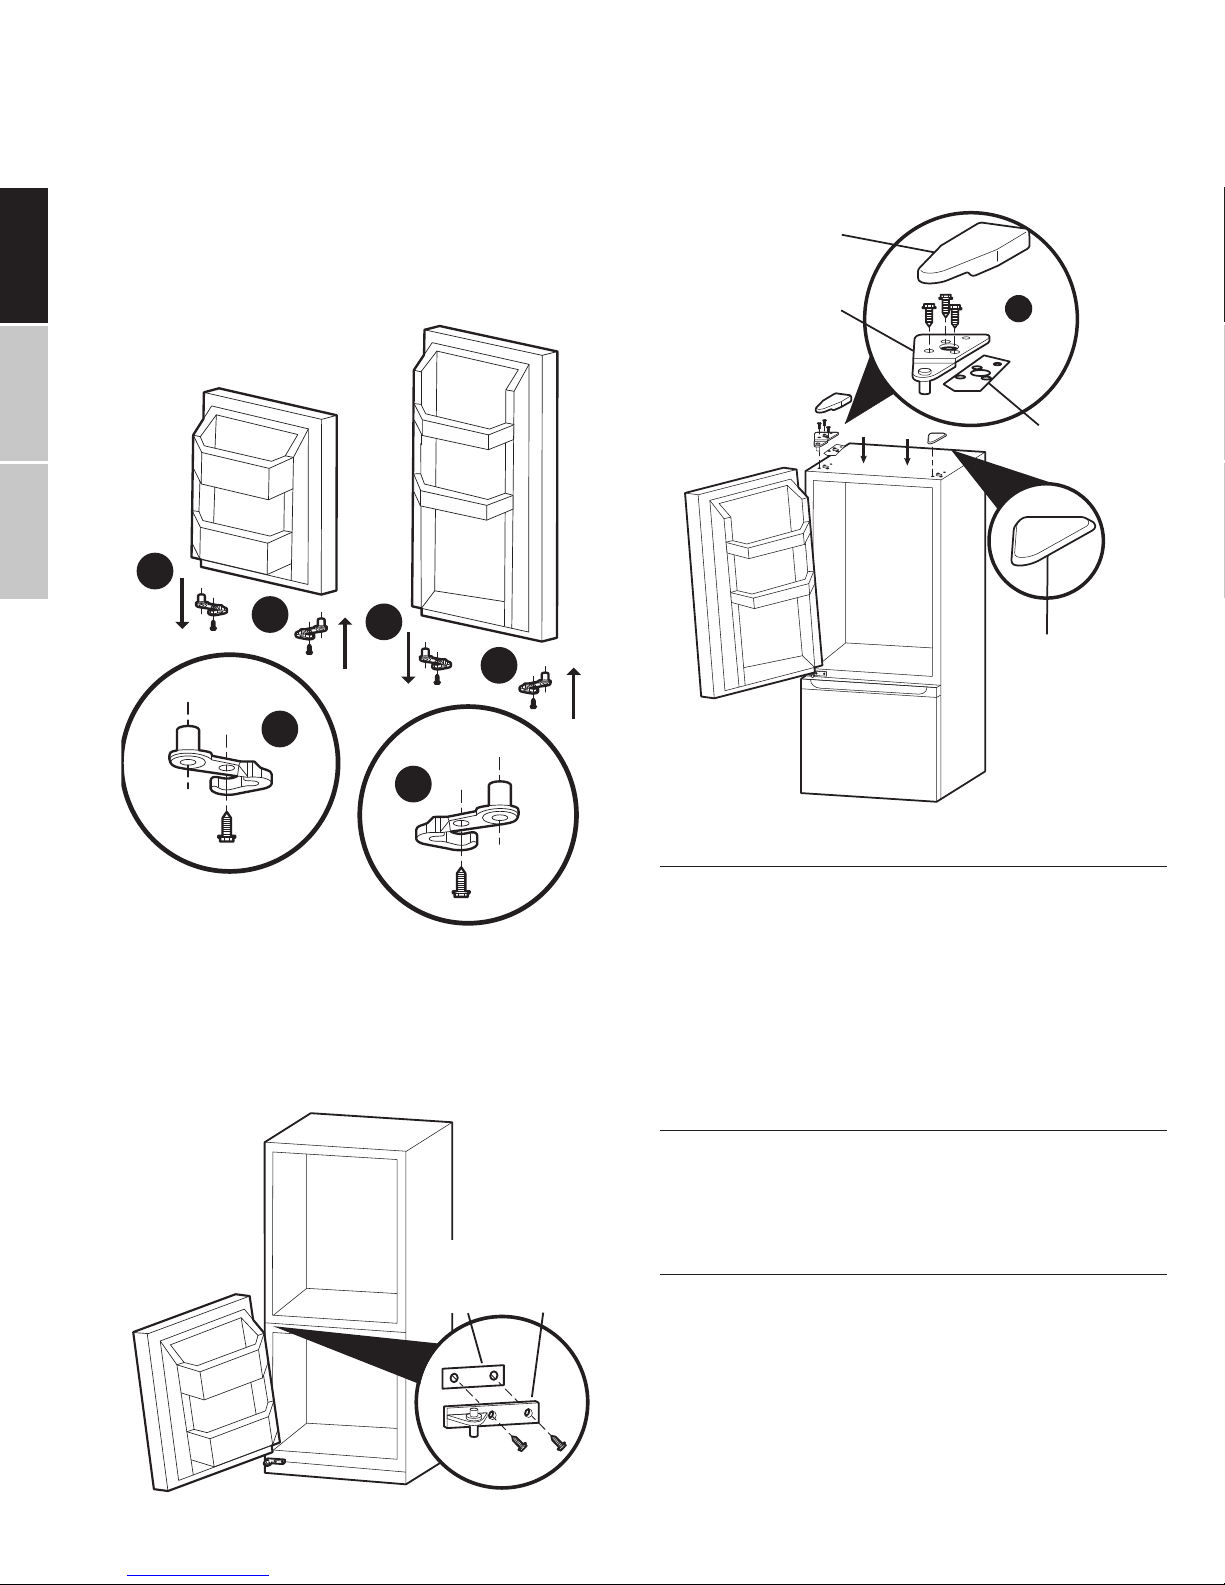
STEP 1
Remove the top hinge cover. Unscrew and remove the top
hinge and top hinge shim. Keep the screws and top cap so they
can be used on the opposite side. Remove the top cap. Be sure
not to drop the refrigerator door!
Remove
1
STEP 3
Unscrew and remove the center hinge and center hinge shim.
Save the screws. Li the freezer door up and away from the appliance. Be sure not to drop the refrigerator door!
Center Hinge
Shim
Hinge Cover
1
Top Cap
Top Hinge Top Hinge
Shim
STEP 2
Li the refrigerator door up and away from the appliance.
Pull Up
Center
Pull
Hinge
Up
STEP 4
Unscrew and remove the bottom right hinge. Save the screws.
Remove screw covers from opposite corner (le) and cover
exposed holes (right). Attach new bottom le hinge with the
screws removed from the opposite side.
ENGLISHESPAÑOLFRANÇAIS
New Bottom Le
Hand Hinge (found
in Hinge kit)
–3–
Remove Right Hand
Hinge (store for
future use).
Page 6
ENGLISH ESPAÑOL FRANÇAIS
STEP 5
Remove right pin assemblies from the bottoms of both the
freezer and refrigerator doors. Attach the replacement pin assemblies on the opposite side. These can be found in the plastic bag along with the User’s Manual. Use a screwdriver.
Note: Hold on to the screws as they will be needed for attaching
the new assemblies.
STEP 7
Place the refrigerator door on the center hinge. Ensure that the
door is aligned horizontally and vertically, and that the gasket
seals on all sides before attaching the top hinge. Attach the top
hinge and shim and place the hinge cover and top cap.
Hinge Cover
R
Freezer
Door
L
R
Refrigerator
Door
R
L
L
Top Hinge
UNIT SPECIFICATIONS
1
Top Hinge
Shim
Top Cap
STEP 6
Place the freezer door on the bottom le hinge. Ensure that the
door is aligned horizontally and vertically. Re-attach the mid-
dle hinge to the top (le) of refrigerator door. Attach shim to
the back of hinge, align with holes and aix to the middle beam
with the saved screws. Fasten with a screwdriver.
Center
Hinge
Shim
Insert
Center
Hinge
Center
Hinge
Replace
Door
–4–
UNIT CAPACITY: 10.2 cubic feet
WIDTH (UNIT/PACKED): 24.0/26.1 (inches)
DEPTH (UNIT/PACKED): 26.1/28.0 (inches)
DEPTH WITH DOOR OPEN: 47.75(inches)
HEIGHT (UNIT/PACKED): 59.8/62.7 (inches)
WEIGHT (NET/GROSS): 125.7/138.9 (pounds)
ERROR CODES
If LED1 and LED2 are lit: Refrigerator temperature sensor error
If LED1 and LED3 are lit: Freezer defrost sensor error
If LED1 and LED4 are lit: Ambient temperature sensor error
TECHNICAL SUPPORT
Before calling technical support, please see the troubleshooting guide below. You may also visit our website at www.impecca.com for answers to Frequently Asked Questions and to
contact us.
Email: support@impecca.com
Phone: +1 866–954–4440
Web: www.impecca.com
Page 7

TROUBLESHOOTING GUIDE
PROBLEM SOLUTION
Make sure that the plug is in all the way
My refrigerator is not getting any power no lights, no
hum, etc.
Find another outlet. The outlet should NOT be a GFCI
outlet. (A GFCI outlet is the kind with the PUSH and RESET breaker built in, which is common in kitchens and
used only for smaller counter-top appliances).
The refrigerator’s interior light comes on but it is not
cooling
Refrigerator seems to run for much longer than usual
between cycles.
Inside refrigerator temperature is too warm.
Check to make sure that the temperature is set cold
enough. This can depend on the environment around
the unit.
Make sure that the door to the refrigerator is closed all
the way
Check the ambient temperature. If it’s very warm, this is
normal.
If you recently put very warm food in the refrigerator,
this is normal.
Make sure that the gasket around the door is free of
debris. If the seal is not tight, warm air from the environment may seep in, causing it to run longer.
This is also normal aer being turned on for the rst
time aer an extended time
Make sure that the temperature setting is at the desired
selections. See “Using Your Appliance” for more details.
This could be caused by opening the door very oen
and letting in warm air frequently.
This can be caused by warm food
It can take at least four hours for your refrigerator to get
to its target temperature setting aer being o for an
extended period of time.
ENGLISHESPAÑOLFRANÇAIS
The outside of the unit is warm This is a normal part of how a refrigerator works and is
nothing to be concerned about.
There are many dierent noises we hear emanating
from the refrigerator at dierent times, including: loud
All of these noises are typical during normal operation
and cycles
sounds when it is rst turned on; fans running when
the temperature is below 45°F; popping and/or cracking sounds; boiling or gurgling sounds and snapping
sounds.
There is a vibrating or rattling sounds when the unit
runs.
There is moisture appearing on the inside of the refrigerator walls.
The unit may not be level. See the “Leveling The Unit”
section above.
This can be caused by debris in the door gasket preventing a tight seal. As well, it is a normal occurrence if the
ambient air is humid. This can also occur if the door is
opened very frequently.
There is moisture appearing on the outside of the refrig-
Make sure that your door is closing properly.
erator walls.
The light bulb stopped turning on when the door opens. Your bulb may have burned out. Replace with a 40W
bulb.
© 2016 by Impecca, a division of LT, Inc, Wilkes Barre, PA.
–5–
Page 8

ENGLISH ESPAÑOL FRANÇAIS
POR FAVOR CONSERVE ESTAS INSTRUCCIONES. PUEDE LLEGAR A
NECESITARLAS EN UN FUTURO
i PELIGRO at
EXISTE PELIGRO DE INCENDIO. ESTE REFRIGERADOR CONTIENE UN REFRIGERANTE INFLAMABLE. NO SE DEBE PERFORAR EL SERPENTÍN O TUBERÍA DEL REFRIGERANTE.
RIESGO DE EXPLOSIÓN. EL REFRIGERANTE ES INFLAMABLE. LA UNIDAD SÓLO DEBE SER REPARADA POR UN TÉCNICO DE
SERVICIO CAPACITADO. SE DEBE CUIDAR DE NO PERFORAR NINGUNA DE LAS TUBERÍAS O SERPENTÍN QUE CONTIENEN
EL REFRIGERANTE.
I ADVERTENCIA
INFORMACIÓN ELÉCTRICA
El refrigerador debe estar conectado en un tomacorrientes de 115V. 60Hz, 15Amp dedicado para él. Asegúrese de no eludir la
conexión a tierra (tercera pata en la clavija) en el tomacorriente, ya que protege al refrigerador en contra del riesgo de descargas
eléctricas.
NOTA: Tenga siempre en mente estos puntos:
• No utilice una extensión con este electrodoméstico. Si el cable de suministro de energía está muy corto haga que un
electricista calicado o técnico de servicio instale un tomacorriente cerca del electrodoméstico. El uso de un cable de
extensión afecta en forma negativa el desempeño de la unidad y puede crear un peligro de incendio.
• Evite conectar el refrigerador en un tomacorriente GFCI ya que puede ocasionar que el tomacorriente se dispare y eso no
es recomendable.
• Evite los tomacorrientes controlados por un interruptor de pared.
• Evite conectar la unidad en un tomacorriente que tenga energía insuciente. Esto dañará el compresor y anulará la ga-
rantía.
I NO HAY PARTES A LAS QUE EL USUARIO PUEDA DARLES MANTENIMIENTO DENTRO DE ÁREAS CUBIERTAS NI EN EL
INTERIOR DE LA UNIDAD. PARA EVITAR LOS RIESGOS DE DESCARGA ELÉCTRICA, NO INTENTE REPARARLAS USTED.
I ADVERTENCIA
• Cuando el refrigerador esté vació, asegúrese de retirar las puertas ya que es un lugar atractivo para que los niños jueguen. Incluso cuando vaya a deshacerse de él.
• Después de la instalación Tenga cuidado de no dejar tirado ningún plástico que pueda convertirse en algún peligro de
sofocación.
–6–
Page 9

INTRODUCCIÓN
Gracias por elegir este refrigerador calidad Impecca. Este electrodoméstico está diseñado para su uso en casa. Lea con cuidado
este manual antes de usar este producto. Asegúrese de conservar este manual para su uso posterior.
Nota: Todas las imágenes en esta manual son indicativas, la apariencia física y opciones de su modelo pueden variar.
NÚMERO DE SERIE Y MODELO
LIMPIANDO ANTES DEL USO
Limpie la parte interior de la unidad con una solución ligera de
bicarbonato y agua. Luego enjuague con agua tibia utilizando
una esponja o trapo húmedo. Lave los entrepaños y cajones con
agua jabonosa tibia y seque completamente antes de colocarlos
dentro de la unidad. Limpie la parte externa de la unidad con un
trapo húmedo.
Si requiere más información reérase a la sección de Limpieza.
Por favor a continuación registre su número de serie y modelo.
Puede encontrar la placa en la pared interior superior izquierda
del refrigerador.
Número de modelo: RA-2105
Número de Serie: __________________________
Fecha de Compra: _________________________
ANTES DE DESHACERSE DE SU REFRIGERADOR VIEJO
• Retire la(s) puerta(s), deje los entrepaños en su lugar (esto
evita que los niños puedan meterse dentro del refrigerador) y retire de sus instalaciones con la ayuda de un técnico especializado.
• Revise con su vendedor si ellos se lo pueden llevar y deshacerse de él en forma responsable o reciclarlo.
• Lea www.epa.gov/rad para obtener mayor información
sobre la Eliminación Responsable de Electrodomésticos
ADVERTENCIAS DE SEGURIDAD
Este electrodoméstico está diseñado para uso domestico
o aplicaciones similares, como:
• El área de alimentos de los empleados en tiendas, oci-
nas y otros ambientes de trabajo.
• Uso individual en habitaciones de hotel u otros ambientes residenciales
INSTALANDO SU ELECTRODOMÉSTICO
RESUMEN GENERAL DE LA UNIDAD Y FUNCIONES
• Congelador inferior
• Diseño totalmente sin escarcha
• Iluminación interior de 40W
• Patas ajustables
• Repisa para botellas de 2 litros
• Amplios cajones de almacenamiento de frutas y verduras
• Cubierta de vidrio para los cajones
• 2 entrepaños de vidrio ajustables
• Termostato electrónico del refrigerador
• Termostato del congelador por separado
• Entrepaños de la puerta congurables
• Almacenamiento en la puerta del congelador
• Charola para huevo
UTILIZANDO SU ELECTRODOMÉSTICO
CONTROL DE TEMPERATURA DEL REFRIGERADOR E INDICADOR:
Encontrará el módulo de control de temperatura del refrigerador y módulo indicador en la parte superior media de la sección
del refrigerador. Presione el botón SET para ajustar el control de
temperatura entre diferentes temperaturas de enfriamiento desde 1 (frío) a 5 (muy frío).
Para apagar la unidad presione el botón SET por 3 segundos.
ENGLISHESPAÑOLFRANÇAIS
UBICACIÓN
Cuando seleccione una posición para su unidad asegúrese que
el piso es una supercie nivelada y plana y que la habitación
está bien ventilada. Evite ubicar su unidad cerca de una fuente
de calor como el horno, estufa, calentador o radiador. También
evite la luz directa del sol ya que puede incrementar el consumo
eléctrico.
Los ambientes extremadamente fríos también pueden causar
que la unidad no funcione adecuadamente. La unidad no está
diseñada para utilizarse en una cochera o en exteriores. No coloque ninguna cubierta como una cortina o sábana sobre la unidad.
Cuando instale la unidad asegúrese que haya un mínimo de 3
pulgadas de espacio libre a ambos lados y en la parte trasera de
la unidad, y 3 pulgadas de espacio de la parte superior de la unidad. Esto permitirá que el aire fresco circule alrededor del refrig-
erador y mejore la eciencia del proceso de enfriamiento.
NIVELANDO LA UNIDAD
Para nivelar la unidad gire las dos patas al frente del refrigerador
ya sea en la dirección de las manecillas del reloj o al contrario
de las manecillas del reloj para levantar o bajar el refrigerador.
Si la unidad no está nivelada, la puerta y el sello magnético no
funcionarán adecuadamente.
RELATIVA DEL CONGELADOR:
El congelador también tiene un botón de control que se puede
encontrar en la pared posterior del refrigerador directamente
por encima de la bandeja de frutas y hortalizas. Esto afecta a la
temperatura del congelador con relación al ajuste de la temperatura del refrigerador. Simplemente gire la perilla a la temperatura
relativa deseada.
NOTA: PARA TODOS LOS CAMBIOS DE TEMPERATURA, PERMITA QUE PASEN UNAS 24 HORAS PARA QUE SE AJUSTE POR
COMPLETO.
–7–
Page 10

LIMPIANDO Y CUIDANDO SU ELECTRODOMÉSTICO
Pin de ensamblaje derecho (2)
Pin de ensamblaje izquierdo (2)
INVIRTIENDO LA PUERTA
DESCONGELANDO
El refrigerador se descongela automáticamente así que no hay
necesidad de descongelar en forma manual.
ENGLISH ESPAÑOL FRANÇAIS
LIMPIANDO EL INTERIOR Y EXTERIOR DE LA UNIDAD
• Retire todos los entrepaños y los cajones de frutas y verduras. Limpie la parte interior de la unidad con una solución
ligera de bicarbonato y agua. Luego enjuague con agua tibia utilizando una esponja o trapo húmedo. Seque perfecta-
mente las supercies para evitar que se escarchen antes de
colocar los entrepaños y cajones de frutas y verduras.
• Limpie la parte externa de la unidad usando un trapo húmedo y pula con un pulidor normal de muebles. Asegúrese que
la puerta está cerrada para evitar que el pulidor se meta en
el cierre magnético de la unidad o dentro de la unidad.
• La parrilla del condensador en la parte posterior de la unidad y los componentes que están por detrás deben ser aspirados usando el cepillo suave de la aspiradora.
ACCESORIOS INTERIORES
Deslice uno de los entrepaños de tamaño completo en las guías
de más abajo, arriba de los cajones de las frutas y verduras y manténgalo en esa posición. Para hacer esto jale el entrepaño hacia
delante hasta que pueda ser inclinado hacia arriba o hacia abajo
y pueda retirarse.
De acuerdo a sus necesidades, siéntase en la libertad de retirar uno
o más de los entrepaños o en cajones de la unidad y guárdelos en
un lugar seguro para usarlos más adelante.
Sólo trate de invertir las bisagras de las puertas si se siente capaz
de hacerlo. Pida que alguien le ayude. Si no está seguro de poder
hacer este cambio, entre en contacto con un técnico de servicio
calicado.
HERRAMIENTAS REQUERIDAS (NO INCLUIDAS)
• Destornillador Philips
• Destornillador de cabeza plana
• Llave hexagonal
ANTES DE INVERTIR LAS PUERTAS:
• Asegúrese que la unidad esta desconectada y vacía
• Ajuste las dos patas niveladoras a las posiciones más altas
• Para quitar la puerta necesita inclinar la unidad hacia atrás.
Debe recargarla contra algo rme y bloquear la base de
modo que no se resbale durante el proceso de inversión de
las puertas
• Todas las partes que retire deben ser puestas del lado de
forma cuidadosa y reutilizadas para la reinstalación de la
puerta
• No acueste la unidad (ponerla en forma horizontal) ya que
esto dañaría el sistema congelante
Partes de la puerta
Bisagra superior
Calza de la bisagra superior
MANTENIMIENTO
CAMBIANDO EL FOCO DE ILUMINACIÓN
Utilice focos de 40W máximo. Desconecte el suministro de energía
de la unidad, retire la cubierta de plástico y desenrosque el foco
viejo y reemplácelo con el nuevo.
MANEJANDO/MOVIENDO SU UNIDAD
Bajo ninguna circunstanciá el refrigerador debe ser levantado al
sujetar las orillas de la supercie superior de la unidad. Sostenga la
unidad alrededor de los lados y de la base al moverlo.
No ponga de cabeza el refrigerador, acostado sobre un lado o
someta a vibraciones. No incline en ángulos superiores a los 45o.
SIN USO POR PERIODOS PROLONGADOS
Cuando no use la unidad por periodos prologados, desconéctela del suministro eléctrico, saque todos los alimentos y limpie la
unidad. Bloquee la puerta con algún objeto para que se mantenga
siempre abierta para evitar que se formen olores o moho.
SERVICIO DE MANTENIMIENTO
La unidad debe recibir servicio de mantenimiento por parte de un
técnico de servicio autorizado y utilizar partes de repuesto genuinas. Bajo ninguna circunstancia usted debe intentar reparar la
unidad. Las reparaciones por parte de personas inexpertas pueden
causar daños o descomposturas serias.
Bisagra central
Calza de la bisagra central
Bisagra inferior derecha
Partes incluidas en el Kit de Bisagras
(paquete dentro de la unidad)
Bisagra inferior izquierda
Tapón del orificio (3)
–8–
Page 11

PASO 1
Retire la cubierta de la bisagra superior. Desatornille y retire la bisagra superior y la calza de la bisagra superior. Guarde los tornillos y
la cubierta de modo que pueda utilizarlos cuando reinstale la puerta. Retire la cubierta superior. ¡Asegúrese de que no se le caiga la
puerta del refrigerador!
Retire
1
Cubierta de
la bisagra
1
Cubierta
superior
Bisagra
superior
PASO 2
Levante la puerta del refrigerador hacia arriba y fuera del electrodoméstico.
Calza de la
bisagra
superior
PASO 3
Desatornille y retire la bisagra del centro y la calza del centro.
Guarde los tornillos. Levante la puerta del congelador hacia arriba
y hacia fuera del electrodoméstico. ¡Asegúrese de que no se le caiga puerta del congelador!
Calza de la
bisagra central
Bisagra
Jale
central
hacia
arriba
ENGLISHESPAÑOLFRANÇAIS
Jale hacia arriba
PASO 4
Desatornille y retire la bisagra inferior derecha. Guarde los tornillos.
Retire las cubiertas de los tornillos de la esquina opuesta (izquierdo) y cubra los agujeros expuestos (derecha). Coloque la nueva
bisagra inferior izquierda con los tornillos que retiró del lado contrario.
Nueva bisagra
izquierda
(Está dentro del kit
de bisagras)
Retire la bisagra
derecha
(Guarde para su
uso posterior)
–9–
Page 12

PASO 5
Puerta del
Retire los pines de ensamblaje de la parte inferior de ambas puertas, congelador y refrigerador. Coloque los pines de ensamblaje
de reemplazo en el lado opuesto. Estos se encuentran en la bolsa
de plástico que vino junto con este manual de usuario. Utilice un
destornillador.
ENGLISH ESPAÑOL FRANÇAIS
Nota: Guarde los tornillos que retire ya que serán utilizados para terminar la instalación.
PASO 7
Coloque la puerta del refrigerador en la bisagra central. Asegúrese
que la puerta está alineada horizontal y verticalmente, y que las
juntas sellan todos los lados antes de colocar la bisagra superior.
Coloque la bisagra superior y la calza en su lugar y coloque la cubi-
erta en la bisagra y la cubierta superior.
Cubierta de
la bisagra
Puerta del
Refrigerador
congelador
D
I
D
I
D
I
PASO 6
Coloque la puerta del congelador en la bisagra izquierda. Asegúrese
que la puerta está alineada horizontal y verticalmente. Reinstale la
bisagra media en la parte superior izquierda de la puerta del congelador. Coloque la calza en la parte posterior de la bisagra, alinee
los oricios y coloque con los tornillos que guardó. Asegúrelos con
un destornillador.
Center
Hinge
Shim
Inserte la
bisagra
central
Center
Hinge
Reemplace
la puerta
Bisagra
superior
1
Calza de la
bisagra superior
Tapa superior
ESPECIFICACIONES DE LA UNIDAD
CAPACIDAD DE LA UNIDAD: 10.2 pies cúbicos
ANCHO: (UNIDAD/EMPACADA) 24.0/26.1 (pulgadas)
FONDO: (UNIDAD/EMPACADA) 26.1/28.0 (pulgadas)
FONDO CON LA PUERTA ABIERTA: 47.75 pulgadas
ALTURA: (UNIDAD EMPACADA) 59.85/62.7 (pulgadas)
PESO (NETO/BRUTO): 125.7.4/138.9 (libras)
CÓDIGOS DE ERROR
Si el LED1 y el LED2 están encendidos: Error en el sensor de temperatura del refrigerador
Si el LED1 y el LED3 están encendidos: Error en el sensor de temperatura del congelador
Si el LED1 y el LED4 están encendidos: Error en el sensor de temperatura ambiente
SOPORTE TÉCNICO
Antes de llamar a soporte técnico, por favor vea la guía de Solución
de Problemas que se muestra a continuación. También puede visitar nuestro sitio web en www.impecca.com para ver las respuestas
a las Preguntas Más Frecuentes y contactarnos.
Email: support@impecca.com
Teléfono: +1 866–954–4440
Web: www.impecca.com
–10–
Page 13

GUIA DE SOLUCIÓN DE PROBLEMAS
PROBLEMA SOLUCIÓN
Asegúrese que la clavija está bien conectada al tomacorrientes.
Mi refrigerador no está obteniendo alimentación de
energía, sin luces, sin zumbido, etc.
La luz interior del refrigerador está encendida pero el
refrigerador no está funcionando.
El refrigerador parece que no funciona por mucho más
tiempo que el usual entre ciclos.
Busque otro tomacorrientes. Verique que no sea un tomacorrientes GFCI. (Los tomacorrientes GFCI son del tipo de
interruptor integrado de presionar y restaurar, el cual es
común en cocinas y se utilizan frecuentemente para electrodomésticos de encimera pequeños).
Revise que la temperatura está ajustada en el frío necesario.
Esto puede depender de la temperatura ambiente alrededor de la unidad.
Asegúrese que la puerta del refrigerador está bien cerrada.
Revise la temperatura ambiente. Si está muy cálida, es
normal.
Si recientemente metió alimentos muy calientes en el refrigerador, esto es normal.
Asegúrese que el sellador alrededor de la puerta está libre
de polvo y mugre. Si el sello no está apretado, el aire cálido
del medio ambiente se puede colar, causando que el compresor funcione más a menudo.
Esto es usual al haberse prendido después de mucho tiempo de no haberlo utilizado.
ENGLISHESPAÑOLFRANÇAIS
Asegúrese que el ajuste de temperatura está en la selección
deseada. Para mayor información lea “Utilizando su Electrodoméstico”.
Esto puede ser causado por abrir la puerta demasiado a
La temperatura dentro del refrigerador es demasiado
caliente.
menudo dejando que el aire caliente entre a la unidad.
Puede ser causado por alimentos calientes.
Puede tomar algunas horas para que su refrigerador alance
la temperatura deseada después de haber estado apagado
por un periodo largo de tiempo.
Afuera de la unidad está caliente. Esto es la parte normal de cómo funciona un refrigerador y
no hay nada por qué preocuparse.
Hay muchos ruidos diferentes que vienen del refriger-
ador a diferentes tiempos, incluyendo: sonidos fuertes
cuando se prende por primera vez; los ventiladores
están funcionando cuando la temperatura es inferior a
Todos estos ruidos son típicos durante la operación y ciclos
normales.
los 45OF; sonidos de tronidos o craqueos; sonidos de
gorgoteos o de ebullición y sonidos de chasqueo.
Hay sonidos de vibración o traqueteo cuando la unidad
está funcionando.
Hay humedad que aparece en la parte interior de las
paredes del refrigerador.
La unidad puede no estar nivelada. Lea la sección “Nivelan-
do la Unidad”.
Esto puede ser causado por polvo en el sello de la puerta
evitando que el cierre sea hermético. También es algo nor-
mal si hay humedad en el medio ambiente. Esto también
puede ocurrir si la puerta se abre en forma muy frecuente.
Hay humedad que aparece en la parte exterior de las
Asegúrese que la puerta está cerrando bien.
paredes del refrigerador.
La luz ya no prende cuando la puerta está abierta. El foco pudo haberse agotado, reemplácelo con un foco de
máximo 40W.
© 2016 por Impecca , una división de LT , Inc , Wilkes Barre , Pennsylvania .
–11–
Page 14

ENGLISH ESPAÑOL FRANÇAIS
VEUILLEZ CONSERVER CES INSTRUCTIONS.
ELLES POURRONT VOUS ÊTRES UTILES DANS LE FUTUR.
i DANGERat
IL Y A UN RISQUE D’INCENDIE : CE RÉFRIGÉRATEUR CONTIENT UN RÉFRIGÉRANT INFLAMMABLE. NE PAS PERCER LA
TUYAUTERIE DE FRIGORIGÈNE.
RISQUE D’EXPLOSION : LE FLUIDE FRIGORIGÈNE EST INFLAMMABLE. L’APPAREIL DOIT ÊTRE RÉPARÉ PAR UN TECHNICIEN
QUALIFIÉ SEULEMENT. VEILLEZ À NE PAS PERFORER TOUT CONDUIT QUI ABRITE LE RÉFRIGÉRANT.
IAVERTISSEMENT
INFORMATIONS ÉLECTRIQUES
Le réfrigérateur doit être branché dans sa propre prise électrique de 115 V, 60 Hz, 15 ampères. Veillez à ne pas contourner la prise
de terre (troisième volet) sur la sortie, car elle protège contre les risques de décharge électrique.
REMARQUE : Gardez aussi ces points à l’esprit :
• Ne pas utiliser une rallonge avec cet appareil. Si le cordon d’alimentation est trop court, demandez à un électricien ou
un technicien de service qualié d’installer une prise près de l’appareil. L’utilisation d’une rallonge peut aecter négativement les performances de l’appareil et créer un risque d’incendie.
• Évitez de brancher le réfrigérateur dans une prise DDFT comme cela pourrait causer une défaillance et est déconseillé.
• Évitez les prises électriques commandées par un interrupteur mural.
• Évitez de brancher l’appareil dans une prise qui n’a pas une puissance nécessaire. Cela pourrait endommager le compresseur et annuler la garantie.
I IL N’Y A AUCUN COMPOSANT SUSCEPTIBLE D’ÊTRE RÉPARÉ PAR L’UTILISATEUR À L’INTÉRIEUR DES ZONES COU-
VERTES DE VOTRE UNITÉ. POUR ÉVITER LES RISQUES DE DÉCHARGE ÉLECTRIQUE, NE PAS TENTER D’EFFECTUER DES
RÉPARATIONS VOUS-MÊME.
IAVERTISSEMENT
• Lorsque le réfrigérateur est vide, assurez-vous de retirer les portes, comme il peut sembler être endroit de jeu attrayant
pour les enfants. Ceci s’applique même si vous planiez le mettre aux vidanges.
• Après l’installation, faites attention lorsque vous jetez toute matière plastique qui pourrait provoquer un risque de suffocation.
–12–
Page 15

INTRODUCTION
Merci d’avoir choisi ce réfrigérateur Impecca de qualité. Cet appareil est conçu pour un usage domestique. Veuillez lire attentivement ce manuel avant d’utiliser ce produit. Assurez-vous de
conserver le manuel pour consultation ultérieure.
Remarque : Toutes les images présentes dans ce manuel sont à titre indicatif; l’apparence physique et les options de votre modèle
peuvent varier.
NUMÉRO DE SÉRIE ET MODÈLE
Veuillez enregistrer votre numéro de modèle et le numéro de
série ci-dessous. Vous pouvez trouver la plaque d’immatriculation sur le mur supérieur gauche à l’intérieur du réfrigérateur.
Numéro de modèle : RA-2105
Numéro de série : ______________________
Date d’achat : __________________________
AVANT DE METTRE VOTRE ANCIEN RÉFRIGÉRATEUR AUX
VIDANGES :
• Retirez le(s) porte(s), laissez les étagères en place (de
sorte à prévenir que des enfants s’y introduisent) et fait-
es le sortir de votre maison par un technicien qualié.
• Vériez auprès de votre revendeur pour savoir s’ils vont
emporter et éliminer ou recycler votre ancien réfrigérateur de manière responsable.
• Consultez www.epa.gov/rad pour plus d’informations
sur le stockage des appareils responsable.
AVIS DE SÉCURITÉ
Cet appareil est destiné à être utilisé dans un ménage et des
lieux similaires, tel que :
• zones de cuisine du personnel dans les magasins, les bureaux et autres environnements de travail;
• usage individuel dans les chambres d’hôtel et autres environnements de type résidentiel;
INSTALLATION DE VOTRE APPAREIL MÉNAGER
EMPLACEMENT
Lors de la sélection d’une position pour votre appareil, assurez-vous que le plancher est une surface plane de niveau et
que la pièce est bien ventilée. Évitez de placer votre appareil
à proximité d’une source de chaleur, comme un four, une cui-
sinière, un chaue-eau ou un radiateur. Évitez aussi les rayons
directs du soleil, car cela peut augmenter la consommation
électrique.
Des températures ambiantes extrêmement froides peuvent
aussi empêcher l’unité de fonctionner correctement. Cet appareil n’a pas été conçu pour une utilisation dans un garage ou une
installation extérieure. Ne pas recouvrir l’appareil avec drap ou
une couverte.
Lors de l’installation, veiller à ce qu’il y ait un minimum de 3
pouces d’espace libre aux deux côtés, à l’arrière et au-dessus
de l’appareil. Cela permettra à l’air froid de circuler autour du
réfrigérateur et d’améliorer l’eicacité du processus de refroidissement. Ne pas placer d’objets comme un livre ou un vase sur
l’appareil.
NIVELLEMENT DE L’UNITÉ
Pour mettre à niveau l’unité, tournez les deux pieds réglables à
l’avant du réfrigérateur dans le sens horaire ou antihoraire pour
respectivement monter ou baisser le coin. Si l’unité n’est pas à
niveau, la porte et le joint magnétique ne fonctionneront pas
correctement.
NETTOYAGE AVANT USAGE
Essuyez l’intérieur de l’appareil avec une faible solution de
bicarbonate de soude. Rincez ensuite à l’eau tiède avec une
éponge ou un chion humide. Lavez les tablettes et les bacs
à l’eau chaude savonneuse et séchez complètement avant de
les remettre dans l’unité. Nettoyer l’extérieur de l’unité avec un
chion humide.
Si vous désirez plus d’informations, reportez-vous à la section
Nettoyage.
APERÇU DE L’APPAREIL ET CARACTÉRISTIQUES
• Congélateur au bas
• Conception anti-givre
• Éclairage intérieur de 40 W
• Pieds réglables
• Rangement pour bouteilles de 2 litres
• Grand bac de rangement pour fruits et légumes
• Couvercle de bac de rangement en verre
• 2 étagères congurables en verre dans le réfrigérateur
• Thermostat électronique de réfrigérateur
• Thermostat de congélateur séparé
• Étagères de porte congurables
• Entreposage dans la porte du congélateur
• Plateau à œufs
UTILISATION DE VOTRE APPAREIL MÉNAGER
CONTRÔLE ET INDICATION DE LA TEMPÉRATURE DE RÉFRIGÉRATEUR :
Vous trouverez le module de contrôle et indication de la température du réfrigérateur dans la section moyenne supérieure de
votre section réfrigérateur. Appuye z sur le bouton SET pour régler
la commande de température entre les diérentes températures de refroidissement allant de 1 (froid) à 5 (le plus froid).
Pour éteindre l’appareil, maintenez SET pendant 3 seconde.
RELATIVE DU CONGÉLATEUR:
Le congélateur a également un bouton de commande qui se
trouve sur la paroi arrière du réfrigérateur directement au-des-
sus des fruits et légumes bin. Ceci aecte la température du
congélateur par rapport au réglage de la température du réfrigérateur. Il suit de tourner le bouton à la température souhaitée par rapport.
PRENEZ NOTE QUE POUR TOUS LES CHANGEMENTS DE
TEMPÉRATURE, UNE ATTENTE DE 24 HEURES EST NÉCESSAIRE POUR UN PLEIN AJUSTEMENT.
ENGLISHESPAÑOLFRANÇAIS
–13–
Page 16

ENGLISH ESPAÑOL FRANÇAIS
ale de la charnière supérieure
NETTOYAGE ET ENTRETIEN DE VOTRE APPAREIL
DÉGIVRAGE
Le réfrigérateur se dégivre automatiquement. Un dégivrage
manuel n’est pas nécessaire.
NETTOYAGE DE L’INTÉRIEUR ET DE L’EXTÉRIEUR DE L’APPAREIL
• Retirez toutes les étagères et le bac de fruits et légumes.
Essuyez l’intérieur de l’appareil avec une faible solution
de bicarbonate de soude (bicarbonate) puis rincez à
l’eau tiède avec une éponge ou un chion humide. Essuyez complètement les surfaces pour éviter l’accumulation de givre avant de remplacer les étagères et les bacs.
• Utilisez un chion humide pour nettoyer l’extérieur, et es-
suyez avec du vernis de meubles standard. Assurez-vous
que la porte est fermée pour éviter que le vernis soit
en contact avec le joint de la porte magnétique ou l’intérieur de l’unité.
• La grille du condenseur à l’arrière de l’appareil et les
composants adjacents peut être aspirée à l’aide d’une
brosse douce.
ACCESSOIRES INTÉRIEURS
Faites glisser l’un des étagères pleine grandeur en verre dans
l’ensemble le plus bas de guides, au-dessus des conteneurs de
fruits et légumes, puis gardez-le dans cette position. Pour ce
faire, tirez l’étagère vers l’avant jusqu’à ce qu’elle puisse être inclinée vers le haut ou vers le bas et retirée.
Selon vos besoins, vous pouvez retirer une ou plusieurs étagères
ou tiroirs de l’appareil et entreposez-les dans un endroit sécuritaire pour une réutilisation ultérieure.
INVERSER LA PORTE
Essayer seulement d’inverser les charnières de la porte si vous
vous sentez capable de le faire. Demandez à quelqu’un de vous
aider au cours du processus. Si vous n’êtes pas sûr d’être en me-
sure d’inverser les charnières, contactez un technicien qualié
agréé.
OUTILS NÉCESSAIRES (NON INCLUS) :
• Tournevis Phillips
• Tournevis à tête plate
• Clé hexagonale
AVANT D’INVERSER LA PORTE
• Assurez-vous que l’appareil est débranché et vide.
• Ajustez les deux pieds de nivellement à leur position la
plus haute.
• Pour retirer la porte, vous aurez besoin d’incliner l’appareil vers l’arrière. Vous devriez vous reposer l’appareil
contre quelque chose de solide et bloquer la base an
qu’elle ne glisse pas pendant le processus d’inversion de
la porte.
• Toutes les pièces enlevées doivent être soigneusement
mises de côté et réutilisées pour la réinstallation de la
porte.
• Ne pas poser l’appareil à plat, car cela pourrait endommager le système de refroidissement.
Pièces de la porte
Charnière supérieure
C
ENTRETIEN
CHANGEMENT DE LA LUMIÈRE
Utilisez uniquement une ampoule de 40W au maximum.
Coupez l’alimentation de l’unité, dévissez l’ancienne ampoule
et vissez la nouvelle en place.
MANIPULATION/DÉPLACEMENT DE VOTRE APPAREIL
En aucun cas l’appareil ne devrait être soulevé en tenant les extrémités de l’aire supérieure de l’unité. Tenez l’unité autour de
ses côtés ou de sa base lors de son déplacement. .
Ne pas tourner le réfrigérateur à l’envers, horizontalement ou le
faire vibrer. Ne pas transporter à un angle supérieur à 45 °.
NON-UTILISATION POUR DES PÉRIODES PROLONGÉES
Lorsque l’appareil est inutilisé pendant une longue période de
temps, débranchez-le de l’alimentation, videz toute la nourriture et nettoyez l’appareil. Laissez la porte entre ouverte avec
l’aide d’un objet pour éviter les odeurs désagréables et l’accumulation de moisissure.
ENTRETIEN
L’appareil doit être réparé par un technicien agréé et avec des
pièces de rechange d’origine. En aucun cas vous ne devez ten-
ter de réparer l’unité par vous-même. Les réparations eectuées
par des personnes inexpérimentées peuvent causer des blessures ou un dysfonctionnement grave.
Charnière centrale
Cale de la charnière centrale
Charnière inférieure droite
Assemblage de fiche droite(2)
Pièces incluses avec le kit de charnière
(emballé à l'intérieur de l'unité)
Charnière inférieure gauche
Assemblage de fiche gauche (2)
Bouchon à trou (3)
–14–
Page 17

ÉTAPE 1
Retirez le couvercle de la charnière supérieure. Dévissez et retirez la charnière supérieure et sa cale. Conservez les vis et le capuchon de sorte qu’ils peuvent être utilisés sur le côté opposé.
Retirez le couvercle supérieur. Veillez à ne pas laisser tomber la
porte du réfrigérateur!
Retirer
1
Couvercle de
charnière
1
Capuchon
supérieur
ÉTAPE 3
Dévissez et retirez la charnière centrale et sa cale. Conservez les
vis. Soulevez la porte du congélateur et éloignez-la de l’appareil. Veillez à ne pas laisser tomber la porte du réfrigérateur!
Cale de charnière centrale
ENGLISHESPAÑOLFRANÇAIS
Charnière
Charnière
supérieure
ÉTAPE 2
Soulevez la porte du réfrigérateur et éloignez-la de l’appareil.
Cale de
charnière
supérieureim
Tirer vers le haut
centrale
Tirer
Vers
le haut
ÉTAPE 4
Dévissez et retirez la charnière inférieure droite. Conservez les
vis. Retirez les cache-vis du coin opposé (à gauche) et couvrez
les trous exposés (à droite). Fixez une nouvelle charnière inférieure gauche avec les vis retirées du côté opposé.
Nouvelle charnière
inférieure gauche
(qui se trouve dans
le kit de charnière)
Nouvelle charnière
inférieure droite
(à conserver pour
une utilisation future).
–15–
Page 18

ENGLISH ESPAÑOL FRANÇAIS
Porte de
ÉTAPE 5
Retirez les assemblages de che droite du fond des portes du
congélateur et du réfrigérateur. Attachez les ches de rem-
placement sur le côté opposé. Celles-ci se trouvent dans le sac
plastique avec le manuel de l’utilisateur. Utilisez un tournevis.
Remarque : Gardez les vis près de vous, car elles seront néces-
saires pour xer les nouveaux assemblages.
ÉTAPE 7
Placez la porte du congélateur sur la charnière centrale. Assurez-vous que la porte est alignée horizontalement et verticalement et que les joints scellent les deux côtés avant de la xation de la charnière supérieure. Fixez la charnière supérieure et
la cale, puis placez le couvercle de la charnière et le capuchon
supérieur.
Couvercle de charnière
Porte de
congélateur
D
G
D
réfrigérateur
D
G
G
Charnière supérieure
1
Cale de la
charnière supérieure
Capuchon supérieur
SPÉCIFICATIONS DE L’APPAREIL
ÉTAPE 6
Placez la porte du congélateur sur la charnière inférieure
gauche. Assurez-vous que la porte est alignée horizontalement
et verticalement. Fixez la charnière centrale vers le haut (à
gauche) de la porte du réfrigérateur. Fixez la cale à l’arrière de
la charnière en l’alignant avec les trous et xez-la à la poutre du
milieu avec les vis mises de côté. Fixez avec un tournevis.
Insérer la
charnière
Remplacer
centrale
la porte
Cale de la
charnière
Charnière
centrale
centraleenter
CAPACITÉ DE L’APPAREIL : 10,2 PIEDS CUBES
LARGEUR : (UNITÉ/EMBALLÉE) 24,0/26,1 (POUCES)
PROFONDEUR : (UNITÉ/EMBALLÉE) 26,1/28,0 (POUCES)
PROFONDEUR AVEC PORTE OUVERTE : 47,75 (POUCES)
HAUTEUR : (UNITÉ/EMBALLÉE) 59,84/62,20 (POUCES)
POIDS (NET/BRUT) : 134,4/147,6 (LIVRES)
CODES D’ERREUR
Si les voyants 1 et 2 sont allumés : Erreur du capteur de température de réfrigérateur
Si les voyants 1 et 3 sont allumés : Erreur du capteur de dégivrage du congélateur
Si les voyants 1 et 4 sont allumés : Erreur du capteur de température ambiante
SOUTIEN TECHNIQUE
Avant d’appeler le soutien technique, veuillez consulter le guide
de dépannage ci-dessous. Vous pouvez également visiter notre
site web au www.impecca.com pour des réponses aux questions fréquemment posées et pour nous contacter.
Courriel : support@impecca.com
Téléphone : +1 866–954–4440
Web : www.impecca.com
–16–
Page 19

GUIDE DE RÉSOLUTION DE PROBLÈMES
PROBLÈME SOLUTION
Assurez-vous que la che est complètement insérée.
Mon réfrigérateur ne reçoit pas de puissance, pas de
lumières, pas de bourdonnement, etc.
L’éclairage intérieur du réfrigérateur s’allume, mais il ne
refroidit pas.
Le réfrigérateur semble fonctionner beaucoup plus longtemps que d’habitude entre les cycles.
Trouver une autre prise. La sortie ne devrait pas être une
prise DDFT. (Une prise GFCI est le genre avec le disjoncteur PUSH et RESET intégré, qui est commun dans
les cuisines et utilisé seulement pour les petits appareils
de comptoir).
Assurez-vous que la température réglée est suisamment froide. Cela peut dépendre de l’environnement
autour de l’appareil.
Assurez-vous que la porte du réfrigérateur est complètement fermée.
Vériez la température ambiante. Si elle est très chaude,
cela est normal.
Si vous avez récemment mis de la nourriture très chaud
dans le réfrigérateur, cela est normal.
Assurez-vous que le joint d’étanchéité autour de la
porte n’est pas encombré de débris. Si le joint n’est pas
étanche, l’air chaud de l’environnement peut s’inltrer,
l’amenant à fonctionner plus longtemps.
Ceci est également normal lors de la première activation
après une période prolongée.
ENGLISHESPAÑOLFRANÇAIS
Assurez-vous que le réglage de la température est dans
les sélections souhaitées. Consultez « Utiliser votre appareil ménager » pour plus de détails.
Cela pourrait être causé une ouverture très fréquente de
La température à l’intérieur du réfrigérateur est trop
chaude.
la porte, ce qui laisse entrer l’air chaud.
Cela peut être causé par de la nourriture chaude.
Votre réfrigérateur peut nécessiter au moins quatre heu-
res pour se rendre à son réglage de la température cible
après avoir été éteint pendant une période de temps
prolongée.
L’extérieur de l’appareil est chaud. Ceci fait partie du fonctionnement normal d’un ré-
frigérateur et ne devrait pas vous inquiéter.
Divers bruits émanent du réfrigérateur à des moments
diérents, y compris: des sons fort quand il est allumé
Tous ces bruits sont typiques pendant le fonctionnement régulier et les cycles.
pour la première fois, des ventilateurs qui fonctionnent
lorsque la température est inférieure à 45 °F; et des sons
de craquage, des gargouillis et des sons de claquage.
Il y a un bruit de vibration ou de cliquetis lorsque l’appareil fonctionne.
De l’humidité apparait sur l’intérieur des parois du
réfrigérateur.
L’unité pourrait ne pas être à niveau. Voir la section «
Nivellement de l’unité » ci-dessus.
Cela peut être dû à des débris dans le joint de porte
empêchant un joint étanche. En outre, il s’agit d’un
phénomène normal si l’air ambiant est humide. Cela
peut également se produire si la porte est ouverte très
fréquemment.
De l’humidité apparait sur l’extérieur des parois du
Assurez-vous que votre porte se ferme correctement.
réfrigérateur.
L’ampoule a cessé de s’allumer lorsque la porte s’ouvre. Votre ampoule peut avoir brûlé. Remplacez-la par une
ampoule 40 W.
© 2016 par Impecca, une division de LT, Inc, Wilkes Barre, PA.
–17–
 Loading...