

Page 1
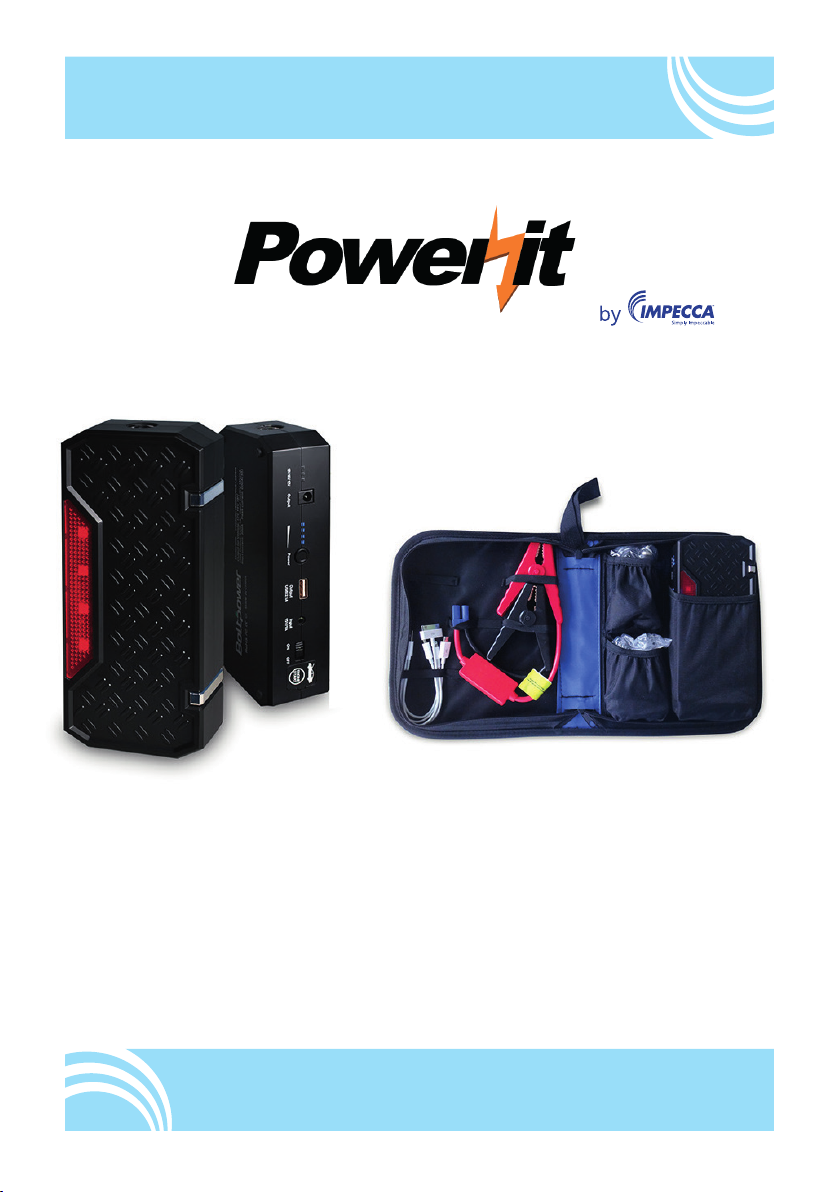
PowerIt Jumpstarter—User Manual
Arrancador Portátil PowerIt—Manual de usuario
Démarreur de saut PowerIt—Mode d’emploi
Model N°: CJK-1750
Page 2
ENGLISH ESPAÑOL FRANÇAIS
INTRODUCTION
Thank you for choosing this quality PowerIt jump starter kit. Please carefully read this
manual before using this product. Be sure to keep the manual with your jump starter kit
for later consultation. As with any electrical product, please follow all necessary safety
precautions to avoid electric shock or electrocution, especially in humid or precipitous
weather (rain, snow, etc.).
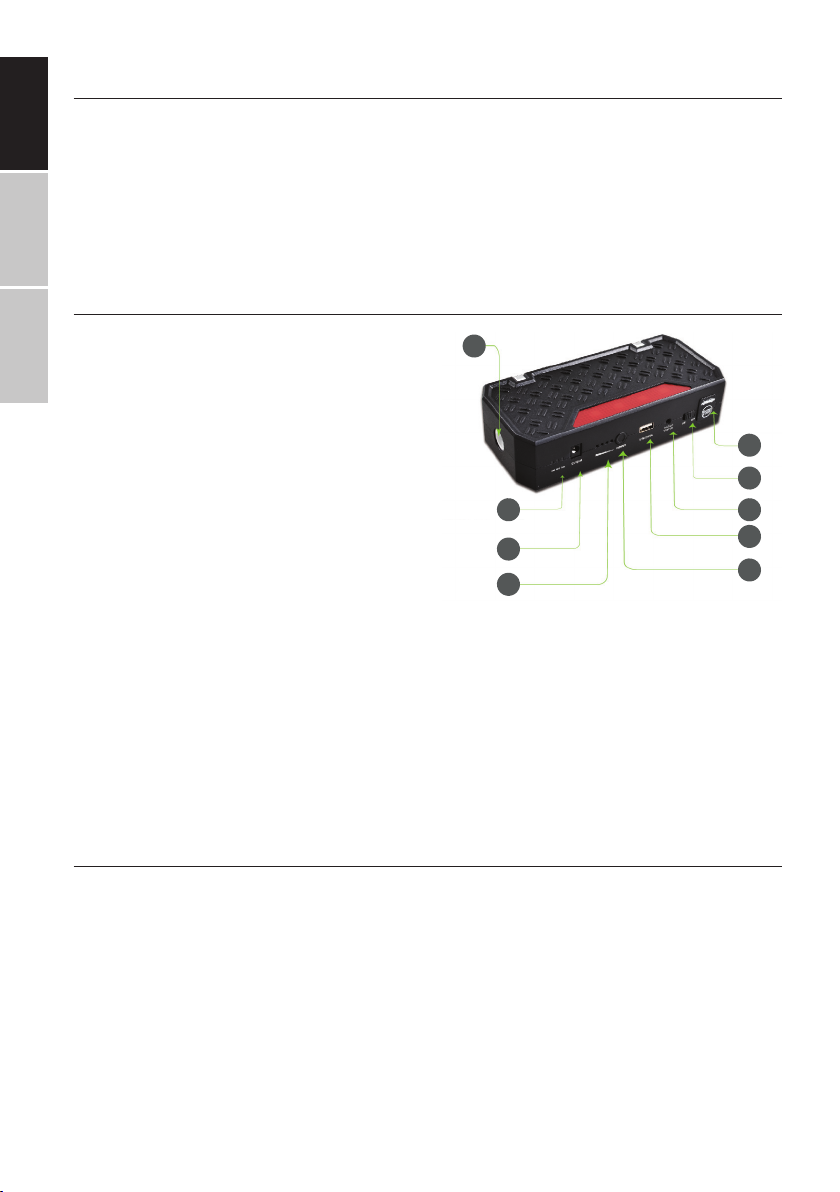
PRODUCT OVERVIEW
1. LED flashlight
1
2. Output indicator
3. 12V/(2A),16V/(3.5A),19V/(3.5A) output port
4. Charge indicator LEDs
5. Power on switch
6. USB 5V/2.1A output
7. 15V/(1A) input
8. Master power switch
9. 12V car starter outlet
INCLUDED ACCESSORIES
2
3
4
• Jump starter cable with crocodile clamps
• Switch cable with tip adaptors for various laptops (verify compatibility with your
laptop manufacturer before using)
• USB adaptor to charge a variety of mobile devices (microUSB, 30-pin adaptor, etc.)
• Car charger
• Home power charger
• User manual
BASIC OPERATING INSTRUCTIONS
CHARGING YOUR UNIT
9
8
7
6
5
Plug the home or car power adapter into the power outlet/socket. Then connect the other end of the power adapter to the 15V 1A power input port on the jump starter unit.
While charging, the indicator LEDs will flash. As the unit charges, LEDs will progressively
illuminate and stop flashing. When charging is complete, all indicator lights will turn o.
–2–
Page 3

CHECKING UNIT CHARGE
When the master power switch is turned on, look at the power indicator LEDs. No lit LEDs
indicates that your unit must be recharged before use.
UNIT CHARGE LEVEL BASED ON LED INDICATORS:
• No LEDs illuminate: unit battery drained - recharge immediately!
• 1 LED: 20% charge
• 2 LEDs: 40% charge
• 3 LEDs: 70% charge
• 4 LEDs: 100% charge
JUMP STARTER OPERATING INSTRUCTIONS
IMPORTANT: Read these instructions carefully before each use of the jump starter
functionality. Ignoring these instructions could lead to physical or mental injury,
bodily harm, or even death as well as damage to vehicles or other objects.
• Press the unit charge indicator button; at least 3 LEDs should illuminate before
attempting to jump start a vehicle.
• Connect the RED clamp to the vehicles positive (+) battery terminal.
• Connect the BLACK clamp to the vehicles negative (-) battery terminal.
• Firmly insert the blue end of the jumper cable into the jump start socket of the
battery unit.
• Turn the vehicle ignition switch and start the vehicle. Leave the vehicle running to
continue charging the battery.
• When the vehicle is started, disconnect the blue end of the jumper cable from the
battery unit.
• Disconnect the red and black clamps from the vehicle battery terminals.
ENGLISHESPAÑOLFRANÇAIS
CHARGING OTHER DEVICES
Aer connecting auxiliary power cables, press the indicator light switch if charging
doesn’t begin.
USB-POWERED DEVICES
Plug a USB cable or use the provided adaptor cable to the USB 5V 2A output port.
Note: certain tablets, large phones, and other devices may not be able to draw suicient
power from the USB port to charge while in use. See your device manual for minimum
charging specifications.
–3–
Page 4

ENGLISH ESPAÑOL FRANÇAIS
LAPTOP POWER PORT
If your laptop uses a 16 or 19V 3.5A power adapter, select the proper voltage BEFORE
plugging in your laptop by pressing on the Power On button. The voltage LED indicator
will illuminate. Select the appropriate adapter for your laptop and plug the cable into the
battery unit.
IMPORTANT: Impecca declines any and all responsibility for damage and risk of improper use of electrical output voltage and currents.
LED FLASH LIGHT
Press and hold the power switch for 3 seconds to turn on the LED flash light. Press the
button again to cycle between a normal beam, strobe light, SOS signal, and finally to turn
the light o.
CHARGING DURATION & FAQ
Q: How do I turn o the unit?
A: The unit turns o automatically when no charge enters or leaves the device.
Q: How many times can this appliance charge my mobile phone?
A: A fully charged unit can recharge a mobile phone approximately 6 times (iPhone 6,
iPhone 6 Plus, etc.).
Q: How long will it take to recharge my mobile phone?
A: Each mobile phone is dierent. The 2A output of the USB port will give an 80% charge
to an iPhone in roughly one hour.
Q: How long will a fully charged unit power my laptop?
A: The average laptop can run 2 to 3 hours on a fully charged unit.
Q: How many times can the appliance jump start a vehicle?
A: The unit can jump start gasoline-powered vehicles approximately 20 times aer a full
charge. Note that the unit may not be able to jump start diesel vehicles.
Q: How long will the unit battery remain charged before discharging?
A: The unit should keep a usable charge for at least 6 months. We recommend recharging
it at least once every 6 months.
–4–
Page 5

TROUBLESHOOTING
Problem: The unit does not fully charge even though the 5 indicator lights are solid.
Cause: To increase the battery lifetime, the unit detects situations of infrequent use and
limits charge to 60% of capacity.
Solution: Simply unplug the charger and plug it back in. The unit will charge to 100%.
Problem: No LEDs illuminate when the indicator button is pressed.
Cause: The unit is in ”Hibernation” mode
Solution: Plug the wall charger or car charger into the unit’s 14V input port.
Problem: My laptop heats up more than usual when using the charging adaptor
Cause: The high-current output (3.5A) may be more than your laptop wall charger provides.
Remove the laptop battery and run o of power to keep the laptop cool.
TOXIC & HARMFUL SUBSTANCES
WARNING: The unit contains toxic and harmful substances: lead (Pb), mercury (Hg), cadmium (Cd), hexavalent chromium (Cr-VI), polybrominated biphenyl (PBB), and polybrominated diphenyl ethers (PBDEs).
IMPORTANT SAFETY INFORMATION
• Always make sure the blue jumper cable plug is firmly seated in the unit before
jump starting a vehicle. Failure to do so can cause an electrical arc and other phenomena which melt the socket or fails to jump start the vehicle.
• Always verify the battery ports of the vehicle you will jump start. Remove all dirt,
rust, and corrosion before connecting the jump starter clamps. Ensure the clamps
are firmly seated on the connector ports.
• Do not make more than three attempts to jump start a vehicle. There may be other
problems with the vehicle.
• Never attach electrical clamps to one another.
• This unit is NOT A TOY! Never attach electrical clamps to a human being, an animal, or other surfaces or objects, as they can cause serious and permanent damage, harm, or even death.
• Never disassemble the unit under any circumstances.
• Never allow young or mentally disabled persons use this appliance without proper, competent adult supervision.
• Do not submerge or immerge the unit in water.
• Never let water come in contact with the unit
• Never place the unit in explosive environments, such as in the presence of flammable liquids, gasoline, or dust
ENGLISHESPAÑOLFRANÇAIS
–5–
Page 6

ENGLISH ESPAÑOL FRANÇAIS
• Never let the storage temperature exceed 70° C
• Never charge the device in environments that exceed 40° C
• Only use the provided electrical chargers with this device
• Under extreme conditions, battery leakage may occur. Avoid contact with skin and
carefully wipe the liquid away with a cloth. In case of skin or eye contact, rinse
immediately with clean, fresh water, contact your local poison control center, and
immediately seek qualified medical attention.
TECHNICAL SPECIFICATIONS
• Size: 186 x 85 x 44mm
• Output: 5V (2A); 12V (200A); 16V (3.5A); 19V (3.5A)
• Input: 15V (1A)
• Capacity: 17500 mAh / 61.05 Wh
• Full charging time: approx. 3 hours
• Base current: 300A
• Peak current: 600A (3S)
• Cycle life: 3,000 cycles
• Operating temperature range: 0°C to 60°C
CONTACT TECHNICAL SUPPORT
Phone: +1 866–954–4440
Email: service@impeccausa.com
–6–
Page 7

INTRODUCCIÓN
Gracias por elegir este equipo de arrancador portátil PowerIt de calidad. Por favor, lea
cuidadosamente este manual antes de utilizar el producto. Asegúrese de conservar este
manual con su equipo arrancador para consultas posteriores. Al igual que como con cualquier producto eléctrico, siga todas las indicaciones de seguridad para evitar descargas
eléctricas o electrocución, especialmente en clima húmedo o lluvioso (lluvia, nieve, etc.).
DESCRIPCIÓN GENERAL DEL PRODUCTO
1. Linterna Eléctrica LED
2. Indicador de Salida
3. Puerto de Salida de 12V/(2A),16V/
(3.5A),19V/(3.5A)
4. Indicador LED de Carga
5. Interruptor de Encendido
6. Salida USB 5V/2.1A
7. Entrada 15V/(1A)
8. Interruptor Maestro de Encendido
9. Toma del Arrancador del Auto de 12V
ACCESORIOS INCLUIDOS
• Cable del arrancador con pinzas caimán
• Cable interruptor con puntas adaptadoras para diferentes ordenadores
portátiles (verifique la compatibilidad con su fabricante de ordenador
portátil antes de utilizar)
1
9
8
2
3
4
7
6
5
• Adaptador USB para cargar gran variedad de dispositivos móviles (microUSB, adaptador de 30-pines, etc.)
• Cargador de corriente de Autos
• Cargador de corriente de Pared
• Manual de Usuario
ENGLISHESPAÑOLFRANÇAIS
INSTRUCCIONES BÁSICAS DE OPERACIÓN
CARGANDO SU UNIDAD
Conecte el adaptador de corriente de pared o del auto en la toma de corriente o enchufe. Después conecte el otro extremo del adaptador de corriente al puerto de entrada de
energía de 15V 1A en la unidad del arrancador portátil.
–7–
Page 8

ENGLISH ESPAÑOL FRANÇAIS
Mientras se carga, los indicadores LED parpadearán. Conforme la unidad se carga, los
LED se iluminarán y apagarán progresivamente. Cuando la unidad esté totalmente cargada se apagarán todas las luces indicadoras.
REVISANDO LA CARGA DE LA UNIDAD
Cuando el interruptor maestro de encendido esté activado, vea los LED indicadores de
energía. Los LED apagados indican que su unidad debe ser recargada antes de usarla.
NIVEL DE CARGA DE LA UNIDAD BASADO EN LOS INDICADORES LED:
• No hay LED iluminados: se agotó la batería – ¡recargue de inmediato!
• 1 LED: 20% de carga
• 2 LEDs: 40% de carga
• 3 LEDs: 70% de carga
• 4 LEDs: 100% de carga
INSTRUCCIONES DE OPERACIÓN DE ARRANCADOR
PORTÁTIL
IMPORTANTE: Lea estas instrucciones cuidadosamente antes de casa uso de las funciones del arrancador portátil. Al ignorar estas instrucciones puede llegar a causar
daños físicos o mentales, daños corporales, o incluso la muerte así como daño a los
vehículos u otros dispositivos.
• Presione el botón indicador de carga de la unidad: al menos deben estar iluminados
3 LEDS antes de intentar arrancar un vehículo.
• Conecte la pinza caimán ROJA en la terminal positiva (+) de la batería del vehículo.
• Conecte la pinza caimán NEGRA en la terminal negativa (-) de la batería del vehículo.
• Inserte firmemente el extremo azul del cable del arrancador en el enchufe del arrancador de la unidad de batería.
• Abra el interruptor de ignición del vehículo y enciéndalo. Deje el vehículo encendido
para continuar la carga de la batería.
• Una vez que el vehículo ha encendido, desconecte el extremo azul del cable del
arrancador de la unidad de batería.
• Desconecte las pinzas caimán ROJA y NEGRA de las terminales de la batería
del auto.
CARGANDO OTROS DISPOSITIVOS
Después de conectar los cables de corriente auxiliares, presione el interruptor de las luces indicadoras si es que la carga no ha comenzado.
–8–
Page 9

DISPOSITIVOS QUE SE CARGAN A TRAVÉS DE USB
Conecte un cable USB o utilice el adaptador de cable suministrado al puerto de salida
USB 5V 2A.
Nota: Algunas tablets, teléfonos grandes u otros dispositivos tal vez no puedan obtener suficiente energía del puerto USB para la carga mientras estén en uso. Vea el manual del
dispositivo para saber cuáles son las especificaciones mínimas de carga.
PUERTO DE ALIMENTACIÓN PARA ORDENADORES PORTÁTILES
Si su laptop utiliza un adaptador de corriente de 16V o 19V 3.5A, seleccione el voltaje
adecuado ANTES de conectar su laptop al presionar el botón de encendido. El indicador
LED de voltaje se iluminará. Seleccione el apartador apropiado para su laptop y conecte
el cable de la unidad de batería.
IMPORTANTE: Impecca rechaza cualquier reclamación y todas y cada una de las responsabilidad por daños y riesgos debido al uso inadecuado de los voltajes y corrientes eléctricas de salida.
LÁMPARA LED
Presione y sostenga el botón por 3 segundos para encender la linterna LED. Presione
nuevamente el botón para activar los diferentes modos de linterna: luz normal, luz estroboscópica, señal SOS y apagar la linterna.
ENGLISHESPAÑOLFRANÇAIS
TIEMPO DE CARGA Y PREGUNTAS FRECUENTES
P: ¿Cómo apago la unidad?
R: La unidad se apaga automáticamente cuando no recibe ni proporciona carga.
P: ¿Cuántas veces puedo cargar la batería de mi teléfono móvil con este dispositivo?
R: Una unidad totalmente cargada puede recargar un teléfono móvil aproximadamente
6 veces (iPhone 6, iPhone 6 Plus, etc.).
P: ¿Cuánto tiempo le tomará a mi teléfono móvil recargarse?
R: Cada teléfono móvil es diferente. La salida 2A del puerto USB dará un 80% de carga a
un iPhone en aproximadamente una hora.
P: ¿Cuánto tiempo le lleva a una unidad totalmente cargada, cargar la pila de mi
ordenador portátil?
R: La carga completa de un ordenador portátil promedio puede llevarse de 2 a 3 horas.
–9–
Page 10

ENGLISH ESPAÑOL FRANÇAIS
P: ¿Cuántas veces el dispositivo puede darle arranque a la batería de un auto?
R: La unidad puede darle arranque a la batería de un vehículo con motor de gasolina
aproximadamente 20 veces después de haber cargado completamente la unidad. Tome
en cuenta que el arrancador no puede darle arranque a vehículos con motores diésel.
P: ¿Cuánto tiempo permanecerá cargada la unidad antes de descargarse?
R: La unidad debe conservar una carga útil por aproximadamente 6 meses. Recomendamos cargarla al menos cada 6 meses.
SOLUCIÓN DE PROBLEMAS
Problema: La unidad no está completamente cargada aunque todas las luces indicadoras están fijas.
Causa: Para incrementar la vida útil de la batería, la unidad detecta situaciones de uso
infrecuente y limita su carga al 60% de su capacidad.
Solución: Simplemente desconecte el cargador y vuélvalo a conectar. La unidad se cargará al 100%.
Problema: No se iluminan los LED al presionar el botón indicador.
Causa: La unidad está en modo de hibernación.
Solución: Conecte el cargador de pared o del auto en el puerto de entrada de 14V de la
unidad.
Problema: Mi ordenador portátil se calienta más de lo usual cuando uso el adaptador de carga.
Causa: La corriente alta de salida (3.5A) debe ser mayor a la que suministra el cargador
del ordenador portátil. Retire la batería de su ordenador portátil y deje que se quede sin
energía para mantener frío su ordenador portátil.
SUSTANCIAS TÓXICAS Y DAÑINAS
ADVERTENCIA: La unidad contiene sustancias tóxicas y dañinas; plomo (Pb), mercurio
(Hg), cadmio (Cd), cromo hexavalente (Cr-VI), bifenilo polibromado (PBB), y éteres de difenilo polibromado (PBDE).
INFORMACIÓN IMPORTANTE DE SEGURIDAD
• Asegure siempre que el cable azul del arrancador esté firmemente asentado en la unidad antes de darle arranque a un vehículo. De no estar bien conectado se puede causar
un arco voltaico u otro fenómeno que derretirá el enchufe o el arranque del vehículo no
–10–
Page 11

será exitoso.
• Siempre verifique las terminales de la batería a la que le dará arranque. Retire toda suciedad, óxido y corrosión antes de conectar las pinzas caimán del arrancador. Asegure que
las pinzas caimán están firmemente asentadas en las terminales de la batería.
• No haga más de tres intentos de darle arranque a un vehículo. Debe haber algún otro
problema con el vehículo.
• Nunca conecte entre sí las pinzas caimán.
• ¡Este dispositivo NO ES UN JUGUETE! Nunca conecte las pinzas caimán a una persona,
animal u otras superficies u objetos, ya que puede causar daños severos o permanentes,
heridas e incluso la muerte.
• Bajo ninguna circunstancia desarme esta unidad.
• No permita que niños o personas con discapacidad mental utilicen esta unidad sin la
adecuada o competente supervisión adulta.
• No sumerja esta unidad en agua.
• No permita que el agua entre en contacto con la unidad.
• Nunca coloque la unidad en ambientes explosivos, como lugares con presencia de líquidos inflamables, gasolina o polvo.
• No permita que la temperatura de almacenaje exceda los 70°C.
• Nunca cargue el dispositivo en ambientes que excedan los 40°C.
• Utilice solo los cargadores eléctricos que vienen junto con este dispositivo.
• Puede ocurrir un escurrimiento de la batería bajo condiciones extremas, evite el contacto con la piel y limpie cuidadosamente ese líquido con un paño. En caso de contacto con
la piel u ojos, enjuague inmediatamente con agua limpia y fresca, contacte de inmediato al centro de control de envenenamientos y busque inmediatamente ayuda medica
calificada.
ENGLISHESPAÑOLFRANÇAIS
ESPECIFICACIONES TÉCNICAS
• Tamaño: 186 x 85 x 44mm
• Salida: 5V (2A); 12V (200A); 16V (3.5A); 19V (3.5A)
• Entrada: 15V (1A)
• Capacidad: 17500 mAh / 61.05 Wh
• Tiempo de carga completa: aproximadamente 3 horas
• Corriente base: 300A
• Corriente pico: 600A (3S)
• Ciclo de vida: 3,000 ciclos
• Rango de temperatura de operación: 0°C a 60°C
DATOS DE CONTACTO DE SOPORTE TÉCNICO
Teléfono: +1 866–954–4440 Correo: service@impeccausa.com
–11–
Page 12

ENGLISH ESPAÑOL FRANÇAIS
INTRODUCTION
Merci d’avoir choisi ce kit de démarrage de saut PowerIt de qualité. Veuillez lire attentivement ce manuel avant d’utiliser ce produit. Conservez le manuel avec le kit de démarrage
de saut pour consultation ultérieure. Comme avec tout produit électrique, veuillez suivre
toutes les précautions de sécurité nécessaires pour éviter une décharge électrique ou
électrocution, surtout par temps humide ou de précipitation (pluie, neige, etc.).
APERÇU DU PRODUIT
1. Lampe de poche D.E.L.
2. Indicateur de sortie
3. Port de sortie 12V/(2A),16V/(3,5A),19V/
(3,5A)
4. Voyants indicateurs de charge
5. Interrupteur de marche
6. Sortie USB 5V/2,1A
7. Entrée 15V/(1A)
8. Interrupteur d’alimentation principale
9. Sortie de démarrage de voiture 12V
ACCESSOIRES INCLUS
1
2
3
4
9
8
7
6
5
• Câble de démarreur de saut avec
pinces crocodile
• Câble d’interrupteur avec des adaptateurs de pointe pour divers ordinateurs portables (vérifier la compatibilité avec le fabricant de votre
• Adaptateur USB pour charger une
variété d’appareils mobiles (microUSB, adaptateur 30 broches, etc.)
• Chargeur de voiture
• Chargeur d’alimentation de maison
• Manuel d’utilisation
ordinateur portable avant de l’utiliser)
MODE D’EMPLOI DE BASE
CHARGEMENT DE VOTRE APPAREIL
Branchez l’adaptateur d’alimentation de la maison ou de la voiture dans la prise de courant. Branchez ensuite l’autre extrémité de l’adaptateur d’alimentation au port d’entrée
de 15V 1A sur le démarreur de saut.
–12–
Page 13

Pendant la charge, les voyants vont clignoter. Lors de la charge de l’appareil, les voyants
vont progressivement s’éclairer et arrêter de clignoter. Lorsque la charge est complétée,
tous les voyants vont s’éteindre.
VÉRIFIER LA CHARGE DE L’APPAREIL
Lorsque le commutateur d’alimentation principal est activé, regardez les voyants de puissance. Si aucun voyant n’est allumé, cela indique que votre appareil doit être rechargé
avant utilisation.
LE NIVEAU DE CHARGE DE L’UNITÉ EST BASÉ SUR DES INDICATEURS D.E.L. :
• Aucun voyant allumé : la pile de l’appareil est drainée — rechargez immédiatement !
• 1 voyant : charge de 20%
• 2 voyants : charge de 40%
• 3 voyants : charge de 70%
• 4 voyants : charge de 100%
INSTRUCTIONS D’UTILISATION DE CÂBLES DE DÉMARRAGE
IMPORTANT : Lisez attentivement ces instructions avant chaque utilisation de la
fonctionnalité de démarrage de saut. Le fait d’ignorer ces instructions peut entraîner des blessures physiques ou mentales, des lésions corporelles, voire la mort,
ainsi que des dommages aux véhicules ou autres objets.
ENGLISHESPAÑOLFRANÇAIS
• Appuyez sur le bouton d’indicateur de chargement de l’unité; au moins un voyant
devrait s’allumer avant de tenter de faire démarrer un véhicule.
• Branchez la pince ROUGE à la borne positive (+) de la batterie du véhicule.
• Branchez la pince NOIRE à la borne négative (-) de la batterie du véhicule.
• Insérez fermement l’extrémité bleue du câble de raccordement dans la prise de
démarrage de saut de l’unité de la batterie.
• Tournez la clé de contact du véhicule et démarrez le véhicule. Laissez le véhicule
en marche et continuez à charger la batterie.
• Lorsque le véhicule est démarré, débranchez l’extrémité bleue du câble de raccordement de l’unité de batterie.
• Débranchez les pinces rouges et noires des bornes de la batterie du véhicule.
CHARGER D’AUTRES APPAREILS
Après avoir connecté les câbles d’alimentation auxiliaires, appuyez sur le bouton de lumière indicateur si la charge ne commence pas.
–13–
Page 14

ENGLISH ESPAÑOL FRANÇAIS
APPAREILS ALIMENTÉS PAR USB
Branchez un câble USB ou utilisez le câble adaptateur fourni sur le port de sortie USB 5V
2,1A.
Remarque : certaines tablettes ainsi que certains téléphones et autres appareils peuvent ne
pas être en mesure de tirer suisamment de puissance du port USB pour se recharger en
cours d’utilisation. Consultez votre manuel de l’appareil pour les spécifications de charge
minimales.
PORT D’ALIMENTATION POUR ORDINATEUR PORTABLE
Si votre ordinateur portable utilise un adaptateur d’alimentation 16 ou 19V 3,5A, choisissez la tension adéquate avant de brancher votre ordinateur portable en appuyant sur le
bouton de marche. Le voyant de tension est allumé. Sélectionnez l’adaptateur approprié
pour votre ordinateur portable et branchez le câble sur l’unité de batterie.
IMPORTANT : Impecca décline toute responsabilité pour les dommages et les risques d’une mauvaise utilisation de la tension et des courants de sortie électrique.
LAMPE DE POCHE D.E.L.
Appuyez et maintenez enfoncé le bouton d’alimentation pendant 3 secondes pour allumer la lampe de poche D.E.L. Appuyez sur le bouton pour basculer entre un rayon normale, une lumière stroboscopique, un signal SOS et éteindre la lumière.
DURÉE DE CHARGE ET FAQ
Q : Comment puis-je désactiver l’appareil?
R : L’appareil se met automatiquement hors tension si aucune charge n’entre ou ne sort
de l’appareil.
Q : Combien de fois cet appareil peut-il recharger mon téléphone mobile?
R : Une unité à pleine charge permet de recharger un téléphone mobile environ 6 fois
(iPhone 6, iPhone 6 Plus, etc.).
Q : Combien de temps faut-il pour recharger mon téléphone cellulaire?
R : Chaque téléphone est diérent. La sortie de 2A du port USB donnera une charge de 80
% pour un iPhone en environ une heure.
–14–
Page 15

Q : Combien de temps une batterie entièrement chargée va-t-elle alimenter mon
ordinateur portable?
R : L’ordinateur portable peut fonctionner en moyenne 2 à 3 heures sur une unité complètement chargée.
Q : Combien de fois l’appareil de saut peut-il démarrer un véhicule?
R : L’appareil peut démarrer les véhicules à essence à partir d’environ 20 fois après une
charge complète. Notez que l’appareil peut ne pas être capable de démarrer les véhicules
au diesel.
Q : Combien de temps la batterie de l’unité reste-t-elle chargée avant
de se décharger?
R : L’appareil doit conserver une charge utilisable pendant au moins 6 mois. Nous vous
recommandons de le recharger au moins une fois tous les 6 mois.
DÉPANNAGE
Problème : L’appareil ne se charge pas complètement, même si les 5 voyants sont
stables.
Cause : Pour augmenter la durée de vie de la batterie, l’appareil détecte les situations d’utilisation peu fréquentes et limite la charge à 60% de la capacité.
Solution : Il suit de débrancher le chargeur et de le rebrancher. L’appareil se chargera à
100 %.
ENGLISHESPAÑOLFRANÇAIS
Problème : Aucun voyant ne s’allume lorsque le bouton d’indicateur est appuyé.
Cause : L’appareil est en mode « Hibernation »
Solution : Branchez le chargeur mural ou le chargeur de voiture dans le port d’entrée de
14V de l’unité.
Problème : Mon ordinateur portable chaue plus que d’habitude en utilisant l’adaptateur de charge
Cause : Le fort courant de sortie (3,5A) peut être plus que ce que votre chargeur mural d’ordinateur portable ore. Retirez la batterie d’ordinateur portable et utilisez la puissance pour
maintenir l’ordinateur portable frais.
SUBSTANCES TOXIQUES & NUISIBLES
AVERTISSEMENT : L’appareil contient des substances toxiques et dangereuses : plomb
(Pb), mercure (Hg), cadmium (Cd), chrome hexavalent (Cr-VI), biphényles polybromés
(PBB) et polybromodiphényléthers (PBDE).
–15–
Page 16

ENGLISH ESPAÑOL FRANÇAIS
INFORMATIONS IMPORTANTES SUR LA SÉCURITÉ
• Assurez-vous toujours que la prise de câble de saut est bien installée dans l’appareil avant
de faire démarrer un véhicule. Ne pas le faire peut causer un arc électrique et d’autres
phénomènes qui fondent la prise ou ne parviennent pas à démarrer le véhicule.
• Vérifiez toujours les ports de la batterie du véhicule que vous allez démarrer. Enlevez toute
la saleté, la rouille et la corrosion avant de brancher les pinces de démarrage de saut. Vérifiez que les pinces sont bien en place sur les ports de connexion.
• Ne pas faire plus de trois tentatives pour relancer un véhicule. Il peut y avoir d’autres problèmes avec le véhicule.
• Ne jamais attacher les pinces électriques ensemble.
• Cet appareil n’est PAS un JOUET! Ne jamais attacher des pinces électriques à un être humain, un animal ainsi que d’autres surfaces ou objets, car ils peuvent causer des dommages graves et permanents, des dommages ou même la mort.
• Ne jamais démonter l’appareil en toutes circonstances.
• Ne jamais permettre à des personnes jeunes ou déficientes d’utiliser cet appareil sans surveillance d’un adulte compétent.
• Ne pas plonger ou immerger l’appareil dans l’eau.
• Ne jamais laisser l’eau entrer en contact avec l’unité
• Ne jamais placer l’appareil dans des environnements explosifs, comme en présence de liquides inflammables, d’essence ou de poussière
• Ne laissez jamais la température de stockage dépasser 70 °C
• Ne jamais recharger l’appareil dans des environnements qui dépassent 40 °C
• Utilisez uniquement les chargeurs électriques fournis avec cet appareil
• Dans des conditions extrêmes, des fuites de batterie peuvent se produire. Évitez le contact
avec la peau et essuyez soigneusement le liquide avec un chion. En cas de contact avec
la peau ou les yeux, rincez immédiatement à l’eau fraîche et propre, contactez votre centre
antipoison local et consultez immédiatement un médecin qualifié.
CARACTÉRISTIQUES TECHNIQUES
• Taille : 186 x 85 x 44mm
• Sortie : 5V (2A); 12V (200A); 16V (3,5A);
19V (3,5A)
• Entrée : 15V (1A)
• Capacité : 17500 mAh / 61,05 Wh
• Temps de charge complet : environ
3 heures
• Courant de base 300A
• Courant de pointe : 600A (3S)
• Vie de cycle : 3000 cycles
• Gamme de températures de
fonctionnement : 0°C à 60 °C
CONTACTER LE SOUTIEN TECHNIQUE
Numéro de téléphone : +1 866–954–4440
Courriel : service@impeccausa.com
–16–
 Loading...