

Page 1
Portable Air Conditioner—User Manual
Aire acondicionado—Manual de usuario
Models: IPAC08-CR, IPAC-10CR
www.impecca.com
Page 2

Read the following notices and information carefully to ensure proper operation of your air
conditioner unit.
This manual is solely provided for informational purposes and in no way constitutes a legally
binding document between the manufacturer, distributor, and end consumer.
Lea las siguientes indicaciones cuidadosamente para asegurar el correcto funcionamiento
de su unidad de aire acondicionado.
Este manual se proporciona únicamente con fines informativos y de ninguna manera
constituye un documento jurídicamente vinculante entre el fabricante, distribuidor y
consumidor final.
Warning: To avoid permanent damage to
unit:
Ensure it is in the upright position for at least 24 hours
before powering on the first time.
Advertencia: Para evitar daños
permanentes a la unidad:
Asegúrese de que está en la posición vertical durante al
menos 24 horas antes de encender la primera vez.
Page 3

ENGLISHESPAÑOL
–1–
INTRODUCTION
Thank you for purchasing this quality Impecca portable air conditioner unit. To ensure the
longest life and highest energy eiciency of your unit, please carefully follow these operating
instructions. Keep these instructions in a safe place and consult them as needed. Please note
that constant enhancement and improvements to our air conditioning units may mean that
your model will slightly dier in appearance from the model pictured in this manual, but the
actual operation and installation of the unit remains unchanged. This manual is solely provided for informational purposes and does not constitue a binding, legal contract.
SAFETY NOTICE:
This appliance should not be used by children or mentally/physically disabled persons without strict, direct supervision by a responsible adult. Never play with or around the appliance.
SAFETY INFORMATION
• Before operation, ensure your electrical installation (outlets and circuits) complies
with the power specifications found on the unit.
• Before cleaning or maintaining the air conditioner, please turn o air conditioner
and unplug the unit.
• Make sure the power cord isn’t kinked, bent, or under the weight of sharp or heavy
objects.
• Do not pull or yank the power cord to unplug the unit or move the air conditioner.
• Do not insert or unplug the power plug with wet hands.
• Only use a grounded power outlet. Make sure the grounding is functional.
• If the power cord is damaged, it must be replaced by the manufacturer or a qualified technician in order to avoid fire and electrical hazards.
• Should abnormal operation occur (such as a burning smell), please disconnect
power cord immediately and contact your local dealer.
• If nobody is present to monitor the operation of the unit, please turn it o and
disconnect the power cord.
• Do not splash or pour water on air conditioner to avoid causing a short circuit or
damage to the unit.
• Do not put or hang dripping objects above the air conditioner.
• If using a drainage hose, ensure the ambient temperature remails well above
freezing (32°F or 0°C) to avoid cracking or damaging the unit.
• Keep heat sources away from the air conditioner.
• Ensure the unit is far away from fire, inflammable, or explosive objects.
• Never allow children or persons with reduced physical, sensory, or mental capabilities to operate or play around the air conditioner without direct adult supervision.
• Never allow children to perform cleaning or other user-maintenance operations
without direct adult supervision.
• Never attempt to repair or disassemble the air conditioner by yourself.
• Never insert objects into the air conditioner.
Page 4

ENGLISH ESPAÑOL
–2–
OPERATING CONDITIONS
• The air conditioner must be operated within the temperature range of 62°F to 95°F
(16°C to 35°C).
• The appliance is for indoor use only.
• The appliance must be positioned so that the plug is accessible.
• A perimiter of 12′′(30cm) around the air conditioner should be free of all objets.
• Do not operate the air conditioner in a humid environment.
• Please keep air inlet and air outlet clean and free of obstacles.
• During operation, close doors and windows to improve cooling eect.
• Please put the air conditioner on smooth and flat ground for operation to avoid
noise and vibration.
• This air conditioner is equipped with castors that roll on smooth, flat surfaces.
• Do not tilt or turn over the air conditioner. If there’s problem, please disconnect
the power supply immediately and contact your local dealer or technical support.
• Avoid exposing the unit to direct sunlight.
GETTING TO KNOW YOUR AIR CONDITIONER
1
2
3
4
5
1213 11 10
9
6
7
8
1. Control panel
2. Horizontal directional blades
3. Vertical directional blades
4. Castors
5. Remote control storage compartment
6. Power cord
7. Filter
8. Upper air intake grille
9. Lower air intake grille
10. Connector A
11. Heat exhaust pipe
12. Connector B
13. Connector C
Note: do not discard the exhaust pipe or other accessories; you may need them later should you need to
change the location of your air conditioner unit.
Page 5
ENGLISHESPAÑOL
–3–
USING YOUR AIR CONDITIONER
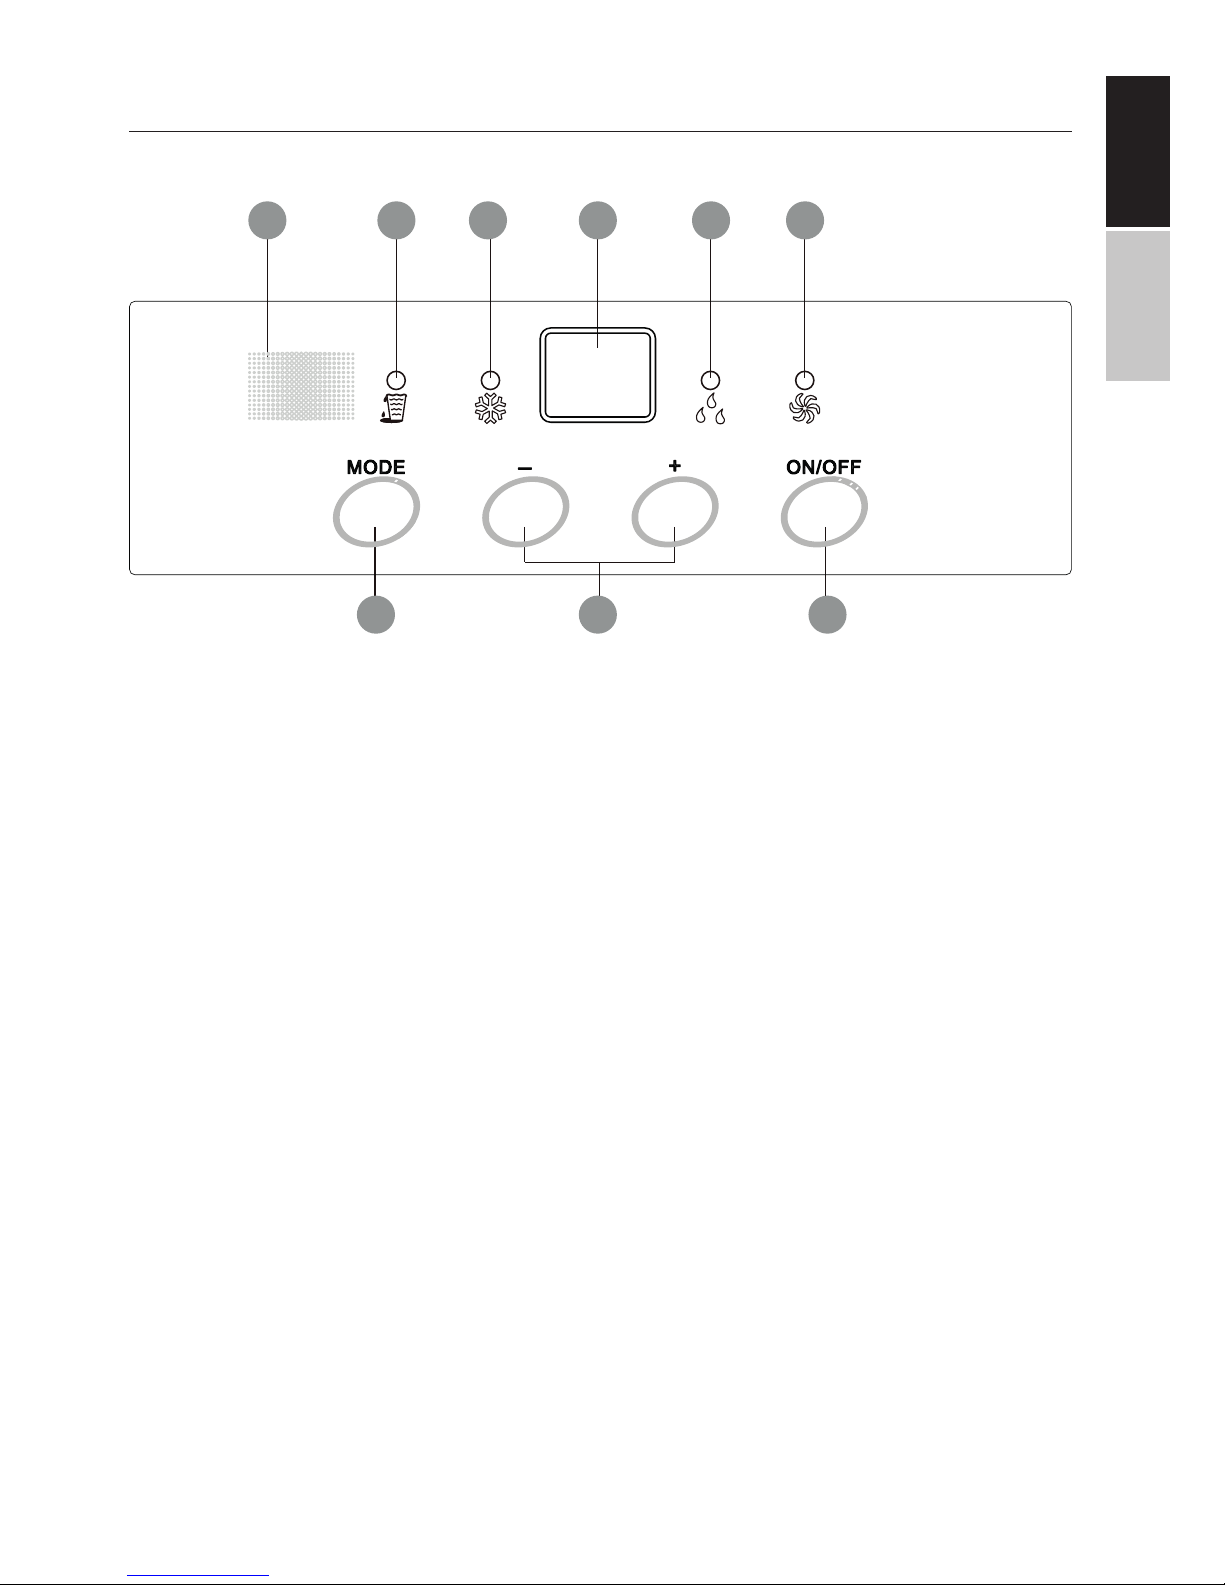
CONTROL PANEL OVERVIEW
1 2 3 4 5 6
987
1. IR receiver
2. Water condensation build-up (when illuminated)
3. Cooling A/C mode operation (when illuminated)
4. Temperature LED: Displays the desired room temperature during cooling mode. In
other modes, the display will be blank.
5. Dehumidifier mode operation (when illuminated)
6. Fan mode operation (when illuminated)
7. Mode button: Cycle between cooling mode, dehumidifier mode, and fan mode.
8. Temperature +/- buttons: Set the desired room temperature by pressing the appropriate button. Temperature changes are displayed in 1° increments in the
range of 61°F (16°C) and 86°F (30°C) Note: Temperature cannot be set when using
the fan or dehumidifier modes
9. Power ON/OFF button: Use this button to turn the unit on or o.
Page 6

ENGLISH ESPAÑOL
–4–
REMOTE CONTROL
21
3
4 5
6 7
1. ON/OFF button
2. Mode button
3. Temperature +/- buttons
4. Fan button
5. Swing button
6. Sleep button
7. Timer button
REMOTE CONTROL DISPLAY OVERVIEW
13 14
7 6
1
2
3
4
5
10
12
11
8
9
1. Signal transmission
2. Swing operation (not applicable to this unit)
3. Sleep mode operation
4. Remote control lock
5. Fan speed
6. Set timer
7. Desired temperature
8. Heat mode (not applicable to this unit)
9. Fan mode
10. Dehumidifier mode
11. Cooling mode
12. Automatic operation
13. Start up timer activated
14. Shut down timer activated
Page 7

ENGLISHESPAÑOL
–5–
USING THE REMOTE CONTROL
ON/OFF BUTTON
Press the ON/OFF button to turn the unit on or o.
MODE BUTTON
Cycle between cooling mode, dehumidifier mode, and fan mode.
TEMPERATURE +/- BUTTONS
Set the desired room temperature by pressing the appropriate button. Temperature
changes are displayed in 1° increments in the range of 61°F (16°C) and 86°F (30°C)
Note: Temperature cannot be set when using the fan or dehumidifier modes
FAN BUTTON
Cycle through dierent fan speeds between Auto, Low, Medium, and High speed. Auto
speed selects an appropriate fan speed based on ambient temperature and most eicient unit operation.
SWING BUTTON
Not applicable for this model.
SLEEP BUTTON
During cooling mode, the sleep button will allow the room temperature to slightly increase for more energy eicient operation.
TIMER BUTTON
• When the unit is running, press this button to program a time when the unit will
automatically turn o. While the T-OFF and H icons are flashing on the remote
control display, use the +/- buttons to determine the time the unit will shut down
in 30 minute (.5h) increments. Press the Timer button again to confirm the shut
down command.
• When the unit is powered on but not running, press this button to program a time
when the unit will automatically turn on. While the T-ON and H icons are flashing
on the remote control display, use the +/- buttons to determine the time the unit
will start up in 30 minute (.5h) increments. Press the Timer button again to confirm
the power on command.
• To cancel a timer, press the timer button to see remaining time before the timer
activates. Press the timer button again to cancel the timer.
Note: Timers can be set between the range of 30 minutes (.5h) and 24 hours. The unit must
remain plugged in for the timer to function properly.
Page 8

ENGLISH ESPAÑOL
–6–
REMOTE CONTROL LOCK
1. Press and hold the + and - buttons simultaneously to activate the remote control
child lock and prevent inadvertent changes to unit settings.
2. Press the + and - buttons simultaneously to deactivate the remote control lock.
CHANGE TEMPERATURE UNITS (C° OR F°)
While the unit is o, press the - and MODE button simultaneously on the remote
control to toggle the unit readout temperature between Celsius (C°) and Fahrenheit (F°).
REPLACING THE REMOTE CONTROL UNIT BATTERIES
1. Press gently on the tab located on the back side of the remote control unit. Li out
the battery compartment cover.
2. Replace the batteries with two AAA 1.5v batteries. Insert batteries while respecting
the polarity of the batteries (+ and - sides). Replace both batteries at the same
time; never insert an old battery with a fresh battery to avoid a battery leak.
3. Gently reinsert the battery compartment cover.
REMOTE CONTROL OPERATION NOTES
• When using the remote control, aim the controller directly at the air conditioning
units IR receiver located on the control panel.
• The remote control must have a clear line of sight to the control panel.
• Interference to remote control operation may occur in areas with fluorescent lighting or wireless telephones.
• When the remote control will remain unused for long periods of time, please remove the batteries.
• If the display appears faint or does not appear, please replace the batteries.
PRE-INSTALLATION INSTRUCTIONS
TOOLS & ACCESSORIES FOR INSTALLATION
Gather the following tools and unit accessories before beginning your installation:
UNIT & ACCESSORIES
• Air conditioning unit
• Connectors A, B, C
• Window frame (3 pieces)
• Heat exhaust duct
• Screws (x5)
• Pipe clip
• Rubber stopper
• Drainage pipe
• Pipe hoop
• Remote control batteries (2x AAA)
• Remote control
• Users manual
Note: Never use an underrated electrical cord or outlet!
Page 9

ENGLISHESPAÑOL
–7–
INSTALLING YOUR UNIT
STEP 1: IDENTIFY INSTALLATION LOCATION
1. Following the steps in the pre-installation section, identify a proper installation location.
STEP 2: INSTALLATION OF THE AIR EXHAUST DUCT
1. Remove the exhaust hose and all connectors.
STEP 3: WINDOW KIT INSTALLATION
The window kit is designed for installation in most vertical or horizontal sash windows.
You may be required to slightly modify your specific installation to ensure safe and proper
use of your air conditioner unit.
Horizontal window:
Minimum width: 27.5” (70cm)
Maximum width: 48” (122cm)
Vertical window:
Minimum height: 27.5” (70cm)
Maximum height: 48” (122cm)
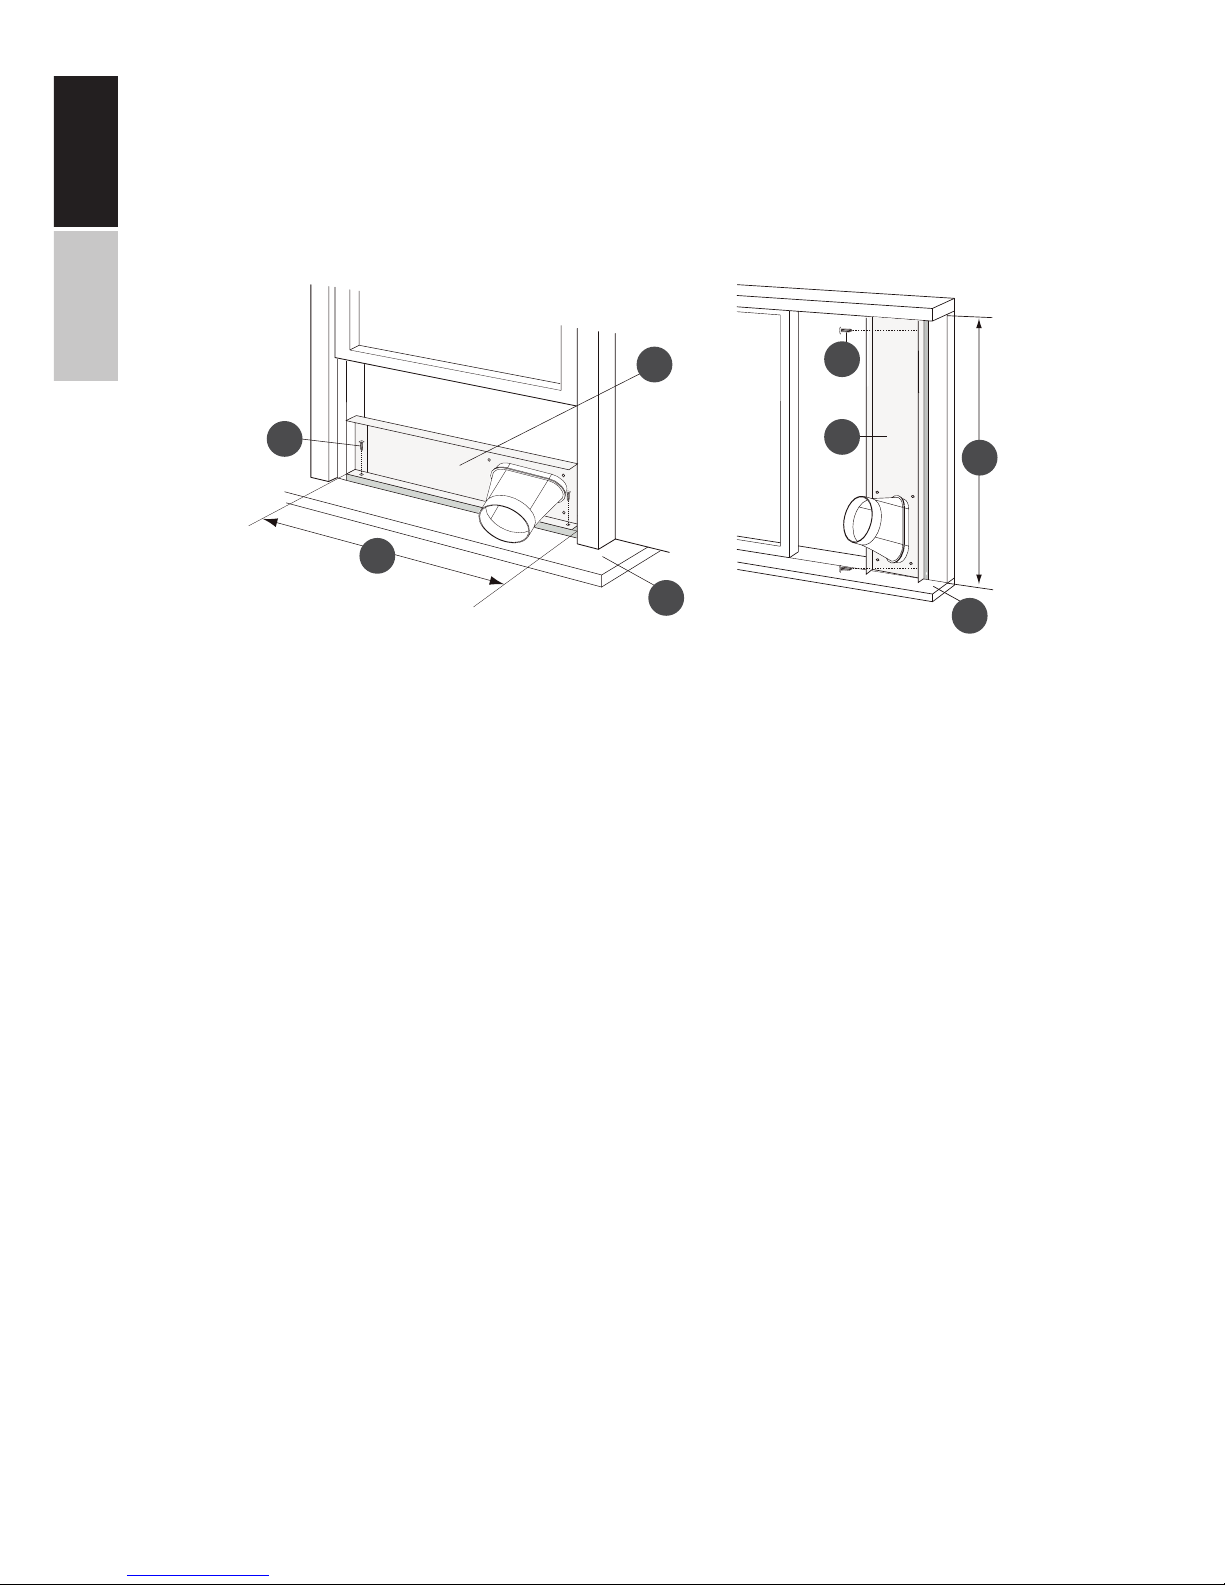
1. Adapt window frame size
Insert the window exhaust port fitting (#1) into your window and extend the width or
height to fill your window entirely using the adjustment plate (#2).
If the inner width of the window is less than 28”, you may need to cut the frame to adjust
the width. Cut on the OPPOSITE side (#3) side of the opening, as indicated below.
1
2
3
2. Insert connector C (#2) into the window frame (#1)
2
1
Page 10
ENGLISH ESPAÑOL
–8–
3. Fasten the window frame
Fasten the frame (#1) to the windowsill (#2) with screws (#3) based on the dimensions below corresponding to the width (horizontal window sash) (#4) or height (vertical window
sash) (#5) of the installation.
1
1
2
3
3
4
2
5
Width or height less than 28”: 2 screws
Width or height between 28” and 36.5” : 3 screws
Width or height between 36.5” and 64” : 4 screws
4. Close the window to finish installation
Page 11
ENGLISHESPAÑOL
–9–
AIR EXHAUST PORT MOUNTING
If you have an existing air exhaust port, you can directly connect your portable air conditioning unit to the port. For the best energy eiciency and to preserve the longest life of
your unit, avoid bending the hose and keep the exhaust hose length as short as possible.
The hose bending point should be at least 24” away from the unit for optimal performance. Avoid any kinks or sharp bends.
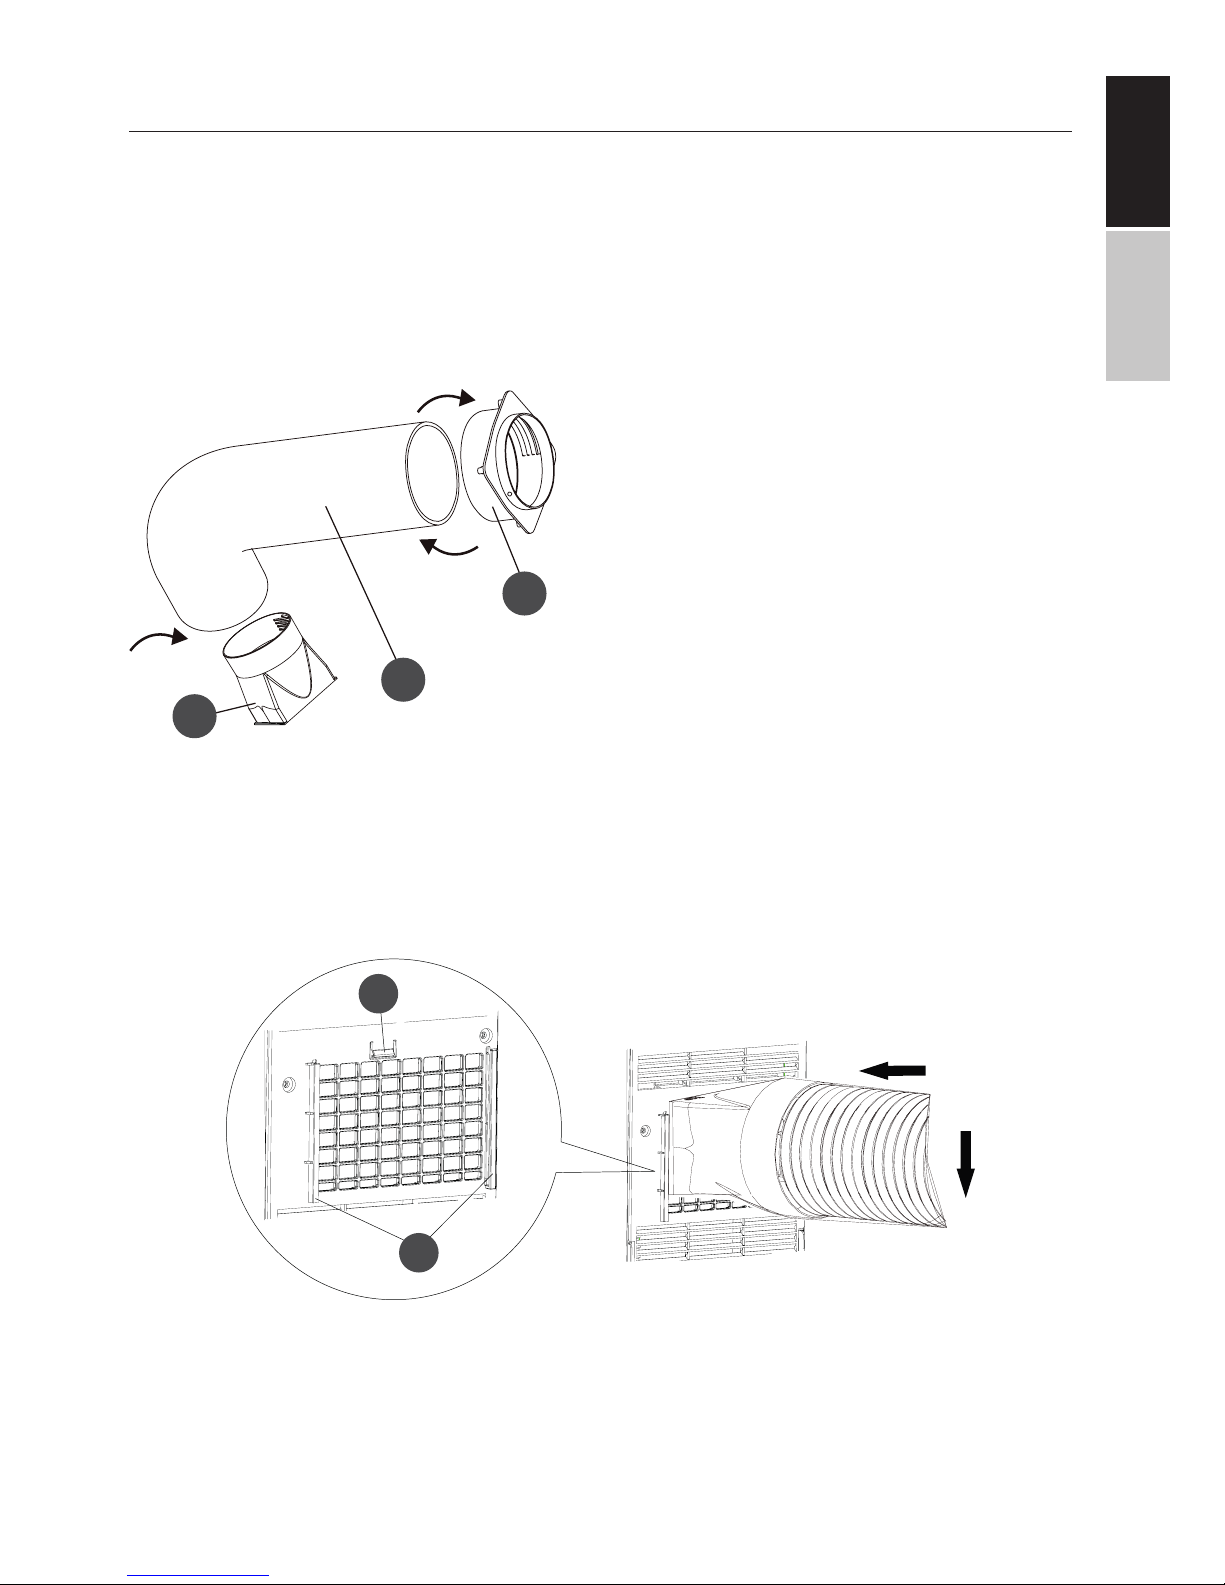
CONNECTING THE AIR EXHAUST DUCT
2
1
3
Step 1: First completely expand about 5 inches of hose on both ends of the exhaust pipe.
Insert and fasten connector A (#1) to the exhaust pipe (#2) by turning the connector
clockwise at one end of the hose. Repeat the
process at the opposite end of the hose with
connector B (#3).
Step 2: Ensure the side marked TOP on connector A is facing upwards. Slide connector A
into the rails (#1) found at the rear of the air conditioner unit and press firmly until you
hear a slight click from the clasp (#2).
2
1
Page 12

ENGLISH ESPAÑOL
–10–
2
1
OK
Step 3: Insert connector B (#1)
into connector C (#2) by the window by locating the slot in connector C, and inserting and
slightly twisting connector B for
a snug fit.
Note: For optimal performance, avoid any kinks or bends in the air exhaust duct.
OK OK
OK
DRAINAGE PIPE SETUP
Condensation buildup in humid environments will severely impact the eiciency and
normal operation of your unit. If you have a drain near the installation, you can have a
continuous drainage setup.
Step 1: Remove the rubber plug (#1) found at the rear base of the unit.
1
Page 13

ENGLISHESPAÑOL
–11–
Step 2: Using the provided screw (#1), attach the drainage pipe clip (#2) near the drainage port.
1
2
Step 3: Place the drainage pipe (#1) onto the drainage port (#2) and fasten with the drainage pipe hoop (#3). Place the rubber stopper (#4) at the top of the pipe, clip the hose to
the unit (#5), and drain the unit in a suitable location as needed.
1
2
3
4
5
TESTING UNIT OPERATION
Turn the unit on by plugging in the power cord and pressing the ON/OFF button. Press the
mode button to cycle through the various operation modes.
Note: if the ambient temperature is below 61°F, the cooling mode will not function.
Page 14

ENGLISH ESPAÑOL
–12–
CLEANING & MAINTENANCE
SAFETY WARNING
To avoid electric shock, fire, damage, or injury while performing maintenance on your unit:
• Always turn o and disconnect the air conditioner from electric power.
• Never submerge the unit in water or spray liquids directly on the unit.
• Never use solvents or other flammable or volatile liquids (examples: paint thinner,
acetone, gasoline, etc.) to clean the air conditioner.
PRE-COOLING SEASON UNIT CHECK
Before using your air conditioner in the warm summer months, always perform the following verifications to ensure reliable, eicient operation.
• Check the air inlets and outlets for any foreign objects (example: leaves, sticks,
small toys, etc.)
• Check that the electrical cord and socket are not damaged, bent, or fraying.
• Check the filter and clean if necessary.
• Check the batteries in the remote control and insert or replace them if needed.
• Check whether the connectors, heat exhaust duct, and window brackets are firmly
in place.
• Check the heat exhaust duct for any cracks, damage, or other signs of weakness.
POST-COOLING SEASON UNIT CHECK
Aer using your air conditioner in the warm summer months, always perform the following verifications.
• Disconnect the unit electrical power.
• Clean the filter and unit casing.
• Remove dust and other objects on the unit.
• Discard any accumulated water inside the unit (see section about drainage)
• Check whether the connectors, heat exhaust duct, & window brackets are firmly in place.
LONG-TERM STORAGE
Should you place your unit in long-term storage, perform all of the post-season checks
listed above and perform the following additional steps:
• Disassemble the heat exhaust duct and connectors
• Wrap the electrical cord loosely around the unit.
• Cover the unit with a sheet or cloth to prevent dust buildup inside during storage.
DISPOSAL INFORMATION
• Most unit packaging materials are recyclable. Please dispose of them according to
local recycling guidelines.
• If you wish to discard the unit, contact your local authorities for specific appliance
disposal instructions. If the unit is functional and in good repair, but you wish to
dispose of it, consider donating it to a local charity.
Page 15

ENGLISHESPAÑOL
–13–
DRAINING CONDENSATION BUILDUP
If the unit emits 8 beeps and displays H8 on the control panel, unplug the unit and wheel
it outdoors or in another area suitable for water drainage. Remove the rubber plug from
the drainage hose and allow the water to drain; replace the plug and reinstall the unit.
Note: the unit will restart aer the compressor has been stopped for at least 3 minutes.
CLEANING THE OUTER HOUSING AND INTAKE GRILLE
If dust has accumulated on the unit, use a so, dry dusting towel to wipe it o. If grease or
other harder to remove substances is on the unit, use a wrung-out cloth dampened with
warm, soapy water. Use a so brush to clean o the grille.
CLEANING THE FILTER
1 2
For energy eicient operation, your filter
should be cleaned every three months.
Units in dusty environments may require
more frequent cleaning.
• The front filter cover rests on a bottom hinge and swings down. Open by using pulls on either side of the cover.
• Remove the filter by gently tugging on it.
• Use a vacuum cleaner or run cold water onto the filter to clean it. If the filter is
particularly dirty (such as grease buildup), wash and gently scrub the filter in a
bath of warm soapy water. Let the filter completely dry in a shady place; exposing
the filter to direct sunlight can cause deformation.
• Aer the filter is clean and completely dry, re-insert the filter by pressing firmly
without forcing.
Note: To avoid deformation and fire risk, never dry the filter with a heat source, such as a
hair dryer, fireplace, or heater.
CLEANING THE HEAT EXHAUST DUCT
Disconnect the heat exhaust duct from the unit. Clean using warm, soapy water. Completely dry the parts and reconnect the duct.
TROUBLESHOOTING
PROBLEM / POSSIBLE CAUSES
The air conditioner does not function at all
• Is the power cable properly inserted into a functioning, grounded outlet?
• Is there a power failure such as a blown fuse or tripped circuit breaker?
• Is the timer set to “TIMER ON” mode? Disable the timer to immediately start operations.
• Is the internal collection tank or partition drain full/blocked and the FULL light
illuminated? Empty the tank.
• Is the ambient temperature lower than 61°F (16°C)? A safety device prevents the
unit from cooling the room to even lower temperatures.
Page 16

ENGLISH ESPAÑOL
–14–
Heating or cooling is insuicient
• Is the room temperature set properly?
• Is the air filter dirty?
• Are doors or windows open?
• Is the room directly exposed to sunlight or are other heat sources in the room?
• Are there a large number of people in the room?
The air conditioner does not restart immediately aer turning it o.
• The unit can not be restarted for 3 minutes to allow the condenser to cool and
avoid risk of fire. Wait a few minutes before restarting the unit.
The air conditioner unit starts and stops frequently.
• Verify the rating of your electrical system and outlets. You may need a qualified
electrician to troubleshoot and upgrade your electrical circuits if your air conditioner unit exceeds the rated capacity.
• Ensure the exhaust system is properly connected and not bent or kinked. Keep
the hose as short as possible and cut excess length as needed.
Fog is blown out during cooling
• In warm, high humidity environments this may naturally occur. Continued cooling will remove excess humidity from the room and the fog will disappear.
The unit emits a strange smell
• This may be caused by cigarette smoke or other residues from cooking and other
living activities that remain in the air conditioning unit. Clean the filter.
The unit makes loud or unusual noises and vibrations
• Place the unit on a level surface.
There is a “squeezing” noise
• The cycling of the refrigerant inside the unit can temporarily cause this noise.
There is a “patting” noise
• This is oen caused by heat expansion in the plastic parts.
The remote control doesn’t work
• Ensure the remote control has a clear line-of-sight to the operating panel on the
unit and ensure the sensors are not obstructed by curtains or other objects. Ensure
the remote control has fresh, working batteries.
There is moisture at the air output
• High humidity environments may cause condensation at the air flow output.
Wipe the condensation o with a sponge.
Page 17

ENGLISHESPAÑOL
–15–
Water spills while moving the unit
• The internal water collection tank is nearly full. Empty the water tank by placing
the unit near a drain or outdoors and remove the base plug. Aer draining has
completed, replace the base plug and reinstall your unit in the desired location.
IF ANY OF THE FOLLOWING PHENOMENA OCCUR DESPITE THE ABOVE TROUBLESHOOTING TECHNIQUES, PLEASE TURN OFF THE UNIT AND DISCONNECT THE POWER CORD
IMMEDIATELY AND CONTACT TECHNICAL SUPPORT OR A QUALIFIED TECHNICIAN:
• The fuse blows or circuit breaker
trips frequently.
• The power cable is abnormally hot.
• The insulation of the power cable is
ripped, shred or torn.
• The unit controls do not work.
• The unit produces abnormal noises.
UNIT ERROR CODES
When the air conditioner status is abnormal, the indicator display on the indoor unit will display an appropriate error code. Refer to the below table for specific and immediate action.
E5: OVER-CURRENT PROTECTION
Unplug and restart your unit to clear the error. If the error persists, contact a qualified
service technician.
E6: Unplug and restart your unit to clear the error. If the error persists, contact a qualified
service technician.
F1: Unit failure. Contact a qualified service technician.
F2: Unit failure. Contact a qualified service technician.
H1: Defrosting status; a natural phenomenon. The error will automatically clear aer suf-
ficiently defrosting the cooling coils.
H6: Unplug and restart your unit to clear the error. If the error persists, contact a qualified
service technician.
OTHER ERROR CODES: Contact a qualified service technician.
TECHNICAL SUPPORT
For additional assistance, please visit our website or contact technical support.
Web: www.impecca.com
Phone: +1 866–954–4440
Email: support@impecca.com
Page 18

ENGLISH ESPAÑOL
–16–
INTRODUCCIÓN
Gracias por comprar esta unidad portátil de aire acondicionado de calidad Impecca. Para asegurar una larga vida útil y la más alta eficiencia de energía de su unidad, siga cuidadosamente
estas instrucciones. Mantenga estas instrucciones en un lugar seguro y consúltelas cuando
lo requiera. Tome en cuenta que las mejoras constantes a nuestras unidades de aire acondicionado significan que su modelo puede variar ligeramente en apariencia al compararlo con
el modelo en imagen, pero la operación actual y el proceso de instalación permanecen sin
cambios. Este manual se proporciona únicamente con fines informativos y de ninguna manera constituye un documento legal vinculante.
AVISO DE SEGURIDAD:
Este electrodoméstico no debe ser utilizado por niños o por personas que tienen una discapacidad mental o física sin la supervisión estricta y directa de un adulto responsable. Nunca
juegue con o cerca de la unidad.
INFORMACIÓN DE SEGURIDAD
• Antes de la operación, asegúrese
que su instalación eléctrica (tomacorrientes y circuitos) cumplan con
las especificaciones de energía y potencia señaladas en la unidad
• Antes de limpiar o darle mantenimiento a la unidad de aire acondicionado, apague el aire acondicionado y desconéctelo
• Asegúrese que el cable de suministro de energía no esté torcido, doblado, u oprimido bajo objetos pesados o filosos.
• Para desconectar la unidad o moverla de lugar no jale el cable de suministro de energía.
• No conecte o desconecte la unidad
con las manos mojadas.
• Utilice solamente un tomacorrientes
aterrizado. Asegúrese que la conexión
a tierra es la adecuada y funciona.
• Si el cable de suministro de energía
está dañado, debe ser reemplazado
por el fabricante o por un técnico calificado para evitar incendios y peligros eléctricos
• En caso de que ocurra una operación anormal (como puede ser olor
a quemado) desconecte de inmediato la unidad y entre en contacto
con su distribuidor local.
• Si nadie se encuentra presente para
supervisar la operación de la unidad,
por favor apáguela y desconéctela.
• No salpique o vierta agua en la unidad de aire acondicionado para
evitar daños a la unidad o un corto
circuito.
• No coloque o cuelgue objetos que
puedan gotear encima de la unidad
de aire acondicionado.
• Si utiliza una manguera de drenado,
asegúrese que la temperatura ambiente permanezca por encima del
punto de congelación (32°F o 0°C)
para evitar que la unidad se agriete
o se dañe.
• Mantenga las fuentes de calor lejos
de la unidad de aire acondicionado.
• Asegúrese que la unidad se encuentra lejos del fuego y objetos inflamables o explosivos.
Page 19

ENGLISHESPAÑOL
–17–
• No permita que niños o personas
con capacidades físicas, sensoriales
o mentales disminuidas operen o
estén cerca de la unidad sin la supervisión directa de un adulto.
• No permita que los niños realicen
la limpieza u otras operaciones de
mantenimiento sin la supervisión
directa de un adulto.
• No intente reparar o desarmar usted
mismo la unidad de aire acondicionado.
• Nunca inserte objetos en la unidad
de aire acondicionado.
CONDICIONES DE OPERACIÓN
• La unidad de aire acondicionado debe ser operada dentro de un rango de temperatura de 62°F a 95°F (16°C a 35°C).
• Este electrodoméstico es para uso en interiores únicamente.
• El electrodoméstico debe colocarse de modo tal que el tomacorrientes esté a la mano.
• Se debe dejar un perímetro libre de objetos alrededor del aire acondicionado de
12′′ (30 cm).
• No opere el aire acondicionado en climas húmedos.
• Mantenga la entrada y salida de aire limpias y libres de obstáculos.
• Durante la operación, cierre las puertas y ventanas para mejorar el efecto de enfriamiento.
• Coloque el aire acondicionado sobre una superficie plana y suave para evitar el
ruido y la vibración al estar operando.
• Este aire acondicionado esta equipado con ruedas giratorias que permiten deslizarlo sobre superficies planas y suaves.
• No incline o ponga de cabeza la unidad de aire acondicionado. Si hay algún problema desconecte de inmediato y entre en contacto con su distribuidor local o
soporte técnico.
• Evite exponer la unidad directamente a la luz del sol.
Page 20

ENGLISH ESPAÑOL
–18–
CONOCIENDO SU UNIDAD DE AIRE ACONDICIONADO
1
2
3
4
5
1213 11 10
9
6
7
8
1. Panel de control
2. Cuchillas direccionales horizontales
3. Cuchillas direccionales verticales
4. Ruedas giratorias
5. Compartimento del control remoto (mando
a distancia)
6. Cable de suministro de energía
7. Filtros
8. Rejilla superior de entrada de aire
9. Rejilla inferior de entrada de aire
10. Conector A
11. Tubo de escape de calor
12. Conector B
13. Conector C
Nota: No descarte el tubo de escape de calor u otros
accesorios; los necesitará más adelante en caso de
cambiar la unidad de aire acondicionado de lugar.
Page 21

ENGLISHESPAÑOL
–19–
USANDO SU UNIDAD DE AIRE ACONDICIONADO
DESCRIPCIÓN GENERAL DEL PANEL DE CONTROL
1 2 3 4 5 6
987
1. Receptor de la señal de rayos infrarrojos (IR)
2. Formación de agua condensada (cuando está iluminada)
3. Modo de operación Enfriamiento A/C (cuando está iluminada)
4. Pantalla LED de Temperatura: Muestra la temperatura deseada de la habitación
en el modo de enfriamiento. En otros modos la pantalla estará en blanco..
5. Modo de Operación Deshumidificador (cuando está iluminada)
6. Modo de Operación Ventilador (cuando está iluminada)
7. Botón de Modo: Realiza un ciclo a través de los modos enfriamiento, deshumidificador y ventilador.
8. Botones + / - de Temperatura: Para ajustar la temperatura deseada de la habitación al presionar el botón apropiado. Los cambios de temperatura se muestran en
incrementos o disminuciones de 1° en el rango de 61°F (16°C) a 86°F (30°C). Nota:
No se puede fijar la temperatura en los modos ventilador o deshumidificador.
9. Botón ON/OFF de encendido y apagado: Utilice este botón para prender y apagar
la unidad.
Page 22

ENGLISH ESPAÑOL
–20–
CONTROL REMOTO (MANDO A DISTANCIA)
21
3
4 5
6 7
1. Botón ON/OFF
2. Botón de Modo
3. Botones + / - de Temperatura
4. Botón del Ventilador
5. Botón de Oscilación
6. Botón de Suspensión
7. Botón del Temporizador
DESCRIPCIÓN GENERAL DE LA PANTALLA DEL CONTROL REMOTO
13 14
7 6
1
2
3
4
5
10
12
11
8
9
1. Señal de transmisión
2. Operación de Oscilación (no aplicable a esta unidad)
3. Operación del Modo de Suspensión
4. Seguro del Control Remoto
5. Velocidad del Ventilador
6. Ajuste del Temporizador
7. Temperatura Deseada
8. Modo de calefacción
(no aplicable a esta unidad)
9. Modo Ventilador
10. Modo Deshumidificador
11. Modo Enfriamiento
12. Operación Automática
13. Temporizador de arranque activado
14. Temporizador de apagado activado
Page 23

ENGLISHESPAÑOL
–21–
USANDO EL CONTROL REMOTO
BOTÓN ON/OFF
Presione el botón ON/OFF para encender y apagar la unidad.
BOTÓN DE MODO
Realiza un ciclo a través de los modos enfriamiento, deshumidificador y ventilador.
BOTONES +/- DE TEMPERATURA
Para ajustar la temperatura deseada de la habitación al presionar el botón apropiado.
Los cambios de temperatura se muestran en incrementos o disminuciones de 1° en el
rango de 61°F (16°C) a 86°F (30°C). Nota: No se puede fijar la temperatura en los modos de
ventilador o deshumidificador.
BOTÓN FAN - VENTILADOR
Hace un ciclo entre las diferentes velocidades del ventilador entre, Auto, Low (baja), Medium (media), y High (alta velocidad). La velocidad Auto selecciona una velocidad apropiada del ventilador de acuerdo a la temperatura ambiente y para un aprovechamiento
más eficiente de la energía.
BOTÓN SWING – OSCILACIÓN: No aplica para este modelo.
BOTÓN SLEEP - SUSPENSIÓN
Durante el modo de enfriamiento, el botón de suspensión permitirá que la temperatura de la
habitación se incremente ligeramente para un aprovechamiento más eficiente de la energía.
BOTÓN TIMER - TEMPORIZADOR
• Cuando la unidad esté en operación presione este botón para programar el tiempo en
que la unidad se ha de apagar. Mientras que los íconos T-OFF y H estén parpadeando
en la pantalla del control remoto, utilice los botones +/- para determinar el tiempo en
que la unidad se ha de apagar en incrementos de 30 minutos (0.5 horas). Presione el
botón del temporizador nuevamente para confirmar la orden de apagado.
• Cuando la unidad esté conectada pero no en operación presione este botón para
programar el tiempo en que la unidad arrancará de forma automática. Mientras
que los íconos T-ON y H estén parpadeando en la pantalla del control remoto,
utilice los botones +/- para determinar el tiempo en que la unidad se ha de encender en incrementos de 30 minutos (0.5 horas). Presione el botón del temporizador
nuevamente para confirmar la orden de encendido.
• Para cancelar el temporizador, presione el botón del temporizador para ver el
tiempo restante antes de que se active el temporizador. Presione el botón del temporizador nuevamente para cancelar el tiempo.
Nota: el temporizador puede ajustarse desde 30 minutos a 24 horas. La unidad debe permanecer conectada para que el temporizador funcione.
Page 24

ENGLISH ESPAÑOL
–22–
SEGURO DEL CONTROL REMOTO
1. Presione y sostenga en forma simultánea los botones + y – para activar el seguro de
niños del control remoto y evitar cambios inadvertidos en los ajustes de la unidad.
2. Presione en forma simultánea los botones + y – para desactivar el seguro del control remoto.
CAMBIO EN LA UNIDAD DE LA TEMPERATURA (C° O F°)
Cuando la unidad esté apagada, presione simultáneamente el botón – y el botón
MODE para cambiar la unidad de despliegue de la temperatura de grados Centígrados o Celsius (C°) a grados Fahrenheit (F°) y viceversa.
REEMPLAZANDO LAS BATERÍAS DEL CONTROL REMOTO
1. Presione suavemente la tapa localizada en la parte posterior del control remoto.
Levante la tapa del compartimento de baterías.
2. Reemplace las baterías con dos baterías AAA de 1.5 v. Inserte las baterías respetando la polaridad (extremos + y -). Reemplace ambas baterías al mismo tiempo;
nunca inserte baterías nuevas y viejas, para evitar que se chorreen.
3. Reinserte suavemente la cubierta o tapa del compartimento de las baterías.
NOTAS ACERCA DE LA OPERACIÓN DEL CONTROL REMOTO
• Cuando utilice el control remoto, diríjalo directamente al receptor IR de la unidad
de aire acondicionado el cual se encuentra en el panel de control.
• El control remoto debe tener una línea de visión libre de obstáculos hacia el panel
de control.
• Puede ocurrir interferencia en la operación del control remoto cuando están presentes ya sea luz fluorescente o teléfonos inalámbricos.
• Cuando el control remoto permanezca sin usar por largos periodos de tiempo,
retire las baterías.
• Si la pantalla se ve deslavada o no se muestra, es momento de reemplazar las baterías.
INSTRUCCIONES DE PRE-INSTALACIÓN
HERRAMIENTAS Y ACCESORIOS DE INSTALACIÓN
Reúna las siguientes herramientas y accesorios de la unidad antes de comenzar la instalación:
UNIDAD Y ACCESORIOS
• Unidad de aire acondicionado
• Conectores A, B, C
• Marco de la ventana (3 piezas)
• Ducto para el escape de calor
• Tornillos (x5)
• Clip para tubo
• Tapón de goma
• Tubería de drenado
• Mariposa para tubería
• Baterías del control remoto (2xAAA)
• Control Remoto
• Manual de Usuario
Page 25

ENGLISHESPAÑOL
–23–
INSTALANDO SU UNIDAD
PASO 1: IDENTIFIQUE EL LUGAR DE INSTALACIÓN
1. Siguiendo los pasos en la sección de preinstalación, identifique un lugar adecuado para
la instalación.
PASO 2: INSTALACIÓN DEL DUCTO DE ESCAPE DE CALOR
1. Retire la manguera de escape y todos los conectores.
PASO 3: INSTALACIÓN DEL KIT DE LA VENTANA
El kit de ventana está diseñado para instalarse en la mayoría de las ventanas de guillotina
horizontales y verticales. Tal vez requiera de leves modificaciones en su instalación para
asegurar un uso seguro y adecuado de su unidad de aire acondicionado.
Ventanas Horizontales:
Ancho mínimo: 27.5” (70cm)
Ancho máximo: 48” (122cm)
Ventanas Verticales:
Altura mínima: 27.5” (70cm)
Altura máxima: 48” (122cm)
1. Adapte el tamaño del marco de la ventana
nserte el puerto de ajuste del escape (#1) en su ventana y extienda al ancho o alto para
llenar completamente la apertura de la ventana con la placa de ajuste (#2). Si el ancho
interior de la ventana es menor a los 28”, necesitará cortar el marco para ajustar el ancho.
Corte en el lado OPUESTO (#3) de la apertura como se indica a continuación
1
2
3
2. Inserte el conector C (#2) en el marco de la ventana (#1)
2
1
Page 26

ENGLISH ESPAÑOL
–24–
3. Asegure el marco de la ventana
Asegure el marco (#1) al alféizar de la ventana (#2) con los tornillos (#3) basándose en
las dimensiones siguientes que corresponden al ancho (ventana de guillotina horizontal)
(#4) o altura (ventana de guillotina vertical) (#5) de la instalación.
1
1
2
3
3
4
2
5
Ancho o Altura menor a 28”: 2 tornillos
Ancho o Altura entre 28” y 36.5” : 3 tornillos
Ancho o Altura entre 36.5” y 64” : 4 tornillos
4. Cierre la ventana para terminar la instalación
Page 27

ENGLISHESPAÑOL
–25–
MONTAJE DEL PUERTO DE ESCAPE DE AIRE
Si ya cuenta con un puerto de escape de aire, puede conectar su unidad de aire acondicionado al puerto. Para una mejor eficiencia de la energía y conservar la vida útil de su
unidad, evite doblar la manguera de escape y mantenerla con la longitud más corta posible. Para un desempeño óptimo, el punto de doblez de la manguera debe estar al menos
a 24” de distancia de la unidad. Evite que se tuerza o que tenga dobleces muy marcados.
CONECTANDO EL DUCTO DE ESCAPE DE AIRE
2
1
3
Paso 1: Primero estire completamente alrededor de 5 pulgadas de la manguera en ambos extremos del tubo de escape. Inserte y
ajuste un conector A (#1) al tubo de escape
(#2) al girar el conector en dirección de las
manecillas del reloj en uno de los extremos
de la manguera. Repita el proceso en el otro
extremo de la manguera con el conector B
(#3)
Paso 2: Asegúrese de que el lado marcado TOP en el conector A está de frente. Deslice el
conector A en los rieles (#1) que se encuentran en la parte posterior de la unidad de aire
acondicionado y presione firmemente hasta que escuche un ligero clic del pestillo de
ajuste. (#2).
2
1
Page 28

ENGLISH ESPAÑOL
–26–
2
1
OK
Paso 3: Inserte el conector B (#1) en
el conector C (#2) por la ventana al
ubicar la ranura en el conector C, e
insertando y torciendo ligeramente
el Conector B para lograr que se
ajuste correctamente.
Nota: Para un desempeño óptimo, evite todo tipo de torceduras y dobleces en el ducto de escape.
OK OK
OK
INSTALACIÓN DE LA TUBERÍA DE DRENADO
La formación de condensación en ambientes húmedos impactará severamente el la eficiencia y la operación normal de su unidad. Si cuenta con un drenaje cerca de la instalación, usted tendrá una instalación continua de drenado.
Paso 1: Retire el tapón de goma (#1) que se encuentra en a base posterior de la unidad.
1
Page 29

ENGLISHESPAÑOL
–27–
Paso 2: Usando el tornillo provisto (#1), instale el clip de la tubería de drenado (#2) cerca del
puerto de drenado.
1
2
Paso 3: Coloque la tubería de drenado (#1) en el puerto de drenado (#2) y asegure con la
mariposa la tubería de drenado (#3). Coloque el tapón de goma (#4) en la parte superior
de la tubería y meta la manguera en clip del paso (#5), y drene el agua condensada de la
unidad en una ubicación adecuada conforme lo requiera.
1
2
3
4
5
PROBANDO LA OPERACIÓN DE LA UNIDAD
Ponga en marcha la unidad al conectarla y al presionar el botón ON/OFF. Presione el botón MODE para realizar un ciclo por los diferentes modos de operación.
Nota: si la temperatura ambiente es inferior a los 61°F, no funcionará el modo de enfriamiento.
Page 30

ENGLISH ESPAÑOL
–28–
LIMPIEZA Y MANTENIMIENTO
ADVERTENCIAS DE SEGURIDAD
Para evitar descargas eléctricas, incendios, daños y lesiones al realizar el mantenimiento
de su unidad:
• Siempre apague y desconecte del tomacorrientes la unidad de aire acondicionado
• Nunca sumerja la unidad en agua o rocíe líquidos directamente sobre la unidad
• Nunca utilice solventes u otros líquidos inflamables o volátiles (ejemplos: pintura,
solventes, acetona, gasolina, etc.)
REVISIÓN PREVIA DE LA UNIDAD PARA LA TEMPORADA DE ENFRIAMIENTO
Antes de utilizar su unidad de aire acondicionado en los cálidos meses del verano, siempre realice las siguientes verificaciones para asegurar una operación confiable y eficiente:
• Revise que en las entradas y salidas de aire no haya objetos extraños (ejemplo:
hojas, pelusas, palitos, juguetes pequeños, etc.)
• Revise que el cable de suministro eléctrico y el enchufe no estén dañados dobla-
dos o rasgados
• Revise el fitro y límpielos si es necesario
• Revise las baterías del control remoto y reemplácelas de ser necesario
• Revise que los conectores, el ducto de escape de calor y el soporte de la ventana
están firmemente ensamblados y en su lugar
• Verifique que el ducto de escape de calor no tenga grietas, daños u otros signos
de debilidad
REVISIÓN POST TEMPORADA DE LA UNIDAD
Después de utilizar su unidad de aire acondicionado en los cálidos meses del verano,
siempre realice las siguientes revisiones:
• Desconecte la unidad del tomacorrientes
• Limpie el filtro y la carcasa de la unidad
• Retire polvo y otros objetos de la unidad
• Descarte cualquier acumulación de agua dentro de la unidad (vea la sección acer-
ca del drenado)
• Revise que los conectores, el ducto de escape de calor y el soporte de la ventana
están firmemente ensamblados y en su lugar
ALMACENAMIENTO POR LARGO TIEMPO
Si va a guardar su unidad por un largo plazo, realice todos los pasos post-temporada de
la sección anterior y además los siguientes pasos:
• Desarme el ducto de escape y conectores
• Enrolle alrededor de la unidad el cable de suministro eléctrico de manera suelta
• Cubra la unidad con una sábana o tela para prevenir la acumulación de polvo
dentro de la unidad durante el almacenamiento
Page 31

ENGLISHESPAÑOL
–29–
INFORMACIÓN PARA SU DESHECHO
• La mayoría de los materiales son reciclables. Deséchelos de acuerdo a las directrices locales de reciclado.
• Si desea desechar su unidad, entre en contacto con las autoridades locales para
obtener las instrucciones específicas de desecho de aparatos electrodomésticos.
Si su unidad aún funciona y está en buen estado, en lugar de deshacerse de ella,
dónela a alguna institución de caridad.
DRENANDO LA ACUMULACIÓN DE CONDENSACIÓN
Si la unidad emite 8 pitidos y muestra H8 en el panel de control, desconecte la unidad y
deslícela hacia afuera o a otra área ideal para eliminar el agua. Retire el tapón de goma
de la manguera de drenado y permita que el agua drene. Coloque el tapón nuevamente
y reinstale la unidad. NOTA: la unidad comenzará a funcionar hasta que el compresor ha
estado detenido por al menos 3 minutos.
LIMPIANDO LA CARCASA EXTERIOR Y LA REJILLA DE TOMA DE AIRE
Si se ha acumulado polvo en la unidad, utilice un paño suave y seco de sacudir para limpiarlo. Si hay grasa u otras substancias más duras de eliminar, use un paño suave humedecido con agua tibia y jabonosa. Utilice un cepillo suave para limpiar la rejilla
LIMPIANDO EL FILTRO
1 2
Para una operación de energía eficiente, su filtro debe ser limpiado cada 3
meses. Las unidades en ambientes polvosos requieren una limpieza del filtro
más frecuente.
• Retire el fitro al tirar suavemente de ellos
• Utilice una aspiradora o póngalos bajo el chorro de agua fría para limpiarlos. Si
el filtro está particularmente sucio (con formación de grasa, por ejemplo), lave y
talle suavemente el filtro en un baño de agua tibia jabonosa. Deje el filtro secar
totalmente en un lugar con sombra. La exposición del filtro a la luz directa del sol
puede causar que este se tuerza.
• Después de que el filtro esté limpio y completamente seco, reinsértelo en la unidad presionando firmemente sin forzarlo.
Nota: Para evitar la deformación y el riesgo de incendio nunca seque el filtro con una fuente
de calor como es una secadora del cabello, calentador o chimenea.
LIMPIANDO EL DUCTO DE ESCAPE DE CALOR
Desconecte de la unidad el ducto de escape de calor. Límpielo usando agua tibia y jabonosa. Seque totalmente las partes y reconecte el ducto.
Page 32

ENGLISH ESPAÑOL
–30–
SOLUCIÓN DE PROBLEMAS
PROBLEMA / CAUSA PROBABLE
El aire acondicionada no funciona para nada
• ¿El cable de suministro de energía esta adecuadamente conectado en un tomacorrientes que funciona y está aterrizado?
• ¿Existe alguna falla como un fusible quemado o se disparó el cortacircuitos?
• ¿El temporizador está ajustado al modo de “TIMER ON”? Deshabilite el temporizador para iniciar de inmediato con la operación.
• ¿El tanque interno de recolección está lleno o el tubo de drenado está lleno/
bloqueado y está iluminada la luz FULL? Vacié el tanque.
• ¿La temperatura ambiente es menor a los 61°F (16°C)? Un dispositivo de seguridad evita que una habitación se enfríe a temperaturas más bajas que esto.
La calefacción o enfriamiento es insuficiente
• ¿La temperatura de la habitación es la adecuada?
• ¿Está sucio el filtro de aire?
• ¿Están las puertas y ventanas abiertas?
• ¿La habitación está expuesta a la luz directa del sol o hay otras fuentes de calor
dentro de la habitación?
• ¿Hay un gran número de personas en la habitación?
El aire acondicionado no se reinicia de inmediato después de apagarlo
• La unidad no puede reiniciar sino hasta después de 3 minutos de que ha sido
apagada para permitir que el condensador se enfríe y evitar el riesgo de incendio.
Espere unos cuantos minutos antes de reiniciar la unidad.
La unidad de aire acondicionado se enciende y apaga frecuentemente
• Verifique que la capacidad de su instalación eléctrica cumpla con las especificaciones requeridas. Necesitará de un electricista para revisar su instalación si es
que su aire acondicionada excede la capacidad instalada.
• Asegúrese que el sistema de escape está bien conectado y no está doblado o
torcido. Mantenga la manguera lo más corto posible cortando el exceso conforme
se requiera.
Sale neblina al estar enfriando
• Esto puede ocurrir normalmente en ambientes cálidos con alta humedad. El
enfriamiento continuo retirará el exceso de humedad en la habitación y eventualmente la neblina desaparecerá.
La unidad emite un olor extraño
• Esto puede deberse al humo del cigarro u otros residuos por cocinar u otras
actividades que permanecen en la unidad de aire acondicionado. Limpie el filtro.
Page 33

ENGLISHESPAÑOL
–31–
La unidad emite un sonido fuerte o inusual y vibraciones
• Coloque la unidad en una superficie nivelada
Se escucha como un sonido de “estrujamiento”
• Ocasionalmente la circulación del refrigerante dentro de la unidad puede causar este ruido.
Se escucha un sonio como de “palmaditas”
• Esto es usualmente causado por la expansión por calor de las partes de plástico
El control remoto no trabaja
• Asegúrese que el control remoto tiene una línea de visión sin obstáculos directa
a la unidad y además verifique que los sensores en la unidad no están siendo obstruidos por cortinas ni otros objetos. Asegúrese que el control remoto cuenta con
pilas útiles y frescas.
Hay humedad en la salida de aire
• Los ambientes de alta humedad pueden causar condensación en la salida del
flujo de aire. Con una esponja limpie la condensación.
Se derrama agua al mover la unidad
• El tanque interno de recolección de agua está casi lleno. Vacíe este tanque al
colocar la unidad cerca de un drenaje o afuera y retire el tapón de goma. Ya que
termine el drenado, coloque de nuevo el tapón de goma y reinstale su unidad en
la ubicación deseada.
SI CUALQUIERA DE LOS SIGUIENTES FENÓMENOS LLEGARAN A OCURRIR A PESAR
DE LAS TÉCNICAS DE SOLUCIÓN DE PROBLEMAS ANTES DESCRITAS, APAGUE SU
UNIDAD DE AIRE ACONDICIONADO Y DESCONECTE EL CABLE DE SUMINISTRO ELÉCTRICO DE INMEDIATO Y ENTRE EN CONTACTO CON SOPORTE TÉCNICO O CON UN
TÉCNICO ESPECIALIZADO:
• Se quemó el fusible o el cortacircuitos se dispara frecuentemente
• El cable de suministro eléctrico está
inusualmente caliente
• El aislante del cable de suministro
de energía está rasgado, destrozado
o desgarrado
• Los controles de la unidad no funcionan
• La unidad produce ruidos anormales.
Page 34

ENGLISH ESPAÑOL
–32–
CÓDIGOS DE ERROR DE LA UNIDAD
Cuando el estado de la unidad de aire acondicionado es anormal, la pantalla indicadora en
la unidad desplegará el código de error adecuado. Refiérase a la siguiente tabla para una
acción específica e inmediata.
E5: PROTECCIÓN DE SOBRE CORRIENTE
Desconecte y reinicie la unidad para borrar el error. Si el error persiste, contacte a un técnico de servicio calificado.
E6: Desconecte y reinicie la unidad para borrar el error. Si el error persiste, contacte a un
técnico de servicio calificado.
F1: Falla de la unidad. Contacte a un técnico de servicio calificado.
F2: Falla de la unidad. Contacte a un técnico de servicio calificado.
H1: Estado de descongelamiento; un fenómeno natural. El error se borrará hasta que el
serpentín de enfriamiento se descongele lo suficiente.
H6: Desconecte y reinicie la unidad para borrar el error. Si el error persiste, contacte a un
técnico de servicio calificado.
OTROS CÓDIGOS DE ERROR: Contacte a un técnico de servicio calificado.
SOPORTE TÉCNICO
Para mayor ayuda, visite nuestro sitio web o contacte a soporte técnico.
Sitio Web: www.impecca.com
Teléfono: +1 866–954–4440
Email: support@impecca.com
 Loading...