

Page 1
Portable Air Conditioner—User Manual
Aire acondicionado—Manual de usuario
Climatiseur mobile—Mode d’emploi
Models N°: IPAC-08NR, IPAC-11NR
Page 2

Read the following notices and information carefully to ensure proper operation of your air
conditioner unit.
This manual is solely provided for informational purposes and in no way constitutes a legally
binding document between the manufacturer, distributor, and end consumer.
Lea las siguientes indicaciones cuidadosamente para asegurar el correcto funcionamiento
de su unidad de aire acondicionado.
Este manual se proporciona únicamente con fines informativos y de ninguna manera
constituye un documento jurídicamente vinculante entre el fabricante, distribuidor y
consumidor final.
Lisez attentivement les notices dans ce document et respectez-les pour assurer le bon fonctionnement de votre climatiseur.
Ce manuel n’est que fourni à titre indicatif et ne constitue en aucune façon un contrat ou
instrument légal entre le fabricant, le distributeur et le consommateur.
Page 3

ENGLISHESPAÑOLFRANÇAIS
–1–
INTRODUCTION:
Thank you for purchasing this quality Impecca portable air conditioner unit. To ensure
the longest life and highest energy eiciency of your unit, please carefully follow these operating instructions. Keep these instructions in a safe place and consult them as needed.
Please note that constant enhancement and improvements to our air conditioning units
may mean that your model will slightly dier in appearance from the model pictured in
this manual, but the actual operation and installation of the unit remains unchanged.
This manual is solely provided for informational purposes and does not form a binding,
legal contract.
SAFETY NOTICE:
This appliance should not be used by children or mentally/physically disabled persons
without strict, direct supervision by a responsible adult. Never play with or around the
appliance.
IMPORTANT INFORMATION
Read the following notices and information carefully to ensure proper operation of your
air conditioner unit.
IMPORTANT INSTALLATION GUIDELINES
Ensure that a qualified and authorized technician performs the air conditioning unit installation.
1. Do not install the units in areas with potential gas leaks and around inflammable
substances. Areas without proper ventilation are hazardous and can cause fires.
2. Ensure that your unit is connected to a circuit breaker with the amperage that
corresponds to the electrical current required to operate your air conditioning
unit. Improper electrical systems can lead to electrical shock, electrocution, or
fire hazards.
3. Ensure the unit is properly grounded. Improper grounding can lead to electrical
shock, electrocution, or fire hazards.
IMPORTANT OPERATING INFORMATION
ABOUT YOUR PORTABLE UNIT
1. A small reservoir is located at the bottom of the unit to collect moisture from condensation made in the cooling process. Do not tip the unit or move it abruptly to
avoid spills.
Page 4

ENGLISH ESPAÑOL FRANÇAIS
–2–
SAFETY WARNINGS
1. Do not stop unit operation by pulling the power cable out of the wall outlet.
Electrical shock, unit damage, and fire hazards may result in addition to other
accidents.
2. Connect your unit directly to a properly grounded wall-mount electrical socket.
Never connect the unit with an extension cable or outlet splitter of any kind, which
may result in electrical shock, overheating, fire hazards, or other accidents.
3. Do not press, stretch, kink, damage, heat, deform, or modify the power cable in
any way. Doing so may result in electrical shock, electrocution, overheating, fire
hazard, or other accidents. Should your units power cable be damaged in any way,
contact technical support immediately for a replacement solution.
4. Do not operate the unit with wet or damp hands. Doing so may result in electric
shock, electrocution, or other accidents.
5. Ensure the power receptacle and unit plug are free of dust, rust, and other corrosion before connecting the unit. Failure to do so may lead to electrical shock,
electrocution, fire hazards, or other accidents.
6. Do not use the unit with underrated fuses, circuit breakers, or electrical wiring.
An insuicient electrical system can result in unit failure, unit damage, unit performance issues, electrical shock, electrocution, fire hazards, or other accidents.
7. Never place the unit near open-flames or burners as the operation of the unit can
create a fire hazard or induce a lack of oxygen in confined spaces.
8. Never place flammable objects near the air conditioning unit such as insecticides,
paint, spray paint, or other aerosols. Never spray products on the unit as it may
result in fire hazards or other accidents.
9. Never insert sticks or other foreign objects into the unit. The rotating blades may
break and cause bodily damage and result in fire hazards or other accidents.
10. Do not wash the air conditioner unit with water or other liquids. Instead, use a dry
dusting cloth. Should the unit surfaces be exceptionally dirty, use a cloth slightly
dampened with warm, soapy water. May result in electrical shock, electrocution,
fire hazards, or other accidents.
11. Never use the following types of substances on the unit to avoid deformation,
damage, and fire/electrical hazards: hot water (over 100°F/40°C), gasoline, paint
thinners, benzene, kerosene, detergents, corrosives, or abrasives.
12. Do not let the cooled air blow directly on your body, as it may result in personal discomfort or be harmful to your health such as inducing hypothermia
in hot climates.
13. Should your unit remain unused for a prolonged period of time, please turn the
unit power o and then disconnect the power cable to ensure safety.
14. Should an operating abnormality arise (such as a burning smell), stop the unit
IMMEDIATELY, then disconnect the power cable and contact technical support.
Page 5
ENGLISHESPAÑOLFRANÇAIS
–3–
ENERGY EFFICIENCY
1. Avoid direct sunlight in the cooled space; lower shades, curtains, and blinds to
ensure high unit performance.
2. Reduce and remove heat sources from the room during cooling such as desktop
computers, electronics, and cooking appliances.
IMPORTANT MAINTENANCE/DISPOSAL INFORMATION
1. Contact technical support to ensure any necessary unit maintenance is performed
by a qualified and authorized technician.
2. Your unit should be disposed of in accordance to local laws and regulations.
Please contact your municipality or local disposal authorities for further information on proper disposal.
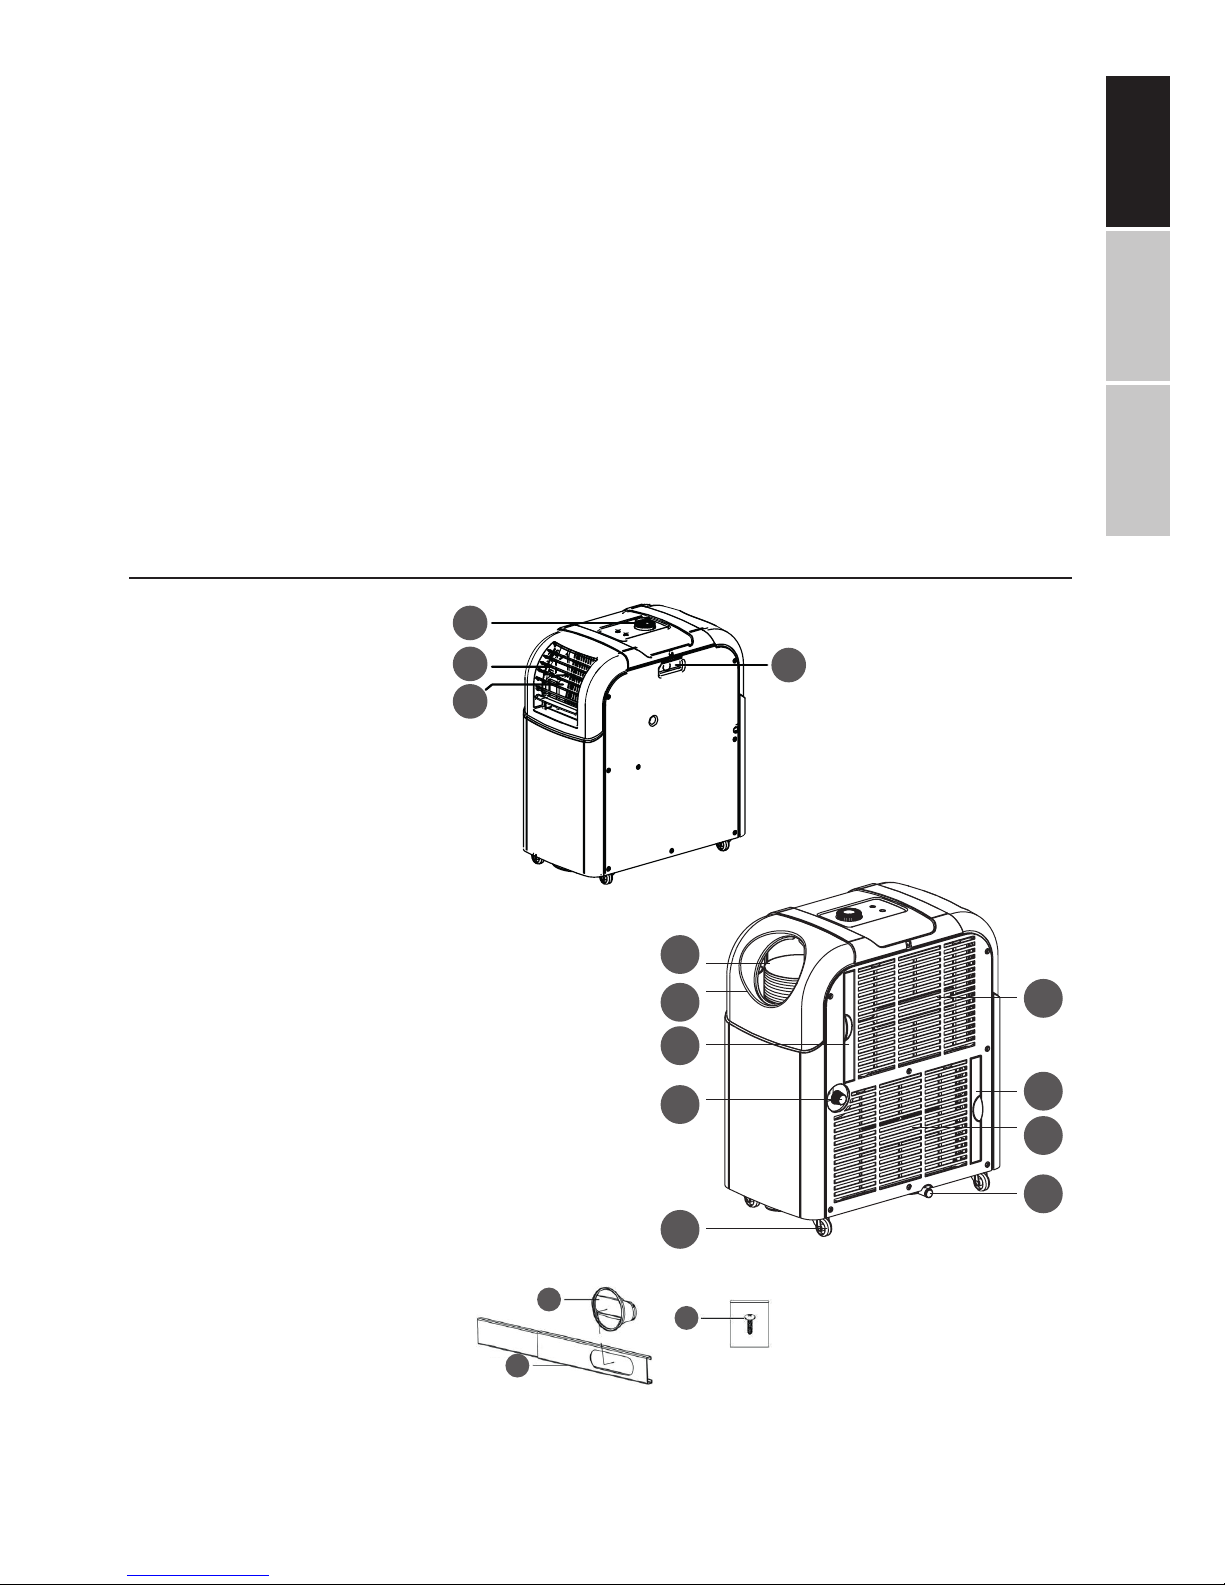
GETTING TO KNOW YOUR AIR CONDITIONER
UNIT FRONT:
1. Control knobs
2. Directional air blades
3. Cold air outlet
4. Carrying handle
UNIT REAR:
5. Cold air intake
6. Hot air filter
7. Hot air intake
8. Base drain plug
9. Casters
10. Partition plate drain plug
11. Cold air filter
12. Hot air outlet
13. Air exhaust hose
PARTS:
14. Air exhaust adapter
15. Screw
16. Window kit
NOTE: Features and appearance will vary by model; the above drawings are for illustrative
purposes only.
1
4
2
3
5
6
7
8
9
10
11
12
13
14
16
15
Page 6
ENGLISH ESPAÑOL FRANÇAIS
–4–
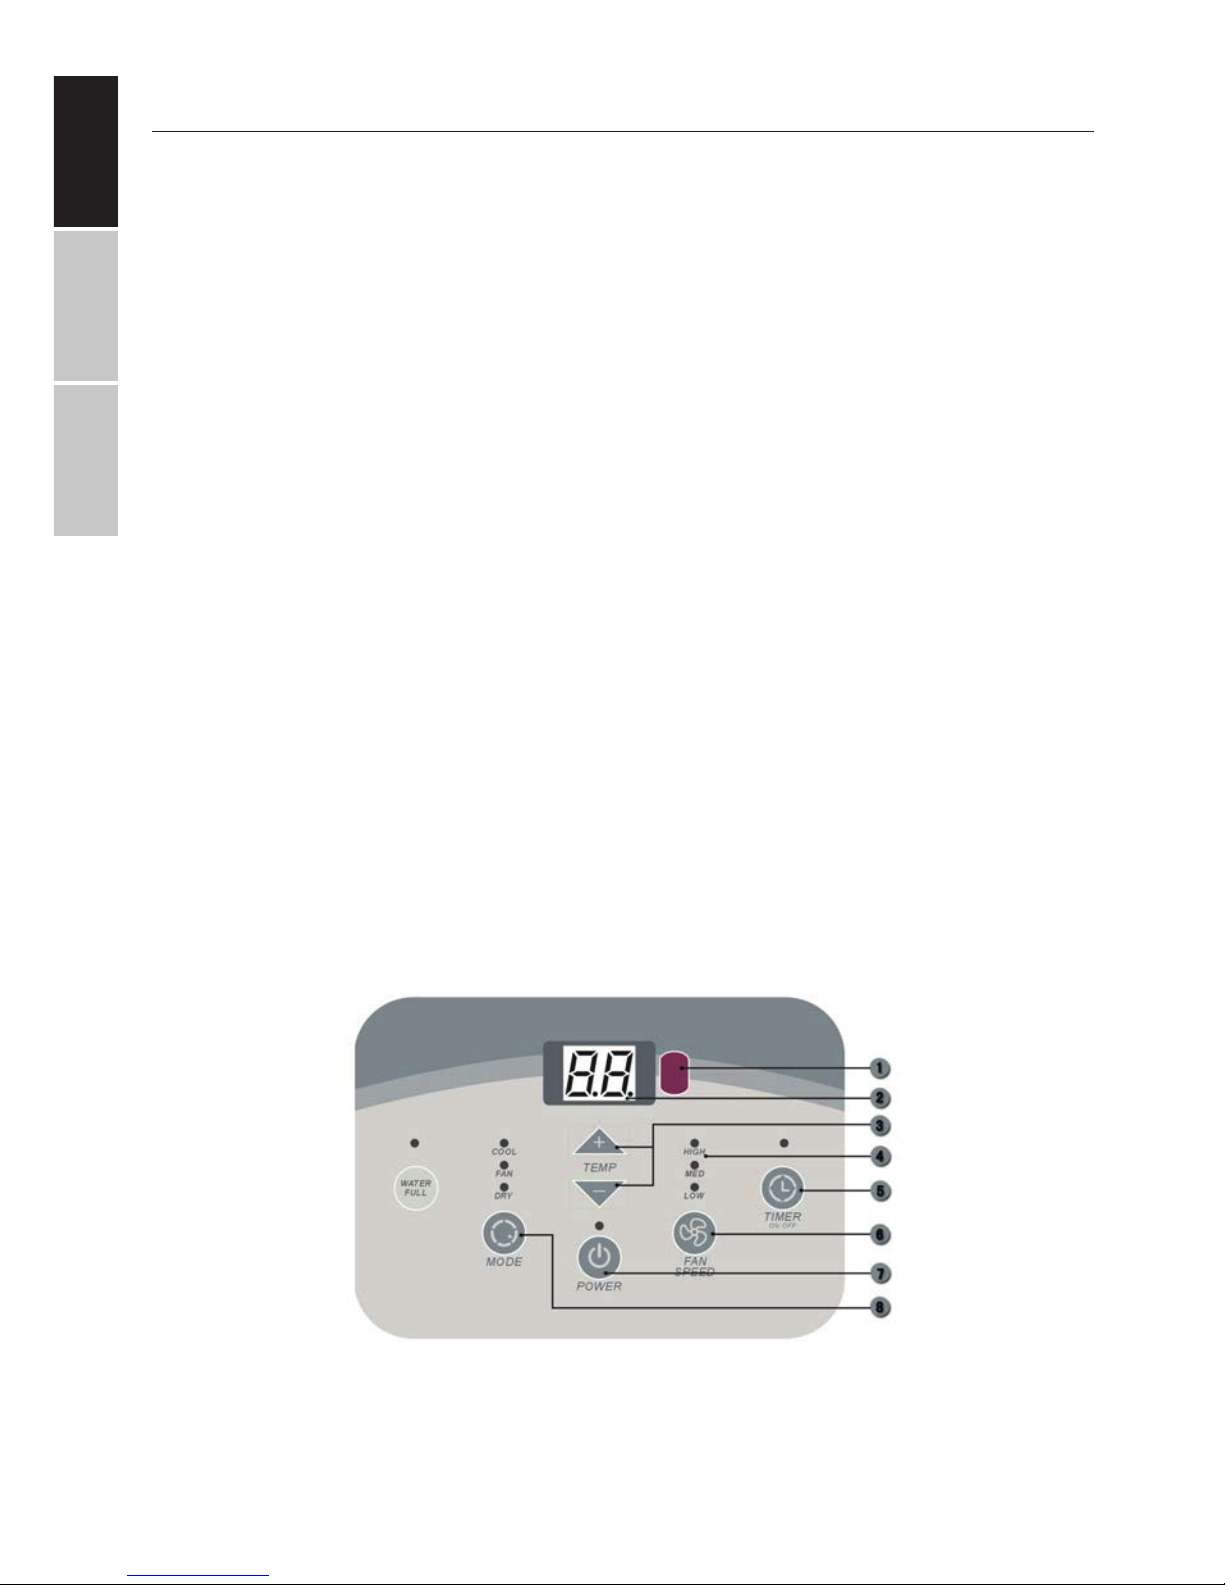
DIGITAL CONTROL PANEL
1. Remote control sensor
2. Digital display
• Fan mode: indicates present room temperature
• Cool/Dry mode: indicates desired temperature
• Timer mode: indicates the remaining time
NOTE: if the temperature sensor fails, the display will continuously read 77°F or 25°C
3. Temp/Time button
While the device is continuously operating, press this button to adjust the programmed room temperature using the up and down arrow buttons.
4. Operating mode
The current operating mode is indicated by the adjacent LEDs. If the LEDs are illuminated while the unit is not in operation, empty the water receptacle.
5. Timer button
• Press this button while the unit is running to program a shutdown time set
using the up and down arrow buttons.
• Press this button while the unit is in standby mode to program a startup time
set using the up and down arrow buttons.
6. Fan speed button
Choose the fan speed rate between High, Medium, and Low.
7. On/O button
Turn the unit on or o. The power indicator LED illuminates when the device is
powered on.
8. Mode button
Select the unit operating mode between Cool, Dry, and Fan.
Page 7
ENGLISHESPAÑOLFRANÇAIS
–5–
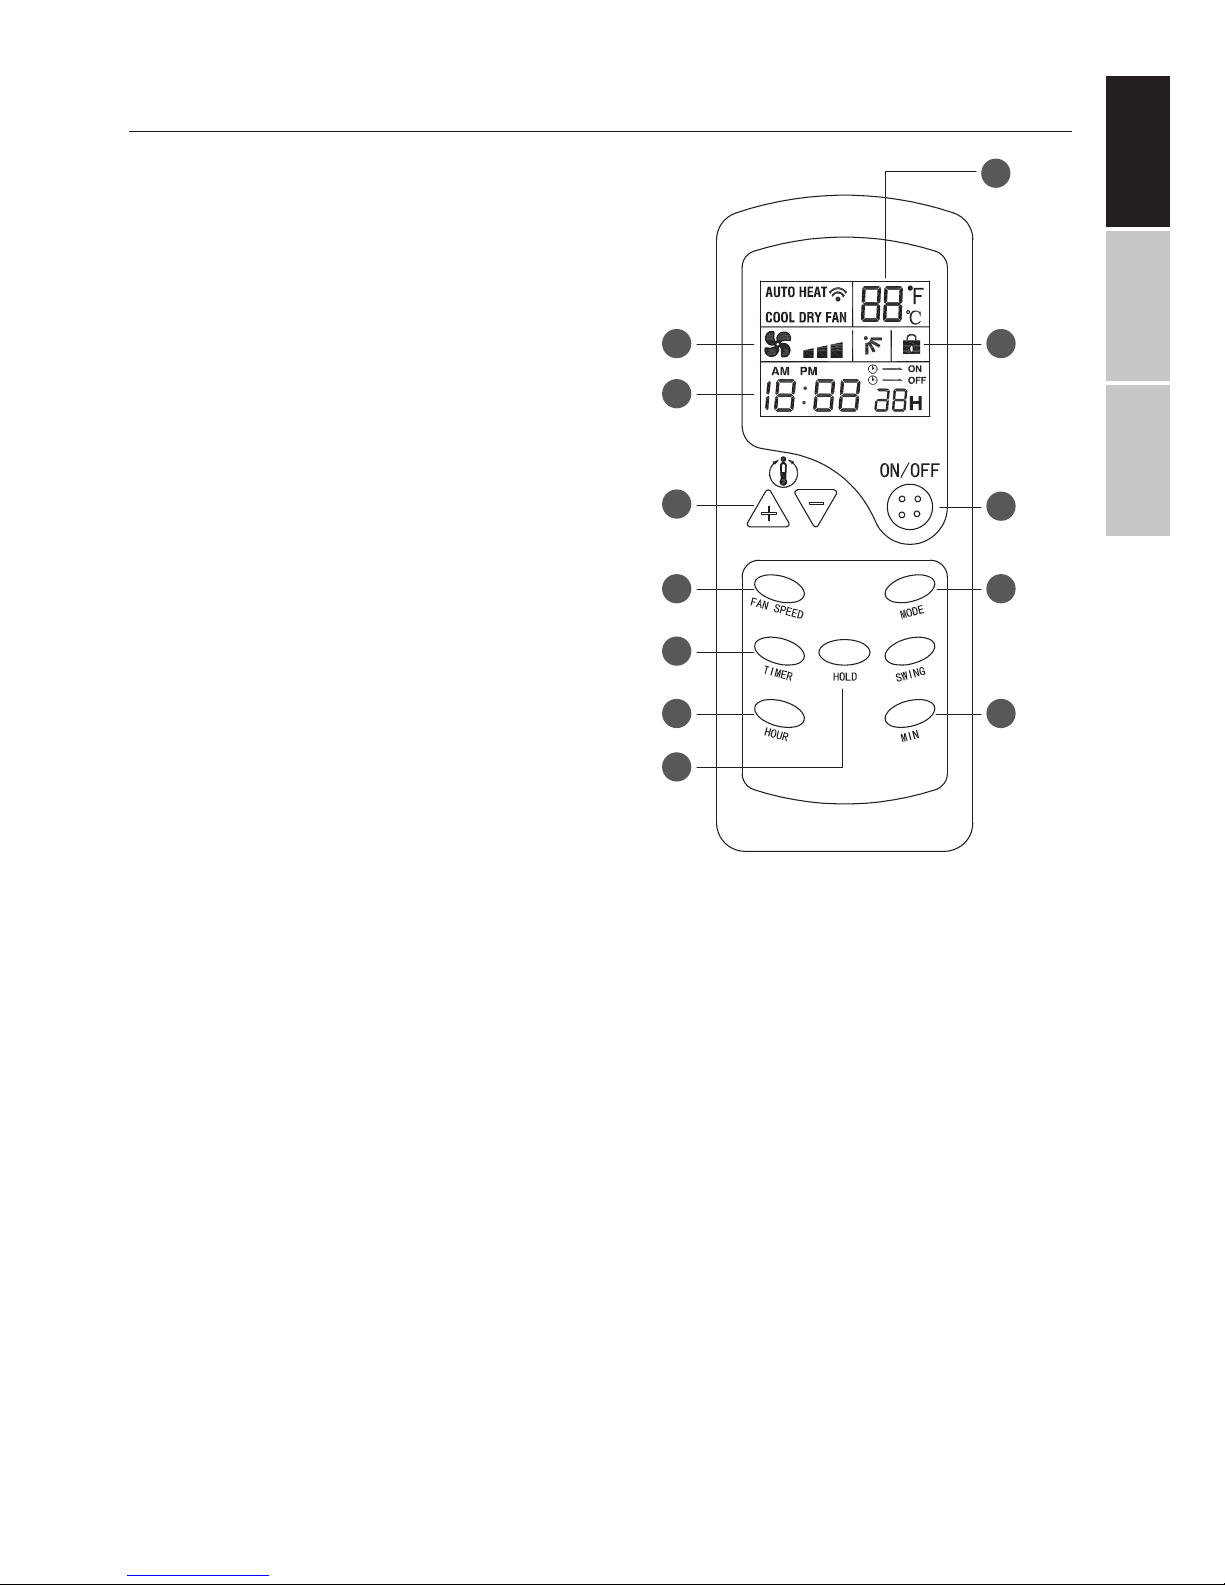
REMOTE CONTROL USE
1. Set temperature indicator
2. Fan speed indicator
3. Lock/Hold key indicator
4. Present time indicator
5. +/- button
Increase or decrease the room temperature or set the timer duration
aer pressing the timer button.
6. On/o button
Turn the unit on or stop operation
and turn the unit o.
7. Hour button
Set the hour on the unit clock by
pressing and holding this button,
then pressing the minute button repeatedly to the correct time.
8. Min button
Set the minutes on the unit clock by
pressing and holding this button,
then pressing the minute button repeatedly to the correct time.
9. Hold button
Press this button to lock or unlock the keypad and prevent undesired changes to
the room temperature and unit settings.
10. Fan speed
Press this button repeatedly to change the unit fan speed between high, medium,
or low air output.
11. Timer button
Press this button while the unit is running to program a shutdown time set using
the up and down arrow buttons.
Press this button while the unit is in standby mode to program a startup time set
using the up and down arrow buttons.
12. Mode button
Press this button repeatedly to alternate between cooling, drying, heating, and fan
operating modes.
13. Mode indicator
Displays the unit’s current operating mode.
NOTE: Due to the universal nature of the remote control for all of our air conditioner units,
certain remote control functions may not correspond to your particular unit.
1
2
4
5
7
9
10
11
3
8
12
6
Page 8

ENGLISH ESPAÑOL FRANÇAIS
–6–
POINTING THE REMOTE CONTROL
Point your remote control directly toward the control panel of your air conditioner unit.
The device will emit a “beep” indicating that the command was received. If your unit does
not respond to the remote control unit, ensure the batteries are correctly inserted (polarity, or the direction of the +/- symbols) or insert new batteries.
INSERTING BATTERIES
To insert batteries into the remote control, press firmly and slide the cover on the back
side gently in the direction of the arrow. Insert the batteries while paying close attention
to the polarity (the direction of the +/- symbols). Replace the back cover carefully.
NOTE: never mix battery types such as using an old and new battery or a lithium or rechargeable battery with an alkaline battery.
REMOTE CONTROL SAFETY INFORMATION
1. Never place the remote control near a heat source such as an electric blanket, a
space heater, or in direct sunlight.
2. Avoid accidentally dropping the remote control
3. Do not place objects that block or interfere with the infrared remote control signals.
4. Do not splash water or other liquids on the remote control
5. Do not place heavy objects on the remote control.
6. Do not stand, sit, or bear unnecessary weight on the remote control.
7. Replace batteries as needed, such as when the air conditioner unit does not respond to the remote control unit.
8. Remove batteries when the remote control unit will be unused for prolonged periods of time.
9. Dispose of batteries and the remote control in accordance with local laws and
recycling instructions. Contact your municipality or waste management company
for further information.
INSTALLATION INSTRUCTIONS
NOTE: This air conditioner unit must be installed by a qualified technician or service professional. Alternative or self-installation may void your warranty and result in unit damage and/or the risks and hazards described in the beginning of this manual. Contact technical support if you need contact information for an authorized technician.
SELECTION OF INSTALLATION LOCATION
Place the portable air conditioner in a flat, level location where the air outlets will not be obstructed. Ensure the unit is a minimum of 20” away in all directions from a wall or other obstacle.
Page 9
ENGLISHESPAÑOLFRANÇAIS
–7–
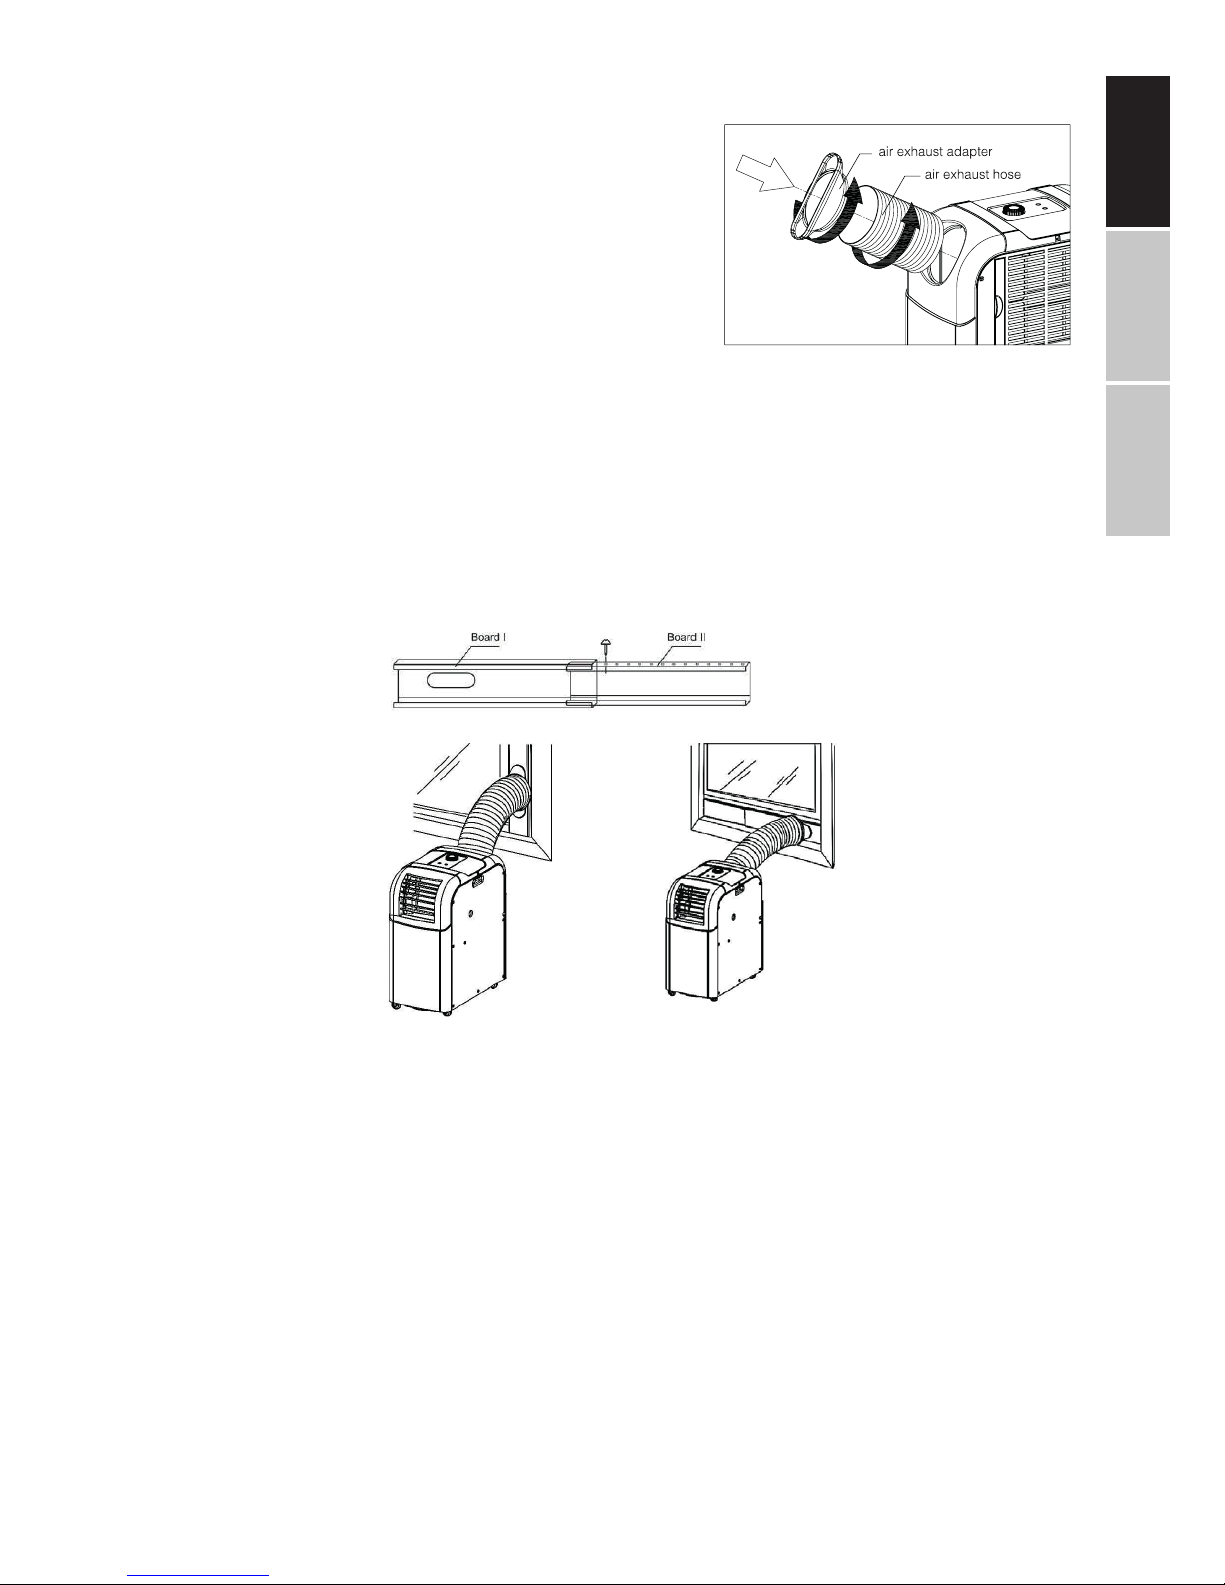
INSTALLATION OF THE AIR EXHAUST HOSE
1. Remove the hot-air outlet and remove the exhaust hose.
2. Fasten the air exhaust adapter to the exhaust
hose by twisting in a counter-clockwise direction.
3. Fasten the air exhaust hose directly to the
unit in a counter-clockwise direction.
WINDOW KIT INSTALLATION
The included window kit is designed for installation in most vertical or horizontal sash
windows. You may be required to slightly modify your specific installation to ensure safe
and proper use of your air conditioner unit.
Horizontal window:
Minimum width: 27.5” (70cm)
Maximum width: 48” (122cm)
Vertical window:
Minimum height: 27.5” (70cm)
Maximum height: 48” (122cm)
STEP 1: ADAPT WINDOW BOARD SIZE
Insert the window exhaust port fitting into your window and extend the width or height to
fill your window entirely. Fasten the screw into section number 2 as shown below to keep
the extended portion from collapsing.
STEP 2: CONNECT AIR EXHAUST ADAPTER
Insert the air exhaust adapter into the window kit. Ensure the unit is placed on a level surface
at least 20” away from any walls or other obstacles. Your unit is ready to begin operation.
WALL AIR EXHAUST PORT MOUNTING
If you have an existing air exhaust port you can directly connect your portable air conditioning unit to the port. For the best energy eiciency and to preserve the longest life of
your unit, avoid bending the hose and keep the exhaust hose length as short as possible.
Page 10
ENGLISH ESPAÑOL FRANÇAIS
–8–
The hose bending point should be at least 24” away from the unit for optimal performance. Avoid any kinks or sharp bends.
REVERSING INTAKE/OUTPUT
You can reverse the inlet and exhaust port on your portable unit to send cold air via the
exhaust outlet. This type of installation may be practical when installing the portable unit
in a garage and blowing cold air inside the house via a duct.
Simply swap the air outflow grille and the exhaust air mount as illustrated below.
Keep in mind that cooling is not recommended when the ambient temperature fallow
below 65°F (18°C) or above 95°F (35°C).
REMOVAL INSTRUCTIONS
To remove your air conditioning unit, follow these instructions:
• Turn the unit o and unplug the power cord.
• Remove the window curtain lock and the air exhaust adapter by twisting on the
hose in a clockwise rotation.
• Re-insert the hose into the storage area contained beneath the air exhaust cover.
• Store the unit in a flat, dry, level place and include all installation parts and this
manual with the unit.
WATER DRAINING INSTRUCTIONS
All air conditioner units produce water via condensation and discharges the moisture
through the hot-air exhaust. Under heavy loads, the exhaust discharge is insuicient and
the unit stores water in an internal collection tank.
When the FULL indicator light illuminates on your unit, the cooling will stop immediately.
Follow these steps to place your air conditioner unit back in service:
1. Unplug the air conditioner, disconnect the exhaust hose and transport the unit to
a drain location or outdoors on a level surface such as your driveway.
2. Remove the stopper from the base of the unit and let the water drain. Do not excessively tip or drop the unit.
3. Once the internal collection tank is emptied, re-insert the tank stopper.
Page 11
ENGLISHESPAÑOLFRANÇAIS
–9–
4. Place the unit back in the desired location, reconnect the exhaust hose and plug
in the electrical power cord.
5. Restart normal cooling operation of your unit.
NOTE: The internal tank capacity is approximately 1.5 liters when full.
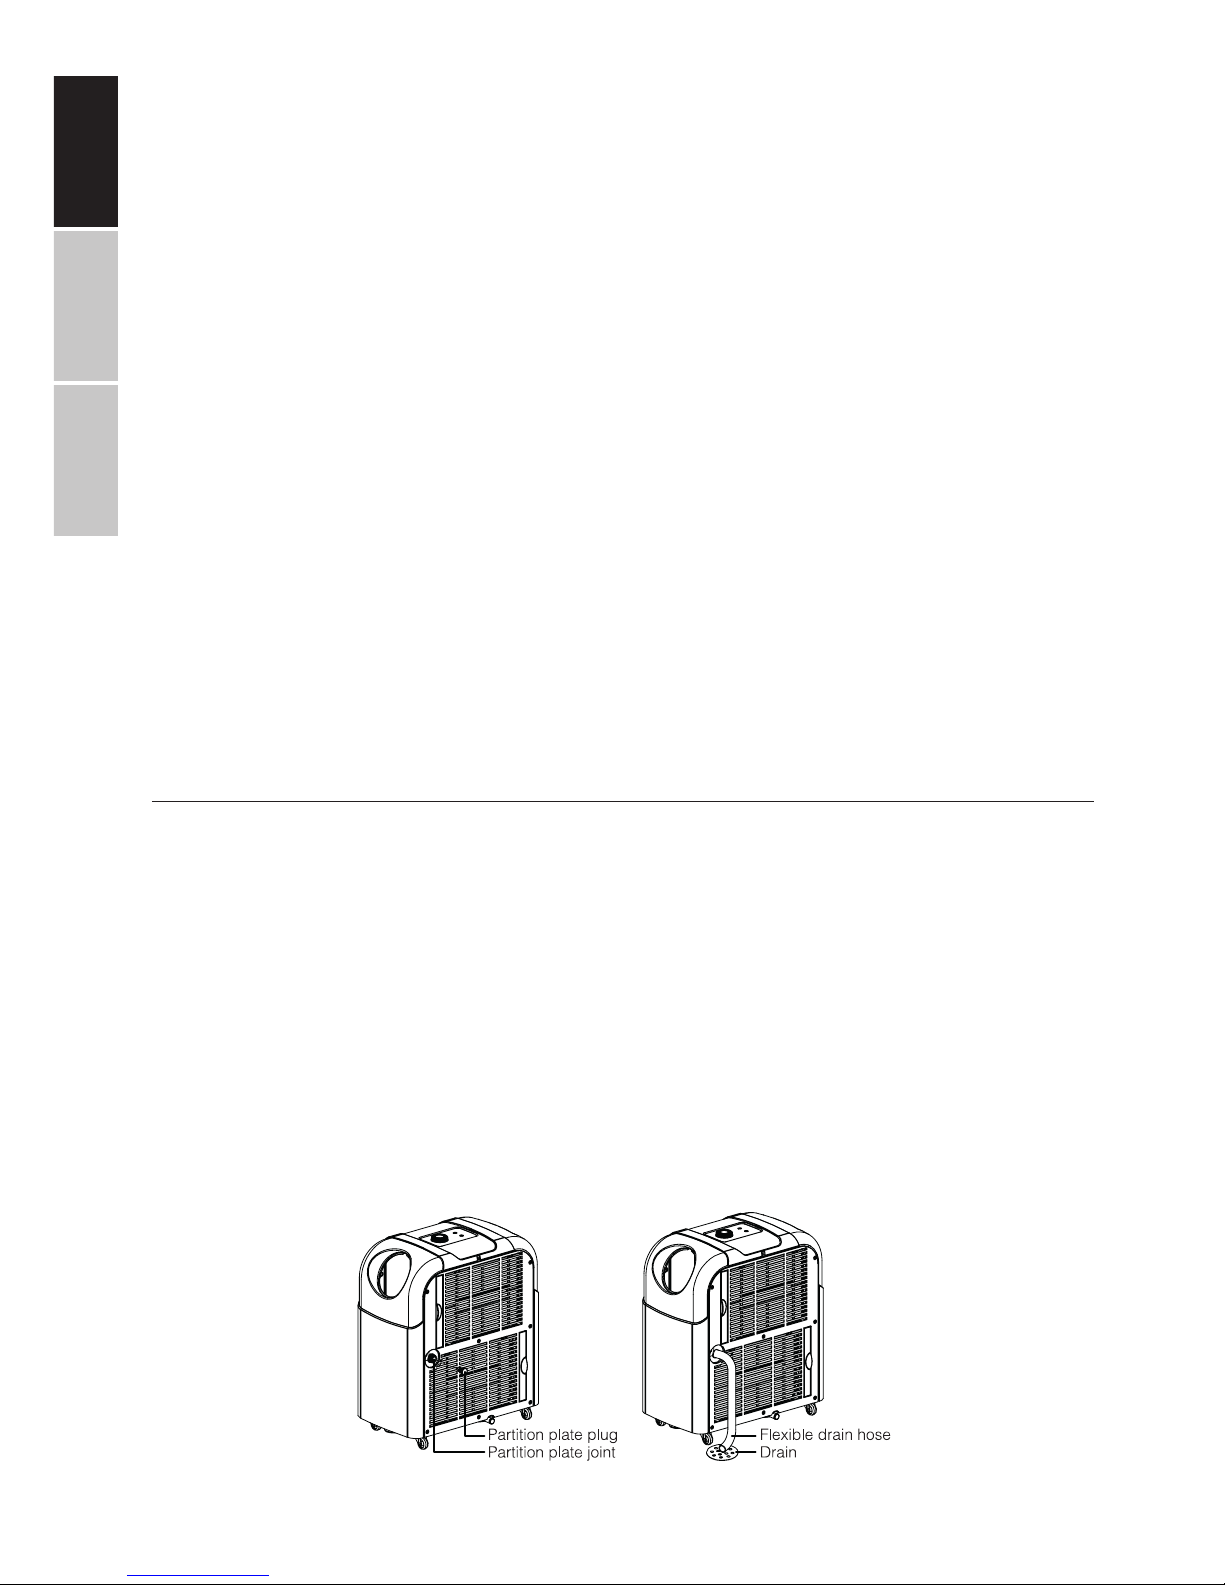
CONTINUOUS WATER DRAINAGE
In high-humidity climates a continuous water drainage system is an optimal solution.
With an optional drainage hose (sold separately), the unit can be placed near a drain, a
large collection tank, or outdoors.
1. Open the partition plate plug.
2. Connect the hose the the partition plate joint and lead it carefully to the floor drain.
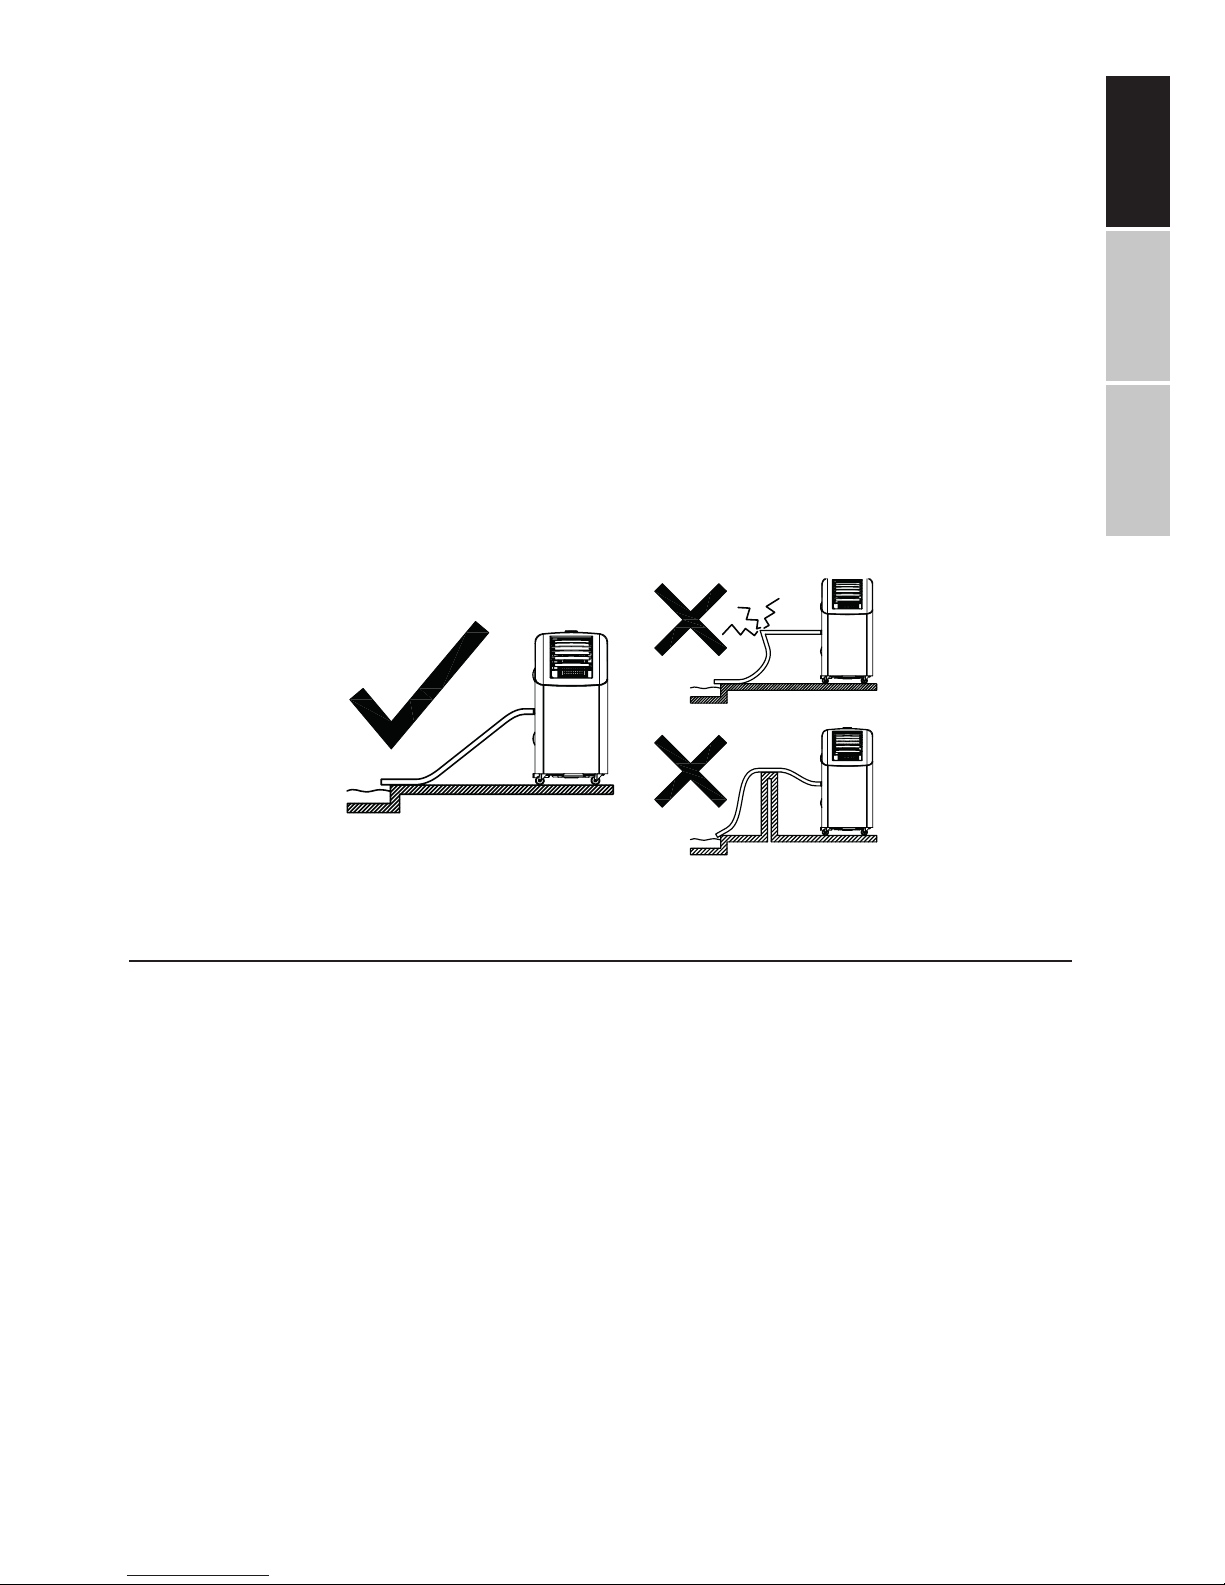
3. Ensure the hose is placed downward with no kinks or bends; the air conditioner unit
relies on gravity to properly drain and can not be elevated.
CARING FOR YOUR AIR CONDITIONER
IMPORTANT: Before performing any maintenance, ensure the air conditioner unit is
turned o and disconnect the power cord from the electrical outlet.
AIR FILTER CLEANING
A dirty air filter reduces your unit performance significantly and increases your cooling
costs! Follow the following steps to clean the air filter:
1. Grasp the hook on the bottom to remove the air filter, pulling in the direction of
the arrows.
2. Wash the filters by immersing them into soapy, lukewarm water.
3. Rinse the filter with clean water and dry it in a shaded place. Do not expose the
filters to direct sunlight as they can melt or deform!
4. Install the air filter to the original port.
BEFORE FIRST SEASONAL USE
1. Check to see if any objects are obstructing the air intake and exhaust ports.
Page 12

ENGLISH ESPAÑOL FRANÇAIS
–10–
2. Verify that the partition and base plugs are properly inserted.
3. Ensure the electrical outlet is properly grounded.
4. Check that the air filters are properly inserted and clean as needed.
5. Connect the power cord to a grounded electrical outlet.
6. Insert batteries into your remote control.
DURING REGULAR OPERATION
1. Clean filters regularly using the above instructions.
2. Empty the internal water collection tank or verify the proper operation of the continuous drain system.
AFTER THE LAST SEASONAL USE
1. Drain the internal collection tank and entire system by opening both the partition
plug and the base plug.
2. Dry out the interior of the unit by running the unit in Fan mode for at least 30 minutes.
3. Reinsert the partition and base plugs.
4. Turn the unit o and unplug the power cable.
5. Clean the air filter screen and reinsert it.
6. Clean the unit exterior if necessary. Use plastic or a towel to cover the unit and
prevent the accumulation of dust and dirt inside the unit.
7. Remove the batteries from the remote control to avoid battery leakage.
NOTE: It’s important to regularly clean the air filter unit as heating and cooling performance
is significantly aected by a dirty filter. Dirty filters also substantially increase energy consumption (your electric bill) and the unit is noisier during operation.
TROUBLESHOOTING
PROBLEM / POSSIBLE CAUSES
The air conditioner does not function at all
• Is the power cable properly inserted into a functioning, grounded outlet?
• Is there a power failure such as a blown fuse or tripped circuit breaker?
• Is the timer set to “TIMER ON” mode? Disable the timer to immediately start operations.
• Is the internal collection tank or partition drain full/blocked and the FULL light
illuminated? Empty the tank.
• Is the ambient temperature lower than 61°F (16°C)? A safety device prevents the
unit from cooling the room to even lower temperatures.
Heating or cooling is insuicient
• Is the room temperature set properly?
• Is air filter dirty?
Page 13

ENGLISHESPAÑOLFRANÇAIS
–11–
• Are doors or windows open?
• Is the room directly exposed to sunlight?
• Are there heat sources within the room?
• Are there a large number of people in the room?
The air conditioner does not restart immediately aer turning it o.
• The unit can not be restarted for 3 minutes to allow the condenser to cool and
avoid risk of fire. Wait a few minutes before restarting the unit.
The air conditioner unit starts and stops frequently.
• Verify the rating of your electrical system and outlets. You may need a qualified
electrician to troubleshoot and upgrade your electrical circuits if your air conditioner unit exceeds the rated capacity.
• Ensure the exhaust system is properly connected and not bent or kinked. Keep
the hose as short as possible and cut excess length as needed.
Fog is blown out during cooling
• In warm, high humidity environments this may naturally occur. Continued cooling will remove excess humidity from the room and the fog will disappear.
The unit emits a strange smell
• This may be caused by cigarette smoke or other residues from cooking and other
living activities that remain in the air conditioning unit. Clean the filter.
The unit makes loud or unusual noises and vibrations
• Place the unit on a level surface.
There is a “squeezing” noise
• The cycling of the refrigerant inside the unit can temporarily cause this noise.
There is a “patting” noise
• This is oen caused by heat expansion in the plastic parts.
The remote control doesn’t work
• Ensure the remote control has a clear line-of-sight to the operating panel on the
unit and ensure the sensors are not obstructed by curtains or other objects. Ensure the remote control has fresh, working batteries.
There is moisture at the air output
• High humidity environments may cause condensation at the air flow output.
Wipe the condensation o with a sponge.
Water spills while moving the unit
Page 14

ENGLISH ESPAÑOL FRANÇAIS
–12–
• The internal water collection tank is nearly full. Empty the water tank by placing
the unit near a drain or outdoors and remove the base plug. Aer draining has
completed, replace the base plug and reinstall your unit in the desired location.
IF ANY OF THE FOLLOWING PHENOMENA OCCUR DESPITE THE ABOVE TROUBLESHOOTING TECHNIQUES, PLEASE TURN OFF THE UNIT AND DISCONNECT THE POWER CORD
IMMEDIATELY AND CONTACT TECHNICAL SUPPORT OR A QUALIFIED TECHNICIAN:
• The fuse blows or circuit breaker trips frequently.
• The power cable is abnormally hot.
• The insulation of the power cable is ripped, shred or torn.
• The unit controls do not work.
• The unit produces abnormal noises.
CONTACT TECHNICAL SUPPORT
24/7 Online: www.impeccausa.com
Telephone: +1 866.954.4440
9am to 5pm EST
Page 15

ENGLISHESPAÑOLFRANÇAIS
–13–
INTRODUCCIÓN:
Gracias por comprar esta unidad de aire acondicionado portátil de calidad Impecca. Para
asegurar una larga vida útil y la eficiencia de energía más alta para su unidad, permita
que la instalación sea hecha por un técnico de servicio calificado y siga cuidadosamente
estas instrucciones de operación. Mantenga estas instrucciones en un lugar seguro y consúltelas cuando las necesite.
Tome en cuenta que las mejoras y modificaciones constantes a nuestras unidades de
aire acondicionado pueden significar que su modelo sea ligeramente diferente del que se
está mostrando en este manual, pero la operación e instalación de la unidad permanece
sin cambios. Este manual se proporciona únicamente con fines informativos y no constituye un contrato legal vinculante.
AVISOS DE SEGURIDAD:
Este aparato no debe ser utilizado por niños y personas con discapacidades mentales o
físicas sin la estricta y directa supervisión de un adulto responsable. Nunca juegue alrededor de este aparato.
INFORMACIÓN IMPORTANTE
Lea los siguientes avisos e información con cuidado para asegurar la adecuada operación de su unidad de aire acondicionado:
LINEAMIENTOS IMPORTANTES DE INSTALACIÓN
Asegúrese que un técnico calificado y autorizado realice la instalación de su unidad de aire
acondicionado.
1. No instale la unidad en áreas con fugas potenciales de gas y cerca de sustancias inflamables. Las áreas sin la adecuada ventilación son peligrosas y pueden causar fuego.
2. Asegúrese que la unidad está conectada a un circuito cortacorriente con el amperaje que corresponda a la corriente eléctrica actual requerida para operar su aire
acondicionado. Los sistemas eléctricos inadecuados pueden causar el peligro de
una descarga eléctrica, electrocución o incendio.
3. Asegúrese que su unidad está adecuadamente conectada a tierra. Una conexión
inadecuada a tierra puede causar el peligro de una descarga eléctrica, electrocución o incendio.
INFORMACION IMPORTANTE DE OPERACIÓN
ACERCA DE SU UNIDAD PORTÁTIL
1. Hay un pequeño receptáculo de agua en la parte inferior de la unidad para recolectar la humedad de la condensación que ocurre en el proceso de enfriamiento.
No incline la unidad o mueva de forma brusca para evitar derramamientos.
Page 16

ENGLISH ESPAÑOL FRANÇAIS
–14–
ADVERTENCIAS DE SEGURIDAD
1. No detenga la operación de la unidad jalando del tomacorriente el cable de
alimentación. Esto puede causar el peligro de una descarga eléctrica, daños a
la unidad o incendio adicionalmente a otros accidentes.
2. Conecte su unidad directamente a un tomacorriente eléctrico debidamente
aterrizado. Nunca conecte la unidad con un cable de extensión o un divisor
de salidas de tomacorrientes de ningún tipo, ya que puede resultar en una
descarga eléctrica, sobrecalentamiento, fuego u otros accidentes.
3. No presione, estire, tuerza, dañe, caliente, deforme o modifique el cable de
alimentación en ninguna forma. Al hacerlo puede causar el peligro de una
descarga eléctrica, electrocución, sobrecalentamiento, incendio u otros accidentes. En caso de que su cable de alimentación llegue a dañarse en alguna
forma, entre inmediatamente en contacto con soporte técnico para tener obtener un remplazo.
4. No opere la unidad con las manos húmedas o mojadas. Al hacerlo puede causar el peligro de una descarga eléctrica, electrocución, u otros accidentes
5. Asegúrese que el receptáculo de corriente y la clavija no tengan polvo, óxido u otra
clase de corrosión antes de conectar la unidad. De no hacerlo puede causar una
descarga eléctrica, electrocución, sobrecalentamiento, incendio u otros accidentes
6. No use la unidad con fusibles, cortacircuitos, corta corrientes o cableado eléctrico que no sean adecuados. Un sistema eléctrico deficiente puede resultar
en fallas, una unidad dañada, problemas de desempeño de la unidad, electrocución, fuego u otros accidentes.
7. Nunca coloque la unidad cerca de flamas expuestas o quemadores ya que la
operación de la unidad puede crear un peligro de incendio o inducir a la falta
de oxígeno en espacios cerrados.
8. Nunca coloque objetos inflamables, tales como insecticidas, pintura en aerosol u otros aerosoles cerca del aire acondicionado. Nunca rocíe la unidad con
productos en aerosol ya que puede causar un incendio u otros accidentes.
9. Nunca inserte palos u otros objetos a la unidad. Las cuchillas giratorias se pueden
romper y causar daño corporal y provocar peligros de incendio u otros accidentes.
10. No lave su unidad de aire acondicionado con agua u otros líquidos. En lugar
de eso utilice un paño de sacudir seco. En caso de que las superficies del aire
acondicionado estén excepcionalmente sucias, utilice un paño ligeramente
humedecido con agua tibia jabonosa. Esto puede causar una descarga eléctrica, electrocución, incendio u otros accidentes
11. Nunca utilice los siguientes tipos de sustancias en la unidad para evitar la deformación, daños y peligro de incendio o choques eléctricos: agua caliente
(arriba de los 100°F/40°C), gasolina, pintura, solvente, benceno, queroseno,
detergentes, corrosivos o abrasivos.
12. No deje que el aire frío sople directamente en su cuerpo ya que puede provocar un malestar personal o ser perjudicial para su salud como inducir la
hipotermia en climas calientes.
Page 17

ENGLISHESPAÑOLFRANÇAIS
–15–
13. Si su unidad permanecerá sin usar por un periodo prolongado de tiempo,
apáguela y desconecte el cable de alimentación para garantizar la seguridad.
14. En caso de que surja algún funcionamiento anormal (como el olor a quemado) detenga la unidad INMEDIATANTE y desconecte el cable de alimentación y
contacte a soporte técnico.
EFICIENCIA DE ENERGÍA
1. Evite la luz directa del sol en el espacio a enfriar. Baje las persianas y sombras, y
cierre las cortinas para asegurar el desempeño de la unidad.
2. Reduzca y retire de la habitación las fuentes del calor como las computadoras de
escritorio, aparatos eléctricos y electrodomésticos de cocción.
INFORMACIÓN IMPORTANTE DE MANTENIMIENTO Y DISPOSICIÓN
1. Contacte a soporte técnico para garantizar que cualquier mantenimiento necesario sea realizado por un técnico calificado y autorizado.
2. Debe deshacerse de su unidad cumpliendo con las leyes y normas locales. Entre
en contacto con sus autoridades locales y municipales para mayor información
acerca de una disposición adecuada.
Page 18

ENGLISH ESPAÑOL FRANÇAIS
–16–
CONOCIENDO SU AIRE ACONDICIONADO
PARTE FRONTAL DE LA UNIDAD:
1. Perillas de control
2. Cuchillas direccionales
del aire
3. Salida de aire frío
4. Asa de transporte
PARTE TRASERA DE LA UNIDAD:
5. Entrada de aire frío
6. Filtro de aire caliente
7. Entrada de aire caliente
8. Tapón de vaciado de la base
9. Ruedas
10. Tapón de drenaje de la placa de reparto
11. Filtro de aire frío
12. Salida de aire caliente
13. Manguera de escape de aire
PARTES:
14. Adaptador del escape de aire
15. Tornillo
16. Juego para ventana
NOTA: la apariencia visual del su panel de control puede diferir significativamente; puede
confiar en que la funcionalidad es la misma.
1
4
2
3
5
6
7
8
9
10
11
12
13
14
16
15
Page 19

ENGLISHESPAÑOLFRANÇAIS
–17–
PANEL DE CONTROL DIGITAL
1. Sensor del control remoto
2. Pantalla digital
• Modo Fan (ventilador): indica la temperatura presente en la habitación.
• Modo Cool/Dry (Enfriar/Secar): indica la temperatura deseada.
• Modo Timer (Temporizador): indica el tiempo de funcionamiento restante.
Nota: si el sensor de temperatura falla, la pantalla mostrará 77°F o 25°C continuamente
3. Botón Temp/Time
Mientras el dispositivo está operando continuamente presione este botón para
ajustar la temperatura ambiente deseada utilizando las flechas hacia arriba o
abajo.
4. Modo de operación
El modo actual de operación se indica en los LEDs adyacentes. Si los LEDs están
iluminados cuando la unidad no está operando, vacíe el receptáculo de agua.
5. Botón del Timer (temporizador)
• Presione este botón mientras la unidad funcionando para programar el tiempo para apagar la unidad utilizando las flechas hacia arriba o abajo.
• Presione este botón mientras la unidad está en modo Standby (de espera)
para programar el tiempo de inicio de funcionamiento utilizando las flechas
hacia arriba o abajo.
6. Botón Speed (Velocidad)
Elija la velocidad del ventilador entre High (Alta), Médium (Media) y Low (Baja).
7. Botón On/O (Encendido/Apagado)
Enciende o apaga la unidad. El LED indicador de encendido se ilumina cuando el
dispositivo está funcionando.
8. Botón Mode (Modo)
Seleccione el modo de operación entre Cool (Enfirar), Dry (Secar), Fan (Ventilador).
Page 20

ENGLISH ESPAÑOL FRANÇAIS
–18–
USO DEL CONTROL REMOTO
1. Indicador Ajuste la temperatura
2. Indicador de velocidad del ventilador
3. Indicador de Bloqueo/Mantener el teclado
4. Indicador de la hora presente
5. Botón + / -
Aumenta o disminuye la temperatura ambiente o fija la duración del temporizador
después de presionar el botón Timer.
6. Botón On/O (Encender/Apagar)
Detiene la operación de la unidad y la apaga.
7. Botón Hour (Hora)
Al oprimir y sostener este botón fija la hora en
el reloj de la unidad, después debe presionar
este botón repetidamente para fijar la hora
correcta.
8. Botón Min (Minutos)
Al oprimir y sostener este botón fija los minutos en el reloj de la unidad, después debe
presionar este botón repetidamente para fijar la hora correcta.
9. Botón Hold (Mantener)
Presione este botón para bloquear o desbloquear el teclado y prevenir cambios
no deseados en la temperatura de la habitación o en los ajustes de la unidad.
10. Botón Fan Speed (Velocidad del ventilador)
Presione este botón repetidamente para cambiar la velocidad del ventilador para
una salida high (alta), médium (media) o low (baja).
11. Botón Timer (Temporizador)
Presione este botón mientras la unidad funcionando para programar el tiempo
para apagar la unidad utilizando las flechas hacia arriba o abajo.
Presione este botón mientras la unidad está en modo Standby (de espera) para
programar el tiempo de inicio de funcionamiento utilizando las flechas hacia arriba o abajo.
12. Botón Mode (Modo de operación)
Presione este botón de forma repetida para alternar entre los diferentes modos de
operación: enfriar, secar, calor, ventilador.
13. Indicador de modo
NOTA: Debido a la gran cantidad de controles remotos de todas nuestras unidades de aire acondicionado, ciertas funciones del control remoto pudieran no corresponder a su unidad en particular.
1
2
4
5
7
9
10
11
3
8
12
6
Page 21

ENGLISHESPAÑOLFRANÇAIS
–19–
APUNTANDO EL CONTROL REMOTO
Apunte el control remoto directamente hacia el panel de control de su unidad de aire
acondicionado. El dispositivo emitirá una indicación “beep” indicando que el comando
fue recibido. Si la unidad no responde a la unidad de control remoto, asegúrese que las
pilas estén colocadas correctamente (polaridad o la dirección de los símbolos +/-) o inserte baterías nuevas.
INSERTANDO LAS BATERÍAS
Para insertar las baterías en el control remoto, presione firmemente la tapa en la parte posterior y deslícela en la dirección de la flecha. Inserte las baterías prestando atención a la
polaridad (la dirección de los símbolos +/-). Con cuidado coloque nuevamente la cubierta.
INFORMACIÓN DE SEGURIDAD DEL CONTROL REMOTO
1. Nunca coloque el control remoto cerca de una fuente de calor como una cobija
eléctrica, un calentador o la luz directa del sol.
2. Evite tirar en forma accidental el control remoto.
3. No coloque objetos que bloqueen o interfieran la señal infrarroja del control remoto.
4. No salpique el control remoto de agua u otros objetos.
5. No coloque objetos pesados sobre el control remoto.
6. No se pare, siente o coloque objetos pesados innecesarios sobre el control remoto.
7. Reemplace las baterías según requiera, como cuando la unidad de aire acondicionado no responde las órdenes del control remoto.
8. Retire las baterías del control remoto si la unidad dejará de utilizarse por tiempo
prolongado.
9. Disponga de las baterías y del control remoto cumpliendo con las leyes y normas
locales. Entre en contacto con sus autoridades locales y municipales para mayor
información acerca de una disposición adecuada.
INSTRUCCIONES DE INSTALACIÓN
NOTA: Esta unidad de aire acondicionado debe instalarse por un técnico calificado o
profesional de servicio. Si realiza una instalación con una opción alternativa o por usted
mismo podrá anular su garantía y puede causar daños a la unidad y/o los riesgos y daños
descritos al inicio de este manual. Contacte a soporte técnico si necesita la información
de contacto de algún técnico autorizado.
SELECCIÓN DEL LUGAR DE INSTALACIÓN
Coloque este aire acondicionado portátil en un lugar plano y nivelado donde las salidas
de aire no queden obstruidas. Asegúrese que la unidad tiene una distancia de al menos
20” en todas direcciones, de la pared u otros obstáculos.
Page 22

ENGLISH ESPAÑOL FRANÇAIS
–20–
INSTALACIÓN DE LA MANGUERA DE ESCAPE DE AIRE
1. Retire la salida de aire caliente y quite la manguera de escape.
2. Asegure el adaptador del escape de aire a la
manguera de escape al girarla en el sentido
contrario de las manecillas del reloj.
3. Asegure la manguera de escape directamente en la unidad escape al girarla en el sentido
contrario de las manecillas del reloj.
JUEGO DE INSTALACIÓN EN VENTANA
El juego de instalación en ventana que se incluye está diseñado para la mayoría de las ventanas de guillotina verticales y horizontales. Tal vez necesite modificar su instalación específica para asegurar una operación segura y adecuada de su unidad de aire acondicionado.
Ventana Horizontal:
Ancho Mínimo: 27.5” (70cm)
Ancho Máximo: 48” (122cm)
Ventana Vertical:
Altura Mínima: 27.5” (70cm)
Altura Máxima: 48” (122cm)
PASO 1: ADAPTAR EL TAMAÑO DEL TABLERO DE LA VENTANA
Inserte el puerto de escape de la ventana ajustándolo a su ventana y extendiéndolo ya
sea a lo alto o a lo ancho para llenar el espacio de la abertura de la ventana por completo.
Asegure el tornillo en la sección número dos como se muestra más adelante para evitar
que se cierre la porción del puerto de escape que fue extendida.
PASO 2: CONECTE EL ADAPTADOR DE ESCAPE DE AIRE
Inserte el adaptador del escape en el juego para ventana. Asegúrese que la unidad tiene
una distancia de al menos 20” en todas direcciones, de la pared u otros obstáculos. Su
unidad ya está lista para operar.
Page 23

ENGLISHESPAÑOLFRANÇAIS
–21–
MONTAJE DEL PUERTO DE ESCAPE DE AIRE EN MURO
Si ya tiene en el muro un puerto de escape, puede conectar directamente ahí su unidad
de aire acondicionado. Para una mejor eficiencia de la energía y conservar una larga vida
de su unidad, evite doblar la manguera y procure conservar la longitud de la manguera
tan corta como le sea posible.
El punto de doblez de la manguera debe estar al menos a 24” de la unidad para un desempeño óptimo. Evite dobleces o curvas pronunciadas.
INVIRTIENDO LA ENTRADA/SALIDA
Puede invertir el puerto de entrada y salida de su unidad portátil para enviar aire frío por
medio del escape de salida. Este tipo de instalación es práctica cuando se instala la unidad de aire en una cochera y se envía aire frio a la casa por medio de un ducto.
Solamente intercambie la parrilla del flujo de salida de aire y el montaje de escape de aire
como se muestra a continuación.
Tenga en cuenta que no se recomienda enfriar cuando la temperatura ambiente del aire
es menor a los 65°F (18°C) o superior a los 95°F (35°C).
INSTRUCCIONES PARA DESINSTALAR
Para desinstalar su unidad de aire acondicionado, siga las siguientes instrucciones:
• Apague la unidad y desenchufe el cable de alimentación.
• Retire el seguro de la de la hoja de la ventana y el adaptador de escape al girar
la manguera en dirección de las manecillas del reloj.
• Reinserte la manguera en el área de almacenamiento que se encuentra detrás de la cubierta de escape de aire.
• Almacene la unidad en un lugar plano, seco y nivelado e incluya todas las
partes de instalación y este manual.
INSTRUCCIONES DE DRENADO DEL AGUA
Todos los aires acondicionados producen agua por medio de la condensación y descargas de
humedad a través del escape de aire caliente. Con una carga pesada, la descarga de escape
es insuficiente y la unidad comienza a almacenar agua en un tanque interno de recolección.
Cuando la luz indicadora FULL se ilumina en la unidad, el enfriamiento se detendrá inmediatamente.
Siga los siguientes pasos para poder hacer uso nuevamente de su unidad de aire acondicionado:
1. Desconecte el aire acondicionado, desconecte la manguera de escape y lleve a
la unidad a donde pueda drenarla o al exterior en una superficie nivelada como
puede ser la entrada.
2. Retire el tapón de la base de la unidad y deje que el agua drene. No incline de
forma excesiva su unidad o la recueste.
3. Una vez que el aire interno de recolección se ha vaciado, vuelva a ponerle el tapón.
Page 24

ENGLISH ESPAÑOL FRANÇAIS
–22–
4. Lleve de regreso el aire acondicionado a la ubicación deseada y reconecte la manguera de escape y conecte la unidad nuevamente al tomacorriente
5. Reinicie la operación normal de enfriamiento de su unidad.
NOTA: La capacidad del tanque interno de recolección es de aproximadamente 1.5 litros
cuando está lleno.
DRENAJE CONTINUO DE AGUA
En climas de alta humedad, la solución óptima es un sistema de drenaje continuo. Con
una manera de drenaje opcional (que se vende por separado), se puede colocar la unidad cerca de un drenaje, o un tanque de recolección mayor o en el exterior.
1. Abra el tapón de la placa de partición.
2. Conecte la manguera en la junta de la placa de partición y guíela cuidadosamente
al drenaje del piso.
3. Asegúrese que está colocada hacia abajo con ninguna clase de torceduras o dobleces; la unidad de aire acondicionado hace uso de la gravedad para drenar adecuadamente y la manguera no debe estar elevada o hacia arriba.
Page 25

ENGLISHESPAÑOLFRANÇAIS
–23–
CUIDANDO DE SU AIRE ACONDICIONADO
IMPORTANTE: Antes de realizar cualquier tarea de mantenimiento, asegúrese de que la unidad de aire acondicionado está apagada y desconecte de la toma el cable de alimentación.
LIMPIEZA DEL FILTRO DE AIRE
Un filtro de aire sucio reduce significativamente el desempeño de su unidad y eleva los
costos de enfriamiento. Siga los siguientes pasos para limpiar su filtro de aire:
1. Sujete el gancho en la parte inferior para quitar el filtro de aire, tirando en la dirección de las flechas.
2. Lave los filtros sumergiéndolos en agua tibia y jabonosa.
3. Enjuague el filtro con agua limpia y ponga a secar en un lugar sombreado. No exponga los filtros para la luz solar directa, ¡ya que pueden derretirse o deformarse!
4. Instale el filtro de aire en el puerto original.
ANTES DEL PRIMER USO ESTACIONAL
1. Compruebe si hay objetos tales como hojas y ramas obstruyendo la entrada y
salida de aire, tanto por dentro como por fuera.
2. Verifique que la tapa de la partición y la de la base están debidamente colocadas.
3. Asegúrese de que la toma de corriente esté conectada a tierra.
4. Compruebe los filtros de aire están colocados adecuadamente y límpielos si es
necesario.
5. Conecte el cable de alimentación a una toma de corriente con conexión a tierra.
6. Inserte las pilas en el control remoto.
DURANTE LA OPERACIÓN REGULAR
1. Limpie los filtros de forma regular siguiendo las instrucciones mencionadas con
anterioridad.
2. Vacíe el tanque interno de recolección de agua o verifique la adecuada operación
de un sistema de drenaje continuo.
DESPUÉS DEL ÚLTIMO USO ESTACIONAL
1. Drene el tanque interno de recolección y todo el sistema al abrir la tapa de la partición y la de la base.
2. Seque el interior de la unidad al ponerla en funcionamiento en modo de ventilación por 30 minutos al menos.
3. Reinserte los tapones de la partición y de la base.
4. Apague la unidad y desenchufe el cable de alimentación.
5. Limpie el filtro de aire y vuelva a insertarlo.
6. Limpie la unidad tanto en del lado interior como exterior. Utilice un plástico o una toalla para tapar la unidad y evitar que se llene de polvo y mugre por dentro de la unidad.
7. Quite las pilas del control remoto para evitar derrames de las pilas.
Page 26

ENGLISH ESPAÑOL FRANÇAIS
–24–
NOTA: Es importante limpiar regularmente el filtro de aire ya que el rendimiento de calefacción y de refrigeración se ve afectado de manera significativa por un filtro sucio. Los filtros
sucios también aumentan sustancialmente el consumo de energía (y su factura de electricidad) y la unidad es hace más ruidosa durante la operación.
SOLUCION DE PROBLEMAS
PROBLEMA/POSIBLE CAUSA
El aire acondicionado no funciona en absoluto
• ¿Está el cable de alimentación correctamente insertado en un tomacorriente
conectado a tierra?
• ¿Ha habido un corte de energía, como un fusible fundido o se disparó el cortacircuitos?
• ¿Se ha ajustado el temporizador a modo “TIMER ON” (Temporizador activado)?
Desactive el temporizador para iniciar de inmediato las operaciones.
• ¿El tanque interno de recolección está lleno o el drenaje de la partición está bloqueado y la luz FULL está iluminada? Vacíe el tanque o desbloquee la manguera.
• ¿La temperatura ambiente es inferior a los 61°F (16°C)? Un dispositivo de seguridad impide que la unidad enfríe una habitación a temperaturas aún más bajas
Es insuficiente la calefacción o enfriamiento
• ¿Está la temperatura de la habitación configurada correctamente?
• ¿Está sucio el filtro de aire?
• ¿Están abiertas las puertas o ventanas en la habitación?
• ¿Está la habitación directamente expuesta a la luz solar?
• ¿Hay fuentes de calor dentro de la habitación?
• ¿Hay un gran número de personas en la habitación?
El aire acondicionado no reinicia inmediatamente después de apagarlo
• La unidad no se puede reiniciar dentro de los siguientes 3 minutos de haberla
apagado para que el condensador se enfríe y evitar el riesgo de incendio. Espere
unos minutos antes de reiniciar la unidad.
El aire acondicionado se enciende y apaga frecuentemente
• Verifique las especificaciones de su sistema eléctrico y salidas. Es posible que
necesite un electricista calificado para solucionar este problema y mejorar sus circuitos eléctricos si su unidad de aire acondicionado excede la capacidad nominal.
• Asegúrese de que el sistema de escape está conectado correctamente y que no
está doblado o retorcido. Mantenga la manguera lo más corta posible y elimine el
exceso de longitud, según sea necesario.
Page 27

ENGLISHESPAÑOLFRANÇAIS
–25–
Ha expulsado niebla durante el enfriamiento
• Esto puede ocurrir de forma natural en ambientes cálidos y humedad altas. El
enfriamiento continuo eliminará el exceso de humedad de la habitación y la niebla desaparecerá.
La unidad emite un olor extraño
• Esto puede ser causado por el humo del cigarrillo o de otros residuos procedentes de la cocina y otras actividades que se quedan en la unidad de aire acondicionado. Limpie el filtro.
La unidad emite un ruido fuerte o inusual y vibraciones
• Coloque la unidad en una superficie nivelada.
Hay un ruido como de “estrujamiento”
• El ciclo del refrigerante dentro de la unidad puede causar temporalmente este ruido.
Hay un ruido como de “caricia”
• Esto es a menudo causado por la expansión de calor en las piezas de plástico.
El control remoto no funciona
• Asegúrese de que el control remoto tiene una línea de visión clara hacia el panel de mando de la unidad y asegúrese que los sensores no estén obstruidos por
cortinas u otros objetos. Asegúrese de que el control remoto tiene baterías frescas
que funcionen.
Hay humedad en la salida de aire
• Los ambientes de alta humedad pueden provocar condensación en la salida del
flujo de aire. Limpie la condensación con una esponja.
Escurre agua al mover la unidad
• El tanque interno de recolección de agua está casi lleno. Vacié el tanque al colocar la unidad cerca del drenaje o en el exterior y retire el tapón de la base. Después
de drenar el agua completamente, coloque nuevamente el tapón de la base y lleve su unidad de aire acondicionado a la ubicación deseada.
Page 28

ENGLISH ESPAÑOL FRANÇAIS
–26–
SI ALGUNO DE LOS SIGUIENTES FENÓMENOS OCURRE A PESAR DE LOS CONSEJOS DE
SOLUCIÓN DE PROBLEMAS ANTERIORES, POR FAVOR APAGUE LA UNIDAD Y DESCONECTE EL CABLE DE ALIMENTACIÓN INMEDIATAMENTE Y PÓNGASE EN CONTACTO CON SOPORTE TÉCNICO O UN TÉCNICO CALIFICADO:
• El fusible se quema o el cortacorriente se activa con frecuencia.
• El cable de alimentación está anormalmente caliente.
• El aislamiento del cable de alimentación está rasgado, triturado o desgarrado.
• Los controles de la unidad no funcionan.
• La unidad produce ruidos anormales.
CONTACTE A SOPORTE TECNICO
En línea las 24/7: www.impeccausa.com
Por teléfono: +1 866.954.4440
De 9am a 5pm tiempo del ESTE
Page 29

ENGLISHESPAÑOLFRANÇAIS
–27–
INTRODUCTION:
Merci d’avoir acheté ce climatiseur de fenêtre de haute qualité par Impecca. Pour prolonger sa vie utile ainsi que son eicacité énergétique, l’appareil doit être installé par un
technicien qualifié ; suivez également ce mode d’emploi et conservez-le.
En raison de l’amélioration continue apporté à nos climatiseurs, le modèle représenté
peut diérer légèrement en apparence aux desseins et images dans ce mode d’emploi.
Cependant, son fonctionnement reste inchangé.
CONSIGNES DE SÉCURITÉ:
Cet appareil ne doit pas être utilisé par des enfants ou des handicapés sans la supervision
directe stricte d’un adulte responsable. Ne jamais jouer avec ou autour de l’appareil.
INFORMATIONS IMPORTANTES
Lisez attentivement l’ensemble de ces consignes pour assurer la bonne opération de votre climatiseur.
CONSIGNES D’INSTALLATION IMPORTANTS
Faites installer votre climatiseur uniquement par un technicien qualifié et agréé.
1. Ne pas installer l’appareil dans des zones des fuites de gaz potentiels ou près de
substances inflammables. Les zones sans ventilation adéquate sont dangereuses et
peuvent causer des incendies.
2. Assurez-vous que votre appareil est connecté à un disjoncteur avec la puissance (ampères) qui correspond au courant électrique nécessaire au fonctionnement. Les systèmes électriques inadaptés peuvent conduire à un choc électrique, l’électrocution ou
les risques d’incendie.
3. Assurez-vous que l’appareil est correctement mis à la terre. La terre incorrecte peut
provoquer un choc électrique, l’électrocution ou les risques d’incendie.
CONSIGNE D’OPÉRATION DE VOTRE APPAREIL
A PROPOS DE VOTRE APPAREIL PORTABLE
1. Un petit réservoir est situé au fond de l’unité pour collecter l’humidité de condensation qui forme pendant le refroidissement. Ne pas basculer l’appareil ou de le
déplacer brusquement pour éviter les déversements.
Page 30

ENGLISH ESPAÑOL FRANÇAIS
–28–
AVERTISSEMENTS DE SÉCURITÉ
1. Ne pas arrêter le fonctionnement de l’unité en tirant sur le câble d’alimentation de la prise.
Risque de choc électrique, des dégâts à l’appareil, et des risques d’incendie peuvent en résulter.
2. Connectez votre appareil directement à une prise électrique murale correctement mise
à la terre. Ne raccordez jamais l’appareil avec un rallonge ou multiprise, qui peut entraîner un choc électrique, une surchaue, les risques d’incendie ou d’autres accidents .
3. Ne pas appuyer, étirer, plier, rayer, exposer à la chaleur, déformer ou modifier le câble
d’alimentation en aucune façon. Cela pourrait entraîner un choc électrique, une électrocution, une surchaue, un incendie ou d’autres accidents graves. Si votre câble
d’alimentation est endommagé en aucune façon, contactez immédiatement le support technique pour une solution de remplacement.
4. Ne jamais utiliser l’appareil avec les mains mouillées ou humides. Cela pourrait entraîner un choc électrique, une électrocution ou d’autres accidents graves.
5. Veiller que la prise de courant et la fiche de l’unité soient libres de poussière, la rouille,
et la corrosion avant de brancher l’appareil. Oublier ceci peut conduire à un choc électrique, une électrocution, risques d’incendie ou d’autres accidents graves.
6. Ne pas utiliser l’appareil avec des fusibles, disjoncteurs, ou de fils électriques non-classés.
Un système électrique insuisante peut entraîner une défaillance de l’appareil, des dommages de l’unité, des problèmes de performances de l’appareil, un choc électrique, une
électrocution, risques d’incendie ou à d’autres accidents graves.
7. Ne jamais placer l’appareil près des flammes ou de brûleurs. L’appareil peut créer un
risque d’incendie ou provoquer un manque d’oxygène dans les espaces confinés.
8. Ne jamais placer d’objets inflammables à proximité de l’unité de climatisation tels que les
insecticides, la peinture, la peinture en bombe, ou d’autres aérosols. Ne vaporisez jamais de
produits sur l’appareil comme il peut entraîner des risques d’incendie ou d’autres accidents.
9. Ne jamais insérer des bâtons ou d’autres objets étrangers dans l’appareil. Les lames intérieures peuvent se casser et causer des dommages corporels et entraîner des risques
d’incendie ou d’autres accidents graves.
10. Ne pas laver le climatiseur avec de l’eau ou d’autres liquides. Au lieu de cela , utilisez
un éponge sec. Si les surfaces extérieures sont exceptionnellement sales, utilisez un
chion humide avec de l’eau chaude savonneuse. Risque de choc électrique, de l’électrocution, des risques d’incendie ou d’autres accidents graves.
11. Ne jamais utiliser les types suivants de substances sur l’appareil pour éviter toute déformation ou dommage ainsi que le feu et les risques électriques : l’eau chaude (plus
de 100 °F/40 °C) , l’essence, les solvants, le benzène, le kérosène, les détergents, les produits corrosifs ou abrasifs.
12. Ne laissez pas l’air climatisé sortir directement vers votre corps, car l’air refroidi peut
être gênant aux personnes frileuses ou être nuisibles pour votre santé, comme induire
l’hypothermie dans les climats chauds .
13. Si votre appareil restera inutilisé pendant une longue période de temps, éteignez l’appareil et débranchez le câble d’alimentation pour assurer la sécurité .
14. Si une anomalie de fonctionnement se produit (comme une odeur ou de la fumée), arrêtez immédiatement l’appareil, puis débranchez le câble d’alimentation et contactez le service technique.
Page 31

ENGLISHESPAÑOLFRANÇAIS
–29–
BONS GESTES ÉNERGÉTIQUES
1. Éviter la lumière solaire directe dans l’espace climatisé ; favoriser l’usage des rideaux et
des stores pendant la journée pour assurer des performances de l’unité.
2. Réduire et éliminer les sources de chaleur dans la salle pendant le refroidissement tels
que les ordinateurs de bureau et les appareils électroniques.
INFORMATIONS IMPORTANTES À LA MAINTENANCE ET À L’ÉLIMINATION
1. Contactez le support technique pour assurer une maintenance de l’unité nécessaire
est eectuée par un technicien qualifié et autorisé .
2. Votre appareil doit être jeté conformément aux lois et règlements locaux. Contacter
votre municipalité ou les autorités locales pour de plus amples informations sur les
déchets et l’élimination appropriée de votre climatiseur.
PRÉSENTATION DE VOTRE CLIMATISEUR
FACE:
1. Panneau de contrôle
2. Lames directionnelles
3. Sortie d’air froid
4. Poignée
ARRIÈRE:
5. Entrée d’air froid
6. Filtre d’air chaud
7. Entrée d’air chaud
8. Bouchon de base
9. Roulettes
10. Bouchon de partition
11. Filtre d’air froid
12. Sortie d’air chaud
13. Tuyau d’évacuation d’air
PIÈCES:
14. Adaptateur de tuyau d’évacuation
15. Vis de fixation
16. Assemblage
pour fenêtres
REMARQUE: Les caractéristiques et l’apparence varie selon le modèle ; les dessins ci-dessus
sont uniquement à titre indicatif.
1
4
2
3
5
6
7
8
9
10
11
12
13
14
16
15
Page 32

ENGLISH ESPAÑOL FRANÇAIS
–30–
PANNEAU DE CONFIGURATION
1. Capteur de télécommande
2. Aichage LCD, selon le mode d’opération
• FAN: indique la température actuelle de la chambre
• COOL ou DRY: indique la température souhaitée dans la pièce
• TIMER: indique le temps restant avant que l’appareil s’éteigne ou s’allume
REMARQUE: si le capteur de température tombe en panne, l’écran indique 77 ° F ou
25 ° C en continue
3. Touche Temp/Time
Lorsque l’appareil est allumé, appuyez sur ce bouton pour régler la température
ambiante programmée en appuyant sur les flèches.
4. Mode de fonctionnement
Le mode de fonctionnement actuel est indiqué par les LEDs ci-contres. Si les
LED sont allumés sans que le climatiseur ne soit en marche, vider l’eau de votre
climatieur.
5. Touche Timer
Appuyez sur cette touche alors que l’appareil est en marche pour programmer un
temps d’arrêt à l’aide des flèches. Appuyez sur ce bouton lorsque l’appareil est en
mode de veille pour programmer le temps de démarrage à l’aide des flèches.
6. Touche Vitesse
Choisir la vitesse du ventilateur entre : High, Medium et Low.
7. Touche On/O
Allumer ou éteindre votre appareil. Le LED est allumé lorsque l’appareil est allumé.
8. Touche Mode
Choisir le mode de fonctionnement entre : Cool, Dry, et Fan.
Page 33

ENGLISHESPAÑOLFRANÇAIS
–31–
UTILISER LA TÉLÉCOMMANDE
1. Indicateur de température actuelle
2. Vitesse du ventilateur
3. Indicateur du verrouillage
4. Horloge
5. Touches +/-
Augmenter ou diminuer la température de la pièce ou définir la durée de
la minuterie après avoir appuyé sur la
touche Timer.
6. Touche on/o
Allumer ou éteindre votre appareil.
7. Touche d’heure
Régler l’heure de votre appareil en
gardant la touche enfoncée, puis
en appuyant successivement sur la
touche pour choisir l’heure.
8. Touche de minute
Régler l’heure à la minute près en gardant la touche enfoncée, puis en appuyant successivement sur la touche
pour arriver à l’heure actuelle.
9. Touche de verrouillage
Appuyer cette touche pour empêcher toute modification aux réglages sur la télécommande. Le cadenas s’aichera sur l’indicateur n° 3 ci-dessus.
10. Touche Vitesse
Choisir la vitesse du ventilateur entre : High, Medium et Low.
11. Touche Timer
Appuyez sur cette touche alors que l’appareil est en marche pour programmer un
temps d’arrêt à l’aide des flèches.
Appuyez sur ce bouton lorsque l’appareil est en mode de veille pour programmer le
temps de démarrage à l’aide des flèches.
12. Touche Mode
Choisir le mode de fonctionnement entre : Cool, Dry, et Fan.
13. Indicateur de mode
Aiche le mode de fonctionnement actuel de l’unité
REMARQUE: En raison de la nature universelle de la télécommande pour l’ensemble de nos
appareils de climatisation, certains fonctions de la télécommande peuvent ne pas correspondre à votre appareil.
1
2
4
5
7
9
10
11
3
8
12
6
Page 34

ENGLISH ESPAÑOL FRANÇAIS
–32–
POINTER VOTRE TÉLÉCOMMANDE
Pointez la télécommande directement en direction du panneau de commande de votre
climatiseur . L’appareil émet un «bip» indiquant que la commande a été reçue. Si votre
appareil ne répond pas à la télécommande, s’assurer que les piles sont correctement
insérées (polarité ou le sens des symboles + / -) ou insérer de nouvelles piles.
INSERTION DES PILES
Pour insérer les piles dans la télécommande, appuyez fermement et faites glisser le couvercle à l’arrière dans le sens de la flèche. Insérez les piles tout en portant attention à la
polarité (le sens des symboles + / -). Remettez le couvercle du dos avec soin.
À NOTER : ne jamais mélanger les types de batterie telles qu’une batterie ancienne et une
nouvelle ou une batterie au lithium rechargeable avec une pile alcaline.
CONSIGNES DE SÉCURITÉ DE LA TÉLÉCOMMANDE
1. Ne placez pas la télécommande à proximité d’une source de chaleur telle qu’une
couverture électrique, un appareil de chauage ou en plein soleil.
2. Évitez de faire tomber accidentellement la télécommande
3. Ne placez pas d’objets qui bloquent ou interfèrent avec les signaux infrarouges de
la télécommande.
4. Ne mettre pas d’eau ou d’autres liquides sur la télécommande
5. Ne placez pas d’objets lourds sur la télécommande.
6. Ne se tenir pas debout, s’asseoir, ou mettre une charge lourde et inutile sur la télécommande.
7. Remplacer les piles si nécessaire, par exemple lorsque l’appareil ne répond pas à
la télécommande.
8. Retirez les piles lorsque la télécommande ne sera pas utilisée pour des périodes
de temps prolongées.
9. Jetez les piles et la télécommande en conformité avec les lois locales et les instructions de recyclage. Consulter votre municipalité pour en savoir plus sur la gestion des déchets électroniques.
INSTRUCTIONS D’INSTALLATION
REMARQUE: Ce climatiseur doit être installé par un technicien ou par un professionnel qualifié. L’auto-installation peut annuler votre garantie et endommager l’appareil et induire les
risques expliqués au début de ce mode d’emploi. Contactez le support technique si vous
avez besoin d’informations supplémentaires ou contacter un technicien agréé.
CHOIX DU POSITION D’INSTALLATION
Placer le climatiseur sur une surface plate où les sorties d’air ne seront pas obstruées. Assurez-vous
que l’appareil est décalé d’au moins 20 pouces de chaque coté des murs ou d’autres obstacles.
Page 35

ENGLISHESPAÑOLFRANÇAIS
–33–
INSTALLATION DU TUYAU D’ÉVACUATION
1. Retirer la sortie d’air chaud et retirer le tuyau
d’échappement.
2. Fixer l’adaptateur d’évacuation d’air vers le
tuyau d’échappement en tournant dans le
sens antihoraire.
3. Fixer le tuyau d’évacuation de l’air directement à l’unité dans le sens antihoraire.
POSER LE CLIMATISEUR DANS LE CADRE DE LA FENÊTRE
Le kit de fenêtre inclus est conçu pour une installation dans la plupart des fenêtres à guillotine verticales ou horizontales. Vous pouvez être amené à modifier légèrement votre
installation spécifique pour garantir une utilisation correcte et sûre de votre climatiseur.
Fenêtre horizontale:
Largeur minimale : 27.5” (70cm)
Largeur maximale : 48” (122cm)
Fenêtre verticale:
Hauteur minimale : 27.5” (70cm)
Hauteur maximale : 48” (122cm)
ÉTAPE 1: ADAPTER TAILLE DU RIDEAU D’INSTALLATION À VOTRE FENÊTRE
Insérer la fenêtre échappement raccord de port dans votre fenêtre et étendre la largeur
ou la hauteur pour remplir votre fenêtre entièrement. Serrer la vis dans la section numéro
2 comme indiqué ci-dessous pour éviter que la partie étendue se rabat.
ÉTAPE 2: CONNECTEZ L’ADAPTATEUR D’ÉVACUATION D’AIR
Insérer l’adaptateur d’évacuation d’air dans le kit de fenêtre. S’assurer que l’appareil est placé sur une surface plate et que l’appareil soit écarté d’au moins 20 po. des murs ou d’autres
objets. Votre appareil est prêt à fonctionner.
Page 36

ENGLISH ESPAÑOL FRANÇAIS
–34–
MONTAGE DE PORT PAROI D’ÉVACUATION D’AIR
Si vous avez un port d’échappement d’air existant vous pouvez directement connecter
votre unité de climatisation portable au port. Pour la meilleure eicacité énergétique et
afin de prolonger la durée de vie de votre appareil, éviter de plier le tuyau et garder la
longueur du tuyau d’échappement aussi courte que possible.
Le point de flexion tuyau doit être placé d’au moins 24 po. de l’unité pour des performances optimales. Éviter tout pli serrés.
INVERSER LES ENTRÉES ET SORTIES D’AIR
Vous pouvez inverser l’entrée et la sortie d’échappement sur votre appareil portable pour
envoyer de l’air froid par la sortie d’échappement. Ce type d’installation peut être pratique lors de l’installation de l’unité portable dans un garage pour souler de l’air froid à
l’intérieur de la maison par un conduit. Il suit d’inverser la grille de sortie d’air et monter
l’air d’échappement, comme illustré ci-dessous.
Gardez à l’esprit que le refroidissement n’est pas recommandé lorsque la température
ambiante est en dessous de 65 ° F (18 ° C) ou supérieure à 95 ° F (35 ° C).
INSTRUCTIONS D’ENLÈVEMENT
1. Mettre l’appareil hors tension et débranchez le cordon d’alimentation.
2. Vider l’eau dans l’accumulateur d’humidité
3. Dévisser l’assemblage du paroi dans la fenêtre
4. Stockez l’appareil dans un endroit sec, et à plat; inclure toutes les parties de l’installation et de l’appareil.
ÉVACUATION DES EAUX DE CONDENSATION
Tous les climatiseurs produisent de l’eau par condensation et le rejet de l’humidité par
l’échappement d’air chaud. Dans les endroits très humides, la l’échappement est insuisant et l’unité stocke de l’eau dans un réservoir interne. Lorsque le voyant FULL s’allume
sur votre climatiseur, le refroidissement s’arrête immédiatement et il faut procéder à vider le réservoir.
Suivez ces étapes pour remettre votre climatiseur en service:
1. Débranchez le climatiseur, débranchez le tuyau d’échappement et transporter
l’appareil à l’extérieur sur une surface plane.
2. Retirez le bouchon de la base de l’unité et laisser couler l’eau. Ne pas trop incliner
ou faire tomber l’appareil.
3. Une fois que le réservoir de collecte interne est vidé, remettre le bouchon de réservoir.
Page 37

ENGLISHESPAÑOLFRANÇAIS
–35–
4. Remettre l’unité à l’endroit désiré, rebrancher le tuyau d’échappement et le brancher le cordon d’alimentation électrique.
5. Redémarrer l’operation de refroidissement normal sur votre appareil.
REMARQUE: Le réservoir contient environ 1,5 litres d’eau lorsque celui-ci est plein.
ÉVACUATION DE CONDENSATION EN CONTINU
Dans les climats très humides un système d’évacuation d’eau en continu est une solution
optimale. Avec un tuyau d’évacuation en option (vendu séparément), l’appareil peut être
placé près d’un égout, un grand réservoir de collecte, ou à l’extérieur.
1. Ouvrir le bouchon de plaque de séparation.
2. Connecter le tuyau à la plaque de séparation et la conduire vers l’égout
3. S’assurer que le tuyau est placé vers le bas sans être plié ou écrasé. Le climatiseur utilise la gravité pour évacuer l’eau correctement et le tuyau ne peut pas être élevé.
Page 38

ENGLISH ESPAÑOL FRANÇAIS
–36–
ENTRETIEN DE VOTRE CLIMATISEUR
IMPORTANT: Avant toute opération de maintenance, s’assurer que le climatiseur est
éteint et débrancher le cordon d’alimentation de la prise.
NETTOYER LE FILTRE À AIR
Un filtre à air sale réduit les performances de votre appareil de manière significative et augmente vos coûts de refroidissement! Suivez les étapes suivantes pour nettoyer le filtre à air:
1. Saisir le crochet sur le fond pour retirer le filtre à air, le tirant dans le sens des flèches.
2. Laver les filtres en les immergeant dans de l’eau tiède savonneuse.
3. Rincer le filtre avec de l’eau propre et le sécher dans un endroit hors la portée du
soleil. Ne pas exposer les filtres à lumière directe du soleil, car ils peuvent fondre
ou se déformer!
4. Installer le filtre à air pour le port d’origine.
AVANT LE PREMIER USAGE DE LA SAISON
1. Vérifier si des objets gênent les fentes d’entrée et d’échappement.
2. Vérifiez que les bouchons la partition et de la base soient correctement insérés.
3. Vérifiez que la prise électrique soit correctement mis à la terre.
4. Vérifiez que le filtre à air soit correctement inséré ; laver-le si nécessaire.
5. Brancher le cordon d’alimentation à une prise électrique mise à la terre.
6. Insérer les piles dans la télécommande.
PENDANT LA SAISON D’UTILISATION
1. Nettoyer les filtres régulièrement à l’aide des instructions ci-dessus.
2. Vider le réservoir de collecte d’eau interne ou vérifier le bon fonctionnement du
système d’évacuation d’eau en continu.
APRÈS LE DERNIER USAGE DE LA SAISON
1. Vider le réservoir interne en ouvrant les bouchons qui se trouvent à la base et à la
plaque de partition.
2. Sécher l’appareil en le faisant tourner en mode DRY pendant 30 minutes.
3. Remettre les bouchons à la base du climatiseur et à la plaque de partition.
4. Mettre l’appareil hors tension et débranchez le câble d’alimentation.
5. Nettoyez le filtre à air et le réinsérer.
6. Nettoyez l’appareil sur les deux côtés intérieurs et extérieurs. Couvrer l’appareil
pour éviter les accumulations de poussière à l’intérieur.
7. Retirez les piles de la télécommande pour éviter des fuites de la batterie.
À NOTER: Il est important de nettoyer régulièrement le filtre à air puisque le chauage et la
climatisation sont significativement aectés par l’encrassement du filtre. Des filtres encrassés augmentent aussi sensiblement la consommation énergétique (votre facture d’électricité) et l’appareil est plus bruyant pendant l’opération.
Page 39

ENGLISHESPAÑOLFRANÇAIS
–37–
DÉPANNAGE & SOLUTIONS
Selon le problème qui se présente, examiner les causes possibles suivantes :
L’APPAREIL NE FONCTIONNE PAS
1. Le câble d’alimentation correctement est-il inséré dans une prise à terre qui fonctionne?
2. Y a-t-il une panne de courant comme un fusible grillé ou un disjoncteur coupe?
3. La minuterie est-elle réglée sur «TIMER ON» ? Désactiver le délai pour enclencher
immédiatement l’opération.
4. La température ambiante est-elle inférieure à 61 ° F (16 ° C)? Un dispositif de sécurité empêche le fonctionnement de l’appareil dans les pièces à basse température.
LE CHAUFFAGE OU LA CLIMATISATION EST INSUFFISANT
1. La température souhaitée est-elle bien réglée ?
2. Le filtre à air est-il sale ?
3. Des portes ou fenêtres sont-elles ouvertes dans la salle ?
4. La pièce est-elle directement exposée au soleil ?
5. Y a-t-il des sources de chaleur dans la pièce ?
6. Y a-t-il un grand nombre de personnes dans la salle ?
LE CLIMATISEUR NE SE REMET PAS EN MARCHE APRÈS AVOIR ÉTÉ ÉTEINT
L’unité ne peut pas être redémarré pour 3 minutes après l’arrêt pour permettre le condenseur de refroidir et d’ éviter tout risque d’incendie. Attendre quelques minutes avant de
redémarrer l’appareil.
L’APPAREIL S’ARRETE ET DÉMARRE FRÉQUEMMENT
• Vérifier la puissance de votre système électrique et les prises électriques. Vous
aurez besoin d’un électricien qualifié pour remplacer vos circuits électriques si
votre climatiseur est supérieure à la capacité du circuit.
• S’assurer que le système d’échappement est correctement branché et n’est pas plié.
Garder le tuyau aussi court que possible et couper la partie excédentaire si besoin.
L’APPAREIL EST UNE SOURCE DU BROUILLARD
Dans les environnements de forte humidité chauds, cela peut se produire naturellement. Le
refroidissement continu éliminera l’excès d’humidité de la pièce et le brouillard disparaîtra.
L’APPAREIL ÉMET UNE ODEUR ÉTRANGE
Cela peut être provoqué par la fumée de cigarettes ou d’autres résidus provenant de la
cuisine et d’autres activités de la vie qui restent dans l’appareil. Nettoyer le filtre.
IL Y A UN BRUIT DE COMPRESSION
Le cycle du réfrigérant à l’intérieur de l’appareil peut temporairement provoquer ce bruit.
Page 40

ENGLISH ESPAÑOL FRANÇAIS
–38–
IL Y A UN BRUIT DE TAPOTEMENT
Ceci est souvent dû à la dilatation thermique des pièces en plastique.
IL Y A UN BRUIT ÉTRANGE
Placez le climatiseur sur une surface droit et nivélée.
LA TÉLÉCOMMANDE NE FONCTIONNE PAS
Assurer la télécommande a une ligne de vue dégagée au panneau de commande de l’appareil et s’assurer que les capteurs ne sont pas obstrués par des rideaux ou d’autres objets. S’assurer que la télécommande ait des batteries neuves.
IL Y’A DE L’HUMIDITÉ / DE LA CONDENSATION À LA SORTIE DE L’AIR
Des environnements à forte humidité peuvent provoquer une l’évacuation de la condensation à la sortie du flux d’air. Essuyez la l’évacuation de la condensation avec une éponge.
Water spills while moving the unit
• The internal water collection tank is nearly full. Empty the water tank by placing
the unit near a drain or outdoors and remove the base plug. Aer draining has
completed, replace the base plug and reinstall your unit in the desired location.
SI L’UN DES PHÉNOMÈNES SUIVANTS SE PRODUISENT MALGRÉ LES TECHNIQUES
DE DÉPANNAGE CI-DESSUS, S’IL VOUS PLAÎT ÉTEINDRE L’APPAREIL ET DÉBRANCHEZ
LE CORDON D’ALIMENTATION IMMÉDIATEMENT AVANT DE CONTACTER LE SERVICE
TECHNIQUE OU UN TECHNICIEN QUALIFIÉ :
1. Le fusible grille ou le disjoncteur se déclenche fréquemment.
2. Le câble d’alimentation est anormalement chaud.
3. L’isolation du câble d’alimentation est déchiré, déchiqueter ou déchiré.
4. Les commandes de l’appareil ne fonctionnent pas.
5. L’appareil produit des bruits anormaux.
CONTACTEZ LE SERVICE TECHNIQUE
Internet : www.impeccausa.com
Téléphone: +1 866.954.4440
de 9h à 5h (heure de l’Est)
 Loading...