

Page 1

USER MANUAL • MANUAL DE USUARIO
5.1 Channel Home Theater System
MODE D’EMPLOI
Model – HTDS-5175BT
Page 2

TABLE OF CONTENTS
Important Safety Instructions 1
CD/DVD Disc Handling 3
Copyright Notice 3
Package Contents 4
Product Features 4
Main Unit Controls 5
Rear Panel Connections 5
Getting Started 6
Connecting the Speakers 6
Remote Control 7
Speaker Placement 8
Connecting to a Television 9
FM Antenna Setup 9
Remote Control Buttons 10
Remote Control Functions 11
Audio CD Playback Features 12
Set Video Playback Time 12
ENGLISHESPAÑOLFRANÇAIS
CD Ripping 13
Bluetooth Operation 14
Pro Logic II 15
FM Radio Operation 15
Additional Video Features 16
System Menu Options 17-20
Supported Discs & File Formats 21
Troubleshooting 23
Contact Technical Support 25
Warranty 26
ii
Page 3
IMPORTANT SAFETY INSTRUCTIONS
Before using the unit, be sure to read all of the operating instructions
carefully. All of the safety & operating instructions should be retained
for future reference & all the warnings on the product and in this user
WARN ING
Ris k of el ec tri c s ho ck,
do n ot op en.
THE LIGHTNING FLASH WI TH
ARROWHEAD SYMBOL, WITHIN
AN EQUIL ATERAL TRIANGLE, IS
INTENDED TO ALER T THE USER
TO THE PRESENCE OF NON-INSULATED “DANGEROUS VOLTAGE” WITHIN THE PRODUCT’S
ENCLOSURE TH AT MAY BE OF
SUFFICIENT MAGNITUDE TO
CONST ITUTE A RISK OF ELECTRIC
SHOCK TO PERSO NS.
• WARNING: To reduce the risk of
electric shock, do not remove
the cover or back of the unit.
There are no user-serviceable
parts inside. Refer all servicing
• Clean the unit only with a dry
cloth.
•
electric shock hazard, do not
expose the unit or any of its
components to water, rain or
moisture (including drips or
liquids, such as vases and water
bottles, should not be placed
on the unit.
• Protect the power cord from
being walked on or pinched.
• USB cables longer than 10”
(250mm) should not be used
with this unit.
• Do not block the ventilation
openings on the unit, as they are
provided for safety purposes.
Do not install this product in
TO REDUCE THE RISK OF
ELECTRIC SHOCK, DO NOT
REMOVE THE FRONT OR
REAR COVER. NO USER
SERVICEA BLE PART S ARE
INSIDE. REFER SERVICING
TO QUALIFIED SERVICE
PERSO NNEL.
• Do not expose the unit or any of
• WARNING: If the unit
• Do not install the main unit
• Do not use the unit at altitudes
• Unplug the unit during lightning
THE EXCLAMATION POINT WITHIN
AN EQUILATERAL TRIANGLE IS INTENDED TO ALERT THE USER TO
THE PRESENCE OF IMPORTANT
OPERATING AND MAINTENANCE
(SERVICING) INSTRUCTIONS IN THE
LITERATURE ACCOMPANYING THE
APPLIANCE.
bookcase. There must be at
least 2 inches of space cleared
around the unit at all times to
ensure proper ventilation.
the package contents to direct
sunlight or excessive heat.
The unit should not be used in
temperatures above 113ºF.
overheats, stop using the unit
IMMEDIATELY and contact
customer support.
or any of its speakers on an
unstable table, stand, tripod, or
cart. The unit may fall, resulting
in possible damage or injury.
greater than 6500ft above sea
level.
storms or when not used for
an extended period of time.
ENGLISHESPAÑOLFRANÇAIS
1
Page 4

• WARNING: Excessive volume
can cause hearing loss.
• WARNING: This DVD player
uses a laser system to read
the CD/DVD disc. Use of the
controls, or the performance of
procedures other than those
hazardous laser radiation.
• WARNING: To prevent direct
exposure of laser beam, do not
open the unit. Laser radiation is
visible when the unit is opened.
Never stare directly into the
laser beam.
• WARNING: When in use by children, parents must ensure that
the child understands all safety
instructions -- especially those
regarding overheating, electrical hazards, and laser radiation.
ENGLISHESPAÑOLFRANÇAIS
2
Page 5

CD/DVD DISC HANDLING
• Do not expose discs to heat,
direct sunlight, or high humidity environments. In warmer
weather, do not leave discs inside a parked vehicle.
• Store discs in their cases when
not in use.
• Stacking discs or standing them
on end can cause them to warp.
• Do not touch the disc surface
while handling the disc.
Instead, hold the edges.
• Fingerprints, dust, dirt, and
scratches can distort the picture or sound quality on your
disc, or cause playback to skip.
Beware of scratches on the disc
inhibiting the laser beam system from reading and playing
the disc correctly. Clean discs
before use.
• Do not use paper, tape, or adhesive labels on discs. Only use
permanent makers on the top
side of the disc.
• Clean discs with a soft cloth,
wiping from the center outwards.
• Do not use solvents such as
benzene, household cleaning
products (except those designed for CD/DVD use), or anti-static spray for vinyl records,
as this can damage your device
and discs.
• Ensure the label always faces
up when putting discs into the
player.
Copyright Notice:
• It is forbidden by law to copy, rent, broadcast or show in public performance (via cable, wireless, or otherwise) copyrighted material
without permission.
ENGLISHESPAÑOLFRANÇAIS
• This product features the copy protection function developed by
Macrovision. Copy protection signals are recorded on some discs.
When recording and playing the pictures of these discs, picture noise
will appear. This product incorporates copyright protection technology that is protected by method claims of certain U.S. Patents and
other intellectual property rights owned by Macrovision Corporation
and other rights owners. Use of this copyright protection technology
must be authorized by Macrovision Corporation and is intended for
home and other limited viewing uses only unless otherwise authorized by Macrovision Corporation. Reverse engineering or disassembly is prohibited.
3
Page 6
PACKAGE CONTENTS
Your Impecca 5.1 Channel Home Theater System includes
the following:
• Main unit (1)
• Main speakers (5)
• Subwoofer (1)
• Speaker wires (6)
• Remote Control (1)
• AV Cable (1)
• FM pigtail antenna (1)
• User Manual and Warranty Card (1)
PRODUCT FEATURES
• CD / DVD player with built-in Dolby Digital® decoder.
• CDs and DVDs play automatically when inserted.
• 5.1 audio and surround sound processing with 5-chan-
• Dolby Pro Logic II (stereo content can be played in 5.1
surround).
• FM Reciever.
• Support for many audio, video, and photo CD types
including VCD, MP3, HDCD and JPEG (Picture CD).
• Built-in USB read/write capability.
• CD Ripping (CD to USB copying functionality).
• Bluetooth Support: Stream audio through your home
theater system from any Bluetooth-enabled device,
such as a smartphone.
• Infrared remote controller.
ENGLISHESPAÑOLFRANÇAIS
4
Page 7
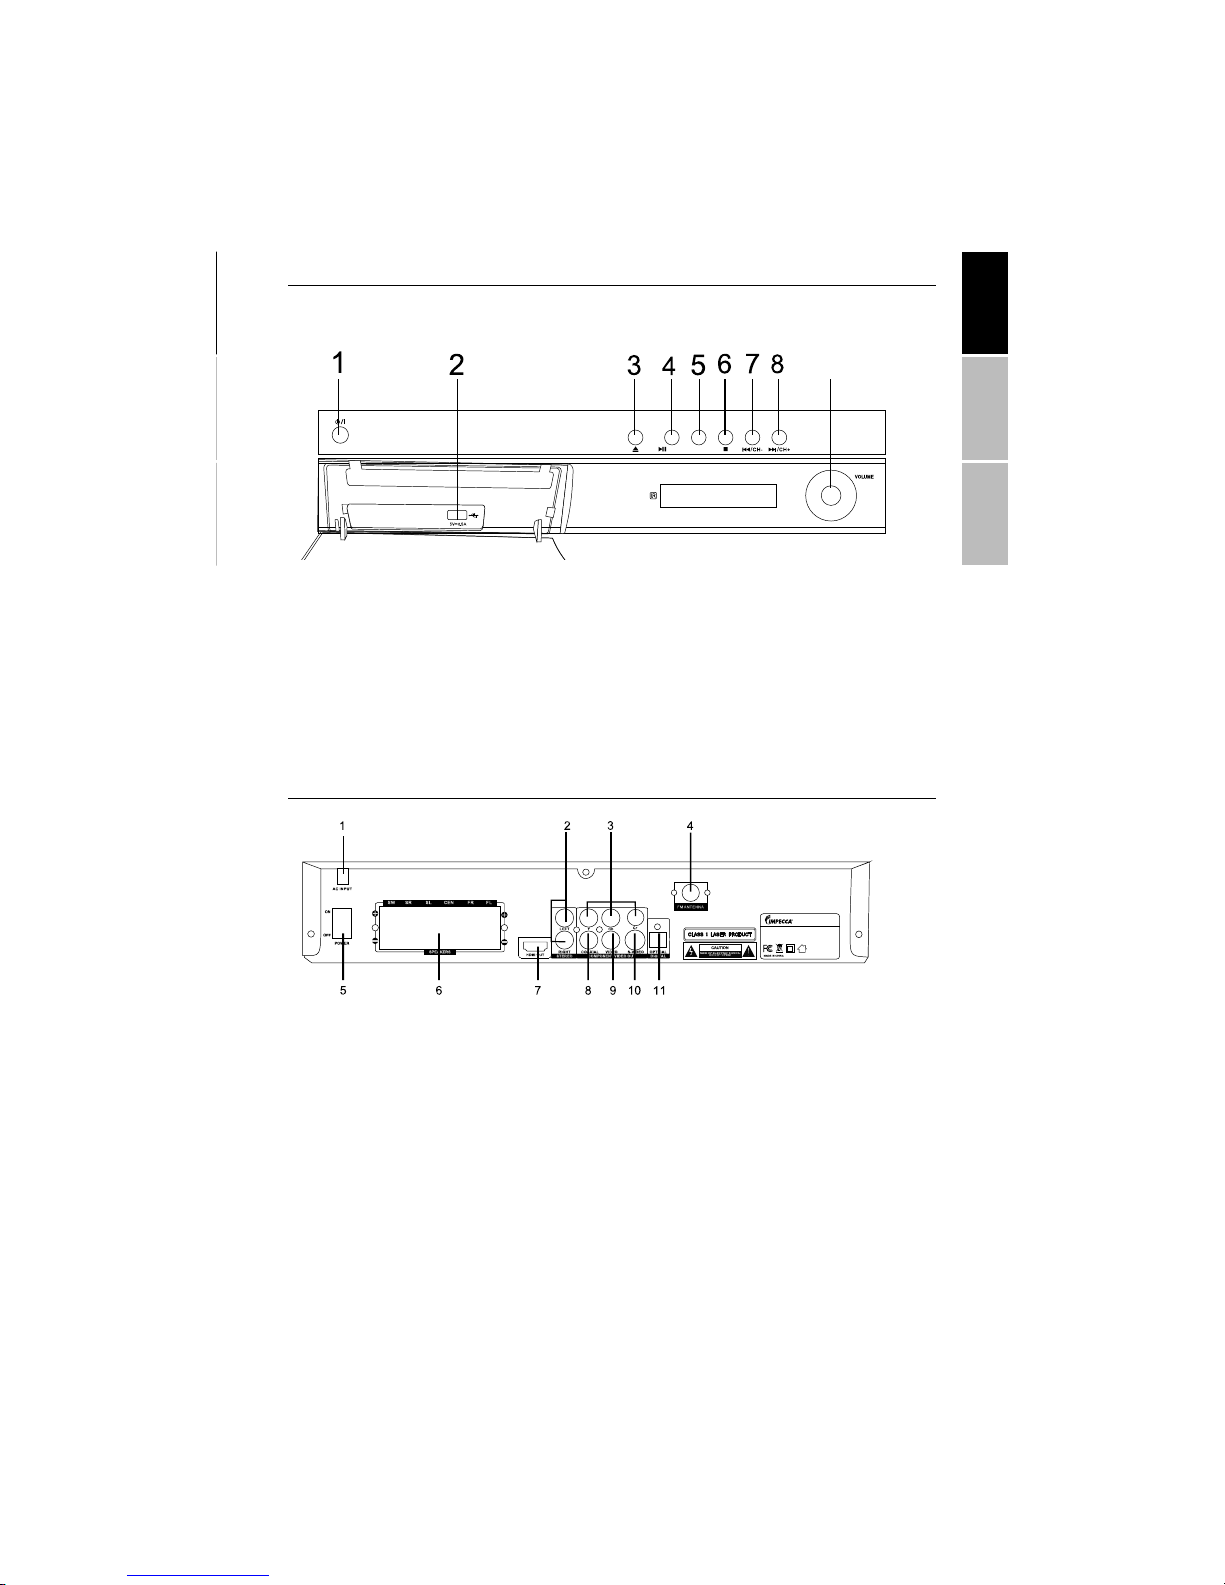
MAIN UNIT CONTROLS
ENGLISHESPAÑOLFRANÇAIS
9
/SC AN SOURCE
1. STANDBY
2. USB INPUT
3. OPEN / CLOSE DVD TRAY
4. PLAY / PAUSE / SCAN
6. STOP
7. PREVIOUS / CH-
8. NEXT / CH+
9. VOLUME + / -
5. SOURCE
REAR PANEL CONNECTIONS
1. POWER INPUT
2. L/R AUDIO OUTPUT
3. Y/Pb/Pr SIGNAL OF COMPONENT OUTPUT
4. FM ANTENNA
5. POWER SWITCH
6. SPEAKER OUTPUT
7. HDMI OUTPUT
8. COAXIAL OUTPUT
9. RCA VIDEO OUTPUT
10. S-VIDEO OUTPUT
11. OPTICAL OUTPUT
MODEL: HTDS-5 175BT
HOME THE ATER SYSTEM
POWER SUP PLY: 110-24 0V~ 50 /60Hz
RATED POWE R: 32W
www.impecca.c om
5
Page 8
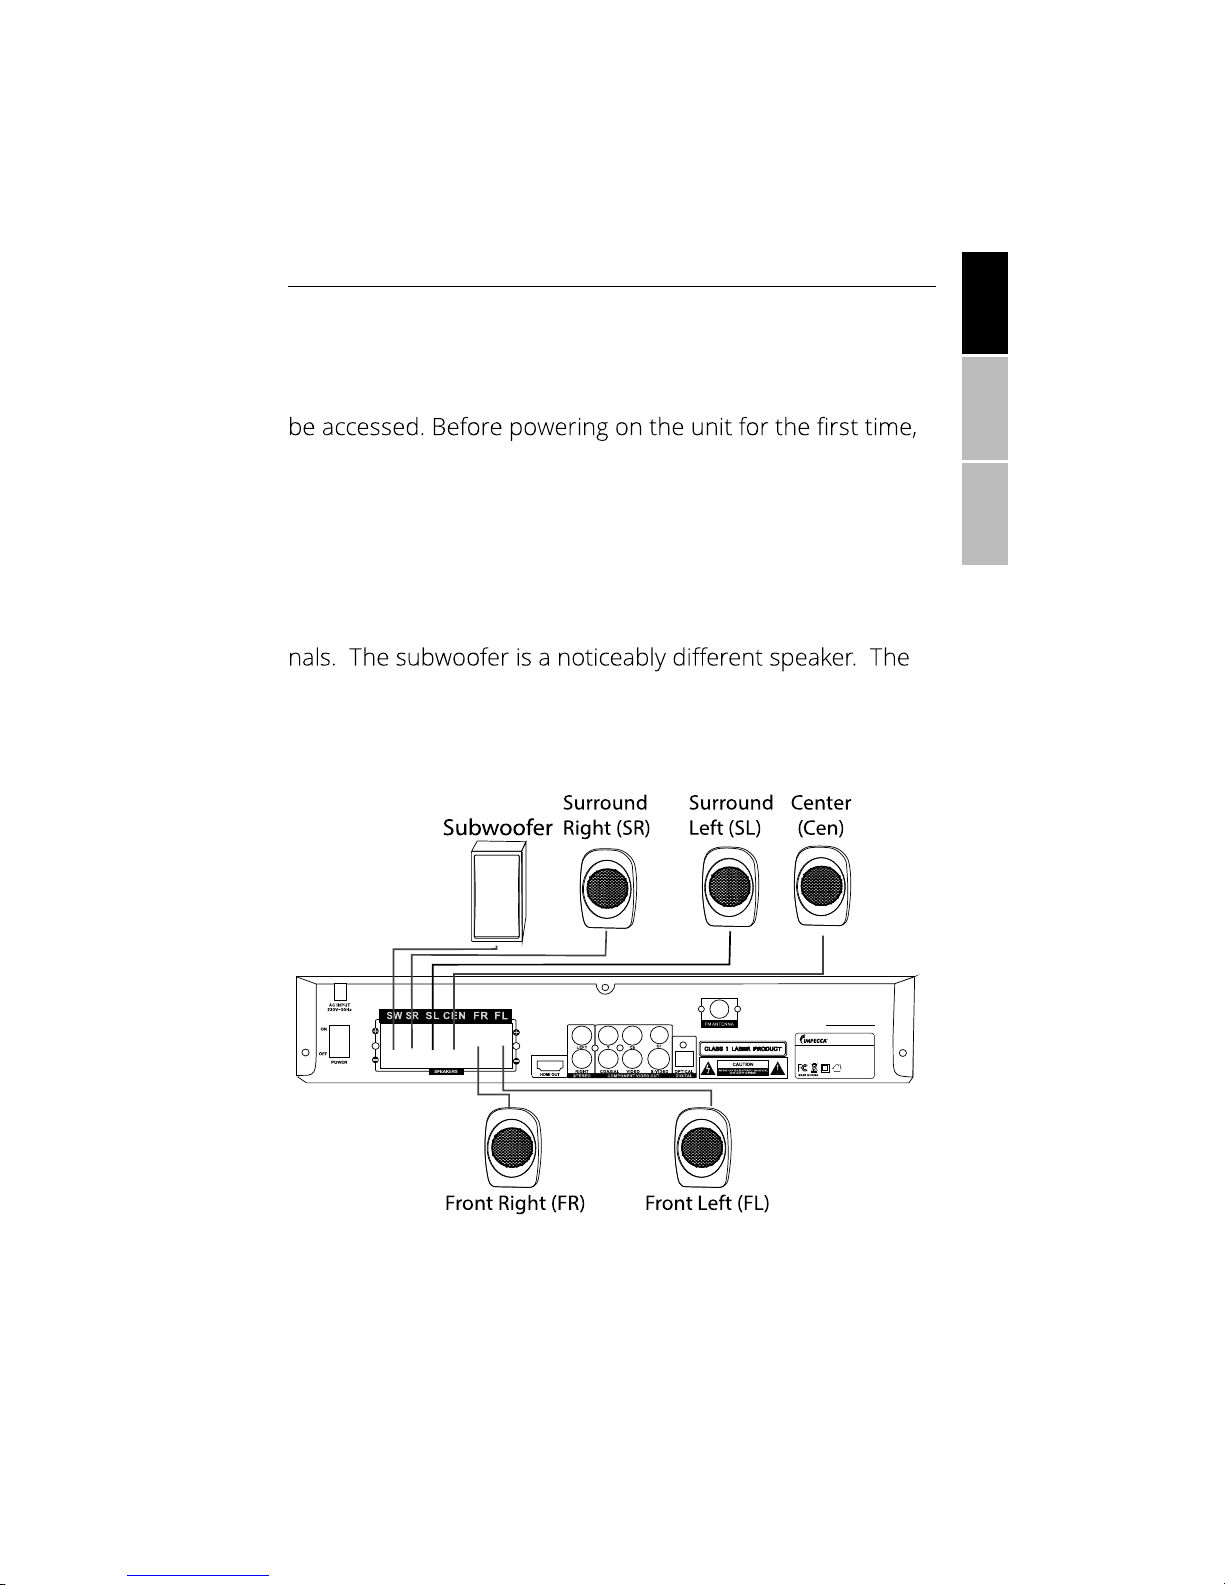
GETTING STARTED
Speakers
Before plugging the main unit into power, place it where it
will be installed, in a safe place where the rear panel can
ensure that each of the six speakers are connected properly, as shown. Speaker cables have been provided and are
already attached to the speakers. You must plug each of
them into the rear of the unit. Make sure that the speaker
cabling does not become tangled so that it is easier to place
the speakers where desired. Use the diagram below to
make sure the speakers are connected to the correct termi-
other 5 speakers should be labeled with stickers. Take note
of what each one of them are so that you can position the
speakers correctly in the next chapter.
ENGLISHESPAÑOLFRANÇAIS
SERIAL NO.:
MODEL: HTDS-517 5BT
HOME THE ATER SYSTEM
POWER SUP PLY: 110-24 0V~ 50 /60Hz
RATED POWE R: 32W
www.impecca.c om
6
Page 9
GETTING STARTED
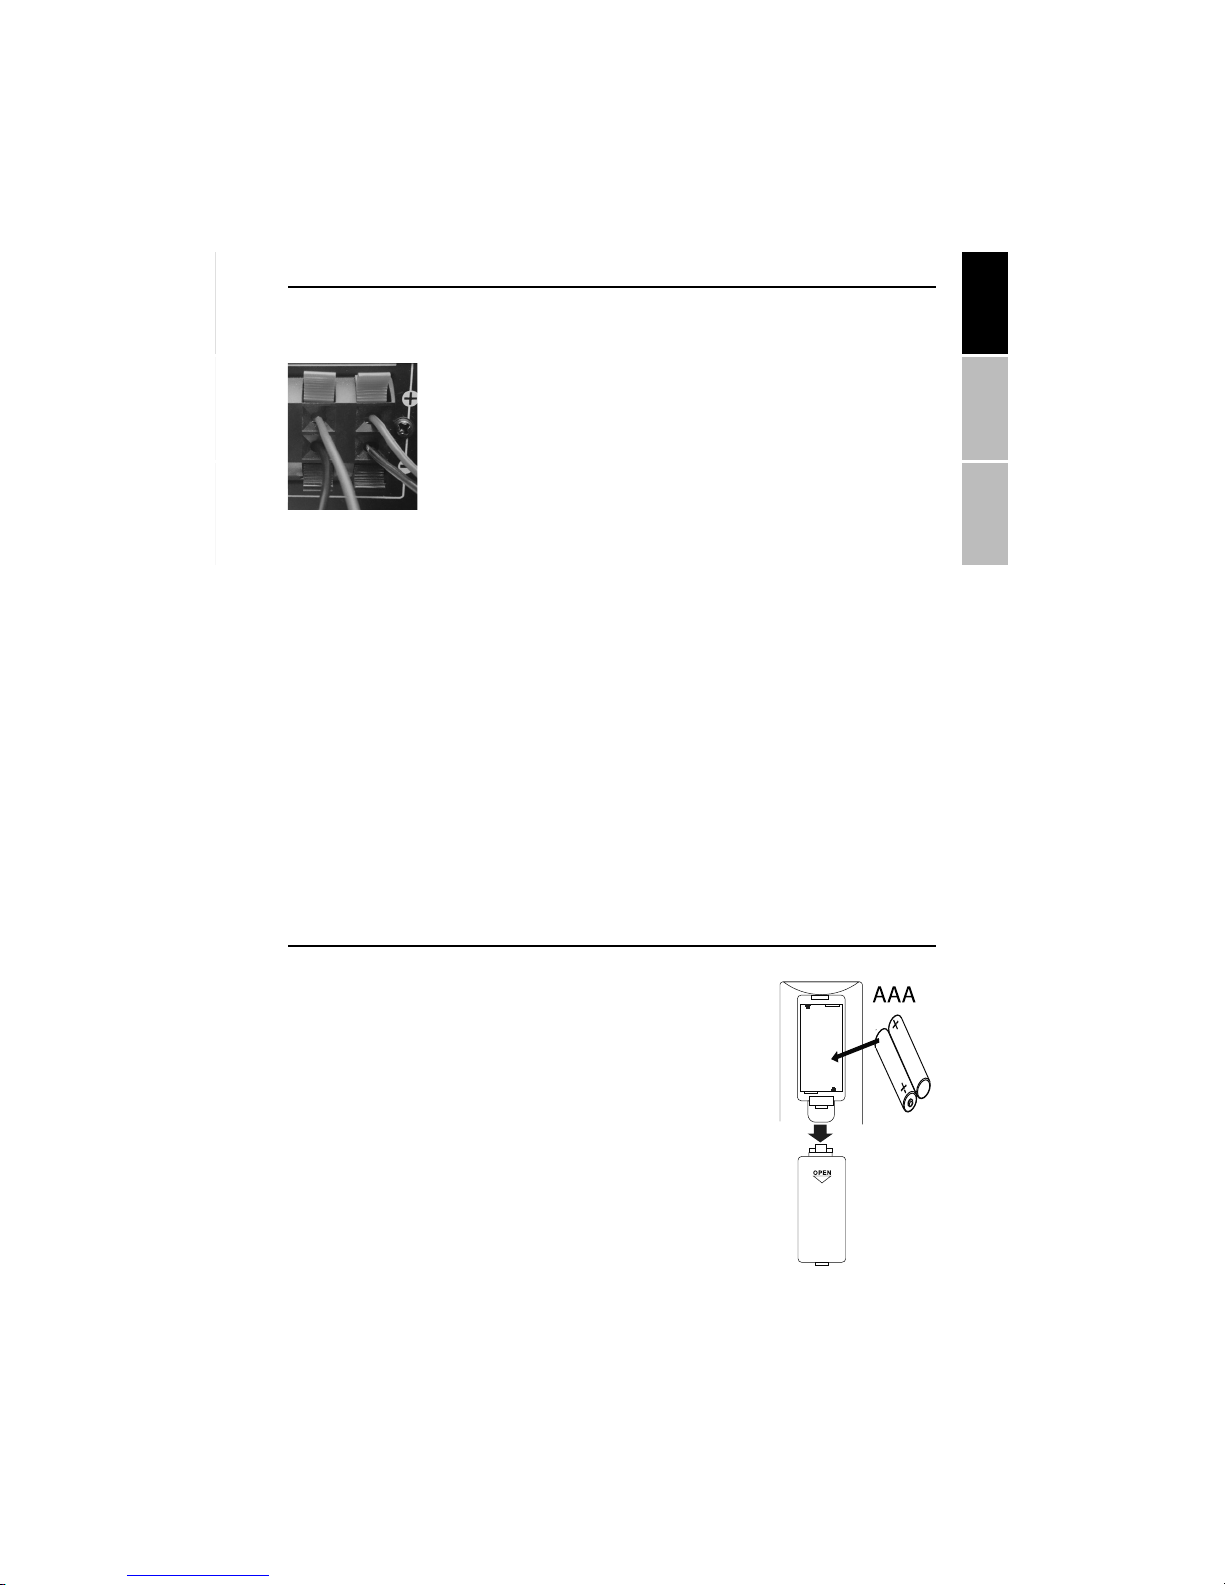
Connecting the Speaker Wire
Speaker cables are always split into two
sides. For each speaker, you must connect
both the positive (+) and negative (-) sides
of the speaker cable to the back of the unit.
The positive cable is red, with a black stripe.
Make sure that the positive (+) side of the cable is plugged
into the red terminal: Press the red tab on the terminal, insert the wire at the end of the cable and release the tab.
The negative cable (coming from the same speaker) is
black with a red stripe. In the same fashion, make sure the
negative (-) side is plugged into the black terminal directly below the red one (hold down the black tab to connect).
WARNING: Make sure that positive and negative speaker
wires never touch each other! Always keep black and red
wires separate!
ENGLISHESPAÑOLFRANÇAIS
REMOTE CONTROL
Please remove the battery cover on the rear
of the remote control, insert 2 AAA batteries
(not included) then place the cover back on
the remote. Please see the “Remote Control
Buttons section” for a full listing of each button and what it does.
7
Page 10
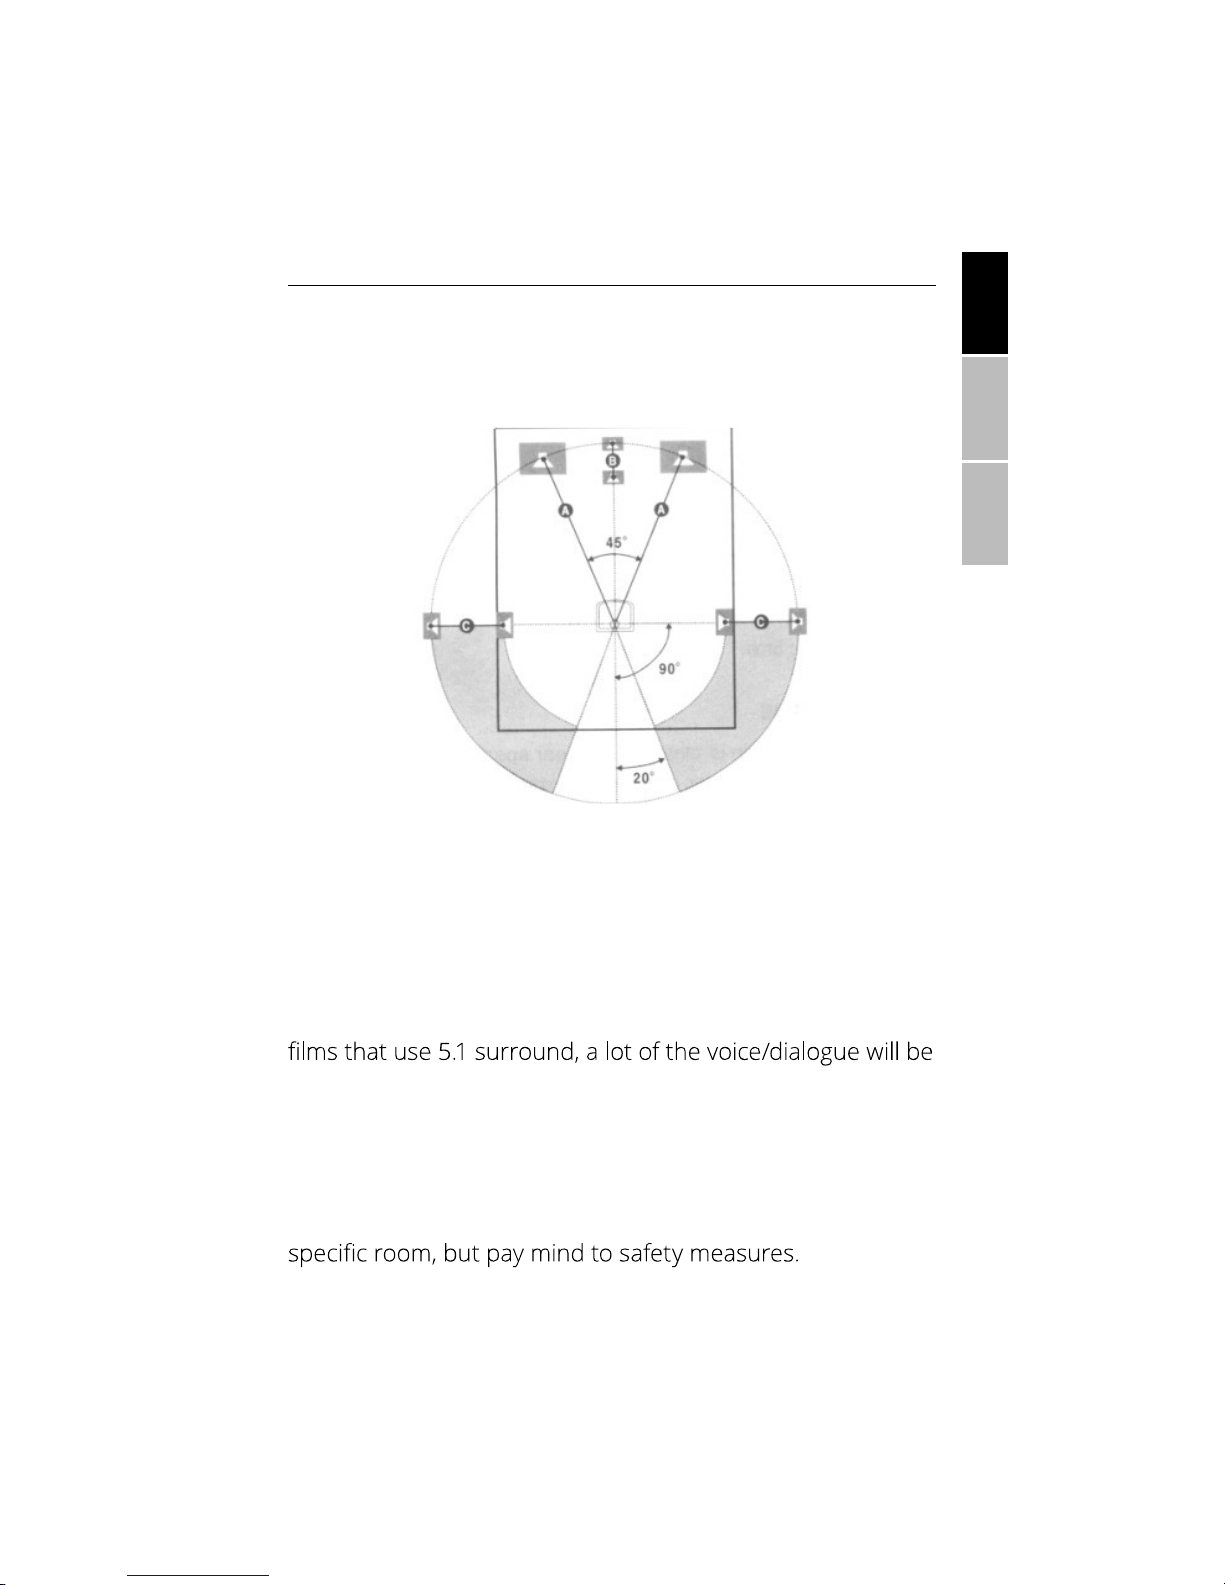
SPEAKER PLACEMENT
Generally, it’s preferred that each of the speakers (except
for the subwoofer) to all be about the same distance from
the listening position and at ear height. Here’s one idea for
speaker placement:
A: Front Left (FL) and Front Right (FR) speakers
B: Center Speaker (CEN)
C: Surround Left (SR) and Surround Right (SR) speakers.
ENGLISHESPAÑOLFRANÇAIS
Place the front speakers near the front of the listening area,
on either side of the center speaker. Try not to place the
surround speakers (C) “behind” your ears. Place them so
they would be in the top half of the circle shown above. In
heard coming from the center speaker.
If possible, place the subwoofer near a corner for more bass
response. However, due to the nature of low frequencies,
the positioning of the subwoofer is not as critical. Experiment with what is convenient and sounds the best for your
8
Page 11

CONNECTING TO A TELEVISION
The provided RCA AV cable may be used to connect the main
unit to a TV. If the TV has an S-Video, component or HDMI
input, those cable types may also be used. Note that while
there is a stereo “audio out” to send audio to your TV speaker,
this is not completely necessary as sound will be coming out
of the speakers provided.
SERIALNO .:
MODEL: HTDS- 5175 BT
HOME THEAT ER SYSTEM
POWER SUP PLY: 110-2 40V~ 5 0/60 Hz
RATED POW ER: 32W
www.impec ca.c om
ENGLISHESPAÑOLFRANÇAIS
FM ANTENNA SETUP
Connect the supplied FM pigtail antenna to the FM Antenna
jack as seen below. See the “FM Radio Operation” section for
more details on using the built-in FM radio.
SERIALNO .:
MODEL: HTDS- 5175 BT
HOME THEAT ER SYSTEM
POWER SU PPLY: 110- 240V ~ 50/60 Hz
RATED POW ER: 32W
www.impec ca.c om
9
Page 12
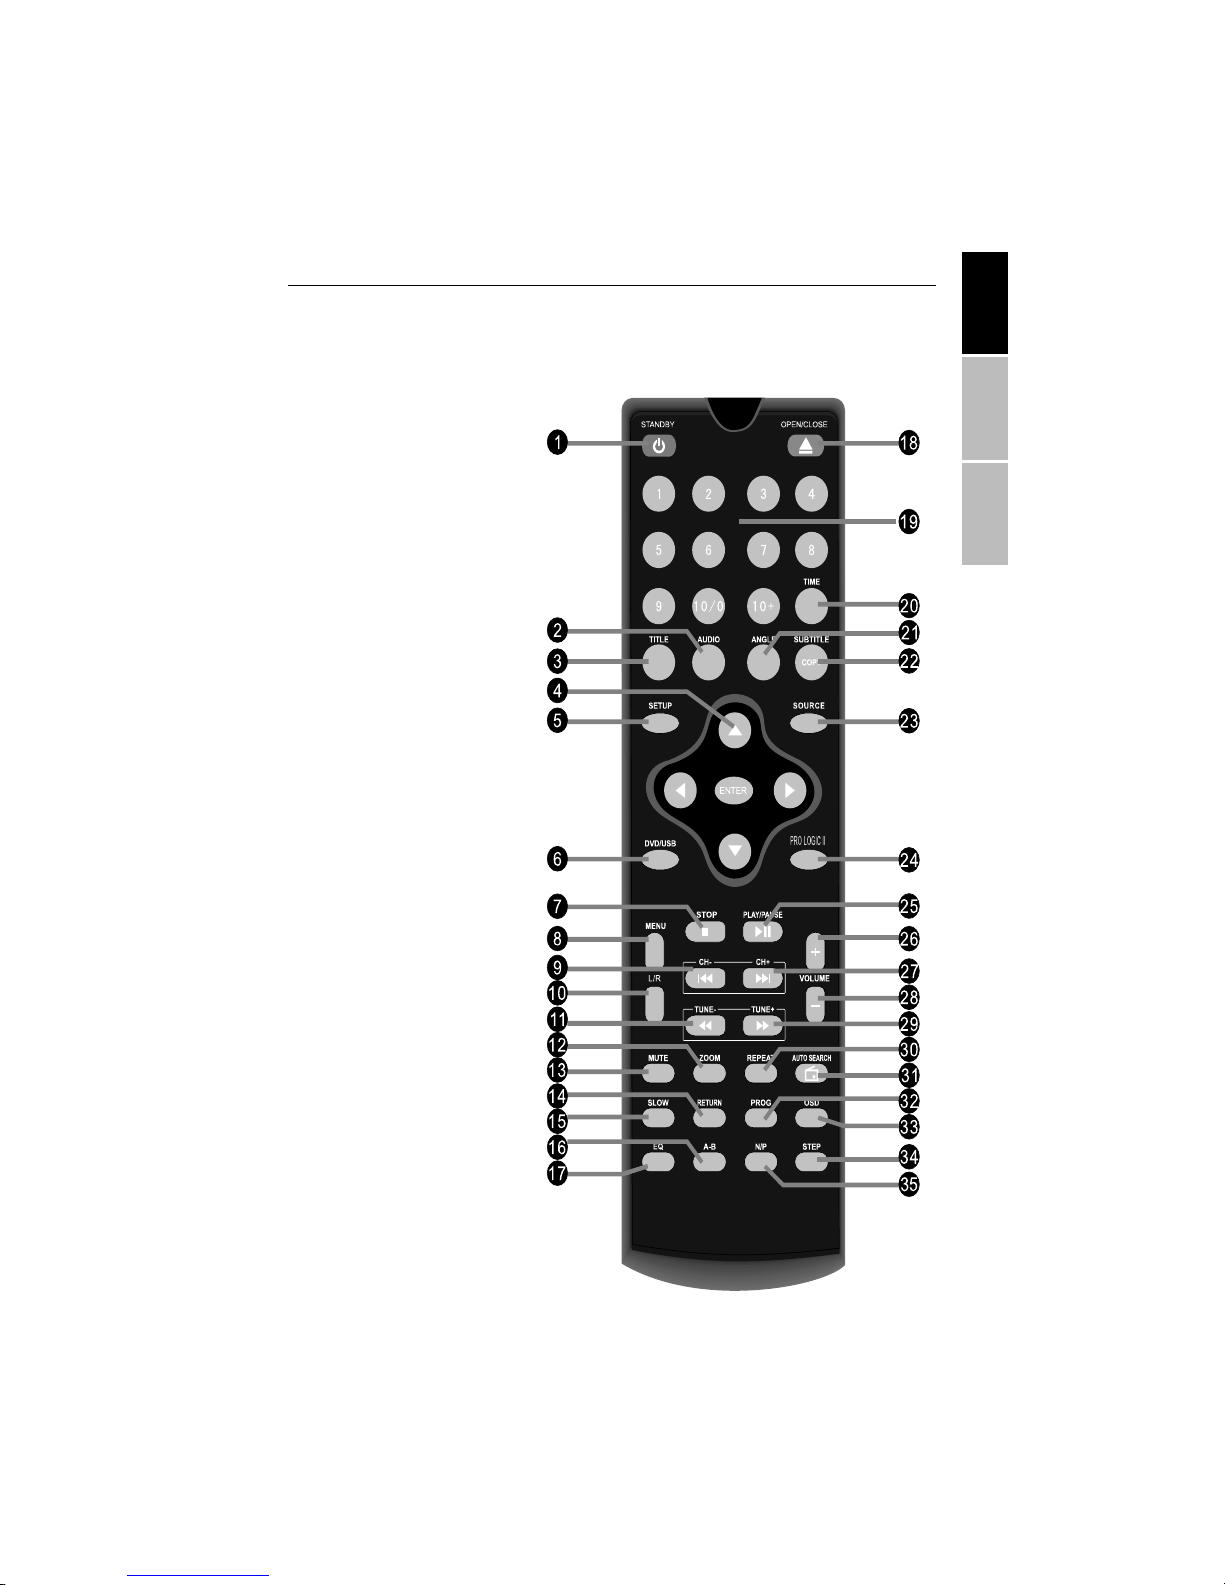
REMOTE CONTROL BUTTONS
The following diagram will help you make the best use of your remote control.
1. POWER
2. AUDIO
3. TITLE
4. ARROW BUTTONS
5. SETUP
6. DVD / USB
7. STOP
8. MENU
9. PREV / CH-
10. L / R
11. REV / TUNE-
12. ZOOM
13. MUTE
14. RETURN
15. SLOW
16. A-B
17. EQ
18. OPEN (EJECT)
/ CLOSE
19. NUMBER
20. TIME
21. ANGLE
22. SUBTITLE / COPY
23. SOURCE
24. PRO LOGIC II
25. PLAY / PAUSE
26. VOLUME+
27. NEXT / CH+
28. VOLUME-
29. FWD / TUNE+
30. REPEAT
31. AUTO SEARCH
32. PROGRAM
33. OSD
34. STEP
35. N / P
ENGLISHESPAÑOLFRANÇAIS
10
Page 13

REMOTE CONTROL FUNCTIONS
1.
2. Change audio/language tracks (if supported by the disc)
3. Return to the DVD title (as if the disc was just inserted)
4. Highlight and select menu items using the directional arrows
5. Enter the system setup menu
6. Switch between the CD/DVD and USB sound sources
7. Stop playback
8. Return to the root menu of the DVD
9. Go to the previous chapter or track
10. Change sound to mono (left/right/left+right). Rarely used.
11. Rewind (for song/video) or tune to a lower frequency (FM radio)
12. Zoom in on the picture (for video) or store the current station in
memory (for radio)
13.
14. Go to the menu, or return to DVD playback it already at the menu
15. Play the video in various slow motion speeds (if supported)
16. Repeat from A to B (press to mark A, then again for B)
Press B again to resume normal playback
17. Change sound equalization (e.g. Rock, Jazz, Pop)
18. Eject any disc currently in the tray (when in DVD mode)
19. Use these numbers to enter time or chapters. Use “10+” for 10 or
higher.
20.
21. Change camera angles (if supported by the disc)
22. Select/enable subtitles (if supported by the disc)
23. Change between DVD, Bluetooth and Radio sound sources.
24. Enable Pro Logic II playback
25. Begin or pause playback
26. Turn up volume
27. Skip to the next chapter or track
28. Turn down volume
29. Fast Forward (song/video) or tune to a higher frequency
(radio)
30. Repeat tracks (for audio) or chapters (for video)
31. Search/scan for the next tunable radio station
32. Program a tracklist
33. Press to display information about playback time/status
34. Pause and advance one frame at a time (if supported). Press play
to resume normal playback
35. Switch between NTSC and PAL video modes
ENGLISHESPAÑOLFRANÇAIS
11
Page 14
AUDIO CD PLAYBACK FEATURES
The unit will automatically play an audio CD when inserted.
If you wish to change the order of the tracks that are played,
press the PROG button on your remote to create your own
playlist.
Use the number and arrow buttons to program the order of
tracks to be played. Refer to the “Remote Control Buttons”
section above for additional features.
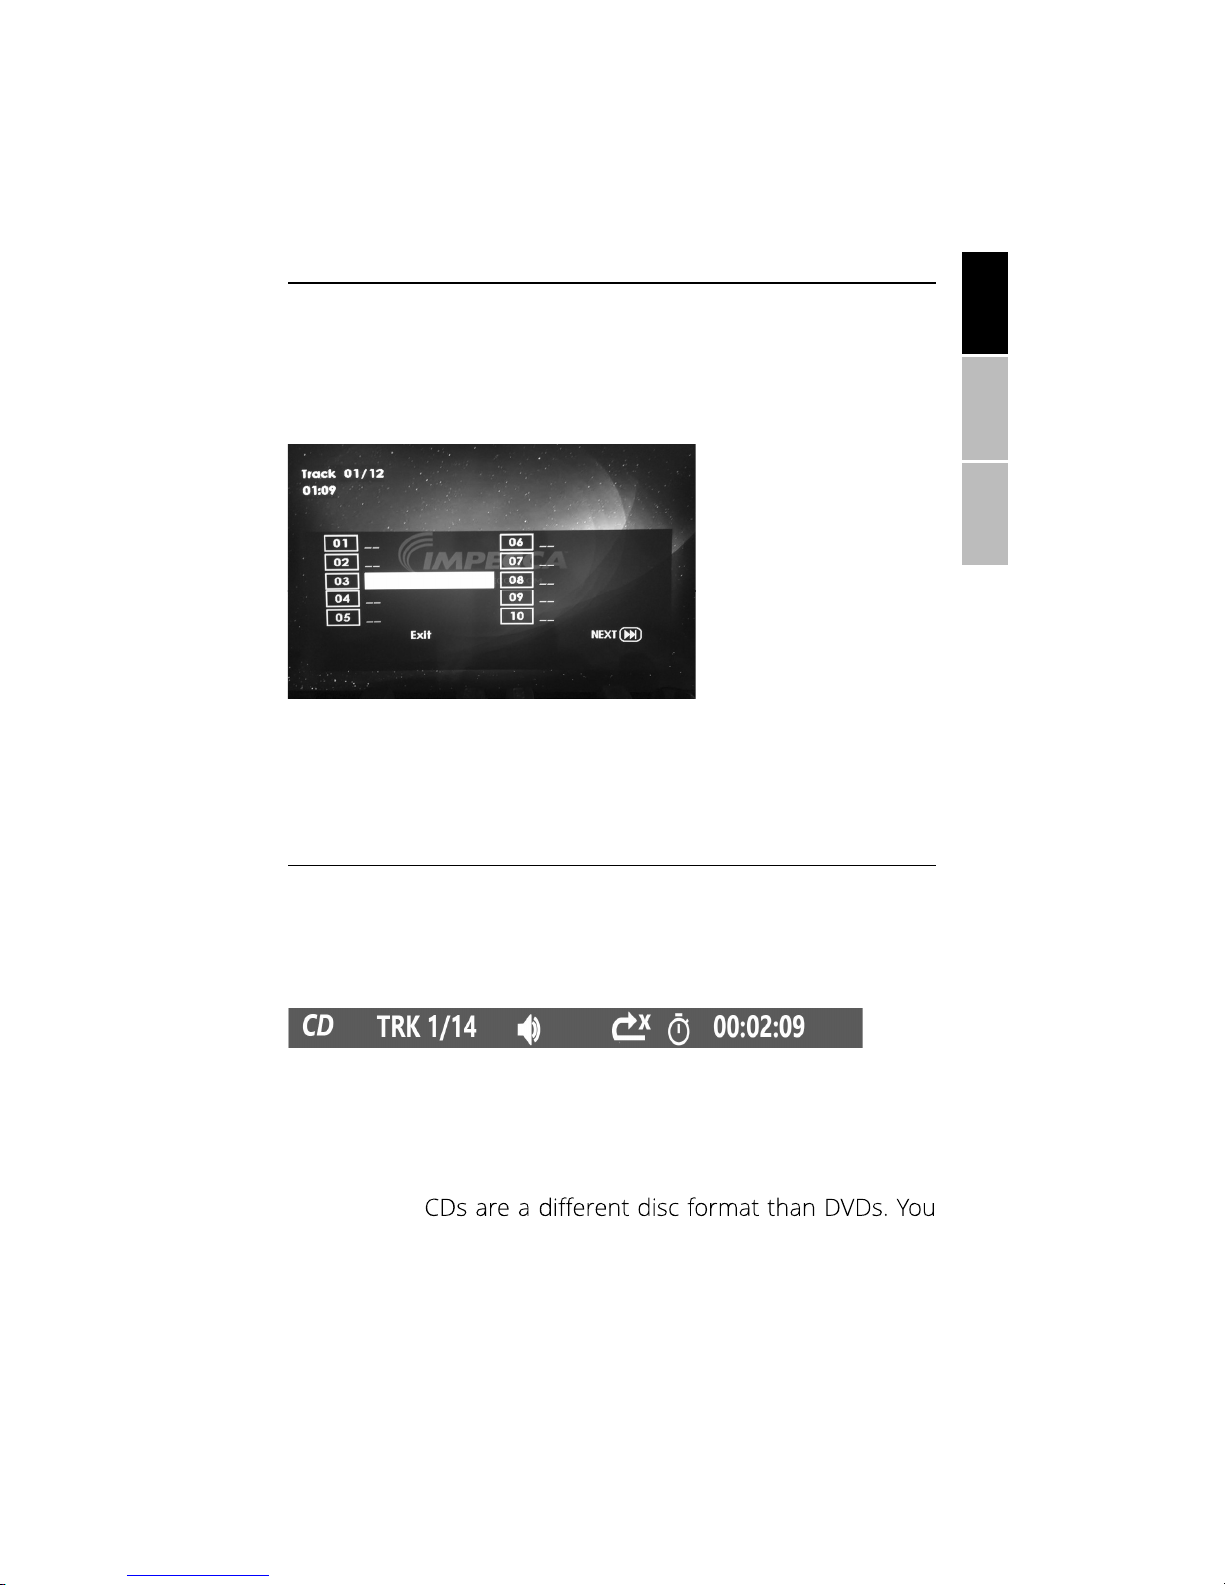
SET VIDEO PLAYBACK TIME
ENGLISHESPAÑOLFRANÇAIS
When a Video CD is loaded, you may select the time within
the video to start playback by pressing the TIME button on
your remote:
You can then use the number button (0-9, 10+) to input the
desired time. Press TIME again to exit.
Note: Video
can use this same procedure to skip to the desired chapter
of a DVD, but this is usually integrated into the DVD’s menu
system.
12
Page 15

CD RIPPING
The DVD Player can copy tracks from unprotected audio CDs
to a USB thumb drive (also called a memory stick). With an
audio CD loaded, insert the USB drive into the front of the
unit. Make sure it has plenty of available space. The system
accepts USB drives up to 32GB in size. You may select to copy
only certain tracks (using the arrow keys) or select them all.
Press the SUBTITLE button on the remote control to start
the ripping process.
ENGLISHESPAÑOLFRANÇAIS
Please note that it is normal for this process to run in real
time and take a while, especially when ripping an entire disc.
volume cannot be changed during the ripping process.
13
Page 16
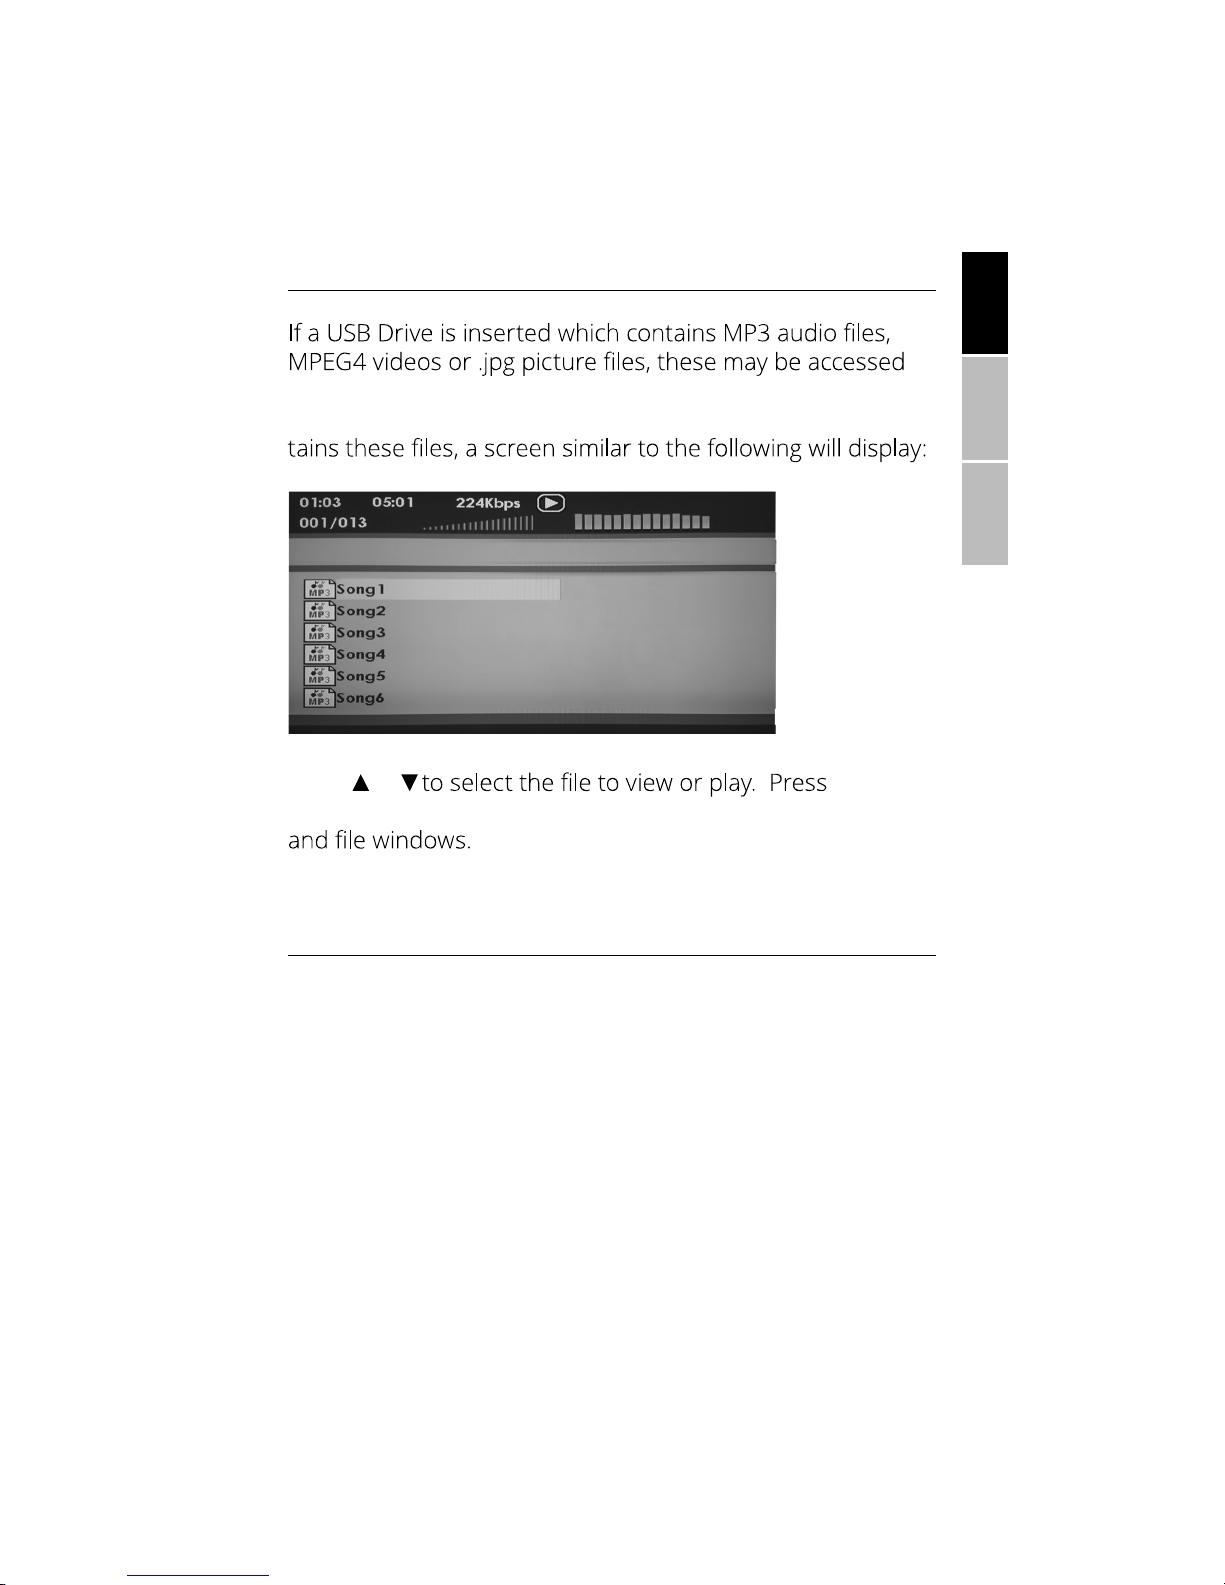
MP3 / MPEG4 / JPEG FILES
for playback from DVD mode by pressing the DVD/USB
button on the remote. Likewise, if a disc is inserted that con-
Press or
PROGRAM to switch between the directory window
ENGLISHESPAÑOLFRANÇAIS
BLUETOOTH OPERATION
From DVD mode, press the SOURCE key on the remote to
switch to Bluetooth mode. When in this mode, the receiver
will be seen by other Bluetooth devices. The Bluetooth name
of this unit is HTDS-5175BT. You can pair a device, such as a
smartphone, to playback through the unit. Follow the same
steps on your Bluetooth device as you would for connecting
to any other Bluetooth speaker or headphone system. When
your device is paired with the receiver, you will hear a chiming
sound that indicates success.
14
Page 17
PRO LOGIC II
Most of the music CDs in your collection are in stereo. Stereo
is not intended for a 5.1 channel surround system. Stereo
is two channels (left and right). This means that your music
CDs are designed for two speakers, such as a pair of stereo
speakers, a pair of headphones, or earbuds. Most music CDs
aren’t made to play back on a 5.1 system and would only be
heard out of 2 of the speakers.
However, your Impecca 5.1 Home Theater System is equipped
with Dolby Pro Logic II! All you have to do is press the “Pro Logic II” button on your remote control and your music CDs will
come to life in 5.1 Surround Sound! This also works for older
movies that do not otherwise support 5.1 surround sound.
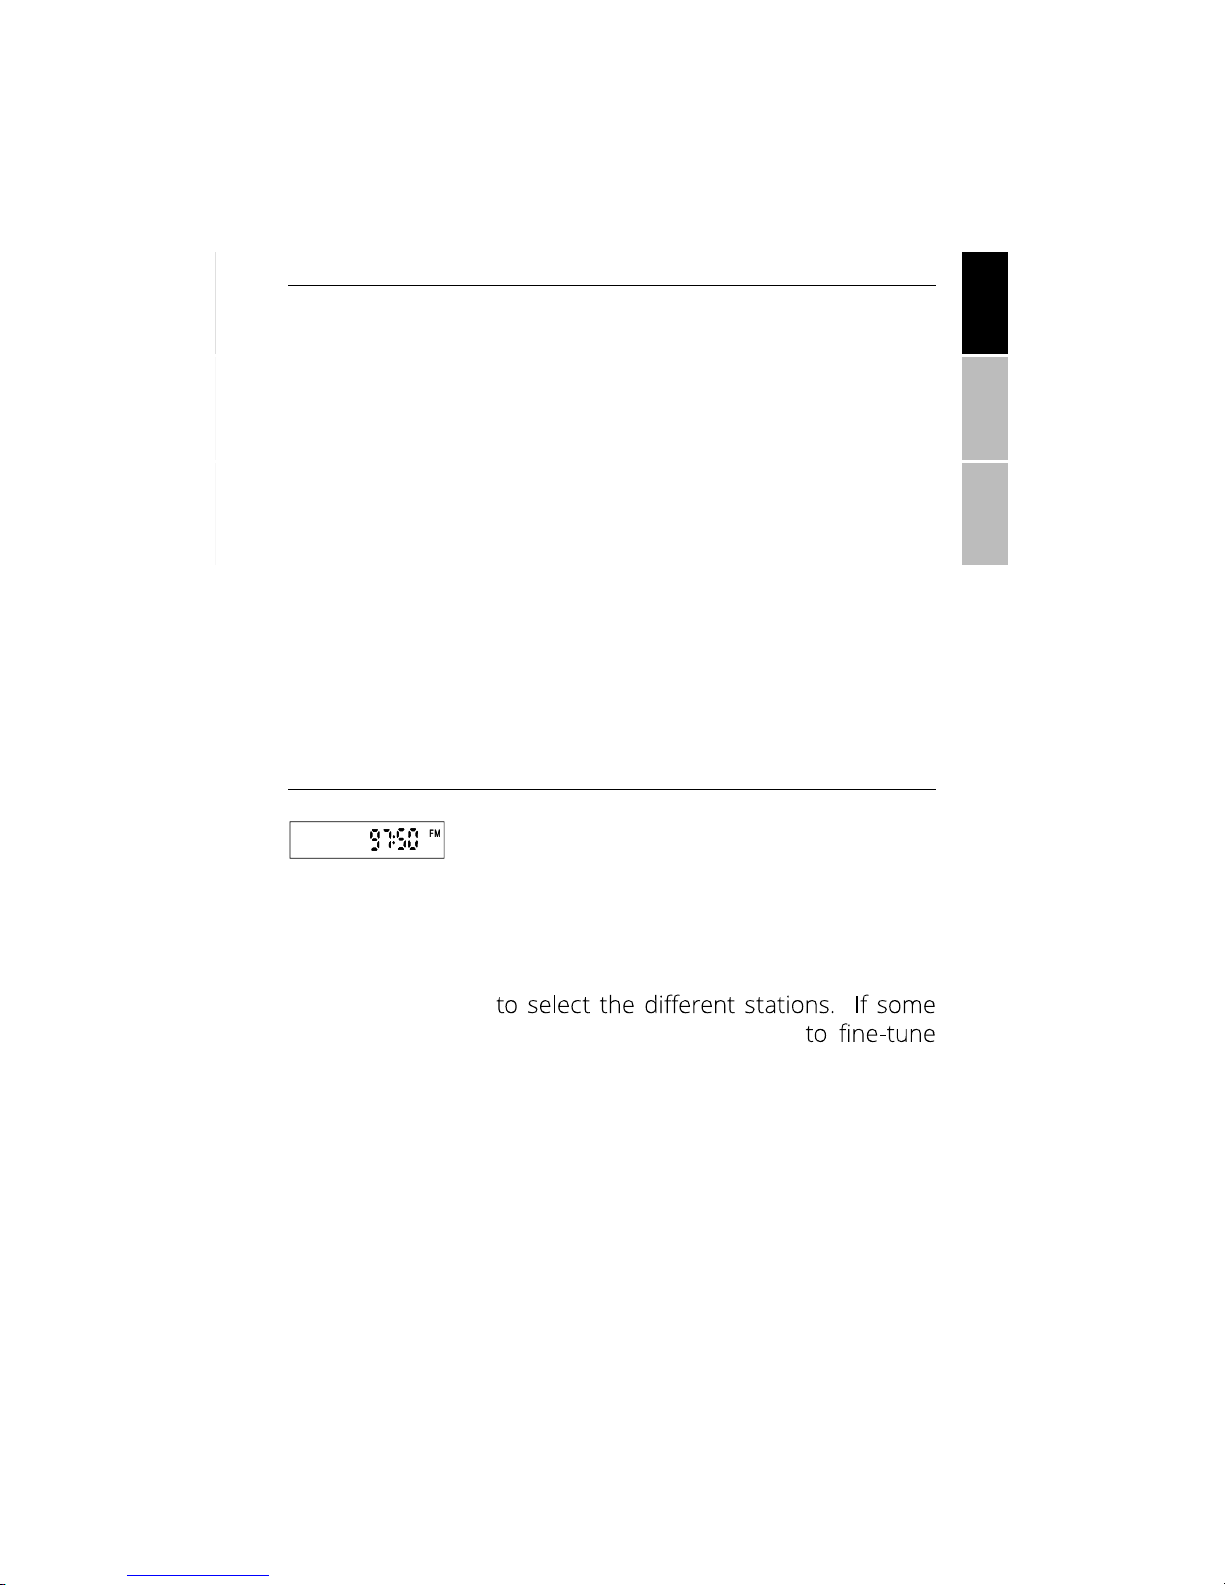
FM RADIO OPERATION
From DVD mode, press the SOURCE button
twice to switch to Radio mode. When the
unit is in radio mode, press the PLAY/PAUSE key on the DVD
panel to start the automatic scan of stations. The unit will
search through all of the tunable stations automatically and
store each one into memory. After the scan is complete,
press CH+ or CH-
stations are unclear, press TUNE+ or TUNE-
them. Then, press the ZOOM key on the remote to store this
station. Up to 30 stations may be added into memory.
ENGLISHESPAÑOLFRANÇAIS
15
Page 18
ADDITIONAL VIDEO FEATURES
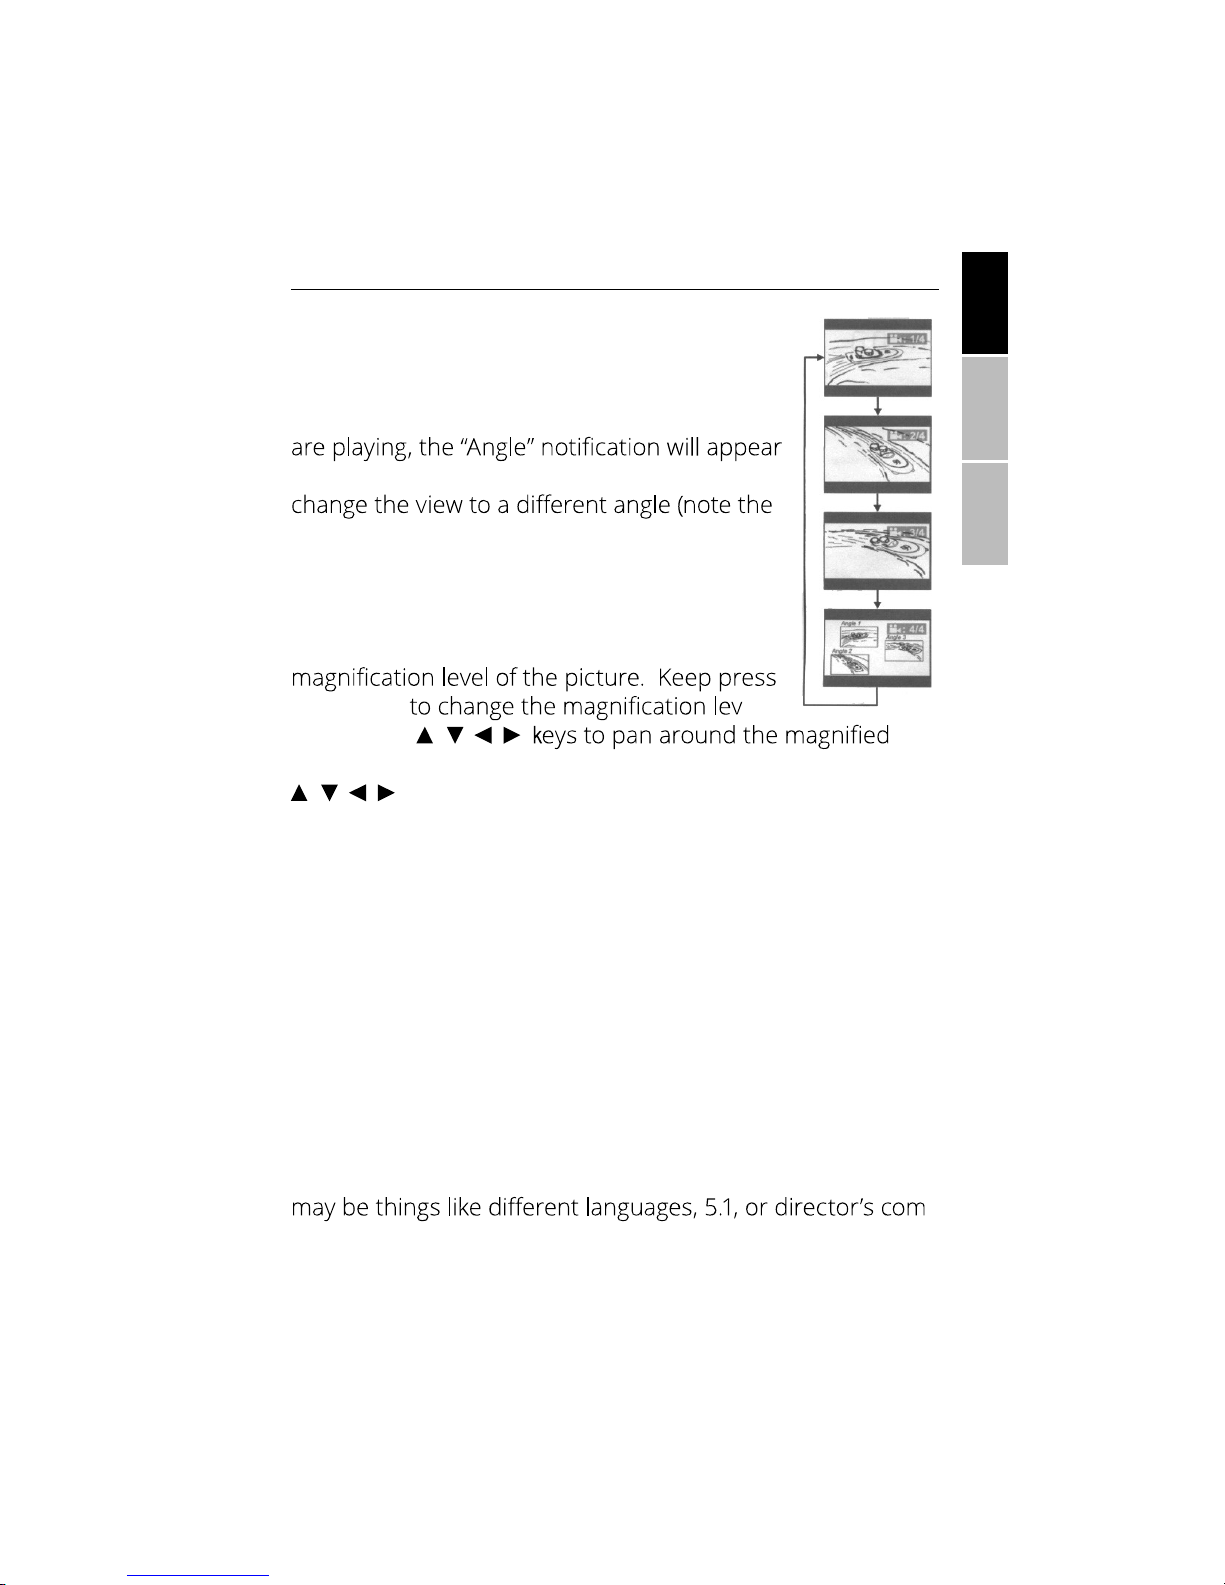
Angles
DVDs may contain scenes which allow you to
select the camera or angle that you wish to
view the scene from. If one of these scenes
on the screen. Press the ANGLE button to
illustration to the right). The available angle will
depend on the DVD.
Picture Zooming
Press ZOOM on your remote to change the
ing ZOOM el. Use the / / /
picture. If the picture is zoomed out to 100%, then the
/ / / keys will rotate the picture instead.
Subtitles
If the DVD supports subtitles, press SUBTITLE to activate
subtitles. If there are subtitles for multiple languages, press
SUBTITLE repeatedly until the desired language is selected. As mentioned previously, DVD features such as this will
depend on the author or company that produced the DVD.
Subtitles (or other features) may also be available from the
main menu/title of the disc.
Audio Track
If supported, pressing the AUDIO button will cycle through
alternate audio tracks to listen to during playback. These
mentary.
ENGLISHESPAÑOLFRANÇAIS
-
16
Page 19

SYSTEM MENU OPTIONS
Press the SETUP button on the remote control unit to open
the setup menu. Then, press / to highlight one of the top
submenu items (General, Audio, Dolby, Video, Preference) and
press ENTER/ to go into that submenu. In the submenu,
press / to highlight an item and to change the setting
of that item. Select a new setting with / and then press
ENTER to commit that setting. The new setting will appear in
orange. After changing the desired settings, press the SETUP
button again to return to the normal display or to navigate
Let’s review each section tab and setting.
The illustrations shown in this section to describe the menu are for
- General -
TV Display:
4:3/PS- (Pan and Scan). For older TVs
that are more narrow, this option trims
Gen eral Se tup Pa ge --
TV Di splay 4:3 /PS
OSD L ang ENG
HDC D Off
OnAng le Mark
OffCap tions
OnS creen S aver
OnLa st Memo ry
ENGLISHESPAÑOLFRANÇAIS
4:3/LB- (Letterbox). A wider picture with black bands on the upper and lower portions of the TV screen will be displayed.
16:9- Widescreen display for newer TVs.
Angle Mark: Display current angle information (if available).
OSD Language: Select your preferred language for the On Screen
Display.
Captions: ent from subtitles).
Screen Saver:
HDCD: Enable playback for HDCD media.
Last Memory: This setting allows the disc to resume playing
where it was previously stopped.
17
Page 20

SYSTEM MENU OPTIONS
- Audio -
Speaker Setup:
Downmix Setup:
Spe aker S etup
Spd if Set up
CH E Q S etup
3D Pr oces s
LT/RT: Select if DVD Player is connected to a decoder (rare).
Stereo: Select this option when the output delivers sound from
only the two front speakers.
5.1CH: 5.1-Ch. audio outputs are connected.
Front Speaker: Output level for the front speakers.
Center Speaker: Output level for the center speaker.
Rear Speaker: Output level for the rear speakers.
Subwoofer:
SPDIF Setup (advanced): Set the SPDIF digital audio output to
3D Process: This function is used to change
settings.
--A udio S etup --
the 3D surround
- Dolby -
Dual Mono Setup: This function is less
common and is to set the ML/MR audio
Stereo: Select this mode when your
DVD player is connected a single stereo speaker or TV with stereo audio
inputs.
L-Mono: Output Left channel audio only.
R-Mono: Output Right channel audio only.
Mix-Mono: Output all audio as one mono signal
--D olby Digi tal Setu p --
Dual Mon o
Dynam ic
Ster eo
L-Mon o
FULL
R-Mon o
3/4
Mix- Mono
1/2
1/4
OFF
ENGLISHESPAÑOLFRANÇAIS
Dynamic Setup: This function is used to set dynamic output
level from OFF to FULL. This is Dynamic Range Control (DRC)
and helps regulate audio levels, meaning that sudden jumps in
volume from soft to loud can be minimized when it is turned on.
18
Page 21

SYSTEM MENU OPTIONS
- Video -
Component:
Set the component video output in S-Video or YUV mode.
Resolution:
Set video output resolution according to
the TV that is connected to this player. Please refer to your TV’s
manual for resolution details.
Quality:
Sharpness: Set the sharpness of picture to high, medium or low.
Brightness: Set brightness of the picture. Highlight Brightness,
then press ENTER to set brightness from -20 to +20. Press ENTER
again to save and exit.
Contrast: Set the contrast of the picture. Highlight Contrast then
press ENTER to set contrast from- 16 to +16. Press ENTER again
to save and exit.
HDMI:
Audio Source: Set the audio source for HDMI to AUTO or PCM.
--V IDEO Se tup Pa ge --
Compon ent
Resol u ti on
Quali ty
HDMI Set up
Sha rpn es s
Bri ght ne ss
Con tra st
Gam ma
Hue
Sat ura ti on
48 0I
57 6I
720 P5 0
720 P6 0
108 0I 50
108 0I 60
108 0p (50 Hz )
108 0p (60 Hz )
S-V ide o
YU V
ENGLISHESPAÑOLFRANÇAIS
- Preference -
TV Type:
Used to select between PAL or NTSC
TV systems.
PAL
: Select this if the connected
TV is a PAL system. It will change
the video signal of an NTSC
disc and output to PAL format.
NTSC
: Select this if your TV is an
NTSC system.
Auto
: Change the video signal output automatically according to
the playing disk format.
Audio
Subtitle
Disc Menu
: Selects a language for audio (if available).
: Selec
ts a language for the subtitles (if available).
: Selects a language for the disc menu (if available).
19
--P ref erenc e Pag e--
TV Typ e
Au dio
Sub title
Dis c Menu
Par ental
Pas sword
Def ault
Rese t
PAL
ENG
Off
ENG
1 KID SA F
2 G
3 PG
4 Pg13
5 PGR
6 R
7 Nc17
8 ADULT
Engl ish
Fren ch
Germ an
Span ish
Itlia n
Portu guese
Engl ish
Fren ch
Germ an
Span ish
Itlia n
Port uguese
Off
Engl ish
Fren ch
Ger man
Span ish
Itli an
Port ugue se
PAL
AUTO
NTSC
Page 22

SYSTEM MENU OPTIONS
Parental: Some DVDs may have a parental level assigned to the
complete disc or to certain scenes on the disc. This feature lets
you set a restriction. The rating levels are from 1 to 8 and are
country dependent. You can prohibit the playing of certain discs
that are not suitable for your children or even have some discs
played with alternate scenes.
Password:
and to change the password. Highlight “Password”, then press ENTER on the Password Setup Page and the set Password Mode “On
--P refere nce Setu p Page--
Pass word Mo de
Pass word
On
Chan ge
On
Off
--P ref erence S etup Pag e--
Old P ass wor d
New P ass word
Con fir m P WD
OK
Old Password: Enter the OLD password, (factory setting is
“0000”) and the cursor will jump automatically to “NEW PASSWORD”.
ENGLISHESPAÑOLFRANÇAIS
New Password: Enter the NEW password. Enter 4 digits from
the remote control’s numeric buttons, and the cursor will automatically jump to CONFIRM PASSWORD. Re-enter the pass-
Important: To access the Preferences menu with a disc in the tray, it
may be necessary to stop playback. Otherwise, you may notice that
the Preferences tab cannot be selected, even though the other 4 tabs
can be selected with no issue.
20
Page 23

SUPPORTED DISCS & FILE FORMATS
Playable Discs
The unit can play back the following discs:
Disc Types
DVD
Data on most DVDs is split into large sections
sections called titles, which are split into subsections called chapters, each of which as a
number.
DVD
AUDIO CD
Data on an Audio disc is split into sections
called tracks and each track is given a track
number.
Audio
CD
FEATURES
Read the manual that accompanies the DVD disc or explore the DVD’s
menu and titles, as the available features on a DVD disc will change depending on the DVD.
ENGLISHESPAÑOLFRANÇAIS
Note: Blu-ray, CD-G, CD-Extra, CD-ROM and DVD-ROM discs are
not supported.
21
Page 24

TECHNICAL SPECIFICATIONS
General
Power Supply: 110-240V ~ 50/60Hz
Power Consumption: 32W
Dimensions: 360x260x65mm
DVD Player
Laser Type: Semiconductor laser, wavelength 650nm
Signal System: PAL, NTSC/AUTO
Video Format: 16:9, 4:3 (pan and scan), 4:3 (letterbox)
Video Output Level: 1 Vp-p (75 ohm)
Video Y output level: 1 Vp-p (75 ohm)
Video C output level: 286 mV P-P (75 ohm)
Frequency Response: 20hz - 22kHz (48 KHz)
(Audio) 20hz - 22kHz (96 KHz)
Output Power Stereo Mode (DIN) 2x15W(RMS)
Surround mode (1 kHz) 2x15W(RMS)
Center speaker 1x15W(RMS)
Subwoofer 1x30W(RMS)
Signal to Noise Ratio >60 dB
Speakers
Surround/ Stereo / Center Impedance: 4ohm
Speaker Drivers: 3” full range
Dimensions: 92x78x132mm
ENGLISHESPAÑOLFRANÇAIS
Subwoofer Impedance: 6ohm
Speaker Driver: 5.25”
Dimensions: 160x265x305mm
22
Page 25

TROUBLESHOOTING
PROBLEM SOLUTION
ENGLISHESPAÑOLFRANÇAIS
The main unit does not turn on.
The front panel display is blank.
The icon appears on screen
Make sure that other devices
plugged into the same power source (such as the TV) also
work.
There are two power buttons on
the main unit. Make sure that
the power switch on the rear
of the unit is turned on before
pressing the front power button
or the power button on the remote control.
If the remote isn’t turning the
system on, press the power button on the front of the unit. If
this works, check the batteries
on the remote control.
The feature or action cannot be completed at this time
because:
• The disc doesn’t support the
feature (e.g., angles).
• The feature is not available
in this area of the disc (e.g.
fast forward or rewind).
• You’ve requested a time,
chapter, track, or title number which does not exist.
Picture is distorted The disc might be damaged.
The disc tray isn’t ejecting when
pressing the eject button
Try another disc. Note that it
is normal for some distortion
to appear during forward or
reverse scan.
Switch to DVD mode by pressing the Source button, then try
ejecting again.
23
Page 26

TROUBLESHOOTING
PROBLEM SOLUTION
ENGLISHESPAÑOLFRANÇAIS
The forward or rewind buttons
do not work
play.
FM Reception is poor Ensure that the provided FM an-
No sound is heard Ensure that the unit is not on
Some discs have sections that
prohibit scanning or skipping.
For example, the unit cannot
skip through the warning information and copyright notices at
the beginning of a DVD.
Blu-ray, CD-G, CD-Extra, CDROM and DVD-ROM discs are
not supported. Discs with
deformities will also not tend to
play successfully.
tenna is connected securely and
the station is properly tuned.
Move the FM antenna to various
positions at various angles to
gain reception.
mute and that the volume is
turned up. See if other audio
sources are working by pressing
the SOURCE button.
No sound in the center / surround speakers
Movie is not heard in 5.1 surround
This is normal if the material being played is not in 5.1 surround.
You may wish to turn on Prologic
II by pressing that button on the
remote control.
Make sure the DVD supports
types may need to play in stereo.
24
Page 27

CONTACT TECHNICAL SUPPORT
Questions and for other resources, which may include an
updated version of this user’s guide:
http://www.impecca.com
Contact Customer Service at:
service@impecca.com
ENGLISHESPAÑOLFRANÇAIS
25
Page 28

WARRANTY
®
. Please your produ ct
ENGLISHESPAÑOLFRANÇAIS
®
®
®
®
adapters
®
®
®
®
®
®
®
®
®
®
®
®
®
service@impecca.com
26
Page 29

ENGLISHESPAÑOLFRANÇAIS
27
Page 30

ENGLISH ESPAÑOL FRANÇAIS
TABLA DE CONTENIDO
Instrucciones importantes de seguridad 29
Manejo de Discos CD/DVD 31
Aviso de derechos de autor 31
Contenido del paquete 32
Características del producto 32
Controles de la unidad principal 33
Conexiones del panel posterior 33
Comenzando 34
Conectando los altavoces 35
Control remoto 35
Colocación de altavoces 36
Conectando a un televisor 37
Botones del control remoto 38
Funciones del control remoto 39
Características de reproducción de los CD de audio 40
ENGLISHESPAÑOLFRANÇAIS
Ripping del CD 41
Archivos MP3 / MPEG4 / JPEG 42
Operación Bluetooth 42
Pro Logic II 43
Operación del radio FM 43
Características adicionales de video 44
Opciones del menú del sistema 45
Discos y formatos de archivo compatible 49
Solución de problemas 50
Garantía 54
28
Page 31

INSTRUCCIONES IMPORTANTES
DE SEGURIDAD
Antes de utilizar esta unidad, asegúrese de leer todas las instrucciones
de operación. Todas las instrucciones de seguridad y operación
deben conservarse para referencia a futuro y todas las advertencias
del producto en este manual de usuario deben seguirse como se
WARN ING
Ris k of el ec tri c s ho ck,
do n ot op en.
EL SÍMBOLO DE RAYO CON PUN TA DE FLEC HA DENTRO DE UN
TRIANGULO EQUIL ÁTERO TIENE
EL PROPÓSITO DE ALERTAR AL
USUARIO SOBRE L A PRESENCIA DE ‘ VOLTAJE PELIGROSO’
NO-AISL ADO DENTRO DE LA
CARCASA DEL PRODUC TO QUE
PUEDE SER DE LA MAGNIT UD
SUFIC IENTE PARA CONSTITUIR
RIESGO DE DESCARGA ELÉCTRICA PAR A LAS PER SONAS.
• ADVERTENCIA: Para reducir
tricas no retire la cubierta o
parte posterior de la unidad.
No hay partes a las que el
usuario pueda darles servi-
• Limpie la unidad únicamente con un paño seco.
• ADVERTENCIA: Para evitar el
riesgo de incendio o descargas, no exponga la unidad
o cualquiera de sus componentes al agua, lluvia o
humedad (incluyendo gotas
o salpicaduras). No deben
colocarse sobre la unidad
o cerca de ella, objetos lle-
PARA R EDUCIR EL RIESGO
DE DESCARGA ELÉCTRICA ,
NO RETIRE LA CUBIERTA
DELA NTERA O POSTERIOR.
NO HAY PARTES ADENTRO
A L AS QUE EL USUARIO
PUEDA DARLES SERVICIO.
SOLIC ITE EL SERVICIO A
UNA PERSONA CALIFIC ADA
-
• Proteja el cable de sumin-
• No deben utilizarse con
• No bloquee las aberturas
29
EL SIGNO DE EXCLAMACIÓN DENTRO DE UN TRIANGULO EQUILÁTERO TIENE EL PROPÓSITO DE
ALERTAR AL USUA RIO SOBRE LA
PRESENCIA DE INSTRUCCIONES DE
OPERACIÓN Y MA NTENIMIEN TO
IMPOR TAN TES (SERVICIO) EN LA
LITERATURA QUE ACOMPAÑA A
ESTE APAR ATO.
nos con líquidos como los
istro de energía para que
no lo pisen o perforen.
esta unidad cables USB
más largos de 10” (250mm)
de ventilación en la unidad,
ya que se proporcionan por
motivos de seguridad. No
instale este producto en
un librero. Debe haber al
menos 2 pulgadas de espacio libre alrededor de la
unidad en todo momento
ENGLISHESPAÑOLFRANÇAIS
ENGLISHESPAÑOLFRANÇAIS
Page 32

para asegurar una ventilación adecuada cuando la
unidad está en operación.
• No exponga la unidad o
cualquiera de los contenidos del paquete a la luz directa del sol y fuentes de
calor. La unidad no debe
ser utilizada en temperaturas mayores a los 113°F.
• ADVERTENCIA: Si la unidad se sobrecalienta, deje
de utilizarla de INMEDIATO y entre en contacto con soporte al cliente
• No instale la unidad principal
o cualquiera de sus altavoces en una mesa, trípode o
carro inestable. La unidad
podría caer, resultando en
posibles daños o lesiones.
• No utilice la unidad en altitudes mayores a los 65,000
pies sobre el nivel del mar.
• Desconecte la unidad duran-
o cuando no se utilice por
periodos largos de tiempo.
• ADVERTENCIA: El volumen
excesivo y/o el uso de auriculares o audífonos puede
ENGLISHESPAÑOLFRANÇAIS
• ADVERTENCIA: Este reproductor DVD utiliza un sistema
láser para leer los discos CD/
DVD. El uso de controles, o la
realización de procedimien-
cados aquí pueden resultar
en radiación láser peligrosa.
• ADVERTENCIA: Para evitar la
exposición directa al rayo láser, no abra la unidad cuando
está reproduciendo. La radiación láser es visible cuando
se abre la unidad. Nunca vea
directamente el rayo láser.
• ADVERTENCIA: Cuando sea
utilizado por niños los padres deben asegurarse que
los niños entienden todas
las instrucciones de seguridad, especialmente aquellas relacionadas con el sobrecalentamiento, riesgos
Este equipo genera y puede irradiar energía de radiofrecuencia y, si no
se instala y utiliza de acuerdo con las instrucciones, puede causar interferencias perjudiciales a las comunicaciones de radio. Sin embargo,
no hay garantía de que la interferencia no ocurra en una instalación en
particular. Si este equipo causa interferencia dañina a la recepción de
radio o televisión, lo cual puede determinarse apagando y encendiendo
el equipo, se recomienda al usuario que intente corregir la interferencia
mediante una o más de las siguientes medidas:
• Reoriente o reubique la antena receptora.
• Aumente la separación entre el equipo y el receptor.
•
TV.
30
Page 33

MANEJO DE LOS DISCOS CD/DVD
• No exponga los discos al calor,
la luz directa del sol o en alta
humedad. En climas más cálidos, no deje los discos en un
vehículo estacionado.
• Almacene los discos en sus
-
ando.
• Apilar los discos o dejarlos
parados sobre su orilla causará
que el disco se tuerza.
• -
-
lando. Tómelo por las orillas.
• Las huellas, polvo, suciedad o
rayones en el disco pueden distorsionar la imagen o la calidad
del sonido de su disco, o causar
que la reproducción brinque.
Tenga cuidado de los rasguños
en el disco que impiden que
el sistema de rayo láser lea y
reproduzca el disco adecuadamente. Limpie los discos antes
de usarlos.
• No pegue papel o cinta adhesiva a los discos. Use marcadores permanentes en la parte
superior del disco.
• Limpie los discos con un paño
seco, limpiando ligeramente del
centro hacia afuera.
• No utilice solventes como el
benceno, productos de limpieza caseros (a excepción de
los apropiados para CD/DVD)
o spray antiestático apropiado
para los LP de vinilo, ya que se
pueden dañar el dispositivo y
los discos.
• Asegúrese que la etiqueta
siempre está hacia arriba cuando coloque los discos en el reproductor.
Aviso de Derechos de autor
• Está prohibido por ley copiar, rentar, transmitir, mostrar en eventos
públicos (por medio de cable, inalámbrico, o de cualquier otra forma) material protegido por derechos de autor sin permiso.
ENGLISHESPAÑOLFRANÇAIS
• Este producto cuenta con la función de protección de copia desarrollada por Macrovision. Las señales de protección de copia se
graban en algunos discos. Cuando se graban o reproducen las imágenes de estos discos se mostrará con ruido. Este producto incorpora la tecnología de protección de derechos de autor que es pro-
otros derechos de propiedad intelectual propiedad de Macrovision
Corporation y otros propietarios de derechos. El uso de esta tecnología de protección de derechos de autor debe ser autorizado por
co y otros usos de visualización limitados a menos que Macrovision
Corporation lo autorice de otra manera. La ingeniería inversa o el
desmontaje están prohibidos.
-
31
Page 34

CONTENIDO DEL PAQUETE
Su Sistema de Teatro en Casa de 5.1 Canales Impecca
incluye lo siguiente:
• Unidad principal (1)
• Altavoces principales (5)
• Subwoofer (1)
• Cables para altavoces (6)
• Control remoto (1)
• Cable AV (1)
• Antena de coleta FM (1)
• Manual de usuario y tarjeta de garantía (1)
CARACTERÍSTICAS DEL PRODUCTO
• tal® integrado.
• LOS CD y DVD se reproducen automáticamente cuando se insertan.
• Procesamiento de audio 5.1 y¬¬ sonido surround (en-
ENGLISHESPAÑOLFRANÇAIS
incluidos.
• ducirse en 5.1 surround)
• Receptor FM
• Compatible con muchos tipos de CD de audio, video y
fotografías incluyendo VCD, MP3, HDCD y JPEG (CD de
imágenes)
• Capacidad de lectura/escritura de USB integrada
• Ripping de CD (funcionalidad de copia de CD a USB)
•
su sistema de cine en casa desde cualquier dispositivo
• Control remoto infrarrojo
32
Page 35

CARACTERÍSTICAS DEL PRODUCTO
9
ENGLISHESPAÑOLFRANÇAIS
/SC AN SOURCE
1. EN ESPERA
2. ENTRADA USB
3. ABRIR Y CERRAR LA BANDEJA
DEL DVD
4. REPRODUCIR / PAUSAR / REVIS-
5. FUENTE
6. DETENER
7. PREVIO / CH-
8. SIGUIENTE / CH+
9. VOLUMEN +/-
CONEXIONES DEL PANEL POSTERIOR
SERIALNO .:
MODEL: HTDS-5 175BT
HOME THE ATER SYSTEM
POWER SUP PLY: 110-24 0V~ 50 /60Hz
RATED POWE R: 32W
www.impecca .com
AR
1. ENTRADA DEL SUMINISTRO DE
ENERGÍA
2. SALIDA DE AUDIO DER/IZQ
3. SEÑAL DEL COMPONENTE DE
SALIDA Y/Pb/Pr
4. ANTENA FM
5. INTERRUPTOR DE ENCENDI-
DO
6. SALIDA DE ALTAVOZ
7. SALIDA HDMI
8. SALIDA COAXIAL
9. ALIDA RCA DE VIDEO
10. SALIDA S-VIDEO
11. SALIDA ÓPTICA
33
Page 36

COMENZANDO
Altavoces
Antes de conectar la unidad principal al suministro de energía, colóquela en donde será instalada, en un lugar seguro donde se pueda acceder al panel posterior. Antes de
encender la unidad por primera vez, asegúrese que cada
uno de los seis altavoces están conectados adecuadamente
como se muestra. Se proporcionan cables de los altavoces
y ya están adjuntos a ellos. Debe conectar cada uno de los
altavoces a la parte posterior de la unidad. Asegúrese de
que el cableado de los altavoces no se enrede, de modo
que sea fácil colocar los altavoces donde se desee. Utilice
el diagrama siguiente para asegurarse que los altavoces
están conectados a la terminal correcta. El subwoofer es un
altavoz bastante diferente. Los otros cinco altavoces deben
estar etiquetados. Fíjese qué es cada altavoz de modo que
pueda conectarlos correctamente en el siguiente capítulo:
ENGLISHESPAÑOLFRANÇAIS
34
SERIA LNO .:
MODEL: HTDS-51 75BT
HOME THE ATER SYSTEM
POWER SU PPLY: 110-2 40V~ 50 /60H z
RATED POWE R: 32W
www.impecca .com
Page 37

COMENZANDO
Conectando el cable de los altavoces
Los cables de los altavoces siempre están divididos en dos. Para cada altavoz deben conectar
los lados positivo (+) y negativo (-) del cable del
altavoz en la parte posterior de la unidad.
El cable positivo es el rojo, con una franja
negra. Asegúrese que el lado positivo (+) está
conectado en la terminal roja: Presione la pestaña de la terminal, inserte el extremo del cable y suelte la pestaña.
El cable negativo (que viene en el mismo altavoz) es negro
con una franja roja. De la misma forma, asegúrese que el lado
negativo (-) se conecte en la terminal negra directamente debajo de la roja (presione la pestaña negra hacia abajo para
conectar).
ADVERTENCIA: ¡Asegúrese de que los cables positivo y negativo del altavoz nunca entren en contacto entre ellos! ¡Siempre mantenga los cables negro y rojo separados!
ENGLISHESPAÑOLFRANÇAIS
CONTROL REMOTO
Retire la tapa de la batería en la parte posterior
del control remoto e inserte 2 baterías AAA (no
incluidas) y luego vuelva a colocar la tapa en el
control remoto. Lea la sección de Botones del
control remoto para tener una lista completa de
cada botón y su función.
35
Page 38

COLOCACIÓN DE LOS ALTAVOCES
misma distancia de la posición de audición y a la altura de la
audición. Esta es una idea de la colocación de los altavoces:
A: Altavoces Delantero Izquierdo (FL) y Delantero Derecho (FR)
B: Altavoz Central (CEN)
C: Envolvente o Surround Izquierdo (SR) y Envolvente o Sur-
round Derecho (SR)
ENGLISHESPAÑOLFRANÇAIS
Coloque los altavoces centrales cerca del frente del área de
audición, a cada lado del altavoz central. Procure no colocar
los altavoces envolventes (C) “detrás” de los oídos. Colóque-
círculo mostrado anteriormente. En películas que utilizan el
envolvente o surround 5.1 gran parte de las voces o diálogos se escuchan provenir del altavoz central.
Si es posible, coloque el subwoofer cerca de una esquina
para una respuesta mayor de bajos. Sin embargo, debido
a la naturaleza de las frecuencias bajas, el posicionamiento
-
preste atención a las medidas de seguridad.
36
Page 39

CONECTANDO A UN TELEVISOR
El cable RCA AV proporcionado puede ser usado para conectar la unidad principal a un televisor. Si la televisión tiene un
componente S-Video o entrada HDMI, también puede usarse
ese tipo de cables. Tome en cuenta que aunque hay una salida de auto (audio out) estéreo para enviar el audio a la bocina
de su televisor, esto no es completamente necesario, ya que
el sonido saldrá de las bocinas provistas.
SERIALNO .:
MODEL: HTDS- 5175 BT
HOME THEAT ER SYSTEM
POWER SU PPLY: 110- 240V ~ 50/60 Hz
RATED POW ER: 32W
www.impec ca.c om
CONFIGURACIÓN DE LA ANTENA FM
ENGLISHESPAÑOLFRANÇAIS
Conecte la antena de coleta FM suministrada a la conexión
de la antena FM como se muestra a continuación. Vea la sección de la “Operación del radio FM” para tener mayor información sobre el uso del radio FM integrado.
SERIALNO .:
MODEL: HTDS- 5175 BT
HOME THEAT ER SYSTEM
POWER SUP PLY: 110-2 40V~ 5 0/60 Hz
RATED POWE R: 32W
www.impec ca.c om
37
Page 40

BOTONES DEL CONTROL REMOTO
El siguiente diagrama le ayudará a lograr el mejor uso de su control remoto:
1. POWER
2. AUDIO
3. TITLE
4. BOTONES DE FLECHA
5. SETUP
6. DVD / USB
7. STOP
8. MENU
9. PREV / CH-
10. L / R
11. REV / TUNE-
12. ZOOM
13. MUTE
14. RETURN
15. SLOW
16. A-B
17. EQ
18. OPEN (EJECT) /
CLOSE
19. TECLADO NUMÉRICO
20. TIME
21. ANGLE
22. SUBTITLE / COPY
23. SOURCE
24. PRO LOGIC II
25. PLAY / PAUSE
26. VOLUMEN+
27. NEXT / CH+
28. VOLUMEN-
29. FWD / TUNE+
30. REPEAT
31. AUTO SEARCH
32. PROGRAM
33. OSD
34. STEP
35. N / P
ENGLISHESPAÑOLFRANÇAIS
38
Page 41

FUNCIONES DEL CONTROL REMOTO
1. Enciende y apaga la unidad (ON/OFF)
2. Cambia las pistas de audio/idioma (si el disco cuenta con ello)
3. Regresa al título del DVD (como si el disco acabara de ser insertado)
6. Cambia entre las fuentes de entrada CD/DVD y USB
7. Detiene la reproducción
8. Regresa al menú raíz del DVD
9. Va al capítulo o pista previa
10 Cambia el sonido a mono (izquierda/derecha/izquierda+derecha). Se usa rara vez
11. Retroceder (para canciones o video) o sintonizar una frecuencia más baja
(radio FM)
12. Acerca la imagen (para video) o almacena la estación actual en la memoria
(para el radio)
13. Silencia y activa el sonido
14. Va al menú o regresa la reproducción del DVD que ya está en el menú
15. Reproduce el video en diferentes velocidades en cámara lenta (si el disco lo
soporta)
16. Repite de A a B (presione para marcar A, y luego otra vez para B) Presione
nuevamente para regresar a la reproducción normal.
17. Cambia la ecualización del sonido (i.e., Rock, Jazz, Pop)
18. Expulsa cualquier disco que se encuentra en ese momento en la bandeja
(cuando está en modo DVD)
19. Utilice estos números para ingresar la hora o capítulos. Utilice “10+” para 10 o
más.
ENGLISHESPAÑOLFRANÇAIS
21. Cambia los ángulos de la cámara (si el disco lo soporta)
22. Selecciona/habilita subtítulos (si el disco lo soporta)
23. Cambia entre las fuentes de sonido DVD, Bluetooth y Radio
24. Habilita la reproducción Pro Logic II
25. Comienza o pausa la reproducción
26. Sube el volumen
27. Salta al siguiente capítulo o pista
28. Baja el volumen
29. Avance rápido (canciones/video) o sintoniza una frecuencia mayor (radio)
30. Repetir pistas (para audio) o capítulos (para video)
31. Buscar/explorar la siguiente estación sintonizable del radio
32. Programar una lista de canciones
33. Presione para desplegar información sobre el tiempo/estado de reproducción
34. Pausa y avanza un cuadro a la vez (si está soportado). Presione PLAY para resumir la reproducción normal
35. Cambia entre los modos de video NTSC y PAL
39
Page 42

CARACTERÍSTICAS DE REPRODUCCIÓN
DE LOS CD DE AUDIO
Automáticamente, la unidad reproducirá un CD de audio
cuando es insertado. Si desea cambiar el orden en el cual se
reproducen las pistas, presione el botón PROG en su control
para crear su propia lista de reproducción.
“Botones del control remoto” mencionada anteriormente
para conocer más características.
ENGLISHESPAÑOLFRANÇAIS
-
ESTABLECIMIENTO DEL TIEMPO DE REPRODUCCIÓN DE VIDEO
Cuando se carga un CD de Video puede seleccionar el tiempo
dentro del cual comenzará a reproducir el video al presionar
el botón TIME en su control remoto:
para ingresar el tiempo deseado. Presione nuevamente TIME
para salir.
Nota: Los CD de Video tienen un formato diferente a los de
los DVD. Puedes utilizar este mismo procedimiento para saltar al capítulo deseado de un DVD, pero este está normalmente integrado al sistema de menús del DVD.
40
Page 43

RIPPING DEL CD
El reproductor de DVD puede copiar pistas de CD de audio
protegidos a una memoria USB. Con un CD de audio cargado,
inserte la memoria USB en la parte delantera de la unidad
memorias USB de hasta 32 GB de tamaño. Puede elegir co-
cionar todas.
Presione el botón SUBTITLE en el control remoto para
comenzar el proceso de ripping.
ENGLISHESPAÑOLFRANÇAIS
-
Por favor, tome en cuenta que es normal para este proceso
el ejecutarse en tiempo real y llevarse un tiempo, especialmente cuando se le hace ripping a todo un disco. Asegúrese
de ajustar el volumen a un nivel razonable primero, ya que el
el proceso de ripping.
41
Page 44

ARCHIVOS MP3 / MPEG4 / JPEG
Si la memoria USB que se inserta contiene archivos de audio MP3, videos MPEG4 o archivos de imágenes .jpg. estos
pueden accederse para reproducirse desde el modo DVD
al presionar el botón DVD/USB en el control remoto De la
misma forma, si se inserta un disco que contiene estos archivos, se desplegará una pantalla similar a la siguiente:
Presione o para seleccionar el archivo a ver o reproducir.
Presione PROGRAM para cambiar entre la ventana del direc-
torio y la ventana de los archivos.
ENGLISHESPAÑOLFRANÇAIS
OPERACIÓN BLUETOOTH
Desde el modo DVD, presione la tecla SOURCE en el control
ese modo, el receptor será visto por otros dispositivos Bluetooth. El nombre Bluetooth de esta unidad es HTDS5175BT.
Puede acoplar un dispositivo como un Smartphone, para
su dispositivo Bluetooth como lo haría para conectarse a
cualquier altavoz o sistema de auriculares Bluetooth. Cuando su dispositivo se acople con el receptor, escuchará un
42
Page 45

PRO LOGIC II
La mayoría de los CD de música en su colección están en
par de auriculares o intraurales. La mayoría de los CD de
música no están hechos para reproducirse en un sistema 5.1
y solo pueden escucharse en 2 de los altavoces.
Sin embargo, ¡su Sistema de Teatro en Casa 5.1 de Impecca
está equipado con Dolby Pro Logic II! Todo lo que tiene que
hacer es presionar el botón “Pro Logic II” en su control remoto, ¡y sus CD de música cobrarán vida en el Sistema Surround
forma no son compatibles con el sistema surround 5.1.
OPERACIÓN DEL RADIO FM
Desde el modo DVD, presione el botón
SOURCE dos veces para cambiar al modo
Radio. Cuando la unidad está en modo Radio, presione la tecla PLAY/PAUSE en el panel del DVD para comenzar con la
exploración automática de las estaciones. La unidad buscará
en todas las estaciones sintonizables y almacenará cada una
sione CH+ o CH- para seleccionar las diferentes estaciones.
Si algunas de las estaciones no son claras, presione TUNE+ o
TUNEZOOM en el control remoto para almacenar esa estación. Se
pueden agregar hasta 30 estaciones en la memoria.
ENGLISHESPAÑOLFRANÇAIS
-
-
43
Page 46

FUNCIONES ADICIONALES DE VIDEO
Ángulos
Los DVD pueden contener escenas que permiten seleccionar la cámara o el ángulo que quiere
ver de la escena. Si una de estas escenas está
mostrándose, en la pantalla aparecerá la noti-
ANGLE para
cambiar la vista a un ángulo diferente (vea la
ilustración de la derecha). El ángulo disponible
dependerá del DVD.
Acercamiento de imagen (Zooming)
Presione ZOOM en su control remoto para
cambiar el nivel de aumento en la imagen. Siga
presionando ZOOM para cambiar el nivel de
aumento. Utilice las teclas / / / para mover la imagen
aumentada. Si la imagen se acerca al 100%, entonces las
teclas / / / le darán vuelta a la imagen.
Subtítulos
Si el DVD cuenta con subtítulos, presione SUBTITLE para
activar los subtítulos. Si hay subtítulos para varios idiomas,
presione SUBTITLE repetidamente hasta seleccionar el
idioma deseado. Como se mencionó anteriormente, las
características del DVD como estas dependen del autor o la
compañía que produjo el DVD. Los subtítulos u otras car-
ENGLISHESPAÑOLFRANÇAIS
principal/título del disco.
Pistas de Audio
Si es compatible, al presionar el botón AUDIO se alternará
entre pistas de audio alternativas para escuchar durante la
reproducción. Esto puede ser algo como diferentes idiomas,
5.1, o comentarios del director.
44
Page 47

OPCIONES DEL MENÚ DEL SISTEMA
Presione el botón SETUP en el control remoto para abrir el
/ para resaltar
uno de los elementos superiores del menú (General, Audio,
Dolby, Video, Preference) y presione ENTER / para entrar
en ese submenú. En el submenú, presione / para resaltar un elemento y
elemento. Seleccione un nuevo ajuste con / y luego presione ENTER -
cambiar los ajustes deseados, presione nuevamente el botón
SETUP para regresar a la pantalla normal o para regresar
al menú anterior para poder ver las diferentes pestañas. Va-
Las ilustraciones mostradas en esta sección para describir el menú son para
propósitos informativos únicamente. La pantalla actual puede diferir.
- General -
TV Display:
4:3/PS- (Pan y Scan). Para televisiones
más antiguas que son más angostas,
esta opción recorta los lados de la
película para que quepan en su pantalla.
4:3/LB- (Letterbox). Se desplegará una imagen más ancha con
bandas negras en la parte superior e inferior de la pantalla.
16:9- Despliegue de pantalla ancha (widescreen) para televisores
más nuevos.
Angle Mark: Despliega la información actual del ángulo (si está
disponible).
OSD Language: Seleccione su idioma preferido para el despliegue en pantalla.
Captions: ponibles (es diferente de los subtítulos).
Screen Saver: Habilita o deshabilita el protector de pantalla.
HDCD: Enable playback for HDCD media.
Last Memory:
la reproducción donde se detuvo previamente.where it was previously stopped.
45
Gen eral Se tup Pa ge --
TV Di splay 4:3 /PS
OSD L ang ENG
HDC D Off
OnAng le Mar k
OffCap tion s
OnS creen S aver
OnLa st Memo ry
ENGLISHESPAÑOLFRANÇAIS
Page 48

OPCIONES DEL MENÚ DEL SISTEMA
- Audio -
Speaker Setup:
Downmix Setup:
Spe aker S etup
Spd if Set up
CH E Q S etup
3D Pr oces s
LT/RT: Seleccione si el reproductor
(rara vez).
Stereo: Seleccione esta opción cuando la salida entrega el
sonido desde los dos altavoces frontales.
5.1CH: Las salidas de audio 5.1-Ch se conectan.
Front Speaker: Nivel de salida para los altavoces delantero.
Center Speaker: Nivel de salida para el altavoz central.
Rear Speaker: Nivel de salida para los altavoces posteriores.
Subwoofer: Apaga y enciende el subwoofer.
SPDIF Setup (
modo de apagado, RAW o PCM.
3D Process:
surround 3D.
--A udio S etup --
- Dolby -
Dual Mono Setup: Esta función es
menos común y es para establecer la
salida de audio ML/MR en diferentes
modos:
Stereo: Seleccione este modo cuando su reproductor DVD está conecta-
--D olby Digi tal Setu p --
Dual Mon o
Dynam ic
Ster eo
L-Mon o
FULL
R-Mon o
3/4
Mix- Mono
1/2
1/4
OFF
ENGLISHESPAÑOLFRANÇAIS
L-Mono: Salida de audio únicamente del canal izquierdo.
R-Mono: Salida de audio únicamente del canal derecho.
Mix-Mono: Salida de todo el audio como una señal mono.
Dynamic Setup: Esta función se utiliza para establecer el nivel
de salida dinámico de OFF a FULL. Este control Dinámico de
Rando (DCR-Dynamic Range Control) ayuda a regular los niveles
suave a alto puede minimizarse cuando está habilitado..
46
Page 49

OPCIONES DEL MENÚ DEL SISTEMA
- Video -
Component:
Ajusta la salida del componente de video
en el modo S-Video o YUV.
Resolution:
Ajusta la resolución de salida de acuerdo a la televisión que está conectada a este reproductor. Por fa-
la resolución.
Quality:
Sharpness: Ajusta la nitidez de la imagen a alta (high), media
(medium) o baja (low).
Brightness: Ajusta el brillo de la imagen. Resalte Brightness, luego presione ENTER y ajuste el brillo de -20 a +20. Presione nuevamente ENTER para guardar y salir.
Contrast: Ajusta el contraste de la imagen. Resalte Contrast y
luego presione ENTER para ajustar el contraste de -16 a +16. Presione nuevamente ENTER para guardar y salir.
HDMI: Ajusta la salida HDMI a encendido (ON) o apagado (OFF)
Audio Source: Ajusta la fuente del audio para HDMI a AUTO o
PCM
--V IDEO S etup Page - -
Compon ent
Resol u ti on
Quali ty
HDMI Set up
Sha rpn es s
Bri ght ne ss
Con tr ast
Ga mma
Hue
Sa tura ti on
48 0I
57 6I
720 P5 0
720 P6 0
108 0I 50
108 0I 60
108 0p (50 Hz )
108 0p (60 Hz )
S-V ide o
YU V
ENGLISHESPAÑOLFRANÇAIS
- Preference -
TV Type:
Se utiliza para seleccionar entre los
sistemas de televisión PAL o NTSC.
PAL
: Seleccione este si la televisión
conectada es un sistema PAL.
Cambiará la señal de video a un disco NTSC y la salida al formato PAL.
NTSC
: Seleccione si su televisor es un sistema NTSC.
Audio
Subtitle
ponible).
Disc Menu
ponible).
: Selecciona un idioma para el audio (si está disponible).
: Seleccion
a un idioma para los subtítulos (si está dis-
: Selecciona un idioma para los subtítulos (si está dis-
47
-- Pref erenc e P age --
TV Typ e
Aud io
Sub tit le
Dis c Men u
Par ental
Pas sword
Def ault
PAL
EN G
Off
EN G
Rese t
1 KID SA F
2 G
3 PG
4 Pg13
5 PGR
6 R
7 Nc17
8 ADULT
Engl ish
Fren ch
Ger man
Span ish
Itli an
Port ugue se
Engl ish
Fren ch
Germ an
Span ish
Itlia n
Portu guese
Off
Engl ish
Fren ch
Germ an
Span ish
Itlia n
Port uguese
PAL
AUTO
NTSC
Page 50

OPCIONES DEL MENÚ DEL SISTEMA
Parental: Algunos DVD tienen un nivel parental asignado a todo
el disco o a ciertas escenas en el disco. Esta función le permite
dependen del país. Puede prohibir la reproducción de ciertos discos que no son adecuados para sus hijos o incluso tener algunos
discos reproducidos con escenas alternas.
Password: Esta función se usa para habilitar o deshabilitar el
contraseña. Resalte “Password” y luego presione ENTER en la pá-
y luego seleccione “Change”:
--P refere nce Setu p Page--
Pass word Mo de
Pass word
On
Chan ge
On
Off
--P ref erence S etup Pag e--
Old P ass wor d
New P ass word
Con fir m P WD
OK
Old Password: Ingrese la contraseña anterior (el valor de
fábrica es “0000”) y el cursor brincará automáticamente a “New
Password”.
ENGLISHESPAÑOLFRANÇAIS
New Password: Ingrese la NUEVA contraseña. Ingrese 4 dígitos
-
Importante: Para acceder al menú PREFERENCES (de Preferencias )
De no ser así, puede notar que la pestaña PREFERENES no puede
ser seleccionada, aunque las otras 4 pestañas pueden seleccionare
sin problema.
48
Page 51

DISCOS QUE PUEDEN REPRODUCIRSE
Playable Discs
La unidad puede reproducir los siguientes tipos de discos:
Disc Types
DVD
La información en la mayoría de los DVD se
divide en secciones llamadas títulos (titles),
los cuales están divididos en subsecciones
llamadas capítulos (chapters). Cada una de
los cuales es nombrado por un número de
título y un número de capítulo.
DVD
AUDIO CD
La información en un disco de audio se divide en secciones llamadas pistas (tracks) y a
cada pista se le asigna un número de pista.
Audio
CD
CARACTERÍSTICAS
Lea el manual que acompaña al disco DVD o explore el menú y títulos
del DVD, ya que las características disponibles en el disco DVD cambian
dependiendo del DVD.
90-
ENGLISHESPAÑOLFRANÇAIS
Nota: No son compatibles los discos Blu-ray, CDG, CD-Extra, CDROM y DVD-ROM.
49
Page 52

ESPECIFICACIONES TÉCNICAS
General
Suministro de energía: 110-240V ~ 50/60Hz
Consumo de energía: 32W
Dimensiones: 360x260x65mm
Reproductor DVD
Tipo de láser: Semiconductor láser, longitud de onda 650nm
Sistema de señal: PAL, NTSC/AUTO
Formato de video: 16:9, 4:3 (pan and scan), 4:3 (letterbox)
Nivel de salida de video: 1 Vp-p (75 ohm)
Nivel de salida Y del video: 1 Vp-p (75 ohm)
Nivel de salida C del video: 286 mV P-P (75 ohm)
Respuesta de frecuencia: 20hz - 22kHz (48 KHz)
(Audio) 20hz - 22kHz (96 KHz)
Potencia de salida Modo estéreo(DIN) 2x15W(RMS)
Modo surround (1 kHz) 2x15W(RMS)
Altavoz central 1x15W(RMS)
Subwoofer 1x30W(RMS)
Relación señal a ruido >60 dB
Altavoces
Surround/Estéreo/Centro Impedancia: 4ohm
Drivers de altavoces: 3” full range
Dimensiones: 92x78x132mm
ENGLISHESPAÑOLFRANÇAIS
Subwoofer Impedancia: 6ohm
Drivers de altavoces: 5.25”
Dimensiones: 160x265x305mm
50
Page 53

SOLUCIÓN DE PROBLEMAS
PROBLEMA SOLUCIÓN
ENGLISHESPAÑOLFRANÇAIS
La unidad principal no enciende.
La pantalla del panel frontal
está en blanco.
El icono Ø aparece en la pantalla Esta función o acción no puede
Asegúrese que otros dispositivos conectados a la misma
fuente de energía (como la TV)
Hay dos botones de encendido en la unidad principal.
Asegúrese que el interruptor
de encendido en la parte pos-
dido (ON) antes de presionar el
botón de encendido al frente
o el botón de encendido en el
control remoto.
Si el control remoto no enciende
el sistema, presione el botón
al frente de la unidad. Si esto
funciona, revise las baterías del
control remoto.
ser realizada en ese momento
ya que:
• El software del disco no es
compatible con esa función
(por ejemplo, ángulos).
• La función no está disponible en esa área del
disco (por ejemplo, avance o
retroceso rápido).
• Solicitó un tiempo, número
de capítulo, pista o título
que no existe.
-
La imagen está distorsionada El disco puede estar dañado.
La bandeja no expulsa el disco
cuando se presiona el botón de
expulsión
Intente con otro disco. Tome en
cuenta que es normal que aparezca cierta distorsión durante
el avance o retroceso rápido.
Cambie el modo DVD al presion-
-
tente nuevamente la expulsión.
51
Page 54

SOLUCIÓN DE PROBLEMAS
PROBLEMA SOLUCIÓN
ENGLISHESPAÑOLFRANÇAIS
Los botones de avance o retroceso no funcionan
reproduce
La recepción FM es pobre Asegúrese que la antena FM pro-
No hay sonido Asegúrese de que la unidad
Algunos discos tienen secciones
que prohíben el escaneo rápido
o el salto de capítulos. Por ejemplo, la unidad no puede saltarse
la información de advertencia ni
el aviso de derechos de autor al
inicio del DVD.
Los discos Blu-ray, CDG, CD-Extra, CD-ROM y DVD-ROM no son
discos compatibles. Los discos
con rayones, huellas u otras deformidades tampoco se pueden
reproducir correctamente..
porcionada está bien conectada
y la estación está bien sintonizada. Mueva la antena FM a
diferentes posiciones y en varios
ángulos para ganar recepción.
no está en silencio y que hay
volumen. Vea si otras fuentes
de audio están funcionando al
presionar el botón SOURCE.
No hay sonido en el altavoz central o en los altavoces surround
Esto es normal si el material que
se está reproduciendo no está
en 5.1 surround. Quizá quiera
habilitar el Pro Logic II al presionar ese botón en el control
remoto.
52
Page 55

La película no se escucha en 5.1
surround
Asegúrese de que el DVD es
con “Dolby” 5.1. Otros tipos
5.1 necesitan reproducirse en
CONTACT TECHNICAL SUPPORT
Visite nuestro sitio web para encontrar respuestas en la
sección de Preguntas Frecuentes, y para otros recursos
que puedan incluir una versión actualizada de esta guía de
usuario:
http://www.impecca.com
ENGLISHESPAÑOLFRANÇAIS
Contacte al servicio de Servicio al cliente en:
service@impecca.com
53
Page 56

GARANTIE
GARANTÍA LIMITADA POR UN AÑO
Impecca garantiza e ste producto contra defectos en
material y obra al comprador original com o se esp ecifica
abajo siempre y cuando el producto este registrado en
línea dentro de los catorce (14) día s de compra.
PARTES – Si se determina que el producto tien e defecto de
fábrica, dentro de un (1) año d e la fecha de la compra
original, Impecca reparará o reemplazará las p artes del
producto sin costo alguno (de las part es) par a
consumidores en Estados Unidos y Can adá.
LABOR – Si se determina q ue el pro ducto tiene un defect o
de fabrica, dent ro de un periodo de noventa (90) días de
la fecha de la compra original, Impecca reparará o
reemplazará el producto sin costo alguno para
consumidores en Estados Unidos y Canadá. Despué s de
noventa (90) días será responsabilid ad del consumidor.
Costos de emb arque hacia y desde el Centro de Servicio
de Garantía son la comp leta responsabilidad de l
consumidor.
Para obtener servi cio de garantía por un centro de servici o
autorizado de Impecca, por favor envíenos un correo
electrónico a: service@impecca.com para obtene r un
numero de Autorización de Reparación y Mantenimiento y
para localizar el Centro de Servici o de Gara ntía mas cer ca
de usted. Una v ez auto rizado, u sted debe e nviar e l
artículo por correo al c entro de ser vicios autorizado
Impecca en sus materiales de empaque de produ cto
originales o equivalente, para preve nir daño en tránsito.
Además, si Impecca determina que el producto está
fuera de l os términos de Garantía, Impecca retornará el
producto a l rem itente a cargo del remit ente sin s er
reparado o reemp lazado, salvo qu e haya sido autorizado
por el consumidor a dar servi cio al p roducto fuera de
garantía al costo del co nsumidor. Todos los cargos de
manejo o por reposición por devoluciones y/o reemplazos
no serán reembolsables.
Impecca espe cíficamente excluye de esta garantía
aditamentos no- eléctricos/mecáni cos, accesorios, y partes
desechables incluyendo, pero no limitados a, caj a
externa, cables de conexión, ba terías, y ada ptadores AC.
Impecca se reserva el d erecho a reparar o reemplazar
productos con el mismo, equiva lente, o mod elo m ás
nuevo.
Nos reserv amos el dere cho a repar ar o reemplazar e l
producto a nuestra discr eción. El reemplazo puede s er
nuevo o reparado y aunque se hará todo lo posib le por que
sea el mismo modelo, si el mismo mode lo no est á
disponible, será reemplazado con un modelo de l a misma
o mayor especific ación.
Desgaste normal no es cubierto por esta garantía.
Además, Impecca se reserva el derecho a determina r el
“desgaste” en cualquier y todos lo s productos .
Manipulación o apertura de la cubierta o tapadera del
producto anulará esta garantía compl etamente.
Im portante: Asegúrese de Registrar su producto en WWW.IMPECCA.COM dentro de 14 Días.
Impecca USA PA 18711 www.impecca.com service@impecca.com
No envíe devoluciones a esta dirección ya que se pueden perd er y esto atrasara el proceso de reparación y servicio.
La garantía no ap lica si el producto h a sido dañado por
accidente, abuso, mal uso, o mala aplicación; ha sido
alterado o modificado sin el permiso expreso de
Impecca ; ha r ecibido servicio por un ce ntro de
reparación no autorizado por Impecca ; no ha sido
mantenido u operado de forma apropiada de acuerdo al
manual de oper ación; ha sido usado para prop ósitos
comerciales, no domésticos; ha sido dañado
cosméticamente; no fue impo rtado por Impecca ; no
fue f abricad o de acuer do a especificación del mercado
de Es tados U nidos; fue dañado deb ido a insta lación no
apropiada o ne gligencia del co nsumidor; fue dañado por
empaque no apropiado en el embarque al Centro de
Servicio de Gar antía; fue dañado por desastre natu ral; o
si el número de serie del producto ha sido removido o
desfigurado.
TODAS LAS GARANTÍAS IMPLÍCITAS, INCL UYEN DO
GARANTÍAS DE COM ERCIALIZACIÓN Y ADECUACIÓN
IMPLÍCITAS PARA UN PROPÓSITO PARTICULAR S ON
LIMITADAS EN DURACIÓN A UN (1) AÑO EN PARTES Y
NOVENTA ( 90) DÍAS EN LABOR DE LA FECHA D E LA
COMPRA ORIGINAL AL DETALLE DE ESTE PRODUCTO.
ESTAS GARANTÍAS Y REMEDIOS SO N LAS ÚNICA S Y
EXCLUSIVAS GARANTÍAS Y REMEDIOS EN CONEXIÓN CON
LA VENTA Y USO DEL PRODUC TO. NINGUNA OTRA
GARANTÍA, ORAL O ESC RITA, EXPRESA O IMPLÍCITA SO N
DADAS.
IMPECCA NO ES RESPONSABLE POR NINGÚN DAÑO , YA
SEA ESPECIAL, ACCIDENTAL, CONSE CUENTE, DI RECTO O
DE OTRA MANERA, O Y A SEA CONOCIDO O TUVO QUE
HABER SIDO CONOCIDO POR IMPECCA , INCLUYENDO
GANANCIAS PERDIDAS, BUENA VOL UNTAD, Y LES IÓN
PERSONAL O DE PROPIEDAD RESUL TAN TE DE CUALQUIER
ROMPIMIENTO DE GARANTÍA, LA INHABILIDAD DE USAR
EL PRODUCTO, O BAJO CUALQUIER TEORÍA LEGAL EN
CONTRATO O AG RAVIO. LA RESPONSABILIDAD DE
IMPECCA ES LIMIT ADA AL PRECIO DE COMPRA ACTUAL
PAGADO AL VENDEDO R DETAL LISTA DEL PRODUCTO
DEFECTUOSO.
Ningún co merciante, agente, o empleado de Impecca
está autorizado pa ra ha cer ning una modificación,
extensión, cambio o enmienda a esta garantía sin el
consentimiento escrito y autorización de Impecca .
Algunos estados no perm iten la ex clusión o limitación
de garant ías imp lícitas o responsabilid ad po r da ños
accidentales o con secuentes, o no permiten una
limitación en el tiempo de duración de una garantí a
implícita, así qu e es po sibl e que las limitaciones o
exclusiones anteriores no apliq uen a usted. Esta
garantía le da a usted derechos legales específico s, y es
posible que us ted tenga otros derechos que varían d e
estado a estado.
Nota: N uestr o Cent ro de Servicio de Garantía em barca
solamente dentro de Estado s Unidos Continental,
excluyendo Alask a y Hawái.
ENGLISHESPAÑOLFRANÇAIS
54
Page 57

ENGLISHESPAÑOLFRANÇAIS
55
Page 58

SOMMAIRE
Gestion des disques CD/DVD 59
Avis de droit d’auteur 59
Contenu de l’emballage 60
Connexions du panneau arrière 61
Pour commencer 62
Positionnement du haut-parleur 64
Installation de l’antenne FM 65
ENGLISHESPAÑOLFRANÇAIS
Extraction de CD 69
Fichiers MP3 / MPEG4 / JPEG 70
Connexion Bluetooth 70
Pro Logic II 71
Commande radio FM 71
Options du menu système 73
Contactez le service d’assistance technique 81
Garantie 82
56
Page 59

CONSIGNES DE SÉCURITÉ IMPORTANTES
Avant d’utiliser l’appareil, assurez-vous d’avoir soigneusement lu
WARN IN G
Ris k o f ele ctric s ho ck,
do n ot op en.
LE SYMBOLE DE L'ECLAIR AVEC
UNE FLECHE A L'INTERIEUR D'UN
TRIANGLE EQUILATERAL EST
DESTINE A ALERTER L'UTILISATEUR DE L A PRESENCE D'UNE
"TENSION DANGEREUSE" NON
ISOLEE A L'INTERIEUR DU BOIT IER DU PRODUIT QUI PEUT ETRE
D'UNE INTENSITE SUFFISANTE
POUR CONSTITUER UN RISQUE
DE CHOC ELECTRIQUE POUR SES
UTILISATEURS.
•
ne retirez pas le couvercle ou
l’arrière de l’appareil. Aucune
AFIN DE REDUIRE LE
RISQUE DE CHOC ELECTRIQUE, NE RETIREZ PAS
LE COUV ERCLE AVANT OU
ARRIERE. AUCUNE PIECE
NECESSITAN T UN ENTRETIEN PAR L’UTILISATEUR NE
SE TROUVE A L’INTERIEUR.
CONFIEZ-LE A UN TECHNICIEN DE MA INTENANCE
QUALIFIE
• Les câbles USB d’une longueur
• N’obstruez pas les ouvertures
LE POINT D’EXCLAM ATION A L’INTERIEUR D’UN TRIANGLE EQUILATERAL EST DESTINE A ALERTER
L’UTILISATEUR DE L A PRESENCE
D’IMPORTANTES INSTRUC TIONS
D’U TILISATION ET D’ENTRETIEN
(MAINTENANCE) DANS LE LIVRET
CI-JOINT DE L’APPAREIL.
appareil.
ENGLISHESPAÑOLFRANÇAIS
• Nettoyez l’appareil uniquement
•
tout risque d’incendie ou de
pas l’appareil ou l’un de ses
composants à l’eau, à la pluie
Les objets pleins de liquides, tels
que les vases et les bouteilles
d’eau, ne doivent en aucun cas
•
d’alimentation contre tout
pincement.
bibliothèque. Il doit y avoir
au moins 2 pouces d’espace
libre autour de l’appareil en
tout temps pour assurer une
• Ne jamais exposer l’appareil
ou le contenu de l’emballage
à la lumière directe du soleil
ou à une chaleur excessive.
à 113ºF.
• AVERTISSEMENT : Si
IMMÉDIATEMENT d’utiliser
57
Page 60

l’appareil et contactez le service
clients.
•
ou l’une de ses enceintes sur
ou un chariot instable. L’appareil
risque de chuter, ce qui pourrait
entraîner des dommages ou
des blessures.
• Ne pas utiliser l’appareil à des
pieds au-dessus du niveau de
la mer.
•
les orages ou lorsqu’il n’est pas
• AVERTISSEMENT : Un volume
sonore excessif peut entraîner
une perte auditive.
• AVERTISSEMENT : Ce lecteur
DVD utilise un système laser
pour lire le disque CD/DVD.
L’utilisation des commandes
entraîner un rayonnement laser
dangereux.
•
l’exposition directe du faisceau
laser, n’ouvrez pas l’appareil. Le
rayonnement laser est visible
lorsque l’appareil est ouvert. Ne
regardez jamais directement
dans le faisceau laser.
• AVERTISSEMENT : Lorsqu’ils
les parents doivent s’assurer
que l’enfant comprend toutes
particulier celles qui concernent
la chaleur excessive, les risques
laser.
radio. Cependant, aucune garantie n’est fournie quant à l’absence
ENGLISHESPAÑOLFRANÇAISFRANÇAIS
hors et sous tension, l’utilisateur est enjoint d’essayer de corriger ces
•
•
•
obtenir de l’aide
58
 Loading...