

Page 1
–1–
Tablet—User Manual
Tablet—Manual de usuario
Tablette numérique—Mode d’emploi
Model No.: ET7050D-K24 & ET7050D-K28
Page 2

ENGLISH ESPAÑOL FRANÇAIS
–2–
INTRODUCTION
Thank you for purchasing this quality Impecca 7” Android™
tablet. Please read all the operating instructions before
operating the unit and keep this manual in a safe place for
later consultation.
HANDLING GUIDELINES
1. Do not drop the unit. Avoid shaking the unit or placing
substantial weight or pressure on the display; doing so
may result in irreparable damage.
2. Do not use metal objects to touch the device.
3. Please backup your data regularly, especially before
you upgrade the rmware. Failure to perform frequent
backups may result in data loss.
4. Do not disassemble the unit. Do not wipe the surface
of the unit using any solvents, alcohol, paint thinners
or benzene.
5. Do not disconnect the unit while it is formatting or
synchronizing or upgrading rmware. This may lead to
software and content errors.
6. Do not use around water and do not place foreign
objects in the unit.
7. Do not use the unit in places that are extremely hot,
cold, dusty, or humid.
8. Specications and technical characteristics are subject
to change without notice.
Google Play™ and Android™ are trademarks of Google Inc. All
other trademarks are property of their respective owners.
Page 3
ENGLISHESPAÑOLFRANÇAIS
–3–
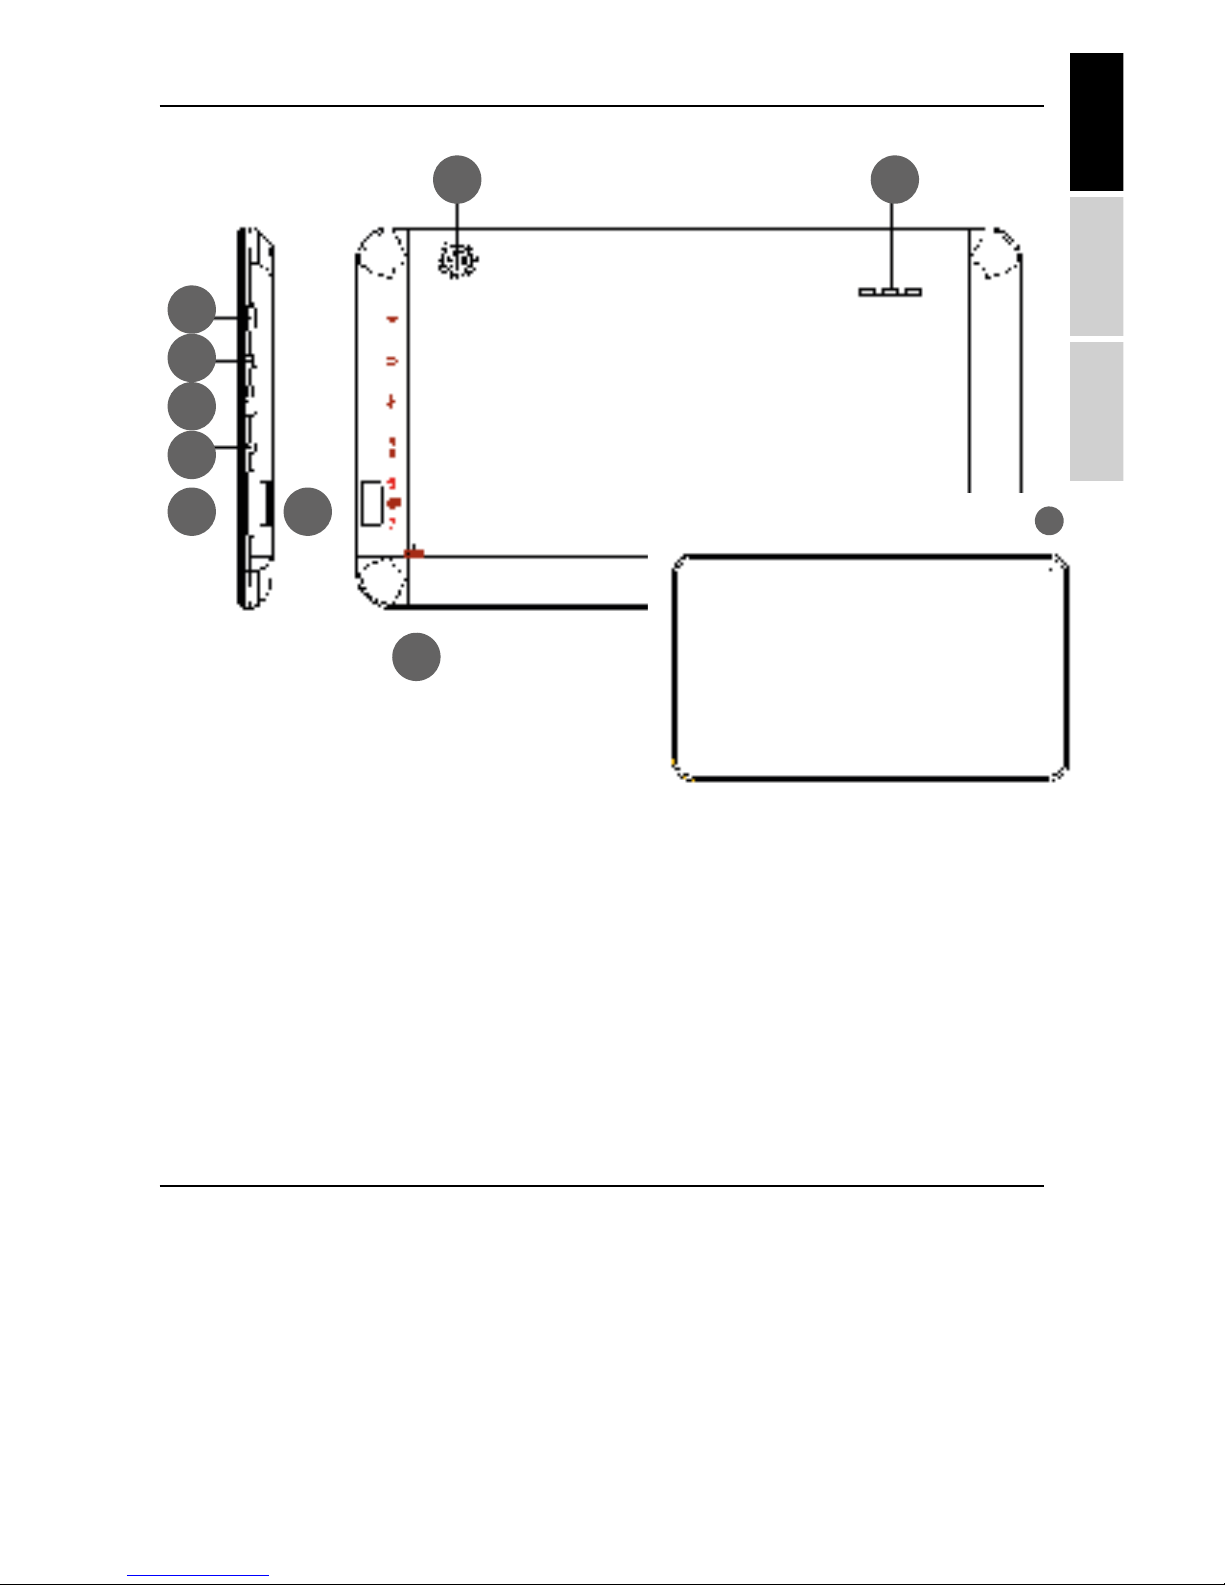
UNIT OVERVIEW
1. Front camera
2. DC-IN
3. Micro USB interface
4. Reset button
5. Headphone jack
6. Volume +/–
7. Power on/o
(press & hold)
8. Rear camera
9. Micro SD Card interface
10. Speaker
OPERATION INSTRUCTIONS
Power on/Power off
Power on: press and hold the power button for 3 seconds;
the unit will display the start-up logo.
Power o: press and hold the power button for 3 seconds.
The screen will show a menu saying, “Your tablet will shut
down.” Touch “OK.” This will turn the unit o.
8
10
7
5
3
2
6 9
4
1
Page 4

ENGLISH ESPAÑOL FRANÇAIS
–4–
Lock/sLeeP
Conserve your battery power by locking the display when
your tablet is not in use. While the device is running, press
the power button to lock the display and place the tablet into
sleep mode. Press the power button while the device is locked
to turn the display back on. Unlock the device by sliding the
lock icon to the outer part of the circle (any direction).
charging
You can see the current battery level in the upper-righthand corner of the screen with the percentage of battery
life left. When the device indicates a low battery charge,
connect the tablet to the included AC power adapter using
the USB charging cable. When device is connected to a PC
or laptop, it will only receive a trickle charge when the tablet
is in sleep mode.
Note: To improve the longevity of the battery, stop charging the
device no more than 15 minutes after the battery is fully charged.
home screen
Tap the “Home” icon—one of the on-screen buttons—which
is always found at the bottom of the display, to show the
Home Screen. Above these buttons you will nd a the seven
icons that make up the “Apps Dock.” The icons in the Apps
dock stay the same when you move from screen to screen.
Here you will nd (from left to right), a button that brings
up all of the Google apps at once, the Google Play store,
[Internet] Browser, the Apps icon (which brings up every
app installed currently on the unit), Settings, Contacts, and
Google Play Music.
Page 5

ENGLISHESPAÑOLFRANÇAIS
–5–
SETTINGS
Tap “Settings” icon from the Apps Dock to enter the settings
menu. Adjust device settings as desired.
setting the date & time
Tap “Date & time” in the settings menu to set the current
date and time. You may set the date, time zone, current
time, 12h/24h time format, and date format in this menu.
When connected to the Internet, the date and time can
update automatically (with the “Automatic date & time”
selection checked.
setting the disPLay brightness
Tap “Display” in the settings menu. Tap on “Brightness” and
tap and slide the bar to adjust the display brightness. Tap
“OK.” Note: lowering the display brightness can prolong
your battery life.
screen timeout
Your tablet can automatically enter sleep mode after a
certain period of inactivity. To adjust the timeout, tap
“Display” in the settings menu. Tap “Sleep” and select the
desired display timeout duration.
Note: Screen timeout is disabled during video playback.
connecting to a wi-fi network
Tap “Settings” from the Apps Dock. Tap Wi-Fi. If the slider
switch is in the “O” position, slide to turn on the wireless
radio and search for available Wi-Fi networks. Tap the name
of your network; you will need to enter a network password
if your network is secured. If you do not know your network
password, contact your Internet Service Provider or a
qualied technician.
Page 6
ENGLISH ESPAÑOL FRANÇAIS
–6–
INSTALLING, REMOVING & USING APPLICATIONS
instaLLation aPPLications
Open the Google Play™ store available from the Apps
Dock to nd thousands of free and paid applications,
games, music, movies, TV shows, books and magazines for
your tablet. Choose the category, nd the items you want,
and simply tap “Install” and enjoy! Note: to use Google Play and
to get the most out of your tablet you will need to logon to your
Google account. If you do not have one, the tablet will guide you
through creating one. There is no charge for the account.
removing aPPLications
Tap on “Settings” from the Apps Dock. Tap ”Apps”. You will
see a list of downloaded Apps. Tap on any app that you
want to remove. Tap “Uninstall” and then tap “OK.”
SURFING THE WEB
After connecting to your Wi-Fi network, open the Browser
app and enter a web address such as http://google.com.
Tap the icon to enter your list of bookmarks and consult
your browser history. Tap on the desired web page in your
bookmarks or history to open in current tab.
Your unit also includes the Google Chrome browser, which
can be used and even set as the default browser, if you prefer.
AUDIO & VIDEO PLAYBACK
audio PLayback
Tap the “Google Play Music” icon from the Apps Dock
to open the audio playback application. All audio les
on the device and external memory card are listed, simply
Page 7
ENGLISHESPAÑOLFRANÇAIS
–7–
tap on the le name to commence playback. While listening
to your music, tap the appropriate keys to play, pause, fastforward, and rewind. You can adjust volume either from the
rocker switch on the upper-right side of the unit or from the
soft navigation keys at the bottom of the screen.
video PLayback
Tap “Play Movies” from the Apps screenscreen to enter the
video playback application. You will see a selection of free
and paid movies available to watch. To watch videos that
are on the device, select “On Device” from the Google Play
menu. While watching your videos, tap the screen to show
the playback controls to play, pause, increase/decrease the
volume, fast-forward, and rewind. Tap the display again to
hide the playback controls.
PICTURES
Tap “Photos” from the Apps screen to enter the photo and
video playback application. Tap on the thumbnail of any
picture to view it.
While browsing your photos, note that at the bottom of the
screen you have three buttons. The pencil button can be used
to edit the photo, which includes functions such as autocorrect,
crop and rotate. The middle icon is for sharing the photo, and
the trashcan on the right is for deleting the photo.
Page 8
ENGLISH ESPAÑOL FRANÇAIS
–8–
CAMERA
Tap “Camera” from the Apps menu.
taking Photos
If the center button is blue, the device is in Camera mode.
Tap the blue button to take the picture.
Pressing the white circle to the right of the button brings up
a menu, which contains options such as settings, lighting,
exposure, and to switch between the rear facing camera
and the front-facing camera.
recording video
To switch to video mode, press the camera icon found on
the left of the screen and choose the movie camera icon.
This will change the center button to a red button. Tap the
red button to record video.
Tapping the white circle to the right of the red button will
bring up a menu with the lighting, settings options ad well
as rear-facing or front-facing camera.
Page 9
ENGLISHESPAÑOLFRANÇAIS
–9–
CONNECTING YOUR TABLET
connecting to your Pc
Connect your tablet with the PC with the provided USB
cable. On your computer, two new drives will appear. One
drive is the internal storage; the other is the removable
Micro SD Card.
aPPLications
Additional software provided by third parties is included to
help manage your device. For detailed operation methods,
please consult the read me les located on the device.
Some of the software contains geographic and network
restrictions.
TROUBLESHOOTING
what if the device is abnormaL during oPeration?
1. Reboot the device.
2. Charge the device using your external charger. Ensure
the battery is charged before operating your device.
3. If an update is available, update the Android™
operating system.
the tabLet battery Life is short. what do i do?
Battery life is based on usage and ambient temperature.
If the ambient temperature is too high or too low, the use
time of the battery will be aected. High volume output and
frequent operation can also impact battery life.
CONTACT TECHNICAL SUPPORT
By phone: 1-866-954-4440
By e-mail: service@impeccausa.com
Page 10

ENGLISH ESPAÑOL FRANÇAIS
–10–
DEVICE SPECIFICATIONS
Display resolution: 1024 x 600 capacitive touch screen
OS: Android 4.4
Input method: Soft keypad
Internal storage capacity: 4GB, 8GB, 16GB
SD Card capacity: up to 32GB
Audio formats: MP3, WMA, FLAC, APP, OGG
Video formats: MP4, DIVX, WMV, RMVB, H.264/1080P
E-book support
Wireless networking: 802.11b/g/n
Language support: English, Español, Français
OTG Support
Operating temperature: -20°C to 60°C
Battery: Poly-lithium battery
Protect the environment: do not dispose of electrical
equipment in your domestic waste. Please return any
personal electronics that you will no longer use to authorized
collection points. These simple steps can help to prevent
harmful environmental eects through incorrect disposal.
Information concerning disposal locations can be obtained
from your city or local authorities.
MADE IN CHINA
Page 11

ENGLISHESPAÑOLFRANÇAIS
–11–
INTRODUCCIÓN
Gracias por comprar esta Tablet Android™ Marca Impecca
de 7”. Lea todas las instrucciones antes de operar la unidad
y mantenga este manual en un lugar seguro para su
consulta a futuro.
DIRECTRICES DE MANIPULACIÓN
1. No tire la unidad. Evite agitarla o ponerle peso o
presión sustancial sobre la pantalla, de hacerlo le
causará un daño irreparable.
2. No utilice objetos de metal para tocar el dispositivo.
3. Saque respaldos de su información regularmente,
especialmente después de actualizar el rmware. Si
no realiza respaldos frecuentemente puede llegar a
perder su información.
4. No desarme la unidad. No limpie la supercie usando
solventes, alcohol, diluyentes de pintura o benceno.
5. No desconecte la unidad cuando se está formateando,
sincronizando, o actualizando el rmware. Esto puede
casar errores de software y de contenido.
6. No utilice agua alrededor y no coloque objetos ajenos
en la unidad.
7. No utilice la unidad en lugares extremadamente
calientes, fríos, polvosos o húmedos.
8. Las especicaciones y las características técnicas
están sujetas a cambios sin previo aviso.
Google Play™ y Android™ son marcas registradas de Google
Inc. Todas las otras marcas registradas son propiedad de sus
respectivos propietarios.
Page 12

ENGLISH ESPAÑOL FRANÇAIS
–12–
DESCRIPCIÓN DE LA UNIDAD
1. Cámara frontal
2. DC-IN
3. Interfaz micro USB
4. Botón de reinicio
5. Salida para auriculares
6. Volumen +/-
7. Encendido y apagado
(presione y sostenga)
8. Cámara posterior
9. Interfaz de Tarjeta
Micro SD
10. Altavoz
11. Micrófono Interno
INSTRUCCIONES DE OPERACIÓN
encendido/aPagado
Encendido: Presione y sostenga el botón de encendido por
3 segundos. La unidad desplegará el logotipo de inicio.
Apagado: Presione y sostenga el botón de encendido por
3 segundos. La pantalla mostrará un menú que dice, “Su
Tablet se apagará”- Presiones “OK”. Esto apagará la unidad.
8
10
7
5
3
2
6 9
4
1
Page 13

ENGLISHESPAÑOLFRANÇAIS
–13–
bLoqueo/rePoso
Conserve la energía de su batería al bloquear la pantalla
cuando su Tablet no está en uso. Mientras el dispositivo está en
funcionamiento, presione el botón de encendido para bloquear la
pantalla y colocar la Tablet en modo de reposo. Presione el botón
de encendido mientras el dispositivo está bloqueado para prender
nuevamente la pantalla. Desbloquee el dispositivo al deslizar el
ícono de bloqueo fuera del círculo (en cualquier dirección).
carga
Cargador AC/DC a la entrada DC de 5V. Tome en cuenta que esta
unidad no se carga por medio de una USB.
Nota: para mejorar la vida de la batería, deje de cargar el
dispositivo no más de 15 minutos después de que la batería se
ha cargado por completo.
PantaLLa de inicio
Pulse el ícono “Inicio” – uno de los botones de la pantalla
– el cual siempre se encuentra en la parte inferior de la
pantalla, para mostrar la pantalla de inicio. En la parte
superior de estos botones usted encontrará 7 íconos que
conforman la Estación de Apps. Los íconos en la Estación de
Apps permanecen igual cuando usted se mueve de pantalla
en pantalla. Aquí encontrará (de izquierda a derecha) un
botón que muestra todas las aplicaciones de Google Apps
de una sola vez, la tienda de Google Play, el Navegador (de
internet), el ícono de las Apps (el cual incluye cada una de las
Apps instaladas hasta el momento), los Ajustes, Contactos, y
Google Play Music.
Page 14

ENGLISH ESPAÑOL FRANÇAIS
–14–
AJUSTES
Pulse el ícono de “Ajustes” de la Estación de Apps para entrar
al menú´ de Ajustes. Ajuste la conguración del dispositivo
como desee.
ajustando La fecha y La hora
Pulse la “Fecha y Hora” en el menú de ajustes para ajustar la
fecha y hora actuales. Puede ajustar la fecha, zona horaria,
hora actual, formato de hora de 12 o 24 horas, el formato de
la fecha en este menú. Cuando está conectado a internet, la
fecha y la hora pueden actualizarse automáticamente. (Con
la selección habilitada de “Fecha y Hora Automática”).
ajustando eL briLLo de La PantaLLa
Pulse “Pantalla” en el menú de ajustes. Pulse en “Brillo” y
pulse y deslice la barra para ajustar el brillo de la pantalla.
Pulse “OK”. Nota: Bajarle el brillo a la pantalla puede alargar
la vida de la batería.
tiemPo de esPera de La PantaLLa
Su Tablet puede entrar en modo de reposo en forma automática
después de cierto periodo de inactividad. Para ajustar el tiempo
de espera pulse “Pantalla” en el menú de ajustes. Pulse “Reposo”
y seleccione el tiempo de espera deseado.
NOTA: El tiempo de espera está deshabilitado durante la reproducción de videos.
conectando a una red wi-fi
Pulse “Ajustes” desde la Estación de Apps. Pulse “Wi-Fi”. Si
el interruptor deslizable está en la posición de apagado,
deslice para encender el radio inalámbrico y buscar por las
redes Wi-Fi disponibles. Pulse el nombre de su red, si su red
tiene seguridad necesitará proporcionar una contraseña
de red. Si no sabe la contraseña de su red, contacte a su
proveedor de internet o a un técnico calicado.
Page 15

ENGLISHESPAÑOLFRANÇAIS
–15–
INSTALANDO, ELIMINANDO Y USANDO OPERACIONES
instaLando aPLicaciones
Abra la tienda de Google Play ™disponible desde
la Estación de Apps, para encontrar miles de
aplicaciones, música, juegos, películas, series de TV, libros
y revistas gratuitas y con costo, para su Tablet. Elija la
categoría, encentre los artículos que desea y simplemente
presione “Instalar”, ¡y disfrute! NOTA: Para usar Google Play
y sacar el mejor provecho de su Tablet deberá de ingresar a su
cuenta de Google. Si no tiene una, la Tablet le guiará para crear
una. No hay costo por la cuenta.
eLiminando aPLicaciones
Pulse “Ajustes” en la Estación de Apps. Pulse “Apps”. Verá una
lista de las Apps descargadas. Pulse cualquiera de las Apps
que desea eliminar. Pulse “Desinstalar” y luego pulse “OK”.
NAVEGANDO EN LA WEB
Después de conectarse a su red Wi-Fi abra la App de Navegador y
proporcione una dirección web, tal como http://google.com
Pulse el ícono para ingresar a su lista de marcas y consultar
su historial de navegación. Pulse la página web deseada en
su lista de marcas o historial y abrirá en la pestaña actual.
Su unidad también incluye el navegador Google Chrome,
el cual puede ser usado e inclusive ser elegido como el
navegador por defecto, si usted así lo preere.
Page 16

ENGLISH ESPAÑOL FRANÇAIS
–16–
REPRODUCCIÓN DE AUDIO Y VIDEO
reProducción de audio
Pulse el ícono “Música de Google Play” en la
Estación de Apps para abrir la aplicación de
reproducción de audio. Se enlistarán todos los archivos de
audio del dispositivo y de la tarjeta de memoria externa,
simplemente pulse en el nombre de archivo para comenzar
la reproducción. Al escuchar su música, pulse las teclas
adecuadas para reproducir, pausar, adelantar o retroceder.
Puede ajustar el volumen, ya sea desde el interruptor rocker
en la parte superior derecha de la unidad o desde las teclas
suaves de navegación en la parte inferior de a pantalla.
reProducción de video
Pulse el ícono “Reproducir Videos” pantalla de aplicaciones
para abrir la aplicación de reproducción de video. Verá una
selección de películas gratis y de paga que están disponibles
para ver. Para ver videos que están en el dispositivo,
seleccione “En el dispositivo” desde el menú de Google Play.
Mientras ve el video pulse la pantalla para ver los controles
de reproducción para reproducir, pausar, subir o bajar
el volumen, adelantar o retroceder. Pulse de nuevo en la
pantalla para ocultar los controles de reproducción.
IMÁGENES
Pulse “Fotos” desde la pantalla de Apps para entrar a la
aplicación de preproducción de fotos y videos. Pulse la
miniatura de cualquier foto para verla.
Mientras navega por las fotos, tenga en cuenta que en la
parte inferior de la pantalla hay tres botones. El botón del
lápiz se puede utilizar para editar la foto e incluye funciones
como la corrección automática, recortar y rotar. El icono de
Page 17

ENGLISHESPAÑOLFRANÇAIS
–17–
enmedio es para compartir la foto, y el bote de basura de la
derecha es para borrar la foto.
CÁMARA
Pulse “Cámara” desde el menú de Apps.
tomando fotos
Si el botón central está azul, el dispositivo está en el modo
cámara. Pulse el botón azul para tomar la foto.
Al pulsar el círculo blanco a la derecha del botón, se abrirá
un menú que contiene opciones como la conguración, la
iluminación, la exposición y para cambiar entre la cámara
posterior y la cámara frontal.
grabando video
Para cambiar al modo de vídeo, pulse el icono de la cámara que
se encuentra en el lado izquierdo de la pantalla y elija el icono
de la cámara de cine. Esto cambiará el botón central a un botón
color rojo. Pulse el botón rojo para grabar vídeo.
Al tocar el círculo blanco a la derecha del botón rojo se abrirá un menú
con la iluminación, la conguración de las opciones de publicidad, así
como la orientación hacia la cámara posterior o frontal.
CONECTANDO SU TABLET
conectando a su Pc
Conecte su Tablet a una PC con el cable USB que se
proporciona. En su computadora aparecerán dos nuevos
drives. Uno es el del almacenamiento interno, y el otro es el
de la tarjeta Micro SD.
Page 18

ENGLISH ESPAÑOL FRANÇAIS
–18–
aPLicaciones
Se incluye software adicional de terceros para ayudarle a
manejar su dispositivo. Algunos de estos software contienen
restricciones geográcas y de red.
SOLUCIÓN DE PROBLEMAS
¿qué Pasa si durante La oPeración eL funcionamiento deL
disPositivo es anormaL?
1. Reinicie el dispositivo
2. Cargue el dispositivo utilizando su cargador externo.
Asegúrese que la batería está cargada antes de operar
el dispositivo.
3. Si hay una actualización del sistema operativo
Android, actualice su Tablet.
La vida de La PiLa de La tabLet es corta. ¿qué Pasa?
La vida de la batería depende del uso y de la temperatura
ambiente. Si la temperatura ambiente es demasiado alta
o baja, el tiempo de uso de la batería se verá afectado.
También un alto volumen de operaciones y la frecuencia de
ellas también impactan en el tiempo de uso de la batería.
CONTACTO EL SOPORTE TÉCNICO
Teléfono: 1-866-954-4440
Internet: service@impeccausa.com
Page 19

ENGLISHESPAÑOLFRANÇAIS
–19–
ESPECIFICACIONES DEL DISPOSITIVO
Resolución de la pantalla: pantalla táctil 1024x600
Sistema Operativo: Android 4.4
Método de entrada: Teclado suave
Capacidad de almacenamiento: 4GB, 8GB, 16GB
Capacidad de la tarjeta SD: hasta 32GB
Formatos de audio compatibles: MP3, WMA, FLAC, APP,
OGG
Formatos de video compatibles: MP4, DIVX, WMV, RMVB,
H.264/1080P
Compatible con E-book
Red inalámbrica: 802.11b/g/n
Idiomas: Inglés, Español, Francés
Compatible con OTG
Temperatura de Operación: -20°C a 60°C
Batería: Batería Poli-litio
Proteja el ambiente: no deseche equipo electrónico/
eléctrico en su basura doméstica. Deposite cualquier
dispositivo electrónico que no va a utilizar en los centros
autorizados de recolección. Estos simples pasos pueden
ayudarle a evitar efectos dañinos en el medio ambiente
al deshacerse de forma incorrecta de este tipo de equipo.
Puede obtener la información sobre puntos de recolección
de este tipo de equipo con sus autoridades locales.
HECHO EN CHINA
Page 20

ENGLISH ESPAÑOL FRANÇAIS
–20–
INTRODUCTION
Merci d’avoir acheté cette tablette Android™ Impecca 7” de
qualité. Veuillez lire toutes les instructions de fonctionnement
avant d’utiliser l’appareil et le conserver ce manuel dans un
endroit sûr pour une consultation ultérieure.
CONSIGNES D’UTILISATION
1. Ne laissez pas tomber l’appareil. Évitez de secouer
l’appareil ou de placer un poids ou une pression
importante sur l’écran, car cela peut entraîner des
dommages irréparables.
2. N’utilisez pas d’objets métalliques pour toucher l’appareil.
3. Veuillez sauvegarder vos données régulièrement, en
particulier avant la mise à niveau du logiciel. Le fait
de ne pas eectuer de sauvegardes fréquentes peut
entraîner la perte de données.
4. Ne démontez pas l’appareil. N’essuyez pas la surface
de l’appareil à l’aide de solvants, d’alcool, de diluants
de peinture ou de benzène.
5. Ne débranchez pas l’appareil pendant son formatage
ainsi que la synchronisation ou la mise à niveau du
logiciel. Cela peut conduire à des erreurs de logiciel et
de contenu.
6. N’utilisez pas près de l’eau et ne placez pas d’objets
étrangers à l’intérieur de l’appareil.
7. N’utilisez pas l’appareil dans des endroits
extrêmement chauds, froids, poussiéreux ou humides.
8. Les spécications et caractéristiques techniques sont
sujettes à changement sans préavis.
Google Play™ et Android™ sont des marques commerciales de Google Inc.
Toutes les autres marques sont la propriété de leurs propriétaires respectifs.
Page 21

ENGLISHESPAÑOLFRANÇAIS
–21–
APERÇU DE VOTRE TABLETTE
1. Caméra face
2. DC-IN
3. Interface USB
4. Bouton de réinitialisation
5. Prise casque
6. Volume +/–
7. Marche/arrêt
(appuyer et tenir)
8. Caméra arrière
9. Interface de carte SD
10. Haut-parleur
11. Microphone interne
INSTRUCTIONS D’UTILISATION
marche/arrêt
Marche : Appuyez et maintenez enfoncé le bouton de
marche/arrêt pendant 3 secondes; l’appareil achera le
logo de démarrage.
Arrêt : Appuyez et maintenez enfoncé le bouton de marche/
arrêt pendant 3 secondes. L’écran achera un menu en
disant : « Votre tablette va s’éteindre. » Appuyez sur « OK. »
Cela éteindra l’appareil.
8
10
7
5
3
2
6 9
4
1
Page 22

ENGLISH ESPAÑOL FRANÇAIS
–22–
verrouiLLer/mode veiLLe
Conserver votre niveau de la pile en verrouillant l’écran
lorsque votre tablette n’est pas en cours d’utilisation. Alors
que le dispositif est en marche, appuyez sur le bouton
de marche/arrêt pour verrouiller l’écran et le placer en
mode veille. Appuyez sur le bouton d’alimentation lorsque
l’appareil est verrouillé pour rallumer l’écran. Déverrouillez
l’appareil en faisant glisser l’icône de verrouillage sur la
partie extérieure du cercle (n’importe quelle direction).
recharge
On peut voir le niveau de la pile dans le coin supérieur droit de
l’écran avec le pourcentage de vie de la pile à gauche. Lorsque
l’appareil indique une charge faible, connecter la tablette à
l’adaptateur secteur fourni avec l’adaptateur secteur AC/DC. La
tablette ne peut pas être chargée par un cable USB.
Note : Pour améliorer la longévité de la batterie, arrêtez de
recharger l’appareil au plus 15 minutes après que la recharge
de la batterie est complète.
écran d’accueiL
Appuyez sur l’icône « Accueil » — l’un des boutons à l’écran
— se situant toujours au bas de l’écran, an d’acher l’écran
d’accueil. Au-dessus de ces boutons, vous trouverez une
des sept icônes qui composent le « Dock d’applications ».
Les icônes dans le Dock restent les mêmes lorsque vous
passez d’un écran à l’autre. Vous trouverez (de gauche à
droite) un bouton qui ouvre toutes les applications Google
en même temps, le magasin Google Play, le navigateur
Internet, l’icône Apps (qui ache toutes les applications
actuellement installées sur l’appareil), les réglages, les
contacts et les paramètres de musique Google Play.
Page 23

ENGLISHESPAÑOLFRANÇAIS
–23–
RÉGLAGES
Appuyez sur l’icône « Réglages » dans le Dock pour entrer
dans le menu des réglages de l’appareil.
régLage de La date et de L’heure
Appuyez sur « Date et heure » dans le menu des réglages
an de régler la date et l’heure. Vous pouvez régler la date,
le fuseau horaire, l’heure, le format de temps entre 12 h
et 24 h ainsi que le format de date dans ce menu. Lorsque
vous êtes connecté à Internet, la date et l’heure peuvent se
mettre à jour automatiquement (avec la sélection « date et
heure automatique » étant cochée).
régLage de La Luminosité de L’écran
Appuyez sur « Achage » dans le menu des réglages. Appuyez sur
« Luminosité » puis appuyez et faites glisser la barre pour ajuster la
luminosité de l’écran. Appuyez sur « OK ». Remarque : la baisse de
la luminosité de l’écran peut prolonger la vie de votre pile.
veiLLe de L’écran
Votre tablette peut entrer automatiquement en mode veille après
une certaine période d’inactivité. Pour régler le délai, appuyez sur
« Achage » dans le menu de réglages. Appuyez sur « Veille » et
sélectionnez la durée du délai souhaité pour la veille de l’écran.
Note : La veille de l’écran est désactivée pendant la lecture vidéo.
se connecter à un réseau wi-fi
Appuyez sur « Réglages » depuis le Dock d’applications. Appuyez
sur Wi-Fi. Si le bouton glissant est en position « O », faites-le glisser
pour mettre en marche la radio sans l et rechercher des réseaux
Wi-Fi disponibles. Saisissez le nom de votre réseau, vous devrez
entrer un mot de passe de réseau si votre réseau est sécurisé. Si
vous ne connaissez pas le mot de passe de votre réseau, contactez
votre fournisseur de services Internet ou un technicien qualié.
Page 24

ENGLISH ESPAÑOL FRANÇAIS
–24–
INSTALLER, SUPPRIMER ET UTILISER DES APPLICATIONS
instaLLer des aPPLications
Ouvrez le magasin Google Play™ disponible à partir
du Dock d’applications pour trouver des milliers
d’applications, de jeux, de musique, de lms,
d’émissions de télévision, de livres et de magazines qui
sont gratuits ou payants pour votre tablette. Choisissez la
catégorie, trouvez les articles que vous voulez et appuyez
simplement sur « Installer» et protez-en! Remarque : pour
utiliser Google Play et tirer le meilleur parti de votre tablette, vous
devrez vous connecter à votre compte Google. Si vous n’en avez
pas, la tablette vous guidera à travers le processus pour en créer
un. Il n’y a pas de frais pour le compte.
suPPrimer des aPPLications
Appuyez sur « Réglages » depuis le Dock d’applications. Appuyez sur
« Applications ». Vous verrez une liste des applications téléchargées.
Appuyez sur n’importe quelle application que vous souhaitez
supprimer. Appuyez sur « Désinstaller» puis appuyez sur « OK ».
NAVIGUER LE WEB
Une fois connectée à votre réseau Wi-Fi, ouvrez l’application
de navigateur et saisissez une adresse web telle que
http://google.com. Appuyez sur l’icône pour entrer
dans votre liste de favoris et consulter l’historique de
votre navigateur. Appuyez sur la page web souhaitée dans
vos favoris ou votre historique pour l’ouvrir dans l’onglet
courant. Votre appareil comprend également le navigateur
Google Chrome, qui peut être utilisé et même déni comme
navigateur par défaut, si vous préférez.
Page 25

ENGLISHESPAÑOLFRANÇAIS
–25–
LECTURE AUDIO ET VIDÉO
Lecture audio
Appuyez sur l’icône « Google Play Music » à partir
du Dock d’applications pour ouvrir l’application de
lecture audio. Tous les chiers audio sur l’appareil et la carte
de mémoire externe sont répertoriés, appuyez simplement
sur le nom du chier pour en commencer la lecture. Tout
en écoutant votre musique, appuyez sur les touches
appropriées pour jouer, mettre sur pause, en avance rapide
et en rembobinage. Vous pouvez régler le volume soit à partir
de l’interrupteur à bascule sur le côté supérieur droit de
l’appareil ou avec les touches de navigation au bas de l’écran.
Lecture vidéo
Appuyez sur « Films » depuis l’écran Applications pour
entrer dans l’application de lecture vidéo. Vous pourrez voir
une sélection de lms gratuits et payants à visionner. Pour
regarder des vidéos qui sont sur l’appareil, sélectionnez
« Sur l’appareil » dans le menu de Google Play. Lorsque vous
regardez vos vidéos, appuyez sur l’écran pour acher les
contrôles de lecture an de lire, mettre à pause, augmenter
ou diminuer le volume ainsi qu’utiliser les fonctions d’avance
rapide et de rembobinage. Appuyez de nouveau sur l’écran
pour masquer les commandes de lecture.
PHOTOS
Appuyez sur « Photos » depuis l’écran Applications pour entrer
dans l’application de lecture de photo et vidéo. Appuyez sur la
miniature de n’importe quelle image pour la voir.
Tout en parcourant vos photos, notez que dans le bas de
l’écran, vous disposez de trois boutons. Le bouton de crayon
peut être utilisé pour modier la photo, ce qui inclue des
Page 26

ENGLISH ESPAÑOL FRANÇAIS
–26–
fonctions telles que la correction automatique, le reformatage
et la rotation. L’icône du milieu est pour le partage de photo
et la poubelle à la droite est pour la suppression de la photo.
CAMÉRA
Appuyez sur « Caméra » depuis le menu d’applications.
Prendre des Photos
Si le bouton central est bleu, l’appareil est en mode Caméra.
Appuyez sur le bouton bleu pour prendre une photo.
Appuyer sur le cercle blanc à la droite du bouton fait
apparaître un menu qui contient des options telles que les
paramètres, l’éclairage, l’exposition ainsi que l’option de
basculer entre la caméra à l’arrière et celle à l’avant.
Prendre des vidéos
Pour passer en mode vidéo, appuyez sur l’icône de l’appareil photo
qui se trouve sur la gauche de l’écran et choisissez l’icône de caméra
vidéo. Cela va changer le bouton central vers un bouton rouge.
Appuyez sur le bouton rouge pour prendre des vidéos.
Appuyez sur le cercle blanc à la droite du bouton rouge pour
faire apparaître un menu avec l’éclairage, les options de
réglages ainsi que le choix entre la caméra arrière ou avant.
CONNECTER VOTRE TABLETTE
connexion à votre Pc
Connectez votre tablette au PC avec le câble USB qui est
fourni. Sur votre ordinateur, deux nouveaux lecteurs
s’acheront. Un lecteur est la mémoire interne et l’autre est
la carte micro SD amovible.
Page 27

ENGLISHESPAÑOLFRANÇAIS
–27–
aPPLications
Des logiciels supplémentaires fournis par des tiers sont
inclus pour vous aider à gérer votre appareil. Pour les
méthodes de fonctionnement détaillées, veuillez consulter
les chiers Lisez-moi situé sur l’appareil. Certains des logiciels
contiennent des restrictions géographiques et de réseau.
DÉPANNAGE
que faire si L’aPPareiL est anormaL Pendant Le fonctionnement?
1. Redémarrez le périphérique.
2. Chargez l’appareil en utilisant votre chargeur externe. S’assurer
que la batterie est chargée avant d’utiliser votre appareil.
3. Si et mise à jour est disponible, mettez à jour le
système d’exploitation Android™.
La durée de vie de La batterie de La tabLette est courte. que faire?
Autonomie de la batterie est basée sur l’utilisation et la
température ambiante. Si la température ambiante est trop
élevée ou trop basse, le temps d’utilisation de la batterie sera
aectée. Le volume en sortie et d’un fonctionnement fréquent
peuvent également avoir un impact vie de la batterie.
CONTACTER LE SERVICE TECHNIQUE
By phone: 1-866-954-4440
Online 24/7: service@impeccausa.com
Page 28

ENGLISH ESPAÑOL FRANÇAIS
–28–
CARACTÉRISTIQUES DE L’APPAREIL
Résolution de l’écran : Écran tactile capacitif de 1024x600
Système d’exploitation : Android 4.4
Méthode de saisie : Clavier programmable
Capacité de stockage : 4GB, 8GB, 16GB
Capacité de la carte SD : jusqu’à 32 Go
Formats audio : MP3, WMA, FLAC, APP, OGG
Formats vidéo : MP4, DIVX, WMV, RMVB, H.264/1080P
Livre électronique de soutien
Réseau sans l : 802,11b/g/n
Langue : Français, English, Español
Soutien OTG
Température de fonctionnement : -20 °C à 60 °C
Pile : Pile au lithium-polymère
Protégez l’environnement : ne jetez pas les appareils
électriques dans les ordures ménagères. Veuillez retourner
les appareils électroniques personnels que vous n’allez
plus utiliser aux points de collecte agréés. Ces mesures
simples peuvent aider à prévenir les eets néfastes sur
l’environnement qui seraient causés par une élimination
inappropriée. Les informations concernant les emplacements
de stockage peuvent être obtenues auprès de votre ville ou
des autorités locales.
FABRIQUÉ EN CHINE
 Loading...