

Page 1
Portable DVD Player - User's Guide
Reproductor DVD Portátil - Manual de Usuario
Lecteur DVD Portable - Manuel de l'Utilisateur
Model – DVP-1330
v 1.34
www.impecca.com
Page 2

ENGLISH
ESPAÑOL FRANÇAIS
ii
TABLE OF CONTENTS
Important Safety Instructions 3
CD/DVD Disc Handling 4
Package Contents 5
Product Features 5
Main Unit Controls 6
Swivel Screen Panel 7
Getting Started 8
Charging from AC/DC Outlet 8
Charging using Car Charger Adapter 9
Powering Unit & Disc Playback 9
Remote Control Buttons 10
Operating Instructions 11
Connecting to External TV, DVD, VCR or DVR 11
Using Headphones Or External Speakers 11
Advanced System Options 12-18
CD Ripping 19
Supported Discs & File Formats 20
Technical Specifications 21
Troubleshooting 22
Customer Support 23
Spanish 25
French 45
Page 3

ENGLISHESPAÑOLFRANÇAIS
3
IMPORTANT SAFETY INSTRUCTIONS
Before using the unit, be sure to read all the operating instructions
carefully. All the safety & operating instructions should be retained
for future reference & all the warnings on the product and in this
user guide should be followed as specified.
1. WARNING: To reduce the risk of
electric shock, do not remove
the cover or back of the unit.
There are no user-serviceable parts
inside.
2. WARNING: To prevent fire or elec-
tric shock hazard, do not expose
the unit to water, rain or moisture.
3. Do not expose the adapter and
portable DVD to any water (including drips or splashes). Objects
filled with liquids, such as vases
and water bottles, should not be
placed on the unit.
4. Keep the portable DVD away
from direct sunlight and heat
sources such as radiators or stoves.
5. Do not block the ventilation
openings. Slots and openings on
the unit are provided for ventilation. Placing your portable DVD
on a cushion, sofa or other similar
surface, should never block the
ventilation opening while unit is in
operation.
6. Do not place the portable DVD
on an unstable table, stand, tripod, bracket or cart. The unit may
fall, resulting in possible damage
or possible injury.
7. Never place heavy or sharp objects
or pressure on the LCD panel or
frame.
8. Only use the AC adapter included
with the portable DVD player. Using
any other adapter will void your
warranty.
9. Unplug the power from the outlet
when the unit is not in use.
10. CAUTION: The rechargeable
battery incorporated in this
product is not user replaceable.
It is dangerous to try to open the
battery incorporated in the unit &
any attempt to do so, will void the
warranty.
11. WARNING: Excessive volume and/
or usage of earphones or headphones can cause hearing loss.
12. WARNING: Only use attachments/
accessories specifically provided
by the manufacturer, including the
provided AC adapter and DC car
adapter.
13. WARNING: This DVD player uses
a laser system to read the CD/
DVD disc. Use of the controls,
adjustments, or the performance
of procedures other than those
specified herein may result in hazardous laser radiation.
14. WARNING: To prevent direct exposure to the laser beam which reads
the CD/DVD disc, do not open the
unit while unit is playing. The laser
beam is visible when the unit is
opened while the CD/DVD disc is
spinning.
15. WARNING: Never stare directly
into the laser beam.
16. CAUTION: Do not permanently
place nor build a casing for this
product in a confined space such
as a bookcase or similar unit, preventing proper ventilation.
17. WARNING: When in use by children, parents must ensure that
the child understands all safety
instructions -- especially those
Page 4

ENGLISH
ESPAÑOL FRANÇAIS
4
regarding overheating, electrical
hazards, and laser radiation.
18. WARNING: If the unit overheats
or has a deformed, damaged, or
destroyed battery, stop using the
unit IMMEDIATELY and contact customer support for repair options.
19. WARNING: Do not charge the
battery when the unit is not suiciently ventilated. Such insuicient
locations include: mattresses,
sofas, cushions, pillows and any
others which limit the air circulation into the ventilation openings.
20. WARNING: The manufacturer,
distributor, and retailers accept no
responsibility for battery damage
caused by improper use and/or
unit damage.
21. Warning: USB cables longer than
10” (250mm) should not be used
with this unit.
CD/DVD DISC HANDLING
1. Do not leave discs near heat
sources, in direct sunlight, or high
humidity environments
2. Store discs in their cases when not
in use.
3. Stacking discs or standing them on
end can cause them to warp.
4. Do not touch the disc surface while
handling the disc. Instead, hold the
edges.
5. Fingerprints, dust, dirt, and scratches can distort the picture or reduce
the sound quality from your disc or
cause playback to skip. Beware of
scratches on the disc inhibiting the
laser beam system from reading
and playing the disc correctly. Clean
discs before use.
6. Do not stick paper, tape, or adhesive
labels onto any disc. Only use permanent makers on the top side of
the disc – not the shiny (under) side
of the disc.
7. Clean discs with a so cloth wiping
from the center outwards.
8. Do not use solvents on any disc
such as benzene, household cleaning products (except those designed
for CD/DVD use), or anti-static spray
for vinyl records as this can damage
your device and discs.
Page 5

ENGLISHESPAÑOLFRANÇAIS
5
PACKAGE CONTENTS
Your Impecca Portable DVD Player includes the following:
• 13.3” DVD Player
• Remote controller with battery
• 12V AC/DC Power Adapter
• Car Charger
• Audio/Video Cable
• Ear buds
• User Manual and Warranty Card
PRODUCT FEATURES
• High contrast and 1366 x 768 dpi resolution 13.3” TFT/LCD widescreen display with 180 and 90 rotating on both sides for personalized adjustments.
• Plays most audio, video, and photo formats & compatible with
most DVD, SVCD, VCD, CD, MP3, MP4 & other disc formats. Built-in
DOLBY® decoder supporting MPEG-4 video decoding
• Electronic skip protection (3 seconds for DVD, 10 seconds for CD/
VCD and 90 seconds for MP3)
• Built-in USB reader for supporting up to 32GB flash drives.
• Built-in SD and MMC card slot, supporting up to 32GB cards.
• AV out port for connecting to external TV.
• 3.5mm jack for headphones or external speakers
• Equipped with infrared remote controller
• Built-in 3W RMS stereo speakers (1.5W x 2)
• CD to USB copying functionality
• Multi-language menus and on-screen displays (English, French,
and Spanish)
• Built-in rechargeable 4000 mAh Li-ion polymer battery for up to 6
hours of continuous play
• Dual-voltage power (100V~240V, 50/60Hz) for world-wide use
Page 6
ENGLISH
ESPAÑOL FRANÇAIS
6
1
2
3
4
5
6
7
8
9
10
11
12
13
14
15
16
17
19
18
REPEAT SUBTITLE
DVD/USB/SD
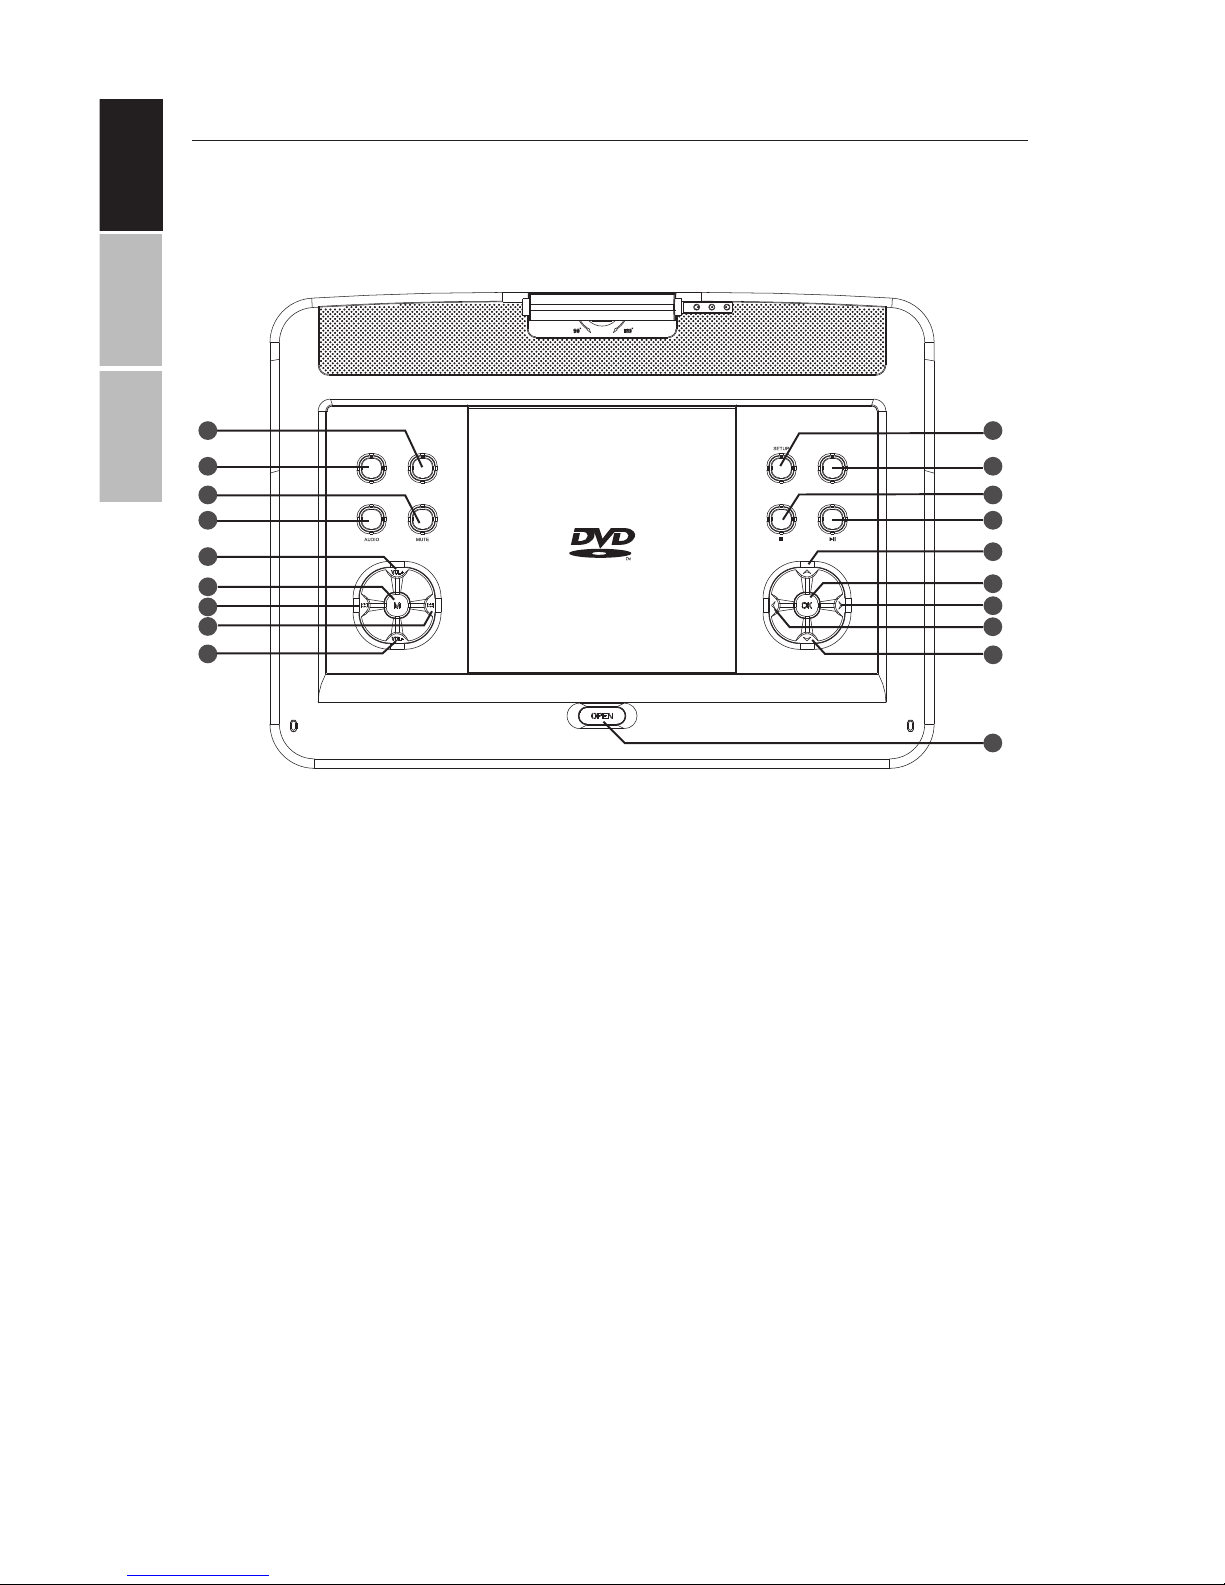
MAIN UNIT CONTROLS
1. SUBTITLE/CAPTION
2. REPEAT
3. MUTE
4. AUDIO
5. VOL +
6. MENU
7. SKIP BACK
8. SKIP FORWARD
9. VOL -
10. SETUP
11. INPUT SELECT
12. STOP
13. PLAY/PAUSE
14. UP
15. OK
16. RIGHT
17. LEFT
18. DOWN
19. OPEN
Page 7

ENGLISHESPAÑOLFRANÇAIS
7
20 21 22 23 24 25
DC12V
SWIVEL SCREEN PANEL
The viewing angle of the swivel screen panel can be adjusted as
shown below to the desired angle:
MAIN UNIT CONTROLS
20. USB SLOT – Used for connecting USB Flash Drives
21. SD CARD SLOT – Used for
connecting SD and MMC
Cards
22. 3.5mm JACK – Used for
connecting ear phones or
external speakers. Built-in
speakers will automatically
turn o/on once this jack is
plugged or unplugged.
23. AV OUT JACK – Used for
connecting external TV
24. POWER (OFF/ON) SLIDE
KEY – Used to turn unit
OFF/ON
25. POWER JACK – Used to
plug in 12V AC/DC adapter
or 12V Car Charger
Page 8
ENGLISH
ESPAÑOL FRANÇAIS
8
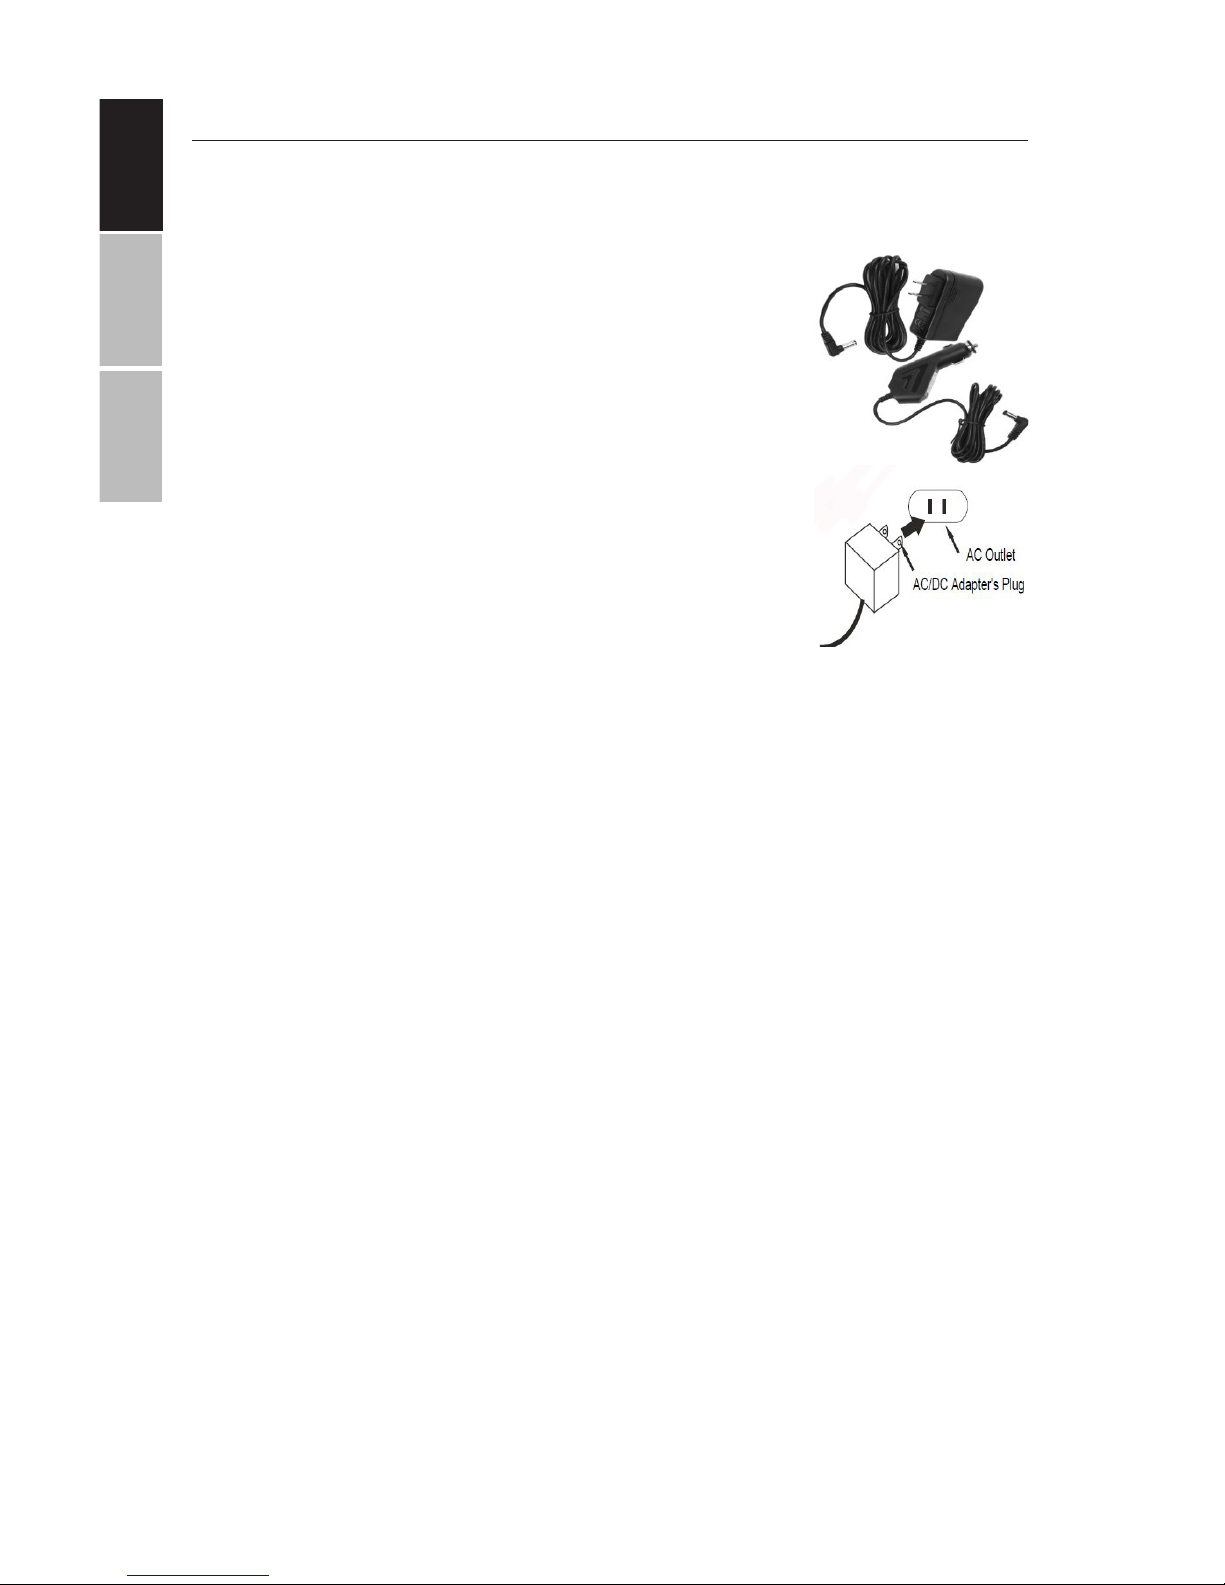
GETTING STARTED
CHARGING FROM AC/DC OUTLET - The unit has a built-in rechargeable
Li-ion polymer battery. Recharge it before use as instructed below:
• Insert the small plug from the AC/DC adapter
into the DC IN jack on the side of the unit.
• Insert the AC/DC adapter into a conveniently located AC outlet having AC 100-240V~; 50 or 60Hz.
• Charging will start automatically showing a red
LED.
• Once unit is fully charged the red LED indicator
light will change to green.
• When the unit is turned ON (using the OFF/ON
switch on the le side panel) the LED on the right
will show blue.
NOTES:
Use the enclosed AC/DC adapter for this product only.
Remove the AC/DC adapter from wall outlet when not using for a
long period of time. Do not try to insert the AC/DC adapter into the
wall outlet incorrectly.
BATTERY INDICATOR
When power of the built-in battery is low, the player will stop and
turn o. It is advised to charge the unit at this point or before it turns
o. During charging, you can play the DVD/USB/SD as usual.
BATTERY TIPS:
Your battery will last longer if you follow these simple guidelines for
caring for and storing the unit.
A. The first time, charge unit at least 6-8 hours.
B. Recharge and store the unit within the temperature range of
40°F-95°F (5°C-35°C).
C. Do not over-charge (longer than 24 hours). Excessive charging or
discharging may shorten the battery's life.
D. Battery should be charged at least every 3 months.
E. The rechargeable battery incorporated in this product is not user
replaceable.
Note: It is normal for rechargeable batteries to slowly lose some of
their charge over time.
Page 9

ENGLISHESPAÑOLFRANÇAIS
9
GETTING STARTED
CHARGING USING CAR CHARGER ADAPTER - The unit can also be
charged or recharged from a car outlet as follows:
• Insert the small Car Charger plug from the Car Charger Adapter into
the DC IN jack on the side of the unit.
• Insert the Car Charger adapter into the car’s cigarette lighter outlet
having 12V DC. Charging will start automatically.
• Charging will start automatically showing a red LED.
• Once unit is fully charged the red LED indicator light will change to
green.
• When the unit is turned ON (using the OFF/ON switch on the le side
panel) the LED on the right will show blue.
NOTES:
Use the enclosed Car Charger adapter for this product only.
Only use the Impecca authorized power adapter included with your
DVD player. Using any other power adapter can damage the unit
and/or cause electrical shock, fire, or even death.
Remove the Car Charger adapter from the outlet when not using for
a long period of time.
POWERING UNIT & DISC PLAYBACK
• Important: Remove the plastic screen protector before use.
• Li up the screen panel and turn to desired angle. Slide the Power
ON/OFF switch to “ON” position to power on the player. The blue LED
indicator light on front of the player will light.
• Press the OPEN button to open disc door. Place the disc on the center
spindle with label side facing up. Close the disc door and the player
will start playback automatically.
• To power o, press the STOP () button to stop the playback and
disc spinning.
NOTES:
The blue LED indicator light will remain lit while ON/OFF switch on
side of player is in the ON position.
Inserting a USB stick or SD/MMC card will load the media menus.
To save battery power, always power o the player by sliding the
ON/OFF switch on the side of player to "OFF" position.
Page 10
ENGLISH
ESPAÑOL FRANÇAIS
10
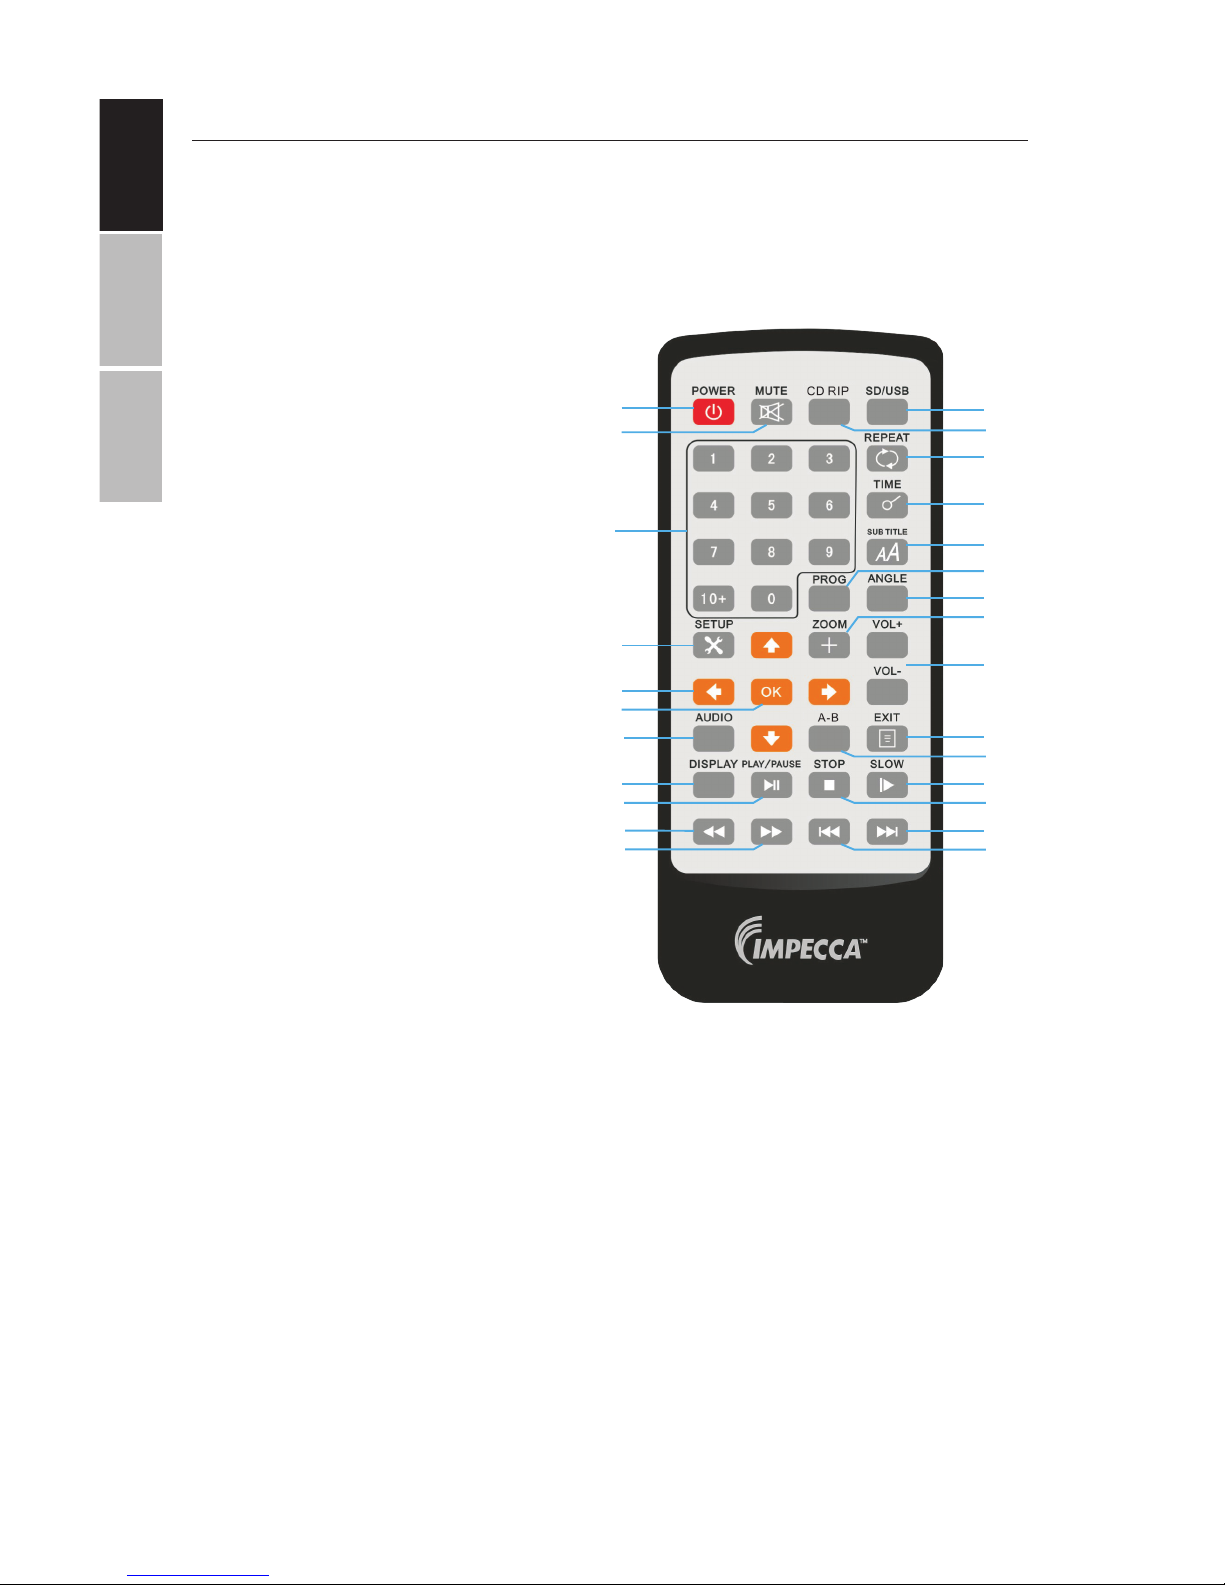
REMOTE CONTROL BUTTONS
Note: Remove the protective plastic tap from bottom of remote before first use.
The following guide will help you make the best use of your remote control:
1
2
3
4
5
6
7
8
9
10
11
12
13
14
15
16
17
18
19
20
21
22
23
24
25
26
1. STANDBY - Switch unit on/o
2. MUTE- disable sound
3. NUMERIC KEYS
4. SETUP - Enter setup menu
5. UP/DOWN/LEFT/RIGHT
ARROW KEYS
6. ENTER - Select menu items
7. AUDIO - Change audio language
tracks
8. DISPLAY - display disc info.
9. PLAY/PAUSE
10. REWIND - Press repeatedly to
rewind playback in 2x, 4x, 8x, 16x
and 32x increments. Press again to
resume normal playback
11. FAST FORWARD - Fast forward
Playback in 2x, 4x, 8x, 16x and 32x
increments. Press again to resume
normal playback.
12. DVD/USB/SD CARD
INPUT - Switch card source
13. CD RIP - Copy audio from CD to
USB
14. REPEAT - Repeat tracks or video
15. TIME - Skip to a specific time in
media
16. SUBTITLE - Enable Subtitles (disc
must support this function)
17. PROG. - Place track on program list
18. ANGLE - Change camera angles (if
supported by your disc)
19. ZOOM - Zoom in on the scene
at ratios of 2x, 3x, and 4x. Use the
directional arrows to pan across the
screen.
20. VOLUME +/–
21. EXIT - Return to menu
22. A-B - Repeat A-B
23. SLOW - Scan the video track slower
than normal playback speeds
24. STOP
25. NEXT - Skip to next chapter or track
26. PREVIOUS - Skip to previous chap-
ter or track
Page 11
ENGLISHESPAÑOLFRANÇAIS
11
OPERATING INSTRUCTIONS
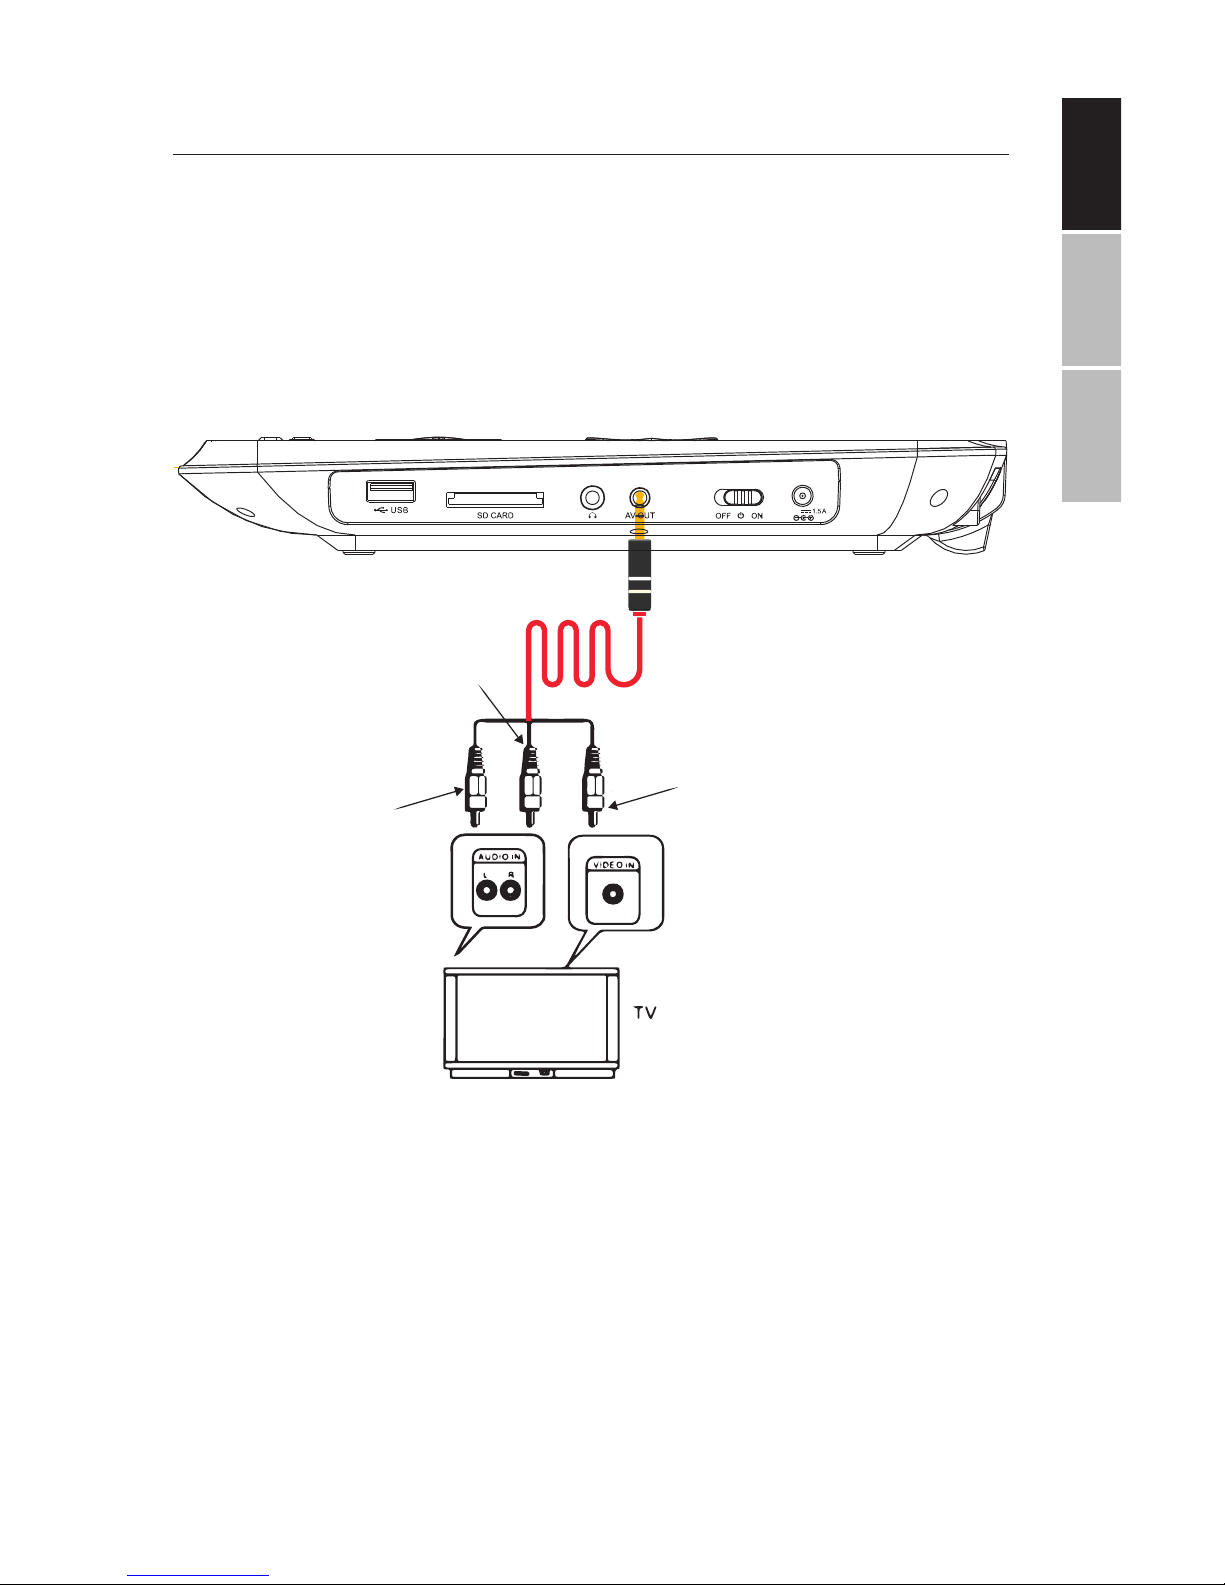
CONNECTING TO EXTERNAL TV:
Your portable DVD player can act as a DVD Player that can be hooked up to
a TV for viewing on a larger screen. You can use another video source such
as another DVD, Blu-ray player, VCR, or DVR. External speakers can also be
used instead of the built-in speakers to play the sounds.
• Connect the external TV to the unit through the AV-OUT jack as shown in Figure
1 above.
USING HEADPHONES OR EXTERNAL SPEAKERS:
For private listening, connect the supplied ear buds into the headphone
jack on the side of unit. The unit’s speakers will turn o when headphones
are inserted into the jack. External speakers may also be used the same
way for a dierent listening experience.
White
Red
Yellow
Figure 1
Page 12
ENGLISH
ESPAÑOL FRANÇAIS
12
ADVANCED SYSTEM OPTIONS
Press the SETUP button on the remote control unit to open the setup menu. Use the directional buttons (up, down, le, right) to select
menu items. Aer changing the desired settings, press the SETUP
button again to return to the normal display.
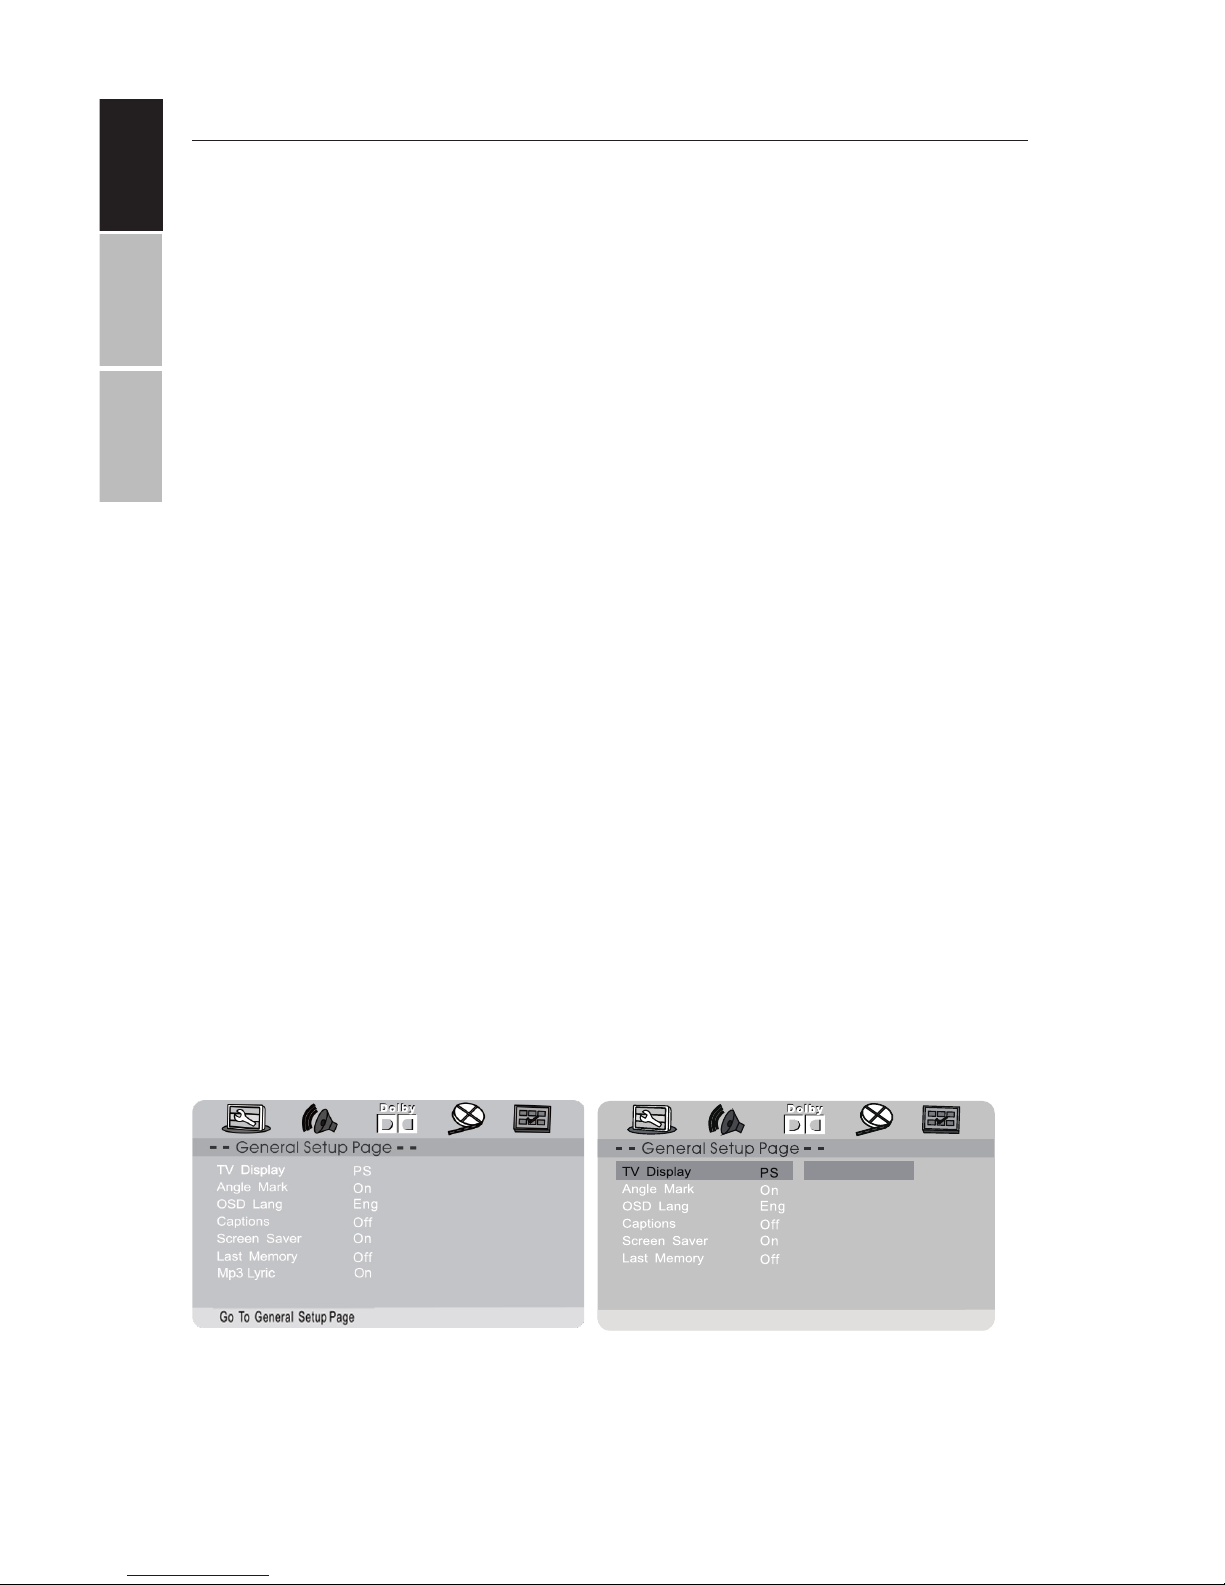
GENERAL SETTINGS
Mp3 Lyric On
Set TV Display Mode
4:3/PS
4:3/LB
16:9
TV DISPLAY
Sets the aspect ratio of the playback image when using an external
television display.
• 4:3 Panscan: a standard ‘square’ television (4:3 aspect ratio)
will trim the le and right sides o of a wide-screen film. Also
known as full-screen.
• 4:3 Letterbox: select this if you have a standard ‘square television (4:3 aspect ratio). In this case, the full image will be shown
on the screen with black letterbox bars on the upper and lower
portions of the image.
• 16:9: Choose this display option on any wide-screen display
(most HDTVs).
• Wide Squeeze: Squeezes a wide-screen image to fit a 4:3
screen with no trimming.
Page 13
ENGLISHESPAÑOLFRANÇAIS
13
ADVANCED SYSTEM OPTIONS
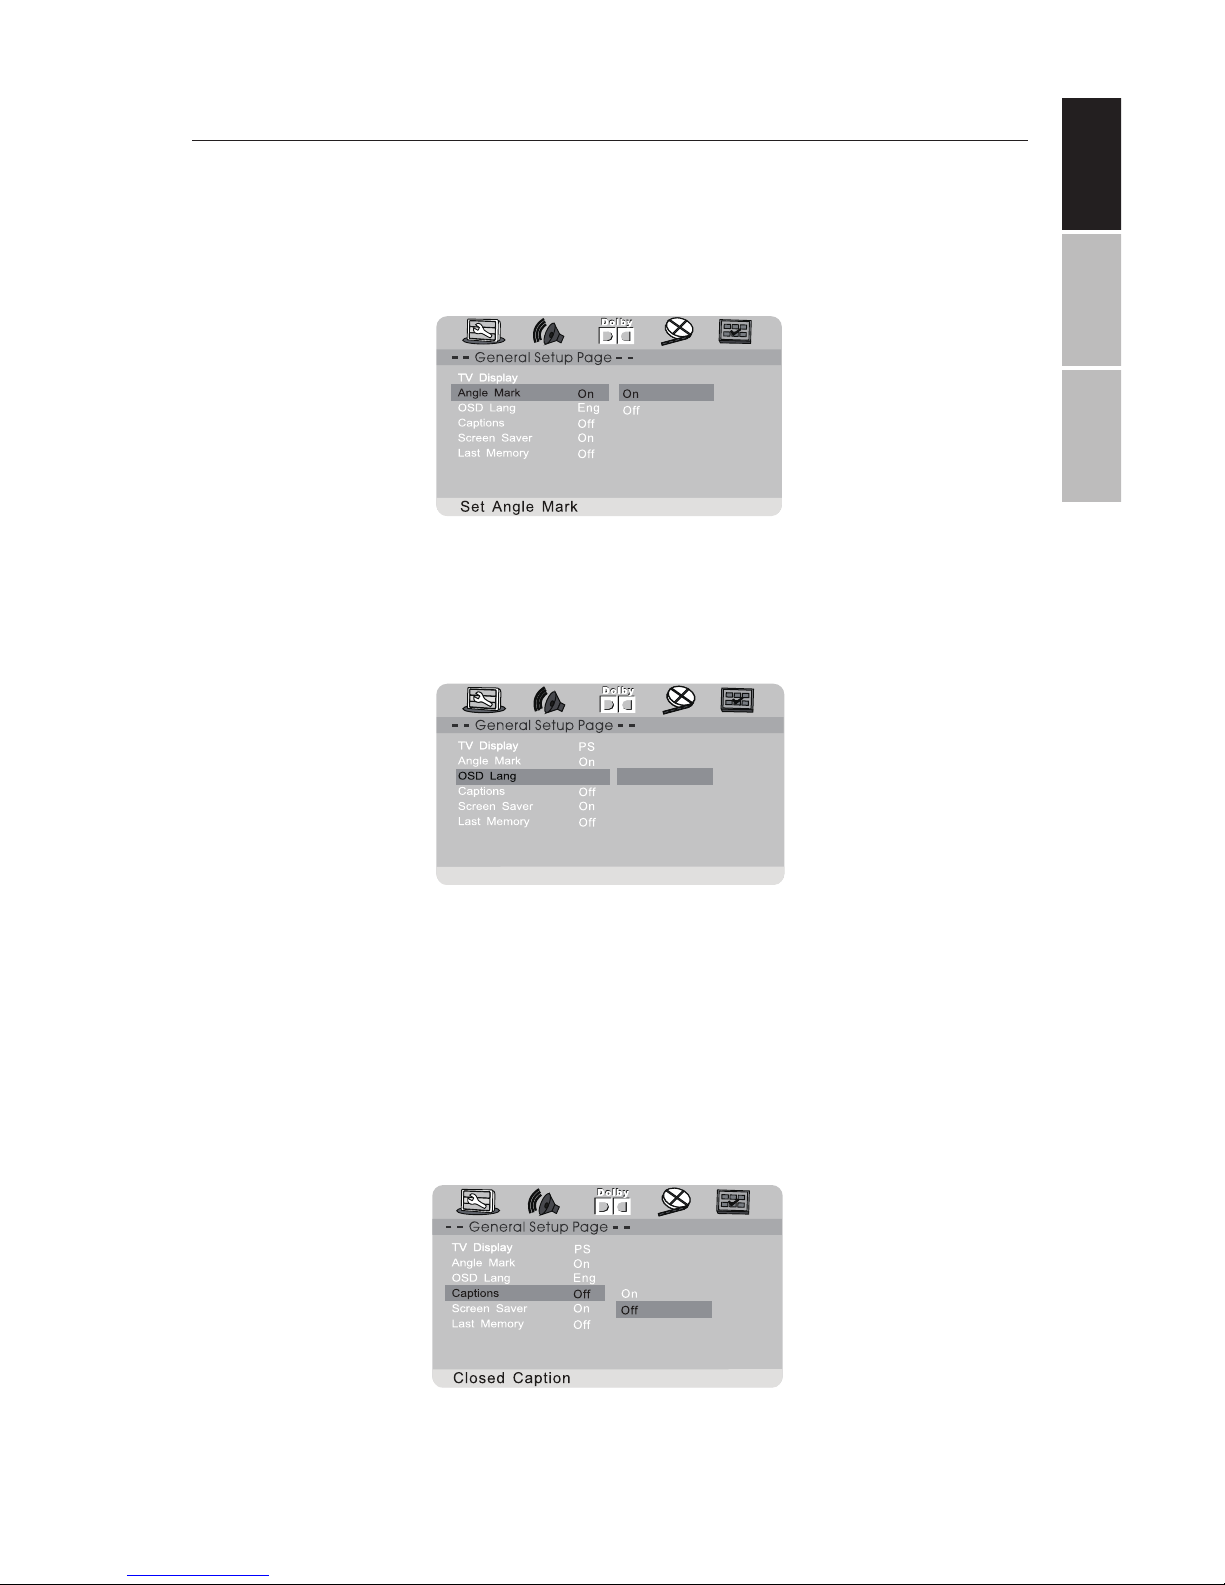
VIEWING ANGLE
Displays current camera viewing information on the right hand corner of the TFT screen if available on the disc.
OSD LANGUAGE
Change the DVD player system language
CLOSED CAPTIONS
Closed captions are data that are hidden in the video signal of some
discs for the hearing impaired. Closed captions are dierent from
subtitles that can be selected by using the SUBTITLE button or in
your DVD menu. You can enable closed captions with this option.
Set OSD Language
Mp3 Lyric On
English
French
German
Spanish
Portuguese
ENG
Mp3 Lyric On
Mp3 Lyric On
PS
Page 14
ENGLISH
ESPAÑOL FRANÇAIS
14
ADVANCED SYSTEM OPTIONS
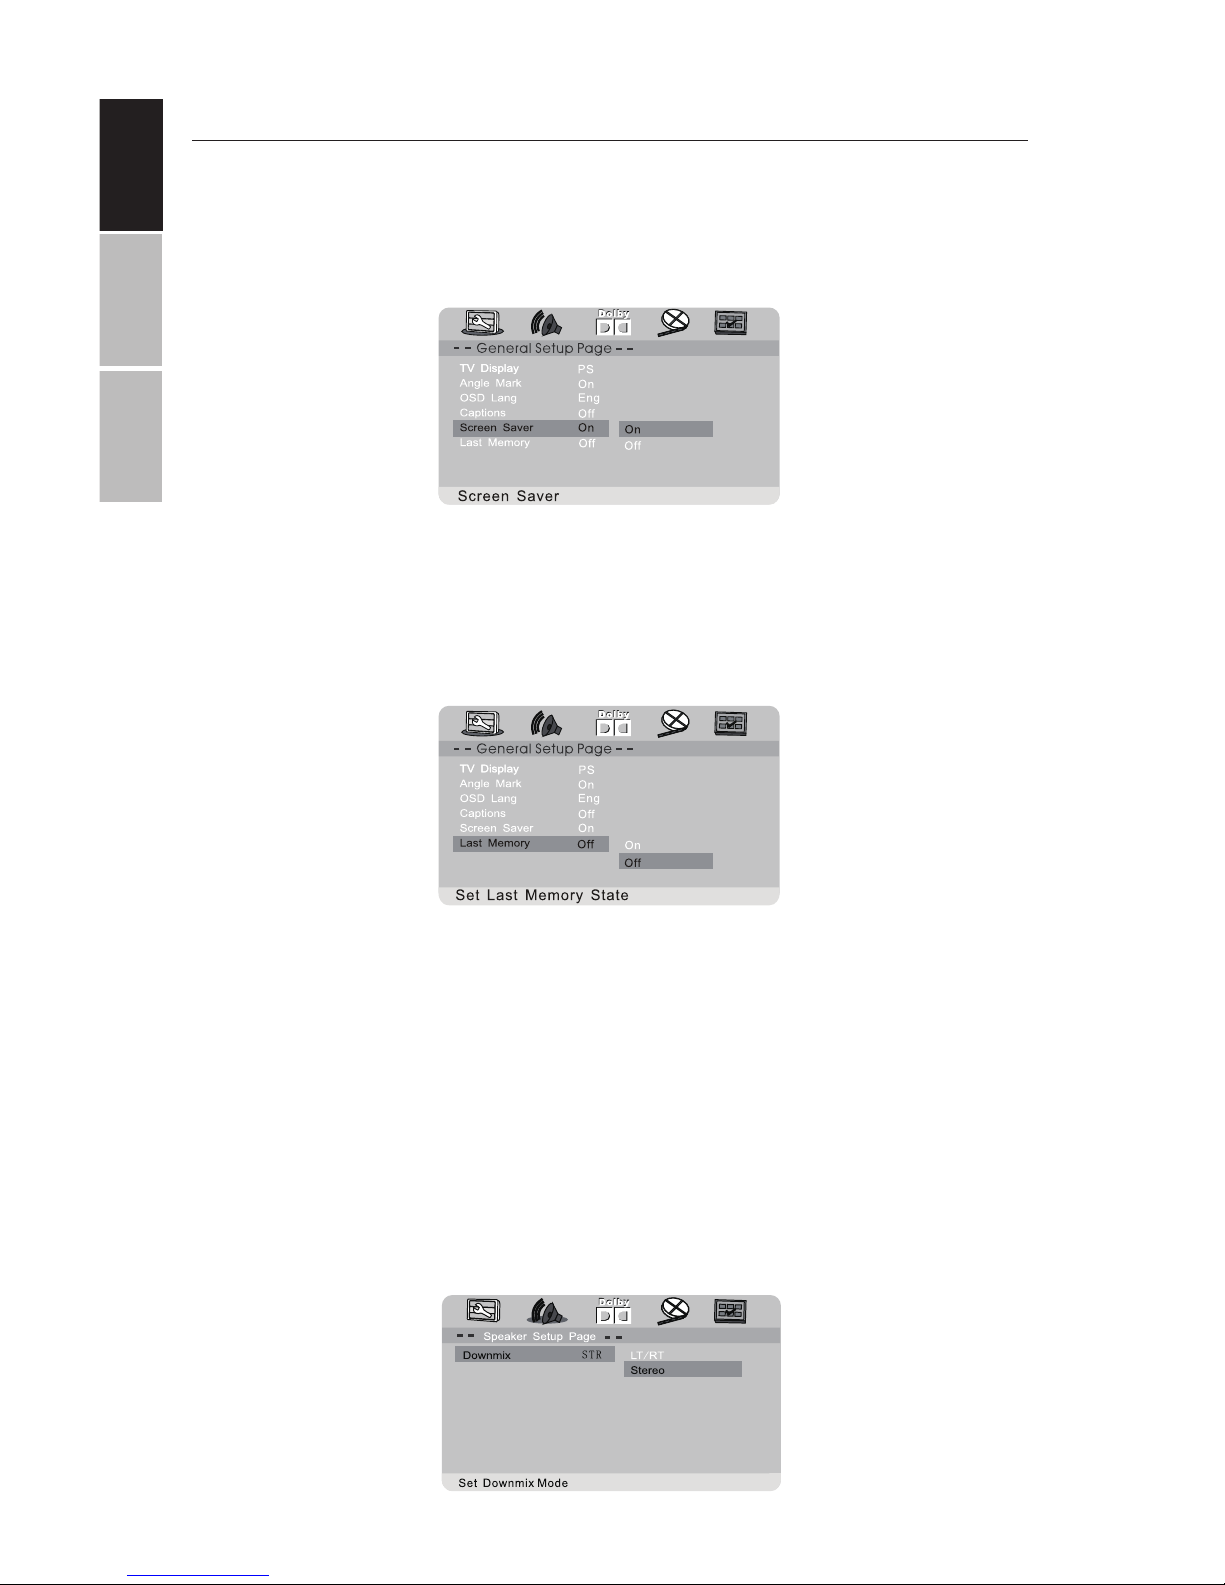
SCREEN SAVER
Turn the screen saver on or o aer a period of prolonged DVD player inactivity.
RESUME PLAYBACK
The player will remember the last point read on your disc when this
option is enabled; the player will automatically resume playback
when the disc is re-inserted.
AUDIO SETTINGS
Down-mix:
This options allows you to set the analog stereo output of your DVD
Player.
• LT/RT: Select this option if your DVD Player is connected to a
Dolby Pro Logic decoder.
• Stereo: Select this option when output delivers sound from
only the two front speakers.
Mp3 Lyric On
Mp3 Lyric On
Page 15
ENGLISHESPAÑOLFRANÇAIS
15
ADVANCED SYSTEM OPTIONS
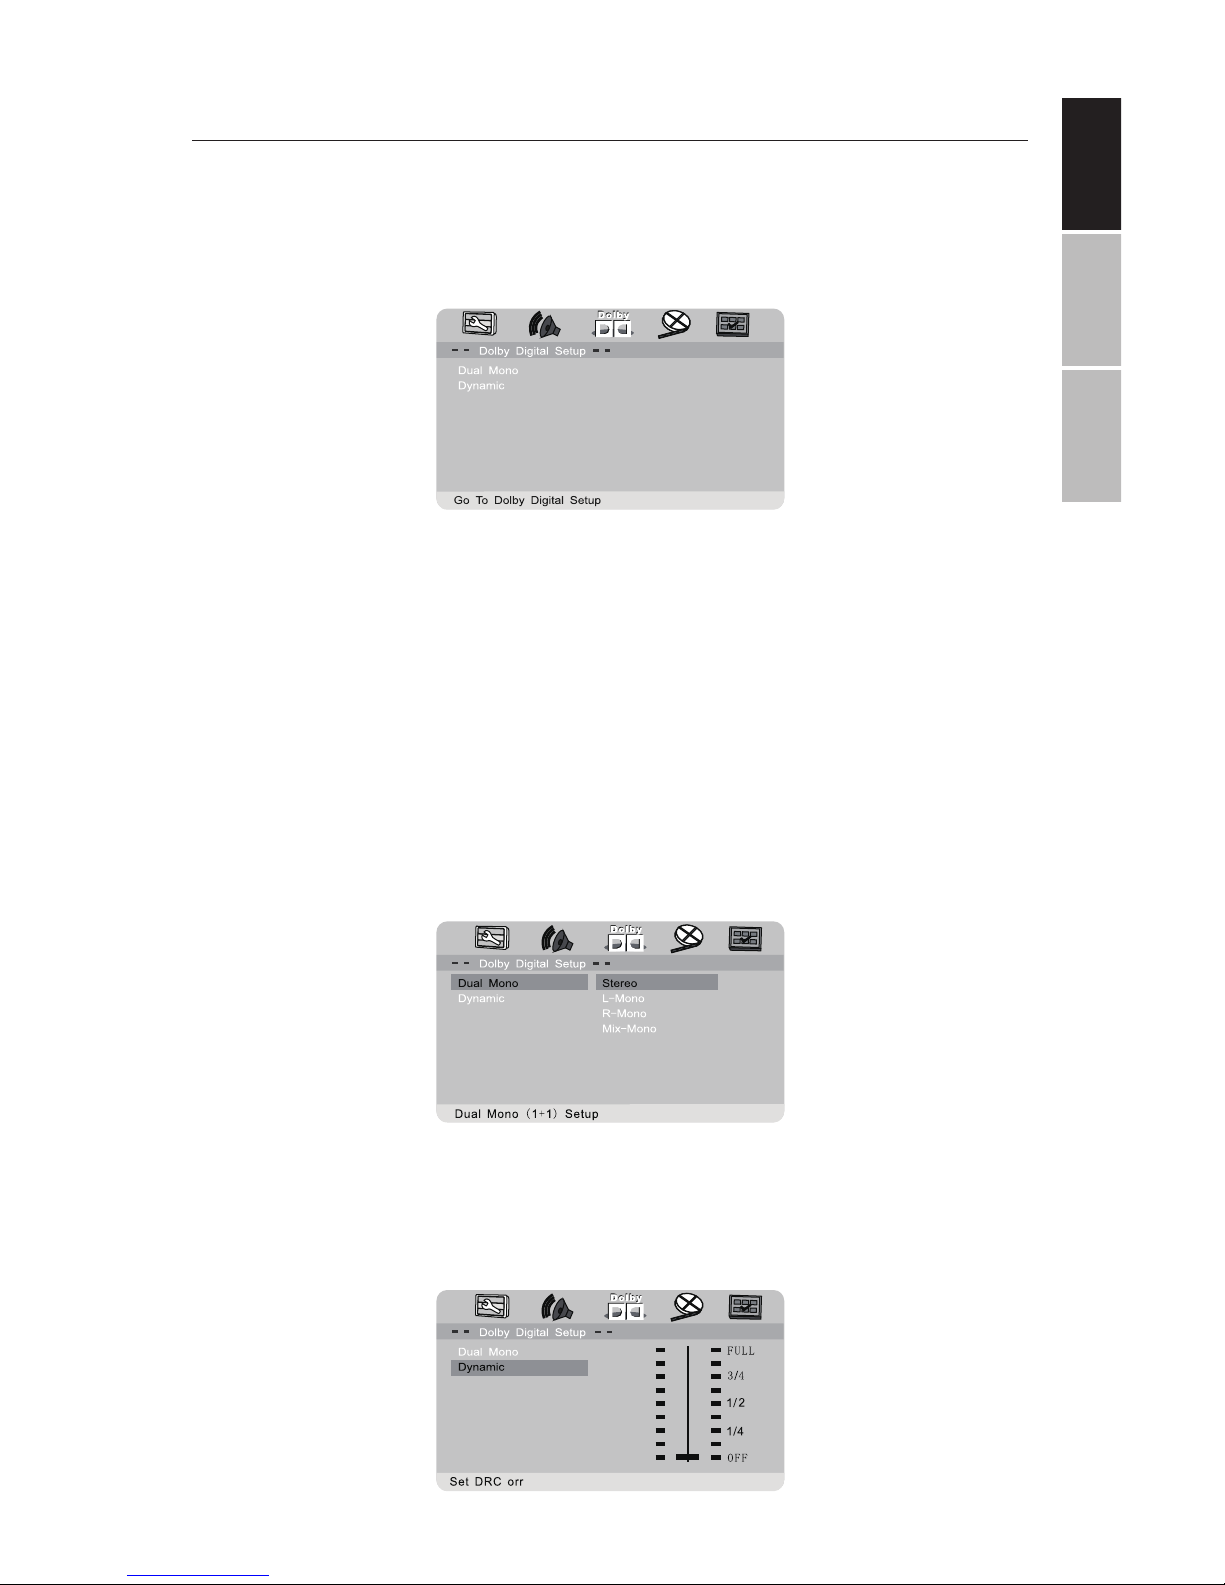
DOLBY DIGITAL
The options included in Dolby Digital Setup are: ‘Dual Mono’ or ‘Dynamic’.
DUAL MONO
• Stereo: Le mono sound will send output signals to le speaker and
right mono sound will send output signals to right speaker.
• L-Mono: Le mono sound will send output signals to both the le
speaker and right speaker.
• R-Mono: Right mono sound will send output signals to both the le
speaker and right speaker.
• Mix-Mono: Le and right mixed mono sound will send output signals
to le and right speakers.
DYNAMIC
Dynamic range compression.
Page 16
ENGLISH
ESPAÑOL FRANÇAIS
16
ADVANCED SYSTEM OPTIONS
VIDEO SETTINGS
Adjust the video quality of the LCD display unit by modifying the sharpness, brightness, contrast, hue, and saturation of the image.
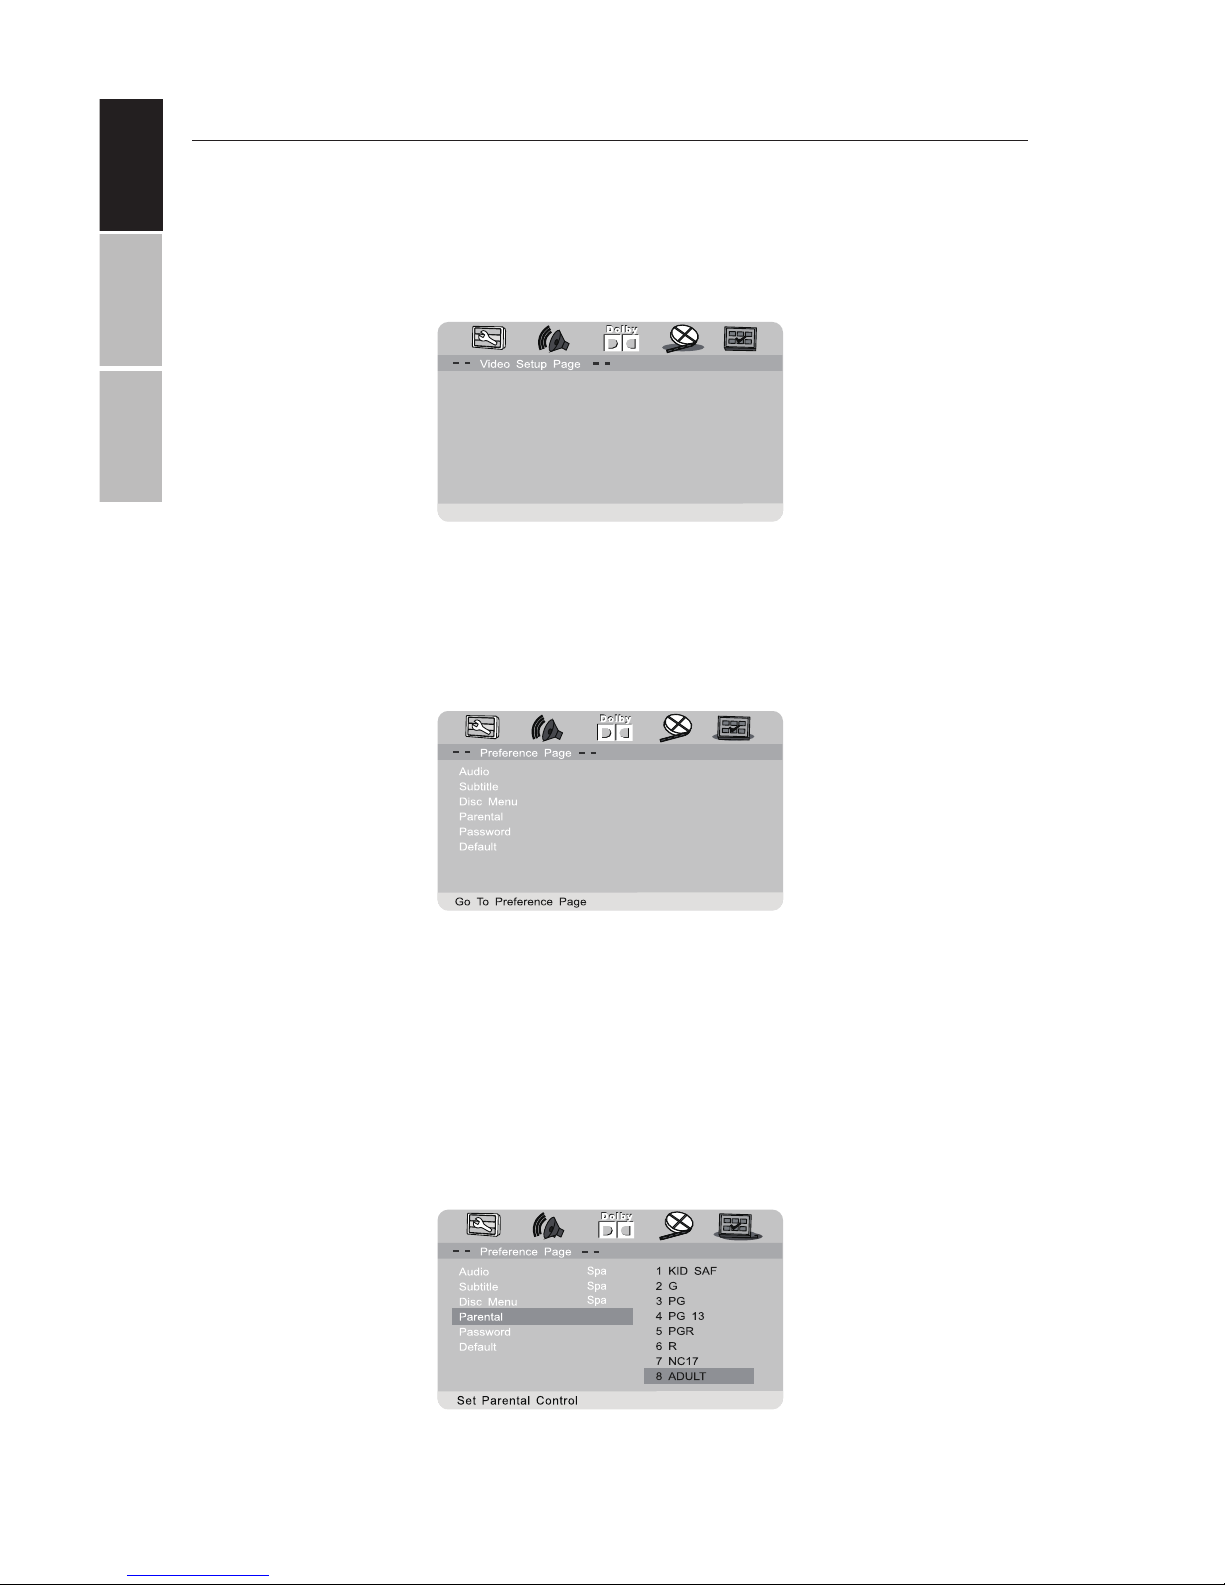
PLAYBACK PREFERENCES
Audio: Selects a default DVD audio language (if available). Subtitle: Selects
a default DVD subtitle language (if available). Disc Menu: Selects a default
DVD menu language (if available).
PARENTAL
Some DVDs may have parental levels assigned to the complete disc or to
certain scenes on the disc. This feature lets you set playback limitations.
The rating levels range from 1 to 8 and are country dependent. You can
prohibit the playing of certain discs that are not suitable for your children.
Certain discs support the playback of alternate scenes.
Panel Quality
Panel Display 16:9
Go To Video Setup Page
Eng
Eng
Eng
Page 17
ENGLISHESPAÑOLFRANÇAIS
17
ADVANCED SYSTEM OPTIONS
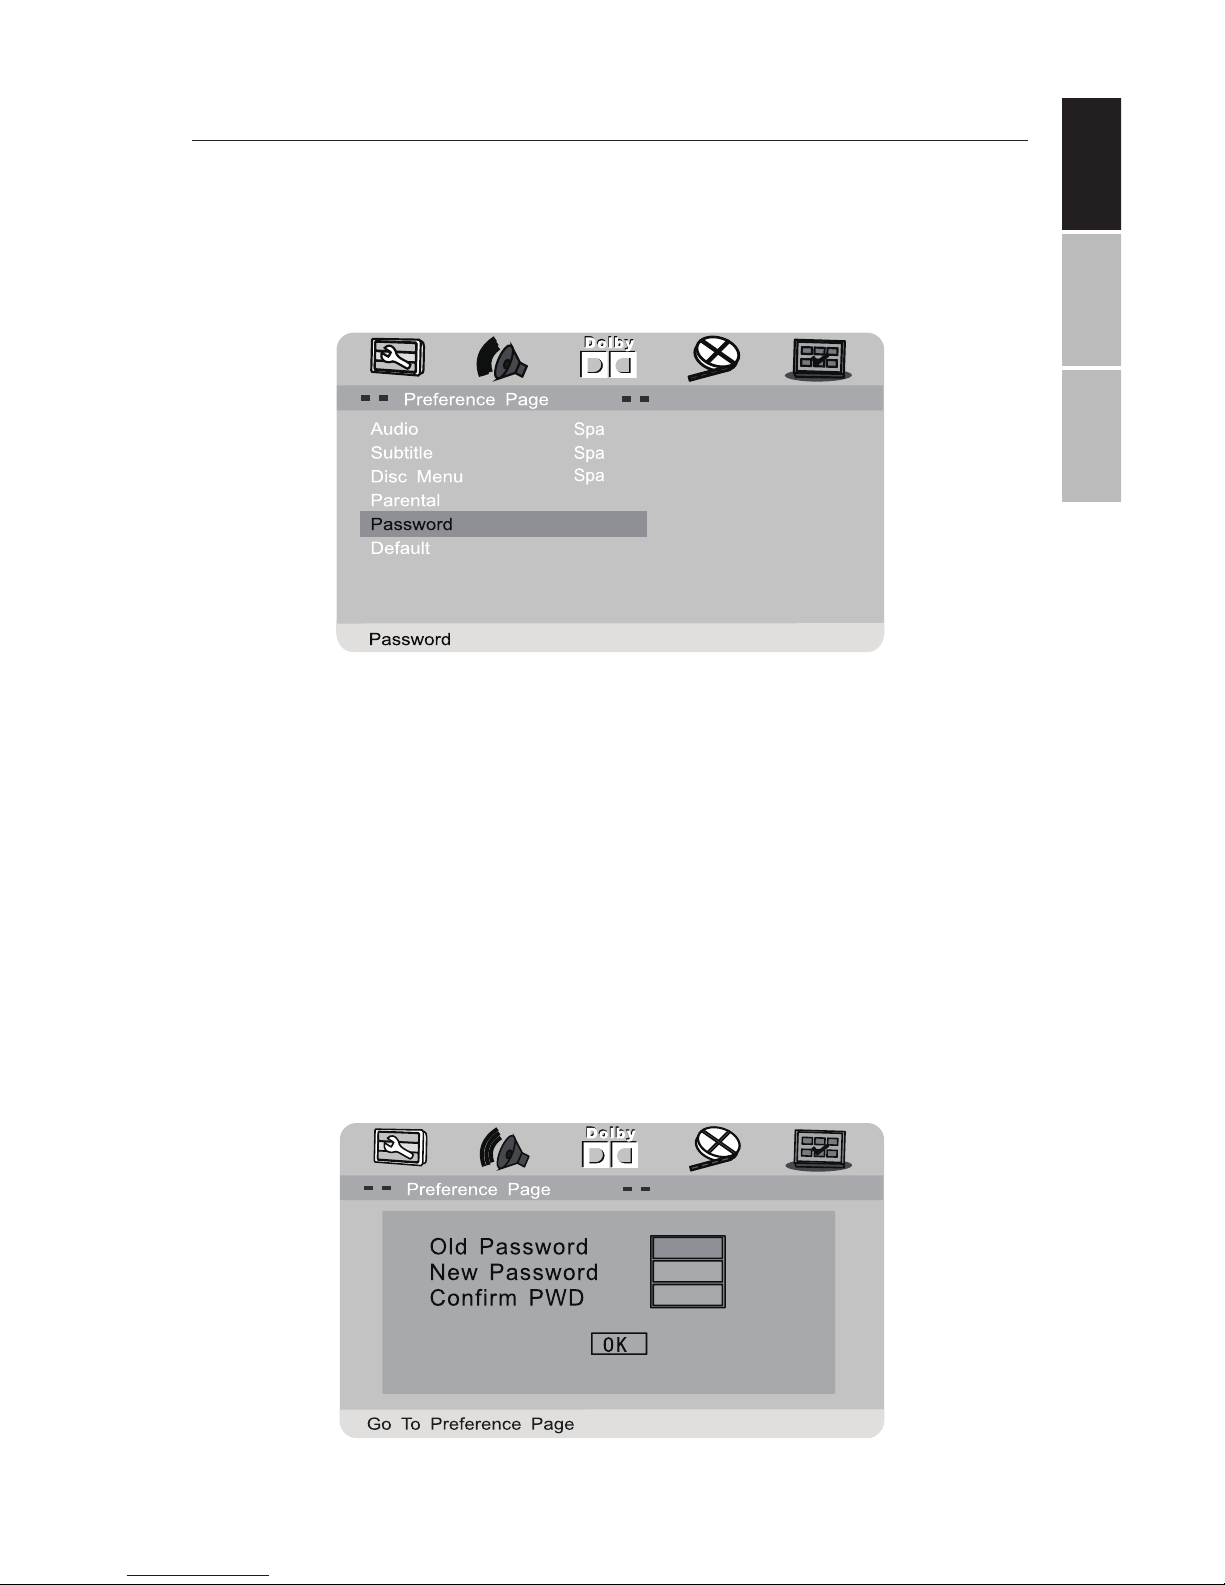
PASSWORD SETTINGS
Require a password to playback restricted ratings on DVDs. If this
setting is disabled, parental settings will not function.
OLD PASSWORD
Enter the old password using the remote control (factory setting is
136900), and the cursor will jump automatically to the new password field.
NEW PASSWORD
Enter a new password using 6 digits from the remote control, and the
cursor will automatically jump to the confirm password field.
Page 18
ENGLISH
ESPAÑOL FRANÇAIS
18
ADVANCED SYSTEM OPTIONS
CONFIRM PASSWORD
Confirm the new password by entering it again using the remote control. If the incorrect password is entered, the cursor will stay in this
field and you will need to enter the correct password. Aer entering,
the correct new password again, the cursor will jump automatically
to the OK button.
CONFIRM
Once all fields are filled in, click the ENTER button on the remote control to save your new password.
Note: If the password has been changed, the parental and disc lock
code will also be changed.
Note that the default password (136900) remains permanently ac-
tive even if the system password has been changed.
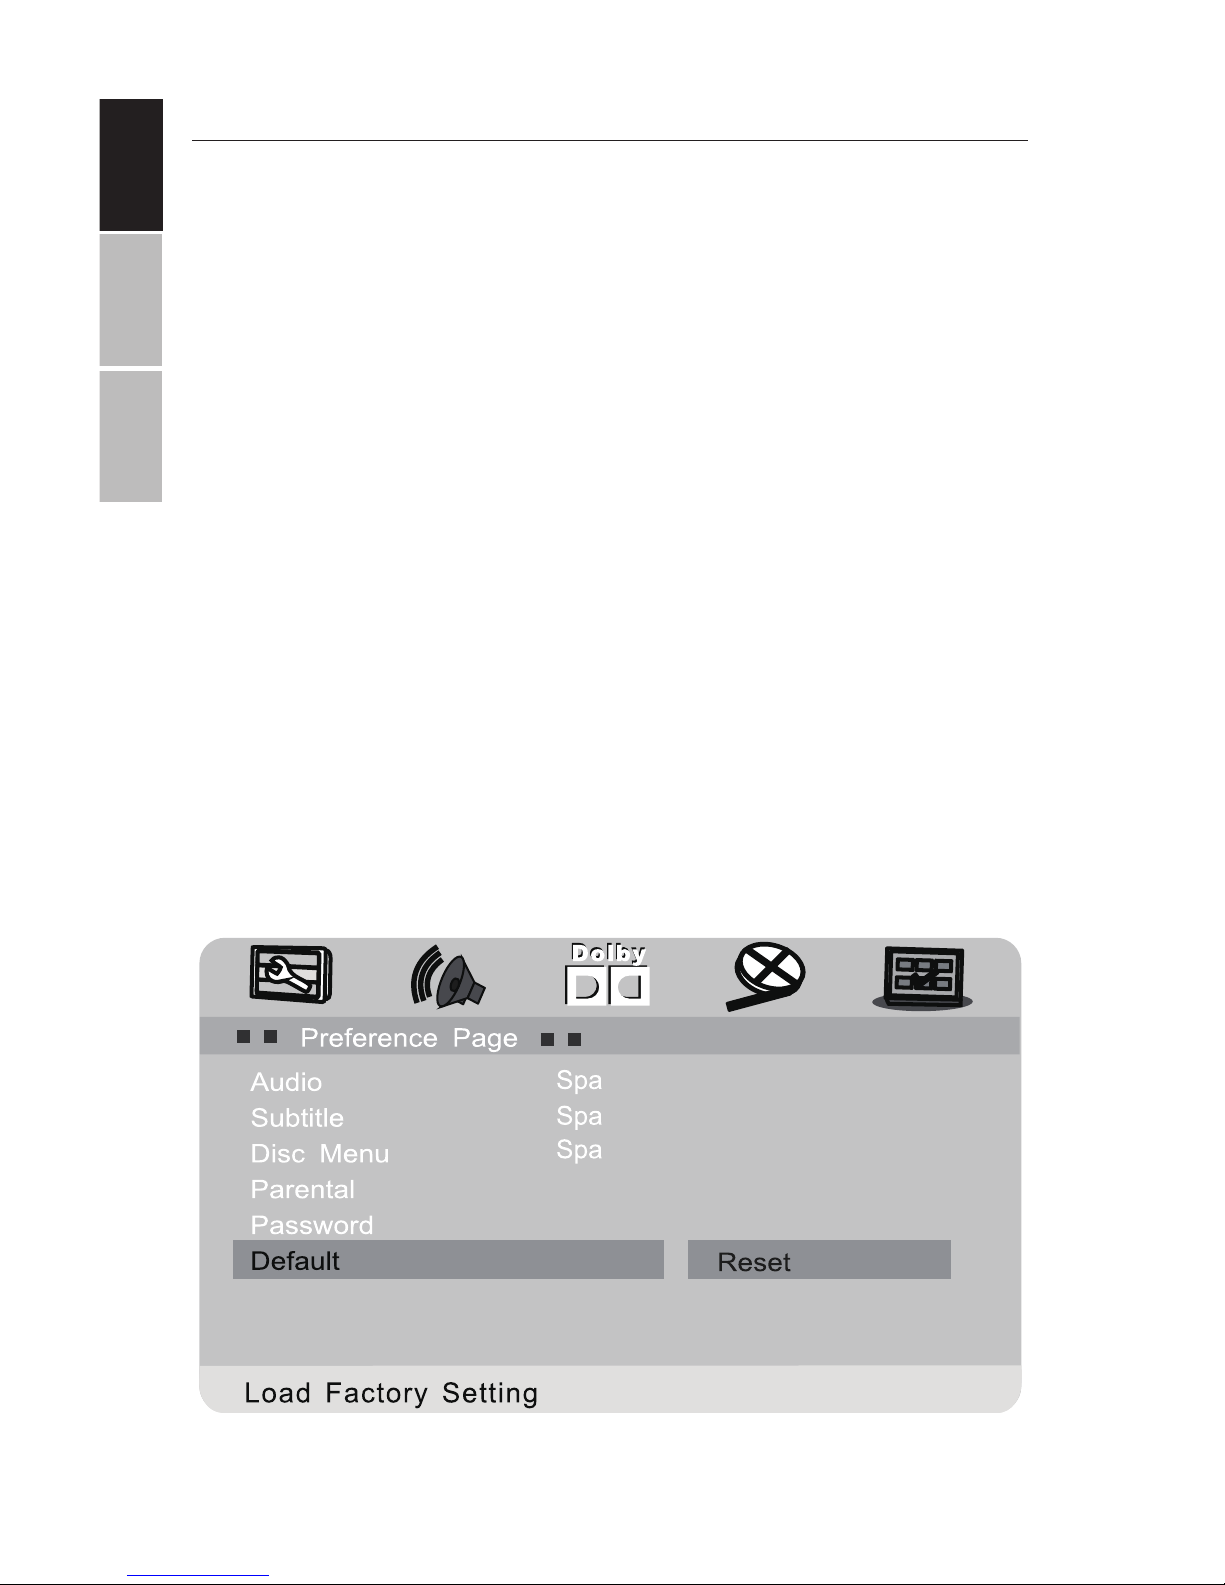
DEFAULT
Revert all player settings to factory defaults.
Page 19
ENGLISHESPAÑOLFRANÇAIS
19
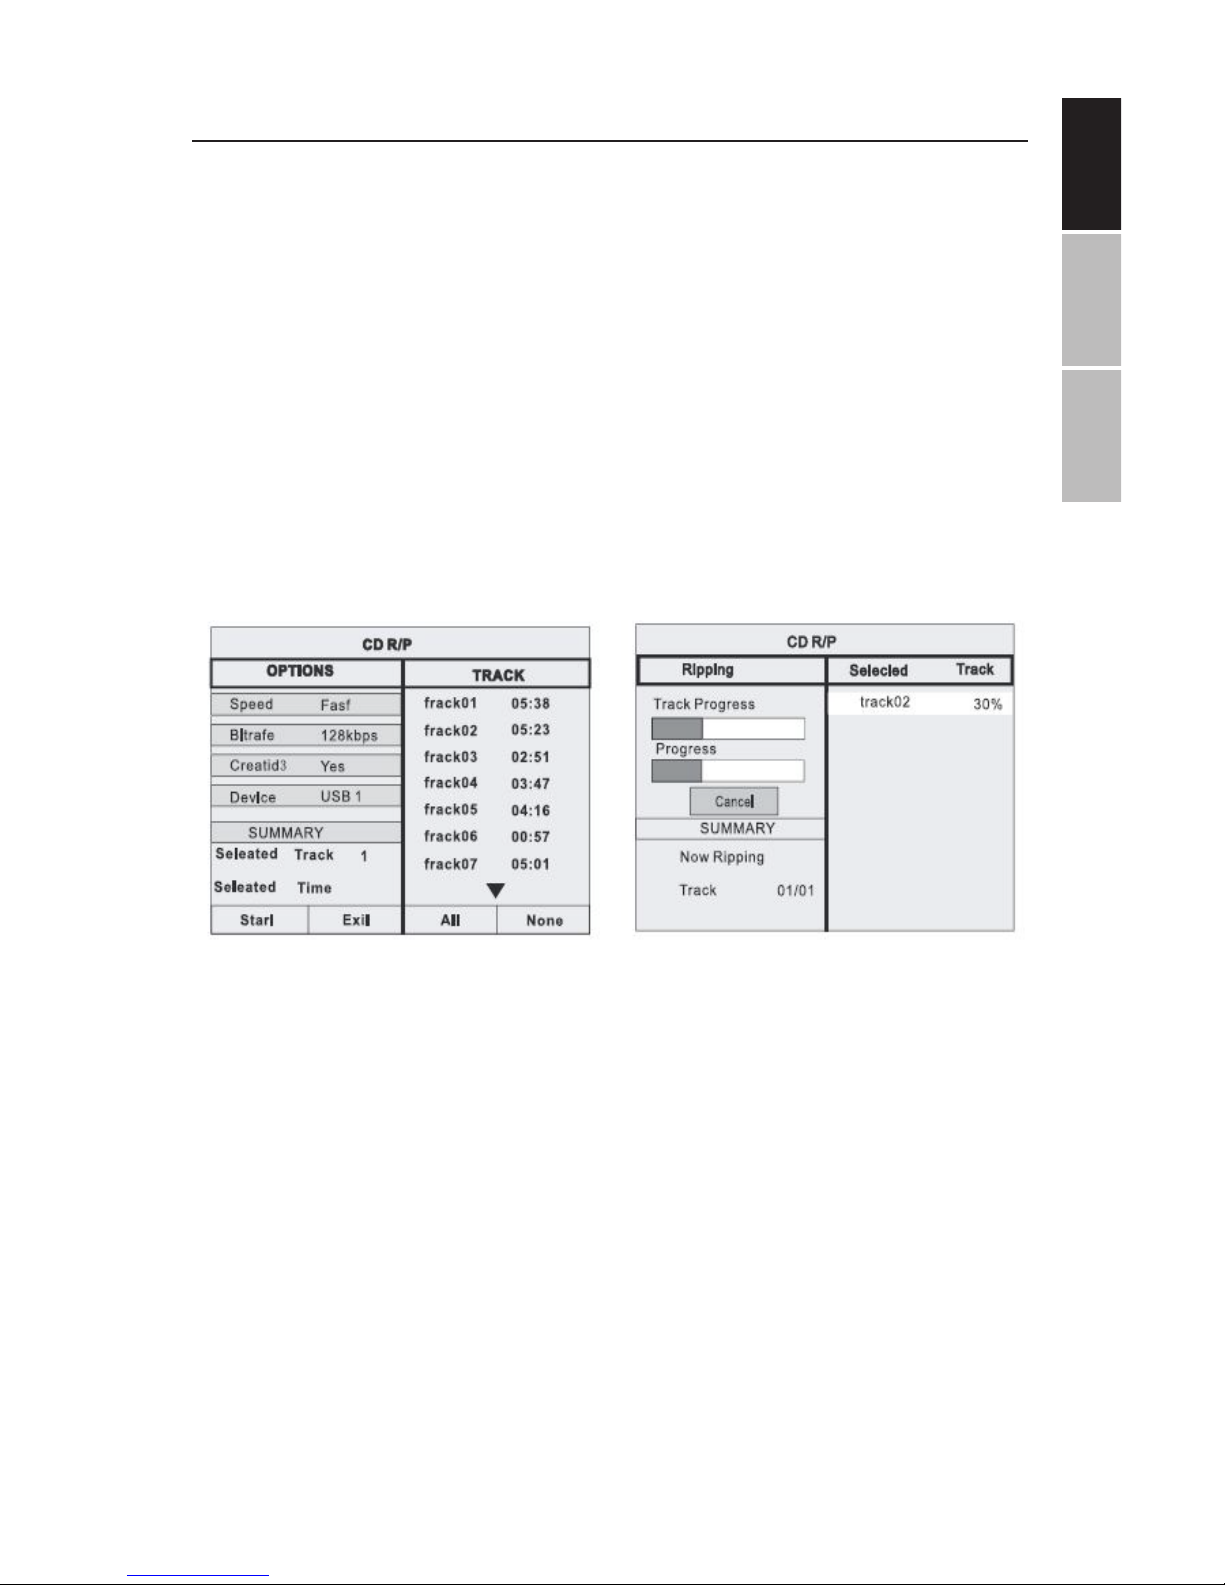
CD RIPPING
The DVD Player can copy unprotected CDs and MP3 CDs to a USB
drive. Before beginning this process, ensure that your USB drive has
suicient free space.
Using the directional arrow keys on the front panel, select the track(s)
you would like to copy to your USB drive. Confirm your selection and
wait for the copy process to complete. A dialog box will confirm completion as shown below.
Note that it is normal for this process to take quite some time.
Page 20
ENGLISH
ESPAÑOL FRANÇAIS
20
SUPPORTED DISCS & FILE FORMATS
PLAYABLE DISCS:
The unit can play back the following discs:
DISC TYPES:
IMPORTANT:
Read the manual that accompanies the DVD disc, as there are features on this DVD player which
cannot be used on certain discs. There are also additional features on a DVD disc which are dierent
for each disc and would require referring back to the manual accompanying the disc itself or the
soware from which the disc was created.
This player conforms to the NTSC and PAL color systems. Note: If you are in USA, Canada or Mexico,
using the remote controller or setup menu, leave this setting on NTSC. In other countries, PAL color
system will be used by the player either automatically or can be changed using the remote controller or setup menu. If unit is incorrectly set to PAL (which might be used in other countries,) the
picture might be distorted or rolled vertically. In such a case, refer back to the manual accompanying the disc itself or the soware from which the disc was created as to the color system of the disc.
SUPPORTED FILE FORMATS - The following table shows the file formats supported by the
player for watching movies, listening to audio or displaying picture files:
MPEG1, 2 dat, mpg, mpeg MPG, MPEG
MPEG2 vob MPEG2-PS
MPEG4
Divx 3.11, Divx 4.12, Div x 5.x, Div x 6, Xvid 1.00, Xvid 1.01, Xvid
1.02, Xvid 1.03, Xvid 1.03, Xvid 1.10-beta1/2
divx, avi AVI (1.0, 2.0)
DMF0,1,2
Audio mp3 MP3
JPEG Motion jpeg AVI
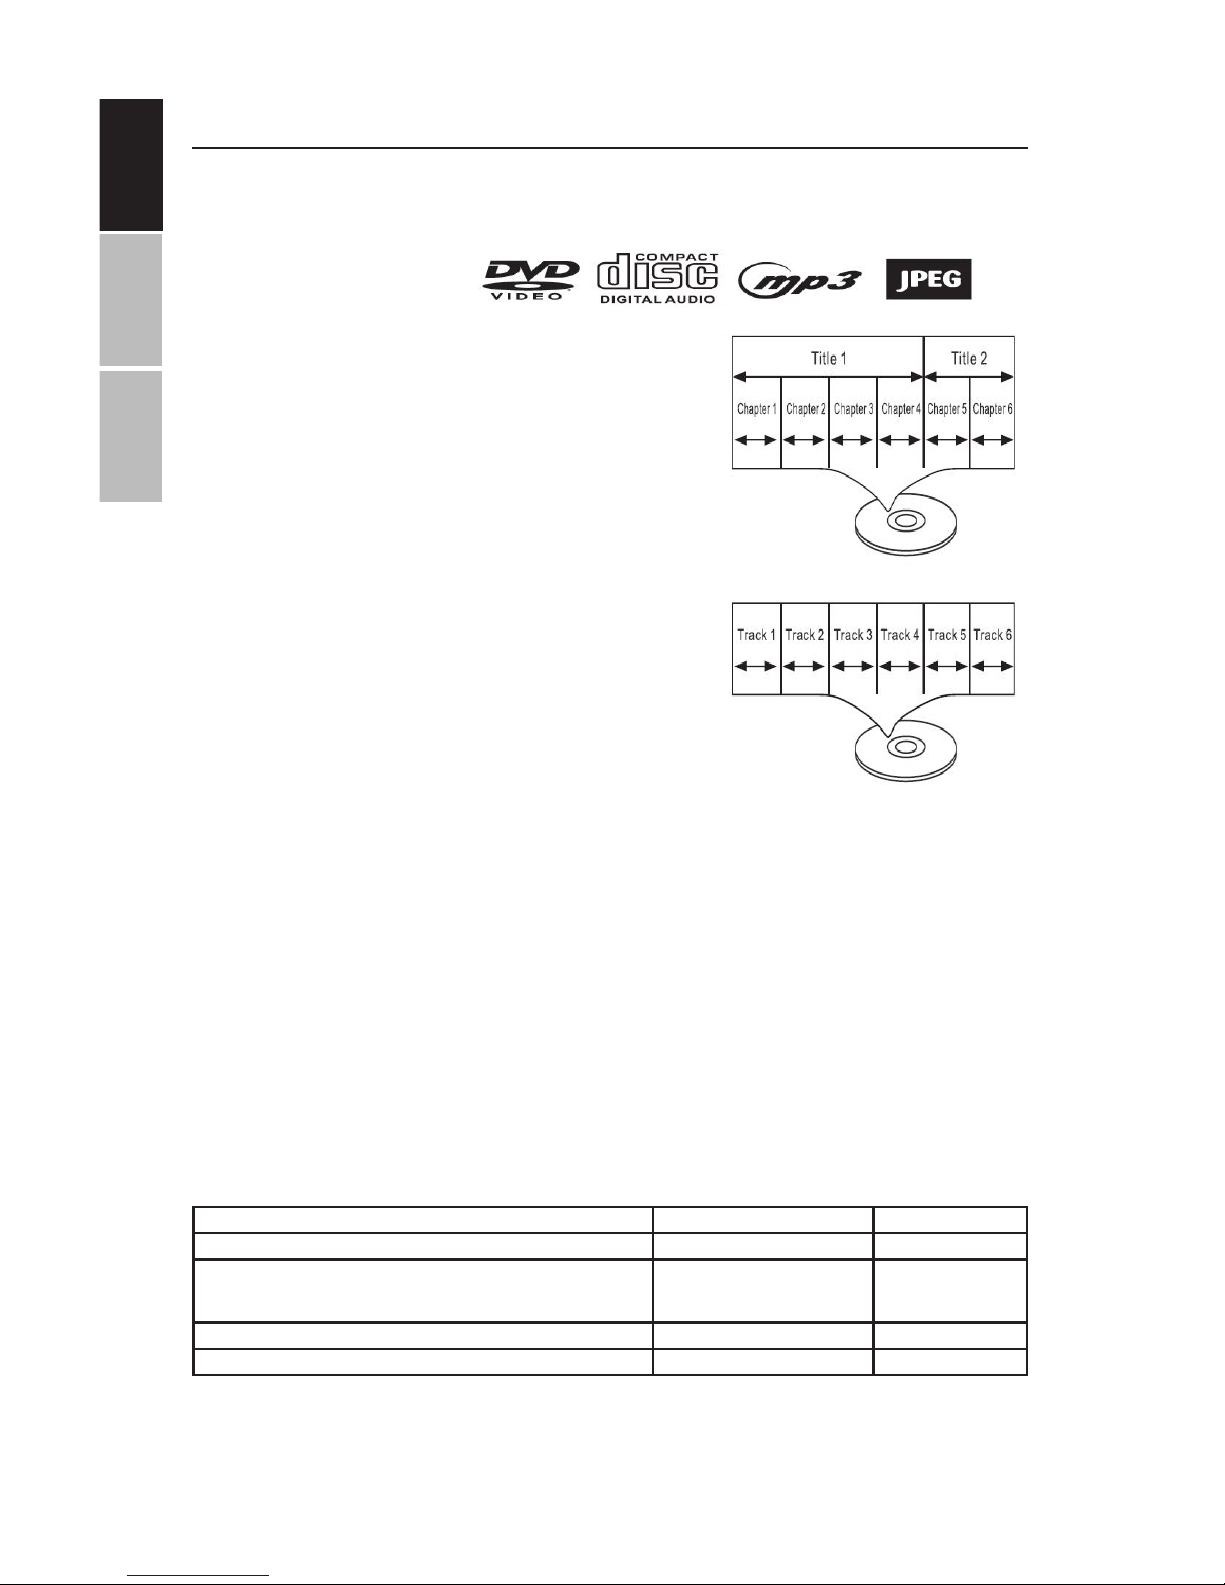
DVD
Data on most DVDs is split o into sections called
titles which are split o into subsections called
chapters, each of which is named by a title and
chapter number. Some features of this DVD player
might not operate with some DVD discs which are
preset. If a feature does not function as desired,
refer back to the manual accompanying the DVD
disc or the soware which created the disc.
AUDIO DISC
Data on an Audio disc is split o into sections
called tracks and each track is given a track number.
Page 21

ENGLISHESPAÑOLFRANÇAIS
21
TECHNICAL SPECIFICATIONS
BATTERY OUTPUT: 7.4 VOLTS
STORAGE ENVIRONMENTAL CONDITIONS:
1. When storing for up to 6 months:
• Temperature between -4°F to 113°F (-20°C to 45°C)
• Humidity at 65% ±20%
2. When storing for up to 1 week:
• Temperature between -4°F to 113°F (-20°C to 45°C)
• Humidity at 65% ±20%
OPERATING ENVIRONMENTAL CONDITIONS:
1. When charging the battery:
• Temperature between -32°F to 113°F (-0°C to 45°C)
• Humidity at 65% ±20%
2. When running on battery:
• Temperature between -4°F to 113°F (-20°C to 45°C)
• Humidity at 65% ±20%
POWER REQUIREMENTS:
AC 100-240 V, 50/60 Hz Power consumption: 9-12V, 1.5A, 20 watts Operating
AUDIO SPECIFICATIONS:
Speakers: 2 x 1.5 Watt, Headphone output
Audio Response: 20Hz-20Khz
Audio S/N Ratio: 50dB
Frequency Distortion +Noise: -70dB
Channel Isolation: 55dB
Dynamic Range: 85dB
SYSTEM SPECIFICATIONS:
Laser: Semiconductor laser, 650 nm wavelength
Note: Design and specifications are subject to change without prior
notice.
Page 22

ENGLISH
ESPAÑOL FRANÇAIS
22
TROUBLESHOOTING
PROBLEM SOLUTION
The icon appears on screen
The feature or action cannot be
completed at this time because:
1. The disc’s soware restricts or
doesn’t support the feature
(e.g., angles)
2. The feature is not available at
the moment.
3. You’ve requested a chapter,
track, or title number which
does not exist.
Picture is distorted The disc might be damaged. Try
another disc; it is normal for some
distortion to appear during forward or reverse scan.
No forward or reverse scan Some discs have sections that pro-
hibit rapid scanning or chapter skip;
The unit cannot skip through the
warning information and copyright
notices at the beginning of the DVD.
Page 23

ENGLISHESPAÑOLFRANÇAIS
23
CUSTOMER SUPPORT
Before contacting customer support, please see the troubleshooting
guide above.
Visit our website to contact us, find answers to Frequently Asked Questions, and for other resources which may include an updated version of
this user's guide.
WWW.IMPECCA.COM
If you wish to contact us by phone, please be sure to have your model number and serial number ready and call us between 9:00am and 6:00pm ET, at
+1 866-954-4440.
Keep tabs on Impecca's newest innovations & enter contests via our social
network feeds:
www.facebook.com/Impecca/
www.instagram.com/impecca/
@impeccausa
© 2016 Impecca, a division of LT Inc., Wilkes Barre, PA.
Page 24

Impecca™ warrants this product against defects in
material and workmanship to the original purchaser
as specified below. Please register your product
online within fourteen (14) days of purchase.
PARTS – if the product is determined to have a
manufacturing defect, within a period of one
(1) year from the date of the original purchase,
Impecca™ will repair or replace the product
parts at no charge (for parts) to consumers in
the U.S.A. and Canada.
LABOR – if the product is determined to have
a manufacturing defect, within a period of
ninety (90)Days from the date of the original
purchase,Impecca™ will repair or replace the
product at no charge to consumers in the U.S.A.
and Canada. A er ninety (90) days, it will be the
responsibility of the consumer.
Shipping costs to and from our warranty service cen-
ter are the sole responsibility of the consumer.
To obtain warranty service by an authorized Im-
pecca™ service center, please email us at: service@
impecca.com to obtain a Repair and Maintenance Au-
thorization (RMA) number and to locate the Warranty
Service Center nearest you. Once authorized, you
must mail the product to the authorized Impecca™
service center in its original product packaging mate-
rials or equivalent, to prevent damage while in transit.
Further, should Impecca™ determine that the product
is outside of the Warranty terms, Impecca™ will return
the product to sender at sender’s expense without
being repaired or replaced, unless authorized by the
consumer to service the out-of-warranty product
at consumer’s expense. All handling or restocking
charges for returns and/or replacements shall be
non-refundable.
Impecca™ specifically excludes from this warranty any
non-electric/mechanical attachments, accessories,
and disposable parts including, but not limited to,
outside case, connecting cables, batteries, and AC
adapters. Impecca™ reserves the right to repair or
replace defective products with the same, equivalent,
or newer models.
We reserve the right to either repair or replace prod-
uct at our discretion. Replacement may be either new
or refurbished and while every endeavor will be made
to ensure it is the same model, if same model is not
available, it will be replaced with a model of equal or
higher specification.
Normal “Wear and Tear” is not covered by this, or any
other, warranty. Further, Impecca™ hereby reserves
the right to determine “Wear and Tear” on any and all
products. Tampering or opening the product casing
or shell will void this warranty in its entirety.
In addition, this warranty does not apply if the prod-
uct has been damaged by accident, abuse, misuse, or
misapplication; has been altered or modified without
the written permission of Impecca™; has been ser-
viced by a non-authorized repair center of Impecca™;
has not been properly maintained or operated
according to the operation manual; has been used
for commercial, non-household purposes; has been
cosmetically damaged; was not imported by Impec-
ca™; was not manufactured according to specification
of the United States market; was damaged due to
improper installation or neglect by the consumer; was
damaged due to improper packaging in shipment
to the Warranty Service Center; was damaged due
to natural disasters; or if the serial number for the
product has been removed or defaced.
ALL IMPLIED WARRANTIES, INCLUDING IMPLIED WAR-
RANTIES OF MERCHANTABILITY AND FITNESS FOR A
PARTICULAR PURPOSE ARE LIMITED IN DURATION TO
ONE (1) YEAR PARTS AND NINETY (90) DAYS LABOR
FROM THE DATE OF THE ORIGINAL RETAIL PURCHASE
OF THIS PRODUCT.
THESE WARRANTIES AND REMEDIES ARE THE SOLE
AND EXCLUSIVE WARRANTIES AND REMEDIES IN CON-
NECTION WITH THE SALE AND USE OF THE PRODUCT.
NO OTHER WARRANTIES, ORAL OR WRITTEN, EX-
PRESSED OR IMPLIED, ARE GIVEN.
IMPECCA™ IS NOT RESPONSIBLE OR LIABLE FOR ANY
DAMAGE, WHETHER SPECIAL, INCIDENTAL, CONSE-
QUENTIAL, DIRECT OR OTHERWISE, OR WHETHER
KNOWN OR SHOULD HAVE BEEN KNOWN TO IMPEC-
CA™, INCLUDING LOST PROFITS, GOODWILL, AND
PROPERTY AND PERSONAL INJURY RESULTING FROM
ANY BREACH OF WARRANTY, THE INABILITY TO USE
THE PRODUCT OR UNDER ANY LEGAL THEORY IN
CONTRACT OR TORT. IMPECCA LIABILITY IS LIMITED
TO THE ACTUAL PURCHASE PRICE PAID TO THE
RETAIL SELLER OF THE DEFECTIVE PRODUCT.
No Impecca™ dealer, agent, or employee is autho-
rized to make any modification, extension, change
or amendment to this warranty without the written
consent and authorization from Impecca™.
Some states do not allow the exclusion or limitation
of implied warranties or liability for incidental or
consequential damages, or do not allow a limitation
on how long an implied warranty lasts, so the above
limitations or exclusions may not apply to you. This
warranty gives you specific legal rights, and you may
have other rights, which vary from state to state.
Note: Our Warranty Service Center ships only within
Continental U.S.A., excluding Alaska and Hawaii.
ONE YEAR LIMITED WARRANTY (US)
Page 25

ENGLISH
ESPAÑOL
FRANÇAIS
25
TABLA DE CONTENIDO
Instrucciones Importantes de Seguridad 26
Manejo De Discos Cd/Dvd 28
Contenido del Paquete 28
Caracteristicas Del Producto 29
Controles De La Unidad Principal 30
Pantalla Giratoria 31
Iniciando 32
Cargando Desde Un Enchufe AC/DC 32
Enciendo La Unidad y Reproduccion Del Disco 33
Botones Del Control Remoto 34
Instrucciones De Operacion 35
Conexion a TV, DVD, VCR O DVR Externos 35
Utilizando Auriculares o Altavoces Externos 35
Opciones Avanzadas Del Sistema 36-42
Copiado De CD 43
Discos y Formatos De Archivos Compatibles 44
Especificaciones Tecnicas 45
Solucion De Problemas 46
Soporte Tecnico 47
French 49
Page 26

ENGLISH ESPAÑOL FRANÇAIS
26
1. ADVERTENCIA: Para reducir el riesgo
de descarga eléctrica, no retire la
cubierta o parte trasera de la unidad.
No hay partes internas a las que el
usuario pueda darles servicio.
2. ADVERTENCIA: Para evitar fuego o
el peligro de descarga eléctrica, no
exponga la unidad al agua, lluvia o
humedad.
3. No exponga el adaptador y el DVD
portátil a ninguna clase de agua
(incluyendo gotas o salpicaduras) .
No deben ponerse sobre la unidad
objetos llenos de agua, como floreros
o botellas de agua.
4. Mantenga el DVD portátil lejos de la
luz del sol y de fuentes de calor como
radiadores y estufas.
5. No bloquee las aberturas de venti-
lación. Las ranuras y aperturas en la
unidad están provistas para ventilación. Al colocar su DVD portátil en un
cojín, un sofá u otra superficie similar,
no deberá bloquear las aberturas de
ventilación mientras la unidad esté en
operación.
6. No coloque el DVD portátil en una
mesa inestable, soporte, trípode, o
carro. La unidad puede caer, resultando en posibles daños o posibles
lesiones.
7. Nunca coloque objetos pesados o
filosos o presione el panel o marco de
la pantalla LCD.
8. Sólo utilice el adaptador AC incluido
con el reproductor DVD portátil. Al
usar otro adaptador invalidará su
garantía.
9. Desconecte del suministro de energía
cuando la unidad no esté en uso.
10. PRECAUCIÓN: La batería recargable
incorporada en este producto no puede ser reemplazada por el usuario.
Es peligroso tratar de abrir la batería
incorporada en la unidad y cualquier
intento de hacerlo, invalidará su
garantía.
11. ADVERTENCIA: El volumen excesivo
y/o el uso de auriculares o audífonos puede causar la pérdida de la
audición.
12. ADVERTENCIA: Sólo utilice accesorios
específicamente provistos por el
fabricante, incluyendo el adaptador
AC ya provisto o el adaptador DC para
el auto.
13. ADVERTENCIA: Este reproductor
DVD utiliza un sistema láser para
leer los discos CD/DVD. El uso de los
controles, ajustes o el desempeño de
procedimientos diferentes de aquellos especificados en esta guía puede
resultar en radiación láser perjudicial.
14. ADVERTENCIA: Para evitar la exposición directa del rayo láser el cual lee
el disco CD/DVD, no abra la unidad
mientras está reproduciendo. El rayo
láser es visible cuando la unidad se
abre y el disco CD/DVD está dando
vueltas.
15. ADVERTENCIA: No se le quede viendo
directamente al rayo láser.
INSTRUCCIONES IMPORTANTES DE
SEGURIDAD
Antes de utilizar su unidad, asegúrese de leer cuidadosamente
todas las instrucciones de operación. Todas las instrucciones, de
seguridad y operativas, deben conservarse para referencia a futuro
y todas las advertencias sobre el producto y esta guía deben seguirse tal y como se especifican.
Page 27

ENGLISH
ESPAÑOL
FRANÇAIS
27
16. PRECAUCIÓN: No coloque permanentemente en un estuche o le construya
uno en un espacio confinado como
un librero o unidad similar, evitando
la adecuada ventilación.
17. ADVERTENCIA: Cuando se usa por
niños, los padres deben asegurarse
que el niño entiende todas las instrucciones de seguridad – especialmente
las relacionadas con el sobrecalentamiento, peligros eléctricos y radiación
láser.
18. ADVERTENCIA: Si la unidad se sobrecalienta o la batería está deformada,
dañada o destruida, deje de utilizar
la unidad de INMEDIATO y entre en
contacto con soporte al cliente para
conocer las opciones de reparación.
19. ADVERTENCIA: No cargue la batería
cuando la unidad no está lo suficientemente ventilada. Las ubicaciones
que no son idóneas son: colchones,
sofás, cojines, almohadas y cualquiera otros que limiten la circulación de
aire hacia las aberturas de ventilación.
20. ADVERTENCIA: El fabricante, distribuidor y minoristas no aceptan ninguna
responsabilidad por daños a la batería causados por un uso inadecuado
y/o daños a la unidad.
21. ADVERTENCIA: No deben utilizarse
con esta unidad cables USB más
largos de 10” (250mm).
Page 28

ENGLISH ESPAÑOL FRANÇAIS
28
MANEJO DE DISCOS CD/DVD
1. No deje los discos cerca de fuentes
de calor, a la luz directa del sol o en
ambientes altamente húmedos.
2. Almacene sus discos en sus cajas o
estuches cuando no los use.
3. El estibar los discos o pararlos sobre
su costado causará que se deformen.
4. Al manipular sus discos, no toque la
superficie de los discos, en lugar de
eso, agárrelos por las orillas.
5. Las huellas digitales, el polvo, la
suciedad y los rayones pueden
distorsionar las películas o reducir
la calidad del sonido de sus discos
o puede causar saltos en la reproducción. Tenga cuidado de los
rayones en el disco ya que evitan
que el sistema de rayo láser lea y
reproduzca el disco correctamente. Limpie el disco antes de usarlo.
6. No pegue papel, cinta o etiquetas
adhesivas a ningún disco. Utilice
solamente marcadores permanentes en la parte superior del disco
– no en la parte brillosa y tornasol
del disco (parte inferior del disco).
7. Limpie los discos con un paño suave
frotando suavemente del centro
hacia fuera.
8. No utilice solventes en ningún disco,
tal como veneno, productos de
limpieza del hogar (a excepción de
aquellos indicados para CD o DVD),
o aerosol antiestático para discos
de vinilo ya que estos productos
pueden dañar sus discos y su dispositivo.
CONTENIDO DEL PAQUETE
Su Reproductor DVD Portátil Impecca incluye lo siguiente:
• Reproductor DVD 13.3”
• Control Remoto con Batería
• Adaptador de Corriente de 12V AC/DC
• Cargador para el Auto
• Cable de Audio/Video
• Auriculares
• Manual de Usuario y Tarjeta de Garantía
Page 29

ENGLISH
ESPAÑOL
FRANÇAIS
29
CARACTERÍSTICAS DEL PRODUCTO
• Pantalla panorámica de 13.3” de alto contraste y 1366 x 768
dpi de resolución TFT/LCD con 180° y 90° de rotación en ambos lados para ajustes personalizados
• Reproduce la mayoría de los formatos de audio, video y
fotografías y es compatible con la mayoría de los DVD, SVCD,
VCD, CD, MP3, MP4 y otros formatos de disco. Decodificador
DOLBY® integrado compatible con la decodificación de video
MPEG-4
• Protección electrónica de saltos (3 segundos para DVD, 10
segundos para CD/VCD y 90 segundos para MP3)
• Lector electrónico USB integrado para compatibilidad con
unidades flash de 32GB
• Ranura para tarjeta SD/MMC integrada para compatibilidad
con tarjetas de 32GB
• Puertos OUT para AV para conectar a TV
• Conexión para 3.5mm para usar con auriculares o altavoces
externas
• Equipado con control remoto infrarrojo
• Altavoces estéreo RMS de 3W integradas (1.5W x 2)
• Funcionalidad de copiado de CD a USB
• Menús y despliegue en pantalla multilenguaje (Inglés, Francés y Español)
• Batería de polímero Li-ion recargable 4000 mAh recargable
para reproducción continua de hasta 6 horas
• Suministro de energía de voltaje (100V~240V, 50/60Hz) dual
para uso mundial.
Page 30

ENGLISH ESPAÑOL FRANÇAIS
30
CONTROLES DE LA UNIDAD PRINCIPAL
1. Tecla de DVD/USB/SD
2. Tecla para Detener re-
producción
3. Tecla para Reproducir/
Pausa
4. Tecla de Avanzar
5. Tecla de Retroceder
6. Tecla para Vol +
7. Tecla para Vol –
8. Tecla de Ajustes
9. Tecla Izquierda
10. Tecla Arriba
11. Tecla Derecha OK
12. Tecla Derecha
13. Tecla Abajo
14. Tecla de Menu
15. Tecla de Audio
16. Tecla para Abrir
1
2
3
4
5
6
7
8
9
10
11
12
13
14
15
16
17
19
18
REPEAT SUBTITLE
DVD/USB/SD
Page 31

ENGLISH
ESPAÑOL
FRANÇAIS
31
PANTALLA GIRATORIA
El ángulo de visión de la pantalla giratoria puede ajustarse al ángulo
deseado como se muestra a continuación:
17. Ranura USB – Usada para
conectar unidades flash
USB
18. Ranura de tarjeta SD/MMC
- Usada para conectar
tarjetas SD/MMC
19. Conexión para 3.5mm
– Usada para conectar
auriculares o altavoces
externos. Los altavoces
integrados se apagarán o
se encenderán automáticamente cuando se conecten
o desconecten los auriculares o altavoces externos
20. Conexión AV OUT– Usada para conectar una TV
externa
21. Tecla deslizable para encender /apagar (ON/OFF)
la unidad – Usados para
apagar o prender la unidad
22. Conexión para suministro
de energía – Usado para
conectar un Adaptador 12
AV/DC o un Cargador de
Auto de 12V
20 21 22 23 24 25
DC12V
CONTROLES DE LA UNIDAD PRINCIPAL
Page 32

ENGLISH ESPAÑOL FRANÇAIS
32
INICIANDO
CARGANDO DESDE UN ENCHUFE AC/DC – La unidad cuenta con
una batería recargable integrada de polímero Li-ion, antes de usar
recárguela como se indica a continuación:
NOTAS:
Utilice únicamente el adaptador AC/DC que viene con su producto.
Desconecte el adaptador AC/DC del tomacorrientes cuando el aparato no
se utilice por un largo periodo de tiempo. No trate de conectar el adaptador
AC/DC de forma incorrecta en el tomacorrientes.
INDICADOR DE BATERÍA
Cuando la carga de la pila integrada sea baja, el reproductor se detendrá y
se apagará. Se aconseja cargar la unidad en este momento o antes de que
se apague. Durante la carga usted puede reproducir sus DVD/CD/SD como
acostumbra.
CONSEJOS PARA LAS BATERÍAS:
Su batería durará más si sigue estos simples consejos para cuidar y almacenar su unidad.
A. La primera vez que use su aparato, deje cargar por espacio de 6 a 8 horas.
B. Recargue y almacene su unidad dentro de un rango de temperatura de
40°F -95°F (5°C-35°C).
C. No sobrecargue la batería (por más de 24 horas). La carga o descarga
excesiva puede acortar la vida útil de la batería.
D. La batería debe recargarse al menos cada 3 meses.
E. La batería recargable incorporada en este producto no puede ser reemplazada por el usuario.
Nota: Es normal para las baterías recargables ir perdiendo su capacidad de
carga paulatinamente con el paso del tiempo.
• Inserte el conector pequeño del adaptador AC/DC en
la conexión DC IN a un lado de la unidad.
• Inserte el adaptador AC/DC en un enchufe AC convenientemente ubicado y que suministre AC 100V~240V,
50/60Hz .
• La carga comenzará automáticamente y el LED indicador de carga color VERDE comenzará a parpadear.
• Una vez que la unidad esté completamente cargada,
el LED indicador verde permanecerá estable, siempre
y cuando la unidad permanezca conectada.
• Cuando la unidad este encendida – ON – (usando el
interruptor OFF/ON en el panel del lado izquierdo) el
LED indicador azul permanecerá iluminado
Adaptador AC/DC
Enchufe AC
Page 33

ENGLISH
ESPAÑOL
FRANÇAIS
33
INICIANDO
CARGA DE LA BATERÍA USANDO EL ADAPTADOR DE CARGA PARA EL AUTO
– La unidad también puede ser cargada o recargada en el enchufe del carro,
como se indica a continuación:
• Inserte el conector pequeño del adaptador del cargador del auto en la entrada DC IN que se encuentra en la parte lateral de la unidad.
• Inserte el adaptador del cargador del auto en el enchufe del encendedor del
auto de 12 V DC, convenientemente localizado. La carga comenzará automáticamente.
• La carga comenzará automáticamente y el indicador LED de color rojo se
iluminará inmediatamente.
• Una vez que la batería esté totalmente cargada se iluminará el indicador LED
de color amarillo.
• Cuando la unidad sea encendida (en ON usando el interruptor OFF/ON que se
encuentra en el panel izquierdo de la unidad) el indicador LED de color azul se
iluminará de forma permanente.
NOTAS:
Utilice el adaptador Cargador de Auto que viene incluido con su reproductor
DVD para este producto únicamente. Sólo utilice el adaptador de corriente
Impecca autorizado. Al usar otro adaptador de corriente puede dañar la unidad
y/o causar una descarga eléctrica, fuego o incluso la muerte.
Retire el adaptador Cargador de Auto del enchufe cuando no se utilice por un
periodo largo de tiempo.
ENCENDIENDO LA UNIDAD Y REPRODUCCIÓN DEL DISCO
• Levante el panel de la pantalla y voltéela en el ángulo deseado. Deslice
el interruptor de encendido/apagado (ON/OFF) a la posición “ON”, se
iluminará la luz indicadora LED azul al frente de la unidad.
• Presione el botón OPEN para abrir la puerta del disco. Coloque el disco
en el eje central con la cara de la etiqueta hacia arriba. Cierre la puerta
del disco y el reproductor comenzará a reproducir automáticamente.
• Para apagar, presione el botón STOP para detener la reproducción y el
giro del disco.
NOTAS:
La luz LED indicadora azul permanecerá encendida mientras el interruptor ON/
OFF a un lado del reproductor esté en la posición ON.
Al insertar una unidad USB o una tarjeta SD/MMC se cargará el menú de medios.
Para ahorrar batería apague siempre el reproductor al deslizar el interruptor
ON/OFF a un lado del reproductor a la posición OFF.
Page 34

ENGLISH ESPAÑOL FRANÇAIS
34
BOTONES DEL CONTROL REMOTO
La siguiente guía le ayudará a tener el mejor uso para su control
remoto:
1. STANDBY – Apaga y prende la unidad
2. MUTE – Silencio
3. TECLADO NUMÉRICO
4. SETUP – Ingresar al menú de ajustes
5. Teclas de flecha ARRIBA, ABAJO,
IZQUIERDA, DERECHA
6. ENTER/OK – Selecciona los elementos del menú
7. AUDIO – Cambia el idioma del audio
en las pistas
8. DISPLAY – Despliega la información
del disco
9. PLAY/PAUSE, para reproducir y pausar la preproducción
10. RETROCEDER – Presione repetidamente para retroceder la reproducción en incrementos de 2x, 4x, 8x,
16x y 32x. Presione nuevamente para
regresar a la reproducción normal.
11. AVANZAR – Avanza la reproducción
en incrementos de 2x, 4x, 8x, 16x
y 32x. Presione nuevamente para
regresar a la reproducción normal.
12. DVD/USB/SD – Cambiar el tipo de
tarjeta fuente
13. CD RIP - Copiar CD y CD MP3 a un
dispositivo USB
14. REPEAT – Repite la pista o el video
15. TIME – Salta a un tiempo específico
en el medio
16. SUBTITLE – Permite los subtítulos (el
disco debe contar con esta función)
17. PROG – Coloca la pista en la lista de
programas
18. ANGLE – Cambia el ángulo de la
cámara (si el DVD cuenta con esta
función)
19. ZOOM – Hacer un acercamiento en
la escena en proporciones de 2x, 3x
y 4x. Use las teclas de flecha para
desplazar la imagen por la pantalla.
20. VOL + / VOL –
21. EXIT – Regresar al menú
22. A-B - Repetir a-b
23. SLOW – Permite reproducir el video en
una velocidad más lenta a la velocidad
normal de reproducción
24. STOP, para detener la reproducción
25. SIGUIENTE – Salta al siguiente capítulo
o pista
26. PREVIO – Retrocede al capítulo o pista
anterior
1
2
3
4
5
6
7
8
9
10
11
12
13
14
15
16
17
18
19
20
21
22
23
24
25
26
Page 35

ENGLISH
ESPAÑOL
FRANÇAIS
35
INSTRUCCIONES DE OPERACIÓN
CONEXIÓN A TV, DVD, VCR O DVR EXTERNOS
Su Reproductor DVD Portátil puede actuar como un Reproductor DVD
que puede conectarse a una TV para ver el video en una pantalla más
grande. Puede utilizar otra fuente de video como otro DVD, Reproductor
Blu-ray, VCR o VDR. Los altavoces externos también pueden ser usados
en lugar de los altavoces integrados para reproducir el sonido.
Blanco
Rojo
Amarillo
Diagrama 1
• Conecte la TV externa a la unidad por medio del la conexión AV-OUT como se
muestra en la Figura 1 mostrada anteriormente.
UTILIZANDO AURICULARES O ALTAVOCES EXTERNOS
Para escuchar de forma privada, conecte los auriculares que vinieron
con su DVD en la conexión para auriculares en un lado de la unidad. Los
altavoces de la unidad se apagaran cuando los auriculares se inserten
en la conexión. Los altavoces externos también pueden conectarse de la
misma forma para obtener una experiencia diferente de sonido.
Page 36

ENGLISH ESPAÑOL FRANÇAIS
36
OPCIONES AVANZADAS DEL SISTEMA
Presione el botón SETUP en el control remoto para abrir el menú
de ajustes. Utilice los botones de flecha (arriba, abajo, izquierda,
derecha) para seleccionar los elementos del menú. Después de
cambiar los ajustes deseados, presione nuevamente el botón SETUP para regresar a la pantalla normal.
CONFIGURACIÓN GENERAL
PANTALLA TV
Ajusta la relación de aspecto de la imagen reproducida cuando se
utiliza una pantalla de TV externa.
• 4:3 Panscan: una televisión estándar ‘cuadrada’ (relación
de aspecto 4:3) cortará los lados izquierdo y derechos de
una pantalla panorámica. También conocida como pantalla
completa.
• 4:3 Letterbox: seleccione esta si cuenta con una televisión
estándar ‘cuadrada (relación de aspecto 4:3). En este caso la
imagen completa se mostrará en la pantalla con barras en
negro en la parte superior e inferior de la pantalla.
• 16:9: Elija esta opción de despliegue para cualquier pantalla
panorámica (casi cualquier HDTV)
• Wide Squeeze: Comprime una imagen de pantalla panorámica para que quepa en una pantalla 4:3 sin que se hagan
recortes a la imagen.
Mp3 Lyric On
PS
Mp3 Lyric On
Set TV Display Mode
4:3/PS
4:3/LB
16:9
Page 37

ENGLISH
ESPAÑOL
FRANÇAIS
37
OPCIONES AVANZADAS DEL SISTEMA
ÁNGULOS DE VISIÓN
Muestra la información actual de visión de la cámara en la esquina
derecha de la pantalla TFT si es que está disponible en el disco.
LENGUAJE OSD
Cambia el idioma del sistema del reproductor DVD
SUBTÍTULOS CLOSED CAPTION
Los subtítulos closed caption son datos que están ocultos en la
señal de video de algunos discos para ser usados por personas
con dificultades de audición. Estos subtítulos closed caption son
diferentes de los subtítulos que se pueden seleccionar en el botón
SUBTITLE en el menú del DVD. Con esta opción puede habilitar los
subtítulos closed caption.
Mp3 Lyric On
PS
Mp3 Lyric On
Set OSD Language
Mp3 Lyric On
English
French
German
Spanish
Portuguese
ENG
Page 38

ENGLISH ESPAÑOL FRANÇAIS
38
OPCIONES AVANZADAS DEL SISTEMA
PROTECTOR DE PANTALLA
Cambie el protector de pantalla on (encendido) u o (apagado)
después de un periodo de inactividad prolongada del DVD.
CONTINUAR CON LA REPRODUCCIÓN
Cuando está función está habilitada el reproductor recordará el último
punto de lectura en su disco; el reproductor automáticamente continuará con la reproducción cuando el disco sea reinsertado.
AJUSTES DE AUDIO
DOWNMIX
Esta opción le permite ajustar la salida análoga estéreo de su reproductor DVD.
• LT/RT: Seleccione esta opción si su reproductor DVD está
conectado a un decodificador Dolby Pro Logic
• Stereo: Seleccione esta opción cuando la salida entrega sonido sólo en los dos altavoces frontales
Mp3 Lyric On
Mp3 Lyric On
Page 39

ENGLISH
ESPAÑOL
FRANÇAIS
39
OPCIONES AVANZADAS DEL SISTEMA
DOLBY DIGITAL
Las opciones incluidas en los ajustes Dolby Digital son: ‘Dual Mono’
o ‘Dynamic’.
DUAL MONO
• Stereo: El sonido monoaural izquierdo enviará las señales
de salida al altavoz izquierdo y el sonido monoaural derecho
enviará las señales de salida al altavoz derecho.
• L-Mono: El sonido monoaural izquierdo enviará las señales
de salida a ambos altavoces, izquierdo y derecho.
• R-Mono: El sonido monoaural derecho enviará las señales de
salida a ambos altavoces, izquierdo y derecho.
• Mix-Mono: el sonido monoaural mezclado izquierdo y derecho enviará la señal a ambos altavoces, izquierdo y derecho.
DYNAMIC
Comprensión dinámica del rango
Page 40

ENGLISH ESPAÑOL FRANÇAIS
40
PREFERENCIAS DE REPRODUCCIÓN
Audio: Seleccione el idioma del audio del DVD (si está disponible).
Subtítulo: Selecciona el idioma de subtítulos del DVD (si está disponible). Disc Menu: Selecciona el idioma del menú del DVD (si está
disponible).
CONTROL PARENTAL
Algunos DVD cuentan con niveles de control parental asignados
al disco completo o a ciertas escenas en el disco. Esta función le
permite ajustar limitaciones a la reproducción. Los niveles de clasificaciones varía de 1 a 8 y dependen del país. Usted puede prohibir
la reproducción de ciertos discos que no sean adecuados para sus
hijos. Ciertos discos soportan la reproducción de escenas alternas.
OPCIONES AVANZADAS DEL SISTEMA
AJUSTES DEL VIDEO
Ajuste la calidad del video en la pantalla LCD al modificar la nitidez,
brillo, contraste, tono y saturación de la imagen.
Panel Quality
Panel Display 16:9
Go To Video Setup Page
Eng
Eng
Eng
Page 41

ENGLISH
ESPAÑOL
FRANÇAIS
41
CLAVE ANTERIOR
Ingrese la clave anterior usando el control remoto (el valor de fábrica es 136900) y el cursor brincará automáticamente al campo de la
clave nueva.
OPCIONES AVANZADAS DEL SISTEMA
AJUSTE DE CLAVE
Requiere de una clave para reproducir escenas con clasificación
restringidas en el DVD. Si este ajuste está deshabilitado, los ajustes
parentales no funcionarán.
CLAVE NUEVA
Ingrese la clave nueva utilizando 6 dígitos desde el control remoto,
y el cursor brincará automáticamente al campo de confirmar clave.
Page 42

ENGLISH ESPAÑOL FRANÇAIS
42
OPCIONES AVANZADAS DEL SISTEMA
CONFIRMAR CLAVE
Confirme la clave nueva al ingresarla nuevamente usando el control
remoto. Si se ingresa una y incorrecta, el cursor se quedará en este
campo y usted deberá ingresar la clave correcta. Una vez que se ha
ingresado la clave correcta el cursor brincará automáticamente al
botón OK.
CONFIRMAR
Una vez que los campos han sido llenados haga clic en el botón
ENTER en el control remoto para guardar su clave nueva.
Nota: Si la clave ha sido cambiada, el código parental y el bloqueo
de disco también se cambiará
Tome en cuenta que la clave por defecto (136900) permanece activa permanentemente aún cuando se halla cambiado la clave.
VALORES POR DEFECTO
Revierte todos los ajustes del reproductor a los valores predeterminados de fábrica.
Page 43

ENGLISH
ESPAÑOL
FRANÇAIS
43
COPIADO DE CD
El reproductor DVD puede copiar CD y CD MP3· a un dispositivo
USB. Antes de comenzar con este proceso asegúrese que
su dispositivo USD tenga suficiente espacio.
Utilizando las teclas de flechas direccionales en el panel frontal, seleccione las pistas que desee copiar a su dispositivo USB. Confirme
su selección y espere que el proceso de copia termine. Una caja de
diálogo confirmará el fin del proceso como se muestra a continuación:
Tome en cuenta que es normal que este proceso se tome tiempo.
Page 44

ENGLISH ESPAÑOL FRANÇAIS
44
DISCOS Y FORMATOS DE ARCHIVOS COMPATIBLES
DISCOS REPRODUCIBLES
La unidad puede reproducir los siguientes discos:
TIPOS DE DISCO:
DVD
La información en la mayoría de los DVD está dividida en secciones llamadas
títulos que están divididos a su vez en subsecciones llamadas capítulos, cada
uno de los cuales se nombran por un título y número de capítulo. Algunas
funciones de este reproductor DVD pueden no
operar con algunos discos DVD que están preestablecidos. Si la función no opera como se desea,
refiérase al manual que acompaña al disco DVD o
al soware que creó el disco.
DISCO DE AUDIO
La información en el disco de audio está dividida
en secciones llamadas pistas y cada pista recibe
un número de pista como nombre.
IMPORTANTE:
Lea el manual que acompaña al DVD, ya que puede haber
funciones en este reproductor DVD que no pueden ser utilizadas en ciertos discos. También hay funciones adicionales
en un disco DVD que son diferentes para cada disco y que
requieren referirse al manual que acompaña al mismo disco o
al soware que lo creó.
Este reproductor se ajusta a los sistemas de color NTSC y PAL. Tome en cuenta que si está en
Estados Unidos, Canadá o México, use el control remoto o el menú de ajustes para fijar esta
opción en NTSC. En otros países el sistema de color PAL será utilizado por el reproductor ya sea
automáticamente o puede ser cambiado utilizando el control remoto o el menú de ajustes. Si la
unidad es erróneamente ajustada a PAL (que puede usarse en otros países) la imagen puede verse
distorsionada o girar en forma vertical. En ese caso refiérase al manual que acompaña al disco o al
soware que lo creó así como al sistema de color del disco.
FORMATOS DE ARCHIVO COMPATIBLES – La siguiente tabla muestra los formatos de
archivo compatibles con el reproductor para ver películas, escuchar audio o mostrar
fotografías:
MPEG1, 2 dat, mpg, mpeg MPG, MPEG
MPEG2 vob MPEG2-PS
MPEG4
Divx 3.11, Divx 4.12, Div x 5.x, Div x 6, Xvid 1.00, Xvid 1.01, Xvid
1.02, Xvid 1.03, Xvid 1.03, Xvid 1.10-beta1/2
divx, avi AVI (1.0, 2.0)
DMF0,1,2
Audio mp3 MP3
JPEG Motion jpeg AVI
Page 45

ENGLISH
ESPAÑOL
FRANÇAIS
45
ESPECIFICACIONES TÉCNICAS
SALIDA DE LA BATERÍA: 7.4 volts.
CONDICIONES AMBIENTALES PARA ALMACENAJE:
1. Cuando lo almacene hasta por 6 meses:
• Temperaturas entre -4°F a 113°F (-20°C a 45°C)
• Humedad en 65% ±20%
2. Cuando lo almacene hasta por 1 semana
• Temperaturas entre -4°F a 113°F (-20°C a 45°C)
• Humedad en 65% ±20%
CONDICIONES AMBIENTALES DE OPERACIÓN:
1. uando cargue la batería:
• Temperaturas entre -32°F a 113°F (-0°C a 45°C)
• Humedad en 65% ±20%
2. Cuando utilice la batería
• Temperaturas entre -4°F a 113°F (-20°C a 45°C)
• Humedad en 65% ±20%
REQUERIMIENTOS DE ENERGÍA:
AC 100-240 , 50/60 Hz Consumo de energía: 9-12V, 1.5A, 20 watts operando
ESPECIFICACIONES DE AUDIO:
Altavoces: 2 x 1.5 Watt, salida de auriculares
Respuesta de audio: 20Hz-20Khz
Relación S/N Audio: 50dB
Distorsión de Frecuencia +Ruido: -700dB
Aislamiento de Canal: 55dB
Rango dinámico: 85dB
ESPECIFICACIONES DEL SISTEMA:
Láser: Semiconductor láser, longitud de onda de 650 nm del sistema de video
Señal: NTSC/PAL/AUTO
Nota: El diseño y las especificaciones están sujetos a cambios sin
previo aviso
Page 46

ENGLISH ESPAÑOL FRANÇAIS
46
SOLUCIÓN DE PROBLEMAS
PROBLEMA SOLUCIÓN
Aparece en la pantalla el ícono ø
La función o acción no puede ser completada en
este momento porque:
1. El soware del disco restringe o no soporta esta función (i.e. ángulos)
2. La función no está disponible en este
momento
3. Ha solicitado un número de capítulo,
pista o título que no existe
La imagen se ve
distorsionada
El disco puede estar dañado. Trate con otro disco; es normal la distorsión al adelantar o atrasar
el video para escanearlo.
No hay escaneo
hacia atrás o hacia
adelante
Algunos discos tienen secciones que prohíben el
escaneo rápido o salto de capítulos. Esta unidad
no puede saltarse la información de advertencia
ni los avisos de derechos de autor mostrados al
inicio del DVD.
Page 47

ENGLISH
ESPAÑOL
FRANÇAIS
47
SOPORTE TÉCNICO
Antes de entrar en contacto con soporte al cliente, vea la guía de
solución de problemas que se ha proporcionado anteriormente/ a
continuación..
Visite nuestro sitio web para entrar en contacto con nosotros, encontrar la respuesta a las Preguntas Más Frecuentes y otros recursos que
pueden incluir una versión actualizada de esta guía de usuario.
WWW.IMPECCA.COM
Si desea entrar en contacto con nosotros por teléfono, asegúrese de
tener a la mano el número de modelo y el número de serie y llámenos
entre las 9:00am y las 6:00pm hora del Este, al +1 866-954-4440.
Manténgase al tanto de las innovaciones más recientes de Impecca y
participe en concursos por medio de nuestras redes sociales.
www.facebook.com/Impecca/
www.instagram.com/impecca/
@impeccausa
© 2016 Impecca, una división de LT Inc., Wilkes Barre, PA.
Page 48

Impecca™ garantiza este producto contra defectos en
material y obra al comprador original como se especifica
abajo siempre y cuando el producto este registrado en
línea dentro de los catorce (14) días de compra.
PARTES – Si se determina que el producto tiene
defecto de fábrica, dentro de un (1) año de la
fecha de la compra original, Impecca™ reparará
o reemplazará las partes del producto sin costo
alguno (de las partes) para consumidores en
Estados Unidos y Canadá.
LABOR – Si se determina que el producto tiene un
defecto de fabrica, dentro de un periodo de noventa (90) días de la fecha de la compra original,
Impecca™ reparará o reemplazará el producto
sin costo alguno para consumidores en Estados
Unidos y Canadá. Después de noventa (90) días
será responsabilidad del consumidor.
Costos de embarque hacia y desde el Centro de Servicio
de Garantía son la completa responsabilidad del consumidor.
Para obtener servicio de garantía por un centro de servicio
autorizado de Impecca, por favor envíenos un correo
electrónico a: service@impecca.com para obtener un
numero de Autorización de Reparación y Mantenimiento y
para localizar el Centro de Servicio de Garantía mas cerca
de usted. Una vez autorizado, usted debe enviar el artículo
por correo al centro de servicios autorizado Impecca™
en sus materiales de empaque de producto originales o
equivalente, para prevenir daño en tránsito.
Además, si Impecca™ determina que el producto está
fuera de los términos de Garantía, Impecca™ retornará el
producto al remitente a cargo del remitente sin ser reparado o reemplazado, salvo que haya sido autorizado por
el consumidor a dar servicio al producto fuera de garantía
al costo del consumidor. Todos los cargos de manejo o
por reposición por devoluciones y/o reemplazos no serán
reembolsables.
Impecca™ específicamente excluye de esta garantía aditamentos no-eléctricos/mecánicos, accesorios, y partes
desechables incluyendo, pero no limitados a, caja externa,
cables de conexión, baterías, y adaptadores AC. Impecca™
se reserva el derecho a reparar o reemplazar productos
con el mismo, equivalente, o modelo más nuevo.
Nos reservamos el derecho a reparar o reemplazar el
producto a nuestra discreción. El reemplazo puede ser
nuevo o reparado y aunque se hará todo lo posible por
que sea el mismo modelo, si el mismo modelo no está
disponible, será reemplazado con un modelo de la misma
o mayor especificación.
Desgaste normal no es cubierto por esta garantía. Además, Impecca™ se reserva el derecho a determinar el
“desgaste” en cualquier y todos los productos. Manipulación o apertura de la cubierta o tapadera del producto
anulará esta garantía completamente.
La garantía no aplica si el producto ha sido dañado por
accidente, abuso, mal uso, o mala aplicación; ha sido
alterado o modificado sin el permiso expreso de Impecca™ ; ha recibido servicio por un centro de reparación
no autorizado por Impecca™ ; no ha sido mantenido u
operado de forma apropiada de acuerdo al manual de
operación; ha sido usado para propósitos comerciales,
no domésticos; ha sido dañado cosméticamente; no fue
importado por Impecca™ ; no fue fabricado de acuerdo
a especificación del mercado de Estados Unidos; fue
dañado debido a instalación no apropiada o negligencia
del consumidor; fue dañado por empaque no apropiado
en el embarque al Centro de Servicio de Garantía; fue
dañado por desastre natural; o si el número de serie del
producto ha sido removido o desfigurado.
TODAS LAS GARANTÍAS IMPLÍCITAS, INCLUYENDO GARANTÍAS DE COMERCIALIZACIÓN Y ADECUACIÓN IMPLÍCITAS
PARA UN PROPÓSITO PARTICULAR SON LIMITADAS EN
DURACIÓN A UN (1) AÑO EN PARTES Y NOVENTA (90) DÍAS
EN LABOR DE LA FECHA DE LA COMPRA ORIGINAL AL
DETALLE DE ESTE PRODUCTO.
ESTAS GARANTÍAS Y REMEDIOS SON LAS ÚNICAS Y EXCLUSIVAS GARANTÍAS Y REMEDIOS EN CONEXIÓN CON LA
VENTA Y USO DEL PRODUCTO. NINGUNA OTRA GARANTÍA, ORAL O ESCRITA, EXPRESA O IMPLÍCITA SON DADAS.
IMPECCA™ NO ES RESPONSABLE POR NINGÚN DAÑO, YA
SEA ESPECIAL, ACCIDENTAL, CONSECUENTE, DIRECTO
O DE OTRA MANERA, O YA SEA CONOCIDO O TUVO QUE
HABER SIDO CONOCIDO POR IMPECCA™ , INCLUYENDO
GANANCIAS PERDIDAS, BUENA VOLUNTAD, Y LESIÓN
PERSONAL O DE PROPIEDAD RESULTANTE DE CUALQUIER ROMPIMIENTO DE GARANTÍA, LA INHABILIDAD DE
USAR EL PRODUCTO, O BAJO CUALQUIER TEORÍA LEGAL
EN CONTRATO O AGRAVIO. LA RESPONSABILIDAD DE
IMPECCA™ ES LIMITADA AL PRECIO DE COMPRA ACTUAL
PAGADO AL VENDEDOR DETALLISTA DEL PRODUCTO
DEFECTUOSO.
Ningún comerciante, agente, o empleado de Impecca™
está autorizado para hacer ninguna modificación, extensión, cambio o enmienda a esta garantía sin el consentimiento escrito y autorización de Impecca™ .
Algunos estados no permiten la exclusión o limitación de
garantías implícitas o responsabilidad por daños accidentales o consecuentes, o no permiten una limitación en
el tiempo de duración de una garantía implícita, así que
es posible que las limitaciones o exclusiones anteriores
no apliquen a usted. Esta garantía le da a usted derechos
legales específicos, y es posible que usted tenga otros
derechos que varían de estado a estado.
Nota: Nuestro Centro de Servicio de Garantía embarca
solamente dentro de Estados Unidos Continen excluyendo
Alaska y Hawái.
GARANTÍA LIMITADA POR UN AÑO
Page 49

ENGLISHESPAÑOLFRANÇAIS
49
TABLE DES MATIÈRES
Consignes de sécurité importantes
50
Manipulation Disque CD/DVD
52
Contenu De La Boite
52
Caractéristiques du produit
53
Contrôle de l’unité principale
54
Panneau de l’écran pivotant
55
Guide de démarrage
56
Chargement avec la prise de courant AC / DC
56
Chargement avec le chargeur adapté pour la voiture
57
Mise en marche de l’unité et de lecture des disques
57
Touches de la Télécommande
58
Mode d’emploi
59
Options de Système Avancés
60-66
Importer D’un CD 67
Disques et Formats de Fichiers Pris en Charge
68
Spécifications Techniques
69
Support Technique
71
Page 50

ENGLISH ESPAÑOL FRANÇAIS
50
CONSIGNES DE SÉCURITÉ IMPORTANTES
Avant d’utiliser l’appareil, veillez à lire toutes les instructions de
fonctionnement avec attention. Toutes les consignes de sécurité
et d’exploitation devraient être conservé pour une future référence
et tous les avertissements sur le produit dans ce mode d’emploi
doivent être suivies comme spécifié.
1. AVERTISSEMENT: Pour réduire le
risque de choc électrique, ne pas enlever le couvercle ou l’arrière de l’unité.
Il n’y a aucune pièce échangeable à
l’intérieur.
2. AVERTISSEMENT: Pour éviter tout
incendie ou risque de choc électrique,
ne pas exposer l’appareil à l’eau, la
pluie ou l’humidité.
3. Ne pas exposer l’adaptateur et le
DVD portable à l’eau (y compris aux
gouttes ou aux éclaboussures). Les
objets rempli de liquides, tels que
les vases et les bouteilles d’eau, ne
devrait pas être mis sur l’unité.
4. Gardez le DVD portable loin des
rayons du soleil et des sources de
chaleur telles que des radiateurs ou
des poêles.
5. Ne pas bloquer les ouvertures de
ventilation. Les fentes et les ouvertures sur l’appareil sont prévues pour
la ventilation. Si vous placer votre DVD
portable sur un coussin, un canapé ou
autre surface similaire, assurez-vous
de ne jamais bloquer l’ouverture de
ventilation pendant que l’appareil est
en fonctionnement.
6. Ne placez pas le DVD portable
sur une table instable, un socle, un
trépied, un support ou un panier. L’ap-
pareil pourrait tomber, entraînant de
possibles dommages ou blessures.
7. Ne jamais placer des objets lourds
ou tranchants ou de la pression sur
l’écran LCD ou sur son panneau ou
son cadre.
8. Utilisez uniquement l’adaptateur CA
inclus avec le lecteur de DVD portable.
L’utilisation de tout autre adaptateur
annulera votre garantie.
9. Débranchez l’alimentation de la
prise lorsque l’appareil n’est pas
utilisé.
10. ATTENTION: La batterie rechargeable incorporée dans ce produit
n’est pas remplaçable par l’utilisateur.
Il est dangereux d’essayer d’ouvrir la
batterie incorporée dans l’unité et
toute tentative de le faire annulera la
garantie.
11. ATTENTION: Un volume excessif et
/ ou l’utilisation des écouteurs ou d’un
casque peuvent causer une perte de
l’ouïe.
12. Attention: N’utilisez uniquement
que des fixations / accessoires spécifiquement fourni par le fabricant, y
compris l’adaptateur AC et l’adaptateur de voiture DC.
13. AVERTISSEMENT: Ce lecteur
Page 51

ENGLISHESPAÑOLFRANÇAIS
51
DVD utilise un système laser pour
lire le Disque CD / DVD. Utilisez ces
contrôles, ces réglages ou les procédures de performance autres que
ceux spécifiés ici peut entraîner des
radiations laser dangereuses.
14. AVERTISSEMENT: Pour éviter une
exposition directe au faisceau laser
qui lit le disque CD / DVD, ne pas ouvrir
l’unité pendant qu’elle est en cours de
lecture. Le faisceau laser est visible
lorsque l’appareil est ouvert alors que
le disque CD / DVD tourne.
15. AVERTISSEMENT: Ne jamais regarder directement dans le faisceau laser.
16. ATTENTION: Ne pas placer de façon permanente, ni construire un boîtier pour ce produit dans un espace
confiné comme une bibliothèque ou
une unité similaire qui empêcherait
une ventilation adéquate.
17. AVERTISSEMENT: Lors de l’utilisation par les enfants, les parents
doivent veiller à ce que l’enfant comprenne toute les instructions de sécurité - en particulier ceux concernant
la surchaue, les dangers d’électrocution, et de la radiation laser.
18. ATTENTION: Si l’appareil surchaue, à une déformation, est
endommagé ou que la batterie serait
défectueuse, cesser d’utiliser l’appareil immédiatement et contacter le
soutien au service à la clientèle pour
les options de réparation.
19. AVERTISSEMENT: Ne chargez pas
la batterie lorsque l’appareil n’est pas
suisamment aéré. Ces mauvais emplacements comprennent: matelas,
canapés, coussins, oreillers et tous les
autres objets qui limitent la circulation
d’air dans les ouvertures prévues pour
la ventilation.
20. AVERTISSEMENT: Le fabricant,
les distributeurs et les détaillants
n’acceptent aucunes responsabilités
quant aux dommages à la batterie
causés par une mauvaise utilisation et
/ ou des dommages à l’unité.
21. Attention: les câbles USB de plus
de 10 “(250mm) ne devrait pas être
utilisé avec cet appareil.
Page 52

ENGLISH ESPAÑOL FRANÇAIS
52
MANIPULATION DISQUE CD/DVD
1. Ne pas laisser les disques près d'une
source de chaleur, directement au
soleil ou dans un environnement au
taux d'humidité élevé.
2. Ranger les disques dans leurs boitiers lorsque non utilisés.
3. Empiler ou ranger les disques debout peut causer des déformations.
4. Ne touchez pas la surface du disque
lors de la manipulation. Tenez plutôt les rebords du disque.
5. Les empreintes digitales, la poussière, la saleté ou des égratignures
peuvent fausser l'image, réduire la
qualité du son ou causer un saut
lors de la lecture du disque. Faites
attention aux égratignures qui
empêchent le rayon laser de lire
et jouer le disque adéquatement.
Nettoyez les disques avant usage.
6. Ne collez aucun papier ni étiquette
adhésive sur le disque. Utilisez
plutôt un marquer permanent sur le
dessus (surface) du disque – c'est à
dire le côté non reluisant.
7. Nettoyez les disques avec un linge
doux en essuyant du centre vers le
rebord extérieur.
8. N'utilisez aucun produit solvant sur
les disques tel que le benzène, les
produits d'entretien ménager (excepté ceux dédiés aux CD/DVD), ou
un vaporisateur antistatique pour
disques en vinyle car cela pourrait
causer des dommages à votre lecteur et disques.
CONTENU DE LA BOÎTE
Votre Lecteur DVD portable Impecca comprend les éléments suivants:
• Lecteur DVD 13.3
• Télécommande avec batterie
• Bloc d’alimentation 12V AC / DC
• Chargeur de voiture
• Câble audio / vidéo
• Les écouteurs
• Manuel de l’utilisateur et carte de garantie
Page 53

ENGLISHESPAÑOLFRANÇAIS
53
CARACTÉRISTIQUES DU PRODUIT
• Un écran large avec contraste élevé et 1366 x 768 dpi de résolution 13.3” TFT / LCD avec des ajustements personnalisés
de 180 et de 90 tournant sur deux côtés.
• Joue la plupart des fichiers audio, vidéo, les photos et des
formats et est compatible avec la plupart des DVD, SVCD,
VCD, CD, MP3, MP4 et autre format de disque. Décodeur DOLBY® intégré qui supporte le décodage vidéo MPEG-4.
• Protection de saut électronique (3 secondes pour les DVD, 10
secondes pour les CD / VCD et 90 secondes pour les MP3)
• Lecteur USB intégré pour supporter jusqu’à 32 Go de de clé
USB.
• Fente de carte SD / MMC, supportant des cartes allant
jusqu’à 32 Go.
• Ports AV out pour la connexion à un téléviseur externe.
• Prise jack de 3,5 mm pour utiliser un casque ou des hautparleurs externes
• Équipé avec une télécommande infrarouge
• Haut-parleurs stéréo intégré 3W RMS (1.5W x 2)
• Fonctionnalité de copie CD à USB
• Menus multilingues (anglais, français et espagnol) et aichage sur écran.
• Batterie polymère de 4000 mAh Li-ion rechargeable intégrée
qui peut faire jusqu’à 6 heures de lecture continue
• Alimentation double tension (100V ~ 240V, 50 / 60Hz) pour
une utilisation dans le monde entier.
Page 54

ENGLISH ESPAÑOL FRANÇAIS
54
CONTRÔLE DE L’UNITÉ PRINCIPALE
1. TOUCHE DVD / USB / SD
2. TOUCHE ARRETER LA LECTURE
3. TOUCHE JOUER / PAUSE
4. TOUCHE AVANCE RAPIDE
5. TOUCHE REWIND
6. TOUCHE VOL +
7. TOUCHE VOL -
8. TOUCHE OPTIONS
9. TOUCHE GAUCHE
10. TOUCHE EN HAUT
11. TOUCHE DROITE
12. TOUCHE OK
13. TOUCHE EN BAS
14. TOUCHE MENU
15. TOUCHE AUDIO
16. TOUCHE « OPEN »
1
2
3
4
5
6
7
8
9
10
11
12
13
14
15
16
17
19
18
REPEAT SUBTITLE
DVD/USB/SD
Page 55

ENGLISHESPAÑOLFRANÇAIS
55
20 21 22 23 24 25
DC12V
17. PORT USB - Utilisé pour la
connexion USB avec une clé
USB.
18. FENTE CARTE SD Utilisé pour
connecter les cartes SD
19. PRISE JACK 3.5mm - Utilisé
pour la connexion d’écouteurs
ou de haut-parleurs externes.
Les haut-parleurs intégrés
seront automatiquement
activé / désactivé une fois que
cette prise sera branchée ou
débranchée.
20. PRISE AV OUT - Utilisé pour la
connexion à une TV externe
21. TOUCHE COULISSANTE (OFF /
ON) - Utilisé pour mettre l’appareil ALLUMÉ ou ÉTEINT.
22. PRISE D’ALIMENTATION Utilisé
pour brancher le bloc alimentation de 12V AC / DC ou le
chargeur 12V de voiture
PANNEAU DE L’ÉCRAN PIVOTANT
L’angle de vision du panneau de l’écran pivotant peut être ajusté
comme indiqué ci-dessous à l’angle désiré:
CONTRÔLE DE L’UNITÉ PRINCIPALE
Page 56

ENGLISH ESPAÑOL FRANÇAIS
56
DÉMARRAGE
CHARGE DE LA PRISE AC / DC - L’unité a une batterie polymère Li-ion
rechargeable intégrée, rechargez-la avant utilisation comme indiqué
ci-dessous:
• Insérez la petite prise de l’adaptateur AC / DC
dans la prise DC IN sur le côté de l’appareil.
• Insérez l’adaptateur AC / DC dans une prise bien
située ayant AC 100-240V ~; 50 ou 60 Hz.
• La charge débutera automatiquement et l'indicateur DEL vert clignotera.
• Une fois la charge terminée, l'indicateur DEL vert
demeura allumé sans
• clignoter,aussi longtemps que l'appareil demeura branché.
• Lorsque l'appareil est allumé (en utilisant le bouton OFF/ON du côté gauche.
NOTES:
Utilisez l’adaptateur AC / DC fourni pour ce produit uniquement. Retirez l’adaptateur AC / DC de la prise murale lorsque vous n’utilisez pas l’appareil pour une
longue période de temps. Ne pas essayer d’insérer l’adaptateur AC / DC dans la
prise murale de manière incorrecte.
L’INDICATEUR DE BATTERIE
Lorsque la puissance de la batterie intégrée est faible, le lecteur va s’arrêter et
s’éteindre. À ce point, il est conseillé de charger l’unité avant qu’il ne s’éteigne.
Pendant le chargement, vous pouvez lire les DVD / USB / SD comme à l’habitude.
CONSEILS CONCERNANT LA BATTERIE
Votre batterie durera plus longtemps si vous suivez ces trucs simples afin de
prendre soin et de bien ranger l’unité.
A. La première fois, charger l’unité au moins 6-8 heures.
B. Recharger et ranger l’appareil dans une plage de température de 40 °F ~ 95 °F
(5 °C ~ 35 °C)
C. Ne pas trop chargé (plus de 24 heures). Le chargement ou le déchargement
excessif risque d’abréger la vie de la batterie.
D. La batterie doit être chargée au moins tous les trois mois.
E. La batterie rechargeable intégrée à ce produit n’est pas remplaçable par
l’utilisateur.
Remarque: Il est normal que les batteries rechargeables perdent lentement une
partie de leur charge avec le temps.
Adaptateur AC/DC
Prise AC
Page 57

ENGLISHESPAÑOLFRANÇAIS
57
DÉMARRAGE
CHARGEMENT À L’AIDE DU CHARGEUR DE VOITURE
L’appareil peut également être chargée ou rechargée à partir d’une sortie
de voiture comme suit:
• Insérez la petite prise du chargeur de voiture dans la prise DC IN sur
le côté de l’appareil.
• Insérez la prise du chargeur de voiture idéalement dans la prise de
l’allume-cigare de la voiture ayant un DC de 12V. Le chargement
démarra automatiquement.
• Le chargement démarre automatiquement et le voyant rouge de
charge sera allumé.
• Une fois que l’unité sera complètement chargée, le voyant DEL jaune
s’allumera.
• Lorsque l’appareil est allumé (en utilisant la touche OFF / ON sur le
panneau latéral gauche) le voyant LED bleu restera allumé.
NOTES:
Utilisez le chargeur de voiture fourni uniquement pour ce produit. Utiliser
l’adaptateur d’alimentation autorisé Impecca inclus avec votre lecteur DVD. L’utilisation de tout autre adaptateur peut endommager l’appareil et / ou causer un
choc électrique, un incendie, ou même un décès.
Retirez le chargeur de voiture de toute prise lorsque vous ne l’utiliser pas sur une
longue période de temps.
ALIMENTATION DE L’UNITÉ & LECTURE DE DISQUE
• Soulevez le panneau de l’écran et tourner à l’angle désiré. Faites glisser la
touche Power ON / OFF en position “ON” pour allumer le lecteur, le voyant
LED bleu sur le devant du lecteur va s’allumer.
• Appuyez sur la touche OPEN pour ouvrir la porte du lecteur de disque.
Placez le disque sur l’axe central avec l’étiquette du disque vers le haut.
Fermez la porte du lecteur de disque et le lecteur commencera la lecture
automatiquement.
• Pour éteindre, appuyez sur la touche STOP () pour arrêter la lecture et le
disque tournant.
NOTES:
Le voyant LED bleu restera allumé tant que l’interrupteur ON / OFF sur le côté du
lecteur sera en position ON.
L’insertion d’une clé USB ou d’une carte SD / MMC chargera le menu des fichiers.
Pour économiser l’énergie de la batterie, toujours éteindre le lecteur en faisant
glisser l’interrupteur ON / OFF sur le côté du lecteur à la position OFF.
Page 58

ENGLISH ESPAÑOL FRANÇAIS
58
TOUCHES DE LA TÉLÉCOMMANDE
Le guide suivant vous aidera à faire le meilleur usage de votre télécommande:
1. POWER – Mettre l’unité à on / o
2. MUTE- Silence
3. TOUCHES NUMÉRIQUES
4. SETUP - Entrez dans le menu de configuration
5. TOUCHES DIRECTIONNELLES HAUT /
BAS / GAUCHE / DROITE
6. ENTER - Sélectionnez les éléments du
menu
7. AUDIO - Change la langue audio des
pistes
8. DISPLAY - Aichage de l’information du
disque.
9. PLAY / PAUSE
10. REWIND - Appuyez plusieurs fois pour
rembobiner la lecture en intervalles
de 2x, 4x, 8x, 16x et 32x. Appuyez à
nouveau pour reprendre la lecture
normale.
11. AVANCE RAPIDE - Avancement rapide
de la lecture en intervalles de 2x, 4x,
8x, 16x et 32x. Appuyez à nouveau pour
reprendre la lecture normale.
12. DVD / USB / CARTE SD INPUT – Basculer la source de la carte/clé
13. CD RIP - Copier à partir du CD audio
vers USB
14. REPEAT – Répéter des pistes ou une
vidéo
15. TIME - Passer à un moment précis dans
le fichier
16. SUBTITLE – Activer les sous-titres (le
disque doit avoir cette fonction)
17. PROG. – Place la piste sur la liste de
programme
18. ANGLE – Changement les angles de
caméra (si supporté par votre disque)
19. ZOOM - Zoom sur la scène à des rapports de 2x, 3x, 4x et utiliser les flèches
directionnelles pour vous déplacer à
travers l’écran.
20. VOLUME +/-
21. EXIT - Retour au menu
22. A-B - répéter un b
23. SLOW - Lecture de la piste vidéo plus
lente que la vitesse de lecture normale
24. STOP
25. NEXT - Passer au chapitre ou à la piste
suivante
26. PRÉCÉDENT - Aller au chapitre ou à la
piste précédente
1
2
3
4
5
6
7
8
9
10
11
12
13
14
15
16
17
18
19
20
21
22
23
24
25
26
Page 59

ENGLISHESPAÑOLFRANÇAIS
59
MODE D’EMPLOI
CONNEXION TV externe, DVD, VCR ou DVR:
Votre lecteur de DVD portable peut agir comme un lecteur DVD qui peut être
raccordé à un téléviseur pour un aichage sur un écran plus grand. Vous pouvez
utiliser une autre source vidéo comme un autre DVD, un lecteur Blu-ray, un
magnétoscope ou un DVR. Des haut-parleurs externes peuvent également être
utilisés à la place des haut-parleurs intégrés pour reproduire les sons.
• Raccordez le téléviseur externe à l’unité via la prise AV-OUT comme montré
à la figure 1 ci-dessus.
UTILISATION D’UN CASQUE, D’ÉCOUTEURS OU DE HAUTPARLEURS EXTERNES:
Pour une écoute privée, branchez les écouteurs fournis dans la prise à
écouteur sur le côté de l’appareil. Les haut-parleurs de l’appareil s’éteindront lorsque les écouteurs sont insérés dans la prise. Des haut-parleurs
externes peuvent également être utilisés de la même façon pour une
diérente expérience d’écoute.
Blanc
Rouge
Jaune
Diagramme 1
Page 60

ENGLISH ESPAÑOL FRANÇAIS
60
OPTIONS DE SYSTÈME AVANCÉS
Appuyez sur le bouton SETUP de la télécommande pour ouvrir le
menu de configuration. Utilisez les touches directionnelles (haut,
bas, gauche, droite) pour sélectionner les éléments du menu. Après
avoir modifié les paramètres souhaités, appuyez de nouveau sur le
bouton SETUP pour revenir à l’aichage normal.
RÉGLAGES GÉNÉRAUX
AFFICHAGE TV
Définit le rapport d’aspect de l’image de lecture lors de l’utilisation
d’un écran de télévision externe.
• 4: 3 Panscan: une télévision standard «carré» (ratio 4: 3) qui
coupe les côtés gauche et droit d’une image grand écran.
Aussi connu sous plein écran.
• 4: 3 Letterbox: sélectionnez cette option si vous avez une
télévision carrée standard (aspect ratio 4: 3). Dans ce cas,
l’image complète sera aichée sur l’écran avec des barres
noires sur les parties supérieure et inférieure de l’image.
• 16: 9: Choisissez cette option d’aichage sur un grand écran
(la plupart des téléviseurs haute définition).
• Large squeeze: écrase une image grand écran afin de la montrer sur un ratio 4: 3 sans recadrage.
Mp3 Lyric On
PS
Mp3 Lyric On
Set TV Display Mode
4:3/PS
4:3/LB
16:9
Page 61

ENGLISHESPAÑOLFRANÇAIS
61
OPTIONS DE SYSTÈME AVANCÉS
ANGLE DE VISION
Aiche les informations de l’angle de la caméra sur le coin droit de
l’écran TFT si disponible sur le disque.
LANGUE OSD
Changer la langue du système du lecteur de DVD
SOUS-TITRE
Le sous-titrage est en fait des données qui sont cachées dans le
signal vidéo de certains disques pour les malentendants. Le sous-titrage est diérent des sous-titres et peuvent être sélectionnés en
utilisant le bouton SUBTITLE ou dans votre menu DVD. Vous pouvez
activer le sous-titrage avec cette option.
Mp3 Lyric On
PS
Mp3 Lyric On
Set OSD Language
Mp3 Lyric On
English
French
German
Spanish
Portuguese
ENG
Page 62

ENGLISH ESPAÑOL FRANÇAIS
62
OPTIONS DE SYSTÈME AVANCÉS
ÉCRAN DE VEILLE
Active ou désactive l’écran de veille après une période prolongée
d’inactivité sur le Lecteur DVD.
REPRENDRE LA LECTURE
Le lecteur se souviendra du dernier point lu sur votre disque
lorsque cette option est activée; le lecteur reprendra automatiquement la lecture lorsque le disque sera réinséré.
RÉGLAGES AUDIO
Downmix:
Cette option vous permet de régler la sortie analogique stéréo de
votre lecteur DVD.
• LT / RT: Sélectionnez cette option si votre lecteur DVD est
connecté à un décodeur Dolby Pro Logic.
• Stéréo: Sélectionnez cette option lorsque la sortie de son
vient seulement de deux haut-parleurs avant.
Mp3 Lyric On
Mp3 Lyric On
Page 63

ENGLISHESPAÑOLFRANÇAIS
63
OPTIONS DE SYSTÈME AVANCÉS
DOLBY DIGITAL
Les options incluses dans le programme d’installation Dolby Digital
sont: « Dual Mono »ou « Dynamique ».
DUAL MONO
• Stéréo: Le son mono gauche envoie des signaux de sortie
au haut-parleur de gauche et le son mono droit envoie des
signaux de sortie au haut-parleur de droit.
• L-Mono: Le son mono gauche envoie des signaux de sortie à
la fois au haut-parleur de gauche et celui de droite.
• R-Mono: le son mono droit envoie des signaux de sortie à la
fois au haut-parleur de gauche et celui de droite.
• Mix-Mono: Des sons mono mixtes de gauche et de droite
enverront des signaux de sorties dans les haut-parleurs de
gauche et de droite.
DYNAMIQUE
Compression de gamme dynamique.
Page 64

ENGLISH ESPAÑOL FRANÇAIS
64
OPTIONS DE SYSTÈME AVANCÉS
PARAMÈTRES VIDÉO
Ajuster la qualité de la vidéo de l’écran LCD en modifiant la netteté,
la luminosité, le contraste, la teinte et la saturation de l’image.
LES PRÉFÉRENCES DE LECTURE
Audio: sélectionne une langue audio par défaut du DVD (si disponible). Sous-titre: Sélectionne une langue de sous-titrage par défaut
du DVD (si disponible). Menu du disque: Sélection de la langue par
défaut du menu du DVD (si disponible).
CONTRÔLE PARENTAL
Certains DVD peuvent avoir un niveau de contrôle parental assigné
au disque complet ou à certaines scènes du disque. Cette fonctionnalité vous permet de définir la limite de lecture. Les niveaux de
notation vont de 1 à 8 et varie selon les pays. Vous pouvez interdire
la lecture de certains disques qui ne sont pas appropriés pour vos
enfants. Certains disques font la lecture de scènes alternatives.
Eng
Eng
Eng
Panel Quality
Panel Display 16:9
Go To Video Setup Page
Page 65

ENGLISHESPAÑOLFRANÇAIS
65
OPTIONS DE SYSTÈME AVANCÉS
OPTIONS DE MOT DE PASSE
Exiger un mot de passe pour lire des parties restreintes sur les DVD.
Si ce paramètre est désactivé, les réglages de contrôles parentaux
ne fonctionneront pas.
ANCIEN MOT DE PASSE
Entrez l’ancien mot de passe à l’aide de la télécommande (le mot de
passe par défaut est 136900), et le curseur sautera automatiquement au champ nouveau mot de passe.
NOUVEAU MOT DE PASSE
Entrez un nouveau mot de passe en utilisant 6 chires de la télécommande et le curseur passera automatiquement au champ
confirmation de mot de passe.
Page 66

ENGLISH ESPAÑOL FRANÇAIS
66
OPTIONS DE SYSTÈME AVANCÉS
CONFIRMEZ LE MOT DE PASSE
Confirmez le nouveau mot de passe en l’entrant à nouveau en
utilisant les contrôles de la télécommande. Si le mot de passe est
incorrect, le curseur restera dans le champ et vous devrez entrer le
bon mot de passe. Après avoir entré le nouveau mot de passe correctement, le curseur passera automatiquement sur le bouton OK.
CONFIRMER
Une fois que tous les champs sont remplis, cliquez sur le bouton
ENTER de la télécommande pour enregistrer votre nouveau mot de
passe.
Remarque: Si le mot de passe a été changé, le contrôle parental et
le code de verrouillage du disque sera aussi modifié.
Notez que le mot de passe par défaut (136900) reste en permanence actif, même si le mot de passe système a été changé.
DÉFAUT
Rétablir tous les paramètres par défaut du lecteur.
Page 67

ENGLISHESPAÑOLFRANÇAIS
67
IMPORTER D’UN CD
Le lecteur DVD peut copier des CD et des CD MP3 non protégés sur
une clé USB. Avant de commencer ce processus, veiller à ce que
votre clé USB aille suisamment d’espace libre.
En utilisant les touches directionnelles sur le panneau avant, sélectionnez la/les piste(s) que vous souhaitez copier sur votre clé USB.
Confirmer votre sélection et attendez que le processus de copie se
termine. Une boîte de dialogue confirmera l’achèvement, comme
indiqué ci-dessous.
Notez qu’il est normal que ce processus prenne un certain temps.
Page 68

ENGLISH ESPAÑOL FRANÇAIS
68
DISQUES ET FORMATS DE FICHIERS PRIS EN CHARGE
DISQUES LISIBLES
L’appareil peut lire les disques suivants:
TYPES DE DISQUES:
DVD
Les données sur la plupart des DVD sont séparées en
sections appelées titres qui sont divisés en sections
appelés chapitres, dont chacun est nommé avec un
titre et un numéro de chapitres. Certaines caractéristiques de ce lecteur DVD pourraient ne pas fonctionner
avec certains disques DVD qui sont prédéfinis. Si une
fonctionnalité ne fonctionne pas comme souhaité,
reportez-vous au manuel accompagnant le disque DVD
ou le logiciel qui a créé le disque.
DISC AUDIO
Les données sur un disque audio sont séparées en
sections appelé pistes et chaque piste a son propre
numéro.
IMPORTANT:
Lisez le manuel qui accompagne le disque DVD, car il y a diérentes options sur ce lecteur de
DVD qui ne peuvent pas être utilisés sur certains disques. Il y a également des fonctions supplémentaires sur un disque DVD qui sont diérentes pour chaque disque et exigerait de se référer au
manuel accompagnant le disque lui-même ou le logiciel qui a créé le disque.
Ce lecteur est compatible avec les systèmes de couleurs NTSC et PAL. Notez toutefois que si
vous êtes aux États-Unis, au Canada ou au Mexique, en utilisant la télécommande ou le menu
de configuration, laissez le réglage sur NTSC. Dans d’autres pays, le système de couleur PAL est
utilisé par le lecteur automatiquement ou peut être modifié en utilisant la télécommande ou le
menu de configuration. Si l’appareil est mal réglé sur PAL (qui pourrait être utilisé dans d’autres
pays), l’image peut être déformée ou roulé verticalement. Dans un tel cas, se référer au manuel
accompagnant le disque lui-même ou le logiciel qui a créé le disque pour le système de couleurs
du disque.
Formats de fichiers supportés - Le tableau suivant indique les formats de fichiers soutenu par le
lecteur pour regarder des films, écouter de l’audio ou aicher des fichiers d’images:
MPEG1, 2 dat, mpg, mpeg MPG, MPEG
MPEG2 vob MPEG2-PS
MPEG4
Divx 3.11, Divx 4.12, Div x 5.x, Div x 6, Xvid 1.00, Xvid 1.01, Xvid
1.02, Xvid 1.03, Xvid 1.03, Xvid 1.10-beta1/2
divx, avi AVI (1.0, 2.0)
DMF0,1,2
Audio mp3 MP3
JPEG Motion jpeg AVI
Page 69

ENGLISHESPAÑOLFRANÇAIS
69
SPÉCIFICATIONS TECHNIQUES
SORTIE DE LA BATTERIE: 7,4 volts
CONDITIONS ENVIRONNEMENTALES POUR LE STOCKAGE:
1. Pour un stockage jusqu’à 6 mois:
• Température entre -4 ° F à 113 ° F (-20 ° C à 45 ° C)
• Humidité à 65% ± 20%
2. Pour un stockage de 1 semaine:
• Température entre -4 ° F à 113 ° F (-20 ° C à 45 ° C)
• Humidité à 65% ± 20%
LES CONDITIONS ENVIRONNEMENTALES D’EXPLOITATION:
1. Lors de la charge de la batterie:
• Température entre -32 ° F à 113 ° F (-0 ° C à 45 ° C)
• Humidité à 65% ± 20%
2. Lorsque de l’utilisation de la batterie:
• Température entre -4 ° F à 113 ° F (-20 ° C à 45 ° C)
• Humidité à 65% ± 20%
EXIGENCES D’ALIMENTATION:
CA 100-240 V, 50/60 Hz Consommation électrique: 9-12 V, 1.5A, 20
watts d’exploitation
SPÉCIFICATIONS AUDIO:
Haut-parleurs: 2 x 1,5 Watt, sortie casque
Réponse Audio: 20Hz-20kHz
Audio S / N Ratio: 50dB
Fréquence Distorsion + bruit: -70dB
Isolation des canaux: 55dB
Plage dynamique: 85dB
SPÉCIFICATIONS DU SYSTÈME:
Laser: Système vidéo laser à semi-conducteur, longueur d’onde 650
nm
Signal: NTSC / PAL / AUTO
Remarque: La conception et les spécifications sont sujets à change-
ment sans préavis.
Page 70

ENGLISH ESPAÑOL FRANÇAIS
70
PROBLÈME SOLUTION
L’i cô ne apparaît à l’écran
La fonction ou l’action ne peut pas
être complété en ce moment parce
que:
1. Le logiciel du disque empêche
ou ne prend pas en charge la
fonctionnalité (par exemple, les
angles)
2. La fonction n’est pas disponible
pour le moment.
3. Vous avez demandé un chapitre,
une piste, ou un numéro de
titre, qui n’existe pas.
L’image est déformée Le disque pourrait être endomma-
gé. Essayez un autre disque; c’est
normal d’avoir une certaine distorsion lors d’un avancement rapide
ou reculer.
Aucun avancement rapide ou
reculer
Certains disques comportent des
sections qui interdisent l’avancement rapide ou le saut de chapitre;
L’unité ne peut pas sauter les
informations d’avertissement et les
mentions de copyright au début du
DVD.
Page 71

ENGLISHESPAÑOLFRANÇAIS
71
SUPPORT TECHNIQUE
Avant de contacter le support technique, veuillez consulter le guide de dépannage ci-dessus / ci-dessous.
Consultez notre site Web pour nous rejoindre, pour trouver les réponses à vos
questions fréquentes et pour des ressources additionnelles telles qu'une version
mise à jour de ce guide de l'utilisateur.
WWW.IMPECCA.COM
Pour nous rejoindre par téléphone, veuillez avoir en main le numéro de modèle
et de série de votre appareil. Nos lignes sont ouvertes entre 9 h et 18 h HE au 1866-954-4440.
Tenez-vous à jour sur les plus récentes innovations chez Courant et pour participer à nos concours via nos médias sociaux:
www.facebook.com/Impecca/
www.instagram.com/impecca/
@impeccausa
© 2016 Impecca, une division de LT Inc., Wilkes Barre, PA.
Page 72

Impecca™ garantit ce produit contre les défauts de matériaux et de fabrication à l’acheteur original tel que spécifié
ci-dessous à condition que le produit soit enregistré en ligne
dans les quatorze (14) jours suivants l’achat.
PIÈCES — Si le produit a un défaut de fabrication
dans un délai d’un (1) an à compter de la date
d’achat initiale, Impecca™ réparera ou remplacera
les pièces du produit sans frais (pour les pièces)
pour les consommateurs aux États-Unis et au
Canada.
MAIN-D’OEUVRE — Si le produit a un défaut de
fabrication dans un délai de quatre-vingt-dix (90)
jours à compter de la date d’achat initiale, Impecca™ réparera ou remplacera les pièces du produit
sans frais (pour les pièces) pour les consommateurs aux États-Unis et au Canada. Après quatrevingt-dix (90) jours, il en sera de la responsabilité
du consommateur.
Les frais d’expédition à destination et à partir de notre centre
de service de garantie sont à la charge du consommateur.
Pour obtenir le service de garantie par un centre de service
autorisé Impecca™, veuillez nous écrire à : service@impecca.com pour obtenir une autorisation de réparation et d’entretien (ARE) ainsi que pour localiser le centre de service de
garantie le plus près de vous. Une fois autorisé, vous devez
envoyer le produit au centre de service autorisé Impecca™
dans ses matériaux d’emballage d’origine ou l’équivalent,
pour éviter tout dommage pendant le transport.
De plus, si Impecca™ devait déterminer que le produit est en
dehors des conditions de la garantie, Impecca™ retournera
le produit à l’expéditeur aux frais de celui-ci sans être réparé
ou remplacé, sauf s’il est autorisé par le consommateur à
servir le produit à garantie expiré aux frais du consommateur. Tous les frais de manutention ou de réapprovisionnement pour les retours et/ou les remplacements seront non
remboursables.
Impecca™ exclut expressément de cette garantie toutes
pièces jointes non électriques/mécaniques, accessoires
et pièces jetables, y compris, mais non limité à, l’extérieur
du boîtier, les câbles de connexion, batteries et adaptateurs secteur. Impecca™ se réserve le droit de réparer ou
de remplacer les produits défectueux avec des modèles
identiques, équivalents ou plus récents.
Nous nous réservons le droit de réparer ou de remplacer
le produit à notre discrétion. Le remplacement peut être
soit neuf ou remis à neuf et alors que tous les e orts seront
faits pour s’assurer qu’il s’agit du même modèle, si le même
modèle n’est pas disponible il sera remplacé par un modèle
équivalent ou supérieur.
L’usure « normale » n’est pas couverte par la présente, ou
toute autre garantie. De plus, Impecca™ se réserve le droit
de déterminer l’usure « normale » sur tous les produits.
L’altération ou l’ouverture du boîtier ou de la coquille du
produit annulera cette garantie dans son intégralité.
De plus, cette garantie ne s’applique pas si le produit a été
endommagé par accident, abus, mauvaise utilisation ou
mauvaise application, a été altéré ou modifié sans l’autorisation écrite de Impecca™, a été réparé par un centre de
réparation Impecca™ non agréé, n’a pas été correctement
entretenu ou utilisé conformément au manuel d’utilisation, a été utilisé à des fins commerciales ou autres que
personnelles, a été esthétiquement endommagé, n’a pas
été importé par Impecca™, n’a pas été fabriqué selon les
spécifications du marché des États-Unis, a été endommagé
suite à une mauvaise installation ou à une négligence de
la part des consommateurs, a été endommagé suite à un
mauvais emballage lors de l’expédition au centre de service
de garantie, a été endommagé en raison de catastrophes
naturelles ou si le numéro de série du produit a été retiré ou
rendu illisible.
TOUTE GARANTIE IMPLICITE, Y COMPRIS TOUTE GARANTIE
IMPLICITE DE QUALITÉ MARCHANDE ET D’ADAPTATION À
UN USAGE PARTICULIER, EST LIMITÉE À UN (1) AN POUR
LES PIÈCES ET QUATRE-VINGTS-DIX (90) JOURS POUR LA
MAIN-D’OEUVRE À PARTIR DE LA DATE D’ACHAT INITIALE DE
CE PRODUIT.
CES GARANTIES ET RECOURS SONT LES SEULS ET
UNIQUES GARANTIES ET RECOURS CONCERNANT LA
VENTE ET L’UTILISATION DU PRODUIT. AUCUNE AUTRE
GARANTIE, ORALE OU ÉCRITE, EXPLICITE OU IMPLICITE,
N’EST DONNÉE.
IMPECCA™ N’EST PAS RESPONSABLE DE TOUT DOMMAGE,
QU’IL SOIT PARTICULIER, ACCIDENTEL, INDIRECT, DIRECT
OU AUTRE ÉTANT CONNU OU QUI AURAIT DU ÊTRE CONNU
D’IMPECCA™, Y COMPRIS LA PERTE DE PROFITS, LA BONNE
VOLONTÉ ET LA PROPRIÉTÉ AINSI QUE LES BLESSURES
PERSONNELLES RÉSULTANTES D’UNE RUPTURE DE
GARANTIE, DE L’INCAPACITÉ D’UTILISER LE PRODUIT OU
SOUS TOUTE AUTRE THÉORIE JURIDIQUE CONTRACTUELLE OU DÉLICTUELLE. LA RESPONSABILITÉ D’IMPECCA
EST LIMITÉE AU PRIX D’ACHAT PAYÉ AU DÉTAILLANT DU
PRODUIT DÉFECTUEUX.
Aucun revendeur, agent ou employé Impecca™ n’est
autorisé à faire quelques modifications, extension, changement ou amendement que ce soit de cette garantie sans le
consentement écrit et l’autorisation d’Impecca™.
Certains États ne permettent pas l’exclusion ou la limitation
des garanties implicites ou de la responsabilité pour les
dommages directs ou indirects, ou ne permettent pas
de limitation sur la durée d’une garantie implicite. Les
limitations ou exclusions ci-dessus peuvent donc ne pas
s’appliquer à vous. Cette garantie vous donne des droits
légaux spécifiques et vous pouvez avoir d’autres droits, qui
varient d’un État à l’autre.
Note : Notre centre de service de garantie expédie seulement
à l’intérieur des États-Unis contigus, excluant l’Alaska et
Hawaï.
GARANTIE LIMITÉE D’UN AN
 Loading...