

Page 1
USER MANUAL
Portable DVD Player
Model – DVP-1016
Page 2

ENGLISHESPAÑOLFRANÇAIS
ii
TABLE OF CONTENTS
Important Safety Instructions 1
Copyright Notice 2
CD/DVD Disc Handling 3
Package Contents 4
Product Features 4
Main Unit Controls 5
Swivel Screen Panel 6
Getting Started 7
Charging from AC/DC Outlet 7
Charging using Car Charger Adapter 8
Powering Unit & Disc Playback 8
Remote Control Buttons 9
Using the Remote Control 10
Operating Instructions 11
Connecting to External TV, DVD, VCR or DVR 11
Using Headphones Or External Speakers 11
Advanced System Options 12-15
CD Ripping 16
Supported Discs & File Formats 17
Technical Specications 18
Troubleshooting 19
Contact Technical Support 19
Page 3

ENGLISHESPAÑOLFRANÇAIS
1
IMPORTANT SAFETY INSTRUCTIONS
Before using the unit, be sure to read all the operating instructions carefully. All the safety & operating instructions
should be retained for future reference & all the warnings
on the product and in this user guide should be followed as
specied.
1. WARNING: To reduce the risk
of electric shock, do not remove the cover or back of the
unit. There are no user-serviceable parts inside.
2. WARNING: To prevent re or
electric shock hazard, do not
expose the unit to water, rain or
moisture.
3. Do not expose the adapter and
portable DVD to any water (including drips or splashes). Ob-
jects lled with liquids, such as
vases and water bottles, should
not be placed on the unit.
4. Keep the portable DVD away
from direct sunlight and heat
sources such as radiators or
stoves.
5. Do not block the ventilation
openings. Slots and openings
on the unit are provided for ventilation. Placing your portable
DVD on a cushion, sofa or other similar surface, should never
block the ventilation opening
while unit is in operation.
6. Do not place the portable
DVD on an unstable table,
stand, tripod, bracket or cart.
The unit may fall, resulting in
possible damage or possible
injury.
7. Never place heavy or sharp ob-
jects or pressure on the LCD
panel or frame.
8. Only use the AC adapter includ-
ed with the portable DVD player. Using any other adapter will
void your warranty.
9. Unplug the power from the outlet when the unit is not in use.
10. CAUTION: The rechargeable
battery incorporated in this
product is not user replaceable.
It is dangerous to try to open
the battery incorporated in the
unit & any attempt to do so, will
void the warranty.
11. WARNING: Excessive volume
and/or usage of earphones or
headphones can cause hearing
loss.
12. WARNING: Only use attach-
ments/accessories specically
provided by the manufacturer, including the provided AC
adapter and DC car adapter.
13. WARNING: This DVD player
uses a laser system to read the
CD/DVD disc. Use of the controls, adjustments, or the performance of procedures oth-
er than those specied herein
may result in hazardous laser
radiation.
14. WARNING: To prevent direct exposure to the laser beam which
reads the CD/DVD disc, do not
open the unit while unit is playing. The laser beam is visible
when the unit is opened while
the CD/DVD disc is spinning.
15. WARNING: Never stare directly into the laser beam.
16. CAUTION: Do not permanently
place nor build a casing for this
product in a conned space
such as a bookcase or similar
unit, preventing proper ventila-
Page 4

ENGLISHESPAÑOLFRANÇAIS
2
tion.
17. WARNING: When in use by children, parents must ensure that
the child understands all safety
instructions -- especially those
regarding overheating, electrical hazards, and laser radiation.
18. WARNING: If the unit overheats
or has a deformed, damaged,
or destroyed battery, stop using the unit IMMEDIATELY and
contact customer support for
repair options.
19. WARNING: Do not charge the
battery when the unit is not suf-
ciently ventilated. Such insufcient locations include: mat-
tresses, sofas, cushions, pillows
and any others which limit the
air circulation into the ventilation openings.
20. WARNING: The manufacturer,
distributor, and retailers accept
no responsibility for battery
damage caused by improper
use and/or unit damage.
21. Warning: This DVD player uses
a laser system. Use of controls,
adjustments, or the performance of procedures other
than those specied herein may
result in hazardous laser radiation.
22. Warning: To prevent direct ex-
posure of laser beam, do not
open the unit. Laser radiation is
visible when the unit is opened.
23. Warning: Never stare directly
into the laser beam.
24. Caution: Do not install this prod-
uct in a conned space such as
a bookcase or similar unit.
25. Warning: When in use by children, parents must ensure that
the child understands all safety
instructions, especially those
regarding overheating, electrical hazards, and laser radiation.
26. Warning: If the unit overheats
or has a deformed, damaged,
or destroyed battery, stop using the unit IMMEDIATELY and
contact technical support for a
replacement.
27. Warning: Do not charge the
battery when the unit is not sufciently ventilated. Such locations include: mattresses, sofas,
cushions, pillows, etc.
28. Warning: The manufacturer,
distributor, and retailers accept
no responsibility for battery
damage caused by improper
use and/or unit damage.
29. Warning: USB cables longer
than 10” (250mm) should not
be used with this unit.
Copyright Notice:
1. It is forbidden by law to copy, broadcast and show (via cable, wireless, or otherwise,)
in public performance, or rent copyrighted material without permission.
2. This product features the copy protection function developed by Macrovision. Copy
protection signals are recorded on some discs. When recording and playing the pictures of these discs, picture noise will appear. This product incorporates copyright
protection technology that is protected by method claims of certain U.S. Patents
and other intellectual property rights owned by Macrovision Corporation and other
rights owners. Use of this copyright protection technology must be authorized by
Macrovision Corporation, and is intended for home and other limited viewing uses
only unless otherwise authorized by Macrovision Corporation. Reverse engineering
or disassembly is prohibited.
Page 5

ENGLISHESPAÑOLFRANÇAIS
3
CD/DVD DISC HANDLING
1. Do not leave discs near heat
sources, in direct sunlight, or
high humidity environments
2. Store discs in their cases when
not in use.
3. Stacking discs or standing them
on end can cause them to warp.
4. Do not touch the disc surface
while handling the disc. Instead,
hold the edges.
5. Fingerprints, dust, dirt, and
scratches can distort the pic-
ture or reduce the sound quality
from your disc or cause playback
to skip. Beware of scratches on
the disc inhibiting the laser beam
system from reading and playing
the disc correctly. Clean discs
before use.
6. Do not stick paper, tape, or adhesive labels onto any disc. Only
use permanent makers on the
top side of the disc – not the
shiny (under) side of the disc.
7. Clean discs with a soft cloth wiping from the center outwards.
8. Do not use solvents on any disc
such as benzene, household
cleaning products (except those
designed for CD/DVD use), or anti-static spray for vinyl records as
this can damage your device and
discs.
Page 6

ENGLISHESPAÑOLFRANÇAIS
4
PACKAGE CONTENTS
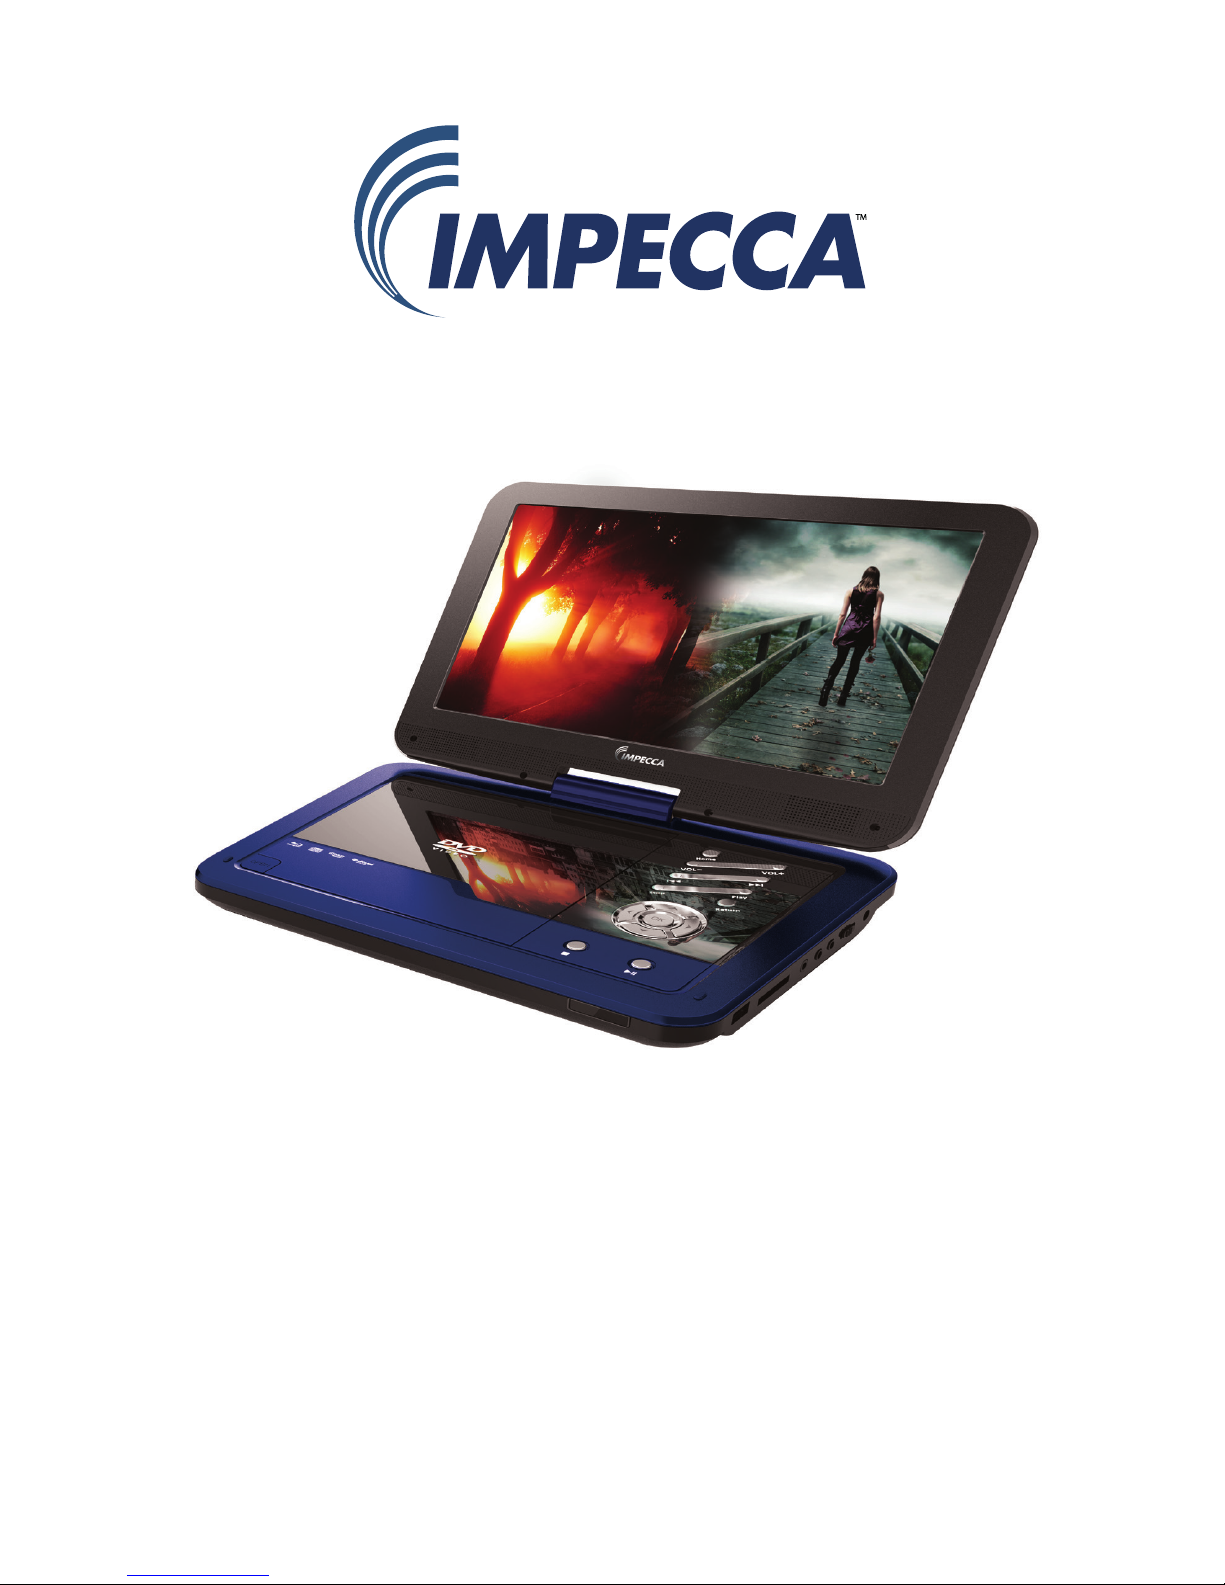
Your Impecca Portable DVD Player includes the following:
• 10.1” DVD Player
• Remote controller with battery
• 12V AC/DC Power Adapter
• Car Charger
• Audio/Video Cable
• Ear buds
• User Manual and Warranty Card
PRODUCT FEATURES
• High contrast and 1024 x 600 dpi resolution 10.1” TFT/LCD
wide-screen display with 180⁰ and 90⁰ rotating on both
sides for personalized adjustments.
• Plays most audio, video, and photo formats & compatible
with most DVD, SVCD, VCD, CD, MP3, MP4 & other disc
formats. Build-in DOLBY® decoder supporting MPEG-4
video decoding
• Electronic skip protection (3 seconds for DVD, 10 seconds
for CD/VCD and 90 seconds for MP3)
• Built-in USB reader for supporting up to 32GB ash drives.
• Built-in SD/MMS card slot, supporting up to 32GB cards.
• AV in/out ports for connecting to external TV, DVD, Blu-ray,
VCR or DVR.
• 3.5mm jack for headphones or external speakers use
• Equipped with infrared remote controller
• Built-in 3W RMS stereo speakers (1.5W x 2)
• CD to USB copying functionality
• Multi-language menus and on-screen displays (English,
French, and Spanish)
• Built-in rechargeable 3200 mAh Li-ion polymer battery for
up to 6 hours of continuous play
• Dual-voltage power (100V~240V, 50/60Hz) for world-wide
use
Page 7
ENGLISHESPAÑOLFRANÇAIS
5
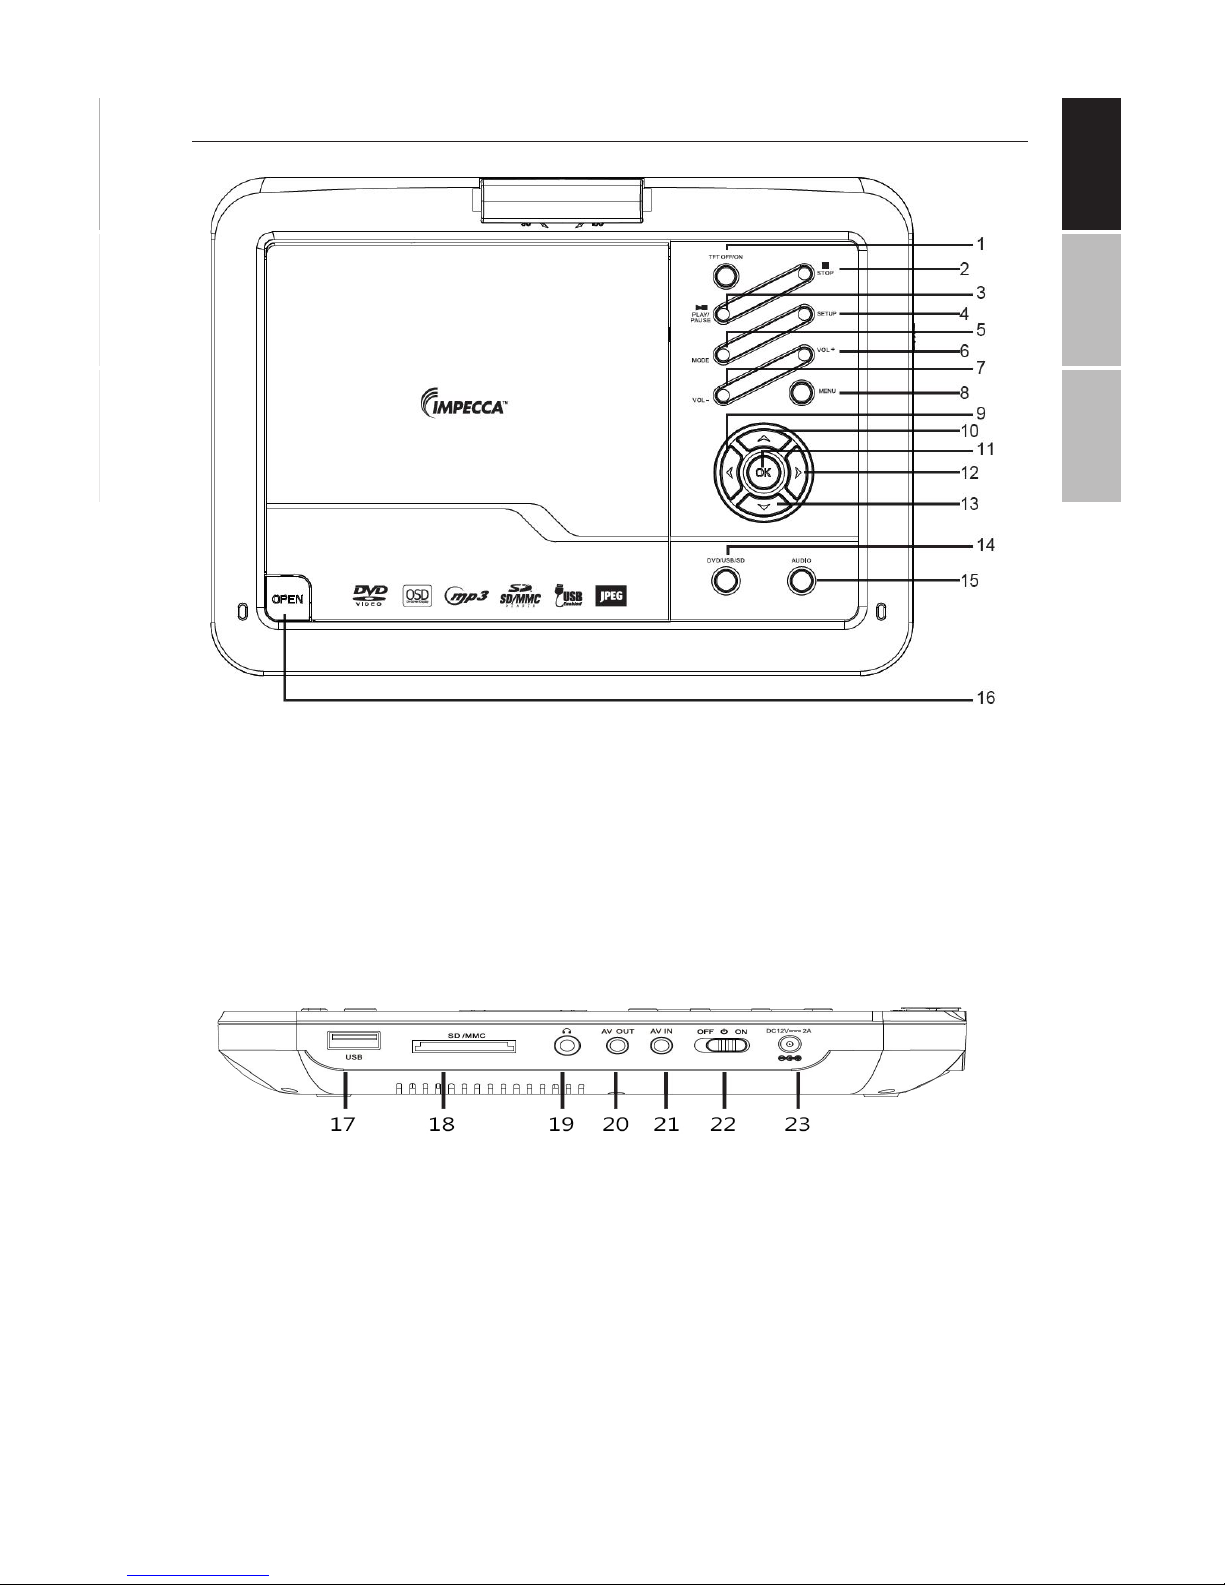
MAIN UNIT CONTROLS
1. TFT SCREEN OFF/ON KEY
2. STOP PLAYBACK KEY
3. PLAY/PAUSE KEY
4. SETUP KEY
5. MODE KEY
6. VOL + KEY
7. VOL – KEY
8. MENU KEY
9. LEFT KEY
10. UP KEY
11. OK KEY
12. RIGHT KEY
13. DOWN KEY
14. DVD/USB/SD KEY
15. AUDIO KEY
16. OPEN KEY
17. USB SLOT – Used for connecting USB Flash Drives
18. SD/MMC CARD SLOT – Used for
connecting SD/MMS Cards
19. 3.5mm JACK- Used for connecting ear phones or external
speakers. Built-in speakers
will automatically turn o/on
once this jack is plugged or unplugged.
20. AV OUT JACK – Used for connecting external TV
21. AV IN JACK – Used for using an
external DVD, Blu-ray, VCR or
DVR players.
22. POWER (OFF/ON) SLIDE KEY –
Used to turn unit OFF/ON
23. POWER JACK – Used to plug in
12V AC/DC adapter or 12V Car
Charger
Page 8

ENGLISHESPAÑOLFRANÇAIS
6
SWIVEL SCREEN PANEL
The viewing angle of the swivel screen panel can be adjusted as shown below to the desired angle:
Page 9

ENGLISHESPAÑOLFRANÇAIS
7
GETTING STARTED
CHARGING FROM AC/DC OUTLET - The unit has a built-in
rechargeable Li-ion polymer battery, recharge it before use
as instructed below:
• Insert the small plug from the AC/DC adapter
into the DC IN jack on the side of the unit.
• Insert the AC/DC adapter into a conveniently
located AC outlet having AC 100-240V~; 50 or
60Hz.
• Charging will start automatically and the Red
charging LED indicator light will be turned on.
• Once unit is fully charged the Yellow LED indicator light will turn on.
• When the unit is turned ON (using the OFF/
ON switch on the left side panel) the Blue LED
indicator light will stay on.
NOTES:
Use the enclosed AC/DC adapter for this product only.
Remove the AC/DC adapter from wall outlet when not using a long
period of time. Do not try to insert the AC/DC adapter into the
wall outlet incorrectly.
BATTERY INDICATOR
When power of the built-in battery is low, the player will stop and
turn o. It is advised to charge the unit at this point or before it
turns o. During charging, you can play the DVD/USB/SD as usual.
Battery tips:
~ Your battery will last longer if you following these simple guidelines for caring for and storing the unit.
A. The rst time, charge unit at least 6-8 hours.
B. Recharge and store the unit within the temperature range of
40°F~95°F (5°C~35°C).
C. Do not over-charge (longer than 24 hours). Excessive charging
or discharging may shorten the battery's life.
D. Battery should be charged at least every 3 months.
E. The rechargeable battery incorporated in this product is not
user replaceable.
Note: It is normal for rechargeable batteries to slowly lose some of
their charge over time.
Page 10

ENGLISHESPAÑOLFRANÇAIS
8
GETTING STARTED
CHARGING USING CAR CHARGER ADAPTER - The unit can
also be charged or recharged from a Car outlet as follows:
• Insert the small Car Charger plug from the Car Charger Adapter
into the DC IN jack on the side of the unit.
• Insert the Car Charger adapter into a conveniently located in the
car’s cigarette lighter outlet having 12V DC. Charging will start automatically.
• Charging will start automatically and the Red charging LED indicator light will be turned on.
• Once unit is fully charged the Yellow LED indicator light will turn
on.
• When the unit is turned ON (using the OFF/ON switch on the left
side panel) the Blue LED indicator light will stay on.
NOTES:
Use the enclosed Car Charger adapter for this product only.
Only use the Impecca authorized power adapter included with
your DVD player. Using any other power adapter can damage the
unit and/or cause electrical shock, re, or even death.
Remove the Car Charger adapter from all outlet when not using a
long period of time.
POWERING UNIT & DISC PLAYBACK
• Lift up the screen panel and turn to desired angle. Slide
the Power ON/OFF switch to “ON” position to power on
the player, the Blue LED indicator light on front of the
player will light.
• Press the OPEN button to open disc door. Place the disc
on the center spindle with label side facing up. Close the
disc door and the player will start playback automatically.
• To power o, press the STOP () button to stop the play-
back and disc spinning.
NOTES:
The Blue LED indicator light will remain lit while ON/OFF switch on
side of player is in the ON position.
Inserting a USB stick or SD/MMS will load the media menus
To save battery power, always power o the player by sliding the
ON/OFF switch on the side of player to OFF position.
Page 11

ENGLISHESPAÑOLFRANÇAIS
9
REMOTE CONTROL BUTTONS
The following guide will help you make the best use of
your remote control:
1. DISPLAY
2. MUTE
3. NUMERIC KEYS
4. SUBTITLE/CD RIP
5. SYSTEM
6. UP/DOWN/LEFT/RIGHT
ARROW KEYS
7. ENTER
8. SETUP
9. PREVIOUS
10. TIME
11. REWIND
12. PLAY/PAUSE
13. SOURCE
14. STOP
15. STANDBY
16. DVD/USB/SD CARD INPUT
17. VOLUME +/–
18. ZOOM
19. AUDIO
20. ANGLE
21. EXIT
22. PROG.
23. NEXT
24. SLOW
25. FAST FORWARD
26. REPEAT
Page 12

ENGLISHESPAÑOLFRANÇAIS
10
USING THE REMOTE CONTROL
1. Press repeatedly to display disc information.
2. Turn the sound on/o temporarily
3. Input chapter numbers or select a track number
4. Enable subtitles (disc must support this function)
5. Change between PAL and NTSC video outputs
6. Highlight menu items using the directional arrows
7. Make a menu selection
8. Enter the DVD player setup menu
9. Skip to the previous chapter or track
10. Skip to a specic time in the lm or song
11. Press repeatedly to rewind playback in 2x, 4x, 8x, 16x and 32x increments. Press again to resume normal playback.
12. Begin or pause playback
13. Switch between DVD and AV input
14. Stop playback
15. Switch the unit on/o
16. Switch between the DVD/USB/SD Card sources
17. Increase and decrease volume
18. Zoom in on the scene at ratios of 2x, 3x, and 4x. Use the directional
arrows to pan across the screen.
19. Change audio language tracks (if supported by your disc)
20. Change camera angles (if supported by your disc)
21. Return to the menu
22. Place a track on the program list
23. Skip to the next chapter or track
24. Scan the video track slower than normal playback speeds
25. Press repeatedly to fast forward playback in 2x, 4x, 8x, 16x and 32x
increments. Press again to resume normal playback.
26. Repeat tracks or video playback.
Battery protector: Before the rst use, the plastic battery protector
must be removed.
Page 13

ENGLISHESPAÑOLFRANÇAIS
11
OPERATING INSTRUCTIONS
CONNECTING TO EXTERNAL TV, DVD, VCR OR DVR:
Your portable DVD player can act as a DVD Player that can be
hooked up to a TV for viewing on a larger screen. You can use
another video source such as another DVD, Blu-ray player, VCR, or
DVR. External speakers can also be used instead of the build-in
speakers to play the sounds.
• Connect the external TV to the unit through the AV-OUT jack as the Figure 1 above.
• Connect the external Video Player such like DVD Player, Blu-ray, VCR, VDR
to the unit through the AV IN jack using the standard RCA display cable
as the Figure 2 below.
• After connected press the MENU button on the unit repeatedly to select
the AV in or out modes as the connecting.
USING HEADPHONES OR EXTERNAL SPEAKERS:
For private listening, connect the supplied ear buds into the head-
phone jack on the side of unit. The unit’s speakers will be turn o
when headphones are inserted into the jack. External speakers
may also be used the same way for a dierent listening experience.
Page 14

ENGLISHESPAÑOLFRANÇAIS
12
ADVANCED SYSTEM OPTIONS
Press the SETUP button on the remote control unit to open the
setup menu. Use the directional buttons (up, down, left, right) to
select menu items. After changing the desired settings, press the
SETUP button again to return to the normal display.
General Settings
TV Display: sets the aspect ratio of the playback
image when using an external television display.
• 4:3 Panscan: a standard ‘square’ television
(4:3 aspect ratio) will trim the left and right
sides o of a wide-screen lm. Also known
as full-screen.
• 4:3 Letterbox: select this if you have a stan-
dard ‘square television (4:3 aspect ratio). In
this case, the full image will be shown on
the screen with black letterbox bars on the
upper and lower portions of the image.
• 16:9: Choose this display option on any
wide-screen display (most HDTVs).
• Wide Squeeze: Squishes a wide-screen im-
age to t a 4:3 screen with no trimming.
Viewing Angle:
Displays current camera viewing information on
the right hand corner of the TFT screen if available on the disc.
OSD Language
Change the DVD player system language
Closed Captions
Closed captions are data that are hidden in the
video signal of some discs for the hearing impaired. Closed captions are dierent from subtitles that can be selected by using the SUBTITLE
button or in your DVD menu. You can enable
closed captions with this option.
English
French
German
Italian
Spanish
Page 15

ENGLISHESPAÑOLFRANÇAIS
13
ADVANCED SYSTEM OPTIONS
Screen Saver
Turn the screen saver on or o after a period of
prolonged DVD player inactivity.
Resume playback
The player will remember the last point read on
your disc when this option is enabled; the player
will automatically resume playback when the disc
is re-inserted.
Audio Settings
Downmix:
This options allows you to set the analog stereo
output of your DVD Player.
• LT/RT: Select this option if your DVD Player is
connected to a Dolby Pro Logic decoder.
• Stereo: Select this option when output delivers sound from only the two front speakers.
Dolby Digital:
The options included in Dolby Digital Setup are:
‘Dual Mono’ or ‘Dynamic’.
Dual Mono:
• Stereo: Left mono sound will send output
signals to left speaker and right mono sound
will send output signals to right speaker.
• L-Mono: Left mono sound will send output
signals to both the left speaker and right
speaker.
• R-Mono: Right mono sound will send output
signals to both the left speaker and right
speaker.
• Mix-Mono: Left and right mixed mono sound
will send output signals to left and right
speakers.
Dynamic
Dynamic range compression.
Page 16

ENGLISHESPAÑOLFRANÇAIS
14
ADVANCED SYSTEM OPTIONS
Video Settings
Adjust the video quality of the LCD display unit by
modifying the sharpness, brightness, contrast,
hue, and saturation of the image.
Playback Preferences
Audio: Selects a default DVD audio language (if
available). Subtitle: Selects a default DVD subtitle
language (if available). Disc Menu: Selects a default DVD menu language (if available).
Parental:
Some DVDs may have a parental levels assigned
to the complete disc or to certain scenes on the
disc. This feature lets you set playback limitations. The rating levels range from 1 to 8 and are
country dependent. You can prohibit the playing
of certain discs that are not suitable for your children. Certain discs support the playback of alternate scenes.
Password Settings
Require a password to play back restricted ratings on DVDs. If this setting is disabled, parental
settings will not function.
Old Password:
Enter the old password using the remote control
(factory setting is 136900), and the cursor will
jump automatically to the new password eld.
New Password:
Enter a new password using 4 digits from the remote control, and the cursor will automatically
jump to the conrm password eld.
Panel Quality
Eng
Eng
Eng
Page 17

ENGLISHESPAÑOLFRANÇAIS
15
ADVANCED SYSTEM OPTIONS
Conrm Password:
Conrm the new password by entering it again
using the remote control. If the incorrect pass-
word is entered, the cursor will stay in this eld
and you will need to enter the correct password.
After entering, the correct new password again,
the cursor will jump automatically to the OK button.
Conrm:
Once all elds are lled in, click the ENTER but-
ton on the remote control to save your new
password.
Note: If the password has been changed, the parental and disc lock code will also be changed.
Note that the default password (136900) remains
permanently active even if the system password
has been changed.
Default:
Revert all player settings to factory defaults.
Page 18

ENGLISHESPAÑOLFRANÇAIS
16
CD RIPPING
The DVD Player can copy unprotected CDs and MP3 CDs
DVD player can copy unprotected CDs and MP3 CDs to a USB
drive. Before beginning this process, ensure that your USB
drive has sucient free space.
Using the directional arrow keys on the front panel, select
the track(s) you would like to copy to your USB drive. Conrm
your selection and wait for the copy process to complete. A
dialog box will conrm completion as shown below.
Note that it is normal for this process to take quite some time.
Page 19

ENGLISHESPAÑOLFRANÇAIS
17
SUPPORTED DISCS & FILE FORMATS
PLAYABLE DISCS
The unit can play back the following discs:
DISC TYPES:
IMPORTANT:
Read the manual that accompanies the DVD disc, as there are features on this DVD player which cannot be used on
certain discs. There are also additional features on a DVD disc which are dierent for each disc and would require
referring back to the manual accompanying the disc itself or the software which the disc was created.
This playe r conforms to the NT SC and PAL co lor sys tems. Notice ho wever, if you a re in USA, C anada or Me xico, usi ng the
remote controller or setup menu, leave this setting on NTSC. In other countries, PAL color system will be used by the
play er eithe r automa ticall y or can be ch anged usi ng the remo te contro ller or se tup menu. I f unit is in correc tly set t o PAL
(which might be used in other count ries,) the picture might be di storted or rolled ver tically. In such a case, refer ba ck to
the manual accompanying the disc itself or the software which the disc was created as to the color system of the disc.
SUPPORTED FILE FORMATS - The following table shows the le formats
supported by the player for watching movies, listening to audio or dis-
playing picture les:
MPEG1, 2 dat, mpg, mpeg MPG,
MPEG
MPEG2 vod MPEG2-PS
MPEG4
Divx 3.11, Divx 4.12, Divx 5.x, Divx 6, Xvid 1.00, Xvid
1.01, Xvid 1.02, Xvid 1.03, Xvid 1.03, Xvid 1.10-beta1/2
mp4 AVI, MP4
MPEG4
Divx 3.11, Divx 4.12, Divx 5.x, Divx 6, Xvid 1.00, Xvid
1.01, Xvid 1.02, Xvid 1.03, Xvid 1.03, Xvid 1.10-beta1/2,
H.264
divx, avi AVI (1.0,
2.0)
DM F0,1, 2
Realvideo4 rmvb RMVB
Sorenson H263 v FLV
Audio mp3 MP3
JPEG Motion jpeg AVI, MOV
DVD
Data on most DVDs is split o into sections
called titles which are split o into sub-
sections called chapters, each of which is
named by a title and chapter number. Some
features of this DVD player might not operate with some DVD discs which are preset. If
a feature does not function as desired, refer
back to the manual accompanying the DVD
disc or the software which created the disc.
AUDIO DISC
Data on an Audio disc is split o into sections
called tracks and each track is given a track
number.
Page 20

ENGLISHESPAÑOLFRANÇAIS
18
TECHNICAL SPECIFICATIONS
Battery output: 7.4 volts
Storage environmental conditions:
1. When storing for up to 6 months:
• Temperature between -4°F to 113°F (-20°C to 45°C)
• Humidity at 65% ±20%
2. When storing for up to 1 week:
• Temperature between -4°F to 113°F (-20°C to 45°C)
• Humidity at 65% ±20%
Operating environmental conditions:
1. When charging the battery:
• Temperature between -32°F to 113°F (-0°C to 45°C)
• Humidity at 65% ±20%
2. When running on battery:
• Temperature between -4°F to 113°F (-20°C to 45°C)
• Humidity at 65% ±20%
Power requirements:
AC 100-240 V, 50/60 Hz Power consumption: 9-12V, 2A, 20 watts Operating
Audio specications:
Speakers: 2 x 1.5 Watt, Headphone output
Audio Response: 20Hz-20Khz
Audio S/N Ratio: 50dB
Frequency Distortion +Noise: -70dB
Channel Isolation: 55dB
Dynamic Range: 85dB
System specications:
Laser: Semiconductor laser, 650 nm wavelength Video system
signal: NTSC/PAL/AUTO
Note: Design and specications are subject to change prior notice.
Page 21

ENGLISHESPAÑOLFRANÇAIS
19
TROUBLESHOOTING
PROBLEM SOLUTION
The icon appears on screen
The feature or action cannot
be completed at this time because:
1. The disc’s software restricts
or doesn’t support the feature (e.g., angles)
2. The feature is not available at
the moment.
3. You’ve requested a chapter,
track, or title number which
does not exist.
Picture is distorted The disc might be damaged.
Try another disc; it is normal
for some distortion to appear
during for- ward or reverse
scan.
No forward or reverse scan Some discs have sections that
prohibit rapid scanning or
chapter skip; The unit cannot
skip through the warning information and copyright notices at
the beginning of the DVD.
TECHNICAL SUPPORT
Before calling technical support, please see the troubleshooting guide below.
You may also visit our website at www.impecca.com for answers to Frequently
Asked Questions and to contact us.
Email: support@impecca.com
Phone: +1 866–954–4440
Web: www.impecca.com
 Loading...