

Page 1
DVD Player — User’s Guide
Reproductor DVD — Manual De Usuario
Lecteur DVD — Manuel de l’utilisateur
Model:
DVHP-9117
www.impecca.com
V 1.3
Page 2
ENGLISH
TABLE OF CONTENTS
Important Safety Instructions ................................................................................................. 3
Introduction ............................................................................................................................... 4
ESPAÑOL
What’s In the Box ....................................................................................................................... 4
Unit Diagram: ............................................................................................................................. 5
Remote Controller ..................................................................................................................... 6
FRANÇAIS
Connections ............................................................................................................................... 7
Basic DVD Player Operation .................................................................................................... 8
Additional Features Explained: ............................................................................................... 9
Settings ......................................................................................................................................10
Troubleshooting ...................................................................................................................... 13
Technical Specifications ........................................................................................................ 14
Customer Support ...................................................................................................................14
One Year Limited Warranty (Us) ............................................................................................ 15
SPANISH .................................................................................................................................... 16
FRENCH ..................................................................................................................................... 30
This DVD video player employs a Class 1 Laser Product. To ensure proper use of this product, please read this
owner’s manual carefully and retain for future reference. As the laser beam used in this DVD video player is harmful to the eyes, do not attempt to disassemble the casing.
Modification or adjustments or performance of procedures other than those specified herein may result in
hazardous radiation exposure. Should this unit require maintenance, refer servicing to authorized and qualified
personnel only.
Canada Notice This Class B digital apparatus complies with Canadian ICES-003.
To prevent electric shocks, never attempt to disassemble the casing, do not expose to water, and be sure to
match wide-blade plug with wide slot and fully insert into a power outlet. This product should be operated only
from the type of power source indicated on the marking label. The IMPECCA™ Compact Home DVD Player is
designed to use 120V – 60Hz only. If you are not sure of the type of power supplied to your home, consult your
product dealer or local power company.
ii
Page 3

IMPORTANT SAFETY INSTRUCTIONS
PLEASE SAVE THESE INSTRUCTIONS. YOU MAY NEED THEM IN THE FUTURE.
Here are some basic safety precautions that you should carefully follow as you use your
new Impecca DVD Player. Read all instructions carefully! Impecca is not responsible for
damage or injuries caused by improper use of the appliance.
ENGLISH
1. READ ALL INSTRUCTIONS
2. Remove any packaging material before using this appliance.
3. Moisture - Do not expose this apparatus water or moisture. To prevent fire or shock hazard, do not place
objects filled with liquids, such as vases, on the DVD player. If liquid enters the unit, unplug the device immediately. Be sure to install the player in an area where access to the AC power cord is available so that the
unit may be unplugged from the wall socket immediately in the event of trouble or if liquid is spilled onto
the unit.
NOTE: If the player is brought directly from a cold to a warm location, or is placed in a very damp room,
moisture may condense on the lenses inside the player and the player may not operate properly. In this
case, remove the disc and leave the player turned on for about half an hour until the moisture evaporates.
4. Heat - The DVD player should be situated away from heat sources such as radiators, heat registers, stoves,
or other products (including amplifiers) that produce heat.
5. Proper ventilation - Do not install this player in a confined space, such as a bookshelf or similar unit un-
less proper ventilation is provided. Slots and openings in the DVD player casing are provided for ventilation
to ensure reliable operation of the product and to protect it from overheating. These openings must not be
blocked or covered. The openings should never be blocked by placing the product on a bed, sofa, rug, or
other similar surface as ventilation will be inhibited and overheating will occur.
6. Overloading - Do not overload wall outlets, extension cords, or integral convenience receptacles, as this
can result in a risk of fire or electric shock.
7. Cleaning - Unplug this product from the wall outlet before cleaning. If dusting or cleaning is required, be
sure to clean the outer portion of the casing only. Do not attempt to clean the inside or to dissemble the
casing. Do not use liquid cleaners or aerosol cleaners. Use a damp cloth for cleaning AND be sure to allow
the unit to dry completely before plugging the unit to a power source.
8. To protect against electric shock do not immerse cord, plugs or appliance in water or any other liquid.
9. Close supervision is necessary when your appliance is being used by or near children.
10. Keep the appliance and its cord out of reach of children aged less than 8 years.
11. If the supplied power cord is damaged, it must be replaced by the manufacturer, its service agent or similarly qualified persons in order to avoid a hazard.
12. Do not operate any appliance with a damaged cord or plug or aer the appliance malfunctions, or is
dropped or damaged in any manner. Return appliance to the nearest authorized service facility for examination, repair or electrical or mechanical adjustment.
13. Any use of this product which is not recommended by manufacturer may cause injury to persons or damage to appliance.
14. Place appliance on flat surface or table. Do not hang its power cord over the edge of table or counter. Ensure that the power cord does not touch hot surface of appliance.
15. If the unit requires servicing, refer servicing to qualified service personnel. If the unit is still under warranty,
contact IMPECCA™ or our service center. See terms and conditions specified under the warranty included
with this product.
16. Do not use appliance for other than intended use.
17. Do not use outdoors.
ESPAÑOL
FRANÇAIS
FOR HOUSEHOLD USE ONLY
SAVE THESE INSTRUCTIONS
3
Page 4

ENGLISH
INTRODUCTION
Congratulations on your purchase of the IMPECCA™ Home DVD Player. The Home DVD player from IMPECCA™ is
a great way to enjoy your DVDs without the clutter of a full size player. Its compact design provides easy access
to all your favorite media, and the fast search backwards/forwards will guarantee that you never miss a minute.
Watch from a distance using the remote control, or use the zoom in feature to get a closer look. The IMPECCA™
ESPAÑOL
Home DVD player is a great way to ensure quality entertainment within minutes.
Before using your player, it is recommended that you familiarize yourself with the features, functions, and operating procedures described in this manual. Due to slight modifications in production, the instructions, features,
and/or descriptions found in this manual might be slightly dierent from your product. Design and specification
subject to change without notice.
FRANÇAIS
FEATURES AT A GLANCE
Zoom-in Function
Multi Language Display Menu (English, French, Spanish)
Parental Lock
Fast Search Forward/Backward
Screen Saving Protection
Multi Language Subtitles
LED Amber Display
USB 2.0
MEDIA FORMATS SUPPORTED
DVD Video
DVD+R
DVD+RW
Audio CD
CD-R
CD-RW
HDCD
VCD
SVCD
Kodak Picture CD
JPEG
WMA
MP3
MPEG1-2-4
WHAT’S IN THE BOX
Please verify your box for the following items. Note that some models may not include all items.
1 2
1. DVD Player
2. User’s Guide
3. Remote Controller
4. A/V Cables (Not shown)
3
4
Page 5
UNIT DIAGRAM:
1 2 3
4 5 6
7
8
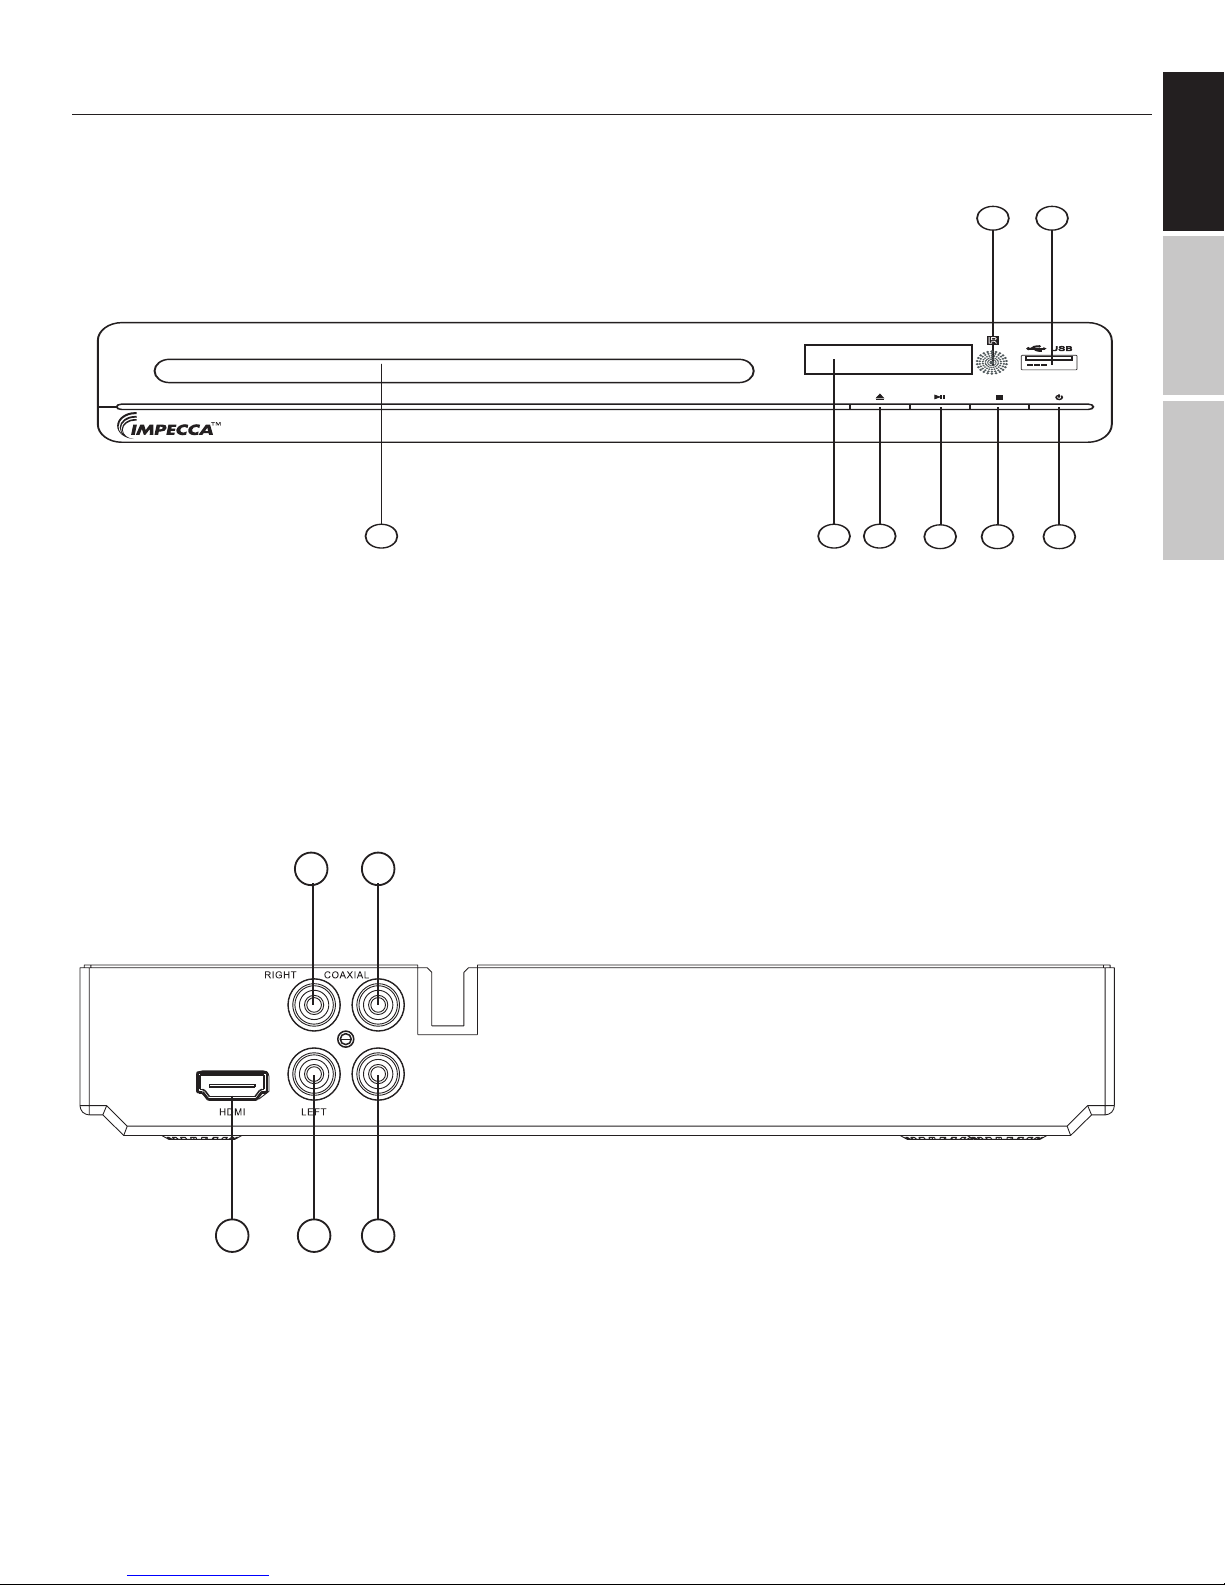
FRONT PANEL
ENGLISH
ESPAÑOL
FRANÇAIS
1. DVD Door
2. Display Window
3. Open/Close Button
4. Play/Pause Button
REAR PANEL
5. Stop Button
6. Standby Button
7. Remote Receiver Window
8. USB Jack
4 5
VIDEO
1 2 3
1. HDMI AV Output Jack
2. Audio Le Output Jack
3. Video Output Jack
4. Audio Right Output Jack
5. Coaxial Digital Output Jack
5
Page 6
ENGLISH
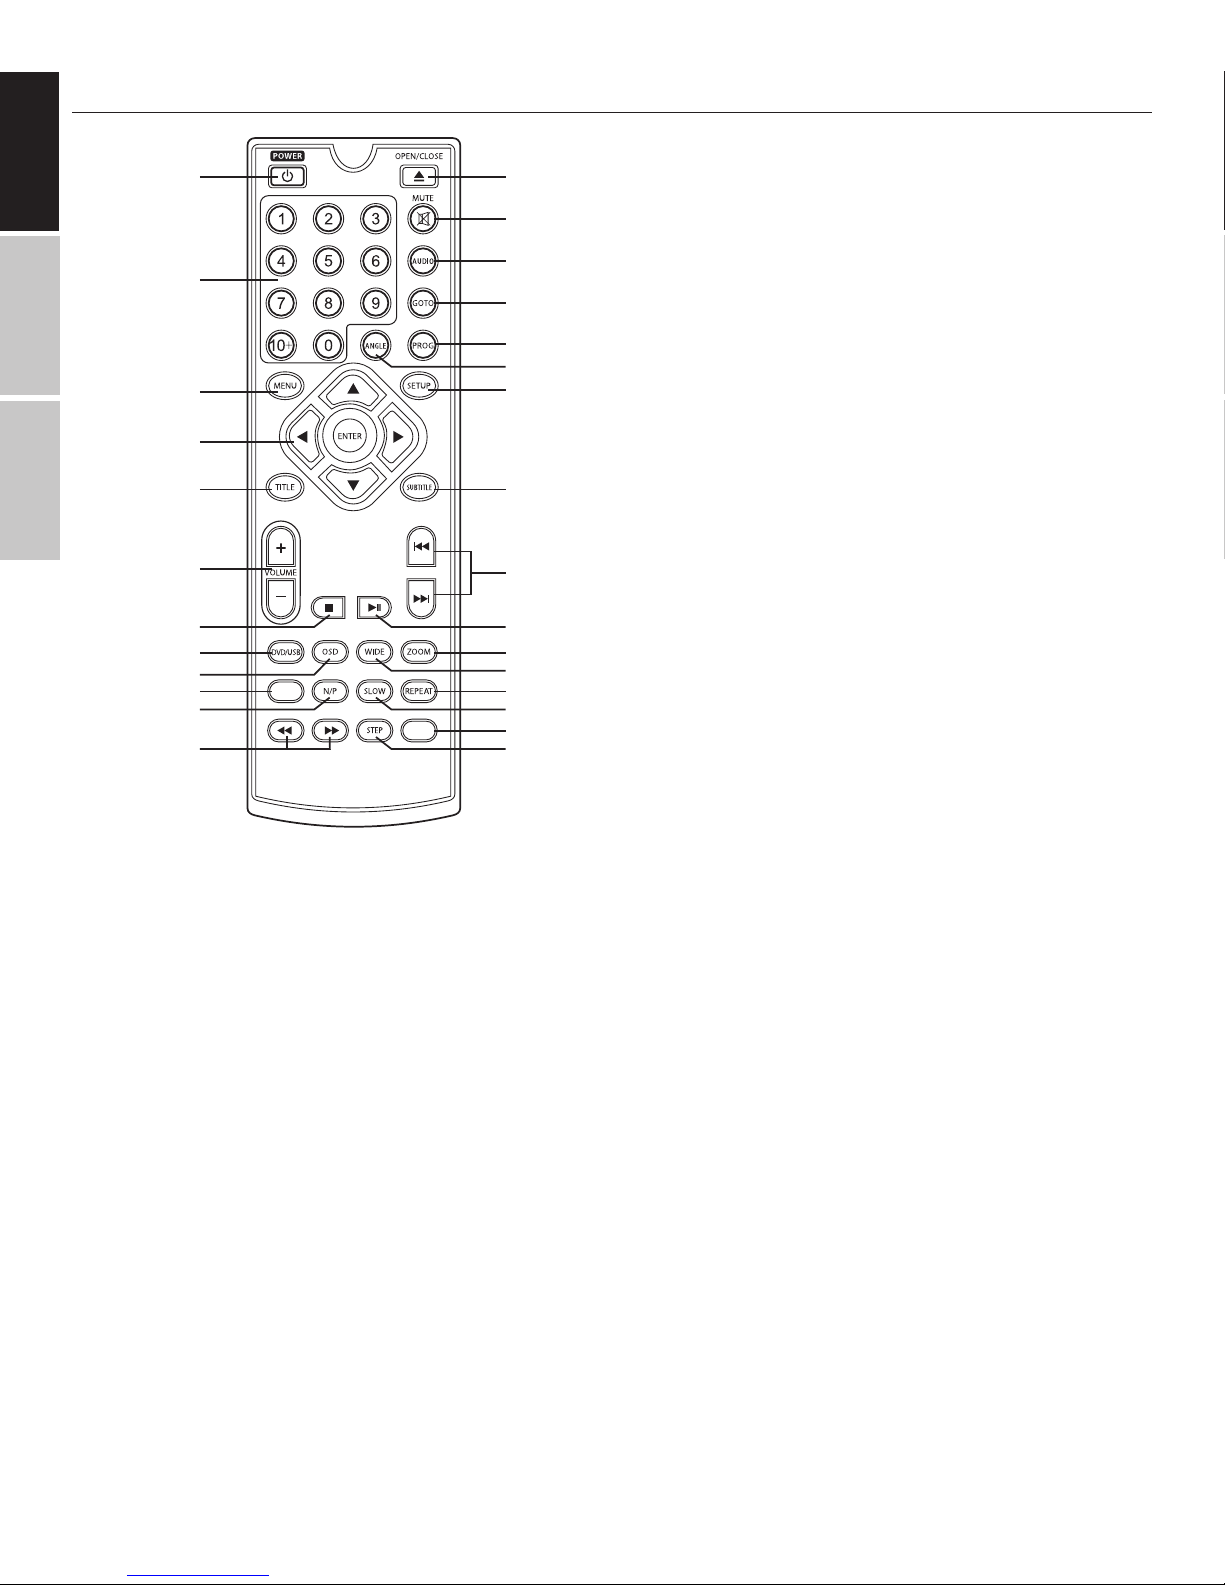
REMOTE CONTROLLER
ESPAÑOL
Number Keypad
FRANÇAIS
Arrows/Enter
Power Open/Close
Mute
Audio
Goto
Prog
Angle
Menu
Title
Volume
Stop
DVD/USB
OSD
L/R
N/P
Search
L/R
A-B
Setup
Subtitle
Skip
Play/Pause
Zoom
Wide
Repeat
Slow
A-B
Step
POWER - Press to turn the power On/O or
restore the DVD player to standby mode.
OPEN/CLOSE - Press to open and close the disc
drawer.
MUTE - Press to mute or unmute the volume.
NUMBER KEYS - Input numbers when in
Program mode.
AUDIO - Press to change the audio settings.
GOTO - Go to a specific title, chapter, or play time/
point on a DVD.
PROGRAM- Press to program a DVD to play
chapters or tracks in a specified order.
ANGLE - Press to access dierent camera
angles on supported DVDs.
MENU - Open the main menu.
SETUP - Press to access or exit the setup menu.
ARROWS UP/RIGHT/LEFT/DOWN - Press directional
buttons to navigate through menu screens.
ENTER - Press to confirm selections within on-
screen menus or the setup menu.
TITLE - Press to access the title menu of a
loaded DVD.
SUBTITLE - Press to turn available subtitles on
or o.
VOL + : Press to INCREASE the volume.
VOL - : Press to DECREASE the volume.
SKIP PREV -
Press to return to the previous title, chapter, or track.
SKIP NEXT - Press to skip to the next title, chapter, or track.
STOP - Press to stop a DVD or CD during play.
PLAY/PAUSE - Press to play or pause a loaded disc .
DVD/USB - To select between DVD and USB.
OSD - Press to view the various On Screen Display modes.
WIDE - Press to switch between dierent aspect ratio settings.
INSTALLATION OF BATTERIES
1. Press and li the back cover up to open
the battery compartment of the remote
control.
2. Insert two AAA size batteries. Make sure
that the polarities of the batteries ( + )
and ( - ) match those of the battery
compartment.
3. Close the battery compartment cover.
ZOOM - Press to zoom in or out of a picture on the screen.
L/R - Press to switch between the Le and Right audio channels.
N/P - Press to select between NTSC and PAL output signal.
SLOW - Press to view the loaded DVD in slow motion.
REPEAT - Press to enable repeat play of track or tracks.
SEARCH REV - Press to scan backward. Press again to increase scan speed ( 2x, 4x, 8x, 16x, 32x).
SEARCH FWD - Press to scan forward. Press again to increase scan speed ( 2x, 4x, 8x, 16x, 32x).
STEP - Press to advance one frame at a time.
6
Page 7
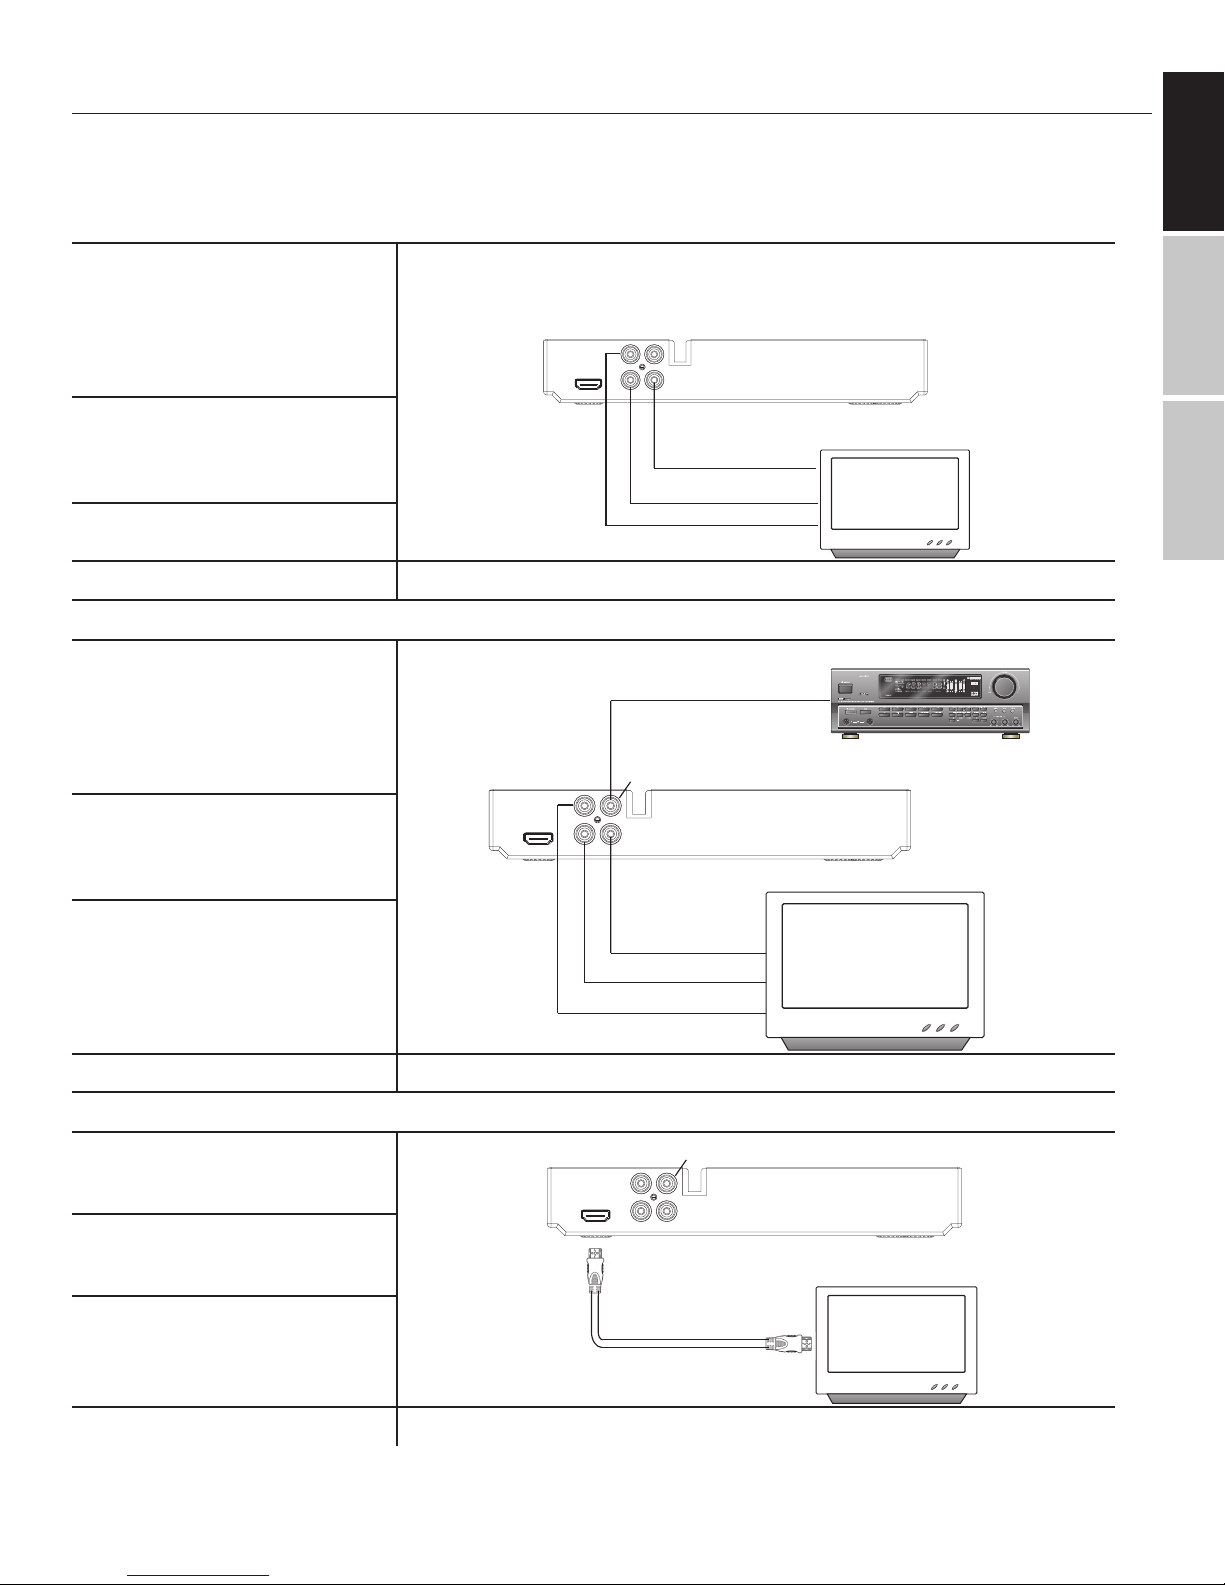
CONNECTIONS
When connecting this unit to other components, be sure that all devices are turned o. Audio/Video cables are
connected according to dierent color identification and should be fitted firmly into the appropriate jacks.
CONNECTING TO A TV USING THE STANDARD AUDIO/VIDEO CABLE
HDMI
RIGHT
LEFT
DVD PLAYER
COAXIAL
RIGHT
VIDEO
LEFT
COAXIAL CABLE
COAXIAL
VIDEO
VIDEO IN
TV
AUDIO IN LEFT
AUDIO IN RIGHT
AMPLIFI ER
TV
1. Connect the supplied RCA
Audio/Video cable using the
red(right) and white(left) cables
to the Audio jacks on the rear of
the DVD player and to the Audio
Inputs on your TV.
2. Connect the video cable
(yellow) to the Video jack on the
rear of the player to the Video
Input on your TV.
3. Set your TV to its appropriate
Video input
CONNECTING TO AN AMPLIFIER USING COAXIAL DIGITAL AUDIO OUTPUT
1. Connect the supplied RCA
Audio/Video cable using the red
and white cables to the Audio
jacks on the rear of the DVD
player and to the Audio Inputs
on your TV.
2. Connect the video cable
(yellow) to the Video jack on the
rear of the player to the Video
Input on your TV.
DVD PLAYER
HDMI
ENGLISH
ESPAÑOL
FRANÇAIS
3. Connect a digital coaxial cable (not included) to the coaxial
cable jack on the rear of the
DVD player and to the coaxial
digital audio input on your digi-
VIDEO IN
AUDIO IN LEFT
AUDIO IN RIGHT
tal receiver or amplifier.
CONNECTING TO TV THROUGH HDMI OUTPUT (HDMI CABLE NOT INCLUDED)
1. Connect an HDMI cable to the
HDMI jack located on the rear of
the DVD player.
2. Connect an HDMI cable to the
HDMI Input jack on your television.
DVD PLAYER
RIGHT
HDMI
LEFT
COAXIAL
VIDEO
TV
HDMI CABLE
7
Page 8

ENGLISH
BASIC DVD PLAYER OPERATION
BEFORE YOU BEGIN
Turn on your TV. Select the appropriate video input settings to correspond to the input used when connecting to
the DVD player. Refer to the “Connections” section of this manual.
ESPAÑOL
If you have connected the player to an audio system (stereo or amplifier) turn on your audio system and select
the appropriate audio input settings to correspond to the input used when connecting to the DVD player.
Note: As TV and/or audio systems vary, please refer to your TV or Audio system user’s manual.
PLAY
FRANÇAIS
1. Press the POWER button on the DVD player or press the Power/Standby button on the DVD remote control.
2. Press OPEN/CLOSE button (on the DVD player or remote control) to open the disc tray.
3. Hold the edge of the disc and place it in the tray with the label side up.
4. Press OPEN/CLOSE button (on the DVD player or remote control) again to close the disc tray.
The DVD player starts playback or opens the DVD disc menu automatically. Use the directional buttons and the
ENTER button to navigate the DVD’s menu screen. If the DVD does not automatically begin playing, press PLAY
(on the DVD player or remote control).
Note: The auto-load sequence of each DVD, CD, VCD disc may vary according to format and/or the way the disc
was authored. Some DVDs will auto-play a series of previews, copyright notices, or advertisements before loading the Menu screen. Certain buttons on the remote control, such as the MENU, TITLE, F.RWD, F.FWD, PREV, NEXT,
and GOTO buttons, may be automatically disabled until the auto-load sequence is completed.
PAUSE
To pause, press the PLAY/PAUSE button once during playback. To resume, press the PLAY/PAUSE button again.
FORWARD/REVERSE SCAN
Press REV or FWD during playback.
To increase the Fast Forward or Rewind speed, press the REV or FWD button again to choose the desired speed
(Normal, x2, x4, x8, x16, x32)
SKIP NEXT/PREVIOUS
You can skip to a specific chapter or track during playback.
Skipping Ahead - Press NEXT during playback.
You will advance to the next chapter/track each time you press the NEXT button.
Skipping Back - Press PREV during playback.
If you press the PREV button midway through a chapter, the DVD player returns to the beginning
of the chapter. The player then skips a chapter each time you press the PREV button.
STOP
This DVD player has a “Last Played” memory feature. When you press stop, it will retain the position so that you
can resume play from this point, even aer turning the DVD player o.
Press STOP once to stop and hold playback at the current position. Pressing Play will resume play from
the current position.
Press STOP twice to completely stop and reset the disc to the beginning. The “Last Played” feature will
not be activated.
8
Page 9

ADDITIONAL FEATURES EXPLAINED:
USING USB MEMORY STICKS/THUMB DRIVES
1. Turn o the DVD player.
2. Insert the USB Memory Stick (with AVI, MP4, or JPEG files) to the USB Port on the front of the DVD Player.
3. Turn on the DVD Player. Press and hold the DVD/USB button on the remote control.
4. The Folder/Files list will appear on the screen.
5. Use the directional buttons to select and highlight the desired folder or file. Press the ENTER button to con-
firm and begin playback.
JPEG (PICTURE) MP3 DISCS OPERATIONS:
ENGLISH
ESPAÑOL
1. Turn on the player and place the disc or USB Memory stick into the DVD player as indicated on previous pro-
cedures. The Folder/Files list will appear on the screen.
2. Use the directional buttons to select and highlight the desired folder. Press the ENTER button. The file list will
appear on the screen.
3. Using the directional buttons to select and highlight the desired file. Press the ENTER button to begin play-
back.
REPEAT FEATURE
During playback, press the REPEAT button repeatedly to select:
Repeat Single: Play the current track repeatedly
Repeat Folder: Play the tracks in the current folder repeatedly
O: Resume normal playback
FRANÇAIS
9
Page 10
ENGLISH
Go To General Setup Page
Go To Audio Setup Page
Speaker Setup
Spdif Setup
Audio Setup Page
Preferences
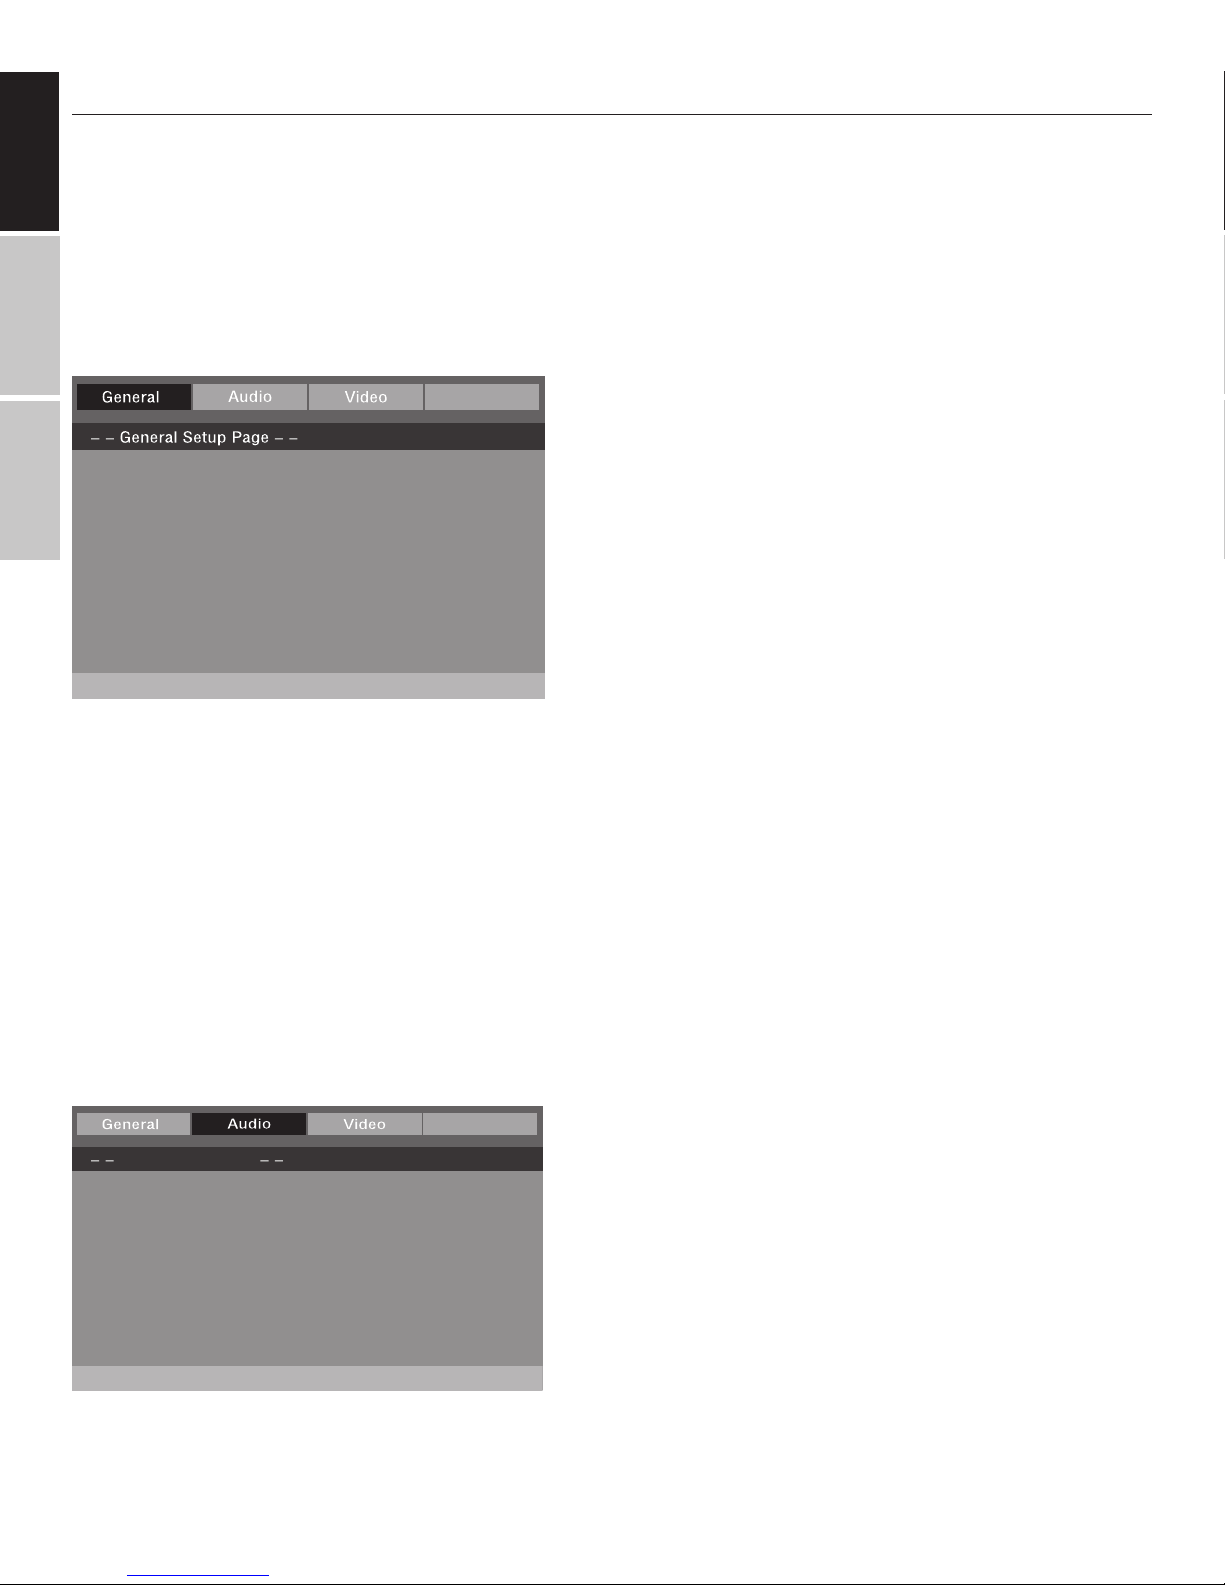
SETTINGS
1. Press the SETUP button. The setting menu will appear on the screen.
2. Use the directional buttons to select and highlight the function you need to configure. Press the directional
button. Press the ENTER button to confirm the selection.
ESPAÑOL
3. Press the SETUP button to save the settings and exit.
GENERAL SETUP PAGE
This page allows you to configure the TV Screen format, Angle Mark, OSD, Captions, Screen Saver, HDCD, and
Last Memory settings.
FRANÇAIS
Preferences
TV Display
If TV Display is selected, press the directional button to
enter. Press the directional buttons to select 4:3 or 16:9 to
TV Display
Angle Mark
OSD Lang
Captions
Screen Saver
HDCD
Last Memory
16:9
On
Eng
Off
On
1X
Off
match the aspect ratio of your TV and then press the Enter
button to confirm your selection. Press the SETUP button to
save the setting and exit.
Angle Mark
You can enable or disable the ability to select dierent
camera angles when viewing DVDs that oer this feature.
OSD Lang (Onscreen display language)
You can select your desired OSD language from this menu.
Captions
You can use this feature to display recorded explanatory captions.
Screen Saver
When the unit is in Stop mode for several moments, a screen saver will display if this feature is enabled.
HDCD
You can use this feature to enable playback of High Definition compatible digital CDs.
Last Memory
This feature will enable the DVD player to resume playback from the last point played before the player
was turned o.
AUDIO SETUP PAGE
This page allows you to configure the Audio settings.
setting aects the output of the Digital Coax Audio output,
or the Digital Optical Audio output depending on the model
of television. The two settings are PCM and Raw.
Speaker Setup
Select Speaker Setup to access the Downmix settings
screen.
Downmix
This sets the audio down-mix mode to convert
multi-channel audio into two channel output. This setting
only aects the Mixed L/R analogue audio outputs.
Spdif Setup
The Digital Audio/SPDIF setting controls the way your
television outputs through its digital audio output port. This
10
Page 11

VIDEO SETUP PAGE
Go To Video Setup Page
Video Setup Page
Resolution
Quality
HDMI Setup
Preferences
Go To Preferences Page
Preferences Page
NTSC
ENG
ENG
ENG
TV Type
Audio
Subtitle
Disc Menu
Parental
Password
Default
Preferences
This page allows you to configure the Video output settings.
Resolution
Use this feature to adjust the resolution.
Quality
Use this feature to adjust the Sharpness, Brightness and
Contrast.
HDMI Setup
Use this feature to turn the HDMI On/O.
PREFERENCE SETUP PAGE
This page allows you to configure additional preferences. The Preference Setup Page is only available when there
is no disc inserted in the DVD Player. If a setting is modified, it will only be changed once the DVD Player has been
turned o and on again.
TV Type
This DVD player supports Multi (AUTO), NTSC, and PAL
systems. If you select an output type that is not
supported by your TV, the screen will flicker with a black
and white display. Press the SETUP button and use the
arrow buttons to select the correct TV type from this list.
ENGLISH
ESPAÑOL
FRANÇAIS
Audio
Use this feature to select the preferred default language
when watching DVDs.
Subtitle
Use this feature to set the preferred subtitle language as the
default.
Disc Menu
Use this feature to set the preferred menu language as the default.
Parental Control
The parental control function works in conjunction with the dierent censorship classes assigned to
DVDs.
Rating levels:
1. Kid Safe
2. G: All ages
3. PG: Parental Guidance
4. PG-13: Parental Guidance recommended for children below the age of 13
5. PG-R : Parental Guidance suggested for children below the age of 17
6. R: Parental guidance strongly recommended for children below the age of 17
7. NC17 : Not suitable for children below the age of 17
8. Adult: Adult only
11
Page 12

Password
Change Password
Preferences Page
NTSC
ENG
ENG
ENG
TV Type
Audio
Subtitle
Disc Menu
Parental
Password
Default
Change
Preferences
ENGLISH
Use this feature to setup and change a password to manage rate levels or to prevent others from
changing the settings.
From the Preference Page, choose Password and then
ESPAÑOL
select Change.
FRANÇAIS
You will need to enter the old, or current, password and
then enter a combination of numbers in the New Password
field. You will need to retype this combination in the
Old Password
New Password
Confirm PWD
Confirm PWD field. Be sure to make a note of the new
password.
OK
Note: The default password is 8888
Default
Use this feature to reset customized defaults to the original settings for the unit (except password).
12
Page 13

TROUBLESHOOTING
Problem What to Check
The power light does not
• Plug the power cord into a wall outlet.
ENGLISH
come on
No Picture
No Sound
Distorted Picture
Flickering or unstable
brightness
• Try a dierent wall outlet
• Select the appropriate video input format on your TV in
order to receive the player's output signals.
• Fully insert the plugs on the video cable into the corresponding jacks.
• Fully insert the plugs on the audio cable into the corresponding jacks.
• Turn on the stereo/amplifier system (if applicable).
• Select the correct output in the setup menu.
• Remove and clean the disc
• Some distortion may occur during the FORWARD and
REWIND operations. This is normal.
• Connect the player directly to your TV
NOTE: Disruptions can be caused by copy protection
systems on a DVD or CD
• Be sure that a disc is loaded.
ESPAÑOL
FRANÇAIS
The DVD player does not
operate
No response when buttons
are pressed
The remote controller does
not work
The icon appears on
screen
• Be sure that the disc is compatible (check the disc’s format and color signal coding standard).
• Check that the disc is correctly loaded.
• Clean the disc.
• Be sure that the DVD player settings are correct.
• Switch off the DVD player, unplug the power cord, and
then plug in the power cord and switch it on again.
• Point the remote controller at the sensor.
• Check that the remote control is no more than 20 feet
from the sensor.
• Replace the batteries with new batteries.
• The DVD’s software restricts the current operation.
• The DVD’s software doesn’t support the feature
(eg. Angles).
• The feature is not available at the moment.
13
Page 14

ENGLISH
TECHNICAL SPECIFICATIONS
POWER SOURCE AC 100-240V ~ 50-60 Hz
POWER CONSUMPTION 11W
REMOTE CONTROL DC 3V, 2x AAA batteries
ESPAÑOL
VIDEO SIGNAL SYSTEM AUTO/NTSC/PAL
FREQUENCY RESPONSE ± 1dB(20Hz ~20KHz)
SIGNAL NOISE RATIO ≥ 90dB
AUDIO DISTORTION ≤ 1%
CHANNEL SEPARATION ≥ 80dB (1KHz)
FRANÇAIS
DYNAMIC RANGE ≥ 80dB (1KHz)
OUTPUT Audio Out OUTPUT LEVEL: 2 ± 0.1V
(Analog Audio) LOAD IMPEDANCE: 10K Ω
Audio Out OUTPUT LEVEL: 0.5Vp-p
(Digital Signal) LOAD IMPEDANCE: 75 Ω
Video Out OUTPUT LEVEL: 1Vp-p
LOAD IMPEDANCE: 75 Ω, imbalance, negative polarity
LASER BANDWIDTH WAVELENGTH 645 - 660 nm
LASER POWER Class 1
SUPPORTED DISCS DVD/VCD/CD/MP3/Photo CD/SVCD/JPEG/MPEG-4
CUSTOMER SUPPORT
Before contacting customer support, please see the troubleshooting guide above.
Visit our website to contact us, find answers to Frequently Asked Questions, and for other
resources which may include an updated version of this user's guide.
WWW.IMPECCA.COM
If you wish to contact us by phone, please be sure to have your model number and serial
number ready and call us between 9:00am and 6:00pm ET, at +1 866-954-4440.
Keep tabs on Impecca's newest innovations & enter contests via our social network feeds:
www.facebook.com/Impecca/
www.instagram.com/impecca/
© 2016 Impecca, a division of LT Inc., Wilkes Barre, PA.
@impeccausa
14
Page 15

ONE YEAR LIMITED WARRANTY (US)
Impecca™ warrants this product against defects in material
and workmanship to the original purchaser as specified
below. Please register your product online within fourteen
(14) days of purchase.
PARTS – if the product is determined to have a
manufacturing defect, within a period of one (1) year
from the date of the original purchase, Impecca™ will
repair or replace the product parts at no charge (for
parts) to consumers in the U.S.A. and Canada.
LABOR – if the product is determined to have a
manufacturing defect, within a period of ninety (90)
Days from the date of the original purchase,Impecca™ will repair or replace the product at no charge to
consumers in the U.S.A. and Canada. Aer ninety (90)
days, it will be the responsibility of the consumer.
Shipping costs to and from our warranty service center are
the sole responsibility of the consumer.
To obtain warranty service by an authorized Impecca™ service center, please email us at: service@impecca.com to obtain a Repair and Maintenance Authorization (RMA) number
and to locate the Warranty Service Center nearest you. Once
authorized, you must mail the product to the authorized
Impecca™ service center in its original product packaging
materials or equivalent, to prevent damage while in transit.
in its entirety.
In addition, this warranty does not apply if the product has
been damaged by accident, abuse, misuse, or misapplication; has been altered or modified without the written
permission of Impecca™; has been serviced by a non-authorized repair center of Impecca™; has not been properly
maintained or operated according to the operation manual;
has been used for commercial, non-household purposes;
has been cosmetically damaged; was not imported by
Impecca™; was not manufactured according to specification
of the United States market; was damaged due to improper
installation or neglect by the consumer; was damaged due
to improper packaging in shipment to the Warranty Service
Center; was damaged due to natural disasters; or if the serial
number for the product has been removed or defaced.
ALL IMPLIED WARRANTIES, INCLUDING IMPLIED WARRANTIES OF MERCHANTABILITY AND FITNESS FOR A PARTICULAR
PURPOSE ARE LIMITED IN DURATION TO ONE (1) YEAR PARTS
AND NINETY (90) DAYS LABOR FROM THE DATE OF THE ORIGINAL RETAIL PURCHASE OF THIS PRODUCT.
THESE WARRANTIES AND REMEDIES ARE THE SOLE AND
EXCLUSIVE WARRANTIES AND REMEDIES IN CONNECTION
WITH THE SALE AND USE OF THE PRODUCT. NO OTHER
WARRANTIES, ORAL OR WRITTEN, EXPRESSED OR IMPLIED,
ARE GIVEN.
ENGLISH
ESPAÑOL
FRANÇAIS
Further, should Impecca™ determine that the product is outside of the Warranty terms, Impecca™ will return the product
to sender at sender’s expense without being repaired or
replaced, unless authorized by the consumer to service the
out-of-warranty product at consumer’s expense. All handling
or restocking charges for returns and/or replacements shall
be non-refundable.
Impecca™ specifically excludes from this warranty any
non-electric/mechanical attachments, accessories, and
disposable parts including, but not limited to, outside case,
connecting cables, batteries, and AC adapters. Impecca™
reserves the right to repair or replace defective products with
the same, equivalent, or newer models.
We reserve the right to either repair or replace product at
our discretion. Replacement may be either new or refurbished and while every endeavor will be made to ensure it
is the same model, if same model is not available, it will be
replaced with a model of equal or higher specification.
Normal “Wear and Tear” is not covered by this, or any other,
warranty. Further, Impecca™ hereby reserves the right to determine “Wear and Tear” on any and all products. Tampering
or opening the product casing or shell will void this warranty
IMPECCA™ IS NOT RESPONSIBLE OR LIABLE FOR ANY DAMAGE, WHETHER SPECIAL, INCIDENTAL, CONSEQUENTIAL,
DIRECT OR OTHERWISE, OR WHETHER KNOWN OR SHOULD
HAVE BEEN KNOWN TO IMPECCA™, INCLUDING LOST PROFITS, GOODWILL, AND PROPERTY AND PERSONAL INJURY
RESULTING FROM ANY BREACH OF WARRANTY, THE INABILITY TO USE THE PRODUCT OR UNDER ANY LEGAL THEORY IN
CONTRACT OR TORT. IMPECCA LIABILITY IS LIMITED TO THE
ACTUAL PURCHASE PRICE PAID TO THE RETAIL SELLER OF
THE DEFECTIVE PRODUCT.
No Impecca™ dealer, agent, or employee is authorized to
make any modification, extension, change or amendment to
this warranty without the written consent and authorization
from Impecca™.
Some states do not allow the exclusion or limitation of
implied warranties or liability for incidental or consequential damages, or do not allow a limitation on how long an
implied warranty lasts, so the above limitations or exclusions
may not apply to you. This warranty gives you specific legal
rights, and you may have other rights, which vary from state
to state.
Note: Our Warranty Service Center ships only within Continental U.S.A., excluding Alaska and Hawaii.
15
Page 16

ENGLISH
PRECAUCIÓN
RIESGO DE DESCARGA ELÉCTRICA
NO ABRIR
TABLA DE CONTENIDO
Instrucciones Importantes De Seguridad ................................................................................ 17
Introducción ................................................................................................................................... 18
ESPAÑOL
Qué Hay En La Caja ....................................................................................................................... 18
Diagrama De La Unidad ............................................................................................................... 19
Control Remoto.............................................................................................................................. 20
FRANÇAIS
Conexiones ..................................................................................................................................... 21
Operación Básica Del Reproductor DVD .................................................................................. 22
Explicación De Funciones Adicionales ..................................................................................... 23
Configuración ................................................................................................................................. 24
Solución De Problemas ............................................................................................................... 27
Especificaciones Técnicas ........................................................................................................... 28
Soporte Al Cliente .......................................................................................................................... 28
Garantía Limitada Por Un Año .................................................................................................... 29
Este reproductor de video DVD emplea Productos Láser Clase 1. Para asegurar el uso adecuado de este producto, por favor lea cuidadosamente este manual de usuario y consérvelo para referencia futura. Ya que el rayo láser
usado en este reproductor DVD es dañino para los ojos, no intente desarmar la carcasa.
Las modificaciones o ajustes o la realización de procedimientos diferentes a los aquí especificados pueden resultar en exposición dañina a la radiación. Si esta unidad requiere de mantenimiento, envíe a servicio únicamente
con personal autorizado y calificado.
Aviso para Canadá: Este aparato digital Clase B cumple con la norma canadiense ICES-003.
Para evitar descargas eléctricas, nunca intente desarmar la carcasa, no se exponga al agua y asegúrese de que
la clavija con una pata más ancha coincida con un tomacorrientes con un orificio más ancho. Este producto
debe ser operado únicamente en el tipo de suministro de energía indicado en la etiqueta de especificaciones.
El Reproductor DVD para Casa IMPECCA™ está diseñado para usarse únicamente con 120V – 60Hz. Si no está
seguro del tipo de energía suministrada en su casa, consulte a su distribuidor o a la compañía local de suministro
energía.
16
Page 17

INSTRUCCIONES IMPORTANTES DE SEGURIDAD
CONSERVE ESTAS INSTRUCCIONES, PUEDE LLEGAR A NECESITARLAS EN EL FUTURO.
Estas son algunas precauciones básicas de seguridad que debe seguir cuidadosamente conforme utilice su nuevo Reproductor DVD Impecca™. ¡Lea todas las instrucciones cuidadosamente! Impecca™ no es responsable de
daños o lesiones causadas por un uso inadecuado del producto.
1. LEA TODAS LAS INSTRUCCIONES
2. Retire todo el material de empaque antes de utilizar este electrodoméstico
3. Humedad – No exponga este aparato al agua o humedad. Para evitar el peligro de incendio o descarga, no
coloque objetos que contengan líquidos, como floreros, encima del reproductor DVD. Si entra líquido en
la unidad, desconecte de inmediato. Asegúrese de instalar el reproductor en un área donde haya acceso al
cable de suministro de energía AC de modo que pueda ser desconectado del tomacorrientes de inmediato
en el caso de problemas o si se llegara a derramar líquido en la unidad.
NOTA: Si el reproductor es traído directamente de una ubicación fría a una cálida, o se coloca en un cuarto
húmedo, se puede producir condensación en las lentes dentro del reproductor y este no operará adecuadamente. En este caso, retire el disco y deje el reproductor encendido d 30 minutos a una hora hasta que la
humedad se evapore.
4. Calor- El reproductor DVD debe estar colocado lejos de fuentes de calor como radiadores, registros de calor,
estufas y otros productos (incluyendo amplificadores) que produzcan calor.
5. Ventilación adecuada - No instale este reproductor en espacios confinados como un librero o unidad
similar, a menos que haya ventilación adecuada. Las ranuras y aberturas en la carcasa de reproductor DVD
existe por motivos de ventilación para asegurar una operación confiable del producto o para protegerlos del
sobrecalentamiento. Estas aberturas no deben ser bloqueadas o cubiertas. Las aberturas nunca deben ser
bloqueadas al colocar el producto sobre una cama, sofá, alfombra u otra superficie similar ya que inhibirá la
ventilación y el aparato se sobrecalentará.
6. Sobrecarga - No sobrecargue los tomacorrientes, cables de extensión o receptáculos integrales, ya que esto
puede generar el riesgo de descarga eléctrica.
7. Limpieza - Antes de limpiar este producto, desconéctelo del tomacorrientes. Si se requiere retirar el polvo o
limpiar, asegúrese de limpiar únicamente la carcasa. No intente limpiar la parte interna o desarmar la carcasa. No utilice limpiadores líquidos o en aerosol. Utilice un paño húmedo Y asegúrese dejar secar completamente la unidad antes de conectarla a una fuente de energía.
8. Para protegerse en contra de descargas eléctricas no sumerja el cable, enchufe o aparato en agua o cualquier otro líquido.
9. Es necesaria la supervisión cercana cuando este aparato es utilizado por o cerca de niños.
10. Mantenga este aparato y su cable lejos del alcance de niños menores de 8 años.
11. Si el cable suministrado se daña, debe ser reemplazado por el fabricante, su agente de servicio o personas
calificadas similares para poder evitar descargas.
12. No opere este electrodoméstico con un cable o clavija dañados o después que el aparato ha funcionado
mal, se ha caído o dañado de alguna forma. Regrese el aparato a las instalaciones de servicio autorizado
más cercano para que sea examinado, reparado o ajustado de forma eléctrica o mecánica.
13. Cualquier uso de este producto que no sea el recomendado por el fabricante puede causar lesiones a personas o producir daños al aparato.
14. Coloque el aparato en una superficie plana o mesa. No deje colgar el cable en la orilla de la mesa o encimera. Asegúrese que el cable no toque la superficie caliente del aparato.
15. Si la unidad necesita servicio, haga que este sea realizado por personal de servicio calificado. Si la unidad
está todavía dentro de garantía, entre en contacto con IMPECCA™ o nuestro centro de servicio.
16. No utilice este electrodoméstico en otro uso que no sea el previsto.
17. No se use en exteriores.
ENGLISH
ESPAÑOL
FRANÇAIS
ÚNICAMENTE PARA USO DOMÉSTICO
CONSERVE ESTAS INSTRUCCIONES
17
Page 18

ENGLISH
INTRODUCCIÓN
Felicitaciones por haber comprado este Reproductor DVD Compacto para Casa IMPECCA™. Este Reproductor
DVD Compacto para Casa IMPECCA™ consiste en una gran forma de disfrutar de sus DVD sin el desorden de un
reproductor de mayor tamaño. Su diseño compacto proporciona un fácil acceso de sus discos favoritos, y su
rápida búsqueda hacia delante y hacia atrás le garantiza que usted no pierda ni un solo minuto. Disfrute la repro-
ESPAÑOL
ducción a distancia usando el control remoto, o usando la función de aumento para poder echar un vistazo más
cercano. El Reproductor DVD Compacto para Casa IMPECCA™ es una gran forma de asegurar entretenimiento de
calidad en unos cuantos minutos.
Antes de utilizar su reproductor, se recomienda que se familiarice con las funciones, características y procedimientos de operación descritos en este manual. Debido a ligeras diferencias en la producción, las instrucciones,
características y/o descripciones descritas en este manual pueden ser ligeramente diferentes a los de su producto. El diseño y especificaciones están sujetos a cambio sin previo aviso.
FRANÇAIS
RÁPIDO VISTAZO A LAS CARACTERÍSTICAS
Función de acercamiento
Bloqueo parental
Búsqueda rápida hacia delante y atrás
Protector de pantalla
Menú multilenguaje (Inglés, Francés, Español)
Subtítulos multilenguaje
Pantalla LED color ámbar
USB 2.0
FORMATOS COMPATIBLES DE MEDIOS
Video DVD
DVD+R
DVD+RW
CD Audio
CD-R
CD-RW
HDCD
VCD
SVCD
Imágenes Kodak en
CD
JPEG
WMA
MP3
MPEG1-2-4
QUÉ HAY EN LA CAJA
Verifique que en la caja se encuentren los siguientes artículos. Tome en cuenta que
algunos modelos pueden no incluir todos los artículos
1 2
1. Reproductor DVD
2. Guía de Usuario
3. Control Remoto
4. Cables A/V (No se
muestran)
3
18
Page 19

DIAGRAMA DE LA UNIDAD
1 2 3
4 5 6
7
8
PANEL FRONTAL
ENGLISH
ESPAÑOL
FRANÇAIS
1. Puerta del DVD
2. Ventana de la pantalla
3. Botón para Abrir/Cerrar
4. Botón para Reproducir/Pausa
PANEL POSTERIOR
4 5
VIDEO
5. Botón para Detener
6. Botón de Espera
7. Ventana del Receptor del Control Remoto
8. Entrada para USB
1 2 3
1. Entrada para la salida HDMI AV
2. Entrada para la salida izquierda de
audio
3. Entrada para salida de video
4. Entrada para salida derecha de audio
5. Entrada para la salida coaxial digital
19
Page 20

ENGLISH
Power Open/Close
Mute
Audio
Number Keypad
Menu
Arrows/Enter
Title
Volume
Stop
L/R
DVD/USB
OSD
N/P
Search
Goto
Prog
Setup
Subtitle
Skip
L/R
Play/Pause
Angle
Zoom
Wide
Repeat
Slow
A-B
A-B
Step
CONTROL REMOTO
POWER – ENCENDIDO – Presione para prender o apagar
o restablecer el reproductor DVD en modo de espera
OPEN/CLOSE – ABRIR CERRAR – Presione para
ESPAÑOL
FRANÇAIS
SUBTITLE – SUBTÍTULO – Presione para habilitar o deshabilitar subtítulos
VOL +: Presione para AUMENTAR el volumen
VOL -: Presione para DISMINUIR el volumen
SKIP PREV – SALTAR PREV:- Presione para regresar al capítulo / pista / título anterior
SKIP NEXT – SALTAR SIGTE – Presione para saltar al siguiente capítulo / pista / título
STOP – DETENER – Presione para detener la reproducción de un CD o DVD
PLAY/PAUSE – REPRODUCIR/PAUSA – Presione para reproducir o detener la repro-
ducción de un disco
DVD/USB: para elegir entre DVD y USB
OSD – OSD – Presione para ver los diferentes modos de Despliegue en Pantalla
WIDE – ANCHO – Presione para cambiar los diferentes ajustes de la proporción de aspecto
ZOOM – ACERCAMIENTO – Presione para alejar o acercar una imagen en la pantalla
L/R – I/D – Presione para elegir entre los canales de audio izquierdo o derecho
N/P – N/P – Presione para cambiar la señal de salida a NTSC / PAL / AUTO
SLOW - LENTO – Presione para ver el DVD en cámara lenta
REPEAT – REPETICIÓN – Presione para permitir la reproducción repetida de una pista o pistas
abrir/cerrar el compartimento del DVD
MUTE – SILENCIO – Presione para silenciar o quitar el
silencio del volumen
NUMBER KEYS – TECLADO NUMÉRICO – Para ingresar
números estando en el modo de programación
AUDIO - Presionar para cambiar los ajustes de audio
GOTO – IR A – Para ir a un punto/tiempo en la reproducción
del DVD
PROGRAM – PROGRAMA – Presione para programar un DVD
para reproducir capítulos o pistas en un orden
específico
ANGLE –ÁNGULO – Presione para acceder a diferentes
ángulos en discos DVD que son compatibles con esta
función
MENU – MENÚ – Abrir el menú principal
SETUP – CONFIGURACIÓN – Presione para acceder al
menú de configuración
FLECHAS ARRIBA/ABAJO/IZQUIERDA/DERECHA – Presione
las flechas direccionales para navegar a través de las
pantallas de menú
ENTER – ACEPTAR – Presione para confirmar las selecciones
dentro de las pantallas de menú o el menú de configuración
TITLE – TÍTULO – Presione para acceder al menú de títulos
de un DVD
INSTALACIÓN DE LAS
BATERÍAS
1. Presione y levante la tapa para
abrir el compartimento de
baterías del control remoto
2. Inserte dos baterías tamaño
AAA. Asegúrese que las
polaridades de las baterías (+) y
(-) coinciden con las indicadas
en el compartimiento de las
baterías.
3. Coloque la tapa del
compartimento de baterías
SEARCH REV – BUSCAR HACIA ATRÁS – Presione para explorar hacia atrás. Presione nuevamente para incrementar la velocidad de exploración (2x, 4x, 8x, 16x, 32x)
SEARCH FWD – BUSCAR HACIA ADELANTE - Presione para explorar hacia adelante. Presione nuevamente para
incrementar la velocidad de exploración (2x, 4x, 8x, 16x, 32x)
STEP – PASO – Presione para avanzar un cuadro a la vez
20
Page 21

CONEXIONES
When connecting this unit and other components be sure that all devices are turned o. Audio/Video cables are
connected according to dierent color identification and should be fitted firmly into the appropriate jacks.
CONEXIÓN A UNA TV USANDO UN CABLE ESTÁNDAR DE AUDIO/VIDEO
1. Conecte el cable RCA de audio/video suministrado usando
los cables rojo y blanco a las
entradas en la parte posterior
del reproductor DVD y a las
entradas de Audio en su TV.
2. Conecte el cable de Video
(amarillo) a la entrada de Video
en la parte posterior del reproductor DVD y a la entrada de
Video en su TV.
3. Ajuste su TV en la entrada
apropiada de Video.
CONEXIÓN A UN AMPLIFICADOR USANDO LA SALIDA DE AUDIO COAXIAL DIGITAL
1. Conecte el cable RCA de audio/video suministrado usando
los cables rojo y blanco a las
entradas en la parte posterior
del reproductor DVD y a las
entradas de Audio en su TV.
2. Conecte el cable de Video
(amarillo) a la entrada de Video
en la parte posterior del reproductor DVD y a la entrada de
Video en su TV.
3. Conecte un cable coaxial
digital (no está incluido) en la
entrada del cable coaxial en la
parte posterior del reproductor
DVD y la entrada de audio coaxial digital en su receptor digital
o amplificador.
REPRODUCTOR DVD
HDMI
REPRODUCTOR DVD
COAXIAL
RIGHT
HDMI
LEFT
RIGHT
LEFT
ENTRADA DE AUDIO IZQUIERDA
ENTRADA DE AUDIO IN DERECHA
VIDEO
ENTRADA DE VIDEO
ENTRADA DE AUDIO IZQUIERDA
ENTRADA DE AUDIO IN DERECHA
CABLE COAXIAL
COAXIAL
VIDEO
ENTRADA DE VIDEO
TV
AMPLIFICADOR
TV
ENGLISH
ESPAÑOL
FRANÇAIS
CONEXIÓN A LA TV POR MEDIO DE LA SALIDA HDMI (NO SE INCLUYE EL CABLE HDMI)
1. Conecte el cable HDMI a la
entrada HDMI localizada en la
parte posterior del reproductor
DVD
2. Conecte el cable HDMI a la
entrada HDMI de su televisión.
REPRODUCTOR DVD
RIGHT
HDMI
LEFT
CABLE HDMI
21
COAXIAL
VIDEO
TV
Page 22

ENGLISH
OPERACIÓN BÁSICA DEL REPRODUCTOR DVD
ANTES DE COMENZAR
Encienda su TV y seleccione el ajuste apropiado de entrada de video que corresponde a la entrada usada cuando se conectó el reproductor DVD. Refiérase a la sección “CONEXIONES” de este manual.
ESPAÑOL
Si ha conectado el reproductor a un sistema de audio (estéreo o amplificador) encienda su sistema de audio y
seleccione el ajuste apropiado de entrada de audio que corresponde a la entrada usada cuando se conectó el
reproductor DVD.
Nota: Ya que su sistema de TV y/o sistema de audio pueden variar, refiérase al manual de usuario de su de TV y/o
sistema de audio.
REPRODUCIR
FRANÇAIS
1. Presione el botón POWER en el reproductor DVD o presione el botón Power/Standby en el control remoto
del DVD.
2. Presione el botón OPEN/CLOSE (en el reproductor DVD o en el control remoto) para abrir la bandeja del disco
3. Sostenga la orilla del disco y colóquelo en la bandeja con la etiqueta hacia arriba
4. Presione nuevamente el botón OPEN/CLOSE (en el reproductor DVD o en el control remoto) para cerrar la
bandeja del disco
Automáticamente, el reproductor DVD comenzará la reproducción o mostrará el menú del disco DVD. Utilice los
botones de flecha y el botón ENTER para navegar por la pantalla del menú. Si el DVD no comienza a reproducirse automáticamente, presione el botón PLAY (en el reproductor DVD o en el control remoto).
Nota: La secuencia de carga automática de cada DVD, CD, VCD puede variar de acuerdo al formato y / o la forma creó el disco. Algunos DVD se reproducirá automáticamente una serie de avances, los avisos de copyright o
anuncios publicitarios antes de cargar la pantalla del menú. Algunos botones del mando a distancia, tales como
el menú, TÍTULO, F.RWD, F.FWD, PREV, NEXT, y GOTO botones, se pueden desactivar de forma automática hasta
que se complete la secuencia de carga automática.
PAUSA
Para pausar, presione el botón PLAY/PAUSE una vez durante la reproducción. Para continuar presione
nuevamente el botón PLAY/PAUSE.
HACIA ADELANTE O INVERSA SCAN
Presione REV o FWD durante la reproducción.
Para aumentar el avance rápido o rebobinado de velocidad, pulse el botón REV o FWD nuevamente para selec-
cionar la velocidad deseada (Normal, x2, x4, x8, x16, x32)
EXPLORAR HACIA ADELANTE O ATRÁS
Usted puede brincar a un capítulo o pista específica durante la reproducción.
Para brincar hacia delante – Presione el botón NEXT durante la reproducción.
Cada vez que presione el botón NEXT avanzará al siguiente capítulo o pista
Para brincar hacia atrás – Presione el botón PREV durante la reproducción.
Si presiona el botón PREV mientras está viendo un capítulo, el DVD retrocederá al inicio del
capítulo. Cada vez que presione el botón PREV retrocederá un capítulo.
DETENER
Este DVD tiene una función de memoria que guarda la última posición en reproducción (Last Played). Al presionar el botón STOP memorizará la posición para que usted pueda regresar a ese punto, incluso después de que
usted apague el reproductor DVD.
Presione STOP una vez para detener y memorizar esa posición. Si presiona PLAY la reproducción
comenzará a partir de ese punto.
Presiona STOP dos veces, detendrá la reproducción pero se irá hasta el
inicio del disco. En este caso, la función Last Played no se habrá activado.
22
Page 23

EXPLICACIÓN DE FUNCIONES ADICIONALES
UTILIZANDO MEMORIAS USB
1. Apague el reproductor DVD.
2. Inserte la memoria USB (con archivos MP3, WMA o JPEG) en el puerto USB en la parte frontal del reproductor
DVD.
3. Encienda el reproductor DVD. Presione el botón USB en el control remoto.
4. En la pantalla se mostrará la lista de carpetas/archivos.
ENGLISH
5. Utilice los botones de dirección (flechas) para seleccionar y resaltar al carpeta o archivo deseado. Presione el
botón ENTER para confirmar y comenzar la reproducción.
FUNCIONAMIENTO DE DISCOS JPEG (IMÁGENES) MP3
1. Apague el reproductor DVD y coloque el disco o memoria USB en el reproductor DVD como se indicó en los
procedimientos anteriores. En la pantalla se mostrará la lista de carpetas/archivos.
2. Utilice los botones de dirección (flechas) para seleccionar y resaltar la carpeta. Presione el botón ENTER. En
la pantalla se mostrará la lista de archivos.
3. Utilice los botones de dirección (flechas) para seleccionar y resaltar el archivo. Presione ENTER para
confirmar y comenzar la reproducción.
FUNCIÓN DE REPETICIÓN
Durante la reproducción, presione el botón REPEAT repetidamente para:
Repetir una vez: Reproducción repetida de la misma pista
Repetir carpeta: Reproducción repetida de las pistas en la carpeta actual
Apagar (O): Regresar a la reproducción normal
ESPAÑOL
FRANÇAIS
23
Page 24

ENGLISH
Go To General Setup Page
Go To Audio Setup Page
Speaker Setup
Spdif Setup
Audio Setup Page
Preferences
CONFIGURACIÓN
1. Presione el botón SETUP. En la pantalla se mostrará el menú de configuración.
2. Utilice los botones de dirección (flechas) para seleccionar y resaltar la función que desee configurar. Presione el botón
ENTER para confirmar la selección.
3. Presione el botón SETUP para guardar los ajustes y salir.
ESPAÑOL
PÁGINA GENERAL DE CONFIGURACIÓN
Esta página le permite configurar el formato de la TV, marca de ángulo, OSD, subtítulos y el protector de pantalla, HDCD y
la configuración de Last Memory.
FRANÇAIS
Preferences
Despliegue de pantalla (TV Display)
Si se selecciona TV Display, presione los botones de
dirección para seleccionar 4:3 o 16:9 para que coincida con
TV Display
Angle Mark
OSD Lang
Captions
Screen Saver
HDCD
Last Memory
16:9
On
Eng
Off
On
1X
Off
la relación de aspecto de su TV y después presione el botón
ENTER para confirmar su selección. Presione el botón
SETUP para guardar los ajustes y salir.
Marca de Ángulo (Angle Mark)
Puede habilitar o deshabilitar la posibilidad de seleccionar
diferentes ángulos de cámara al estar viendo un DVD que
ofrezca esta función.
Idioma de despliegue en pantalla (OSD Language)
Puede seleccionar su idioma de despliegue en pantalla en este menú.
Subtítulos (Captions)
Puede utilizar esta función para desplegar los subtítulos explicativos grabados.
Protector de pantalla (Screen Saver)
Cuando esta unidad está en modo STOP por cierto tiempo, se mostrará un protector de pantalla
siempre y cuando esta opción esté habilitada.
HDCD
Puede usar esta función para habilitar el reproducción de Alta Definición de los CD digitales compatibles.
Last Memory
Esta función le permite al reproductor DVD regresar a la reproducción en el último punto reproducido
antes de apagar el reproductor.
PÁGINA DE CONFIGURACIÓN DE AUDIO
Esta página le permite configurar los ajustes de audio.
Ajustes de las bocinas (Audio Setup Page)
Puede utilizar esta función para acceder a la pantalla de
ajustes Downmix.
Downmix
Esto configura el modo downmix de audio para convertir
visor reproduce el audio digital por su puerto de salida. Este ajuste afecta la salida de la salida Digital de Audio Coax, o de
la salida Digital de Audio Óptico, dependiendo del modelo de su televisor. Los dos ajustes son PCM y Raw.
un multicanal de audio en un canal de salida doble. Este
ajuste solo afecta a las salidas de audio analógicas L//R
mezcladas.
Configuración Spdif (Spdif setup)
El ajuste de Audio/SPDIF digital controla la forma en que su tele-
24
Page 25

PÁGINA DE CONFIGURACIÓN DE VIDEO
Go To Video Setup Page
Video Setup Page
Resolution
Quality
HDMI Setup
Preferences
Go To Preferences Page
Preferences Page
NTSC
ENG
ENG
ENG
TV Type
Audio
Subtitle
Disc Menu
Parental
Password
Default
Preferences
Esta página le permite configurar los ajustes de salida de video.
Resolución (Resolution)
Use esta opción para ajustar la resolución.
Calidad (Quality)
Utilice esta función para ajustar la Nitidez (Sharpness),
Brillo (Brightness) y Contraste (Contrast).
Configuración HDMI (HDMI Resolution)
Utilice esta función para prender o apagar el HDMI.
PÁGINA DE CONFIGURACIÓN DE PREFERENCIAS
Esta página le permite configurar las preferencias adicionales. Esta página sólo está disponible cuando no hay
disco insertado en el reproductor DVD. Si se cambia algún ajuste, sólo cambiará una vez que el reproductor se ha
apagado y encendido nuevamente.
Tipo de TV (TV Type)
Este reproductor DVD es compatible con sistemas Multi
(AUTO), NTSC y PAL. Si selecciona un tipo de salida que no
es compatible con su TV, la pantalla se mostrará
parpadeando o en negro y blanco. Presione el botón SETUP
y utilice los botones de flecha para seleccionar de la lista el
tipo de TV correcta.
Audio
Utilice esta función para seleccionar el idioma por defecto
preferido al reproducir sus DVD.
Subtítulos (Subtitle)
Utilice esta función para seleccionar el idioma por defecto de los
subtítulos
ENGLISH
ESPAÑOL
FRANÇAIS
Menú del Disco (Disc Menu)
Utilice esta función para ajustar el idioma preferido por defecto para menús
Control Parental (Parental Control)
El control parental funciona junto con las clases de censura diferentes asignadas a los DVD.
Niveles de clasificación:
1. Seguro para los niños
2. G: Todas las edades
3. PG: Con guía de los padres
4. PG-13: Con guía de los padres para niños menores de 13 años
5. PG-R: Con guía de los padres para niños menores de 17 años
6. R: Con guía de los padres fuertemente recomendada para niños menores de 17 años
7. NC17: No es idónea para niños menores de 17 años
8. Adult: Sólo adultos
25
Page 26

Contraseña (Password)
Change Password
Preferences Page
NTSC
ENG
ENG
ENG
TV Type
Audio
Subtitle
Disc Menu
Parental
Password
Default
Change
Preferences
ENGLISH
Utilice esta función para asignar y cambiar la contraseña para gestionar los niveles de clasificación para
evitar que otros cambien los ajustes.
De la página de preferencias, elija Password (Contraseña) y
ESPAÑOL
después seleccione Change (Cambiar)
FRANÇAIS
Necesitará ingresar la contraseña anterior o actual e
ingresar una combinación de números en el campo de New
Password (Contraseña Nueva). Necesitará volver a escribir
Old Password
New Password
Confirm PWD
esta combinación en el campo Confirm PWD (Confirmar
contraseña). Asegúrese de tomar nota de la nueva
contraseña.
OK
Nota: La contraseña por defecto es 8888
Por Defecto (Default)
Utilice esta función para restablecer los ajustes originales de la unidad (a excepción de la contraseña).
26
Page 27

SOLUCIÓN DE PROBLEMAS
Problema Qué es lo que hay que revisar
La luz de encendido no
prende
Sin imagen
Sin Sonido
Imagen distorsionada
Parpadeo o brillo inestable
• Conecte el cable de suministro de energía en un
tomacorrientes.
• Intente en un tomacorrientes diferente.
• Seleccione en su TV el formato de entrada de video apropiado para poder recibir las señales de salida de reproductor.
• Inserte totalmente hasta el fondo los cables de video en las
entradas correspondientes.
• Inserte totalmente hasta el fondo los cables de audio en las
entradas correspondientes.
• Encienda el sistema estéreo/amplificador (si aplica).
• Seleccione la salida correcta en el menú de ajustes.
• Retire y limpie el disco DVD.
• Puede ocurrir cierta distorsión en las operaciones
AVANZAR y RETROCEDER. Esto es normal.
• Conecte el reproductor directamente a su TV.
NOTA: Las distorsiones pueden ser causadas por sistema de
protección de copias en un DVD o CD.
ENGLISH
ESPAÑOL
FRANÇAIS
No funciona el reproductor
DVD
No hay respuesta al
presionar los botones
El control remoto no
funciona
En la pantalla aparece el
ícono
• Asegúrese que se ha introducido un disco.
• Asegúrese que el disco es compatible (revise el formato del
disco y por el estándar de codificación de señal de color).
• Revise que el disco se haya insertado en forma correcta.
• Limpie el disco.
• Asegúrese que los ajustes del reproductor DVD sean correctos.
• Apague el DVD, desconecte el cable, vuélvalo a conectar y
enciéndalo nuevamente.
• Apunte el control remoto al sensor.
• Revise si la distancia entre el control remoto y el reproductor excede los 20 pies.
• Reemplace las baterías viejas por unas nuevas.
• El software del DVD restringe la operación actual.
• El software del DVD no es compatible con a función (p.ej.
ángulo).
• Por el momento, esta función no está disponible.
27
Page 28

ENGLISH
ESPECIFICACIONES TÉCNICAS
FUENTE DE ENERGÍA AC 100-240V ≈ 50-60 Hz
CONSUMO DE ENERGÍA 11W
CONTROL REMOTO DC 3V, 2 baterías AAA
ESPAÑOL
SISTEMA DE SEÑAL DE VIDEO AUTO / NTSC / PAL
RESPUESTA DE FRECUENCIA ± 1dB (20Hz ≈ 20 KHz)
RELACIÓN DE LA SEÑAL DE RUIDO ≥ 90dB
DISTORSIÓN DE AUDIO ≤ 1%
SEPARACIÓN DE CANALES ≥ 80dB (1KHz)
FRANÇAIS
RANGO DINÁMICO ≥ 80dB (1KHz)
SALIDA Audio Out NIVEL DE SALIDA: 2 ± 0.1V
(Audio Analógico) IMPEDANCIA DE CARGA: 10 KΩ
Audio Out NIVEL DE SALIDA: 0.5Vp-p
(Audio DIGITAL) IMPEDANCIA DE CARGA: 75 Ω
Video Out NIVEL DE SALIDA: 1Vp-p
(Audio DIGITAL) IMPEDANCIA DE CARGA: 75 Ω, desbalance, polaridad negativa
ANCHO DE BANDA DEL LÁSER LONGITUD DE ONDA 645 – 660 NM
POTENCIA LÁSER Clase 1
DISCOS COMPATIBLES DVD/VCD/CD/MP3/Photo CD/SVCD/JPEG/MPEG-4
SOPORTE AL CLIENTE
Antes de entrar en contacto con soporte al cliente, lea nuestra guía de solución de problemas presentada anteriormente en este manual.
Visite nuestro sitio web para entrar en contacto con nosotros, encontrar respuestas a las Preguntas Más Frecuentes
y otros recursos entre los cuales podría encontrar una actualización a este manual.
WWW.IMPECCA.COM
Si desea entrar en contacto con nosotros por teléfono, asegúrese de tener a la mano el número de modelo y el
número de serie de su equipo y llámenos entre 9:00am y 6:00pm Tiempo del Este al +1 888-945-4440.
Manténgase al tanto de las más recientes innovaciones de Impecca y participe de nuestros concursos por medio de
los medios sociales:
www.facebook.com/Impecca/
www.instagram.com/impecca/
© 2016 Impecca, a division of LT Inc., Wilkes Barre, PA.
@impeccausa
28
Page 29

GARANTÍA LIMITADA POR UN AÑO
Impecca™ garantiza este producto contra defectos en material y
obra al comprador original como se especifica abajo siempre y
cuando el producto este registrado en línea dentro de los catorce
(14) días de compra.
PARTES – Si se determina que el producto tiene defecto
de fábrica, dentro de un (1) año de la fecha de la compra
original, Impecca™ reparará o reemplazará las partes del
producto sin costo alguno (de las partes) para consumidores en Estados Unidos y Canadá.
LABOR – Si se determina que el producto tiene un defecto de fabrica, dentro de un periodo de noventa (90) días
de la fecha de la compra original, Impecca™ reparará o
reemplazará el producto sin costo alguno para consumidores en Estados Unidos y Canadá. Después de noventa
(90) días será responsabilidad del consumidor.
Costos de embarque hacia y desde el Centro de Servicio de
Garantía son la completa responsabilidad del consumidor.
Para obtener servicio de garantía por un centro de servicio autorizado de Impecca, por favor envíenos un correo electrónico a: service@impecca.com para obtener un numero de Autorización de
Reparación y Mantenimiento y para localizar el Centro de Servicio
de Garantía mas cerca de usted. Una vez autorizado, usted debe
enviar el artículo por correo al centro de servicios autorizado
Impecca™ en sus materiales de empaque de producto originales
o equivalente, para prevenir daño en tránsito.
Además, si Impecca™ determina que el producto está fuera de
los términos de Garantía, Impecca™ retornará el producto al
remitente a cargo del remitente sin ser reparado o reemplazado,
salvo que haya sido autorizado por el consumidor a dar servicio
al producto fuera de garantía al costo del consumidor. Todos los
cargos de manejo o por reposición por devoluciones y/o reemplazos no serán reembolsables.
Impecca™ específicamente excluye de esta garantía aditamentos no-eléctricos/mecánicos, accesorios, y partes desechables
incluyendo, pero no limitados a, caja externa, cables de conexión,
baterías, y adaptadores AC. Impecca™ se reserva el derecho a
reparar o reemplazar productos con el mismo, equivalente, o
modelo más nuevo.
Nos reservamos el derecho a reparar o reemplazar el producto a
nuestra discreción. El reemplazo puede ser nuevo o reparado y
aunque se hará todo lo posible por que sea el mismo modelo, si
el mismo modelo no está disponible, será reemplazado con un
modelo de la misma o mayor especificación.
Desgaste normal no es cubierto por esta garantía. Además,
Impecca™ se reserva el derecho a determinar el “desgaste” en
cualquier y todos los productos. Manipulación o apertura de la
cubierta o tapadera del producto anulará esta garantía completamente.
La garantía no aplica si el producto ha sido dañado por
accidente, abuso, mal uso, o mala aplicación; ha sido
alterado o modificado sin el permiso expreso de Impecca™ ; ha
recibido servicio por un centro de reparación no autorizado por
Impecca™ ; no ha sido mantenido u operado de forma apropiada
de acuerdo al manual de operación; ha sido usado para propósitos comerciales, no domésticos; ha sido dañado cosméticamente; no fue importado por Impecca™ ; no fue fabricado de acuerdo
a especificación del mercado de Estados Unidos; fue dañado
debido a instalación no apropiada o negligencia del consumidor;
fue dañado por empaque no apropiado en el embarque al Centro de Servicio de Garantía; fue dañado por desastre natural; o si
el número de serie del producto ha sido removido o desfigurado.
TODAS LAS GARANTÍAS IMPLÍCITAS, INCLUYENDO GARANTÍAS
DE COMERCIALIZACIÓN Y ADECUACIÓN IMPLÍCITAS PARA UN
PROPÓSITO PARTICULAR SON LIMITADAS EN DURACIÓN A UN
(1) AÑO EN PARTES Y NOVENTA (90) DÍAS EN LABOR DE LA FECHA
DE LA COMPRA ORIGINAL AL DETALLE DE ESTE PRODUCTO.
ESTAS GARANTÍAS Y REMEDIOS SON LAS ÚNICAS Y EXCLUSIVAS
GARANTÍAS Y REMEDIOS EN CONEXIÓN CON LA VENTA Y USO
DEL PRODUCTO. NINGUNA OTRA GARANTÍA, ORAL O ESCRITA,
EXPRESA O IMPLÍCITA SON DADAS.
IMPECCA™ NO ES RESPONSABLE POR NINGÚN DAÑO, YA SEA
ESPECIAL, ACCIDENTAL, CONSECUENTE, DIRECTO O DE OTRA
MANERA, O YA SEA CONOCIDO O TUVO QUE HABER SIDO
CONOCIDO POR IMPECCA™ , INCLUYENDO GANANCIAS PERDIDAS, BUENA VOLUNTAD, Y LESIÓN PERSONAL O DE PROPIEDAD
RESULTANTE DE CUALQUIER ROMPIMIENTO DE GARANTÍA, LA
INHABILIDAD DE USAR EL PRODUCTO, O BAJO CUALQUIER TEORÍA LEGAL EN CONTRATO O AGRAVIO. LA RESPONSABILIDAD DE
IMPECCA™ ES LIMITADA AL PRECIO DE COMPRA ACTUAL PAGADO
AL VENDEDOR DETALLISTA DEL PRODUCTO DEFECTUOSO.
Ningún comerciante, agente, o empleado de Impecca™ está
autorizado para hacer ninguna modificación, extensión, cambio
o enmienda a esta garantía sin el consentimiento escrito y autorización de Impecca™ .
Algunos estados no permiten la exclusión o limitación de garantías implícitas o responsabilidad por daños accidentales o consecuentes, o no permiten una limitación en el tiempo de duración
de una garantía implícita, así que es posible que las limitaciones
o exclusiones anteriores no apliquen a usted. Esta garantía le da
a usted derechos legales específicos, y es posible que usted tenga
otros derechos que varían de estado a estado.
Nota: Nuestro Centro de Servicio de Garantía embarca solamente
dentro de Estados Unidos Continen excluyendo Alaska y Hawái.
ENGLISH
ESPAÑOL
FRANÇAIS
29
Page 30

ENGLISH
ATTENTION
RISQUE DE DÉCHARGE ÉLECTRIQUE
NE PAS OUVRIR
TABLE DES MATIÈRES
Consignes De Sécurité Importantes ................................................................................................ 31
Introduction ........................................................................................................................................... 32
ESPAÑOL
Dans La Boîte ......................................................................................................................................... 32
Schéma De L'appareil ......................................................................................................................... 33
Télécommande .................................................................................................................................... 34
FRANÇAIS
Connections ........................................................................................................................................... 35
Opérations De Base Du Lecteur DVD ............................................................................................... 36
Fonctions Additionnelles Expliquées .............................................................................................. 37
Réglages .................................................................................................................................................. 38
Dépannage ............................................................................................................................................. 41
Spécifications Techniques ................................................................................................................. 42
Assistance Technique .......................................................................................................................... 42
Garantie Limitée D’un An .................................................................................................................... 43
Ce lecteur DVD utilise un produit laser de classe 1. Afin d’assurer une utilisation adéquate de ce
produit, veuillez lire attentivement le manuel d’instruction et le préserver pour référence future.
Comme le laser utilisé dans ce lecteur DVD peut nuire aux yeux, ne tentez pas d’ouvrir le boitier.
Les modifications ou ajustements ainsi que les procédures autres que celles spécifiées dans le
présent manuel pourraient causer une exposition à des radiations dangereuses. Si l’appareil requiert une réparation, veuillez vous référer au personnel autorisé et qualifié uniquement.
Notice Canada Cet appareil laser de classe B est conforme selon le NMB-003 Canadien.
Afin de prévenir les décharges électriques, ne tentez pas d’ouvrir le boitier, ne pas exposer l’ap-
pareil à l’eau, assurez-vous d’insérer la fiche large que dans la fente large de la prise. Ce produit
devrait uniquement être utilisé avec le type de source d’alimentation indiquée sur la fiche d’information. Le lecteur DVD compact de maison IMPECCA™ est conçu pour fonctionner avec une prise
de 120V – 60Hz uniquement. Si vous n’êtes pas certain du type d’alimentation disponible à votre
domicile, veuillez consulter votre détaillant local ou votre compagnie électrique.
30
Page 31

CONSIGNES DE SÉCURITÉ IMPORTANTES
VEUILLEZ CONSERVER CES INSTRUCTIONS. VOUS POURRIEZ EN AVOIR BESOIN DANS LE FUTUR.
Voici quelques précautions de base à suivre en utilisant votre nouveau lecteur DVD Impecca. Lisez attentivement
l’ensemble des instructions. Impecca n’est pas responsable pour les dommages ou blessures causés par une
mauvaise utilisation de l’appareil.
1. LISEZ TOUTES LES INSTRUCTIONS
2. Retirez tout le matériel d’emballage avant d’utiliser l’appareil.
3. Humidité – Ne pas exposer cet appareil à l’eau ou à l’humidité. Afin de prévenir le risque d’incendie ou de
décharge électrique, ne placez aucun objet rempli de liquide, tel que des vases, sur le lecteur DVD. Si un
liquide pénètre l’appareil, débranchez-le immédiatement. Assurez-vous que l’appareil est installé de manière
à vous donner un accès rapide à la prise advenant le cas d’un débranchement urgent requis.
NOTE: Si l’appareil est transposé directement d’un lieu froid vers un lieu chaud ou s’il est placé dans une
pièce humide, de la condensation pourrait se former sur la lentille interne du lecteur et pourrait aecter la
performance de celui-ci. Si c’est le cas, retirez le disque et laissez le lecteur en fonction pour environ une
demi-heure, jusqu’à ce que l’humidité se soit évaporée.
4. Chaleur- Le lecteur DVD devrait être situé loin des sources de chaleur telles que les radiateurs, les registres
de chaleur, les fours ou tout autre appareil (incluant les amplificateurs) qui produisent de la chaleur.
5. Ventilation adéquate - N’installez pas le lecteur DVD dans un espace clos comme une bibliothèque à
moins que la ventilation appropriée soit disponible. Les fentes et ouvertures dans le boitier du lecteur DVD
permettent une ventilation afin d'assurer une opération fiable et afin d'éviter le risque de surchaue. Ces
ouvertures ne devraient pas être recouvertes ou bloquées. Les ouvertures ne devraient pas être bloquées en
plaçant l'appareil sur un lit, un divan, un tapis ou toute autre surface similaire, car la ventilation sera entravée et
causera une surchaue.
6. Surcharger - Ne surchargez pas les prises de courant, les rallonges ou les boîtiers multiprises, car cela
pourrait poser des risques de décharge électrique ou d'incendie.
7. Nettoyage - Débranchez l'appareil de la prise murale avant de le nettoyer. Si de l'époussetage or un net-
toyage est requis, assurez-vous de nettoyer uniquement le boitier externe. N'essayez pas de nettoyer l'intérieur du lecteur ou de désassembler le boitier. N'utilisez pas de nettoyant liquide ou en aérosol. Utilisez
un linge humide pour le nettoyage ET assurez-vous de laisser l'appareil sécher complètement avant de le
brancher à nouveau à une prise de courant.
8. Afin d'éviter le risque de décharge électrique, ne plongez pas le cordon d'alimentation, la fiche ou l'appareil
dans l'eau ou tout autre liquide.
9. Une supervision accrue est nécessaire lorsque l'appareil est utilisé ou près d'enfants.
10. Gardez l'appareil et son cordon d'alimentation loin de la portée de tout enfant de 8 ans et moins.
11. Si le cordon d'alimentation fourni est endommagé, il doit être remplacé par le fabricant, son agent de service
désigné ou toute autre personne qualifiée afin d'éviter un risque.
12. N'utilisez aucun appareil avec un cordon d'alimentation ou une fiche endommagé, suite à un mauvais fonctionnement de l'appareil, après une chute ou n'importe quel dommage causé. Retournez l'appareil chez le
détaillant le plus près pour un examen, une réparation électrique ou un ajustement mécanique.
13. Toute utilisation de cet appareil qui n’est pas recommandée par le fabricant pourrait causer des blessures ou
des dommages à l'appareil.
14. Placez l'appareil sur une surface plate ou une table. Ne laissez pas le cordon d'alimentation pendre sur le
coin du comptoir ou de la table. Assurez-vous que le cordon ne touche aucune surface chaude de l'appareil.
15. Si l'appareil requiert un entretien, référez-vous au personnel de service qualifié. Si l'appareil est toujours
sous garantie, contactez IMPECCA™ ou notre centre de service. Veuillez consulter les conditions spécifiées
dans la garantie incluse avec l'appareil.
16. Ne pas utiliser l'appareil à d'autres fins que celles prévues.
17. Ne pas utiliser à l'extérieur.
ENGLISH
ESPAÑOL
FRANÇAIS
POUR USAGE DOMESTIQUE, UNIQUEMENT
GARDEZ CES INSTRUCTIONS
31
Page 32

ENGLISH
INTRODUCTION
Félicitations pour votre achat du lecteur de DVD pour maison d'IMPECCA™. Ce lecteur de DVD est un excellent
appareil qui vous permet de profiter pleinement de vos DVD sans l'embarras d'un lecteur de pleine grosseur. Sa
conception compacte vous donne accès à tous vos médias préférés et l'option de recherche accélérée en lecture
avant ou arrière vous garantit que vous ne manquerez pas une minute. Regardez de loin en utilisant la télécom-
ESPAÑOL
mande ou focalisez sur un point particulier en utilisant la fonction de zoom. Le lecteur DVD de maison IMPECCA™
est une superbe manière de se divertir en quelques minutes.
Avant d'utiliser votre lecteur, il est recommandé de vous familiariser avec les fonctions, caractéristiques et procédures d'opération telles que décrites dans ce manuel. Suite à des modifications légères en cours de production;
les instructions, caractéristiques et/ou descriptions dans ce manuel pourraient être légèrement diérentes de
celle de votre appareil. La conception et les caractéristiques du produit peuvent être changées sans préavis.
FRANÇAIS
CARACTÉRISTIQUES EN BREF
Fonction de zoom
Contrôle parental
Recherche accélérée avant/arrière
Ralenti / Heure / Programmaé
Protection d'écran
Aichage de menu multilangues (anglais, français, espagnol)
Sous-titrage multilangues (sous-titres externes Divx en
anglais seulement)
USB 2.0
FORMATS MÉDIA SUPPORTÉS
DVD Video
DVD+R
DVD+RW
Audio CD
CD-R
CD-RW
HDCD
VCD
SVCD
Kodak Picture CD
JPEG
WMA
MP3
MPEG1-2-4
DANS LA BOÎTE
Veuillez vérifier le contenu de votre boîte pour les items suivants. Il est possible que
certains modèles ne soient pas livrés avec tous les items.
1. Lecteur DVD
2. Manuel de l'utilisateur
3. Télécommande
4. Câbles A/V (non illustrés)
1 2
3
32
Page 33

SCHÉMA DE L'APPAREIL
1 2 3
4 5 6
7
8
PANNEAU AVANT
ENGLISH
ESPAÑOL
FRANÇAIS
1. Ouverture DVD
2. Aichage
3. Bouton ouverture / fermeture
4. Bouton lecture / pause
PANNEAU ARRIÈRE
4 5
VIDEO
5. Bouton arrêt
6. Touche veille
7. Récepteur télécommande
8. Prise USB
1 2 3
1. Prise de sortie HDMI AV
2. Prise de sortie audio gauche
3. Prise de sortie vidéo
4. Prise de sortie audio droite
5. Prise de sortie coaxiale
33
Page 34

ENGLISH
Power Open/Close
Mute
Audio
Number Keypad
Menu
Arrows/Enter
Title
Volume
Stop
L/R
DVD/USB
OSD
N/P
Search
Goto
Prog
Setup
Subtitle
Skip
L/R
Play/Pause
Angle
Zoom
Wide
Repeat
Slow
A-B
A-B
Step
TÉLÉCOMMANDE
ESPAÑOL
FRANÇAIS
POWER – Appuyer pour mettre sous tension le lecteur DVD
ou pour remettre le lecteur en mode veille.
OPEN/CLOSE – Appuyer pour ouvrir et fermer le tiroir du
lecteur.
MUTE – Appuyer pour mettre ou enlever le volume en mode
sourdine.
TOUCHE NUMÉRIQUE – Permet saisir des numéros en mode
de programmation.
AUDIO- Appuyer pour changer les réglages audio.
GOTO – Permets de se rendre à un point / temps spécifique
sur un DVD.
PROGRAM – Appuyer pour programmer la lecture de
certains chapitres et pistes du DVD selon un ordre
déterminé.
ANGLE – Permets d'accéder à des angles de caméra
diérents sur les DVD qui supportent l'option.
MENU – Ouvrir le menu principal.
SETUP – Appuyer pour accéder un menu de configuration.
BOUTON DIRECTIONNEL HAUT/DROITE/GAUCHE/BAS –
Appuyer pour naviguer les diérents menus.
ENTER – Appuyer pour confirmer une sélection dans les
diérents menus.
TITLE – Appuyer pour accéder au titre du DVD inséré.
SUBTITLE – Appuyer pour activer ou désactiver le
sous-titrage.
VOL + : Appuyer pour AUGMENTER le volume.
VOL - : Appuyer pour DIMINUER le volume.
SKIP PREV – Appuyer pour retourner au titre / chapitre / piste antérieure.
SKIP NEXT – Appuyer pour avancer vers le prochain titre / chapitre ou piste.
STOP – Appuyer pour arrêter le DVD ou CD en cours de lecture.
PLAY / PAUSE : Appuyer pour démarrer ou mettre en pause la lecture du disque.
DVD/USB : Choisir entre le lecteur DVD et USB
OSD : Permets de voir les diérents modes de sélections à l'écran.
WIDE – Appuyer pour changer la correspondance hauteur-largeur.
ZOOM – Appuyer pour focaliser sur une photo à l'écran.
L/R – Appuyer pour ajuster l'audio sur certains DVD.
N/P – Appuyer pour changer le signal sortant au NTSC / PAL / AUTO.
SLOW – Appuyer pour ralentir l'Image à l'écran.
INSTALLATION DES
BATTERIES
1. Appuyez et soulevez le
couvercle arrière pour ouvrir le
compartiment à batteries de la
télécommande.
2. Insérez deux batteries de type
AAA. Assurez-vous de bien
respecter les polarités (+ / -)
dans le compartiment à
batteries.
3. Refermez le compartiment à
batteries.
REPEAT – Appuyer pour permettre la répétition d'une piste / chapitre.
SEARCH REV – Appuyer pour rechercher en marche arrière. Appuyer de nouveau pour augmenter la vitesse
( 2x, 4x, 8x, 16x, 32x).
SEARCH FWD – Appuyer pour recherche en lecture en marche avant. Appuyer de nouveau pour augmenter le vitesse
( 2x, 4x, 8x, 16x, 32x).
STEP – Appuyer pour avancer une image à la fois.
34
Page 35

CONNECTIONS
Lorsque vous connectez votre appareil à d'autres composantes, assurez-vous que celles-ci sont mises hors tension. Les câbles audio / vidéo sont connectés selon l'identification de couleur diérente et doivent être montés
fermement dans les prises appropriées.
CONNECTER À LA TÉLÉVISION
1. Connecter le câble audio-vidéo RCA fourni en utilisant les
câbles rouges et blancs des
prises audio à l'arrière du lecteur DVD et les insérer dans les
prises d'entrée audio de votre
télévision.
2. Connecter le câble vidéo
(jaune), de la prise derrière le
lecteur DVD vers la prise d'entrée vidéo de votre télévision.
3. Ajuster votre télévision à la
source d'entrée vidéo appropriée.
LECTEUR DVD
RIGHT
HDMI
COAXIAL
LEFT
VIDEO
ENTRÉE VIDÉO
ENTRÉE AUDIO GAUCHE
ENTRÉE AUDIO DROITE
TV
ENGLISH
ESPAÑOL
FRANÇAIS
CONNECTER À UN AMPLIFICATEUR
1. Connectez le câble RCA Audio/Video en utilisant les câbles
rouges et blancs aux sorties
Audio à l'arrière du lecteur DVD
et aux entrées audio de votre
télévision.
2. Branchez le câble vidéo
(jaune) à la prise vidéo à l'arrière
du lecteur à l'entrée vidéo de
votre télévision.
3. Connectez le câble digital
coaxial (non inclus) à l'entrée
coaxiale à l'arrière du lecteur
DVD et à l'entrée coaxiale de
votre récepteur digital ou amplificateur.
LECTEUR DVD
HDMI
CABLE COAXIAL
RIGHT
LEFT
ENTRÉE AUDIO GAUCHE
ENTRÉE AUDIO DROITE
COAXIAL
VIDEO
ENTRÉE VIDÉO
AMPLIFICATEUR
TÉLÉVISION
CONNECTER À TRAVERS UNE SORTIE HDMI (CÂBLE HDMI NON INCLUS)
1. Connectez le câble HDMI à
la prise HDMI situé à l'arrière du
lecteur DVD.
2. Connectez le câble HDMI à
l'entrée HDMI de votre télévision.
LECTEUR DVD
RIGHT
HDMI
LEFT
COAXIAL
VIDEO
TÉLÉVISION
HDMI CÂBLE
35
Page 36

ENGLISH
OPÉRATIONS DE BASE DU LECTEUR DVD
AVANT DE DÉBUTER
Allumez votre télévision et sélectionnez l'entrée vidéo appropriée qui correspond à l'entrée utilisée lors de la
connexion du lecteur DVD. Référez-vous à la section « Connexions » du présent manuel.
ESPAÑOL
Si vous avez connecté le lecteur à un système audio (stéréo ou amplificateur), allumez votre système audio et
sélectionnez l'entrée audio appropriée qui correspond à l'entrée utilisée lors de la connexion du lecteur DVD.
Note: Comme les télévisions et/ou les systèmes audio peuvent varier, veuillez vous référer à leurs manuels de
l'utilisateur.
LECTURE
FRANÇAIS
1. Appuyez sur POWER sur le lecteur DVD ou appuyez sur le bouton Power/Standby sur la télécommande.
2. Appuyez sur OPEN/CLOSE (sur lecteur DVD ou la télécommande), pour ouvrir le tiroir du lecteur.
3. Tenez le rebord du disque et placez-le sur le plateau du tiroir, l'étiquette vers le haut.
4. Appuyez de nouveau sur OPEN/CLOSE (sur lecteur DVD ou la télécommande) pour fermer le tiroir.
Le lecteur DVD débutera la lecture ou aichera le menu du disque automatiquement. Utilisez les flèches et le bouton
ENTER pour naviguer à travers le menu. Si le DVD ne démarre pas automatiquement, appuyez sur PLAY(sur le lecteur DVD
ou la télécommande).
Note : La séquence de démarrage automatique varie pour chaque DVD, CD, VCD, selon le format et/ou de la manière que
le disque a été configuré. Certains DVD présenteront une série de bandes-annonces, notices légales ou bien des publicités
avant d'aicher le menu principal. Certains boutons de la télécommande tels que MENU, TITLE, F.RWD, F.FWD, PREV, NEXT
et GOTO seront automatiquement désactivés jusqu'à la fin de la séquence de démarrage automatique.
PAUSE
Pour interrompre la lecture, appuyer sur PLAY / PAUSE. Pour démarrer à nouveau la lecture, appuyez de nouveau
sur PLAY / PAUSE.
RECHERCHE ACCÉLÉRÉE AVANT/ARRIÈRE
Appuyez sur REV or FWD pendant la lecture.
Pour augmenter la vitesse de la recherche, appuyez de nouveau sur REV ou FWD et choisissez la vitesse désirée
(normale, x2, x4, x8, x16, x32).
SAUTER AU PROCHAIN / PRÉCÉDENT
Vous pouvez sauter vers un chapitre ou une piste spécifique pendant la lecture.
Sauter au prochain – Appuyez sur NEXT pendant la lecture.
Vous serez avancé vers le prochain chapitre / piste à chaque fois que vous appuierait sur le
bouton NE XT.
Sauter au précédent – Appuyez sur PREV pendant la lecture.
Si vous appuyez sur PREV à mi- lecture d'un chapitre, le lecteur DVD retournera au début du
chapitre. Le lecteur passera au précédent chapitre à chaque fois que vous appuierait sur le
bouton PREV.
ARRÊT
Ce lecteur DVD a une fonction qui permet de revenir au dernier point de lecture. Lorsque vous arrêtez la lecture,
le lecteur DVD retiendra le moment afin que vous puissiez redémarrer exactement à la même position, même
après avoir mis le lecteur hors tension.
Appuyez sur STOP pour arrêter la lecture et maintenir la lecture à au point de lecture. Appuyer sur PLAY
redémarrera la lecture au même point.
Appuyez sur STOP deux fois arrêtera complètement la lecture et réinitialisera la lecture du disque au
début. La fonction de reprise de lecture au dernier point ne sera pas activée.
36
Page 37

FONCTIONS ADDITIONNELLES EXPLIQUÉES
UTILISATION DE CLÉ USB
1. Mettez le lecteur DVD hors tension.
2. Insérez la clé USB (qui contient des fichiers AVI, MP4 ou JPEG), au port USB situé sur le devant du lecteur DVD.
3. Allumez le lecteur DVD. Appuyez sur le bouton USB sur la télécommande.
4. Les dossiers / fichiers apparaîtront à l'écran.
5. Utilisez les boutons de direction pour sélectionner le fichier ou dossier désiré. Appuyez ensuite sur ENTER
pour confirmer et débuter la lecture.
OPÉRATIONS DE DISQUE JPEG (PHOTO) MP3 :
ENGLISH
ESPAÑOL
1. Allumez le lecteur et placez le disque ou la clé USB dans le lecteur DVD tel qu'indiqué dans les procédures
précédentes. La liste de dossiers et fichiers apparaîtra à l'écran.
2. Utilisez les boutons de direction pour sélectionner le dossier désiré. Appuyez ENTER, la liste de fichiers apparaîtra à l'écran.
3. Utiliser les boutons direction pour choisir le fichier désiré. Appuyez ENTER pour débuter la lecture.
FONCTION RÉPÉTER
Pendant la lecture, appuyez sur REPEAT de façon répétée pour choisir :
Répété piste: Lecture répétée de la piste courante.
Répété dossier : Lecture répété de tous les fichiers dans le dossier courant.
Désactiver : Résumer la lecture normale.
FRANÇAIS
37
Page 38

ENGLISH
Go To General Setup Page
Go To Audio Setup Page
Speaker Setup
Spdif Setup
Audio Setup Page
Preferences
RÉGLAGES
1. Appuyez sur le bouton SETUP. Le menu des réglages apparaîtra à l'écran.
2. Utilisez les boutons de direction afin de choisir la fonction que vous désirez configurer. Appuyez sur le bouton de
direction. Appuyez sur ENTER pour confirmer la sélection.
3. Appuyez sur SETUP pour sauvegarder le réglage et sortir du menu.
ESPAÑOL
PAGE DE RÉGLAGE GÉNÉRALE
Cette page vous permettra de configurer le format de l'écran de télévision, le marque angle, la langue d'aichage de la
télévision, les sous-titres, l'écran de veille, HDCD et l'option du dernier point de lecture.
Preferences
FRANÇAIS
Aichage Télé
Si l'aichage télé est choisi, appuyez sur le bouton direction pour
y accéder. Appuyez sur le bouton direction pour choisir 4:3 ou
TV Display
Angle Mark
OSD Lang
Captions
Screen Saver
HDCD
Last Memory
16:9
On
Eng
Off
On
1X
Off
16:9 afin d'apparier avec le ratio de votre télévision et ensuite,
appuyez sur Enter pour confirmer votre sélection. Appuyez sur
SETUP pour sauvegarder le réglage et sortir du menu.
Marque angle
Vous pouvez activer ou désactiver la possibilité de choisir
diérents angles de caméra lorsque vous regardez un DVD qui
ore cette option.
Langue TV (OSD Lang – Onscreen display language)
Vous pouvez choisir la langue d'aichage de votre choix pour votre
télévision.
Sous-titres
Utilisez cette option pour aicher les sous-titres explicatifs enregistrés.
Écran de veille
Lorsque le lecteur est arrêté pour sept moments, un écran de veille débutera si l'option est activée.
HDCD
Utilisez cette fonction pour permettre la lecture de CD haute-définition compatibles.
Dernier Point
Cette fonction permets au lecteur DVD de retourner au dernier point de lecture avant que le lecteur ait été
mis hors tension.
PAGE DES RÉGLAGES AUDIO
Cette page vous permet de configurer les paramètres audio.
paramètre aectera la sortie audio numérique ou la sortie optique numérique dépendant du modèle de la télévision. Les
deux réglages sont PCM et Raw.
Réglages haut-parleurs
Choisissez le réglage haut-parleurs pour accéder à l'écran de
réglage Downmix.
Downmix
Permet de régler le down-mix audio à convertir multicanaux
audio à une sortie à deux canaux. Ce réglage aectera
uniquement les sorties audio analogues gauche / droite Mixed.
Sortie Spdif
Les contrôles audio numériques / SPDIF contrôle la manière que
votre téléviseur livre via ses ports de sortie l'audio numérique. Ce
38
Page 39

PAGE CONFIGURATION VIDÉO
Go To Video Setup Page
Video Setup Page
Resolution
Quality
HDMI Setup
Preferences
Go To Preferences Page
Preferences Page
NTSC
ENG
ENG
ENG
TV Type
Audio
Subtitle
Disc Menu
Parental
Password
Default
Preferences
Cette page vous permettra de configurer les paramètres de sortie de vidéo.
Résolution
Utilisez cette fonction pour ajuster la résolution.
Qualité
Utilisez cette fonction pour ajuster la netteté, la luminosité
et le contraste.
Réglage HDMI
Utilisez cette fonction pour activer ou désactiver la
fonction HDMI.
PAGE DES PRÉFÉRENCES
Cette page vous permet de configurer des préférences additionnelles. La page des préférences est uniquement
disponible lorsqu'il n'y a aucun disque d'inséré dans le lecteur DVD. Si une configuration est ajustée, elle sera
uniquement changée une fois le lecteur mis hors tension et allumé de nouveau.
Type de TV
Ce lecteur DVD supporte les systèmes Multi (AUTO), NTSC et PAL.
Si vous choisissez un type de sortie qui n'est pas supporté par
votre télévision, il y aura un papillotement de l'écran avec un
aichage noir et blanc. Appuyez sur SETUP et utilisez les boutons
de direction pour choisir le type de TV directement de la liste.
Audio
Utilisez cette fonction pour choisir la langue de lecture par défaut
des DVD.
Sous-titres
Utilisez cette fonction pour choisir la langue des sous-titres par
défaut.
ENGLISH
ESPAÑOL
FRANÇAIS
Menu Disque
Utilisez cette fonction pour choisir la langue du menu par défaut.
Contrôle parental
Le contrôle parental fonctionne en conjonction avec diérents types de classement de censure
assigné aux DVDs.
Niveau de classement :
1. Approprié pour les enfants
2. G: Tous les âges
3. PG: Surveillance parentale
4. PG-13: Surveillance parentale, recommandé pour les enfants de moins de 13 ans.
5. PG-R : Surveillance parentale, recommandé pour les enfants de moins de 17 ans.
6. R: Surveillance parentale fortement recommandée pour les enfants de moins de 17 ans.
7. NC17 : Non approprié pour des enfants de moins de 17 ans.
8. Adulte : Pour adultes uniquement.
39
Page 40

Mot de passe
Change Password
Preferences Page
NTSC
ENG
ENG
ENG
TV Type
Audio
Subtitle
Disc Menu
Parental
Password
Default
Change
Preferences
ENGLISH
Utilisez cette fonction pour mettre en place ou pour changer un mot de passe afin de gérer les diérents niveaux
de classement ou pour prévenir les changements par toute autre personne. .
À partir des préférences, choisissez Mot de passe et ensuite
ESPAÑOL
sélectionnez Changement.
FRANÇAIS
Vous aurez à soumettre l'ancien ou le mot de passe actuel
et ensuite entrer une combinaison de chires dans la case
Nouveau mot de passe. Vous aurez à entrer de nouveau
Old Password
New Password
Confirm PWD
cette combinaison dans la section Confirmer Mot de passe.
Assurez-vous de bien prendre en note le nouveau mot de
passe.
OK
Note : Le mot de passe par défaut est 8888
Par défaut
Utilisez cette fonction pour réinitialiser les fonctions personnalisées aux fonctions originales de l'appareil
(autre que le mot de passe).
40
Page 41

DÉPANNAGE
Problème Quoi vérifier
Le témoin d'alimentation
ne s'allume pas
Aucune image
Pas de son
Image déformée
Scintillement ou la
luminosité instable
• Branchez le cordon d'alimentation dans une prise murale.
• Essayez une prise murale diérente.
• Choisissez la source vidéo adéquate sur votre télévision afin
de recevoir le signal sortant de votre lecteur.
• Insérez adéquatement tous les câbles audio dans les prises
correspondantes.
• Insérez adéquatement tous les câbles audio dans les prises
correspondantes.
• Allumez le système stéréo / amplificateur (si applicable)
• Choisissez la bonne source audio dans le menu réglages.
• Retirez et nettoyez le disque
• Pendant la recherche avancée rapide, il est possible que
l'image se déforme, c'est normal.
• Connectez le lecteur directement à votre téléviseur.
NOTE: Les distorsions peuvent être causées par le système de
protection contre la copie sur un DVD ou un CD.
ENGLISH
ESPAÑOL
FRANÇAIS
Le lecteur DVD ne
fonctionne pas
Aucun réponse quand les
boutons sont appuyés
La télécommande ne
fonctionne pas
L’ic ône apparaît à
l'écran
• Assurez-vous que le disque est inséré.
• Assurez-vous de la compatibilité du disque (vérifiez le format du disque et le codage de signaux colorés standard).
• Assurez-vous que le disque est bien inséré.
• Nettoyez le disque.
• Assurez-vous que les réglages du lecteur DVD sont corrects.
• Mettez le lecteur hors tension, débranchez le cordon d’alimentation et ensuite branchez-le de nouveau et allumez le
lecteur.
• Pointez la télécommande vers le senseur.
• Assurez-vous que la télécommande n'est pas à plus de
20 pieds du senseur.
• Remplacez les batteries avec des nouvelles
• Le logiciel du DVD restreint l'opération courante.
• Le logiciel du DVD ne supporte pas la fonction (ex : angles).
• La fonction n'est pas disponible pour le moment.
41
Page 42

ENGLISH
SPÉCIFICATIONS TECHNIQUES
SOURCE D'ALIMENTATION AC 100-240V ~ 50-60 Hz
COSOMMATION D'ÉNERGIE 11W
TÉLÉCOMMANDE DC 3V, batteries 2xAAA
ESPAÑOL
SYSTÈME SIGNAL VIDÉO AUTO/NTSC/PAL
FRÉQUENCE DE RÉPONSE ± 1dB(20Hz ~20KHz
RAPPORT SIGNAL / BRUIT ≥ 90dB
DISTORTION AUDIO ≤ 1%
SÉPARATION DES CANAUX ≥ 80dB (1KHz)
FRANÇAIS
GAMME DYNAMIQUE ≥ 80dB (1KHz)
SORTIE
Sortie Audio NIVEAU DE SORTIE : 2 ± 0.1V
(Audio analogue) IMPÉDANCE DE CHARGE 10 KΩ
Sortie Audio NIVEAU DE SORTIE : 0.5Vp-p
(Signal digital) IMPÉDANCE DE CHARGE : 75 Ω
Sortie vidéo NIVEAU DE SORTIE : 1Vp-p
IMPÉDANCE DE CHARGE : 75 Ω, débalancement, polarité négative.
LONGEUR D'ONDE DE LA BANDE PASSANTE DU LASER 645 - 660 nm
PUISSANCE DU LASER Classe 1
DISQUES COMPATIBLES DVD/VCD/CD/MP3/Photo CD/SVCD/JPEG/MPEG-4
ASSISTANCE TECHNIQUE
Avant de contacter le support technique, veuillez consulter le guide de dépannage ci-dessus.
Consultez notre site Web pour nous rejoindre, pour trouver les réponses à vos questions fréquentes et pour des
ressources additionnelles telles qu’une version mise à jour de ce guide de l’utilisateur.
WWW.IMPECCA.COM
Pour nous rejoindre par téléphone, veuillez avoir en main le numéro de modèle et de série de votre appareil.
Nos lignes sont ouvertes entre 9 h et 18 h HE au 1- 866-954-4440.
Tenez-vous à jour sur les plus récentes innovations chez Impecca et pour participer à nos concours via nos médias sociaux:
www.facebook.com/Impecca/
www.instagram.com/impecca/
© 2016 Impecca, a division of LT Inc., Wilkes Barre, PA.
@impeccausa
42
Page 43

GARANTIE LIMITÉE D’UN AN
Impecca™ garantit ce produit contre les défauts de matériaux et
de fabrication à l’acheteur original tel que spécifié ci-dessous à
condition que le produit soit enregistré en ligne dans les quatorze
(14) jours suivants l’achat.
PIÈCES — Si le produit a un défaut de fabrication dans
un délai d’un (1) an à compter de la date d’achat initiale,
Impecca™ réparera ou remplacera les pièces du produit
sans frais (pour les pièces) pour les consommateurs aux
États-Unis et au Canada.
MAIN-D’OEUVRE — Si le produit a un défaut de fabrication
dans un délai de quatre-vingt-dix (90) jours à compter de
la date d’achat initiale, Impecca™ réparera ou remplacera
les pièces du produit sans frais (pour les pièces) pour
les consommateurs aux États-Unis et au Canada. Après
quatre-vingt-dix (90) jours, il en sera de la responsabilité
du consommateur.
Les frais d’expédition à destination et à partir de notre centre de
service de garantie sont à la charge du consommateur.
Pour obtenir le service de garantie par un centre de service autorisé Impecca™, veuillez nous écrire à : service@impecca.com pour
obtenir une autorisation de réparation et d’entretien (ARE) ainsi
que pour localiser le centre de service de garantie le plus près de
vous. Une fois autorisé, vous devez envoyer le produit au centre
de service autorisé Impecca™ dans ses matériaux d’emballage
d’origine ou l’équivalent, pour éviter tout dommage pendant le
transport.
De plus, si Impecca™ devait déterminer que le produit est en dehors des conditions de la garantie, Impecca™ retournera le produit
à l’expéditeur aux frais de celui-ci sans être réparé ou remplacé,
sauf s’il est autorisé par le consommateur à servir le produit à
garantie expiré aux frais du consommateur. Tous les frais de manutention ou de réapprovisionnement pour les retours et/ou les
remplacements seront non remboursables.
Impecca™ exclut expressément de cette garantie toutes pièces
jointes non électriques/mécaniques, accessoires et pièces jetables,
y compris, mais non limité à, l’extérieur du boîtier, les câbles de
connexion, batteries et adaptateurs secteur. Impecca™ se réserve
le droit de réparer ou de remplacer les produits défectueux avec
des modèles identiques, équivalents ou plus récents.
Nous nous réservons le droit de réparer ou de remplacer le produit
à notre discrétion. Le remplacement peut être soit neuf ou remis
à neuf et alors que tous les eorts seront faits pour s’assurer qu’il
s’agit du même modèle, si le même modèle n’est pas disponible il
sera remplacé par un modèle équivalent ou supérieur.
L’usure « normale » n’est pas couverte par la présente, ou toute
autre garantie. De plus, Impecca™ se réserve le droit de déterminer
l’usure « normale » sur tous les produits. L’altération ou l’ouverture
du boîtier ou de la coquille du produit annulera cette garantie dans
son intégralité.
De plus, cette garantie ne s’applique pas si le produit a été endommagé par accident, abus, mauvaise utilisation ou mauvaise application, a été altéré ou modifié sans l’autorisation écrite de Impecca™, a été réparé par un centre de réparation Impecca™ non agréé,
n’a pas été correctement entretenu ou utilisé conformément au
manuel d’utilisation, a été utilisé à des fins commerciales ou autres
que personnelles, a été esthétiquement endommagé, n’a pas été
importé par Impecca™, n’a pas été fabriqué selon les spécifications
du marché des États-Unis, a été endommagé suite à une mauvaise
installation ou à une négligence de la part des consommateurs, a
été endommagé suite à un mauvais emballage lors de l’expédition
au centre de service de garantie, a été endommagé en raison de
catastrophes naturelles ou si le numéro de série du produit a été
retiré ou rendu illisible.
TOUTE GARANTIE IMPLICITE, Y COMPRIS TOUTE GARANTIE
IMPLICITE DE QUALITÉ MARCHANDE ET D’ADAPTATION À UN
USAGE PARTICULIER, EST LIMITÉE À UN (1) AN POUR LES PIÈCES
ET QUATRE-VINGTS-DIX (90) JOURS POUR LA MAIN-D’OEUVRE À
PARTIR DE LA DATE D’ACHAT INITIALE DE CE PRODUIT.
CES GARANTIES ET RECOURS SONT LES SEULS ET UNIQUES
GARANTIES ET RECOURS CONCERNANT LA VENTE ET L’UTILISATION DU PRODUIT. AUCUNE AUTRE GARANTIE, ORALE OU ÉCRITE,
EXPLICITE OU IMPLICITE, N’EST DONNÉE.
IMPECCA™ N’EST PAS RESPONSABLE DE TOUT DOMMAGE, QU’IL
SOIT PARTICULIER, ACCIDENTEL, INDIRECT, DIRECT OU AUTRE
ÉTANT CONNU OU QUI AURAIT DU ÊTRE CONNU D’IMPECCA™,
Y COMPRIS LA PERTE DE PROFITS, LA BONNE VOLONTÉ ET LA
PROPRIÉTÉ AINSI QUE LES BLESSURES PERSONNELLES RÉSULTANTES D’UNE RUPTURE DE GARANTIE, DE L’INCAPACITÉ
D’UTILISER LE PRODUIT OU SOUS TOUTE AUTRE THÉORIE JURIDIQUE CONTRACTUELLE OU DÉLICTUELLE. LA RESPONSABILITÉ
D’IMPECCA EST LIMITÉE AU PRIX D’ACHAT PAYÉ AU DÉTAILLANT
DU PRODUIT DÉFECTUEUX.
Aucun revendeur, agent ou employé Impecca™ n’est autorisé à
faire quelques modifications, extension, changement ou amendement que ce soit de cette garantie sans le consentement écrit et
l’autorisation d’Impecca™.
Certains États ne permettent pas l’exclusion ou la limitation des
garanties implicites ou de la responsabilité pour les dommages
directs ou indirects, ou ne permettent pas de limitation sur la durée
d’une garantie implicite. Les limitations ou exclusions ci-dessus
peuvent donc ne pas s’appliquer à vous. Cette garantie vous donne
des droits légaux spécifiques et vous pouvez avoir d’autres droits,
qui varient d’un État à l’autre.
Note : Notre centre de service de garantie expédie seulement à l’intérieur des États-Unis contigus, excluant l’Alaska et Hawaï.
ENGLISH
ESPAÑOL
FRANÇAIS
43
Page 44

© 2016 Impecca, a division of LT Inc., Wilkes Barre, PA.
 Loading...