

Page 1
Page 2

TABLE OF CONTENTS
ENGLISH
Introduction ................................................................................................................................ 2
Warnings and Safety Instructions .............................................................................................. 3
What’s In the Box ....................................................................................................................... 4
Getting to know your DVD Player .............................................................................................. 5
Remote Control features ............................................................................................................ 6
Connecting to a Television ......................................................................................................... 9
Basic Operation ....................................................................................................................... 10
USB Memory Sticks ................................................................................................................. 12
Configuring Settings ................................................................................................................. 13
Troubleshooting ....................................................................................................................... 18
Specifications ........................................................................................................................... 19
FRENCH .................................................................................................................................. 21
SPANISH ................................................................................................................................. 41
Page 3
- 2 -
INTRODUCTION
Screen Saving Protection Function
Fast Search Forward/Backward
Full Function Remote Control
Zoom-in Function
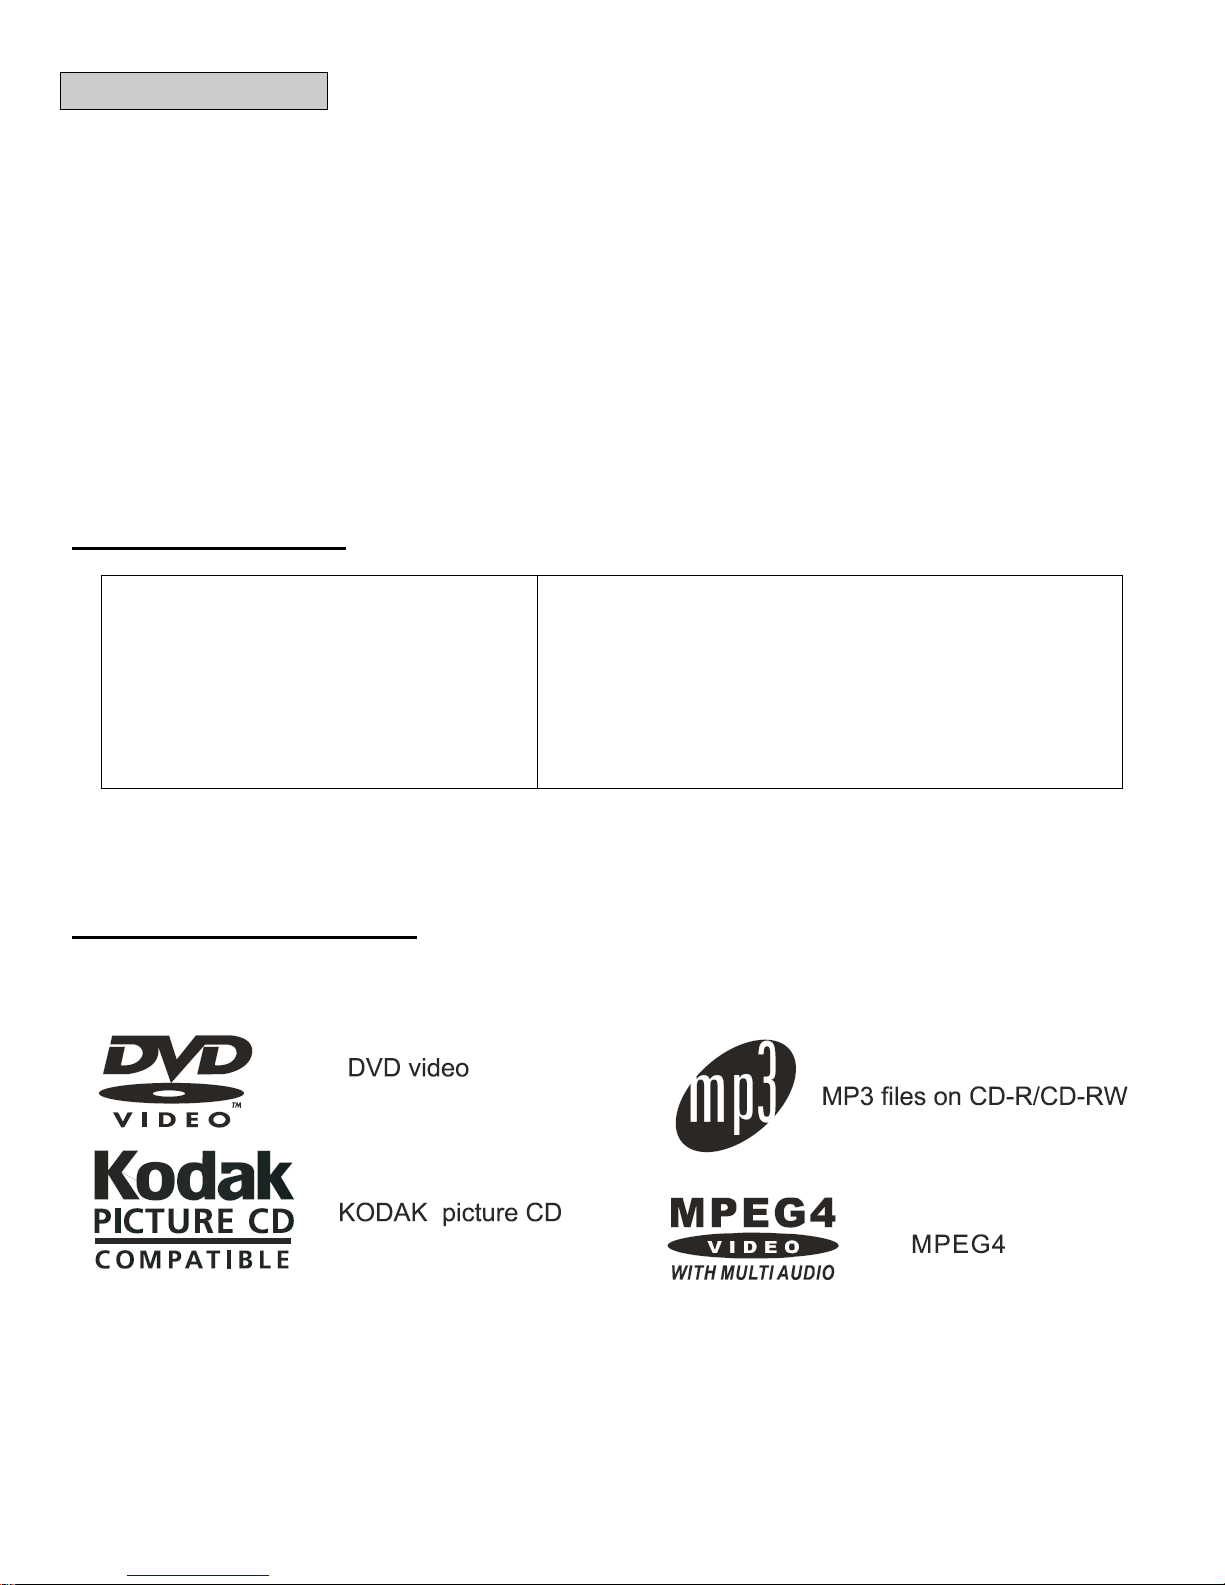
Supports Multiple Media Formats:
Multi Language Display Menu (English, French, Spanish)
Multi Language Subtitles
Parental Lock
LED Amber Display
USB 2.0
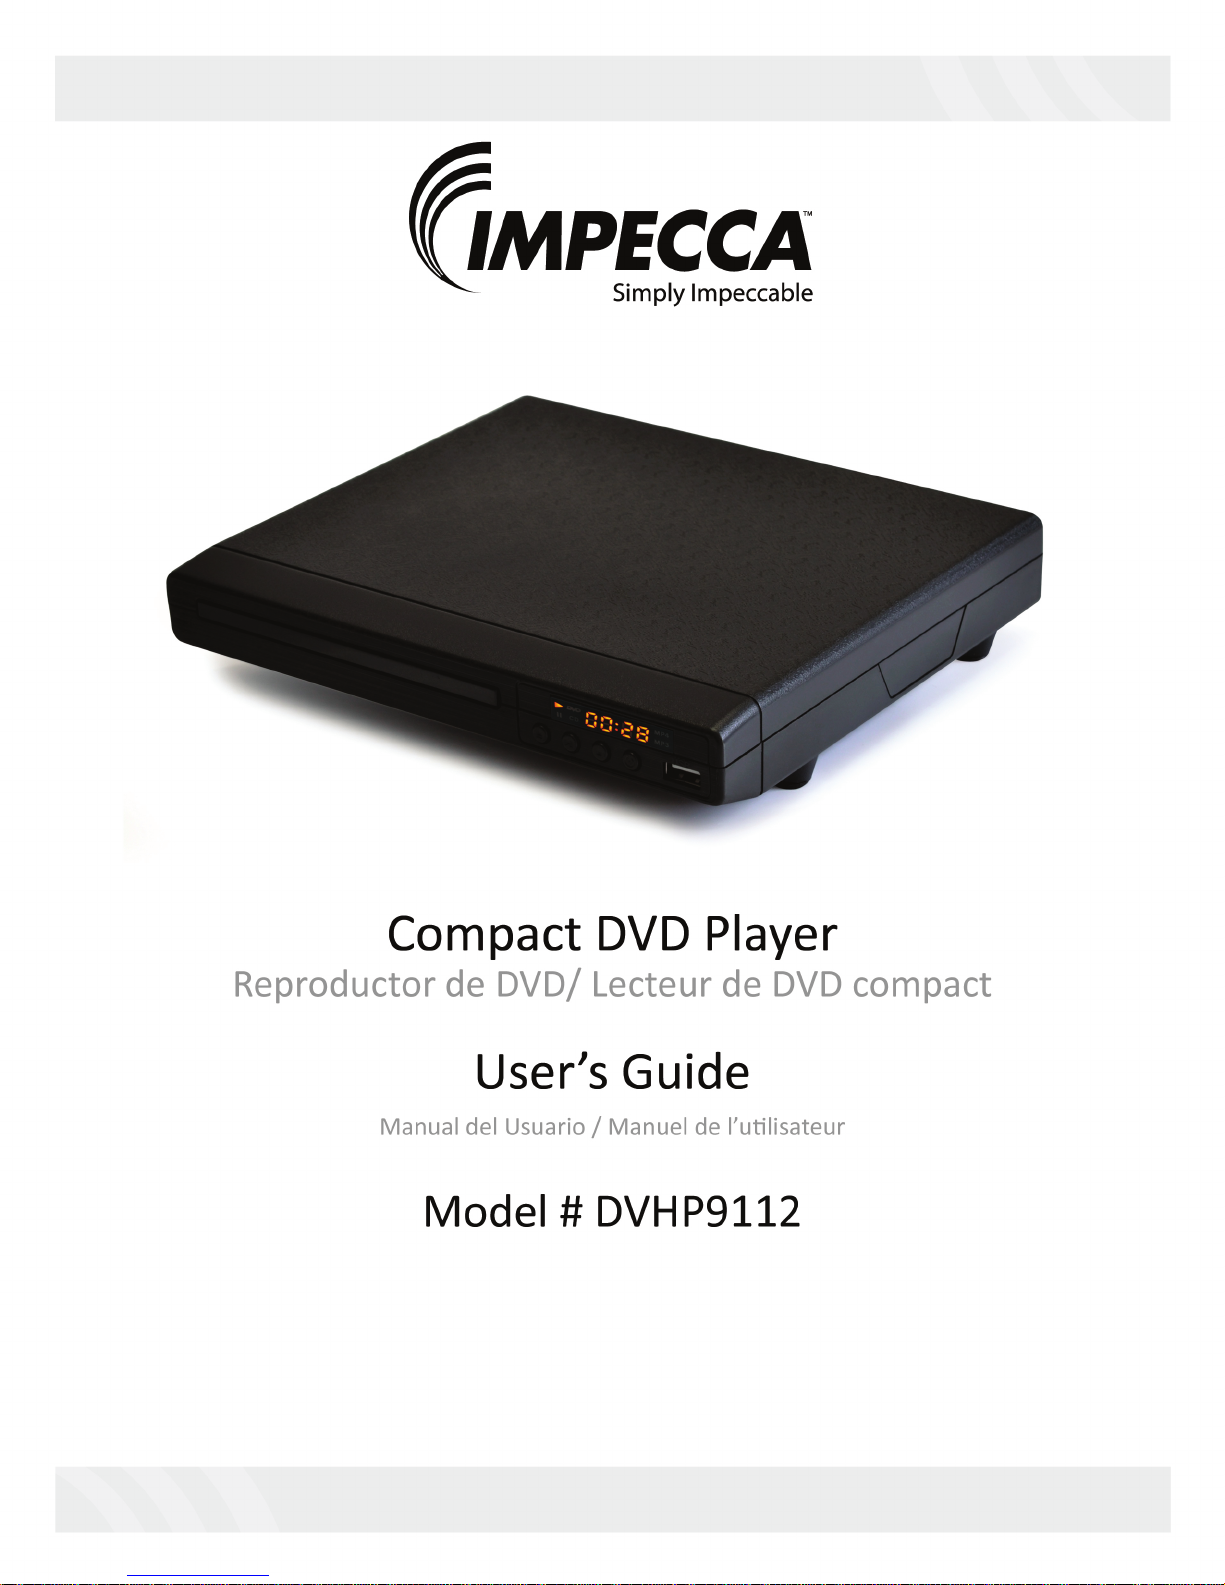
Congratulations on your purchase of the IMPECCA™ Compact Home DVD Player. The Compact Home DVD
player from IMPECCA™ is a great way to enjoy your DVDs without the clutter of a full size player. Its compact
design provides easy access to all your favorite media, and the fast search backwards/forwards will guarantee
that you never miss a minute. Watch from a distance using the remote control, or use the zoom in feature to
get a closer look. The IMPECCA™ Compact Home DVD player is a great way to ensure quality entertainment
within minutes
IMPECCA™…Simply Impeccable.
Before using your player, it is recommended that you familiarize yourself with the features, functions, and
operating procedures described in this manual. Due to slight modifications in production, the instructions,
features, and/or descriptions found in this manual might be slightly different from your product.
Features at a Glance
Supported Media Formats
Page 4

- 3 -
WARNINGS AND SAFETY INSTRUCTIONS
This DVD video player employs a Class 1 Laser Product. To ensure proper use of this product, please read this owner’s
manual carefully and retain for future reference. Modification or adjustments or performance of procedures other than
those specified herein may result in hazardous radiation exposure. As the laser beam used in this DVD video player is
harmful to the eyes, do not attempt to disassemble the casing. Should this unit require maintenance, refer servicing to
authorized and qualified personnel only.
To prevent electric shocks, never attempt to disassemble the casing, do not expose to water, and be sure to match wideblade plug with wide slot and fully insert into a power outlet. This product should be operated only from the type of power
source indicated on the marking label. The IMPECCA™ Compact Home DVD Player is designed to use 120V – 60Hz
only. If you are not sure of the type of power supplied to your home, consult your product dealer or local power company.
NOTE: The player is not disconnected from the AC power source as long as it is still connected to the wall outlet,
even if the player itself has been turned off.
Additional Safety Instructions
Moisture - Do not expose this apparatus water or moisture. To prevent fire or shock hazard, do not place objects filled
with liquids, such as vases, on the DVD player. If liquid enters the unit, unplug the device immediately. Be sure to install
the player in an area where access to the AC power cord is available so that the unit may be unplugged from the wall
socket immediately in the event of trouble or if liquid is spilled onto the unit.
NOTE: If the player is brought directly from a cold to a warm location, or is placed in a very damp room, moisture
may condense on the lenses inside the player and the player may not operate properly. In this case, remove the
disc and leave the player turned on for about half an hour until the moisture evaporates.
Heat - The DVD player should be situated away from heat sources such as radiators, heat registers, stoves, or
other products (including amplifiers) that produce heat.
Proper ventilation - Do not install this player in a confined space, such as a bookshelf or similar unit unless proper
ventilation is provided. Slots and openings in the DVD player casing are provided for ventilation to ensure reliable
operation of the product and to protect it from overheating. These openings must not be blocked or covered. The
openings should never be blocked by placing the product on a bed, sofa, rug, or other similar surface as ventilation will be
inhibited and overheating will occur.
Overloading - Do not overload wall outlets, extension cords, or integral convenience receptacles, as this can result in a
risk of fire or electric shock.
Cleaning - Unplug this product from the wall outlet before cleaning. If dusting or cleaning is required, be sure to clean
the outer portion of the casing only. Do not attempt to clean the inside or to dissemble the casing. Do not use liquid
cleaners or aerosol cleaners. Use a damp cloth for cleaning AND be sure to allow the unit to dry completely before
plugging the unit to a power source.
If the unit requires servicing, refer servicing to qualified service personnel. If the unit is still under warranty, contact
IMPECCA™ or our service center. See terms and conditions specified under the warranty included with this product.
Page 5
- 4 -
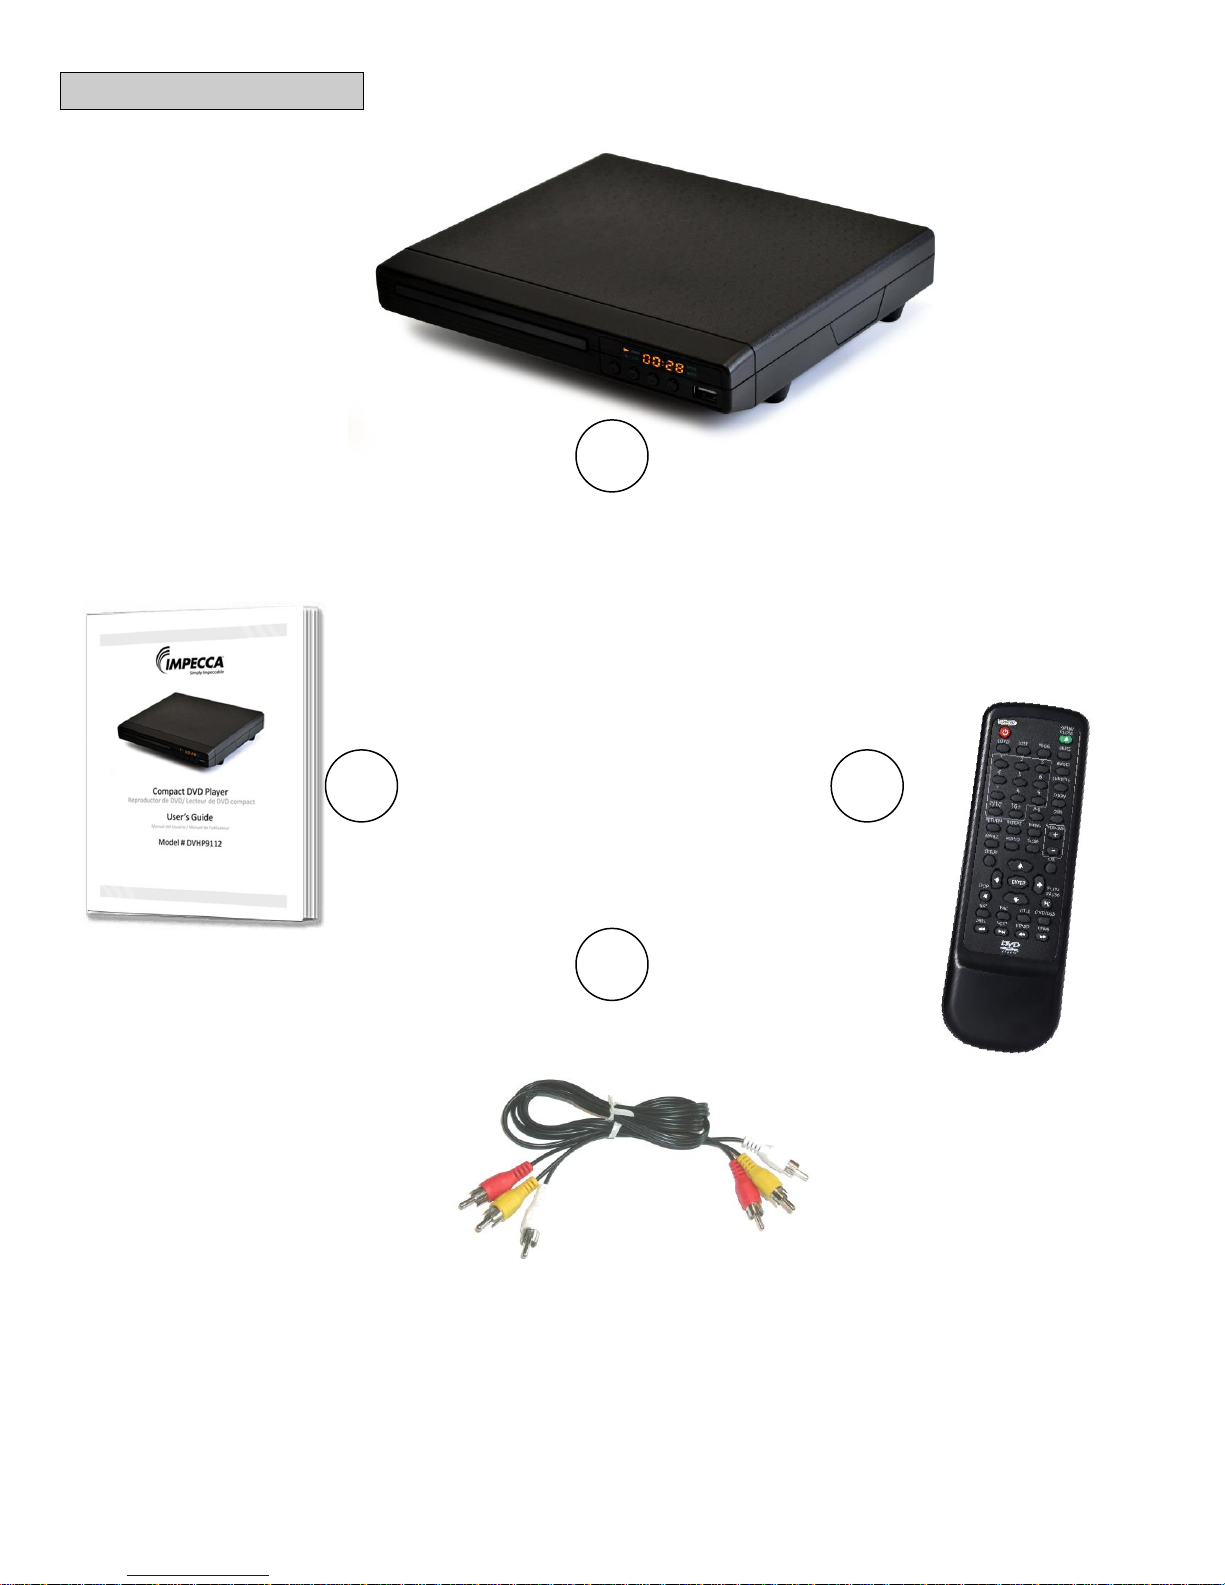
WHAT’S IN THE BOX
1 4 2
3
1. DVHP9112 Compact Home DVD player
2. Remote Control
3. A/V Cables
4. User’s Guide
Page 6
- 5 -
GETTING TO KNOW YOUR DVD PLAYER
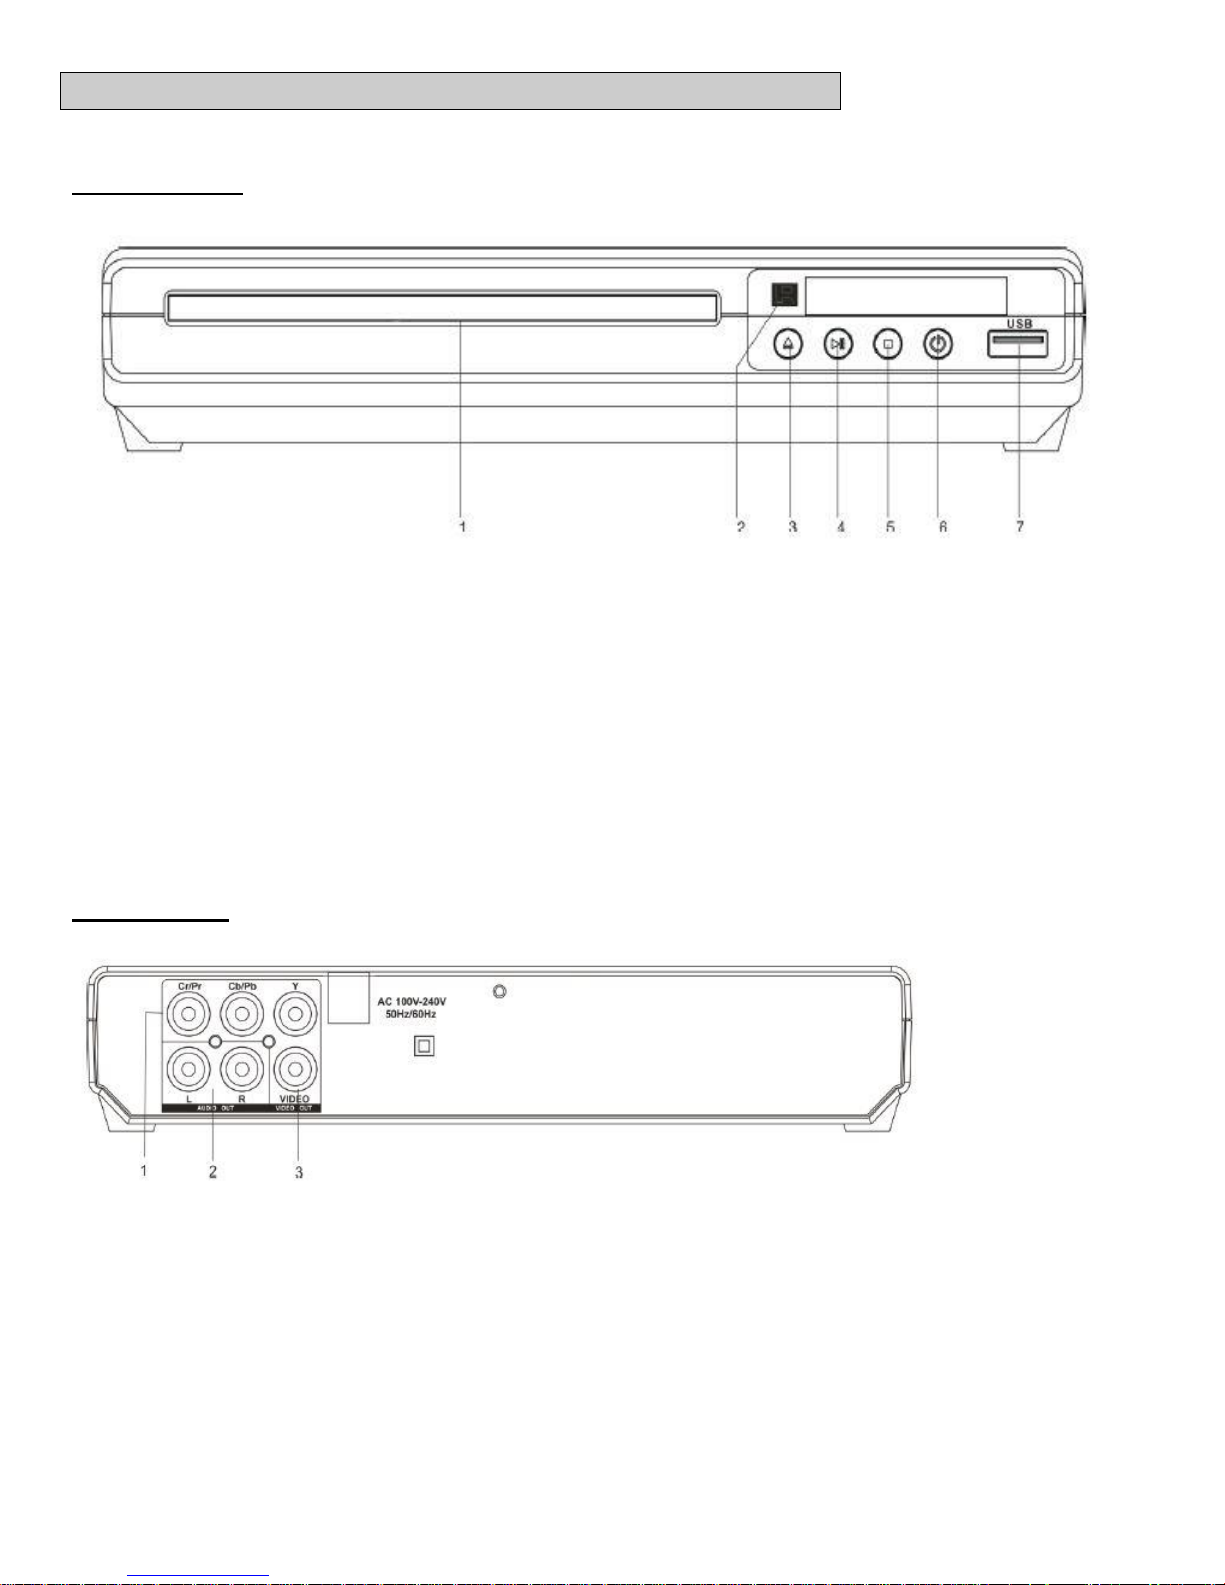
1. Disc Tray
5. Stop
2. Remote Sensor
6. Power
3. Open/Close
7. USB Host Port
4. Play/Pause
1. Component Video (Y;Pb/Cb;Pr/Cr) Output Jacks
3. Video Output Jack
2. Audio Left / Right Output
FRONT PANEL
BACK PANEL
Page 7
- 6 -
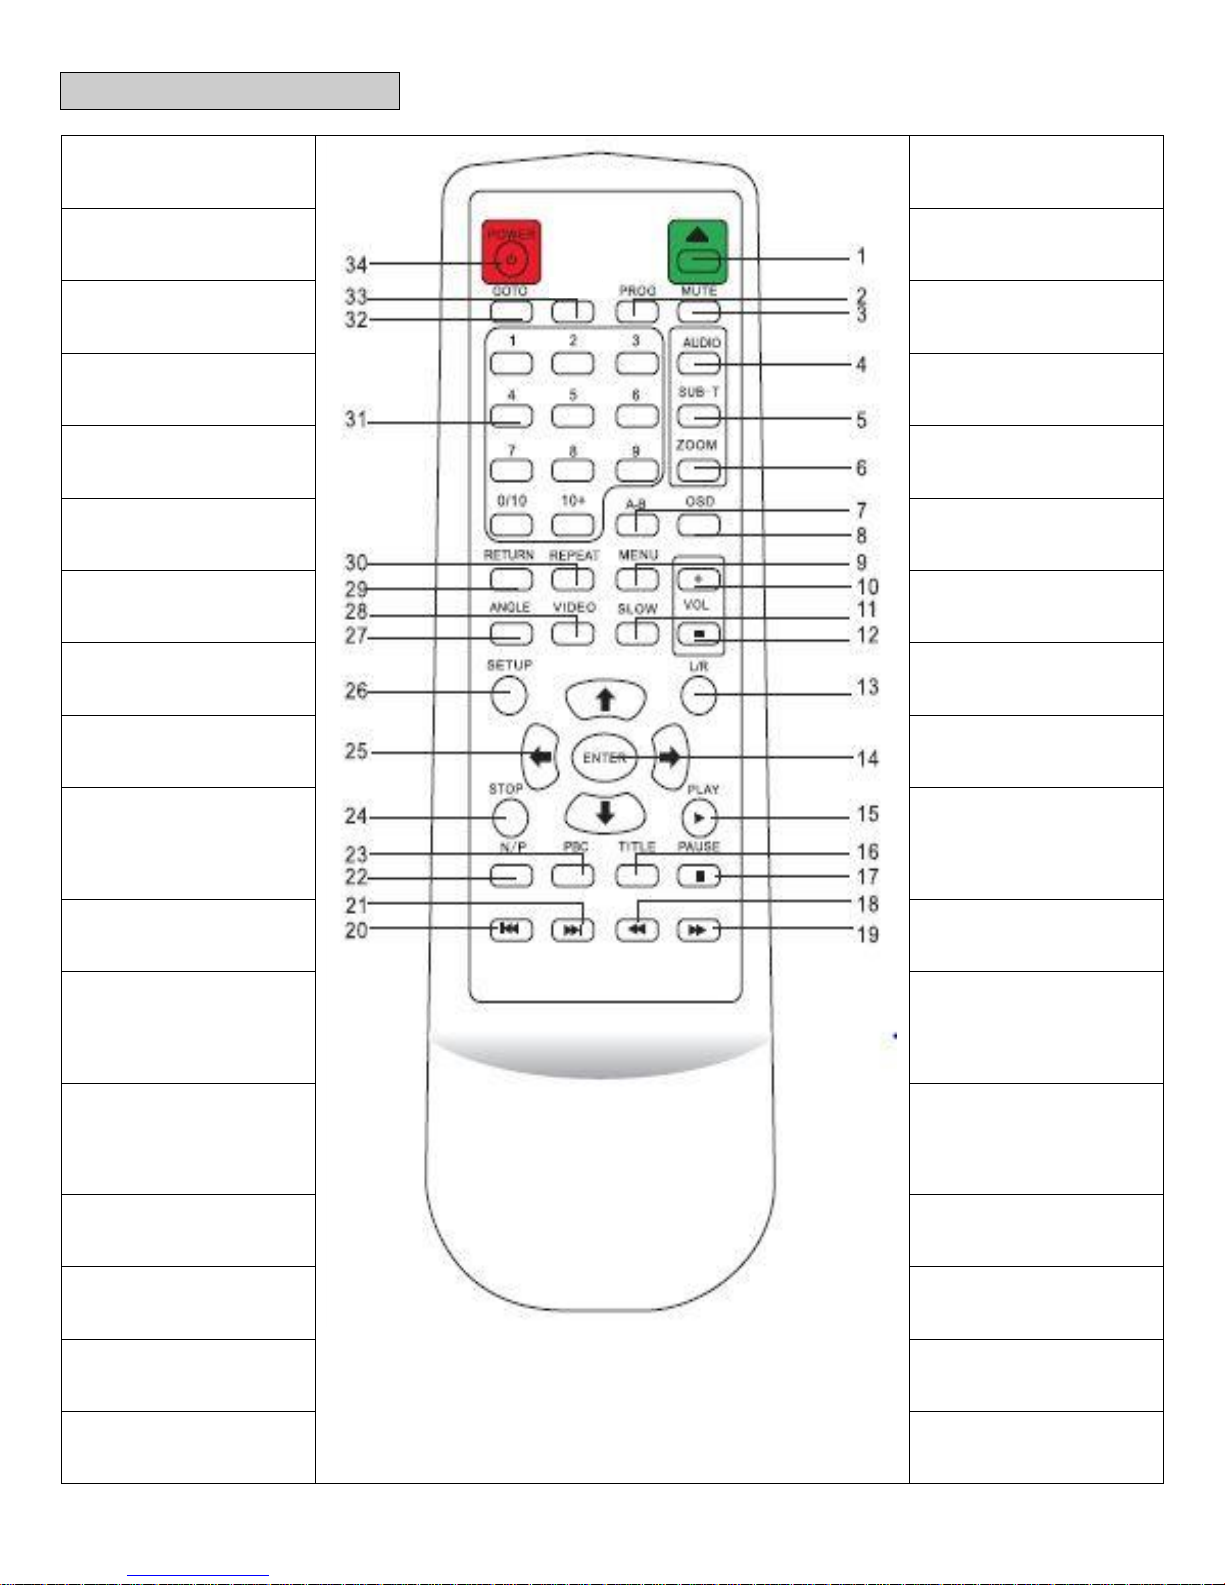
REMOTE CONTROL
18) REV
1) OPEN/CLOSE
19) FWD
2) PROG
(PROGRAM)
20) PREV
3) MUTE
21) NEXT
4) AUDIO
22) N/P
(NTSC/PAL)
5) SUBTITLE
23) PBC
6) ZOOM
24) STOP
7) A-B
25) DIRECTION
BUTTON
8) OSD
26) SETUP
9) MENU
27) ANGLE
10) VOL +
(VOLUME
INCREASE)
28) VIDEO
11) SLOW
29) RETURN
12) VOL (VOLUME
DECREASE)
30) REPEAT
13) L/R
(LEFT/RIGHT AUDIO
CHANNEL)
31) 0-9 AND 10+
NUMBER KEYS
14) ENTER
32) GOTO
15) PLAY
33) USB
16) TITLE
34) POWER
17) PAUSE
USB
Page 8

- 7 -
1. OPEN/CLOSE - Press to open and close the disc drawer.
2. PROG - Press to program a DVD to play chapters or tracks in a specified order.
3. MUTE - Press to mute or unmute the volume.
4. AUDIO - Press to switch between available audio modes.
5. SUBTITLE - Press to turn available subtitles on or off.
6. ZOOM - Press to zoom in or out of a picture on the screen.
7. A-B - Press to create a repeating loop of a specified section of a loaded DVD.
8. OSD - Press to view the various On Screen Display modes.
9. MENU - Press to access the main menu on a loaded DVD or disc.
10. VOL + : Press to INCREASE the volume.
11. SLOW - Press to view the loaded DVD in slow motion.
12. VOL - : Press to DECREASE the volume.
13. L/R - Press to adjust the audio mode of a supported DVD.
14. ENTER - Press to CONFIRM selections within on-screen menus or the setup menu.
15. PLAY - Press to play a loaded disc.
16. TITLE - Press to access the title menu of a loaded DVD.
17. PAUSE - Press to pause a loaded disc.
18. REV- Press to scan backward. Press again to increase scan speed ( 2x, 4x, 8x, 16x, 32x).
19. FWD - Press to scan forward. Press again to increase scan speed ( 2x, 4x, 8x, 16x, 32x).
20. PREV – Press to return to the previous title /chapter / track.
21. NEXT – Press to skip to the next title /chapter / track.
22. N/P - Press the change the output signal to NTSC / PAL / AUTO.
23. PBC - Open the VCD main menu.
24. STOP - Press to stop a DVD or CD during play.
25. DIRECTION Buttons (▲▼◄►) - Press to navigate through on-screen menus or the setup menu.
26. SETUP - Press to access the setup menu.
27. ANGLE - Press to access different camera angles on supported DVDs.
28. VIDEO - To change the video output mode to CVBS/RGB
29. RETURN - To return to the previous menu
30. REPEAT- Press to enable repeat play of track or tracks.
31. NUMBER KEYPAD - Input numbers when in Program mode.
32. GOTO – Go to a specific play time/point on a DVD.
33. USB - Press to switch between DVD and USB modes (if loaded or connected).
34. POWER - Press to turn the power On/Off or restore the DVD player to standby mode.
Page 9
- 8 -
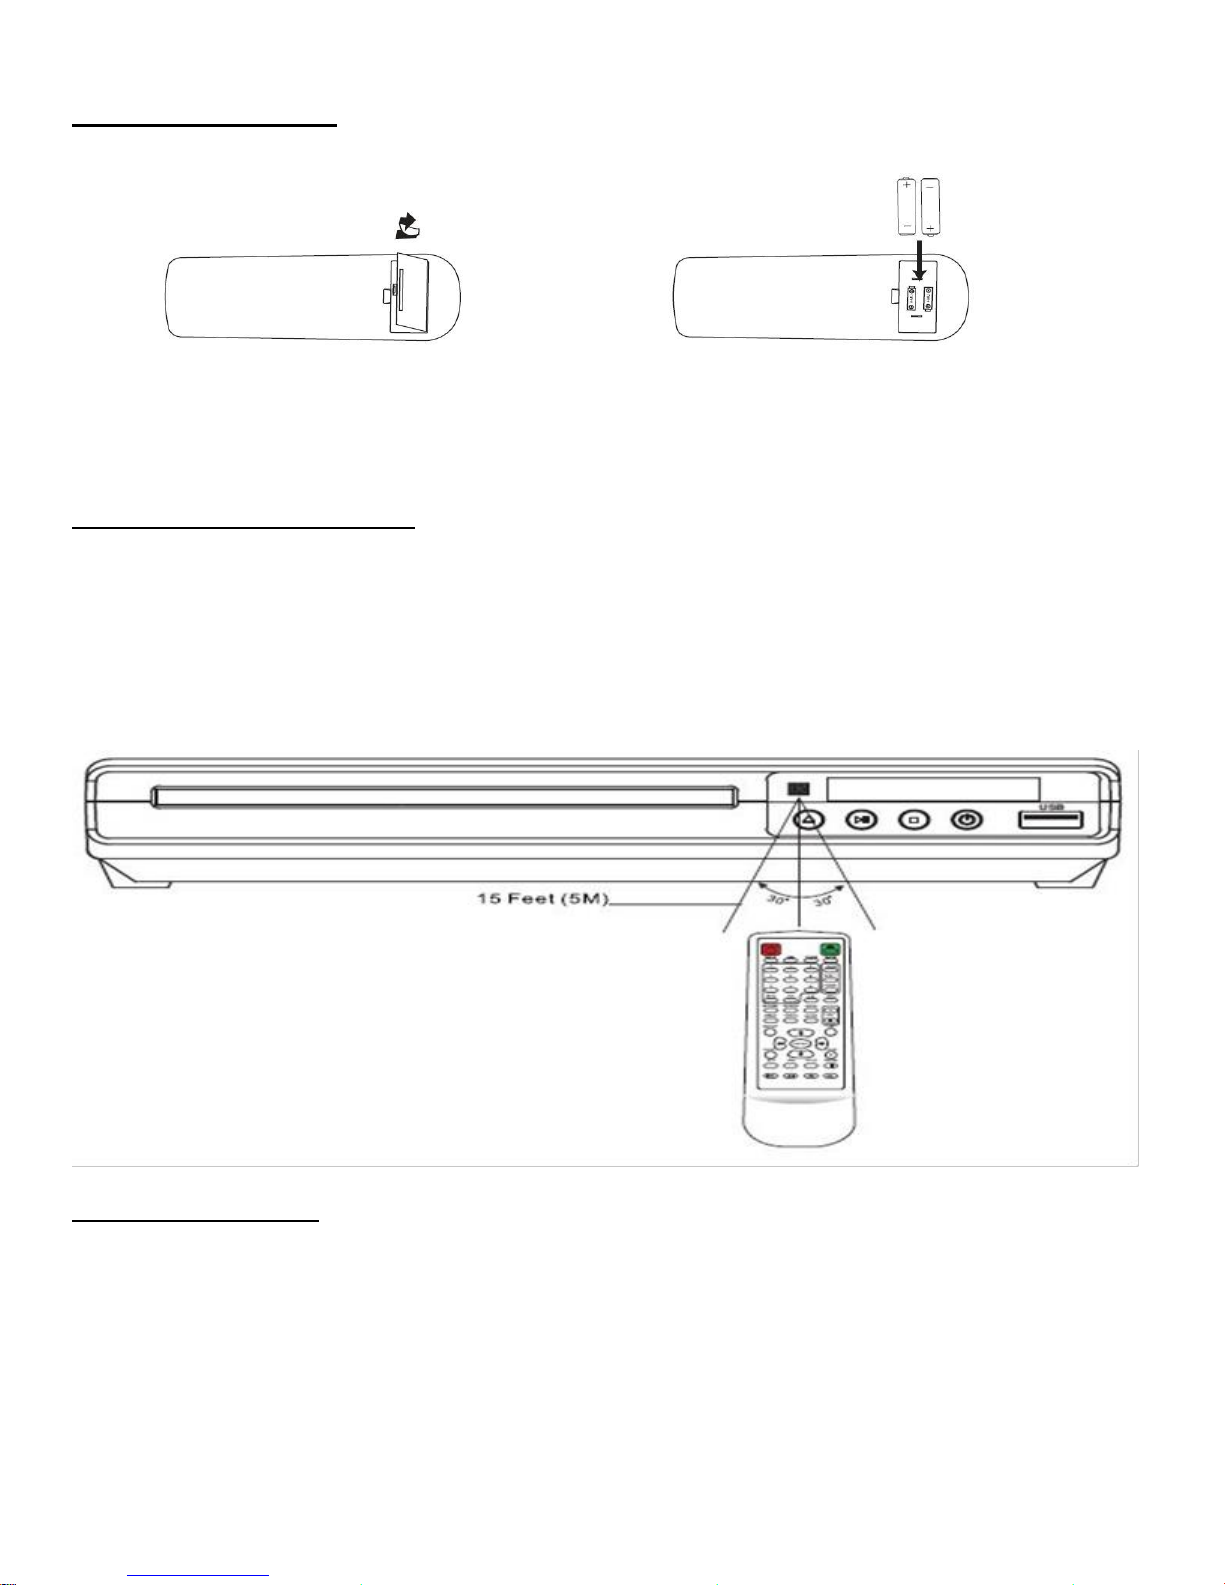
Installation of Batteries
1. Press and lift the back cover up to open the battery compartment of the remote control.
2. Insert two AAA size batteries. Make sure that the polarities of the batteries ( + ) and ( - ) match those of the
battery compartment.
3. Close the battery compartment cover.
Operating the Remote Control
Aim the remote control at the remote receiver (located on the LED display) on the DVD player and
make your selections.
For best results, use the remote control within 7 meters from the DVD player and within the arc radius
shown below ( ± 30°).
Handling Instructions
Do not expose the remote control to hot or moist conditions for extended periods of time.
Avoid dropping remote control from high positions as high impact collisions may damage the infrared
device.
When not in use, please remove batteries. If remote control is not responsive or if it does not perform
properly, replace batteries.
Page 10

- 9 -
CONNECTING TO A TELEVISION
Basic TV Connection: Connecting to a TV using the standard Audio/Video cable
You can connect the DVD
player to a standard television
using the player's Audio and
Video jacks.
1. Connect the supplied
Audio/Video cable using the
red and white cables to the
Audio jacks on the rear of the
DVD player and to the Audio
Inputs on your television.
2. Connect the video cable
(yellow) to the Video jack on
the rear of the player to the
Video Input on your television.
3. Set your TV to its
appropriate Video input.
Connection to TV using YUV Output Jacks
(cable NOT included):
1. Connect a YUV cable (not
included) to the Y, Pb, Pr jacks on
the DVD player and to the Y, Pb/Cb,
Pr/Cr input jacks on your television.
2. Connect the supplied Audio/Video
cable using the red and white cables
to the Audio jacks on the rear of the
DVD player and to the Audio Inputs
on your television.
3. Set the Component setting (on
the video settings page) to YUV.
When connecting this unit and other components, be sure that all devices are turned off.
Audio/Video cables are connected according to different color identification and should be fitted firmly
into the appropriate jacks.
Page 11

- 10 -
BASIC DVD PLAYER OPERATION
Before You Begin
Turn on your TV and select the appropriate video input settings to correspond to the input used when
connecting to the DVD player. Refer to the “System Connections” section of this manual.
If you have connected the player to an audio system (stereo or amplifier) turn on your audio system
and select the appropriate audio input settings to correspond to the input used when connecting to
the DVD player.
Note: As TV and/or audio systems vary, please refer to your TV or Audio system user’s manual.
Play
1. Press the POWER button on the DVD player or press the Power/Standy button on the DVD
remote control.
2. Press OPEN/CLOSE button (on the DVD player or remote control) to open the disc tray.
3. Hold the edge of the disc and place it in the tray with the label side up.
4. Press OPEN/CLOSE button (on the DVD player or remote control) again to close the disc
tray.
The DVD player starts playback or opens the DVD disc menu automatically. Use the
arrows and the enter button to navigate the DVD’s menu screen.
If the DVD does not automatically begin playing, press PLAY (on the DVD player or remote control).
Note: The auto-load sequence of each DVD, CD, VCD disc may vary according to format and/or
the way the disc was authored. Some DVDs will auto-play a series of previews, copyright notices,
or advertisements before loading the Menu screen. Certain buttons on the remote control, such as
the MENU, TITLE, F.RWD, F.FWD, PREV, NEXT, and GOTO buttons, may be automatically
disabled until the auto-load sequence is completed.
Pause
To pause, press the PLAY/PAUSE button once during playback.
To resume , press the PLAY/PAUSE button again.
Page 12
- 11 -
Forward/Reverse Scan
Press REV or FWD during playback.
To increase the Fast Forward or Rewind speed, press the REV or FWD button again to choose
the desired speed (Normal, x2, x4, x8, x16, x32)
Skip Next/Previous
You can skip to a specific chapter or track during playback.
Skipping Ahead
Press NEXT during playback.
You will advance to the next chapter/track each time you press the NEXT button.
Skipping Back
Press PREV during playback.
If you press the PREV button midway through a chapter, the DVD player returns to the
beginning of the chapter. The player then skips a chapter each time you press the PREV
button.
Stop
The DVHP 9112 DVD player has a “Last Played” memory feature. When you press stop, it will retain
the position so that you can resume play from this point, even after turning the DVD player off.
Press STOP once to stop and hold playback at the current position. Pressing Play will
resume play from the current position.
Press STOP twice to completely stop and reset the disc to the beginning. The “Last
Played” feature will not be activated.
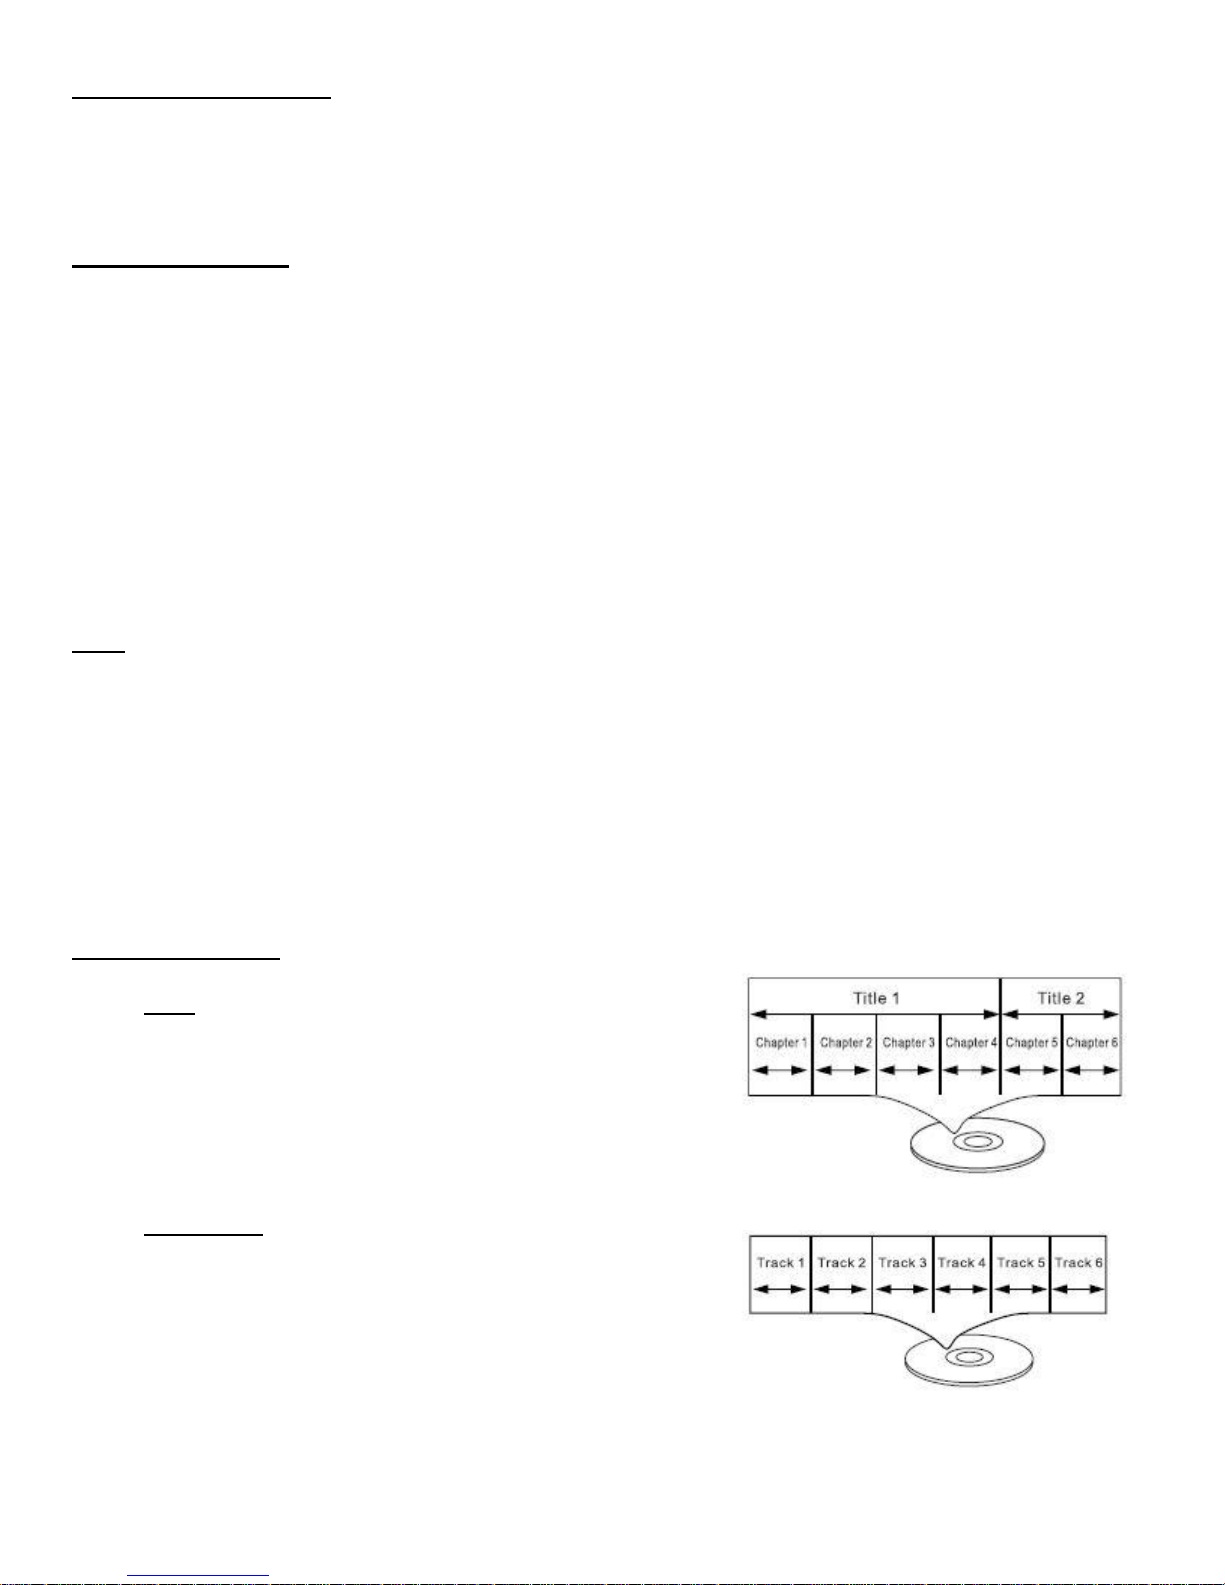
NOTE: Disc Types
DVD
Data on most DVDs is divided into sections called
titles, and then into subsections called chapters, each
of which is given a title or chapter number.
AUDIO CD
Data on an audio CD is divided into sections called
tracks, each of which is given a track number.
Page 13

- 12 -
USING USB MEMORY STICKS
1. Turn off the DVD player.
2. Insert the USB Memory Stick (with MP3, WMA or JPEG files) to the USB Port on the front of
the DVD Player.
3. Turn on the DVD Player. Press the USB button on the remote control.
4. The Folder/Files list will appear on the screen.
5. Use the Direction buttons to select and highlight the desired folder or file. Press the ENTER
button to confirm and begin playback.
JPEG (PICTURE) MP3 DISCS OPERATIONS:
1. Turn on the player and place the disc or USB Memory stick into the
DVD player as indicated on previous procedures. The Folder/Files list will appear on the
screen.
2. Use the Direction buttons to select and highlight the desired folder. Press the ENTER
button. The file list will appear on the screen.
3. Using the Direction buttons to select and highlight the desired file. Press the ENTER button
to begin playback.
Repeat Feature
During playback, press the REPEAT button repeatedly to select:
Repeat Single: Play the current track repeatedly
Repeat Folder: Play the tracks in the current folder repeatedly
Off: Resume normal playback
Page 14
- 13 -
SETTINGS
1. Press the SETUP button. The setting menu will appear on the screen.
2. Use the Direction buttons to select and highlight the function you need to configure. Press the
Direction button. Press the ENTER button to confirm the selection.
3. Press the SETUP button to save the settings and exit.
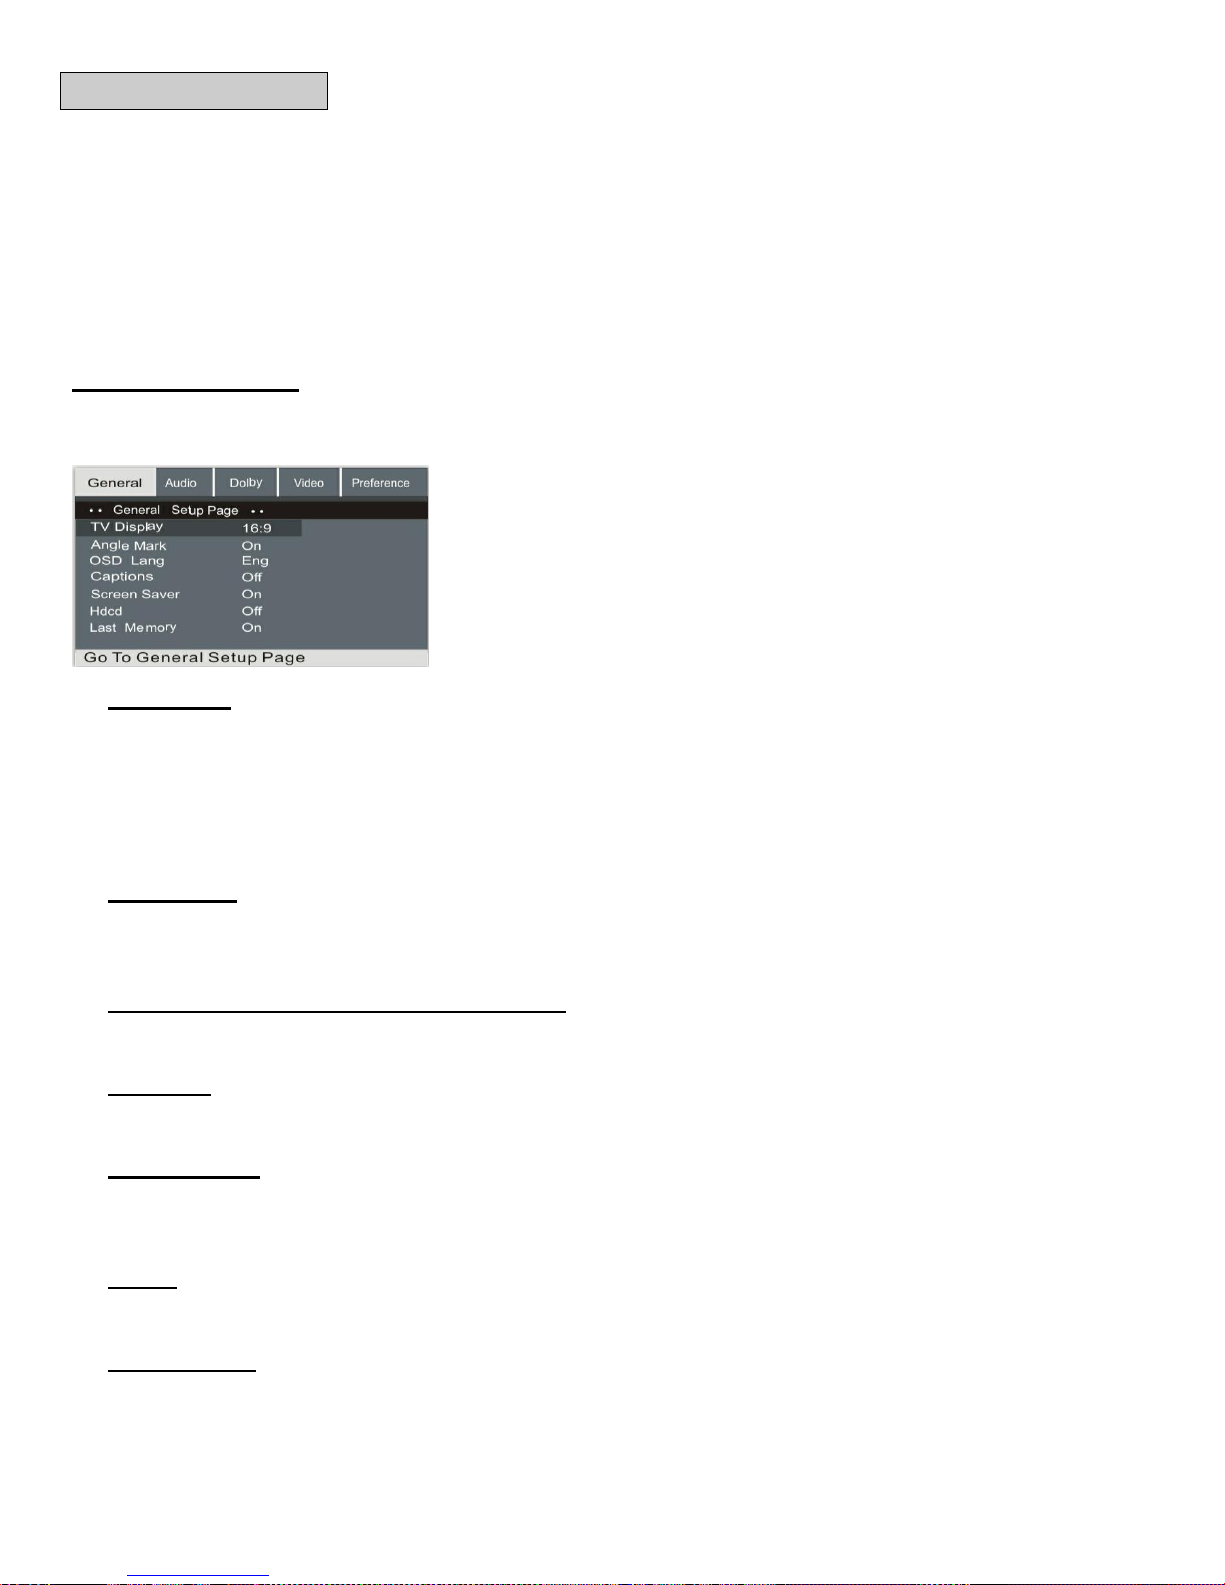
General Setup Page
This page allows you to configure the TV Screen format, Angle Mark, OSD, Captions, HDCD, and
Last Memory settings.
TV Display
If TV Display is selected, press the Direction button to enter. Press the Direction buttons
to select 4:3 or 16:9 to match the aspect ratio of your TV then press the Enter button to
confirm your selection. Press the SETUP button to save the setting and exit.
4:3 : Select when the unit is connected to an external 4:3 TV.
16:9: Select when the unit is connected to an external wide-screen TV.
Angle Mark
You can enable or disable the ability to select different camera angles when viewing DVDs that
offer this feature.
OSD Lang (On screen display language)
You can select your desired OSD language from this menu.
Captions
You can use this feature to display recorded explanatory captions.
Screen Saver
When the unit is in Stop mode for several moments, a screen saver will display if this feature is
enabled.
HDCD
You can use this feature to enable playback of High Definition compatible digital CDs
Last Memory
This feature will enable the DVD player to resume playback from the last point played before
the player was turned off.
Page 15
- 14 -
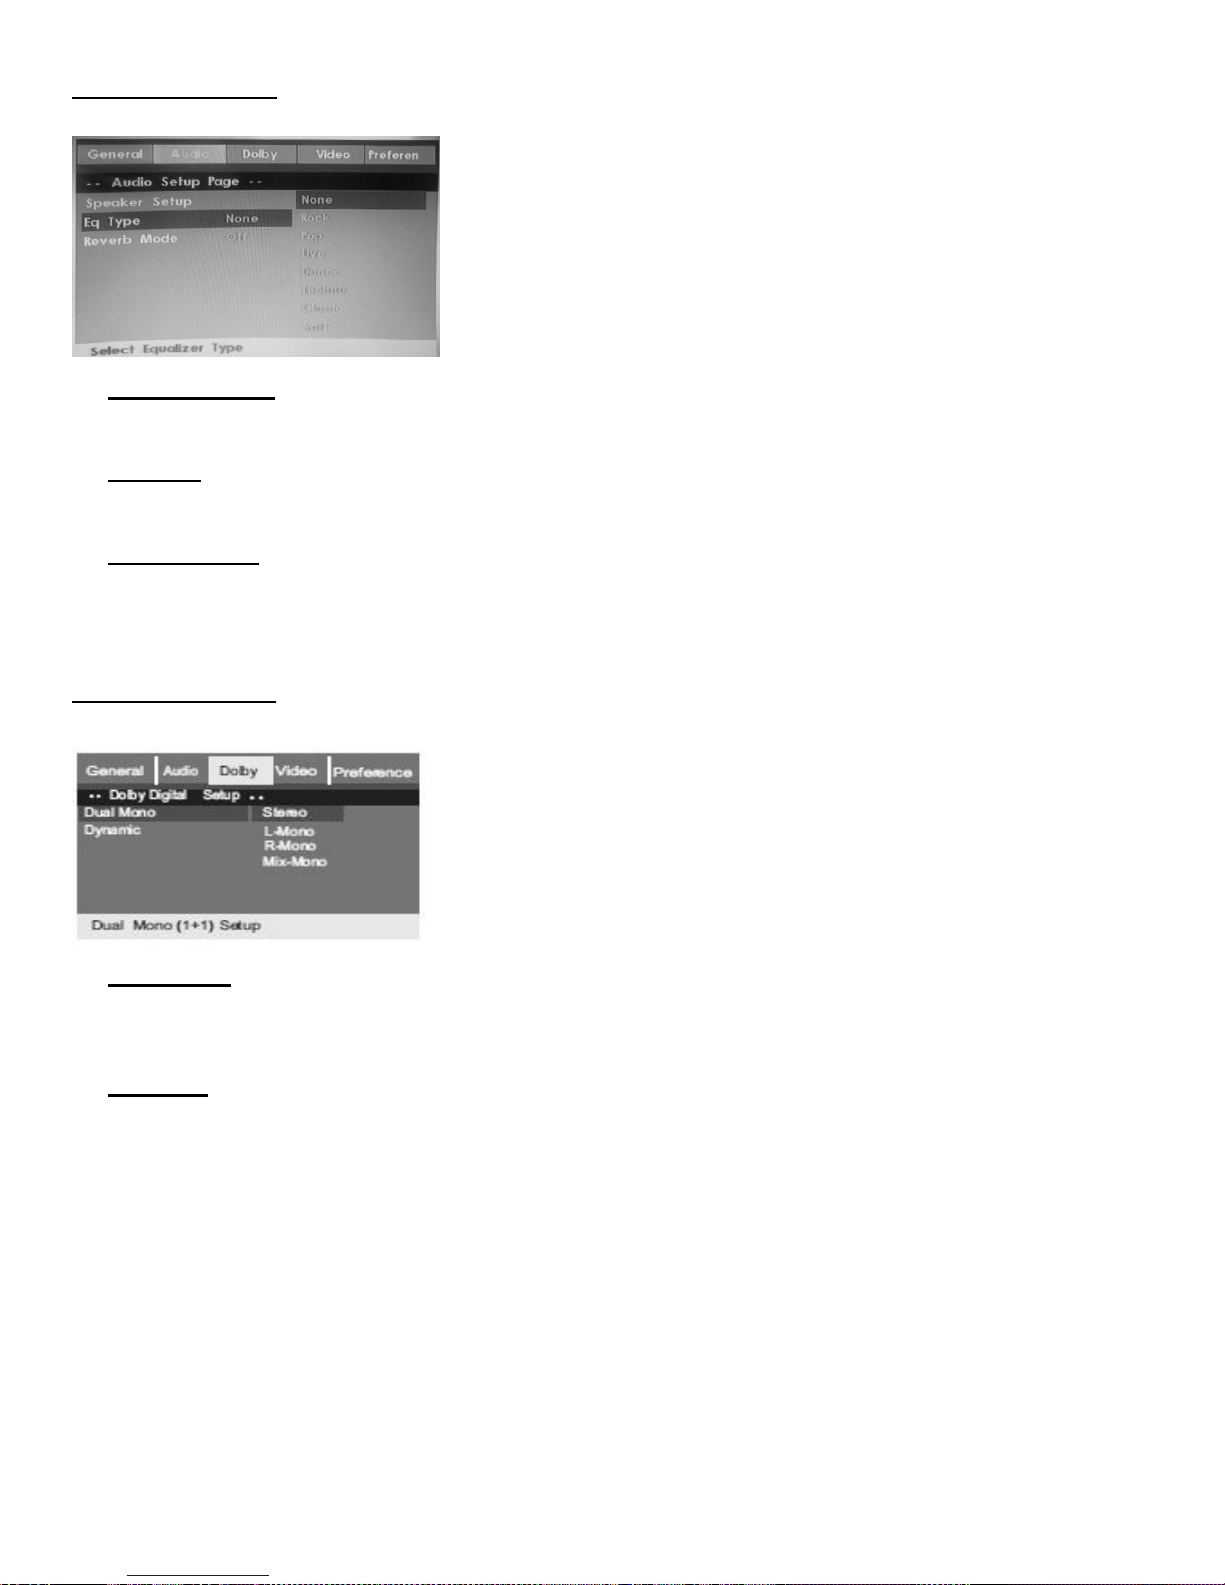
Audio Setup Page
This page allows you to configure the Audio settings.
Speaker Setup
You can use this feature to set the front speakers to LT/RT Stereo.
Eq Type
You can use this feature to select equalizer settings.
Reverb Mode
You an enable this mode to enhance or simulate a surround sound environment.
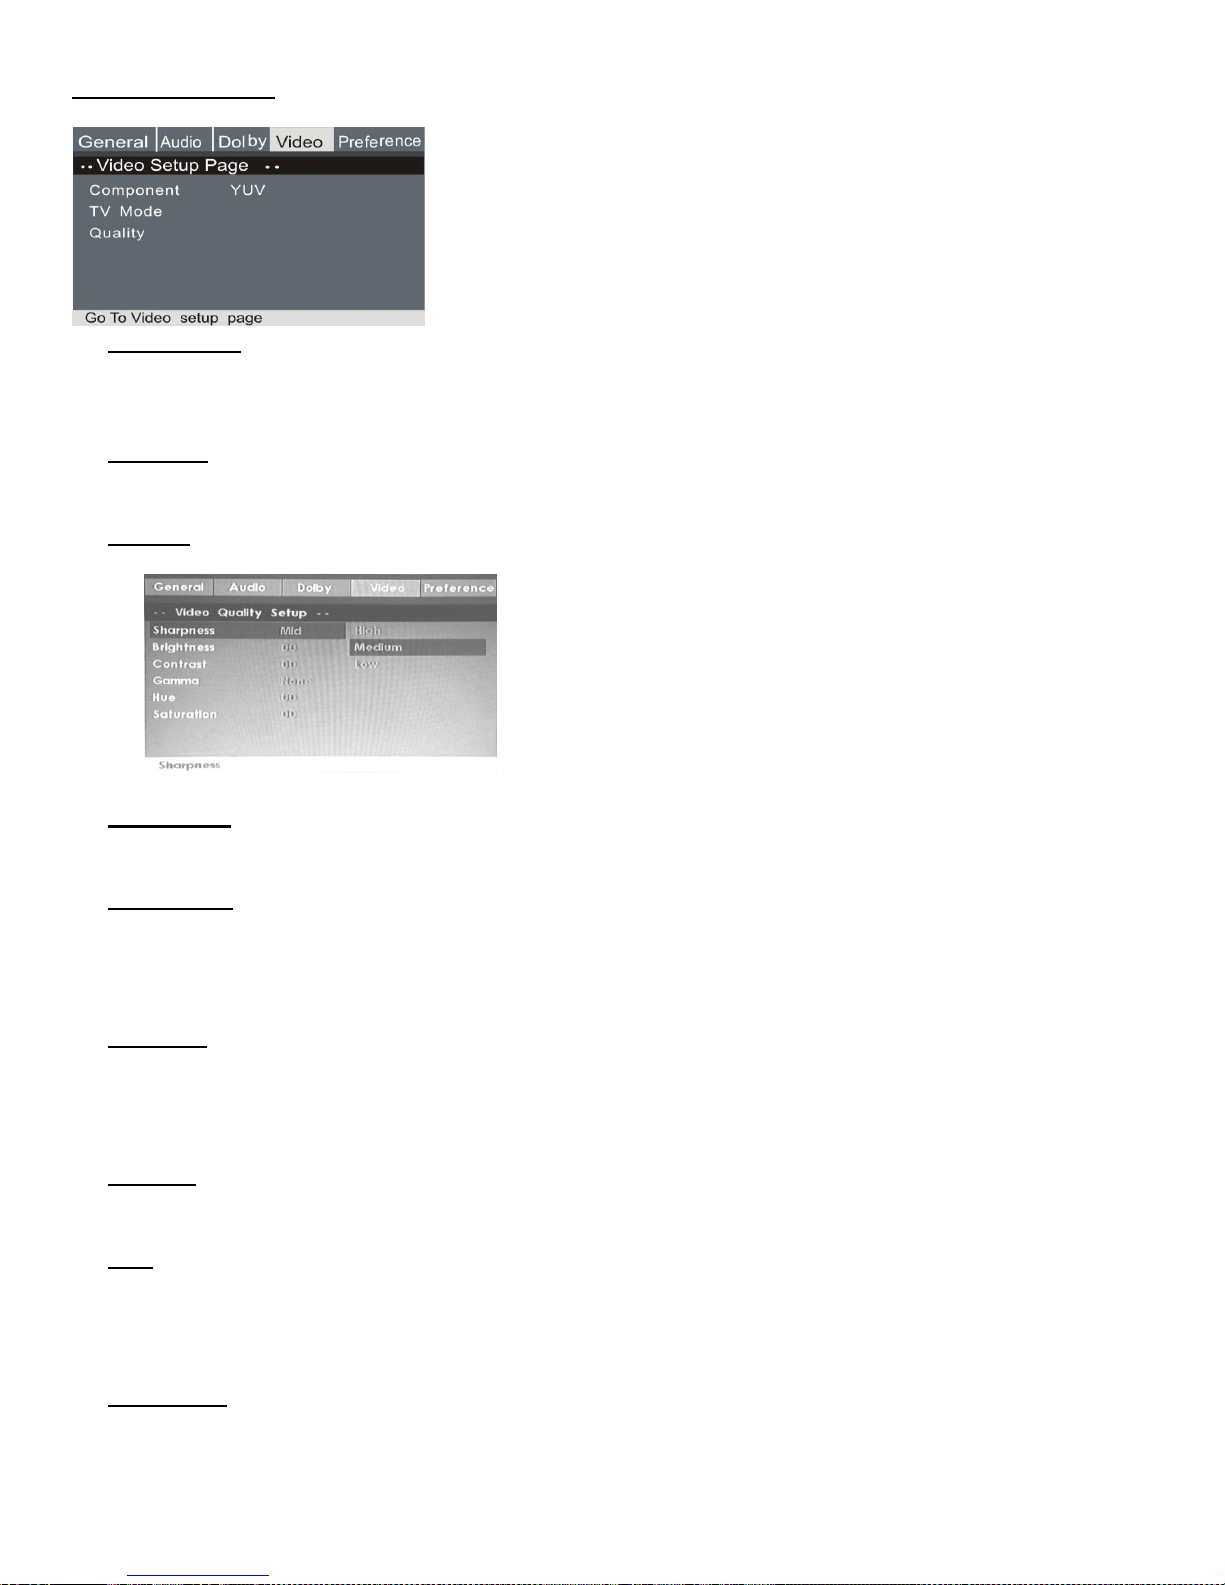
Dolby Setup Page
This page allows you to configure the Dolby settings.
Dual Mono
If your amplifier/decoder has Dolby digital output, you can use this feature to select “stereo,
left mono, right mono, or mixed mono” mode.
Dynamic
You can use this setting to dynamically lower the volume and still maintain the original tone
quality. This is the range, measured in decibels (dB), between the highest and lowest sound
registers on the soundtrack.
Page 16
- 15 -
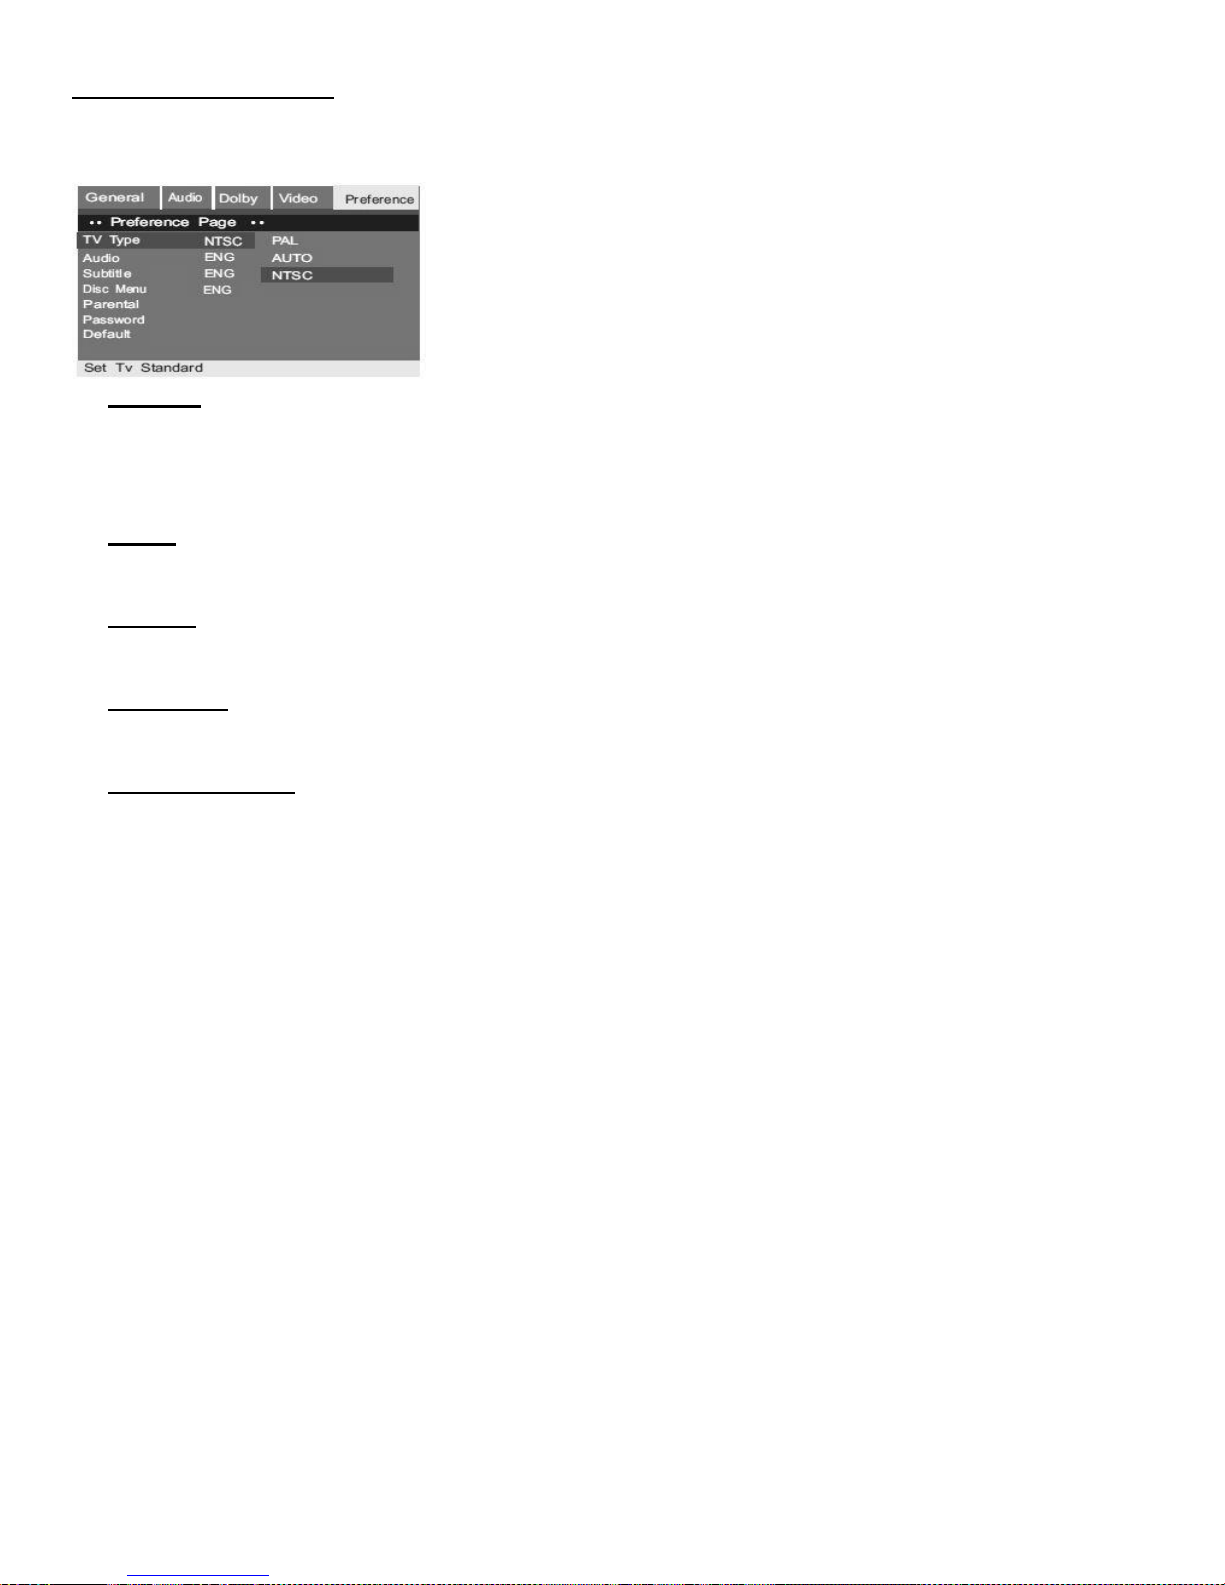
Video Setup Page
This page allows you to configure the Video output settings.
Component
If you are connecting the composite video output on the DVD player to the composite video
input on your TV, choose the CVBS setting. Otherwise, select YUV.
TV Mode
Use this feature to select P-Scan or Interlace.
Quality
Select Quality to modify additional settings as shown:
Sharpness
Use this feature to adjust the sharpness – High, Medium, Low.
Brightness
Use this feature to adjust the quality of your video display. Select Brightness and then use the
Left/Right Direction buttons to adjust the Brightness. Press the Enter button to confirm and
return to the previous menu.
Contrast
Use this feature to adjust the quality of your video display. Select Contrast and then use the
Left/Right Direction buttons to adjust the Contrast. Press the Enter button to confirm and
return to the previous menu.
Gamma
Use this feature to adjust the Gamma.
Hue
Use this feature to adjust the quality of your video display. Select Hue and then use the
Left/Right Direction buttons to adjust the Hue. Press the Enter button to confirm and return
to the previous menu.
Saturation
Use this feature to adjust the quality of your video display. Select Saturation and then use the
Left/Right Direction buttons to adjust the Saturation. Press the Enter button to confirm and
return to the previous menu.
Page 17
- 16 -
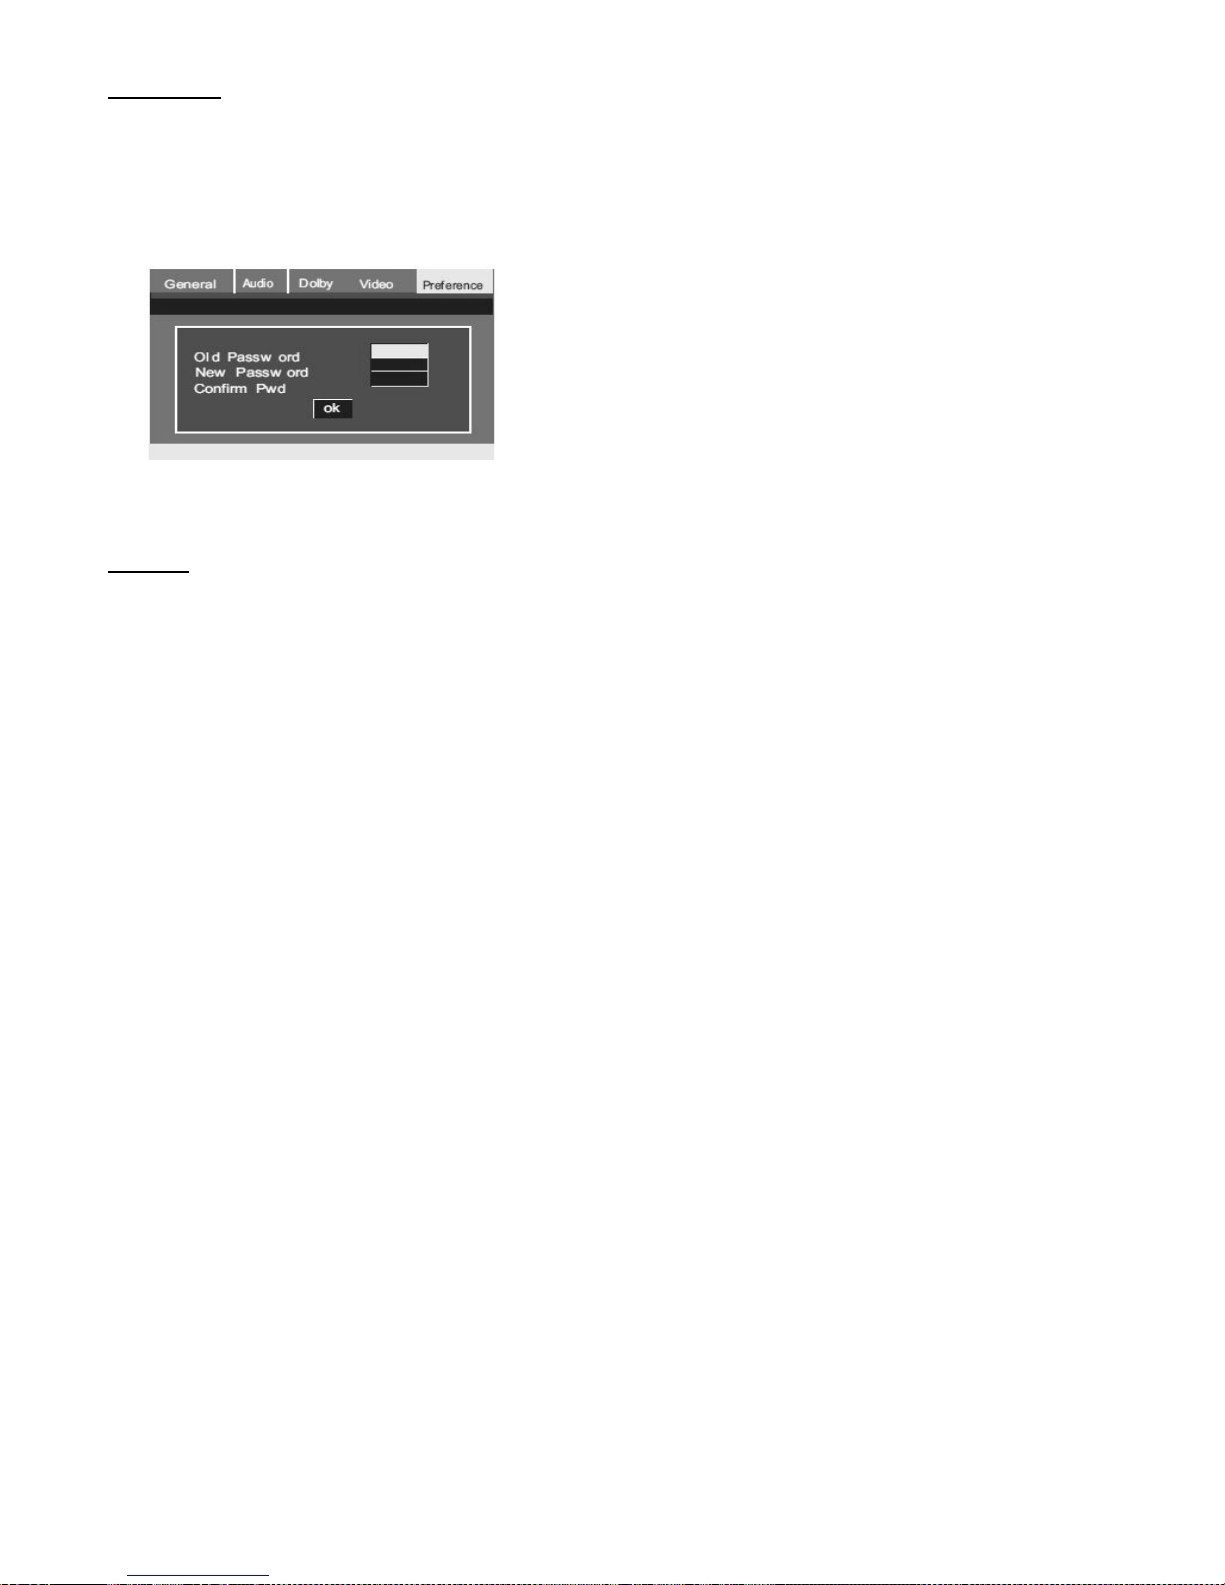
Preference Setup Page
This page allows you to configure additional preferences. The Preference Setup Page is only
available when there is no disc inserted in the DVD Player. If a setting is adjusted, it will only be
changed once the machine has been turned off and on again.
TV Type
This DVD player supports Multi (AUTO), NTSC, and PAL systems. If you select an output
type that is not supported by your TV, the screen will flicker with a black and white display.
Press the SETYP button and use the arrow buttons to select the correct TV type from this list.
Audio
Use this feature to select the preferred default language when watching DVDs.
Subtitle
Use this feature to set the preferred subtitle language as the default.
Disc Menu
Use this feature to set the preferred menu language as the default.
Parental Control
The parental control function works in conjunction with the different censorship classes
assigned to DVDs.
Rate levels:
1 Kid Safe
2 G: All ages
3. PG: Parental Guidance
4. PG-13: Parental Guidance recommended for children below the age of 13
5. PG-R : Parental Guidance suggested for children below the age of 17
6. R: Parental guidance strongly recommended for children below the age of 17
7. NC17 : Not suitable for children below the age of 17
8. Adult: Adult only
Page 18
- 17 -
Password
Default
Use this feature to setup and change a password to manage rate levels or to prevent others
from changing the settings. From the Preference Page, choose Password and then select
Change. You will need to enter the old, or current, password and then enter a combination of
numbers in the New Password field. You will need to retype this combination in the Confirm
Pwd field. Be sure to make a note of the new password.
Note: The default password is 8888
Use this feature to reset customized defaults to the original settings for the unit (except
password).
Page 19

- 18 -
TROUBLESHOOTING
Problem
Solution
The Power light does not come on
1. Plug the power cord into a wall outlet.
2. Try a different wall outlet.
No picture
1. Select the appropriate video input format on your TV in
order to receive the player’s output signals.
2. Fully insert the plugs on the video cable into the
corresponding jacks.
No sound
1. Fully insert the plugs on the audio cable into the
corresponding jacks.
2. Switch on the stereo system (if applicable).
3. Select the correct output in the setup menu.
Distorted picture
1. Remove and clean the disc
2. Some distortion may occur during the FORWARD and
REWIND operations. This is normal.
Flickering or unstable brightness.
1. Connect the player directly to your TV.
NOTE: Disruptions can be caused by copy protection
systems on a DVD or CD.
The player does not operate.
1. Be sure that a disc is loaded.
2. Be sure that the disc is compatible (check the disc’s
format and color signal coding standard).
3. Check that the disc is correctly loaded.
4. Clean the disc.
5. Be sure that the DVD player settings are correct.
No response when buttons are
pressed.
1. Switch off the DVD player, unplug the power cord, and
then plug in the power cord and switch it on again.
The remote control handset does not
work.
1. Point the remote control handset at the sensor.
2. Check that the remote control is no more than 7 meters
from the sensor
3. Replace the batteries with new batteries.
If you experience any issues that are not listed above, or if you are unable to resolve your issue after trying the
methods and solutions described above, please contact Impecca technical support team:
Email: service@impeccausa.com
Website: www.impeccausa.com
Page 20

- 19 -
SPECIFICATIONS
POWER SOURCE
AC 100-240V ~ 50-60 Hz
POWER CONSUMPTION
Max 15W
REMOTE CONTROL
DC 3V, 2x AAA batteries
SIGNAL SYSTEM
NTSC/PAL
DVD – VIDEO Disc
12cm single sided, single layer
12cm single sided, dual layer
12cm double sided, single layer
8cm single-sided, single layer
8cm single-sided, dual layer
8cm double-sided, single layer
COMPACT DISC (Video CD)
12cm disc
8cm disc
VIDEO OUTPUT LEVEL
1Vp-p
AUDIO OUTPUT LEVEL
2Vrms (1KHz, 0dB)
AUDIO SIGNAL OUTPUT
CHARACTERISTICS:
DVD (Linear audio)
20Hz-20KHz (48KHz/96KHz sampling)
CD AUDIO
20Hz-20KHz
S/N RATIO
70dB
WAVELENGTH
655 nm
LASER POWER
Class 1
Specifications are subject to change without notice.
This appliance uses copyright protection technology covered by claims under the terms of various US
patents and other intellectual property rights of Macro Vision Corporation and other holders. Use of
the aforementioned copyright protection technology is subject to consent by Macro vision Corporation
and is intended solely for private use or restricted broadcasting, unless otherwise authorized by
Macro vision Corporation. Reverse engineering and disassembly prohibited.
IMPECCA USA® is a division of Luzerne Trading Co. Wilkes-Barre PA. All rights reserved. All
trademarks are the property of their respective owners and are used by Luzerne Trading Company
solely for descriptive purposes.
This product is serviced and supported exclusively by IMPECCA USA and its Limited Warranty.
Page 21

- 20 -
Page 22

- 21 -
TABLE DES MATIÈRES
Introduction .............................................................................................................................. 22
Avertissements et consignes de sécurité ................................................................................. 23
Contenu……. ........................................................................................................................... 23
Connaître votre lecteur DVD .................................................................................................... 24
Caractéristiques de la télécommande ...................................................................................... 25
Branchement à une télévision .................................................................................................. 28
Opérations de base .................................................................................................................. 29
USB ......................................................................................................................................... 31
Paramètres de configuration .................................................................................................... 32
Dépannage .............................................................................................................................. 38
Spécifications ........................................................................................................................... 39
Page 23

- 22 -
INTRODUCTION
Fonction protection économiseur d’écran
Recherche avant/arrière rapide
Télécommande complète
Fonction Zoom avant
Supporte multiples formats média :
Menu d’affichage multi-langues (anglais, français, espagnol)
Sous-titres multi-langues
Verrouillage parental
Affichage LED couleur ambre
USB 2.0
Félicitations pour l’achat de votre lecteur DVD compact home cinéma IMPECCA™. Le lecteur DVD compact
home cinéma IMPECCA™ est le meilleur moyen de profiter de vos DVD sans l’encombrement d’un lecteur de
taille standard. Son design compact permet un accès aisé à tous vos médias préférés, et la recherche
avant/arrière rapide vous permettra de ne pas en rater une minute. Regardez de loin grâce à la
télécommande, ou utilisez le zoom pour regarder de plus près. Le lecteur DVD compact home cinéma
IMPECCA™ vous permettra d’accéder à un divertissement de qualité en quelques minutes.
IMPECCA™…Simplement Impeccable.
Avant d’utiliser votre lecteur, nous vous recommandons de vous familiariser avec ses caractéristiques,
fonctions et procédures de fonctionnement décrites dans ce manuel. En raison de légères modifications dans
la production, les instructions, caractéristiques et/ou descriptions de ce manuel peuvent différer légèrement de
votre produit.
Aperçu des fonctions
Formats médias supportés
Page 24

- 23 -
AVERTISSEMENTS ET CONSIGNES DE SÉCURITÉ
Ce lecteur DVD vidéo comporte un laser de Classe 1. Pour assurer une bonne utilisation de cet appareil, veuillez lire
attentivement le manuel du fabricant et le conserver pour vous y référer à l’avenir. Des changements ou des
modifications ou la performance des procédures autres que ceux mentionnés dans la présente peuvent engendrer une
exposition dangereuse aux radiations. Étant donné que le rayon laser utilisé dans ce lecteur DVD vidéo est nocif du point
de vue ophtalmologique, n’essayez pas d’ouvrir l’appareil. Si celui-ci doit être entretenu, veuillez le confier uniquement à
un personnel autorisé et qualifié.
Pour éviter les chocs électriques, n’essayez jamais de démonter l’appareil, ne l’approchez pas de l’eau et veillez à ce que
le branchement de la large fiche s’effectue dans une prise correspondante. Ce produit ne doit fonctionner qu’avec le type
d’alimentation indiqué sur l’étiquette. Le lecteur DVD compact home cinéma IMPECCA™ est conçu pour être branché
uniquement sur du 120V – 60Hz. Si vous n’êtes pas sûr(e) du type d’alimentation de votre domicile, contactez votre
distributeur ou votre compagnie d’électricité.
REMARQUE : Le lecteur n’est pas débranché tant qu’il reste branché à la prise murale, et ce, même si le
lecteur est éteint.
Consignes de sécurité supplémentaires
Humidité – Ne pas exposer cet appareil à l’eau ou à l’humidité. Pour éviter un incendie ou tout danger d’électrocution,
ne placez pas d’objets contenant des liquides, tels que des vases, sur le lecteur DVD. Si du liquide pénètre dans
l’appareil, débranchez-le immédiatement. Veillez à installer le lecteur dans un endroit où l’accès au câble d’alimentation
est aisé afin que l’appareil puisse être immédiatement débranché de la prise murale en cas de problème ou si du liquide
tombe dessus.
REMARQUE : Si le lecteur est déplacé d’un endroit froid à un endroit chaud ou s’il est déposé dans une pièce
très humide, de l’humidité peut se former sur les lentilles du lecteur, qui pourra donc ne pas fonctionner
correctement. Dans ce cas, enlevez le disque et laissez l’appareil allumé pendant environ une demi-heure jusqu’à
ce que l’humidité soit totalement évaporée.
Chaleur - Le lecteur DVD doit être placé loin de toute source de chaleur, telles que les radiateurs, les appareils de
chauffage, les cuisinières ou tout autre appareil produisant de la chaleur (notamment les amplificateurs).
Ventilation - N’installez pas le lecteur dans un espace confiné, tel qu’une étagère ou un meuble similaire, à moins que
celui-ci ne soit correctement aéré. Des fentes et des ouvertures de ventilation doivent être prévues dans le meuble
contenant le lecteur DVD afin d’assurer le bon fonctionnement du produit et de le protéger d’une surchauffe. Ces
ouvertures ne doivent être ni obstruées ni recouvertes, notamment en posant l’appareil sur un lit, un canapé, un tapis ou
toute autre surface similaire. En effet, cela empêcherait une bonne ventilation et engendrerait une surchauffe.
Surcharge – Ne surchargez pas les prises murales, les rallonges, ou les prises multiples car cela peut entraîner un
risque d’incendie ou de choc électrique.
Nettoyage – Débranchez cet appareil de la prise avant de le nettoyer. Veillez en outre à ne nettoyer que l’extérieur de
l’appareil. N’essayez pas de nettoyer l’intérieur ni de démonter le produit. N’utilisez pas de nettoyants liquides ni
d’aérosols. Utilisez un linge humide pour le nettoyage ET veillez à ce que l’unité soit totalement sèche avant de la
rebrancher à l’alimentation.
S’il faut entretenir l’appareil, veuillez le remettre au personnel qualifié. Si l’appareil est toujours sous garantie, contactez
IMPECCA™ ou notre service clientèle. Voir les conditions générales mentionnées dans la garantie de ce produit.
Page 25

- 24 -
CONTENU
1 4 2
3
1. Lecteur DVD compact Home cinéma DVHP9112
2. Télécommande
3. Câbles A/V
4. Guide de l’utilisateur
Page 26

- 25 -
CONNAÎTRE VOTRE LECTEUR DVD
1. Plateau disque
5. Cesser
2. Télédétection
6. Port USB
3. Ouvert/Fermé
7. Ouvert/Fermé
4. Lecture/Pause
1. Prises de sortie (Y;Pb/Cb; Pr/Cr) Composante vidéo
2. Audio Gauche / Droite sortie
3. Prise de sortie vidéo
PANNEAU FRONTAL
PANNEAU ARRIÈRE
Page 27

- 26 -
TÉLÉCOMMANDE
18) PRÉCÉDENT
1)
OUVERT/FERMER
19) AVANCE
2) PROG
(PROGRAMME)
20) ARRIÈRE
3) SILENCIEUX
21) SUIVANT
4) AUDIO
22) N/P
(NTSC/PAL)
5) SOUS-TITRES
23) PBC
6) ZOOM
24) STOP
7) A-B
25) BOUTON
DIRECTIONNEL
8) OSD
26) RÉGLAGE
9) MENU
27) ANGLE
10) VOL +
(AUGMENTATION
DU VOLUME)
28) VIDÉO
11) RALENTI
29) RETOUR
12) VOL (BAISSE DU
VOLUME)
30) RÉPÉTER
13) G/D
(CANAL AUDIO
GAUCHE/DROITE)
31) 0-9 ET 10+
TOUCHES
NUMÉROS
14) ENTER
32) ATTEINDRE
15) LECTURE
33) USB
16) TITRE
34) POWER
17) PAUSE
USB
Page 28

- 27 -
1. OUVRIR/FERMER - Appuyez pour ouvrir ou fermer le compartiment du disque.
2. PROG - Appuyez pour programmer la lecture de chapitres ou de passages d’un DVD dans un ordre précis.
3. SILENCIEUX – Appuyez pour activer ou désactiver la sourdine.
4. AUDIO – Appuyez pour passer d’un mode audio disponible à l’autre.
5. SOUS-TITRES - Appuyez pour activer ou désactiver les sous-titres disponibles.
6. ZOOM - Appuyez pour zoomer en avant ou en arrière une image sur l’écran.
7. A-B - Appuyez pour créer une lecture répétée d’une partie précise d’un DVD chargé.
8. MAE - Appuyez pour voir les divers modes d’affichage sur écran.
9. MENU - Appuyez pour accéder au menu principal d’un DVD ou d’un disque chargé.
10. VOL + : Appuyez pour AUGMENTER le volume.
11. RALENTI - Appuyez pour voir le DVD chargé au ralenti.
12. VOL - : Appuyez pour BAISSER le volume.
13. G/D - Appuyez pour régler le mode audio d’un DVD supporté.
14. ENTER - Appuyez pour CONFIRMER les sélections dans les menus sur l’écran ou dans le menu de configuration.
15. LECTURE - Appuyez pour lire le disque chargé.
16. TITRE - Appuyez pour accéder au menu des titres d’un DVD chargé.
17. PAUSE - Appuyez pour suspendre la lecture d’un disque chargé.
18. ARRIÈRE - Appuyez pour reculer rapidement. Appuyez à nouveau pour augmenter la vitesse (2x, 4x, 8x, 16x, 32x).
19. AVANCE - Appuyez pour avancer rapidement. Appuyez à nouveau pour augmenter la vitesse (2x, 4x, 8x, 16x, 32x).
20. PRÉCÉDENT – Appuyez pour passer au titre/chapitre/passage précédent.
21. SUIVANT – Appuyez pour passer au prochain titre/chapitre/passage.
22. N/P - Appuyez pour changer le signal de sortie sur NTSC / PAL / AUTO.
23. PBC – Ouvrir le menu VCD principal.
24. STOP - Appuyez pour apprêter la lecture d’un DVD ou d’un CD.
25. Boutons DIRECTIONNELS (▲▼◄►) - Appuyez pour naviguer dans les menus de l’écran ou dans le menu de
configuration.
26. CONFIGURATION - Appuyez pour accéder au menu de configuration.
27. ANGLE - Appuyez pour accéder aux différents angles de caméra des DVD supportés.
28. VIDÉO – Pour passer du mode de vidéo de sortie à CVBS/RGB
29. RETOUR – Pour revenir au menu précédent.
30. RÉPÉTITION - Appuyez pour répéter la lecture d’un passage et de divers passages.
31. CLAVIER NUMÉRIQUE – Entrez des nombres en mode Programme.
32. ATTEINDRE – Atteindre un endroit/moment de lecture précis sur un DVD.
33. USB - Appuyez pour passer du mode DVD au mode USB (si chargé ou connecté).
34. POWER – Appuyez pour Allumer/Éteindre ou mettre le lecteur DVD en mode veille.
Page 29

- 28 -
Installation des Piles
1. Appuyez et soulevez le couvercle pour ouvrir le compartiment des piles de la télécommande.
2. Insérez des piles AAA. Veillez à ce que les polarités des piles ( + ) et ( - ) correspondent bien à celles du
compartiment des piles.
3. Fermez le couvercle du compartiment des piles.
Fonctionnement de la télécommande
Dirigez la télécommande vers le télédétecteur (situé sur l’affichage LED) du lecteur DVD et faites vos
sélections.
Pour de meilleurs résultats, utilisez la télécommande à moins de 7 mètres du lecteur DVD et dans le
rayon de l’arc montré ci-dessous ( ± 30°).
Conseils de manipulation
N’exposez pas la télécommande à des conditions trop chaudes ou trop humides pendant de longues
périodes.
Évitez de faire tomber la télécommande de haut étant donné que les chocs violents peuvent
endommager l’appareil à infrarouge.
Quand vous n’utilisez pas la télécommande, veuillez enlever les piles. Si elle ne répond pas ou si
elle ne fonctionne pas bien, changez les piles.
Page 30

- 29 -
BRANCHEMENT À UNE TÉLÉVISION
Branchement TV de base : Brancher à une TV à l’aide du câble audio/vidéo
Vous pouvez brancher votre
lecteur DVD à une télévision à
l’aide des prises jacks audio et
vidéo du lecteur.
1. Branchez le câble audio/vidéo
fourni à l’aide des câbles rouge et
blanc aux prises jacks audio
situées à l’arrière du lecteur DVD
et aux prises audio de votre
télévision.
2. Branchez le câble vidéo
(jaune) à la prise vidéo située à
l’arrière du lecteur et à la prise
vidéo de votre télévision.
3. Branchez votre TV dans sa
prise vidéo correspondante.
Branchement à un amplificateur externe / récepteur numérique à l’aide du branchement YUV
(Câble de branchement YUV NON compris) :
1. Connectez un câble YUV (non inclus)
pour les Y, Pb, Pr prises sur le lecteur
DVD et les Y, Pb / Cb, Pr/Cr prises
d'entrée sur votre téléviseur.
2. Branchez le câble audio / vidéo fourni
avec les câbles rouge et blanc aux prises
audio à l'arrière du lecteur DVD et aux
entrées audio sur votre téléviseur.
3. Réglez le paramètre de composant
(sur la page des paramètres vidéo) pour
YUV..
Lorsque vous branchez cet appareil et ses autres composants, veillez à ce que tous les appareils
soient éteints.
Les câbles audio/vidéo sont raccordés selon différentes couleurs et doivent être fermement insérés
dans les prises correspondantes.
Page 31

- 30 -
OPÉRATIONS DE BASE DU LECTEUR DVD
Avant de commencer
Allumez votre TV et sélectionnez les paramètres vidéo correspondant aux prises du lecteur DVD.
Reportez-vous à la section « Branchements d’appareils » de ce manuel.
Si vous avez branché le lecteur à un système audio (stéréo ou amplificateur), allumez votre système
audio et sélectionnez les paramètres audio nécessaires correspondant à l’entrée utilisée lors du
branchement du lecteur DVD.
Remarque : Étant donné que les systèmes TV et/ou audio diffèrent, veuillez vous reporter au
manuel de l’utilisateur de votre système TV ou audio.
Lecture
1. Appuyez sur POWER du lecteur DVD ou appuyez sur Power/Standy (Veille) de la
télécommande de l’appareil.
2. Appuyez sur OPEN/CLOSE (Ouvrir/Fermer) (sur le lecteur DVD ou la télécommande) pour
ouvrir le compartiment du disque.
3. Prenez le disque par ses bords et posez-le sur le plateau avec l’étiquette placée vers vous,
vers le haut.
4. Appuyez à nouveau sur OPEN/CLOSE (Ouvrir/Fermer) (sur le lecteur DVD ou la
télécommande) pour fermer le compartiment du disque.
Le lecteur DVD commence la lecture ou ouvre automatiquement le menu du disque
DVD. Utilisez les flèches et la touche Enter pour naviguer dans l’écran du menu du
DVD.
Si le DVD ne lance pas automatiquement la lecture, appuyez sur LECTURE (sur le lecteur DVD ou la
télécommande du DVD).
Remarque : La durée de chargement automatique de chaque DVD, CD, VCD peut différer selon
le format et/ou l’auteur du disque. Certains DVD lanceront automatiquement une série de bandes
annonces, de droits d’auteurs ou de publicités avant de charger l’écran du Menu. Certaines
touches de la télécommande, telles que MENU, TITRE, RETOUR RAPIDE, AVANCE RAPIDE,
PRÉCÉDENT, SUIVANT, et ATTEINDRE, peuvent être automatiquement désactivées jusqu’à ce
que la séquence chargée automatiquement soit terminée.
Pause
Pour suspendre, appuyez une fois sur la touche LECTURE/PAUSE pendant la lecture.
Pour reprendre, appuyez à nouveau sur la touche LECTURE/PAUSE.
Avance/Retour
Appuyez sur REV (Retour) ou FWD (Avance) pendant la lecture.
Pour augmenter la rapidité de la vitesse d’avance ou de retour, appuyez sur la touche REV
(Retour) ou FWD (Avance) pour choisir la vitesse désirée (Normale, x2, x4, x8, x16, x32)
Page 32

- 31 -
Suivant/Précédent
Vous pouvez passer à un chapitre ou à un moment précis pendant la lecture.
Avancer
Appuyez sur NEXT (Suivant) pendant la lecture.
Vous passerez au chapitre/au moment suivant à chaque fois que vous appuyez sur la
touche NEXT (Suivant).
Reculer
Appuyez sur PREV (Précédent) pendant la lecture.
Si vous appuyez sur la touche PREV (Précédent) au milieu d’un chapitre, le lecteur DVD
revient au début du chapitre. Le lecteur passe un chapitre à chaque fois que vous appuyez
sur la touche PREV (Précédent).
Arrêt
Le lecteur DVD DVHP 9112 enregistre le « Dernier passage visionné ». Quand vous appuyez sur
« Stop », l’appareil se rappelle de l’endroit où vous vous êtes arrêté et redémarrera de là, même
après avoir éteint le lecteur DVD.
Appuyez une fois sur STOP pour arrêter et suspendre la lecture à cet endroit précis.
Appuyez sur Play (Lecture) pour reprendre la lecture de là.
Appuyez deux fois sur STOP pour arrêter complètement et redémarrer le disque du
début. Le “dernier passage” lu ne sera pas activé.
REMARQUE : Types de disques
DVD
Les données de la plupart des DVD sont divisées en
sections appelées titres, puis subdivisées en
chapitres, chacun d’eux comportant soit un titre, soit
un numéro.
CD AUDIO
Les données d’un CD audio sont divisées en sections
appelées pistes, chacune d’elle étant numérotée.
Page 33

- 32 -
CLÉS USB / CARTES MÉMOIRE
1. Éteignez le lecteur DVD.
2. Insérez la clé USB ou la carte mémoire SD (pour des fichiers MP3, WMA ou JPEG) dans les
ports USB situés à l’avant du lecteur DVD.
3. Allumez le lecteur DVD. Appuyez sur la touche USB de la télécommande.
4. Le dossier/les fichiers apparaîtront sur l’écran.
5. À l’aide des touches directionnelles, sélectionnez et surlignez le dossier ou fichier voulu.
Appuyez sur ENTER pour confirmer et démarrer la lecture.
FONCTIONNEMENT DES DISQUES JPEG (PHOTO) ET MP3 :
1. Allumez le lecteur et placez le disque, la clé USB dans le lecteur DVD comme indiqué dans les
procédures précédentes. Le dossier/les fichiers apparaîtront à l’écran.
2. Utilisez les touches directionnelles pour sélectionner et surligner le fichier voulu. Appuyez sur
ENTER. La liste des fichiers apparaîtra sur l’écran.
3. Utilisez les touches directionnelles pour sélectionner et surligner le fichier voulu. Appuyez sur
ENTER pour démarrer la lecture.
Fonction Répétition
Pendant la lecture, appuyez une ou plusieurs fois sur REPEAT (Répéter) pour sélectionner :
Répéter une fois : Lit le passage en cours ad libitum
Répéter Dossier : Lit tous les passages du dossier en cours ad libitum
Off (Éteint) : Reprend la lecture normale
Page 34

- 33 -
PARAMÈTRES
1. Appuyez sur la touche SETUP (Configuration). Le menu de configuration apparaît sur l’écran.
2. Utilisez les touches directionnelles pour sélectionner et surligner la fonction que vous voulez
configurer. Appuyez sur la touche Direction. Puis appuyez sur ENTER pour confirmer la
sélection.
3. Appuyez sur la touche SETUP (Configuration) pour enregistrer les paramètres et sortir.
Page de configuration générale
Cette page vous permet de configurer le format de votre écran TV, les paramètres d’angle de vue, de
la langue OSD, des sous-titres, de la HDCD, et de la dernière sauvegarde.
Affichage TV
Si l’affichage TV est sélectionné, appuyez sur la touche Direction pour entrer. Appuyez sur
les touches Direction pour sélectionner 4:3 ou 16:9 donc pour sélectionner le format
d’affichage de votre téléviseur, appuyez ensuite sur Enter pour confirmer votre sélection.
Appuyez sur la touche SETUP (Configuration) pour enregistrer les paramètres et sortir.
4:3 : Sélectionnez quand l’appareil est branché à une TV 4:3 externe.
16:9: Sélectionnez quand l’appareil est branché à une TV avec grand écran externe.
Angle de vue
Vous pouvez active ou désactiver cette fonction pour sélectionner différents angles de
tournage quand vous regardez des DVD qui proposent cette fonction.
Langue OSD (Affichage sur écran de la langue)
Vous pouvez sélectionner votre langue OSD préférée à partir de ce menu.
Sous-titres
Vous pouvez utiliser cette fonction pour afficher les sous-titres explicatifs.
Économiseur d’écran
Quand l’appareil est en mode Arrêt pendant quelques temps, un économiseur d’écran apparaît
si cette fonction est activée.
HDCD
Vous pouvez utiliser cette fonction pour activer la lecture des CD numériques compatibles
Haute Définition.
Dernière sauvegarde
Cette fonction permet au lecteur DVD de reprendre la lecture au moment où vous l’avez
laissée avant d’éteindre le lecteur.
Page 35

- 34 -
Page de configuration audio
Cette page vous permet de configurer les paramètres audio.
Configuration des enceintes
Vous pouvez utiliser cette fonction pour régler les enceintes avant à LT / RT stéréo
Type d'égaliseur
Vous pouvez utiliser cette fonction pour sélectionner les réglages de l'égaliseur.
Reverb mode
Vous l'activez ce mode afin d'améliorer ou de simuler un environnement sonore surround.
Page de configuration Dolby
Cette page vous permet de configurer les paramètres Dolby.
Double Mono
Si votre amplificateur/décodeur possède une sortie Dolby digital, vous pouvez utiliser cette
fonction pour sélectionner le mode « stéréo, mono gauche, mono droite, ou double
mono ».
Dynamic
Vous pouvez utiliser cette fonction pour baisser de façon dynamique le volume tout en
conservant la qualité de tonalité d’origine. C’est la gamme, mesurée en décibels (dB), située
entre les sons les plus élevés et les plus bas enregistrés sur la bande sonore.
Page 36

- 35 -
Page de configuration vidéo
Cette page vous permet de configurer les paramètres de sortie vidéo.
Composant
Si vous vous connectez la sortie vidéo composite du lecteur DVD à l'entrée vidéo composite
de votre téléviseur, choisissez le paramètre CVBS. Sinon, sélectionnez YUV.
Mode TV
Utilisez cette fonction pour sélectionner P-Scan ou entrelacé.
Qualité
Sélectionnez Qualité pour modifier les paramètres supplémentaires, comme illustré:
Netteté
Utilisez cette fonction pour régler la netteté - haut, moyen, bas.
Éclat
Utilisez cette fonction pour ajuster la qualité de votre affichage vidéo. Sélectionnez Luminosité,
puis utilisez les touches directionnelles gauche / droite pour régler la luminosité. Appuyez sur
la touche Entrée pour confirmer et revenir au menu précédent.
Contraste
Utilisez cette fonction pour ajuster la qualité de votre affichage vidéo. Sélectionnez Contraste,
puis utilisez les touches directionnelles gauche / droite pour régler le contraste. Appuyez sur la
touche Entrée pour confirmer et revenir au menu précédent.
Gamma
Utilisez cette fonction pour régler le gamma.
Hue
Utilisez cette fonction pour ajuster la qualité de votre affichage vidéo. Sélectionnez Hue puis
utilisez les touches directionnelles gauche / droite pour ajuster la teinte. Appuyez sur la touche
Entrée pour confirmer et revenir au menu précédent.
Saturation
Utilisez cette fonction pour ajuster la qualité de votre affichage vidéo. Sélectionnez Saturation,
puis utilisez les touches directionnelles gauche / droite pour régler la saturation. Appuyez sur
la touche Entrée pour confirmer et revenir au menu précédent.
Page 37

- 36 -
Page de configuration des préférences
Cette page vous permet de configurer des préférences supplémentaires. La page de configuration
des préférences n’est disponible que lorsqu’il n’y a aucun disque dans le lecteur DVD. Si un
paramètre est réglé, il n’est modifié que lorsque l’appareil est éteint puis rallumé à nouveau.
Type de TV
Ce lecteur DVD supporte les systèmes Multi (AUTO), NTSC et PAL. Si vous sélectionnez un
type de sortie qui n’est pas supporté par votre TV, l’affichage blanc et noir de l’écran tremble.
Appuyez sur la touche SETYP et utilisez les flèches de direction pour sélectionner dans la liste
le bon type de TV.
Audio
Utilisez cette fonction pour sélectionner la langue par défaut préférée quand vous regardez un
DVD.
Sous-titre
Utilisez cette fonction pour régler la langue de sous-titres préférée par défaut.
Menu du disque
Utilisez cette fonction pour régler la langue de menu préférée par défaut.
Contrôle parental
La fonction contrôle parental s’active selon les différents niveaux de censure établis dans les
DVD.
Niveaux :
1 Tous publics
2 G : Tous âges
3. PG : Contrôle parental
4. PG-13 : Contrôle parental recommandé pour les enfants de moins de 13 ans
5. PG-R : Contrôle parental suggéré pour les adolescents de moins de 17 ans
6. R : Contrôle parental fortement recommandé pour les adolescents de moins de 17
ans
7. NC17 : Inapproprié pour les adolescents de moins de 17 ans
8. Adult: Uniquement pour adultes
Page 38

- 37 -
Mot de passe
Utilisez cette fonction pour régler et changer un mot de passe afin de gérer les niveaux de
censure ou pour empêcher d’autres personnes de changer ses paramètres. À partir de la
Page des Préférences, choisissez Mot de passe puis sélectionnez Change. Vous devez
entrer l’ancien mot de passe ou le mot de passe actuel avant d’entrer une combinaison de
chiffres dans le champ New Password (Nouveau mot de passe). Vous devez retaper cette
combinaison dans le champ Confirm Pwd (Confirmer mot de passe). Veillez à bien noter
votre nouveau mot de passe.
Remarque : Le mot de passe par défaut est 8888
Défaut
Utilisez cette fonction pour régler à nouveau les paramètres originaux par défaut personnalisés
de cet appareil (sauf le mot de passe).
Page 39

- 38 -
DÉPANNAGE
Problème
Solution
Le voyant ne s’allume pas
1. Branchez le cordon d’alimentation dans une prise.
2. Essayez une autre prise électrique.
Aucune image
1. Sélectionnez le format d’entrée vidéo approprié de
votre TV pour recevoir les signaux de sortie du lecteur.
2. Insérez complètement les prises du câble vidéo dans
les prises jacks correspondantes.
Aucun son
1. Insérez complètement les prises du câble audio dans
les prises jacks correspondantes.
2. Allumez le système stéréo (si applicable).
3. Sélectionnez la bonne sortie dans le menu
configuration.
Image déformée
1. Retirez et nettoyez le disque
2. Des distorsions peuvent apparaître lors de l’avance ou
du retour rapide. C’est normal.
Tremblements ou luminosité instable.
1. Branchez directement le lecteur à votre TV.
REMARQUE : Des distorsions peuvent être provoquées
par les systèmes de protection de copie d’un DVD ou
d’un CD.
Le lecteur ne marche pas.
1. Veillez à ce qu’un disque soit chargé.
2. Veillez à ce que le disque soit compatible (vérifiez le
format et la norme de codage du signal couleur du
disque).
3. Vérifiez que le disque soit chargé correctement.
4. Nettoyez le disque.
5. Veillez à ce que les paramètres du lecteur DVD soient
corrects.
Pas de réponse quand on appuie sur
les touches.
1. Éteignez le lecteur DVD, débranchez le cordon
d’alimentation puis rebranchez ce dernier et rallumez
l’appareil.
La télécommande ne marche pas.
1. Dirigez la télécommande vers le télédétecteur.
2. Vérifiez que la télécommande ne soit pas à plus de 7
mètres du télédétecteur
3. Changez les piles.
Si vous rencontrez des problèmes qui ne sont pas mentionnés ci-dessus, ou si vous ne pouvez pas résoudre
votre problème après avoir appliqué les méthodes et solutions décrites ci-dessus, veuillez contacter l’équipe
technique d’Impecca :
E-mail : service@impeccausa.com
Site Web : www.impeccausa.com
Page 40

- 39 -
SPÉCIFICATIONS
ALIMENTATION
ÉLECTRIQUE
100-240V ~ 50-60 Hz
CONSOMMATION
ÉLECTRIQUE
15W maximum
TÉLÉCOMMANDE
2 piles AAA de 3V
SYSTEME DE SIGNAL
NTSC/PAL
Disque DVD – VIDEO
12 cm une face, une couche
12 cm une face, double couche
12 cm double face, une couche
8 cm une face, une couche
8 cm une face, double couche
8 cm double face, une couche
COMPACT DISC (CD vidéo)
Disque de 12cm
Disque de 8cm
NIVEAU SORTIE VIDEO
1Vp-p
NIVEAU SORTIE AUDIO
2Vrms (1KHz, 0dB)
CARACTERISTIQUES
SORTIE SIGNAL AUDIO :
DVD (audio linéaire)
20Hz-20KHz (48KHz/96KHz sampling)
CD AUDIO
20Hz-20KHz
RAPPORT S/B
70dB
LONGUEUR D’ONDES
655 nm
PUISSANCE LASER
Classe 1
Les spécifications sont soumises à des modifications sans préavis.
Cet appareil utilise une technologie de protection des droits d’auteur couverte par les conditions
générales de divers brevets américains et d’autres droits de propriété intellectuelle de Macro Vision
Corporation et d’autres détenteurs. L’utilisation de la technologie de protection des droits d’auteur
susmentionnée est soumise au consentement de Macro vision Corporation et n’est destinée qu’à un
usage privé ou à une diffusion restreinte, sauf autorisation spéciale de Macro vision Corporation.
Rétro-ingénierie et démontage interdits.
IMPECCA USA® est une division de Luzerne Trading Co. Wilkes-Barre PA. Tous droits réservés.
Toutes les marques déposées sont la propriété de leurs propriétaires respectifs et sont utilisées par
Luzerne Trading Company uniquement à des fins descriptives.
Cet appareil est exclusivement entretenu et supporté par IMPECCA USA et sa garantie limitée.
Page 41

- 40 -
Page 42

- 41 -
CONTENIDO
Introducción ............................................................................................................................. 42
Avisos e Instrucciones de seguridad ........................................................................................ 43
Que hay dentro de la caja ........................................................................................................ 44
Conociendo su reproductor DVD ............................................................................................. 45
Características Control Remoto ............................................................................................... 46
Conectándose a un Televisor .................................................................................................. 49
Operación Básica ..................................................................................................................... 50
Tarjetas de Memoria USB ........................................................................................................ 52
Configurando Ajustes ............................................................................................................... 53
Resolución de problemas ........................................................................................................ 58
Especificaciones ...................................................................................................................... 59
Page 43

- 42 -
INTRODUCCIÓN
Función de protección de pantalla
Búsqueda rápida Adelante/Atrás
Control Remoto de Función Completa
Función de Acercamiento
Soporta Múltiples Formatos de Medios:
Menu de Múltiples Lenguajes (Ingles, Francés, Español)
Subtítulos en lenguajes múltiples
Candado Paternal
Pantalla LED Ámbar
USB 2.0
Felicitaciones por su compra del Reproductor Compacto de Hogar IMPECCA™. El Reproductor Compacto de
Hogar IMPECCA™ es una gran manera de disfrutar sus DVDs sin el desorden de un reproductor de tamaño
completo. Su diseño compacto brinda acceso fácil a todos sus medios favoritos, y la búsqueda rápida
retroceso/adelantar le garantizara que nunca se pierda un minuto. Vea de cierta distancia usando el control
remoto, o use la función de acercamiento para ver mas de cerca. El Reproductor Compacto de Hogar
IMPECCA™ es una excelente manera de asegurar entretenimiento de calidad en minutos.
IMPECCA™…Simplemente Impecable.
Antes de usar su reproductor se recomienda que usted se familiarice con las características, funciones, y
procedimientos operativos dentro de este manual. Debido a pequeñas modificaciones en producción, las
instrucciones, características, y/o descripciones encontradas en este manual podrían ser levemente distintas
de su producto.
Características de un vistazo
Formatos de Medios Soportados
Page 44

- 43 -
AVISOS E INSTRUCCIONES DE SEGURIDAD
Este reproductor de video DVD usa un producto laser Clase 1. Para asegurar el uso apropiado de este producto, favor
lea este manual de propietario cuidadosamente y guárdelo para referencia futura. Modificación, o ajustes, o rendimiento
de procedimientos además de los especificados aquí pueden resultar en exposición peligrosa a la radiación. Ya que el
rayo laser usado en este reproductor de video DVD es dañino para los ojos, no intente desarmar la carcasa. Si esta
unidad requiere mantenimiento, refiera mantenimiento a personal autorizado y calificado solamente.
Para prevenir shock eléctrico, nunca intente desarmar la carcasa, no lo exponga al agua, y asegúrese de unir el
enchufe ancho con la entrada ancha y métalo al tomacorriente completamente. Este producto debe ser operado
solamente por el tipo de fuente de poder indicado en la etiqueta. El Reproductor Compacto de Hogar IMPECCA™
está diseñado para usar 120V – 60Hz solamente. Si usted no está seguro del tipo de energía suministrada a su hogar,
consulte al comerciante de su producto o a la empresa de energía eléctrica.
NOTA: El reproductor no está desconectado de la fuente de energía AC mientras esté conectado todavía al
tomacorriente de la pared, aun después de haber apagado el reproductor.
Instrucciones de Seguridad Adicionales
Humedad – No exponga este aparato al agua o humedad. Para prevenir fuego o peligro de shock, no ponga objetos
llenos de líquidos, tales como floreros, sobre el reproductor DVD. Si líquidos entran en el aparato desconecte el aparato
inmediatamente. Asegúrese de instalar el reproductor en un área donde hay acceso al cable de AC de manera que el
aparato se pueda desconectar inmediatamente de la pared en caso de problemas o si líquidos se derraman dentro del
aparato.
NOTA: Si el reproductor es traído directamente de un lugar frio a uno caliente, o si es puesto en una habitación
muy húmeda, humedad se puede condensar sobre los lentes dentro del reproductor y el reproductor no operara
normalmente. En este caso, remueva el disco y deje el reproductor encendido por media hora hasta que la
humedad se evapore.
Calor – El reproductor DVD debe ser ubicado lejos de fuentes de calor tales como radiadores, registros de calor,
estufas, u otros productos (incluyendo amplificadores) que producen calor.
Ventilación apropiada – No instale este reproductor en espacio confinado, como ser librero o unidad similar a no ser
que se brinde ventilación apropiada. Aperturas en la carcasa del reproductor DVD se brindan para asegurar operación
fiable del producto y para protegerlo de sobre calentamiento. Estas aperturas no deben ser bloqueadas ni cubiertas. Las
aperturas nunca deben ser bloqueadas poniendo el producto sobre una cama, sofá, alfombra, o superficies similares ya
que inhiben la ventilación y habrá sobrecalentamiento.
Sobrecarga – No sobrecargue los tomacorrientes, extensiones, o receptáculos integrales de conveniencia, ya que esto
puede resultar en riesgo de fuego o shock eléctrico.
Limpieza – Desconecte este aparato de la pared antes de limpiarlo. Si se requiere limpieza o despolvar, asegúrese de
limpiar la porción exterior de la carcasa solamente. No intente limpiar por dentro o desarmar la carcasa. No use
limpiadores liquidos o limpiadores en aerosol. Use un trapo húmedo para limpiar Y asegúrese que le permita al aparato
secarse completamente antes de conectar la unidad a una fuente de energía.
Si la unidad requiere servicio, refiérase a personal de servicio calificado. Si la unidad esta bajo garantía todavía, contacte
a IMPECCA™ o nuestro centro de servicio. Vea términos y condiciones especificadas bajo la garantía incluidas con este
producto.
Page 45

- 44 -
QUE HAY DENTRO DE LA CAJA
1 4 2
3
1. Reproductor Compacto de Hogar DVHP9112
2. Control Remoto
3. Cables A/V
4. Guía de Usuario
Page 46

- 45 -
CONOCIENDO SU REPRODUCTOR DVD
1. Bandeja de Disco
5. Alto
2. Sensor Remoto
3. Abrir/Cerrar
4. Reproducción/Pausa
6. Encendido/Apagado Siguiente
7. Puerto Anfitrión USB
1. Vídeo por componentes (Y, Pb / Cb, Pr / Cr)
Salida Jacks
2. Salida de audio izquierda / derecha
3. Salida de vídeo Jack
PANEL FRONTAL
PANEL TRASERO
Page 47

- 46 -
CONTROL REMOTO
18) REV
1) ABRIR/CERRAR
19) FWD
2) PROG (PROGRAMA)
20) PREV
3) MUDO
21) SIGUIENTE
4) AUDIO
22) N/P
(NTSC/PAL)
5) SUBTITULO
23) PBC
6) ZOOM
24) ALTO
7) A-B
25) BOTÓN DE
DIRECCIÓN
8) OSD
26)
CONFIGURACIÓN
9) MENU
27) ANGULO
10) VOL +
(INCREMENTO
VOLUMEN)
28) VIDEO
11) LENTO
29) RETORNO
12) VOL (BAJAR VOLUMEN)
30) REPETIR
13) L/R
( CANAL DE AUDIO
IZQUIERDA/DERECHA)
31) TECLAS DE
NUMERO 0-9 Y
10+
14) ENTER
32) IR A
15) REPRODUCIR
33) USB
16) TITULO
34) POTENCIA
17) PAUSA
USB
Page 48

- 47 -
1. ABRIR/CERRAR – Presione para abrir y cerrar la gaveta de disco.
2. PROG – Oprima para programar un DVD para reproducir capítulos o pistas en un orden especifico.
3. MUDO – Presiona para que volumen este mudo o no mudo.
4. AUDIO – Presione para cambiar entre modos de audio disponibles.
5. SUBTITULO – Presione para encender o apagar subtítulos disponibles.
6. ZOOM – Presione para acercar o alejar una imagen en la pantalla.
7. A-B – Presione para crear un ciclo repetitivo de una sección específica de un DVD cargado.
8. OSD – Presione para ver varios modos de Pantalla.
9. MENU – Presione para accesar el menú principal en un DVD cargado o disco.
10. VOL + : Presione para SUBIR el volumen.
11. SLOW – Presione para ver el DVD cargado en cámara lenta.
12. VOL - : Presione para BAJAR el volumen.
13. L/R – Presione para ajustar el modo de audio de un DVD soportado.
14. ENTER – Presione para CONFIRMAR selecciones dentro del menú en pantalla o el menú de configuración.
15. PLAY – Presione para reproducir un disco cargado.
16. TITLE – Presione para accesar el menú de titulo de un DVD cargado.
17. PAUSE – Presione para pausar un disco cargado.
18. REV- Presione para escanear en reversa. Presione de nuevo para incrementar la velocidad de escaneo ( 2x, 4x, 8x,
16x, 32x).
19. FWD – Presione para escanear hacia adelante. Presione de nuevo para incrementar la velocidad de escaneo ( 2x,
4x, 8x, 16x, 32x).
20. PREV – Presione para regresar al titulo/capitulo/pista previa.
21. NEXT – Presione para saltar al siguiente titulo/capitulo/pista.
22. N/P – Presione para cambiar la señal de salida a NTSC / PAL / AUTO.
23. PBC – Abrir el menú principal VCD.
24. STOP – Presione para detener un DVD o CD durante reproducción.
25. DIRECTION Buttons (▲▼◄►) – Presione para navegar entre menús de pantalla o el menú de configuración.
26. SETUP – Presione para accesar el menú de configuración.
27. ANGLE – Presione para accesar diferentes ángulos de cámara en DVDs soportados.
28. VIDEO – Para cambiar el modo de salida de video a CVBS/RGB
29. RETURN – Para retornar al menú previo.
30. REPEAT- Presione para habilitar repetir reproducción o pista o pistas.
31. NUMBER KEYPAD – Digite números cuando en modo de Programa.
32. GOTO – Ir a un tiempo/punto especifico en reproducción de un DVD.
33. USB – Presione para cambiar entre modos DVD y USB (si está cargado o conectado).
34. POWER – Presione para Encender/Apagar o restaurar el reproductor de DVD a modo standby.
Page 49

- 48 -
Instalación de Baterías
1. Presione y levante el cobertor trasero para abrir el compartimiento de batería del control remoto.
2. Inserte dos baterías AAA . Asegúrese que las polaridades de las baterías ( + ) y ( - ) combinan con los del
compartimiento de baterías.
3. Cierre el compartimiento de batería.
Operando el Control Remoto
Apunte el control remoto hacia el recibidor (ubicado en la pantalla LED) sobre el reproductor DVD y
haga sus selecciones.
Para mejores resultados, use el control remoto dentro de 7 metros del reproductor DVD y dentro del
arco de radio mostrado abajo ( ± 30°).
Instructions de Manejo
No exponga el control remoto a condiciones calientes o húmedas por periodos extensos de tiempo.
Evite dejar caer el control remoto de posiciones altas ya que colisiones de alto impacto pueden dañar
el aparato infrarrojo.
Cuando no esté en uso, favor remover las baterías. Si el control remoto no responde o si no ejecuta
de manera apropiada, reemplace las baterías.
Page 50

- 49 -
CONECTANDO A UN TELEVISOR
Conexión Básica de TV: Conectando a un TV usando el cable de Audio/Video estándar
Usted puede conectar un
reproductor de DVD a un
televisor estándar usando los
jacks de audio y video del
reproductor.
1. Conecte los cables
suministrados de
Audio/Video usando los
cables rojo y blanco para
conectar a los jacks de audio
en la parte trasera del
reproductor de DVD y a las
entradas de audio de su
Televisor.
2. Conecte el cable de video
(amarillo) al jack de Video en la
parte trasera de su televisor.
3. Configure su TV a su entrada
apropiada de Video.
Conexión usando Conexión YUV
(Cable de Conexión YUV NO incluido):
1. Conecte un cable YUV (no incluido) a
las tomas Y,Pr, Pb, en el reproductor de
DVD y de los tomas de entrada Y, Pb / Cb
Pr / Cr en el televisor.
2. Conecte el cable de audio / vídeo
suministrado con los cables rojo y blanco
a los conectores de audio en la parte
trasera del reproductor de DVD a las
entradas de audio del televisor.
3. Ajuste la configuración de
componentes (en la página de
configuración de video) a YUV.
Al conectar esta unidad y otros componentes, asegúrese que todos los aparatos están apagados.
Cables de Audio/Video son conectados de acuerdo a diferente identificación de colores y deben ser
ajustados firmemente dentro del los jacks apropiados.
.
Page 51

- 50 -
OPERACIÓN BÁSICA DE REPRODUCTOR DVD
Antes de comenzar
Encienda su televisor y seleccione los ajustes de entrada de video apropiados que correspondan con
la entrada usada al conectar el reproductor DVD. Refiérase a la sección “Conexiones de Sistema” de
este manual.
Si usted ha conectado un reproductor a un sistema de audio (estéreo o amplificador) encienda su
sistema de audio y seleccione los ajustes de entrada de audio correspondientes que correspondan
con la entrada usada al conectar el reproductor DVD.
Nota: Como Televisores y/o Sistemas de audio varían, favor referirse al manual de usuario de su
Televisor o sistema de audio.
Reproducción
1. Oprima el botón de POWER en el reproductor DVD o presione el botón Power Standby en el
control remoto del DVD.
2. Oprima el botón OPEN/CLOSE (en el reproductor DVD o control remoto) para abrir la bandeja
de disco.
3. Tome el borde del disco y póngalo en la bandeja con la etiqueta hacia arriba.
4. Presione el botón OPEN/CLOSE (en el reproductor DVD o control remoto) de Nuevo para
cerrar la bandeja.
El reproductor de DVD inicia la reproductor o abre el menú del disco DVD
automáticamente. Use las flechas y el botón de enter para navegar en el menú del
DVD.
Si el DVD no comienza a reproducir automáticamente, presione PLAY (en el reproductor DVD o
control remoto).
Nota: La secuencia de carga automática de cada DVD, CD, VCD puede variar de acuerdo al
formato y / o la forma en que el disco fue escrito. Algunos DVD auto-reproducirán una serie de
avances, los avisos de copyright, o los anuncios antes de cargar la pantalla del menú. Algunos
botones del control remoto, tales como el menú, TÍTULO F.RWD, F.FWD, anterior, siguiente, y
los botones GOTO, se pueden desactivar de forma automática hasta que se complete la
secuencia de carga automática.
Pausa
Para hacer una pausa, presione el botón PLAY / PAUSE una vez durante la reproducción.
Para resumir, presione el botón PLAY/PAUSE de nuevo.
Page 52

- 51 -
Escaneo Forward/Reverse
Presione REV o FWD durante la reproducción.
Para aumentar la velocidad de avance o retroceso rápido, pulse el botón REV o FWD
nuevamente para elegir la velocidad que desee (Normal, x2, x4, x8, x16, x32)
Saltar Next/Previous
Ud. puede saltar a un capitulo o pista especifica durante reproducción.
Saltar Adelante
Presione NEXT durante la reproducción.
Va a pasar al siguiente capítulo / pista cada vez que se pulsa el botón NEXT.
Saltar Atras
Pulse PREV durante la reproducción.
Si pulsa el botón PREV a mitad de camino a través de un capítulo, el reproductor de DVD
volverá al principio del capítulo. Entonces, el reproductor se salta un capítulo cada vez que
se pulsa el botón PREV.
Alto
El 9112 DVD DVHP tiene una función de memoria "Última reproducción". Al pulsar stop, mantendrá
la posición para que pueda reanudar la reproducción desde este punto, incluso después de
desconectar el reproductor de DVD.
Pulse STOP una vez para detener y aguantar la reproducción en la posición actual. Al
pulsar Play se reanuda la reproducción desde la posición actual.
Pulse STOP dos veces para detener por completo y reiniciar el disco al inicio. La
"Última reproducción" función no se activará.
NOTA: Tipos de Disco
DVD
Los datos sobre la mayoría de los DVD se dividen en
secciones llamadas títulos, y luego en sub secciones
denominadas capítulos, cada uno de los cuales se le
asigna un número de título o capítulo.
CD DE AUDIO
Los datos de un CD de audio se dividen en secciones
llamadas pistas, cada una de las cuales se le da un
número de pista.
Page 53

- 52 -
USANDO LLAVES DE USB/ TARJETAS DE MEMORIA
1. Apague el reproductor de DVD.
2. Inserte el dispositivo de memoria USB (con archivos MP3, WMA o JPEG) al puerto USB en la
parte frontal del reproductor de DVD.
3. Encienda el reproductor de DVD. Pulse el botón USB en el control remoto.
4. Aparecerá la carpeta / lista de archivos en la pantalla.
5. Use los botones de dirección para seleccionar y resaltar la carpeta o el archivo que desee.
Pulse el botón ENTER para confirmar y comenzar la reproducción.
OPERACIONES DE DISCOS MP3, JPEG (IMAGEN):
1. Encienda el reproductor y coloque el disco, memoria USB en el Reproductor de DVD como se
indica en los procedimientos anteriores. Aparecerá la carpeta / lista de archivos en la pantalla.
2. Use los botones de dirección para seleccionar y resaltar la carpeta deseada. Presione el
botón ENTER. La lista de archivos aparecerá en la pantalla.
3. Usando los botones de dirección para seleccionar y resaltar el archivo deseado, pulse el
botón ENTER para iniciar la reproducción.
Función de Repetición
Durante la reproducción, pulse el botón REPEAT varias veces para seleccionar:
Repetir uno: Reproduce la pista actual de forma repetida
Repetir carpeta: Reproduce las pistas de la carpeta actual
Off: Reanudar la reproducción normal
Page 54

- 53 -
AJUSTES
1. Pulse el botón SETUP. El menú de configuración aparecerá en la pantalla.
2. Use los botones de dirección para seleccionar y resaltar la función que debe configurar.
Pulse el botón de dirección. Pulse el botón ENTER para confirmar la selección.
3. Pulse el botón SETUP para guardar los ajustes y salir.
Pagina General de Configuración
Esta página le permite configurar el formato de TV de pantalla, Marca de Angulo, OSD, leyendas,
HDCD, y la última configuración de memoria.
Pantalla TV
Si se selecciona la pantalla de TV, pulse el botón de dirección para entrar. Pulse los botones de
dirección para seleccionar 4:3 o 16:9 para que coincida con la relación de aspecto de su
televisor y pulse el botón Enter para confirmar su selección. Pulse el botón SETUP para guardar
la configuración y salir.
04:03: Selecciónelo cuando la unidad está conectada a un monitor de televisión de 4:3.
16:9: Selecciónelo cuando la unidad está conectada a un televisor de pantalla Ancha externa.
Marca de Angulo
Puede activar o desactivar la posibilidad de seleccionar diferentes ángulos de la cámara al ver
DVDs que ofrecen esta característica.
OSD Lang (Lenguaje de pantalla)
Se puede seleccionar el idioma deseado para la OSD en este menú.
Subtítulos
Puede utilizar esta función para visualizar subtítulos explicativos grabados.
Protector de Pantalla
Cuando la unidad está en modo de parada durante unos momentos, un protector de pantalla
se mostrará, si esta función está habilitada.
HDCD
Puede utilizar esta característica para permitir la reproducción de CDs digitales de alta
definición compatibles.
Ultima Memoria
Esta característica permitirá al reproductor de DVD reanudar la reproducción desde el último
punto tocado antes de que el reproductor se apagara.
Page 55

- 54 -
Pagina de Configuración de Audio
Esta página le permite configurar los ajustes de Audio.
Configuración de los altavoces
Puede utilizar esta función para configurar los altavoces delanteros en LT / RT Estéreo.
Eq Tipo
Puede utilizar esta función para seleccionar los ajustes del ecualizador.
Modo de Reverb
Usted una activa esta modalidad para mejorar o simular un entorno de sonido surround.
Pagina de Configuración Dolby
Esta página le permite configurar los ajustes de Dolby.
Dual Mono
Si su amplificador / decodificador tiene salida digital Dolby, puede utilizar esta función para
seleccionar el modo "Estéreo, mono izquierdo, mono derecho o mono mezclado".
Dinámico
Puede utilizar este ajuste para reducir dinámicamente el volumen y aún así mantener la
calidad de sonido original. Se trata de la gama, se mide en decibelios (dB), entre los registros
de sonidos más altos y más bajos en el álbum.
Page 56

- 55 -
Pagina de Configuración de Video
Esta página le permite configurar los ajustes de salida de Video.
Componente
Si va a conectar la salida de vídeo compuesto en el reproductor de DVD a la entrada de vídeo
compuesto en su televisor, seleccione el ajuste CVBS. De lo contrario, seleccione YUV.
Modo TV
Utilice esta función para seleccionar P-Scan o entrelazado.
Calidad
Seleccione Calidad de modificar ajustes adicionales, como se muestra:
Nitidez
Utilice esta función para ajustar la nitidez - Alta, Media, Baja.
Brillo
Utilice esta función para ajustar la calidad de la pantalla de vídeo. Seleccione Brillo y luego
utilice los botones de dirección izquierda / derecha para ajustar el brillo. Pulse el botón Enter
para confirmar y volver al menú anterior.
Contraste
Utilice esta función para ajustar la calidad de la pantalla de vídeo. Seleccione Contraste y
luego use los botones de dirección izquierda / derecha para ajustar el contraste. Pulse el
botón Enter para confirmar y volver al menú anterior.
Gamma
Utilice esta función para ajustar el gamma.
Matiz
Utilice esta función para ajustar la calidad de la pantalla de vídeo. Seleccione Tono y luego
use los botones de dirección izquierda / derecha para ajustar el tono. Pulse el botón Enter
para confirmar y volver al menú anterior.
Saturación
Utilice esta función para ajustar la calidad de la pantalla de vídeo. Seleccione Saturación y
luego use los botones de dirección izquierda / derecha para ajustar la saturación. Pulse el
botón Enter para confirmar y volver al menú anterior.
Page 57

- 56 -
Pagina de Configuración de Preferencia
Esta página le permite configurar las preferencias adicionales. La preferencia Ajustar página sólo
está disponible cuando no hay ningún disco insertado en el reproductor de DVD. Si se ajusta una
configuración, sólo se puede cambiar una vez que la máquina se ha apagado y encendido de nuevo.
Tipo de TV
Este reproductor de DVD soporta los sistemas Multi (AUTO), NTSC y PAL,. Si selecciona un
tipo de salida que no sea compatible con su TV, la pantalla parpadeará con una pantalla en
blanco y negro. Pulse el botón SETYP y utilice los botones de flecha para seleccionar el tipo
de TV correcto de la lista.
Audio
Utilice esta función para seleccionar el idioma predeterminado preferido cuando vea películas
en DVD.
Subtitulo
Utilice esta función para configurar el idioma de subtítulos preferido como predeterminado.
Menu de Disco
Utilice esta función para configurar el idioma del menú preferido como predeterminado.
Control Paternal
La función de control de los padres trabaja en conjunto con las diferentes clases de censura
asignados a los DVD.
Niveles de Categoría:
1 Seguro para Niños
2 G: Todas las edades
3. PG:
4. PG-13: supervisión de los padres recomendada para niños menores de 13
5. PG-R: Se sugiere orientación paterna para niños menores de 17
6. R: Supervisión paterna fuertemente recomendado para niños menores de 17
7. NC17: No apto para niños menores de 17
8. Adulto: Sólo para adultos
Page 58

- 57 -
Contraseña
Utilice esta función para configurar y cambiar una contraseña para controlar los niveles de
categoría o para evitar que otras personas cambien la configuración. Desde la página de
preferencias, seleccione Contraseña y luego seleccione Cambiar. Usted tendrá que entrar la
contraseña vieja, o la corriente, y escribir una combinación de números en el campo Nueva
Contraseña. Usted tendrá que volver a escribir esta combinación en el campo Confirmar
Contraseña. Asegúrese de tomar nota de la nueva contraseña.
Nota: La contraseña de fabrica es 8888
De fábrica
Utilice esta función para restablecer los valores predeterminados personalizados a los ajustes
originales de la unidad (excepto la contraseña).
Page 59

- 58 -
RESOLUCIÓN DE PROBLEMAS
Problema
Solución
Indicador de Encendido no se
enciende
1. Conecte el cable de alimentación a una toma de corriente.
2. Pruebe con una toma de corriente diferente.
No imagen
1. Seleccione el formato de entrada de vídeo en el televisor
con el fin de recibir señales de salida del reproductor.
2. Inserte completamente los conectores del cable de vídeo
en la toma correspondiente.
No sonido
1. Inserte completamente los conectores del cable de audio a
la toma correspondiente.
2. Encienda el equipo estéreo (si es aplicable).
3. Seleccione la salida correcta en el menú de configuración.
Imagen distorsionada
1. Retire y limpie el disco
2. La distorsión puede ocurrir durante las operaciones FWD y
REV. Esto es normal.
Parpadeo o el brillo inestable.
1. Conecte el reproductor directamente al televisor.
NOTA: Los trastornos pueden ser causados por los
sistemas de protección de copia en un DVD o CD.
El reproductor no funciona
1. Asegúrese de que se ha cargado un disco.
2. Asegúrese de que el disco sea compatible (consulta el
formato del disco y la señal de código de colores estándar).
3. Compruebe que el disco está cargado correctamente.
4. Limpie el disco.
5. Asegúrese de que la configuración del reproductor de DVD
son correctos.
No hay respuesta al oprimir botones
1. Apague el reproductor de DVD, desenchufe el cable de
alimentación y enchufe el cable de alimentación y vuelva a
encenderlo.
El control remoto no funciona
1. Apunte el control remoto hacia el sensor.
2. Compruebe que el control remoto no está a más de 7
metros del sensor
3. Cambie las pilas por pilas nuevas.
Si experimenta cualquier problema no listado arriba, o si usted no puede resolver el problema después de
probar los métodos y soluciones descritas anteriormente, por favor póngase en contacto con Impecca equipo
de soporte técnico:
Correo electrónico: service@impeccausa.com
Sitio web: www.impeccausa.com
Page 60

- 59 -
ESPECIFICACIONES
FUENTE DE POTENCIA
AC 100-240V ~ 50-60 Hz
CONSUMO DE POTENCIA
Max 15W
CONTROL REMOTO
DC 3V, 2x baterías AAA
SISTEMA DE SEÑAL
NTSC/PAL
Disco DVD – VIDEO
12cm un solo lado, una sola capa
12cm un solo lado, doble capa
12cm dos lados, una sola capa
8cm un solo lado, una sola capa
8cm un solo lado, doble capa
8cm dos lados, una sola capa
DISCO COMPACTO (Video
CD)
disco12cm
Disco 8cm
NIVEL DE SALIDA DE VIDEO
1Vp-p
NIVEL DE SALIDA DE AUDIO
2Vrms (1KHz, 0dB)
CARACTERÍSTICAS DE
SEÑAL DE SALIDA DE
AUDIO:
DVD (audio Lineal)
20Hz-20KHz (48KHz/96KHz muestra)
CD AUDIO
20Hz-20KHz
S/N TASA
70dB
LONGITUD DE ONDA
655 nm
POTENCIA DE LASER
Clase 1
Las especificaciones están sujetas a cambios sin previo aviso.
Este aparato utiliza la tecnología de protección de derechos de autor por créditos en los términos de
varias patentes estadounidenses y otros derechos de propiedad intelectual de Macro Vision
Corporation y otros titulares. El uso de la tecnología de protección de copyright anterior es con el
consentimiento por Macro visión Corporation y está destinado únicamente para uso privado o
difusión restringida, salvo autorización de Macro visión Corporation. Ingeniería inversa y el
desmontaje prohibido.
Impecca EE.UU. ® es una división de Luzerne Trading Co. Wilkes-Barre PA. Todos los derechos
reservados. Todas las marcas registradas son propiedad de sus respectivos dueños y son utilizadas
por Luzerne Trading Company únicamente con fines descriptivos.
Este producto cuenta con los servicios y el soporte exclusivo de Impecca EE.UU. y su garantía
limitada.
 Loading...