

Page 1
USER MANUAL
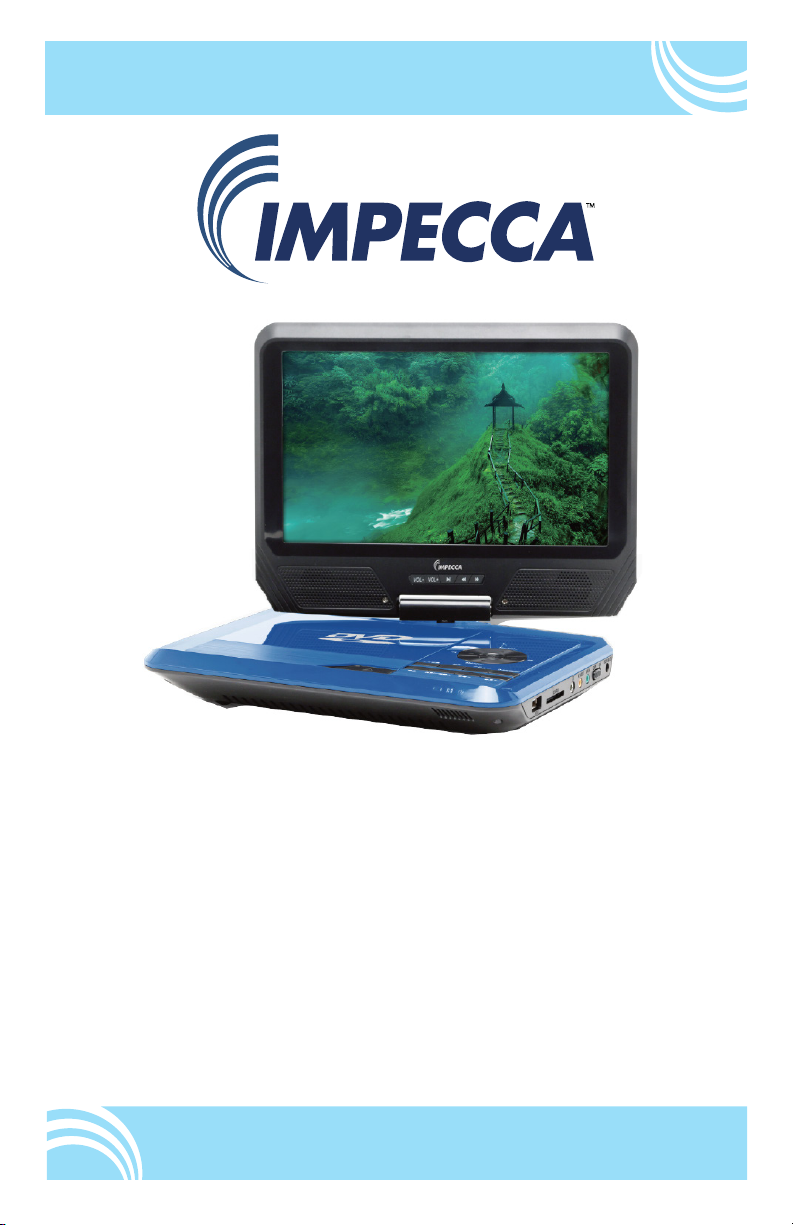
Portable DVD Player
Reproductor DVD Portátil - Manual de Usuario
Lecteur DVD Portable - Manuel de l’Utilisateur
Model DVD-917
Page 2

TABLE OF CONTENTS
Important safety precautions 4
Package contents / Product features 5
Precautions and warnings 6
Main unit controls 8
Common keys 9
Operating instructions 10
Using the remote control 11
System Setup 14
General settings 15
Playback 21
Technical specications 23
Troubleshooting 25
Warranty exclusions 26
Customer support 26
ENGLISHESPAÑOLFRANÇAIS
Warranty 27
Spanish translation of user manual 28
French translation of user manual 53
2
Page 3

IMPORTANT
Since the CD Circuitry may cause interference to other radio tuners
nearby, switch this unit o when not in use or move the aected radio
tuner away.
This device complies with Part 15 of the FCC Rules. Operation is subject
to the following two conditions: (l) This device may not cause harmful
interference, and (2) this device must accept any interference received,
including interference that may cause undesirable operation.
This device complies with Canadian ICES-003 Standard TELEVISION
receiving Apparatus.
FEDERAL COMMUNICATIONS COMMISSION STATEMENT
NOTE: This equipment has been tested and found to comply with the
limits for a Radio Receiver, pursuant to part 15 of the FCC Rules. These
limits are designed to provide reasonable protection against harmful
interference in a residential installation. This equipment generates uses
and can radiate radio frequency energy and, if not installed and used
in accordance with the instructions, may cause harmful interference
to radio communications. However, there is no guarantee that
interference will not occur in a particular installation. If this equipment
does cause harmful interference to radio or television reception, which
can be determined by turning the equipment o and on, the user is
encouraged to try to correct the interference by one or more of the
following measures:
ENGLISHESPAÑOLFRANÇAIS
• Reorient or relocate the receiving antenna.
• Increase the separation between the equipment and receiver.
• Connect the equipment into an outlet on a circuit dierent from
that to which the receiver is connected.
• Consult the dealer or an experienced radio/TV technician for
help.
CAUTION: changes or modications not expressly approved by the
party responsible for
operate the equipment.
compliance could void the user’s authority to
3
Page 4

IMPORTANT SAFETY INSTRUCTIONS
For your safety, please read these instructions carefully.
1. WARNING: To reduce the risk of electric shock, do not remove
the cover or back of the units. There are no user-serviceable
parts inside. Contact technical support for further assistance.
2. WARNING: To prevent re or electric shock hazard, do not
expose the unit to rain or moisture.
3. Do not expose the adapter and portable PDVD to any water
(including drips or splashes). Objects lled with liquids, such
as vases and water bottles, should not be placed on the unit.
4. Keep the portable DVD player away from direct sunlight and
heat sources such as radiators or stoves.
5. Do not block the ventilation openings. Slots and openings on
the unit are provided for ventilation. To prevent re hazard
or risk of electric shock, do not place your portable DVD on a
cushion, sofa, or other similar surface.
6. Do not place the portable PDVD player on an unstable table,
stand, tripod, bracket or cart. The unit may fall, resulting in
possible damage or injury.
7. Never place heavy or sharp objects or pressure on the LCD
panel or frame.
8. Only use the AC adapter included with the portable DVD play-
er. Using any other adapter will void your warranty.
9. Unplug the power from the outlet when the unit is not in use.
10. Dispose of this unit properly respecting your local laws for
electronics and battery disposal.
11. CAUTION: There is a danger of explosion if battery is incor-
rectly replaced. Replace only with the same or equivalent type
of battery.
12. WARNING: The battery (batteries or battery pack) shall not be
exposed to excessive heat such as sunlight, re, or any other
heat source.
13. WARNING: Excessive volume and/or usage of earphones or
headphones can cause hearing loss.
14. WARNING: Only use attachments/accessories specied pro-
vided by the manufacturer, using the included AC adapter and
DC car adapter.
ENGLISHESPAÑOLFRANÇAIS
4
Page 5

PACKAGE CONTENTS
Your Impecca Portable DVD Player includes the following:
• 9” DVD Player
• Remote controller
• USB Cable and AC/DC Power Adapter
• Car Charger
• AV cable
• User manual
PRODUCT FEATURES
Please read through this manual before making connections and operating your unit. Retain this manual for future
reference.
This unit is small, lightweight and utilize the latest state of
the art electronics. It is easy to install, conveniently portable
and may be used at home, in the oce or on vacation.
ENGLISHESPAÑOLFRANÇAIS
Features:
• High-denition TFT LCD screen
• Headphone jack
• USB/MMC/SD card slot
• Compatible with DVD, VCD, MPEG4, CD, MP3, CD-R,
DVD-RW JPEG, Kodak Picture CD, etc.
• Playback controls include: play, pause, fast forward
playback, and fast rewind playback.
• Two optional aspect ratios 16:9 and 4:3
• Working voltage: DC5V
5
Page 6

PRECAUTIONS AND WARNINGS
Placement
• To prevent a re or shock hazard do not expose this PDVD
to rain or any moisture.
• Do not expose this PDVD to direct sunlight.
• Keep this PDVD away from strong magnets, heat sources
and excessive dust.
• Do not place this PDVD on an unstable surface.
• If the PDVD is brought directly from a cold place to a warm
one, moisture may condense inside PDVD and cause a
malfunction. If this occurs, leave the PDVD turned o for a
few hours until the moisture evaporates.
Installation
• Ensure that the PDVD player is installed according to the
instructions and illustrations provided in this manual.
ENGLISHESPAÑOLFRANÇAIS
Caution
• Do not drop any objects into the PDVD through the openings.
• Do not spill or spray liquid of any kind on or in the PDVD
(this may result in a re or electic shock).
• Do not place anything heavy on the PDVD.
• To ensure proper ventilation and proper operation, never
cover or block the slot and opening with a cloth or other
materials.
• Keep the PDVD away from any open ame, such as: re,
candles, etc.
• Install new batteries correctly. Incorrect installation is hazardous. Dispose of pre-installed batteries in accordance
with local regulations.
• The maximum working termperature is 95°F/35°C.
6
Page 7

Do Not Disassemble
• Never attempt to disassemble the PDVD as this is very dangerous and may cause an electric shock and/or harm from
exposure to the laser beam.
• Please, only seek an authorized service center for any service
or maintenance on the player.
Cleaning the PDVD
• When cleaning the unit, please make sure the PDVD is un-
plugged and turned o.
• Do not use chemicals or detergents when cleaning.
• Use a soft cloth lightly dampened with water.
• Clean only the exterior of the unit and immediately wipe dry.
Disc Handling
• Do not leave discs near heat sources, in direct sunlight, or in
high humidity.
ENGLISHESPAÑOLFRANÇAIS
• Store discs in their cases when they are not being used.
• Stacking disc or standing them at an angle without putting
them in the case can cause a disc to warp.
• Do not touch the disc surface when handling a disc; hold it by
the edges.
• Fingerprints, dust, dirt or scratches on the disc can distort
the picture or reduce sound quality. Always handle carefully
and make sure discs are clean before use.
• Do not stick paper or tape onto the disc.
• Do not write on the disc with a marker or any other ink. Clean
discs using a soft cloth, lightly wiping from the center outwards.
• Do not use solvents such as benzene, commercially available
cleaner not intended for CD/DVD’s or anti-static spray intend-
ed for vinyl LP’s, as these may damage your disc.
7
Page 8
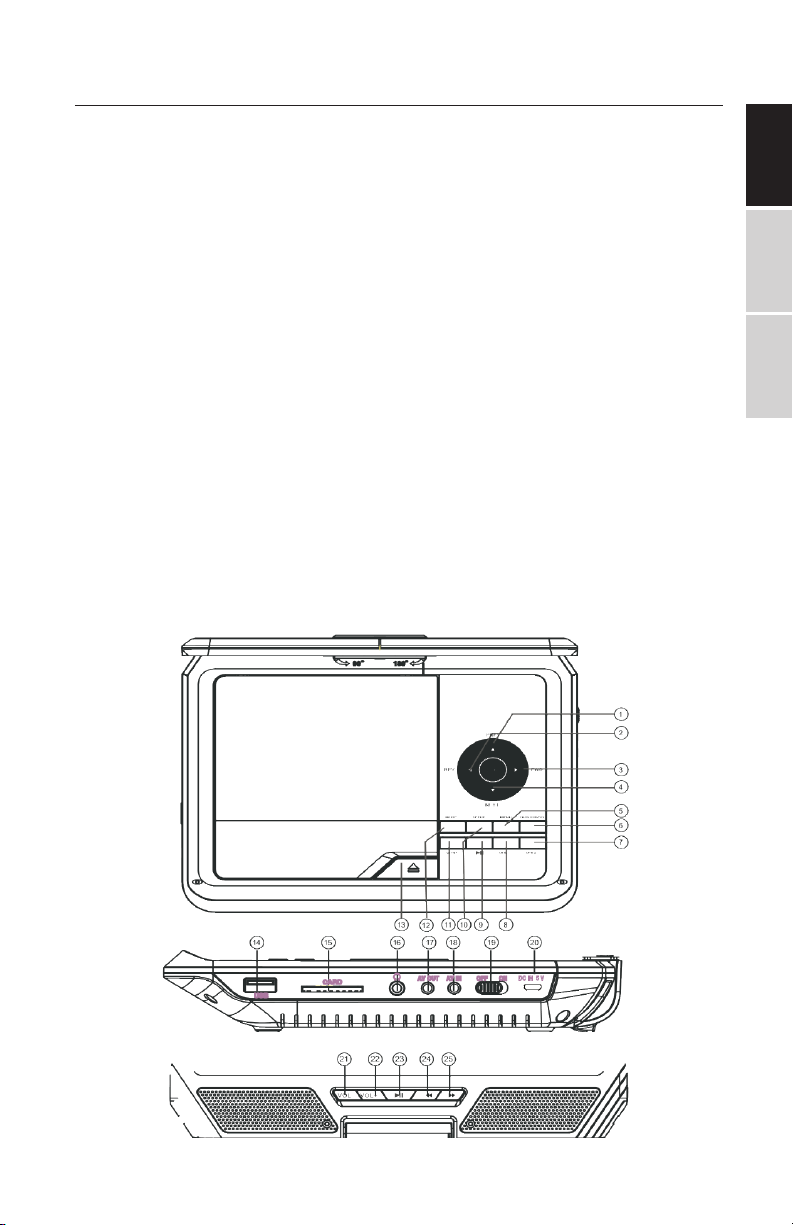
MAIN UNIT CONTROLS
1. PREV
2. REV
3. FWD
4. NEXT
5. MENU
6. DVD/USB/SD
7. V O L+
8. VOL-
9. PLAY/PAUSE
10. SETUP
11. STOP
12. MODE
13. OPEN
14. USB PORT
15. SD/MMC slot
16. Headphone jack
17. AV OUT
18. AV IN
19. POWER ON/OFF
20. DC IN 5V
21. VOL-
22. VOL+
23. PLAY/PAUSE
24. FWD
25. REV
ENGLISHESPAÑOLFRANÇAIS
8
Page 9

COMMON KEYS
These are the common key functions on the panel:
MENU — Press to return to the root menu for DVD.
STOP — Press to suspend playback.
PLAY/PAUSE — Press once to pause the playing. Press again to resume.
SETUP — Press to enter the setup menu. Then use the direction keys
and press OK to set the system menu.
DVD/USB/SD — Press repeatedly to switch among the input of the disc,
USB source, and SD card.
Direction Keys — Use direction keys for: previous/next, fast forward/
fast rewind.
OK — Press the center button to choose the selected item or the
choice.
OPEN — Press to open the door.
PDVD Battery installation and replacement
The remote control for the PDVD uses 2 AAA batteries. Follow these
steps to install and replace depleted batteries:
1. Unscrew battery cover and remove.
2. Properly dispose of exhausted batteries.
3. Insert 2 new AAA batteries.
4. Be sure the positive (+) and negative (-) ends of the batteries are
facing the correct direction. Replace the battery cover.
5. Do not mix old and new batteries.
6. Do not mix alkaline, standard (carbon-zinc) or rechargeable (nick el-
cadmium) batteries.
ENGLISHESPAÑOLFRANÇAIS
9
Page 10

OPERATING INSTRUCTIONS
Plug in your DVD Player:
Plug in the AC adapter into the DVD player (DC IN) and then
plug the adapter into the AC wall outlet.
If using the car charger, plug in the DC adapter into the DVD
player (DC IN) and plug the adapter into the cigarette lighter
outlet.
NOTE: Only use the Impecca power adapter that is included with your DVD player. Using any other power adapter
can damage the unit and/or cause electrical shock, re, or
even death.
ENGLISHESPAÑOLFRANÇAIS
10
Page 11

USING THE REMOTE CONTROL
Point the remote control toward the main unit when operating. The remote control works best at a distance of less than
5 meters and within a maximum of 30 degress vertical in
front of the unit. Avoid having obstacles in front of the unit.
Do not place the remote in direct sunlight. If the remote
control fails to work close to the unit, it is time to replace the
battery.
Notes on batteries
• The remote control does not include any batteries.
• Remove the battery if the remote will not be in use for
a lengthy period.
• Do not heat batteries or dispose in a re.
• Do not dissassemble, deform, or modify the batteries.
Replace the batteries
ENGLISHESPAÑOLFRANÇAIS
1. Requires 2 x AAA batteries (not included).
2. Remove the battery cover from the rear of the remote
control.
3. Insert the batteries into the battery compartment
according to polarity indicators.
4. Place the battery cover back onto the remote.
11
Page 12

2
2
2
2
2
1
10
1
1
4
0
2
4
2
5
2
8
3
1
9
7
5
3
9
2
22
3
0
1
3
4
1
3
1
8
2
5
2
6
1
9
3
2
6
1
8
1
7
1
7
ENGLISHESPAÑOLFRANÇAIS
6
11
1. MUTE: Mute the audio of the player. Press it again to activate
the sound.
2. POWER: Switch the player on of o.
3. 0-9, 10+ NUMBERS
4. VOL+: Adjust the volume up.
5. VOL-: Adjust the volume down.
6. MENU: Press to view the main menu on a loaded DVD.
7. SLOW: Slow the audio/video/photo playback.
8. STOP: Stop the audio/video/photo playback.
9. REPEAT: Press here repeatedly to cycle through repeat op-
tions for the loaded disc.
10. A-B
11. PBC
12. ZOOM: For the DVD disc, short press to access the zoom
function, you can select the 2X, 3X, 4X,1/2, 1/3, 1/4. For the
photo disc, press it to switch between the zoom 100%, 125%,
150%, 200%, 75%, 50% and normal status.
13. MODE: Change the mode of the player.
12
Page 13

14. SD/USB: Press the key to switch between the DVD, SD and
USB modes.
15. TITLE: Press to view the title menu on a loaded DVD.
16. SUBTITLE: Short press to Changes subtitle mode.
17. AUDIO: Press here to switch the available audio channels
provided by the disc.
18. RETURN: Conrm a screen or menu selection.
19. GOTO: Go to a specic time index/title/chapter.
20. UP
21. LEFT
22. RIGHT
23. DOWN
24. ENTER
25. PLAY/PAUSE: Play or pause the audio/movie.
26. RWD/FWD: Move backward or forward.
27. NEXT/PREVIOUS: Press here to play previous or next chapter/
title/track.
28. SETUP: Access the Setup menu.
29. LCD MENU: Display the screen menu.
30. PROG: Program a loaded disc to play chapters and titles or
tracks in a specied order.
31. ANGLE: Toggle through the viewing angles, if available.
32. OSD: Press to display the information of the current video/
audio.
ENGLISHESPAÑOLFRANÇAIS
13
Page 14

SYSTEM SETUP
Charging the unit
The player is powered by a lithium-polymer battery, which
features a high ratio of energy to weight. It has no memory
eect and it can be recharged at any time—whether it is fully
or partially discharged.
It takes about six hours to fully charge the battery and a fully-
charged battery can be used for about 3-4 hours.
Connect the attached AC/DC adapter to the DC INPUT jack on
the unit, then plug the adapter into a 240V AC outlet.
NOTE: Be sure to switch o the unit before charging. The
charging indicator LED will change from RED to OFF to indi-
cate that the battery has been fully charged. When the unit is
turned ON (using the OFF/ON switch on the left-side panel), the
Green LED indicator light will stay on.
Usage and maintenance of the rechargeable battery
• The working temperature range is 0-45C.
ENGLISHESPAÑOLFRANÇAIS
• Always unplug the unit when not in used—unless it is
being charged.
• Heat is inevitably produced during playback, which is
normal. Switch the player o to cool it down.
• Avoid impact to player, and keep it away from heat and
moisture.
Connection to TV
Connect this unit to a TV in order and enjoy high quality music
or movies. Use an AV cable to connect the AV OUT jack on the
unit to the AV IN jack of a TV.
The DVD player also has sound and video input jacks for con-
14
Page 15

necting external audio and video inputs.
General Settings
Press the SETUP button on the remote control unit to open
the setup menu. Use the directional buttons (up, down, left,
right) to select menu items. After changing the desired settings,
press the SETUP button again to return to the normal display.
Using the left and right keys, the following menu pages can
be chosen:
• General settings
• Audio settings
• Video settings
• Playback Preferences
• Password settings
Menu Operation
1. Press SETUP on the remote control or on the unit to
show the setup menu.
2. Press LEFT/RIGHT to select an item. The submenu of
the selected item will be instantly shown.
ENGLISHESPAÑOLFRANÇAIS
3. Press UP/DOWN to select an item in the submenu,
then press OK, then ENTER, and then RIGHT to enter.
Use UP /DOWN to select an option, then press OK/
ENTER to conrm it or press LEFT to cancel.
4. Press UP/DOWN to continue to set other items in the
sub menu.
5. Press LEFT to go back to the superior menu of the
current one.
6. Press SETUP again and press ENTER/OK to exit the
setup menu.
15
Page 16
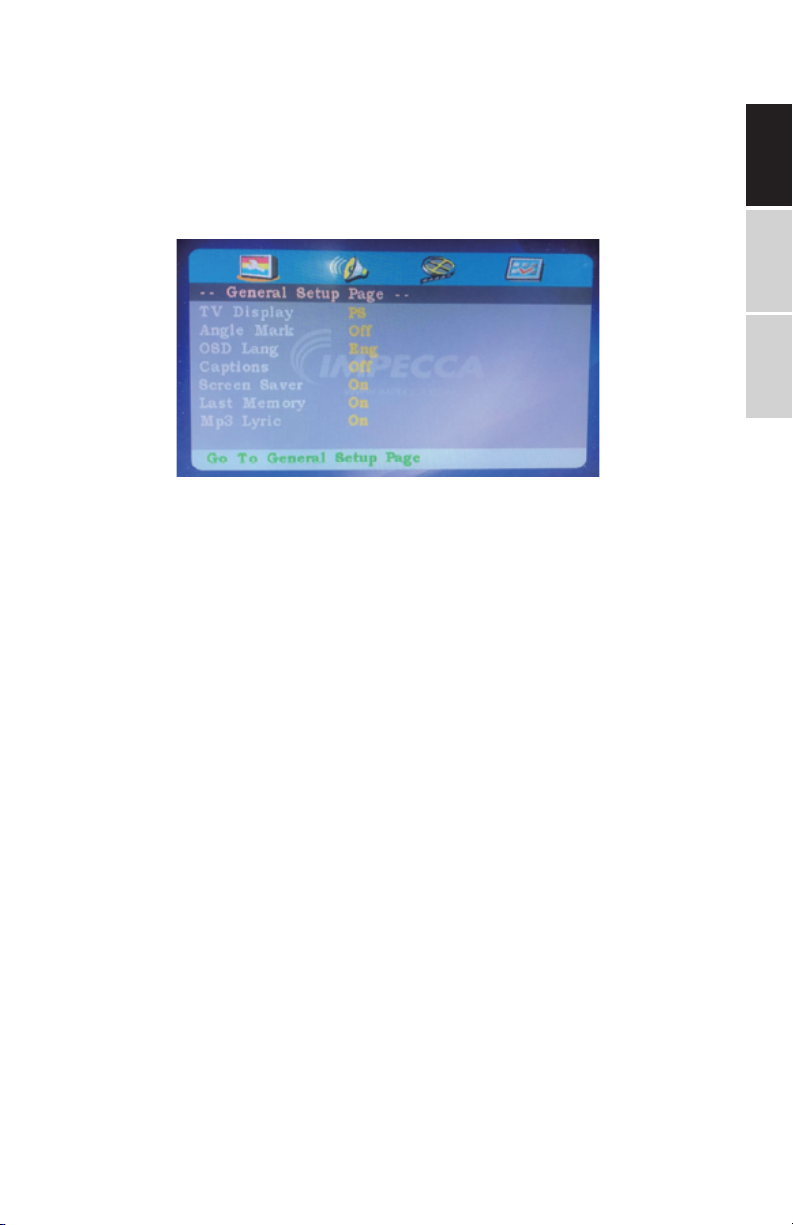
There are six items in the General Setup page:
TV Display: Sets the aspect ratio of the playback image
when using an external television display.
• 4:3 Panscan - a 4:3 aspect ratio that will trim the left
and right sides o of a widescreen lm. Also known as
fullscreen.
• 4:3 Letterbox - select this if you have a standard
'square' television (4:3 aspect ratio). The full image will
be shown on the screen with black letterbox bars on
the upper and lower portions of the image.
ENGLISHESPAÑOLFRANÇAIS
• 16:9 - Choose this display option on any widescreen
display (most HDTVs).
• Wide Squeeze - Squishes a widescreen image to t a
4:3 screen with no trimming.
Angle Mark: Displays current camera viewing information
on the right hand corner of the TFT screen if available on
the disc. Note that this function only works with those discs
encoded with multiple camera angles.
OSD Language: Change the DVD player system language
16
Page 17

Captions: Closed captions are data that are hidden in the
video signal of some discs for the hearing impaired. Closed
captions are dierent from subtitles that can be selected by
using the SUBTITLE button or in your DVD menu.
Screen Saver: User this setting to turn the screen saver on
or o after a period of prolonged DVD player inactivity.
Last Memory: Set this to ON so that, each time you turn
o the unit or stop the disc, the last point of play will be
retained. On the next time you turn on the unit and play the
same disc, the unit will play from that point.
Audio Setup
Here, you can change the audio setup of the portable DVD
player:
ENGLISHESPAÑOLFRANÇAIS
• LT/RT - Select this option if your DVD player is connected to a Dolby Pro Logic decoder.
• Stereo - Select this option when output delivers sound
from only the two front speakers.
17
Page 18
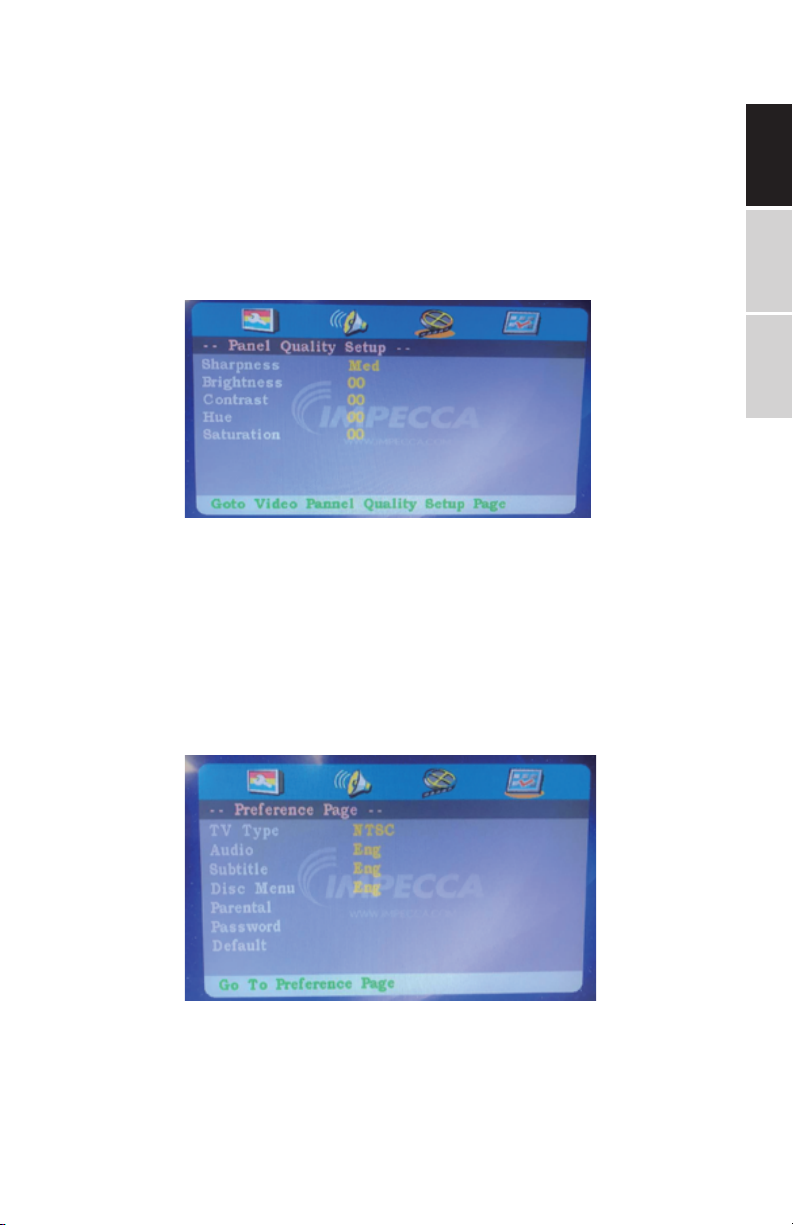
Panel Quality Setup
These are settings for the video quality of the LCD display:
BRIGHTNESS, CONTRAST, HUE, SATURATION
For each setting, there are three options: High, Medium,
Low. Enter these items respectively. Use direction key LEFT/
RIGHT to adjust the value. Then press OK to conrm it.
Preferences
TV Type: This DVD player is compatible with both NTSC and
PAL televisions. Choose either NTSC (US/Americas/Japan)
or PAL (Europe/Asia) TV output settings to correspond your
television.
ENGLISHESPAÑOLFRANÇAIS
Use to select the TV types, include PAL/AUTO/NTSC.
18
Page 19

• NTSC - Select this signal when connected to a NTSC
television. The output of PAL discs will automatically be
converted to NTSC format.
• PAL - Select this signal when connected to a PAL tele-
vision. The output of NTSC discs will automatically be
converted to PAL format.
• Auto - Changes the video signal according to the disc
format.
Audio: Selects a default DVD audio language (if available).
Subtitle: Selects a default DVD subtitle language (if available).
Disc Menu: Selects a default DVD menu language (if avail-
able).v
Default: Revert all player settings to factory defaults.
Password: the default password is 136900.
ENGLISHESPAÑOLFRANÇAIS
19
Page 20

PLAYBACK
After all the connections are made correctly, switch on the
unit. Now it is ready to play!
Loading and Playing a Disc
1. After connecting power to the unit, set the power
switch to the ON position.
2. Push OPEN to open the disc tray. Place a disc in it with
the label side facing up.
3. Close the disc tray. The unit will load the disc and start
playing.
MP3/MPEG4 Disc Playback
After the unit loads a MP3/MPEG4 disc, a menu showing the
contents of the disc will display on the screen.
ENGLISHESPAÑOLFRANÇAIS
1. Press the direction key UP/DOWN to select a le or a
folder.
2. Press OK to enter the selected folder. The le or/and
folder in it will be listed instantly.
3. Press OK to begin to play the selected le.
4. When the disc is stopped press LEFT to return to the
previous menu.
Kodak Picture CD playback
Place a Kodak picture CD in the disc tray; the unit will load
the disc automatically.
Press MENU to display the menu showing the contents of
the disc.
20
Page 21

In the menu, use the direction keys UP/DOWN to select a
picture. Then press to start the playback from the selected picture.
GOTO: Press this button, then use the digit keys to select a
picture. Then the playback from the selected picture begins.
Press to pause the playback; press it again to resume the
playback. Press it to begin a playback or resume playback.
REPEAT: Press repeatedly to switch the repeat modes (Single-Repeat One-Repeat Folder-Folder-Cancel repeat). Press
to skip to the previous /next picture during playback.
Left/Right (on the remote control): Press to rotate the picture counter-clockwise/clockwise during the playback.
ZOOM: During the playback, press ZOOM repeatedly to
zoom in/out the picture or return to the original size. When
the picture is zoomed in, the direction keys can be used to
move the picture.
USB and SD/MMC CARD PLAYBACK
Insert a USB drive or a card reader into the USB port. Press
SOURCE SELECT to select USB mode to play the readable
les on it. Insert a SD/MMC card into the SD/MMC card port.
ENGLISHESPAÑOLFRANÇAIS
Press SOURCE SELECT to select MCR mode to play the read-
able les in it.
DIVX Playback
DIVX is a video (movies and video) recording format, which is
commonly known as AVI.
DIVX disc features high quality that is comparable with the
DVDs and larger capacity. See the tables below.
21
Page 22

1.5H movie In MPEG-1/2 format In DivX
DVD(MPEG-2) About 1.5-GB About 600-800MB
VCD (MPEG-1) About 800MB-l G About 600-800MB
These are the dierences among media formats:
MPEG 1 MPEG 2 MPEG4
Speed(kb/s) 1380kb/s
(352*288)
Quality Good Excellent Perfect
Hardware Low Medium High
6500kb/s 8800kb/s
(720*576)
ENGLISHESPAÑOLFRANÇAIS
22
Page 23

TECHNICAL SPECIFICATIONS
Battery output: 3.7 volts
Storage environmental conditions:
1. When storing for up to 6 months:
a. Temperature between -4°F to 113°F (-20°C to 45°C)
b. Humidity at 65% ±20%
2. When storing for up to 1 week:
a. Temperature between -4°F to 149°F (-20°C to 65°C)
b. Humidity at 65% ±20%
Operating environmental conditions:
1. When charging the battery:
a. Temperature between 32°F to 113°F (0°C to 45°C)
b. Humidity at 65% ±20%
2. When running on battery:
a. Temperature between -4°F to 149°F (-20°C to 65°C)
b. Humidity at 65% ±20%
ENGLISHESPAÑOLFRANÇAIS
Electrical Specications:
Power requirements: DC 5V, AC 100-240 V (50/60 Hz)
Power consumption: < 15 watts
Operating humidity: 5% to 90%
Output: Video output: 1 Vp-p (75 Ω)
Audio output: 1.0 Vrms / 10 kohm (1 KHz, 0 dB)
Speakers: 2 x 1 Watt, Headphone output, Coaxial output
System specications:
Laser: Semiconductor laser, 650 nm wavelength
Video system signal: NTSC/PAL
Frequency response: 20Hz to 20 kHz(1dB)
Signal-to-noise ratio: > than 80 dB (ANALOG OUT only)
Dynamic range: More than 85 dB (DVD/CD)
23
Page 24

Compatible discs: DVD+R/RW, DVD-R/RW, CD-DA, CD-R/RW,
MP3, JPEG, VCD.
Signal system: NTSC/PAL Panel size: 10.1 inch
Picture resolution: 800x 480 (RGB) Frequency response: 20 Hz
to 20 kHz Video output: 1 Vp-p/75 Ohm, unbalanced Audio output: 1.4 Vrms/10 kOhm
NOTE: Design and specications are subject to change without
advance notice.
Rechargeable Battery Use
The DVD player features a Li polymer battery as a portable
power supply. The battery has no “Memory Eect” and thus can
be recharged safely regardless of whether the battery is fully
charged. When the battery is fully charged, it can last about two
hours using earphones.
CAUTION: Danger of explosion if battery is incorrectly replaced.
Replace only with the same or equivalent type.
Precautions related to Battery Recharge
ENGLISHESPAÑOLFRANÇAIS
The power switch must be in the OFF position to charge the battery. The red light will indicate that the battery is charging. When
the DVD player is fully charged, the light will turn o.
1. Using and Maintaining Rechargeable Battery
2. The normal working temperature is: 32°- 10 4 ° F.
3. Always unplug the AC/DC power supply for the unit when is
not in use.
4. Heat will be created during playback which is normal. Avoid
playing while unattended.
5. Do not drop the unit. Avoid heat sources and damp areas.
24
Page 25

TROUBLESHOOTING
PROBLEM SOLUTION
No sound or distorted
sound
Can’t advance through a
movie
The ∅ icon appears on
screen
Picture is distorted The disc might be damaged. Try another
No forward or reverse
scan
The player breaks down
when a USB drive or memory card is inserted into
the player.
Ensure that the DVD Player is connected
properly. Ensure that all cables are se-
curely insured into the correct jacks.
You can’t advance through the opening
credits and warning information that ap-
pears at the beginning of movies because
the disc is programmed to prohibit that
action.
The feature or action cannot be completed at this time because:
1. The disc software restricts or doesn’t
support the feature (such as angles)
2. The feature is unavailable.
3. You’ve requested an nonexistent chap-
ter, track, or title number.
disc; it is normal for some distortion to
appear during forward or reverse scan.
Some discs have sections that prohibit
rapid scanning or chapter skip; You can
not skip through the warning information
and copyright notices at the beginning of
a DVD.
The connected U drive or the memory
card Is probably not of an original version
one.
The player cannot play any U drive and
memory card of non-original version. In
case the player breaks down, turn it o
and unplug it from the power supply.
Then, connect it to the power supply and
switch It on again. The player will resume
the normal status.
ENGLISHESPAÑOLFRANÇAIS
25
Page 26

WARRANTY EXCLUSIONS
The warranty will become invalid if any of the following occurs:
1. The product has not been installed, operated or maintained
in accordance with the manufacturer’s operating instructions
provided with the product.
2. The product has been used for purposes other than its intended function.
3. The product has been used for purposes other than household use.
4. The damage or malfunction of the product is caused by any
of following conditions:
• Incorrect voltage
• Accidents (including liquid or moisture damage)
• Misuse or abuse of the product
CONTACT TECHNICAL SUPPORT
ENGLISHESPAÑOLFRANÇAIS
Email: service@impecca.com
Website: www.impecca.com
26
Page 27

ENGLISHESPAÑOLFRANÇAIS
27
Page 28

TABLA DE CONTENIDO
Instrucciones de seguridad importantes 30
Continedos del paquete / Características del producto 31
Precauciones y advertencias 33
Controles de la unidad principal 34
Claves communes 35
Instrucciones de operación 36
Usando el control remoto 37
Conguración del sistema 40
Reproducción 46
Especicaciones técnicas 49
Solución de problemas 50
Exclusiones de garantía 51
Atención al cliente 51
Garantía 52
Traducción al francés del manual del usuario 53
ENGLISHESPAÑOL
FRANÇAIS
28
Page 29

IMPORTANTE
Ya que los circuitos del CD pueden causar interferencia con otros
sintonizadores en la cercanía, apague esta unidad cuando no se utilice
o mueva el radio afectado a otro lugar.
Este dispositivo cumple con la Parte 15 de las Normas de la FCC.
La operación está sujeta a las siguientes dos condiciones: (1) Este
dispositivo puede no causar interferencia dañina, y (2), este dispositivo
debe aceptar cualquier interferencia recibida, incluyendo interferencia
que puede causar una operación indeseable.
Este dispositivo cumple con la Norma Canadiense ICES-003 de Aparatos
receptores de televisión.
DECLARACIÓN DE LA COMISIÓN FEDERAL DE
COMUNICACIONES
NOTA: Este equipo ha sido probado y se encuentra que cumple con los
límites de un Radio Receptor, de acuerdo con la Parte 15 de las Normas
de la FCC. Estos límites están diseñados para proporcionar una protección
razonable contra interferencias dañinas en una instalación residencial.
Este equipo genera y puede irradiar energía de radiofrecuencia y, si no se
instala y utiliza de acuerdo con las instrucciones, puede causar interferencias
perjudiciales a las comunicaciones de radio. Sin embargo, no hay garantía
de que la interferencia no ocurra en una instalación en particular. Si este
equipo causa interferencia dañina a la recepción de radio o televisión, lo cual
puede determinarse apagando y encendiendo el equipo, se recomienda
al usuario que intente corregir la interferencia mediante una o más de las
siguientes medidas:
ENGLISHESPAÑOLFRANÇAIS
• Reoriente o reubique la antena receptora.
• Aumente la separación entre el equipo y el receptor.
• Conecte el equipo a una toma de corriente en un circuito
diferente al que está conectado el receptor.
• Solicite ayuda al distribuidor o a un técnico experimentado de
radio/T V.
CAUTION: Los cambios o modicaciones no expresamente aprobados
por la parte responsable del cumplimiento podría anular la autoridad
del usuario para operar el equipo.
29
Page 30

INSTRUCCIONES DE SEGURIDAD IMPORTANTES
For your safety, please read these instructions carefully.
1. ADVERTENCIA: Para reducir el riesgo de descarga eléctrica, no re-
tire la cubierta o la parte posterior de las unidades. No hay partes
reparables por el usuario adentro. Póngase en contacto con el
servicio de asistencia técnica para obtener más ayuda.
2. ADVERTENCIA: Para evitar el riesgo de incendio o descarga eléctrica, no exponga la unidad a la lluvia o la humedad.
3. No exponga el adaptador y el DVD portátil al agua (incluidas
goteras o salpicaduras). Los ob jetos llenos de líquidos, como jarrones y botellas de agua no deben colocarse en la unidad.
4. Mantenga el reproductor de DVD portátil alejado de la luz solar
directa y de fuentes de calor como radiadores o estufas.
5. No bloquee las aberturas de ventilación. Las ranuras y aberturas
en la unidad se pro porcionan para la ventilación. Para evitar riesgo
de incendio o riesgo de descarga eléctrica, no coloque su DVD
portátil en un cojín, sofá u otra supercie similar.
6. No coloque el reproductor de DVD portátil en una mesa inestable,
soporte, trípode, o carro. La unidad puede caerse y provocar
posibles daños o lesiones.
7. Nunca coloque objetos pe sados o punzantes o presión sobre el
panel LCD o el marco.
8. Solo use el adaptador de CA incluido con el reproductor de DVD
portátil. El uso de cualqui er otro adaptador anulará la garantía.
9. Desenchufe la corriente de la toma de corriente cuando la unidad
no esté en uso.
10. Deseche esta unidad respetan do debidamente sus leyes locales
sobre la eliminación de baterías y electrónicos.
11. PRECAUCIÓN: existe peligro de explosión si la batería se reemplaza
incorrectamente. Reemplace solo con el mismo tipo de batería o
equivalente.
12. ADVERTENCIA: La batería (bat erías o paquete de baterías) no debe
exponerse a un calor excesivo, como la luz del sol, el fuego o cual-
quier otra fuente de calor.
13. ADVERTENCIA: El volumen y/o uso excesivo de auriculares o audífonos puede causar pérdi da de audición.
14. ADVERTENCIA: Utilice úni camente accesorios/objetos especicados
por el fabricante, utilizando el adaptador de CA incluido y el adaptador para automóvil de CC.
ENGLISHESPAÑOL
FRANÇAIS
30
Page 31

CONTENIDOS DEL PAQUETE
Su Reproductor DVD Portátil Impecca incluye lo siguiente:
• Reproductor DVD de 10.1”
• Control remoto
• Cable USB y Adaptador de corriente AC/DC
• Cargador del auto
• Cable Audio/Video
• Manual de usuario
CARACTERÍSTICAS DEL PRODUCTO
Lea este manual antes de hacer las conexiones y operar su
unidad. Por favor, conserve este manual para futuras referencias.
Esta unidad es pequeña, ligera y utiliza la tecnología de
punta en electrónica más reciente. Es fácil de instalar, cómodamente portátil y puede usarse en la casa, en la ocia o
de vacaciones.
ENGLISHESPAÑOLFRANÇAIS
Caracteristicas:
• Pantalla TFT LCD de alta denición
• Conector para audífonos
• Ranura para tarjeta USB/MMC/SD
• Compatible con DVD, VCD, MPEG4, CD, MP3, CD-R,
DVD-RW, LPEG, Imágenes en CD Kodak, etc.
• Controles de reproducción: reproducción, pausa, adelanto rápido, atraso rápido, etc.
• Dos relaciones de aspecto 16:9 y 4:3
• Voltaje de funcionamiento: DV 5V
31
Page 32

PRÉCAUTIONS ET AVERTISSEMENTS
Colocación
• Para evitar incendios o descargas eléctricas, no exponga este
PDVD a la lluvia ni a la humedad.
• No exponga este PDVD a la luz solar directa.
• Mantenga este PDVD alejado de imanes fuertes, fuentes de
calor y polvo excesivo.
• No coloque este PDVD en una supercie inestable.
• Si el PDVD se lleva directamente de un lugar frío a uno cálido,
la humedad puede condensarse dentro de PDVD y provocar
un mal funcionamiento. Si esto ocurre, deje el PDVD apagado
durante unas horas hasta que la humedad se evapore.
Instalación
• Asegúrese de que el reproductor PDVD esté instalado de
acuerdo con las instrucciones e ilustraciones proporcionadas
en este manual.
Precaución
• No deje caer ningún objeto en el PDVD a través de las aber-
turas.
• No derrame ni rocíe líquido de ningún tipo sobre o en el
PDVD (esto puede provocar un incendio o un choque eléctrico).
• No coloque nada pesado en el PDVD.
• Para garantizar una ventilación adecuada y un funcionamiento adecuado, nunca cubra o bloquee la ranura y la abertura
con un paño u otros materiales.
• Mantenga el PDVD alejado de cualquier llama abierta, como:
fuego, velas, etc.
• Instale pilas nuevas correctamente. La instalación incorrecta
es peligrosa. Deseche las baterías preinstaladas de acuerdo
con las regulaciones locales.
• The maximum working termperature is 95°F/35°C.
32
ENGLISHESPAÑOL
FRANÇAIS
Page 33

No desarmar
• Nunca intente desmontar el PDVD, ya que es muy peligroso
y puede provocar una descarga eléctrica y / o daños por
exposición al rayo láser.
• Por favor, solo busque un centro de servicio autorizado para
cualquier servicio o mantenimiento en el reproductor.
Limpiar el PDVD
• Cuando limpie la unidad, asegúrese de que el PDVD esté
desenchufado y apagado.
• No use productos químicos o detergentes cuando limpie.
• Use un paño suave ligeramente humedecido con agua.
• Limpie solo el exterior de la unidad y seque inmediatamente.
Manejo de disco
• No deje los discos cerca de fuentes de calor, a la luz solar
directa o con mucha humedad.
• Guarde los discos en sus estuches cuando no los estén usando.
• Apilar el disco o colocarlo en ángulo sin colocarlo en el estuche puede hacer que el disco se combe.
• No toque la supercie del disco cuando manipule un disco;
sostenlo por los bordes.
• Las huellas dactilares, el polvo, la suciedad o los arañazos en
el disco pueden distorsionar la imagen o reducir la calidad
del sonido. Siempre maneje con cuidado y asegúrese de que
los discos estén limpios antes de su uso.
• No pegue papel o cinta en el disco.
• No escriba en el disco con un marcador o cualquier otra
tinta. Limpie los discos con un paño suave, pasando suavemente desde el centro hacia afuera.
• No utilice disolventes como benceno, limpiadores disponibles
en el mercado que no sean para CD / DVD ni aerosoles antiestáticos para discos de vinilo, ya que pueden dañar el disco.
ENGLISHESPAÑOLFRANÇAIS
33
Page 34

CONTROLES PRINCIPALES DE LA UNIDAD
1. PREV
2. REV
3. FWD
4. NEXT
5. MENU
6. DVD/USB/SD
7. V O L+
8. VOL-
9. PLAY/PAUSE
10. SETUP
11. STOP
12. MODE
13. OPEN
14. USB PORT
15. SD/MMC espacio
16. Toma de auriculares
17. AV OUT
18. AV IN
19. POWER ON/OFF
20. DC IN 5V
21. VOL-
22. VOL+
23. PLAY/PAUSE
24. FWD
25. REV
ENGLISHESPAÑOL
FRANÇAIS
34
Page 35

LLAVES COMUNES
These are the common key functions on the panel:
MENU — Presione para regresar al menú raíz para DVD.
STOP — Presione para suspender la reproducción.
PLAY/PAUSE — Presione una vez para pausar la reproducción. Presione
nuevamente para reanudar.
SETUP — Presione para ingresar al menú de conguración. Luego
use las teclas de dirección y presione OK para congurar el menú del
sistema.
DVD/USB/SD — Presione repetidamente para alternar entre la entrada
del disco, la fuente USB y la tarjeta SD.
Direction Keys — Utilice las teclas de dirección para: anterior / sigui-
ente, avance rápido / rebobinado rápido.
OK — Presione el botón central para elegir el elemento seleccionado o
la opción.
OPEN — Presione para abrir la puerta.
PDVD Battery installation and replacement
El control remoto para PDVD usa 2 baterías AAA. Siga estos pasos para
instalar y reemplazar las baterías agotadas:
ENGLISHESPAÑOLFRANÇAIS
1. Desatornille la tapa de la batería y quítela.
2. Deseche adecuadamente las baterías agotadas.
3. Inserta 2 nuevas pilas AAA.
4. Asegúrese de que los extremos positivo (+) y negativo (-) de las baterías estén orientados en la dirección correcta. Reemplace la tapa
de la batería.
5. No mezcle pilas viejas y nuevas.
6. No mezcle pilas alcalinas, estándar (carbono-zinc) o recargables
(níquel-cadmio).
35
Page 36

INSTRUCCIONES DE OPERACIÓN
Enchufe su reproductor de DVD:
Enchufe el adaptador de CA en el reproductor de DVD (DC IN) y
luego enchufe el adaptador en la toma de CA de la pared.
Si usa el cargador del automóvil, enchufe el adaptador de CC en
el reproductor de DVD (DC IN) y enchufe el adaptador en la salida
del encendedor.
NOTA: Solo use el adaptador de corriente Impecca que se
incluye con su reproductor de DVD. El uso de cualquier otro
adaptador de corriente puede dañar la unidad y / o causar
descargas eléctricas, incendios o incluso la muerte.
ENGLISHESPAÑOL
FRANÇAIS
36
Page 37

USANDO EL CONTROL REMOTO
Apunte el control remoto hacia la unidad principal cuando esté
funcionando. El control remoto funciona mejor a una distancia
de menos de 5 metros y dentro de un máximo de 30 grados de
avance en frente de la unidad. Evite tener obstáculos en frente
de la unidad. No coloque el control remoto a la luz solar directa.
Si el control remoto no funciona cerca de la unidad, es hora de
reemplazar la batería.
Notas sobre las baterías
• Retire la batería si el control remoto no se va a utilizar du-
rante un período prolongado.
• No caliente las baterías ni las arroje al fuego.
• No desarme, deforme ni modique las baterías.
Reemplace las baterías
ENGLISHESPAÑOLFRANÇAIS
1. Requiere 2 pilas AAA (no incluidas).
2. Retire la tapa de la batería de la parte posterior del control
remoto.
3. Inserte las baterías en el compartimento de la batería de
acuerdo con los indicadores de polaridad.
4. Coloque la tapa de la batería de nuevo en el control remoto.
37
Page 38

2
2
2
2
2
2
1
10
3
1
4
0
2
4
2
8
3
1
9
7
5
9
21
5
22
3
0
1
3
4
1
3
1
8
2
5
2
6
1
9
3
2
6
1
8
1
7
1
7
ENGLISHESPAÑOL
FRANÇAIS
6
11
1. MUTE (Silencio): Silencia el audio del reproductor. Presiónelo
de nuevo para activar el sonido.
2. POWER (Encendido): Enciende el reproductor de apagado.
3. 0-9, 10+ Números
4. VOL-: Ajuste el volumen hacia abajo.
5. VO L+: Ajuste el volumen hacia arriba.
6. MENU: Presione para ver el menú principal en un DVD cargado.
7. SLOW (Lento): Reduzca la velocidad de reproducción de audio /
video / foto.
8. STOP (Detener): Detenga la reproducción de audio / video /
foto.
9. REPEAT (repetir): Presione aquí repetidamente para recorrer
las opciones de repetición para el disco cargado.
10. A-B
11. PBC
12. ZOOM (Acercar): Para el disco DVD, presione brevemente para
acceder a la función de zoom, puede seleccionar el 2X, 3X, 4X,
1/2, 1/3, 1/4. Para el disco fotográco, presiónelo para alternar
entre el zoom 100%, 125%, 150%, 200%, 75%, 50% y el estado
38
Page 39

normal.
13. MODE (modo): Cambia el modo del jugador.
14. SD/USB: Presione la tecla para cambiar entre los modos DVD,
SD y USB.
15. TITLE (Título): Presione para ver el menú de título en un DVD
cargado.
16. SUBTITLE (Subtítulo): Presione brevemente para cambiar el
modo de subtítulos.
17. AUDIO: Presione aquí para cambiar los canales de audio dis-
ponibles provistos por el disco.
18. RETURN (Entrada): Conrme una selección de pantalla o
menú.
19. GOTO (Ir a): Go to a specic time index/title/chapter.
20. UP (Arriba)
21. LEFT (Izquierda)
22. RIGHT (Derecha)
23. DOWN (Abajo)
24. ENTER
25. PLAY/PAUSE: Reproduzca o pause el audio / película.
26. RWD/FWD: Muévete hacia adelante o hacia atrás.
27. NE XT/PREVIOUS: Presione aquí para reproducir el capítulo
anterior o siguiente/título/pista.
28. SETUP (Conguración): Acceda al menú de conguración.
29. LCD MENU: Mostrar el menú de la pantalla.
30. PROG: Programe un disco cargado para reproducir capítulos
y títulos o pistas en un orden especíco.
31. ANGLE: Alterna entre los ángulos de visión, si está disponible.
32. OSD: Presione para mostrar la información del video / audio
actual.
ENGLISHESPAÑOLFRANÇAIS
39
Page 40

CONFIGURACIÓN DEL SISTEMA
Cargando la unidad
El reproductor está alimentado por una batería de polímero de litio,
que presenta una alta relación de energía a peso. No tiene efecto
de memoria y se puede recargar en cualquier momento, ya sea que
esté total o parcialmente descargado.
Se tardan aproximadamente seis horas en cargar completamente la
batería y se puede usar una batería completamente cargada duran-
te aproximadamente 3-4 horas.
Conecte el adaptador de CA / CC conectado a la toma DC INPUT
de la unidad, luego enchufe el adaptador a una toma de corriente
alterna de 240V.
NOTA: asegúrese de apagar la unidad antes de cargarla. El LED indi-
cador de carga cambiará de ROJO a OFF para indicar que la batería
se ha cargado por completo. Cuando la unidad se enciende (usando
el interruptor OFF / ON en el panel lateral izquierdo), la luz indicadora LED verde permanecerá encendida.
Uso y mantenimiento de la batería recargable:
• El rango de temperatura de trabajo es 0-45C.
• Siempre desenchufe la unidad cuando no esté en uso, a
menos que se esté cargando.
• El calor se produce inevitablemente durante la reproduc-
ción, lo cual es normal. Apaga el reproductor para enfriarlo.
• Evite el impacto al jugador y manténgalo alejado del calor y
la humedad.
ENGLISHESPAÑOL
FRANÇAIS
Conexión a TV
Conecte esta unidad a un televisor en orden y disfrute de música o
películas de alta calidad. Use un cable AV para conectar la toma AV
OUT de la unidad a la toma AV IN de un televisor.
40
Page 41

El reproductor de DVD también tiene tomas de entrada de sonido y
video para conectar entradas externas de audio y video.
Conguración general
Presione el botón SETUP en la unidad de control remoto para abrir
el menú de conguración. Use los botones direccionales (arriba,
abajo, izquierda, derecha) para seleccionar los elementos del menú.
Después de cambiar la conguración deseada, presione el botón
SETUP de nuevo para volver a la pantalla normal.
Usando las teclas izquierda y derecha, se pueden elegir las siguientes páginas de menú:
• Conguración general
• Conguraciones de audio
• Ajustes de video
• Preferencias de reproducción
• Conguración de contraseña
Operación del menú
ENGLISHESPAÑOLFRANÇAIS
1. Presione SETUP en el control remoto o en la unidad para
mostrar el menú de conguración.
2. Presione LEFT / RIGHT para seleccionar un elemento. El
submenú del elemento seleccionado se mostrará al instan-
te.
3. Presione UP/DOWN para seleccionar un elemento en el
submenú, luego presione OK, luego ENTER, y luego RIGHT
para ingresar. Utilice ARRIBA / ABAJO para seleccionar una
opción, luego presione OK / ENTER para conrmarlo o
presione LEFT para cancelar.
4. Presione UP/DOWN para continuar congurando otros
elementos en el submenú.
5. Presione LEFT para volver al menú superior de la actual.
6. Presione SETUP de nuevo y presione ENTER / OK para salir
del menú de conguración.
41
Page 42

Hay seis elementos en la página de Conguración general:
Pantalla de TV: Establece la relación de aspecto de la im-
agen de reproducción cuando se usa una pantalla de tele-
visión externa.
• 4:3 Panscan - una relación de aspecto de 4: 3 que
recortará los lados izquierdo y derecho de una película de pantalla panorámica. También conocido como
pantalla completa.
• Letterbox 4:3 - seleccione esto si tiene un televisor
“cuadrado” estándar (relación de aspecto 4: 3). La im-
agen completa se mostrará en la pantalla con barras
negras en la parte superior e inferior de la imagen.
ENGLISHESPAÑOL
FRANÇAIS
• 16:9 - Elija esta opción de visualización en cualquier
pantalla panorámica (la mayoría de los HDTV).
• Wide Squeeze - aplica una imagen de pantalla ancha
para adaptarse a una pantalla 4: 3 sin recorte.
Angle Mark: Muestra la información actual de visualización
de la cámara en la esquina derecha de la pantalla TFT, si está
disponible en el disco. Tenga en cuenta que esta función solo
funciona con los discos codicados con múltiples ángulos de
cámara.
42
Page 43

OSD Language: cambie el idioma del sistema de reproducción de
DVD
Subtitles: los subtítulos son datos que están ocultos en la señal de
video de algunos discos para personas con discapacidad auditiva.
Los subtítulos son diferentes de los subtítulos que se pueden se-
leccionar con el botón SUBTITLE o en el menú del DVD.
Screen Saver: use esta conguración para activar o desactivar el
protector de pantalla después de un período prolongado de inactividad del reproductor de DVD.
Last memory: congúrelo en ON para que, cada vez que apague
la unidad o detenga el disco, se conserve el último punto de reproducción. La próxima vez que encienda la unidad y reproduzca el
mismo disco, la unidad reproducirá desde ese punto.
Conguraciones de audio
Aquí puede cambiar la conguración de audio del reproductor de
DVD portátil:
• LT / RT: seleccione esta opción si su reproductor de DVD
está conectado a un decodicador Dolby Pro Logic.
ENGLISHESPAÑOLFRANÇAIS
• Estéreo: seleccione esta opción cuando la salida solo emi-
ta sonido desde los dos altavoces frontales.
43
Page 44

Conguración de calidad del panel
Estos son los ajustes para la calidad de video de la pantalla LCD:
BRILLO, CONTRASTE, TONO, SATURACIÓN
Para cada ajuste, hay tres opciones: Alto, Medio, Bajo. Ingrese
estos artículos respectivamente. Use la tecla de dirección LEFT/
RIGHT to ajustar el valor. Luego presione OK para conrmarlo.
Preferencias
Tipo de TV: este reproductor de DVD es compatible con
televisores NTSC y PAL. Elija conguración de salida de TV
NTSC (EE. UU./ Américas / Japón) o PAL (Europa / Asia) para
que corresponda a su televisor.
Use para seleccionar los tipos de TV, incluya PAL / AUTO /
NTSC.
ENGLISHESPAÑOL
FRANÇAIS
• NTSC: seleccione esta señal cuando esté conectado a un
44
Page 45

televisor NTSC. La salida de los discos PAL se convertirá
automáticamente a formato NTSC.
• PAL: seleccione esta señal cuando esté conectado a un
televisor PAL. La salida de los discos NTSC se convertirá
automáticamente a formato PAL.
• Auto: Cambia la señal de video según el formato del disco.
Audio: Selecciona un idioma de audio de DVD predeterminado (si
está disponible).
Subtítulo: Selecciona un idioma de subtítulos de DVD predeter-
minado (si está disponible).
Menú de disco: Selecciona un idioma de menú de DVD predeter-
minado (si está disponible).
Predeterminado: invierte todas las conguraciones del reproductor a los valores predeterminados de fábrica.
Contraseña: la contraseña predeterminada es 136900.
ENGLISHESPAÑOLFRANÇAIS
45
Page 46

REPRODUCCIÓN
Después de que todas las conexiones se hayan realizado correctamente, encienda la unidad. ¡Ahora está listo para jugar!
Cargando y reproduciendo un disco
1. Después de conectar la energía a la unidad, coloque el
interruptor de encendido en la posición ON.
2. Presione OPEN para abrir la bandeja del disco. Coloque un
disco con la etiqueta hacia arriba.
ENGLISHESPAÑOL
3. Cierre la bandeja del disco. La unidad cargará el disco y
comenzará a jugar.
Reproducción de discos MP3 / MPEG4
Después de que la unidad cargue un disco MP3 / MPEG4, se
mostrará en la pantalla un menú que muestra el contenido del
disco.
1. Presione la tecla de dirección UP/DOWN para seleccionar
un archivo o una carpeta.
2. Presione OK para ingresar a la carpeta seleccionada. El
archivo o la carpeta que contiene se mostrarán al instante.
3. Presione OK para comenzar a reproducir el archivo selec-
cionado.
4. Cuando el disco está parado, presione LEFT para regresar
al menú anterior.
Reproducción de Kodak Picture CD
Coloque un CD con imágenes Kodak en la bandeja del disco; la
unidad cargará el disco automáticamente.
FRANÇAIS
Presione MENU para visualizar el menú que muestra el contenido del disco.
En el menú, use las teclas de dirección UP/DOWN para seleccionar una imagen. Luego presione para comenzar la reproducción
desde la imagen seleccionada.
46
Page 47

GOTO: Presione este botón, luego use las teclas de dígitos para
seleccionar una imagen. Luego comienza la reproducción de la
imagen seleccionada. Presione para pausar la reproducción; pre-
sione de nuevo para reanudar la reproducción. Presiónelo para
comenzar una reproducción o reanudar la reproducción.
REPEAT: Presione repetidamente para cambiar los modos de
repetición (repetición única repetición de carpeta-carpeta-cancelación repetición). Presione para saltar a la imagen anterior /
siguiente durante la reproducción.
Left/Right (en el control remoto): presione para girar la imagen
en sentido antihorario / horario durante la reproducción.
ZOOM: Durante la reproducción, presione ZOOM repetidamente
para acercar / alejar la imagen o volver al tamaño original. Cuando se acerca la imagen, las teclas de dirección se pueden usar
para mover la imagen.
REPRODUCCIÓN DE TARJETAS USB y SD / MMC
Inserte una unidad USB o un lector de tarjetas en el puerto USB.
Presione SOURCE SELECT para seleccionar el modo USB para re-
producir los archivos legibles en él. Inserte una tarjeta SD / MMC
en el puerto de la tarjeta SD / MMC.
ENGLISHESPAÑOLFRANÇAIS
Presione SOURCE SELECT para seleccionar el modo MCR para
reproducir los archivos legibles en él.
Reproducción DIVX
DIVX es un formato de grabación de video (películas y videos),
que comúnmente se conoce como AVI.
El disco DIVX presenta una alta calidad que es comparable con
los DVD y una mayor capacidad. Vea las tablas a continuación.
47
Page 48

1.5H movie In MPEG-1/2 format In DivX
DVD(MPEG-2) Acerca de 1.5-GB Acerca de 600-
800MB
VCD (MPEG-1) Acerca de 800MB-l G Acerca de 600-
800MB
These are the dierences among media formats:
MPEG 1 MPEG 2 MPEG4
Velocidad
(kb/s)
Calidad Bueno Excellente Perfecto
Hardware Bajo Medio Alto
1380kb/s
(352*288)
6500kb/s 8800kb/s
(720*576)
ENGLISHESPAÑOL
FRANÇAIS
48
Page 49

ESPECIFICACIONES TÉCNICAS
Salida de la batería: 3.7 voltios
Condiciones ambientales de almacenamiento:
1. Cuando se almacena por hasta 6 meses:
a. Temperatura entre 4° F y 113° F (-20° C a 45° C)
b. Humedad al 65% ± 20%
2. Que almacena por hasta 1 semana:
a. Temperatura entre -4° F a 149° F (-20° C a 65° C)
b. Humedad al 65% ± 20%
Condiciones ambientales de operación:
1. Al cargar la batería:
a. Temperatura entre 32° F y 113° F (0° C a 45° C)
b. Humedad al 65% ± 20%
2. Cuando se ejecuta con batería:
a. Temperatura entre -4 ° F a 149 ° F (-20 ° C a 65 ° C)
b. Humedad al 65% ± 20%
Especicaciones eléctricas:
Requisitos de alimentación: DC 5V, AC 100-240 V, 50/60 Hz
Consumo de energía: <15 vatios
Humedad de funcionamiento: 5% a 90%
Salida: Salida de video: 1 Vp-p (75 Ω)
Salida de audio: 1.0 Vrms (1 KHz, 0 dB)
Altavoces: 2x 1 vatio, salida para auriculares, salida coaxial
ENGLISHESPAÑOLFRANÇAIS
Especicaciones del sistema:
Láser: láser semiconductor, longitud de onda de 650nm
Señal del sistema de video: NTSC/PAL
Respuesta de frecuencia: 20Hz a 20 kHz (1dB)
Relación señal-ruido: más de 80 dB (solo conectores ANALOG OUT)
Rango dinámico: más de 80 dB (DVD/CD)
NOTA: el diseño y las especicaciones están sujetos a cambios con
previo aviso.
49
Page 50

SOLUCIÓN DE PROBLEMAS
PROBLEMA SOLUCIÓN
Sin sonido o con
sonido distorsionado
No se puede avanzar en una película
El ícono ∅ aparece
en la pantalla
La imagen está
distorsionada
No se puede avanzar
o retroceder
El reproductor
se descompone
cuando se inserta
un U o una tarjeta
de memoria en el
reproductor.
Asegure que el reproductor de DVD está conectado
apropiadamente. Asegure que todos los cables es-
tén asegurados de forma segura en los conectores
correctos.
No puede avanzar en los créditos iniciales ni en la
información de advertencia que aparece al comienzo de las películas porque los discos están pro-
gramados para prohibir esa acción.
La opción o acción no puede ser completada en
este momento porque:
1. El software del disco restringe o no soporta esta
opción (ej. Ángulos).
2. La opción no está disponible en este momento.
3. Has requerido un capítulo, título o parte inexistente.
El disco puede estar dañado. Intente con otro disco;
es normal que algo de distorsión aparezca cuando
adelanta o retrasa el disco.
Algunos discos tienen secciones que prohíben los
saltos de un capítulo o adelantos;
No puede adelantar la información de advertencia o
de derechos de autor al comienzo del DVD.
La unidad U conectada o la tarjeta de memoria
probablemente no sea de una versión original.
El reproductor no puede reproducir ninguna
unidad U y tarjeta de memoria de una versión no
original. En caso de que el reproductor se descomponga, apáguelo y desenchúfelo de la fuente
de alimentación.
ENGLISHESPAÑOL
FRANÇAIS
Luego, conéctelo a la fuente de alimentación y
vuelva a encenderlo. El reproductor reanudará el
estado normal.
50
Page 51

EXCLUSIONES DE GARANTÍA
La garantía quedará invalidada si se produce alguno de los siguientes casos:
1. El producto no se ha instalado, operado o mantenido de
acuerdo con las instrucciones de funcionamiento proporcionadas por el fabricante con el producto.
2. El producto se ha utilizado para nes distintos a su función
prevista.
3. El producto ha sido utilizado para nes distintos al uso
doméstico.
4. El daño o mal funcionamiento del producto es causado por
cualquiera de las siguientes condiciones:
• Voltaje incorrecto
• Accidentes (incluyendo daños líquidos o de humedad)
• Mal uso o abuso del producto
ENGLISHESPAÑOLFRANÇAIS
CONTACTO SOPORTE TÉCNICO
Email: service@impecca.com
Website: www.impecca.com
51
Page 52

ENGLISHESPAÑOLFRANÇAIS ENGLISHESPAÑOL
FRANÇAIS
52
Page 53

TABLE DES MATIÈRES
Consignes de sécurité importantes 55
Contenu de l’emballage/ Caractéristiques du produit 56
Précautions et avertissements 57
Contrôles de l’unité principale 59
Touches communes 60
Mode d’emploi 61
Utilisation de la télécommande 62
Conguration du système 65
Playback 71
Caractéristiques techniques 74
Dépannage 76
Exclusions de garantie 77
Contacter le service clientèle 77
Garantie 78
ENGLISHESPAÑOLFRANÇAIS
53
Page 54

IMPORTANT
Since tÉtant donné que le circuit CD peut causer des interférences avec
d’autres syntoniseurs radio à proximité, éteignez cet appareil lorsqu’il
n’est pas utilisé ou éloignez le syntoniseur radio aecté.
Cet appareil est conforme à la partie 15 des règles de la FCC.
L’utilisation est soumise aux deux conditions suivantes : (l) Cet appareil
ne doit pas causer d’interférences nuisibles et (2) cet appareil doit
accepter toute interférence reçue, y compris les interférences qui
peuvent causer un fonctionnement indésirable.
Cet appareil est conforme à la norme canadienne ICES-003 Standard
TELEVISION receiving Apparatus.
FEDERAL COMMUNICATIONS COMMISSION DÉCLARATION
REMARQUE: Cet équipement a été testé et déclaré conforme aux limites
d’un récepteur radio, conformément à la partie 15 des règles de la FCC. Ces
limites sont conçues pour fournir une protection raisonnable contre les
interférences nuisibles dans une installation résidentielle. Cet équipement
génère des utilisations et peut émettre de l’énergie radiofréquence et, s’il
n’est pas installé et utilisé conformément aux instructions, peut causer
des interférences nuisibles aux communications radio. Cependant, il n’y
a aucune garantie que des interférences ne se produiront pas dans une
installation particulière. Si cet équipement cause des interférences nuisibles
à la réception de la radio ou de la télévision, ce qui peut être déterminé en
éteignant et en rallumant l’équipement, l’utilisateur est encouragé à essayer
de corriger les interférences par une ou plusieurs des mesures suivantes :
ENGLISHESPAÑOLFRANÇAIS
• Réorienter ou déplacer l’antenne de réception.
• Augmenter la distance entre l’équipement et le récepteur.
• Brancher l’équipement dans une prise de courant sur un circuit
diérent de celui auquel le récepteur est branché.
• Consulter le concessionnaire ou un technicien radio/TV
expérimenté pour obtenir de l’aide.
ATTENTION: les changements ou modications non
expressément approuvés par la partie responsable de la
conformité pourraient annuler l’autorisation de l’utilisateur
d’utiliser l’équipement.
54
Page 55

CONSIGNES DE SÉCURITÉ IMPORTANTES
Pour votre sécurité, veuillez lire attentivement ces instructions.
1. AVERTISSEMENT: Pour réduire le risque d’électrocution, ne retirez pas
le couvercle ou le dos des appareils. Il n’y a pas de pièces réparables
par l’utilisateur à l’intérieur. Communiquez avec le soutien technique
pour obtenir de l’aide supplémentaire.
2. AVERTISSEMENT: Pour éviter tout risque d’incendie ou de choc électrique, n’exposez pas l’appareil à la pluie ou à l’humidité.
3. N’exposez pas l’adaptateur et le DVD portable à de l’eau (y compris
des gouttes ou des éclaboussures). Les objets remplis de liquides,
comme les vases et les bouteilles d’eau, ne doivent pas être placés sur
l’appareil.
4. Tenez le lecteur DVD portable à l’écart de la lumière directe du soleil
et des sources de chaleur comme les radiateurs ou les poêles.
5. Ne bloquez pas les ouvertures de ventilation. Des fentes et des
ouvertures sur l’appareil sont prévues pour la ventilation. Pour éviter
tout risque d’incendie ou de choc électrique, ne placez pas votre DVD
portable sur un coussin, un canapé ou toute autre surface similaire.
6. Ne placez pas le lecteur DVD portable sur une table, un pied, un
trépied, un support, un support ou un chariot instable. L’appareil peut
tomber, ce qui peut entraîner des dommages ou des blessures.
7. Ne placez jamais d’objets lourds ou tranchants ou de pression sur
l’écran LCD ou le cadre.
8. N’utilisez que l’adaptateur secteur fourni avec le lecteur DVD portable.
L’utilisation d’un autre adaptateur annulera votre garantie.
9. Débrancher l’alimentation de la prise de courant lorsque l’appareil
n’est pas utilisé.
10. Débarrassez-vous de cet appareil en respectant les lois locales en
matière d’électronique et d’élimination des piles.
11. ATTENTION: Il y a un risque d’explosion si la pile n’est pas correctement remplacée. Remplacez seulement avec le même type de batterie
ou un type équivalent.
12. AVERTISSEMENT: La batterie (batteries ou bloc-piles) ne doit pas être
exposée à une chaleur excessive telle que la lumière du soleil, le feu
ou toute autre source de chaleur.
13. AVERTISSEMENT: Un volume excessif et/ou l’utilisation d’écouteurs ou
de casques peut causer une perte auditive.
14. AVERTISSEMENT: N’utilisez que les accessoires spéciés par le fabri-
cant, en utilisant l’adaptateur secteur et l’adaptateur allume-cigare.
ENGLISHESPAÑOLFRANÇAIS
55
Page 56

CONTENU DE L’EMBALLAGE
Votre lecteur DVD portable Impecca comprend les éléments
suivants:
• Lecteur DVD de 10,1 po
• Télécommande
• Câble USB et adaptateur secteur AC/DC
• Chargeur de voiture
• Câble AV
• Manuel utilisateur
CARACTÉRISTIQUES DU PRODUIT
Veuillez lire attentivement ce manuel avant d’eectuer les
connexions et d’utiliser votre appareil. Veuillez conserver ce manuel pour référence future.
Cet appareil est petit, léger et utilise une électronique à la ne
pointe de la technologie. Il est facile à installer, facilement transportable et peut être utilisé à la maison, au bureau ou en vacances.
Caractéristiques:
ENGLISHESPAÑOLFRANÇAIS
• Ecran LCD TFT haute dénition
• Prise casque
• Fente pour carte USB/MMC/SD
• Compatible avec DVD, VCD, MPEG4, CD, MP3, CD-R, DVD-
RW JPEG, Kodak Picture CD, etc.
• Prise en charge de la commande de lecture : lecture,
pause, avance rapide, rembobinage rapide, etc.
• Deux rapports d’aspect optionnels 16:9 et 4:3.
• Tension de travail: DC 5V
56
Page 57

PRÉCAUTIONS ET AVERTISSEMENTS
Placement
• Pour éviter tout risque d’incendie ou d’électrocution, n’exposez pas ce PDVD à la pluie ou à l’humidité.
• N’exposez pas ce PDVD à la lumière directe du soleil.
• Gardez ce PDVD loin des aimants puissants, des sources de
chaleur et de la poussière excessive.
• Ne placez pas ce PDVD sur une surface instable.
• Si le PDVD est amené directement d’un endroit froid à un en-
droit chaud, de l’humidité peut se condenser à l’intérieur du
PDVD et provoquer un dysfonctionnement. Si cela se produit,
laissez le PDVD éteint pendant quelques heures jusqu’à ce
que l’humidité s’évapore..
Installation
• Assurez-vous que le lecteur PDVD est installé conformément
aux instructions et illustrations fournies dans ce manuel..
Mise en garde
• Ne faites pas tomber d’objets dans le PDVD par les ouvertures.
• Ne pas renverser ou pulvériser de liquide d’aucune sorte sur
ou dans le PDVD (cela pourrait provoquer un incendie ou un
choc électrique).
• Ne placez aucun objet lourd sur le PDVD.
• Pour assurer une ventilation adéquate et un fonctionnement
correct, ne jamais couvrir ou bloquer la fente et ouvrir avec
un chion ou un autre matériau.
• Éloignez le PDVD de toute amme nue, telle que: feu, bougies, etc.
• Installez les nouvelles piles correctement. Une installation
incorrecte est dangereuse. Débarrassez-vous des batteries
préinstallées conformément aux réglementations locales.
• La température de travail maximale est de 95 ° F / 35 ° C.
ENGLISHESPAÑOLFRANÇAIS
57
Page 58

Ne pas désassembler
• N’essayez jamais de démonter le PDVD, car cela est très
dangereux et peut provoquer un choc électrique et / ou des
dommages dus à une exposition au rayon laser.
• Veuillez vous adresser uniquement à un centre de service
agréé pour tout entretien ou maintenance du lecteur.
Nettoyage du PDVD
• Lors du nettoyage de l’appareil, assurez-vous que le PDVD est
débranché et éteint.
• N’utilisez pas de produits chimiques ou de détergents lors du
nettoyage.
• Utilisez un chion doux légèrement humidié avec de l’eau.
• Nettoyer uniquement l’extérieur de l’appareil et essuyer immédiatement.
Gestion des disques
• Ne laissez pas de disques à proximité de sources de chaleur,
à la lumière directe du soleil ou dans une forte humidité.
• Rangez les disques dans leur boîtier lorsqu’ils ne sont pas
utilisés.
• Empiler des disques ou les placer de biais sans les mettre
dans le boîtier peut déformer le disque.
• Ne touchez pas la surface du disque lorsque vous manipulez
un disque; tenez-le par les bords.
• Les traces de doigts, la poussière, la saleté ou les rayures sur
le disque peuvent déformer l’image ou réduire la qualité du
son. Toujours manipuler avec soin et s’assurer que les disques sont propres avant utilisation.
• Ne collez pas de papier ou de ruban sur le disque.
• N’écrivez pas sur le disque avec un marqueur ou une autre
encre. Nettoyez les disques avec un chion doux, en essuyant légèrement du centre vers l’extérieur.
• N’utilisez pas de solvants tels que le benzène, un nettoyant
disponible dans le commerce, non destiné aux CD / DVD, ou
un spray antistatique destiné aux disques vinyle, car ils pour-
raient endommager votre disque.
ENGLISHESPAÑOLFRANÇAIS
58
Page 59

CONTRÔLES DE L’UNITÉ PRINCIPALE
1. PREV
2. REV
3. FWD
4. NEXT
5. MENU
6. DVD/USB/SD
7. V O L+
8. VOL-
9. PLAY/PAUSE
10. SETUP
11. STOP
12. MODE
13. OPEN
14. USB PORT
15. SD/MMC slot
16. Prise casque
17. AV OUT
18. AV IN
19. POWER ON/OFF
20. DC IN 5V
21. VOL-
22. VOL+
23. PLAY/PAUSE
24. FWD
25. REV
ENGLISHESPAÑOLFRANÇAIS
59
Page 60

TOUCHES COMMUNES
Fonctions des touches communes sur le panneau :
MENU - Appuyez sur cette touche pour revenir au menu racine
du DVD.
STOP - Appuyez sur cette touche pour suspendre l’émission en
cours.
PLAY/PAUSE - Appuyez une fois sur cette touche pour mettre
la lecture en pause. Appuyez à nouveau sur cette touche pour
reprendre.
SETUP - Appuyez sur cette touche pour accéder au menu de
conguration. Utilisez ensuite les touches de direction et appuyez
sur OK pour régler le menu système.
USB/CARD - Appuyez plusieurs fois sur cette touche pour basculer entre l’entrée du disque, de la carte SD ou de la source USB.
Touches de direction - Utilisez les touches de direction pour :
Précédent/Suivant, Avance rapide/Rembobinage rapide.
OK - Appuyez sur pour entrer l’élément sélectionné ou le choix.
OPEN - Appuyez sur cette touche pour ouvrir la porte.
ENGLISHESPAÑOLFRANÇAIS
Installation et remplacement des piles:
1. Dévissez le couvercle du compartiment à piles et retirez-le.
2. Jetez les piles usées de façon appropriée.
3. Insérez 2 piles AAA neuves.
4. Assurez-vous que les extrémités positive (+) et négative (-) des
piles sont orientées dans le bon sens. Replacez le couvercle
du compartiment à piles.
5. Ne mélangez pas d’anciennes et de nouvelles piles.
6. Ne pas mélanger des piles alcalines, standard (carbone-zinc)
ou rechargeables (nickel-cadmium).
60
Page 61

MODE D’EMPLOI
Branchez votre lecteur DVD:
Branchez votre lecteur DVD Branchez l’adaptateur secteur dans
le lecteur DVD (DC IN), puis branchez l’adaptateur dans la prise
murale CA.
Si vous utilisez le chargeur de voiture, branchez l’adaptateur CC
dans le lecteur DVD (DC IN) et branchez l’adaptateur dans la prise
de l’allume-cigare.
REMARQUE: Utilisez uniquement l’adaptateur secteur Impecca
fourni avec votre lecteur DVD. L’utilisation d’un autre adaptateur
secteur peut endommager l’appareil et/ou provoquer un choc
électrique, un incendie ou même la mort.
ENGLISHESPAÑOLFRANÇAIS
61
Page 62

UTILISATION DE LA TÉLÉCOMMANDE
Dirigez la télécommande vers l’unité principale pendant le
fonctionnement. La télécommande fonctionne mieux à une distance de moins de 5 mètres et à un maximum de 30 degrés verticalement devant l’appareil. Évitez d’avoir des obstacles devant
l’appareil. Ne placez pas la télécommande à la lumière directe
du soleil. Si la télécommande ne fonctionne pas à proximité de
l’appareil, il est temps de remplacer la pile.
Remarques sur les piles:
• La télécommande ne comprend pas de piles.
• Retirez la pile si la télécommande n’est pas utilisée pendant
une longue période.
• Ne chauez pas les piles et ne les jetez pas au feu.
• Ne pas démonter, déformer ou modier les piles.
Remplacer les piles
ENGLISHESPAÑOLFRANÇAIS
1. Nécessite 2 piles AAA (non incluses).
2. Retirez le couvercle du compartiment à piles à l’arrière de
la télécommande.
3. Insérez les piles dans le compartiment des piles selon les
indicateurs de polarité.
4. Replacez le couvercle du compartiment à piles sur la
télécommande.
62
Page 63

2
2
2
2
2
1
10
1
1
4
0
2
4
2
5
2
8
3
1
9
7
5
3
9
2
22
3
0
1
3
4
1
3
1
8
2
5
2
6
1
9
3
2
6
1
8
1
7
1
7
ENGLISHESPAÑOLFRANÇAIS
6
11
1. MUTE: Couper le son du lecteur. Appuyez de nouveau sur cette
touche pour activer le son.
2. POWER: Allumer ou éteindre le lecteur.
3. 0-9, 10+ CHIFFRES
4. VOL-: Réglez le volume vers le bas.
5. VOL+: Ajustez le volume vers le haut.
6. MENU: Appuyez sur cette touche pour acher le menu principal
sur un DVD chargé.
7. SLOW: ralentit la lecture audio/vidéo/photo.
8. STOP: Arrêtez la lecture audio/vidéo/photo.
9. REPEAT: Appuyez ici à plusieurs reprises pour faire déler les
options de répétition du disque chargé.
10. A-B
11. CBP
12. ZOOM: Pour le disque DVD, appuyez brièvement sur pour ac-
céder à la fonction zoom, vous pouvez sélectionner le 2X, 3X, 4X,
4X, 1/2, 1/3, 1/4. Pour le disque photo, appuyez sur cette touche
pour basculer entre le zoom 100%, 125%, 150%, 200%, 75%,
50% et l’état normal.
63
Page 64

13. MODE: Changer le mode du lecteur.
14. SD/USB: Appuyez sur la touche pour basculer entre les modes
DVD, SD et USB.
15. TITLE: Appuyez sur cette touche pour acher le menu titre d’un
DVD chargé.
16. SUBTITLE: Appuyez brièvement sur pour changer le mode
sous-titres.
17. AUDIO: Appuyez ici pour changer les canaux audio disponibles
fournis par le disque.
18. RETURN: Conrmer un écran ou une sélection de menu.
19. GOTO: Aller à un index temporel/titre/chapitre/chapitre.
20. UP
21. LEFT
22. RIGHT
23. DOWN
24. ENTER
25. PLAY/PAUSE: Lecture de l’audio/lm.
26. RWD/FWD: Se déplacer en arrière ou en avant.
27. NEXT/PREVIOUS: Appuyez ici pour lire le chapitre / titre / piste
précédent ou suivant.
28. SETUP: Accéder au menu Setup.
29. LCD MENU: Achez le menu de l’écran.
30. PROG: Programmer un disque chargé pour lire les chapitres et
les titres ou les pistes dans un ordre spécié.
31. ANGLE: Faites déler les angles de vue, si disponibles.
32. OSD: Appuyez sur cette touche pour acher les informations
de la vidéo/audio en cours.
ENGLISHESPAÑOLFRANÇAIS
64
Page 65

CONFIGURATION DU SYSTÈME
Chargement de l’appareil
Le lecteur est alimenté par une batterie lithium-polymère,
qui présente un rapport énergie/poids élevé. Il n’a pas d’eet
mémoire et peut être rechargé à tout moment, qu’il soit complètement ou partiellement déchargé.
Il faut environ six heures pour charger complètement la batterie et une batterie complètement chargée peut être utilisée
pendant environ 3-4 heures.
Connectez l’adaptateur CA/CC à la prise d’entrée CC de l’appareil, puis branchez l’adaptateur dans une prise de 240 V CA.
REMARQUE : Assurez-vous d’éteindre l’appareil avant de le recharger. La DEL de l’indicateur de charge passe du ROUGE au
OFF pour indiquer que la batterie a été complètement chargée.
Lorsque l’appareil est allumé (en utilisant l’interrupteur OFF
/ ON sur le panneau latéral gauche), le voyant DEL vert reste
allumé.
Utilisation et entretien de la batterie rechargeable:
ENGLISHESPAÑOLFRANÇAIS
• La plage de température de travail est de 0-45C.
• Débranchez toujours l’appareil lorsqu’il n’est pas utilisé
- à moins qu’il ne soit en cours de charge.
• La chaleur est inévitablement produite pendant la
lecture, ce qui est normal. Eteignez le lecteur pour le
refroidir.
• Évitez l’impact sur le joueur et gardez-le loin de la chal-
eur et de l’humidité.
Connexion à la télévision
Connectez cet appareil à un téléviseur an de proter d’une
musique ou de lms de haute qualité. Utilisez un câble AV pour
65
Page 66

connecter la prise AV OUT de l’appareil à la prise AV IN d’un
téléviseur.
Le lecteur DVD dispose également de prises d’entrée audio et
vidéo pour connecter les entrées audio et vidéo externes.
Réglages généraux
Appuyez sur la touche SETUP de la télécommande pour ouvrir
le menu Réglages. Utilisez les touches directionnelles (haut,
bas, gauche, gauche, droite) pour sélectionner les éléments du
menu. Après avoir modié les réglages souhaités, appuyez à
nouveau sur la touche SETUP pour revenir à l’achage normal.
Les touches gauche et droite permettent de sélectionner les
pages de menu suivantes:
• Réglages généraux
• Paramètres audio
• Paramètres vidéo
• Préférences de lecture
• Paramètres du mot de passe
Menu Fonctionnement
ENGLISHESPAÑOLFRANÇAIS
1. Appuyez sur SETUP sur la télécommande ou sur l’appareil pour acher le menu de conguration.
2. Appuyez sur GAUCHE/DROITE pour sélectionner un
élément. Le sous-menu de l’élément sélectionné s’afche instantanément.
3. Appuyez sur UP/DOWN pour sélectionner un élément
dans le sous-menu, puis appuyez sur OK, puis sur ENTER, puis sur RIGHT pour entrer. Utilisez UP /DOWN
pour sélectionner une option, puis appuyez sur OK/ENTER pour conrmer ou appuyez sur LEFT pour annuler.
4. Appuyez sur UP/DOWN pour continuer à régler les autres éléments du sous-menu.
66
Page 67

5. Appuyez sur GAUCHE pour revenir au menu supérieur
du menu en cours.
6. Appuyez à nouveau sur SETUP et appuyez sur ENTER/
OK pour quitter le menu Réglages.
Il y a six éléments dans la page Conguration générale:
Achage TV: Règle le rapport hauteur/largeur de l’image
en lecture lors de l’utilisation d’un écran de télévision ex-
terne.
ENGLISHESPAÑOLFRANÇAIS
• Panoramique 4:3 - un format 4:3 qui permet de
découper les côtés gauche et droit d’un lm grand
écran. Aussi connu sous le nom de plein écran.
• Boîte aux lettres 4:3 - sélectionnez cette option si vous
avez un téléviseur carré standard (format 4:3). L’image
complète sera achée à l’écran avec des barres noires
sur les parties supérieure et inférieure de l’image.
• 16:9 - Choisissez cette option d’achage sur n’importe
quel écran large (la plupart des téléviseurs HD).
• Wide Squeeze - Permet d’écraser une image grand
écran pour l’adapter à un écran 4:3 sans aucun
découpage.
67
Page 68

Marque d’angle: Ache les informations actuelles de
visualisation de la caméra sur le coin droit de l’écran TFT
si disponible sur le disque. Notez que cette fonction ne
fonctionne qu’avec les disques encodés avec plusieurs angles de caméra.
Langue OSD: Changer la langue du système du lecteur DVD
Légendes: Les sous-titres codés sont des données qui sont
cachées dans le signal vidéo de certains disques pour les
malentendants. Les sous-titres codés sont diérents des
sous-titres qui peuvent être sélectionnés en utilisant le bouton SUBTITLE ou dans votre menu DVD.
Économiseur d’écran: Utilisez ce réglage pour activer ou
désactiver l’économiseur d’écran après une période d’inactivité prolongée du lecteur DVD.
Dernier souvenir: Réglez ce paramètre sur ON pour que,
chaque fois que vous éteignez l’appareil ou arrêtez le disque, le dernier point de lecture soit conservé. La prochaine
fois que vous allumerez l’appareil et lirez le même disque,
l’appareil jouera à partir de ce point.
ENGLISHESPAÑOLFRANÇAIS
Conguration audio
Ici, vous pouvez modier la conguration audio du lecteur
DVD portable :
• LT/RT - Sélectionnez cette option si votre lecteur DVD
est connecté à un décodeur Dolby Pro Logic.
• Stéréo - Sélectionnez cette option lorsque la sortie ne
délivre le son qu’à partir des deux enceintes avant.
68
Page 69

Conguration de la qualité du panneau
Il s’agit des réglages de la qualité vidéo de l’écran LCD : LUMINOSITÉ, CONTRASTE, TEINTE, TEINTE, SATURATION
Pour chaque réglage, il y a trois options : Élevé, Moyen,
Faible, Faible. Saisissez ces postes respectivement. Utilisez la
touche de direction GAUCHE/DROITE pour régler la valeur.
Appuyez ensuite sur OK pour conrmer.
ENGLISHESPAÑOLFRANÇAIS
Préférences
Type de télévision: Ce lecteur DVD est compatible avec les
téléviseurs NTSC et PAL. Choisissez les paramètres de sortie
NTSC (US/Amériques/Japon) ou PAL (Europe/Asie) pour correspondre à votre téléviseur.
Utilisez pour sélectionner les types de téléviseurs, y compris
PAL/AUTO/NTSC.
69
Page 70

• NTSC - Sélectionnez ce signal lorsque vous êtes connecté à un téléviseur NTSC. La sortie des disques PAL
sera automatiquement convertie au format NTSC.
• PAL - Sélectionnez ce signal lorsque vous êtes connecté à un téléviseur PAL. La sortie des disques NTSC
sera automatiquement convertie au format PAL.
• Auto - Change le signal vidéo en fonction du format du
disque
Audio: Sélectionne une langue audio DVD par défaut (si
disponible).
ENGLISHESPAÑOLFRANÇAIS
Sous-titre: Sélectionne une langue par défaut pour les
sous-titres DVD (si disponible).
Menu du disque: Sélectionne une langue de menu DVD
par défaut (si disponible).
Par défaut: Rétablir tous les réglages du lecteur aux valeurs
par défaut de l’usine.
Password: le mot de passe par défaut est 136900.
70
Page 71

PLAYBACK
Une fois tous les raccordements eectués correctement,
allumez l’appareil. Maintenant il est prêt à jouer!
Chargement et lecture d’un disque
1. Après avoir branché l’appareil, placez l’interrupteur
d’alimentation en position ON.
2. Appuyez sur OPEN pour ouvrir le plateau de disque.
Placez un disque avec le côté étiquette vers le haut.
3. Fermez le tiroir du disque. L’appareil chargera le disque
et commencera la lecture.
Lecture de disques MP3/MPEG4
Après le chargement d’un disque MP3/MPEG4, un menu
achant le contenu du disque s’ache à l’écran.
1. Appuyez sur la touche de direction HAUT/BAS pour
sélectionner un chier ou un dossier.
2. Appuyez sur OK pour entrer dans le dossier sélectionné. Le chier ou/et le dossier qu’il contient seront listés
instantanément.
ENGLISHESPAÑOLFRANÇAIS
3. Appuyez sur OK pour commencer la lecture du chier
sélectionné.
4. Lorsque le disque est arrêté, appuyez sur la touche
GAUCHE pour revenir au menu précédent.
Lecture de CD Kodak Picture CD
Placez un CD d’images Kodak dans le plateau du disque ;
l’appareil chargera automatiquement le disque.
Appuyez sur MENU pour acher le menu montrant le contenu du disque.
71
Page 72

Dans le menu, utilisez les touches de direction HAUT/BAS
pour sélectionner une image. Appuyez ensuite sur pour
démarrer la lecture à partir de l’image sélectionnée.
GOTO: Appuyez sur cette touche, puis utilisez les touches
numériques pour sélectionner une image. Ensuite, la lecture
de l’image sélectionnée commence. Appuyez sur cette touche pour interrompre la lecture ; appuyez de nouveau sur
cette touche pour reprendre la lecture. Appuyez sur cette
touche pour commencer ou reprendre la lecture.
REPEAT: Appuyez plusieurs fois sur cette touche pour
changer de mode de répétition (Répétition Unique - Répétition Unique - Dossier - Dossier - Annuler - Annuler la répétition). Appuyez sur cette touche pour passer à l’image précédente /suivante pendant la lecture.
LEFT/RIGHT (sur la télécommande) : Appuyez sur cette
touche pour faire pivoter l’image dans le sens inverse des
aiguilles d’une montre ou dans le sens inverse des aiguilles
d’une montre pendant la lecture.
ENGLISHESPAÑOLFRANÇAIS
ZOOM: Pendant la lecture, appuyez plusieurs fois sur ZOOM
pour eectuer un zoom avant/arrière sur l’image ou revenir
à la taille d’origine. Lorsque l’image est agrandie, les touches
de direction peuvent être utilisées pour déplacer l’image.
USB and SD/MMC CARD PLAYBACK
Insérez une clé USB ou un lecteur de carte dans le port
USB. Appuyez sur SOURCE SELECT pour sélectionner le
mode USB pour lire les chiers lisibles. Insérez une carte SD/
MMC dans le port de la carte SD/MMC.
Appuyez sur SOURCE SELECT pour sélectionner le mode
MCR pour lire les chiers lisibles qui s’y trouvent.
72
Page 73

Lecture DIVX
DIVX est un format d’enregistrement vidéo (lms et vidéo),
communément appelé AVI.
Le disque DIVX ore une haute qualité comparable à celle
des DVD et une plus grande capacité. Par exemple:
1.5H movie In MPEG-1/2 format In DivX
DVD(MPEG-2) Environ 1.5-GB Environ 600-
800MB
VCD (MPEG-1) Environ 800MB-l G Environ 600-
800MB
These are the dierences among media formats:
MPEG 1 MPEG 2 MPEG4
Vitesse(kb/s) 1380kb/s
(352*288)
Qualité Bon Excellent Parfait
Matériel Faible Moyen Élevée
6500kb/s 8800kb/s
(720*576)
ENGLISHESPAÑOLFRANÇAIS
73
Page 74

CARACTÉRISTIQUES TECHNIQUES
Sortie batterie : 3,7 volts
Conditions environnementales d’entreposage:
1. En cas de stockage jusqu’à 6 mois :
a. Température comprise entre -4°F et 113°F (-20°C à 45°C)
b. Humidité à 65% ±20%
2. En cas de stockage jusqu’à 1 semaine:
a. Température comprise entre-4°F et 149°F (-20°C to 65°C)
b. Humidité à 65% ±20%
Operating environmental conditions:
1. When charging the battery:
a. Température comprise entre 32°F to 113°F (0°C to 45°C)
b. Humidité à 65% ±20%
2. When running on battery:
a. Température comprise entre -4°F to 149°F (-20°C to
65°C)
b. Humidité à 65% ±20%
Spécications électriques:
Alimentation électrique: DC 5V, AC 100-240 V (50/60 Hz)
Consommation d’énergie: < 15 watts
Humidité de fonctionnement : 5% à 90%.
Sortie : Sortie vidéo: 1 Vp-p (75 Ω)
Sortie audio: 1,0 Vrms (1 KHz, 0 dB)
Haut-parleurs: 2 x 1 Watt, Sortie casque, Sortie coaxiale
ENGLISHESPAÑOLFRANÇAIS
Spécications du système:
Laser : Laser à semi-conducteur, longueur d’onde 650 nm
Signal du système vidéo : NTSC/PAL
Réponse en fréquence : 20Hz à 20 kHz(1dB)
Rapport signal/bruit : plus de 80 dB (ANALOG OUT seulement)
Plage dynamique : Plus de 80 dB (DVD/CD)
74
Page 75

Disques compatibles: DVD+R/RW, DVD-R/RW, CD-DA, CD-R/RW,
MP3, JPEG, VCD.
Système de signalisation: Taille du panneau NTSC/PAL : 10,1
pouces
Résolution de l’image: 800x 480 (RGB) Réponse en fréquence :
20 Hz à 20 kHz Sortie vidéo : 1 Vp-p/75 Ohm, asymétrique Sortie
audio : 1,4 Vrms/10 kOhm
NOTE: La conception et les spécications sont sujettes à changement sans préavis.
Utilisation d’une batterie rechargeable
Le lecteur DVD est équipé d’une batterie en polymère Li comme source d’alimentation portable. La batterie n’a pas d’”eet
mémoire” et peut donc être rechargée en toute sécurité, que la
batterie soit complètement chargée ou non. Lorsque la batterie
est complètement chargée, elle peut durer environ deux heures à
l’aide d’écouteurs.
ATTENTION: Danger d’explosion si la pile n’est pas correctement
remplacée.
Précautions relatives à la recharge de la batterie
ENGLISHESPAÑOLFRANÇAIS
L’interrupteur d’alimentation doit être en position OFF pour charger la batterie. Le voyant rouge indique que la batterie est en
charge. Lorsque le lecteur DVD est complètement chargé, la lumière s’éteint.
1. Utilisation et entretien de la batterie rechargeable
2. La température normale de travail est : 32°- 10 4 ° F.
3. Débranchez toujours l’alimentation AC/DC de l’appareil lorsqu’il n’est pas utilisé.
4. La chaleur sera créée pendant la lecture, ce qui est normal.
Évitez de jouer sans surveillance.
5. Ne laissez pas tomber l’appareil. Évitez les sources de chaleur
et les endroits humides.
75
Page 76

DÉPANNAGE
PROBLÈME SOLUTION
Pas De Son Ou Son
Déformé
Impossible D’avancer
Un Film
L’icône Apparaît À
L’écran
L’image Est Déformée Le disque peut être endommagé. Essayez un
Pas De Balayage
Avant Ou Arrière
Assurez-vous que le lecteur DVD est correctement connecté. Veillez à ce que tous les câbles
soient assurés dans les prises correctes.
Vous êtes incapable d’avancer dans le
générique d’ouverture qui apparaît au début
des lms parce que le disque est programmé
pour interdire l’action.
La fonctionnalité ou l’action ne peut pas être
terminée pour le moment car:
1). le logiciel du disque restreint ou ne supporte
pas la fonctionnalité (par exemple, l’angle).
2) La fonction n’est pas disponible pour le moment.
3) vous avez demandé un chapitre inexistant,
une piste ou un numéro de titre.
autre disque, il est normal qu’une certaine
distorsion apparaisse pendant le balayage avant
ou arrière.
Certains disques ont des sections qui interdisent le balayage rapide ou le passage d’une
piste. Vous pouvez passer à chaud les informations d’avertissement et les avis de copyright au
début d’un DVD
ENGLISHESPAÑOLFRANÇAIS
Le lecteur tombe en
panne lorsqu’un lecteur U ou une carte
mémoire est inséré
dans le lecteur.
Le lecteur U connecté ou la carte mémoire n’est
probablement pas d’une version originale.
Le lecteur ne peut pas jouer n’importe quel
lecteur U et carte mémoire de la version non originale. En cas de panne du lecteur, éteignez-le
et débranchez-le de l’alimentation électrique. Le
lecteur reprendra son état normal.
76
Page 77

EXCLUSIONS DE GARANTIE
La garantie devient caduque si l’une des situations suivantes se
produit:
1. Le produit n’a pas été installé, utilisé ou entretenu conformé-
ment aux instructions d’utilisation du fabricant fournies avec
le produit.
2. Le produit a été utilisé à des ns autres que sa fonction
prévue.
3. Le produit a été utilisé à des ns autres que l’usage domes-
tique.
4. Le dommage ou le mauvais fonctionnement du produit est
causé par l’une des conditions suivantes:
• Tension incorrecte
• Accidents (y compris les dommages causés par les liq-
uides ou l’humidité)
• Mauvaise utilisation ou abus du produit
ENGLISHESPAÑOLFRANÇAIS
CONTACTER LE SERVICE CLIENTÈLE
Courriel: service@impecca.com
Site Web: www.impecca.com
77
Page 78

ENGLISHESPAÑOLFRANÇAIS
78
 Loading...