

Page 1
Model:
40921 (Three-Port)
40922 (Five-Port)
HDMI™ Selector Switch
User’s Manual
Page 2

Table of Contents
Functions …………………………………………………………………………...1
Features……………………………………………………………………………..2
Connecting Devices…….………………………………………………………..2-3
Operating Components
Controlling the Switch from the IR Remote………………………………3
Controlling the Switch from the Front Panel………….………………….4
Troubleshooting……………………………………………………………………..5
Specifications……………………………………………………………………......6
Trademarks…………………………………………………………………………..6
Warranty/Important Safety Information……………………………………………7
ii
Page 3
User’s Manual
Model: 40921
40922
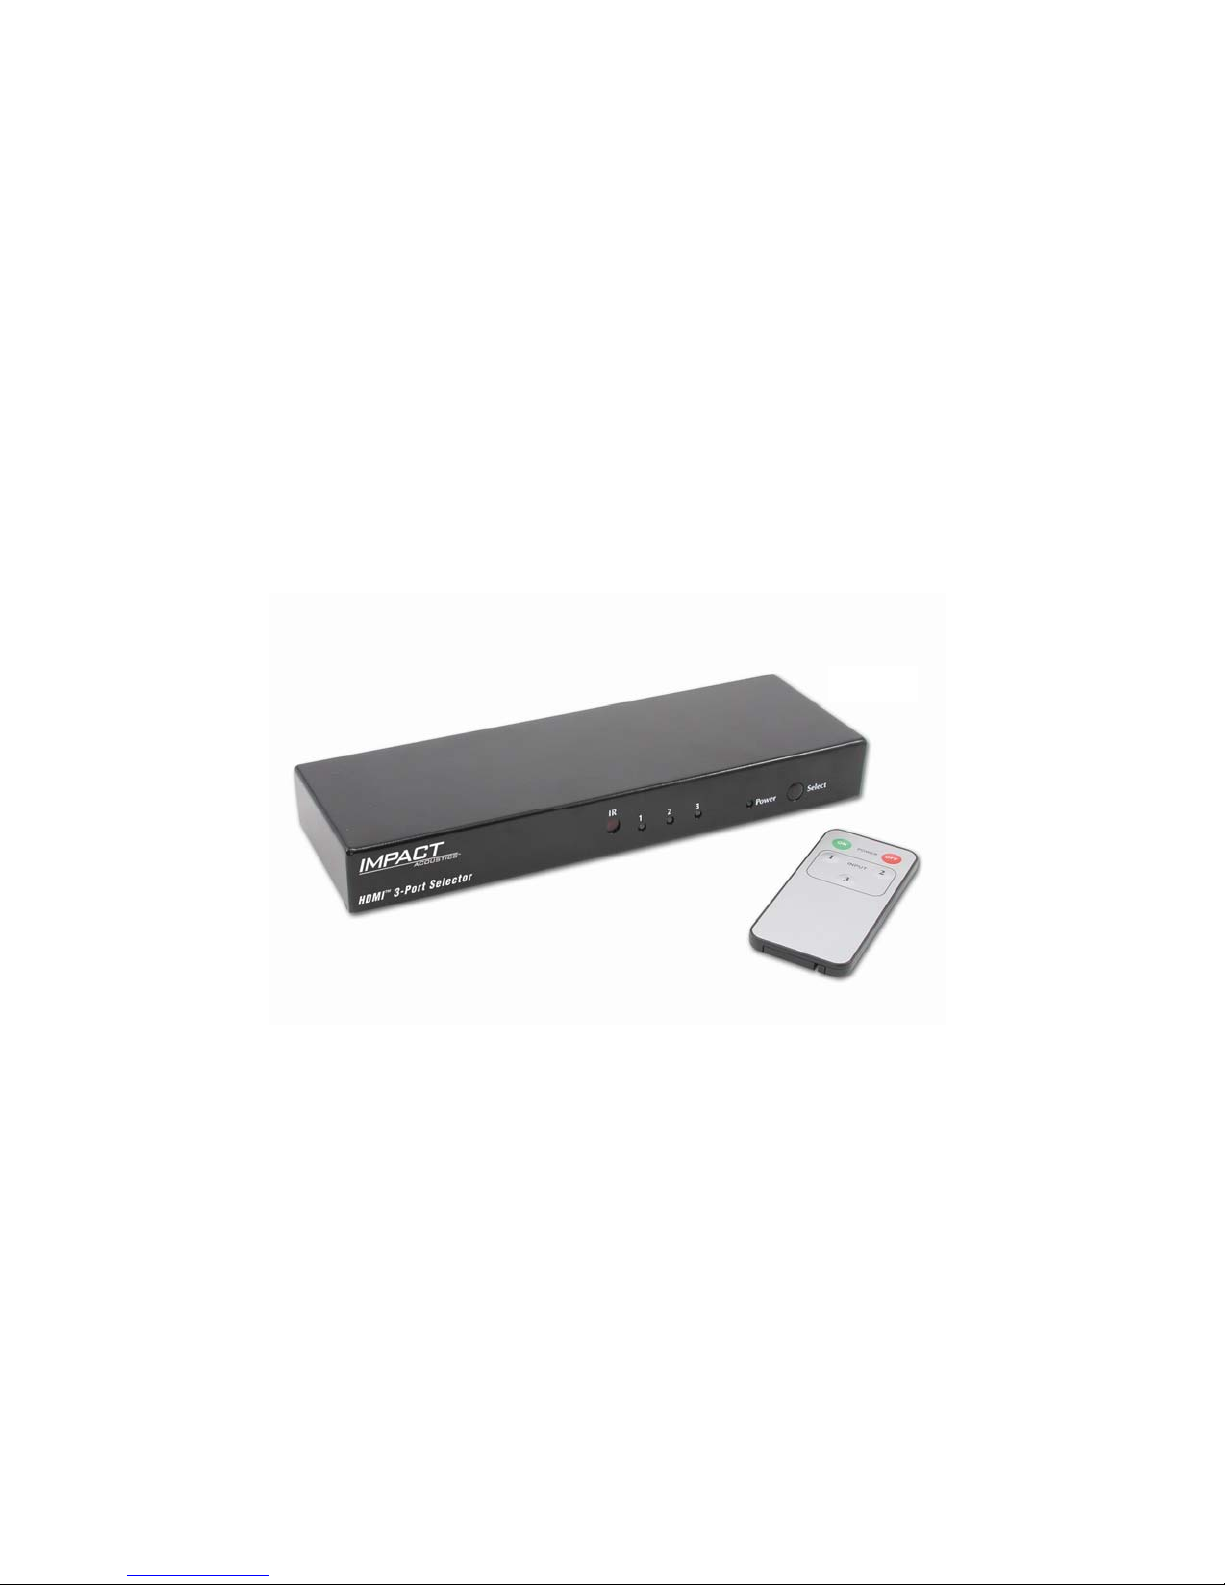
HDMI™ Selector Switch
Connect multiple devices using HDMI™ to one television
Thank you for purchasing the Impact Acoustics™ HDMI™ Selector Switch. We recommend that
you thoroughly read this manual and retain for future reference.
40921
Package Contents:
• HDMI Selector Switch
• Remote Control
• 5VDC Power Supply
• User Manual
Function:
The Impact Acoustics™ HDMI™ selector switch p rovides additional digital high definition video
inputs for devices such as a DVD player, HD-DVD player, and high definition set top boxes from
cable television and satellite providers. This selector is HDCP™ compatible for use with all HDTV
HDMI™ enabled devices.
1
Page 4
Features:
• Fully HDCP™ compliant for use with High Definition Movies and Broadcasts
• Supports 480i, 480p, 720p, 1080i and 1080p video resolution
• Infrared (IR) remote control features discrete commands for easy programming with your
universal remote control system.
• IR extender jack built in for external switching.
• LED displays video source and status
Connecting Devices:
1. Make sure that your HDMI enabled devices and television/monitor is turned off.
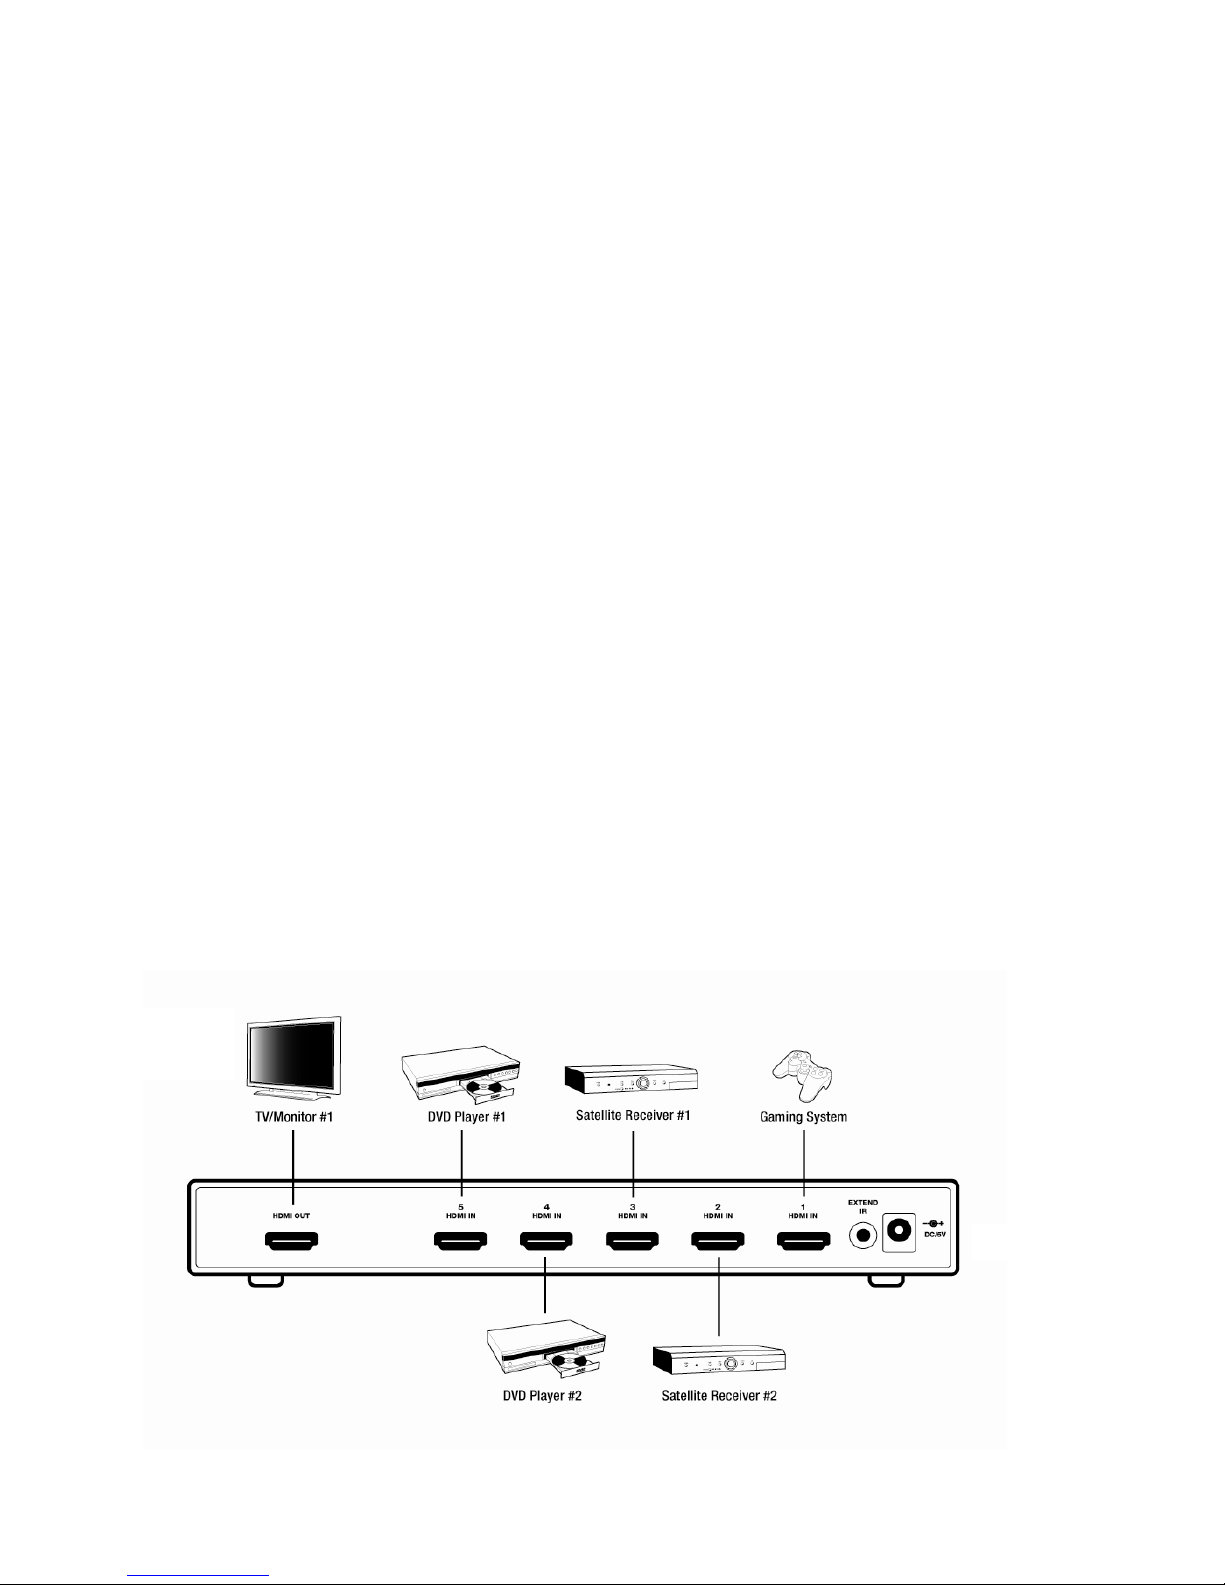
2. Use an HDMI cable (not included) to connect the HDMI enabled device (DVD player, high-
definition cable receiver, etc.) from the device’s HDMI output to an HDMI input (HDMI IN 1-3
for Model: 40921-shown on next page; HDMI IN 1-5 for Model: 40922-shown below) of the
HDMI Selector Switch. (Repeat this step if necessary to connect additional devices)
3. Connect an HDMI cable between the HDMI Output on the Selector Switch and an
HDMI input on your television/monitor.
4. Connect IR Extender into a home automation system or an IR extender device with a 3.5mm
cable. (Optional step)
5. Connect the 5VDC power supply to the HDMI Selector Switch and plug the adapter into a
110~120VAC outlet.
Example
diagrams:
40922
2
Page 5
Power
On
Button
Operating the Switch:
Controlling the switch from the IR remote control
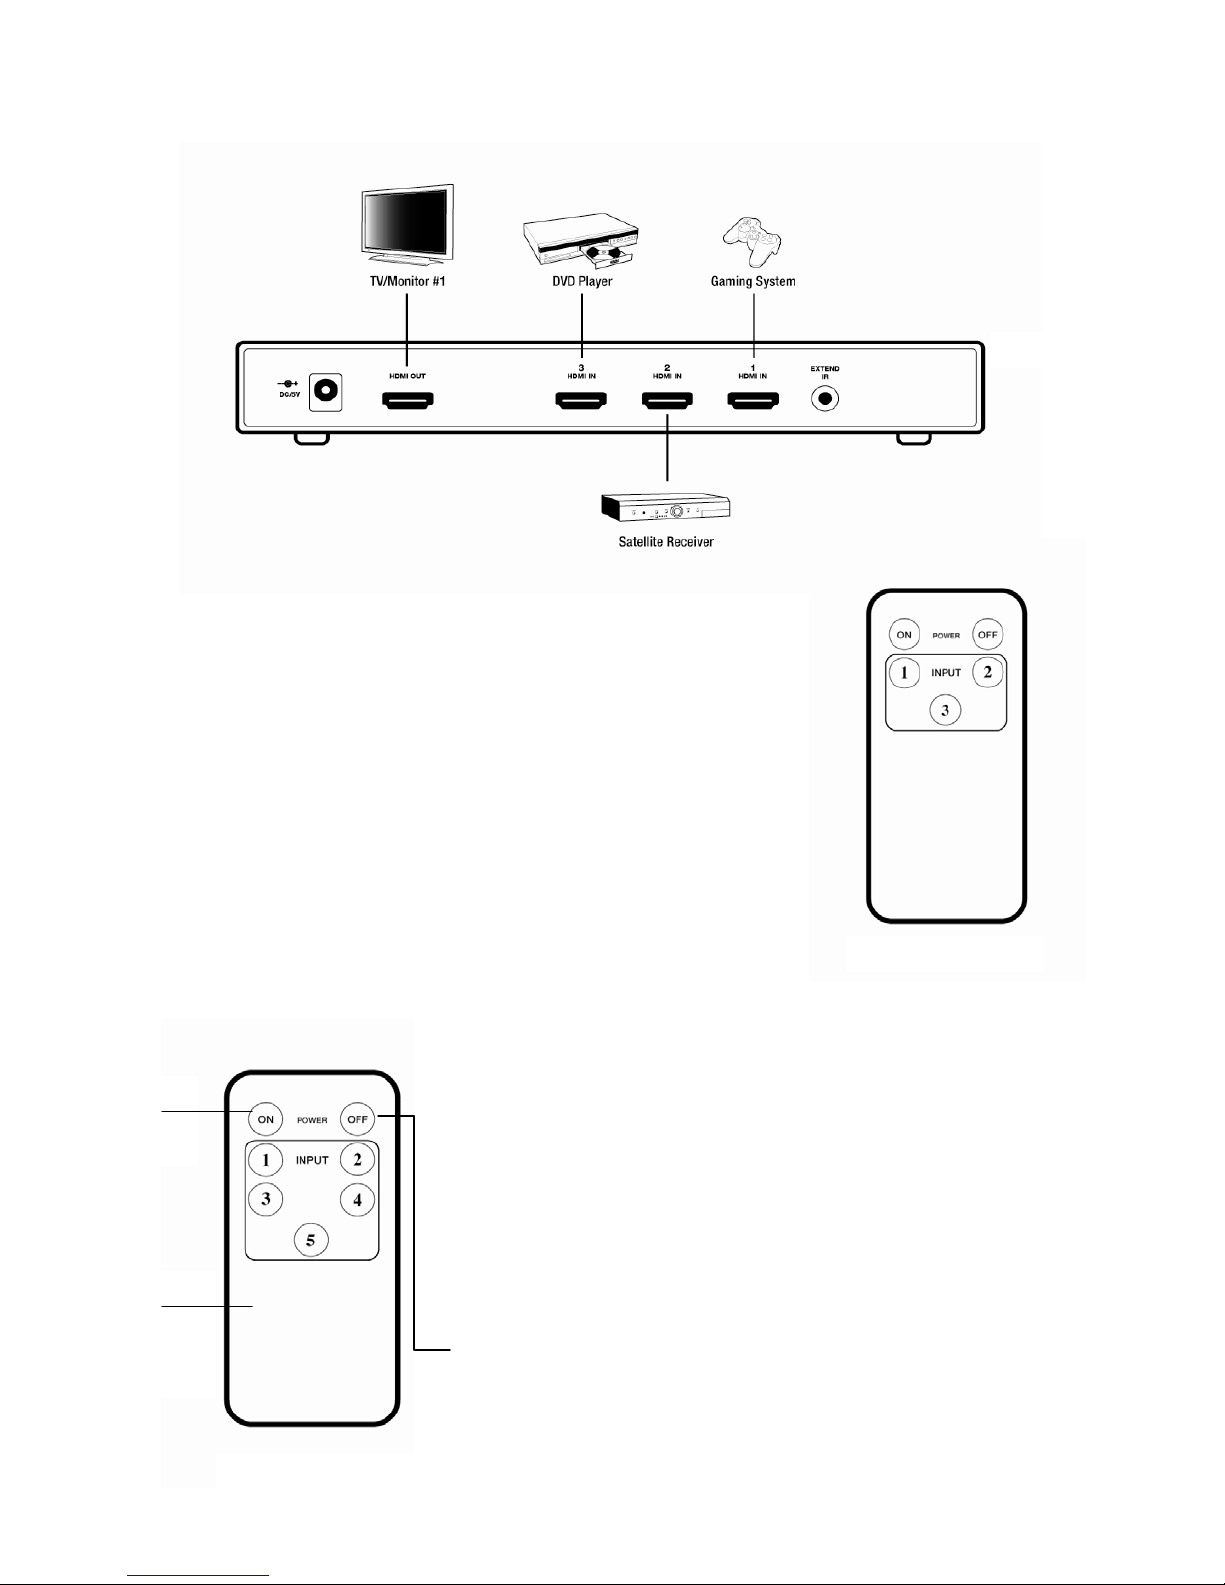
1. Press Power On to turn on the HDMI Selector Switch.
2. Put your television or monitor on its HDMI input setting (refer to
your television/monitor user’s manual if you need assistance with
that process)
3. Press the “1, 2, or 3” button on the remote control for Model:
40921 (to the right) or “1, 2, 3, 4, 5” for Model: 40922 (shown
below). The inputs that are used by your device determine what
input buttons on the remote control that you will need to press.
Example: If you have your DVD player connected to Input 1 on the
rear panel of the HDMI Selector Switch, press button “1” on the
Selector Switch remote control and you will be able to watch your
DVD player. Note: You may switch inputs at any time by
pressing one of the HDMI Input Selection Buttons, however by
switching from one input to another input will not turn off the
power of unused devices.
40921
Remote for 40921
HDMI
Input
Selection
Buttons
Remote for 40922
4. When you are done using the switch, press “Power Off” and that
will turn the switch off.
Power
Off
Button
3
Page 6
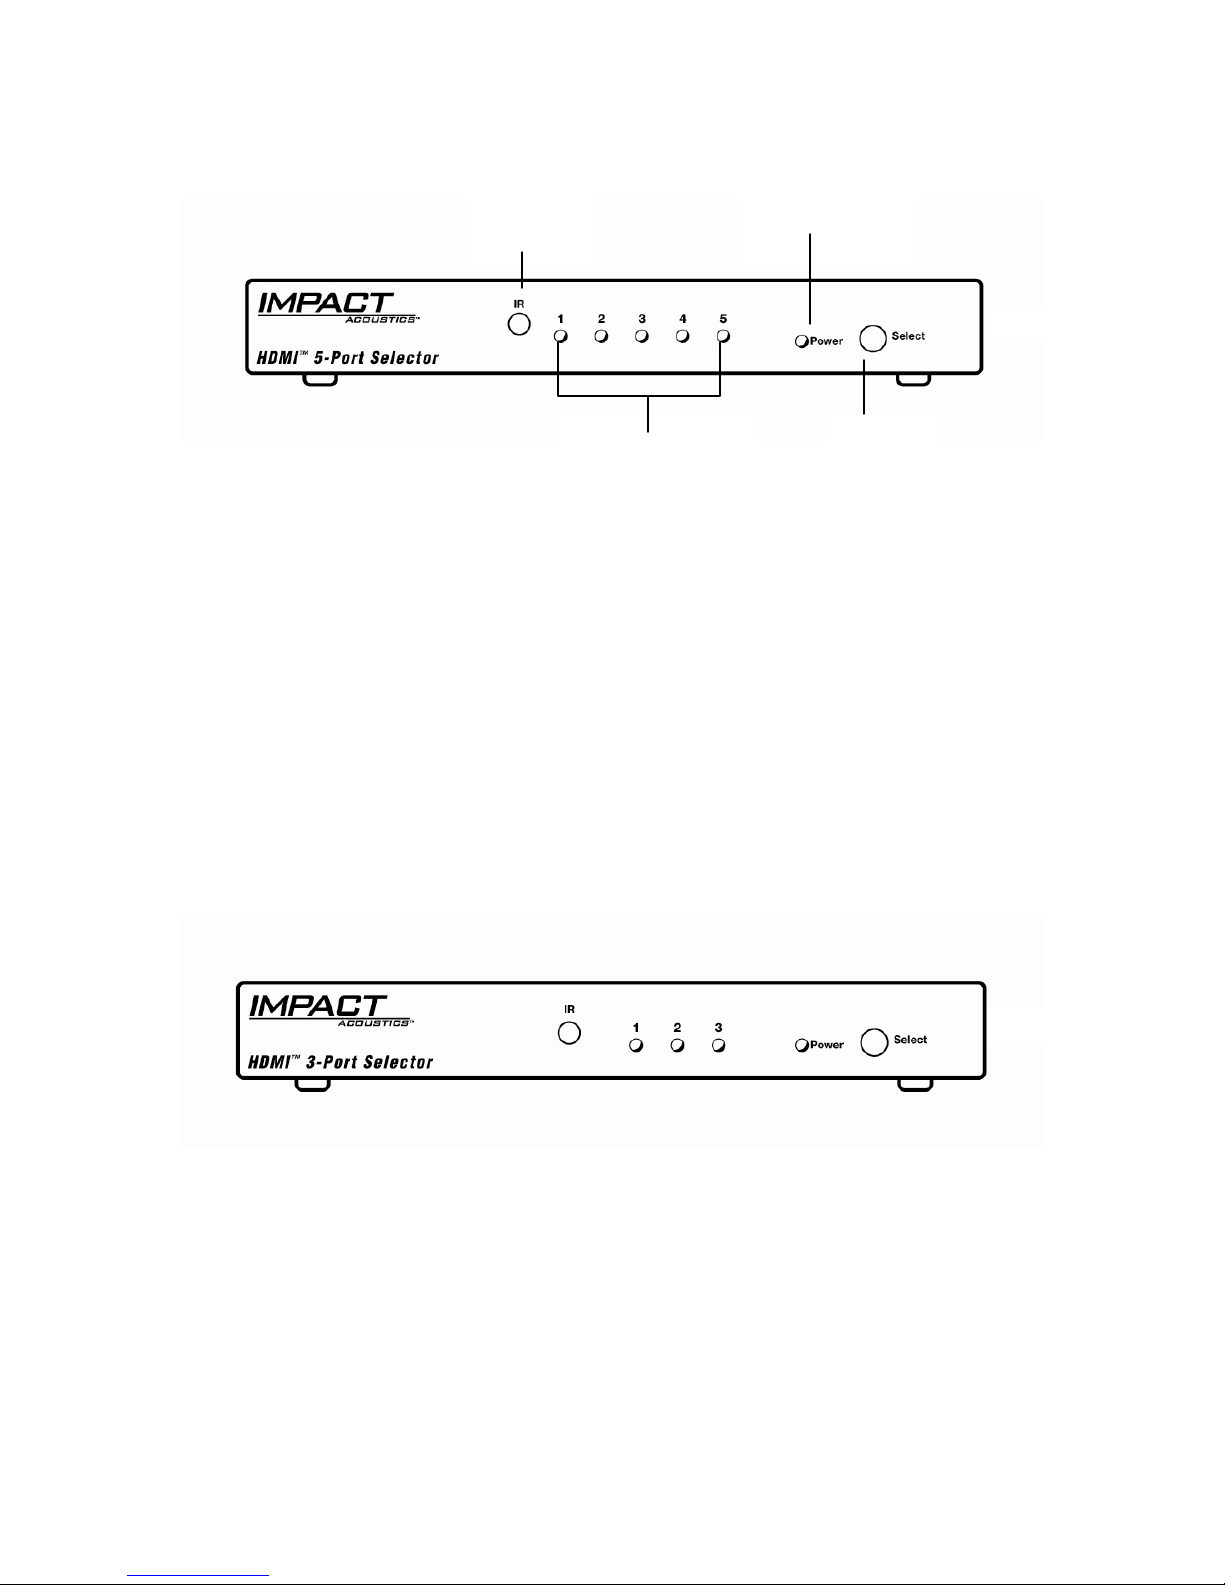
Controlling the switch from the front panel
IR Signal
Reader
Power Indicator
Light
40922
HDMI Input LED
Indicator Lights
Select
button
1. Make sure that the HDMI selector switch is plugged into an outlet to provide power. The
power indicator light will be illuminated green to indicate the switch is functional.
2. Press the select button and that will activate the switch.
3. Press the select button until your desired input is selected. You will know which input is
being used by the HDMI Input LED Indicator Lights illuminated green color.
4. When you are done using the switch press and hold the select button for two seconds and it
will shut off the input. Note: The Power Indicator Light will remain illuminated as in a
standby mode. You can not truly power down the switch unless you press the “Power
Off” on the remote control or unplug the unit.
40921
4
Page 7
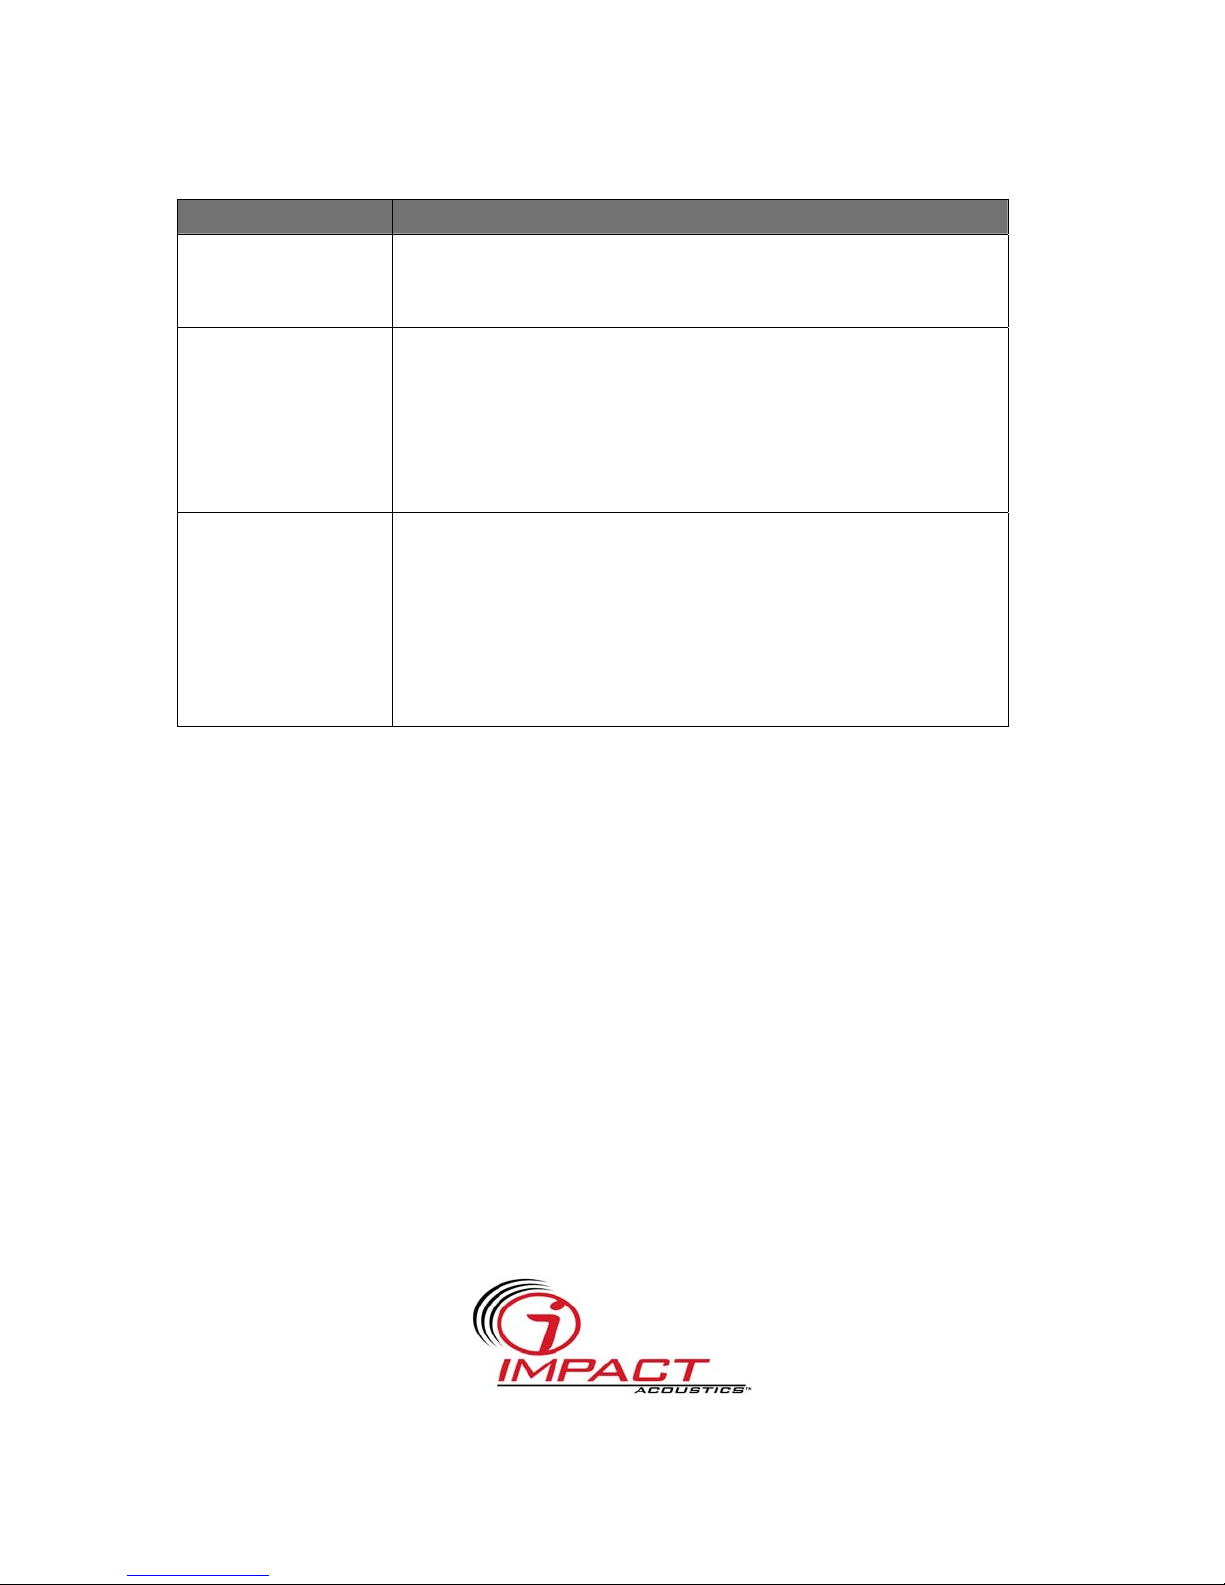
Troubleshooting:
Problem Solution
No Operation
No picture or Signal;
Poor picture.
Remote control unit
will not operate.
1. Verify the 5V power supply is connected to the selector.
2. Verify unit’s power is on by the power indicator GREEN LED.
1. Make sure your video display is HDCP compliant.
2. Make sure all HDMI connectors are tightly secured to all HDMI
ports. The LEDs will glow GREEN to show activity.
3. Turn all equipment power to off and then restore power.
1. Verify the 5V power supply is connected to the selector.
2. Verify unit’s power is on by the power GREEN LED.
3. Replace the remote control battery.
5
Page 8
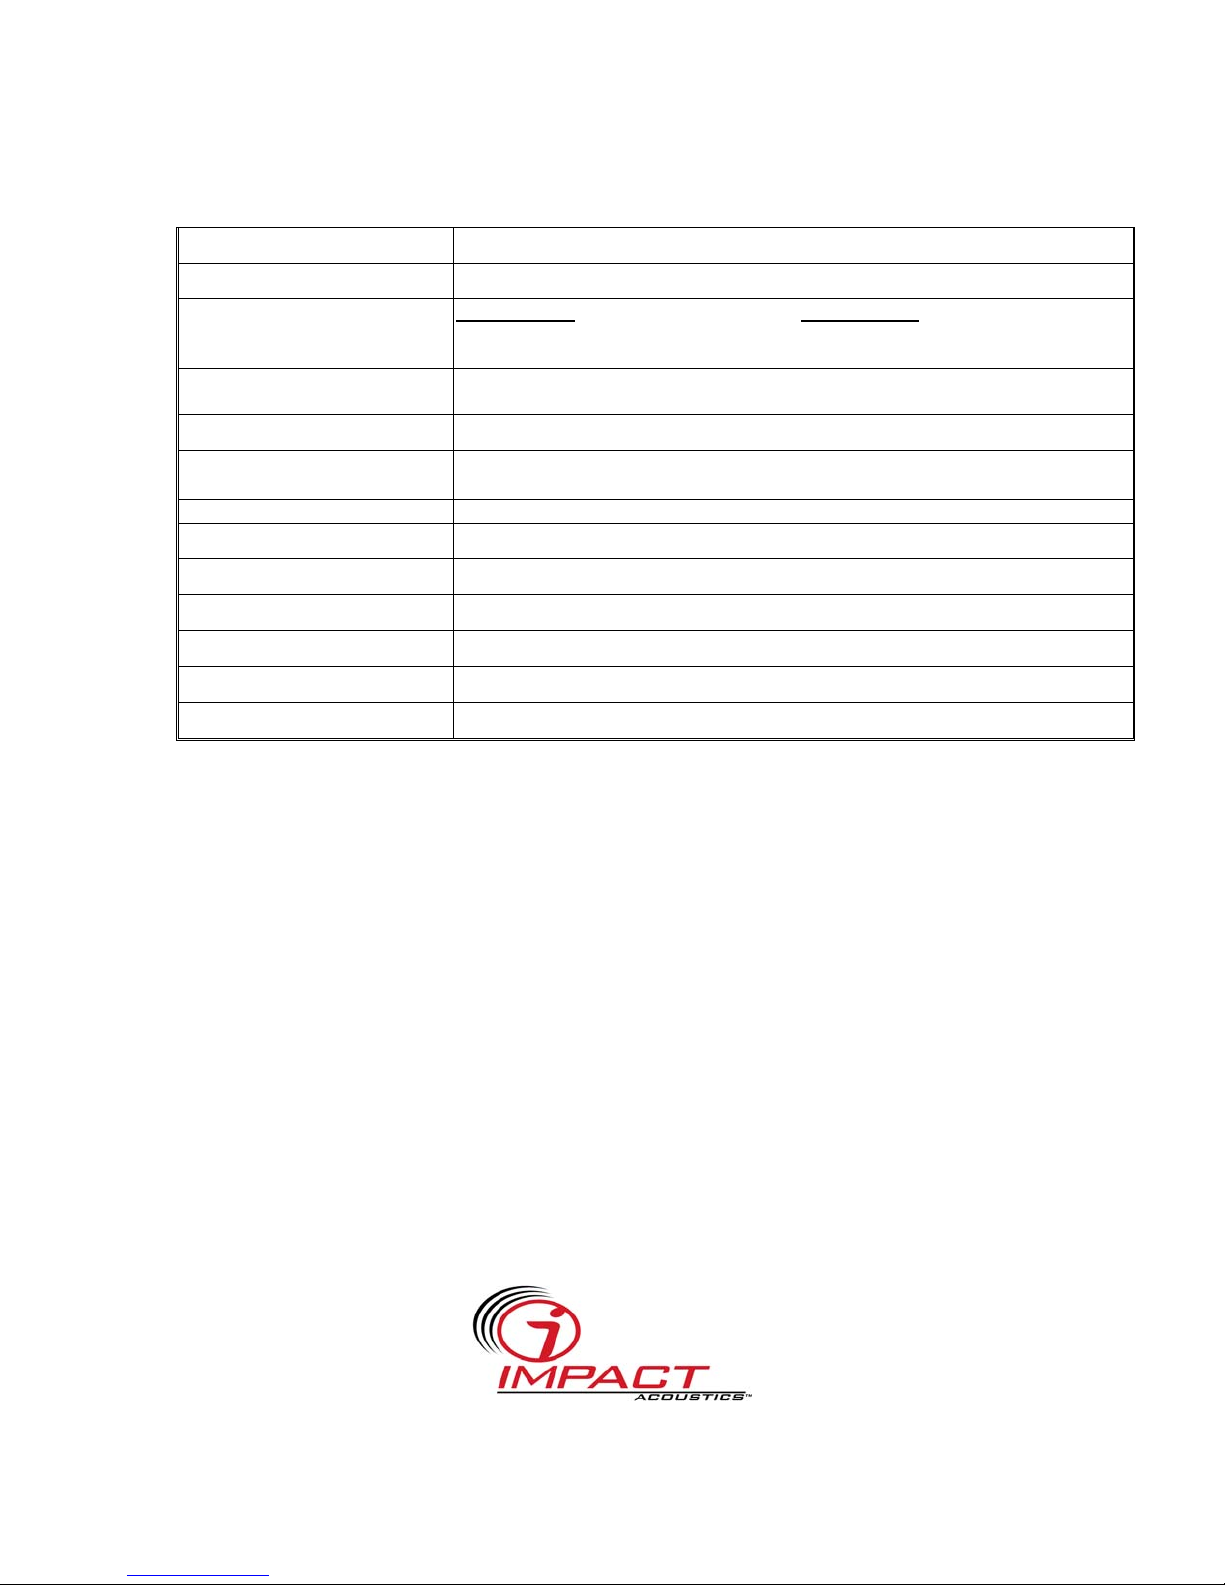
Specifications:
HDMI Source Input Port HDMI Single Link, TMDS.
Display Device Output Port HDMI Single Link, TMDS.
Model 40921
Interface
Single Link Range
HDCP Function HDCP Compliant
Display Device Selection Front Panel or Remote
IR Extender 1
Max Input Cable Length 5M
Max Output Cable Length 5M
Power 5VDC, 1A
Enclosure Steel
Dimension 7" x 1" x 2.75"
Weight 0.6 lbs
HDMI Input Connector X 3 HDMI Input Connector X 5
HDMI Output Connector X 1 HDMI Output Connector X 1
: DC Power Jack X 1 Model 40922: DC Power Jack X 1
VGA / SVGA / XGA / UXGA
480i,480p,720p,1080i, 1080p
Trademarks:
• HDMI™, the HDMI logo and High-Definition Multimedia Interface™ are trademarks or
registered trademarks of HDMI Licensing, LLC.
• HDCP
®
is a registered trademark of Pacific Microsonics, Inc.
6
Page 9

Impact Acoustics™ One Year Warranty
At Impact Acoustics, we want you to be totally confident in your purchase. That is why we offer a
one year warranty on this device. If you experience problems due to workmanship or material
defect for the duration of this warranty, we will repair or replace this device. To request a Return
Merchandise Authorization (RMA) number, contact customer service at 877-AV-EXPERT or
www.impactacoustics.com
Important Safety Information
.
! Do not plug the switch adapter in any outlet that does not have enough current to allow the
switch to function. Refer to the specifications in this manual for power level of the switcher.
! Liquid:
If your switch or its corresponding power adapter has had liquid spilled on or in it, do not
attempt to use the unit.
Do not attempt to use this product in an outdoor environment as elements such as rain, snow,
hail, etc. can damage the product.
! In case of a storm, it is recommended that you unplug this device from the outlet.
! Avoid placing this product next to objects that produce heat such as portable heaters, space
heaters, or heating ducts.
! THERE ARE NO USER SERVICEABLE PARTS
Do not attempt to open this product and expose the internal circuitry. If you feel that the
product is defective, unplug the unit and refer to the warranty information section of this
manual.
7
Page 10

Impact Acoustics™
1501 Webster St.
Dayton, OH 45404, USA
Tech Support: 877-AV-EXPERT
www.impactacoustics.com
 Loading...