

Page 1
Pro Photo LED Booth
INSTRUCTIONS
Page 2

Introduction
Thank you for choosing Impact.
Impact’s PLB-300 portable LED photo booth is ideal for shooting large products, apparel,
or portraiture on location and in the studio. It’s designed to give multiple options for
creating awless images with shadowless or contrasty lighting. A softer lighting
environment is possible with the integrated diffusers. The booth is lined with reective,
textured silver fabric, and clips are included to hold backgrounds.
The included LED strips offer bright daylight-balance light. They easily attach to the frame,
and depending on where they’re placed, the LEDs can be used as key or accent lights.
The frame is composed of lightweight steel rods that are designed for quick and easy
assembly. The durable shell is constructed of heavy-duty fabric that can endure transport
and location shooting. The booth sets up in minutes and breaks down into a compact
carry case that you can take anywhere.
Precautions ⚠⚡
• Please read and follow these instructions, and keep this manual in a safe place.
• Keep this product away from water and any ammable gases or liquids.
• Handle this product with care.
• Use only parts provided by the manufacturer.
• Make sure this item is intact and that no parts are missing.
• All images in this manual are for illustrative purposes only.
• The LED arrays can be warm to the touch when in use. Handle the LED arrays with caution.
Specications
Light Source LED
23.6 in. (60 cm): 60 LEDs (×8)
LED Count 480
Color Temperature 5600 K
CRI >92
TLCI 90.7
LUX 2474 lx
Input Voltage 100 to 250 V AC, 47/63 Hz
Output Voltage 18 V, 1.5 A
Dimensions (H × W × D) 79.75 × 49.5 × 33 in. (202.6 × 125.7 × 83.8 cm)
Weight 27 lb. (12.25 kg)
2
Page 3
Overview
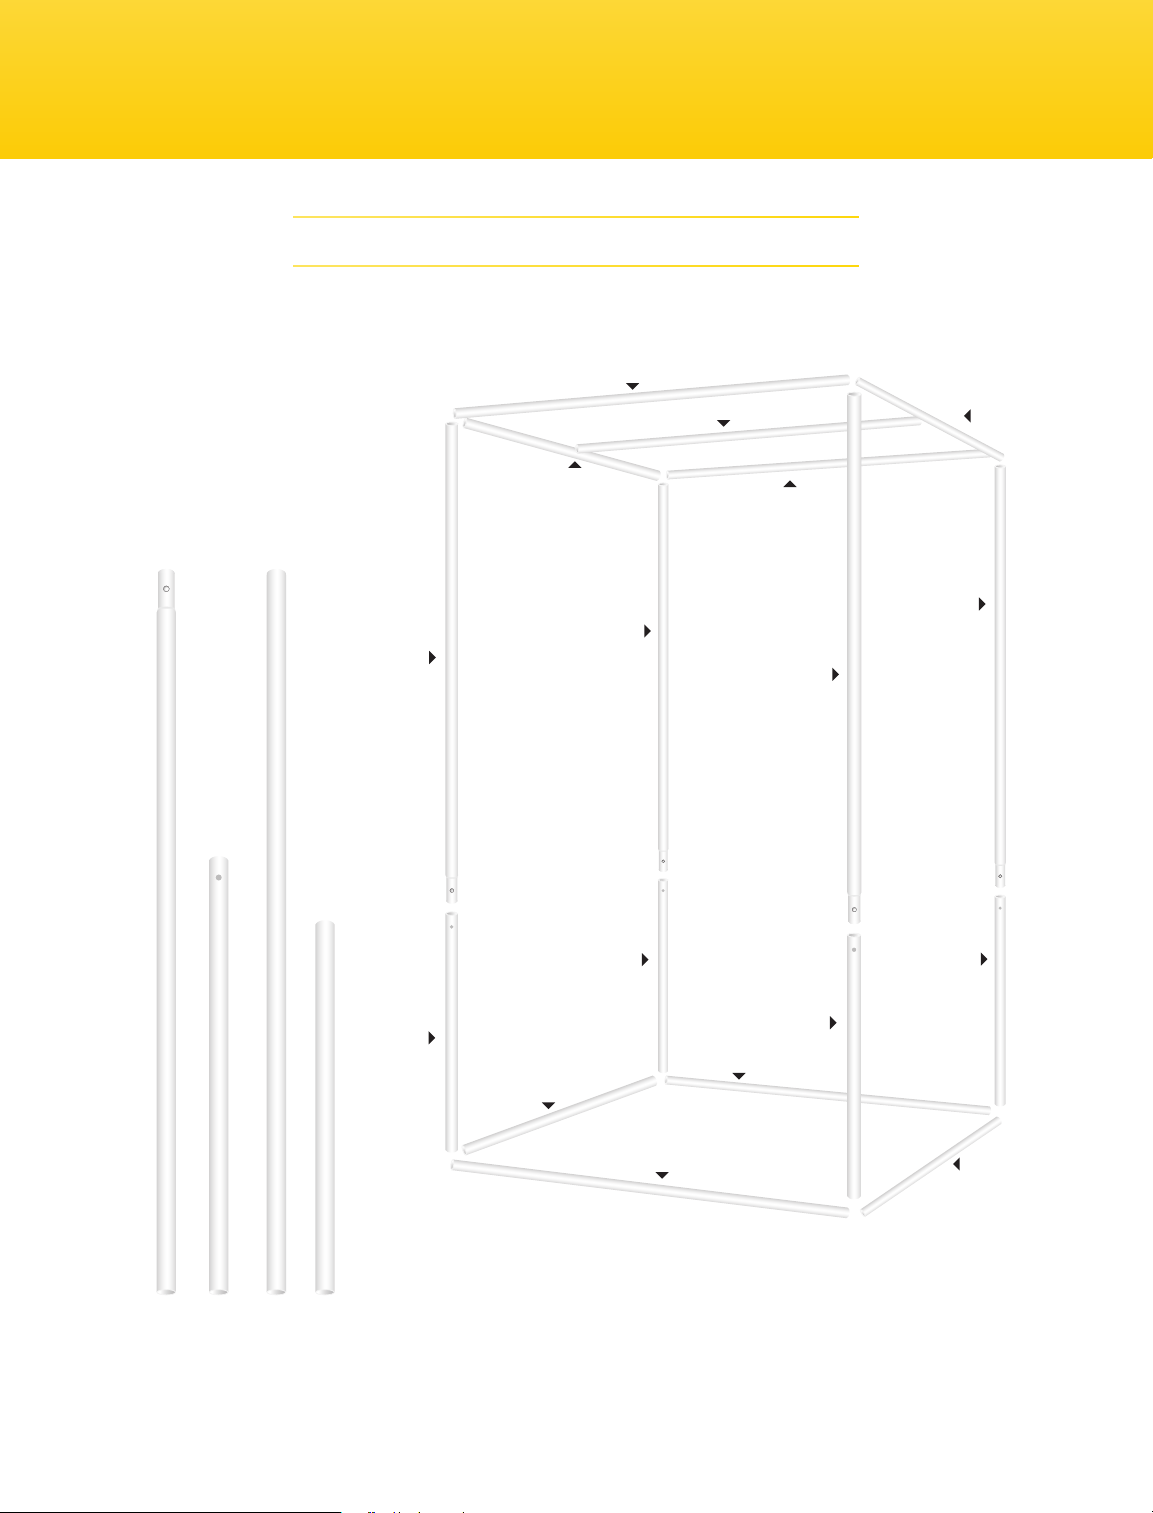
Frame Assembly Diagram
W
H1
W
D
W
H1
H1
H2
D
H1
H2
H1x4 H2x4 Wx5 Dx4
H2
H2
W
D
W
D
3
Page 4

Overview
1
Corner connector (×8)
2
Background clip (×2)
3
Apparel rod hook (×2)
4
LED clip (×16)
Clips & Connectors
1
Lights & Power
2
3
4
1
LED strip (×8)
2
DC power input
3
AC power cord
4
Power adapter (×4)
Power switch
5
6
DC power connectors
3
1
2
5
4
6
4
Page 5

Overview
1
Top diffuser
2
Top section
3
Back section
4
Zippers
5
Bottom section
6
Side sections
Shell
1
2
7
Power supply holes
8
Side diffusers
9
Bottom exterior flap
7 7
3
4
5 66
9
8
4
Also Included
1
1
White polyvinyl background
2
Carrying case
2
5
Page 6

Instructions
Getting Started
• The height rods are designed to attach via a button lock. To
connect the H1 and H2 sections, press the button on H1, and t the
two rods together until the button pops through the hole on H2.
• It’s best to lay the shell at on the oor and
assemble the frame on top of it.
• It may be easiest to assemble the frame by laying it on its side.
Assembling the Frame
Refer to the frame assembly diagram in the Overview
above while following these steps.
1. Assemble the base of the frame by connecting D
and W rods with the corner connectors.
2. Insert the H1/H2 assemblies into the four corners of the base.
3. Place four corner connectors on top of each H1/H2
assembly, and attach them with D and W rods.
2
2
1
1
2
Important! The assembled frame should be straight and
even. If the frame is lopsided or uneven, you’ve used the
wrong combinations of rods. Make sure you have used the
correct combinations, and reassemble if necessary.
Completing the Booth
1. Lift the back of the shell, and extend it over the top of the frame.
Attach the touch connectors in the diffuser to secure the shell.
2. Lift each side into place, and close the zippers that extend
from the bottom rear corner to the top front corner.
3. Lift up the ap at the bottom front of the shell, and attach
it to the side panels with the touch-connect strips.
4. Fit the apparel hooks on both ends of the remaining
W rod, and attach it to the top of the frame.
4
3
3
3
4
6
Page 7

Instructions
Attaching the LEDs
The LED strips can be attached to any of the booth’s
rods for the lighting your shoot requires.
Important! Both DC connectors from the same AC adapter
must be plugged into LED strips in order for LEDs to turn on.
To attach an LED strip to the booth, follow these steps:
1. Attach LED clips to both ends of the LED strip by sliding
the clips into the grooves on the underside of the
strip. Start from the inside, and slide each clip toward
the edge of the strip until it clicks into place.
2. Attach the LED strip to the frame by pressing the clip
onto the rod until it snaps into place. Slide the LED
along the rod until it’s at the desired position.
5
6
5
3. Run the DC power connector through the nearest
hole on the side of the booth, and insert the connector
into the power input on the LED strip.
7
Note: The power adapter cord may not be long
enough to reach the oor. It’s alright for the power
adapter to hang loosely at the side of the booth.
4. Plug the AC power cord into a wall outlet, and use
the adapter’s power switch to turn on the LEDs.
Using the Diffusers
The top and side panels have integrated diffusers
for a softer and less angular light.
Use the touch-connect strips on the inside of the top
and sides to cover the LEDs with the diffusers.
Attaching the Background
1. Attach the background clips to the top-rear width rod.
Use the clips to hold the background in place.
2. Tuck the end of the background into the bottom interior ap.
8
6
7
8
7
Page 8

One-Year Limited Warranty
This Impact product is warranted to the original purchaser to be free from defects in
materials and workmanship under normal consumer use for a period of one (1) year
from the original purchase date or thirty (30) days after replacement, whichever occurs
later. The warranty provider’s responsibility with respect to this limited warranty shall
be limited solely to repair or replacement, at the provider’s discretion, of any product
that fails during normal use of this product in its intended manner and in its intended
environment. Inoperability of the product or part(s) shall be determined by the warranty
provider. If the product has been discontinued, the warranty provider reserves the right
to replace it with a model of equivalent quality and function.
This warranty does not cover damage or defect caused by misuse, neglect, accident,
alteration, abuse, improper installation or maintenance. EXCEPT AS PROVIDED HEREIN,
THE WARRANTY PROVIDER MAKES NEITHER ANY EXPRESS WARRANTIES NOR ANY
IMPLIED WARRANTIES, INCLUDING BUT NOT LIMITED TO ANY IMPLIED WARRANTY
OF MERCHANTABILITY OR FITNESS FOR A PARTICULAR PURPOSE. This warranty
provides you with specic legal rights, and you may also have additional rights that
vary from state to state.
To obtain warranty coverage, contact the Impact Customer Service Department to
obtain a return merchandise authorization (“RMA”) number, and return the defective
product to Impact along with the RMA number and proof of purchase. Shipment of the
defective product is at the purchaser’s own risk and expense.
For more information or to arrange service, visit www.impactstudiolighting.com or call
Customer Service at 212-594-2353.
®
Product warranty provided by the Gradus Group.
www.gradusgroup.com
Impact is a registered trademark of the Gradus Group.
© 2018 Gradus Group LLC. All Rights Reserved.
GG3
 Loading...