

Page 1

Luxbanx Softbox
INSTRUCTIONS
1
Page 2

Introduction
Thank you for choosing this Impact Luxbanx softbox. Luxbanx softboxes
are designed to control and soften light for your specific photographic
needs. This softbox is compatible with flash (strobe), fluorescent, and LED
lighting sources. Do not use this softbox with “hot” lights such as quartz,
tungsten, or HMI sources.
Luxbanx softboxes come in three shapes: rectangular, strip (a long, narrow
rectangle), and octagonal. In addition, softboxes come in extra-small, small,
medium, large and extra-large sizes. A speed ring (not included) is required
to mount the softbox to a light. Each softbox has a front diffuser, which can
be attached using touch fasteners. The diffuser can be removed to produce
more intense light with increased contrast. Luxbanx softboxes have a matte
white interior finish, which softens and diffuses the light. The removable
internal baffle will soften and diffuse light further when installed in the
softbox.
The size and shape of the softbox is related to the lighting effect produced
— the larger the softbox, the softer the light. The distance from the softbox
to the object being photographed also affects the quality of light produced —
when the softbox is close to the object, the light will be more intense, with
more contrast. When the distance is greater, the light will be more diffused,
with less contrast. The removable interior baffle will also soften and diffuse
light — you can add or subtract a degree of contrast through inserting or
removing the baffle.
Generally, the larger the object you’re photographing, the larger the softbox
you should use. A large rectangular or octagonal softbox will give more even
light for a full-length portrait than a small softbox. The shape of the softbox
affects the light produced as well: when photographing a slender object, use
a strip softbox that has a similar shape to produce more even light than an
octagonal softbox.
2
Page 3

Instructions
Please follow these instructions carefully
when assembling your Luxbanx softbox.
There are four parts to your Luxbanx:
• The softbox fabric shell
• Flex rods
• Front diffuser
• Removable internal baffle
A speed ring (not included) is required to
assemble the Luxbanx softbox and mount
it to a light. Speed rings are available
separately.
Box Contents
• Softbox fabric shell
• Four flex rods (eight rods for
the octagonal softbox)
• One spare flex rod
• Internal baffle
• Front diffuser
• Carrying case
• User instruction manual
• Warranty
Warnings ⚠
• Please read
and follow these
instructions and keep
this manual in a safe
place.
• Keep this unit away
from water and any
flammable gas or liquid.
• Handle this unit with
care.
• Keep this unit away
from children.
• Use parts provided
by the manufacturer
only.
• Make sure this item
is intact and that no
parts are missing.
• All photos in
this manual are for
illustrative purposes
only.
3
Page 4
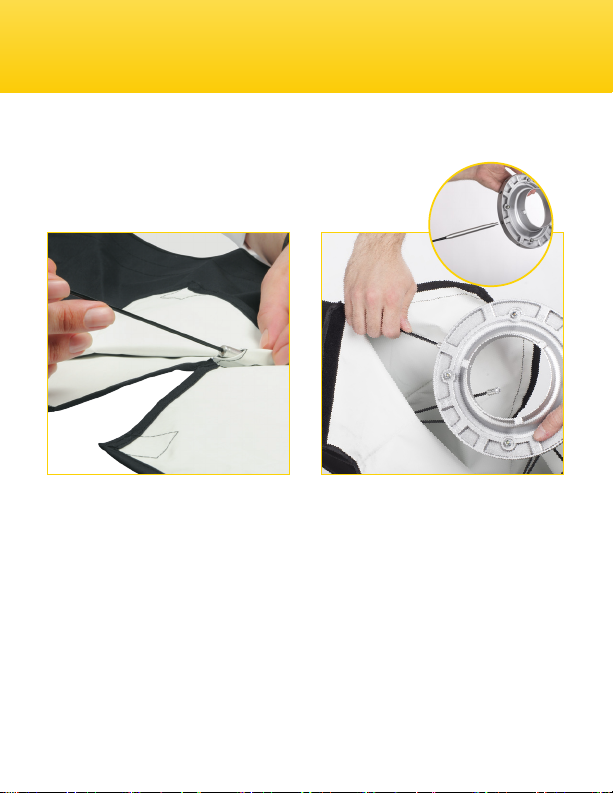
Luxbanx Assembly Instructions
INSET:
Heavy Duty Flex Rod
1. Insert the small tip of a flex
rod into the sleeve along the
inner seam of the softbox
shell. Slide the flex rod
through the sleeve until the
tip fits into the end of the
sleeve in the front corner of
the softbox. The large tip is
now at the rear of the softbox
shell. Repeat this step with
the remaining flex rods.
4
2. With the speed ring’s reflector
mount facing away from the
softbox, insert the end of a
flex rod into a rod hole in the
speed ring.
NOTE: Some larger Luxbanx
models use a Heavy Duty Flex
Rod, which has a thicker end
to attach to the speed ring.
(See inset above.)
Page 5

Luxbanx Assembly Instructions
INSET:
Strip Model
3. Insert the second flex rod in
the softbox fabric shell into
the hole in the speed ring that
is directly opposite the first
hole used. Flex the rod gently
but firmly until it is securely
seated in the speed ring.
4. Insert the third and fourth flex
rods into the speed ring in the
same manner. As each flex
rod is inserted, flex it gently
but firmly into position until
each rod is securely seated in
the speed ring.
5
Page 6

Luxbanx Assembly Instructions
5. For octagonal softboxes,
continue in the same manner,
always working in opposite
pairs.
NOTE: The second pair of
flex rods installed should be
at a 90° orientation from the
first pair so that a square
framework is established.
6
6. Fold the flaps of the softbox
shell over the speed ring and
press down on the touch
fasteners to close the back of
the softbox.
Page 7

Luxbanx Assembly Instructions
7. If you are using the internal
baffle, attach it to the interior
now, using the straps with
snaps that are built into the
softbox.
8. Attach the front diffuser to the
front of the softbox using the
touch fastener, making sure
the diffuser is in contact with
the softbox all the way around
its perimeter so no direct light
can escape.
9. With your light unit’s power
off, mount the speed ring to
the light unit according to its
manufacturer’s instructions.
7
Page 8

Luxbanx Assembly Instructions
An optional Luxbanx grid provides
more control over the light of your
softbox by producing a narrower
beam of light than the softbox
alone.
When using the optional Luxbanx
Grid, be sure to install the softbox
front diffuser at the rear edge of the
softbox touch fastener strip. This
will allow enough of the softbox
touch fastener strip to be visible
8
so that there is room to install the
Luxbanx grid at the front edge of
the touch fastener strip. Press the
grid’s touch fastener firmly against
the softbox’s touch fastener strip
as smoothly as possible along
the length of one side. Repeat for
the remaining sides of the grid,
attaching sides in opposite pairs.
Page 9

Luxbanx Disassembly Instructions
1. Turn off the power to your
light head and disconnect the
power cord from the power
supply.
2. Allow time for the light unit,
flex rods and speed ring to
cool off before proceeding.
3. Unmount the softbox
assembly from the light head.
4. Pull the flex rods out of the
speed ring using the same
opposite rod pattern used in
assembly.
5. You can leave the diffuser in
place if you wish. The softbox
will roll up for storage with
its diffuser and inner baffle in
place.
9
Page 10

Recommended Accessories
• Luxbanx Grid
• Speed Ring (Required)
Notes
10
Page 11

One-Year Limited Warranty
This IMPACT product is warranted to the original purchaser to be free from
defects in materials and workmanship under normal consumer use for a period of
one (1) year from the original purchase date or thirty (30) days after replacement,
whichever occurs later. The warranty provider’s responsibility with respect
to this limited warranty shall be limited solely to repair or replacement, at the
provider’s discretion, of any product that fails during normal use of this product in
its intended manner and in its intended environment. Inoperability of the product
or part(s) shall be determined by the warranty provider. If the product has been
discontinued, the warranty provider reserves the right to replace it with a model
of equivalent quality and function.
This warranty does not cover damage or defect caused by misuse, neglect,
accident, alteration, abuse, improper installation or maintenance. EXCEPT AS
PROVIDED HEREIN, THE WARRANTY PROVIDER MAKES NEITHER ANY EXPRESS
WARRANTIES NOR ANY IMPLIED WARRANTIES, INCLUDING BUT NOT LIMITED
TO ANY IMPLIED WARRANTY OF MERCHANTABILITY OR FITNESS FOR A
PARTICULAR PURPOSE. This warranty provides you with specic legal rights, and
you may also have additional rights that vary from state to state.
To obtain warranty coverage, contact the Impact Customer Service Department
to obtain a return merchandise authorization (“RMA”) number, and return the
defective product to Impact along with the RMA number and proof of purchase.
Shipment of the defective product is at the purchaser’s own risk and expense.
For more information or to arrange service, visit www.impactstudiolighting.com
or call Customer Service at 212-594-2353.
Product warranty provided by the Gradus Group.
www.gradusgroup.com
IMPACT is a registered trademark of the Gradus Group.
© 2014 Gradus Group LLC. All Rights Reserved.
11
Page 12

12
GG3
 Loading...