

Page 1
FP-5982Z / FP-4367Z
Panel Frame Kit
INSTRUCTIONS
1
Page 2

Introduction
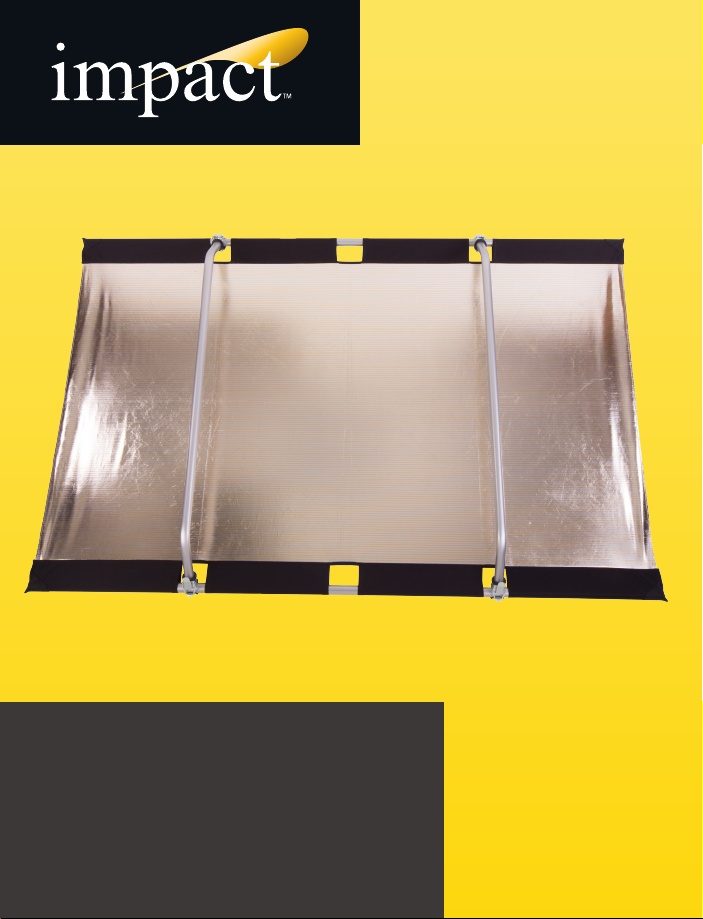
Thank you for choosing the Impact Panel Frame Kit. This lightweight
portable light reflector kit helps you turn harsh direct sunlight into a
well-balanced, beautifully lit photograph or video. The Panel Frame
Kit comes in its own sturdy carrying bag, and can be assembled
without tools in 5 minutes or less. The reversible reflector gives you
the choice of a silver zebra or a gold zebra pattern. The silver zebra
gives a neutral specular reflected light, and the gold zebra delivers a
warmer, slightly softer light. The Panel Frame can be hand-held or
mounted to a stand for better images, no matter what the lighting
situation.
Precautions ⚠
• Please read and follow these instructions, and keep this manual in a safe place.
• Keep this unit away from water and flammable gases or liquids.
• Handle the unit with care.
• Clean the unit with a soft, dry cloth.
• Keep this unit away from children.
• Use only parts provided by the manufacturer.
• Make sure everything is secure before proceeding.
• Make sure the item is intact and that there are no missing parts.
• All photos are for illustrative purposes only.
2
Page 3
Overview
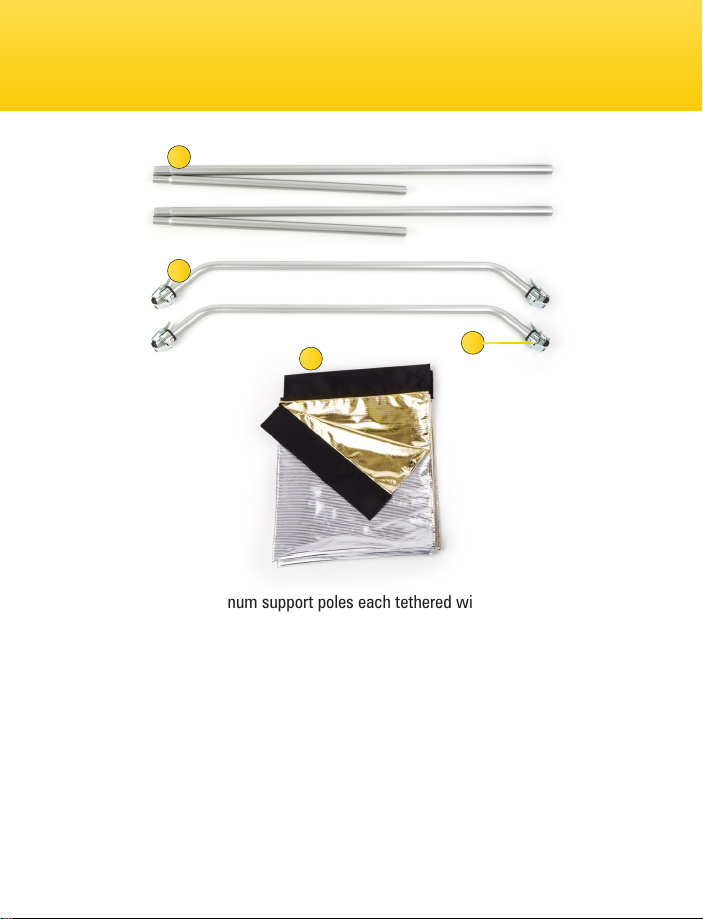
1
2
4
1. Two (2) aluminum support poles each tethered with built-in shock cords
2. Two (2) aluminum latching cross bars
3. Locking latches
4. Reversible sided panel fabric
The Panel Frame helps to reduce contrast and gives you well-balanced light even
in harsh sunlight. You can vary the amount of fill light by moving the reflector
closer or further from your subject. The silver side gives you a neutral colored
specular light with moderate contrast, while the gold side produces a warming
effect with slightly softer contrast.
3
3
Page 4

Setup - Part One
1 2
1. Open the carrying bag and
remove all elements of the Panel
Frame kit.
2. Assemble a support pole by
pulling the two halves slightly
apart and inserting the end of one
into the other.
3. The shock cord will hold the
two halves securely together.
Assemble the other support pole
in the same way.
4
4. Unfold the reflector and lay it out
flat.
5. Insert the end of one support pole
into an end of the fabric guide
that runs along each of the two
1
6. Slide the pole through a far end
sides of the panel.
2
of the guide, into and through
the second guide and through
the third guide so that the pole
runs along the entire length of the
reflector.
Page 5

3 4
7. Place the end of the pole into the
small pocket at the end of the
3
guide.
8. Place the other end of the pole
into the small pocket at the other
end of the guide.
Specifications:
• Panel Frame Dimensions – (L×H)
FP-4367Z: 67 x 43” (170.2 x 109.2 cm)
FP-5982Z: 82 x 59” (208.3 x 149.9 cm)
• Weight
FP-4367Z—Total: 9.7 lbs. (4.4 kg); Frame panel: 6.1 lbs (2.76 kg)
FP-5982Z—Total: 13.98 lbs. (6.34 kg); Frame panel: 9.9 lbs. (4.5 kg)
9. Repeat this process with the
other pole along the other side of
the reflector.
10. The reflector should now be held
flat and tight by the two support
4
poles.
5
Page 6

Setup - Part Two
1 2
1. Decide which surface you want
to use.
2. On the opposite side of the
reflector from the side you’re
using, install the two cross bars.
3. There are three gaps in the fabric
guides that hold the supporting
poles. Use the two gaps nearest
each end of the reflector to mount
a cross bar. Do not use the gap in
the middle for mounting a cross
1
bar.
6
4. Place the latch lock that’s on
the end of the cross bar onto the
support pole in a gap between
sections of the fabric guide near
the end of the reflector.
5. Seat the latch lock on the support
pole, and close the latch, locking
the end of the cross bar to the
support pole.
2
6. Place the other end of the cross
bar in the gap directly across the
reflector from the first one.
Page 7

3 4
7. Attach the latch lock in the same
manner as above. The curved
part of the cross bar should
protrude toward you.
3
8. Repeat this process with the
other cross bar in the gaps near
the other end of the reflector.
Note: Always be sure to keep the
Panel Frame well-anchored when
using it outside. Even a light
breeze can move it or knock it
over if it’s not properly weighted.
9. The Panel Frame is now ready for
use. The two cross bars provide a
secure grip for holding the panel,
or they can be used to mount the
reflector to a stand.
4
10. To disassemble the Panel Frame,
follow these instructions in
reverse order.
7
Page 8

One-Year Limited Warranty
Impact provides a limited warranty that this product is free from defects in
materials and workmanship to the original purchaser under normal use for a
period of one (1) year from the original purchase date or thirty (30) days after
replacement whichever occurs later. Our responsibility with respect to this
limited warranty shall be limited solely to repair or replacement, at its option,
of any product which fails during normal consumer use.
To obtain warranty coverage during the Warranty Period, contact your place
of purchase (“Seller”) to obtain a return merchandise authorization (“RMA”)
number, and return to Seller the defective product along with proof of
purchase and the RMA number.
This warranty does not extend to damage or failure which results from
misuse, neglect, accident, alteration, abuse, improper installation or
maintenance. EXCEPT AS PROVIDED HEREIN, IMPACT MAKES NEITHER
ANY EXPRESS WARRANTIES NOR ANY IMPLIED WARRANTIES, INCLUDING
BUT NOT LIMITED TO ANY IMPLIED WARRANTY OF MERCHANTABILITY OR
FITNESS FOR A PARTICULAR PURPOSE. This warranty provides you with
specific legal rights, and you may also have additional rights which vary
from state to state.
© Copyright 2013 Gradus Group
8
 Loading...