

Page 1

6
2
8
hold the cu
and tu
wr
Then ta
all leg
S e tup Instruc t i ons - I M PAC T ARC H
S e t Up I nstru c t ions f o r E xpo d o m e
o
1
bolt the cupola
2
shaft to cupola
hub
stick the cupola shaft
1
through the hole in the
cupola hub
3
2
4
stick the Aluminium-pipes together
and secure it with the snap buttons.
5
2
3
4
1
place a plastic-sheet on the ground and spread fabric on
the sheet (tunnels upside). Then push the pipes into the
tunnels (small plastic part on the backside). Please walk
on fabric without shoes and take care about a clean ground.
5
place the cupola hub with the fixed cupola shaft
into the center opening of the fabric. (the long
part of the shaft on upper side). Then connect the
frame legs to the cupola hub. Please mind to do
this according to No. 1 - 5. Sliding the fabric inward
towards the center opening will ease the legs
connection to the hub.
place the cupola fabric over the shaft and snap to
the webbing loop along the tunnels.
if applicable: place the cupola flag onto cupola
shaft.
impactcanopy.comBritish Columbia | Ontario | Quebec | Nova Scotia
Page 2
S e t u p I n s t r u c t i ons - I M PAC T
S e t U p I nstr u c t i o n s f o r E x p o d o m e
o
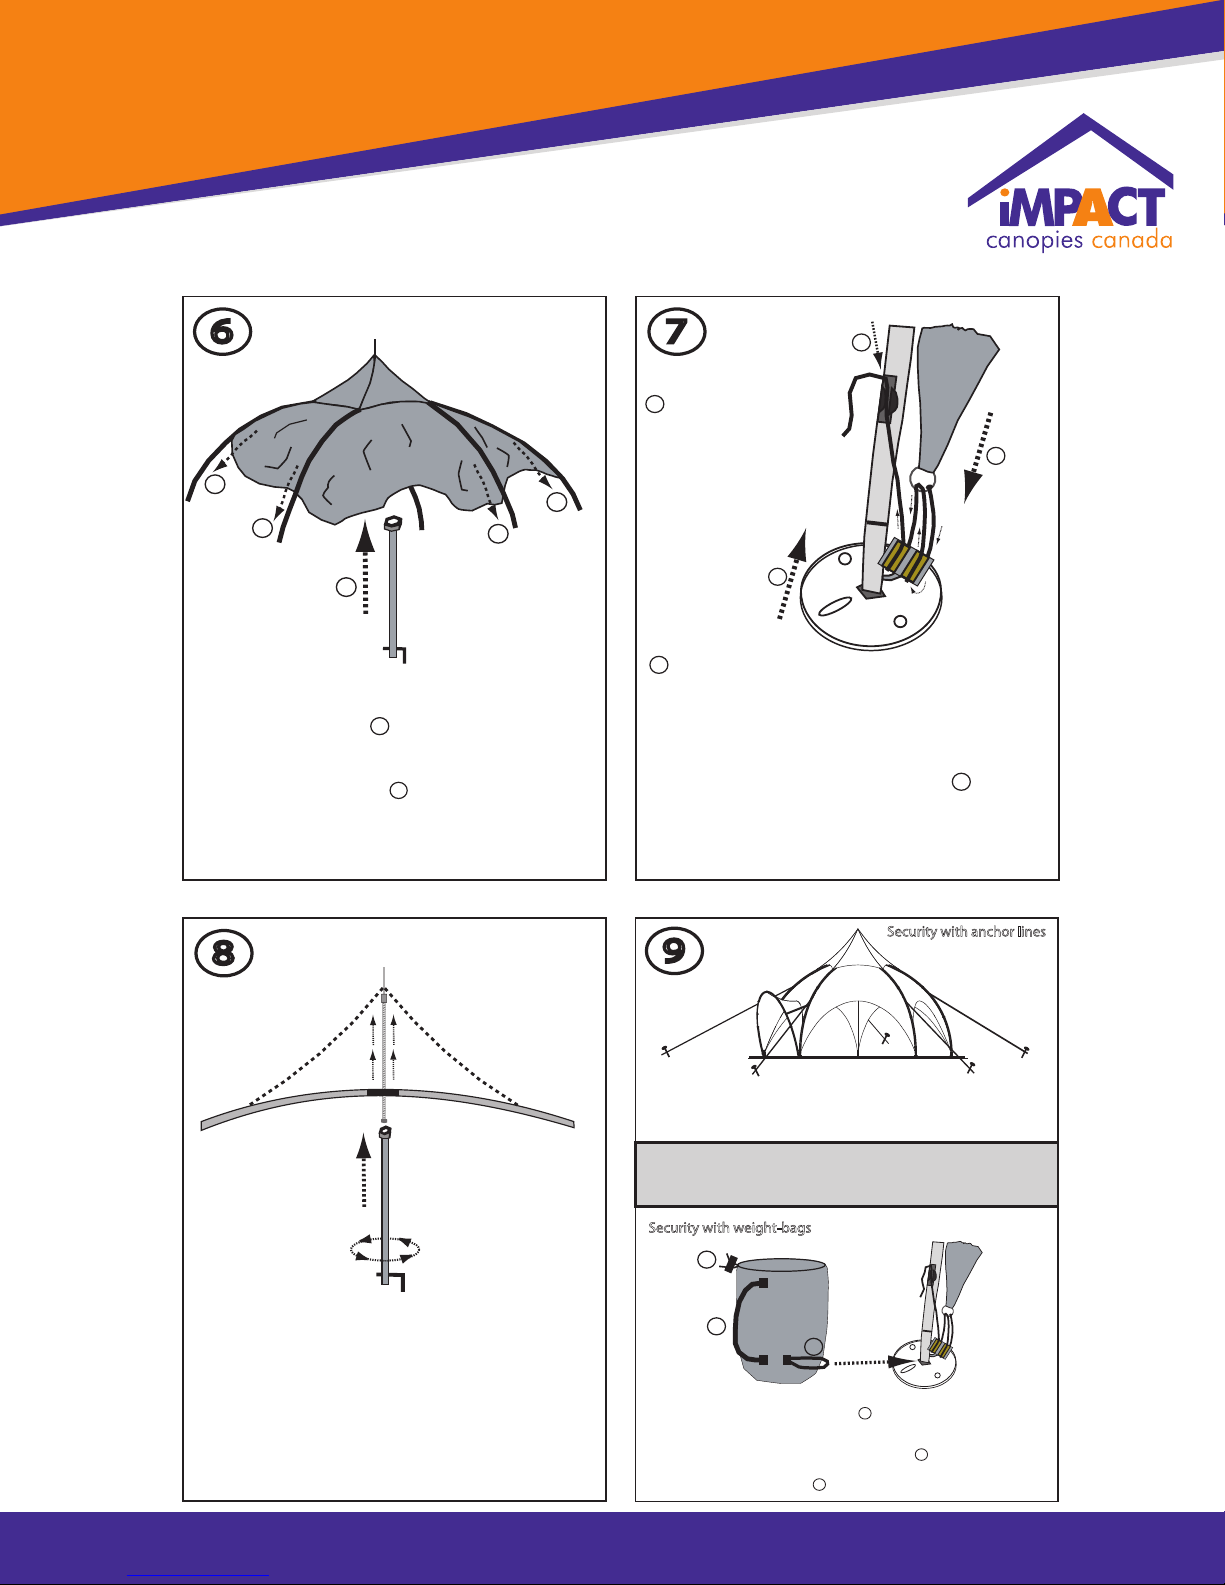
6
2
2
1
one person is going under the fabric and raise the Dome
with the cupola wrench.
the other person(s) lift and twist the frame legs in a
straight position to the center-hub and pulling the fabric
down towards the ground.
the one person is holding the cupola-wrench as long as
the Dome is stable enough to stand itself.
1
2
2
2
7
1
push the round foot-pads into
the frame-legs.
The double-pulley should be
placed in directon to the center
of the dome.
1
2
pull down the fabric (on the metal ring) and thread the corner
ropes through the either left or right part of the pulley - after
that thread the rope upwards through the metal ring and then
again downwards through the second side of the pulley.
Finally pull at the rope and tighten the dome "step by step"
at all legs. Then thread rope into the plastic-cleat at the frame
leg. Please ensure that all legs are tensioned equally throughout
the Dome.
3
2
3
8
hold the cupola wrench to the bottom part of the cupola shaft
and turn the wrench to raise the cupola until fabric becomes
wrinkle free. Caution: do not over tighten !!
Then take away the wrench and check again the tension at
all legs.
Security with anchor lines
9
thread the anchor lines (fixed on the tunnels) as wide as possible away from
the dome and drive the stakes into the ground. Then fix the rope at the
upper part of the stake. Furthermore drive the stakes through the hole at
each footpad to fix the legs and secure the dome.
CAUTION ! During strong winds, snow or other unusual weather conditions
it is recommended to break down the Dome in order not to cause any
damages on material or personal health. We cannot be responsible for any
causes if these instructions are not followed ! It is not a tent for 365 days/year.
Security with weight-bags
1
3
2
Fill the weight-bag inlet with water/sand/stones/snow etc. and close the bag
with the cord on the upper side of the bag.
Then sling the welcro-part around the foot-pad and place the bag as close as
possible to the footpad on the inner side of the dome.
For transportation the 4 bags can be folded and stowed in one bag for easy
carrying with the shoulder strap.
1
2
3
impactcanopy.comBritish Columbia | Ontario | Quebec | Nova Scotia
 Loading...