

imovr TermoTread GT Owner's Manual
Oce Walking Treadmill by iMovR
ermoTread GT
OWNER’S MANUAL

CONGRATULATIONS!
By incorporating a treadmill desk into your daily work life you are about to join legions of formerly-sedentary workers who have
discovered the many health and productivity benets of moving while working. We’re condent that once you experience what it’s
like to have greater energy, less pain, increased stamina and heightened concentration - among other signicant benets - you will
never want to go back to endless days of just sitting in front of a computer.
The iMovR ThermoTread GT is the most advanced oce walking treadmill ever created, designed specically to live in a quiet oce
environment, not a noisy gym. It is intended to work together with a stable, height-adjustable desk, at typical walking speeds of 1.0
to 2.0 mph (with a maximum speed of 2.5 mph). Being that walking on a treadmill at slow speeds is much harder on the motor than
running on one at high speeds, the gearing ratio of the ThermoTread GT’s drivetrain is optimized for these slow walking speeds, and
will outperform all other treadmills in terms of power consumption, noise, and reliability at these low speeds.
Keep in mind that the user’s primary goal should be to spend less time sitting - while gaining some benets from working with a
slightly elevated heart rate. Cardio exercise is decidedly not the objective of treadmill desking. As we like to say at iMovR, “if you’re
sweating, you must be doing it wrong!” After the rst couple of days of use you will nd the ideal speed for your gait that will feel
most comfortable for you, and allow you to type with accuracy. Walking too fast may impede your productivity, so spend some time
trying out dierent speeds to nd your “sweet spot” pace. While our digital console tracks distance, speed, step count and calorie
burn, our oce tness experts always point out that hours not spent sitting is the key measure of successful treadmill desk usage.
TABLE OF CONTENTS
Congratulations ••••••••••••••••••••••••••••••••••••••••••••••••••••••••••••••••••••••••••••••••••••••••••• 2
Important Safety and Operation Instructions ••••••••••••••••••••••••••••••••••••••••••••••••3-5
Console Operation ••••••••••••••••••••••••••••••••••••••••••••••••••••••••••••••••••••••••••••••••••••••• 6
Get Ready - Screen Display & Waivers ••••••••••••••••••••••••••••••••••••••••••••••••••••••••••••••••••••••••••• 6
Get Set - Setting Your Prole, & Mode Selection •••••••••••••••••••••••••••••••••••••••••••••••••••••••••••• 7
Personal Settings ••••••••••••••••••••••••••••••••••••••••••••••••••••••••••••••••••••••••••••••••••••••••••• 8
System Settings ••••••••••••••••••••••••••••••••••••••••••••••••••••••••••••••••••••••••••••••••••••••••••••• 9
Go! - Operating Your Treadmill ••••••••••••••••••••••••••••••••••••••••••••••••••••••••••••••••••••••••••••••••••••10
Sit Mode ••••••••••••••••••••••••••••••••••••••••••••••••••••••••••••••••••••••••••••••••••••••••••••••••••••••11
Stand Mode •••••••••••••••••••••••••••••••••••••••••••••••••••••••••••••••••••••••••••••••••••••••••••••••••11
Walk Mode •••••••••••••••••••••••••••••••••••••••••••••••••••••••••••••••••••••••••••••••••••••••••••••••••••12
Pomodoro Timer ••••••••••••••••••••••••••••••••••••••••••••••••••••••••••••••••••••••••••••••••••••••••••13
General Maintenance ••••••••••••••••••••••••••••••••••••••••••••••••••••••••••••••••••••••••••••••14-15
Troubleshooting Guide ••••••••••••••••••••••••••••••••••••••••••••••••••••••••••••••••••••••••••••••••17
Moving the Treadmill •••••••••••••••••••••••••••••••••••••••••••••••••••••••••••••••••••••••••••••••••••18
Treadmill – Exploded View Diagram ••••••••••••••••••••••••••••••••••••••••••••••••••••••••••••••18
Treadmill – Parts List ••••••••••••••••••••••••••••••••••••••••••••••••••••••••••••••••••••••••••••••••••••19
SAVE THESE INSTRUCTIONS – THINK SAFETY!
2

GETTING STARTED
The Ready-Set-Go section of this manual will get you upright and walking in no time, but rst we need to review some important
safety information to ensure that your experience is a positive one and that your equipment always performs at peak eciency. The
vast majority of treadmill support calls can be attributed to a failure to properly level the treadmill or to keep it properly lubricated
and clean. To ensure that your treadmill continues to work trouble-free for many years, and your warranty coverage remains intact,
please pay particular attention to the instructions in this manual pertaining to installation and regular maintenance. Please note
that failure to follow the instructions in this manual may void your warranty.
IMPORTANT SAFETY INSTRUCTIONS
Please read all instructions carefully before using this treadmill.
ELECTRICAL SAFETY
• CAUTION: Never remove any cover without rst
disconnecting AC power.
• To reduce the risk of an electrical shock, disconnect your
treadmill from the electrical outlet prior to any cleaning,
lubrication or service work.
• Never use a ground fault circuit interrupt (GFCI) wall outlet
with this treadmill. As with any appliance with a large motor,
the GFCI will trip often. Route the power cord away from any
moving part of the treadmill including the transportation
wheels.
• To reduce the risk of burns, re or electric shock, be sure
to install your treadmill where it will have good access to a
110-volt, 10-amp grounded outlet, with only the treadmill
plugged into the circuit.
• Do not use an extension cord unless it’s a 14 AWG cord, or
better – with only one (1) outlet on the end. The outlet must
be a three-prong, grounded type. The treadmill should be
the only appliance in the circuit to which it is connected.
• Never operate the treadmill if it has a damaged cord or plug.
TREADMILL SITING AND INSTALLATION
• Do not operate treadmill on a deeply padded, plush or shag
carpet. Damage to both carpet and the treadmill may occur.
• Provide a minimum clearance of 1m (40”) behind the treadmill
and 1/2m (20”) to the left and ride sides of the treadmill.
Comply with local re codes for any additional clearance
instructions, and never block access to re safety equipment.
• Use a level to make sure that the treadmill is perfectly
horizontal, as most oors are slightly uneven. Use the
adjustable leveling feet on the treadmill to ensure that all four
corners of the unit are solidly on the oor, and no corner is
“high sided.” Making sure the treadmill is perfectly horizontal
is key to avoiding undue torqueing forces on the frame, which
can cause the belt to move out of position, generate squeaks
or scraping noises when walking on the belt, reduce the life
expectancy of key components, and/or void the warranty.
• Do not attempt to disable the grounding plug by using
improper adaptors or extension cords, or in any way attempt
to modify the cord set. A serious shock or re hazard may
result along with electronics malfunctions.
• If voltage varies by 10 percent (10%) or more, the
performance of your treadmill may be aected. Such
conditions are not covered under your warranty. If you
suspect the voltage is low, contact your local power
company or a licensed electrician for proper testing/
evaluation.
• Keep all cords away from heated surfaces.
• Do not operate in the vicinity of where aerosol products are
being used or where oxygen is being administered. Sparks
from the motor may ignite may ignite a highly gaseous
environment.
• Never expose this treadmill to rain or moisture. This product is
NOT designed for use outdoors, near a pool or spa, or in any
other high-humidity environment.
• The treadmill’s specied environmental operating range is:
• Temperature: 50° to 95° Fahrenheit (10° to 35 °Celsius)
• Maximum Humidity: 80% non-condensing (no water
drops forming on surfaces)
3
OPERATING SAFETY RECOMMENDATIONS
CAUTION - ATTENTION
• Wear suitable shoes for use. High heels, sandals, ip-ops
or bare-feet are not suitable for use on your treadmill. For
prolonged use, quality athletic shoes are recommended to
avoid leg fatigue.
• Keep children and animals away from an operating treadmill.
• Keep hands and loose clothing (e.g. scarves, ties) away from
all moving parts.
• Never use your treadmill during an electrical storm. Power
surges may occur in your household or oce power supply
that could damage treadmill components. Unless you have
a properly-rated surge protector on the treadmill’s power
outlet we recommend unplugging the treadmill during an
electrical storm as a precaution.
• The ThermoTread GT is designed as a walking treadmill that
will allow the user to perform basic work functions (reading,
use of phone, tablet or computer) while walking at a low and
comfortable speed. Use caution while participating in other
activities while walking on your treadmill. These distractions
may cause you to lose balance, which may result in serious
injury.
• Avoid eating or drinking while on the treadmill. Any food,
liquid or other substances that may fall onto the treadmill
belt should be cleaned up immediately. Nothing other than
lubricant should ever enter the space between the belt and
the deck. If any foreign material gets in between the belt
and the deck, immediately turn o and unplug the treadmill,
loosen the belt (see instructions for Adjusting Tread-Belt
Tension) and clean the entire deck area, and the inside of the
entire walking belt, using a clean cloth. Once the belt is retightened, check the belt alignment and re-lubricate the deck
following the instructions for Tread-Belt Lubrication.
• Do not use excessive pressure on the control console buttons.
The LCD screen buttons are precision set to function properly
with little nger pressure.
• Should you experience static electricity shocks while
working at your treadmill desk computer rst check to see
that the treadmill, and all electronics that are connected to
your workstation (computer, monitor, etc.) are all properly
grounded. Especially in cold environments, static charges
can build up on the treadmill. One common method of
eliminating or reducing static electricity build-up is to place
the treadmill on an anti-static treadmill mat (contact iMovR
to purchase). If you experience static shocks when touching
your computer we recommend using a remote keyboard
with a wireless Bluetooth connection in order to break the
electrical circuit and prevent possible harm to your computer
equipment.
• Never drop or insert any object(s) into any openings.
• To disconnect, turn the treadmill o using the console
commands, turn o the ON/OFF “rocker” style switch at the
rear of the treadmill, and then remove the plug from the
outlet.
THE TREADMILL AND ITS RELATIONSHIP TO AN ADJUSTABLE-HEIGHT DESK
• The ThermoTread GT treadmill is specically designed as a walking treadmill
for use in an oce or home oce environment, and should ONLY be used in
conjunction with a stable, adjustable-height desk.
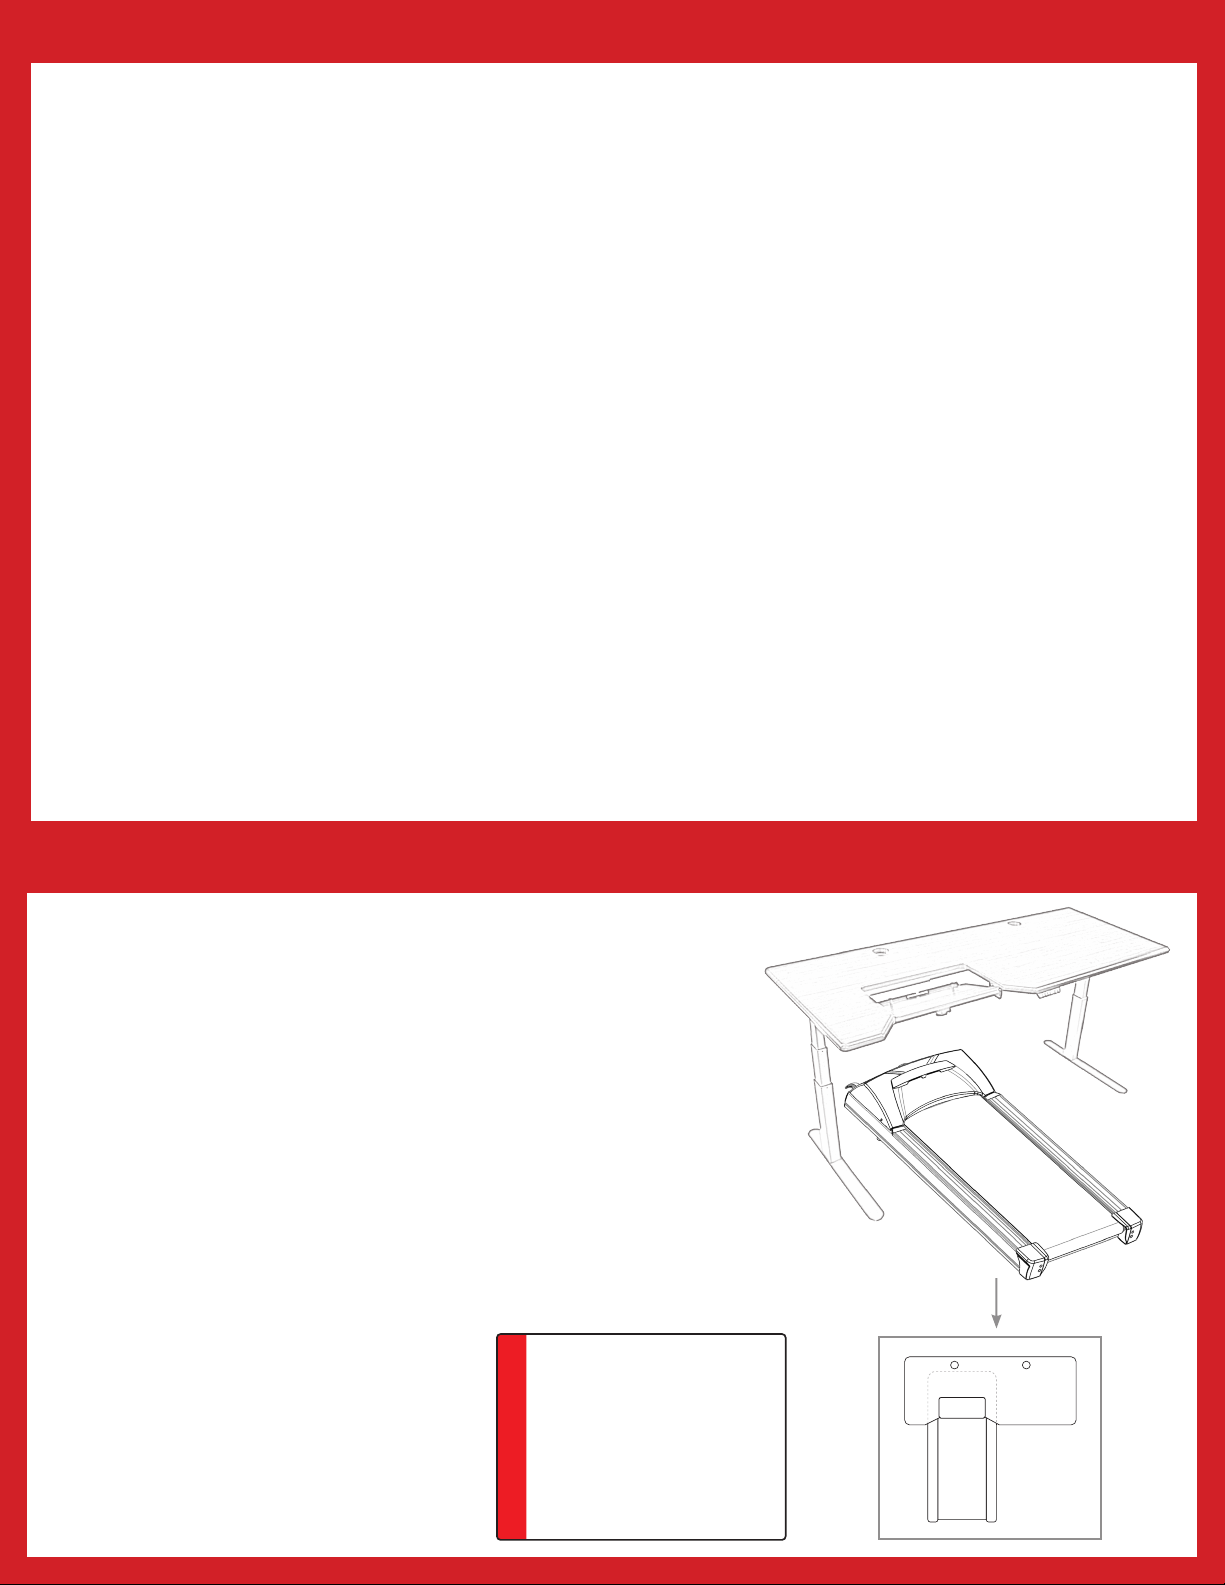
• When setting up the treadmill relative to the desk, it is important to combine
both safety and ergonomics. Place the treadmill perpendicular (at 90 degrees)
to the opening of the desk. This is for both safety and comfort. The user should
be able to safely lean on the desk with two hands when they feel the need
for extra support or to perform some basic working functions such as typing,
writing, reading, etc. The 90-degree relationship between treadmill and desk
keeps the distance between the user and the desk perfectly balanced for both
left and right arms. This spatial balance is important for maintaining proper
ergonomics and typing productivity.
• Position the treadmill such that your footfall will generally be in the center of
the deck, and as far to the front of the treadmill as possible without having
your shoes touch the motor housing, when walking at your normal stride.
Experiment with the best walking position
relative to safety, ergonomics, and the ability
to access the desk area.
• A sticker has been provided (see image below)
as a reminder to the user to only use the
treadmill in conjunction with an adjustable
height desk. Please place this sticker on your
desk near the treadmill console.
4
Caution - Risk of Injury to Persons. To avoid injury, use
1.
extreme caution when stepping onto or o a moving
treadmill belt. Read Instruction Manual before using.
Attention - Risque de blessures. Pour éviter des blessures,
soyez extrèmement prudent en montant ou descendant
un tapis roulant. Lisez attentivement la notice avant
l’utilisation.
Remove Safety Key when not in use and store out of
2.
reach of children.
Retirer la clé de sécurité lorsque ‘appareil n’est pas en
fonction et la garder hors de la portée des enfants.
This treadmill is specically designed as a walking
3.
treadmill and shall only be used in conjunction with an
adjustable height desk.
Ce tapis est spéciquement conçu comme un tapis
roulant de marche et doit être utilisé qu’en conjonction
avec un bureau réglable en hauteur.
CIRCUIT BREAKERS
• The ThermoTread GT is a very power-ecient device and should work perfectly well on standard 10A circuits (i.e. any power outlet
in the home or oce). A special high-amp circuit is not required as would often be the case with a running treadmill. As long as
the ThermoTread GT is the only device on the circuit (recommended), it should never trip a 10A circuit breaker in normal use.
Maintaining a proper lubrication schedule is essential to keeping friction at bay and power consumption minimized, extending the
useful life of the equipment, and keeping the warranty intact.
• If you nd that your treadmill is tripping a circuit breaker then immediately stop using the treadmill and make sure it is properly
cleaned, and lubricated with iMovR-brand, 100% silicone lubricant. If there is a lot of dirt under the belt follow the instructions in this
manual for Cleaning The Tread-Belt. Depending on the age of the unit, it may need a new belt and/or walking deck if it continues to
trip a 10A circuit breaker. Contact iMovR Customer Care for assistance with obtaining parts and scheduling a service call.
• Some circuit breakers used in homes are not rated for high inrush currents that can sometimes occur when using a treadmill. In the
highly unusual circumstance that your treadmill is tripping the house/oce circuit breaker but the circuit breaker on the treadmill
itself does not trip, you will need to replace the home/oce breaker with a high inrush type. This is not considered a warranty defect.
This is, unfortunately, a condition that we as a manufacturer have no ability to control. High inrush circuit breakers are available at
most hardware stores.
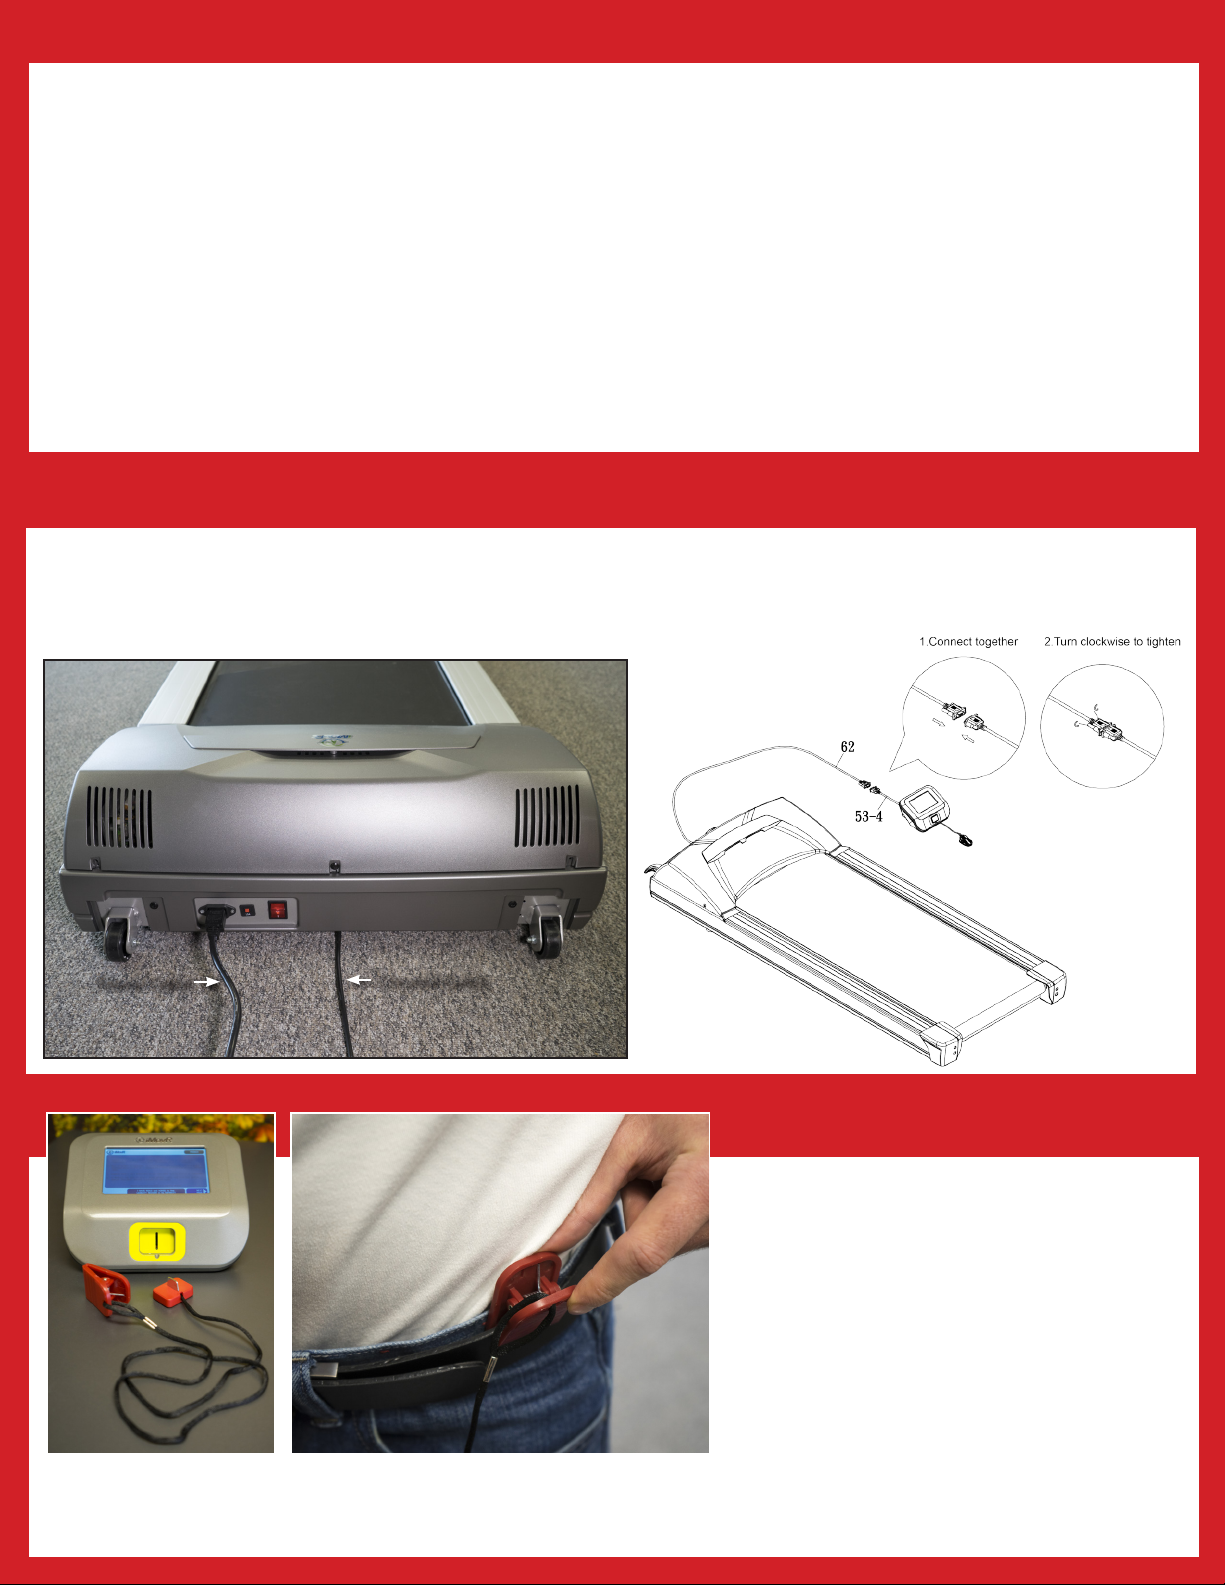
CONNECTING THE CONSOLE
The console will become operational when you connect the 15-pin plug to the 15-pin socket on the rear of the treadmill. Be sure to
tighten up the securing pins for a solid connection.
Once the connections are established and the treadmill is turned on (via the red “rocker” switch in the rear), the console will activate.
Back of Treadmill
Connect Upper Computer Cable (53-4)
for the console (53) with 15-PIN Lower
Computer Cable (62) from the Main
Frame (1) and tighten securely.
Power Cable
Console Cable
SAFETY KEY
A Safety Key with Tether Cord and Clip is provided with
this treadmill. Its intent is purely for user safety should
you fall or move too far back on the treadmill belt.
First fasten the plastic clip onto your clothing in a
secure manner to ensure good holding power, while
allowing enough slack in the cord to provide safe and
unimpeded walking. Then insert the red safety key into
the front of the control console. Your treadmill will NOT
start or operate without this. Removing the safety key
also secures the treadmill from unauthorized use.
Be familiar with its function and limitations. The treadmill will stop, depending on speed, with a one to two step coast anytime the safety
key is pulled out of the console. Replace the safety key into the slot on the front of the console, and then use the STOP/RESUME/START
button to return to normal operation.
5

CONSOLE / SCREEN DISPLAY & OPERATION
GET READY >>>>>
1. GETTING READY
READY
INITIAL SCREEN DISPLAY
Once the connections are made and the
power switch is turned on the console will
display this screen asking you to either select
an existing User Prole or create a new one.
Press CREATE USER then USER 1 will display.
Now press USER 1 to proceed.
Once you have selected or created a User
Prole, the next screen that appears is:
Caution – Liability Waiver Screens
CAUTION LIABILITY WAIVER
SCREENS
This liability waiver must be agreed to in order
to use the ThermoTread GT. There are four (4)
pages to read and click through. The nal page
conrms that you agree to the specied terms
and conditions.
After selecting the “I have read and agreed to
this liability waiver in its entirety” button, the
Mode Select Screen will appear – see next page.
6
 Loading...