

Page 1

Quick Start Guide
Version 1.0.0
Page 2

Contents
Quick Start Guide ................................................................................................................... 1
Kurzanleitung ......................................................................................................................... 5
Guía de inicio rápido .............................................................................................................. 9
Guide de démarrage rapide ................................................................................................. 13
Snelstarthandleiding ............................................................................................................ 17
Guida introduttiva ................................................................................................................ 21
Guia de Início Rápido ........................................................................................................... 25
About the Guide ................................................................................................................... 29
Page 3

Quick Start Guide
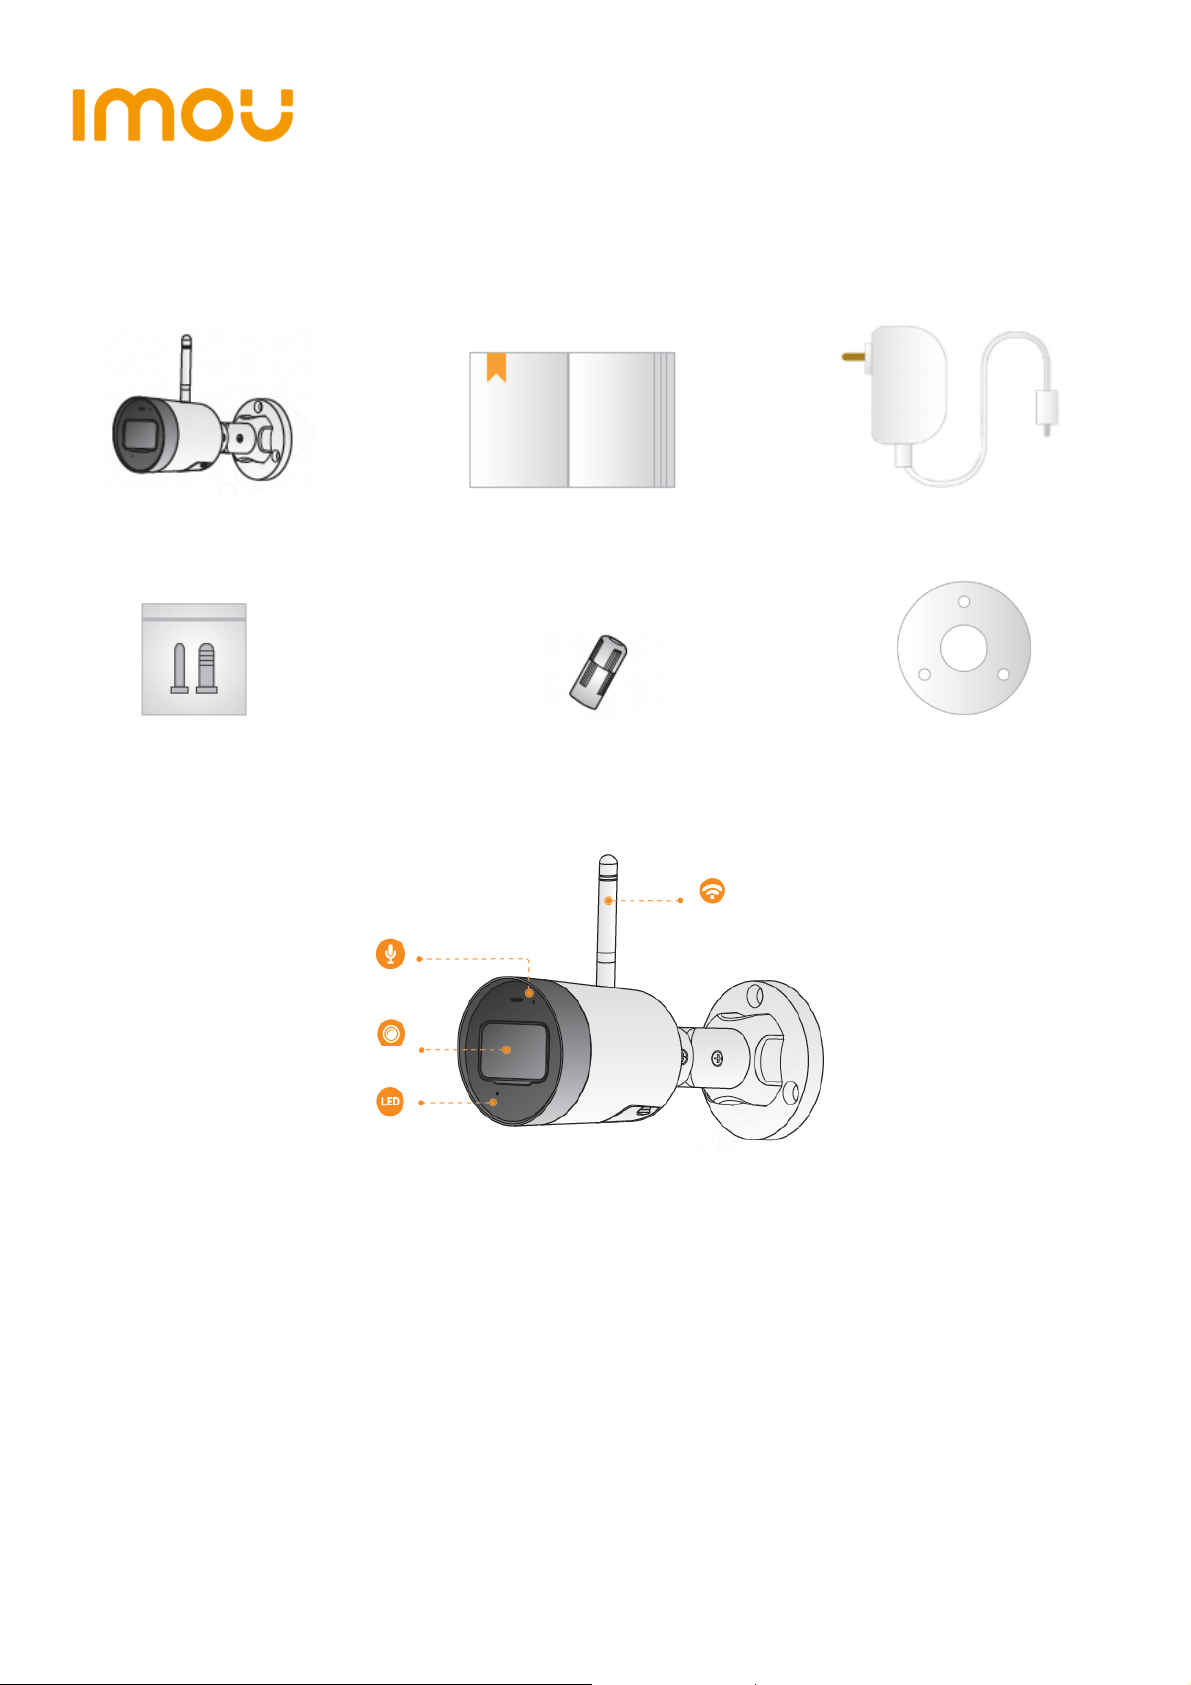
Packing List
1
Camera *1 QSG *1 Power Adapter *1
Screw Package *1 Waterproof Connector *1 Position Map *1
Camera Introduction
2
Figure 2-1
1
Page 4

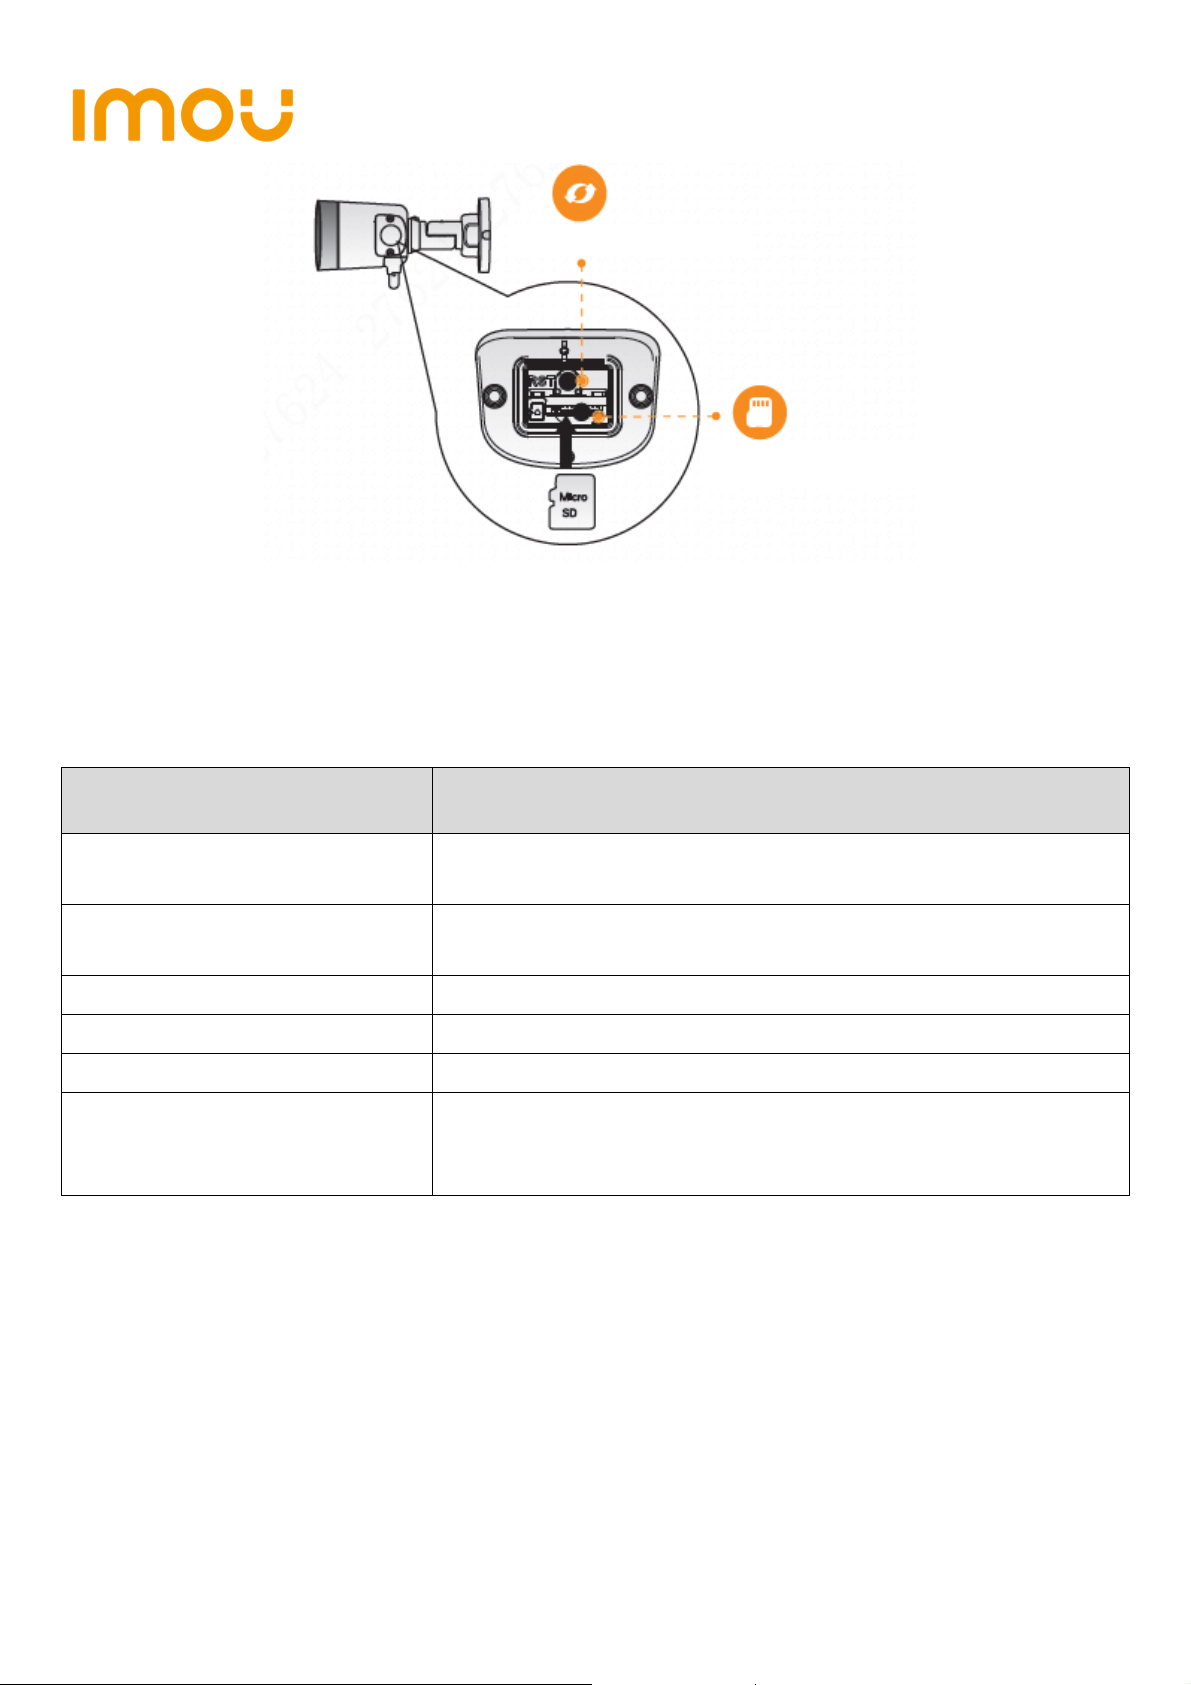
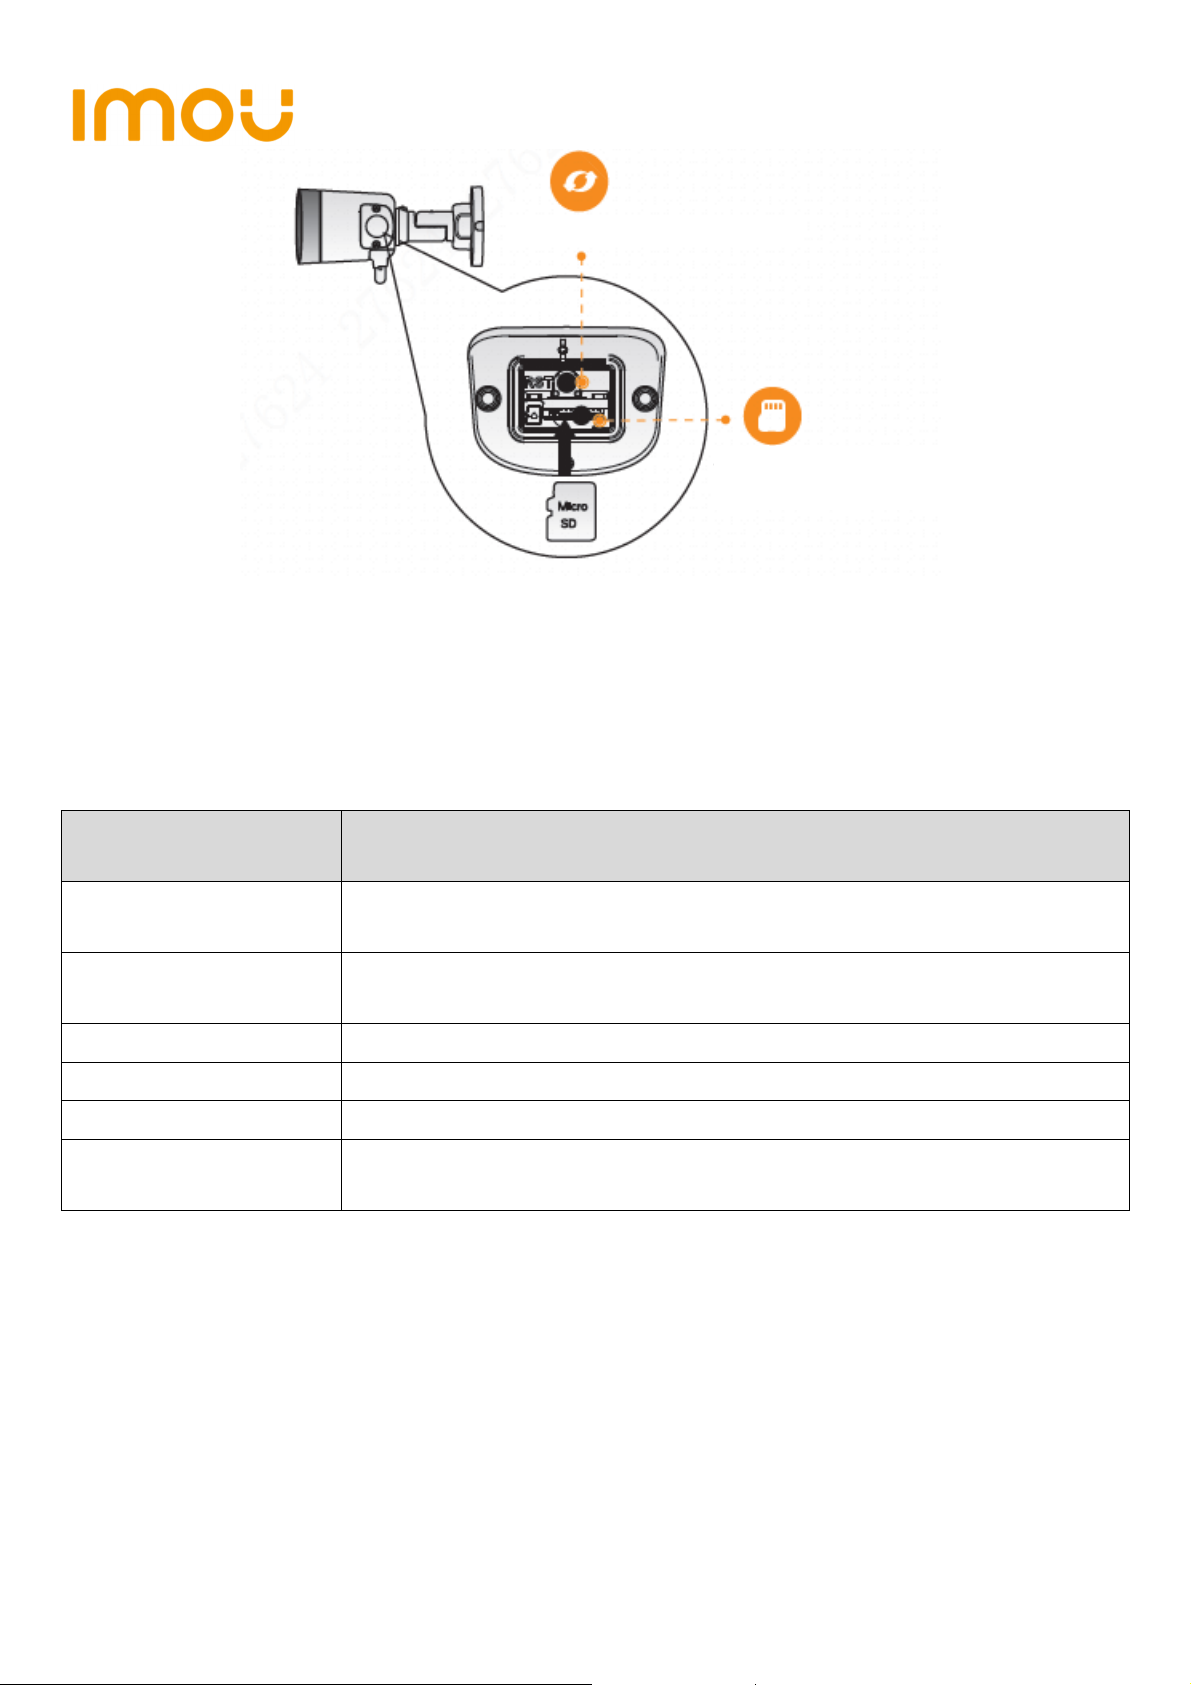
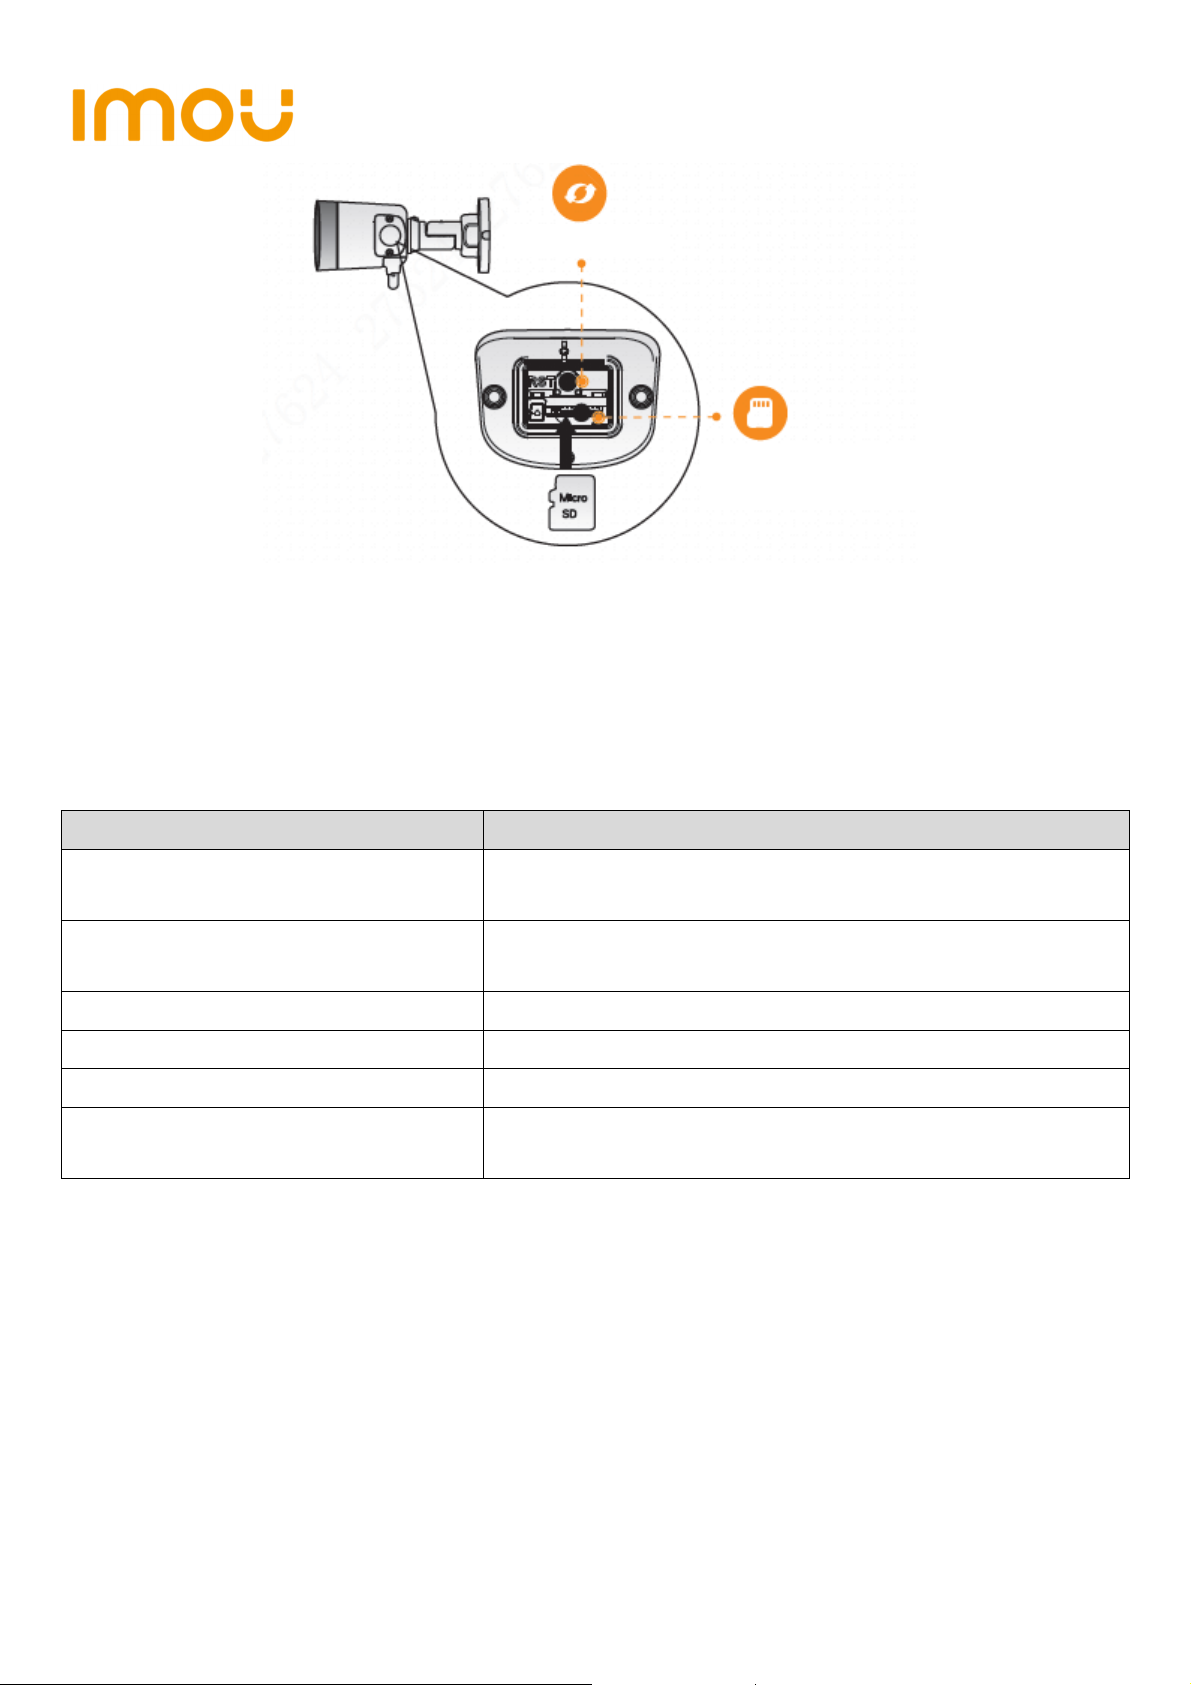
Figure 2-2
Note
Press and hold the Reset button for 10 s to reset the camera.
The pattern of the LED indicator is included in the following table.
LED Indicator Status Device status
Powered off/LED turned off
Off
Rebooting after reset
Booting
Red light on
Device malfunction
Green light flashing Waiting for network
Green light on Operating properly
Red light flashing Network connection failed
Green and Red light
Firmware updating
flashing alternately
Table 2-1
2
Page 5

Operation With Imou App
3
Step 1 Scan the following QR code or search “Imou” in Google Play or App Store
to download and install Imou App.
Step 2 Run Imou App, and then register an account for first use.
Step 3 Connect the camera to power source with the power adapter.
Step 4 Wait for booting to be finished, and then the camera indicator flashes with
green light.
Step 5 Connect your smart phone to your Wi-Fi network, and make sure your
smartphone is connected to Wi-Fi network with 2.4 GHz band, and then do
the following operations to finish adding camera.
Figure 3-1
Note
- If you have more than one camera, do step 5 to add them one by one.
- If the Wi-Fi network changed or the indicator status goes wrong,reset the
camera, and then do step 5 to add it again.
3
Page 6

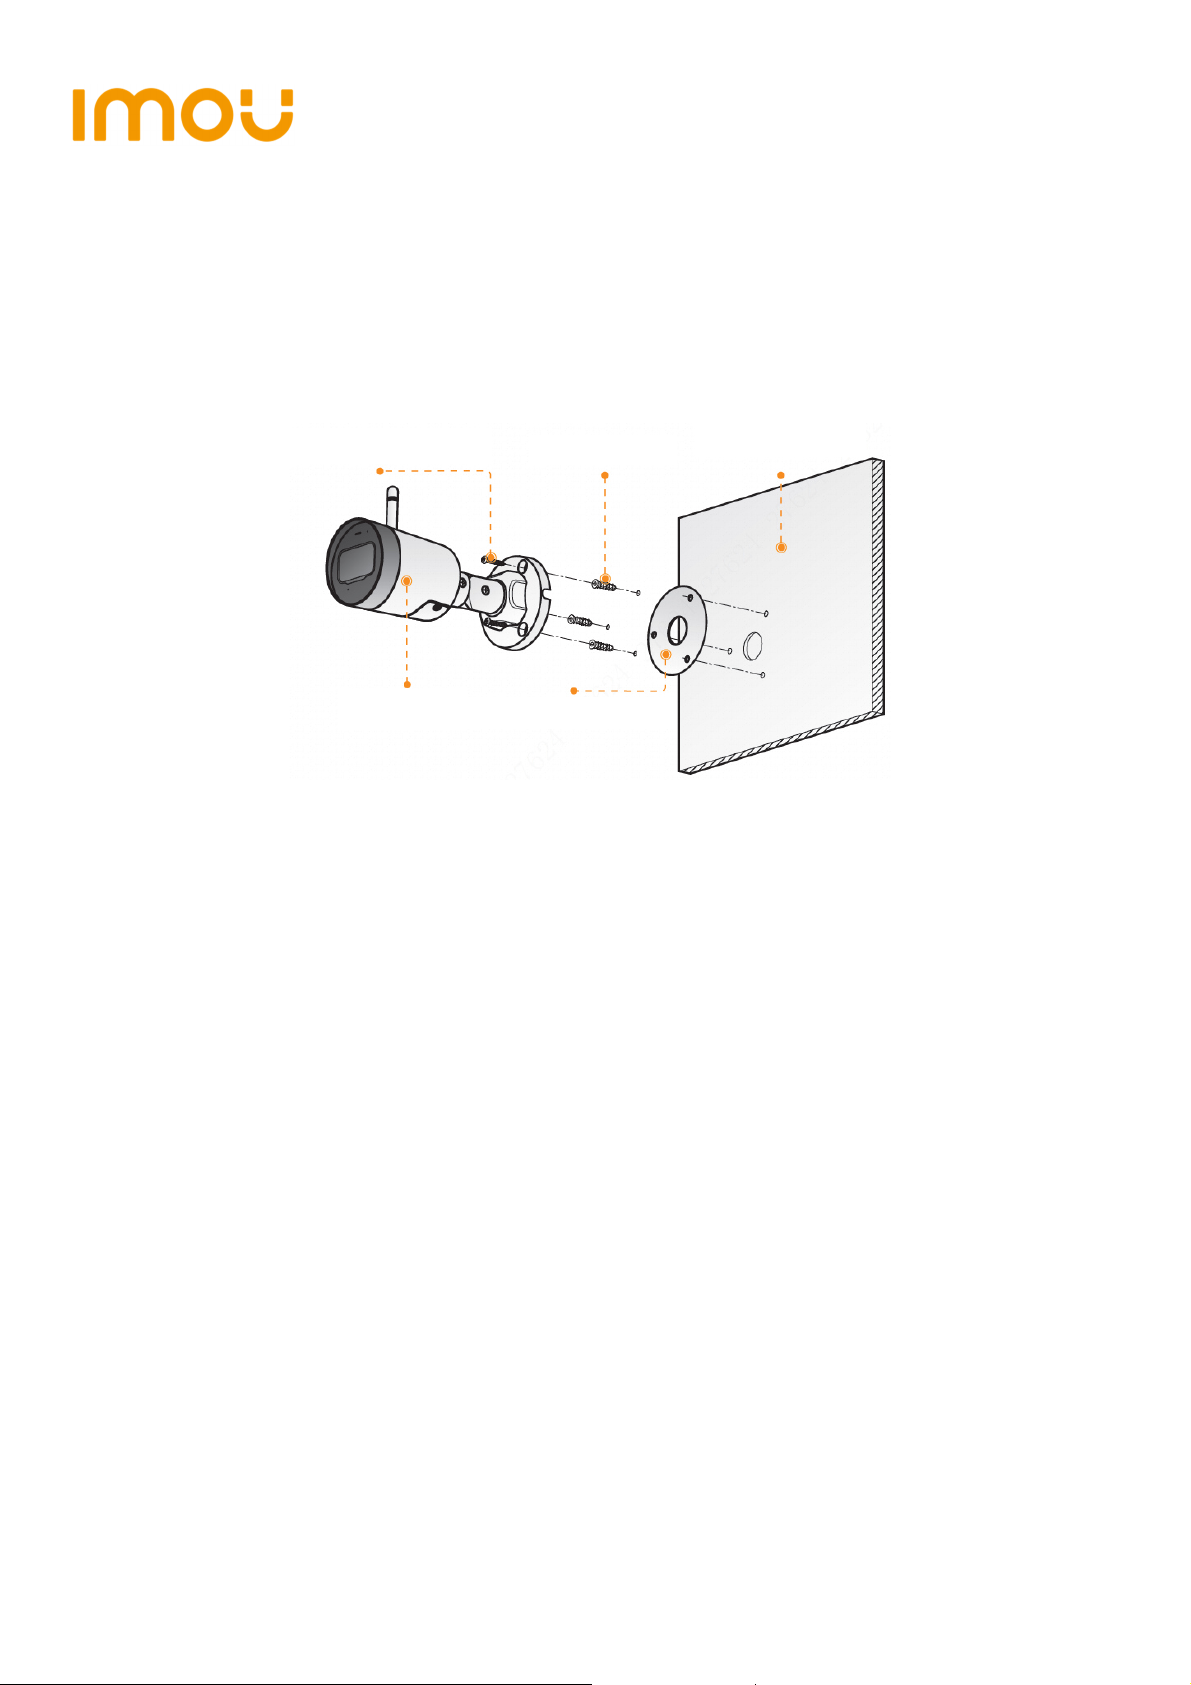
Installing Camera
4
Note: Make sure the mounting surface is strong enough to hold at least three times
of the device weight.
Figure 4-1
Step 1 Drill screw holes on the mounting surface as the positioning map shows,
and then put in the expansion bolts.
Step 2 Attach the camera pedestal to the mounting surface with the self-tapping
screws.
Step 3 Power up the camera, and then adjust the lens to the ideal angle.
4
Page 7
Objektiv
Antenne
Kurzanleitung
Lieferumfang
1
1 x Gerät 1 x Kurzanleitung 1 x Netzteil
1 x Befestigungsmaterial 1 x Wasserdichter Stecker 1 x Montageschablone
Bedienelemente und Funktionen der Kamera
2
Integriertes Mikrofon
LED Anzeige
Abbildung 2-1
5
Page 8

Rücksetztaste
microSD-Kartensteckplatz
Abbildung 2-2
Hinweis
Halten Sie die Rücksetztaste für 10 Sekunden gedrückt, um die Kamera
zurückzusetzen.
Der LED-Status ist in der nachfolgenden Tabelle dargestellt.
LED-Anzeigestatus Gerätestatus
Gerät/LED ausgeschaltet
Aus
Gerät fährt nach Rücksetzung hoch
Gerät fährt hoch
Rote LED leuchtet
Gerätestörung
Grüne LED blinkt Warten auf Netzwerkverbindung
Grüne LED leuchtet Ordnungsgemäßer Betrieb
Rote LED blinkt Netzwerkverbindung fehlgeschlagen
Grüne und rote LED blinken abwechselnd Firmware-Update
Tabelle 2-1
6
Page 9

Betrieb mit Imou-App
3
Schritt 1: Scannen Sie den nachfolgenden QR-Code oder
suchen Sie „Imou“ in Google Play oder im App Store,
um die Imou-App herunterzuladen und zu installieren.
Schritt 2: Starten Sie die Imou-App und erstellen Sie ein
Konto für die erstmalige Nutzung.
Schritt 3: Schließen Sie die Kamera über das Netzteil an der Stromquelle an.
Schritt 4: Warten Sie, bis die Kamera hochgefahren ist, die Kameraanzeige blinkt
grün.
Schritt 5: Verbinden Sie Ihr Smartphone mit Ihrem WLAN-Netzwerk und
vergewissern Sie sich, dass es über das 2,4-GHz-Band verbunden ist.
Folgen Sie anschließend den nachfolgenden Schritten, um das Hinzufügen
der Kamera abzuschließen.
Abbildung 3-1
Hinweis
- Wenn Sie mehr als eine Kamera haben, führen Sie Schritt 5 aus, um sie
nacheinander hinzuzufügen.
7
Page 10
- Wenn das WLAN-Netzwerk sich geändert hat oder der Anzeigestatus nicht
korrekt ist, setzen Sie die Kamera zurück und führen Sie Schritt 5 aus, um sie
erneut hinzuzufügen.
Kamerainstallieren
4
Hinweis: Vergewissern Sie sich, dass die Montagefläche stark genug ist, um
mindestens das Dreifache des Gerätegewichts zu halten.
Selbstschneidende Schraube
Kamera
Montageschablone
Dübel
Montagefläche
Abbildung 4-1
Schritt 1: Bohren Sie Löcher entsprechend der Montageschablone in die
Montagefläche und setzen Sie die Dübel ein.
Schritt 2: Schrauben Sie die Halterung an der Montagefläche an.
Schritt 3: Schalten Sie sie ein und richten Sie das Objektiv auf den idealen Winkel
aus
8
Page 11

Guía de inicio rápido
Contenido
1
1 cámara 1 guía de inicio rápido 1 adaptador
1 bolsa con tornillos 1 conector impermeable 1 plantilla de instalación
Presentación de la cámara
2
Antena
Micrófono incorporado
Lente
Indicador
Figura 2-1
9
Page 12
Botón de reinicio
Ranura de la tarjeta microSD
Figura 2-2
Nota
Mantenga pulsado el botón Reset durante 10 s para restablecer la cámara.
El comportamiento del indicador led se incluye en la tabla siguiente.
Estado del indicador LED Estado del dispositivo
Desconectado/LED apagado
Desactivar
Nuevo arranque después del reinicio
Arranque
Luz roja encendida
Mal funcionamiento del dispositivo
Luz verde parpadeante En espera de la red
Luz verde encendida Funcionando correctamente
Luz roja parpadeante Fallo de conexión de red
Luz verde y roja
parpadeando
Actualización de firmware
alternativamente
Tabla 2-1
10
Page 13

Funcionamiento con la aplicación Imou
3
Paso 1: Escanee el siguiente código de respuesta rápida (QR) o busque «Imou»
en Google Play o en la App Store para descargar e
instalar la aplicación Imou.
Paso 2: Ejecute la aplicación Imou y registre una cuenta si
es su primer uso.
Paso 3: Conecte la cámara a la fuente de alimentación
mediante el adaptador de corriente.
Paso 4: Espere a que finalice el arranque, momento en el cual la luz verde del
indicador de la cámara comienza a parpadear.
Paso 5: Conecte su teléfono inteligente a su red wifi, asegurándose de usar la
banda de 2,4 GHz para, luego, llevar a cabo los siguientes pasos para
terminar de agregar la cámara.
Figura 3-1
Nota
- Si tiene más de una cámara, realice el paso 5 para agregarlas una a una.
- Si ha cambiado la red wifi o el estado del indicador no funciona, restablezca la
cámara y realice el paso 5 para volver a agregarla.
11
Page 14

posicionamiento
Instalación de la cámara
4
Nota: Asegúrese de que la superficie de montaje sea lo suficientemente sólida
para soportar al menos 3 veces el peso del dispositivo.
Tornillo autorroscante
Cámara
Perno de expansión
Plantilla de
Superficie de montaje
Figura 4-1
Paso 1: Taladre los agujeros para los tornillos en la superficie de montaje según lo
indicado en la plantilla de posicionamiento. Una vez perforados, introduzca
los pernos de expansión.
Paso 2: Fije el soporte a la superficie de montaje mediante los tornillos
autorroscantes.
Paso 3: Enciéndala y ajuste el ángulo ideal de la lente.
12
Page 15

Objectif
Guide de démarrage rapide
Contenu de l’emballage
1
Appareil × 1 Guide de démarrage rapide × 1 Adaptateur d’alimentation × 1
Jeu de vis × 1 Connecteur étanche × 1 Patron d’installation × 1
Présentation de la caméra
2
Microphone intégré
Indicateur lumineux
Antenne
Figure 2-1
13
Page 16
Bouton de mise à zéro
Emplacement de la
Carte microSD
Figure 2-2
Remarque
Maintenez enfoncé le bouton de mise à zéro pendant 10 s pour réinitialiser la
caméra.
Les variantes des indicateurs lumineux sont présentées dans le tableau cidessous.
Statut de l’indicateur
Statut de l’appareil
lumineux
Appareil éteint/LED éteinte
Arrêt
Redémarrage après remise à zéro
Amorçage
Allumé en rouge
Fonctionnement défectueux de l’appareil
Clignotant en vert En attente de connexion réseau
Allumé en vert Fonctionnement normal
Clignotant en rouge Échec de connexion au réseau
Clignotant vert et
Mise à jour du micrologiciel
rouge alterné
Tableau 2-1
14
Page 17

Fonctionnement avec l’application Imou
3
Étape 1 : scannez le code QR figurant sur l’unité ou recherchez « Imou » dans
Google Play ou App Store, téléchargez et
installez l’application.
Étape 2 : exécutez l’application Imou et inscrivez-vous
pour la toute première utilisation.
Étape 3 : Branchez la caméra à l’aide de l’adaptateur
d’alimentation.
Étape 4 : patientez jusqu’à la fin du redémarrage ; l’indicateur lumineux de la
caméra clignote en vert.
Étape 5 : connectez votre smartphone à votre réseau Wi-Fi et assurez-vous qu’il y
est connecté sur une bande de 2,4 GHz. Procédez comme indiqué cidessous pour terminer l’ajout de la caméra.
Figure 3-1
Remarque
- Si vous avez plusieurs caméras, veuillez suivre l’étape 5 pour les ajouter une
par une.
- En cas de changement du réseau Wi-Fi ou de dysfonctionnement du statut de
l’indicateur lumineux, réinitialisez la caméra et répétez l’étape 5 pour l’ajouter.
15
Page 18

Vis autotaraudeuse
Installation de la caméra
4
Remarque : Assurez-vous que la surface de montage est assez solide pour
supporter le triple du poids de l’appareil.
Surface de montage
Caméra
Cheville à expansion
Patron d‘ installation
Figure 4-1
Étape 1 : perforez les trous de vissage sur la surface de montage suivant le patron
d’installation et fixez les chevilles à expansion.
Étape 2 : fixez la Support sur la surface de montage à l’aide des vis
autotaraudeuses.
Étape 3 : Puis mettez-la sous-tension. Ajustez la position de l’objectif sur l’angle
idéal.
16
Page 19

Snelstarthandleiding
Paklijst
1
Apparaat *1 Snelstartgids *1 Voedingsadapter *1
Schroevenpakket *1 Waterdichte connector *1 Positioneringskaart t.b.v. installatie *1
Inleiding camera
2
Geïntegreerde microfoon
LED-Indicator
Antenne
Lens
Afbeelding 2-1
17
Page 20

Reset
Sleuf voor micro-SD-kaart
Afbeelding 2-2
Opmerking
Houd de toets Reset gedurende 10 seconden ingedrukt om de camera te
herstellen.
Het patroon van het led-indicatielampje is in de volgende tabel opgenomen.
LED-Indicator Status Status apparaat
Uitgeschakeld/LED is uitgeschakeld
Uit
Opnieuw opstarten na reset
Opstarten
Rood lampje aan
Storing van het apparaat
Groen lampje knippert Wachten op netwerk
Groen lampje aan Werkt zoals dat moet
Rood lampje knippert Netwerkverbinding mislukt
Groene en rode lampje
Bijwerken firmware
knipperen afwisselend
Tabel 2-1
18
Page 21

Bediening met de Imou-app
3
Stap 1: Scan de volgende QR code of zoek naar "Imou" in Google Play of de App
Store om de Imou-app te downloaden en installeren.
Stap 2: Open de Imou-app en registreer dan voor het eerste
gebruik een account.
Stap 3: Sluit de camera met de lichtnetadapter aan op de
stroombron.
Stap 4: Wacht totdat het opstarten is voltooid, waarna het
indicatielampje van de camera groen knippert.
Stap 5: Verbind uw smartphone met het Wi-Fi-netwerk en zorg ervoor dat de
smartphone met het Wi-Fi-netwerk met de 2,4 GHz-band is verbonden en
voer dan de volgende handelingen uit om het toevoegen van de camera te
voltooien.
Afbeelding 3-1
Opmerking
- Als u meer dan een camera hebt, herhaal dan stap 5 om ze een voor een toe te
voegen.
19
Page 22

- Als het Wi-Fi-netwerk wijzigt of er gaat iets fout met de status van het
indicatielampje, herstel dan de camera en voer stap 5 uit om het opnieuw toe te
voegen.
Het installeren van de camera
4
Opmerking: Zorg ervoor dat het montageoppervlak sterk genoeg is om minstens
drie keer het gewicht van het apparaat te kunnen dragen.
Zelftappende Schroef
Camera
Positiebepaling kaart
Expansiebout
Montage-oppervlak
Afbeelding 4-1
Stap 1: Boor schroefgaten op het montage-oppervlak volgens de Positiebepaling
kaart en plaats dan de pluggen.
Stap 2: Bevestig de Beugel met de zelftappende schroeven aan het montage-
oppervlak.
Stap 3: Start hem dan op en stel dan de lens af op de ideale hoek.
20
Page 23

Guida introduttiva
Contenuto della confezione
1
1 Dispositivo 1 Guida introduttiva 1 Adattatore
1 Kit di viti 1 Connettore impermeabile 1 Dima adesiva
Introduzione alla telecamera
2
Antenna
Microfono integrato
Obiettivo
Indicatore LED
Figura 2-1
21
Page 24

Pulsante ripristino
Slot per scheda Micro SD
Figura 2-2
Nota
Premere e tenere premuto il pulsante Reset per 10 secondi per reimpostare la
telecamera.
Segnalazione dei LED:
Stato dell’indicatore a LED Stato del dispositivo
Spento/LED spento
Disattivo
Riavvio dopo il ripristino
Avvio
Luce rossa accesa
Malfunzionamento del dispositivo
Luce verde lampeggiante In attesa di rete
Luce verde accesa Funzionamento normale
Luce rossa lampeggiante Connessione di rete non riuscita
Le luci verde e rossa lampeggiano
Aggiornamento del firmware
alternatamente
Tabella 2-1
22
Page 25

Funzionamento con l'app Imou
3
Fase 1: Effettuare la scansione del seguente codice QR oppure ricercare "Imou" in
Google Play o App Store per scaricare e installare
l'app Imou.
Fase 2: Eseguire l'app Imou, quindi registrare un account
per il primo utilizzo.
Fase 3: Collegare la telecamera alla sorgente di
alimentazione mediante l'adattatore di alimentazione.
Fase 4: Attendere che l'avvio sia terminato, quindi l'indicatore della telecamera
lampeggerà con spia verde.
Fase 5: Collegare il proprio smartphone alla rete Wi-Fi, e assicurarsi che sia
collegato a una rete Wi-Fi con una banda a 2,4 GHz, quindi eseguire le
seguenti operazioni per terminare l'aggiunta della telecamera.
Figura 3-1
Nota
- Se si dispone di più di una telecamera, eseguire il passaggio 5 per aggiungerle
una alla volta.
23
Page 26

Vite
- Se la rete Wi-Fi è cambiata oppure lo stato dell'indicatore segnala un errore,
reimpostare la telecamera, quindi eseguire il passaggio 5 per aggiungerla
nuovamente.
Installazione della telecamera
4
Nota: Accertarsi che la superficie di montaggio sia abbastanza robusta da
sostenere almeno tre volte il peso del dispositivo.
di fissaggio
Telecamera
Tassello ad espansione
Dima di
posizionamento
Superficie di montaggio
Figura 4-1
Fase 1: Praticare dei fori per viti sulla superficie di montaggio come mostrato
dalla Dima di posizionamento, quindi inserirvi i tasselli ad espansione.
Fase 2: Fissare la Staffa alla superficie di montaggio mediante le viti.
Fase 3: Quindi accenderla, e infine regolare l'obiettivo secondo l'angolazione
ideale.
24
Page 27

Objetiva
Guia de Início Rápido
Lista da embalagem
1
Dispositivo × 1
Embalagem de parafusos × 1 Conector à prova de água × 1 Mapa de posicionamento × 1
QSG × 1
Adaptador de corrente × 1
Introdução à câmara
2
Microfone incorporado
Indicador LED
Antena
Figura 2-1
25
Page 28
Botão Reset
Ranhura para cartão
micro SD
Figura 2-2
Nota
Prima sem soltar o botão Reset durante 10 segundos para repor as definições
da câmara.
O padrão do indicador LED está incluído na tabela a seguir.
Estado do indicador LED Estado do dispositivo
Desligado/LED desligado
Desligado
Reinicializar após a reposição
Arranque
Luz vermelha acesa
Avaria do dispositivo
Luz verde intermitente À espera da rede
Luz verde acesa A funcionar corretamente
Luz vermelha intermitente Ligação à rede falhou
Luz verde e vermelha a piscar
Atualização do firmware
alternadamente
Tabela 2-1
26
Page 29

Funcionamento com a aplicação Imou
3
Passo 1: Leia o seguinte código QR ou procure por “Imou” no Google Play ou na
App Store para transferir e instalar a aplicação Imou.
Passo 2: Execute a aplicação Imou e, em seguida, registe
uma conta para a primeira utilização.
Passo 3: Ligue a câmara à fonte de alimentação com o
adaptador de corrente.
Passo 4: Aguarde até terminar de arrancar; em seguida, o indicador da câmara
piscará a verde.
Passo 5: Ligue o seu smartphone à sua rede Wi-Fi, certificando-se de que está
ligado a uma rede Wi-Fi com uma banda de 2,4 GHz e realize as operações
a seguir para terminar de adicionar a câmara.
Figura 3-1
Nota
- Se tiver mais do que uma câmara, repita o passo 5 para as adicionar uma a uma.
- Se a rede Wi-Fi tiver mudado ou o estado do indicador estiver errado, reponha
as definições da câmara e repita o passo 5 para a adicionar novamente.
27
Page 30

Instalar a câmara
4
Nota: Certifique-se de que a superfície de montagem é suficientemente forte para
suportar, pelo menos, três vezes o peso do dispositivo.
Parafuso perfurante
Câmara
Parafuso de expansão
Mapa de
posicionamento
Superfície de montagem
Figura 4-1
Passo 1: Faça furos para os parafusos na superfície de montagem, tal como
mostra a Mapa de posicionamento e, em seguida, coloque os parafusos de
expansão.
Passo 2: Fixe a Suporte à superfície de montagem com os parafusos
perfurantes.
Passo 3: Em seguida, ligue a câmara e ajuste a objetiva para obter o ângulo
ideal.
28
Page 31

About the Guide
- This quick start guide is for reference only. Minor difference might be found in
user interface.
- All the designs and software here are subject to change without prior written
notice.
- All trademarks and registered trademarks mentioned are the properties of their
respective owners.
- Please visit our website or contact your local service engineer for more
information.
- If there is any uncertainty or controversy, please refer to our final explanation.
29
Page 32

 Loading...