


IMPORTANT SAFETY INSTRUCTIONS
STRANGULATION HAZARD - Keep the adapter cord out of baby’s reach.
•NEVER place camera or cords within the cot/crib.
•The baby unit and cables should be at least 3 feet/1 meter away from children.
•Secure the cord to the wall to keep cord away from the baby’s reach.
•Never use extension cords with AC adapters. Only use the AC adapters provided.
Warning
•This baby monitor is not designed to replace responsibility of human supervision on
children.
•This baby monitor must be assembled and installed by an adult.
•This product is designed for indoor use.
•Read these instructions.
•Keep these instructions.
•Heed all warnings.
•Follow all instructions.
•Clean only with dry cloth.
•Do not use this baby monitor near water.
•Do not install this baby monitor near a heat source.
•Do not cover the baby monitor with a towel or blanket.
•Unplug this apparatus during lightning storms or when unused for long periods of
time.
•The small parts of this baby monitor can be swallowed by babies or small children.
Keep these parts out of reach of children.
•Do not touch the plug contacts with sharp or metal objects.
•Protect the power cord from being walked on or pinched, particularly at plugs,
convenience receptacles, and the point where they exit from the apparatus.
•Only use the power adapters provided. Do not use other charges or power adapters
as this may damage the device and battery pack.
Caution
•Risk of explosion if battery is replaced by an incorrect type. Dispose of used
batteries according to the instructions.
WARNING!
01

Specific services instructions and Warranty Terms
•Please retain your original dated sales receipt for your records. For warranty service
of your baby monitor, you will need to provide a copy of your dated sales receipt to
confirm warranty status.
For product related questions, please call:
•123456789
•123456789
•123456789
02
1
3
4
5
6
8
2
9
7
PRODUCT AND ACCESSORIES
•Baby unit x1
•Parent unit x1
•Rechargeable Lithium battery x1
•Power adapter for the baby unit x1 (Longer cable one)
•Power adapter for the parent unit x1 (shorter cable one)
•Screws and extension bolt x2 to mount baby unit on the wall.
•User’s guide x1
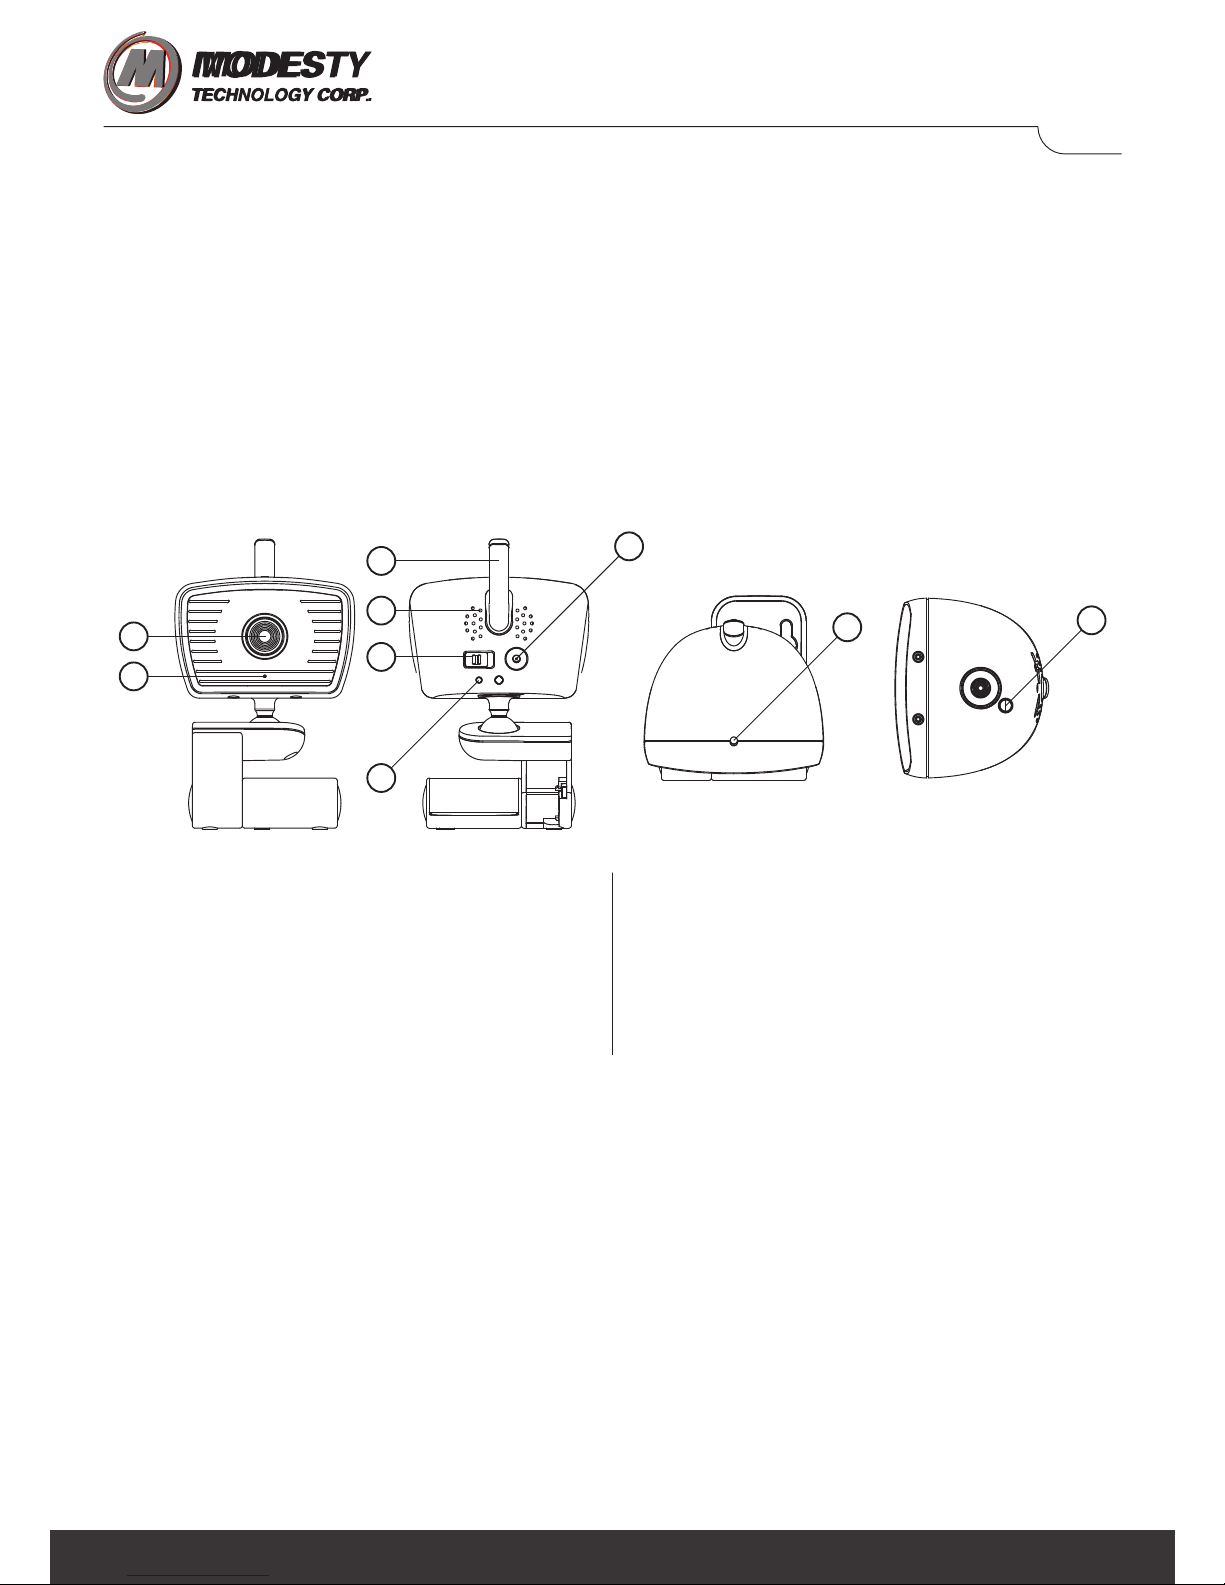
Overview of the Baby Unit
01.Camera lens
02.Photo Sensor (Night vision on/off)
03.Microphone
04.Antenna
05.Speaker
06.On/Off switch
07.Power adapter connector
08.Power LED
09.Pairing Key
(for service center use only)
03

1
2
5
7
10
11
12
9
8
15
3
4 136
14
Overview of the Parent Unit
01.Menu Key
Normal mode:
Press to enter / exit menu
Zoom in mode:
Right arrow to move image to the right
02.Talk Key
Normal mode:
Press and hold to speak to your baby
Zoom in mode:
Left arrow to move image to the left
03.Display (LCD)
04.VOX mode LED (green LED)
05.Speaker
06.Power LED
(Power on=steady green)
(Battery low=flash red)
07.Microphone
08.Zoom Key
Press to zoom in 2X
Press again to go back to 1X
Menu Mode: to switch between menu
items
09.Volume up
Normal mode:
Adjust audio level louder
Zoom in mode:
Up arrow to move image to the top
Menu mode:
to switch between menu items
10.Volume down
Normal mode:
Adjust audio level lower
Zoom in mode:
down arrow to move image to the
bottom
Menu mode:
to switch between menu items
11.Stand
12.Battery cover
13.Audio level LEDs (Blue)
14.Power adapter connector
15.Power On/Off switch
Press and hold to turn on/off parent
unit
04
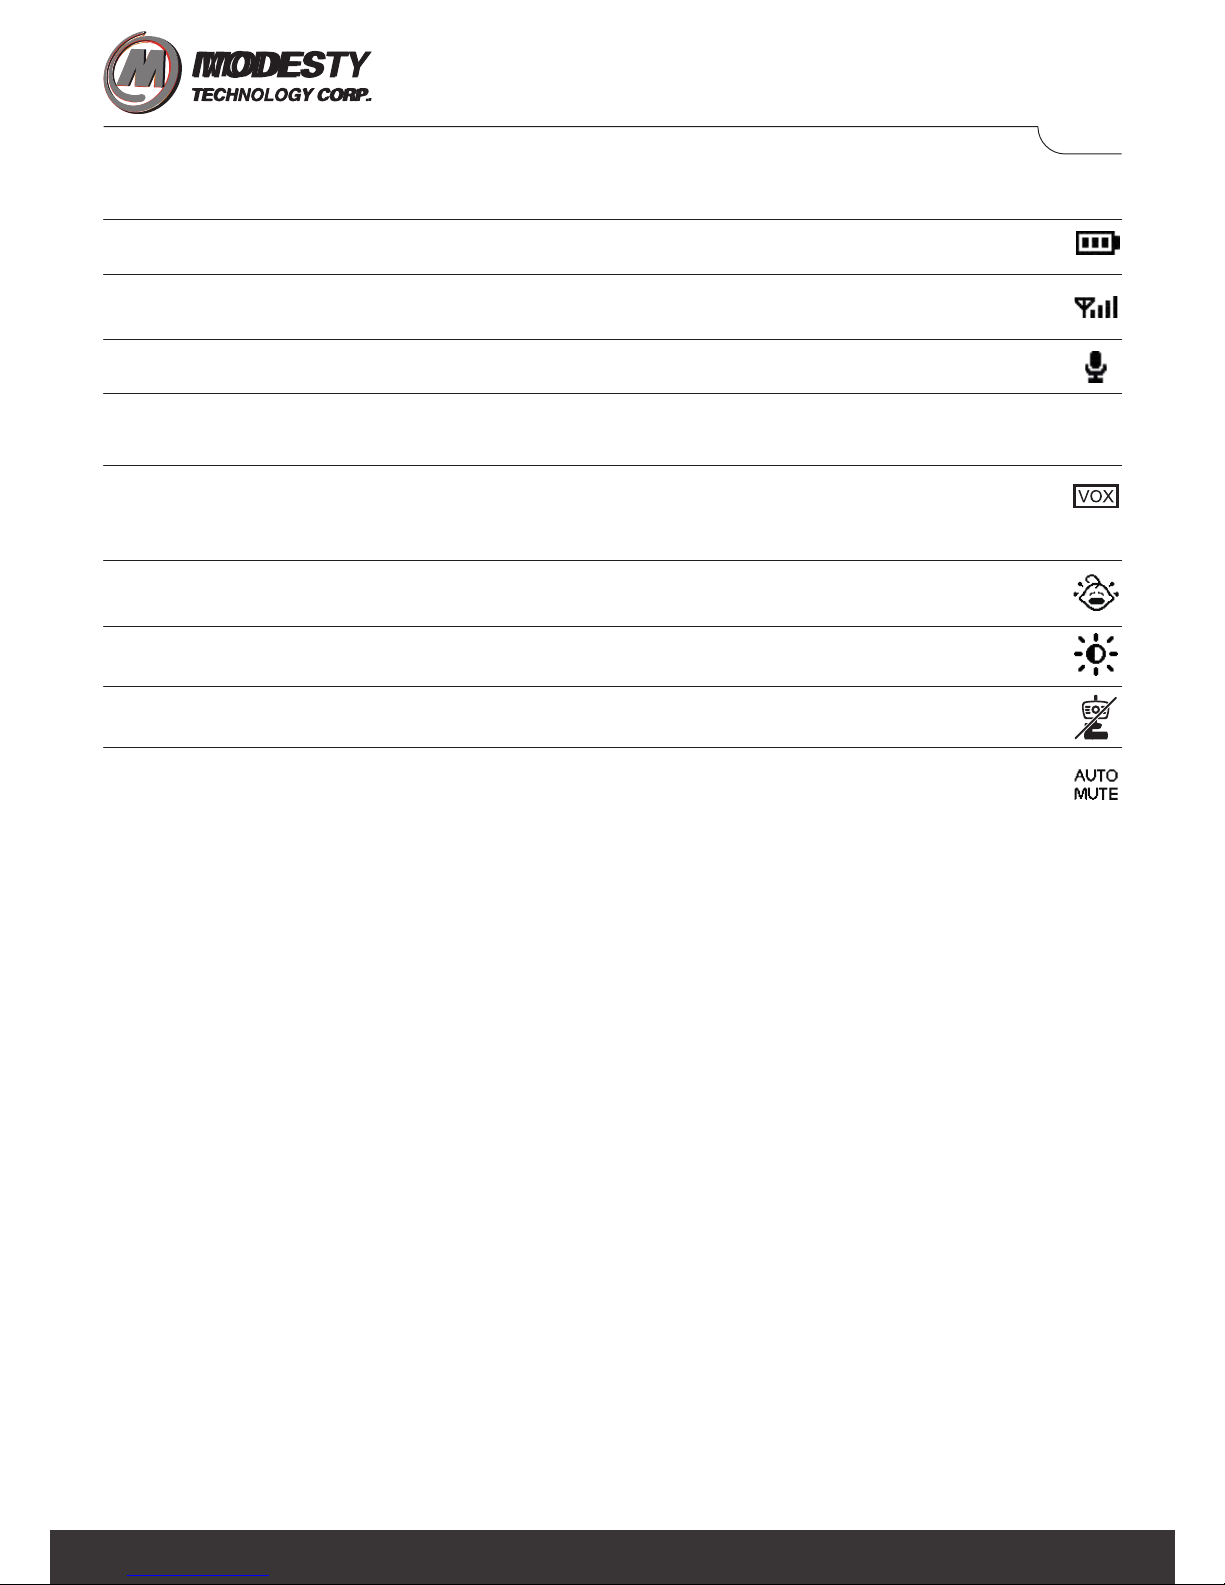
Parent Unit menu icons
Battery level (3 levels plus flashing of battery low)
Signal strength (4 levels)
Talk Mode
Night vision mode (Image becomes black/white)
VOX mode (Baby and parent unit are in sleep mode while baby sleeps. Baby
and parent unit will start streaming video and audio when baby cries.
Trigger sensitivity level (3 levels)
Brightness level (5 levels)
Out of range/Lost link alert
Auto mute on/off. Switch auto mute “on”, parent unit enters audio mute mode
automatically when baby does not make much noise. Parent unit starts to
stream audio when baby’s sound level exceeds preset sensitivity level.
05

OFF/ON
2 sec.
Getting started
Plug in baby unit power adapter
•Make sure to use provided (6V 800mA) power adapter, the longer cable one.
•Slide the switch to on position to turn on baby unit. Green power LED is turned on.
Plug in parent unit power adapter
•Make sure to use provided (6V 800mA) power adapter, the shorter cable one.
•Plug in adapter to parent unit to charge parent unit for at least 4 hours before using
the parent unit for the first time.
•Press and hold power on/off key for 2 seconds to turn on parent unit.
•Once the baby and parent units are switched on, the display on the parent unit will
show the video captured by the baby unit.
•If there is no connection or you are out of range, the video display will go off and the
LOST LINK signal will be shown on the LCD display with beep sounds every 3
seconds. Move the parent unit closer to the baby unit until the link is re-established.
06

Black
Red
Operation on rechargeable batteries
•The parent unit comes with a rechargeable Li-ion polymer rechargeable battery.
•The battery symbol flashes and power LED flash red when battery is empty.
•If the battery is completely empty, the parent unit automatically switches off and loses
contact with the baby unit.
•The rechargeable battery is inside of the parent unit. If you need replacement of
battery when battery has reached end of life, please follow the following steps:
-Slide open battery compartment lid to remove it.
-Insert the rechargeable battery with cable alignment as shown in figure.
-Reattach the lid.
•Charging normally takes 2.5 hours, but it takes longer when the parent unit is
switched on during charging. To keep charging time as short as possible, switch off
the parent unit during charging.
•When the rechargeable battery is fully charged, the parent unit can be used
approximately 10 hours if the parent unit is on VOX mode.
•The parent unit can be used approximately 5.5 hours if the parent unit’s display is
switched on continuously.
•The battery gradually discharges, even when the parent unit is switched off.
07

< 2m / 7ft
> 1m / 3.5ft
Using the baby monitor
Setting up
•Place the baby unit in a convenient location where the camera will provide the best
view of your baby in their cot/crib.
•Place the baby unit on a flat surface.
•For optimal sound detection, place the baby unit at least 1 meter (3.5 feet) away
from your baby, but no further than 2 meters (7 feet) away.
•Mount the baby unit to the wall as shown in the figure with the screws supplied.
•Adjust the baby unit’s head by rotating the camera up, down, left and right.
•Do not place the baby unit within baby’s reach. If the signal is weak, try moving the
parent and/or the baby unit to different positions in the rooms.
Night vision mode
•The baby unit has 8 pcs infrared LEDs for picking up clear images in the dark.
When the built-in photo sensor detects a low level of ambient light, the LEDs will
automatically activate. The image on the LCD display becomes black and white
when night vision mode is activated.
08

Talk mode
•Press and hold the TALK key on the parent unit to talk to your baby through
baby unit’s speaker.
Adjust speaker volume
•Press Volume up key to increase volume on parent unit.
•Press Volume down key to decrease volume on parent unit.
•There are 8 levels for volume level adjustment. When volume level equals to 0,
Parent unit is muted.
NOTE: If the volume is set to a high level, the parent unit consumes more power.
Virtual Zoom in
•Press Zoom in key to zoom image to 2 X. Press again to go back to default 1X.
•When parent unit is in 2X zoom mode, you can press “talk” to pan to the left;
press “menu” to pan to the right; press “volume up” to tilt to the top; press
“volume down” to tilt to the bottom.
09

ON
OFF
1 5
Brightness adjustment
•Press menu key to enter menu mode.
•Select “brightness icon” then press “Zoom key” to enter brightness adjustment.
•Press volume up key to increase brightness.
•Press volume down key to decrease brightness.
•There are 5 levels for brightness level adjustment.
Auto Mute mode
•Auto mute mode is designed to make parent unit completely silent when baby does
not cry. Audio automatically streams again when baby’s sound exceeds the desired
activation level. If you select Auto mute mode on, please also select the desired
level of activation sensitivity to stream audio to parent unit when baby needs help.
•Press menu key to enter menu mode.
•Default setting is Auto Mute “on”.
•Select “Auto mute icon” then press “zoom key” to de-select/select Auto Mute
mode.
10

OFF ON
VOX mode
•VOX mode is designed to reduce RF emission when baby is not crying. This mode
also saves the battery life of parent unit. If you select VOX mode on, please also
select the desired level of activation sensitivity to activate baby and parent unit when
baby needs help.
•Press menu key to enter menu mode.
•Default setting is VOX “off”.
•Select “VOX icon” then press “zoom key” to select/de-select VOX mode.
•VOX mode LED blinks green when VOX mode is selected.
•When the baby unit detects a sound, the video display on the parent unit
automatically goes on to show the baby. When no new sound is detected for
30 seconds, the video display goes out again.
11

High Medium Low
Activation Sensitivity adjustment
•When you select VOX mode to switch off baby and parent unit, you have to decide
a desired level which will activate baby and parent unit again. You do not want to
miss the baby crying.
•Press Menu key to enter menu mode.
•Press Zoom key to enter activation sensitivity adjustment.
•Press Volume up /down key to adjust sensitivity level.
•Low sensitivity means that the baby has to cry louder to activate the baby unit.
•Medium sensitivity means that the baby makes a moderate sound to activate
baby unit.
•High sensitivity means that the baby makes a tiny sound to activate baby unit.
•This sensitivity level is set and shared by VOX mode and Auto Mute mode”.
NOTE
Distance between baby and baby unit affects the sound level picked up by baby unit.
Please confirm the location of your baby unit first, then, adjust the sensitivity level you
desire. When the distance between baby and baby unit changes, please set the
sensitivity level again.
12

Disposal of the device
•At the end of the product lifecycle, you should not dispose of this
product with normal household waste. Take this product to a
collection point for the recycling of electrical and electronic equipment.
The symbol on the product, user’s guide and /or box indicates this.
•Dispose of the battery pack in an environmentally-friendly manner according to your
local regulations.
•Please contact your local authorities in case you need more information on the
collection points in your area.
13

Help
Interference
•If the signal is weak, try moving the parent and/or baby unit to different positions in
the rooms.
•Use of other 2.4Ghz devices, such as WIFI router, Bluetooth products or microwave
ovens may cause interference with this baby monitor. Please put this baby monitor
at least 1 meter(4 feet) from these wireless devices.
•Close proximity of the baby and parent unit will causes echo and audio feedback.
Please keep baby unit and parent 2 meters (8 feet) apart from each other.
No Video
•Running out of battery? Charge parent unit again. Make sure Baby unit power LED
is turned on.
•VOX mode? Check whether VOX mode LED is turned on. Press any button to
activate baby monitor or select VOX mode off from menu.
No Audio
•Running out of battery? Charge parent unit again. Make sure Baby unit power LED
is turned on.
•VOX mode? Check whether VOX mode LED is turned on. Press any button to
activate baby monitor or select VOX mode off from menu.
•Auto mute mode? If auto mute is selected “ON”, Parent unit will stream audio when
baby’s sound exceeds selected sensitivity level. Switch auto mute off or select
sensitivity level to your desired one.
•Pressing Talk Key. When you press Talk Key, you can speak to your baby. Release
the Talk Key and you can hear baby’s voice again.
EC Declaration of Conformity
EMC
•TP13020072-ETS
•VERI TS13020048-EME
•VERI TS13020049-EME
The product is labelled with the European Approval Marking CE as show. Any
Unauthorized modification of the product voids this Declaration.
14

FCC Declaration of Conformity
FCC ID : 2AAGOMB920T
2AAGOMB920R
•Warning : Changes or modifications to this unit not expressly approved by the party
responsible for compliance could void the user’s authority to operate the equipment.
•NOTE : This equipment has been tested and found to comply with the limits for a
Class B digital device, pursuant to Part 15 of the FCC Rules. These limits are
designed to provide reasonable protection against harmful interference in a
residential installation. This equipment generates, uses and can radiate radio
frequency energy and, if not installed and used in accordance with the instructions,
may cause harmful interference to radio communications.
However, there is no guarantee that interference will not occur in a particular
installation. If this equipment does cause harmful interference to radio or television
reception, which can be determined by turning the equipment off and on, the user is
encouraged to try to correct the interference by one or more of the following
measures:
Reorient or relocate the receiving antenna.
Increase the separation between the equipment and receiver.
Connect the equipment into an outlet on a circuit different from that to which the
receiver is connected.
Consult the dealer or an experienced radio/TV technician for help.
•This device complies with Part 15 of the FCC Rules. Operation is subject to the
following two conditions:
1.this device may not cause harmful interference, and
2.this device must accept any interference received, including interference that may
cause undesired operation.
FCC Radiation Exposure Statement
This equipment complies with FCC radiation exposure limits set forth for an uncontrolled
environment. This equipment should be installed and operated with minimum distance
20 cm between the radiator & your body.
15
 Loading...