

Page 1
Installation and Operating Manual
Slew Drives
WD-L, WD-H, SP-L, SP-I, SP-M, SP-H
IO SD 1.00
Read the operating manual prior to starting all work!
Page 2

© IMO Antriebseinheit GmbH & Co. KG
Gewerbepark 16
91350 Gremsdorf, Germany
Tel.: +49 9193 6395-20
Fax: +49 9193 6395-2140
email: slew.drives@goimo.com
Internet: www.goimo.com
Customer Service:
Tel.: +49 9193 6395-2200
email: service@goimo.com
This operating manual provides important instructions for working
with the component. The specified instructions must be precisely
followed, to protect yourself and others.
Inform yourself of the locally applicable accident prevention
regulations and the general safety regulations.
The operating manual must be carefully read prior to starting any
work! It is a component of the product and must be kept in the
immediate vicinity of the component. It must be accessible to
personnel at all times.
If this component is provided to a third party ensure that the
operating manual is provided with the component.
The illustrations in this manual are provided for the purpose of
better understanding. They are not necessarily true to scale and
can deviate from the actual design of the component.
2
Page 3

Slew Drives
Table of contents
1 Structure and function..................................................5
1.1 Brief description ........................................................ 5
1.2 Overview ..................................................................5
1.2.1
WD-L series (light series)............................. 5
1.2.2
WD-H series (heavy series).......................... 6
1.2.3
SP series.....................................................7
1.3 Intended use............................................................. 8
2 General .........................................................................9
2.1 Explanation of symbols .............................................. 9
2.2 Limitation of liability .................................................. 9
2.3 Copyright................................................................ 10
2.4 Original IMO parts ................................................... 10
2.5 Customer Service .................................................... 11
3 Safety..........................................................................12
3.1 Safety devices ......................................................... 12
3.2 Special dangers ....................................................... 12
3.3 Responsibility of the customer.................................. 13
3.4 Personnel requirements ........................................... 14
3.5 Personal protective equipment ................................. 14
4 Transport, packaging, and storage.............................16
4.1 Safety instructions for transport ............................... 16
4.2 Transport................................................................ 16
4.3 Transport inspection/incoming goods inspection........ 18
4.4 Packaging ............................................................... 19
4.5 Symbols on the packaging ....................................... 19
4.6 Storage................................................................... 20
5 Installation and commissioning .................................21
5.1 Safety..................................................................... 21
5.2 Preparation ............................................................. 22
5.2.1
Lubricating prior to commissioning ............. 22
5.2.2
Cleaning the slew drive and mounting
structure................................................... 22
5.2.3
Determination of flatness deviation, and
perpendicularity deviation and deformation
of the mounting structure .......................... 23
5.2.4
Selecting the mounting elements ............... 26
5.2.5
Tightening bolts with a torque wrench........ 27
5.2.6
Tightening bolts with a hydraulic bolt-
tensioning cylinder .................................... 28
5.3 Installing the slew drive ........................................... 30
5.3.1
Hardness gap............................................ 30
5.3.2
Positioning the slew drive .......................... 30
3
Page 4

Slew Drives
Table of contents
5.3.3
Bolting the slew drive ................................31
5.3.4
Determining the tilting clearance ................33
5.3.5
Determining the circumferential backlash ....34
5.4 Function test ...........................................................35
6 Maintenance ...............................................................36
6.1 Safety .....................................................................36
6.2 Cleaning..................................................................37
6.3 Maintenance schedule ..............................................37
6.4 Maintenance tasks ...................................................39
6.4.1
Inspecting the mounting bolts ....................39
6.4.2
Checking the tilting clearance .....................39
6.4.3
Checking the circumferential backlash.........40
6.4.4
Lubricating the slew drive ..........................41
6.4.5
Inspecting the seals ...................................42
6.5 Measures after successful maintenance.....................42
7 Dismantling.................................................................43
7.1 Safety .....................................................................43
7.2 Dismantling .............................................................44
7.3 Disposal ..................................................................44
8 Technical data – Type plate ........................................45
4
Page 5
Slew Drives
Structure and function
1 Structure and function
1.1 Brief description
Slew drives are used for concurrent transmission of axial and radial
forces, as well as transmission of tilting moments. Slew drives
consist of a ball or roller slewing ring, hydraulic or electric drives,
and a completely enclosing housing. Force is transmitted to the
mounting structure through bolts. For this purpose through holes
1.2 Overview
1.2.1 WD-L series (light series)
or threads are provided in the inner and outer ring.
Series WD slew drives are designed with worm gear. Series SP
slew drives are designed with spur gear and straight toothing.
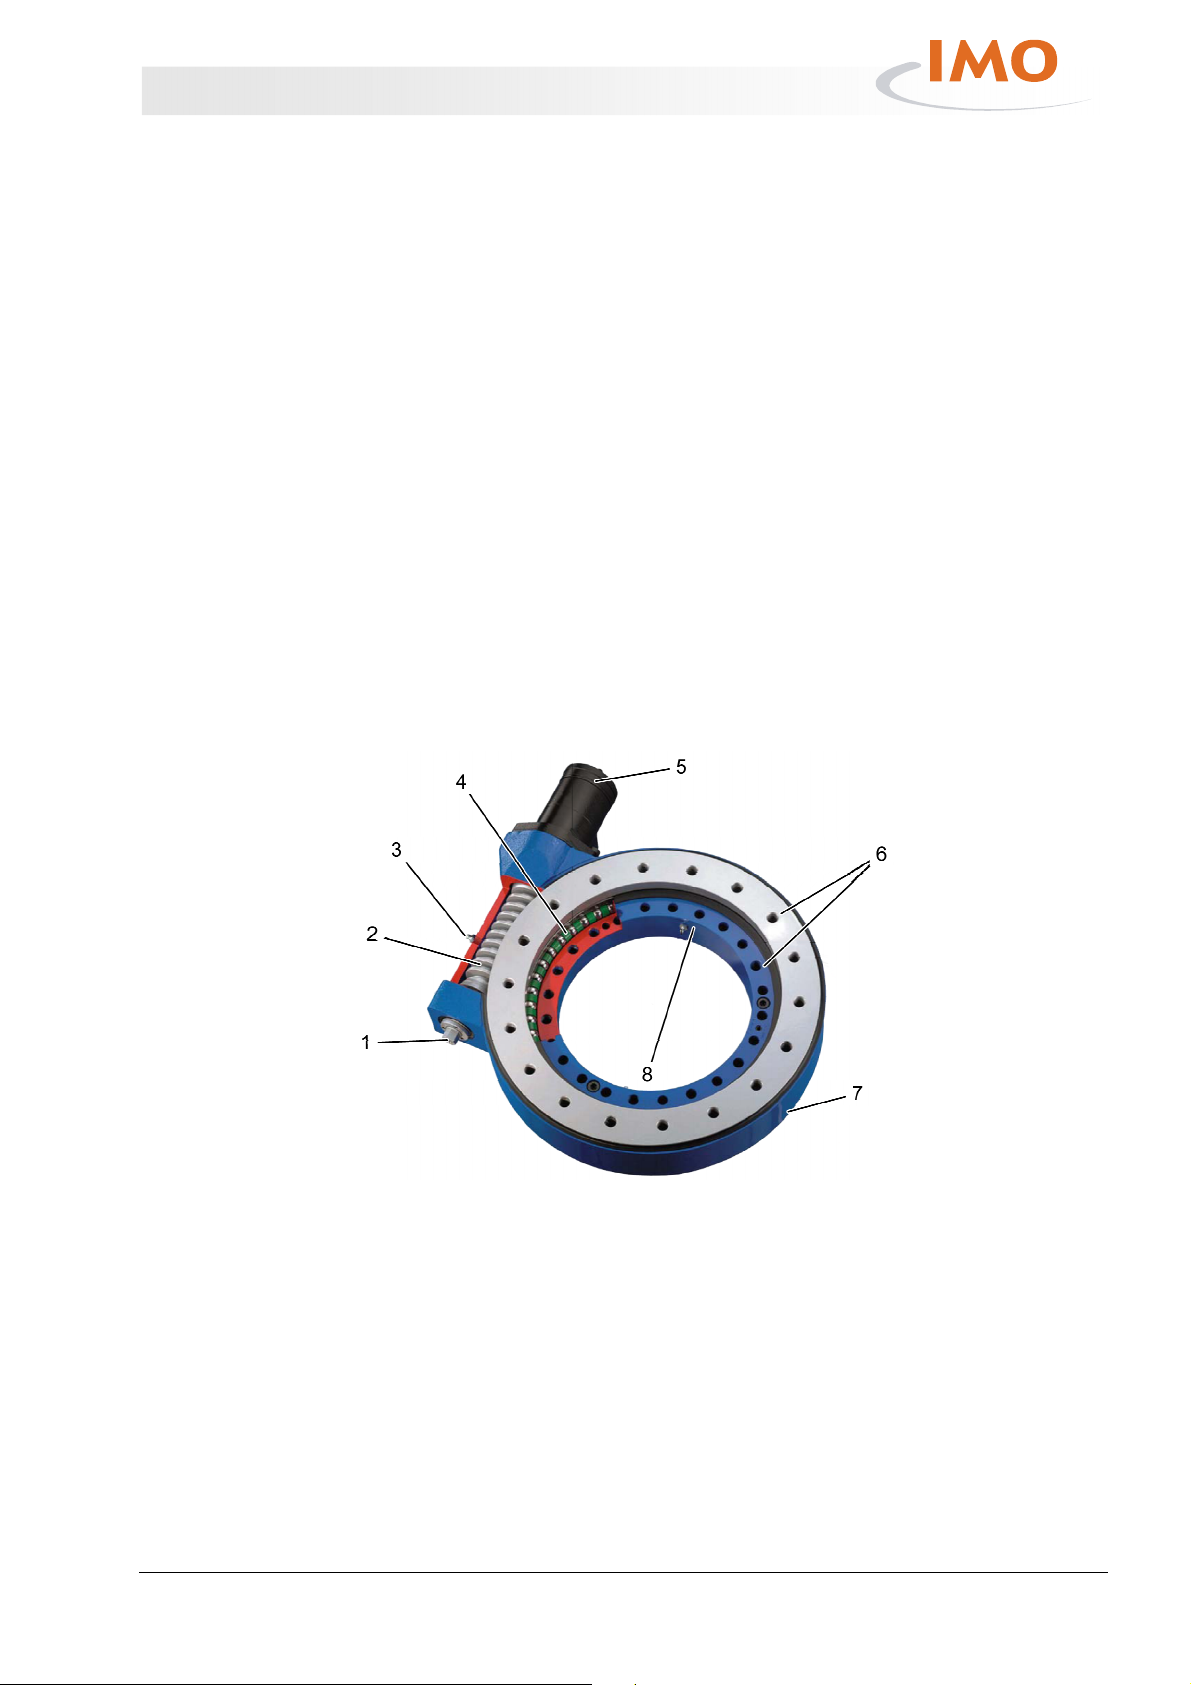
The lighter series is designated as the WD-L series. The drive
motor (hydraulic/electric) is optional. Additional optional
components are potentiometers, permanent brake or front-end
brake.
Fig. 1: Slew drive WD-L
1 Connection for options: Potentiometer,
permanent brake or front-end brake
2 Worm shaft
3 Lubricating nipple
4 Ball slewing ring
5 Option: Drive motor
6 Bolted unions for the mounting structure
7 Housing
8 Lubricating nipple
5
Page 6
Slew Drives
Structure and function
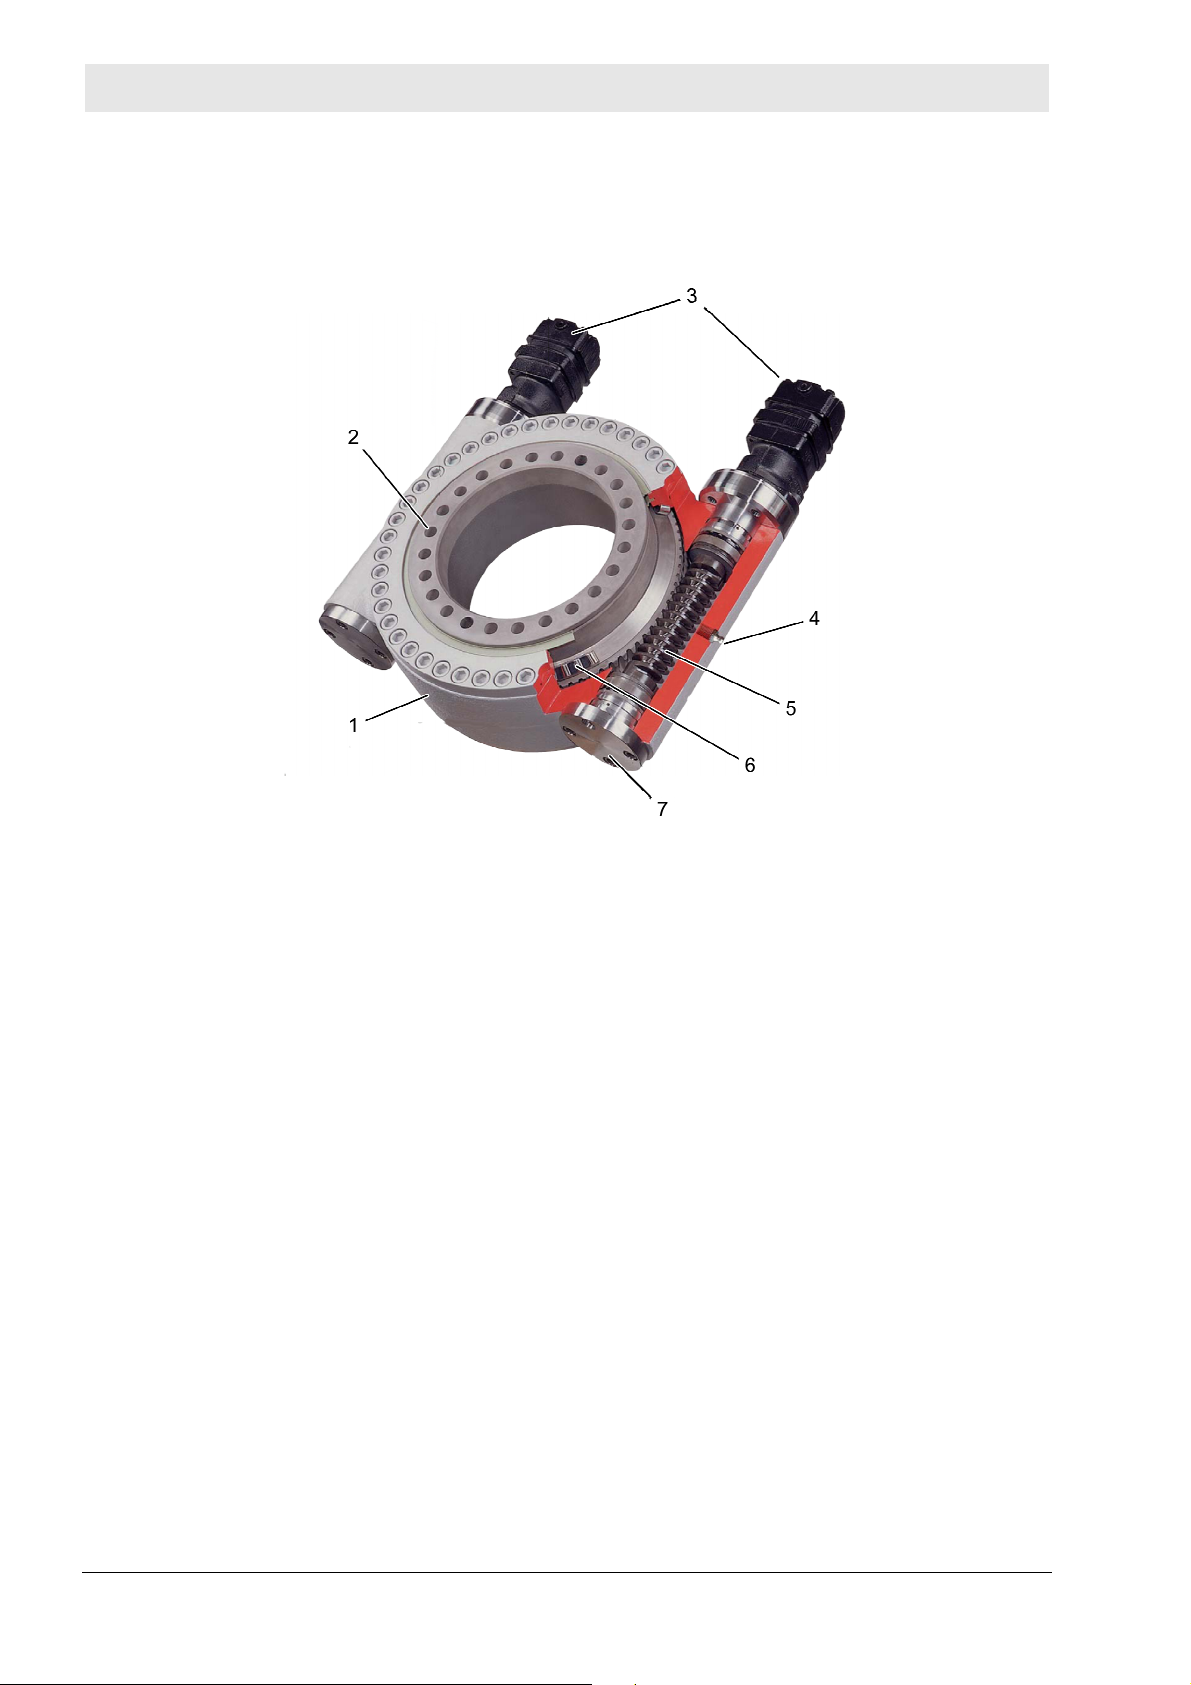
1.2.2 WD-H series (heavy series)
The heavy series is designated as the WD-H series. The drive
motors (hydraulic/electric) are optional. Additional optional
components are potentiometers, permanent brake or front-end
brake.
Fig. 2: Slew drive WD-H
1 Housing
2 Bolted unions for the mounting structure
3 Option: Drive motors
4 Lubricating nipple
5 Worm shaft
6 Roller slewing ring
7 Connection possibility for add-on parts
6
Page 7
Slew Drives
Structure and function
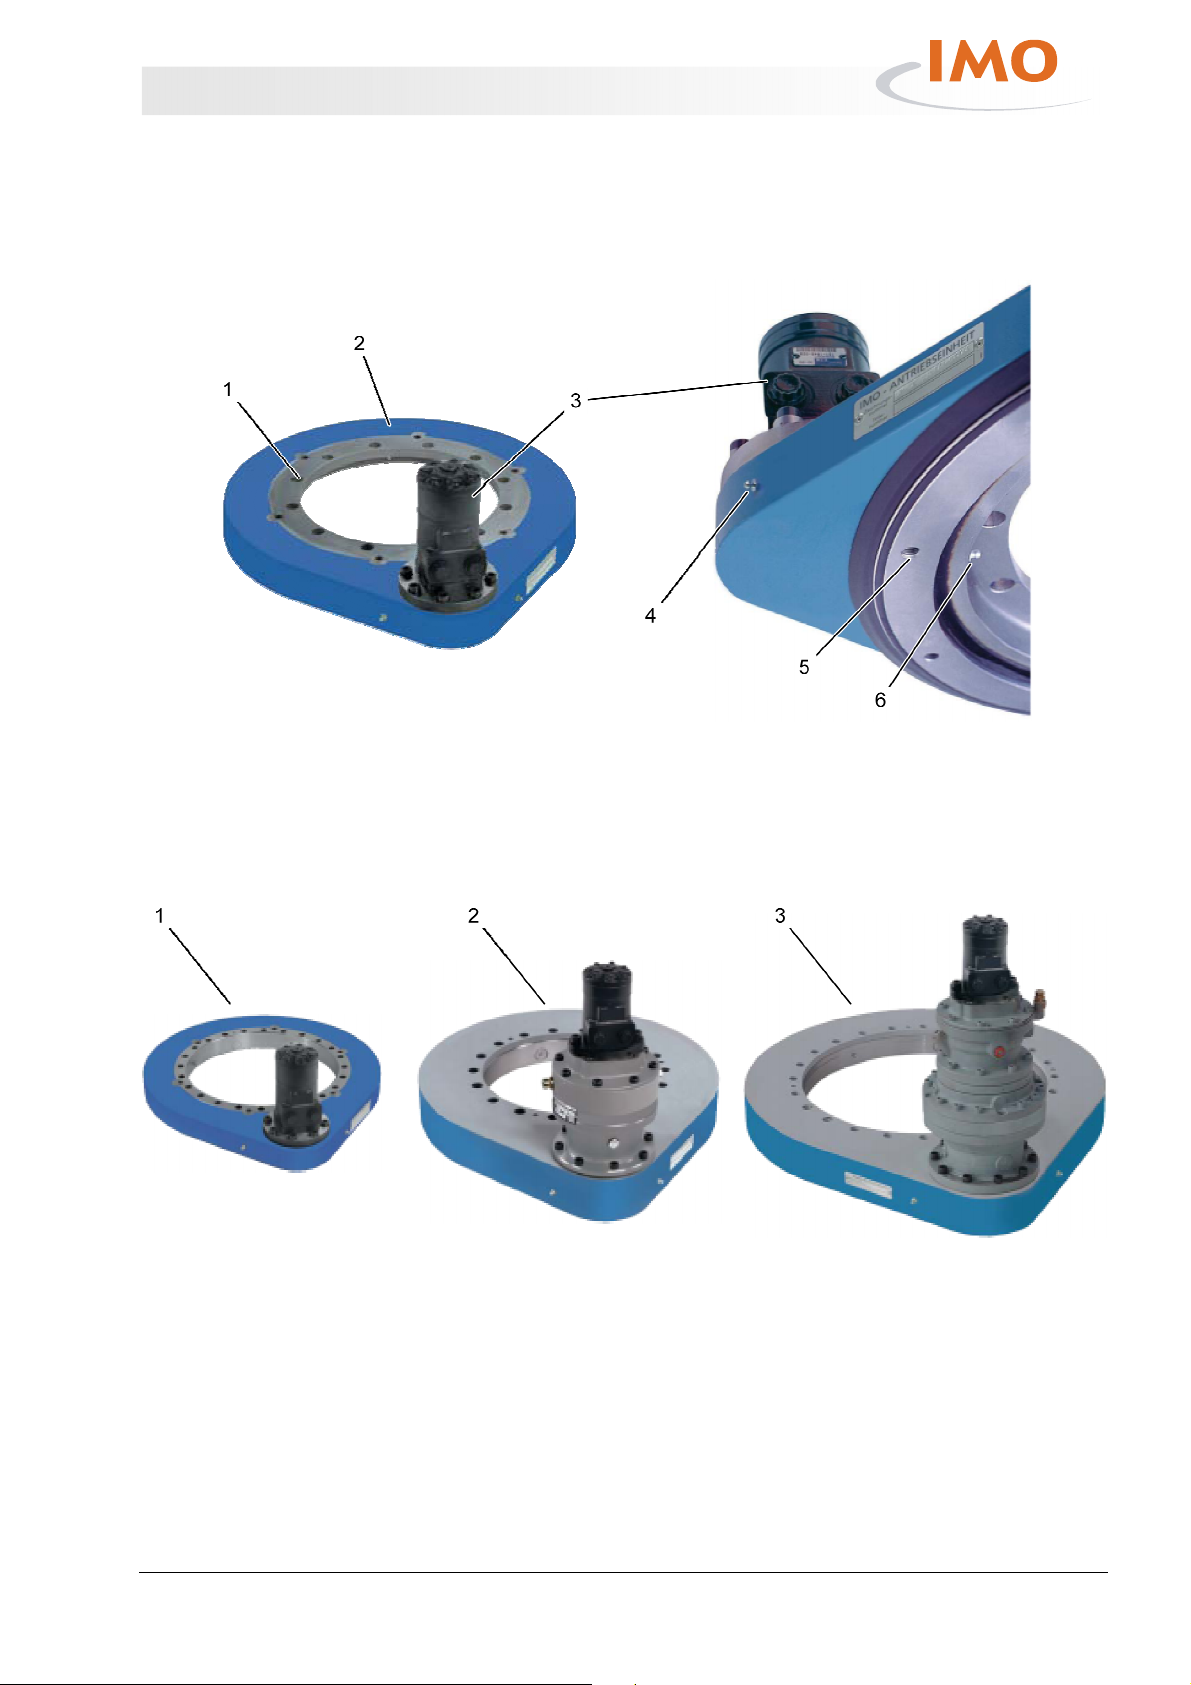
1.2.3 SP series
SP-L, light version
The SP slew drive is powered by a pinion gear unit. The drive
motor (hydraulic/electric) is optional.
Fig. 3: Slew drive SP-L, light version
1 Bolted unions for the mounting structure
2 Housing
3 Drive motors
Additional versions
Fig. 4: Additional SP slew drives
1 SP-I, reinforced version
2 SP-M, medium version
3 SP-H, heavy version
4 Lubricating nipple for tooth mesh
5 Bolted unions for the mounting structure
6 Lubricating nipple for raceway
7
Page 8

Slew Drives
Structure and function
1.3 Intended use
WARNING
WARNING
WARNINGWARNING
The component is not designed for use in potentially
explosive atmospheres. Misuse of the component may
cause dangerous situations.
The component has been designed and manufactured exclusively
for the use according to this Installation and Operating Manual.
The slew drive is used
as a drive for generating a rotary movement as well as the
absorption of radial, axial forces and tilting moments. For
example it is used as steering gear for crane undercarriages,
manlift platforms, construction machines, mining and
tunneling.
Modification, retooling, or changing the construction or individual
parts of the equipment with the objective of changing the area of
application or usability of the component is not permitted, as this is
not considered intended use.
Claims of any type due to damage arising from improper use are
excluded.
The customer is solely liable for all damage in the case of improper
use.
8
Page 9

Slew Drives
General
2 General
2.1 Explanation of symbols
Warnings
Warnings in this operating manual are indicated by a warning
symbol () and/or signal words. The scope of the hazard is
described by signal words.
The warnings must be strictly heeded; you must act prudently to
prevent accidents, personal injury, and material damage, as well
as life-threatening danger.
Warning symbol / signal word Explanation
DANGER
or
DANGER!
DANGER!
DANGER!DANGER!
WARNING
or
WARNING!
WARNING!
WARNING!WARNING!
CAUTION
or
CAUTION!
CAUTION!
CAUTION!CAUTION!
IMPORTANT
or
IMPORTANT!
IMPORTANT!
IMPORTANT!IMPORTANT!
Indicates an imminent dangerous situation that can
result in death or serious injury if it is not avoided.
Indicates a possible dangerous situation that can
result in death or serious injury if it is not avoided.
Indicates a possible dangerous situation that can
result in minor injury if it is not avoided.
Indicates a possible dangerous situation that can
result in material damage if it is not avoided.
Tips and recommendations Explanation
Indicates useful tips and recommendations as well
as information for efficient and trouble-free
operation.
2.2 Limitation of liability
All information and instructions in this operating manual have been
provided under due consideration of applicable guidelines, the
current state of technology, as well as our many years of
experience.
The manufacturer assumes no liability for damages due to:
Failure to follow the instructions in this manual
Non-intended use
Deployment of untrained personnel
Unauthorized conversions
Technical changes
Use of non-approved spare parts
The actual scope of delivery can vary from the explanations and
graphic representations provided in this manual in the case of
special versions, if supplemental order options are desired, or on
the basis of the latest technical changes.
9
Page 10

Slew Drives
General
2.3 Copyright
In all other respects the agreed obligations in the delivery contract,
the general terms and conditions, as well as delivery conditions of
the manufacturer, and the statutory regulations valid at the time
the contract was concluded, apply.
We reserve the right to make changes in the interest of
enhancements and improvement of the performance
characteristics.
© Copyright 2010, IMO Antriebseinheit GmbH & Co. KG
The information contained in this operating manual and/or in all
parts, sub-sections, or sections of this manual is the intellectual
property of IMO Antriebseinheit GmbH & Co. KG, and is subject to
German and international copyright legislation and other laws that
protect intellectual property.
The information contained in this manual is provided as in aid in
operating, maintaining, and eliminating faults of the units
described here.
2.4 Original IMO parts
WARN
WARNIIIING
WARNWARN
NG
NGNG
Duplication, reproduction, translation, microfilming, storing in
electronic or magnetic form, imitation, or forwarding of these
materials and/or the information contained without the previous
written consent of IMO Antriebseinheit GmbH & Co. KG, is strictly
prohibited.
All rights and legal remedies remain expressly reserved.
Actions to the contrary will be prosecuted.
IMO Antriebseinheit GmbH & Co. KG assumes no liability for
improper use of the information contained here by persons or legal
entities, regardless of the location.
IMO Antriebseinheit GmbH & Co. KG reserves the right at any time
and regardless of reason, to change or modify the information
contained here, as well change and modify the system itself, with
or without prior notice.
Only use original IMO parts! Use of non-authorized, wrong,
or defective spare parts may cause damage, and failures,
or may impair the safety of the device and thus cause
severe or fatal injuries.
Purchase original IMO parts from authorized dealers or direct from
the manufacturer ( page 2).
10
Page 11

Slew Drives
General
2.5 Customer Service
Our customer service is available for technical information
( page 2).
Our employees are always interested in new information and
experiences associated with the application, and which could prove
valuable in improving our products.
11
Page 12

Slew Drives
Safety
3 Safety
3.1 Safety devices
Integration in an emergency-stop
concept is required
3.2 Special dangers
This section provides an overview of all the important safety
aspects for optimal protection of personnel, as well as for safe and
trouble-free operation.
Significant hazards can occur if the handling instructions and
safety instructions in this manual are not complied with.
The component is designed for utilization within a system. It does
not have its own controller and does not have an autonomous
emergency-stop function.
Before the component is placed in service, emergency-stop devices
must be installed on the device and integrated in the safety chain
of the plant control system.
The emergency-stop devices must be connected in such a manner
that dangerous situations for persons and property are excluded in
the event of power supply interruption, or activation of the power
supply after an interruption.
The emergency-stop devices must always be freely accessible.
WARNI
WARNING
WARNIWARNI
Electrical current
Hydraulic system
VCI foil
NG
NGNG
Residual risks are cited in the following section.
Comply with the safety instructions listed here and the
warning instructions in the other chapters of this manual
to reduce health hazards and to avoid dangerous
situations.
DANGER!
DANGER! Only have qualified electricians perform work on
DANGER!DANGER!
electrical components of the system!
Improper installation of components, or improper handling of
electrical equipment may result in injuries and life-threatening
danger.
If insulation is damaged immediately switch off the power supply
and have the system repaired by a qualified electrician!
Keep moisture away from electrical components. Moisture can
cause short circuits.
DANGER!
DANGER! Only have trained, specialized personnel perform work
DANGER!DANGER!
on the hydraulic equipment. De-pressurize the hydraulic system
prior to starting work on the hydraulic system. Completely depressurize the pressure accumulator. Ensure that the system is depressurized. Do not change pressure settings to exceed the
maximum values. Hydraulically powered parts may move
unexpectedly.
Hydraulic energy may cause severe or fatal injuries.
DANGER! Keep out of reach of children and dispose of properly. If
used improperly there is danger of suffocation. Avoid skin and eye
contact with VCI foil. Repeated or longer skin contact may dissolve
skin fat and cause dermatitis.
12
Page 13

Slew Drives
Safety
Moving parts
WARNING! Do not reach into moving parts or handle moving
parts during operation. Do not open covers when the device is in
operation. Pay attention to overtravel time: Prior to opening the
cover ensure that all parts have come to a standstill. Wear tightfitting work clothing in the danger zone. Rotating components
and/or components with linear movements may cause serious
Falling materials
injury!
WARNING! Never enter the danger zones during operation. In
operation heavy material can fall uncontrolled or it may be
Fouling and loose objects
accelerated out of the device and cause severe injuries.
CAUTION! Always keep the work area clean. Remove objects that
are not being used. Mark stumbling hazards with a black/yellow
marking tape. Fouling and loose objects on the ground pose
slipping and stumbling hazards and may cause severe injuries.
3.3 Responsibility of the customer
Customer
The customer is the person or entity that operates the component
himself for commercial or economic purposes, or who transfers the
device to a third person for use/application, and who bears the
legal responsibility for protecting the users or third parties.
The component is used in commercial applications. Consequently
the owner of the component is subject to legal industrial safety
obligations.
In addition to the safety instructions in this manual, generally valid
safety and accident protection guidelines, and environmental
protection guidelines must be heeded and complied with for the
area of implementation of the component. In this regard:
The customer must inform himself of applicable industrial safety
regulations, and in a hazard analysis identify other hazards that
may exist at the installation site of the component due to the
special work conditions. Customer must convert this information
relative to hazards into operating instructions for operation of
the component.
The customer must ensure during the entire period of
component implementation that the operating instructions
created by the customer correspond to the current state of
legislation, and if necessary the customer must adapt these
operating instructions.
The customer must clearly regulate and specify responsibilities
for installation, operation, maintenance, and cleaning.
The customer must ensure that all employees who handle the
component have read and understood this manual.
In addition, customer must train personnel and inform
personnel of the hazards at regular intervals.
The customer must provide the required protective equipment
for personnel.
13
Page 14

Slew Drives
Safety
Moreover the customer is responsible for ensuring that the
component is always in faultless technical condition; consequently
the following applies:
The customer must ensure that the maintenance intervals
described in this operating manual are observed.
The customer must have all safety devices inspected regularly
for function and for completeness.
The seals in the slew drive are subject to a certain amount of
wear. From time to time it is necessary to check the seals for
trouble-free seat and function. However depending on system
runtime it may also be necessary to replace the seals. Thus the
system manufacturer must ensure that sufficient space and
accessibility for inspecting and replacing the seals are available on
the total circumference of the slew drive.
3.4 Personnel requirements
Unauthorized person
WARNING!
WARNING! Unauthorized persons should not enter the work
WARNING! WARNING!
area! Unauthorized persons may cause dangerous
Specialized personnel
situations.
Specialized personnel are personnel who thanks to their specialized
training, skills, and experience, as well as knowledge of the
applicable regulations are capable of executing the tasks assigned
Qualified electrician
to them and of recognizing possible hazards on their own.
...is a person who thanks to his specialized training, skills, and
experience, as well as knowledge of the applicable regulations is
capable of executing work on electrical equipment and of
recognizing possible hazards on his own. The qualified electrician is
especially trained for the work environment in which he is active
and knows all relevant standards and regulations.
In Germany the qualified electrician must meet the requirements
set forth in the accident prevention guideline BGV A3 (e.g. master
electrical contractor). Similar regulations apply in other countries.
3.5 Personal protective equipment
Wearing personal protective equipment is required to minimize the
health hazards when working with the device.
Always wear the protective equipment necessary for the
respective task when working with the device.
Always wear For all tasks always wear:
Follow the instructions that have been posted in the work area.
Protective work clothing
is tight-fitting work clothing with low resistance to tearing, with
tight sleeves, and without projecting parts. It is primarily used as a
protection against entanglement by moving machine parts.
Do not wear rings, chains, or other jewelry.
14
Page 15

Slew Drives
Safety
Safety footwear
for protection against heavy falling parts and slipping on slippery
substrates.
For special tasks wear
Protective gloves
to protect hands from friction, abrasion, puncture wounds, or
deeper injuries, as well as from contact with hot surfaces.
Special protective equipment is required when executing special
tasks. Separate reference is made to this equipment in the specific
sections. This special protective equipment is explained below:
Face protection
to protect the eyes and face from solvents.
Chemical-resistant protective gloves
to protect hands from aggressive substances.
Check protective gloves for leaks prior to use. Clean the gloves
before pulling them off, store them in a well-ventilated location.
15
Page 16

Slew Drives
Transport, packaging, and storage
4 Transport, packaging, and storage
4.1 Safety instructions for transport
WARNI
WARN
IMPORTANT
IMPORTANT
WARNING
WARNIWARNI
WARNIIIING
WARNWARN
4.2 Transport
NG
NGNG
NG
NGNG
Never position yourself under a suspended load! Swinging
or falling parts may cause injury or life-threatening
danger.
Carefully supervise the lifting processes and transport.
Only use the transport methods described here. A lifethreatening crushing hazard exists if the slew drive falls.
Proceed with caution when transporting objects! Comply
with instruction symbols on the packages and only use the
prescribed attachment points. Improper transport may
cause significant damage.
Avoid impact when transporting! Improper transport may
cause significant damage to the component.
Transport by specialized personnel only!
Transporting packages
Packages that are not attached to pallets can be transported with
a forklift or forklift truck under the following conditions:
The forklift or forklift truck must be configured appropriately for
the weight of the transport units.
The operator must be authorized to operate the forklift.
Attachment:
1. Place sufficiently long and wide extensions (e.g. of wood or
metal) between the forks and the package so that the weight
is distributed on the support surface.
2. Drive in the forks, with extensions if needed, far enough that
they protrude on the opposite side.
3. If there is an eccentric center of gravity, ensure that the
package cannot tip.
4. Lift the package and start the transport.
16
Page 17

Slew Drives
Transport, packaging, and storage
Transporting pallets with the
crane
Packages that are attached to pallets can be transported with a
crane under the following conditions:
Crane and hoist must be designed for the weight of the
packages.
The operator must be authorized to operate the crane.
Attachment:
1. Attach ropes, straps, or multi-point suspensions to the pallet as
shown in Fig. 5 and ensure that they cannot slip.
2. Ensure that the packages cannot be damaged by the lifting
tackle. Use other lifting tackle if necessary.
3. Start the transport.
Fig. 5 Transporting with the crane
Transporting pallets with the
forklift
Packages that are attached to pallets can be transported with a
forklift under the following conditions:
The forklift must be configured appropriately for the weight of
the transport units.
The operator must be authorized to operate the forklift.
Attachment:
1. Drive the forklift with the forks between or under the spars of
the pallet.
2. Drive in the forks until they protrude on the opposite side.
3. If there is an eccentric center of gravity, ensure that the pallet
cannot tip.
4. Lift the package and start the transport.
Fig. 6 Transporting with the forklift
Transporting unpacked slew drives
Fig. 7: Use suitable lifting gear/never transport product vertically
17
Page 18

Slew Drives
Transport, packaging, and storage
Unpacked slew drives can be transported with lifting gear when
using eye bolts under the following conditions
The lifting gear must be configured appropriately for the
weight of the transport units.
The ring bolts must be configured appropriately for the weight
of the transport unit.
The slew drive shall only be transported by itself, without
attached parts.
Maintain the insertion depth prescribed by the manufacturer.
If insertion depth is not prescribed, then a minimum insertion
depth of 1.5 x the bolt diameter must be selected.
Transport within the company shall only be executed
horizontally.
Attachment:
1. Screw the 3 eye bolts into the 3 threads that are distributed
uniformly on the circumference of the slew drive.
WARNING!
WARNING! Screw in the eye bolts to the full thread length!
WARNING!WARNING!
Improperly attached, unsuitable, or damaged eye bolts
may cause the slew drive to fall and cause life-threatening
injuries.
2. Attach lifting gear to the eye bolts.
3. Start the transport.
Fig. 8: Always use the full length of the
thread
4.3 Transport inspection/incoming goods inspection
Check delivery immediately upon receipt to ensure that delivery is
complete, and to identify any transport damage.
Proceed as follows if there is apparent external damage:
Do not accept the delivery, or only accept it with reservation.
Note the extent of transport damage on the transport
documents or on the transport company's delivery ticket.
Submit a complaint.
Report any defect within 2 days of delivery of goods. Claims for
damage compensation can only be enforced during this period
of notification.
18
Page 19

Slew Drives
Transport, packaging, and storage
4.4 Packaging
Packaging
The individual boxes are packaged according to the expected
transport conditions. Only environmentally-friendly materials have
been used for the packaging.
The packaging is designed to protect the individual components
against transport damage, corrosion, and other damage until
installation. Therefore do not damage the packaging; remove it
just before installation.
If parts are not installed within the agreed storage period, then
the customer must ensure that an appropriate preservation
agent is applied to these parts.
Unless otherwise agreed, it is assumed that the parts will be
Handling packaging materials
used within 8 weeks.
If a separate agreement regarding handling of the packaging has
not been concluded, then separate the materials according to type
and size, and keep them on hand for subsequent use, or recycle.
IMPORTANT!
environmentally responsible manner. Environmental
damage may be caused by improper disposal.
4.5 Symbols on the packaging
No user serviceable parts inside!
Unauthorized opening of the slew
drive voids the manufacturer's
warranty.
If packed in foil:
Danger!
Choking and asphyxiation hazard!
This bag is not a toy!
Keep away from children!
Dispose of packaging materials in an
19
Page 20

Slew Drives
Transport, packaging, and storage
4.6 Storage
Storage of packages
Fig. 9: Ensure protective storage
Fig. 10: Do not store vertically
Only store packages under the following conditions:
Do not store outdoors.
Store in a dry and dust-free location.
Do not expose to aggressive media.
If stacking, use stable intermediate layers.
Protect from direct sunlight.
Avoid mechanical vibration.
Storage temperature: >5° C (>41° F) to 40° C (104° F).
Relative humidity: < 65 %.
Do not store vertically.
For longer periods of storage (> 2 months) regularly check the
general status of the packages. Touch up or re-apply anticorrosion agents as needed.
The anti-corrosion protection period is 12 months, if the
aforementioned storage requirements are observed. We recommend
to re-apply the preservation after 12 months.
Please refer to tab. 1 below for anti-corrosion agents.
Recommended anti-corrosion agents
Manufacturer Product name
Cortec VpCITM -329 ≥ 12 months
Fuchs Europe
Schmierstoffe GmbH
Schramm Molecular Nato-Fluid-C634 ≥ 12 months
Pos: 5.35 /KN2006-SM/nL---------- Absc hnittsende ------- --- @ 8\mod_114 1997892953_0 .doc @ 75471
Tab. 1
Long-term preservation is possible for storages which are planned for
several years and can already be discussed during the technical
consultation. Re-application of anti-corrosion agents as well as initial
greasing can be performed by our customer service ( page 2) prior
to operation.
Greased slew drives shall not be stored for a longer period than 3
years. Greases can change their chemical-physical behaviour
during storage. Grease provisions can be diminished by a storage
period of more than 3 years. The storage of slew drives shall not
exceed 1 year if food lubricants are used.
Period of
anticorrosion
protection
Anticorit OHK-F ≥ 12 months
Under certain circumstances storage instructions are affixed to the
packages that go beyond the requirements cited here. Comply
with these instructions accordingly.
20
Page 21

Slew Drives
Installation and commissioning
5 Installation and commissioning
5.1 Safety
DANGER
WARN
WARNI
WARNI
IMPORTANT
IMPORTANT
IMPORTANT
DANGER
DANGERDANGER
WARNIIIING
WARNWARN
WARNING
WARNIWARNI
WARNING
WARNIWARNI
NG
NGNG
NG
NGNG
NG
NGNG
Prior to starting work switch off all energy supplies and
safeguard them from being switched on again. If the
power supply is switched on by unauthorized personnel, a
life-threatening danger exists for persons in the danger
zone.
Prior to starting work ensure that there is adequate free
space for installation. Handle open, sharp-edged
components carefully. Ensure order and cleanliness at the
installation location! Parts and tools that are lying loose or
on top of each other are accident hazards! Mount
components properly. Maintain the prescribed bolt torque
and fastening torque. Secure the components so that they
do not fall down or fall over. Improper installation and
commissioning may cause serious personal injury and/or
property damage.
Never position yourself under a suspended load! Swinging
or falling parts may cause injury or life-threatening
danger.
Carefully supervise the lifting processes and transport.
Only use the transport methods described here. A lifethreatening crushing hazard exists if the components fall.
Proceed with caution when transporting objects! Comply
with instruction symbols on the packages and only use the
prescribed attachment points. Improper transport may
cause significant damage.
Avoid impact when transporting! Improper transport may
cause significant damage.
Seals shall not be overpainted! Overpainting may cause
significant damage.
IMPORTANT
Prevent damage to coating and painting of slew drives.
Please refer to our customer service ( page 2), if the
coating is damaged.
Follow the instructions provided in the operating manuals for
the drive motors (hydraulic or electric), as well as the
instructions provided with the optional potentiometer or
Personnel
permanent brake.
Only trained, skilled personnel should perform installation and
commissioning work.
21
Page 22

Slew Drives
Installation and commissioning
Personal protective equipment
Wear the following protective equipment for all installation and
commissioning work:
Protective work clothing
Safety footwear
Protective gloves
The warnings in this chapter make special reference to
additional protective equipment that is required for certain
tasks.
5.2 Preparation
5.2.1 Lubricating prior to commissioning
Slew drives have been lubricated in the factory prior to delivery.
Nevertheless, prior to commissioning the slew drive must be
5.2.2 Cleaning the slew drive and mounting structure
lubricated ( section 6.4.4 "Lubricating the slew drive").
Wear the following additional protective equipment for cleaning
work:
Face protection
to protect the eyes and face from solvents.
Fig. 11: Do not let cleaning agents get
into the slew drive
Chemical-resistant protective gloves
to protect hands from aggressive substances.
Check protective gloves for leaks prior to use. Clean the gloves
before pulling them off, store them in a well-ventilated location.
Cleaning:
IMPORTANT!
Only use cold solvents (e.g. white spirit,
diesel oil, Kaltryl KEV) that do not corrode the sealing
material. Ensure that the cleaning agent does not get into
the slew drive. Do not use a high-pressure cleaner to clean
the slew drive. Unsuitable trichloroethylene-based or
perchloroethylene-based cleaning agents, or other
aggressive cleaners damage the seal and may cause
bearing damage.
22
Page 23

Slew Drives
Installation and commissioning
When using cleaning agents, ensure adequate ventilation.
Maintain a strict ban on smoking.
Remove old grease, dust, and fouling with lint-free cloths.
Remove foreign material from the support surface of the
mounting structure (including paint residue, welding beads,
burrs).
If necessary clean the support surface of the slew drive.
Strictly comply with industrial safety regulations.
Fig. 12: Cleaning
5.2.3 Determination of flatness deviation, and perpendicularity deviation and
deformation of the mounting structure
Determination of flatness deviation, and perpendicularity deviation of the mounting structure
IMPORTANT
If there are impermissibly high deviations in flatness and
perpendicularity in the mounting structure, then rotational
resistance of the slew drive may significantly increase and
damage the entire slew drive. In the worst case the slew
drive may block.
If the permissible values for flatness or perpendicularity
deviation are exceeded, the mounting structure of the
slew drive shall be replaced or reworked.
The mounting structure can be measured using a measuring plate
and dial gauges.
Laser processes and measuring with 3D systems have also proven
to be effective. These systems can be used without additional
auxiliary material, and they can document the actual gradient of
the mounting structure and process it accordingly.
Flatness deviation
Fig. 13: Flatness deviation
23
Page 24

Slew Drives
Installation and commissioning
δp = flatness deviation
max. δp = maximum flatness deviation
U = circumference
The maximum residual value for flatness deviation δp in
the circumferential direction should only be reached once
on half of the circumference. The gradient must look like a
sinus curve that slowly rises or falls.
Abb. 14: Permissible flatness deviation of
the mounting structure
Perpendicularity deviation
Fig. 15: Perpendicularity deviation
δw = perpendicularity deviation
B = flange width
The permissible perpendicular deviation δw (tilting) is based on
the actual flange width and should only be half of the values
from the tables below.
The size of the slew drive (WD-H) or of the running circle diameter
DL (WD-L/SP) is indicated in the drawing number at position (1)
and is shown in all documents and the type plate.
Fig. 16: Drawing number
For slew drives that are between the specified sizes, always
assume the smaller value. For slew drives that are larger than
the largest diameter, use the largest specified value.
The slew drive must be supported by the mounting structure up
24
to the diameter specified in the slew drive drawing.
Page 25

Slew Drives
Installation and commissioning
Permissible flatness and perpendicularity deviation for series WD-L and SP slew drives
Running circle diameter [mm] ≥100 ≥250 ≥500 ≥750 ≥1000 ≥1250
Permissible flatness deviation
including perpendicularity
deviation per support surface
Tab. 2
Permissible flatness and perpendicularity deviation for series WD-H slew drives
Size of the slew drive ≥146 ≥220 ≥300 ≥373 ≥490 ≥625
Permissible flatness deviation
including perpendicularity
deviation per support surface
Tab. 3
Determining the deformation of the mounting structure
[mm] 0.04 0.06 0.08 0.09 0.10 0.11
[in] 0.0016 0.0024 0.0032 0.0036 0.0040 0.0044
[mm] 0.06 0.06 0.07 0.07 0.08 0.09
[in] 0.0024 0.0024 0.0028 0.0028 0.0032 0.0036
Under maximum operating load an appropriate deformation of the
mounting structure occurs. The dimensions can be detected via
dial gauges, laser measurement processes, or 3D measuring
systems.
Because in some cases measurement in operation is difficult,
determination of deformation can also be executed
mathematically, e.g. with the finite element method.
Alternatively you can also reference comparable measurements on
test rigs.
For slew drives that are between the specified sizes, always
assume the smaller value. For slew drives that are larger than
the largest diameter, use the largest specified value.
The slew drive must be supported by the mounting structure up
to the diameter specified in the slew drive drawing. All the
installed dimensions as specified in the drawing must be
complied with.
Permissible deformation of the mounting structure, under maximum load for series WD-L and
SP slew drives
Running circle diameter [mm] ≥100 ≥250 ≥500 ≥750 ≥1000 ≥1250
Permissible deformation of the
[mm]
0.13 0.16 0.21 0.24 0.27 0.29
mounting structure per support
surface
[in] 0.0052 0.0063 0.0083 0.0095 0.0106 0.0114
Tab. 4
Permissible deformation of the mounting structure, under maximum load for series WD-H slew
drives
Size of the slew drive ≥146 ≥220 ≥300 ≥373 ≥490 ≥625
Permissible deformation of the
[mm] 0.10 0.11 0.12 0.13 0.15 0.16
mounting structure per support
surface
[in] 0.0040 0.0044 0.0048 0.0052 0.0059 0.0063
Tab. 5
25
Page 26

Slew Drives
Installation and commissioning
IMPORTANT
Axial deflection, tilting, radial extension (or radial
contraction) of the mounting structure under max. load
causes deformation of the mounting structure.
5.2.4 Selecting the mounting elements
CAUTION
CAUTION
CAUTIONCAUTION
Fig. 17: Do not use continuous thread
Only use mounting elements of the correct size, number
and quality. Do not reuse bolts, nuts, and washers. Using
unsuitable mounting elements may cause the bolted union
to fail and thus the entire construction to fail.
The function and service life, as well as the durability of the bolted
union are highly dependent on grip ratio, the type of bolt, and the
dimensions of the bolts. Consequently select the mounting
elements on the basis of the following:
Do not use any bolts with a fully threaded shaft.
Only use new, quality class 10.9 (metric) bolts or SAE Grade 8.
Maintain the grip ratio (grip length to the diameter of the bolt)
of at least ≥ 5 to maximum ≤ 10.
Select bolt length to ensure that the minimum insertion depth is
reached ( Tab. 6).
If the permissible interfacial pressure is exceeded use
appropriate washers ( Tab. 7).
If the specifications cannot be satisfied, please contact our
customer service ( page 2).
Minimum bolt insertion depth depending on fracture
strength of the mounting structure
Fracture strength Rm of the
mounting structure
in N/mm² in lbf/in²
Minimum insertion depth
(le)
Strength class
10.9 / Grade 8
500 to 700 72520 to 101525 le = 1.4*ds
700 to 900 101525 to 130535
le = 1.1*ds
over 900 over 130535 le = 0.9*ds
Tab. 6
Fig. 18: Mounting element
Mounting structures with fracture strength under 500 N/mm² or
72520 lbs/in² are prohibited.
ds = bolt diameter
lk = grip length
le = insertion depth
Permissible interfacial pressure for various materials
Material Max. surface pressure
in N/mm² in lbs/in²
St52/C45N/46Cr2N 600 87023
46Cr4V/42CrMo4V 800 116030
Tab. 7
26
Page 27

Slew Drives
Installation and commissioning
5.2.5 Tightening bolts with a torque wrench
Normally the mounting bolts are adequately secured through
WARNI
IMPORTANT
WARNING
WARNIWARNI
NG
NGNG
correct pretension.
Do not use impact screwdrivers. Using an impact
screwdriver may cause impermissible deviations between
the bolt tightening forces. Failure of the bolted union with
the mounting structure may cause severe personal injury
or material damage.
If there are shock loads or vibration additional screwlocking devices may be necessary. In this case use Loctite
or Nord-Lock® bolt lock washers.
Do not use split rings, spring washers, etc.
Do not reuse bolts, nuts, and washers, etc.
Only use hardened and tempered washers.
Adjust the limit torque in accordance with bolt size and quality.
Use a precisely indicating torque wrench.
Tightening torques and bolt tightening forces for metric
coarse-pitched thread in accordance with DIN 13 when
using a torque wrench:
Mounting
Tightening torque
bolt
dimensions
Strength class 10.9
MA 1)
in
Mounting pretension
force
FM 2)
Strength class 10.9
in
Nm ft-lbs kN lbs
M4 3.31 2.44 5.95 1338
M5 6.77 4.99 9.74 2190
M6 11.5 8.5 13.7 3080
M8 28.0 20.6 25.2 5665
M10 55.8 41.2 40.2 9037
M12 97.7 72.1 58.5 13151
M16 246 181 111 24954
M18 336 248 134 30124
M20 481 355 173 38892
M22 661 487 216 48559
M24 830 612 249 55977
M27 1230 907 328 73737
M30 1661 1225 398 89474
Tab. 8
1)
MA in accordance with VDI guideline 2230 (February 2003) for
µK=0.08 and µG=0.12
2)
FM in accordance with VDI guideline 2230 (February 2003) for
µG=0.12
27
Page 28

Slew Drives
Installation and commissioning
Tightening torques and bolt tightening forces for inch
thread in accordance with ANSI B1.1 when using a torque
wrench:
Mounting bolt
0.1900 – 24 UNC
0.2160 – 24 UNC
Tab. 9
1)
MA in accordance with VDI guideline 2230 (February 2003) for
µK=0.08 and µG=0.12
2)
FM in accordance with VDI guideline 2230 (February 2003) for
µG=0.12
dimensions
Tightening torque
MA 1)
Strength class
Grade 8
in
Mounting
pretension force
FM 2)
Strength class
Grade 8
in
Nm ft-lbs kN lbs
4.80 3.54 7.15 1607
7.69 5.67 10.1 2271
1/4 – 20 UNC 11.7 8.6 13.2 2967
5/16 – 18 UNC 24.4 18.0 22.1 4968
3/8 – 16 UNC 43.7 32.2 33.0 7419
7/16 – 14 UNC 70.1 51.7 45.4 10206
1/2 – 13 UNC 108 80 61.0 13713
9/16 –12 UNC 156 115 78.6 17670
5/8 – 11 UNC 216 159 97.8 21986
3/4 – 10 UNC 386 285 146 32822
7/8 – 9 UNC 625 461 202 45411
1 – 8 UNC 938 692 266 59799
1 1/8 – 7 UNC 1328 979 334 75086
1 1/4 – 7 UNC 1889 1393 428 96218
For mounting bolts from M30 or 1 1/8 - 7 UNC use a hydraulic
bolt-tensioning cylinder ( chapter 5.2.6 "Tightening bolts with
a hydraulic bolt-tensioning cylinder").
When using bolts with fine-pitched thread or other bolt sizes or
qualities, please contact our customer service ( page 2).
For further information about bolts, please refer to the IMO
main catalogues.
5.2.6 Tightening bolts with a hydraulic bolt-tensioning cylinder
Comply with the instructions provided in the operating manual
for the hydraulic fixture! The operating manual for the hydraulic
bolt-tensioning cylinder specifies how the hydraulic pressure is
converted to the pretension force.
28
Page 29

Slew Drives
Installation and commissioning
WARNI
IMPORTANT
WARNING
WARNIWARNI
NG
NGNG
The prescribed hydraulic pressure should not be exceeded
when pretensioning the bolts. Excess hydraulic pressure
may cause failure of the bolted union with the mounting
structure and may cause severe personal injury or material
damage.
When using other threaded bolts or other strength classes
you have to contact our customer service ( page 2).
Bolt tension forces when using a hydraulic bolt-tensioning
cylinder for metric coarse-pitched thread in accordance
with DIN 13:
Tab. 10
1)
FM for hydraulic bolt-tensioning cylinder pretensioned to 85% of
yield strength
Mounting bolt
dimensions
Mounting pretension force
FM 1)
Strength class 10.9
in
kN lbs
M24 282 63396
M27 367 82505
M30 448 100714
M33 554 124544
M36 653 146800
M42 896 201429
M45 1043 234476
M48 1177 264600
M52 1405 315857
M56 1622 364640
M60 1887 424215
M64 2138 480642
M68 2441 548759
Bolt tension forces when using a hydraulic bolt-tensioning
cylinder for inch thread in accordance with ANSI B1.1:
Mounting bolt
dimensions
Mounting pretension force
FM 1)
Strength class 10.9
in
kN lbs
1 – 8 UNC 301 67668
1 1/8 – 7 UNC 379 85203
1 1/4 – 7 UNC 481 108133
1 3/8 – 6 UNC 573 128816
1 1/2 – 6 UNC 697 156692
1 5/8 – 6 UNC 832 187041
1 3/4 – 5 UNC 942 211770
29
Page 30

Slew Drives
Installation and commissioning
Tab. 11
1)
FM for hydraulic bolt-tensioning cylinder pretensioned to 85% of
yield strength
5.3 Installing the slew drive
5.3.1 Hardness gap
The hardness gap occurs with the raceway hardening and is
located between the end and the beginning of the hardening.
For the WD-L series the hardness gap must be arranged with an
offset by 90° relative to the main load-carrying zone. The hardness
gap is marked by a filling plug or a stamped "S".
1 Main load-carrying zone
2 Filling plug or S-mark
2 – 4.5 UNC 1239 278538
2 1/4 – 4.5 UNC 1608 361493
2 1/2 – 4 UNC 1981 445347
2 3/4 – 4 UNC 2442 548984
Fig. 19: Hardness gap marking
5.3.2 Positioning the slew drive
Fig. 20: Main load-carrying zone
1 Hardness gap
2 Main slewing range
3 Main load-carrying zone
1. Determine the main load-carrying zone.
The main load-carrying zone is that area of the slewing ring
that is subject to the highest load, taking all aggressive forces
and torques, and all occurring load cases into account.
30
Page 31

Slew Drives
Installation and commissioning
2. Arrange the hardness gap ( section 5.3.1 "Hardness gap") of
CAUTION!
CAUTION! The hardness gap or the filling plug in a slewing
CAUTION!CAUTION!
ring constitute a zone of decreased load-carrying capacity.
The service-life of the slew drive will be reduced
significantly, if the hardness gap is in the main slewing
range. Fracture of bearing ring for example may cause
slew drive failure. Consequently place this marked point in
a reduced load zone if possible.
3. Use a feeler gauge to check whether the support surface of the
the bearing ring charged with point load so that it is offset by
90° relative to the main load-carrying zone. The main loadcarrying zone is in the main slewing range.
slew drive is completely supported by the mounting structure. If
this is not the case, the support surface of the mounting
structure must be reworked ( section 5.2.3 "Determining
flatness deviation, and perpendicularity deviation and
deformation").
Fig. 21: Check the support surface
5.3.3 Bolting the slew drive
WARNI
WARNING
WARNIWARNI
NG
NGNG
Do not use impact screwdrivers. Using an impact
screwdriver may cause impermissible deviations between
the bolt tightening forces. Failure of the bolted union with
the mounting structure may cause severe personal injury
or material damage.
Mount the slew drive in unstressed state.
Strictly comply with the procedure specified below to avoid
impermissible deviations between the bolt tightening forces:
First fasten the housing, then fasten the toothed bearing ring!
1. Lightly oil the bolt thread (not when using bolt locking devices
with adhesive).
2. Pretension the bolts, with washers if required, crosswise in 3
steps, 30%, 80%, and 100% of the tightening torque, or the
hydraulically applied pretension force.
3. In this process turn the unscrewed ring several times. Repeat
the procedure for the bearing ring that has not yet been bolted.
If using a hydraulic bolt-tensioning cylinder the tensioning forces
for the bolt pretension should not exceed 90% of yield strength
( Tab. 10 and 11).
Fig. 22: Tighten crosswise
31
Page 32

Slew Drives
Installation and commissioning
The end customer or the operating company must be instructed
Tightening torque MA in Nm with incremental tightening
Tab. 12
Tightening torque MA in Nm with incremental tightening
Tab. 13
which tightening process was used. The process must also be
used when servicing the unit to check the bolted union.
Mounting bolt
dimensions
Step 1
30%
Tightening torque MA in Nm
Step 2
80%
Step 3
100%
Strength class 10.9
M6 3.50 9.20 11.5
M8 8.40 22.4 28.0
M10 16.7 44.6 55.8
M12 29.3 78.2 97.7
M16 73.8 197 246
M20 144 385 481
M24 249 664 830
M30 498 1329 1661
Mounting bolt
dimensions
Step 1
30%
Tightening torque MA in Nm
Step 2
80%
Step 3
100%
Strength class SAE Grade 8
1/4 - 20 UNC 3.50 9.30 11.6
5/16 - 18 UNC 7.30 19.4 24.3
3/8 - 16 UNC 13.1 34.9 43.6
7/16 - 14 UNC 21.1 56.2 70.2
5/8 - 11 UNC 64.4 172 215
3/4 - 10 UNC 115 308 385
7/8 - 9 UNC 187 498 622
1 1/8 - 7 UNC 397 1060 1324
32
Page 33

Slew Drives
Installation and commissioning
5.3.4 Determining the tilting clearance
Tightening torque MA in ft-lbs with incremental tightening
Mounting bolt
dimensions
Tab. 14
Tightening torque MA in ft-lbs with incremental tightening
Mounting bolt
dimensions
1/4 - 20 UNC 2.60 6.90 8.60
5/16 - 18 UNC 5.40 14.4 18.0
3/8 - 16 UNC 9.70 25.8 32.3
7/16 - 14 UNC 15.6 41.6 52.0
5/8 - 11 UNC 47.7 127 159
3/4 - 10 UNC 85.5 228 285
7/8 - 9 UNC 138 369 461
1 1/8 - 7 UNC 294 785 981
Tab. 15
Step 1
30%
Step 2
80%
Step 3
100%
Tightening torque MA in ft-lbs
Strength class 10.9
M6 2.50 6.80 8.50
M8 6.20 16.5 20.7
M10 12.3 33.0 41.2
M12 21.6 57.6 72.0
M16 54.3 145 181
M20 107 284 355
M24 184 490 612
M30 368 980 1225
Step 1
30%
Step 2
80%
Step 3
100%
Tightening torque MA in ft-lbs
Strength class SAE Grade 8
Tilting clearance increases as raceway system wear increases. To
determine the increase in tilting clearance a basic measurement
must be executed in installed status and prior to first-time
operation. This is the only way to determine changes.
1 Upper mounting structure
2 Tilting direction
3 Main load-carrying zone
4 Lower mounting structure
Fig. 23: Determine tilting clearance
33
Page 34

Slew Drives
Installation and commissioning
1 Dial gauge
2 Upper mounting structure
3 Slew Drive
4 Lower mounting structure
Fig. 24: Measurement setup
Procedure: Tilting clearance measurement
1. Switch off the system and safeguard it from being turned on
again.
2. Permanently mark the measuring point in the main load
direction on the housing and on the bearing ring.
3. Attach the dial gauge as shown in Fig. 24.
4. Apply defined tilt torque, at least 50% of max. operating load,
in direction "A".
5. Set dial gauge to zero.
6. Apply defined tilt torque, at least 50% of max. operating load,
in direction "B".
The displayed measured value m1 corresponds to the existing
tilting clearance and serves as the base value that will be used
for comparison in later inspections.
7. Log and document all measured values.
All inspections at a later point in time must be executed on the
same measuring point, with the same loads, at the same
relative position of the bearing rings, and in the same
sequence.
At pure axial or radial load check the tilting clearance by
applying an additional tilting load.
5.3.5 Determining the circumferential backlash
Toothing wear causes increased circumferential backlash.
Consequently it is necessary to check circumferential backlash in
accordance with the maintenance intervals ( section 6.3
34
IMPORTANT
"Maintenance schedule").
Do not exceed the specified values for the circumferential
backlash angle of the worm shaft ( Tab. 18). Exceeding
the specified values may result in failure of the slew drive
and damage to the connecting components.
1. Switch off the system and safeguard it from being restarted.
2. Determine the measuring point in the main load-carrying zone,
both on the housing as well as on the worm gear or on the
toothed ring and permanently mark these points.
Page 35

Slew Drives
Installation and commissioning
3. Remove the drive with the goal of ensuring that the worm shaft
4. Determine the circumferential backlash angle of the worm shaft
The determined measured value serves as the comparison
can be freely and easily moved by hand.
If using a front-end brake (flanged-mounted between
motor and slew drive):
Remove front-end brake and motor ( Operating
manual for the front-end brake and motor).
If using a brake that is bolted to the slew drive opposite
side of the motor:
Vent brake ( Operating manual for the brake).
If using a permanent brake (series WD-L):
Remove brake ( Operating manual for the permanent
brake)
in the area in which the worm gear is meshed the majority of
the time.
value for subsequent checks.
5.4 Function test
Limit values, see section 6.4.3 "Checking the circumferential
backlash".
Log and document the measured values.
All measurements at a later point in time must be performed on
the same measuring point.
The slew drive must rotate uniformly. Deviations in the mounting
structure as well as the influence of exterior loads can significantly
affect the friction torque.
1. Turn the mounted slew drive several complete revolutions.
2. Check whether the slew drive turns uniformly and without
jerking.
3. Perform additional test runs under full load.
4. After the function test, check the tightening torque of the
mounting bolts.
35
Page 36

Slew Drives
Maintenance
6 Maintenance
6.1 Safety
DANGER
WARN
Personnel
Personal protective equipment
Environmental protection
DANGER
DANGERDANGER
WARNIIIING
WARNWARN
NG
NGNG
Follow the instructions provided in the operating manuals for
the drive motors (hydraulic or electric), as well as the
instructions provided for the optional potentiometer or
permanent brake.
Prior to starting work switch off all energy supplies and
safeguard them from being switched on again. When
performing maintenance tasks there is danger of the
energy supply being switched on without authorization.
This poses a life-threatening hazard for persons in the
danger zone.
Prior to starting work ensure that there is adequate free
space for installation. Ensure order and cleanliness at the
installation location! Parts and tools that are lying loose or
on top of each other are accident hazards! If components
have been removed, ensure that they are properly reinstalled, that all fastening elements are re-installed, and
that all threaded connections are tightened with the
specified torque. Improper maintenance may cause
serious injury or property damage.
Only qualified, specialized personnel shall perform maintenance
and inspection work.
Only qualified electricians should perform work on the electrical
equipment.
Wear the following personal protective equipment for all
maintenance work:
Protective work clothing
Protective gloves
Safety footwear
Comply with the following instructions for environmental protection
when performing maintenance work:
At all lubricating points where lubricant is applied by hand,
remove escaping, used, or excess grease, and dispose of it in
accordance with applicable local regulations.
Collect hydraulic fluids and oils in suitable containers and
dispose of these substances in accordance with applicable local
regulations.
36
Page 37

Slew Drives
Maintenance
6.2 Cleaning
IMPORTANT
Use cold solvent (e.g. white spirit, diesel oil, Kaltryl KEV)
that does not corrode the sealing material. Ensure that the
cleaning agent does not get into the slew drive. Do not use
a high-pressure cleaner to clean the slew drive. Unsuitable
trichloroethylene-based or perchloroethylene-based
cleaning agents, or other extremely aggressive cleaners
damage the seal and may cause bearing damage.
Wear the following additional protective equipment for cleaning
work:
Face protection
to protect the eyes and face from solvents.
6.3 Maintenance schedule
Chemical-resistant protective gloves
to protect hands from aggressive substances.
Check protective gloves for leaks prior to use. Clean the gloves
before pulling them off, store them in a well-ventilated location.
When using cleaning agents, ensure adequate ventilation.
Remove old grease, dust, and fouling with lint-free cloths.
Maintenance tasks are described in the sections below that are
required for optimal and trouble-free operation.
If increased wear is detected during regular inspections, then
reduce the required maintenance intervals according to the actual
indications of wear.
If you have questions concerning maintenance tasks and intervals,
please contact our customer service ( page 2).
37
Page 38

Slew Drives
Maintenance
wö
Interval Maintenance task To be executed by
weekly Check seal Specialist
after 100 operating
hours
after every additional
700 operating hours
or at least every 6
months
Tighten bolts Specialist
Check tilting clearance Specialist
Tighten bolts
Reduce the inspection interval if there is heavy wear
or continuous operation.
Check tilting clearance
Reduce the inspection interval to 200 operating
hours if the detected increase in tilting clearance is
approximately 75% of the permissible tilting
clearance increase.
After further increase reduce the interval between
inspections to 50 - 100 hours.
Check circumferential backlash
Reduce the inspection interval to 200 operating
hours if the detected increase in circumferential
backlash is approximately 75% of the permissible
circumferential backlash increase.
After further increase reduce the interval between
inspections to 50 - 100 hours.
Tab. 16
Lubrication General re-lubrication of slew drives:
After each cleaning
Before and after longer periods of standstill, e.g. for cranes and
IMPORTANT
construction machines during the winter months.
The main cause for slewing ring failure is inadequate
lubrication. The lubrication intervals essentially depend on
existing working and environmental conditions, as well as
the version of the slew drive. Precise lubrication intervals
can only be determined by tests under normal operating
conditions.
If comparable results are not available, the following table can be
used as a guide value:
Specialist
Specialist
Specialist
Work conditions Lubricating interval To be executed by
Dry and clean workshop hall (rotary
tables, robots, etc.)
Severe conditions on open terrain
(cranes, excavators, etc.)
Aggressive climatic conditions, (ocean,
desert, arctic climate, extremely
Approx. every 300 operating hours, at
least every 6 months
Approx. every 100 to 200 operating
hours, at least every 4 months
Every 50 operating hours, at least every
2 months
Specialist
Specialist
Specialist
polluted environment, ≥70 operating
hours per week
Extreme conditions (tunnel boring
machines, steel works, wind turbines)
Tab. 17
38
Continuous lubrication (through central
lubrication or grease cups)
Specialist
Page 39

Slew Drives
Maintenance
The specified values are valid for the following conditions:
Operating temperature on the slew drive < 70° C (158° F).
Circumferential speed < 0.5 m/s (1.64 ft/sec) for SP slew
drives.
Output speed < 5 rpm for WD slew drives.
Low to moderate load.
Comply with the instructions in the operating manual provided
by the manufacturer, for lubrication of optional intermediate
gear units, brakes, and motors.
If necessary re-lubricate permanent brakes. For this only use
the special grease SHELL RETINAX HDX2.
6.4 Maintenance tasks
6.4.1 Inspecting the mounting bolts
IMPORTANT
Fig. 25: Inspecting the mounting bolts
To compensate for settling, the bolts must be retightened
with the prescribed tightening torque. Retightening must
be executed without exerting additional external stress on
the bolted union.
1 Detached bolt
Execution only by a specialist.
Special tools required:
Torque wrench
Hydraulic clamping fixture
Replace loose and detached bolts or nuts and washers with
new bolts, nuts and washers.
Use the same bolt size and bolt quality.
If a hydraulic clamping fixture was used to tighten the bolts,
then a hydraulic clamping fixture must also be used to check
the bolt pretension. Always use the same tightening procedure
as specified for installation of the slew drive when checking the
bolted union.
6.4.2 Checking the tilting clearance
Wear in the raceway system results in an increase in tilting
clearance. Consequently it is necessary to check the tilting
clearance in accordance with the maintenance intervals ( section
6.3 "Maintenance schedule").
CAUTION!
CAUTION! If the maximum permissible tilting clearance
CAUTION!CAUTION!
increase is reached, then the system must be brought to a
standstill and the slew drive must be replaced
immediately, as safe operation can no longer be ensured.
39
Page 40

Slew Drives
Maintenance
Checking the tilting clearance increase dk directly on the
slew drive
The measured value m1 determined at installation serves as the
base value ( section 5.3.4 "Determination of tilting clearance").
Determine the value mx as described in the section 5.3.4
"Determining the tilting clearance".
Subtract the base value m1 from the value mx determined in
the inspection measurement:
dk = mx – m1 ≤ dkperm
dkperm = 0.45 mm
dkperm = 0.0177 in
Checking the tilting clearance increase dk but not directly
on the slew drive
Proportionally convert the tilting clearance increase each time a
measurement is taken (after the installation measurement ) and
compare with dkperm.
6.4.3 Checking the circumferential backlash
CA
CAUTION
CACA
UTION
UTIONUTION
Toothing wear causes increased circumferential backlash.
When the maximum permissible circumferential backlash
is reached, then the system must be brought to a standstill
and the slew drive must be replaced immediately, as safe
operation can no longer be ensured.
1. Determine the circumferential backlash in accordance with
5.3.5 "Determining the circumferential backlash".
2. Compare the determined value with the permissible values of
the table.
See the type plate for the module specification.
For a module that is between the specified values, use the
value for the smaller module.
Circumferential backlash angle limit values
Module of
the
toothing
circumferential
backlash angle
3 34° 6 28°
4 32°
4/2
convolution
4,5 31°
5 30° 8 27°
5/2
convolution
Tab. 18
Limit of
Module of
the
toothing
circumferential
backlash angle
6/2
convolution
16° 7 28°
7/2
convolution
15°
8/2
convolution
Limit of
14°
14°
13.5°
40
Page 41

Slew Drives
Maintenance
6.4.4 Lubricating the slew drive
IMPORTANT
IMPORTANT
Regularly lubricate the slew drives to prolong their service
life and ensure safe operation.
Always use the lubricants specified in the order drawing. If
using other lubricants pay attention to the relative
mixability of the substances. The standard lubricants used
are "r.tecc Norplex LKP2" from Rhenus, or the grease
"Optimol Longtime PD0" from Castrol. If in doubt, or if
there is no specification on the drawing, consult with our
customer service ( page 2). Using the wrong lubricant
may cause damage to the slew drives and reduce the
service life. In this case, any warranty shall be excluded.
Comply with the instructions provided by the lubricant
manufacturer!
If possible use a central lubrication system to lubricate the
raceway system. In this regard ensure that the hoses are filled
with grease at commissioning and that the storage tanks are
regularly topped up with grease.
An automatic re-lubricating system significantly facilitates re-
lubrication for the raceway system and the toothing. Functional
safety as well as wear behavior are improved.
Comply with the instructions in the operating manual provided
by the respective manufacturer for lubrication of optional
intermediate gear units, brakes, and motors.
If it is evident that moisture has penetrated into the slew drive,
or has been absorbed by the grease, you must re-lubricate
more intensively.
Fig. 26: Lubricating the slew drive
1 Fresh lubricant
2 Lubricating nipple, bearing ring
3 Lubricating ring housing
41
Page 42

Slew Drives
Maintenance
1. In succession, press grease into all lubricating nipples while
simultaneously turning the slew drive all the way through, until
a continuous collar of grease forms under at least one seal.
2. Ensure that old lubricant can escape without obstruction.
6.4.5 Inspecting the seals
IMPORTANT
Damaged seals must be replaced immediately. If there is
corrosion damage or functional impairment as a
consequence of damaged seals not being replaced at the
proper time, any warranty shall be excluded. Penetrating
moisture may quickly cause corrosion in the bearing ring
and impairs safe operation. Note that the factory-installed
seal only offers protection against dust and splashing
water.
If damage is detected on a seal, contact the customer service
organization without delay ( page 2).
6.5 Measures after successful maintenance
Execute the following steps after concluding maintenance work
and before switching the system on:
1. Check all previously loosened bolted unions for firm seat.
2. Ensure that all previously removed protective devices and
covers have been properly installed.
3. Ensure that all tools, materials, and other equipment have/has
been removed from the work area.
4. Clean the work area and remove any substances that may have
escaped, such as liquids, processing material, or similar items.
5. Ensure that all system safety devices are again functioning
properly!
42
Page 43

Slew Drives
Dismantling
7 Dismantling
7.1 Safety
DANGER
WARNI
WARNI
WARNI
IMPORTANT
IMPORTANT
Personnel
DANGER
DANGERDANGER
WARNING
WARNIWARNI
WARNING
WARNIWARNI
WARNING
WARNIWARNI
NG
NGNG
NG
NGNG
NG
NGNG
At the end of the component's service life the component must be
dismantled and disposed of in an environmentally responsible
manner.
Prior to starting work switch off all energy supplies and
safeguard them from being switched on again. When
performing maintenance tasks there is a danger of the
energy supply being switched on without authorization.
This poses a life-threatening hazard for persons in the
danger zone.
Prior to starting work ensure that there is adequate free
space. Handle open, sharp-edged components carefully.
Ensure order and cleanliness at the workstation! Parts and
tools that are lying loose or on top of each other are
accident hazards! Dismantle components properly. Pay
attention to the high dead weight of some of the
components. Use hoist equipment if necessary. Secure the
components so that they do not fall down or fall over.
There is an injury hazard if the device is not dismantled
properly. Consult with the manufacturer if there are
questions.
Never position yourself under a suspended load! Swinging
or falling parts may cause injury or life-threatening
danger.
Carefully supervise the lifting processes and transport.
Only use the transport methods described here. A lifethreatening crushing hazard exists if the components fall.
Proceed with caution when transporting objects! Comply
with instruction symbols on the packages and only use the
prescribed attachment points. Improper transport may
cause significant damage.
Avoid impact when transporting! Improper transport may
cause significant damage.
Only trained, specialized personnel should perform dismantling
work.
43
Page 44

Slew Drives
Dismantling
7.2 Dismantling
Prior to dismantling:
Switch off the system and safeguard it from being turned on
again.
Physically disconnect all energy supplies to the system,
discharge stored residual energy.
Remove fuels and auxiliary materials, as well as residual
processing materials and dispose of these items in an
environmentally responsible manner.
Then clean subassemblies and components properly and dismantle
them, taking applicable local occupational safety and
environmental protection guidelines into consideration.
1. Unscrew the fastening elements of the toothed bearing ring.
2. Remove the mounting structure.
3. Unscrew the mounting elements of the housing.
4. Remove the slew drive.
7.3 Disposal
IMPORTANT
Electrical scrap and electronic components, lubricants and
other auxiliary materials are subject to treatment as
special waste, and should only be disposed of by approved
specialist companies! Improper disposal may cause
environmental damage.
If a return or disposal agreement has not been concluded, then
recycle dismantled components:
Scrap metals.
Recycle plastic elements.
Sort and dispose of the remaining components in accordance
with material condition
Local municipal authorities or specialized disposal companies
provide information on environmentally responsible disposal.
44
Page 45

Slew Drives
Technical data – Type plate
8 Technical data – Type plate
The type plate is on the housing and contains the following
information:
Manufacturer
Drawing no./type
Identification code consisting of:
Order number, year of manufacture and consecutive number
Module
Web address
Fig. 27: Type plate
45
Page 46

www.goimo.com
IMO Antriebseinheit GmbH & Co. KG
Gewerbepark 16
91350 Gremsdorf
Germany
Tel. +49 9193 6395-20
Fax +49 9193 6395-2140
slew.drives@goimo.com
Slewing Rings for Renewable Energy
IMO Momentenlager GmbH & Co. KG
Imostrasse 1
91350 Gremsdorf
Germany
Tel. +49 9193 6395-40
Fax +49 9193 6395-4140
slewing.rings@goimo.com
Slew Drives
Plant I, Gremsdorf, Germany
Plant II, Gremsdorf, Germany
IMO Energy GmbH & Co. KG
Imostrasse 1
91350 Gremsdorf
Germany
Tel. +49 9193 6395-30
Fax +49 9193 6395-3140
energy@goimo.com
Slewing Rings
Plant III, Summerville, SC, USA
IMO Group of Companies
IMO Anlagenbau GmbH & Co. KG
Imostrasse 1
91350 Gremsdorf
Germany
Tel. +49 9193 6395-50
Fax +49 9193 6395-5140
anlagenbau@goimo.com
Solutions in
Machine and Plant Manufacturing
IMO USA Corp.
101 Innovation Drive
McQueen Park
Summerville, South Carolina 29483
USA
Tel. +1 843 291-2882
americas@goimo.com
Germany IMO Holding GmbH
Beijing Representative Office
Unit 502 & 505, 5th Floor
North Office Tower, Beijing Kerry Centre
1 Guang Hua Road, Chaoyang District
Beijing 100020
P.R. China
Tel. +86 10 85296463
china@goimo.com
China
2.000/B0921/A/IO/2spr./Mrz10
IMO Holding GmbH
Imostrasse 1
91350 Gremsdorf
Germany
Tel. +49 9193 6395-0
Fax +49 9193 6395-1140
holding@goimo.com
Central Services
USA
Headquarters Germany
All contact details of our global partners are to be found at:
 Loading...