

Page 1
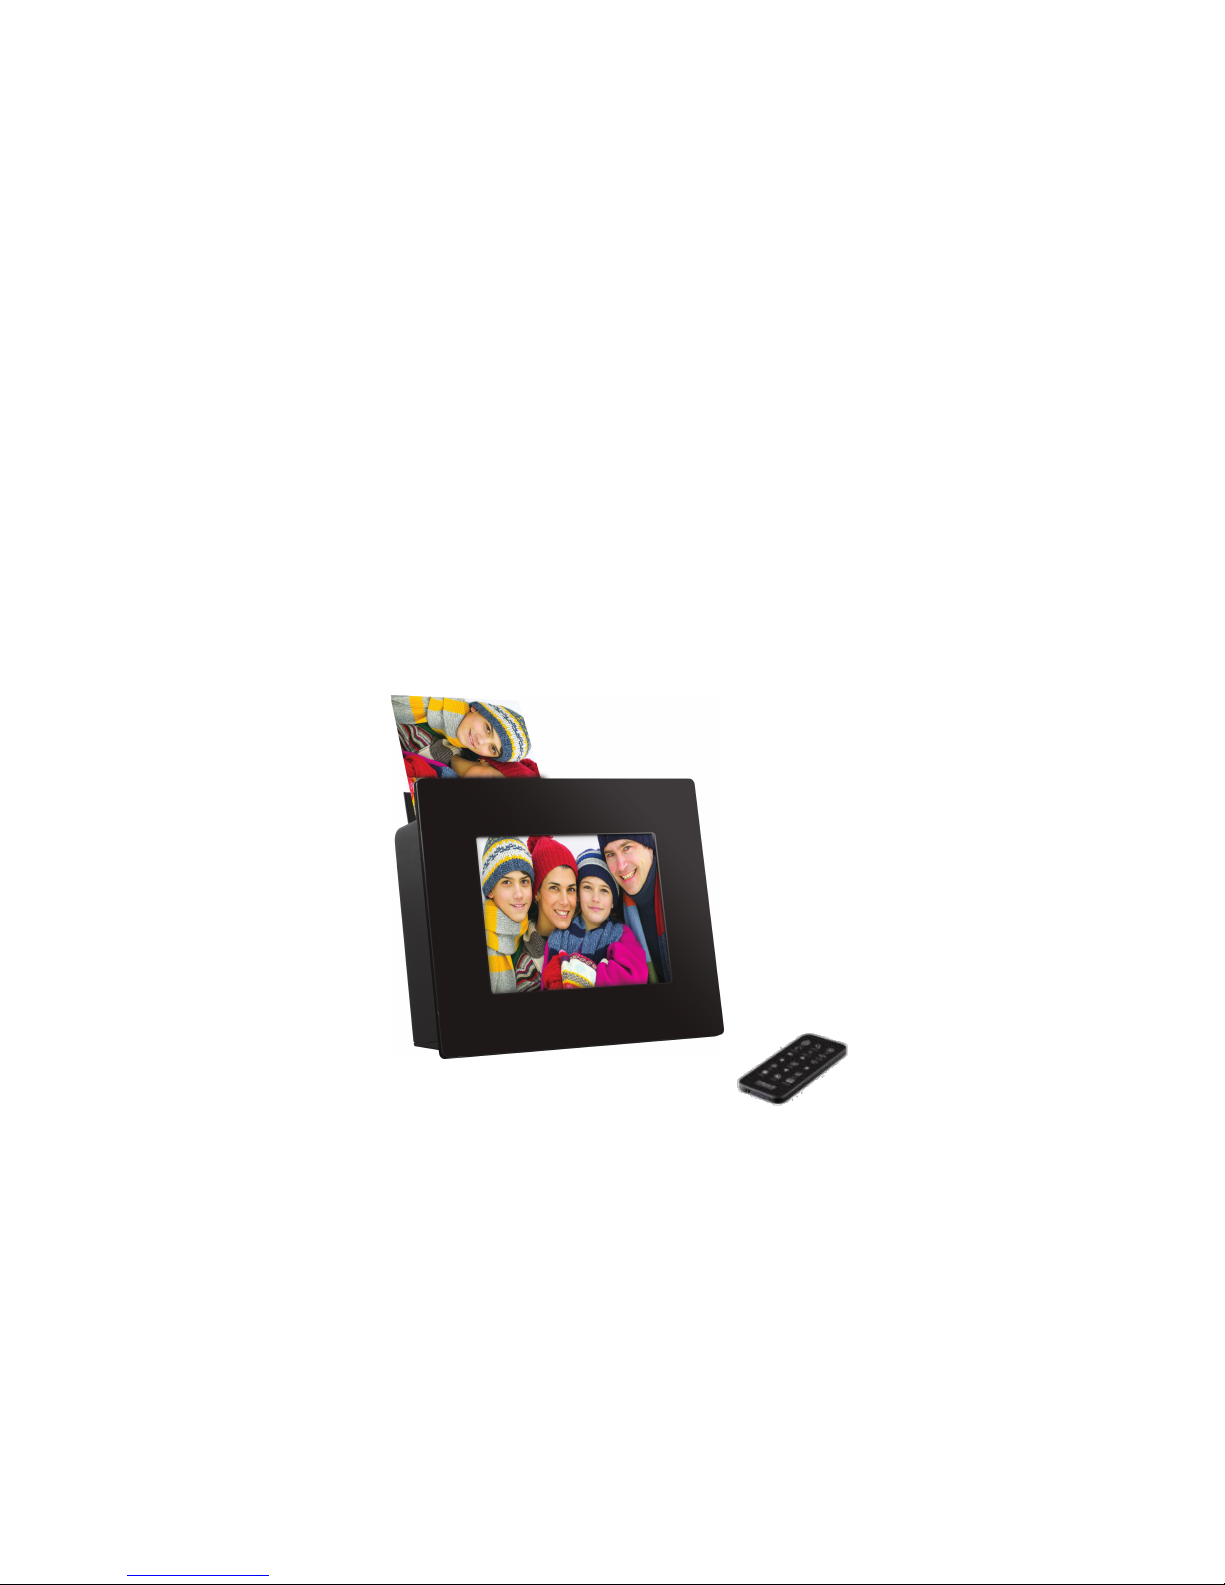
Photo Frame Printer User Manual
1
Page 2

Important Safety Instructions
CAUTION:
Your Photo Frame Printer is designed and tested to meet the latest standards for safety of information technology eq
uipment. However, to ensure safe use of this product, it is important that the safety instructions marked on the produc
t and in the documentation are followed. Always follow these instructions to help guard against personal injury and d
amage to your Photo Frame Printer. Read and follow all instructions marked on the product and in the documentation
before you operate your Photo Frame Printer. Retain all safety and operating instructions for future use.
Proper Handling of the Photo Frame Printer
• Always handle the Photo Frame Printer carefully. Avoid touching the LCD screen as natural skin oils are very difficult to remove.
• Always position the Photo Frame Printer on a stable and level surface. Unstable surfaces can cause the Photo Frame Printer to topple
and fall, resulting in possible damage or injury.
• Avoid exposing the Photo Frame Printer to direct sunlight or high temperatures, which can damage or shorten its life. Do not place the
unit near heat sources such as radiators, heat registers, or other appliances that generate heat. Orient the Photo Frame Printer away fr
om direct sunlight to reduce glare.
• Avoid exposing the Photo Frame Printer to rain, water, moisture or high humidity. Do not place it in a bathroom or kitchen near a sink or
where it may come in contact with water.
• Never place heavy or sharp objects on the LCD panel, frame, or power cord.
Ventilation
• Openings in the printer case are provided for ventilation. Do not block or cover these openings. Make sure you provide adequate spac
e, at least 6 inches (15 cm), around the Photo Frame Printer for ventilation when you set up your work area. Never insert objects of any
kind into the printer ventilation openings.
• Ensure that the fan vents on the bottom of the casing are clear at all time. Place the printer on a soft surface, doing so will block the bo
ttom vents.
Overloading Outlets
Do not overload electrical power sources when using the Photo Frame Printer. Overloading wall outlets, circuits, or extension cords can
result in overheating, fire, or electric shock. Use only grounded or polarized outlets.
2
Page 3

• Power Cord Requirements
• The power cord set (wall plug, cable and AC adapter plug) you received with your printer meets the requirements for use in the country where you pu
rchased your equipment.
• Power cord sets for use in other countries must meet the requirements of the country where you use the printer. For more information on power cord
set requirements, contact your authorized dealer, reseller, or service provider.
• The requirements listed below are applicable to all countries:
• The length of the power cord set must be at least 6.00 feet (1.8m) and a maximum of 9.75 feet (3.0m).
• All power cord sets must be approved by an acceptable accredited agency responsible for evaluation in the country where the power cord se
t will be used.
• The power cord set must have a minimum current capacity of 7A and a nominal voltage rating of 125 or 250 volts AC, as required by each co
untry’s power system.
Power Cord Protection
• To minimize wear on the power supply cord, the power supply cord should be routed away from foot traffic and contact with other objec
ts. Do not route the power cord under rugs or carpeting. The cord should never be severely bent, pinched, or twisted. Periodically inspec
t the power cord and each end of the cord for wear or damage. Unplug and replace the cord if it is damaged.
• If you use an extension cord with this unit, make sure that the total ampere rating on the products plugged into the extension cord does
not exceed the extension cord ampere rating.
Care During Use
• Do not walk on the power cord or allow anything to rest on it.
• Do not spill anything on the system. The best way to avoid spills is to not eat or drink near your system.
• When the printer is turned off, a small amount of electrical current still flows through the Printer. To avoid electrical shock, always unpl
ug all power cables, before cleaning the system.
• Unplug the system from the wall outlet and refer servicing to qualified personnel if:
-The power cord or plug is damaged.
-Liquid has been spilled into the system.
-The system does not operate properly when the operating instructions are followed.
-The system was dropped or the casing is damaged.
-The system performance changes.
3
Page 4

Table of Contents
Important Safety Instruction...................................................................................................................................................2
• Power Cord Requirements......................................................................................................................................................3
1. Getting Started....................................................................................................................................................................6
• What’s Included.......................................................................................................................................................... 6
• Product View............................................................................................................................................................... 7
• Installing and Removing Cartridges…………………………………………………………..………………..…….………..7
• Connecting the Power Cord..........................................................................................................................................9
• Using Memory Cards...................................................................................................................................................10
2. Remote Control & Instruction………………………………………………………………………………………………………11
• Remote control button functions………………………………………………………………..……………………………..11
• Replacing battery…………………………………………………………………………………..…………………………...12
3. System Setup.....................................................................................................................................................................13
• Setup……………………………………………………………………………………………………………………………..13
• Dimmer…………………………………………………………………………………………………………………………..16
• File management………………………………………………………………………………………………………………..17
4. The Select Modes...............................................................................................................................................................20
• Slide Show Mode........................................................................................................................................................20
• Photo Mode................................................................................................................................................................20
• ID Photo Mode............................................................................................................................................................21
• Music Mode................................................................................................................................................................22
• Video Mode.................................................................................................................................................................23
4
Page 5

5. Printing...............................................................................................................................................................................24
• Printing From Memory Cards......................................................................................................................................24
• Print All images…………………………………………………………………………………………………………………24
• Print single image……................................................................................................................................................25
6. Update Firmware…………………………………………………………………………………………………………………….26
7. Troubleshooting................................................................................................................................................................27
8. Maintenance of Printer......................................................................................................................................................28
9. Technical Specifications and Recycling..........................................................................................................................29
• Technical Specification………………………………………………………………………………………………………...29
• CE Disclaimer.............................................................................................................................................................29
• FCC Disclaimer...........................................................................................................................................................29
10. Index............................................................................................................................................................................... 31
Table of Contents
5
Page 6
1 Getting Started
CONGRATULATIONS on your purchase of the Photo Frame Printer. You can print images with the photo frame printer di
rectly memory card without connecting to a computer. Please read carefully and follow all instructions in the manual and tho
se marked on the product before first use. Failing to follow these warnings could result in personal injury or damage to the d
evice. Also, remember to keep this User’s Manual in a convenient location for future reference.
Outstanding features:
--World 1st Photo Frame Printer --Super Convenient (supports MS/MMC/SD/xD/CF cards and USB)
--Slide Show --Highest Resolution Quality
--Superior Image Printing Quality --Enjoy Your Photo With Family
--Super Easy (Crop, rotate, zoom images) --Support All Kinds of ID Photo
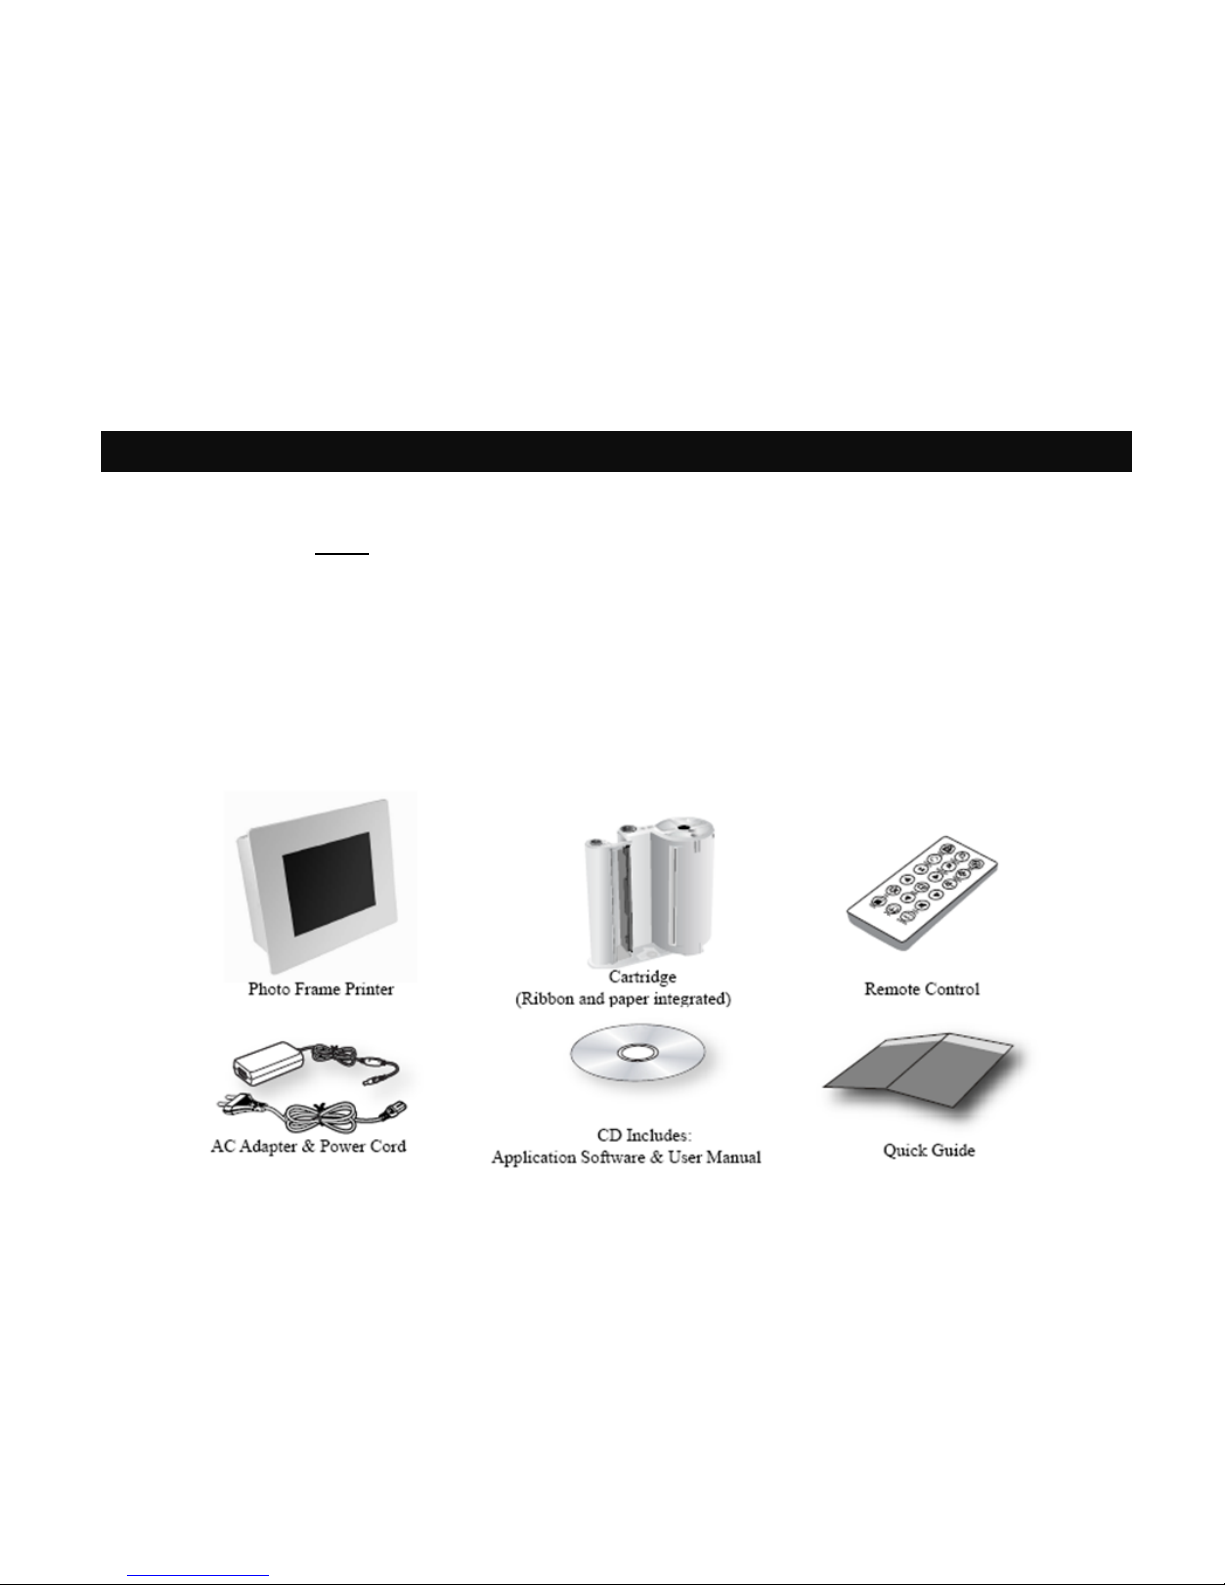
* What's Included
6
Page 7
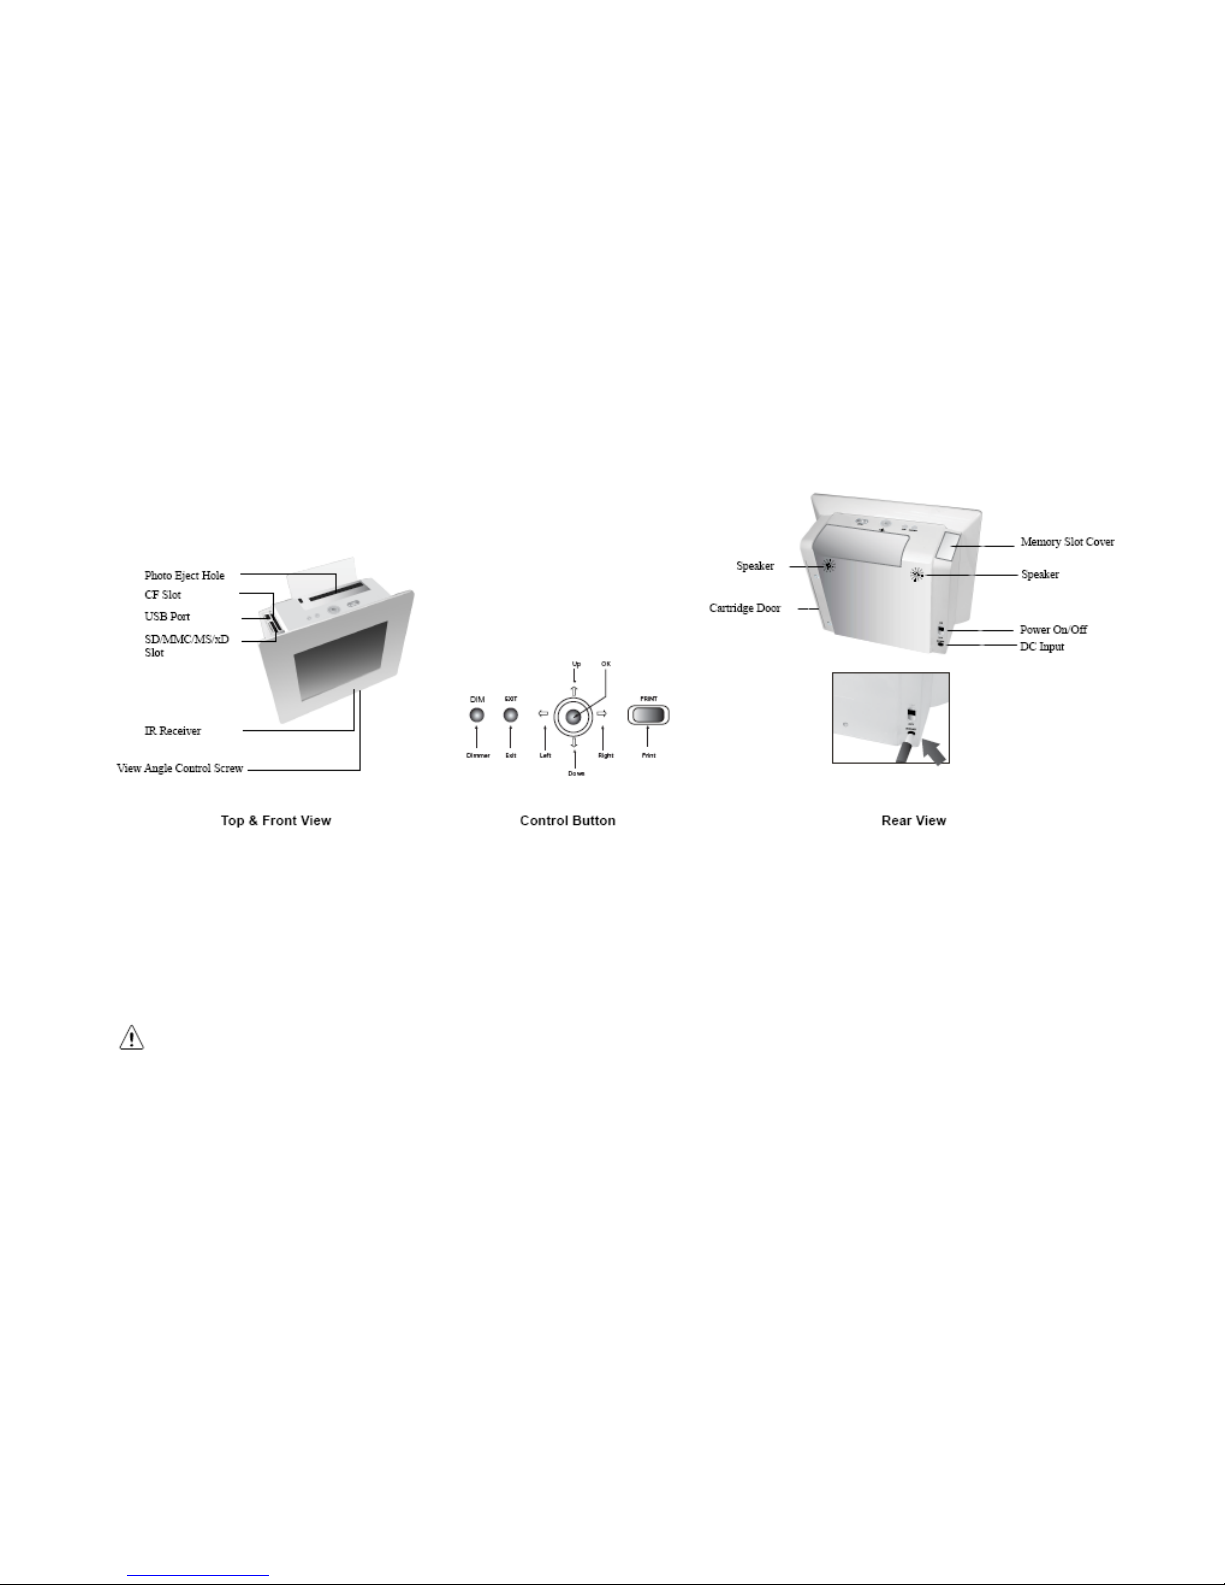
• Product View
• Installing and Removing Cartridges
Use only replacement parts and accessories recommended by manufacturer.
• Do not use this product in areas classified as hazardous. Such areas include patient care areas of medical and dental facili
ties, oxygen rich environments, or industrial areas.
CAUTION: Do not use sharp objects, such as a knife or scissors, to open the ribbon cartridge package. You could
damage the surface of the ribbon cartridge. Do not touch the ribbon cartridge film. Keep the ribbon cartridge where the air i
s not too humid and the temperature is not too high and do not expose it to light directly.
7
Page 8
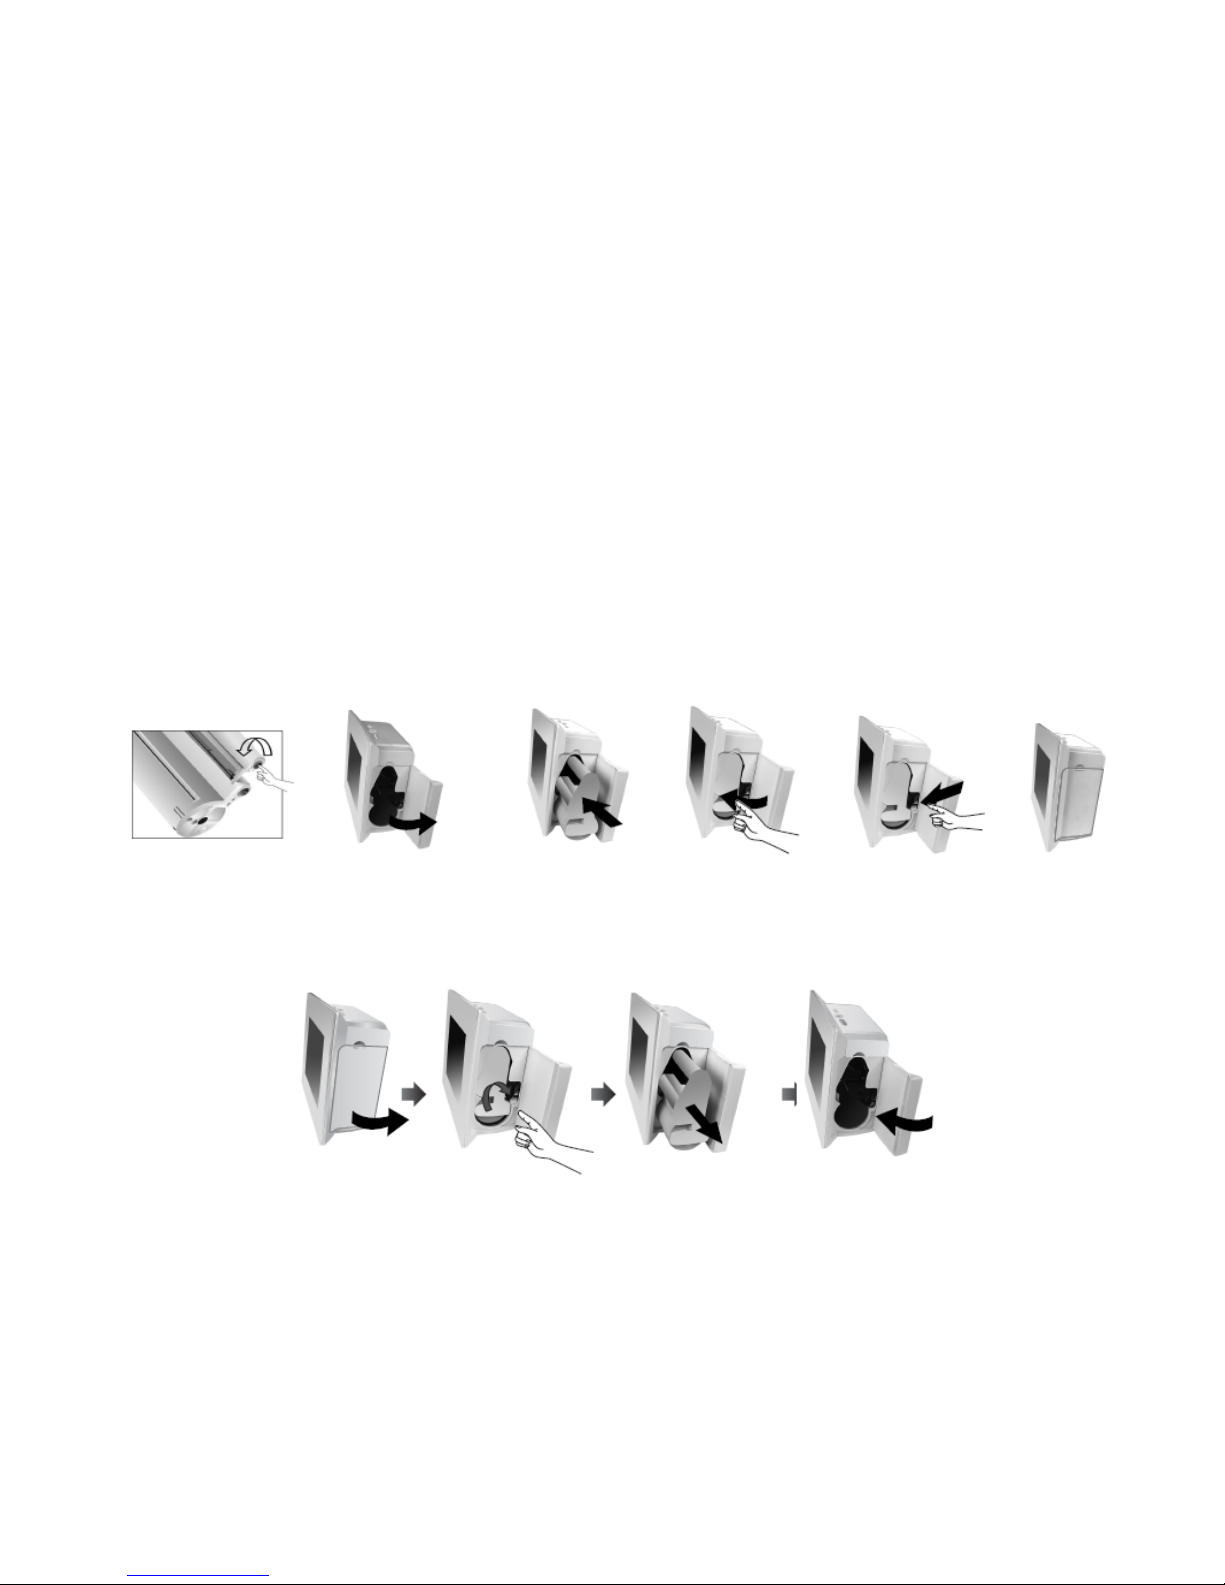
To Install the Cartridge
To Install the Cartridge
• Power off
• After removing the package from the cartridge, rotate the roller counterclockwise to smooth out wrinkles
• or uneven areas in the film by finger as the below drawing. If the film is not even, it could be damaged during installation.
• Open the cartridge door
• Insert the cartridge in the direction as illustrated.
• Push the cartridge until it is locked by black lever
• Make sure that the cartridge is under the lever
• Close the cartridge door then Power on
To Remove or Replace the Cartridge
• Open the cartridge door.
• Push the lever to the right
• Pull the existing cartridge out
• Close the cartridge door
8
Page 9

• Connecting the Power Cord
To turn on the printer, you need the power cord and the power adapter. Connect the power adapter to the printer and conne
ct the power cord to the wall outlet or other power source.
CAUTION: Do not disassemble the printer when the printer is turned on. There is danger of electric shock.
1. Connect the end of the power adapter to the printer.
2. Connect the power cord to the power adapter.
3. Connect the cord to the wall outlet or power source. Make sure the power adapter does not block the printer’s rear apertur
e.
4. Push up the Power On/Off button. The printer will be turned on after about 5 seconds.
9
Page 10
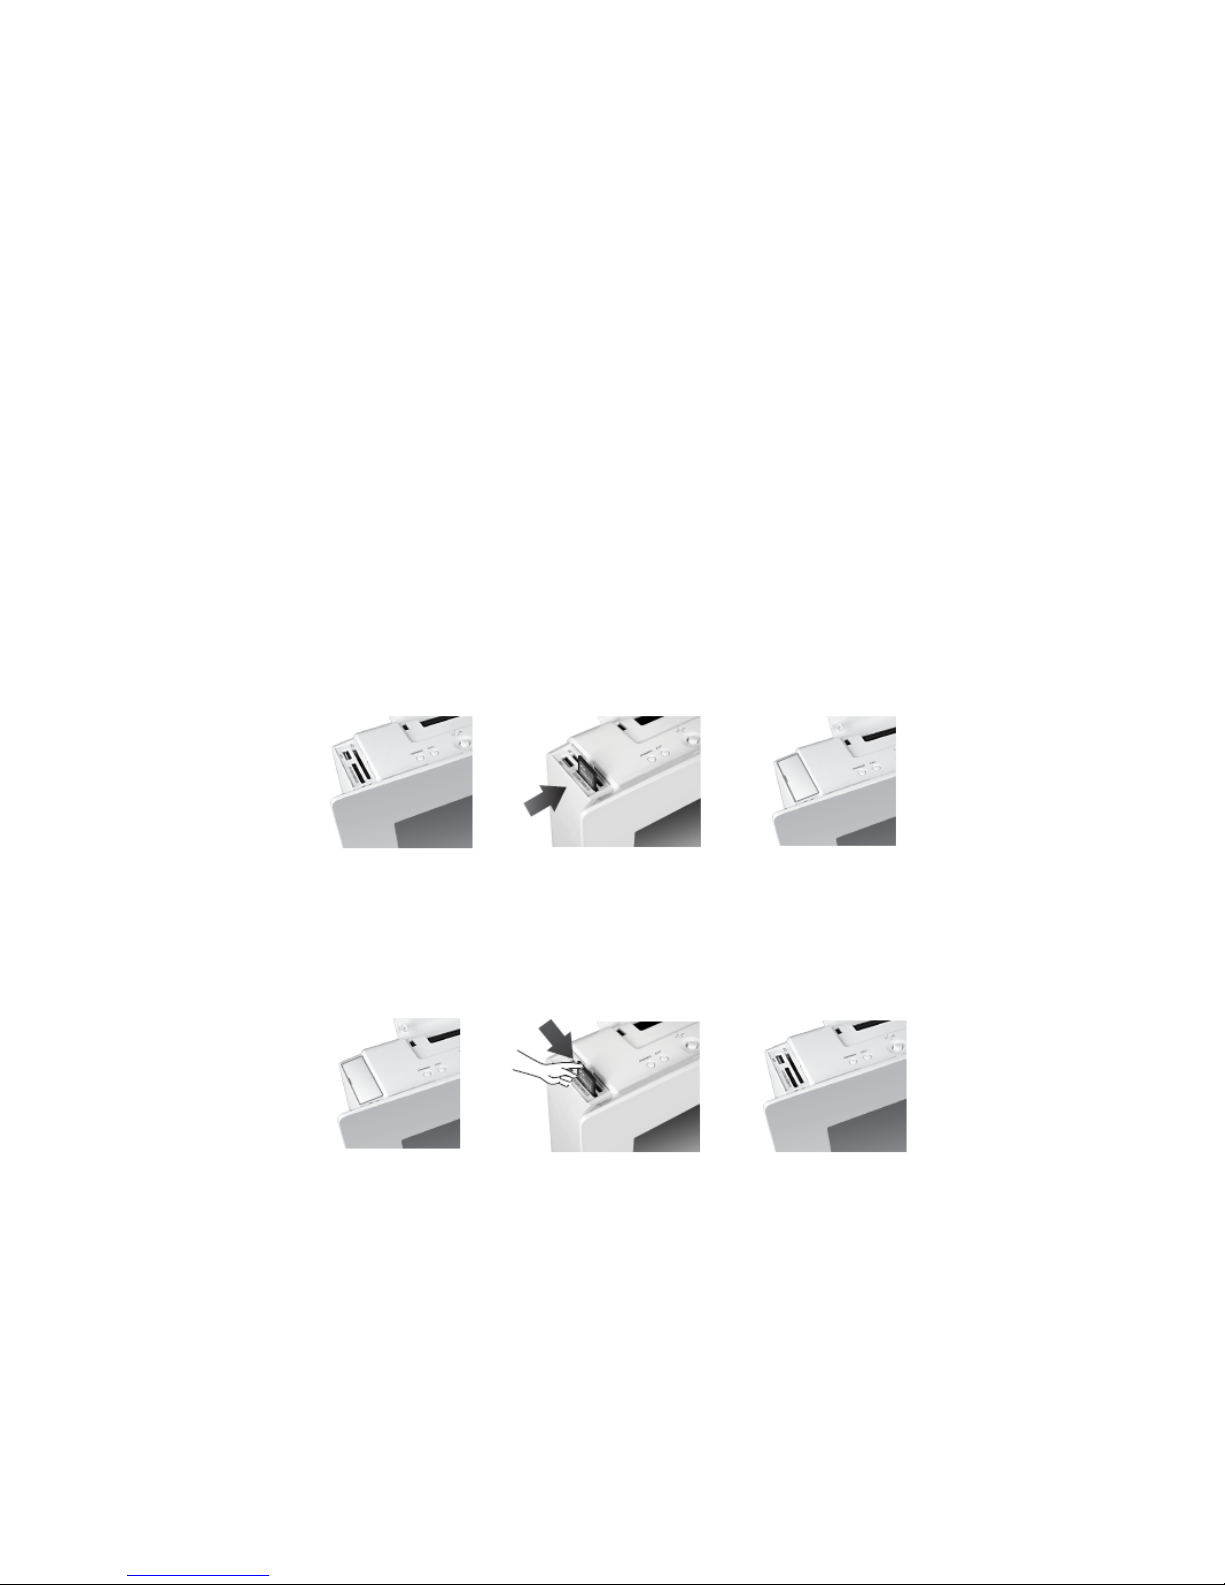
• Using Memory Cards
This printer can read six kinds of memory cards. Insert one or multi memory card . Do not force a card into the memory card
slot as this may cause damage to your printer. There are many kinds of memory cards, and each memory card has many dif
ferent sub types. In some cases a newly launched memory card may not be supported by your printer, even if it is a kind of
memory card that is available with your printer. Do not attempt to insert a non-supported memory card into the printer. Do not
attempt to insert a memory card that has dust or dirt on its surface. This may cause problems.
To Insert an Memory Card
1. Slide the memory card door to right to open.
2. Push the card in to SD/MMC/MS/xD or CF card or USB slot.
NOTE: Make sure the side and direction is correct.
To Remove an Memory Card
1. Slide the memory card door right to open.
2. Use your fingers, push to remove the memory card.
3. Press the memory card. Release until you feel resistance
10
Page 11

2. Remote Control &Instruction
• Remote Control button Functions
Buttons Description
Zoom In/Out Increase/ Decrease the current p
hoto.
Available in ID Photo only.
Exit Exit current operation/window
Volume Up/Down Adjust the volume as desired.
Up/Down/
Left/Right Arrow
Move your selection up, down, le
ft and right
Mute Switch the sound off.
ID Photo Display ID Photo menu
Card Switch to select card page
Slide Show Start Slideshow
Dimmer Dim the screen until blackout.
Enter Enter your selection.
Play/Pause Play/pause music and video clips
.
Rotate Rotate photos 90 degrees each
clockwi
se.
11
Remote Control
Instructions
Page 12

12
• Replace the remote control battery
To remove the battery
1. Turn back the remote control.
2. Push the lever right.
3. Slide the battery tray then release the lever to open the battery tray.
4. Remove the battery
To install the battery
1. Make sure the polarity is correct.
2. Push the battery tray towards the remote control.
Page 13

3. System Setup
After the system is ready, you can set up system as follows:
1. Press the Exit button until Set up screen appear
2. Use the direction arrows on the remote control (Up, Down, buttons) or on the Photo Frame Printer to select a menu.
3. Press the Right button on the remote control or the OK button on the Photo Frame Printer to enter.
4. Press the Exit button to finish Set up
Set up Main Menu
First Submenu
Second Submenu
Third Submenu
Slide Show Slide Interval
5 seconds
10 seconds
30 seconds
60 seconds
Note:
System ready, If you turn on the button, following image is on.
When the select mode screen is on, it starts a slide show automatically.
Exit until Setup screen appears.
13
• Setup
Page 14

14
Set up Main Menu
First Submenu
Second Submenu
Third Submenu
Slide Show
Auto Slide
Off
5 seconds
10 seconds
30 seconds
60 seconds
Slide Effect
All
Curtain
Shutter
Wipe
Background Sound
Off
On
Audio Setup
Set Beep Sound
Off
Small
Large
Speaker Sound
Turn Off
Turn On
Print Setup
Paper Full
Image Full
Display Setup
Image Full
Wide Full
Screen Full
Page 15

Set up Main Menu
First Submenu
Second Submenu Third Submenu
System Setup
Language
(Some Countries does
Not support all langu
ages)
English
Deutsch
Dutch
French
Greek
Italian
Korean
Portuguese
Russian
Spanish
Memory Format
Quick Format
Format internal storage?
Yes/No
Format
Format internal storage?
Yes/No
Setup Initialize Setup Initialize?
Yes
No
File Management Files
Image
Do not support store on same storage.
OK
Video
Memory Info
Internal Flash
Used x KB
Unused x KB
External Flash
Used x KB
Unused x KB
15
Page 16

• Dimmer
• Press Dim button on the top side of the unit or the remote control to adjust brightness/tint.
• You can dim the screen until blackout in any mode when the unit is powered on to suit your environment.
100% 90% 80% 70% 60%
Blackout White & Black 30% 40% 50%
16
Set up Main Menu
First Submenu
Second Submenu
Third Submenu
System Info
Manufacture .
Print Version PFP/V
HW Version
SW Version PFP-xV
Page 17

• How to copy the file from the external memory to internal memory
Insert external memory card into the slot
In the select mode, Press “Exit” button to enter the Set up.
Swing the Up or Down on the Unit ,or Press Up or Down buttons on the remote control to sel
ect File management.
Press “Enter” to access the File management.
1. Copy files
move to cursor to select the file name you want to copy
Press “Enter” button on the file name which you want to copy.
To cancel the file selection, Press “Enter” again.
Swing the Up and Down on the Unit or Press Up and Down button on the remote control to
select additional files to copy.
Press “Enter” button
Press ▶ button to copy the selected file
Press ▶ ∥button to get inside the folder.
Press ‘Yes’ at pop up ‘Save selected file(s) to internal storage?’
The selected file is copied into the internal memory.
Press “Exit” to back to previous screen.
• File management
17
Page 18

• How to copy the file from the external memory to internal memory
2. Copy folders including inside all files
Swing the Up and Down on the Unit or Press Up and Down buttons on the remote control to
select the folder which you want to copy.
Press “Enter” to select folder.
To cancel the folder selection, Press ”Enter” again.
Press “Enter” to select additional folders to copy.
Press ▶ button to copy all the files inside a folder.
Press ‘Yes’ at pop up ‘Save selected file(s) to internal storage?’
The selected folders are copied into the internal memory.
Press “Exit” to back to previous screen.
• File management
18
Page 19

In the select mode, Press “Exit” button to enter the Set up.
Select and “Enter” the File management.
1. Delete files.
Press “Enter” button on the file name which you want to delete.
Press “Enter” button to select additional files to delete.
Press ▶∥ button to enter into the folder
To cancel the file selection, Press “Enter” again.
Press ◀ button to delete the selected file.
Press ‘Yes’ at pop up ‘Delete selected file(s)?’
The selected file is deleted.
Delete files in External memory is exhibited.
2. Delete the folders including all files inside of folder .
Press Enter to select folder.
Press ◀ button to delete all the files inside a folder.
To cancel the folder selection, press “Enter” again.
Press ‘Yes’ at pop up ‘Delete selected file(s)?’
Press “Exit” to back to previous screen.
• How to delete the file from the internal memory
File management
19
Page 20

4. The Select Mode
• Slide Show Mode
1. Simply press “Slide show” button on the remote control to select the Slideshow.
2. Press the ◀ and ▶ arrows on the remote control to select the Slideshow on Select Mode.
3. Swing the L and R on the Photo Frame Printer to select the Slideshow on Select Mode
4. Press the “Rotate” button to rotate the existing image.
5. Press “Exit” button to back to previous screen
• Photo Mode
1. Press the and arrows on the remote control to select Photo on Select Mode
2. Swing the L and R buttons on the Photo Frame Printer to select Photo on Select Mode.
3. Press the “Enter” button on the Photo Frame Printer to access. Thumbnail of all the pictures saved in the current selected
memory will show 12 ones each page on screen.
4. Press the direction arrows on the remote control or swing the left, right, Up, down and “push “ to enter on the Photo Fram
e Printer to select the desired picture. Press the “Enter” button on the Photo Frame Printer to enter full screen immediatel
y.
5. Press the “Rotate” button to rotate the image.
6. Press “Print” button to current image
7. Press “Exit” button to back to previous screen.
20
Page 21

•
ID Photo Mode
Do#you#find#it#troublesome#to#go#to#the#photocopy#studio#for#printing#ID#photos?#ID#Photo#mode#helps#you#to#remove#this#barrier!#!
Do#you#find#it#is#interesting#that#parts#of#some#photos#are#enjoyable?#ID#Photo#mode#help#you#realize#it!#Photo#Frame#Printer#series#su
pports#all#kinds#of#ID#photo#format.#
You can enter ID Photo mode simply by pressing “ID Photo” on the remote control
when the system is ready, pressing the ◀ and ▶ on the remote control or swing the Left and Right on the Photo Frame Pr
inter to select ID Photo.
Select a size using the direction arrows on the remote control or swing the Left , Right, Up and Down
Press the “Enter” button on the Photo Frame Printer or on the remote control to confirm the photo you want to print.
Select Photo you want to make ID Photo
• Press the “Enter” button to confirm.
• Press “zoom in” and “zoom out” to zoom the image.
• Press the Left and Right , Up and Down or the ▲,▼,◀ ,and ▶ on the remote control to
catch the crop point
• Press “Rotate” button to rotate the selected image.
• Press the “Enter” button to see all the ID Photo to be printed
• Press up and down ▲, ▼ buttons on the remote control to set the number of copy.
• Press “Print” button to start printing.
21
Page 22

• Music Mode
When the system is ready,
press the ◀ and ▶ on the remote control
Or swing the Left and Right on the Photo Frame Printer to select Music.
Press the “Enter” button to select music to play.
Press the ▲,▼ on the remote control to select a music file to play.
Press the “Play/Pause” button continually to playback the music and pause;
Press ▲,▼ to select previous and next music files
.
Press or to adjust the volume.
Press to mute.
Press Exit button to back to previous screen
22
Page 23

•
Video Mode
When the system is ready,
press the ◀ and ▶ on the remote control
Or swing the Left or Right on the Photo Frame Printer to select Video.
Press “Enter “button to select video to play
Press the ▲,▼ on the remote control to select a video file to play.
Press the Play/Pause button to playback and pause the video file.
Press “Exit” to exit the video. mode
23
Press or to adjust the volume.
Press to mute.
Page 24

5. Printing
• Printing From Memory Cards
This Photo Frame Printer can print images from six kinds of memory cards.
1. Insert the memory card. Details please refer To Insert an Memory Card on page 10.
2. Swing Left and Right buttons on the unit or and buttons on the remote control to SD/MMC.
3. Then press “Enter” button to enter the chosen memory card.
3. Press “Print” button at thumbnail view of 12 photos.
4. select “Yes” to print 12 photos.
5. Press “Enter” button to print.
6. 12 Photos on current screen will be printed
24
• Print all images:
Page 25

•
Print single image:
At Photo mode, enter 12 photos thumbnail view
1. Swing left and right buttons to select an image, or▲,▼, ◀ and ▶ on the remote control to a
ccess.
2. Press “Enter” button to selected photo
3. Press “Print” button to view full screen..
4. Swing up and down on the unit or ▲,▼ button on the remote control to increase or decrease
copies.
5. Press “Enter” button to Print
25
Page 26

6. Update Firmware
1. Power off the Printer.
2. Extract the attached file (pfp_x_vx.zip)
3. The extracted file name is "pfp_x_vxx.bin"
4. Save the extracted file to SD memory. ( Do not make a directory for saving this file.)
5. Insert the SD memory to SD memory slot and power on.
6. When the set ask you Firmware Update, select "Yes“
7. During F/W update do not power off. ( During F/W update, the LCD display blink RED and Black.)
8. After completing the F/W update, The set reboot automatically.
9. And then the set ask you Firmware Update, select "No“
10. For confirming Update
1) Press Exit Key (Go to Set up mode)
2) Select "System info" and wait about 5sec
3) If you can see that SW version is "PFP-x-Vxx", the F/W update is completed.
11. Take out the SD card from the slot.
Firmware download : www.prinics.com
26
Page 27

7. Troubleshooting
Symptoms
Reasons
Solution
Error message of ‘No Cartridge’
is shown on the pop up windo
w while Print button is pressed.
1) Cartridge is not loaded up;
2) The paper and ribbon in a car
tridge are all used up.
1) Reload up a cartridge.
2) Check paper and ribbon in the cartridge. If they
are used up, replace new ones.
In case of pressing the Print but
ton or in case that the cartridge
is all used during the continuo
us printing, the error message o
f “Replace the Cartridge’ is sho
wn in the pop up window.
1) One cartridge can print up to
36 copies;
2) The paper and ribbon in a car
tridge are all used up.
1) Replace a cartridge.
2) Check paper and ribbon in the cartridge.
If they are used up, replace new ones.
No sound 1) Volume is set at 0;
2) Mute button is pressed.
1) Press button to increase the volume.
Dark screen 1) Dim button is pressed.
2) Unit doesn’t turn on or AC ad
aptor connection is improper.
1) Press Dim button to adjust brightness.
2) Check if the unit is turned on or AC adaptor is pro
perly connected.
Some files cannot be displayed The card is not compatible with
the unit or the file format is incor
rect.
Use another card or change to a correct file format.
Cannot insert memory card The card is being inserted in the
wrong direction.
Insert the cards in correct direction.
Displays unrecognizable code Check if correct language optio
n is set.
Set language selection in the system setup menu.
27
Page 28

8. Maintenance of Printer
Your Photo Frame Printer should only be operated within the following environment.
• Temperature: 50°~ 89° Fahrenheit (10º~ 32º Celsius)
• Humidity: 20~ 80% relative humidity, non condensing
The life and the image quality may be impaired when the unit is operated beyond these conditions.
Clean the Outside
1. Press the On/Off button to turn the printer off and disconnect the power adapter.
2. Clean the outside of the printer using a soft cloth.
3. Do not use a soaps as they may cause damage to the print head.
• NEVER immerse any part of the Photo Frame Printer or its accessories into any fluid or liquid.
• ALWAYS remove dust or stains on the Photo Frame Printer with a soft cloth or neutral detergent.
• NEVER place hot items on the surface of the Photo Frame Printer.
• DO NOT attempt to open or disassemble the Photo Frame Printer because such doing will violate any warranty claim.
28
Photo Frame Printer Cautions
Page 29

9. Technical Specifications and Recycling
•
Technical Specifications
Product 8” LCD Screen Photo Frame Printer
Resolution 800 x 600 pixels
Remote Control 1 Piece
Input Power 100-240V
Output Power 24V/2.5A
AC Adapter 24V/2.5A
Speaker 2 x 1.0W
USB Host USB 1.1 Full Speed
Input Formats Secure Digital™, Multi Media Card™, Compact Flash™,
Memory Stick™, Memory Stick Pro™, Memory Stick Duo Card
Language
(Some countries do not support all languages)
Deutsch, Dutch, English, French, Greek, Italian, Korean, Portuguese, Russian, Spani
sh, Turkish.
File Format Supported JPEG, MPEG Standard
• CE Disclaimer
This unit complies directives of CE marketing.
• FCC Disclaimer
The Photo Frame Printer complies with part 15 of the FCC rules. Operation is subject to the following two conditions: (1) this
device may not cause harmful interference, and (2) this device must accept any interference received, including interference
that may cause undesired operation.
Warning: Changes or modifications to this unit not expressly approved by the party responsible for compliance could void th
e user’s authority to operate the equipment.
NOTE: This equipment has been tested and found to comply with the limits for Class B digital device, pursuant to Part 15 of t
he FCC Rules. These limits are designed to provide reasonable protection against harmful interference in a residential install
ation. This equipment generates, uses and can radiate radio frequency energy and, if not installed and used in accordance w
ith the instructions, may cause harmful interference to radio communications.
29
Page 30

However, there is no guarantee that interference will not occur in a particular installation. If this equipment does cause harm
ful interference to radio or television reception, which can be determined by turning the equipment off and on, the user is en
couraged to try to correct the interference by one or more of the following measures:
• Reorient or relocate the receiving antenna.
• Increase the separation between the equipment and receiver.
• Connect the equipment into an outlet on a circuit different from that to which the receiver is needed.
• Consult the dealer or an experienced radio/TV technician for help.
Shielded cable must be used with this unit to ensure compliance with the Class B FCC limits.
Under the environment with electrostatic discharge, the product may malfunction and require user to reset the product.
WEEE:
This product contains electrical or electronic materials. The presence of these materials may, if not disposed of properly, hav
e potential adverse effects on the environment and human health. Presence of this label on the product means it should not
be disposed of as unsorted waste and must be collected separately. As a consumer, you are responsible for ensuring that thi
s product is disposed of properly.
30
Page 31

10. Index
31
C Power Cord Requirements (p3)
CE Disclaimer (p24) Product View (p7)
Connecting the Power Cord (p9) Photo Mode (p16)
D Print all images (p24)
Dimmer (p15) Printing (p19)
F Printing From Memory Cards (p19)
FCC Disclaimer (p28) R
File copy (p17) Remote Control & Instruction (p11)
File delete (p19) S
G Slide Show Mode (p15)
Getting Started (p6) Setup (p13)
I T
Important Safety Instruction (p2) Table of Contents (p4)
Installing and Removing Cartridge (p7) Troubleshooting (p26)
ID Photo Mode (p16) Technical Specifications and Recycling (p28)
Index (p30) U
L Using Memory Cards (p10)
Language setup (p15) Update Firmware (p25)
M V
Music Mode (p19) Video Mode (p18)
Maintenance of Printer (p27) W
P What’s Included (p6)
 Loading...