

Page 1

Page 2

AT-7 User Guide
3
Safety Instructions
Product Features
Product and Components
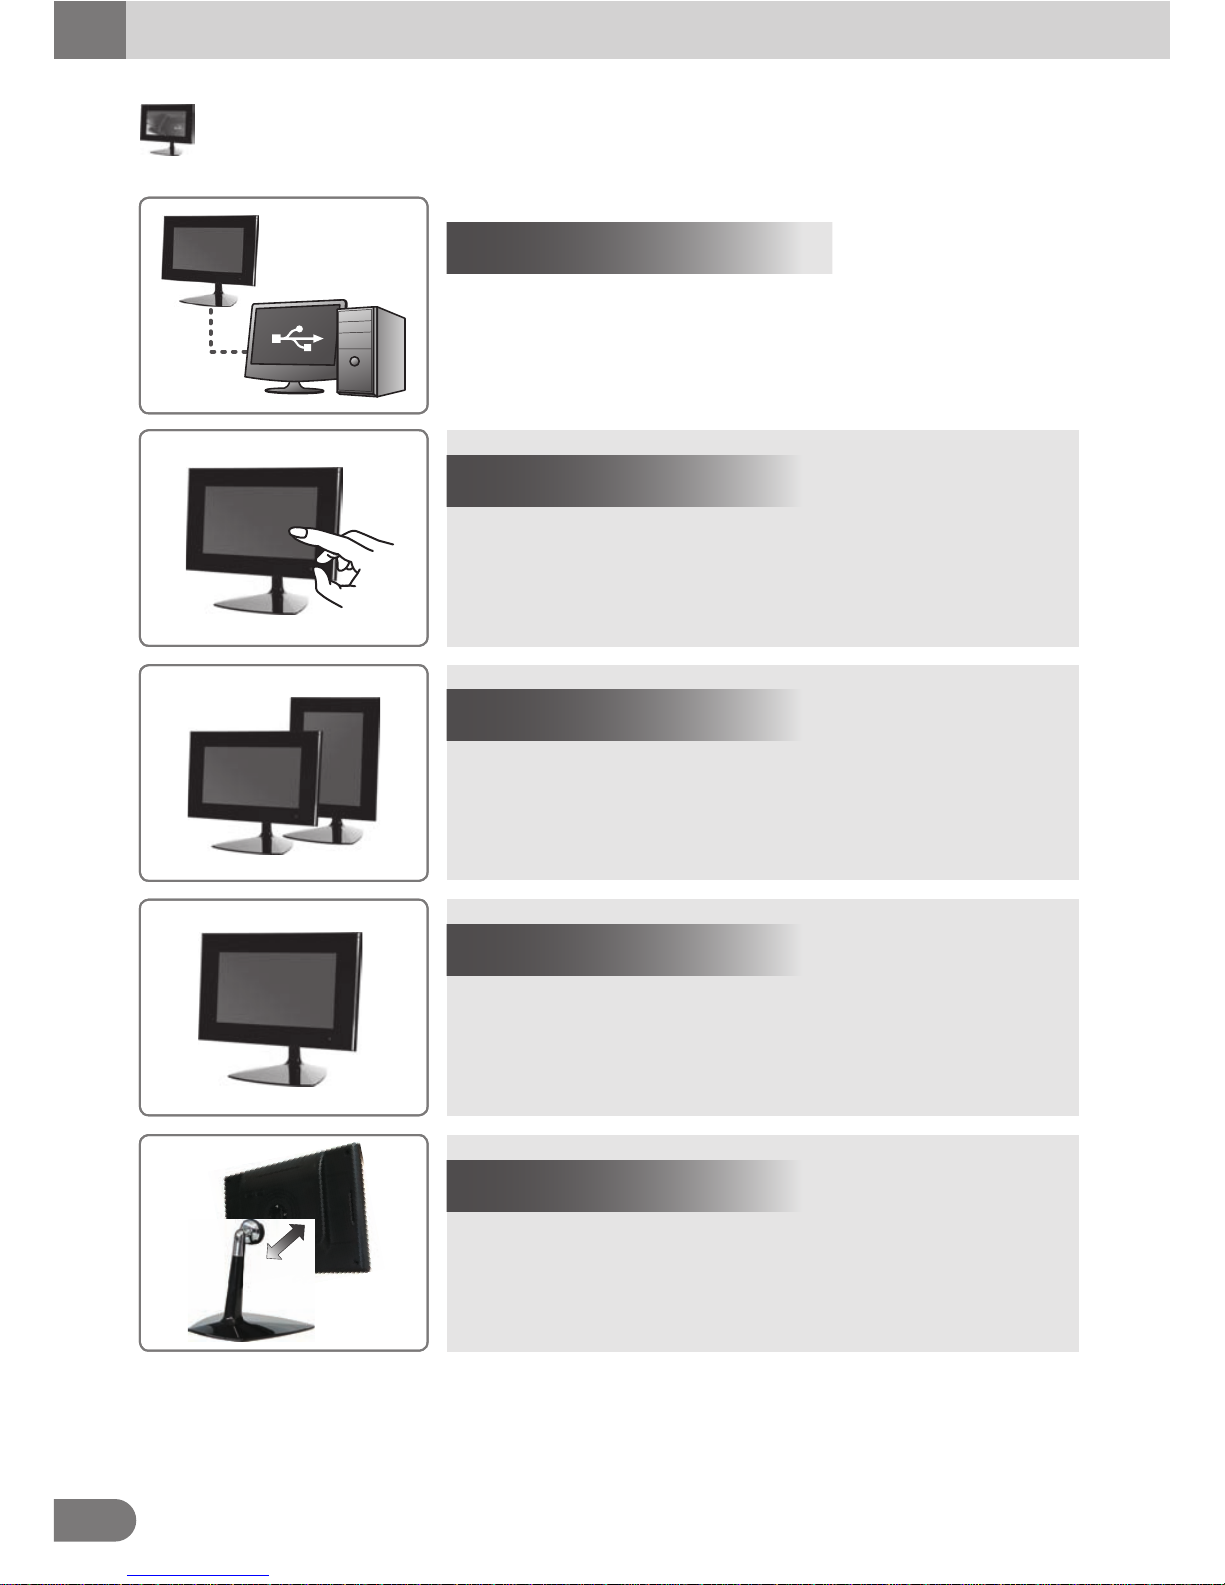
Identify each part
Making connecting to your PC
Driver Program Installation (For Windows OS)
USB Monter
Touch
Configuration Touchside Utility
Driver Program Installation (For Mac OS)
USB Monter
Touch
Configuration Touchside Utility
Using Touch USB sub monitors
Troubleshooting
Specifications
FCC Information
※ It is required to install the USB monitor driver and the touch driver
in order to use "IMO touch" monitor properly.
4
6
7
8
9
10
10
11
15
21
21
21
23
26
28
31
32
..........................................................
............................................................
...............................................
............................................................
........................................
...............
........................................................
..................................................................
...........................
........................
........................................................
..................................................................
............................
.....................................
..............................................................
..................................................................
..............................................................
CONTENTS
Page 3

4
Safety Instructions
Precautions
Safety
Before using this unit please read these operating instructions carefully.
Take special care to follow the warnings indicated on the unit itself as well as the safety
suggestions listed below. Afterwards keep them handy for future reference.
1. Power Source – The unit should be connected to USB Cable only of the type described
in the operating instructions or as marked on the unit.
2. Power Cord USB Cable Protection – USB Cable should be routed so that they are not
likely to be walked on or pinched by items placed upon or against them.
Never take hold of the USB Cable if your hands are wet, and always grasp the plug body when
connecting or disconnecting it.
3. Periods of non-use – When the unit is not in use turn off the power. When left unused for
a long period of time, the unit should be unplugged from the USB slot of the PC.
Installation
1. Water and Moisture – Do not use this unit near water, for example, near a bathtub, washbowl,
swimming pool or the like.
Damp basements should also be avoided.
2. Heat – The unit should be situated away from heat sources such as radiators and the like.
It also should not be placed in temperatures less than 5◦C (41◦F) or greater than 35◦C (95◦F).
Placement
1. Ventilation – The unit should be situated so that its location or position does not interfere
with its proper ventilation.
2. Foreign Material – Care should be taken so that objects do not fall into and liquids are not
spilled into the unit.
Do not subject this unit to excessive smoke, dust, mechanical vibration or shock.
3. Stacking – Do not place heavy objects on top of the unit.
4. Surface – Place the unit on a flat and level surface.
5. Wall or Ceiling mount – The unit should not be mounted on the wall or ceiling unless specified
in the operating instructions.
Page 4

AT-7 User Guide
5
Safety Instructions
Maintenance
Service
Do not use any type of abrasive pad, scouring powder or solvent such as alcohol or benzene.
1. Damage Requiring Service – The unit should be serviced by a qualified service person when:
a. The Power supply cord(USB Cable) has been damaged; or
b. Objects have fallen or liquid has been spilled into the unit; or
c. The unit has been exposed to rain; or
d. The unit does not appear to operate normally or exhibits a marked change in performance; or
e. The unit has been dropped, or the enclosure is damaged.
2. Servicing – The user should not attempt to service the unit beyond described in the
operating instructions.
All other servicing should be referred to a qualified service personnel.
Page 5
6
Product Features
No power cable required.
Simple access to PC with USB cable.
High speed 2.0 USB interface.
Pivot function.
Bright 7” TFT active matrix LCD screen (800x480)
Brightness adjustable.
Application of removable type stand for portable use.
USB
Pivot function
High quality LCD panel
Full Touchscreen Interface
Touchscreen
Removable Stand
Page 6
AT-7 User Guide
7
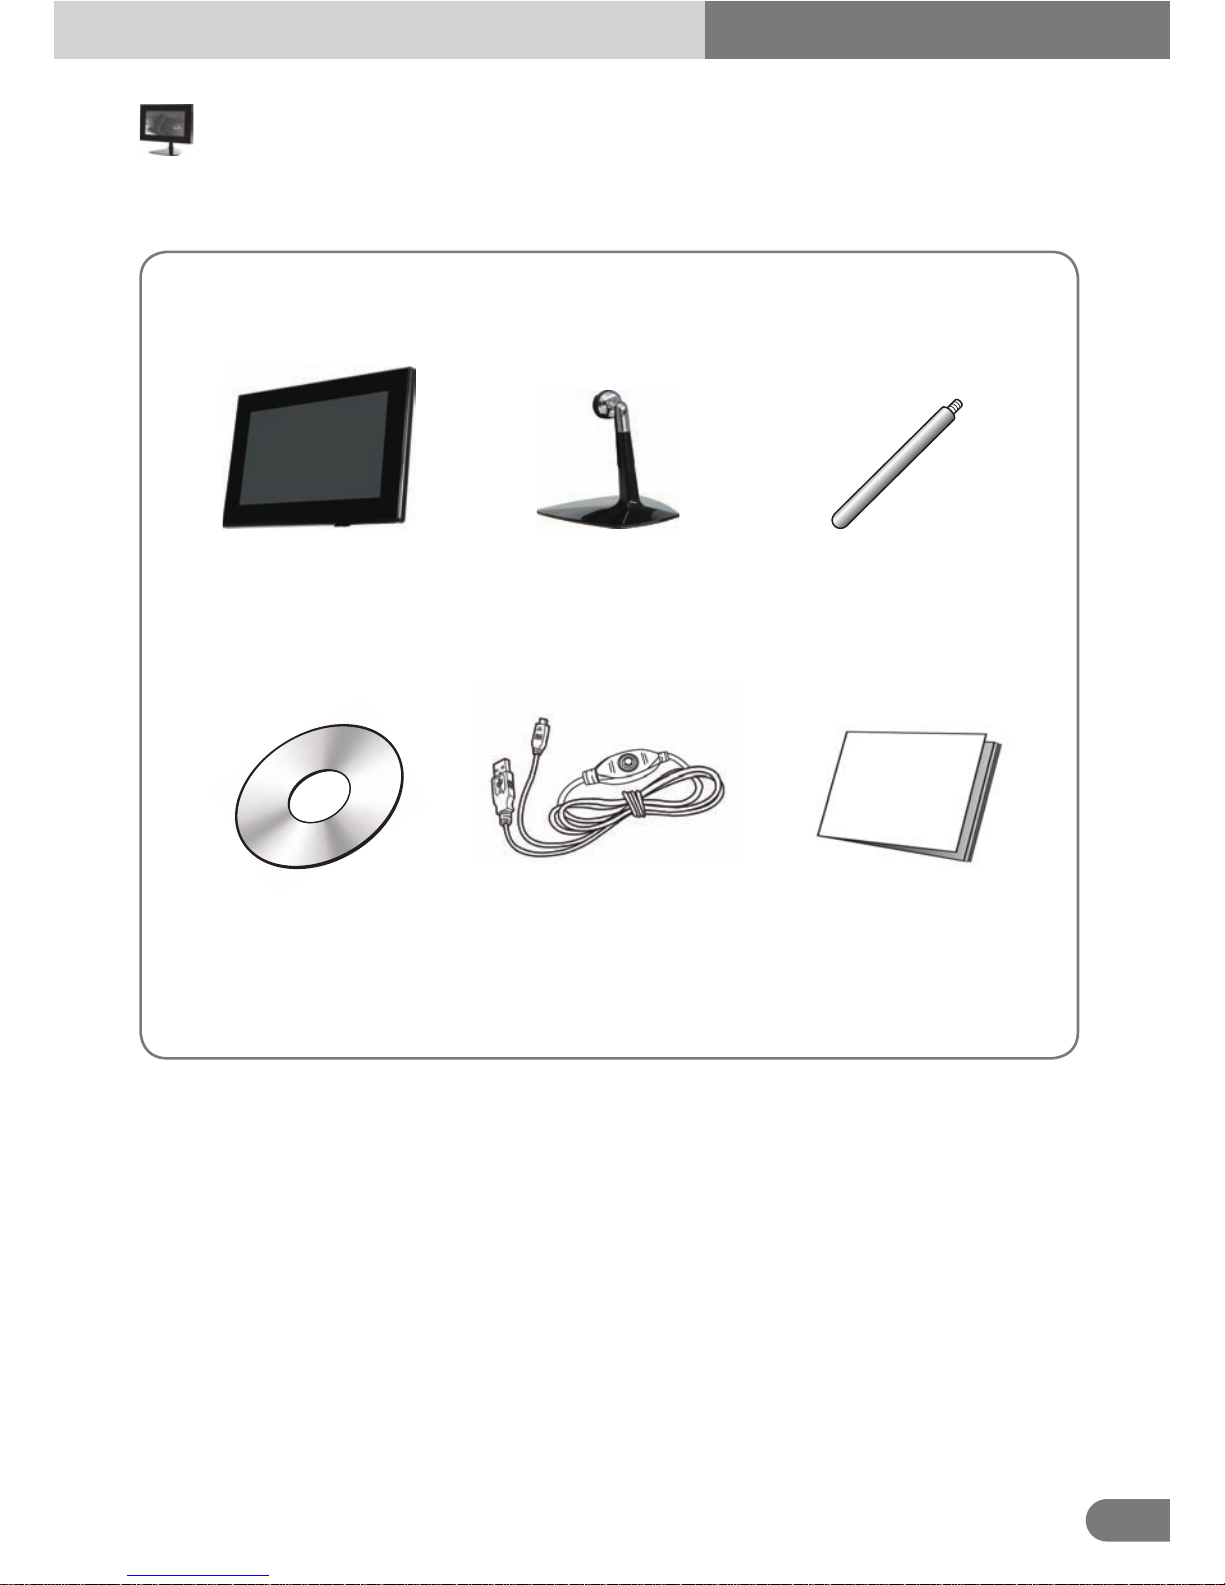
Product and Components
This product is packaged with the following components.
ManualInstallation CD
StandFrame Portable Stand
USB Cable
Page 7

8
The back of the product
It describes the appearance and the name of each part.
Some differences in appearance and function might occur depending on the model
Identify each part
① Brightness
Control Button
② USB Slot
④ Stand Joint
③
Stand Joint
⑤ Power Switch
No. Name Description
1 Brightness Control Button
2 USB Slot
[ + ] Set Brightness up.
[ - ] Set Brightness down.
Connect monitor to PC by using USB Cable.
3 Swivel type stand joint.
4 Stick type stand joint.
5 Switch the power on or off
Stand Joint
Power Switch
Page 8
9
AT-7 User Guide
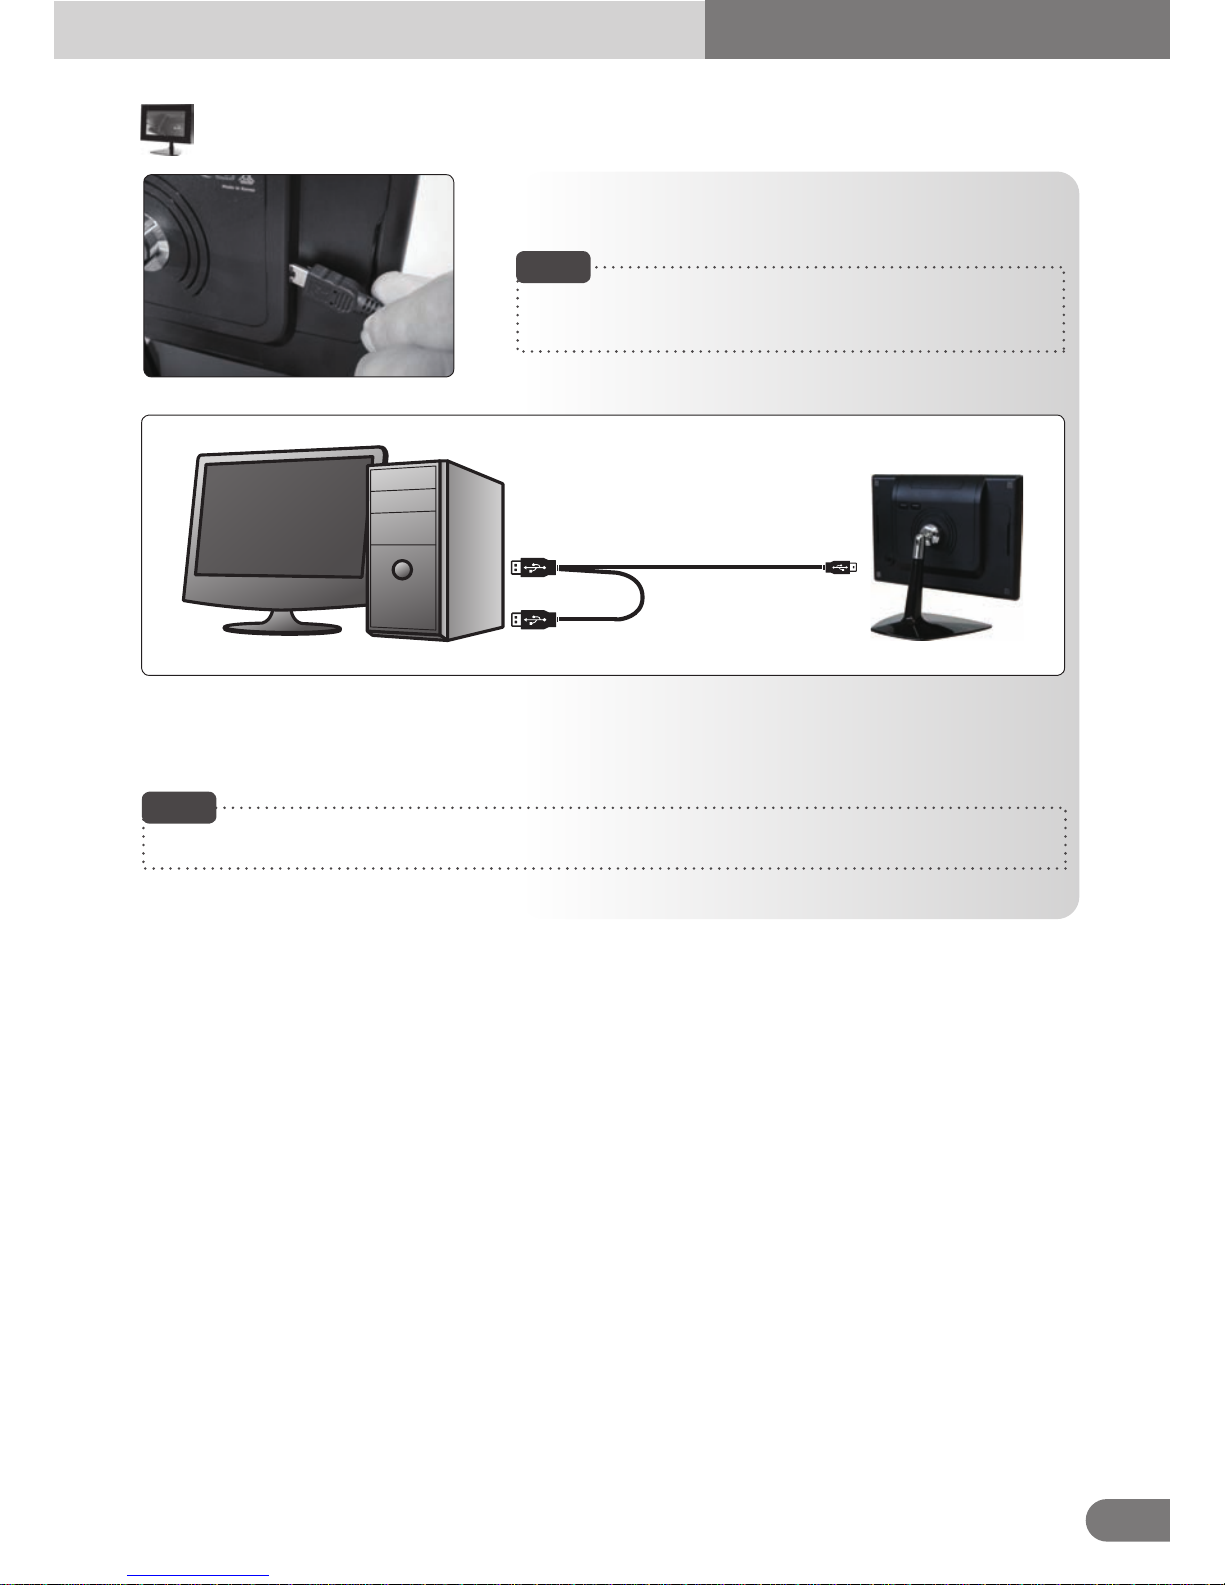
When connecting the USB cable to the PC’s USB port, connect [A] part to the PC and [C] part to
the device. Connect [B] part to the PC’s other USB port when there when there is insufficient
power supply from only one USB connection.
Connect the USB cable to the PC’s USB port and to the
device.
Note
Make sure that the PC’s power is turned off when connecting
the cable.
A
C
B
Making connecting to your PC
This product is powered by USB cable only.
Note
Page 9
10
Turn on the PC and connect the PC with the device by using the USB cable included with USB sub-monitor
(AT-7). When the device is connected to the PC using USB cables, adequate power will be supplied
to the device.
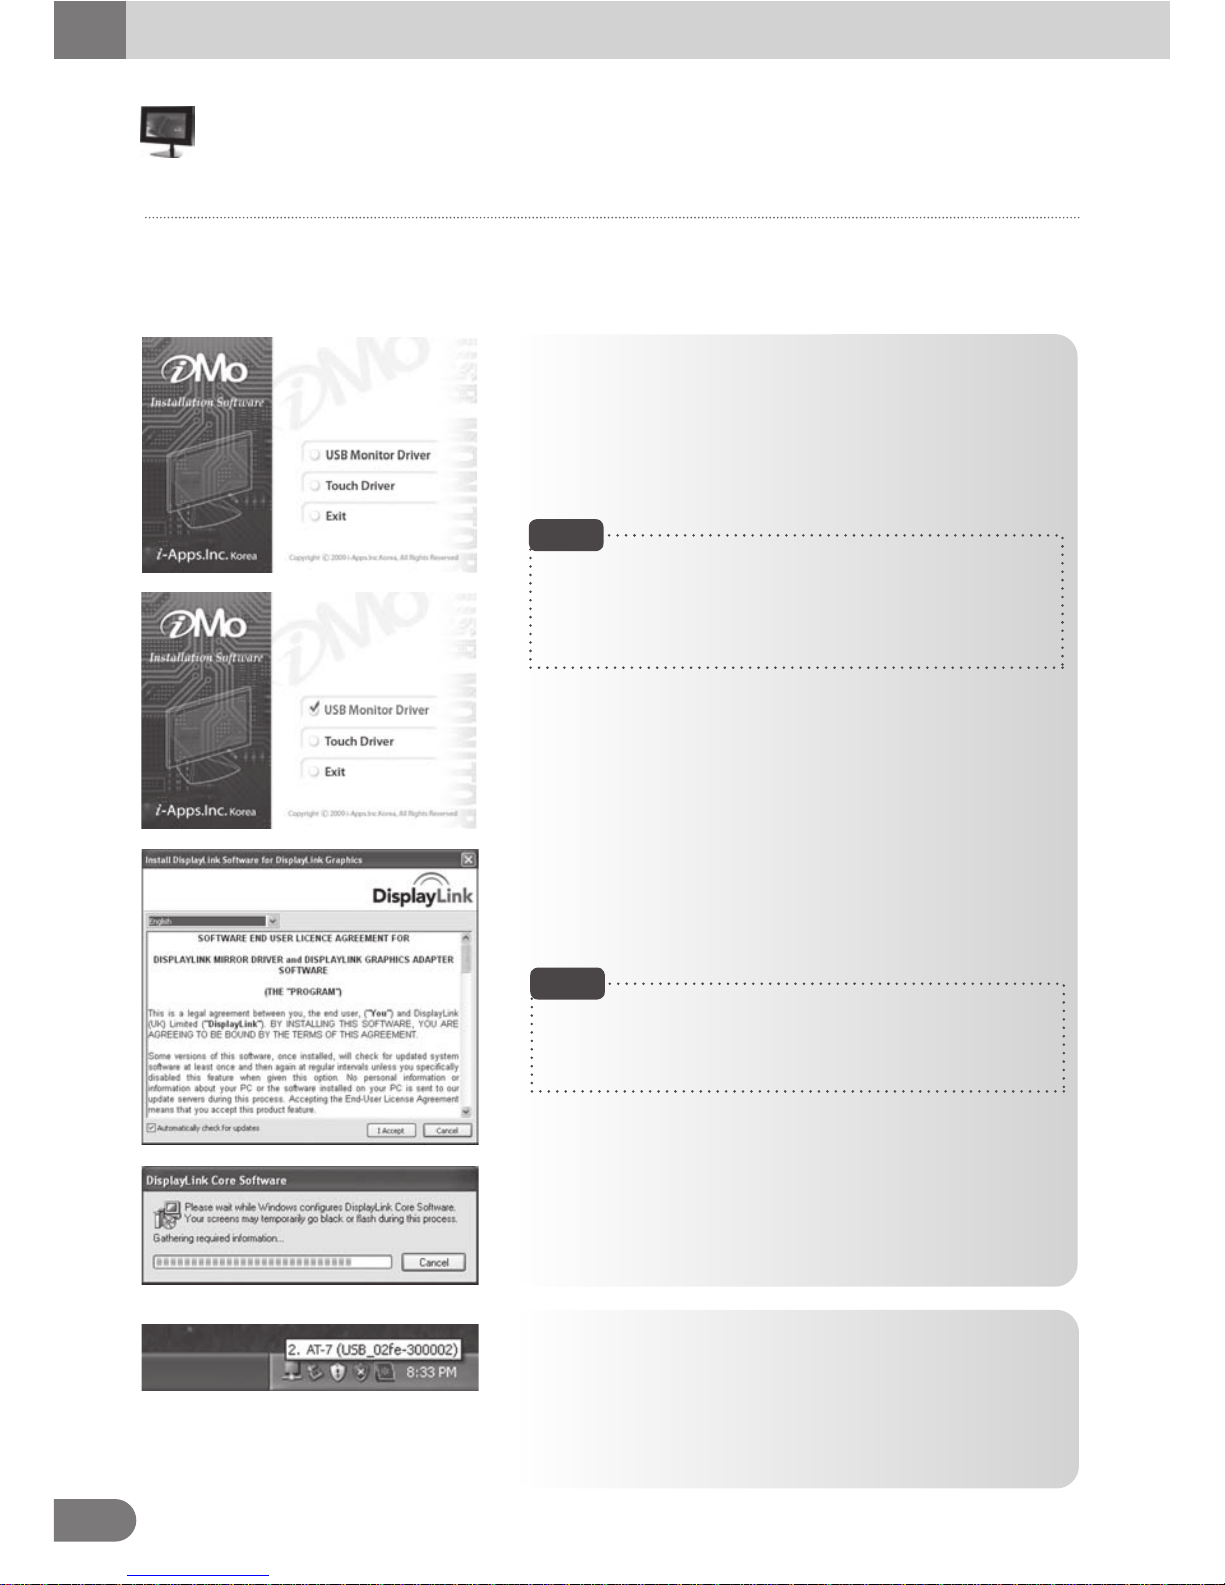
1. Insert the included installation CD.
When the CD is inserted, the driver Installer image will
be displayed
● USB Monitor Driver
● Touch Driver
● Exit
2. Select the ‘USB Monitor Driver’ button.
- When ‘Auto Install’ processing is not activated, click on the
“AutoRun” file on the driver CD for Installation.
- Power or USB cable disconnection, during the process of
installation may cause serious error on the PC or OS system.
Note
Driver Program Installation (For Windows OS)
4. USB installation program will be automatically started.
3. After selecting the ‘USB Monitor Driver, the installation
process will be displayed.
Click [Agree] to proceed with the installation process.
Terms of use will be displayed. Click [Agree].
Please operate the PC with the owner’s ID and password for
proper installations. Please read the terms of use thoroughly
before clicking [Agree] button.
● When [AT-7] icon is formed at the right corner of the
task bar, USB driver installation is completed.
● Remove the CD from the PC.
● Use [Remove Hardware Safely] function to remove the
USB cable safely.
● Reboot the PC.
Note
USB Monitor
Page 10
Driver Program Installation (For Windows OS)
1. Insert the included installation CD.
When the CD is inserted, the driver Installer image will
be displayed
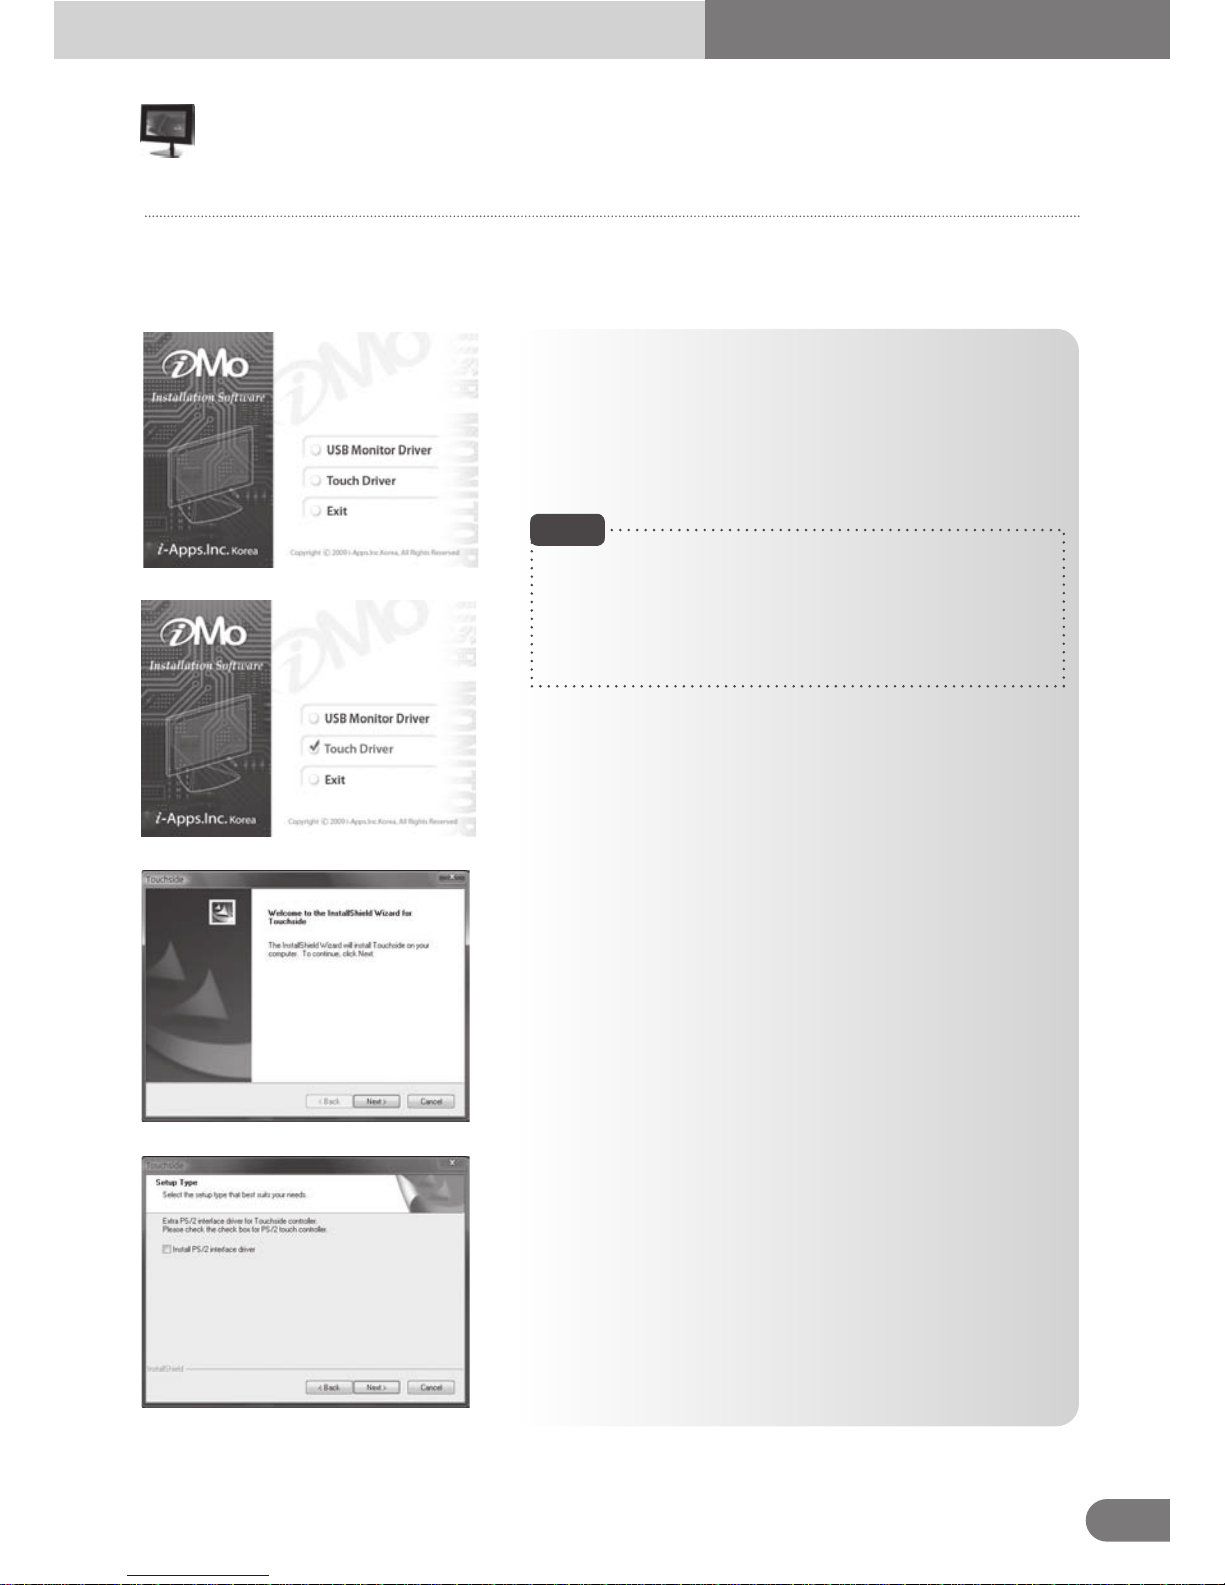
● USB Monitor Driver
● Touch Driver
● Exit
2. Select the‘Touch Driver’ button.
3. After selecting the ‘Touch Driver’ button, the driver package
installation wizard will guide user to install Touchside driver
software package. Click [Next] button to proceed installation.
4. The Installation wizard pops up below dialog to hint user to
check this check box if the PS/2 interface of touchscreen is
going to be used. By default, this check box is unchecked.
Then, press [Next] button to proceed installation.
- When ‘Auto Install’ processing is not activated, click on the
“AutoRun” file on the driver CD for Installation.
- Power or USB cable disconnection, during the process of
installation may cause serious error on the PC or OS system.
Note
Turn on the PC and connect the PC with the device by using the USB cable included with USB sub-monitor
(AT-7). When the device is connected to the PC using USB cables, adequate power will be supplied
to the device.
Touch
11
AT-7 User Guide
Page 11

12
Driver Program Installation (For Windows OS)
5. The installation pops up below dialog for calibration option.
Touchside provides 3 options for calibration.
● Every System boot up : The 4-point calibration utility
will launch automatically whenever the system boot up.
● Next System boot up : The 4-point calibration utility will
launch automatically at next system boot up.
● None : The 4-point calibration utility will NOT launch
automatically.
Choose the proper option, and click [Next] button to continue.
7. Touchside driver package supports multi monitors.
Please check the check box to support multi-monitor
feature. The multi-monitor setting property page will show
only when this check box is checked during installation.
Press [Next] to continue.
6. After selecting the ‘Touch Driver’ button, the driver package
installation wizard will guide user to install Touchside driver
software package. Click [Next] button to proceed installation.
8. The installation wizard pops up below dialog to let user
assign the target folder in local machine.
Press [Next] to continue.
Touch
Page 12

13
AT-7 User Guide
Driver Program Installation (For Windows OS)
9. The installation wizard pops up below dialog to show
the program folder. Press [Next]to continue.
11. After files copied, the wizard begins searching Touchside devices on COM ports.
10. The driver software files are being copied.
12. Once the serial Touchside device is found, the below
dialog pops up for user to confirm to install kernel mode
driver for this device.
Touch
Page 13

14
Driver Program Installation (For Windows OS)
13. After driver installed, below dialog pops up so that users do
calibration now.
14. Finally, the Touchside utility is launched. If PS/2 interface
of driver is installed, it needs to reboot system to make
sure the driver is installed.
● When [Touch side] icon is formed at the right corner of
the task bar, Touch driver installation is completed.
● Remove the CD from the PC.
● Use [Remove Hardware Safely] function to remove the
USB cable safely.
● Reboot the PC.
Touch
Page 14

15
AT-7 User Guide
Driver Program Installation (For Windows OS)
● The general property page in TouchSide utility shows all
of TouchSide touchscreen controllers installed as below,
including RS232, USB and PS2 interfaces.
● User can select the controller list in the window to do
configuration for it. When user use a mouse or other input
device to select the controller device in the controller list
window, The controller name will be shown in the title bar
of the main window( the property sheet ). Also, all of the
other property pages will be updated for this selected
controller. In some application, user may in place edit and
change the controller name for easy identification.
● In addition, there are 2 function push buttons in this prope
1. Add
The function button is used for serial RS232 controllers only. Press this button to search the
TouchSide serial controllers connected with the system COM ports. Whenever it finds a new
TouchSide serial controller, a new serial controller icon object will be shown in the controller list
window automatically.
USB TouchSide device supports plug and play, the icon object for USB controller will be shown
in the controller list window automatically when the USB controller is connected with the system
USB port. And, the icon object for the USB controller will disappear automatically as soon as
the device was removed from the system USB port.
TouchSide PS2 driver support PS2 mice and TouchSide touchscreen controller. It can works
with both PS2 mice and TouchSide touchscreen PS2 controller. After the TouchSide PS2 driver
was installed, this utility assumes the PS2 touchscreen controller exists and is always shown in
the controller list window.
Configuration Touchside Utility
General Property Page
■
Page 15

16
Driver Program Installation (For Windows OS)
2. Remove
This function button is used for serial RS232 controllers only. This button will be greyed and
disabled automatically when the selected controller in the controller list window is not RS232 type.
Press to remove and uninstall the selected serial RS232 controller from the system. Then, this
serial RS232 icon object in controller list window disappears automatically.
USB TouchSide device supports plug and play, the icon object for USB controller will be shown
in the controller list window automatically when the USB controller is connected with the system
USB port. And, the icon object for the USB controller will disappear automatically as soon as
the device was removed from the system USB port.
TouchSide utility does not allow user to remove/uninstall the PS2 device driver dynamically.
To uninstall the TouchSide PS2 driver, user needs to go to Windows Device Manager to do
un-installation.
In addition, after PS2 un-installation, it needs to system reboot to complete un-installation.
Display
The system monitor display geometry was shown in the
Monitors window in this page to show the locations of all
of the monitors of the system.
Monitor Property Page
■
xtouchmon.exe is another utility for TouchSide touchscreen system.
This tray icon utility can monitor the system
monitor display configuration change and correct the touchscreen
monitor mapping relationship automatically as soon as the system
monitor display configuration changed. We strongly suggest the
user to make sure xtouchmon.exe was launched for multiple
monitor system.
Note
1. Enable multiple monitor
Check this check box to enable multiple monitor support and uncheck it to disable multiple monitor
support. When this function is disabled, the touchscreen will be mapped to the primary monitor
automatically.
When this function is enabled, user can double click on the monitor area in the monitor geometry
window to assign the monitor area where the touchscreen will be mapped. In other word, the
touchscreen will work with the selected monitor. Then, the selected monitor area rectangle line
will be changed to be white and the other monitor rectangles line will be grey.
● User can follow below instructions to do the configuration
● TouchSide driver utility supports multiple monitor and display
system. To work with multiple monitor system, user needs
to do proper configuration to map the touchscreen working
area to the correct system display area. User can do such
configuration with this property page shown as below,
Configuration Touchside Utility
Page 16

17
AT-7 User Guide
Driver Program Installation (For Windows OS)
2. Map to main monitor when the system has only one monitor
When the multiple monitor function was enabled, and the system has only one monitor, Driver
allows user to generate the mouse event for the primary monitor or not when the touchscreens
which were not mapped to primary monitor. Check the check box to enable this function, then,
the driver will generate the mouse event for the primary monitor even through the touchscreen
was configured as other monitor mapping and multiple monitor function enabled.
3. Operation Mode
TouchSide driver support split display mode for those applications which do not map the touchscreen
to the full screen of the monitor.
3-1) Full screen
The touchscreen will be mapped to the full screen of the specified monitor.
3-2) Right screen
The touchscreen will be mapped to the right half screen of the specified monitor.
3-3) Left screen
The touchscreen will be mapped to the left half screen of the specified monitor.
3-4) Upper screen
The touchscreen will be mapped to the upper half screen of the specified monitor.
3-5) Lower screen
The touchscreen will be mapped to the lower half screen of the specified monitor.
3-6) Other operation mode
3-6-1) Quarter 1
The touchscreen will be mapped to the first quarter area of the specified monitor display.
3-6-2) Quarter 2
The touchscreen will be mapped to the 2nd quarter area of the specified monitor display.
3-6-3) Quarter 3
The touchscreen will be mapped to the 3rd quarter area of the specified monitor display.
3-6-4) Quarter 4
The touchscreen will be mapped to the 4th quarter area of the specified monitor display.
3-6-5) Customized
If the touchscreen needs to be mapped the area other than the above area, user can
define the mapping area for application. With this mode, the driver does not correct
the mapping area when the display resolution changed. It needs to do configuration
setting again whenever the display resolution changed.
Configuration Touchside Utility
Page 17

AT-7 User Guide
18
Driver Program Installation (For Windows OS)
● Calibration, draw test tools and the linearity curve of the
touchscreen were list in this property page shown as below
for user to do touchscreen calibration and touch position test.
● User can do calibration or draw test by pressing the function push buttons.
1. Linearization Curve
Linearization curve of the touchscreen is list in this page for reference and trouble shooting purpose.
2. 4 points calibration
It needs calibration before the touchscreen can work accurately. Whenever the user feel the
accuracy lost, user can do calibration again to get a more accuracy touch function.
Pressing this button, a new window will be popped-up at the location when the touchscreen was
mapped to area for this touch system to guide the user do 4 points calibration.
User should follows the guide to touch and hold the blinking X symbol in the calibration window
until it does not blink to make sure that the utility can gather enough data for computation.
In addition, a time line bar is shown in the bottom of the window to indicate time elapsed. If the
touchscreen was not touched before the time line bar going to right end, the calibration task will
be terminated automatically.
3. 4 points calibration
It needs calibration before the touchscreen can
work accurately. Whenever the user feel the
accuracy lost, user can do calibration again to
get a more accuracy touch function.
Pressing this button, a new window will be popped
-up at the location when the touchscreen was
mapped to area for this touch system to guide
the user do 4 points calibration.
User should follows the guide to touch and hold
the blinking X symbol in the calibration window
until it does not blink to make sure that the utility
can gather enough data for computation.
In addition, a time line bar is shown in the bottom of the window to indicate time elapsed. If the
touchscreen was not touched before the time line bar going to right end, the calibration task will
be terminated automatically.
Configuration Touchside Utility
Tool Property Page
■
Page 18

19
AT-7 User Guide
Driver Program Installation (For Windows OS)
4. Linearization
Linearization ( 25 or 9 points calibration ) function
is used to compensate the touchscreen linearity.
After linearization completed, the linearity of the
touchscreen will be shown in the Linearity curve
window.
Pressing this button, a new window will be popped
-up at the location when the touchscreen was
mapped to area for this touch system to guide
the user do 25 points calibration. User should follows
the guide to touch and hold the blinking X symbol
in the calibration window until it does not blink
to make sure that the utility can gather enough data for computation. In addition, a time line bar
is shown in the bottom of the window to indicate time elapsed. If the touchscreen was not touched
before the time line bar going to right end, the calibration task will be terminated automatically.
5. Draw Test
This function is used for accuracy and performance
check. Press this button and a new pop up window
will be popped up in the location where the
touchscreen was mapped to the touch system
as below,
● User can press the Clear button to clear the window.
Press Quit button to terminate this draw test.
● TouchSide software package contains an utility to monitor some events related
to touchscreen application. After TouchSide software package installed, a tray
icon utility was shown in the system task bar as below. Whenever the mouse
cursor moves on the tray icon, a tool tip shows as
● This is a fast tool for user to change some driver setting without
launching the TouchSide configuration utility. When user right
click on this tray icon, a pop up context menu shows as below,
● This pop up menu shows the all of the functions this utility supports.
xTouchmon utility
■
Configuration Touchside Utility
Page 19

20
Driver Program Installation (For Windows OS)
3. Beep
User can change the Beep Mode with this function menu. And, the change will be applied to the
specified devices immediately.
4. Auto Right Click
User can enable/disable auto right click function with this function menu. The change will be applied
immediately to those specified devices.
5. Button
This button is designed to show/hide the right button window.
6. 4 Points calibration
Select this function to pop up the 4 points calibration window for user to do calibration for those
specified devices.
7. TouchSide Utility
TouchSide configuration utility will be launched if user selects this function.
8. Support Rotation
Monitor display rotation support. Enable it, this utility will correct the touchscreen orientation to
match with monitor display orientation whenever it detects monitor rotation. This correction will
be done automatically if the system video adapter driver supports Microsoft Win32 APIs for
monitor rotation. If the video adapter driver does not support Microsoft Win32 API for monitor
rotation, the utility will pop up a one point calibration window to correct the orientation mapping.
9. Exit
Exit function to terminate the xTouchmon daemon process. After this daemon process terminated,
all of functions the utility supports will be disabled.
● In addition to above functions, xTouchmon also monitors monitor display setting change. It will
correct the coordination mapping automatically except the touchscreen work with customized area
mode whenever it detect monitor resolution change, numbers of system monitors change.
1. Apply To Touchscreen
When user selects this function, the sub-menu
shows all of the TouchSide devices installed in
the system. User can choose the next function
configuration settings will be applied to which devices.
xTouchmon allows the configuration settings applied
to all of the TouchSide devices or some specified
devices.
2. Mouse Mode
This Mouse mode has sub-menu as below to show
all of the mouse emulation modes the driver supports.
● This mouse emulation mode changed will be applied
to the specified devices.
Configuration Touchside Utility
Page 20

Driver Program Installation (For Mac OS)
USB Monitor
21
AT-7 User Guide
Touch
● [Display Link Software Installer]
Select DisplayLink Software Installer to install USB driver
program. Follow the instructions.
The computer has to be re-booted in order to complete the
installation process.
● [User Guide]
Please choose “user guide” to view the user guide.
● [Display Link Software Uninstaller]
Select DisplayLink Software Installer to uninstall USB
driver program. The computer has to be re-booted in order
to complete the un-installation process.
- Please refer to the “user guide” to learn more about its use
under Mac OS.
- This device supports Intel-based MAC OS X version only.
Double click on iMo Installer image to run iMo Installer.
Note
1. Select TouchKit Software Installer to install Touch driver
program.
2. Touch driver program start installing.
Page 21

22
Driver Program Installation (For Mac OS)
3. Press [Continue] button to continue.
5. After installing the software, the system will restart
automatically. If users want toreboot, press [Continue
Installation].
4.Select the destination folder that installs TouchKit.
6. Installation is in progress.
Touch
7. Press [Restart] to reboot Mac OS x.
Page 22

23
AT-7 User Guide
Driver Program Installation (For Mac OS)
The touch-sensitive area of the panel and touch–sensitivity both can be modulated through the
configuration utility. Besides, the controller identification and deviceactivated shall be done first.
4 pts Cal
● Correct 4 point locations on screen with the panel.
Press [4 pts Cal], screendisplays as follows.
● Touch the blinking symbol on panel until beep or stop
blinking.
General
■
● After installing TouchKit, go to the sub-menu [Application]
and double click
[TouchKit Utility] to start the TouchKit diagnosis window.
● Please check touch panel devices (included its controller)
are equipped well, then those components will be displayed
the Panel List dialogue box.
There is one or more devices found.
● The controller is displayed on the Panel List box. User
can get the information of interface, type, version and model
for each controller.
Select one device after import more than one device at the
panel list window. The one selected will activate the panel.
● There are two property pages in TouchKit utility, and they
are General and About.
Each property page contains different functions for users
to do the adjustments.
Therefore, users can easily manage all the TouchKit
controllers through TouchKit Utility.
General property page contains the functions of [4 pts Cal], [Draw Test] and [Advanced].
Configuration Touchside Utility
Page 23

24
Driver Program Installation (For Mac OS)
Setting
■
Draw Test
● Test the drawing position related to the display screen on
panel.
Click on the [Draw Test] button. There will be a squared
blue display showing.
● Try to write or draw on it to verify the touch position.
● Press [CLEAR] for cleaning touch screen, and press [QUIT]
to exit Draw Test.
Advanced
● Advanced property page contains two pages of 25 Pts Cal
and Setting.
● Press [Clear] to clear the previous calibration records.
Press [Yes] to clear previous records. The record will become
default record.
Mouse mode:
There are three kinds of mouse mode users could choose,
Normal Mode
It provides all the mouse functions, including the dragging
function.
Click on Touch
Click action is executed as soon as users touch the panel.
Click on Release
Click action will not be executed until finger leaves the panel.
● Then, press [25 pts Cal] to execute 25 points calibration.
Correct 25 point locations on screen with the panel.
●Touch the blinking symbol on panel until beep or stop blinking.
After the calibration, the new record will overwrite the old one.
Configuration Touchside Utility
Page 24

25
AT-7 User Guide
Driver Program Installation (For Mac OS)
About
■
Support Constant Touch:
Enable Constant Touch to force driver to stop reporting touch point when the movement is within
the range which users can adjust. Therefore, the user can see a stabilized cursor instead of a chattering
cursor when userstouch the same point with unwanted noise.
Support Auto Right Button:
Enable Auto Right Button to force driver to report a right click mouse event to OS when users do
a continuing touch till time out. It no longer needs to touch the right button in the Touchtray to activate
a right click. This feature makes users to do right click more easily with touchscreen.
● Information about TouchKit.
QUIT
● Exit TouchKit touch panel configuration utility.
Configuration Touchside Utility
Page 25

26
Using Touch USB sub monitors
Click [AT-7] icon to view the menu screen .
■
Refresh menu
View the driver’s refreshed information or perform environment
settings.
[Check] : Check the driver’s refreshed information.
[Environment setting] : Perform driver’s environment setting.
■
Screen rotation menu
It is used when the device is being rotated.
[Normal] : It is a setting used for normal use of the device.
[Rotate to the left]: It is a setting used when the device is
rotated 90° to the left. The screen on the
device will rotate 90° to the right.
[Rotate to the right]: It is a setting used when the device is
rotated 90° to the right. The screen on
the device will rotate 90° to the left.
[Rotate to the left]: It is a setting used when the device is
rotated 180° to the left.
■
Color quality menu
May be set based on user resolutions
When they are set as very high (32 bits), it displays a better
screen but the PC speed may be compromised.
[Medium (16 bit)] : Approximately 65,000 colors are being
depicted.
[Very high(32 bit)] : Approximately 4,294,000,000 colors are
being depicted.
■
Screen resolution menu
Screen resolution is set as 800x480.
Higher resolutions will result in clear and detailed screen.
This product is set in 800x480 settings.
■
Expansion direction menu
Send the screen sent out to the USB monitor in different directions.
[Right] : Drag the screen to the right of the device and from
the PC.
[Left] : Drag the screen to the left of the device and from the PC.
[Upward] : Drag the screen upward to the device and from
the PC.
[Downward] : Drag the screen downward to the device and
from the PC.
Page 26

27
AT-7 User Guide
Using Touch USB sub-monitors
■
Turn off menu
Turn off the USB monitor function.
When the USB monitor is turned off, [Expansion Direction],
[Expansion], [Mirror] and [Advanced] functions are the only
functions that are activated. [Screen resolution], [Color quality]
and [Rotation] functions are deactivated.
In order to release the monitor from [Off] status, select
[Expansion Direction], [Expansion] or [Mirror] functions.
Mirror function will allow the user to view the same screen as
the PC screen.
■
Expansion menu
PC screen may be dragged into the device’s screen.
Simply drag the desired screen into the device’s monitor.
Note
■
Mirror menu
Mirror function will allow the user to view the same screen
as the PC screen.
When mirror menu is selected, PC’s screen will be set as the same
setting as the USB sub monitor screen. Therefore, when the PC’s
screen is larger than 800x480 resolutions, it will be automatically
reduced to match the USB monitor setting and display the same screen.
Note
■
Advanced menu
Select the setting from the USB sub monitor’s display
environment settings.
Detailed USB monitor settings are possible in the display setting
window. Even though it may differ from different PCs, user PC
monitor is set as number 1 monitor and USB monitor (XT-7)
is set as either number 2 or 3 monitor in normal uses.
Note
Page 27

28
Troubleshooting
Problem Solution
Did you run your installation program after connecting the device?
Please use the Installation Software in the CD.
Please refer to the USB driver program installation for detailed
information.
iMo does not power up after
USB cable is connected
Make sure that the USB cables are properly connected.
Make sure that the ‘Installation Software’ is properly installed.
1. Right click on “My Computer” and open the “properties” window.
2. Click “device manager” in the Hardware tab.
3. Click PC located at the top part of the tree in the device
management window.
4. Click “search hardware modifications” in “Action (A)” menu.
5. Reboot the PC.
※This device is recognized as a normal USB device.
Since frequent rebooting of the PC may damage the USB device,
please refer to Microsoft’s USB device troubleshooting section
for further supports.
I cannot see the screen
clearly
Check “hardware acceleration” from the properties menu.
Set the hardware acceleration value to “maximum”.
1. Open display registration information by right clicking the
screen.
2. After selecting “setting” tab, select nanovision minimonitor.
3. Click “Advanced’
4. When the screen does not pop up, click ‘troubleshooting”
tab. Set hardware acceleration as “maximum”.
The screen is frozen
In one-board type computers using i815 chipset mother boards,
disable the Legacy USB support in the BIOS setting menu and
reboot the PC again. Since entering BIOS may require different
steps for different PCs, please refer to your manuals carefully.
Follow instructions from Microsoft help.
The system would not
reboot after the connection
Since this device is a USB device, Dos screen will not appear
during the booting process.
Dos screen that appears
during PC booting does
not appear on the screen
Page 28

29
AT-7 User Guide
Troubleshooting
Problem Solution
This is a USB monitor device that receives USB 2.0 High
Speed(480Mbps) signals. Therefore, it is unable to support various
programs that require 3D acceleration functions.
※Device uses may be limited based on PC’s properties
(CPU or memory)
- Limited programs
(1) Real Player (Do not support expansion mode)
(2) Most of 3D games
(3) Programs running based on Direct X
- Supported movie programs
(1) Windows Media Player (Supports versions higher than 10)
(2) Power DVD
(5) Win DVD(Version 5 onwards)
You cannot perform 3D
games on this screen
1. Windows Vista 32bit is supported.
- Windows Vista 64bit is not currently supported.
2. Windows XP Service Pack 2 is supported.
- Service Packs under version 1 is not supported.
- It is optimized for Windows XP Service Pack 2 and USB 2.0
settings.
3. Windows 2000 Service Pack 4 is supported.
- Service Packs under version 3 is not supported.
- It is optimized for Windows 2000 Service Pack 4 and USB 2.0
settings.
Monitors do not function properly with USB 1.0 ports.
I would like to know which OS
are being support
Theoretically, Up to 127 devices may be connected to the PC.
However, the following numbers are our recommendations.
1. When connecting 1-2 units
Minimum PC requirement: 1.2GHz CPU / 512 MB Memory
2. When connecting 3 units
Minimum PC requirement: 1.8GHz CPU / 1GB Memory
3. When connecting 6 units
Minimum PC requirement : 1.6GHz Dual core CPU / 1GB Memory
※Adequate amount of frame speed may not be supported
depending on the use of PC’s resources.
How many devices may be
connected to a single PC?
When you click “add/remove program” from the control panel,
a list of installed programs will appear.
Click on [DisplayLink Graphics] and click “remove” button.
How can I completely remove
the installation program?
Page 29

30
Troubleshooting
Problem Solution
When the USB monitor is turned off or disconnected, it will be
deactivated from the system. In order to erase this information,
you must remove [DisplayLink Graphics] program from the
control panel. However, when the program is removed, it must
be reinstalled before using the device again.
Even when the connection is
disconnected and the power is
turned off, device information
is still remaining in the display
registration information
Since this device is a LCD monitor, it is attached with a thin
anti-reflection film.Since it is very susceptible to scratching and
chemicals, please refer to the following instructions carefully
during the cleaning process.
① Use soft cloth (such as the cloth used to clean eyeglasses)
Normal cloth may leave scrathches on the screen.
② When cleaning agents are used, please use exclusive cleaning
agent for cleaning LCD screens.
- If other alkali or soap cleaning agents are used it may damage
and discolor the LCD screen.
- Do not spray cleaning agents directly onto the screen.
LCD screen may be discolored and damaged when cleaning
agents are directly sprayed onto the screen. Please spray
the agent on the cloth before cleaning the screen.
③ Do not put pressure onto the screen to clean the LCD screen
thoroughly. Clean the screen 2-3 times with a soft touch.
I would like to clean the
device
You may download it from our homepage (www.s-dion.com).
Refer to the user manual for the homepage address and
download the drivers.
Where can I download the
drivers and software that
I purchased?
- Check other USB devices are recognised by the PC.
Ensure that you are using a good quality USB cable and
test again by using a different USB port on the PC,
for example a port at the back of a desktop PC.
- If using a docking station, remove all other devices that
may be connected to the dock and try again.
- If the problem persists, then you should contact the original
manufacturer of the product.
On connection of a USB device
to the PC, the message
"USB Device Not Recognized"
appears in the Windows
system tray
IMO monitor is compatiable with Intel-based Mac OS X version
only. Please check the main chipset and OS version.
The device is not working
under my Mac OS.
- A beta driver is now available that addresses this issue.
Please visit http://www.s-dion.com to download the beat
release (1.1.3b1).
- If you still continue to encounter problems after installing
this driver, please ask a Question in our Support Portal.
The device stops working
after updating the OS to
version 10.5.7
Page 30

31
AT-7 User Guide
Specifications
Display
Size / Resolution
TFT7” / 800X480
Brightness
250cd/㎡
Contrast
500:1
USB 2.0 High speed
USB Power supply
Interface
Function
Power supply
USB
USB mini to 5-pin B-type
Input key 2 tact switch : Brightness Up, Down
Touch Sub Monitor by USB connection only
Brightness Control
Extend to 4 directions (Up/Down/Right/Left)
Screen rotation (Clockwise)
Mirror function
PC Requirement
Intel Pentium/Celeron 1.2GHz above
RAM 1GB above
USB 1 port above
HDD 500MB capacity
Windows 2000 (SP4), Windows XP (SP2, SP3),
Windows VISTA (32bit, 64bit)
Mac OS X equipped with Intel CPU
Dimensions(mm)
194x133x23.5mm (WxHxD)
Page 31

32
Changes or modifications not expressly approved by the party responsible for compliance could void
the user’s authority to operate the equipment.
This equipment has been tested and found to comply with the limits for a Class B digital device, pursuant
to Part 15 of the FCC Rules. These limits are designed to provide reasonable protection against harmful
interference in a residential installation. This equipment generates, uses and can radiate radio frequency
energy and, if not installed and used in accordance with the instructions, amy cause harmful interference
to radio communications. However, there is no guarantee that interference will not occur in a particular
installation. If this equipment does cause harmful interference to radio or television reception, which
can be determined by turning the equipment off and on, the user is encouraged to correct the interference
by one or more of the following measures:
-- Reorient or relocate the reveiving antenna.
-- Increase the separation between the equipment and reveiver.
-- Connect the equipment into an outlet on a circuit different from that to which the receiver is connected.
-- Consult the dealer or an experienced radio/TV technician for help.
THIS DEVICE COMPLIES WITH PART 15 OF THE FCC RULES. OPERATION IS SUBJECT TO
THE CONDITIONS:
(1) THIS DEVICE MAY NOT CAUSE HARMFUL INTERFERENCE, AND
(2) THIS DEVICE MUST ACCEPT ANY INTERFERENCE RECEIVED, INCLUDING INTERFERENCE
THAT MAY CAUSE UNDESIRED OPERATION.
FCC Information
Caution
Note
Page 32

 Loading...