


IMMOTOR GO Quick Start Guide
ImmotorMKT/CN Team 2017.3
IMMOTOR GO
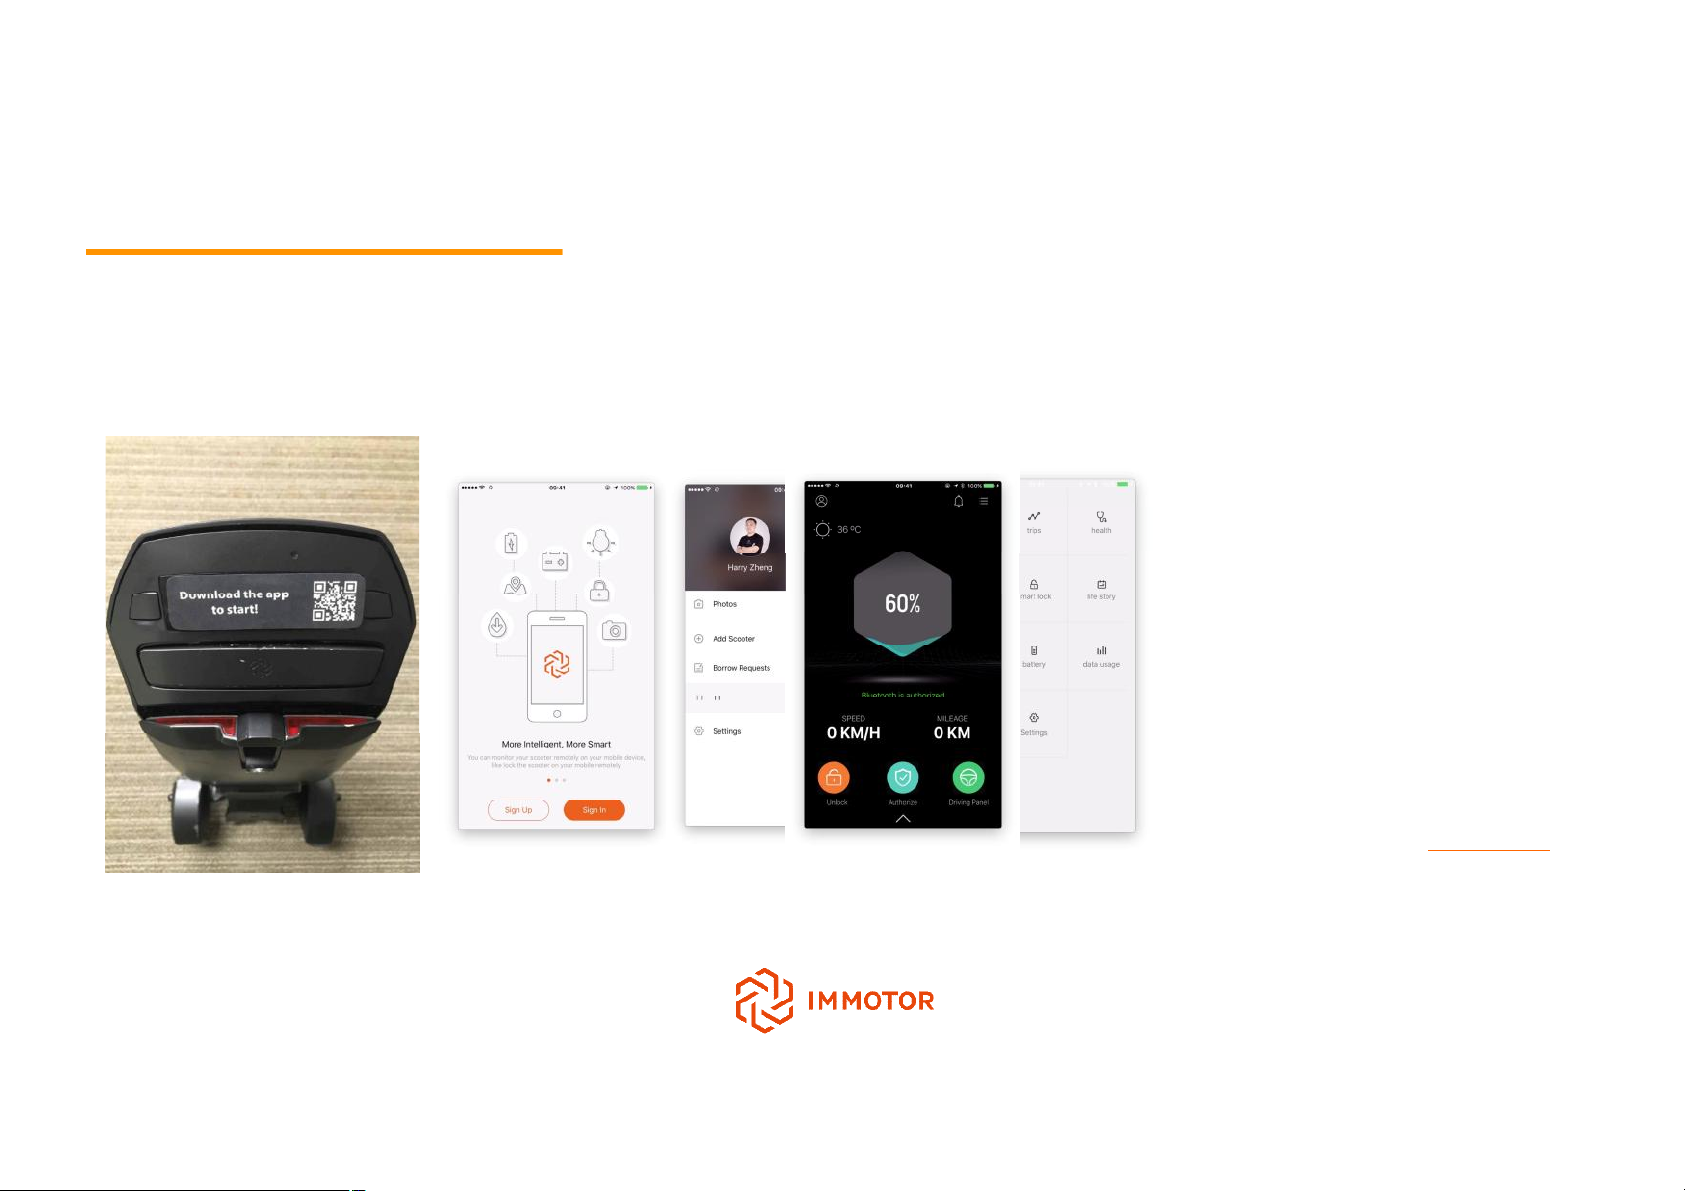
Quick Start Guide——Download APP, get your ID linked with your GO
-1 Download ImmotorAPP,get your ID linked with your GO through
bluetooth,and you can use your phone unlock your GO.
- Step 1 Scan QR code,download ImmotorAPP
- Step 2 Register your ID and connect it to the
GO
- Step 3 Use your phone unlock your GO
* Please find the detail instruction on www.immotor.com
IMMOTOR GO
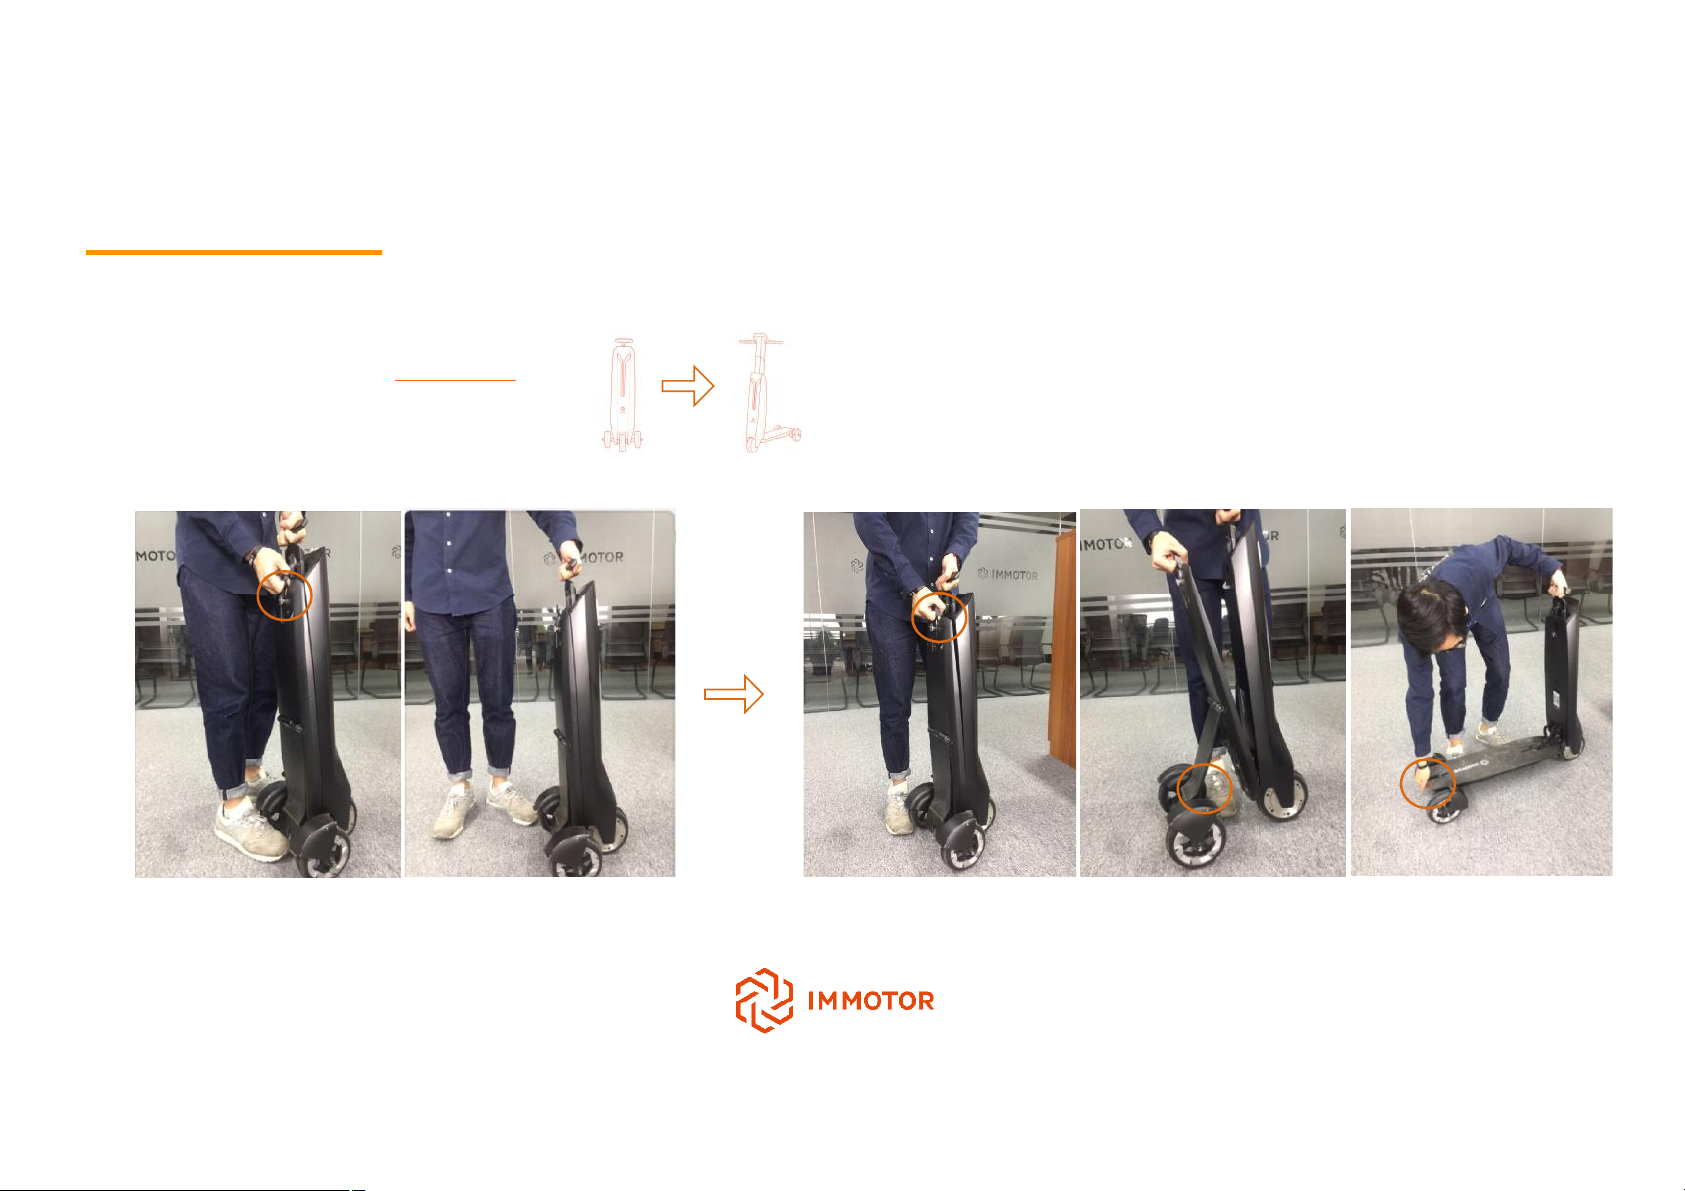
Quick Start Guide——Unfold your IMMOTOR GO 1/2
-2Unfold your IMMOTOR GO
*Refer to the video instruction on www.immotor.com
Step 1
- Pull up the portable lever
Put your finger into the back hole to push up the portable
lever
Step 2
-Put down the pedal
Pull the button on the tail of the pedal, kick back the rear wheels
Put down the pedal, buckle the pedal.
IMMOTOR GO
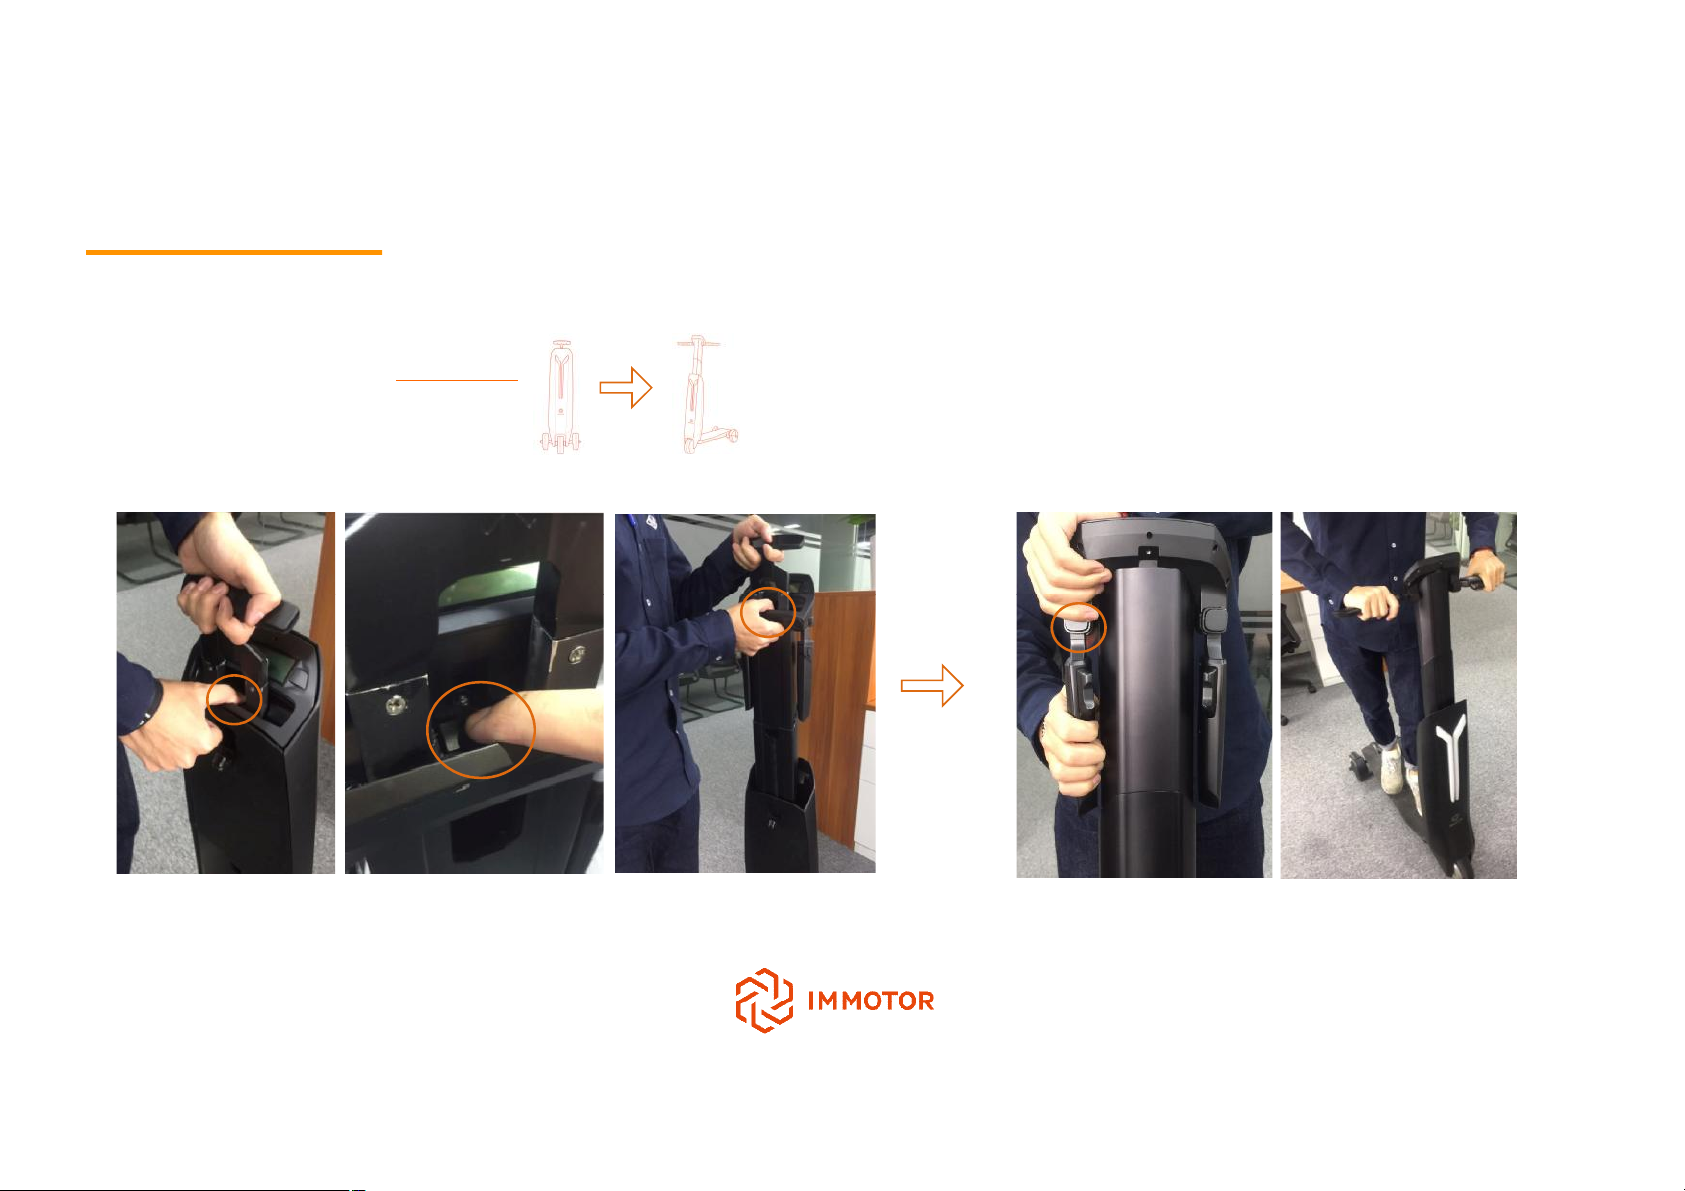
Quick Start Guide——Unfold your IMMOTOR GO 2/2
-2Unfold your IMMOTOR GO
*Refer to the video instruction on www.immotor.com
Step 3
-Pull up the main part
Press the internal button under the portable lever to pull up the main part
Step 4
-Turn up the handles
Press the button to turn the handles up

IMMOTOR GO
Super Battery
Quick Start Guide——Electricity checking and preparaiton
-3 Open the battery compartment ,put in your super batteries, check the electricity
Power
Battery compartment
Charger
Charging interface

IMMOTOR GO
Quick Start Guide——Riding and Screen information
-4Power on your ImmotorGO,start riding
3)USBPort
4)Brake
5)Speed mode/Photo action
(Long pull/Shortpull)
6)Horn
11)Bluetooth
12)Time
13)Battery status
14)Remaining range
10)GPSSignal
9)Missed call
15)Speedmeter
8)Unread message
7)Cruise control
2)Accelarator
1)Power Button
8)Cruise control
7)Light(2 brightness grade)
6)Headlight
5)Error
1)Lock/unlock
2)Speed mode
3)Odometers
4)Mileage

IMMOTOR GO
Quick Start Guide——Fold your IMMOTOR GO 1/2
-5Fold your IMMOTOR GO
Step 1
-Fold the handles
Press the button to turn the handle down
Step 2
- Fold the main part
Put your finger into the back hole and push up the portable lever
Press the button below the portable lever and pull down the main part

IMMOTOR GO
Quick Start Guide——Fold your IMMOTOR GO 2/2
-5Fold your IMMOTOR GO
Step 3
-Fold the pedal
Step down the button below the main part, put down the main part to the
pedal
Buckle the pedal, and fastening the main part
Step 4
-Fold the rear wheels
Lift up the main part and pedal
Kick back the rear wheels, pull the buckle, fasten the rear wheels, completely fold the
GO

IMMOTOR GO
·
Head/Brake Light
·
Hi-brite
LED
Product information & Support
Spec
·Item ·Specification
·Motor ·Direct Drive Gearless Hub,350W,48V
·Wheel ·Front wheel-6.5 in airless tire,Rear-6 inairless tire
·Suspension ·Dual rear and dual front wheel independent heavy duty springs
·Load ·300 lbs/150KG
·Body Composition ·Aluminum alloy,High Impact Plastic,CardonFiber
·Display ·LCDDaybrite
·Super Battery ·Lithium lonwith smart power and battery management system
·Bluetooth ·BT2.1+EDR/BLE4.1
·Data/GPS ·GSM/WCDMA3G/Sim808
·Speed ·Maxspeed 25KM/h,Minimum speed1KM/h
·Hill Climbing ·Up to 35%(20 degree slope)
·Ride range ·Up to 30KM/2 batteries,15KM/1battery
·Recharge time ·2-3hours
Support
·Please read the "ImmotorGO User Manual" carefully before using it. You can download the
file from support.immotor.com/cn/manuals
· Visit www.immotor.com/cn/FAQ for technical support of ImmotorGO
· Find more information via the APP “ImmotorGO Help” menu, or call USA: ***-**** -
***
Comply with local legal provisions
The intelligent personal vehicle ImmotorGO can be used as a smart personal
transportation, but can not replace the existing means of transport, please do not ride on
the public transport road ImmotorGO intelligent personal vehicle. In some countries and
regions, such vehicles are prohibited in the public transport on the roadunder the specific
circumstances, please check the local information, and you can also get these information
from IMMOTOR authorized dealer or after-sales department.
Some features are not for all versions, and are not applicable to all areas.
TM and IMMOTOR.LLC reserves all the rights.
Designed by IMMOTOR in California. Printedin China.

IMMOTOR GO
abuse.
*
The right of this Warranty
content
is
owned by
IMMOTOR.LLC.
All rights reserved
Warranty
Product warranty period
· ImmotorGO provide free repair, replacement and return services for the products
that meet the warranty conditions (only available in ***).
· The number of the warranty card must be the same as the serial number. The
warranty date of the product is based on the date of purchase receipt recording
and the date of activation of the product. Otherwise the date of manufacture as the
warranty start date.
· Customers can choose to repair, replace or return goods within 15 days from the
date of sale. (Non-product performance failure or defect reasons returned by the
customer bear the return shipping fee)
· IMMOTOR provide free repair service of main part and accessories for the
performance problems within the warranty period. IMMOTOR is not guaranteed for
normal wear and tear and is not guaranteed for damage caused by accident or
You can obtain the full terms at www.immotor.com/cn/legal/warranty.
Parts Warranty period Remarks
ImmotorGO 1 Year Including handles, pedal.(Except tires)
Superbattery 1 Year Except improper use.
Tires 3Months (Within 2000 KM)Except damages on purpose.
Phone holder 3Months Except damages on purpose.
During the warranty period, you can not get free service under the following
conditions, please note:
· The cumulative mileage of the vehicle records exceeds 2000KM.
· Any damage caused by the wrong way of installation or use.
· The product serial number is deleted or changed.
· The product serial number on the product warranty card does not match the body.
· The product is disassembled or repaired by an unauthorized store or person.
· Normal nature ware and tear.
· Overload, improper use (up and down stairs, extreme sports, etc.) caused damage.
· Fire, liquid immersion, freezing, earthquakes and other non-normal storage
conditions or force majeure caused damage.
· Other non-product design, technology, manufacturing, quality and other problems
caused damage.

IMMOTOR GO
Warranty Card
After-sale service record
Product name
Trademark
Serial number
Origin
User name
Address
Mail code
Phone number
Sales store
Address
Receipt number
Sales date
Service Centre
Address
Mail code
Phone number
Serial number
Service
date
Tag
Fault/Reason/Result Replaced Part Repair date
IMMOTOR Seller seal
Warranty
certificate
Special
chapter
Service center
name/signature

IMMOTOR GO
Productinformation & Size
Product information
·ImmotorGO (1)
UPC:
Package Content:
·Super Battery (2)
·ACCharger (1)
·Instruction (1)
·Phone holder (1)
·Protective Sleeve (1)
Size
·Packaged Size:31.5in * 15.7in * 11.8in
·Product Size:Stand-by-9.4in * 12.4in * 31.5in
Auto-pilot – 18in * 19.3in * 45in
Ride – 31.9in * 19.3in * 46.4in
·Weight(Packaged):17kg

IMMOTOR GO
Certified by
Europe:
Quality inspection and Certification
Product quality inspection:
2017-5-20
PASS
Chinese mainland product quality inspection certification:
Certified by North America:
International General Certification:

THANK YOU

FCC Caution:
This device complies with part 15 of the FCC Rules. Operation is subject to the
condition that this device does not cause harmful interference
Any Changes or modifications not expressly approved by the party responsible for
compliance could void the user's authority to operate the equipment.
Note: This equipment has been tested and found to comply with the limits for a Class
B digital device, pursuant to part 15 of the FCC Rules. These limits are designed to
provide reasonable protection against harmful interference in a residential installation.
This equipment generates uses and can radiate radio frequency energy and, if not
installed and used in accordance with the instructions, may cause harmful interference
to radio communications. However, there is no guarantee that interference will not
occur in a particular installation. If this equipment does cause harmful interference to
radio or television reception, which can be determined by turning the equipment off
and on, the user is encouraged to try to correct the interference by one or more of the
following measures:
-Reorient or relocate the receiving antenna.
-Increase the separation between the equipment and receiver.
-Connect the equipment into an outlet on a circuit different from that to which the
receiver is connected.
-Consult the dealer or an experienced radio/TV technician for help.
This equipment complies with FCC radiation exposure limits set forth for an
uncontrolled environment. This equipment should be installed and operated with
minimum distance 20cm between the radiator & your body.
 Loading...