

Page 1

ImmersionRC | EzOSD Manual
1
EzOSD Manual
Overview & Operating Instructio n s
Prelimin ary. April 200 9
Page 2

ImmersionRC | EzOSD Manual
2
Contents
Overview ....................................................................................................................................................... 3
Features ........................................................................................................................................................ 3
Installation .................................................................................................................................................... 3
1. Installation using an ImmersionRC camera and transmitter ............................................................ 4
2. Installation without using the sensor board. .................................................................................... 5
Video Standard.......................................................................................................................................... 5
Switch Functions ....................................................................................................................................... 5
Preferences Menu ................................................................................................................................. 5
Show Flight Debriefing .......................................................................................................................... 6
OSD Display Layout ................................................................................................................................... 8
Alarms ....................................................................................................................................................... 9
Units ........................................................................................................................................................ 10
Flight ........................................................................................................................................................... 11
Telemetry, and Tracking Antenna ............................................................................................................... 11
Upgrading Firmware ............................................................................................................................... 12
Diagnostics, Q/A ...................................................................................................................................... 12
Thank You… ................................................................................................................................................. 16
Page 3

ImmersionRC | EzOSD Manual
3
Overview
Congratulations on your purchase of an ImmersionRC ‘EzOSD’, the no-nonsense On-Screen Display for
FPV flight.
Features
Crisp text, shadowed to ensure visibility against a summer sky, or a winter evening
No need for a PhD to install and configure
Robust design, reverse polarity protection, overvoltage protection
Firmware upgrades without a PIC programmer, standard USB port (mini-USB B) on-board
Simple, uncluttered display, just the essentials. ‘Which way is home’, and ‘how long can I stay up
here’. Enjoy the view, not the skills of the HUD author.
Warnings for low battery voltage, pack capacity reached, too high, too far, etc.
Periodic Amateur radio callsign broadcast, to comply with FCC regulations
OSD control from a spare servo channel (optional)
Intuitive menu system, with onboard menu buttons. No R/C receiver, or remote control
required to configure, nor fly.
After-flight debriefing, shows a summary of the flight: Max. altitude, max. distance, max. speed,
average speed, distance flown, etc.
5Hz GPS update rate
PAL/NTSC auto-detect
Uncluttered display, enjoy the view, not the OSD clutter!
Robust telemetry downlink, for live Google Earth™ Tracking, or ImmersionRC’s unique Antenna
Tracking system.
Installation
The easiest way to install the EzOSD is when using ImmersionRC cameras and video transmitters. In this
case, standard connectors are used, which are all compatible with those present on the EzOSD. All of
them are keyed, can’t be inserted backwards, or ‘on the wrong pins’ (as is the case with many other
OSDs currently on the market).
Several things to remember when installing the OSD:
1) In the ‘Ez’ Concept, it is the video transmitter which supplies power to the camera, as it generally
does when the OSD is not present. Note that the OSD does NOT supply power to the camera, it simply
passes the Gnd/VCam lines from the transmitter to the camera. This allows the user of 5v or 12v
cameras.
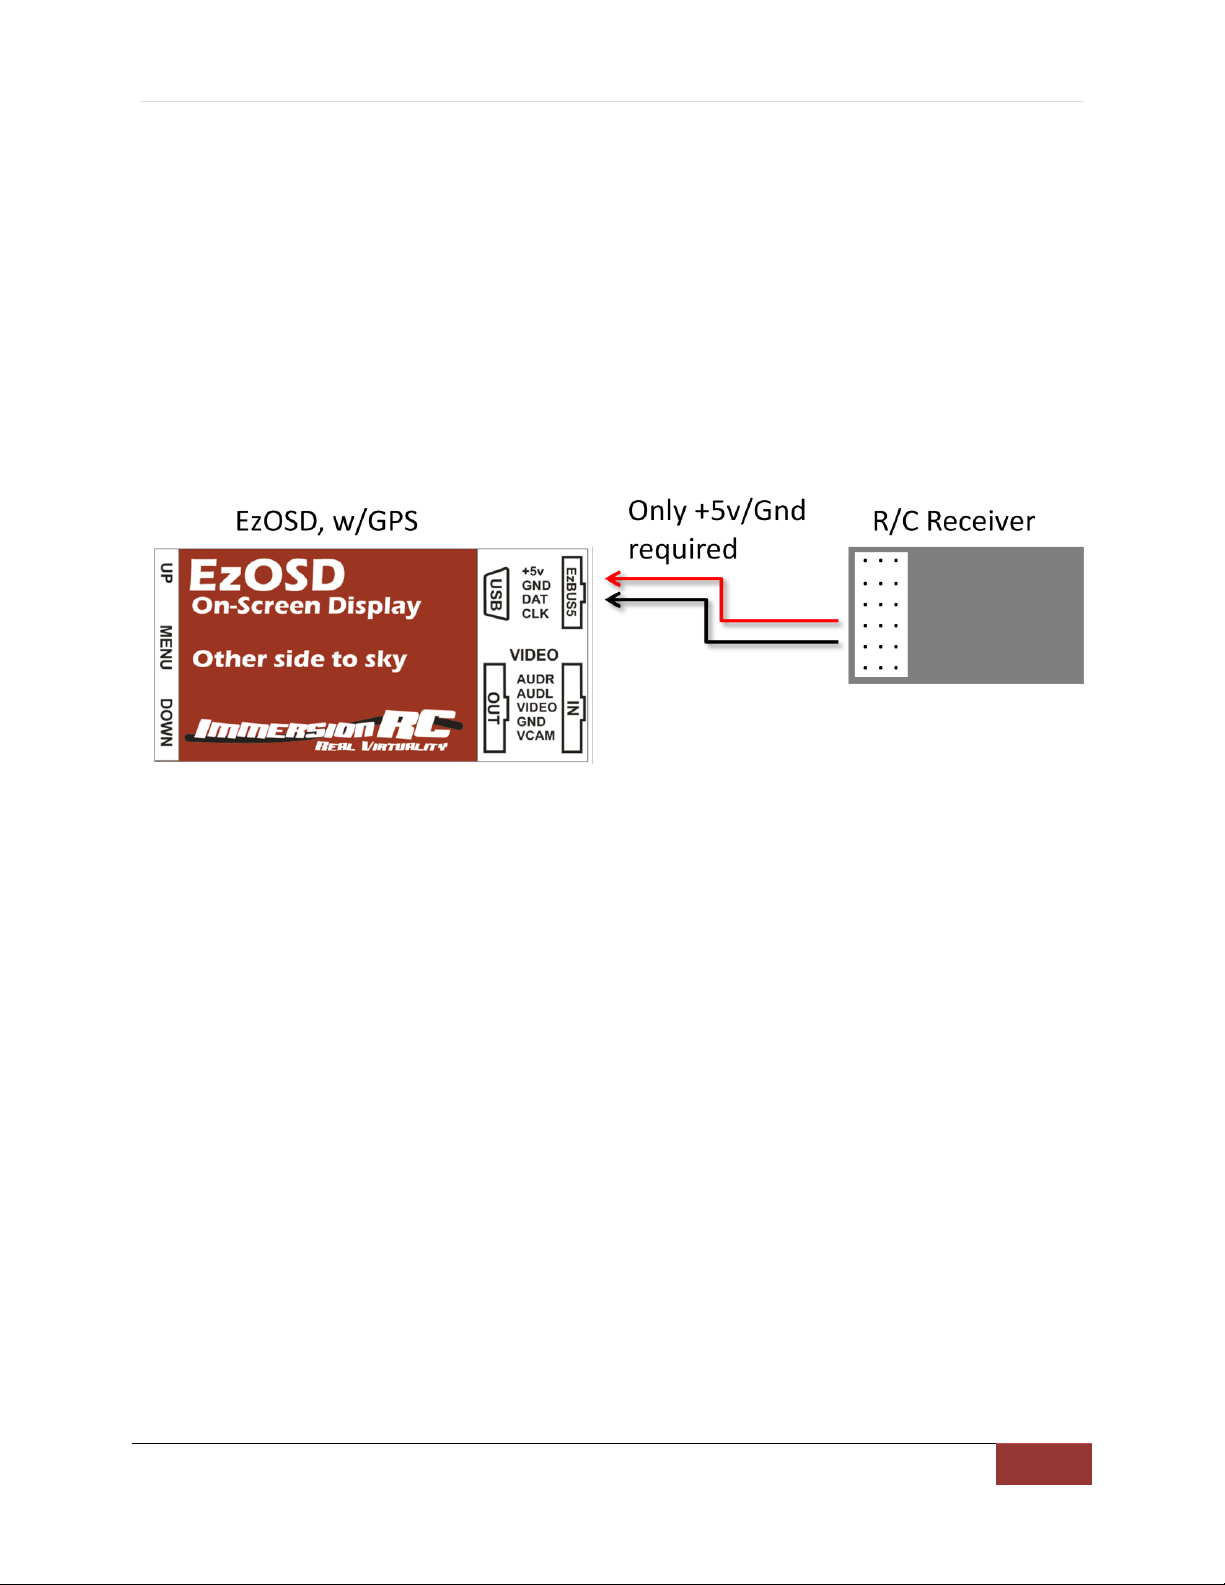
2) The current sensor contains a quiet, cool, switching regulator, which powers the OSD. In applications
where current/voltage sensing is not required, such as a Gas/Glow model, or even a glider, it is possible
to power the OSD directly from a spare connector on the R/C Receiver, without using the sensor board
Page 4

ImmersionRC | EzOSD Manual
4
at all. A wiring diagram for this configuration is shown below. When the current sensor is not detected,
the lower line of the OSD will automatically disappear.
3) The telemetry downlink from the EzOSD uses the AUDR (Right channel of a stereo audio pair) signal.
In the case of using ImmersionRC A/V transmitters, which transmit high-bandwidth stereo audio, the
standard cabling will connect this signal correctly.
In the case that 3rd-Party video transmitters are used, possibly with mono-audio, ensure that the AUDR
signal from the OSD is correctly routed to the transmitter’s audio input pin.
1. Installation using an ImmersionRC camera and transmitter
1. Connect the current sensor between the LiPo and the ESC
2. Hook the 4-pin cable between the current sensor and the OSD (it is keyed, can’t be inserted
backwards, and only fits into the correct connectors)
3. Remove the the 5-pin camera connector from the video transmitter, insert it into the Video-In
connector of the OSD
4. Connect the 5-pin cable, supplied with the OSD, and hook it between the OSD and the video
transmitter.
5. (optional) If this is a new installation, and the video transmitter has not yet been cabled for power,
take the 2-pin cable supplied with the OSD and hook it between the current sensor and the video
transmitter (this will just pass the battery voltage to the Video Transmitter).
Page 5
ImmersionRC | EzOSD Manual
5
2. Installation without using the sensor board.
When the sensor board is not required, the OSD may be powered directly from an unused connector on
the R/C receiver. Cables to make this connection should be available from your local ImmersionRC
distributor.
If the cable is not available, those handy with a soldering-iron could take two standard servo cables,
remove the signal line (white/red/orange), connect the red wires together, black wires together, and on
the OSD end of the cable, swap the red/black pins so that the red wire is on the +5v pin of the EzBUS, and
the black wire is on the Gnd pin of the EzBUS.
Video Standard
When provided with a standard composite video input, in either the PAL, or the NTSC format, the EzOSD
will automatically switch to match the input format.
When powered up (usually for the first time), without a video input signal connected, the EzOSD will
default to PAL mode.
To change this, power up the OSD with either the UP, or DOWN buttons pressed. The DOWN button will
switch to PAL mode, the UP button will switch to NTSC.
Switch Functions
The EzOSD is configured using three simple push-buttons. No need for a complex switch setup in your
R/C transmitter, and no need for any external hardware.
Preferences Menu
The center switch, marked MENU, will enter the simple preferences menu, shown below. All settings
are accessible via a single menu.
Page 6

ImmersionRC | EzOSD Manual
6
Figure 1: Simple 3-button UI
Figure 2: The setup menu
Once in the menu, the UP/DOWN button may be used to navigate between preferences, and the MENU
button will modify the selected preference.
Show Flight Debriefing
Pressing the UP button, will show a summary of the last flight.
Usually this is shown automatically after each flight, but if accidentally closed, the UP button will show it
again.
Page 7

ImmersionRC | EzOSD Manual
7
Note: the conditions for the debrief to appear after a flight are speed < 5km/h, and distance from launch
< 100m.
Figure 3: Debriefing Display
Page 8

ImmersionRC | EzOSD Manual
8
Altitude, Above
Launch Point
Direction to
Pilot
Climb/Sink
indicator
Battery Voltage
Current
Consumption
mAh
Consumed
(counts up
from Zero)
Startup
Satellite Count
Ground Speed
Distance
(Ground) to
Pilot
OSD Display Layout
Page 9

ImmersionRC | EzOSD Manual
9
Alarms
The EzOSD is equipped with 4 settings which define alarms. When an alarm triggers, the relevant onscreen readout will flash, to draw the pilot’s attention.
Figure 4: Alarms
The 4 alarms supported by the EzOSD are:
1. Low Battery
Defaults to ‘Auto’ mode, which assumes a LiPo flight pack. In this mode the number of cells is
automatically detected.
The alarm will sound when the battery voltage drops down below 3.2v/cell.
2. Pack Capacity
While flying, the number of mAh (milliamp-hours) consumed from the battery is recorded. Once it
reaches the trigger point set in the Pack Capacity alarm, the readout will flash, and it’s a good time to
head home.
3. Max Altitude
While flying FPV it is easy to exceed local regulations regarding maximum permitted altitude for model
flight. Set the Max. Altitude value to reflect these local regulations, and the altitude readout will flash
when this altitude is exceeded.
Remember: Altitude is always measured relative to the launch point in the EzOSD (AGL, vs. ASL).
4. Max. Distance
Set this alarm to warn when the plane is more than a pre-set distance from you.
Several of the worldwide modeling federations are starting to define rules for FPV flight on club fields.
These generally include the mention of a requirement to fly within visual range, or at least the visual
range of the spotter pilot which should be monitoring your flight.
Set the Max. Distance alarm to warn you before your spotter starts panicing.
Also useful to warn before your R/C uplink looses control!
Page 10

ImmersionRC | EzOSD Manual
10
Units
In order to accommodate our fellow pilots from lands where the metric system has not yet arrived, the
EzOSD supports selectable units.
Units for Altitude, Distance, and Speed are all independently definable.
Page 11

ImmersionRC | EzOSD Manual
11
Flight
The section of this manual which covers the use of the EzOSD is intentionally very short.
1. Bring Equipment to the field
2. Power up FPV equipment, and wait for ‘Acquiring Satellites’ to disappear (6 satellites required to fly)
3. Fly…
Telemetry, and Tracking Antenna
The EzOSD transmits the position of the plane (Latitude/Longitude/Altitude) in a coded form, down the
Right Audio channel.
This telemetry data may be used in several ways:
1) Replay a flight using the Immersion Player on a PC, and show the plane’s position, and track, in real
time, in Google Earth™
2) Connect the audio output of the A/V receiver to one of ImmersionRC’s Antenna Tracking accessories.
These will drive servos in a pan/tilt (or pan-only) antenna mount, to track the model as it moves around
the sky.
The tracking antenna allows higher-gain, directional antennas to be used, and can be a great help where
video transmitter power is limited.
Page 12

ImmersionRC | EzOSD Manual
12
For further information on the ImmersionRC Antenna Tracker, see the documentation available on the
ImmersionRC website.
Upgrading Firmware
The EzOSD is equipped with a built-in USB port, with a standard connector, commonly found on most
portable USB equipment (technical name is a mini-B).
Upgrading firmware requires no additional hardware, programmers, or returns to the factory. All that is
required is a standard USB cable, and a utility which may be freely downloaded from the ImmersionRC
website.
Figure 5: Standard Mini-B connector
Diagnostics, Q/A
Q. The OSD is taking along time to acquire satellites, or is not very precise when flying
A. This is a common problem in our hobby. The GPS receiver is extremely sensitive, and is generally
placed in close proximity to a powerful video transmitter. To solve this, keep the GPS as far from the
video transmitter as possible.
2. Speed/Altitude not accurate when flying 3D
The GPS antenna is directional, and is similar to the patch antennas that we use commonly for video.
When throwing a plane around the sky, diving rapidly, flying inverted, etc. this directional antenna may
well not be facing towards the satellites which provide its position. During these times, it is normal for
the GPS readout, especially speed, and altitude, to be in-precise. When level flight is returned, the
readings will correct themselves.
Page 13

ImmersionRC | EzOSD Manual
13
Warnings!
If tempted to remove the heatshrink , and relocate the GPS (not recommended), please take great care
when removing the GPS from its sticky insulating foam.
If pulled straight off, the foam will pull the metal screen from the body of the GPS, and destroy it.
Either slide a sharp blade (carefully) between the gps, and the foam, or use a twisting motion to remove
it.
Note that damaged caused by removing the GPS is not covered under warranty!
Page 14

ImmersionRC | EzOSD Manual
14
+
-
-
+
12v Camera, 12v A/V Transmitter Cabling
Dual-Battery
Vid
Gnd
12v
VID
12v
AUD
GND
+
-
Motor Battery
Camera/Video Battery
3s LiPo (11.1v)
ESC
12v A/V Tx (Lawmate, etc.)
12v Camera
Current Sensor supplies
+5v power to OSD
Camera and Tx powered
by separate 11.1v battery
Page 15

ImmersionRC | EzOSD Manual
15
Page 16

ImmersionRC | EzOSD Manual
16
Thank You…
Thank you for purchasing this ImmersionRC product.
We take great pride in the design of our products, and hope that they give you as much pleasure as they
have given us.
Please don’t hesitate to feed back any comments/suggestions/complaints to us, we do listen, and any
feedback will help in perfecting our products in the future.
Now, what are you waiting for, Go Fly!
 Loading...