

IMG STAGE LINE PARL-36/CR User Manual
LED-Scheinwerfer
Bitte lesen Sie diese Bedienungsanleitung vor
dem Betrieb gründlich durch und heben Sie sie
für ein späteres Nachlesen auf.
1 Einsatzmöglichkeiten
Dieser Scheinwerfer eignet sich für Beleuchtungszwecke im privaten und gewerblichen Bereich, z.B. als Deko-Licht im Schaufenster oder
als Effektstrahler in Kombination mit einer Spiegelkugel. Er erzeugt farbiges Licht über 61
superhelle LEDs, die in Blau, Rot und Grün
leuchten, und lässt sich in drei unterschiedlichen
Modi betreiben (musikgesteuerter Farbwechsel,
automatischer Farbwechsel, manuelle Farbeinstellung).
2 Hinweise für den sicheren Gebrauch
Der Scheinwerfer entspricht allen erforderlichen
Richtlinien der EU und ist deshalb mit gekennzeichnet.
Beachten Sie auch unbedingt die folgenden
Punkte:
●
Verwenden Sie den Scheinwerfer nur im Innenbereich und schützen Sie ihn vor Tropfund Spritzwasser, hoher Luftfeuchtigkeit und
Hitze (zulässiger Einsatztemperaturbereich
0–40°C).
●
Platzieren Sie den Scheinwerfer immer so,
dass im Betrieb eine ausreichende Luftzirkulation gewährleistet ist. Die Lüftungsöffnungen am Gehäuse dürfen nicht abdeckt
werden. Der Abstand zum angestrahlten Objekt sollte mindestens 10cm betragen.
●
Nehmen Sie den Scheinwerfer nicht in Betrieb bzw. ziehen Sie sofort den Netzstecker
aus der Steckdose, wenn:
1. sichtbare Schäden am Gerät oder an der
Netzanschlussleitung vorhanden sind,
2. nach einem Sturz oder ähnlichem der Verdacht auf einen Defekt besteht,
3. Funktionsstörungen auftreten.
Geben Sie das Gerät in jedem Fall zur Reparatur in eine Fachwerkstatt.
●
Eine beschädigte Netzanschlussleitung darf
nur durch den Hersteller oder eine Fachwerkstatt ersetzt werden.
●
Ziehen Sie den Netzstecker nie an der Zuleitung aus der Steckdose, fassen Sie immer am
Stecker an.
●
Verwenden Sie für die Reinigung nur ein
trockenes, weiches Tuch, auf keinen Fall
Chemikalien oder Wasser.
●
Wird der Scheinwerfer zweckentfremdet, nicht
sicher montiert, falsch bedient oder nicht fachgerecht repariert, kann keine Haftung für daraus resultierende Sach- oder Personenschäden und keine Garantie für den Scheinwerfer
übernommen werden.
Soll der Scheinwerfer endgültig aus
dem Betrieb genommen werden,
übergeben Sie ihn zur umweltgerechten Entsorgung einem örtlichen
Recyclingbetrieb.
WARNUNG Der Scheinwerfer wird mit le-
bensgefährlicher Netzspannung
(230V~) versorgt. Nehmen Sie
deshalb niemals selbst Eingriffe
am Gerät vor und stecken Sie
nichts durch die Lüftungsöffnungen! Es besteht die Gefahr eines
elektrischen Schlages.
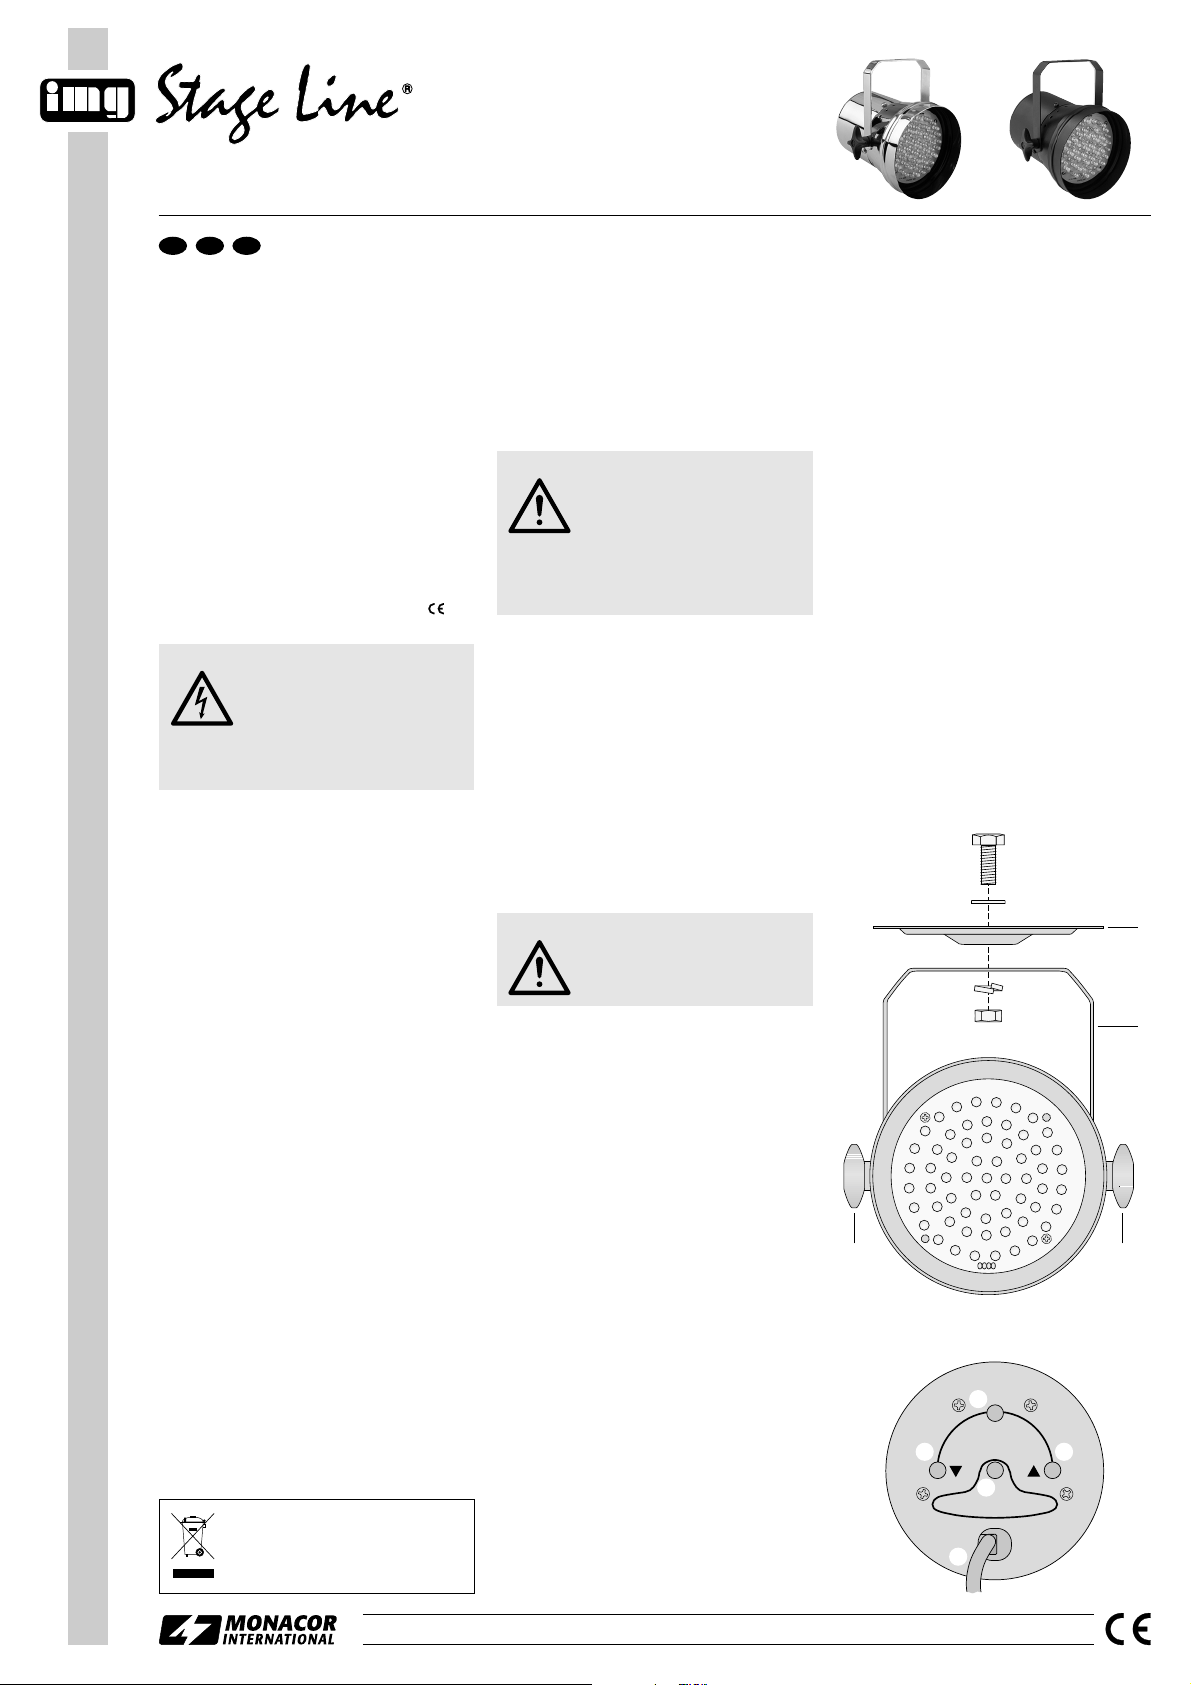
3 Montage
Der Scheinwerfer lässt sich
a durch Ausklappen des Bügels (2) aufstellen.
b mit einer Lichtstrahler-Halterung (C-Haken)
oder einer stabilen Montageschraube über
den Bügel an eine Traverse oder ein Stativ
montieren.
c mit der beiliegenden Montageplatte (1) an
der Decke befestigen; die Montageplatte am
Bügel festschrauben (siehe Abb. 1) und mit
drei Schrauben an die Decke montieren.
Zum Ausrichten des Scheinwerfers die zwei
Schrauben (3) am Bügel etwas lösen, den
Scheinwerfer wie gewünscht neigen und die
Schrauben wieder fest anziehen.
4 Bedienung
4.1 Inbetriebnahme
Zum Einschalten des Scheinwerfers den Stecker des Netzkabels (8) in eine Steckdose
(230V~/50Hz) stecken. Nach jedem Einschalten befindet sich der Scheinwerfer im Betriebsmodus „musikgesteuerter Farbwechsel“ und alle
mit den Tasten (4) – (6) vorgenommenen Einstellungen sind zurückgesetzt.
Zum Ausschalten des Scheinwerfers den Stecker wieder aus der Steckdose ziehen.
Um einen besseren Bedienkomfort zu erhalten, ist es empfehlenswert, das Gerät an eine
Steckdose anzuschließen, die sich über einen
Lichtschalter ein- und ausschalten lässt.
4.2 Betriebsmodus wählen
Die drei Betriebsmodi des Scheinwerfers lassen
sich mit der Taste MIC/AUTO/ MANUAL (7) anwählen. Bei jedem Tastendruck wird in den
jeweils nächsten Modus gewechselt.
1. musikgesteuerter Farbwechsel (MIC)
Läuft Musik mit deutlichem Rhythmus im
Bassbereich in ausreichender Lautstärke,
wechselt der Scheinwerfer, gesteuert über ein
internes Mikrofon, die Farbe im T akt der Musik.
2. automatischer Farbwechsel (AUTO)
In diesem Modus lässt sich die Geschwindigkeit einstellen, mit der die Farben wechseln:
mit jedem Drücken der Taste ▲ (6) erhöht sie
sich, mit jedem Drücken der Taste ▼ (5) wird
sie reduziert.
Bei Drücken der Taste FADE (4) schaltet
der Scheinwerfer auf langsames Überblenden zwischen den Farben um. Die Überblendgeschwindigkeit kann nicht variiert werden. Um das langsame Überblenden zu beenden, die Taste FADE erneut drücken: der
Scheinwerfer schaltet dann wieder zurück
auf den Farbwechsel mit der über die T aste▲
oder ▼ eingestellten Geschwindigkeit.
WARNUNG Beachten Sie, dass sehr schnelle
Farbwechsel bei fotosensiblen
Menschen und Epileptikern epileptische Anfälle auslösen können!
WARNUNG Der Scheinwerfer muss fachge-
recht und sicher montiert werden.
Wird er als schwebende Last über
Personen installiert, muss er zusätzlich gesichert werden (z.B.
durch ein Fangseil am Bügel). Das
Fangseil so befestigen, dass der
Fallweg des Scheinwerfers nicht
mehr als 20cm betragen kann.
3. manuelle Farbeinstellung (MANUAL)
Im manuellen Modus lassen sich die LEDs für
Rot, Grün und Blau separat anwählen:
mit der T aste G (4): Ein- oder Ausschalten der
grün leuchtenden LEDs
mit der Taste R (5): Ein- oder Ausschalten der
rot leuchtenden LEDs
mit der Taste B (6): Ein- oder Ausschalten der
blau leuchtenden LEDs
Durch Drücken der entsprechenden Taste / n
die gewünschte Farbe (Rot, Grün, Blau oder
eine aus den drei Grundfarben zusammengesetzte Mischfarbe) einstellen.
5 Technische Daten
Stromversorgung: . . . . 230V~/50Hz
Leistungsaufnahme: . . 12 VA
Leuchtmittel: . . . . . . . . 61 superhelle LEDs
Einsatztemperatur: . . . 0–40°C
Abmessungen: . . . . . . . Ø 116mm x 155mm
Gewicht: . . . . . . . . . . . . 350g
Änderungen vorbehalten.
wwwwww..iimmggssttaaggeelliinnee..ccoomm
D A CH
PARL-36/CR
Best.-Nr. 38.2630
Copyright©by MONACOR INTERNATIONAL GmbH & Co. KG, Bremen, Germany. All rights reserved. A-0553.99.01.02.2006
®
PARL-36/SW
Best.-Nr. 38.2640
4
56
7
8
➀
➁
1
2
33
LED PINSPOT
G
R
B
R
B
G
G
R
G
R
B
R
GB
G
B
R
R
G
B
R
B
R
B
R
G
G
B
G
B
R
R B
G
R
B
G
B
G
R
B
B
G
G
R
G
B
R
BR
R
B
G
B
G
R
G
R
B
B
R
G
FADE
RB
MIC/AUTO/MANUAL
LED Spotlight
Please read these operating instructions carefully
prior to operation and keep them for later use.
1 Applications
This spotlight is ideally suited for private and
commercial lighting applications, e.g. as a decorative light in shop windows or as an effect spot
in combination with a mirror ball. It generates
coloured light via 61 extra bright LEDs in blue,
red, and green and can be operated in three different modes (music-controlled change of
colour, automatic change of colour, manual
colour adjustment).
2 Safety Notes
The spotlight corresponds to all required directives of the EU and is therefore marked with .
Please observe the following items in any case:
●
The spotlight is suitable for indoor use only.
Protect it against dripping water and splash
water, high air humidity, and heat (admissible
ambient temperature range 0–40°C).
●
Always place the spotlight in such a way to
ensure a sufficient air circulation during operation. Never cover the air vents on the housing. Keep a minimum distance of 10cm to the
illuminated object.
●
Do not operate the spotlight or immediately disconnect the mains plug from the mains socket
1. in case of visible damage to the unit or to
the mains cable,
2. if a defect might have occurred after the unit
was dropped or suffered a similar accident,
3. if malfunctions occur.
In any case the unit must be repaired by
skilled personnel.
●
A damaged mains cable must be replaced by
the manufacturer or skilled personnel only.
●
Never pull the mains cable for disconnecting
the mains plug from the mains socket, always
seize the plug.
●
For cleaning only use a dry, soft cloth, never
use chemicals or water.
●
No guarantee claims for the spotlight and no
liability for any resulting damage to property
or resulting personal injuries will be accepted
if the spotlight is used for other purposes than
originally intended, if it is not safely mounted
or correctly operated, or not repaired in an
expert way.
●
Important for U.K. Customers!
The wires in this mains lead are coloured in
accordance with the following code:
green/yellow = earth
blue = neutral
brown = live
As the colours of the wires in the mains lead of
this appliance may not correspond with the
coloured markings identifying the terminals in
your plug, proceed as follows:
1. The wire which is coloured green and yellow must be connected to the terminal in the
plug which is marked with the letter E or by
the earth symbol , or coloured green or
green and yellow.
WARNING The spotlight is supplied with
hazardous mains voltage (230V~).
Leave servicing to skilled personnel only. Never make any modification on the unit and do not insert
anything into the air vents, otherwise you will risk an electric shock!
2. The wire which is coloured blue must be
connected to the terminal which is marked
with the letter N or coloured black.
3. The wire which is coloured brown must be
connected to the terminal which is marked
with the letter L or coloured red.
Warning – This appliance must be earthed.
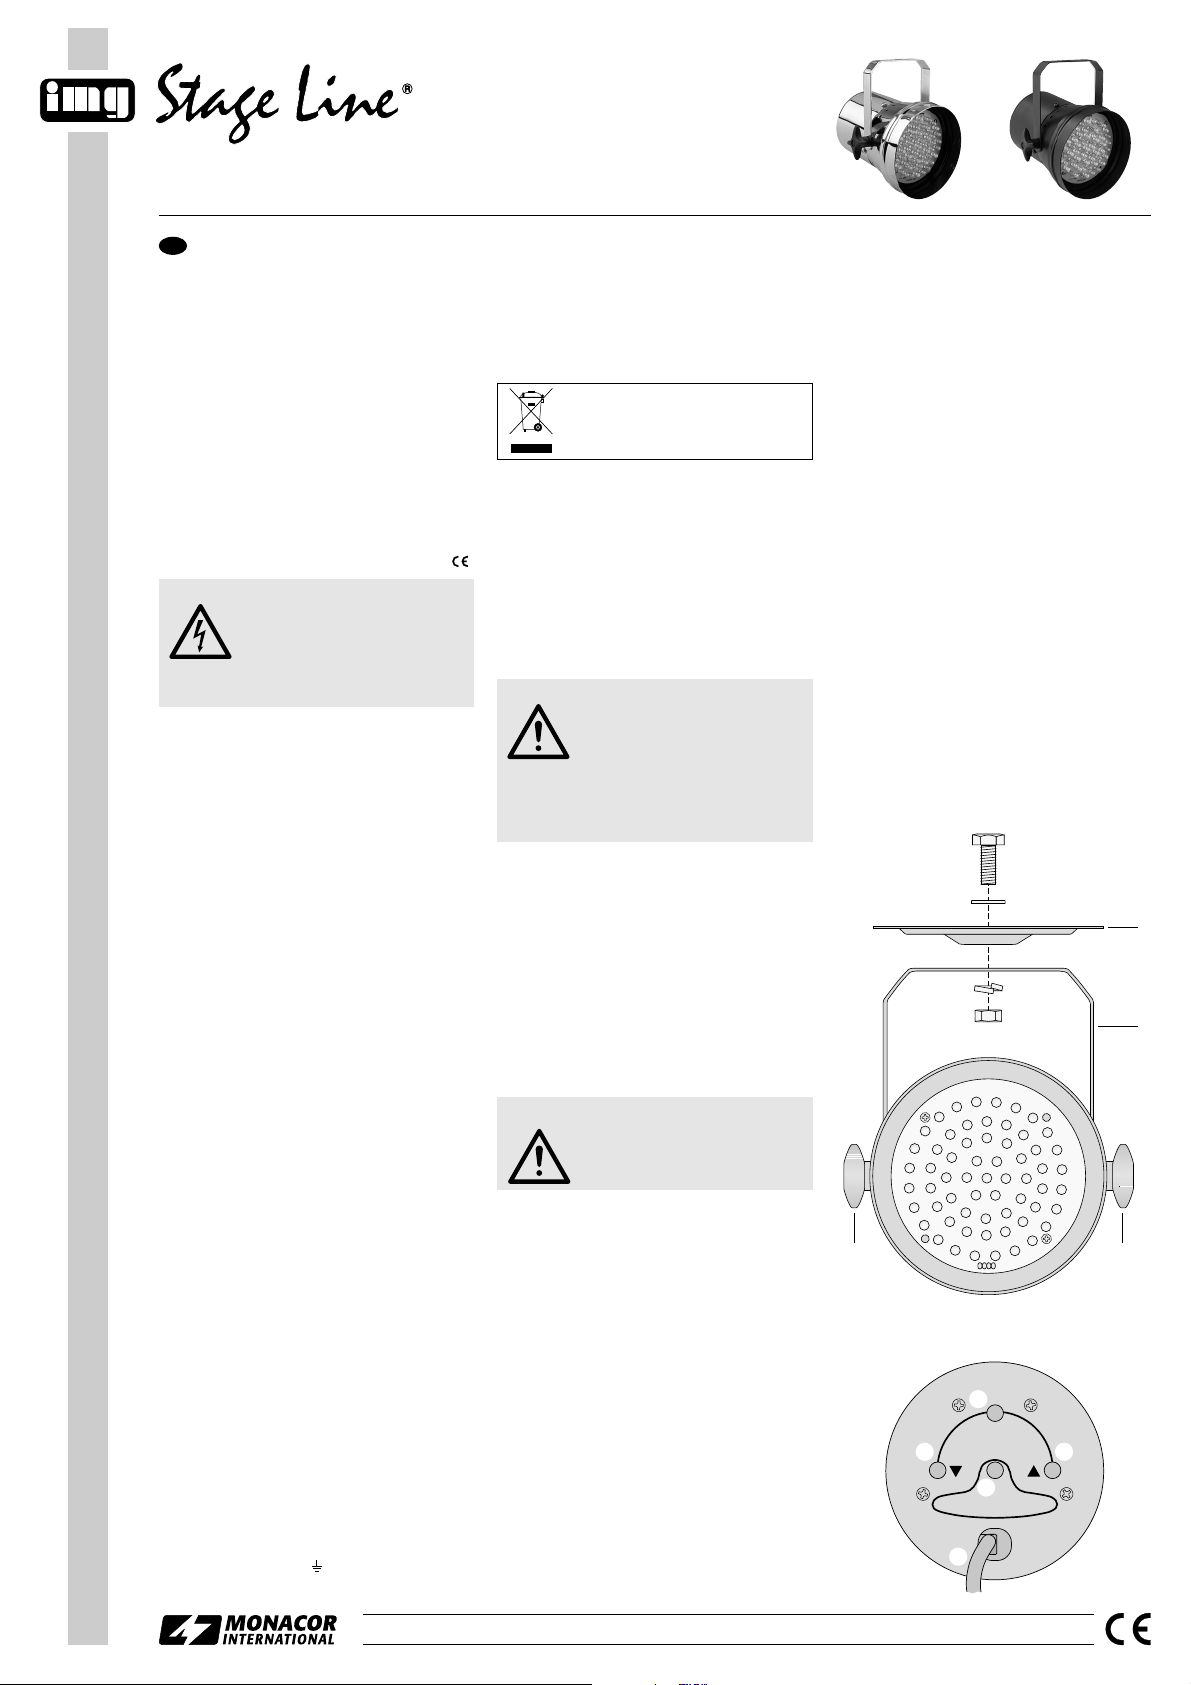
3 Mounting
The spotlight can be
a set up by unfolding the bracket (2).
b mounted with a support for lighting units
(C-hook) or a stable mounting screw via the
bracket to a cross arm or a stand.
c mounted on the ceiling via the supplied
mounting plate (1); screw the mounting plate
to the bracket (see fig. 1) and mount it on the
ceiling via three screws.
To adjust the spotlight, slightly release the two
screws (3) on the bracket, incline the spotlight as
desired, then retighten the screws.
4 Operation
4.1 Setting the spotlight into operation
To switch on the spotlight, connect the plug of
the mains cable (8) to a socket (230V~/50Hz).
Whenever the spotlight is switched on, it is in the
operating mode “music-controlled change of
colour” and all adjustments made with the buttons (4)–(6) will be reset.
To switch off the spotlight, disconnect the mains
plug from the socket.
For a more convenient operation, it is recommended to connect the unit to a mains socket
which is switched on and off via a light switch.
4.2 Selecting the operating mode
The three operating modes of the spotlight can
be selected with the button MIC/AUTO/MANUAL
(7). Each time the button is pressed, the next
mode will be selected.
1. Music-controlled change of colour (MIC)
When music with notable rhythm in the bass
range is played at a sufficient volume, the spotlight, controlled via an internal microphone, will
change its colour to the beat of the music.
2. Automatic change of colour (AUTO)
In this mode, the speed at which the colours
will change can be adjusted:
Each time the button ▲ (6) is pressed, the
speed will be increased; each time the button
▼ (5) is pressed, it will be reduced.
WARNING
Please note that very fast colour
changes may trigger epileptic seizures with photosensitive persons and persons with epilepsy!
WARNING The spotlight must be mounted
expertly and safely. If it is installed
as a suspended load above persons, it must additionally be secured (e.g. by a safety rope fixed
to the bracket). Fasten the safety
rope in such a way that the maximum falling distance of the spotlight is 20cm.
If the unit is to be put out of operation
definitively, take it to a local recycling
plant for a disposal which is not
harmful to the environment.
When the button FADE (4) is pressed, the
spotlight will switch to a gradual fading between the colours. The fading speed is not
adjustable. To stop the gradual fading, press
the button FADE once again: the spotlight will
return to the change of colour at the speed
adjusted with the button ▲ or ▼.
3. Manual colour adjustment (MANUAL)
In the manual mode, the LEDs for red, green,
and blue can be separately selected:
with the button G (4): activation/deactivation
of the green LEDs
with the button R (5): activation/deactivation
of the red LEDs
with the button B (6): activation/deactivation
of the blue LEDs
Press the corresponding button/s to adjust the
desired colour (red, green, blue or a mixed
colour composed of the three primary colours).
5 Specifications
Power supply: . . . . . . . 230V~/50Hz
Power consumption: . . 12VA
Lamp: . . . . . . . . . . . . . . 61 extra bright LEDs
Ambient temperature: . 0–40°C
Dimensions: . . . . . . . . . Ø 116 x 155mm
Weight: . . . . . . . . . . . . 350g
Subject to technical modification.
wwwwww..iimmggssttaaggeelliinnee..ccoomm
GB
PARL-36/CR
Order No. 38.2630
Copyright©by MONACOR INTERNATIONAL GmbH & Co. KG, Bremen, Germany. All rights reserved. A-0553.99.01.02.2006
®
PARL-36/SW
Order No. 38.2640
4
56
7
8
➀
➁
1
2
33
LED PINSPOT
G
R
B
R
B
G
G
R
G
R
B
R
GB
G
B
R
R
G
B
R
B
R
B
R
G
G
B
G
B
R
R B
G
R
B
G
B
G
R
B
B
G
G
R
G
B
R
BR
R
B
G
B
G
R
G
R
B
B
R
G
FADE
RB
MIC/AUTO/MANUAL
 Loading...