

ELECTRONICS FOR SPECIALISTS ELECTRONICS FOR SPECIALISTS ELECTRONICS FOR SPECIALISTS ELECTRONICS FOR SPECIALISTS
BEDIENUNGSANLEITUNG
INSTRUCTION MANUAL
MODE D’EMPLOI
ISTRUZIONI PER L’USO
GEBRUIKSAANWIJZING
MANUAL DE INSTRUCCIONES
INSTRUKCJA OBSŁUGI
SIKKERHEDSOPLYSNINGER
SÄKERHETSFÖRESKRIFTER
TURVALLISUUDESTA
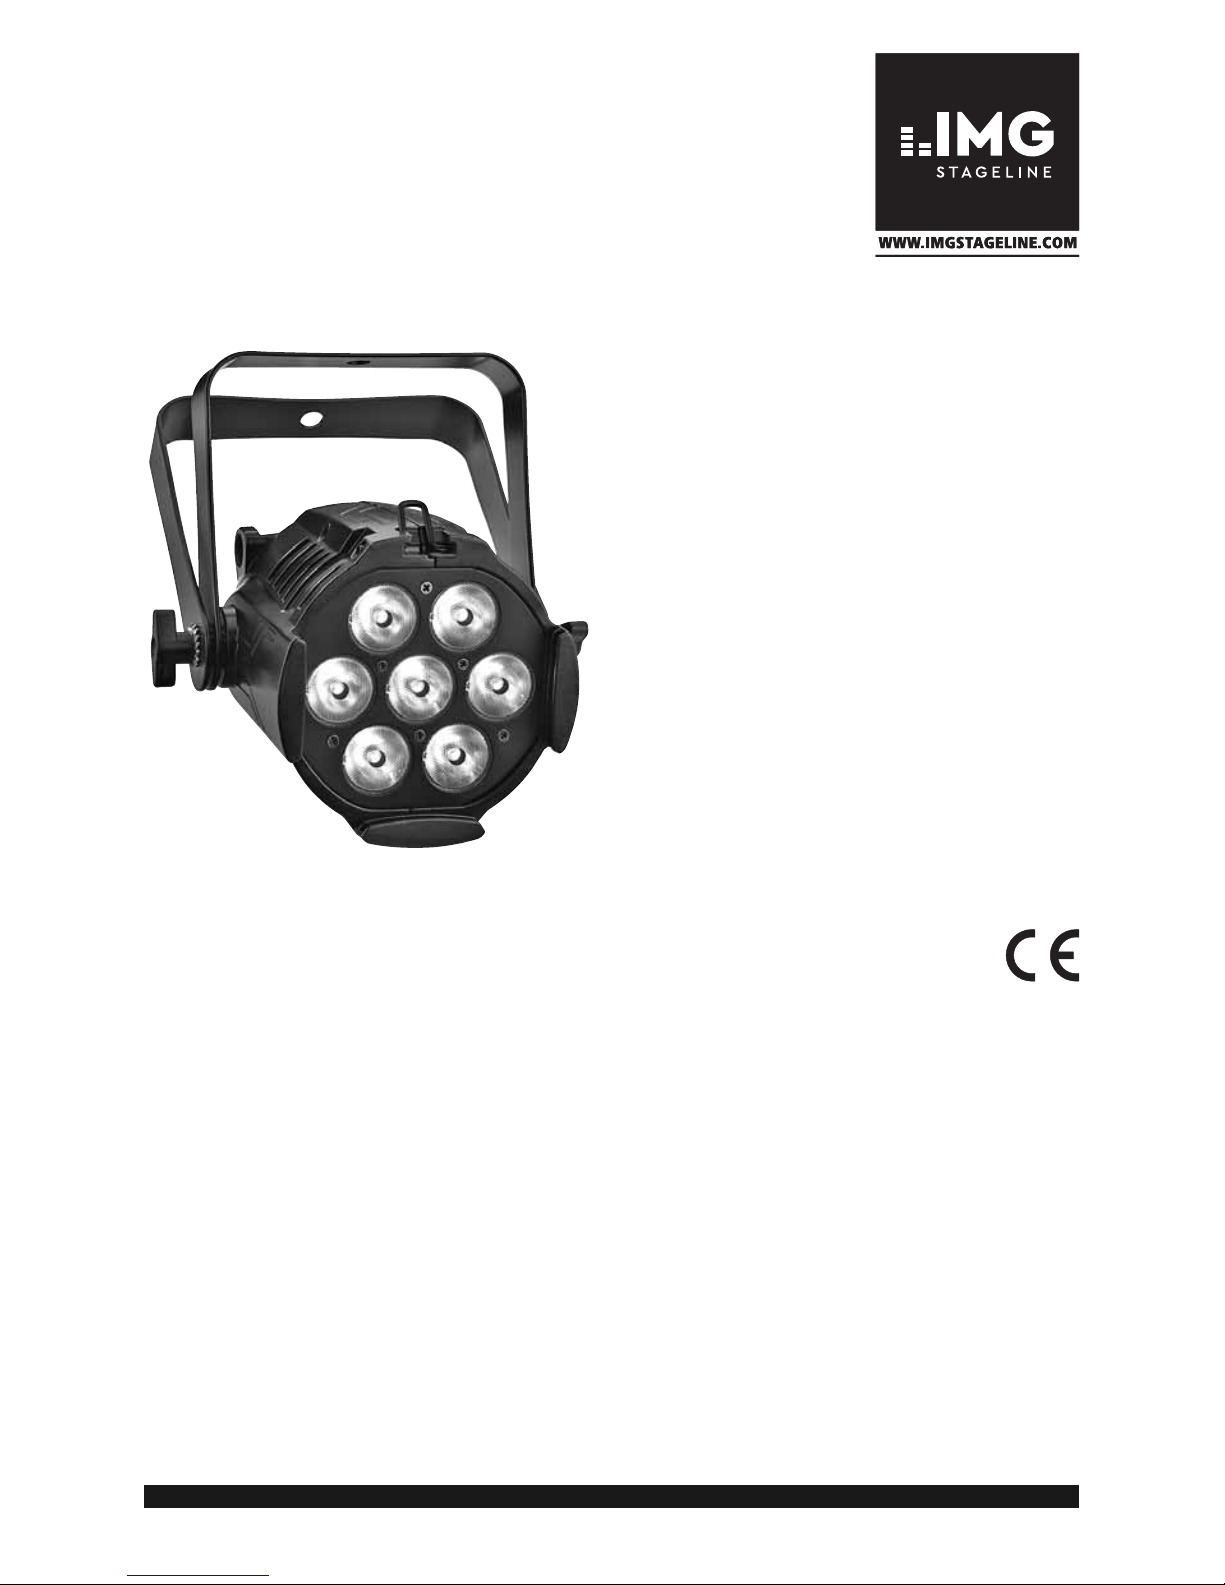
DMX-LED-Scheinwerfer
DMX LED Spotlight
PARL-20DMX
Bestell-Nr. • Order No. 38.6900
2
789
1
10 11 12 13
6
4
5
22
3
3

3
ELECTRONICS FOR SPECIALISTS ELECTRONICS FOR SPECIALISTS ELECTRONICS FOR SPECIALISTS ELECTRONICS FOR SPECIALISTS
Deutsch . . . . . . . Seite 4
English . . . . . . . Page 11
Français . . . . . . Page 18
Italiano . . . . . . . Pagina 25
Nederlands . . . Pagina 32
Español . . . . . . . Página 39
Polski . . . . . . . . Strona 46
Dansk . . . . . . . . Sida 53
Svenska . . . . . . Sidan 54
Suomi . . . . . . . . Sivulta 55
4
Deutsch
DMX-LED-Scheinwerfer
Diese Anleitung richtet sich an den Installateur des
Geräts und an den Bediener mit Grundkenntnissen
in der DMX-Steuerung. Bitte lesen Sie die Anleitung vor dem Betrieb gründlich durch und heben
Sie sie für ein späteres Nachlesen auf. Auf der
Seite 2 finden Sie alle beschriebenen Bedienelemente und Anschlüsse.
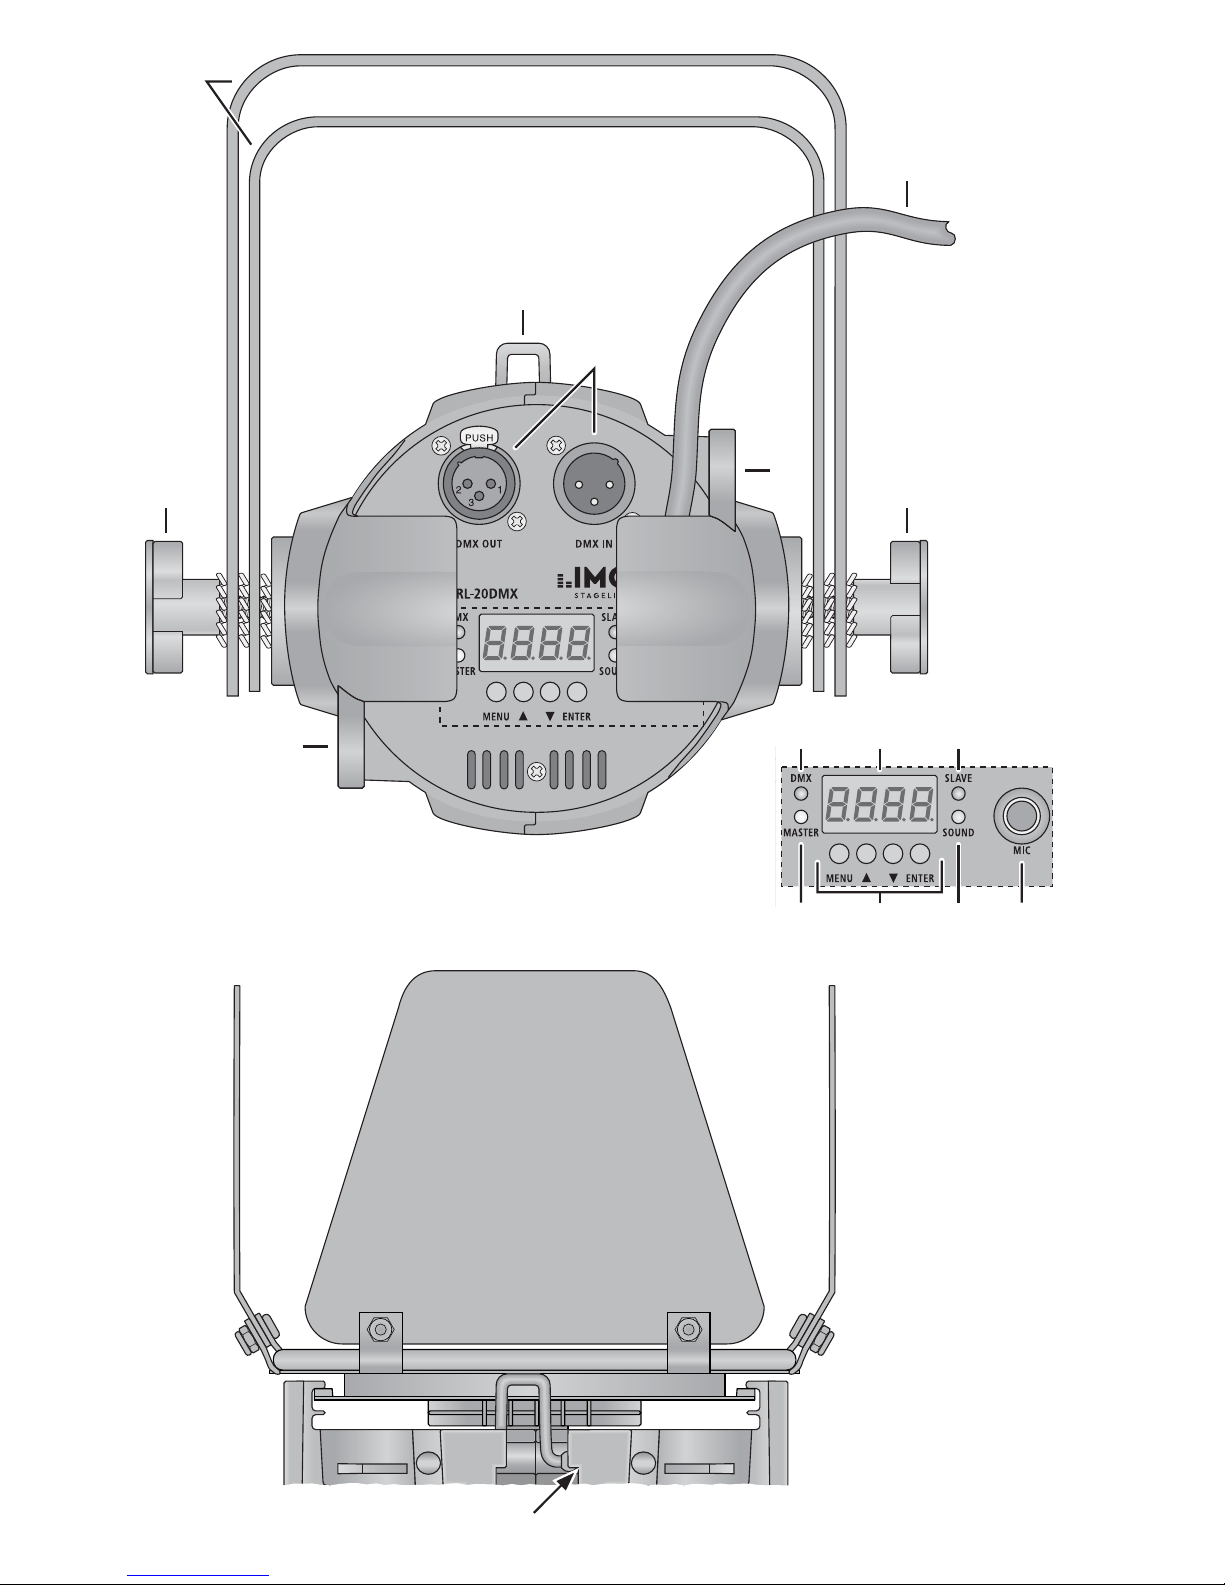
1 Übersicht der Bedienelemente
und Anschlüsse
1 Montagebügel
2 Feststellschrauben für die Montagebügel
3 Gehäuseösen zum Anbringen eines Fangseils
4 Verriegelungsbügel für die als Zubehör erhält -
liche Torblende PARL-20B
5 3-polige XLR-Steueranschlüsse:
Eingang DMX IN (Einbaustecker)
Ausgang DMX OUT (Buchse mit Verriegelung;
zum Herausziehen des Steckers den PUSHHebel drücken)
Anschluss bei Betrieb mit DMX-Steuergerät
1. Den DMX-Eingang mit dem DMX-Ausgang
des DMX-Steuergeräts verbinden.
2. Den DMX-Ausgang mit dem DMX-Eingang
des nächsten DMX-gesteuerten Geräts verbinden. Des sen Ausgang wieder mit dem Eingang des nachfol genden Geräts verbinden
usw., bis alle DMX-gesteuerten Geräte in
einer Kette ange schlossen sind.
3. Um Störungen bei der Signalübertragung
auszuschließen, sollte bei langen Leitungen
oder bei einer Vielzahl von hintereinandergeschal teten Ge räten der DMX-Ausgang des
letzten Geräts der Kette mit einem 120-ΩWider stand (> 0,3W) ab geschlossen werden: In die Ausgangs buchse einen entsprechenden Ab schluss stecker (z. B. DLT-123
von IMG STAGELINE) stecken.
Anschluss bei Master/Slave-Betrieb
Im Master/Slave-Betrieb lassen sich mehrere
Geräte PARL-20DMX synchron im Betriebsmodus „Automatik“ oder „Sound“ be treiben. Dabei
übernimmt das ers te Gerät (Master-Ge rät) die
Steu erung der übrigen Geräte (Slave-Geräte).
Die Geräte wie bei DMX-Betrieb zu einer Kette
verbinden (siehe oben), jedoch bleibt der DMXEingang des ersten Geräts der Kette frei.
6 Netzkabel zum An schluss an eine Steckdose
(230 V~ / 50 Hz)
7 LED DMX: leuchtet, wenn der Scheinwerfer
über ein DMX-Steuergerät betrieben wird
8 Display zur Anzeige der Menüeinstellungen
9 LED SLAVE: leuchtet, wenn der Scheinwerfer
als Slave-Gerät läuft
10 LED MASTER: leuchtet, wenn der Scheinwerfer
als Master-Gerät oder als Einzelgerät im Be triebsmodus „Automatik“ oder „Sound“ läuft
11 Tasten zur Bedienung des Geräts über ein
Menü:
Kapitel 6.1 und 6.2
12 LED SOUND: blitzt bei Musiksteuerung auf,
wenn ein Schallimpuls über das Mi krofon (13)
empfangen wird
13 Mikrofon für die Musiksteuerung
2 Hinweise für den
sicheren Gebrauch
Das Gerät entspricht allen relevanten Richtlinien
der EU und ist deshalb mit gekennzeichnet.
G
Verwenden Sie das Gerät nur im Innenbereich
und schützen Sie es vor Tropf- und Spritzwasser,
hoher Luftfeuchtigkeit und Hitze (zulässiger Einsatztemperaturbereich 0 – 40°C).
G
Stellen Sie keine mit Flüssigkeit gefüllten Ge fäße, z. B. Trinkgläser, auf das Gerät.
G
Nehmen Sie das Gerät nicht in Betrieb oder zie hen Sie sofort den Netzstecker aus der Steckdose,
1. wenn sichtbare Schäden am Gerät oder am
Netzkabel vorhanden sind,
2. wenn nach einem Sturz oder Ähnlichem der
Verdacht auf einen Defekt besteht,
3. wenn Funktionsstörungen auftreten.
Geben Sie das Gerät in jedem Fall zur Reparatur in eine Fachwerkstatt.
G
Ein beschädigtes Netzkabel darf nur durch eine
Fachwerkstatt ersetzt werden.
G
Ziehen Sie den Netzstecker nie am Kabel aus
der Steckdose, fassen Sie immer am Stecker an.
G
Verwenden Sie zum Reinigen nur ein trockenes,
weiches Tuch, niemals Wasser oder Chemikalien.
G
Wird das Gerät zweckentfremdet, nicht sicher
montiert, nicht richtig angeschlossen, falsch be dient oder nicht fachgerecht repariert, kann
keine Haftung für daraus resultierende Sach-
WARNUNG Das Gerät wird mit lebensgefährli-
cher Netzspannung versorgt. Nehmen Sie deshalb niemals selbst Eingriffe am Gerät vor und stecken Sie
nichts durch die Lüftungsöffnungen!
Es be steht die Gefahr eines elektrischen Schlages.
5
Deutsch
oder Personenschäden und keine Garantie für
das Gerät übernommen werden.
3 Einsatzmöglichkeiten
Der LED-Scheinwerfer PARL-20DMX dient zur
Effektbe leuchtung, z. B. für kleine Bühnen, Clubs
oder Festsäle. Als Lichtquelle sind 7 besonders
helle 8-W-RGBW-LEDs eingesetzt, mit denen sich
farbiges oder weißes Licht abstrahlen lässt. Verschiedene Betriebsarten sind einstellbar (z. B. au tomatisch ablaufende oder musikgesteuerte ShowProgramme, Stroboskop-Effekte).
Der Scheinwerfer ist für die Steuerung über ein
DMX-Lichtsteuergerät ausgelegt. Die Anzahl der
DMX-Steuerkanäle ist wählbar: 1, 2, 5, 6 oder 8.
Er lässt sich aber auch ohne Steuergerät betreiben, entweder allein oder im Verbund mehrerer
PARL-20DMX (Master/Slave-Betrieb).
4 Montage/Aufstellung
G
Zur Vermeidung von Wärmestaus im Gerät, platzieren Sie dieses immer so, dass im Betrieb eine
ausreichende Luftzirkulation ge währleistet ist.
Die Lüftungsöffnungen am Ge häuse dürfen auf
keinen Fall abgedeckt werden.
G
Der Abstand zum angestrahlten Objekt sollte
mindestens 50 cm betragen.
Den Scheinwerfer über einen der Montage bügel (1)
be festigen, z. B. mit einer stabilen Mon tage schrau be oder einer Lichtstrahler-Halterung (C-Ha ken) an
einer Traverse. Alternativ lässt sich der Scheinwerfer auch frei aufstellen: Dazu die Montagebügel so
unter dem Scheinwerfer spreizen, dass sie als
Ständer dienen.
Zum Ausrichten des Scheinwerfers bzw. Verstellen der Bügel die zwei Feststellschrauben (2) für
die Bügel lösen und nach der Einstellung die
Schrauben wieder fest anziehen.
4.2 Torblende
Um den Lichtstrahlwinkel zu verkleinern, kann die
als Zubehör erhältliche Torblende PARL-20B einge setzt werden. Die Blende in die äußeren Schienen vorn am Scheinwerfer schieben und mit dem
Verriegelungsbügel (4) gegen Heraus fallen sichern
(Abb. 3). Der Bügel wird durch eine Feder (Pfeil
in Abb. 3) in seiner Position arretiert.
5 Inbetriebnahme
Bei Betrieb mit einem DMX-Steuergerät oder bei
Master/Slave-Betrieb die Steuer verbindungen herstellen (Ka pitel 1, Punkt 5). Zum Anschluss
sollten spezielle Kabel für die DMX-Signalübertragung verwendet werden (z. B. Kabel der CDMXNSerie von IMG STAGELINE). Bei Leitungslängen
ab 150 m wird grundsätzlich das Zwischenschalten
eines DMX-Aufholverstärkers empfohlen (z. B.
SR-103DMX von IMG STAGELINE).
Zum Einschalten des Scheinwerfers den Stecker
des Netzkabels (6) in eine Steckdose (230 V~/
50 Hz) stecken. Zum Ausschalten den Netzstecker
aus der Steckdose ziehen.
Vorsicht: Das Gerät darf nicht über einen Dimmer
an die Netzspannung angeschlossen werden!
6 Bedienung
Das Gerät wird über ein Menü eingestellt. Zur Be dienung des Menüs siehe Kapitel 6.1 und 6.2.
Betrieb mit DMX-Steuergerät
Den Kanalmodus (Menüpunkt ) wählen und
die DMX-Adresse (Menüpunkt ) einstellen. Bei
Bedarf über das Menü weitere Funk tionen einstellen (z. B. das Verhalten des Geräts bei Ausfall des
Steuersignals). Der Scheinwerfer ist auf Steuerung
über das DMX-Steuergerät eingestellt, wenn der
Menüpunkt aufgerufen ist (Anzeige der eingestellten Adresse bei eingeschaltetem Display).
Die LED DMX (7) leuchtet, wenn der Scheinwerfer
über das DMX-Steuergerät betrieben wird. Ist der
Scheinwerfer im 8-Ka nal-Modus auf Musiksteuerung eingestellt, blitzt die LED SOUND (12) im
Rhythmus der über das Mikrofon (13) empfangenen Schallimpulse auf.
WARNUNG Der Scheinwerfer muss fachgerecht
und sicher montiert werden. Wird er
an einer Stelle installiert, unter der
sich Personen aufhalten können,
muss er zusätzlich gesichert werden
[z. B. durch ein Fang seil an einer der
beiden Ge häuseösen (3); das Fang seil so be festigen, dass der Fallweg
des Ge räts nicht mehr als 20 cm
betragen kann].
WARNUNG Blicken Sie nicht für längere Zeit
direkt in die Lichtquel le, das kann zu
Augenschäden führen.
Beachten Sie, dass sehr schnelle
Lichtwechsel bei fotosensiblen Menschen und Epilep tikern epileptische
Anfälle aus lösen können!
Soll das Gerät endgültig aus dem Betrieb
genommen werden, übergeben Sie es zur
umweltgerechten Entsorgung einem örtlichen Recyclingbetrieb.
6
Deutsch
Betrieb ohne DMX-Steuergerät
Wird der Scheinwerfer als Einzelgerät betrieben,
den Menüpunkt für den Betriebsmodus („Automatik“ , „Sound“ oder „Farbe“ ) aufrufen
und von den verfügbaren Einstell optionen die ge wünschte auswählen. Bei Bedarf über das Menü
weitere Funktionen einstellen (z. B. Ge schwindigkeit für den Modus „Automatik“ oder Empfindlichkeit für den Modus „Sound“).
Bei Master/Slave-Betrieb (
Kapitel 1, Punkt 5)
am Master-Gerät den Modus „Automatik“ oder
„Sound“ einstellen und für den Menüpunkt die
Einstellung wählen. Die Slave-Ge räte auf den
Slave-Modus (Menüpunkt ) einstellen.
Die LED MASTER (10) leuchtet, wenn der Scheinwerfer im Modus „Automatik“ oder „Sound“ läuft.
Im Modus „Sound“ blitzt die LED SOUND (12) im
Rhythmus der über das Mikrofon (13) empfangenen Schallimpulse auf. Die LED SLAVE (9) leuchtet, wenn das Gerät im Slave-Modus läuft.
6.1 Bedienung des Menüs
Das Menü wird über die vier Tasten (11) und das
Display (8) bedient. Das Display lässt sich über den
Menüpunkt auf ständige Anzeige einstellen
oder auf eine Anzeigedauer, nach deren Ablauf es
sich ausschaltet. Durch Drücken einer Taste wird
es dann wieder eingeschaltet.
1) Nach dem Einschalten des Geräts ist der zuletzt
gewählte Menüpunkt aufgerufen. Um den
Menüpunkt zu verlassen, die Taste MENU oder
ENTER drücken.
2) Zum Anwählen eines Menüpunkts können fol-
gende Tasten verwendet werden:
– die Taste MENU oder
(aufwärts)
– die Taste (abwärts)
3) Zum Aufrufen des gewählten Menüpunkts die
Taste ENTER drücken.
4) Um den Menüpunkt einzustellen (z.B. bei
die Adresse einstellen, bei die Farbe wählen), die Taste
oder verwenden.
Bei einigen Menüpunkten, wie z. B. , ist
keine Einstellung vorgesehen.
5) Um den Menüpunkt wieder zu verlassen, die
Taste MENU oder ENTER drücken.
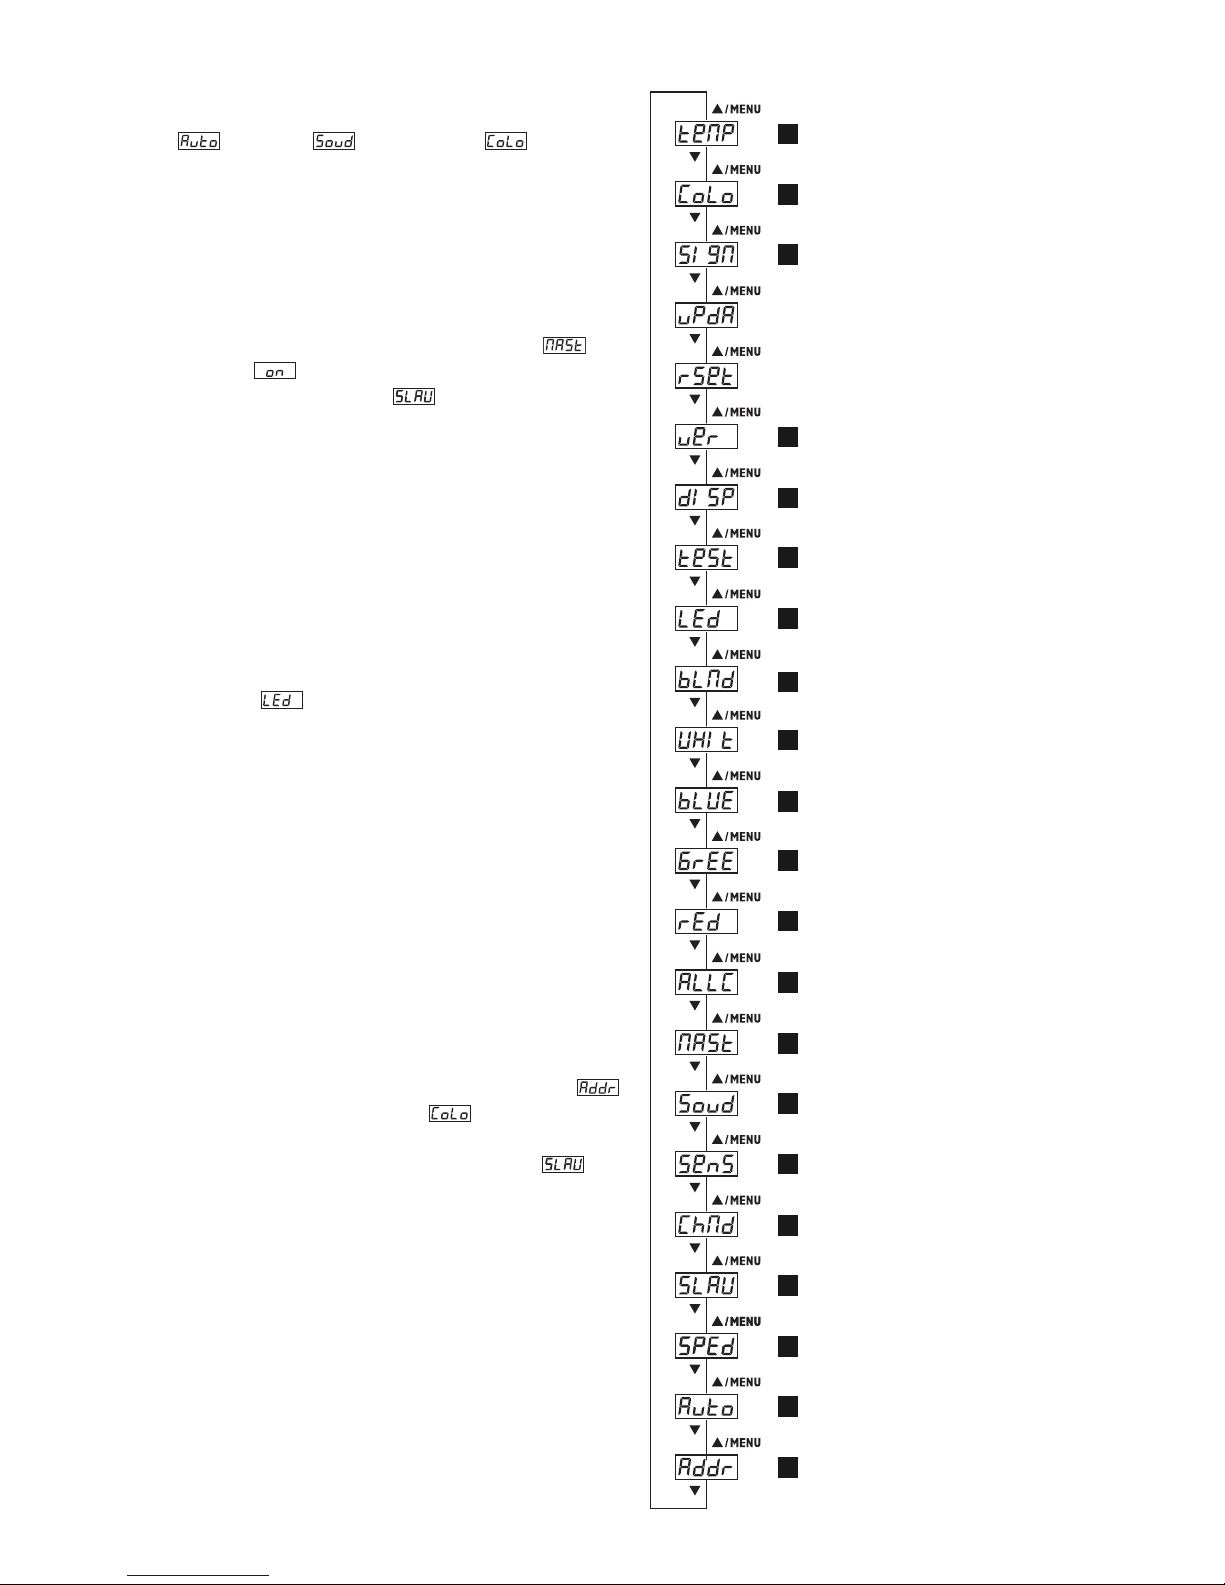
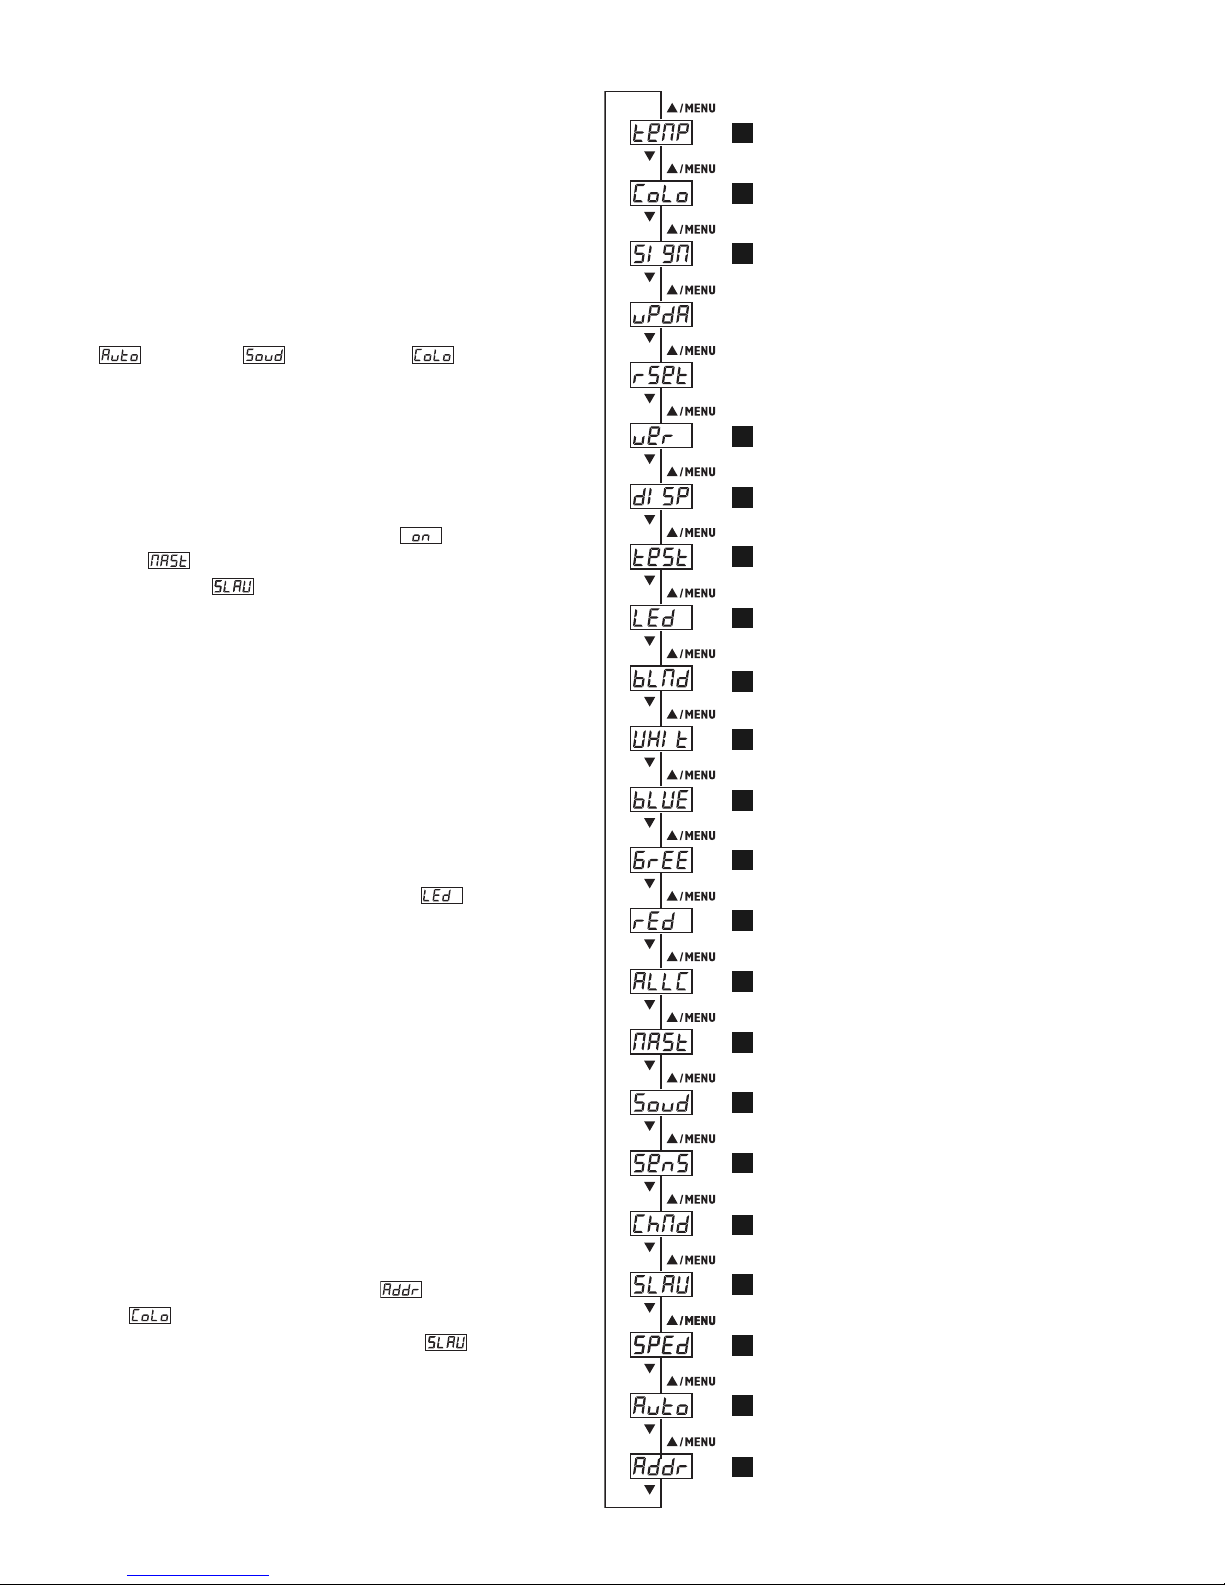
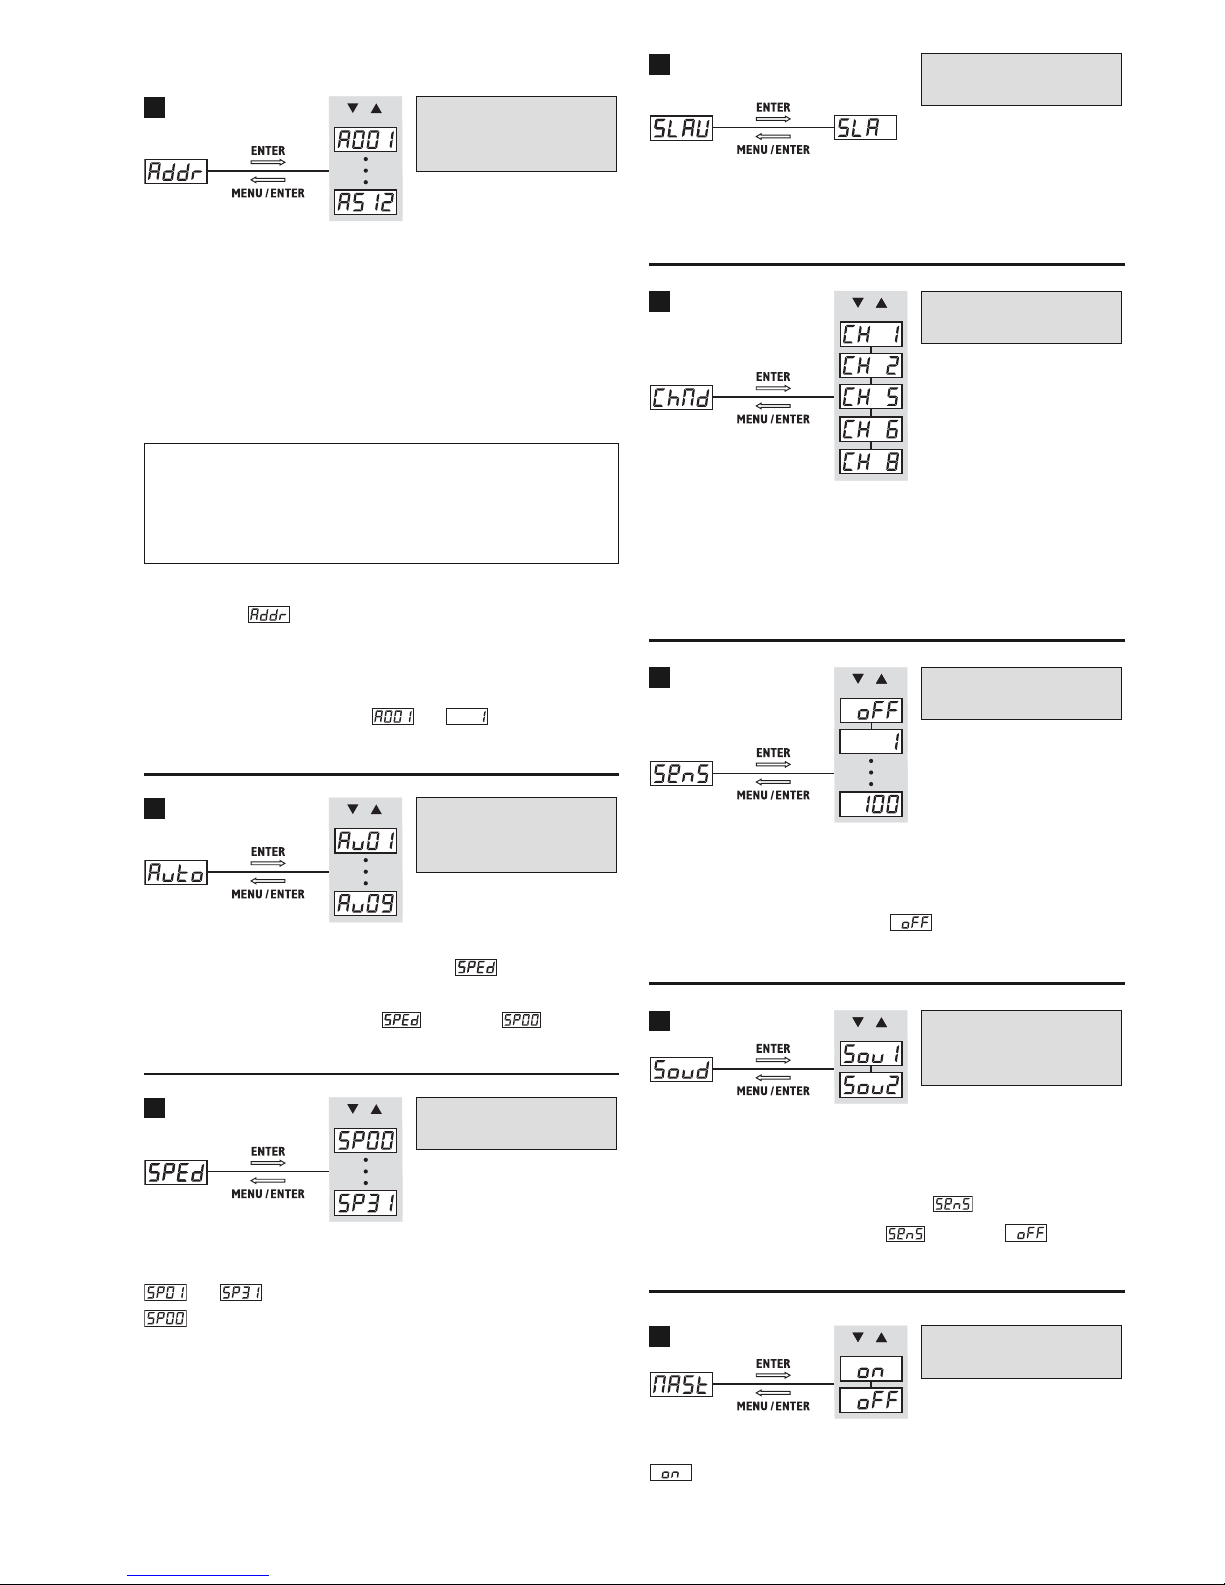
6.2 Menüstruktur
DMX-Startadresse/
Betrieb mit DMX-Steuergerät
Modus „Automatik“
(automatisch ablaufende Show-Programme)
Geschwindigkeit für den Modus „Automatik“
Slave-Modus
Kanalmodus (Anzahl der DMX-Kanäle)
Empfindlichkeit für den Modus „Sound“
Modus „Sound“
(musikgesteuerte Show-Programme)
Ausgabe der Slave-Steuersignale
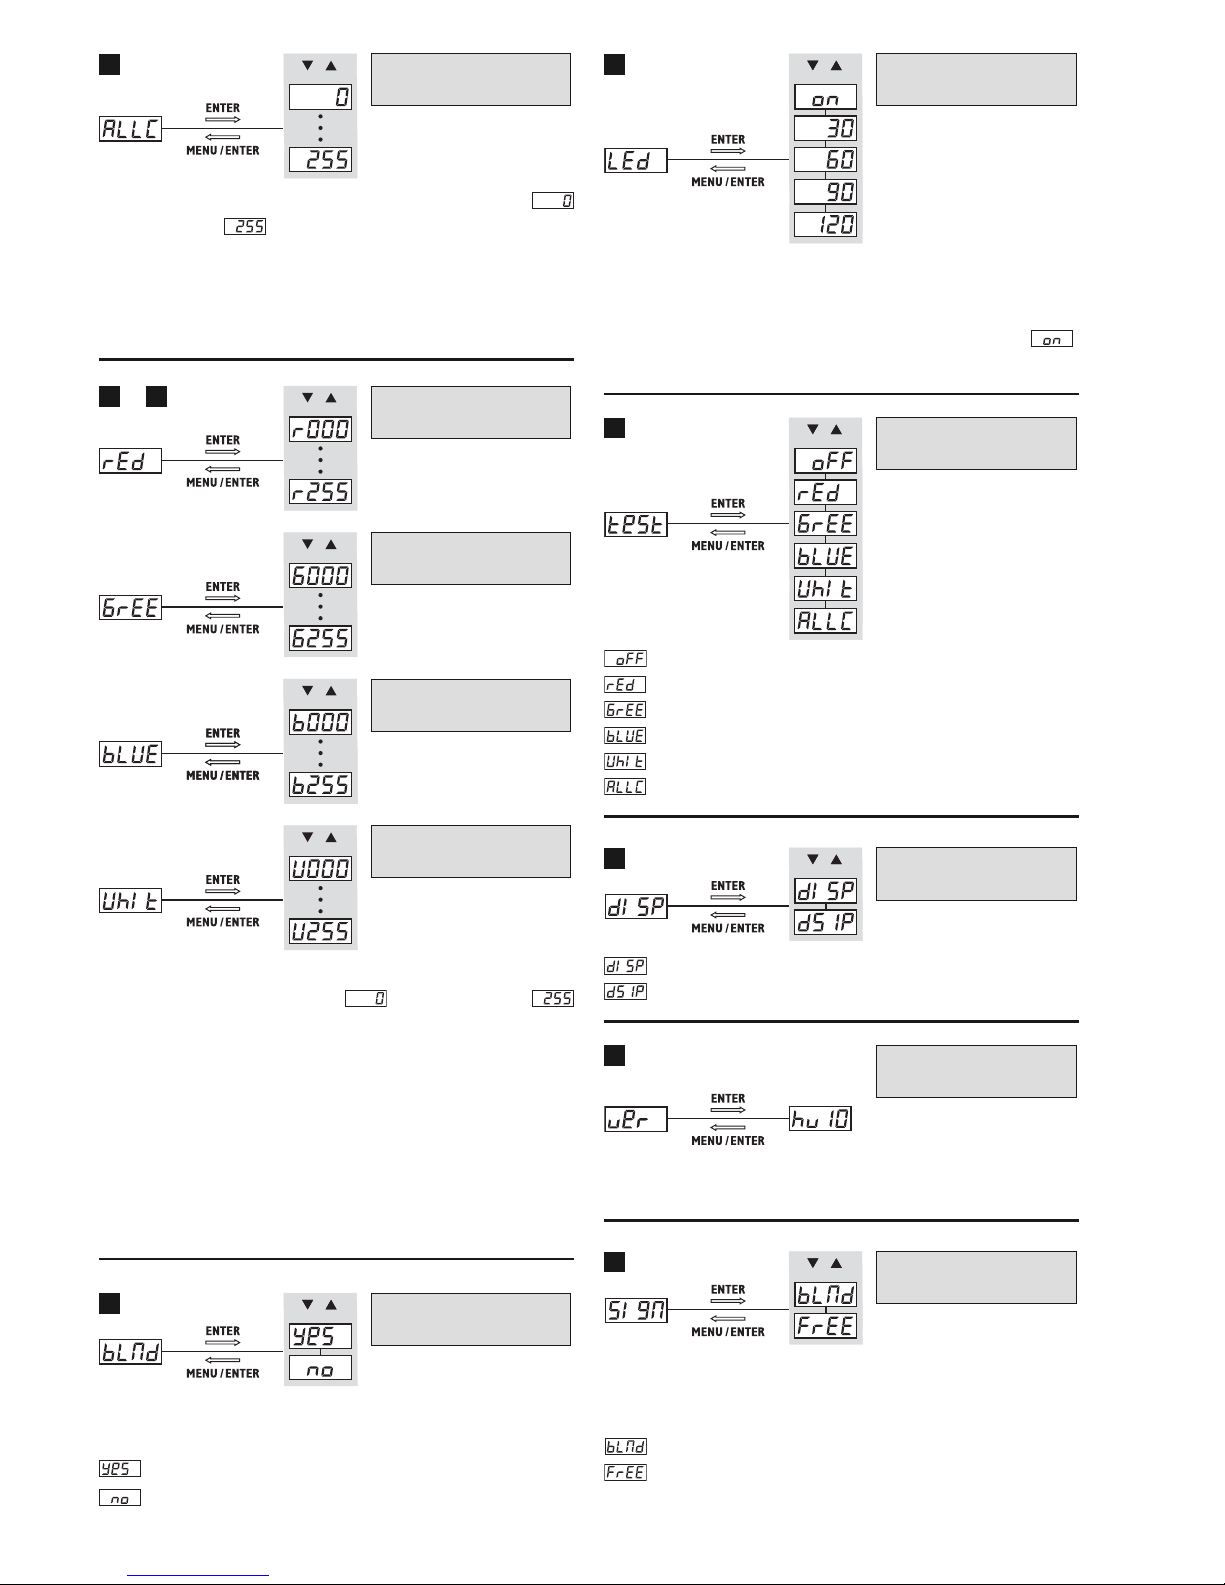
Gesamthelligkeit
Helligkeit Rot
Helligkeit Grün
Helligkeit Blau
Helligkeit Weiß
LEDs ein/aus
Dauer der Anzeige
Testprogramme
Drehung der Anzeige um 180°
Anzeige der Firmware-Version
nur für den Service
nur für den Service
Verhalten des Geräts bei Ausfall des
Steuersignals
Modus „Farbe“ (Farbstrahler-Betrieb)
Temperaturanzeige
1
2
3
4
5
6
7
8
9
10
11
12
13
15
16
17
18
19
20
21
14
6.2.1 Übersicht der einzelnen Menüpunkte
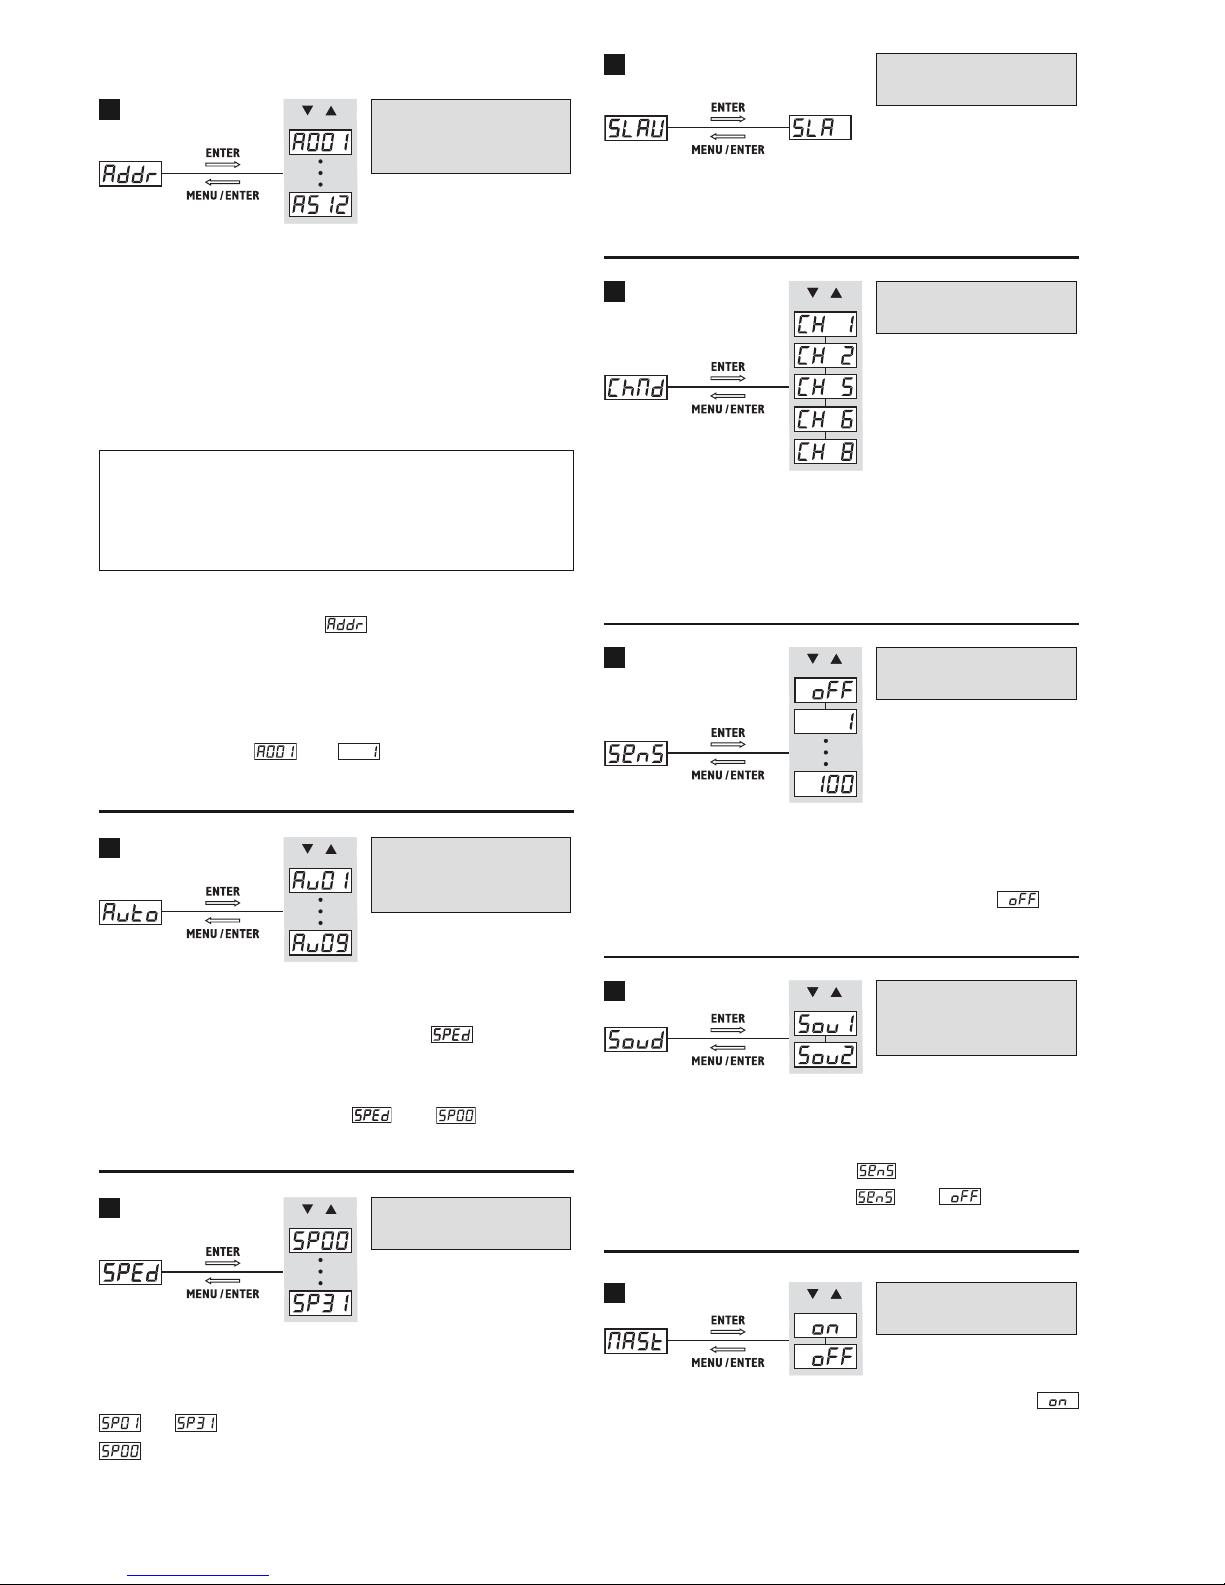
Um alle DMX-gesteuerten Geräte separat bedienen zu können, muss jedes Gerät eine eigene
Startadresse erhalten. Soll der erste DMX-Kanal
des Geräts vom Lichtsteuergerät z. B. über die
DMX-Adresse 17 gesteuert werden, am Gerät die
Startadresse 17 einstellen. Alle weiteren DMXKanäle des Geräts sind dann automatisch den
darauffolgenden Adressen zugeordnet.
Für die Steuerung über das DMX-Steuergerät
muss der Menüpunkt aufgerufen sein, so
dass die eingestellte Adresse bei eingeschaltetem
Display angezeigt wird. Die An zeige der eingestellten Adresse ändert sich, wenn ein DMX-Signal
empfangen wird, so wechselt z. B. bei Adresse 1
die Anzeige von auf , wenn ein DMX-Signal am DMX-Eingang anliegt.
Von den 9 Programmen das ge wünschte auswählen. Für die Programme 1 bis 8 kann die Ablaufgeschwindigkeit über den Menüpunkt eingestellt
werden (Programm 9 = konstante Abstrahlung von
weißem Licht).
Hinweis: Ist der Menüpunkt auf eingestellt,
läuft das gewählte Programm nicht ab.
Nach dem Aufrufen des Menüpunkts läuft das
Gerät im Modus „Automatik“ mit dem aktuell eingestellten Programm.
… = schnell … langsam
= Programm hält an bzw. startet nicht
Diesen Menüpunkt aufrufen, wenn das Gerät als
Slave-Gerät über ein Master-Gerät gesteuert werden soll (
Kapitel 1, Punkt 5).
Die Anzahl der DMX-Kanäle hängt von den benötigten Funktionen ab und eventuell auch von der
Anzahl der verfügbaren Steuerkanäle am Licht steuergerät. In Kapitel 8 sind die Funktionen, die in
den fünf Kanalmodi verfügbar sind, aufgeführt.
Nach dem Aufrufen des Menüpunkts läuft das
Gerät im Modus „Sound“ mit dem aktuell eingestellten Programm. Je höher der Wert, desto empfindlicher reagiert das Gerät auf Schall. Ist eingestellt, hält das Programm an bzw. startet nicht.
Im Modus „Sound“ reagiert das Gerät über das
Mikrofon (13) auf Schall. Von den 2 Programmen
das ge wünschte auswählen. Die Empfindlichkeit
kann über den Menüpunkt eingestellt werden.
Hinweis: Ist der Menüpunkt auf eingestellt,
läuft das gewählte Programm nicht ab.
Im Master/Slave-Betrieb das Master-Gerät auf
einstellen, sonst werden keine Steuersignale für die
Slave-Geräte ausgegeben.
Ausgabe der
Slave-Steuersignale
8
Modus „Sound“
(musikgesteuerte ShowProgramme)
7
Empfindlichkeit für den
Modus „Sound“
6
Kanalmodus
(Anzahl der DMX-Kanäle)
5
Slave-Modus
4
Beispiel: Ist der 5-Kanal-Modus eingestellt, sind bei der
Startadresse 17 die Kanäle 1 bis 5 den Adressen 17 bis
21 zugeordnet. Die Adresse 22 ist dann die nächstmögliche freie Startadresse für das folgende DMX-gesteuerte
Gerät.
Geschwindigkeit für den
Modus „Automatik“
3
Modus „Automatik“
(automatisch ablaufende
Show-Programme)
2
DMX-Startadresse/
Betrieb mit
DMX-Steuergerät
1
7
Deutsch
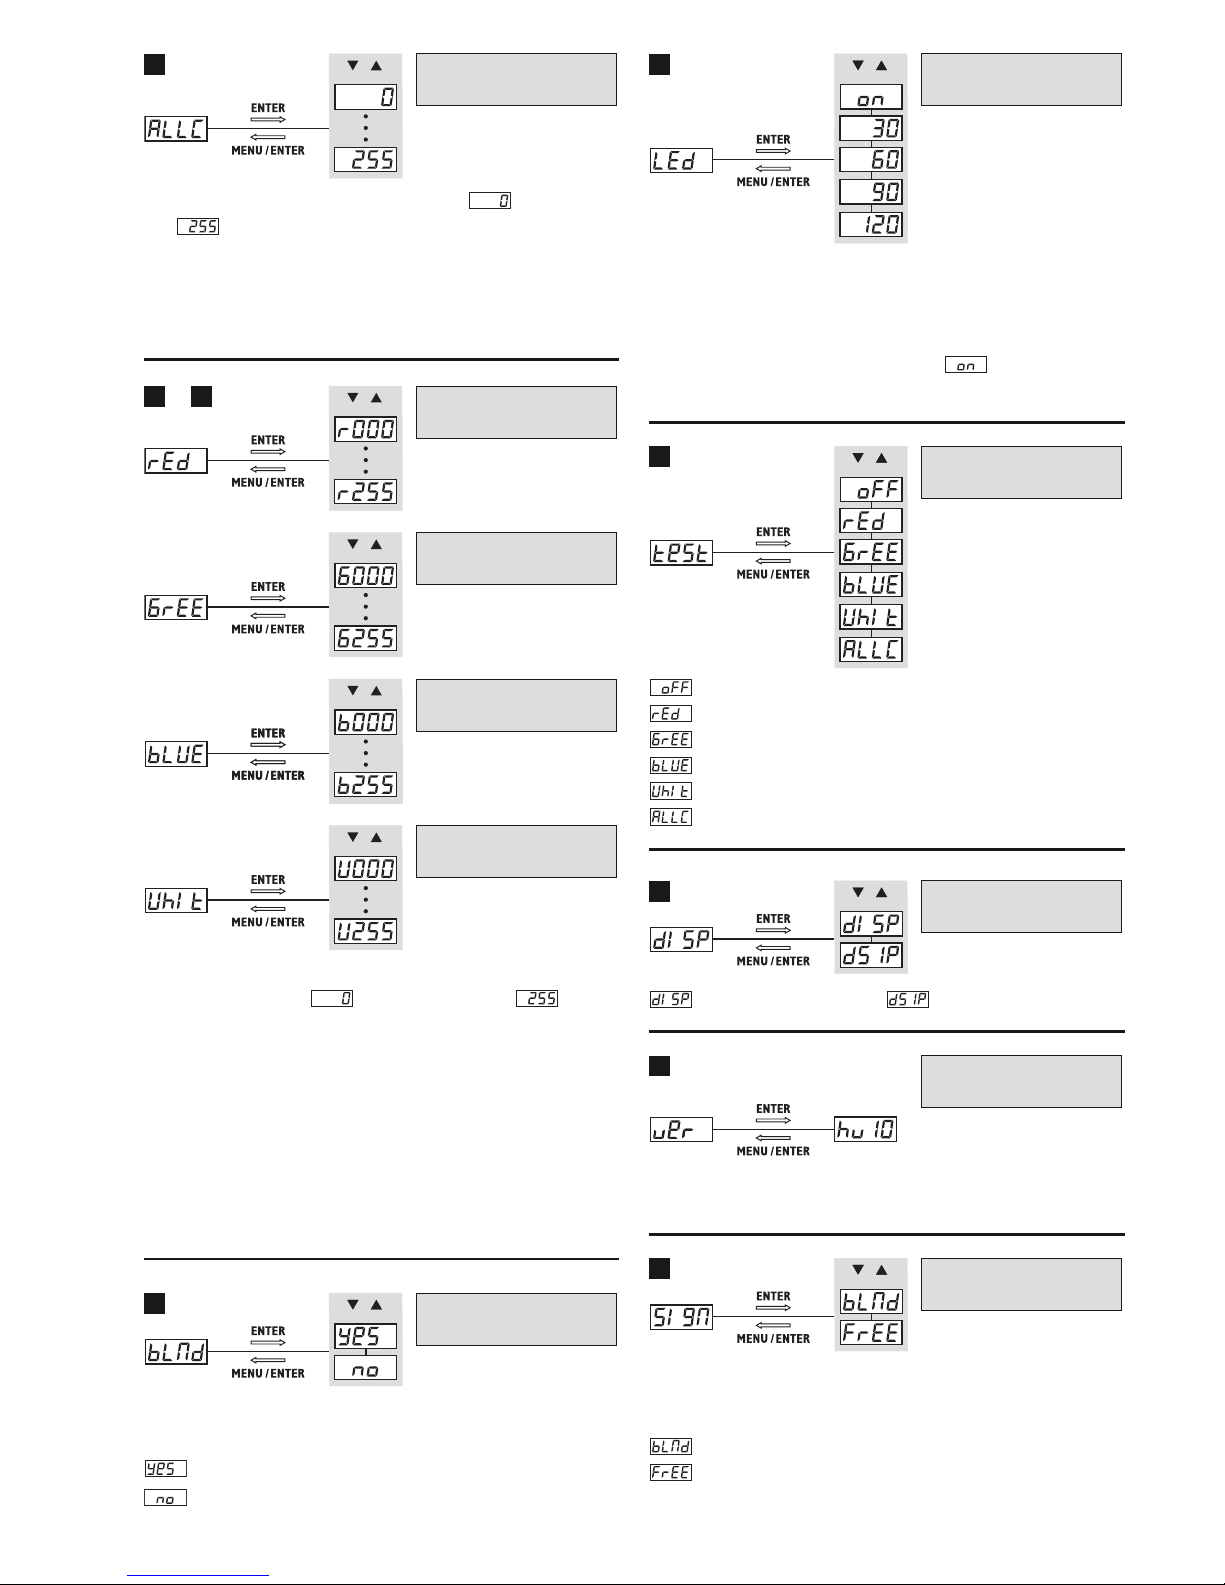
Die Gesamthelligkeit lässt sich von (LEDs aus)
bis (max. Helligkeit) einstellen.
Hinweis: Die Einstellung dieses Menüpunkts wirkt sich
auf alle Betriebsmodi aus, auch auf den Betrieb mit einem
DMX-Steuergerät! Sie gilt jedoch nur für dieses Gerät und
nicht für angeschlossene Slave-Geräte.
Die Helligkeit von Rot, Grün, Blau und Weiß lässt
sich separat von (Farbe aus) bis (max.
Helligkeit) einstellen. Diese Menüpunkte können da zu ge nutzt werden, eine Mischfarbe im ge wünschten Farbton zu erzeugen oder die Farb balance zu
korrigieren (z. B., um die Farbabstrahlung des Ge räts an die anderer Scheinwerfer anzugleichen).
Hinweis: Die Einstellungen dieser Menüpunkte wirken
sich auf alle Betriebsmodi aus, auch auf den Betrieb mit
einem DMX-Steuergerät! Sie gelten jedoch nur für dieses
Gerät und nicht für angeschlossene Slave-Geräte.
Nach dem Aufrufen des Menüpunkts lässt sich
umschalten zwischen:
= alle LEDs aus (Blackout)
= alle LEDs eingeschaltet
Das Display lässt sich auf eine Anzeigedauer von
30 s, 60 s, 90 s oder 120 s einstellen. Ist nach dem
letzten Tastendruck die Dauer verstrichen, schaltet
sich das Display aus. Beim nächsten Tastendruck
schaltet es sich wieder ein. Ist eingestellt, ist
das Display ständig eingeschaltet.
= kein Test
= Test „Rot“
= Test „Grün“
= Test „Blau“
= Test „Weiß“
= Test „Rot +Grün + Blau+ Weiß“
= normale Anzeige, = Anzeige gedreht
Über diesen Menüpunkt lässt sich die FirmwareVersion (Betriebssystem des Geräts) anzeigen.
Wird der Scheinwerfer über ein DMX-Steuergerät
gesteuert, lässt sich sein Verhalten bei Ausfall des
Steuersignals einstellen:
(„Blackout Mode“) = LEDs aus
(„Freeze“) = „Einfrieren“ der LEDs mit dem
letzten Steuerbefehl
Verhalten des Geräts bei
Ausfall des Steuersignals
19
Anzeige der
Firmware-Version
18
Drehung der Anzeige
um 180°
17
Testprogramme
16
Dauer der Anzeige
15
LEDs ein/aus
14
Helligkeit Weiß
Helligkeit Blau
Helligkeit Grün
Helligkeit Rot
10
13
…
Gesamthelligkeit
9
8
Deutsch
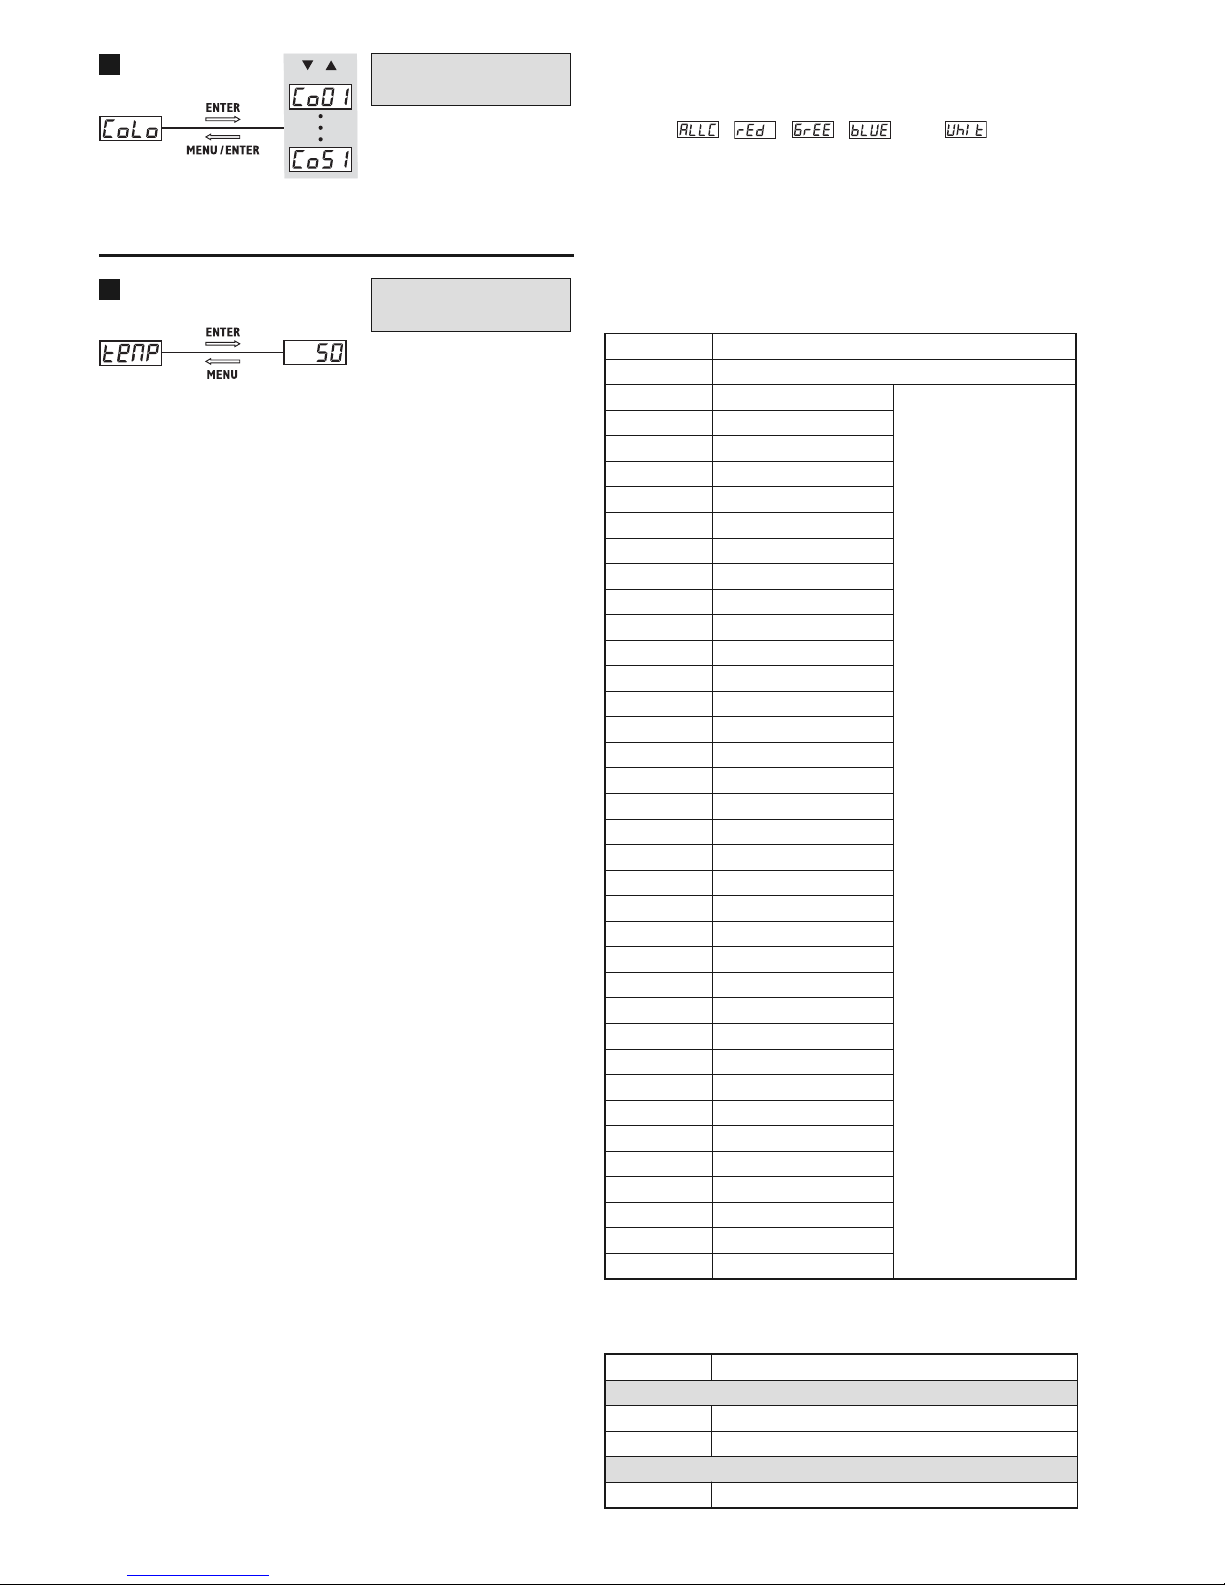
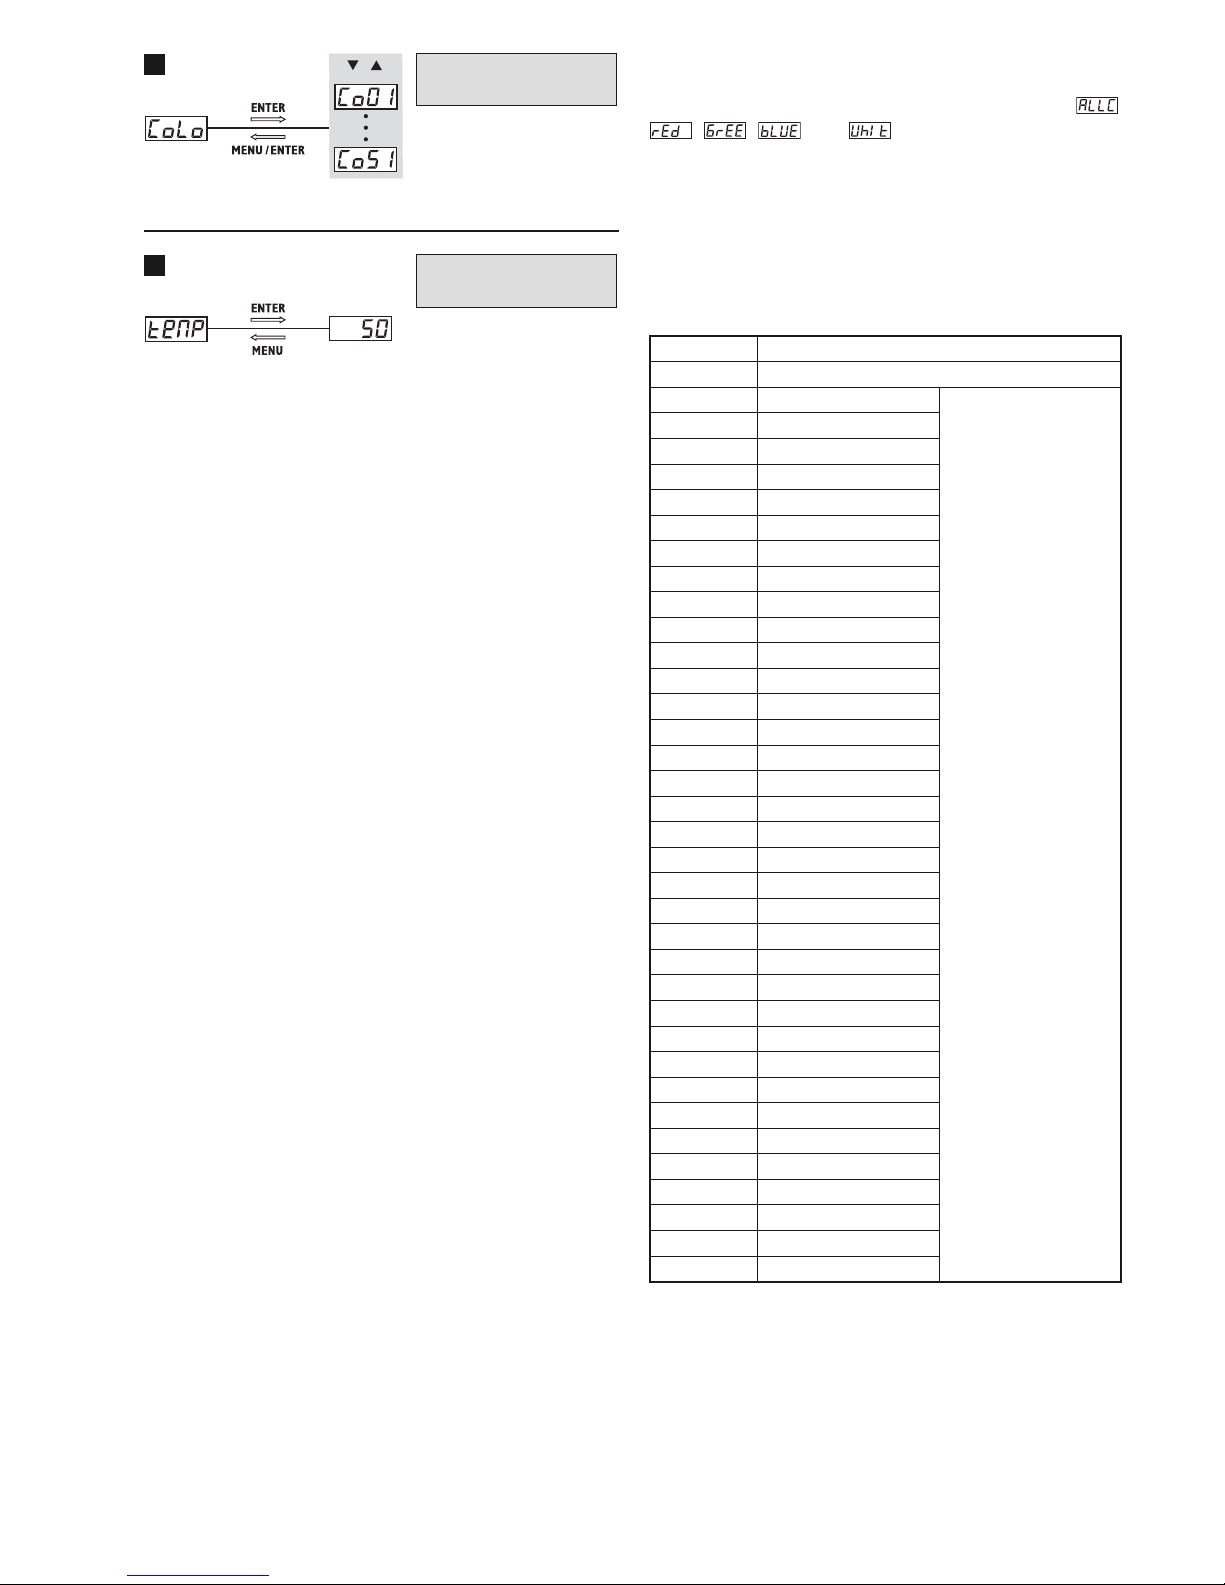
Von 51 vorgegebenen Farben die gewünschte auswählen.
Über diesen Menüpunkt lässt sich die Temperatur
im Geräteinnern anzeigen, z. B. 50 °C.
7 Technische Daten
Steuerprotokoll: . . . . . . . . DMX 512
Anzahl der DMX-Kanäle: . 1, 2, 5, 6 oder 8
Leuchtmittel: . . . . . . . . . . 7 × 8-W-RGBW-LEDs
Abstrahlwinkel: . . . . . . . . 15°
DMX-Anschlüsse: . . . . . . XLR, 3-polig
Pinbelegung: . . . . . . . . Pin 1 = Masse
Pin 2 = DMX
-
Pin 3 = DMX+
Einsatztemperatur: . . . . . 0 –40 °C
Stromversorgung: . . . . . . 230 V~/50 Hz
Leistungsaufnahme: . . . . max. 60 VA
Abmessungen: . . . . . . . . . ∅ 145mm × 190 mm
Gewicht: . . . . . . . . . . . . . . 2,1 kg
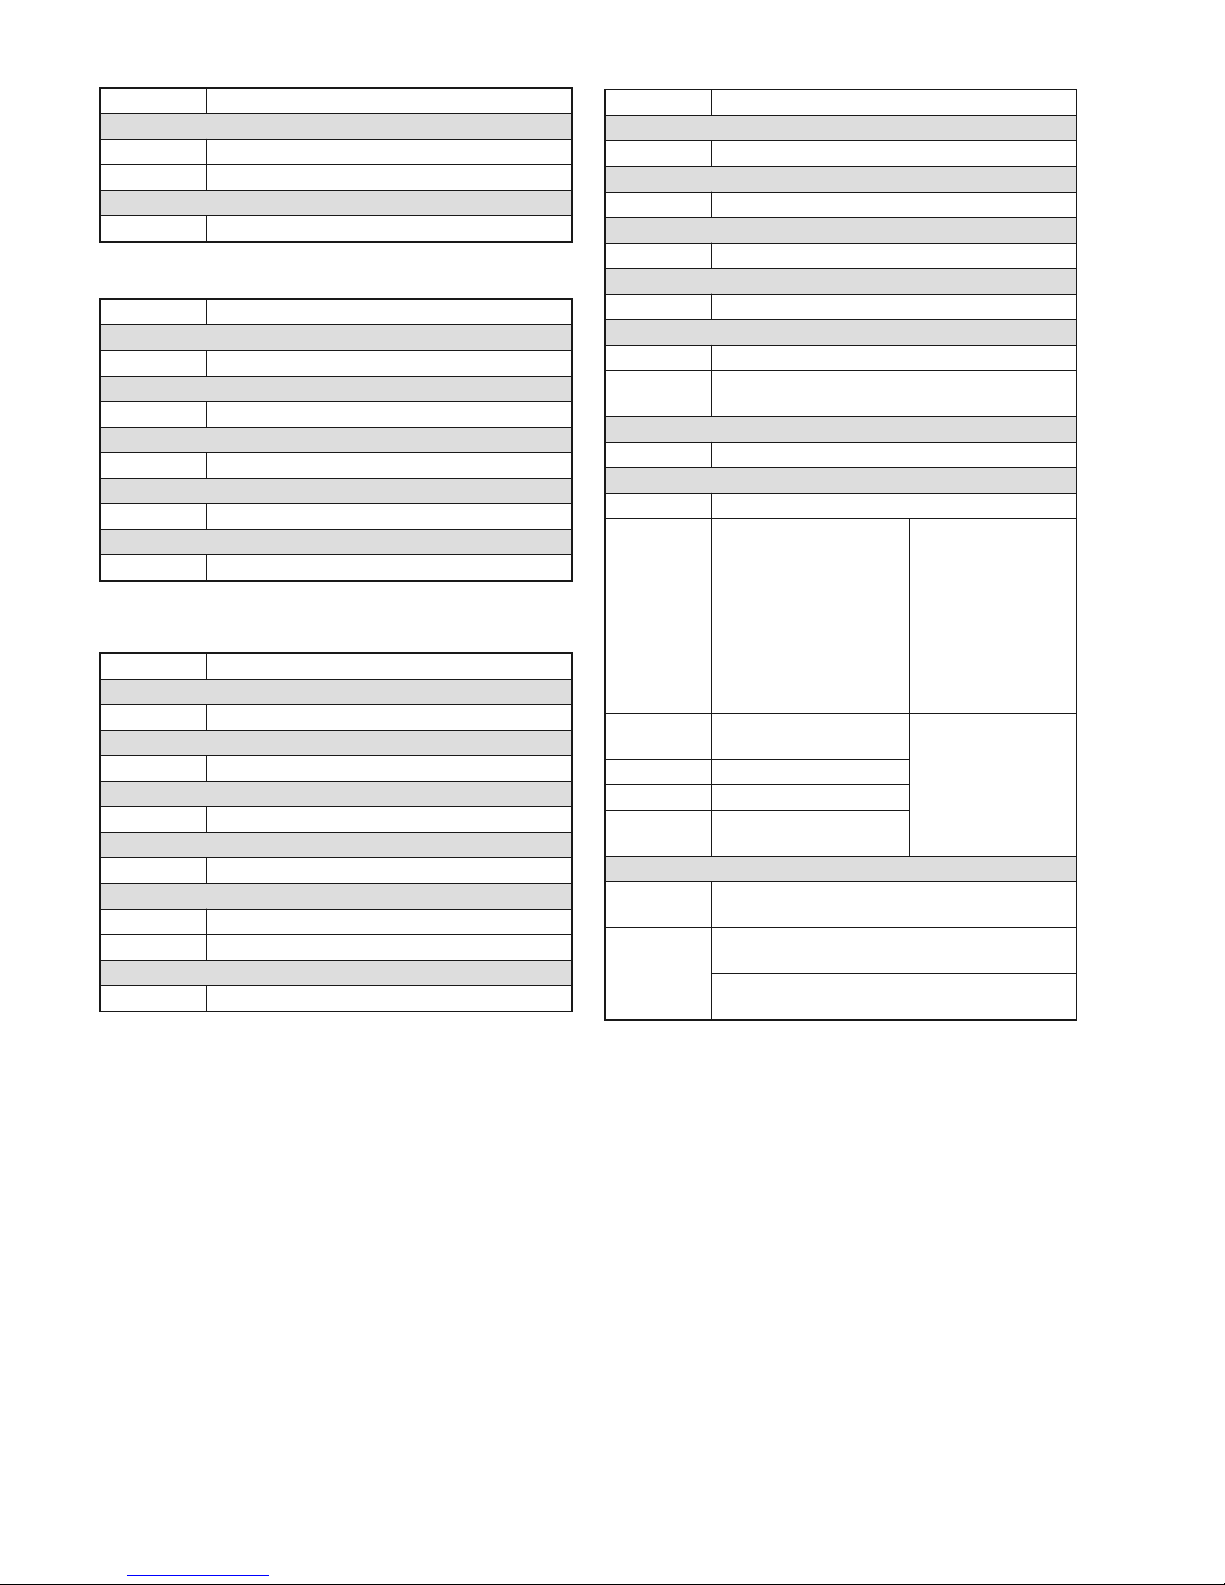
8 DMX-Funktionen
Bitte beachten Sie: Die Einstellungen der Menü-
punkte , , , und betreffen
auch den Be trieb mit DMX-Steuergerät: Die hier
eingestellten Werte bestimmen jeweils die max.
mögliche Helligkeit (Gesamthelligkeit, Helligkeit
Rot, Helligkeit Grün, Helligkeit Blau, Helligkeit
Weiß) für diesen Scheinwerfer.
1-Kanal-Modus
2-Kanal-Modus
DMX-Wert Funktion
Kanal 1: Farben
0– 6 LEDs aus
7 – 255
35 Farben (Tabelle 1-Kanal-Modus)
Kanal 2: Dimmer
0 – 255 Helligkeit
DMX-Wert Funktion
0– 6 LEDs aus
7 – 13 Farbe 1
35 Farben
14 – 20 Farbe 2
21 – 27 Farbe 3
28 – 34 Farbe 4
35 – 41 Farbe 5
42 – 48 Farbe 6
49 – 55 Farbe 7
56 – 62 Farbe 8
63 – 69 Farbe 9
70 – 76 Farbe 10
77 – 83 Farbe 11
84 – 90 Farbe 12
91 – 97 Farbe 13
98 – 104 Farbe 14
105 – 111 Farbe 15
112 – 118 Farbe 16
119 – 125 Farbe 17
126 – 132 Farbe 18
133 – 139 Farbe 19
140 – 146 Farbe 20
147 – 153 Farbe 21
154 – 160 Farbe 22
161 – 167 Farbe 23
168 – 174 Farbe 24
175 – 181 Farbe 25
182 – 188 Farbe 26
189 – 195 Farbe 27
196 – 202 Farbe 28
203 – 209 Farbe 29
210 – 216 Farbe 30
217 – 223 Farbe 31
224 – 230 Farbe 32
231 – 237 Farbe 33
238 – 244 Farbe 34
245 – 255 Farbe 35
Modus „Farbe“
(Farbstrahler-Betrieb)
20
Temperaturanzeige
21
9
Deutsch
5-Kanal-Modus
6-Kanal-Modus
8-Kanal-Modus
Änderungen vorbehalten.
DMX-Wert Funktion
Kanal 1: Rot
0 – 255 Helligkeit Rot
Kanal 2: Grün
0 – 255 Helligkeit Grün
Kanal 3: Blau
0 – 255 Helligkeit Blau
Kanal 4: Weiß
0 – 255 Helligkeit Weiß
Kanal 5: Stroboskop
0– 8 kein Stroboskop
9 – 255 Stroboskop, langsam bis schnell
Kanal 6: Dimmer
0 – 255 Gesamthelligkeit
DMX-Wert Funktion
Kanal 1: Rot
0 – 255 Helligkeit Rot
Kanal 2: Grün
0 – 255 Helligkeit Grün
Kanal 3: Blau
0 – 255 Helligkeit Blau
Kanal 4: Weiß
0 – 255 Helligkeit Weiß
Kanal 5: Dimmer
0 – 255 Gesamthelligkeit
DMX-Wert Funktion
Kanal 1: Rot
0 – 255 Helligkeit Rot
Kanal 2: Grün
0 – 255 Helligkeit Grün
Kanal 3: Blau
0 – 255 Helligkeit Blau
Kanal 4: Weiß
0 – 255 Helligkeit Weiß
Kanal 5: Stroboskop
0– 8 kein Stroboskop
9 – 255
wenn Kanal 7 = 0 … 31:
Stroboskop, langsam bis schnell
Kanal 6: Dimmer
0 – 255 Gesamthelligkeit
Kanal 7: automatische Programme, Musiksteuerung
0– 31 kein Programm
32 – 63
64 – 95
96 – 127
Kontinuierliches
Dimmen
dunkel
© hell
hell
© dunkel
dunkel
© hell © dunkel
Die Farbe wird über
die Kanäle 1 – 4
bestimmt und die
max. Helligkeit über
Kanal 6.
Die Einstellung von
Kanal 5 hat keinen
Einfluss auf diese
Programme.
128 – 159
Überblenden zwischen
den Farben
Die Einstellungen
der Kanäle 1 – 6
haben keinen
Einfluss auf diese
Programme.
160 – 191 Farbwechsel 1
192 – 223 Farbwechsel 2
224 – 255
musikgesteuertes
Programm
Kanal 8: Geschwindigkeit, Empfindlichkeit
0
Ist über Kanal 7 ein Programm gewählt, hält
es an bzw. startet nicht.
1 – 255
wenn Kanal 7 = 32 … 223:
Geschwindigkeit, langsam bis schnell
wenn Kanal 7 = 224 … 255:
Musikempfindlichkeit, niedrig bis hoch
10
Deutsch
Diese Bedienungsanleitung ist urheberrechtlich für MONACOR®INTERNATIONAL GmbH & Co. KG ge schützt.
Eine Reproduktion für eigene kommerzielle Zwecke – auch auszugsweise – ist untersagt.
DMX LED Spotlight
These instructions are intended for installers of the
unit and for users with basic knowledge in DMX
control. Please read the instructions carefully prior
to operation and keep them for later reference. All
operating elements and connections described can
be found on page 2.
1 Operating Elements
and Connections
1 Mounting brackets
2 Locking screws for the mounting brackets
3 Rings on the housing to attach a safety rope
4
Locking bracket for optional barn doors PARL-20B
5 3-pole XLR control connections:
Input DMX IN (chassis plug)
Output DMX OUT (jack with latch, to remove the
plug, press the lever PUSH)
Connection for operation with DMX controller
1. Connect the DMX input to the DMX output of
the DMX controller.
2. Connect the DMX output to the DMX input of
the next DMX-controlled unit. Connect the
output of this unit to the input of the subsequent unit etc. until all DMX-controlled units
have been connected in a chain.
3. To prevent interference in signal transmission: In case of long cables or a multitude of
units connected in series, terminate the DMX
output of the last DMX unit in the chain with a
120 Ω resistor (> 0.3 W): Connect a corresponding terminating plug (e. g. DLT-123
from IMG STAGELINE) to the output jack.
Connection for the master/slave mode
In the master/ slave mode, multiple PARL20DMX can be operated synchronously in the
operating mode “Automatic” or “Sound”. The
first unit (master unit) will control the other units
(slave units). Connect the units in a chain, just
like for DMX mode (see above), but do not connect the DMX input of the first unit in the chain.
6 Mains cable for connection to a socket (230 V~/
50 Hz)
7 LED DMX: lights up when the spotlight is oper-
ated via a DMX controller
8 Display to indicate the menu settings
9 LED SLAVE: lights up when the spotlight is
operated as a slave unit
10 LED MASTER: lights up when the spotlight is
operated as a master unit or when it is operated
on its own in the operating mode “Automatic” or
“Sound”
11 Buttons to control the spotlight via a menu:
chapters 6.1 and 6.2
12 LED SOUND: flashes during music control
when a sound pulse is picked up by the microphone (13)
13 Microphone for music control
2 Safety Notes
The spotlight corresponds to all relevant directives
of the EU and is therefore marked with
.
G
The spotlight is suitable for indoor use only. Protect it against dripping water and splash water,
high air humidity and heat (admissible ambient
temperature range: 0 – 40°C).
G
Do not place any vessel filled with liquid on the
unit, e. g. a drinking glass.
G
Do not operate the spotlight or immediately disconnect the mains plug from the socket
1. if the spotlight or the mains cable is visibly
damaged,
2. if a defect might have occurred after the unit
was dropped or suffered a similar accident,
3. if malfunctions occur.
In any case the spotlight must be repaired by
skilled personnel.
G
A damaged mains cable must be replaced by
skilled personnel only.
G
Never pull the mains cable to disconnect the
mains plug from the socket, always seize the plug.
G
For cleaning only use a dry, soft cloth; never use
water or chemicals.
G
No guarantee claims for the spotlight and no liability for any resulting personal damage or material damage will be accepted if the spotlight is
used for other purposes than originally intended,
if it is not safely installed or not correctly connected or operated, or if it is not repaired in an
expert way.
G
Important for UK Customers!
The wires in this mains lead are coloured in ac -
cord ance with the following code:
green/yellow = earth, blue = neutral, brown = live
As the colours of the wires in the mains lead
of this appliance may not correspond with the
coloured markings identifying the terminals in
your plug, proceed as follows:
WARNING The spotlight uses dangerous mains
voltage. Leave servicing to skilled
personnel and do not insert anything
into the air vents; inexpert handling
may result in electric shock.
11
English
1. The wire which is coloured green and yellow
must be connected to the terminal in the plug
which is marked with the letter E or with the
earth symbol , or coloured green or green
and yellow.
2. The wire which is coloured blue must be connected to the terminal which is marked with
the letter N or coloured black.
3. The wire which is coloured brown must be
connected to the terminal which is marked
with the letter L or coloured red.
Warning – This appliance must be earthed.
3 Applications
The LED spotlight PARL-20DMX is used for effect
lighting, e. g. on small stages, in clubs or function
rooms. It uses 7 extra bright 8 W RGBW LEDs as a
light source for coloured light or white light. Various
operating modes are available (e. g. automatic or
music-controlled show programs, stroboscope
effects).
The spotlight is designed for operation via a
DMX light controller. The number of DMX control
channels is selectable: 1, 2, 5, 6 or 8. The spotlight
can also be operated without a controller, either on
its own or together with multiple PARL-20DMX
(master / slave mode).
4 Installation/Setting Up
G
To prevent heat accumulation inside the unit,
always position the spotlight in such a way to
ensure sufficient air circulation during operation.
Never cover the air vents of the housing.
G
The distance to the illuminated object should be
50 cm as a minimum.
Use one the mounting brackets (1) to install the
spotlight, e. g. with a stable mounting screw or a
support for lighting units (C hook) on a cross bar.
Alternatively, set up the spotlight on its own: Fold
out the mounting brackets underneath the spotlight
and use them as a stand.
To align the spotlight or to adjust the brackets,
release the two locking screws (2) of the brackets,
make the adjustment, then fasten the locking
screws again.
4.2 Barn doors
To reduce the beam angle, optional bar doors
PARL-20B are available. Slide the barn doors into
the outer rails at the front of the spotlight and use
the locking bracket (4) to secure them (fig. 3). A
spring (arrow in fig. 3) will keep the bracket in place.
5 Setting the Spotlight into Operation
For operating the spotlight with a DMX controller or
for the master / slave mode, make the corresponding
control connections (chapter 1, step 5). For connection, special cables for DMX signal transmission
are recommended (e. g. cables of the CDMXN
series from IMG STAGELINE). For cable lengths
exceeding 150 m, it is recommended to insert a
DMX level matching amplifier (e. g. SR-103DMX
from IMG STAGELINE).
To switch on the spotlight, connect the plug of the
mains cable (6) to a socket (230 V~ / 50 Hz). To
switch off, disconnect the mains plug from the
socket.
Caution: Never use a dimmer to connect the spot-
light to the mains voltage!
6 Operation
A menu is used to make the settings for the spotlight. To operate the menu, refer to chapters 6.1
and 6.2.
Operation with a DMX controller
Select the channel mode (menu item ) and set
the DMX address (menu item ). If required, use
the menu to set additional functions (e. g. behaviour
of the spotlight after loss of control signal). The
spotlight will be set to operation via the DMX controller when the menu item is called up (indi-
WARNING To prevent damage to your eyes,
never look directly into the light
source for any length of time.
Please note that fast changes in lighting may trigger epileptic seizures with
photosensitive persons or persons
with epilepsy!
WARNING Install the spotlight safely and
expertly. When installing it at a place
where people may walk or sit under
it, additionally secure it [e. g. via a
safety rope attached to one of the
two rings (3) on the housing; fasten
the safety rope in such a way that the
maximum falling distance of the unit
will not exceed 20 cm].
If the spotlight is to be put out of operation
definitively, take it to a local recycling plant
for a disposal which is not harmful to the
environment.
12
English
cation of the address adjusted when the display is
switched on).
The LED DMX (7) will light up when the spotlight is
operated via the DMX controller. When the spotlight is set to music control in the 8-channel mode,
the LED SOUND (12) will flash to the beat of the
sound pulses picked up by the microphone (13).
Operation without DMX controller
When the spotlight is operated on its own, call up
the menu item for the operating mode (“Automatic”
, “Sound” or “Colour” ) and select
one of the setting options available. If required, use
the menu to set additional functions (e. g. speed for
the mode “Automatic” or sensitivity for the mode
“Sound”).
For the master/ slave mode (
chapter 1, step 5):
On the master unit, set the mode “Automatic” or
“Sound” and select the setting for the menu
item . Set the slave units to the slave mode
(menu item ).
The LED MASTER (10) will light up when the spotlight is operated in the mode “Automatic” or
“Sound”. In the mode “Sound”, the LED SOUND
(12) will flash to the beat of the sound pulses picked
up by the microphone (13). The LED SLAVE (9) will
light up when the spotlight is operated in the slave
mode.
6.1 Operation of the menu
To operate the menu, use the four buttons (11) and
the display (8). The menu item is used to
define the display time: display always on or display switched off after a given time. To switch it on
again, press any button.
1) After switching on the spotlight, the menu item
most recently selected will be called up. To exit
the menu item, press the button MENU or
ENTER.
2) To select a menu item, use the following but-
tons:
– the button MENU or
(up)
– the button (down)
3) To call up the menu item selected, press the but-
ton ENTER.
4) To set the menu item (e. g. for the address,
for the colour), use the button
or .
For some menu items, e. g. , no setting
can be made.
5) To exit the menu item, press the button MENU
or ENTER.
6.2 Menu structure
13
English
DMX start address /
operation with a DMX controller
mode “Automatic”
(automatic show programs)
speed for the mode “Automatic”
slave mode
channel mode (number of DMX channels)
sensitivity for the mode “Sound”
mode “Sound”
(music-controlled show programs)
output of slave control signals
total brightness
brightness of red
brightness of green
brightness of blue
brightness of white
LEDs on / off
display time
test programs
display indication rotated by 180°
indication of firmware version
for service only
for service only
behaviour of the spotlight after
loss of control signal
mode “colour” (colour spotlight mode)
temperature indication
1
2
3
4
5
6
7
8
9
10
11
12
13
15
16
17
18
19
20
21
14
6.2.1 Overview of individual menu items
For separate control of all DMX-controlled units,
each spotlight must have its own start address.
Example: If the first DMX channel of the spotlight is
to be controlled by the DMX controller via DMX
address 17, set the start address on the spotlight
to 17. All other DMX channels of the spotlight will
be automatically assigned to the subsequent ad dresses.
For operation via the DMX controller, call up the
menu item so that the address adjusted will be
indicated when the display is switched on. The indication of the address adjusted will change when a
DMX signal is received, e. g. for address 1, the indication will change from to when a DMX
signal is present at the DMX input.
Select one of the 9 programs available. For the programs 1 to 8, use the menu item to adjust the
speed (program 9 = light output always white).
Note: When the menu item is set to , the pro-
gram selected will not start.
When this menu item is called up, the program currently selected in the mode “Automatic” will start.
… = fast … slow
= program will stop or fail to start
Call up this menu item when the spotlight is to be
controlled as a slave unit via the master unit
(
chapter 1, step 5).
The number of DMX channels depends on the
functions required; it may also depend on the number of control channels available on the light controller. The functions available in the five channel
modes can be found in chapter 8.
When this menu item is called up, the program currently selected in the mode “Sound” will start. The
higher the value, the higher the sensitivity of the
spotlight to sound. When is adjusted, the program will stop or fail to start.
In the mode “Sound”, the spotlight will respond to
sound picked up by the microphone (13). Select
one of the two programs available. To adjust the
sensitivity, use the menu item .
Note: When the menu item is set to , the pro-
gram selected will not start.
In the master/ slave mode, set the master unit to
; otherwise, no control signals will be sent to
the slave units.
Output of
slave control signals
8
Mode “Sound”
(music-controlled
programs)
7
Sensitivity for the mode
“Sound”
6
Channel mode
(number of DMX channels)
5
Slave mode
4
Speed for the mode
“Automatic”
3
Mode “Automatic”
(automatic show
programs)
2
Example: When the 5-channel mode is adjusted and the
start address is 17, the channels 1 to 5 will be assigned
to the addresses 17 to 21. Address 22 will be the next
possible start address available for the subsequent
DMX-controlled spotlight.
DMX start address /
operation with a
DMX controller
1
14
English
The total brightness can be adjusted from
(LEDs off) to (maximum brightness).
Note: The setting of this menu item will affect all operating
modes, even operation with a DMX controller! The setting,
however, will only apply to this spotlight; it will not apply to
any slave units connected.
The brightness of red, green, blue and white can be
separately adjusted from (colour off) to
(maximum brightness). These menu items can be
used to create a mixed colour of the desired shade
or to correct the colour balance (e. g. to match the
lighting colour of this spotlight to the lighting colours
of different spotlights).
Note: The settings of these menu items will affect all operating modes, even operation with a DMX controller! The
settings, however, will only apply to this spotlight; they will
not apply to any slave units connected.
When this menu item is called up, two settings are
available:
= all LEDs off (blackout)
= all LEDs switched on
The display time can be set to 30 s, 60 s, 90 s or
120 s. After this time, when no button is pressed
any more, the display will be switched off. To switch
it on again, press any button. With the setting ,
the display is always on.
= no test
= test “red”
= test “green”
= test “blue”
= test “white”
= test “red + green+ blue + white”
= standard display indication,
= display indication upside down
This menu item is used to indicate the firmware version (operating system of the spotlight).
When the spotlight is operated via a DMX controller,
it is possible to adjust the behaviour of the spotlight
after loss of control signal:
(“Blackout Mode”) = LEDs off
(“Freeze”) = “Freezing” of the LEDs with the
most recent control command
Behaviour of the spotlight
after loss of control signal
19
Indication of
firmware version
18
Display indication rotated
by 180°
17
Test programs
16
Display time
15
LEDs on / off
14
Brightness of red
10
13
…
Brightness of white
Brightness of blue
Brightness of green
Total brightness
9
15
English
Select one of the 51 colours available.
This menu item is used to indicate the temperature
inside the spotlight, e. g. 50 °C.
7 Specifications
Control protocol: . . . . . . . DMX 512
Number of
DMX channels: . . . . . . . . 1, 2, 5, 6 or 8
Light source: . . . . . . . . . . 7 × 8 W RGBW LEDs
Beam angle: . . . . . . . . . . 15°
DMX connections: . . . . . . XLR, 3 poles
Pin configuration: . . . . . pin 1 = ground
pin 2 = DMX
-
pin 3 = DMX+
Ambient temperature: . . . 0 – 40 °C
Power supply: . . . . . . . . . 230 V~ / 50 Hz
Power consumption: . . . . 60 VA max.
Dimensions: . . . . . . . . . . . ∅ 145 mm × 190 mm
Weight: . . . . . . . . . . . . . . 2.1 kg
8 DMX Functions
Please note: The settings of the menu items ,
, , and will also affect operation
with a DMX controller: The values adjusted for
these menu items will define the maximum brightness (total brightness, brightness of red, brightness
of green, brightness of blue, brightness of white) for
this spotlight.
1-channel mode
DMX value Function
0– 6 LEDs off
7 – 13 colour 1
35 colours
14 – 20 colour 2
21 – 27 colour 3
28 – 34 colour 4
35 – 41 colour 5
42 – 48 colour 6
49 – 55 colour 7
56 – 62 colour 8
63 – 69 colour 9
70 – 76 colour 10
77 – 83 colour 11
84 – 90 colour 12
91 – 97 colour 13
98 – 104 colour 14
105 – 111 colour 15
112 – 118 colour 16
119 – 125 colour 17
126 – 132 colour 18
133 – 139 colour 19
140 – 146 colour 20
147 – 153 colour 21
154 – 160 colour 22
161 – 167 colour 23
168 – 174 colour 24
175 – 181 colour 25
182 – 188 colour 26
189 – 195 colour 27
196 – 202 colour 28
203 – 209 colour 29
210 – 216 colour 30
217 – 223 colour 31
224 – 230 colour 32
231 – 237 colour 33
238 – 244 colour 34
245 – 255 colour 35
Temperature indication
21
Mode “Colour”
(colour spotlight mode)
20
16
English
2-channel mode
5-channel mode
6-channel mode
8-channel mode
Subject to technical modification.
DMX value Function
Channel 1: colours
0– 6 LEDs off
7 – 255
35 colours (table for 1-channel mode)
Channel 2: dimmer
0 – 255 brightness
DMX value Function
Channel 1: red
0 – 255 brightness of red
Channel 2: green
0 – 255 brightness of green
Channel 3: blue
0 – 255 brightness of blue
Channel 4: white
0 – 255 brightness of white
Channel 5: stroboscope
0– 8 no stroboscope
9 – 255
when channel 7 = 0 … 31:
stroboscope, slow to fast
Channel 6: dimmer
0 – 255 total brightness
Channel 7: automatic programs, music control
0– 31 no program
32 – 63
64 – 95
96 – 127
continuous
dimming
dark © bright
bright
© dark
dark
© bright © dark
The colour is
defined by channels
1 – 4 and the maximum brightness by
channel 6.
The setting of
channel 5 will not
affect any of these
programs.
128 – 159
crossfading between the
colours
The settings of
channels 1 – 6 will
not affect any of
these programs.
160 – 191 colour change 1
192 – 223 colour change 2
224 – 255
music-controlled
program
Channel 8: speed, sensitivity
0
When a program is selected via channel 7,
this program will stop or fail to start.
1 – 255
when channel 7 = 32 … 223:
speed, slow to fast
when channel 7 = 224 … 255:
music sensitivity, low to high
DMX value Function
Channel 1: red
0 – 255 brightness of red
Channel 2: green
0 – 255 brightness of green
Channel 3: blue
0 – 255 brightness of blue
Channel 4: white
0 – 255 brightness of white
Channel 5: stroboscope
0– 8 no stroboscope
9 – 255 stroboscope, slow to fast
Channel 6: dimmer
0 – 255 total brightness
DMX value Function
Channel 1: red
0 – 255 brightness of red
Channel 2: green
0 – 255 brightness of green
Channel 3: blue
0 – 255 brightness of blue
Channel 4: white
0 – 255 brightness of white
Channel 5: dimmer
0 – 255 total brightness
17
English
All rights reserved by MONACOR®INTERNATIONAL GmbH & Co. KG. No part of this instruction manual may
be reproduced in any form or by any means for any commercial use.

Projecteur DMX à LEDs
Cette notice sʼadresse à lʼinstallateur de lʻappareil
et à lʼutilisateur avec des connaissances de base
dans la gestion DMX. Veuillez lire la presente
notice dʻutilisation avec attention avant le fonctionnement et conservez-la pour pouvoir, si besoin,
vous y reporter ulterieurement. Vous trouverez
page 2 les elements et branchements.
1 Eléments et branchements
1 Etriers de montage
2 Vis de fixation pour les étriers de montage
3 Oeillets sur le boîtier pour fixer une élingue de
sécurité
4 Etrier de verrouillage pour les volets PARL-20B
disponibles en option
5 Branchements de commande XLR, 3 pôles :
Entrée DMX IN (prise châssis)
Sortie DMX OUT (prise avec verrouillage ; pour
retirer la fiche, appuyez sur le levier PUSH)
Branchement pour un fonctionnement avec
un contrôleur DMX
1. Reliez lʼentrée DMX à la sortie DMX du
contrôleur DMX.
2. Reliez la sortie DMX à lʼentrée DMX du prochain appareil géré par DMX. Reliez sa sortie
à lʼentrée de lʼappareil suivant et ainsi de
suite jusquʼà ce que tous les appareils gérés
par DMX soient reliés en une chaîne.
3. Pour éviter les perturbations lors de la transmission du signal, il convient, pour de longs
câbles ou pour une multitude dʼappareils
branchés les uns derrière les autres, de terminer la sortie DMX du dernier appareil de la
chaîne avec une résistance 120 Ω (> 0,3 W) :
mettez un bouchon (par exemple DLT-123 de
IMG STAGELINE) dans la prise de sortie.
Branchement pour le mode Master / Slave
En mode Master / Slave, plusieurs PARL-20DMX
peuvent fonctionner de manière synchrone en
mode “Automatic” ou “Sound”. Le premier appareil (appareil Master) gère les autres appareils
(appareils Slave). Comme en mode DMX, reliez
ces appareils en une chaîne (voir plus haut),
cependant lʼentrée DMX du premier appareil de
la chaîne reste libre.
6 Cordon secteur à relier à une prise secteur
230 V~/50 Hz
7 LED DMX : brille si le projecteur fonctionne via
un contrôleur DMX
8 Affichage pour indiquer les réglages de menu
9 LED SLAVE : brille si le projecteur fonctionne
comme appareil Slave
10 LED MASTER : brille si le projecteur fonctionne
comme appareil Master ou comme appareil
seul en mode “Automatic” ou “Sound”
11 Touches pour utiliser lʼappareil via le menu :
chapitres 6.1 et 62
12 LED SOUND : clignote en mode gestion par la
musique si une impulsion sonore est captée via
le micro (13)
13 Microphone pour la gestion par la musique
2 Conseils dʼutilisation
et de sécurité
Lʼappareil répond à toutes les directives nécessaires de lʼUnion européenne et porte donc le symbole
.
G
Lʼappareil nʼest conçu que pour une utilisation en
intérieur. Protégez-le de tout type de projections
d'eau, des éclaboussures, d'une humidité élevée
de l'air et de la chaleur (plage de température de
fonctionnement autorisée : 0 – 40°C).
G
En aucun cas, vous ne devez pas poser d'objet
contenant du liquide ou un verre sur l'appareil.
G
Ne faites pas fonctionner lʼappareil ou débranchez-le immédiatement du secteur lorsque :
1. des dommages visibles apparaissent sur l'appareil ou sur le cordon secteur,
2. après une chute ou un cas similaire, vous
avez un doute sur l'état de l'appareil,
3. des dysfonctionnements apparaissent.
Dans tous les cas, les dommages doivent être
réparés par un technicien spécialisé.
G
Tout cordon secteur endommagé ne doit être
remplacé que par un technicien spécialisé.
G
Ne débranchez jamais l'appareil en tirant sur le
cordon secteur ; retirez toujours le cordon secteur en tirant la fiche.
G
Pour le nettoyage, utilisez uniquement un tissu
sec et doux, en aucun cas de produits chimiques
ou dʼeau.
G
Nous déclinons toute responsabilité en cas de
dommages matériels ou corporels résultants si
lʼappareil est utilisé dans un but autre que celui
pour lequel il a été conçu, sʼil nʼest pas monté
AVERTISSEMENT Lʼappareil est alimenté par une
tension dangereuse. Ne touchez
jamais l'intérieur de l'appareil et
ne faites rien tomber dans les
ouïes de ventilation ! Risque de
décharge électrique.
18
Français

dʼune manière sûre, s'il n'est pas correctement
branché ou utilisé ou nʼest pas réparé par une
personne habilitée, en outre, la garantie deviendrait caduque.
3 Possibilités dʼutilisation
Le projecteur à LEDs PARL-20DMX permet des
effets d'éclairage, par exemple pour de petites
scènes, dans des clubs ou des salles des fêtes.
Comme source de lumière, il possède 7 LEDs
RGBW 8 W très claires, permettant de diffuser une
lumière de couleur ou une lumière blanche. Plusieurs modes de fonctionnement sont réglables
(p. ex. programmes Show à défilement automatique ou gérés par la musique, effets stroboscope).
Le projecteur est conçu pour une gestion via un
contrôleur DMX, le nombre de canaux DMX est sélectionnable : 1, 2, 5, 6 ou 8. Il peut également fonctionner sans contrôleur, soit seul, soit combiné avec
plusieurs PARL-20DMX (mode Master / Slave).
4 Montage/Positionnement
G
Pour éviter toute accumulation de chaleur dans
lʼappareil, placez-le toujours de telle sorte que
pendant le fonctionnement une circulation suffisante dʼair soit assurée. En aucun cas, les ouïes
de ventilation sur le boîtier ne doivent être obturées.
G
La distance avec lʼobjet à éclairer devrait être de
50 cm au moins.
Fixez le projecteur via un des étriers de montage
(1), par exemple via une vis de montage solide ou
un support pour projecteur (crochet C) à une tra-
verse. A la place, vous pouvez poser le projecteur
librement. Pour ce faire, dépliez les étriers sous le
projecteur pour quʼils servent de support.
Pour orienter le projecteur ou régler les étriers,
desserrez les deux vis de fixation (2) pour les
étriers, effectuez le réglage puis resserrez les vis.
4.2 Volets
Pour diminuer lʼangle de rayonnement, les volets
PARL-20B sont disponibles en option. Poussez les
volets dans les rails extérieurs sur lʼavant du projecteur, sécurisez-les avec lʼétrier de verrouillage
(4) contre toute chute (schéma 3). Lʼétrier est
verrouillé sur sa position par un ressort (flèche sur
le schéma 3).
5 Fonctionnement
Pour un fonctionnement via un contrôleur DMX ou
en mode Master / Slave, effectuez les branchements de commande (chapitre 1, point 5). Pour
le branchement, il est recommandé d'utiliser des
câbles spécifiques pour la transmission de signaux
DMX (par exemple câbles de la série CDMXN de
IMG STAGELINE). Pour des longueurs de liaison à
partir de 150 m, il est recommandé d'insérer un
amplificateur répétiteur DMX (p. ex. SR-103DMX
de IMG STAGELINE).
Pour allumer le projecteur, reliez la fiche du cordon
secteur (6) à une prise secteur 230 V~ / 50 Hz. Pour
éteindre, débranchez-le.
Attention : Lʼappareil ne doit pas être relié à la ten-
sion dʼalimentation via un dimmer.
6 Utilisation
Lʼappareil se règle via un menu. Voir chapitres 6.1
et 6.2 pour lʼutilisation du menu.
Fonctionnement avec un contrôleur DMX
Sélectionnez le mode canal (point menu ) et
réglez lʼadresse DMX (point menu ). Si besoin,
réglez dʼautres fonctions via le menu (par exemple
comportement de lʼappareil en cas de perte de
signal de commande). Le projecteur est réglé sur
CARTONS ET EMBALLAGE
PAPIER À TRIER
AVERTISSEMENT Ne regardez jamais directement
la source de lumière pendant un
certain temps, cela pourrait causer des troubles de la vision.
N'oubliez pas que des changements très rapides de lumière
peuvent déclencher des crises
d'épilepsie chez les personnes
photosensibles et épileptiques.
AVERTISSEMENT L'appareil doit être monté de
manière professionnelle et sûre.
Si lʼappareil est installé à un
endroit sous lequel des personnes peuvent se trouver, il doit
en plus être assuré [p. ex.par
une élingue de sécurité sur un
des deux œillets du boîtier (3).
Fixez-la de telle sorte que la
chute de l'appareil ne puisse pas
être supérieure à 20 cm.]
Lorsque lʼappareil est définitivement retiré
du service, vous devez le déposer dans
une usine de recyclage adaptée pour
contribuer à son élimination non polluante.
19
Français

une gestion via le contrôleur DMX si le point de
menu est appelé (indication de lʼadresse
réglée si l'affichage est allumé).
La LED DMX (7) brille si le projecteur fonctionne
via le contrôleur DMX. Si le projecteur est réglé sur
la gestion par la musique en mode 8 canaux, la
LED SOUND (12) clignote au rythme des impulsions sonores captées par le micro (13).
Fonctionnement sans contrôleur DMX
Si le projecteur fonctionne seul, appelez le point de
menu pour le mode de fonctionnement (“Automatic” , “Sound” ou “Couleur” ) et sélectionnez lʼoption souhaitée parmi les options de
réglage disponibles. Si besoin, réglez dʼautres
fonctions via le menu (par exemple vitesse pour le
mode “Automatic” ou sensibilité pour le mode
“Sound”).
En mode Master / Slave (
chapitre 1, point 5),
réglez sur lʼappareil Master le mode “Automatic” ou
“Sound” et sélectionnez le réglage pour le
point de menu . Réglez les appareils Slave sur
le mode Slave (point menu ).
La LED MASTER (10) brille si le projecteur fonctionne en mode “Automatic” ou “Sound”. En mode
“Sound”, la LED SOUND (12) clignote au rythme
des impulsions sonores captées par le microphone
(13). La LED SLAVE (9) brille si lʼappareil est en
mode Slave.
6.1 Utilisation du menu
Le menu sʼutilise via les quatre touches (11) et lʼaffichage (8). Lʼaffichage peut être réglé, via le point
de menu , sur affichage continu ou sur une
durée dʼaffichage ; une fois cette durée écoulée,
lʼaffichage sʼéteint. En appuyant sur une touche, il
se rallume.
1) Une fois lʼappareil allumé, le dernier point de
menu sélectionné est appelé. Pour quitter le
point de menu, appuyez sur la touche MENU ou
ENTER.
2) Pour sélectionner un point de menu, vous pou-
vez utiliser les touches suivantes :
– touche MENU ou
(vers le haut)
– touche
(vers le bas)
3) Pour appeler le point de menu sélectionné,
appuyez sur la touche ENTER.
4) Pour régler le point de menu (par exemple
pour régler lʼadresse, pour sélectionner la
couleur), utilisez la touche
ou .
Pour certains points du menu, comme ,
aucun réglage nʼest prévu.
5) Pour quitter le point du menu, appuyez sur la
touche MENU ou ENTER.
6.2 Structure du menu
20
Français
adresse DMX /
fonctionnement avec un contrôleur DMX
mode “Automatic” (programmes Show
à défilement automatique)
vitesse pour le mode “Automatic”
mode Slave
mode canal (nombre de canaux DMX)
sensibilité pour le mode “Sound”
mode “Sound”
(programmes Show gérés par la musique)
émission de signaux de commande Slave
luminosité totale
luminosité rouge
luminosité vert
luminosité bleu
luminosité blanc
LEDs allumées / éteintes
durée de lʼaffichage
programmes test
rotation de lʼaffichage de 180°
affichage de la version Firmware
uniquement pour le service
uniquement pour le service
comportement de lʼappareil
en cas de perte de signal de commande
mode “couleur”
(fonctionnement projecteur de couleurs)
affichage température
1
2
3
4
5
6
7
8
9
10
11
12
13
15
16
17
18
19
20
21
14

6.2.1 Présentation des points individuels
du menu
Pour pouvoir utiliser séparément tous les appareils
gérés par DMX, il faut que chaque appareil ait une
adresse de démarrage propre. Si le premier canal
DMX de lʼappareil doit être géré par le contrôleur,
p. ex. via lʼadresse de démarrage DMX 17, réglez
sur lʼappareil lʼadresse de démarrage 17. Tous les
autres canaux DMX de lʼappareil sont alors automatiquement attribués aux adresses suivantes.
Pour la gestion via le contrôleur DMX, le point de
menu doit être appelé pour que lʼadresse
réglée soit indiquée si l'affichage est allumé. Lʼaffichage de lʼadresse réglée se modifie si un signal
DMX est reçu, ainsi par exemple pour lʼadresse 1,
lʼaffichage passe de à si un signal DMX
est présent à l'entrée DMX.
Parmi les 9 programmes, sélectionnez le programme souhaité. Pour les programmes 1 à 8, la
vitesse de défilement peut être réglée via le point
de menu (programme 9 = rayonnement
constant de lumière blanche).
Remarque : Si le point de menu est réglé sur ,
le programme sélectionné ne défile pas.
Une fois le point de menu appelé, lʼappareil est en
mode “Automatic” avec le programme actuellement réglé.
… = rapide … lent
= le programme s'arrête ou ne démarre pas
Appelez ce point de menu si lʼappareil doit être
géré comme appareil Slave via un appareil Master
(
chapitre 1, point 5).
Le nombre de canaux DMX dépend des fonctions
nécessaires et éventuellement du nombre de
canaux de gestion disponibles sur le contrôleur.
Le chapitre 8 présente les fonctions disponibles
pour les cinq modes de canal.
Une fois le point de menu appelé, lʼappareil est en
mode “Sound” avec le programme actuellement
réglé. Plus la valeur est élevée, plus lʼappareil est
sensible au son. Si est réglé, le programme
sʼarrête ou ne démarre pas.
En mode “Sound”, lʼappareil réagit au son via le
microphone (13). Sélectionnez le programme souhaité parmi les deux. La sensibilité peut être réglée
via le point de menu .
Remarque : Si le point de menu est réglé sur ,
le programme sélectionné ne défile pas.
En mode Master / Slave, réglez lʼappareil Master
sur sinon aucun signal de commande pour les
appareils Slave nʼest émis.
Emission des signaux
de commande Slave
8
Mode “Sound”
(programmes Show
gérés par la musique)
7
Sensibilité pour le mode
“Sound”
6
Mode canal
(nombre de canaux DMX)
5
Mode Slave
4
Vitesse pour le mode
“Automatic”
3
Mode “Automatic”
(programmes Show à
défilement automatique)
2
Exemple : Si le mode 5 canaux est réglé, avec lʼadresse
de démarrage 17, les canaux 1 à 5 sont attribués aux
adresses 17 à 21. Lʼadresse 22 est la prochaine adresse
de démarrage libre possible pour lʼappareil suivant géré
par DMX.
Adresse de démarrage
DMX/
fonctionnement avec
un contrôleur DMX
1
21
Français

La luminosité totale se règle de (LEDs éteintes)
à (luminosité max.).
Remarque : Le réglage de ce point de menu agit sur tous
les modes de fonctionnement, même pour le fonctionnement avec un contrôleur DMX ! Cependant, il ne vaut que
pour cet appareil, pas pour les appareils Slave reliés.
La luminosité de rouge, vert, bleu et blanc se règle
séparément de (couleur éteinte) jusquʼà
(luminosité max.). Ces points de menu peuvent
être utilisés pour créer une couleur de mixage dans
la tonalité voulue ou corriger la balance des couleurs (par exemple pour adapter le rayonnement de
couleur de lʼappareil à celui dʼautres projecteurs).
Remarque : Les réglages de ces points de menu agissent
sur tous les modes de fonctionnement, même pour le fonctionnement avec un contrôleur DMX ! Cependant, ils ne
valent que pour cet appareil, pas pour les appareils Slave
reliés.
Une fois le point de menu appelé, vous pouvez
commuter entre :
= toutes les LEDs éteintes (Blackout)
= toutes les LEDs allumées
Il est possible de régler lʼaffichage pour une durée
de 30 s, 60 s, 90 s ou 120 s. Si après la dernière
pression sur une touche, la durée est écoulée, lʼaffichage sʼéteint. Il se rallume à la prochaine activation dʼune touche. Si est réglé, lʼaffichage est
tout le temps allumé.
= pas de test
= test “rouge”
= test “vert”
= test “bleu”
= test “blanc”
= test “rouge + vert +bleu + blanc”
= affichage normal, = affichage inversé
Via ce point de menu, vous pouvez afficher la version Firmware (système dʼexploitation de lʼappareil).
Si le projecteur est géré via un contrôleur DMX, on
peut régler son comportement en cas de perte de
signal de commande :
(“Blackout Mode”) = LEDs éteintes
(“Freeze”) = “gel” des LEDs avec le dernier
ordre de commande
Comportement de
lʼappareil en cas de perte
de signal de commande
19
Affichage de la version
Firmware
18
Rotation de lʼaffichage
de 180°
17
Programmes test
16
Durée de l'affichage
15
LEDs allumées / éteintes
14
Luminosité blanc
Luminosité bleu
Luminosité vert
Luminosité rouge
10
13
…
Luminosité totale
9
22
Français

Sélectionnez la couleur souhaitée parmi les 51 couleurs disponibles.
Via ce point de menu, vous pouvez afficher la température à lʼintérieur de lʼappareil, p. ex. 50 °C.
7 Caractéristiques techniques
Protocole commande : . . . DMX 512
Nombre canaux DMX : . . 1, 2, 5, 6 ou 8
Source lumineuse : . . . . . 7 × LED RGBW 8 W
Angle rayonnement : . . . . 15°
Branchements DMX : . . . XLR, 3 pôles
Configuration pins : . . . Pin 1 = masse
Pin 2 = DMX
-
Pin 3 = DMX+
Température fonc. : . . . . . 0 – 40 °C
Alimentation : . . . . . . . . . . 230 V~ / 50 Hz
Consommation : . . . . . . . 60 VA max.
Dimensions : . . . . . . . . . . ∅ 145 mm × 190 mm
Poids : . . . . . . . . . . . . . . . 2,1 kg
8 Fonctions DMX
Attention : Les réglages des points de menu ,
, , et concernent également
le fonctionnement avec un contrôleur DMX : les
valeurs réglées ici déterminent respectivement la
luminosité maximale possible (luminosité totale,
luminosité rouge, luminosité vert, luminosité bleu,
luminosité blanc) pour ce projecteur.
Mode 1 canal
Mode 2 canal
Valeur DMX Fonction
Canal 1: couleurs
0– 6 LEDs éteintes
7 – 255
35 couleurs (tableau mode 1 canal)
Canal 2: dimmer
0 – 255 luminosité
Valeur DMX Fonction
0– 6 LEDs éteintes
7 – 13 couleur 1
35 couleurs
14 – 20 couleur 2
21 – 27 couleur 3
28 – 34 couleur 4
35 – 41 couleur 5
42 – 48 couleur 6
49 – 55 couleur 7
56 – 62 couleur 8
63 – 69 couleur 9
70 – 76 couleur 10
77 – 83 couleur 11
84 – 90 couleur 12
91 – 97 couleur 13
98 – 104 couleur 14
105 – 111 couleur 15
112 – 118 couleur 16
119 – 125 couleur 17
126 – 132 couleur 18
133 – 139 couleur 19
140 – 146 couleur 20
147 – 153 couleur 21
154 – 160 couleur 22
161 – 167 couleur 23
168 – 174 couleur 24
175 – 181 couleur 25
182 – 188 couleur 26
189 – 195 couleur 27
196 – 202 couleur 28
203 – 209 couleur 29
210 – 216 couleur 30
217 – 223 couleur 31
224 – 230 couleur 32
231 – 237 couleur 33
238 – 244 couleur 34
245 – 255 couleur 35
Affichage température
21
Mode “Couleur”
(fonctionnement projecteur
de couleurs)
20
23
Français

Mode 5 canaux
Mode 6 canaux
Mode 8 canaux
Tout droit de modification réservé.
Valeur DMX Fonction
Canal 1: rouge
0 – 255 luminosité rouge
Canal 2: vert
0 – 255 luminosité vert
Canal 3: bleu
0 – 255 luminosité bleu
Canal 4: blanc
0 – 255 luminosité blanc
Canal 5: stroboscope
0– 8 aucun stroboscope
9 – 255
si canal 7 = 0 … 31:
stroboscope, de lent à rapide
Canal 6: dimmer
0 – 255 luminosité totale
Canal 7: programmes automatiques, gestion par la musique
0– 31 aucun programme
32 – 63
64 – 95
96 – 127
variation continue de
l'intensité lumineuse
sombre
© clair
clair
© sombre
sombre © clair © sombre
La couleur est définie via les canaux
1 à 4 et la luminosité
maximale via le
canal 6.
Le réglage du
canal 5 nʼa pas dʼinfluence sur ces programmes.
128 – 159
transition entre
les couleurs
Les réglages des
canaux 1 à 6 nʼont
pas dʼinfluence sur
ces programmes.
160 – 191 changement couleur 1
192 – 223 changement couleur 2
224 – 255
programme géré par
la musique
Canal 8: vitesse, sensibilité
0
Si via le canal 7, un programme est sélectionné, il s'arrête ou ne démarre pas.
1 – 255
si canal 7 = 32 … 223:
vitesse, de lent à rapide
si canal 7 = 224 … 255:
sensibilité musique, de faible à élevée
Valeur DMX Fonction
Canal 1: rouge
0 – 255 luminosité rouge
Canal 2: vert
0 – 255 luminosité vert
Canal 3: bleu
0 – 255 luminosité bleu
Canal 4: blanc
0 – 255 luminosité blanc
Canal 5: stroboscope
0– 8 aucun stroboscope
9 – 255 stroboscope, de lent à rapide
Canal 6: dimmer
0 – 255 luminosité totale
Valeur DMX Fonction
Canal 1: rouge
0 – 255 luminosité rouge
Canal 2: vert
0 – 255 luminosité vert
Canal 3: bleu
0 – 255 luminosité bleu
Canal 4: blanc
0 – 255 luminosité blanc
Canal 5: dimmer
0 – 255 luminosité totale
24
Français
Notice dʼutilisation protégée par le copyright de MONACOR®INTERNATIONAL GmbH & Co. KG. Toute reproduction même partielle à des fins commerciales est interdite.

Proiettore DMX a LED
Queste istruzioni sono rivolte allʻinstallatore del lʻapparecchio e allʻutente con conoscenze base dei
comandi DMX. Vi preghiamo di leggerle attentamente prima della messa in funzione e di conservarle per un uso futuro. A pagina 2 si trovano tutti
gli elementi di comando descritti e i collegamenti.
1 Elementi di comando
e collegamenti
1 Staffe di montaggio
2 Viti di fissaggio per le staffe di montaggio
3 Asole del contenitore per una fune di trattenuta
4 Staffa di bloccaggio per il paraluce a alette
PARL-20B disponibile come opzione
5 Contatti di comando XLR a 3 poli:
Ingresso DMX IN (connettore da pannello)
Uscita DMX OUT (presa con bloccaggio; per sfilare il connettore premere la levetta PUSH)
Collegamento per il funzionamento con
unità di comando DMX
1. Collegare lʼingresso DMX con lʼuscita DMX
dellʼunità di comando DMX.
2. Collegare lʼuscita DMX con lʼingresso DMX
dellʼapparecchio successivo di comando
DMX e lʼuscita di questʻultimo con lʼingresso
dellʼapparecchio a valle ecc. finché tutti gli
apparecchi con comando DMX sono collegati
formando una catena.
3. Per evitare interferenze durante la trasmissione dei segnali, nel caso di cavi lunghi o di
un gran numero di apparecchi collegati in
serie, terminare lʼuscita DMX dellʼultimo
apparecchio della catena con una resistenza
di 120 Ω (> 0,3 W): Inserire un terminatore
adatto (p. es. DLT-123 di IMG STAGELINE)
nella presa dʼuscita.
Collegamento per il funzionamento
Master / Slave
Con il funzionamento Master / Slave, più apparecchi PARL-20DMX possono essere gestiti in
sincronia nel modo “Automatic” o “Sound”. In
questo caso, il primo apparecchio (apparecchio
Master) assume il comando degli altri apparecchi (apparecchi Slave). Collegare gli apparecchi
formando una catena come per il funzionamento DMX (vedi sopra), mentre lʼingresso
DMX del primo apparecchio della catena
rimane libero.
6 Cavo rete per il collegamento con una presa di
rete (230 V~ / 50 Hz)
7 LED DMX: è acceso, se il proiettore viene
comandato tramite unʼunità di comando DMX
8 Display per visualizzare le impostazioni del
menu
9 LED SLAVE: è acceso, se il proiettore funziona
come apparecchio slave
10 LED MASTER: è acceso, se il proiettore fun-
ziona come apparecchio master oppure come
apparecchio singolo nel modo “Automatic” o
“Sound”
11 Tasti per comandare lʼapparecchio tramite un
menu:
Capitoli 6.1 e 6.2
12 LED SOUND: si accende con dei lampi se tra-
mite il microfono (13) si riceve un impulso acustico
13 Microfono per il comando tramite la musica
2 Avvertenze per lʼuso sicuro
Questʼapparecchio è conforme a tutte le direttive
rilevanti dellʼUE e pertanto porta la sigla .
G
Usare lʼapparecchio solo allʼinterno di locali e
proteggerlo dall'acqua gocciolante e dagli spruzzi
d'acqua, da alta umidità dell'aria e dal calore
(temperatura dʼimpiego ammessa fra 0 e 40 °C).
G
Non depositare sull'apparecchio dei contenitori
riempiti di liquidi, p. es bicchieri.
G
Non mettere in funzione lʼapparecchio e staccare subito la spina rete se:
1. lʼapparecchio o il cavo rete presentano dei
danni visibili;
2. dopo una caduta o dopo eventi simili sussiste
il sospetto di un difetto;
3. lʼapparecchio non funziona correttamente.
Per la riparazione rivolgersi sempre ad unʼofficina competente.
G
Il cavo rete, se danneggiato, deve essere sostituito solo da un laboratorio specializzato
G
Staccare il cavo rete afferrando la spina, senza
tirare il cavo.
G
Per la pulizia usare solo un panno morbido,
asciutto; non impiegare in nessun caso acqua o
prodotti chimici.
G
Nel caso dʼuso improprio, di montaggio non
sicuro, di collegamenti sbagliati, dʼimpiego scor-
AVVERTIMENTO Lʼapparecchio è alimentato con
pericolosa tensione di rete. Non
intervenire mai personalmente al
suo interno e non inserire niente
nelle fessure di aerazione! Esiste
il pericolo di una scarica elettrica.
25
Italiano

retto o di riparazione non a regola dʼarte dellʼapparecchio, non si assume nessuna responsabilità per eventuali danni consequenziali a persone
o a cose e non si assume nessuna garanzia per
l'apparecchio.
3 Possibilità dʻimpiego
Il proiettore a LED PARL-20DMX serve per l'illuminazione a effetto, p. es per palcoscenici piccoli,
club e aule. Come fonte di luce sono integrati 7
LED RGBW di 8 W particolarmente luminose con i
quali è possibile emettere luce colorata o bianca. Si
possono impostare vari modi di funzionamento
(p. es programmi show a svolgimento automatico o
comandati dalla musica nonché effetti stroboscopici).
Il proiettore è previsto per il comando tramite
un'unità DMX di comando luce. Il numero dei canali
di comando DMX è a scelta: 1, 2, 5, 6 o 8. Il proiettore può essere usato anche senza unità di comando, da solo o in unione con più PARL-20DMX
(funzionamento Master / Slave).
4 Montaggio / collocamento
G
Per evitare un accumulo di calore nellʼapparecchio, sistemarlo sempre in modo che durante il
funzionamento sia garantita una circolazione
sufficiente dell'aria. Le aperture di ventilazione
sul contenitore non devono essere coperte in
nessun caso.
G
La distanza dallʼoggetto irradiato non dovrebbe
essere inferiore a 50 cm.
Fissare il proiettore per mezzo di una staffa di montaggio (1), p. es con una robusta vite di montaggio
o un supporto per proiettori (gancio a C) su una traversa. In alternativa, il proiettore può essere anche
collocato liberamente. In questo caso aprire le
staffe di montaggio sotto il proiettore in modo che
servano come supporti.
Per orientare l'apparecchio oppure per spostare
le staffe, allentare le due viti di bloccaggio (2) per le
staffe e dopo lʼimpostazione stringere nuovamente
le viti.
4.2 Paraluce a alette
Per ridurre lʼangolo dei raggi di luce, si può impiegare il paraluce a alette PARL-20B disponibile
come accessorio. Spingere il paraluce nelle guide
esterne sul lato anteriore del proiettore e bloccarlo
con la staffa di bloccaggio (4) in modo che non
possa cadere (Fig. 3). La staffa viene fissata
nella sua posizione per mezzo di una molla (freccia
in fig. 3).
5 Messa in funzione
In caso di uso con unʼunità di comando DMX o con
funzionamento Master / Slave effettuare i collegamenti di comando (Capitolo 1, punto 5). Per il
collegamento si dovrebbero usare cavi speciali per
la trasmissione di segnali DMX (p. es cavi della
serie CDMXN di IMG STAGELINE). Nel caso di
lunghezze oltre i 150 m si consiglia lʼimpiego di un
amplificatore DMX (p. es SR-103DMX di IMG
STAGELINE).
Per accendere il proiettore, inserire la spina del cavo
(6) in una presa di rete (230 V~ / 50 Hz). Per spegnere lʼapparecchio staccare la spina dalla presa.
Attenzione: Lʼapparecchio non deve essere colle-
gato con la tensione di rete tramite un dimmer!
6 Funzionamento
Lʼapparecchio viene impostato tramite un menu.
Per usare il menu vedi i capitoli 6.1 e 6.2.
Funzionamento con unità di comando DMX
Scegliere il modo canali (voce del menu ) e impostare lʼindirizzo DMX (voce del menu ). Se
necessario, tramite il menu impostare ulteriori funzioni (p. es il comportamento dellʼapparecchio se
cade il segnale di comando). Il proiettore è impostato per il comando tramite lʼunità di comando DMX
AVVERTIMENTO Il proiettore deve essere montato
a regola d'arte e in modo sicuro.
Se viene montato in un punto
sotto il quale si possono trattenere
delle persone, occorre prevedere
un sistema di sicurezza supplementare [p. es per mezzo di una
fune di trattenuta su una delle due
asole (3) del contenitore; fissare
la fune in modo tale che la caduta
dell'apparecchio non può superare i 20 cm].
AVVERTIMENTO Non guardate direttamente e a
lungo nella fonte di luce per escludere possibili danni agli occhi.
Tenete presente che i veloci
cambi di luce possono provocare
attacchi d'epilessia presso persone fotosensibili o epilettici!
Se si desidera eliminare l'apparecchio
definitivamente, consegnarlo per lo smaltimento ad un'istituzione locale per il riciclaggio.
26
Italiano

se è stata attivata la voce del menu (indicazione dellʼindirizzo impostato, con display acceso).
Il LED DMX (7) è acceso, se il proiettore viene
comandato tramite lʼunità di comando DMX. Se il
proiettore nel modo a 8 canali è impostato per il
comando tramite la musica, il LED SOUND (12)
lampeggia nel ritmo degli impulsi acustici ricevuti
tramite il microfono (13).
Funzionamento senza unità di comando DMX
Se il proiettore viene usato come apparecchio singolo, aprire la voce del menu per il modo di funzionamento (“Automatic” , “Sound” oppure “
Colore” ) e scegliere, fra le opzioni dʼimpostazione disponibili, quella desiderata. Se necessario,
tramite il menu impostare ulteriori funzioni (p. es
velocità per il modo “Automatic” o sensibilità per il
modo “Sound”).
In caso di funzionamento master / slave (
Capitolo 1, punto 5), impostare sullʼapparecchio master
il modo “Automatic” o “Sound” e per la voce del
menu scegliere lʼimpostazione . Sugli
apparecchi slave impostare il modo slave (voce del
menu ).
Il LED MASTER (10) rimane acceso se il proiettore
funziona nel modo “Automatic” o “Sound”. Nel
modo “Sound”, il LED SOUND (12) lampeggia nel
ritmo degli impulsi acustici ricevuti tramite il microfono (13). Il LED SLAVE (9) si accende se lʼapparecchio funziona nel modo slave.
6.1 Uso del menu
Il menu viene gestito tramite i quattro tasti (11) e il
display (8). Per mezzo della voce del menu, il
display può essere impostato per la visualizzazione
continua oppure per un determinato tempo, trascorso il quale si spegne. Premendo un qualsiasi
tasto si riaccende.
1) Dopo lʼaccensione dellʼapparecchio è attivata la
voce del menu scelta per ultima. Per uscire
dalla voce del menu premere il tasto MENU o
ENTER.
2) Per scegliere una voce del menu si possono
usare i seguenti tasti:
– il tasto MENU o
(su)
– il tasto
(giù)
3) Per aprire la voce scelta del menu premere il
tasto ENTER.
4) Per impostare la voce del menu (p. es con
impostare lʼindirizzo, con scegliere il
colore), usare il tasto
o .
Per alcune voci del menu, come p. es per
, non è prevista nessunʼimpostazione.
5) Per uscire dalla voce del menu, premere il tasto
MENU o ENTER.
6.2 Struttura del menu
27
Italiano
Indirizzo di start DMX /
Funzionamento con unità di comando DMX
Modo “Automatic”
(programmi show a svolgimento automatico)
Velocità per il modo “Automatic”
Modo slave
Modo canali (numero dei canali DMX)
Sensibilità per il modo “Sound”
Modo “Sound”
(programmi show comandati dalla musica)
Emissione dei segnali di comando slave
Luminosità globale
Luminosità rosso
Luminosità verde
Luminosità blu
Luminosità bianco
LED accesi / spenti
Durata dellʻindicazione
Programmi test
Rotazione dellʼindicazione di 180°
Indicazione della versione del firmware
solo per lʼassistenza tecnica
solo per lʼassistenza tecnica
Comportamento dellʼapparecchio
in caso di caduta del segnale di comando
Modo “Colore”
(funzionamento come proiettore di colori)
Indicazione della temperatura
1
2
3
4
5
6
7
8
9
10
11
12
13
15
16
17
18
19
20
21
14

6.2.1 Panoramica delle singole voci del menu
Per poter comandare separatamente tutti gli apparecchi DMX, ogni apparecchio deve avere il suo
indirizzo di start. Se il primo canale DMX dellʼapparecchio deve essere comandato dall'unità per
comando luce p. es tramite l'indirizzo DMX 17,
impostare sullʼapparecchio l'indirizzo di start 17.
Tutti gli ulteriori canali DMX dellʼapparecchio sono
assegnati automaticamente agli indirizzi successivi.
Per il comando tramite lʻunità di comando DMX,
deve essere aperta la voce del menu, in modo
che sia visualizzato, con il display acceso, lʼindirizzo impostato. Lʼindicazione dellʼindirizzo impostato cambia se viene ricevuto un segnale DMX;
per esempio, con lʼindirizzo 1, lʼindicazione passa
da a se allʼingresso DMX è presente un
segnale DMX.
Fra i 9 programmi, scegliere quello desiderato. Per
i programmi 1 a 8 è possibile impostare la velocità
di svolgimento tramite la voce del menu (programma 9 = irradiazione costante di luce bianca).
N. B.: Se alla voce del menu è impostato , il pro-
gramma scelto non si svolge.
Dopo aver aperto la voce del menu, lʼapparecchio
funziona nel modo “Automatic” con il programma
attualmente impostato.
… = veloce … lento
= Il programma si ferma o non si avvia
Aprire questa voce del menu se lʼapparecchio deve
essere comandato tramite un apparecchio master
come apparecchio slave (
Capitolo 1, punto 5).
Il numero dei canali DMX dipende dalle funzioni
richieste e eventualmente anche dal numero dei
canali di comando disponibili sullʻunità di comando
luce. Nel capitolo 8 sono elencate le funzioni disponibili nei cinque modi canali.
Dopo aver aperto la voce del menu, lʼapparecchio
funziona nel modo “Sound” con il programma
attualmente impostato. Più è alto il valore, tanto più
sensibilmente reagisce lʼapparecchio al suono. Se
è stato impostato , il programma si ferma o non
si avvia.
Nel modo “Sound”, lʼapparecchio reagisce al suono
trasmesso tramite il microfono (13). Fra i 2 programmi scegliere quello desiderato. La sensibilità
può essere regolata tramite la voce del menu.
N. B.: Se alla voce del menu è impostato , il pro-
gramma scelto non si svolge.
Nel funzionamento master / slave, impostare
sullʼapparecchio master, altrimenti non ci saranno
emessi dei segnali di comando per gli apparecchi
slave.
Emissione dei segnale
di comando slave
8
Modo “Sound”
(programmi show
comandati dalla musica)
7
Sensibilità per il modo
“Sound”
6
Modo canali
(numero dei canali DMX)
5
Modo Slave
4
Velocità tramite il modo
“Automatic”
3
Modo “Automatic”
(programmi show a
svolgimento automatico)
2
Esempio: Se è impostato il modo a 5 canali, con lʼindi-
rizzo di start 17, i canali da 1 a 5 sono assegnati agli indirizzi 17 a 21. Lʼindirizzo 22 sarà il prossimo indirizzo di
start libero possibile per lʼapparecchio DMX successivo.
Indirizzo di start DMX/
Funzionamento con
unʼunità di comando DMX
1
28
Italiano

La luminosità globale può essere regolata da
(LED spenti) fino a (luminosità massima).
N. B.: Lʼimpostazione di questa voce del menu ha effetti su
tutti i modi di funzionamento, anche sul funzionamento con
unʼunità di comando DMX! Tuttavia, vale solo per questo
apparecchio, non per gli apparecchi slave collegati.
La luminosità di rosso, verde, blu e bianco può
essere regolata separatamente da (colore
spento) fino a (luminosità massima). Queste
voci del menu possono essere utilizzate per generare un colore miscelato nella tonalità richiesta
oppure per correggere il bilanciamento dei colori
(p. es per adattare lʼirradiamento dei colori dellʼapparecchio a quello di altri proiettori).
N. B. : Le impostazioni di queste voci del menu hanno
effetti su tutti i modi di funzionamento, anche sul funzionamento con unʼunità di comando DMX! Tuttavia, valgono
solo per questo apparecchio, non per gli apparecchi slave
collegati.
Dopo aver aperto la voce del menu, si può cambiare fra:
= tutti i LED spenti (blackout)
= tutti i LED accesi
Per il display si può impostare la durata dellʼindicazione fra 30 s, 60 s, 90 s o 120 s. Se dopo lʼultima
pressione del tasto è trascorso il tempo impostato,
il display si spegne. Alla successiva pressione di un
tasto si riaccende. Se è impostato , il display
rimane continuamente acceso.
= nessun test
= Test “rosso”
= Test “verde”
= Test “blu”
= Test “bianco”
= Test “rosso +verde + blu+ bianco”
= indicazione normale
= indicazione girata
Tramite questa voce del menu si può visualizzare
la versione del firmware (sistema operativo dellʼapparecchio).
Indicazione della versione
del firmware
18
Rotazione dellʼindicazione
girata di 180°
17
Programmi test
16
Durata dellʻindicazione
15
LED accesi / spenti
14
Luminosità bianco
Luminosità blu
Luminosità verde
Luminosità rosso
10
13
…
Luminosità globale
9
29
Italiano

Se il proiettore è comandato tramite unʼunità di
comando DMX, si può impostare il suo comportamento se cade il segnale di comando:
(“Blackout Mode”) = LED spenti
(“Freeze”) = “Blocco” dei LED secondo lʼultimo
comando
Fra i 51 colori preimpostati scegliere quello desiderato.
Con questa voce del menu si può visualizzare la
temperatura allʼinterno dellʼapparecchio, p. es 50°C.
7 Dati tecnici
Protocollo di comando: . . DMX 512
Numero dei canali DMX: . 1, 2, 5, 6 o 8
Lampadine: . . . . . . . . . . . 7 × LED RGBW di 8 W
Angolo dʻirradiazione: . . . 15°
Contatti DMX: . . . . . . . . . XLR, 3 poli
Piedinatura: . . . . . . . . . Pin 1 = massa
Pin 2 = DMX
-
Pin 3 = DMX+
Temperatura dʻesercizio: . 0 – 40 °C
Alimentazione: . . . . . . . . . 230 V~ / 50 Hz
Potenza assorbita: . . . . . . max. 60 VA
Dimensioni: . . . . . . . . . . . ∅ 145 mm × 190 mm
Peso: . . . . . . . . . . . . . . . . 2,1 kg
8 Funzioni DMX
Si prega di notare: Le impostazioni delle voci del
menu , , , e riguardano
anche il funzionamento con unʻunità di comando
DMX: I valori impostati qui determinano sempre la
massima luminosità possibile (luminosità globale,
luminosità rosso, luminosità verde, luminosità blu,
luminosità bianco) per questo proiettore.
Modo a 1 canale
Comportamento dellʼapparecchio in caso di caduta
del segnale di commando
19
Valore DMX Funzione
0– 6 LED spenti
7 – 13 Colore 1
35 Colori
14 – 20 Colore 2
21 – 27 Colore 3
28 – 34 Colore 4
35 – 41 Colore 5
42 – 48 Colore 6
49 – 55 Colore 7
56 – 62 Colore 8
63 – 69 Colore 9
70 – 76 Colore 10
77 – 83 Colore 11
84 – 90 Colore 12
91 – 97 Colore 13
98 – 104 Colore 14
105 – 111 Colore 15
112 – 118 Colore 16
119 – 125 Colore 17
126 – 132 Colore 18
133 – 139 Colore 19
140 – 146 Colore 20
147 – 153 Colore 21
154 – 160 Colore 22
161 – 167 Colore 23
168 – 174 Colore 24
175 – 181 Colore 25
182 – 188 Colore 26
189 – 195 Colore 27
196 – 202 Colore 28
203 – 209 Colore 29
210 – 216 Colore 30
217 – 223 Colore 31
224 – 230 Colore 32
231 – 237 Colore 33
238 – 244 Colore 34
245 – 255 Colore 35
Indicazione della
temperatura
21
Modo “Colore”
(funzionamento come
proiettore di colori)
20
30
Italiano

Modo a 2 canale
Modo a 5 canali
Modo a 6 canali
Modo a 8 canali
Con riserva di modifiche tecniche.
Valore DMX Funzione
Canale 1: Colori
0– 6 LED spenti
7 – 255
35 colori (Tabella Modo a 1 canale)
Canale 2: Dimmer
0 – 255 Luminosità
Valore DMX Funzione
Canale 1: Rosso
0 – 255 Luminosità rosso
Canale 2: Verde
0 – 255 Luminosità verde
Canale 3: Blu
0 – 255 Luminosità blu
Canale 4: Bianco
0 – 255 Luminosità bianco
Canale 5: Stroboscopio
0– 8 nessuno stroboscopio
9 – 255
Se canale 7 = 0 … 31:
Stroboscopio da lento a veloce
Canale 6: Dimmer
0 – 255 Luminosità globale
Canale 7: Programmi automatici, comando tramite la musica
0– 31 nessun programma
32 – 63
64 – 95
96 – 127
Dimming continuo
scuro
© chiaro
chiaro
© scuro
scuro
© chiaro © scuro
Il colore viene determinato tramite i
canali 1 – 4 e la
luminosità massima
tramite il canale 6.
Lʼimpostazione del
canale 5 non
influenza questi
programmi.
128 – 159 Dissolvenze fra i colori
Le impostazioni dei
canali 1 – 6 non
influenzano questi
programmi.
160 – 191 Cambio colore 1
192 – 223 Cambio colore 2
224 – 255
Programma comandato
dalla musica
Canale 8: Velocità, sensibilità
0
Se tramite il canale 7 è stato scelto un programma, questo si ferma oppure non si avvia.
1 – 255
Se canale 7 = 32 … 223:
Velocità, da lenta a veloce
Se canale 7 = 224 … 255:
Sensibilità alla musica, da bassa a alta
Valore DMX Funzione
Canale 1: Rosso
0 – 255 Luminosità rosso
Canale 2: Verde
0 – 255 Luminosità verde
Canale 3: Blu
0 – 255 Luminosità blu
Canale 4: Bianco
0 – 255 Luminosità bianco
Canale 5: Stroboscopio
0– 8 nessuno stroboscopio
9 – 255 Stroboscopio da lento a veloce
Canale 6: Dimmer
0 – 255 Luminosità globale
Valore DMX Funzione
Canale 1: Rosso
0 – 255 Luminosità rosso
Canale 2: Verde
0 – 255 Luminosità verde
Canale 3: Blu
0 – 255 Luminosità blu
Canale 4: Bianco
0 – 255 Luminosità bianco
Canale 5: Dimmer
0 – 255 Luminosità globale
31
Italiano
La MONACOR®INTERNATIONAL GmbH & Co. KG si riserva ogni diritto di elaborazione in qualsiasi forma delle
presenti istruzioni per lʼuso. La riproduzione – anche parziale – per propri scopi commerciali è vietata.

DMX-ledschijnwerper
Deze handleiding is bedoeld voor de installateur
van de schijnwerper en voor de gebruiker met
basiskennis van de DMX-besturing. Lees de handleiding grondig door, alvorens het apparaat in
gebruik te nemen, en bewaar ze voor latere raadpleging. Op pagina 2 vindt u een overzicht van alle
bedieningselementen en de aansluitingen.
1 Overzicht van de bedienings -
elementen en aansluitingen
1 Montagebeugels
2 Vastzetschroeven voor de montagebeugels
3 Hijsogen in de behuizing om een hijskabel aan
te brengen
4 Vergrendelingsbeugel voor de als toebehoren
verkrijgbare afschermplaat PARL-20B
5 3-polige XLR-besturingsaansluitingen:
Ingang DMX IN (inbouwstekker)
Uitgang DMX OUT (bus met vergrendeling; om
de stekker eruit te trekken, drukt u op de PUSHhendel)
Aansluiting bij bedrijf met
DMX-besturingsapparaat
1. Verbind de DMX-ingang met de DMX-uitgang
van het DMX-besturingsapparaat.
2. Verbind de DMX-uitgang met de DMX-ingang
van het volgende DMX-gestuurde apparaat.
Verbind de uitgang hiervan opnieuw met de
ingang van het nageschakelde apparaat etc.,
tot alle DMX-gestuurde apparaten in een
kring zijn aangesloten.
3. Om storingen bij de signaaloverdracht uit te
sluiten, moet u bij lange leidingen of bij een
veelvoud van aaneengesloten apparaten de
DMX-uitgang van het laatste apparaat in de
ketting afsluiten met een weerstand van
120 Ω (> 0,3 W): steek een geschikte afsluitstekker (bv. DLT-123 van IMG STAGELINE) in
de uitgangsbus.
Aansluiting bij master- / slavebedrijf
In het master-/slavebedrijf kunnen verschillende
PARL-20DMX-apparaten synchroon worden gebruikt in de bedrijfsmodus “Automatisch” of
“Sound”. Daarbij neemt het eerste apparaat
(masterapparaat) de besturing over van de overige apparaten (slaveapparaten). Verbind de
apparaten zoals bij DMX-bedrijf in een ketting
met elkaar (zie hierboven), maar de DMX-ingang van het eerste apparaat van ketting blijft
toch vrij.
6 Netsnoer voor aansluiting op een stopcontact
(230 V~ / 50 Hz)
7 Led DMX: licht op, als de schijnwerper via een
DMX-besturingsapparaat gebruikt wordt
8 Display voor de weergave van de menu-instel-
lingen
9 Led SLAVE: licht op, als de schijnwerper als
slaveapparaat werkt
10 Led MASTER: licht op, als de schijnwerper als
masterapparaat of als vrijstaand apparaat in de
bedrijfsmodus “Automatisch” of “Sound” werkt
11 Toetsen voor de bediening van het apparaat via
een menu
hoofdstuk 6.1 en 6.2
12 Led SOUND: knippert bij muzieksturing als een
geluidsimpuls via de microfoon (13) opgevangen wordt
13 Microfoon voor de muzieksturing
2 Veiligheidsvoorschriften
Het apparaat is in overeenstemming met alle
relevante EU-Richtlijnen en draagt daarom de
-markering.
G
Het apparaat is enkel geschikt voor gebruik binnenshuis; vermijd druip- en spatwater, plaatsen
met een hoge vochtigheid en uitzonderlijk
warme plaatsen (toegestaan omgevingstemperatuurbereik: 0 – 40°C).
G
Plaats geen bekers met vloeistof zoals drinkglazen etc. op het apparaat.
G
Schakel het apparaat niet in of trek onmiddellijk
de stekker uit het stopcontact,
1. wanneer het apparaat of het netsnoer zichtbaar beschadigd is,
2. wanneer er een defect zou kunnen optreden
nadat het apparaat bijvoorbeeld is gevallen,
3. wanneer het apparaat slecht functioneert.
Het apparaat moet in elk geval worden hersteld
door een gekwalificeerd vakman.
G
Een beschadigd netsnoer mag alleen in een
werkplaats worden vervangen.
G
Trek de stekker nooit aan het snoer uit het stopcontact, maar aan de stekker zelf.
G
Verwijder het stof met een droge, zachte doek.
Gebruik zeker geen water of chemicaliën.
WAARSCHUWING De netspanning van de apparaat
is levensgevaarlijk. Open het
apparaat niet, en zorg dat u niets
in de ventilatieopeningen steekt!
U loopt immers het risico van
een elektrische schok.
32
Nederlands

G
In geval van ongeoorloofd of verkeerd gebruik,
onveilige montage, verkeerde aansluiting, foutieve bediening of van herstelling door een nietgekwalificeerd persoon vervalt de garantie en de
verantwoordelijkheid voor hieruit resulterende
materiële of lichamelijke schade.
3 Toepassingen
De ledschijnwerper PARL-20DMX wordt gebruikt
als effectverlichting, bv. op kleine podia, in clubs of
feestzalen. Als lichtbron worden 7 bijzonder heldere RGBW-leds van 8 W gebruikt, waarmee
gekleurd of wit licht afgestraald wordt. U kunt verschillende bedrijfswijzen instellen (bv. automatisch
lopende of muziekgestuurde showprogramma's,
stroboscoopeffecten).
De schijnwerper is ontworpen voor het besturen
via een DMX-lichtregelaar. Het aantal DMX-besturingskanalen is selecteerbaar: 1, 2, 5, 6 of 8. U kunt
de schijnwerper ook zonder besturingsapparaat
gebruiken: alleenstaand of in combinatie met meerdere PARL-20DMX-apparaten (master- / slavebedrijf).
4 Montage/opstelling
G
Om te vermijden dat het apparaat oververhit
geraakt, plaatst u het steeds zo dat tijdens het
gebruik voldoende ventilatie is gegarandeerd. De
ventilatieopeningen in de behuizing mogen in
geen geval zijn afgedekt.
G
De afstand tot het bestraalde voorwerp moet ten
minste 50 cm bedragen.
Bevestig de schijnwerper via een van de montagebeugels (1), bv. met een stabiele montageschroef
of een spotlichthouder (C-haak) aan een traverse.
De schijnwerper kan ook vrij worden opgesteld:
Spreid de montagebeugels onder de schijnwerper
zodanig dat ze als steunen dienen.
Om de schijnwerper te richten of de beugels te
verstellen, draait u de twee bevestigingsschroeven
(2) voor de beugels los en haalt u de schroeven na
instelling opnieuw vast aan.
4.2 Afschermplaat
Om de lichtbundel te versmallen, kunt u de als toebehoren verkrijgbare afschermplaat PARL-20B
gebruiken. Schuif de plaat in de buitenste rails
vooraan op de schijnwerper en zet vast met de vergrendelingsbeugel (4), zodat ze er niet kan uitvallen (figuur 3). De beugel wordt door een veer
(pijl in figuur 3) in zijn positie vergrendeld.
5 Ingebruikneming
Breng bij bedrijf met een DMX-besturingsapparaat
of bij master- / slavebedrijf de besturingsverbindingen tot stand (hoofdstuk 1, punt 5). Voor het
aansluiten moeten speciale kabels voor de DMXsignaaloverdracht gebruikt worden (bv. kabels van
de CDMXN-serie van IMG STAGELINE). Bij kabellengten vanaf 150 m wordt in principe aanbevolen
om een DMX-ophaalversterker tussen te schakelen (bv. SR-103DMX van IMG STAGELINE).
Plug ten slotte de stekker van het netsnoer (6) in
een stopcontact (230 V~ / 50 Hz) om het apparaat in
te schakelen. Trek de stekker uit het stopcontact
om het apparaat uit te schakelen.
Opgelet: Het apparaat mag niet via een dimmer op
de netspanning worden aangesloten!
6 Bediening
Het apparaat wordt via een menu ingesteld.
Voor de bediening van het menu zie hoofdstuk 6.1
en 6.2.
Bedrijf met DMX-besturingsapparaat
Selecteer de kanaalmodus (menupunt ) en
stel het DMX-adres (menupunt ) in. Stel via het
menu zo nodig andere functies in (bv. het gedrag
van het apparaat bij uitvallen van het besturingssignaal). De schijnwerper is ingesteld op besturing
via het DMX-besturingsapparaat bij openen van
OPGELET Kijk niet rechtstreeks in de lichtbron
gedurende lange tijd, omdat dit de
ogen kan beschadigen.
Weet dat stroboscoopeffecten en
zeer snelle lichtwisselingen bij fotosensibele mensen en epileptici epileptische aanvallen kunnen veroorzaken!
WAARSCHUWING De schijnwerper moet deskundig
en veilig worden gemonteerd. Als
hij op een plek wordt geïnstalleerd, waar personen onder kunnen komen staan, moet hij extra
worden beveiligd [bv. door een
hijskabel aan een van beide ogen
in de behuizing (3); bevestig de
hijskabel zo dat het apparaat niet
meer dan 20 cm kan vallen].
Wanneer het apparaat definitief uit bedrijf
wordt genomen, bezorg het dan voor
milieuvriendelijke verwerking aan een
plaatselijk recyclagebedrijf.
33
Nederlands

het menu-item (weergave van het ingestelde
adres bij ingeschakeld display).
De led DMX (7) licht op, als de schijnwerper via het
DMX-besturingsapparaat gebruikt wordt. Als de
schijnwerper in de 8-kanaalmodus op muzieksturing is ingesteld, knippert de led SOUND (12) op
het ritme van de geluidsimpulsen die via de microfoon (13) ontvangen worden.
Bediening zonder DMX-besturingsapparaat
Indien de koplamp als vrijstaand apparaat wordt
gebruikt, opent u het menupunt voor de bedrijfsmodus (“Automatisch” , “Sound” of
“Kleur” ) en selecteert u de gewenste van de
beschikbare instelopties. Stel via het menu zo
nodig andere functies in (bv. snelheid voor de
modus “Automatisch” of gevoeligheid voor de
modus “Sound”).
Stel bij master / slavebedrijf (
hoofdstuk 1,
punt 5) op het masterapparaat de modus “Automatisch” of “Sound” in en selecteer voor het menuitem de instelling . Stel de slaveapparaten
in op de slavemodus (menu-item ).
De led MASTER (10) licht op als de schijnwerper in
de modus “Automatisch” of “Sound” werkt. In de
modus “Sound” knippert de led SOUND (12) op het
ritme van de schakelimpulsen die via de microfoon
(13) ontvangen worden. De led SLAVE (9) licht op,
als het apparaat in de slavemodus werkt.
6.1 Bediening van het menu
Het menu wordt via de vier toetsen (11) en het display (8) bediend. Het display kan via het menu-item
op permanente weergave ingesteld worden,
of ook op een bepaalde weergaveduur, waarna het
display automatisch uitschakelt. Door op een toets
te drukken, wordt het dan opnieuw ingeschakeld.
1) Na inschakelen van het apparaat is het laatst
geselecteerde menu-item geactiveerd. Om het
menu-item te verlaten, drukt u op de toets
MENU of ENTER.
2) Om een menu-item te selecteren, kunnen vol-
gende toetsen gebruikt worden:
– de toets MENU of
(omhoog)
– de toets
(omlaag)
3) Om het geselecteerde menu-item te openen,
drukt u op de toets ENTER.
4) Om het menu-item in te stellen (bv. bij het
adres instellen, bij de kleur selecteren),
gebruikt u de toets
of .
Bij sommige menu-items, zoals , is geen
instelling voorzien.
5) Om het menu-item opnieuw te verlaten, drukt u
op de toets MENU of ENTER.
6.2 Menustructuur
34
Nederlands
DMX-startadres /
Gebruik met DMX-besturingsapparaat
Modus “Automatisch”
(automatisch lopende showprogramma's)
Snelheid voor de modus “Automatisch”
Slavemodus
Kanaalmodus (aantal DMX-kanalen)
Gevoeligheid voor de modus “Sound”
Modus “Sound”
(muziekgestuurde showprogramma's)
Uitgave van de slavebesturingssignalen
Totale helderheid
Helderheid rood
Helderheid groen
Helderheid blauw
Helderheid wit
Leds aan / uit
Duur van de weergave
Testprogramma's
Weergave 180° draaien
Firmwareversie weergeven
alleen voor de service
alleen voor de service
Gedrag van het apparaat bij uitvallen van
het besturingssignaal
Modus “Kleur” (kleurenstralerbedrijf)
Temperatuurweergave
1
2
3
4
5
6
7
8
9
10
11
12
13
15
16
17
18
19
20
21
14

6.2.1 Overzicht van de individuele menu-items
Om alle DMX-gestuurde apparaten afzonderlijk te
kunnen bedienen, moet elk apparaat een eigen
startadres krijgen. Als het eerste DMX-kanaal van
het apparaat vanaf de lichtregelaar bv. via het
DMX-adres 17 gestuurd moet worden, stel dan op
het apparaat het startadres 17 in. De volgende
DMX-kanalen van het apparaat zijn dan automatisch aan de volgende adressen toegewezen.
Voor de besturing via het DMX-besturingsapparaat
moet het menu-item geopend zijn, zodat het
ingestelde adres bij ingeschakeld display weergegeven wordt. De weergave van het ingestelde
adres wijzigt bij ontvangen van een DMX-signaal.
Zo wisselt bv. bij adres 1 de weergave van
naar , als er een DMX-signaal naar de DMXingang gestuurd wordt.
Selecteer het gewenste van de 9 programma's.
Voor de programma's 1 tot 8 kan de processnelheid
via het menu-item ingesteld worden (programma 9 = constante afstraling van wit licht).
Aanwijzing: Als het menu-item op ingesteld is,
werkt het geselecteerde programma niet.
Na oproepen van het menu-item werkt het apparaat in de modus “Automatisch” met het momenteel
ingestelde programma.
… = snel ... langzaam
= programma stopt of start niet
Open dit menu-item, indien het apparaat als slaveapparaat via een masterapparaat moet worden
gestuurd (
hoofdstuk 1, punt 5).
Het aantal DMX-kanalen hangt af van de benodigde functies en eventueel ook van het aantal
beschikbare besturingskanalen op de lichtregelaar.
In hoofdstuk 8 vindt u de functies terug die in de vijf
kanaalmodi beschikbaar zijn.
Na het openen van het menu-item werkt het apparaat in de modus “Sound” met het momenteel ingestelde programma. Hoe hoger de waarde, des te
gevoeliger het apparaat op geluid reageert. Als
ingesteld is, stopt het programma of start het niet.
In de modus “Sound” reageert het apparaat via de
microfoon (13) op geluid. Selecteer het gewenste
van de 2 programma's. De gevoeligheid kan via het
menu-item ingesteld worden.
Aanwijzing: Als het menu-item op ingesteld is,
werkt het geselecteerde programma niet.
Stel in het master / slavebedrijf het masterapparaat
in op , anders worden er geen besturingssignalen voor de slaveapparaten uitgestuurd.
Uitgave van de slavebesturingssignalen
8
Modus “Sound”
(muziekgestuurde
showprogramma's)
7
Gevoeligheid voor
de modus “Sound”
6
Kanaalmodus
(aantal DMX-kanalen)
5
Slavemodus
4
Snelheid voor de modus
“Automatisch”
3
Modus “Automatisch”
(automatisch lopende
showprogramma's)
2
Voorbeeld: Als de 5-kanaalmodus ingesteld is, zijn bij
het startadres 17 de kanalen 1 tot 5 toegewezen aan de
adressen 17 tot 21. Het adres 22 is dan het volgende
vrije startadres voor het volgende DMX-gestuurde apparaat.
DMX-startadres /
bedrijf met
DMX-besturingsapparaat
1
35
Nederlands

De totale helderheid kan van (leds uit) tot
(max. helderheid) ingesteld worden.
Aanwijzing: De instelling van dit menu-item heeft effect
op alle bedrijfsmodussen, ook op het bedrijf met een DMXbesturingsapparaat! Ze geldt evenwel alleen voor dit
apparaat en niet voor aangesloten slaveapparaten.
De helderheid van rood, groen, blauw en wit kunt u
afzonderlijk van (geen kleur) tot (max.
helderheid) instellen. Deze menu-items gebruikt
worden om een mengkleur in de gewenste kleurtint
te genereren of de kleurbalans te corrigeren (bv.
om de kleurstraling van het apparaat aan de
andere schijnwerpers aan te passen).
Aanwijzing: De instellingen van deze menu-items hebben
effect op alle bedrijfsmodi, ook op het bedrijf met een
DMX-besturingsapparaat! Ze gelden echter alleen voor dit
apparaat en niet voor aangesloten slaveapparaten.
Na het openen van het menu-item kunt u wisselen
tussen:
= alle leds uit (Blackout)
= alle leds ingeschakeld
U kunt het display instellen op een weergaveduur
van 30 sec, 60 sec, 90 sec of 120 sec. Als na de
laatste keer drukken op de toets de duur verstreken
is, dan schakelt het display uit. Als er dan een toets
wordt ingedrukt, schakelt het display opnieuw in.
Als ingesteld is, is het display continu ingeschakeld.
= geen test
= test “Rood”
= test “Groen”
= test “Blauw”
= Test “Wit”
= Test “Rood +Groen + Blauw+ Wit”
= normale weergave
= weergave gedraaid
Via dit menu-item kunt u de firmwareversie (besturingssysteem van het apparaat) weergeven.
Firmwareversie
weergeven
18
Weergave 180° draaien
17
Testprogramma's
16
Duur van de weergave
15
Leds aan / uit
14
Helderheid wit
Helderheid blauw
Helderheid geen
Helligkeit rood
10
13
…
Totale helderheid
9
36
Nederlands

Als de schijnwerper via een DMX-besturingsapparaat gestuurd wordt, kunt u het gedrag bij uitvallen
van het besturingssignaal instellen:
(“Blackout Mode”) = leds uit
(“Freeze”) = “Bevriezen” van de leds met het
laatste besturingscommando
Selecteer de gewenste van 51 vastgelegde kleuren.
Via dit menu-item kunt u de temperatuur in het
apparaat weergaven, bv. 50 °C.
7 Technische gegevens
Besturingsprotocol: . . . . . DMX 512
Aantal DMX-kanalen: . . . . 1, 2, 5, 6 of 8
Verlichting: . . . . . . . . . . . . 7 × RGBW-leds van
8W
Uitstralingshoek: . . . . . . . 15°
DMX-aansluitingen: . . . . . XLR, 3-polig
Penconfiguratie: . . . . . . pin 1 = massa
pin 2 = DMX
-
pin 3 = DMX+
Omgevings-
temperatuurbereik: . . . . . 0 – 40 °C
Voedingsspanning: . . . . . 230 V~ / 50 Hz
Vermogensverbruik: . . . . . max. 60 VA
Afmetingen: . . . . . . . . . . . ∅ 145 mm × 190 mm
Gewicht: . . . . . . . . . . . . . . 2,1 kg
8 DMX-functies
Let op het volgende: De instellingen van de menu-
items , , , en gelden ook
voor het bedrijf met het DMX-besturingsapparaat:
De waarden die hier ingesteld zijn, bepalen deels
de maximaal mogelijke helderheid (totale helderheid, helderheid rood, helderheid groen, helderheid
blauw, helderheid wit) voor deze schijnwerper.
1-kanaalmodus
2-kanaalmodus
DMX-waarde Functie
Kanaal 1: Kleuren
0– 6 Leds uit
7 – 255
35 kleuren (Tabel 1-kanaalmodus)
Kanaal 2: Dimmer
0 – 255 helderheid
Gedrag van het apparaat
bij uitvallen van het
besturingssignaal
19
DMX-waarde Functie
0– 6 Leds uit
7 – 13 Kleur 1
35 kleuren
14 – 20 Kleur 2
21 – 27 Kleur 3
28 – 34 Kleur 4
35 – 41 Kleur 5
42 – 48 Kleur 6
49 – 55 Kleur 7
56 – 62 Kleur 8
63 – 69 Kleur 9
70 – 76 Kleur 10
77 – 83 Kleur 11
84 – 90 Kleur 12
91 – 97 Kleur 13
98 – 104 Kleur 14
105 – 111 Kleur 15
112 – 118 Kleur 16
119 – 125 Kleur 17
126 – 132 Kleur 18
133 – 139 Kleur 19
140 – 146 Kleur 20
147 – 153 Kleur 21
154 – 160 Kleur 22
161 – 167 Kleur 23
168 – 174 Kleur 24
175 – 181 Kleur 25
182 – 188 Kleur 26
189 – 195 Kleur 27
196 – 202 Kleur 28
203 – 209 Kleur 29
210 – 216 Kleur 30
217 – 223 Kleur 31
224 – 230 Kleur 32
231 – 237 Kleur 33
238 – 244 Kleur 34
245 – 255 Kleur 35
Temperatuurweergave
21
Modus “Kleur”
(kleurenstralerbedrijf)
20
37
Nederlands

5-kanaalmodus
6-kanaalmodus
8-kanaalmodus
Wijzigingen voorbehouden.
DMX-waarde Functie
Kanaal 1: Rood
0 – 255 helderheid rood
Kanaal 2: Groen
0 – 255 helderheid groen
Kanaal 3: Blauw
0 – 255 helderheid blauw
Kanaal 4: Wit
0 – 255 helderheid wit
Kanaal 5: Stroboscoop
0– 8 geen stroboscoop
9 – 255
als kanaal 7 = 0 … 31:
stroboscoop van langzaam tot snel
Kanaal 6: Dimmer
0 – 255 totale helderheid
Kanaal 7: Automatische programma's, muzieksturing
0– 31 geen programma
32 – 63
64 – 95
96 – 127
permanent dimmen
donker
© licht
licht
© donker
donker
© licht © donker
De kleur wordt
bepaald via de
kanalen 1 – 4 en
de max. helderheid
via kanaal 6.
De instelling van
kanaal 5 heeft geen
invloed op deze
programma's.
128 – 159
overgang tussen de
kleuren
De instellingen van
de kanalen 1 – 6
hebben geen
invloed op deze
programma's.
160 – 191 kleurwisseling 1
192 – 223 kleurwisseling 2
224 – 255
muziekgestuurd
programma
Kanaal 8: Snelheid, gevoeligheid
0
Als via kanaal 7 een programma geselecteerd is, stopt het of start het niet.
1 – 255
als kanaal 7 = 32 … 223:
Snelheid van langzaam tot snel
als kanaal 7 = 224 … 255:
muziekgevoeligheid, laag tot hoog
DMX-waarde Functie
Kanaal 1: Rood
0 – 255 helderheid rood
Kanaal 2: Groen
0 – 255 helderheid groen
Kanaal 3: Blauw
0 – 255 helderheid blauw
Kanaal 4: Wit
0 – 255 helderheid wit
Kanaal 5: Stroboscoop
0– 8 geen stroboscoop
9 – 255 stroboscoop van langzaam tot snel
Kanaal 6: Dimmer
0 – 255 totale helderheid
DMX-waarde Functie
Kanaal 1: Rood
0 – 255 helderheid rood
Kanaal 2: Groen
0 – 255 helderheid groen
Kanaal 3: Blauw
0 – 255 helderheid blauw
Kanaal 4: Wit
0 – 255 helderheid wit
Kanaal 5: Dimmer
0 – 255 totale helderheid
38
Nederlands
Deze gebruiksaanwijzing is door de auteurswet beschermde eigendom van MONACOR®INTERNATIONAL
GmbH & Co. KG. Een reproductie – ook gedeeltelijk – voor eigen commerciële doeleinden is verboden.

Proyector LED DMX
Estas instrucciones van dirigidas al instalador del
aparato y a usuarios con conocimientos basicos en
control DMX. Lea atentamente estas instrucciones
antes del funcionamiento y guardelas para usos
posteriores. Todos los elementos de funcionamiento y las conexiones que se describen pueden
encontrarse en la pagina 2.
1 Elementos de Funcionamiento
y Conexiones
1 Soportes de montaje
2 Tornillos de cierre para los soportes de montaje
3 Anillas de la carcasa para fijar un cable de
seguridad
4 Soporte de cierre para la visera opcional
PARL-20B
5 Conexiones de control XLR de 3 polos:
Entrada DMX IN (conector chasis)
Salida DMX OUT (toma con cierre; para quitar
el conector, pulse la pestaña PUSH)
Conexión para funcionar con controlador DMX
1. Conecte la entrada DMX a la salida DMX del
controlador DMX.
2. Conecte la salida DMX a la entrada DMX del
siguiente aparato controlado por DMX.
Conecte la salida de este aparato a la
entrada del siguiente aparato, etc. hasta que
todos los aparatos controlados por DMX
estén conectados en cadena.
3. Para prevenir interferencias en la transmisión
de señales: Con cableados largos o para un
gran número de aparatos conectados en
serie, termine la salida DMX del último aparato DMX de la cadena con un resistor de
120 Ω (> 0,3 W): Conecte un tapón correspondiente (p. ej. el DLT-123 de IMG STAGELINE) a la toma de salida.
Conexión para el modo Master / Slave
En el modo Master / Slave, se pueden utilizar
varios PARL-20DMX sincronizadamente con el
modo de funcionamiento “Automatic” o “Sound”.
El primer aparato (Master) controlará el resto de
aparatos (Slaves). Conecte los aparatos en
cadena, del mismo modo que para el modo
DMX (ver arriba), pero no conecte la entrada
DMX del primer aparato de la cadena.
6 Cable de corriente para conectar a una toma
(230 V~ / 50 Hz)
7 LED DMX: Se ilumina cuando el proyector fun-
ciona con un controlador DMX
8 Visualizador para indicar los ajustes de menú
9 LED SLAVE: Se ilumina cuando el proyector
funciona como aparato Slave
10 LED MASTER: Se ilumina cuando el proyector
funciona como aparato Master o cuando funciona por sí mismo con el modo de funcionamiento “Automatic” o “Sound”
11 Botones para controlar el proyector mediante
un menú:
apartados 6.1 y 6.2
12 LED SOUND: Parpadea durante el control por
música cuando se toma una pulsación de
sonido con el micrófono (13)
13 Micrófono para el control por música
2 Notas de Seguridad
El proyector cumple con todas las directivas relevantes de la UE y por lo tanto está marcado con el
símbolo .
G
El proyector está adecuado para utilizarlo sólo
en interiores. Protéjalo de goteos y salpicaduras,
elevada humedad del aire y calor (temperatura
ambiente admisible: 0 – 40ºC).
G
No coloque ningún recipiente con líquido encima
del aparato, p. ej. un vaso.
G
No utilice el proyector y desconecte inmediatamente la toma de corriente del enchufe si:
1. El proyector o el cable de corriente están visiblemente dañados.
2. El aparato ha sufrido daños después de una
caída o accidente similar.
3. No funciona correctamente.
Sólo el personal técnico puede reparar el proyector, bajo cualquier circunstancia.
G
Un cable de corriente dañado sólo puede repararse por el personal cualificado.
G
No tire nunca del cable de corriente para desconectarlo de la toma, tire siempre del enchufe.
G
Utilice sólo un paño suave y seco para la limpieza; no utilice nunca ni agua ni productos químicos.
G
No podrá reclamarse garantía o responsabilidad
alguna por cualquier daño personal o material
resultante si el proyector se utiliza para otros
fines diferentes a los originalmente concebidos,
ADVERTENCIA El proyector utiliza un voltaje de
corriente peligroso. Deje el mantenimiento para el personal cualificado y no inserte nunca nada en
las rejillas de ventilación; el
manejo inexperto puede producir
una descarga eléctrica.
39
Español

si no se instala, no se conecta o no se utiliza
adecuadamente, o si no se repara por expertos.
3 Aplicaciones
El proyector LED PARL-20DMX se utiliza para
efectos de iluminación, p. ej. en pequeños escenarios, clubes y salas de funciones. Utiliza 7 LEDs
RGBW de 8 W y gran brillo como fuente de luz para
luz coloreada o blanca. Hay varios modos de funcionamiento disponibles (p. ej. programas de
muestra automáticos o control por música, efectos
de estroboscopio).
El proyector está diseñado para funcionar
mediante un controlador de luces DMX. El número
de canales de control DMX se puede seleccionar:
1, 2, 5, 6 u 8. El proyector también se puede utilizar
sin controlador, por sí mismo o junto con varios
PARL-20DMX (modo Master / Slave).
4 Instalación/Colocación
G
Para prevenir la acumulación de calor dentro del
aparato, colóquelo siempre de modo que exista
una ventilación suficiente durante el funcionamiento. No cubra nunca las rejillas de ventilación
de la carcasa.
G
La distancia mínima hasta el objeto iluminado
debería ser de 50 cm.
Utilice uno de los soportes de montaje (1) para
instalar el proyector, p. ej. con un tornillo de montaje estable o un soporte para juegos de luces
(gancho C) en una barra transversal. Como alternativa, puede ajustar el proyector por su cuenta:
Despliegue los soportes de montaje por debajo del
proyector y utilícelos como pie.
Para alinear el proyector o para ajustar los
soportes, afloje los dos tornillos de cierre (2) de los
soportes, haga el ajuste, luego fije los tornillos de
cierre nuevamente.
4.2 Visera
Para reducir el ángulo del haz, está disponible la
visera opcional PARL-20B. Deslice la visera por los
raíles exteriores del frontal del proyector y utilice el
soporte de cierre (4) para asegurarla (
fig. 3). Un
resorte (flecha de la fig. 3) mantendrá el soporte en
su lugar.
5 Puesta en Marcha del Proyector
Para utilizar el aparato con un controlador DMX o
para el modo Master / Slave, haga las conexiones
de control correspondientes (
apartado 1, paso 5).
Para la conexión, se recomienda el uso de cables
especiales para la transmisión de la señal DMX
(p. ej. cables de la gama CDMXN de IMG STAGELINE). Para cableados de más de 150 m, se recomienda insertar un amplificador de nivel DMX adecuado (p. ej. SR-103DMX de IMG STAGELINE).
Para conectar el proyector, conecte el enchufe del
cable de corriente (6) a la toma de corriente
(230 V~/ 50 Hz). Para apagar el aparato, desconecte la toma de corriente del enchufe.
Advertencia: ¡Nunca utilice un dimmer para
conectar el proyector al voltaje de corriente!
6 Funcionamiento
Se utiliza un menú para realizar los ajustes del
proyector. Para utilizar el menú, ver apartados 6.1
y 6.2.
Funcionamiento con un controlador DMX
Seleccione el modo canal (objeto de menú ) y
ajuste la dirección DMX (objeto de menú ). Si
es necesario, utilice el menú para seleccionar funciones adicionales (p. ej. comportamiento del proyector después de la pérdida de la señal de control). El proyector se pondrá en funcionamiento
mediante el controlador DMX cuando se active el
objeto de menú (indicación de la dirección
ajustada cuando el visualizador está conectado).
El LED DMX (7) se iluminará cuando el proyector
funciona con el controlador DMX. Cuando el proyector se ponga en control por música en el modo
8 canales, el LED SOUND (12) parpadeará al ritmo
ADVERTENCIA Para prevenir daños oculares, no
mire nunca directamente hacia la
fuente de luz durante un periodo
prolongado.
¡Tenga en cuenta que los cambios
rápidos de iluminación pueden
provocar ataques epilépticos en
personas fotosensibles o con epilepsia!
ADVERTENCIA Instale el proyector de modo
seguro y mediante un experto. Si
se instala en un lugar en el que la
gente puede pasar o sentarse
bajo él, asegúrelo adicionalmente
[p. ej. con un cable de seguridad
en una de las dos anillas (3) de la
carcasa; fije el cable de modo que
la distancia máxima de caída del
aparato no supere los 20 cm].
Si va a poner el proyector definitivamente
fuera de servicio, llévelo a la planta de reciclaje más cercana para que su eliminación
no sea perjudicial para el medioambiente.
40
Español

de las pulsaciones de sonido tomadas con el
micrófono (13).
Funcionamiento sin controlador DMX
Cuando el proyector funcione por sí mismo, active
el objeto de menú para el modo de funcionamiento
(“Automatic” , “Sound” o “Colour” )
y seleccione una de las opciones de ajuste disponibles. Si es necesario, utilice el menú para configurar funciones adicionales (p. ej. velocidad para el
modo “Automatic” o sensibilidad para el modo
“Sound”).
Para el modo Master / Slave (
apartado 1,
paso 5): En el aparato Master, ajuste el modo
“Automatic” o “Sound” y seleccione el ajuste
para el objeto de menú . Ajuste los aparatos
Slave en el modo Slave (objeto de menú ).
El LED MASTER (10) se iluminará cuando el proyector funcione con el modo “Automatic” o
“Sound”. En el modo “Sound”, el LED SOUND (12)
parpadeará al ritmo de las pulsaciones de sonido
tomadas por el micrófono (13). El LED SLAVE (9)
se iluminará cuando el proyector funcione con el
modo Slave.
6.1 Funcionamiento del menú
Para utilizar el menú, hágalo con los cuatro botones (11) y el visualizador (8). El objeto de menú
se utiliza para definir el tiempo de visualización: Visualizador siempre conectado o visualizador desconectado después de un tiempo. Para
conectarlo de nuevo, pulse cualquier botón.
1) Después de conectar el proyector, se activará el
objeto de menú seleccionado más recientemente. Para salir del objeto de menú, pulse el
botón MENU o ENTER.
2) Para seleccionar un objeto de menú, utilice los
siguientes botones:
– El botón MENU o
(arriba)
– El botón (abajo)
3) Para activar el objeto de menú seleccionado,
pulse el botón ENTER.
4) Para ajustar el objeto de menú (p. ej. para
la dirección, para el color), utilice el botón
o .
Para algunos objetos de menú, p. ej. , no
se puede realizar ningún ajuste.
5) Para salir del objeto de menú, pulse el botón
MENU o ENTER.
6.2 Estructura del menú
41
Español
Dirección de inicio DMX /
funcionamiento con un controlador DMX
Modo “Automatic”
(programas de muestra automáticos)
Velocidad para el modo “Automatic”
Modo Slave
Modo canal (número de canales DMX)
Sensibilidad para el modo “Sound”
Modo “Sound” (programas de muestra
controlados por música)
Salida de señales de control Slave
Brillo total
Brillo del rojo
Brillo del verde
Brillo del azul
Brillo del blanco
LEDs encendidos / apagados
Tiempo de visualización
Programas de test
Indicación de visualizador girada en 180º
Indicación de la versión de firmware
Sólo para mantenimiento
Sólo para mantenimiento
Comportamiento del proyector después
de pérdida de señal de control
Modo “Colour” (modo proyector de color)
Indicación de temperatura
1
2
3
4
5
6
7
8
9
10
11
12
13
15
16
17
18
19
20
21
14

6.2.1 Resumen de cada objeto de menú
Para el control separado de todos los aparatos
controlados por DMX, cada proyector debe tener
su propia dirección de inicio. Ejemplo: Si hay que
controlar el primer canal DMX del proyector con el
controlador DMX mediante la dirección DMX 17,
ajuste la dirección de inicio del proyector en 17. El
resto de canales DMX del proyector se asignarán
automáticamente a las direcciones siguientes.
Para el funcionamiento mediante el controlador
DMX, active el objeto de menú de modo que
la dirección ajustada se indique cuando el visualizador esté conectado. La indicación de la dirección
ajustada cambiará cuando se reciba una señal
DMX; p. ej. para la dirección 1, la indicación pasará
de a cuando haya una señal DMX presente en la entrada DMX.
Seleccione uno de los 9 programas disponibles.
Para los programas 1 a 8, utilice el objeto de menú
para ajustar la velocidad (programa 9 = salida
de luz siempre blanca).
Nota: Cuando el objeto de menú esté ajustado en
, el programa seleccionado no empezará.
Cuando se active este objeto de menú, se iniciará
el programa seleccionado en ese momento con el
modo “Automatic”.
… = rápido … lento
= el programa se parará o no empezará
Active este objeto de menú cuando se controle el
proyector como aparato Slave mediante el aparato
Master (
apartado 1, paso 5).
El número de canales DMX depende de las funciones necesarias; también puede depender del
número de canales de control disponibles en el
controlador de luces. Las funciones disponibles en
los cinco modos de canales se pueden encontrar
en el apartado 8.
Cuando se active este objeto de menú, se iniciará
el programa seleccionado en ese momento con el
modo “Sound”. A mayor valor, mayor sensibilidad
del proyector respecto al sonido. Cuando se ajuste
, parará el programa o no empezará.
En el modo “Sound”, el proyector responderá al
sonido tomado por el micrófono (13). Seleccione
uno de los dos programas disponibles. Para ajustar la sensibilidad, utilice el objeto de menú .
Nota: Cuando el objeto de menú esté ajustado en
, el programa seleccionado no empezará.
En el modo Master / Slave, ajuste el aparato Master
en ; de lo contrario, no se enviarán señales de
control a los aparatos Slave.
Salida de señales
de control Slave
8
Modo “Sound”
(programas controlados
por música)
7
Sensibilidad para el modo
“Sound”
6
Modo canal
(número de canales DMX)
5
Modo Slave
4
Velocidad para el modo
“Automatic”
3
Modo “Automatic”
(programas de muestra
automáticos)
2
Ejemplo: Cuando se ajuste el modo de 5 canales y la
dirección de inicio sea 17, los canales 1 a 5 se asignarán
a las direcciones 17 a 21. La dirección 22 será la
siguiente dirección de inicio posible disponible para el
siguiente proyector controlado por DMX.
Dirección de inicio DMX/
funcionamiento
con un controlador DMX
1
42
Español

El brillo total se puede ajustar desde (LEDs
apagados) hasta (brillo máximo).
Nota: ¡El ajuste de este objeto de menú afectará a todos
los modos de funcionamiento, incluso funcionando con un
controlador DMX! El ajuste, sin embargo, sólo se aplicará
en este proyector, no se aplicará a cualquier aparato Slave
conectado.
El brillo de rojo, verde, azul y blanco se pueden
ajustar por separado desde (color apagado)
hasta (brillo máximo). Estos objetos de menú
se pueden utilizar para crear un color mezclado
con el matiz deseado o para corregir el balance del
color (p. ej. para igualar el color de iluminación de
este proyector con los colores de iluminación de
varios proyectores).
Nota: ¡Los ajustes de estos objetos de menú afectarán a
todos los modos de funcionamiento, incluso funcionando
con un controlador DMX! Los ajustes, sin embargo, sólo
se aplicarán en este proyector, no se aplicarán a cualquier
aparato Slave conectado.
Cuando se activa este objeto de menú, aparecen
dos ajustes disponibles:
= todos los LEDs apagados (Blackout)
= todos los LEDs conectados
El tiempo de visualización se puede ajustar en 30,
60, 90 ó 120 segundos. Después, si no se pulsa
algún botón, se apagará el visualizador. Para
conectarlo de nuevo, pulse cualquier botón. Con el
ajuste , el visualizador está siempre encendido.
= no test
= test “rojo”
= test “verde”
= test “azul”
= test “blanco”
= test “rojo + verde+ azul + blanco”
= indicación de visualizador estándar
= indicación de visualizador girada
Este objeto de menú se utiliza para indicar la versión del firmware (sistema operativo del proyector).
Indicación de la versión
de firmware
18
Indicación de visualizador
girada en 180º
17
Programas de test
16
Tiempo de visualización
15
LEDs
encendidos / apagados
14
Brillo del blanco
Brillo del azul
Brillo del verde
Brillo del rojo
10
13
…
Brillo total
9
43
Español

Cuando el proyector funciona mediante un controlador DMX, se puede ajustar el comportamiento del
proyector después de la pérdida de señal de control:
(“Blackout Mode”) = LEDs apagados
(“Freeze”) = “Congelación” de los LEDs con el
comando de control más reciente.
Seleccione uno de los 51 colores disponibles.
Este objeto de menú se utiliza para indicar la temperatura dentro del proyector, p. ej. 50 ºC.
7 Especificaciones
Protocolo de control: . . . . DMX 512
Número de canales DMX: 1, 2, 5, 6 u 8
Fuente de luz: . . . . . . . . . 7 LEDs RGBW de 8 W
Ángulo del haz: . . . . . . . . 15°
Conexiones DMX: . . . . . . XLR, 3 polos
Configuración de pines: Pin 1 = masa
Pin 2 = DMX
-
Pin 3 = DMX+
Temperatura ambiente: . . 0 – 40 °C
Alimentación: . . . . . . . . . . 230 V~ / 50 Hz
Consumo: . . . . . . . . . . . . 60 VA máx.
Dimensiones: . . . . . . . . . . ∅ 145 mm × 190 mm
Peso: . . . . . . . . . . . . . . . . 2,1 kg
8 Funciones DMX
Tenga en cuenta que: Los ajustes de los objetos
de menú , , , y también
afectarán al funcionamiento con un controlador
DMX: Los valores ajustados para estos objetos de
menú definirán el brillo máximo (brillo total, brillo
del rojo, brillo del verde, brillo del azul, brillo del
blanco) para este proyector.
Modo 1 canal
Valor DMX Función
0– 6 LEDs apagados
7 – 13 Color 1
35 colores
14 – 20 Color 2
21 – 27 Color 3
28 – 34 Color 4
35 – 41 Color 5
42 – 48 Color 6
49 – 55 Color 7
56 – 62 Color 8
63 – 69 Color 9
70 – 76 Color 10
77 – 83 Color 11
84 – 90 Color 12
91 – 97 Color 13
98 – 104 Color 14
105 – 111 Color 15
112 – 118 Color 16
119 – 125 Color 17
126 – 132 Color 18
133 – 139 Color 19
140 – 146 Color 20
147 – 153 Color 21
154 – 160 Color 22
161 – 167 Color 23
168 – 174 Color 24
175 – 181 Color 25
182 – 188 Color 26
189 – 195 Color 27
196 – 202 Color 28
203 – 209 Color 29
210 – 216 Color 30
217 – 223 Color 31
224 – 230 Color 32
231 – 237 Color 33
238 – 244 Color 34
245 – 255 Color 35
Indicación de temperatura
21
Modo “Colour”
(modo proyector de color)
20
Comportamiento del proyector después de pérdida
de señal de control
19
44
Español

Modo 2 canales
Modo 5 canales
Modo 6 canales
Modo 8 canales
Sujeto a modificaciones técnicas.
Valor DMX Función
Canal 1: colores
0– 6 LEDs apagados
7 – 255
35 colores (tabla para modo 1 canal)
Canal 2: dimmer
0 – 255 Brillo
Valor DMX Función
Canal 1: rojo
0 – 255 Brillo del rojo
Canal 2: verde
0 – 255 Brillo del verde
Canal 3: azul
0 – 255 Brillo del azul
Canal 4: blanco
0 – 255 Brillo del blanco
Canal 5: estroboscopio
0– 8 Sin estroboscopio
9 – 255
Cuando canal 7 = 0 … 31:
Estroboscopio, lento a rápido
Canal 6: dimmer
0 – 255 Brillo total
Canal 7: programas automáticos, control de la música
0– 31 Sin programa
32 – 63
64 – 95
96 – 127
Dimmer continuo
Oscuro
© brillante
Brillante
© oscuro
Oscuro
© brillante © oscuro
El color se define
con los canales
1 – 4 y el brillo
máximo con el
canal 6.
El ajuste del
canal 5 no afectará a ninguno de
estos programas.
128 – 159
Fundido entre los
colores
Los ajustes de
los canales 1 – 6
no afectarán a
ninguno de estos
programas.
160 – 191 Cambio de color 1
192 – 223 Cambio de color 2
224 – 255
Programa controlado
por música
Canal 8: velocidad, sensibilidad
0
Cuando se seleccione un programa mediante
el canal 7, este programa parará o no se iniciará.
1 – 255
Cuando canal 7 = 32 … 223:
velocidad, lenta a rápida
Cuando canal 7 = 224 … 255:
sensibilidad musical, baja a alta
Valor DMX Función
Canal 1: rojo
0 – 255 Brillo del rojo
Canal 2: verde
0 – 255 Brillo del verde
Canal 3: azul
0 – 255 Brillo del azul
Canal 4: blanco
0 – 255 Brillo del blanco
Canal 5: estroboscopio
0– 8 Sin estroboscopio
9 – 255 Estroboscopio, lento a rápido
Canal 6: dimmer
0 – 255 Brillo total
Valor DMX Función
Canal 1: rojo
0 – 255 Brillo del rojo
Canal 2: verde
0 – 255 Brillo del verde
Canal 3: azul
0 – 255 Brillo del azul
Canal 4: blanco
0 – 255 Brillo del blanco
Canal 5: dimmer
0 – 255 Brillo total
45
Español
Manual de instrucciones protegido por el copyright de MONACOR®INTERNATIONAL GmbH & Co. KG. Toda
reproducción mismo parcial para fines comerciales está prohibida.

Reflektor diodowy DMX
Niniejsza instrukcja przeznaczona jest dla insta latorów i użytkowników posiadających co naj mniej
podstawową wiedzę na temat sterowania DMX.
Przed rozpoczęcim pracy z urządzeniem, prosimy
zapoznać się z instrukcją obsługi, a następnie
zachować ją do wglądu. Na stronie 2 pokazano
rozkład elementów operacyjnych i złączy.
1 Elementy operacyjne oraz złącza
1 Uchwyty montażowe
2 Regulatory uchwytów montażowych
3 Zaczep do linki zabezpieczającej
4 Zaczep z blokadą do montażu przystawki barn
doors PARL-20B
5 3-pinowe złącza XLR:
Wejście DMX IN (wtyk)
Wyjście DMX OUT (gniazdo z zatrzaskiem, aby
odłączyć wtyk wcisnąć dźwignię PUSH)
Podłączanie do kontrolera DMX
1. Połączyć wejście DMX z wyjściem kontrolera
DMX.
2. Podłączyć wyjście DMX do wejścia DMX
następnego reflektora; kolejne urządzenia
podłączać analogicznie, aż wszystkie urządzenia zostaną połączone.
3. Aby zapobiec zakłóceniom, zwłaszcza w
przypadku długich linii lub wielu urządzeń, na
wyjście DMX ostatniego z podłączonych
paneli podłączyć opornik 120 Ω (> 0,3 W) lub
użyć gotowy wtyk terminujący (np. DLT-123
marki IMG STAGELINE).
Łączenie urządzeń w trybie master / slave
Pojedyncze reflektory PARL-20DMX mogą zostać połączone w celu równoczesnego sterowania wszystkich urządzeń podrzędnych (slave)
zgodnie z rytmem nadrzędnego (master), w trybie “Automatic” lub “Sound”. Połączyć wszystkie urządzenia tak jak w trybie DMX (patrz
wyżej), nie podłączając jednak wejścia DMX
pierwszego urządzenia.
6 Kabel zasilający do łączenia z gniazdkiem sie-
ciowym (230 V~/ 50 Hz)
7 Dioda DMX: świeci podczas sterowania sygna-
łem DMX z kontrolera
8 Wyświetlacz do wprowadzania ustawie w menu
sterującym
9 Dioda SLAVE: świeci gdy reflektor jest usta-
wiony w tryb podrzędny slave
10 Dioda MASTER: świeci gdy reflektor jest usta-
wiony w tryb nadrzędny master lub gdy pracuje
niezależnie w trybie “Automatic” lub “Sound”
11 Przyciski operacyjne do wprowadzania usta-
wień w menu sterującym:
rozdz. 6.1 oraz 6.2
12 Dioda SOUND: miga podczas sterowania
muzyką przez wbudowany mikrofon (13)
13 Mikrofon do sterowania muzyką
2 Środki bezpieczeństwa
Urządzenie spełnia wszystkie wymagania norm UE
dzięki czemu jest oznaczone symbolem .
G
Urządzenie jest przeznaczone tylko do użytku
wewnątrz pomieszczeń. Należy chronić je przed
działaniem wody, dużej wilgotności powietrza
oraz wysokiej temperatury (dopuszczalny zakres
0 – 40 °C).
G
Na urządzeniu nie wolno stawiać żadnych
pojemników z cieczą, np. szklanek.
G
Nie należy włączać lub natychmiast odłączyć
urządzenie od sieci w przypadku gdy
1. stwierdzono widoczne uszkodzenie urządzenia lub kabla zasilającego,
2. urządzenie mogło ulec uszkodzeniu na skutek
upadku lub podobnego zdarzenia,
3. stwierdzono nieprawidłowe działanie.
Naprawy urządzenia może dokonywać tylko
przeszkolony personel.
G
Wymianę uszkodzonego kabla zasilającego
należy zlecić specjaliście.
G
Nie wolno odłączać zasilania ciągnąc za kabel,
należy zawsze chwytać za wtyczkę.
G
Do czyszczenia używać suchej, miękkiej ściereczki, nie stosować środków chemicznych ani
wody.
G
Producent ani dostawca nie ponoszą odpowiedzialności za wynikłe uszkodzenia sprzętu lub
obrażenia użytkownika w przypadku gdy urządzenie jest wykorzystywane w innych celach niż
to się przewiduje lub jeśli jest nieodpowiednio
zainstalowane, użytkowane lub naprawiane.
Aby nie zaśmiecać środowiska po całkowitym zakończeniu eksploatacji urządzenia
należy je oddać do punktu recyklingu.
UWAGA Zasilacz urządzenia pracuje na wy-
sokim napięciu. Wszelkie naprawy
należy zlecić przeszkolonemu personelowi. Nie wolno umieszczać niczego w otworach wentylacyjnych!
Nieodpowiednia obsługa oraz wprowadzanie modyfikacji mogą spowodować porażenie prądem elektrycznym.
46
Polski

3 Zastosowanie
Reflektor PARL-20DMX może być wykorzystywany
do zastosowań scenicznych, w dyskotekach lub
jako element dekoracyjny. Wyposażony jest w 7
super jasnych 8 W diod RGBW. Diody mogą emitować białe lub kolorowe światło. Urządzenie
posiada różne tryby pracy (np. automatyczne lub
sterowane muzyką programy świetlne, efekt stroboskopu).
Reflektor przystosowany jest do sterowania sygnałem DMX z kontrolera (za pomocą 1, 2, 5, 6 lub
8 kanałów DMX do wyboru), ale może również pracować bez niego lub w połączeniu z innymi reflektorami PARL-20DMX (tryb master / slave).
4 Montaż
G
Reflektor należy zamontować w takim miejscu,
aby zapewnić dostateczną cyrkulację powietrza
wokół niego. Nie wolno zasłaniać otworów wentylacyjnych na obudowie.
G
Zachować dystans minimum 50 cm od oświetlanej powierzchni.
Urządzenie może być montowane z wykorzystaniem jego uchwytów (1) na stałe lub przez dodatkowe zaczepy do świateł (uchwyt C) na poziomym
ramieniu statywu. Alternatywnie, reflektor może
być ustawiany na podłodze. W tym celu należy
odchylić uchwyty montażowe do tyłu, aby służyły
jako podpórka. Przy takim ustawieniu należy
mocno dokręcić regulatory.
Dla uzyskania żądanej pozycji, poluzować regulatory (2) przy uchwycie montażowym. Ustawić
żądaną pozycję i dokręcić je.
4.2 Przystawka barn doors
W celu regulacji kąta promieniowania oraz kierunku emisji, można wykorzystać przystawkę
PARL-20B typu barn doors, dostępną jako wyposażenie dodatkowe. Umieścić ją w zewnętrznym
uchwycie (4) na przedniej stronie reflektora i
zabezpieczyć ją (rys. 3) zaczepem ze sprężyną
(strzałka na rys. 3).
5 Przygotowanie do pracy
W celu sterowania reflektorem poprzez kontroler
DMX lub z innego reflektora w trybie master / slave,
połączyć odpowiednio urządzenia (rozdz. 1,
krok 5). Do podłączania należy wykorzystać specjalny kabel o dużej przepływności danych (np.
kabel z serii CDMXN marki IMG STAGELINE).
Jeżeli długość przewodu przekracza 150 m, zalecane jest podłączenie wzmacniacza sygnału DMX
(np. SR-103DMX marki IMG STAGELINE).
Podłączyć kabel zasilający do gniazdka sieciowego (230 V~/ 50 Hz). Urządzenie jest już włączone. Aby wyłączyć urządzenie odłączyć wtyczkę
od gniazdka sieciowego.
Uwaga: Nie wolno podłączać reflektora do zasila-
nia poprzez dimer (ściemniacz)!
6 Obsługa
Sterowanie urządzeniem odbywa się poprzez
menu. Szczegóły dotyczące sterowania opisano w
rozdz. 6.1 oraz 6.2.
Sterowanie DMX
W pierwszej kolejności ustawić żądaną ilość kanałów sterujących (polecenie z menu) oraz
adres startowy DMX (polecenie z menu).
Jeżeli trzeba, poprzez menu włączyć dodatkowe
funkcje (np. zachowanie reflektora po utracie sygnału sterującego). Reflektor jest gotowy do sterowania sygnałem DMX po wywołaniu polecenia
z menu (wskazanie ustawionego adresu gdy
wyświetlacz jest włączony).
Dioda DMX (7) świeci podczas sterowania sygna-
łem DMX z kontrolera. W przypadku ustawienia
sterowania muzyką w trybie 8-kanałowym, dioda
SOUND (12) miga w rytm muzyki zbieranej
poprzez mikrofon (13).
Praca bez kontrolera DMX
W przypadku, gdy reflektor pracuje niezależnie,
wywołać z menu polecenie wyboru trybu pracy
(“Automatic” , “Sound” lub “Colour” )
i wybrać jedną z dostępnych opcji. Jeżeli trzeba,
poprzez menu włączyć dodatkowe funkcje (np.
prędkość dla trybu “Automatic” lub czułość dla
trybu “Sound”).
UWAGA Nie należy patrzeć bezpośrednio na
diody, silne światło może uszkodzić
wzrok.
Efekt stroboskopu i szybkie zmiany
światła mogą być groźne dla osób
wrażliwych na światło oraz chorych
na epilepsję!
UWAGA Urządzenie musi być zamontowane
w sposób bezpieczny i fachowy. Jeśli
ma pracować ponad ludźmi, należy
je dodatkowo zabezpieczyć przed
upadkiem (np. wykorzystując linki zabezpieczające. Długość takich linek
należy tak dobrać aby w przypadku
ich wykorzystania urządzenie maksymalnie spadło o 20 cm).
47
Polski

W przypadku pracy w trybie master / slave
(rozdz. 1, krok 5): Ustawić urządzenie nadrzędne master na tryb “Automatic” lub “Sound” i
wybrać ustawienie w poleceniu z menu.
Wszystkie urządzenia podrzędne muszą być ustawione w tryb slave (polecenie z menu).
Dioda MASTER (10) świeci gdy reflektor pracuje w
trybie “Automatic” lub “Sound”. W trybie “Sound”,
dioda SOUND (12) miga w rytm muzyki zbieranej
poprzez mikrofon (13). Dioda SLAVE (9) świeci gdy
urządzenie jest ustawione w ryb podrzędny slave.
6.1 Sterowanie poprzez menu
Do wprowadzania ustawień służą przyciski (11),
menu pokazywane jest na wyświetlaczu (8). Za
pomocą polecenia można ustawić ciągłe
świecenie wyświetlacza lub jego wygaszanie po
pewnym czasie. Po wygaszeniu, wyświetlacz
zapala się ponownie po wciśnięciu dowolnego
przycisku.
1) Po włączeniu zasilania, na wyświetlaczu poka-
zane zostaje ostatnio wybrane polecenie. Aby
wyjść z tego polecenia wcisnąć przycisk MENU
lub ENTER.
2) Do wyboru poleceń służą przyciski:
– przycisk MENU lub
(w górę)
– przycisk
(w dół)
3) Aby wywołać wybrane polecenie, wcisnąć przy-
cisk ENTER.
4) Do wprowadzania ustawień (np. dla
adresu, dla koloru) służą przyciski
lub .
W przypadku niektórych poleceń (np. ),
wprowadzanie ustawień nie jest możliwe.
5) Aby wyjść z polecenia wcisnąć przycisk MENU
lub ENTER.
6.2 Struktura menu
48
Polski
adres startowy DMX /
sterowanie kontrolerem DMX
tryb “Automatic”
(automatyczne programy świetlne)
prędkość dla trybu “Automatic”
tryb slave
wybór liczby kanałów DMX
czułość dla trybu “Sound”
tryb “Sound”
(sterowane muzyką programy świetlne)
wyjście sygnału sterującego slave
całkowita jasność
jasność czerwonego
jasność zielonego
jasność niebieskiego
jasność białego
włączenie / wyłączenie diod
czas wyświetlania
programy testowe
obrót wyświetlacza o 180°
wersja firmwareʼa
tylko tryb serwisowy
tylko tryb serwisowy
zachowanie reflektora po utracie
sygnału sterującego
tryb “colour” (kolorowy reflektor)
wskaźnik temperatury
1
2
3
4
5
6
7
8
9
10
11
12
13
15
16
17
18
19
20
21
14

6.2.1 Przegląd poleceń menu
Aby móc sterować kilkoma urządzeniami poprzez
kontroler DMX, należy ustawić indywidualne
adresy startowe. Przykładowo: Jeżeli np. adres 17
kontrolera jest przewidziany do sterowania reflektorem, należy ustawić adres 17 na reflektorze.
Pozostałym funkcjom reflektora zostaną przypisane automatycznie kolejne adresy DMX.
W celu ustawienia adresu startowego DMX, wywołać polecenie z menu, aby na wyświetlaczu
pojawił się ustawiony adres startowy. Wskazanie
adresu startowego zmieni się po odebraniu sygnału sterującego DMX, np. dla adresu 1, wskazanie
zmieni się z na .
Wybrać jeden z 9 dostępnych programów. Dla programów 1 do 8, możliwa jest regulacja prędkości
poprzez polecenie (program 9 = zawsze białe
światło).
Uwaga: Jeżeli w poleceniu ustawiono opcję ,
wybrany program nie zostanie uruchomiony.
Po wywołaniu tego polecenia, uruchomiony zostanie program wybrany w poleceniu “Automatic”.
… = szybko … wolno
= program zatrzymany lub nie uruchomiony
Polecenie to należy wywołać gdy reflektor ma pracować w trybie podrzędnym ze sterowaniem z innego urządzenia nadrzędnego master (
rozdz. 1,
krok 5).
Liczba kanałów DMX zależy od żądanej funkcjonalności oraz ilości dostępnych kanałów kontrolera. W rozdz. 8 opisano możliwe do uzyskania
funkcje, przy sterowaniu za pomocą różnej liczby
kanałów.
Po wywołaniu tego polecenia, uruchomiony zostanie program wybrany w poleceniu “Sound”. Im
wyższa ustawiona wartość tym wyższa czułość na
rytm muzyki. Po ustawieniu , program zostaje
zatrzymany lub nie zostaje uruchomiony.
W trybie “Sound”, reflektor pracuje w rytm muzyki
zbieranej poprzez mikrofon (13). Dostępne są dwa
programy sterowane muzyką. Do ustawienia czułości służy polecenie .
Uwaga: Jeżeli w poleceniu ustawiono opcję ,
wybrany program nie zostanie uruchomiony.
W trybie master / slave mode, ustawić opcję na
urządzeniu nadrzędnym master; w przeciwnym
razie sygnał sterujący nie będzie przesyłany do
urządzeń podrzędnych slave.
Wyjście sygnału
sterującego slave
8
Tryb “Sound”
(sterowane muzyką
programy świetlne)
7
Czułość dla trybu “Sound”
6
Wybór liczby
kanałów DMX
5
Tryb slave
4
Prędkość dla trybu
“Automatic”
3
Tryb “Automatic”
(automatyczne programy
świetlne)
2
Przykład: W przypadku ustawienia trybu 5-kanałowego,
dla adresu startowego 17, kanałom 1 do 5 przypisane
zostaną adresy 17 do 21. Jako adres startowy DMX
kolejnego urządzenia można wówczas ustawić 22.
Adres startowy DMX /
sterowanie
kontrolerem DMX
1
49
Polski

Całkowita jasność może być regulowana w zakresie od (diody wygaszone) do (maksymalna jasność).
Uwaga: Ustawienie dokonane w tym poleceniu wpływa na
wszystkie tryby pracy, także podczas sterowania kontrolerem DMX! Ustawienie to jednak ma wpływ wyłącznie na
dane urządzenie i nie jest przesyłane do urządzeń slave.
Jasność poszczególnych barw może być regulowana w zakresie od (kolor wygaszony) do
(maksymalna jasność). Pozwala to na stworzenie zmiksowanych kolorów o różnych odcieniach oraz na korekcję balansu bieli (np. w celu
dopasowania kolory do barwy uzyskiwanej z
innych reflektorów).
Uwaga: Ustawienie dokonane w tym poleceniu wpływa na
wszystkie tryby pracy, także podczas sterowania kontrolerem DMX! Ustawienie to jednak ma wpływ wyłącznie na
dane urządzenie i nie jest przesyłane do urządzeń slave.
W poleceniu tym dostępne są dwa ustawienia:
= wszystkie diody wygaszone (blackout)
= wszystkie diody włączone
Czas wyświetlania może być ustawiony na 30 s,
60 s, 90 s lub 120 s. Po upływie ustawionego czasu
od momentu wciśnięcia ostatniego przycisku,
wyświetlacz wygasi się. Aby ponownie włączyć
wyświetlacz, wcisnąć dowolny przycisk. Przy ustawieniu , wyświetlacz świeci cały czas.
= brak testu
= test “czerwonego”
= test “zielonego”
= test “niebieskiego”
= test “białego”
= test “czerwonego + zielonego + niebieskiego
+ białego”
= standardowe wyświetlanie,
= wyświetlanie obrócone
Polecenie to służy do wyświetlenia wersji firmwareʼa (system operacyjny urządzenia).
Wersja firmwareʼa
18
Obrót wyświetlacza o 180°
17
Programy testowe
16
Czas wyświetlania
15
Włączenie /
wyłączenie diod
14
Jasność białego
Jasność niebieskiego
Jasność zielonego
Jasność czerwonego
10
13
…
Całkowita jasność
9
50
Polski

Podczas sterowania kontrolerem DMX, możliwe
jest zdefiniowanie zachowania reflektora po utracie
sygnału sterującego:
(“Blackout Mode”) = wygaszenie
(“Freeze”) = “Freezing” zatrzymanie na ostat-
nim ustawieniu
Dostępne jest 51 gotowych kolorów.
Polecenie to służy do wyświetlenia temperatury
wewnątrz urządzenia, np. 50 °C.
7 Specyfikacja
Protokół danych: . . . . . . . DMX 512
Liczba kanałów DMX: . . . 1, 2, 5, 6 lub 8
Źródło światła: . . . . . . . . . 7 × 8 W diod RGBW
Kąt promieniowania: . . . . 15°
Złącza DMX: . . . . . . . . . . XLR, 3-pinowe
Konfiguracja pinów: . . . pin 1 = masa
pin 2 = DMX
-
pin 3 = DMX+
Zakres temperatur: . . . . . 0 – 40 °C
Zasilanie: . . . . . . . . . . . . . 230 V~ / 50 Hz
Pobór mocy: . . . . . . . . . . 60 VA max
Wymiary: . . . . . . . . . . . . . ∅ 145mm × 190 mm
Waga: . . . . . . . . . . . . . . . 2,1 kg
8 Funkcje DMX
Uwaga: Ustawienia dokonane w poleceniach ,
, , oraz z menu mają wpływ
także podczas sterowania kontrolerem DMX: ustawione wartości definiują maksymalną uzyskiwaną
jasność (całkowitą, kolory czerwonego, zielonego,
niebieskiego ora białego).
Tryb 1-kanałowy
Tryb 2-kanałowy
Wartość DMX Funkcja
Kanał 1: kolory
0– 6 Diody wygaszone
7 – 255
35 kolorów
(
tabela dla trybu 1-kanałowego)
Kanał 2: ściemniacz
0 – 255 jasność
Wartość DMX Funkcja
0– 6 Diody wygaszone
7 – 13 kolor 1
35 kolorów
14 – 20 kolor 2
21 – 27 kolor 3
28 – 34 kolor 4
35 – 41 kolor 5
42 – 48 kolor 6
49 – 55 kolor 7
56 – 62 kolor 8
63 – 69 kolor 9
70 – 76 kolor 10
77 – 83 kolor 11
84 – 90 kolor 12
91 – 97 kolor 13
98 – 104 kolor 14
105 – 111 kolor 15
112 – 118 kolor 16
119 – 125 kolor 17
126 – 132 kolor 18
133 – 139 kolor 19
140 – 146 kolor 20
147 – 153 kolor 21
154 – 160 kolor 22
161 – 167 kolor 23
168 – 174 kolor 24
175 – 181 kolor 25
182 – 188 kolor 26
189 – 195 kolor 27
196 – 202 kolor 28
203 – 209 kolor 29
210 – 216 kolor 30
217 – 223 kolor 31
224 – 230 kolor 32
231 – 237 kolor 33
238 – 244 kolor 34
245 – 255 kolor 35
Zachowanie reflektora
po utracie sygnału
sterującego
19
Wskaźnik temperatury
21
Tryb “Colour”
(kolorowy reflektor)
20
51
Polski

Tryb 5-kanałowy
Tryb 6-kanałowy
Tryb 8-kanałowy
Z zastrzeżeniem możliwość zmian.
Wartość DMX Funkcja
Kanał 1: czerwony
0 – 255 jasność czerwonego
Kanał 2: zielony
0 – 255 jasność zielonego
Kanał 3: niebieski
0 – 255 jasność niebieskiego
Kanał 4: biały
0 – 255 jasność białego
Kanał 5: stroboskop
0– 8 bez stroboskopu
9 – 255
gdy kanał 7 = 0 … 31:
stroboskop, wolno do szybko
Kanał 6: ściemniacz
0 – 255 całkowita jasność
Kanał 7: programy automatyczne, sterowanie muzyką
0– 31 bez programu
32 – 63
64 – 95
96 – 127
ciągłe ściemnianie
ciemno
© jasno
jasno
© ciemno
ciemno
© jasno © ciemno
Kolor definiowany
poprzez kanały
1 – 4 a maksymalna jasność
przez kanał 6.
Ustawienia
kanału 5 nie ma
wpływu na te
programy.
128 – 159
przechodzenie między
kolorami
Ustawienia
kanałów 1 – 6 nie
mają wpływu na
te programy.
160 – 191 zmiana kolorów 1
192 – 223 zmiana kolorów 2
224 – 255
program sterowany
muzyką
Kanał 8: prędkość, czułość
0
Jeżeli program wybrano poprzez kanał 7,
program zostaje zatrzymany lub nie zostaje
uruchomiony.
1 – 255
gdy kanał 7 = 32 … 223:
prędkość, wolno do szybko
gdy kanał 7 = 224 … 255:
czułość, mała do duża
Wartość DMX Funkcja
Kanał 1: czerwony
0 – 255 jasność czerwonego
Kanał 2: zielony
0 – 255 jasność zielonego
Kanał 3: niebieski
0 – 255 jasność niebieskiego
Kanał 4: biały
0 – 255 jasność białego
Kanał 5: stroboskop
0– 8 bez stroboskopu
9 – 255 stroboskop, wolno do szybko
Kanał 6: ściemniacz
0 – 255 całkowita jasność
Wartość DMX Funkcja
Kanał 1: czerwony
0 – 255 jasność czerwonego
Kanał 2: zielony
0 – 255 jasność zielonego
Kanał 3: niebieski
0 – 255 jasność niebieskiego
Kanał 4: biały
0 – 255 jasność białego
Kanał 5: ściemniacz
0 – 255 całkowita jasność
52
Polski
Instrukcje obsługi są chronione prawem copyright for MONACOR®INTERNATIONAL GmbH & Co. KG. Przetwarzanie całości lub części instrukcji dla osobistych korzyści finansowych jest zabronione.

Læs nedenstående sikkerhedsoplysninger grundigt igennem før ibrugtagning af enheden. Bortset
fra sikkerhedsoplysningerne henvises til den
engelske tekst.
Vigtige sikkerhedsoplysninger
Denne enhed overholder alle nødvendige EUdirektiver og er som følge deraf mærket .
G
Enheden er kun beregnet til indendørs brug.
Beskyt den mod vanddråber og -stænk, høj luftfugtighed og varme (tilladt omgivelsestemperatur 0 – 40°C).
G
Undgå at placere væskefyldte genstande, som
f. eks. glas, ovenpå enheden.
G
Tag ikke enheden i brug og tag straks stikket ud
af stikkontakten i følgende tilfælde:
1. hvis der er synlig skade på enheden eller netkablet,
2. hvis der kan være opstået skade, efter at
enheden er tabt eller lignende,
3. hvis der forekommer fejlfunktion.
Enheden skal altid repareres af autoriseret personel.
G
Et skadet strømkabel skal udskiftes af forhandleren eller uddannet personel.
G
Tag aldrig netstikket ud af stikkontakten ved at
trække i kablet, tag fat i selve stikket.
G
Rengør kabinettet med en tør, blød klud; der må
under ingen omstændigheder benyttes kemikalier eller vand.
G
Hvis enheden benyttes til andre formål, end den
oprindeligt er beregnet til, hvis den monteres
eller betjenes forkert, eller hvis den ikke repareres af uautoriseret personel, omfattes eventuelle
skader ikke af garantien.
Opsaetning/montering
G
Placér altid enheden så der er rigeligt med ventilation omkring denne. Kabinettets ventilationshuller må ikke tildækkes.
G
Hold en afstand på mindst 50 cm til belyste objekter.
ADVARSEL
Se ikke direkte mod lyskilden under
brug; dette kan medføre skader på
øjnene.
Vær venligst opmærksom på at stroboskob-effekter og hurtige lysskift kan udløse epileptiske
anfald hos personer, der enten er fotosensitive
eller lider af epilepsi!
ADVARSEL Enheden skal monteres på en sik-
ker måde. Hvis enheden installeres
på et sted hvor personer kan
bevæge sig eller sidde under den,
skal den yderligere sikres med
f. eks. en sikkerhedswire fastgjort til
en af de to ringe (3) på lampen.
Spænd wiren så enheden maximalt
kan falde 20 cm.
Hvis enheden skal tages ud af drift for
bestandigt, skal den bringes til en lokal
genbrugsstation for bortskaffelse.
ADVARSEL Enheden benytter livsfarlig net-
spænding. Udfør aldrig nogen form
for modifikationer på produktet og
indfør aldrig genstande i ventilationshullerne, da du dermed risikere at få elektrisk stød.
53
Dansk
Alle rettigheder til denne brugsvejledning tilhører MONACOR®INTERNATIONAL GmbH & Co. KG. Ingen dele
af denne vejledning må reproduceres under ingen omstændigheder til kommerciel anvendelse.

Läs igenom säkerhetsföreskrifterna innan enheten
tas i bruk. Ytterligare information återfinns på
övriga språk i manualen.
Säkerhetsföreskrifter
Enheten uppfyller alla krav enligt EU och har därför
försetts med symbolen .
G
Enheten är endast avsedd för inomhusbruk.
Enheten skall skyddas mot vätskor, hög värme
och hög luftfuktighet (tillåten omgivningstemperatur 0 – 40°C).
G
Placera inte föremål innehållande vätskor, t.ex.
dricksglas, på enheten.
G
Använd inte enheten och ta omedelbart ut kontakten ur eluttaget om något av följande fel uppstår.
1. Om enheten eller elsladden har synliga skador.
2. Om enheten skadats av fall eller dylikt.
3. Om andra felfunktioner uppstår.
Enheten skall alltid lagas av kunnig personal.
G
En skadad nätkabel måste bytas av utbildad personal.
G
Drag aldrig ur kontakten genom att dra i sladden,
utan ta tag i kontaktkroppen.
G
Rengör endast med en mjuk och torr trasa,
använd aldrig kemikalier eller vatten vid rengöring.
G
Om enheten används för andra ändamål än
avsett, om den monteras eller används på fel
sätt eller inte repareras av auktoriserad personal
upphör alla garantier att gälla. I dessa fall tas
inget ansvar för uppkommen skada på person
eller materiel.
Placering/montering
G
Placera enheten så att luften kan cirkulera fritt
runt den och täpp inte till kylhålen i chassiet.
G
Placera enheten minst 50 cm från ma terialet
som skall belysas.
VARNING Enheten måste monteras på ett pro-
fessionellt och säkert sätt. Om den
installeras på en plats där folk kan
sitta eller gå under, så måste den
säkras med t. ex. en vajer fastsatt i
en av de två ringarna (3) på höljet.
Anordna säkerhetsvajern så att den
maximala fallhöjden är 20 cm.
Om enheten ska tas ur drift slutgiltigt, ta
den till en lokal återvinningsanläggning för
en avyttring som inte är skadligt för miljön.
VARNING
Titta aldrig direkt in i ljuskällan. Risk
för permanent ögonskada föreligger.
Tänk på att strobolampan och snabba ljusskiften
kan framkalla epeleptiska anfall hos känsliga personer!
VARNING Enheten använder farlig nätspän-
ning. Överlåt därför all service till auktoriserad verkstad. Stoppa aldrig in
föremål i ventilationshålen på enheten då detta kan ge upphov till elektriska överslag med risk för skada på
person och materiel.
54
Svenska
Alla rättigheter är reserverade av MMONACOR®INTERNATIONAL GmbH & Co. KG. Ingen del av denna instruktionsmanual får eftertryckas i någon form eller på något sätt användas i kommersiellt syfte.

Ole hyvä ja tutustu seuraaviin ohjeisiin varmistaaksesi tuotteen turvallisen käytön. Tarvitessasi lisätietoja tuotteen käytöstä löydät ne muun kielisistä
käyttöohjeista.
Turvallisuudesta
Laite vastaa kaikkia vaadittuja EU direktiivejä, joten
se on varustettu merkinnällä.
G
Laitteet soveltuvat vain sisätilakäyttöön. Suojele
niitä kosteudelta, vedeltä ja kuumuudelta (sallittu
ympäröivä lämpötila 0 – 40°C).
G
Älä sijoita laitteen päälle mitään nestettä sisältävää, kuten vesilasia tms.
G
Irrota virtajohto pistorasiasta, äläkä käynnistä
laitetta, jos
1. laitteessa tai virtajohdossa on havaittava vaurio,
2. putoaminen tai muu vastaava vahinko on
saattanut aiheuttaa vaurion,
3. laitteessa esiintyy toimintahäiriöitä.
Kaikissa näissä tapauksissa laite tulee huollattaa
valtuutetussa huollossa.
G
Virtajohdon saa vaihtaa vain valtuutettu huolto henkilö.
G
Älä koskaan irrota virtajohtoa pistorasiasta johdosta vetämällä.
G
Käytä puhdistamiseen pelkästään kuivaa, pehmeää kangasta. Älä käytä kemikaaleja tai vettä.
G
Laitteen takuu raukeaa, eikä valmista ja, maahantuoja tai myyjä ota vastuuta mahdollisista
välittömis tä tai välilli sistä vahingoista, jos laitetta
on käytetty muuhun kuin alkuperäiseen käyttötarkoitukseen, laitetta on taitamattomasti käytetty tai asennettu, tai jos laitetta on huollettu
muussa kuin valtuutetussa huollossa.
Asennus
G
Asenna laite aina siten, että riittävä ilmankierto
on varmistettu käytön aikana. Älä koskaan peitä
tuuletusaukkoja.
G
Minimi välimatkan valaistavaan kohteeseen
pitäisi olla 50 cm.
HUOMIO Laite on asennettava asiantuntevasti
ja turvallisesti. Jos laite asennetaan
paikkaan minkä alla on ihmisiä, on
hyvä tehdä lisävarmistus [esim. kiinnittämällä turvavaijeri toiseen valaisimen rungon silmukoista (3), että
vaikka laite irtoaisi, se ei putoaisi
20 cm alemmas].
Kun laite poistetaan lopullisesti käytösta,
vie se paikalliseen kierrätyskeskukseen
jälkikäsittelyä varten.
VAROITUS
Älä katso suoraan valonlähteeseen,
se voi vaurioittaa silmää.
Stroboefektit ja erittäin nopeat valon muutokset
saattavat laukaista epileptisen kohtauksen henkilöillä, jotka ovat valoherkkiä tai epileptisiä!
VAROITUS Laite toimii hengenvaarallisella jän-
nitteellä (230 V~). Jätä huoltotoimet
valtuu tetun huoltoliikkeen tehtäväksi.
Älä peitä tuuletusaukkoja. Asiantuntematon käsittely saattaa aiheuttaa
sähköiskun vaaran.
55
Suomi
Kaikki oikeudet pidätetty MONACOR®INTERNATIONAL GmbH & Co. KG.:n toimesta. Mitään osaa tästä käyttöohjeesta ei saa kopioida, muuttaa tai muutenkaan luvatta hyödyntää missään kaupallisessa tarkoituksessa.

MONACOR INTERNATIONAL GmbH & Co. KG • Zum Falsch 36 • 28307 Bremen • Germany
Copyright
©
by MONACOR INTERNATIONAL. All rights reserved. A-1590.99.02.04.2016
®
 Loading...