

IMG STAGELINE PARC-56/WS, PARC-64/WS Instruction Manual
ELECTRONICS FOR SPECIALISTS ELECTRONICS FOR SPECIALISTS ELECTRONICS FOR SPECIALISTS ELECTRONICS FOR SPECIALISTS
BEDIENUNGSANLEITUNG
INSTRUCTION MANUAL
MODE D’EMPLOI
ISTRUZIONI PER L’USO
GEBRUIKSAANWIJZING
MANUAL DE INSTRUCCIONES
INSTRUKCJA OBSŁUGI
SIKKERHEDSOPLYSNINGER
SÄKERHETSFÖRESKRIFTER
TURVALLISUUDESTA
PARC-56 / WS Bestell-Nr. • Order No. 38.6690
PARC-64 / WS Bestell-Nr. • Order No. 38.6770
DMX-LED-Scheinwerfer
DMX LED Spotlight
2
PUSH
DMX OUTPUTDMX INPUT
ENTERMENU DOWNUP
230 V~ / 50 Hz
FUNCTION DISPLAY
1 2 3 4 5
6 7 8 9 6
MENU UP DOWNENTER
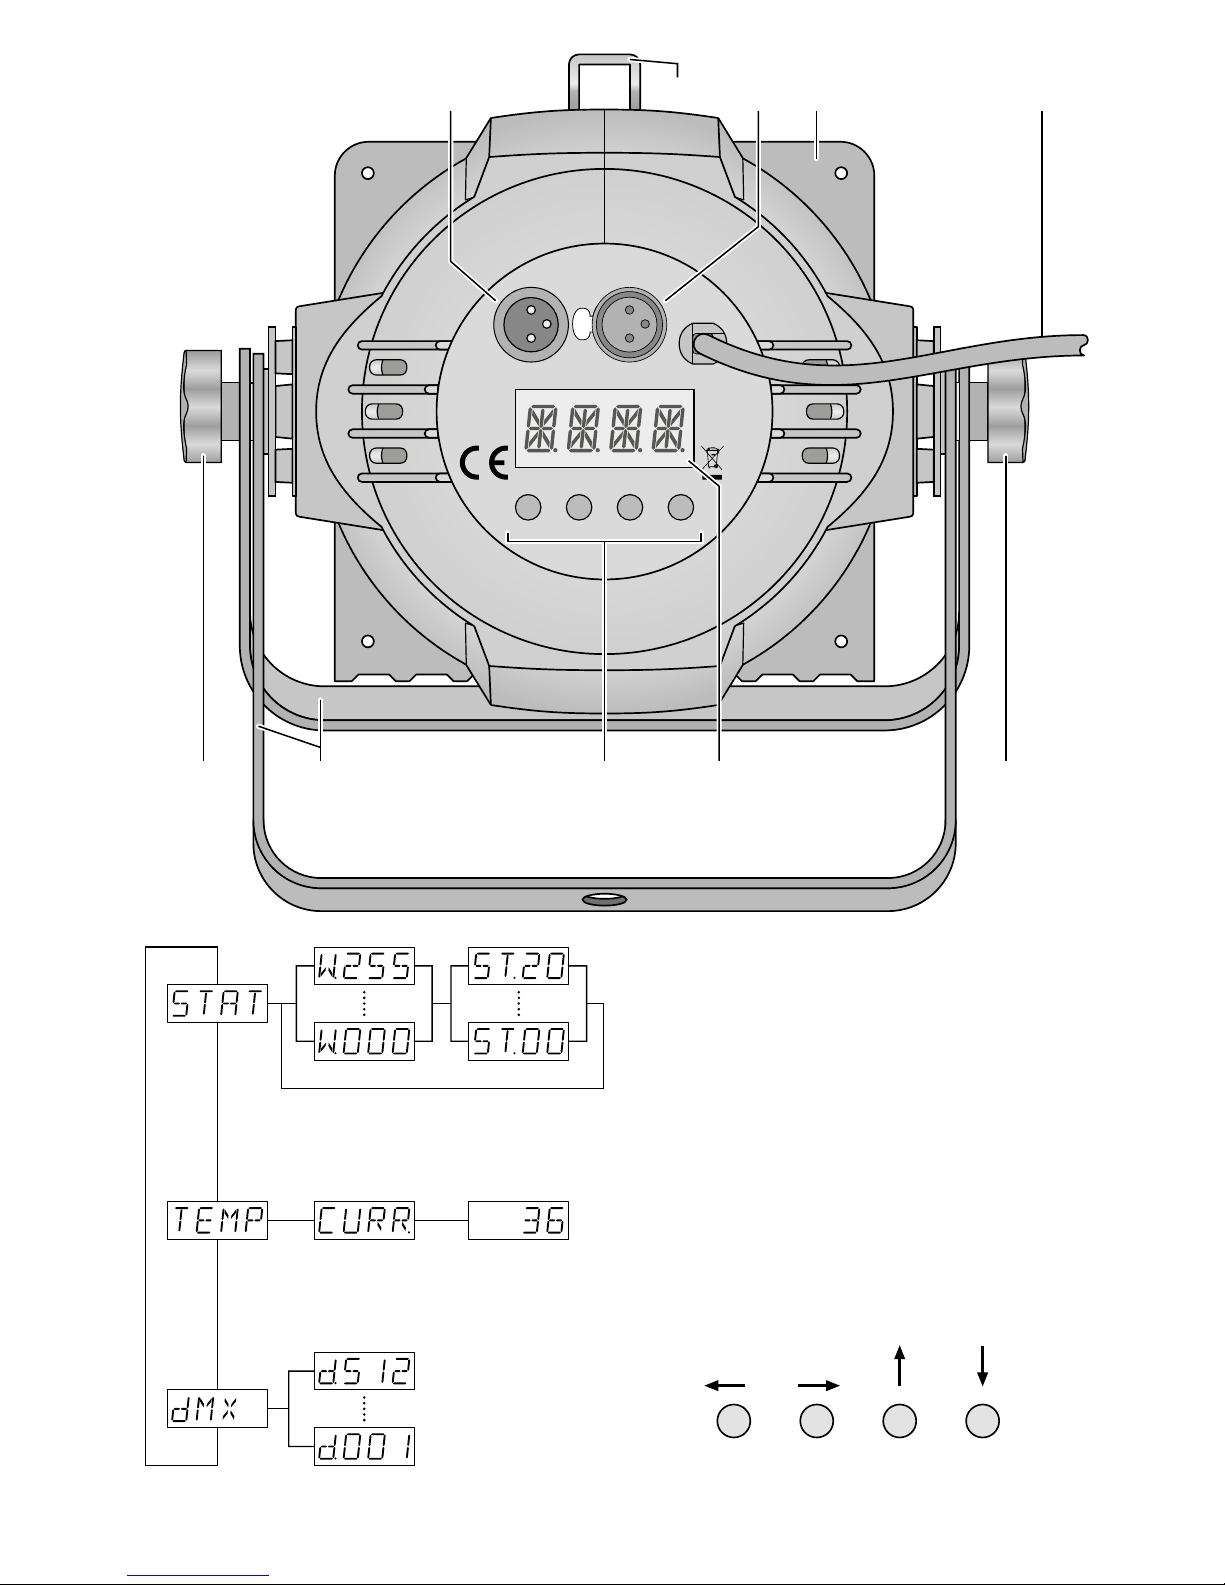
➀
Eigenständiger Betrieb: W = Helligkeit, ST= Blitzfrequenz
Independent operation: W = brightness, ST = flash rate
Fonctionnement indépendant : W = luminosité, ST = fréquence des éclairs
Funzionamento autonomo: W = luminosità, ST= frequenza lampi
DMX-Steuerung
DMX control
Gestion DMX
Comando DMX
Temperatur (°C) im Scheinwerfer
Temperature (°C) inside the spotlight
Température (°C) dans le projecteur
Temperatura (°C) nel proiettore
➁
Menüstruktur • Menu structure • Structure du menu • Struttura del menù

3
ELECTRONICS FOR SPECIALISTS ELECTRONICS FOR SPECIALISTS ELECTRONICS FOR SPECIALISTS ELECTRONICS FOR SPECIALISTS
Deutsch ..........Seite 4
English ...........Page 8
Français ..........Page 11
Italiano...........Pagina 14
Nederlands .......Pagina 17
Español ..........Página 20
Polski ............Strona 23
Dansk ............Sida 26
Svenska ..........Sidan 26
Suomi............Sivulta 27

4
Deutsch
DMX-LED-Scheinwerfer
Diese Anleitung richtet sich an den Installateur des
Geräts und an den Bediener mit Grundkenntnissen
in der DMX-Steuerung. Bitte lesen Sie die Anleitung
vor dem Betrieb gründlich durch und heben Sie sie für
ein späteres Nachlesen auf. Auf der Seite 2 finden Sie
alle beschriebenen Bedienelemente und Anschlüsse.
1 Übersicht der Anschlüsse und
Bedienelemente
1
XLR-Einbaustecker DMX INPUT: DMX-Signaleingang zum Anschluss eines Lichtsteuergerätes
oder an den DMX-Signalausgang eines anderen
Scheinwerfers
2 Klammer zum Sichern des beiliegenden Farbfilter-
rahmens (4) und einer Torblende (Zubehör)
3
XLR-Buchse DMX OUTPUT: DMX-Signalausgang
zum Anschluss an den DMX-Eingang eines weiteren DMX-gesteuerten Gerätes
4 Farbfilterrahmen
5 Netzkabel zum Anschluss an eine Steckdose
(230 V/ 50 Hz)
6 Feststellschrauben für die Montagebügel
7 Montage- /Aufstellbügel
8 Tasten zur Auswahl des Betriebsmodus und zum
Ändern von Einstellungen über das Menü
9 Display
2 Hinweise für den
sicherenGebrauch
Der Scheinwerfer entspricht allen relevanten Richtlinien der EU und trägt deshalb das -Zeichen.
WARNUNG
Das Gerät wird mit lebensgefährlicher
Netzspannung versorgt. Nehmen Sie
deshalb niemals selbst Eingriffe am
Gerät vor und stecken Sie nichts in
die Lüftungsöffnungen. Es besteht
die Gefahr eines elektrischen Schlags.
•
Verwenden Sie den Scheinwerfer nur im Innenbereich und schützen Sie ihn vor Tropf- und Spritzwasser sowie vor hoher Luftfeuchtigkeit. Der zulässige
Einsatztemperaturbereich beträgt 0 – 40 °C.
•
Nehmen Sie das Gerät nicht in Betrieb oder ziehen
Sie sofort den Netzstecker aus der Steckdose,
1.
wenn sichtbare Schäden am Gerät oder am
Netzkabel vorhanden sind,
2.
wenn nach einem Sturz oder Ähnlichem der
Verdacht auf einen Defekt besteht,
3. wenn Funktionsstörungen auftreten.
Geben Sie das Gerät in jedem Fall zur Reparatur in
eine Fachwerkstatt.
•
Ein beschädigtes Netzkabel darf nur durch eine
Fachwerkstatt ersetzt werden.
•
Ziehen Sie den Netzstecker nie am Kabel aus der
Steckdose, fassen Sie immer am Stecker an.
•
Wird das Gerät zweckentfremdet, nicht sicher
montiert, nicht richtig angeschlossen, falsch bedient oder nicht fachgerecht repariert, kann keine
Haftung für daraus resultierende Sach- oder Personenschäden und keine Garantie für das Gerät
übernommen werden.
Soll der Scheinwerfer endgültig aus dem
Betrieb genommen werden, übergeben Sie
ihn zur umweltgerechten Entsorgung einem
örtlichen Recyclingbetrieb.
3 Einsatzmöglichkeiten
Dieser LED-Scheinwerfer dient zur Beleuchtung
z. B. auf Bühnen, in Diskotheken und Festsälen. Als
Lichtquelle ist eine leistungsstarke weiße COB-LED
eingesetzt (COB = Chip-on-Board-Technologie): Viele
einzelne LEDs sind eng zusammen auf einem Chip
untergebracht. Dadurch wird eine gleichmäßige
Lichtverteilung erreicht.
Der Scheinwerfer ist für die Steuerung über ein
DMX-Lichtsteuergerät ausgelegt (3 DMX-Steuerkanäle). Er kann aber auch eigenständig ohne Steuergerät betrieben werden.
4 Inbetriebnahme
4.1 Montage
•
Platzieren Sie das Gerät immer so, dass im Betrieb
eine ausreichende Luftzirkulation gewährleistet ist.
Die Lüftungsöffnungen am Gehäuse dürfen auf
keinen Fall abgedeckt werden.
•
Der Abstand zum angestrahlten Objekt sollte mindestens 50 cm betragen.
WARNUNG
Der Scheinwerfer muss fachgerecht
und sicher montiert werden. Wird er
an einer Stelle installiert, unter der sich
Personen aufhalten können, muss er
zusätzlich gesichert werden (z. B. durch ein Fangseil am Montagebügel; das Fangseil so befestigen,
dass der Fallweg des Gerätes nicht mehr als 20 cm
betragen kann).
1. Den Scheinwerfer über die Montagebügel (7) befestigen, z. B. mit einer stabilen Montageschraube
oder einer Lichtstrahler-Halterung (C-Haken) an
einer Traverse.
Zum Ausrichten des Scheinwerfers die zwei
Feststellschrauben (6) der Montagebügel lösen.
Die gewünschte Neigung des Scheinwerfers einstellen und die Schrauben wieder festziehen.

5
Deutsch
2.
Alternativ lässt sich der Scheinwerfer auch frei aufstellen: Die Montagebügel so unter dem Scheinwerfer spreizen, dass sie als Ständer dienen. Die
Feststellschrauben danach festdrehen.
4.2 Farbfilter und Torblende
Zum Abstrahlen von farbigem Licht in den mitgelieferten Farbfilterrahmen (4) eine Farbfilterscheibe
oder eine Farbfolie (z. B. aus der Serie LCF-… von IMG
STAGELINE) einsetzen. Den Rahmen in die Schienen
vorne am Scheinwerfer schieben und mit der Klammer (2) gegen Herausfallen sichern.
Um den Lichtstrahlwinkel zu verkleinern, kann
eine Torblende eingesetzt werden:
Torblende geeignet für
PARC-56B
PARC-56 / WS
PARC-64B PARC-64 / WS
Die Blende in die äußeren Schienen vorne am Scheinwerfer hineinschieben und mit der Klammer (2)
gegen Herausfallen sichern. Zur zusätzlichen Sicherung die beiliegenden 4 Schrauben in die Gewindelöcher der Blendenhaltung schrauben.
4.3 Einschalten
WARNUNG
Blicken Sie nicht direkt in die Lichtquelle, das kann zu Augenschäden
führen.
Beachten Sie, dass sehr schnelle Lichtwechsel bei fotosensiblen Menschen
und Epileptikern epileptische Anfälle
auslösen können!
Den Stecker des Netzkabels (5) in eine Steckdose
(230 V/ 50 Hz) stecken. Der Scheinwerfer ist damit
eingeschaltet. Das Display (9) zeigt den zuletzt gewählten Menüpunkt an und erlischt nach 30 s. Sobald eine der Bedientasten (8) gedrückt wird, leuchtet
es wieder für 30 s.
5 Bedienung
Das Auswählen des Betriebsmodus und der verschiedenen Funktionen erfolgt über ein Menü mit
den Tasten MENU, ENTER, UP und DOWN (8). Die
Abbildung 2 auf der Seite 2 zeigt, wie die Modi und
Funktionen über das Menü angewählt und vom Display (9) angezeigt werden.
5.1 Eigenständiger Betrieb
Für den eigenständigen Betrieb lässt sich mit den
Bedientasten (8) die Helligkeit einstellen, die Stroboskop-Funktion einschalten und die Blitzfrequenz
einstellen.
1)
Die Taste MENU so oft drücken, bis das Display
anzeigt.
2) Die Taste ENTER ein- oder zweimal drücken, sodass das Display die eingestellte Helligkeit anzeigt
( … ).
3)
Mit den Tasten UP und DOWN die gewüschte
Helligkeit einstellen.
4)
Soll die Stroboskop-Funktion eingeschaltet werden, die Taste ENTER erneut drücken, sodass das
Display anzeigt.
5) Mit den Tasten UP und DOWN die Blitzfrequenz
einstellen ( … ).
6)
Zum Ändern der Blitzhelligkeit mit der Taste ENTER
auf den Menüpunkt für die Helligkeit zurückschalten und den Wert mit der Taste UP oder DOWN
ändern.
7)
Soll die Stroboskop-Funktion wieder ausgeschaltet
werden, die Blitzfrequenz auf einstellen.
Wichtig: Vor dem Ausschalten des Scheinwerfers
den Menüpunkt für die Helligkeit oder Blitzfrequenz
nicht mit der Taste MENU verlassen. Anderenfalls
bleibt der Scheinwerfer nach dem Wiedereinschalten
dunkel.
5.2 Betrieb mit einem DMX-Steuergerät
Zur Bedienung über ein DMX-Lichtsteuergerät (z. B.
DMX-1440 oder DMX-510USB von IMG STAGELINE)
verfügt der Scheinwerfer über vier DMX-Steuerkanäle. DMX ist die Abkürzung für Digital Multiplex
und bedeutet digitale Steuerung von mehreren
DMX-Geräten über eine gemeinsame Steuerleitung.
Die Funktionen der Kanäle und die DMX-Werte sind
im Kapitel 5.2.3 angegeben.
5.2.1 DMX-Anschluss
Für die DMX-Verbindung sind 3-polige XLR-Anschlüsse mit folgender Kontaktbelegung vorhanden:
Pin 1 = Masse, 2 = DMX−, 3 = DMX+
Zum Anschluss sollten spezielle Kabel für die DMX-
Signalübertragung verwendet werden (z. B. Kabel der
CDMXN-Serie). Bei Leitungslängen ab 150 m wird
grundsätzlich das Zwischenschalten eines DMX-Aufholverstärkers empfohlen (z. B. SR-103DMX).
1) Den Eingang DMX INPUT (1) mit dem DMX-Ausgang des Lichtsteuergerätes oder eines anderen
DMX-gesteuerten Gerätes verbinden.
2)
Den Ausgang DMX OUTPUT (3) mit dem DMX-Eingang des nächsten DMX-Gerätes verbinden.
Dessen Ausgang wieder mit dem Eingang des
nachfolgenden DMX-Gerätes verbinden usw.,
bis alle DMX-gesteuerten Geräte in einer Kette
angeschlossen sind.
3) Um Störungen bei der Signalübertragung auszuschließen, sollte bei langen Leitungen bzw. bei
einer Vielzahl von hintereinandergeschalteten

6
Deutsch
Geräten der DMX-Ausgang des letzten DMX-Gerätes der Kette mit einem 120-Ω-Widerstand (>
0,3 W) abgeschlossen werden: In die DMX-Ausgangsbuchse einen entsprechenden Abschlussstecker (z. B. DLT-123) stecken.
5.2.2 DMX-Startadresse einstellen
Um alle am Lichtsteuergerät angeschlossenen
DMX-Geräte separat bedienen zu können, muss
jedes Gerät eine eigene Startadresse erhalten. Soll
der erste DMX-Kanal des Scheinwerfers vom Lichtsteuergerät z. B. über die DMX-Adresse 17 gesteuert
werden, am Scheinwerfer die Startadresse 17 einstellen. Alle weiteren DMX-Kanäle des Scheinwerfers sind dann automatisch den darauffolgenden
Adressen zugeordnet (z. B bei der Startadresse 17
die Adressen 18 und 19).
1)
Die Taste MENU so oft drücken, bis das Display
anzeigt.
2)
Die Taste ENTER drücken. Das Display zeigt die
eingestellte Startadresse an ( … ).
3)
Mit den Tasten UP und DOWN die gewünschte
Adresse einstellen. Der Scheinwerfer lässt sich jetzt
mit dem Lichtsteuergerät bedienen.
Hinweis: Zeigt das Display den Menüpunkt ,
oder , blinkt ganz rechts der Punkt, wenn DMXSignale am DMX-Eingang (1) anliegen.
5.2.3 DMX-Kanäle und -Funktionen
DMX- Kanal DMX-Wert Funktion
1
000 – 255
Helligkeit 0 % 100 %
2
Reaktion der Helligkeitssteuerung
000 leicht träge Reaktion
001 – 255
Reaktion sehr träge schnell
251 – 255 sofortige Reaktion
3
000 – 010 Stroboskop aus
011 – 255
Stroboskop langsam schnell
➂
DMX-Kanäle
5.3 Temperaturanzeige und
Überhitzungsschutz
Der Scheinwerfer verfügt über einen Überhitzungsschutz. Dadurch schaltet er sich bei einer zu hohen
Temperatur im Inneren ab und nach dem Abkühlen
automatisch wieder ein. Zum Anzeigen der Innentemperatur:
1)
Die Taste MENU so oft drücken, bis das Display
anzeigt.
2)
Die Taste ENTER drücken. Das Display zeigt
an.
3)
Die Taste ENTER erneut drücken: Die Innentemperatur wird in °C angezeigt.
4) Mit der Taste MENU kann der Menüzweig wieder
verlassen werden.
6 Reinigung des Gerätes
Die Kunststoffscheibe vor der LED sollte je nach
Verschmutzung in regelmäßigen Abständen gereinigt werden. Nur dann kann das Licht in maximaler
Helligkeit abgestrahlt werden. Zum Säubern den
Netzstecker aus der Steckdose ziehen. Nur ein
weiches, sauberes Tuch und ein mildes Reinigungsmittel verwenden. Anschließend die Kunststoffscheibe trocken wischen.
Zum Reinigen der anderen Gehäuseteile nur ein
weiches, sauberes Tuch benutzen. Auf keinen Fall
eine Flüssigkeit verwenden, die könnte in das Gerät
laufen und es beschädigen.
7 Technische Daten
Datenprotokoll: . . . . . . . . . DMX 512
Anzahl der DMX-Kanäle:
. . 3
Lichtquelle:
. . . . . . . . . . . . weiße COB-LED
Leistungsaufnahme
PARC-56 / WS: . . . . . . . . 50 W
PARC-64 / WS: . . . . . . . . 100 W
Abstrahlwinkel: . . . . . . . 60°
Farbtemperatur: . . . . . . 5600 K
Stromversorgung: . . . . . . . 230 V/ 50 Hz
Leistungsaufnahme
PARC-56 / WS: . . . . . . . . max. 60 VA
PARC-64 / WS: . . . . . . . . max. 110 VA
Abmessungen
PARC-56 / WS: . . . . . . . . ∅ 185 mm × 210 mm
PARC-64 / WS: . . . . . . . . ∅ 220 mm × 260 mm
Gewicht
PARC-56 / WS: . . . . . . . . 2,5 kg
PARC-64 / WS: . . . . . . . . 3,2 kg
Änderungen vorbehalten.
Diese Bedienungsanleitung ist urheberrechtlich für MONACOR ® INTERNATIONAL GmbH & Co. KG geschützt. Eine
Reproduktion für eigene kommerzielle Zwecke – auch auszugsweise – ist untersagt.

7
8
English
DMX LED Spotlight
These instructions are intended for installers of the
unit and for users with basic knowledge in DMX
control. Please read the instructions carefully prior to
operation and keep them for later reference.
All operating elements and connections de-
scribed can be found on page 2.
1 Operating Elements
andConnections
1
XLR chassis plug DMX INPUT: DMX signal input
for connecting a light controller or the DMX signal
output of another spotlight
2 Clip to secure the colour filter frame (4) provided
and the barn doors (optional)
3
XLR jack DMX OUTPUT: DMX signal output for
connecting the DMX input of another DMX-controlled unit
4 Colour filter frame
5 Mains cable for connection to a socket
(230 V/ 50 Hz)
6 Locking screws for the mounting brackets
7 Mounting brackets / stand
8
Buttons to select the operating mode and to
change settings via the menu
9 Display
2 Safety Notes
The spotlight corresponds to all relevant directives of
the EU and is therefore marked with .
WARNING
The spotlight uses dangerous mains
voltage. Leave servicing to skilled personnel and do not insert anything into
the air vents; inexpert handling may
result in electric shock.
•
The spotlight is suitable for indoor use only. Protect
it against dripping water, splash water and high
air humidity. The admissible temperature range
is 0 – 40 °C).
•
Do not operate the spotlight or immediately disconnect the mains plug from the socket
1.
if the spotlight or the mains cable is visibly
damaged,
2. if a defect might have occurred after a unit was
dropped or suffered a similar accident,
3. if malfunctions occur.
In any case the spotlight must be repaired by skilled
personnel.
•
A damaged mains cable must be replaced by skilled
personnel only.
•
Never pull the mains cable to disconnect the mains
plug from the socket, always seize the plug.
•
No guarantee claims for the spotlight and no liability for any resulting personal damage or material
damage will be accepted if the spotlight is used
for other purposes than originally intended, if it is
not safely installed or not correctly connected or
operated, or if it is not repaired in an expert way.
•
Important for UK Customers!
The wires in this mains lead are coloured in
ac cord ance with the following code:
green / yellow = earth
blue = neutral
brown = live
As the colours of the wires in the mains lead of this
appliance may not correspond with the coloured
markings identifying the terminals in your plug,
proceed as follows:
1.
The wire which is coloured green and yellow
must be connected to the terminal in the plug
which is marked with the letter E or by the
earth symbol , or coloured green or green
and yellow.
2. The wire which is coloured blue must be connected to the terminal which is marked with the
letter N or coloured black.
3.
The wire which is coloured brown must be connected to the terminal which is marked with the
letter L or coloured red.
Warning – This appliance must be earthed.
If the spotlight is to be put out of operation
definitively, take it to a local recycling plant
for a disposal which is not harmful to the
environment.
3 Applications
This LED spotlight is used for illumination, e. g. on
stage, in discotheques and function rooms. The
light source is a white high-power COB LED (COB =
chip-on-board technology): Many individual LEDs are
mounted close together on a chip, thus providing a
uniform light distribution.
The spotlight is designed for control via a DMX
light controller (3 DMX control channels), but it can
also be operated independently without a controller.
4 Setting the Spotlight into Operation
4.1 Installation
•
Always position the spotlight in such a way to
ensure sufficient air circulation during operation.
Never cover the air vents of the housing.

9
English
•
Always keep a minimum distance of 50 cm to the
illuminated object.
WARNING
Install the spotlight safely and expertly. When installing it at a place
where people may walk or sit under it,
additionally secure it (e. g. via a safety
rope on the mounting bracket; fasten the safety
rope in such a way that the maximum falling distance of the unit will not exceed 20 cm).
1. Install the spotlight via its mounting brackets (7),
e. g. with a stable mounting screw or a support
for lighting units (C hook) to a cross bar.
To align the spotlight, release the two locking
screws (6) of the mounting brackets. Adjust the
desired inclination of the spotlight and fasten the
screws.
2.
Alternatively, set up the spotlight on its own: Fold
out the mounting brackets underneath the spotlight and use them as a stand. Then fasten the
locking screws.
4.2 Colour filter and barn doors
For radiating coloured light, insert a colour filter or
a coloured filter foil (e. g. LCF-… series from IMG
STAGELINE) into the colour filter frame (4) provided.
Slide the frame into the slot at the front of the spotlight and secure it with the clip (2).
To reduce the light beam angle, barn doors (ac-
cessory) are available:
Barn doors Suitable for
PARC-56B
PARC-56 / WS
PARC-64B PARC-64 / WS
Insert the barn doors into the outer slot at the front of
the spotlight and secure them with the clip (2). To additionally secure the door barns, screw the 4 screws
supplied into the threaded holes of the door barns.
4.3 Switching on
WARNING
To prevent damage to your eyes, never
look directly into the light source.
Please note that fast changes in lighting may trigger epileptic seizures with
photosensitive persons or persons
with epilepsy!
Connect the plug of the mains cable (5) to a mains
socket (230 V/ 50 Hz). Thus, the spotlight is switched
on, its display (9) will indicate the menu item most
recently selected and go out after 30seconds. As
soon as you press one of the control buttons (8), the
display will light up again for 30 seconds.
5 Operation
To select the operating mode and the different functions, use the menu via the control buttons MENU,
ENTER, UP and DOWN (8). Figure 2 on page 2 shows
the selection of the modes and functions via the
menu and the indications on the display (9).
5.1 Independent operation
For independent operation, use the control buttons
(8) to set the brightness, to switch on the stroboscope
function and to set the flash rate.
1)
Press the button MENU repeatedly until
appears on the display.
2)
Press the button ENTER once or twice so that
the display will indicate the brightness adjusted
( … ).
3)
To set the desired brightness, press the buttons
UP and DOWN.
4)
To activate the stroboscope function, press the
button ENTER once again so that the display will
indicate
.
5)
To set the flash rate ( … ), press the
buttons UP and DOWN.
6) To change the brightness of the flash, press the
button ENTER to return to the menu item for the
brightness. To change the value, press the button
UP or DOWN.
7)
To deactivate the stroboscope function, set the
flash rate to .
Important: Do not exit the menu item for the brightness or the flash rate with the button MENU before
switching off the spotlight. If you do, the spotlight
will remain dark when you switch it on again.
5.2 Operation with a DMX controller
For operation via a DMX light controller (e. g. DMX1440 or DMX-510USB), the spotlight is equipped
with four DMX control channels. DMX is short for
digital multiplex and means digital control of several
DMX units via a common control cable. The functions
of the channels and the DMX values can be found
in chapter 5.2.3.
5.2.1 DMX connection
For DMX connection, 3-pole XLR connectors with the
following pin configuration are provided:
Pin 1 = ground, 2 = DMX−, 3 = DMX+
For connection, use special cables for DMX signal
transmission (e. g. cables of the CDMXN series from
IMG STAGELINE). For cable lengths exceeding 150 m,
it is generally recommended to insert a DMX level
matching amplifier (e. g. SR-103DMX).
 Loading...