

IMG STAGE LINE PAR-36/CR, PAR-36/SW Instruction Manual
BEDIENUNGSANLEITUNG • INSTRUCTION MANUAL • MODE D’EMPLOI
ISTRUZIONI PER L’USO • GEBRUIKSAANWIJZING
MANUAL DE INSTRUCCIONES • BRUGSANVISNING • BRUKSANVISNING • KÄYTTÖOHJE
PAR 36-PUNKTSTRAHLERGEHÄUSE
PAR 36 SPOTLIGHT HOUSING
BOITIER DE PROJECTEUR SPOT PAR 36
CUSTODIA DI PROIETTORE SPOT PAR 36
PAR-36/CR Bestell-Nr. 38.1620
PAR-36/SW Bestell-Nr. 38.0960
2
Bevor Sie einschalten ...
Wir wünschen Ihnen viel Spaß mit Ih rem neuen Gerät von „img Stage
Line“. Bitte lesen Sie vor dem Ge brauch zu Ihrer eigenen Sicherheit
diese Bedienungsanleitung und heben
Sie sie für ein späteres Nachlesen auf.
Der deutsche Text beginnt auf Seite 4.
Before you switch on ...
We wish you much pleasure with your
new unit by “img Stage Line”. Please
read these operating instructions for
your own safety prior to operating the
unit and keep them for later use.
The English text starts on page 6.
Avant toute mise en service ...
Nous vous remercions dʼavoir choisi
un appareil “img Stage Line” et vous
prions de lire cette notice avant lʼutili sation. Conservez la notice pour pouvoir vous y reporter ultérieurement.
La version française commence à la
page 8.
Prima di accendere ...
Vi auguriamo buon divertimento con il
Vo stro nuovo apparecchio “img Stage
Line”. Per Vostra sicurezza, Vi pre ghiamo di leggere attentamente le se guenti istruzioni prima dellʼuso. Con servate le istruzioni per poterle consultare anche in futuro.
Il testo italiano comincia a pagina 10.
Voordat u inschakelt ...
Wij wensen u veel plezier met uw
nieuw toestel van “img Stage Line”.
Lees voor uw eigen veiligheid deze
handleiding, alvorens het toestel in
gebruik te nemen. Bewaar de hand leiding voor latere raadpleging.
De nederlandstalige tekst begint op
pagina 12.
D
A
CH
GB
F
B
CH
I
NL
B
E
Antes de la conexión ...
Le agradecemos haber escogido un
aparato “img Stage Line” y le invitamos a leer el manual de instrucciones,
antes de cualquier utilización. Por
favor, guarde el manual de instrucciones para una futura utilización.
La versión española comienza en la
página 14.
DK
Før anlægget tændes ...
Vi ønsker Dem god fornøjelse med
De res nye apparat fra “img Stage
Line”. Af sikkerhedsmæssige årsager
anbefales det, at nærværende vejledning læ ses før brug af apparatet. Gem
venligst denne betjeningsvejledning til
se nere brug.
Den danske tekst starter på side 16.
S
Förskrift
Vi önskar dig mycket nöje med din nya
enheten från “img Stage Line”. Läs
gärna instruktionerna för din egen
säkerhet innan du använder enheden.
Spara in struktionerna för framtida
användning.
Den svenska texten finns på sidan 18.
FIN
Ennen kytkemistä ...
Toivomme että saat paljon hyötyäja
iloa uudesta “img Stage Line” laitteestasi. Lue nämä ohjeet ennen käyttöä.
Ole hyvä ja säilytä käyttöohjeet myöhempää tarvetta varten.
Suomenkielinen teksti alkaa sivulta
yh deksän 20.
wwwwww..iimmggss ttaaggeelliinnee..ccoomm
®
3
123
456
D Lampenwechsel
GB Lamp replacement
F Remplacement de la lampe
I Sostituzione della lampada
NL Vervanging van de lamp
E Cambio de la lámpara
DK Udskiftning af lyskilde
S Byte av lampa
FIN Lampun asennus
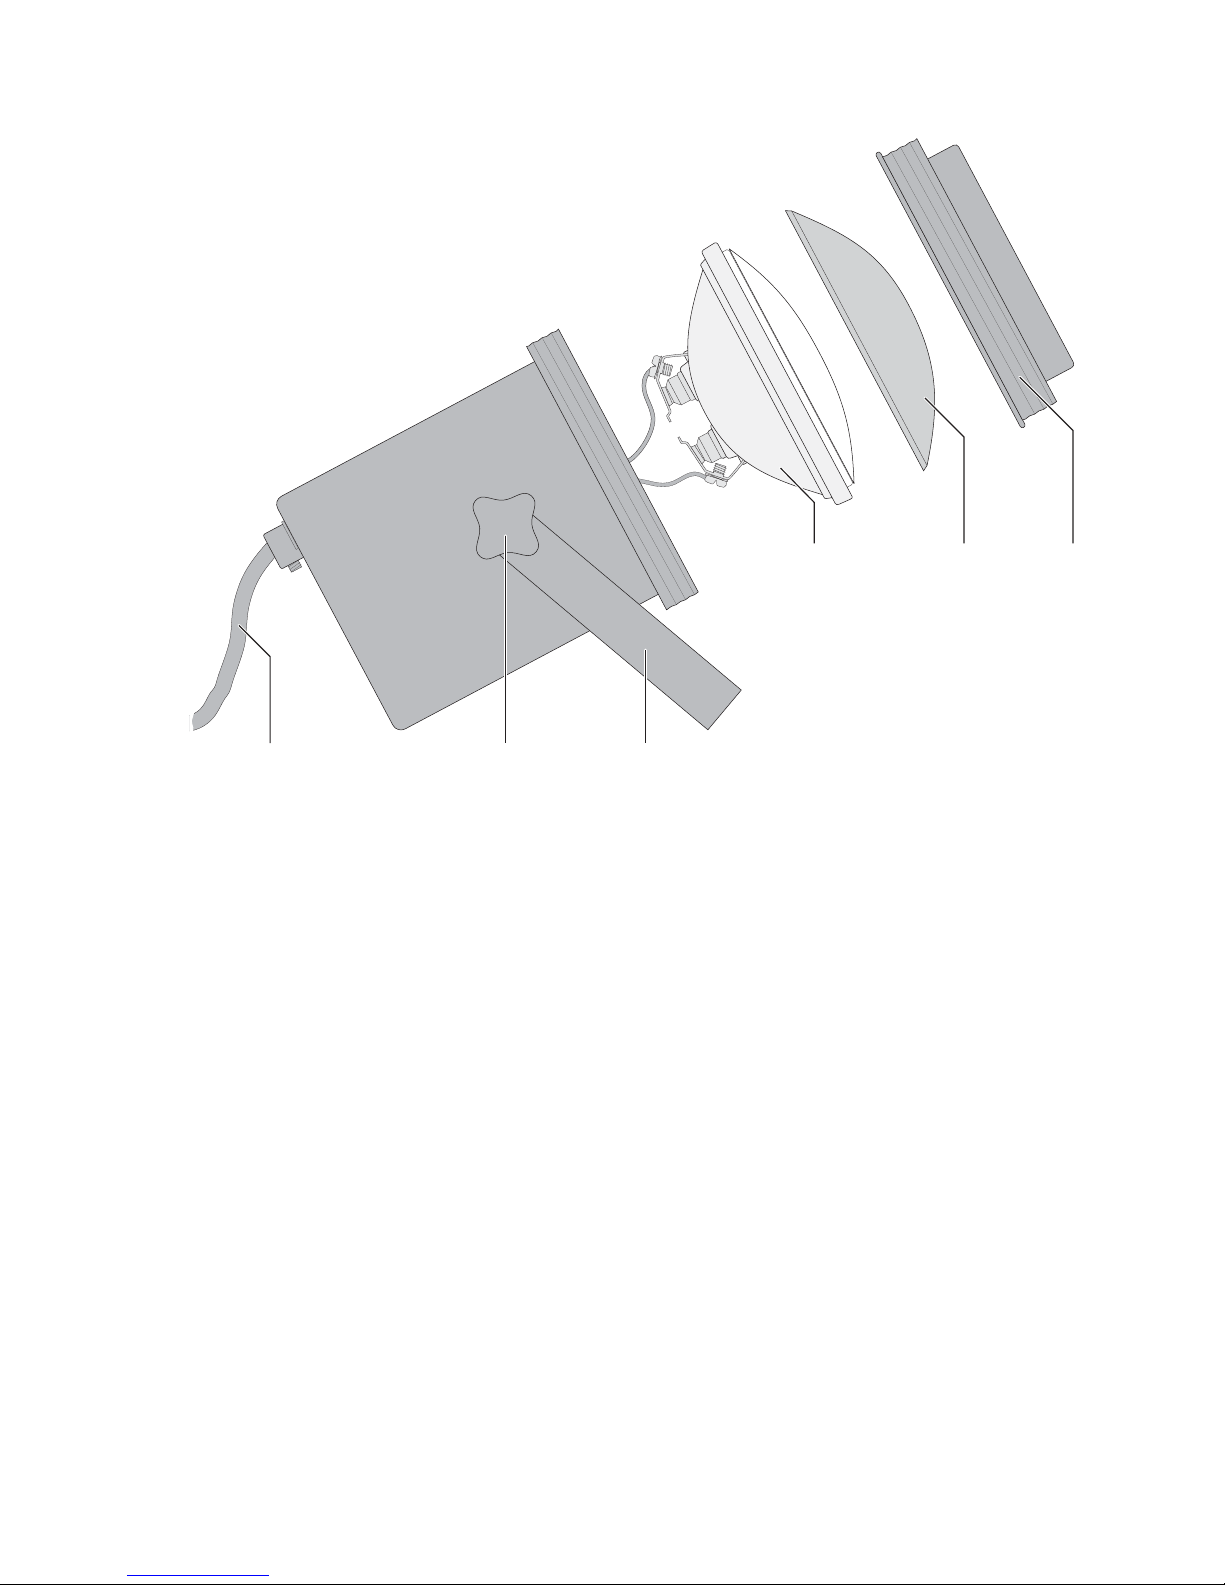
Auf der ausklappbaren Seite 3 finden Sie
alle beschriebenen Bedien elemente und
Anschlüsse.
1 Übersicht der Bedienelemente
1 Netzkabel zum Anschluss an eine Netz-
steckdose (230V~/50 Hz)
2 Knebelschraube zum Einstellen der Nei-
gung
3 Montagebügel
4 PAR 36-Lampe mit 6V/max. 30 W, So ckel:
2 × Schraube
(nicht im Lieferumfang enthalten)
5 Farbfilter, z.B. LEF-36SET
(nicht im Lieferumfang enthalten)
6 Schraubkappe für das Lampenfach
2 Einsatzmöglichkeiten
Das Punktstrahlergehäuse ist sowohl für
den professionellen Einsatz (z.B. Diskothek,
Schaufenster) als auch für den privaten
Gebrauch im Partykeller geeignet. In Kombination mit einer Spiegelkugel erzeugt der
Punktstrahler Disco-Lichteffekte, die eine
be sondere Party-Atmosphäre schaffen.
3 Hinweise für den sicheren
Ge brauch
Dieses Gerät entspricht allen relevanten
Richt linien der EU und ist deshalb mit
gekennzeichnet.
Beachten Sie auch die folgenden Punkte:
G
Verwenden Sie das Gerät nur im Innenbereich. Schützen Sie es vor Tropf- und
Spritzwasser, hoher Luftfeuchtigkeit und
Hitze (zulässiger Einsatztemperaturbereich 0–40 °C).
G
Nehmen Sie das Gerät nicht in Betrieb,
bzw. ziehen sie sofort den Netzstecker
aus der Steckdose, wenn:
1. sichtbare Schäden am Gerät oder am
Netzkabel vorhanden sind,
2. nach einem Sturz oder Ähnlichem der
Verdacht auf einen Defekt besteht,
3. Funktionsstörungen auftreten.
Geben Sie das Gerät in jedem Fall zur
Reparatur in eine Fachwerkstatt.
G
Ein beschädigtes Netzkabel darf nur
durch eine Fachwerkstatt ersetzt wer den.
G
Ziehen Sie den Netzstecker nie an der
Zuleitung aus der Steckdose, fassen sie
immer am Stecker an.
G
Verwenden Sie für die Reinigung nur ein
trockenes, weiches Tuch, auf keinen Fall
Wasser oder Chemikalien.
G
Wird das Gerät zweckentfremdet, nicht
sicher montiert, falsch bedient oder nicht
fachgerecht re pa riert, kann keine Haftung
für daraus resultierende Sach- oder Personenschäden und keine Garantie für das
Gerät übernommen werden.
WARNUNG Das Gerät wird mit lebens ge -
fährlicher Netzspannung versorgt (230V~). Nehmen Sie
deshalb niemals selbst Eingriffe am Gerät vor, die nicht in
dieser Anleitung beschrieben
sind. Durch unsachgemäßes
Vorgehen besteht die Gefahr
eines elektrischen Schlages.
Soll das Gerät endgültig aus dem
Betrieb genommen werden, übergeben Sie es zur umweltgerechten
Entsorgung einem örtlichen Recyc ling betrieb.
4
D
A
CH
4 Lampe einsetzen
Das Punktstrahlergehäuse wird ohne Lampe
geliefert. Benötigt wird eine PAR 36-Lampe
mit 6V/max. 30 W und einem Sockel mit
Schraub an schluss. Als passende Lampe
eignet sich z.B. HLT-6/30 aus dem Programm von „img Stage Line“.
1) Zum bequemen Einsetzen der Lampe
das Strahlergehäuse so aufstellen, dass
es vom Montagebügel (3) ge stützt wird
(siehe Ab bildung). Dazu die beiden Kne bel schrau ben (2) etwas lösen, den Montagebügel in die gewünschte Stellung
brin gen und die Knebelschrauben wieder
anziehen.
2) Die Schraubkappe (6) ab dre hen.
3) Bei einem Lampenwechsel den ggf. aufgesetzten Farbfilter (5) abnehmen und die
alte Lampe vorsichtig aus dem Gehäuse
herausheben. Die zwei Schraubverbindungen, die den elektrischen Kontakt
zwischen dem Lampensockel und dem
Anschlusskabel der Lampenfassung herstellen, lösen. Die alte Lampe entfernen.
4) Die neue Lampe einsetzen: Die beiden
Schrauben am Lampensockel etwas lö sen, unter jede Schraube je einen Kabelschuh des Anschlusskabels festklemmen
und die beiden Schrauben wieder fest
anziehen. Die Lampe vorsichtig in das
Strahlergehäuse setzen.
5) Bei Verwendung eines Farbfilters (5),
z.B. LEF-36SET von „img Stage Line“,
diesen auf die Lampe setzen und die
Schraubkappe (6) wieder aufschrauben.
5 Inbetriebnahme
1) Mit einer Lichtstrahler-Halterung bzw. einer
stabilen Montageschraube das Gerät über
den Montagebügel (3) am gewünschten
Ort, z.B. an einer Lichtstrahlertraverse
oder auf einem Stativ, befestigen.
2) Zum Ausrichten des Gerätes die beiden
Knebel schrau ben (2) am Montagebügel
lösen, die ge wünschte Neigung des Ge rätes einstellen und die Knebelschrauben
wieder anziehen.
3) Den Stecker des Netzkabels (1) in eine
Steckdose (230V~/50 Hz) stecken. Bei
An schluss an die Stromversorgung ist
der Strahler eingeschaltet.
4) Zum Ausschalten des Gerätes den Netzstecker ziehen.
6 Technische Daten
Spannungs-
versorgung: . . . . . . 230V~/50 Hz/40VA
Leuchtmittel: . . . . . PAR 36-Lampe
(6V/max. 30 W;
Soc kel: 2 × Schraube)
Abmessungen: . . . ∅ 120mm × 160mm
Gewicht: . . . . . . . . 1,2 kg
Änderungen vorbehalten.
Das Gerät muss fachgerecht und sicher
montiert werden. Wird es als schwebende Last über Personen installiert,
muss es zusätzlich gesichert werden
(z.B. durch ein Fangseil am Montagebügel; das Fangseil so befestigen, dass
der Fallweg des Gerätes nicht mehr als
20cm betragen kann).
WARNUNG
Ziehen Sie vor dem Einsetzen bzw. Herausnehmen der
Lampe unbedingt den Netzstecker!
G
Da die Lampe im Betrieb sehr heiß wird,
lassen Sie sie nach Betrieb des Gerätes
erst abkühlen (Abkühlzeit mindestens
5 Minuten), bevor Sie sie auswechseln.
G
Auf keinen Fall darf eine Lampe mit einer
höheren Leistungsangabe als 30W verwendet werden.
5
D
A
CH
Diese Bedienungsanleitung ist urheberrechtlich für MONACOR®INTERNATIONAL GmbH & Co. KG
geschützt. Eine Reproduktion für eigene kommerzielle Zwecke – auch auszugsweise – ist untersagt.
All operating elements and connections
described can be found on the fold-out
page 3.
1 Operating Elements
1 Mains cable for the connection to a mains
socket (230V~/50Hz)
2 Knob screw for adjusting the inclination
3 Mounting bracket
4 PAR 36 lamp with 6 V/30 W max.,
base: 2 × screw
(not included in the delivery)
5 Colour filter, e.g. LEF-36SET
(not includ ed in the delivery)
6 Screw cover for the lamp compartment
2 Applications
The spotlight housing is suit able for professional applications (e.g. discothèque, shopwindow) as well as for private party applications. In combination with a mirror ball the
spotlight produces disco light effects which
create a special party atmosphere.
3 Safety Notes
This unit corresponds to all relevant directives of the EU and is therefore marked
with .
It is necessary to observe in any case the
following items:
G
The unit is suitable for indoor use only.
Protect it against dripping water and
splash water, high air humidity, and heat
(admissible ambient temperature range
0–40 °C).
G
Do not set the unit into operation, or immediately disconnect the mains plug from the
mains socket if:
1. damage can be seen at the unit or
mains cable,
2. a defect might have occurred after a
drop or similar accident,
3. there are malfunctions.
The unit must in any case be repaired by
authorized personnel.
G
A damaged mains cable must only be
replaced by authorized personnel.
G
Never pull the mains cable when disconnecting the mains plug from the socket,
always seize the plug!
G
For cleaning only use a dry, soft cloth.
Never use any chemicals or water.
G
No guarantee claims for the unit and no
liability for any resulting personal damage
or material damage will be accepted if the
unit is used for other purposes than originally intended, if it is not safely mounted,
not correctly operated, or not repaired in
an expert way.
G
Important for U.K. Customers!
The wires in this mains lead are coloured in
accord ance with the following code:
green/yellow = earth
blue = neutral
brown = live
As the colours of the wires in the mains
lead of this appliance may not correspond
with the coloured markings identifying the
ter minals in your plug, proceed as follows:
1. The wire which is coloured green and
yellow must be connected to the terminal in the plug which is marked with the
letter E or by the earth symbol or
coloured green or green and yellow.
2. The wire which is coloured blue must
be connected to the terminal which is
marked with the letter N or coloured
black.
3. The wire which is coloured brown must
be connected to the terminal which is
marked with the letter L or coloured red.
Warning!
This appliance must be earthed.
WARNING The unit is supplied with haz-
ardous mains voltage (230V~).
Never make any modifications
on the unit not described in this
instruction manual. Inexpert
handling may cause an electric
shock hazard.
6
GB
4 Installing the Lamp
The spotlight housing is supplied without
lamp. A PAR 36 lamp of 6V/30 W max. with a
base with screw connection is required.
As a matching lamp, the halogen lamp HLT6/30 of the range “img Stage Line” is recommended.
1) For easy installing of the lamp place the
spotlight housing so that it is supported
by the mounting bracket (3) [see figure].
For this purpose, slightly release the two
knob screws (2), place the mounting
bracket into the desired position, and
tighten the knob screws again.
2) Turn off the screw cover (6).
3) For a lamp replacement remove the col our filter (5) in case it has been placed on
the lamp, and take the old lamp carefully
out of the housing. Release the two
screw connections which make the electrical contact between the lamp base and
the connection cable of the lampholder.
Re move the old lamp.
4) Install the new lamp: slightly release the
two screws at the lamp base, tightly
clamp one cable lug each of the connection cable below each screw, and re -
tighten the two screws. Carefully place
the lamp into the spotlight housing.
5) If a colour filter (5), e.g. LEF-36SET from
“img Stage Line”, is used, place same on
the lamp, and screw on the screw cover
(6) again.
5 Setting into Operation
1) Fix the unit via the mounting bracket (3)
with a support for light radiating units or a
stable mounting screw to the desired
place, e.g. to a cross arm for lighting
units or a stand.
2) For aligning the unit release the two knob
screws (2) at the mounting bracket, ad just the desired inclination of the unit, and
retighten the knob screws.
3) Connect the plug of the mains cable (1) to
a mains socket (230V~/50 Hz). With connection to the power supply the spotlight
is switched on.
4) For switching off the unit disconnect the
mains plug.
6 Specifications
Voltage supply: . . . 230 V~/50 Hz/40 VA
Lamp insert: . . . . . PAR 36 lamp
(6V/30 W max.;
base: 2 × screw)
Dimensions: . . . . . ∅ 120 mm × 160 mm
Weight: . . . . . . . . . 1.2 kg
Subject to technical modification.
The unit must be mounted in a safe and
expert way. If it is installed as a suspended load above persons, it must additionally be secured (e.g. by a safety rope at
the mounting bracket; fix the safety rope
in such a way that the maximum falling
distance of the unit is 20cm).
If the unit is to be put out of operation definitively, take it to a local
recycling plant for a disposal which
is not harmful to the environment.
WARNING
Prior to installing or removing
the lamp disconnect the mains
plug in any case!
G
As the lamp becomes very hot during
oper ation, at first let it cool down after
oper ation of the unit (cooling down time
at least 5 minutes) before replacing it.
G
Never use a lamp with a higher wattage
than 30W.
7
GB
All rights reserved by MONACOR®INTERNATIONAL GmbH & Co. KG. No part of this instruction manual
may be reproduced in any form or by any means for any commercial use.
 Loading...