

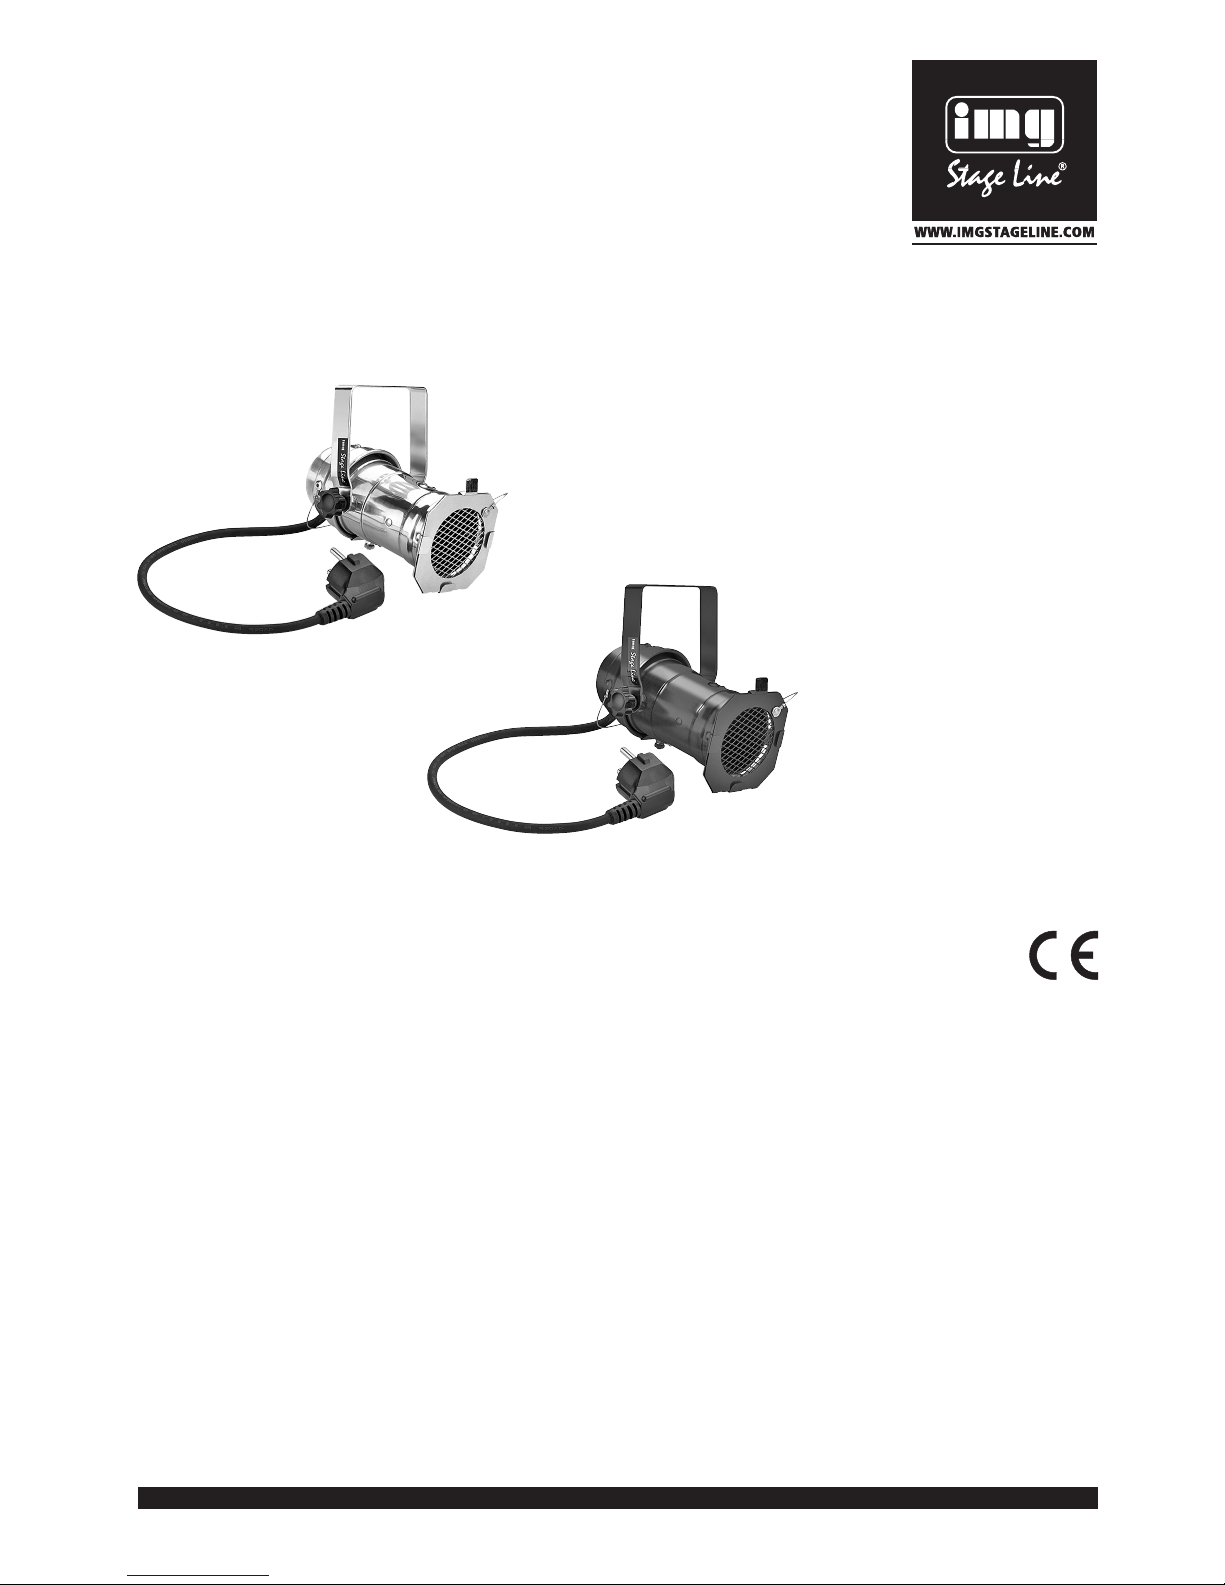
PAR-16M/CR Bestellnummer 38.2970
PAR-16M/SW Bestellnummer 38.2980
ELECTRONICS FOR SPECIALISTS ELECTRONICS FOR SPECIALISTS ELECTRONICS FOR SPECIALISTS ELECTRONICS FOR SPECIALISTS
BEDIENUNGSANLEITUNG
INSTRUCTION MANUAL
MODE D’EMPLOI
ISTRUZIONI PER L’USO
MANUAL DE INSTRUCCIONES
INSTUKCJA OBSŁUGI
PAR 16-Scheinwerfergehäuse
PAR 16 Reflector Housing
PAR-Scheinwerfergehäuse
Bitte lesen Sie diese Anleitung vor dem Betrieb gründlich
durch und heben Sie sie für ein späteres Nach lesen auf.
1 Einsatzmöglichkeiten
Dieses Scheinwerferge häu se eig net sich, mit einer eingesetzten Ha lo gen reflektorlampe, für Be leuch tungs zwe cke
im pri vaten und pro fes sio nel len Be reich (z. B. als DekoLicht). Über ein Farb filter (nicht mitgeliefert) ist auch eine
Be leuch tung mit farbigem Licht möglich.
2 Hinweise für den sicheren Gebrauch
Das Scheinwerfergehäuse entspricht allen relevanten
Richtlinien der EU und ist daher mit
ge kenn zeich net.
Beachten Sie auch unbedingt die folgenden Punkte:
G
Verwenden Sie den Scheinwerfer nur im Innen be reich.
Schützen Sie ihn vor Tropf- und Spritz wasser sowie
hoher Luftfeuchtigkeit.
G
Im Betrieb wird der Scheinwerfer sehr heiß. Lassen Sie
ihn nach dem Betrieb einige Minuten ab kühlen, bevor
Sie ihn berühren.
G
Decken Sie die Lüftungsöffnungen am Gehäuse nicht
ab und halten Sie einen Abstand von min. 1 m zum
angestrahlten Objekt ein. Achten Sie auch auf ausreichenden Ab stand zu leicht entflammbaren oder hitzeempfindlichen Materialien.
G
Nehmen Sie den Scheinwerfer nicht in Be trieb bzw.
ziehen Sie sofort den Netzstecker aus der Steckdose,
wenn:
1. sichtbare Schäden am Scheinwerfer oder am Netz ka bel vorhanden sind,
2. nach einem Sturz oder Ähnlichem der Verdacht auf
einen De fekt besteht,
3. Funktionsstörungen auftreten.
Lassen Sie Reparaturen nur durch Fach personal
durchführen.
G
Eine beschädigtes Netzkabel darf nur durch Fachpersonal er setzt werden.
G
Ziehen Sie den Netzstecker nie am Kabel aus der
Steckdose, fassen Sie immer am Stecker an.
G
Verwenden Sie für die Reinigung nur ein weiches, trockenes Tuch, niemals Wasser oder Chemikalien.
G
Wird der Scheinwerfer zweckentfremdet, nicht vorschriftsmäßig in s talliert oder nicht fachgerecht re pa riert, kann keine Haftung für da raus resultierende Sachoder Perso nen schäden und keine Ga rantie für das
Gerät übernommen werden.
3 Leuchtmittel einsetzen
Das Scheinwerfergehäuse wird ohne Leuchtmittel geliefert. Es darf nur ein Leuchtmittel mit den in Kapitel 6 aufgeführten technischen Daten verwendet werden!
Da die Lampe im Be trieb sehr heiß wird, den Scheinwerfer vor einem Lam penwechsel mindestens 5 Minuten ab kühlen lassen.
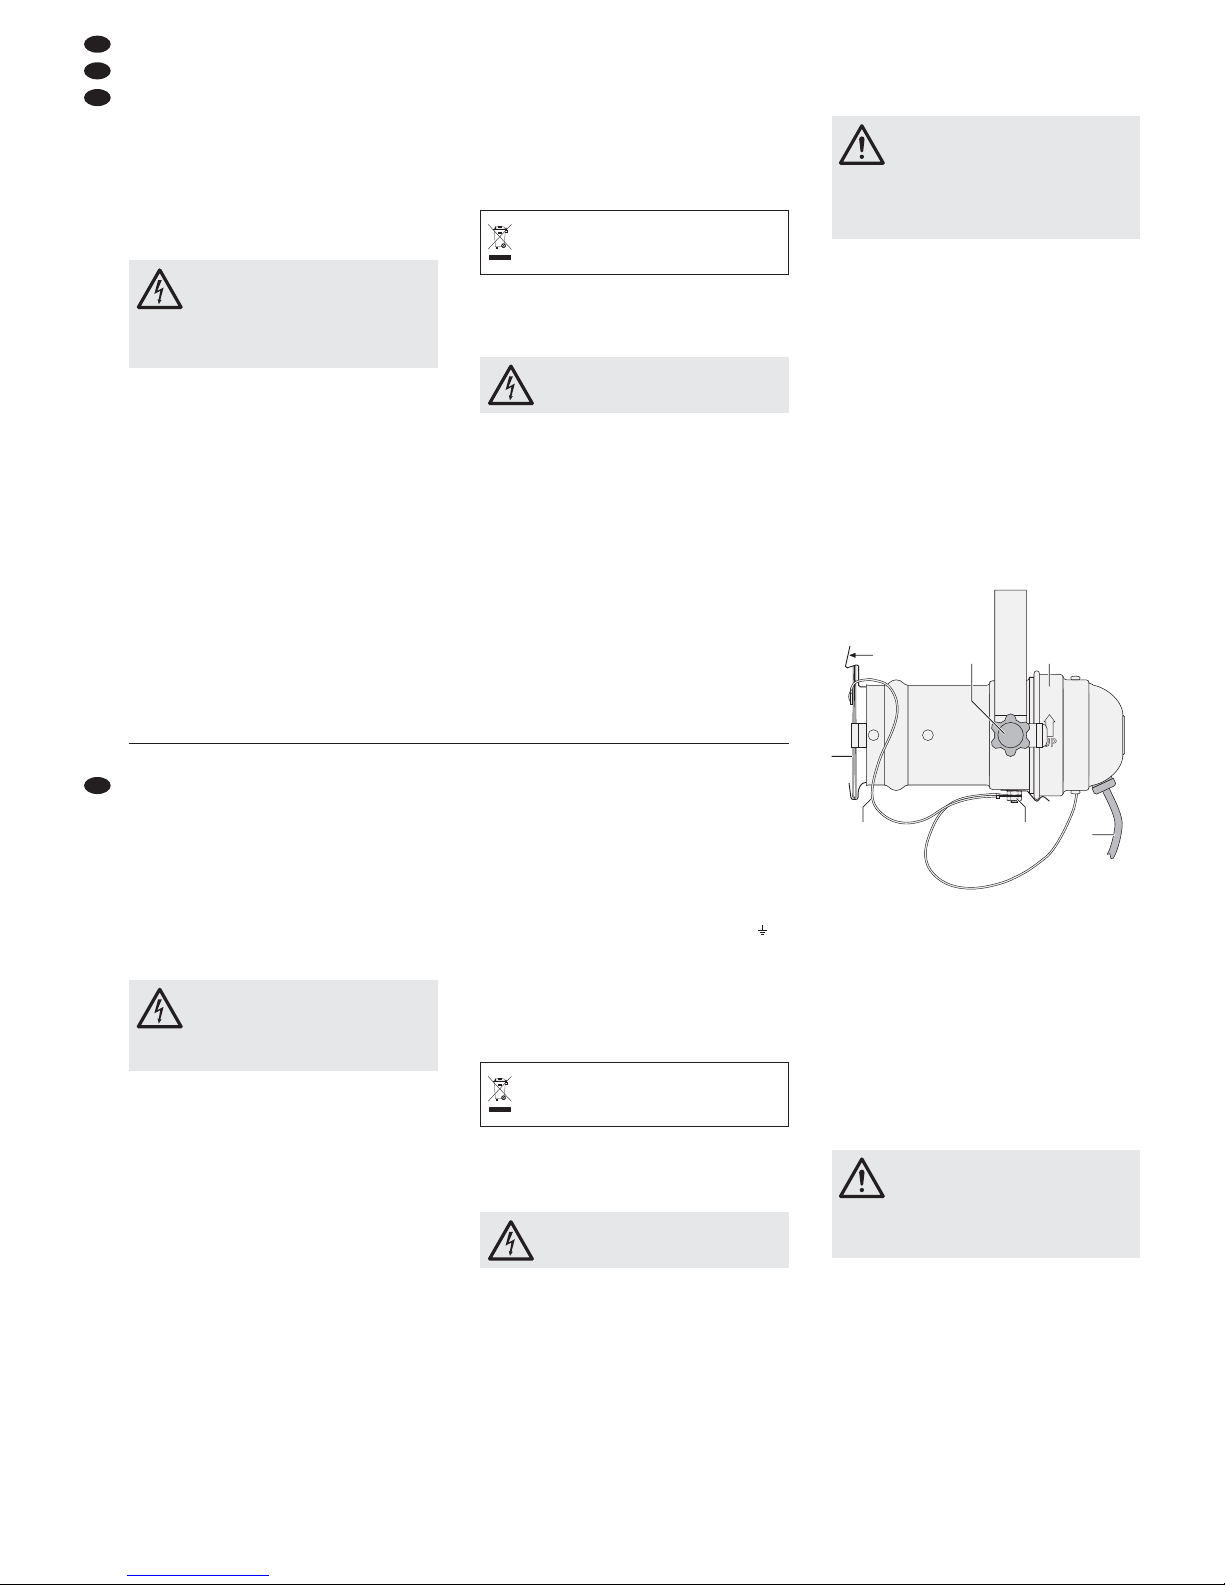
1) Eine der drei Klammern, mit denen der Gehäusedeckel
(3) am vorderen Gehäuseteil befestigt ist, leicht nach
außen biegen und den Deckel abnehmen.
2) Die Lampe in die Fas sung an der Innenseite des
Gehäusedeckels stecken.
3) Die Gehäuseteile wieder zu sam mensetzen.
4 Farbfilteranbringen
1) Das Farbfilter (nicht mitgeliefert) in den beiliegenden
Filterrahmen (4) schieben.
2) Die obere Klammer (1) der Rahmenhalterung leicht
nach hinten biegen, so dass sich der Filterrahmen in
die Halterung schieben lässt.
3) Das Sicherungsseil (5) des Filterrahmens an der
Schraubverbindung (6) befestigen, an der auch das
Sicherungsseil des Gehäusedeckels befestigt ist.
5 Installation
Den Scheinwerfer mit dem Bügel an geeigneter Stelle
(z. B. Stativ) mon tieren. Die Feststellschrauben (2) am
Bügel etwas lösen, den Scheinwerfer wie gewünscht neigen und die Schrauben wieder fest anziehen.
Zum Einschalten des Scheinwerfers den Stecker des
Netzkabels (7) in eine Steckdose (230 V~/50 Hz) ste cken.
6 Technische Daten
Stromversorgung: . . 230V~/50Hz
Leuchtmittel: . . . . . . . Halogenreflektorlampe,
230 V~/max. 50 W,
Sockel GU 10 oder GZ 10
Abmessungen
Gehäuse: . . . . . . . ∅ 70mm × 145 mm
Netzkabel: . . . . . . 0,3 m
Gewicht: . . . . . . . . . . 280 g
Änderungen vorbehalten.
WARNUNG: Ziehen Sie vor dem Ein setzen
oder He rausneh men einer Lam pe unbedingt
den Netzstecker!
WARNUNG: Der Schein werfer wird mit le bens ge fähr licher Netzspannung versorgt.
Nehmen Sie deshalb nie selbst Eingriffe an
ihm vor, die nicht in dieser Anleitung be schrieben sind und ste cken Sie nichts durch
die Lüf tungs öffnungen! Es be steht die
Gefahr eines elektrischen Schla ges.
WARNUNG: Der Scheinwerfer muss fachgerecht und sicher montiert werden. Wird er
an einer Stelle installiert, unter der sich Personen aufhalten können, muss er zusätzlich
gesichert werden (z. B. durch ein Fangseil
am Montagebügel; das Fangseil so befestigen, dass der Fallweg des Gerätes nicht
mehr als 20 cm betragen kann).
Soll das Scheinwerferge häu se end gültig aus
dem Betrieb ge nom men werden, übergeben Sie
es zur um weltgerechten Entsorgung einem örtlichen Re cyc ling be trieb.
PAR Reflector Housing
Please read these operating instructions carefully prior to
the operation and keep them for later use.
1 Applications
With an inserted halogen reflector lamp, this reflector
housing is suit able for private and professional illumination purposes (e. g. as a decora tive light). A colour filter
(not supplied) also allows illumination with coloured light.
2 Safety Notes
The reflector housing corresponds to all relevant directives of the EU and is therefore marked with
.
Please observe the following items in any case:
G
Use the reflector indoors only. Protect it against dripping water and splash water, and high air humidity.
G
During operation, the reflector becomes very hot. Let it
cool down for some minutes after operation be fore
touching it.
G
Do not cover the air vents at the housing and keep a
minimum dis tance of 1 m to the illuminated object. Also
pay attention to a sufficient distance to easily flammable
material or material sensitive to heat.
G
Do not set the reflector into opera tion, or immediately
disconnect the mains plug from the mains socket if
1. there is visible damage to the reflector or to the
mains cable,
2. a defect might have occurred after a drop or similar
accident,
3. malfunctions occur.
The unit must in any case be re paired by qualified personnel.
G
A damaged mains cable must only be replaced by qualified personnel.
G
Never pull the mains cable to disconnect the mains plug
from the mains socket, always seize the plug.
G
For cleaning only use a dry, soft cloth, never water or
chemicals.
G
No guarantee claims for the reflector and no liability for
any resulting personal damage or material dam age will
be accepted if the reflector is used for other purposes
than orig inally intended, if it is not installed according to
the regulations, or not repaired in an expert way.
G
Important for U. K. Customers!
The wires in this mains lead are col oured in ac cord ance
with the follow ing code:
green /yellow = earth, blue = neutral, brown = live
As the colours of the wires in the mains lead of this
appliance may not correspond with the coloured mark ings identifying the terminals in your plug, proceed as
follows:
1. The wire which is coloured green and yellow must be
con nected to the terminal in the plug which is mark ed with the letter E or by the earth symbol , or
coloured green or green and yellow.
2. The wire which is coloured blue must be con nected
to the ter minal which is marked with the letter N or
coloured black.
3. The wire which is coloured brown must be con nected
to the ter minal which is marked with the letter L or
coloured red.
Warning – This appliance must be earthed.
3 Inserting the Lamp
The reflector housing is supplied without lamp. Only a
lamp with the specifications as indicated in chapter 6 must
be used!
As the lamp becomes very hot during operation, let the
reflector cool down for at least 5 minutes prior to changing
a lamp.
1) Slightly bend outwards one of the three clamps which
hold the housing cover (3) at the front housing part and
remove the cover.
2) Place the lamp into the socket at the inner side of the
housing cover.
3) Reassemble the housing parts.
4 Attaching the Colour Filter
1) Slide the colour filter (not supplied) into the supplied filter frame (4).
2) Bend the upper clamp (1) of the frame support slightly
backwards so that the filter frame can be slid into the
support.
3) Fix the safety rope (5) of the filter frame to the screw
connection (6) to which also the safety rope of the
housing cover is fixed.
5 Installation
Mount the reflector with the bracket at a suitable place
(e. g. stand). Slightly release the setscrews (2) at the
bracket, incline the reflector as desired, and retighten the
screws.
To switch on the reflector, connect the plug of the mains
cable (7) to a mains socket (230 V~/50 Hz).
6 Specifications
Power supply: . . . . . 230 V~/50 Hz
Lamp: . . . . . . . . . . . . halogen reflector lamp,
230 V~/max. 50 W,
base GU 10 or GZ 10
Dimensions
housing: . . . . . . . . ∅ 70mm × 145 mm
mains cable: . . . . 0.3 m
Weight: . . . . . . . . . . . 280 g
Subject to technical modifications.
WARNING: The spotlight must be mounted
in a safe and expert way. If it is installed at a
place where people may walk or sit under, it
must additionally be secured (e. g. by a
safety rope at the mounting bracket; fix the
safety rope so that the maximum falling distance of the unit would not exceed 20 cm).
WARNING:
Always disconnect the mains plug prior to in sert ing or removing a lamp!
If the reflector housing is to be put out of oper ation definitively, take it to a local recycling plant
for a disposal which is not harmful to the environment.
WARNING: The reflector is supplied with
hazardous mains voltage. Never make any
modification not de scribed in these operating
instructions and do not insert anything into
the air vents! This may cause an elec tric
shock hazard.
D
A
CH
GB
1
4
32
56
7

Boîtier de projecteur PAR
Veuillez lire la présente notice avec attention avant le
fonctionnement et conservez-la pour pouvoir vous y
reporter ultérieurement.
1 Possibilités dʼutilisation
Avec une lampe halogène réflecteur insérée, ce boîtier de
projecteur est adapté pour des applications dʼéclairage
dans le domaine privé et professionnel (par exemple
lumière de décoration). Un filtre de couleur (non livré) permet également un éclairage avec une lumière de couleur.
2 Conseils dʼutilisation et de sécurité
Ce boîtier de projecteur répond à toutes les directives
nécessaires de lʼU nion Européenne et porte donc le symbole
.
Respectez scrupuleusement les points suivants :
G
Le projecteur nʼest conçu que pour une utilisation en
intérieur. Protégez-le de tout type de projections dʼeau,
des éclaboussures et dʼune humidité élevée de lʼair.
G
Pendant le fonctionnement, le projecteur est très
chaud. Avant de le toucher, laissez-le refroidir quelques
minutes après le fonctionnement.
G
Nʼobturez pas les ouïes de ventila tion du boîtier et laissez une dis tance de 1 m minimum avec lʼobjet à éclairer.
Veillez à ce que la dis tance avec des produits facilement
inflammables ou sensibles à la chaleur soit suffisante.
G
Ne le faites jamais fonctionner et débranchez-le immédiatement lorsque :
1. des dommages sur lʼappareil ou sur le cordon secteur apparaissent.
2. après une chute ou accident similaire, vous avez un
doute au sujet de lʼétat de lʼappareil.
3. des dysfonctionnements apparaissent.
Dans tous les cas, les dommages doivent être réparés
par un technicien spécialisé.
G
Tout cordon secteur endommagé doit être remplacé
uniquement par un technicien habilité.
G
Ne débranchez jamais lʼappareil en tirant sur le cordon
secteur, tenez-le toujours par la fiche.
G
Pour nettoyer lʼappareil, utilisez uniquement un chiffon
sec et doux, en aucun cas de produits chimiques ou
dʼeau.
G
Nous déclinons toute responsabilité en cas de dommages corporels ou matériels résultants si le projecteur
est utilisé dans un but autre que celui pour lequel il a été
conçu, sʼil nʼest pas installé selon les instructions ou
nʼest pas réparé par une personne qualifiée ; de même,
la garantie deviendrait caduque.
3 Placement de la lampe
Le boîtier est livré sans lampe. Seule une lampe telle que
décrite dans les caractéristiques techniques du chapitre 6
doit être utilisée !
Dans la mesure où la lampe est très chaude pendant le
fonctionnement, laissez refroidir le projecteur 5 minutes
au moins avant de remplacer la lampe.
1) Pliez légèrement vers lʼextérieur une des trois pinces
qui maintiennent le couvercle du boîtier (3) sur la partie avant du boîtier et retirez le couvercle.
2) Placez la lampe dans la douille sur la face intérieure du
couvercle du boîtier.
3) Remontez les éléments du boîtier.
4 Positionnement du filtre de couleur
1) Poussez le filtre de couleur (non livré) dans le cadre
pour filtre livré (4).
2) Pliez légèrement vers lʼarrière la pince supérieure (1)
du support du cadre de telle sorte que le cadre du filtre
puisse glisser dans le support.
3) Fixez la corde de sécurité (5) du cadre du filtre sur le
connexion à vis (6) à laquelle la corde de sécurité du
couvercle du boîtier est également fixée.
5 Installation
Montez le projecteur à lʼendroit voulu (p. ex. sur un pied)
avec lʼétrier. Desserrez un peu les vis de réglages (2) sur
lʼétrier, inclinez comme souhaité le projecteur puis revissez les vis.
Pour allumer le projecteur, reliez la fiche du cordon secteur (7) à une prise secteur 230 V~/50 Hz.
6 Caractéristiques techniques
Alimentation : . . . . . . 230 V~/50 Hz
Lampe : . . . . . . . . . . lampe halogène à réflecteur,
230 V~/50 W max.,
culot GU 10 ou GZ 10
Dimensions
Boîtier : . . . . . . . . ∅ 70 mm × 145mm
Cordon secteur : . 0,3m
Poids : . . . . . . . . . . . 280g
Tout droit de modification réservé.
AVERTISSEMENT: Lʼappareil doit être monté
de manière professionnelle et sûre. Si lʼappareil est installé à un endroit sous lequel
des personnes peuvent se trouver, il doit en
plus être assuré (p. ex. par une élingue de
sécurité. Fixez-la de telle sorte que la chute
de lʼappareil ne puisse pas être supérieure à
20 cm.)
AVERTISSEMENT :
Retirez impérativement la prise du secteur
avant de placer la lampe ou de la retirer !
Lorsque lʼappareil est définitivement retiré du
service, vous devez le déposer dans une usine
de recyclage de proximité pour contribuer à son
élimination non polluante.
AVERTISSEMENT : Le projecteur est alimenté par une tension dangereuse. Ne
faites jamais de manipulation qui ne serait
pas décrite dans la présente notice et ne
faites rien tomber dans les ouïes de ventilation, il y a risque de décharge électrique.
Contenitore per faretti PAR
Vi preghiamo di leggere attentamente le presenti istruzioni
prima dellʼuso e di conservarle per un uso futuro.
1 Possibilità dʼimpiego
Con una lampadina alogena con riflettore, questo contenitore per faretti è indicato per lʼilluminazione nel settore
privato e professionale (p. es. come luce decorativa). Con
un filtro cromatico (non in dotazione) è possibile anche
unʼilluminazione con luce colorata.
2 Avvertenze di sicurezza
Il contenitore per faretti è conforme a tutte le direttive rilevanti dellʼUE e pertanto porta la sigla
.
Si devono osservare assolutamente anche i seguenti punti:
G
Usare il faretto solo allʼinterno di locali. Proteggerlo dallʼacqua gocciolante e dagli spruzzi dʼacqua nonché da
alta umidità dellʼaria.
G
Durante il funzionamento, il faretto si riscalda moltissimo. Dopo lʼuso, farlo raffreddarsi prima di toccarlo.
G
Non coprire le fessure di aerazione del contenitore e
mantenere una distanza minima di 1 m dallʼoggetto irradiato. Mantenere una distanza sufficiente da materiali
facilmente infiammabili o sensibili al calore.
G
Non mettere in funzione il faretto e staccare subito la
spina rete se:
1. il faretto o il cavo rete presentano dei danni visibili;
2. dopo una caduta o dopo eventi simili sussiste il
sospetto di un difetto;
3. lʼapparecchio non funziona correttamente.
Per la riparazione rivolgersi sempre ad unʼofficina competente.
G
Il cavo rete, se danneggiato, deve essere sostituito solo
da un laboratorio qualificato.
G
Staccare il cavo rete afferrando la spina, senza tirare il
cavo.
G
Per la pulizia usare solo un panno morbido, asciutto;
non impiegare in nessun caso acquao prodotti chimici.
G
Nel caso dʼuso improprio, di installazione scorretta o di
riparazione non a regola dʼarte del faretto, non si
assume nessuna responsabilità per eventuali danni
consequenziali a persone o a cose e non si assume
nessuna garanzia per lʼapparecchio.
3 Inserire la lampadina
Il contenitore per faretti viene consegnato senza lampadina. Si deve usare solo una lampadina con i dati tecnici
come indicati nel capitolo 6!
Dato che la lampadina si riscalda moltissimo durante
lʼuso, prima di una sostituzione aspettare non meno di
5 minuti perché il faretto possa raf fred darsi.
1) Piegare leggermente verso lʼesterno una delle tre
molle che fissano il coperchio (3) alla parte anteriore
del contenitore, e staccare il coperchio.
2) Inserire la lampadina nel portalampada allʼinterno del
coperchio.
3) Rimettere insieme le parti del contenitore.
4 Montare un filtro cromatico
1) Spingere il filtro cromatico (non in dotazione) nel telaio
(4) in dotazione.
2) Piegare leggermente indietro la molla superiore (1) del
supporto del telaio in modo che il telaio possa essere
inserito nel supporto.
3) Fissare la fune di sicurezza (5) del telaio allʼattacco a
vite (6) dove è fissato anche la fune di sicurezza del
coperchio.
5 Installazione
Montare il faretto con la sua staffa in un posto adatto
(p. es. stativo). Allentare leggermente le viti di bloccaggio
(2) sulla staffa, inclinare il faretto secondo desiderio e
stringere di nuovo le viti.
Per accendere il faretto inserire la spina del cavo (7) in
una presa di rete (230 V~/50 Hz).
6 Dati tecnici
Alimentazione: . . . . . 230 V~/50 Hz
Lampadina: . . . . . . . lampadina alogena con riflettore,
230 V~/max. 50 W,
zoccolo GU 10 o GZ 10
Dimensioni
Contenitore: . . . . . ∅ 70mm × 145 mm
Cavo rete: . . . . . . 0,3m
Peso: . . . . . . . . . . . . 280 g
Con riserva di modifiche tecniche.
AVVERTIMENTO: Il proiettore deve essere
montato a regola dʼarte e in modo sicuro. Se
viene montato in un punto sotto il quale si
possono trattenere delle persone, occorre
prevedere un sistema di sicurezza supplementare (p. es. per mezzo di una fune di trattenuta sulla staffa di montaggio; fissare la
fune in modo tale che la caduta dellʼapparecchio non può superare i 20 cm).
AVVERTIMENTO:
Prima di inserire o to glie re una lampadina
staccare assolutamente la spina di rete!
Se si desidera eliminare il contenitore per faretti
definitivamente, consegnarlo per lo smaltimento
ad unʼisti tuzione locale per il riciclaggio.
AVVERTIMENTO: Il faretto funziona con
pericolosa tensione di rete. Non intervenire
mai al suo interno al di fuori delle operazioni
descritte nelle presenti istruzioni e non inserire niente nelle fessure di aerazione! Esiste
il pericolo di una scarica elettrica.
I
F
B
CH
1
4
32
56
7

Proyector PAR
Por favor lea atentamente estas instrucciones de funcionamiento antes de utilizar la unidad y guárdelas para
usos posteriores.
1 Aplicaciones
Con lámpara halógena insertada, esta carcasa de proyector está diseñada para aplicaciones de iluminación
privada y profesional (p. ej. como luz de decoración). El
uso de filtros de colores (no entregados) permite una
iluminación con luz coloreada.
2 Notas de seguridad
La carcasa de proyector está marcada con el símbolo
ya que cumple con todas las directivas relevantes por
la UE.
Preste atención a los siguientes puntos bajo cualquier circunstancia:
G
Utilize el proyector sólo en interiores. Protéjalo de la
alta humedad, salpicaduras o goteos de agua.
G
El proyector se calienta mucho durante su funcionamiento. Deje en friarlo unos minutos después de apagarlo antes de tocar el proyector.
G
No cubra las rejillas de la carcasa y deje una distancia
mínima de 1 metro con el objeto iluminado. Acuérdese
también de dejar una dis tancia suficiente con cualquier
objeto fácilmente inflamable o sensible al calor.
G
No ponga el proyector en funcionamiento y desconéctelo rápidamente del enchufe en caso de:
1. Daños visibles en el proyector o en el cable
2. Defecto por caída o accidente similar
3. Producirse fallos
Sólo el personal cualificado puede reparar el aparato
en cualquier caso.
G
Si el cable está dañado sólo puede reemplazarlo el personal cualificado.
G
No tire nunca del cable para desconectar el enchufe de
la toma de corriente, tire siempre del enchufe.
G
Para su limpieza utilice únicamente un paño seco y
suave, no use nunca agua ni productos químicos.
G
No se aceptará ninguna garantía para el proyector ni se
asumirá ninguna responsabilidad si el proyector se utiliza para otros fines distintos de los originalmente concebidos, si no está instalado de acuerdo con la reglamentación o si no ha sido reparado por expertos.
3 Inserción de la lámpara
El proyector se entrega sin lámpara. ¡Sólo pueden utilizarse lámparas con las especificaciones que se indican
en el apartado 6!
Ya que la lámpara se calienta mucho durante su funcionamiento, deje que el proyector se enfríe como mínimo
5 mi nutos antes de cambiar la lámpara.
1) Doble levemente hacia fuera una de las tres abrazaderas que sostienen la tapa de la carcasa (3) en la parte
frontal de la carcasa y quite la tapa.
2) Coloque la lámpara en la toma en la parte interior de la
tapa de la carcasa.
3) Monte de nuevo las partes de la carcasa.
4 Acoplar un filtro de color
1) Introduzca el filtro de color (no entregado) en el marco
de filtro entregado (4).
2) Doble la abrazadera superior (1) del soporte del marco
levemente hacia atrás de modo que pueda insertarse
el marco de filtro en el soporte.
3) Fije el cable de seguridad (5) del marco de filtro en el
borne (6) al que también se fija el cable de seguridad
de la tapa de la carcasa.
5 Instalación
Instale el proyector en un lugar adecuado (p. ej. en un pie)
mediante el soporte. Desenrosque ligeramente los tornillos de presión (2) del soporte, incline el proyector a su
gusto y asegure de nuevo los tornillos de presión.
Para encender el proyector, conecte el enchufe del cable
(7) en la toma de corriente (230 V~/50 Hz).
6 Características
Alimentación: . . . . . . 230 V~/50 Hz
Lámpara: . . . . . . . . . lámpara de reflector halógena,
230 V~/máx. 50 W,
zócalo GU 10 o GZ 10
Dimensiones
carcasa: . . . . . . . . ∅ 70mm × 145 mm
cable: . . . . . . . . . . 0,3m
Peso: . . . . . . . . . . . . 280 g
Sujeto a modificaciones técnicas.
ADVERTENCIA: El proyector tiene que montarse de modo seguro y por expertos. Si se
instala en un lugar en el que la gente puede
pasar o sentarse bajo él, tiene que asegurarse adicionalmente (p. ej. con un cable de
seguridad en los soportes de montaje; fije el
cable de modo que la distancia máxima de
caída del aparato no supere los 20 cm).
ADVERTENCIA:
¡Desconecte siempre el cable antes de
insertar o reemplazar la lámpara!
Si la carcasa de proyector debe retirarse del funcionamiento definitivamente, llévela al centro de
reciclaje mas cercano para no perjudicar el
medioambiente.
ADVERTENCIA: El proyector se alimenta
con un voltaje principal peligroso. No haga
nunca ninguna modificación que no esté
descrita en estas instrucciones de funcionamiento y no introduzca nada por las rejillas,
esto podría provocar un electrochoque.
Reflektor PAR
Przed użyciem urządzenia należy przeczytać instrukcję
obsługi oraz zachować ją do wglądu.
1 Zastosowanie
Obudowa do reflektora z żarówką halogenową umożliwia
oświetlenie przestrzeni prywatnych i publicznych (np. jako
element wystroju wnętrza). Po założeniu filtra kolorowego
(nie dołączany) otrzy muje się efekt kolorowego oświetlenia.
2 Bezpieczeństwo użytkowania
Obudowa reflektora spełnia wymogi norm obowiązują cych w Unii Europejskiej, posiada więc oznaczenie .
Należy przestrzegać następujących zaleceń:
G
Urządzenie przeznaczone jest do użytku jedynie w
pomieszczeniach. Należy chronić je przed bezpośrednim kontaktem z wodą oraz przed działaniem wilgoci.
G
Reflektor znacznie się nagrzewa podczas pracy. Po
wyłączeniu należy odczekać kilka minut aż urządzenie
ostygnie.
G
Nie wolno zakrywać otworów wentylacyjnych znajdują cych się w obudowie. Należy zachować odle głość 1 m od
oświetlanego obiektu, należy również zapewnić dostateczną odległość od materiałów łatwopalnych oraz materiałów podatnych na działanie wysokich temperatur.
G
Należy przerwać użytkowanie reflektora oraz niezwłocznie odłą czyć zasilanie jeśli
1. istnieje widoczne uszkodzenie reflektora lub kabla
zasilania,
2. mogło nastąpić uszkodzenie urządzenia w wyniku
jego upuszczenia itp.,
3. urządzenie działa nieprawidło wo.
W razie wystąpienia jednej z wymienionych usterek
należy przekazać urządzenie do naprawy w punkcie
serwisowym.
G
Wymianę uszkodzonego kabla zasilania należy zlecić
pracownikowi autoryzowanego punktu serwisowego.
G
Nie wolno odłączać urządzenia z gniazda sieciowego
ciągnąc za kabel zasilania, należy zawsze chwytać za
wtyczkę.
G
Do czyszczenia urządzenia należy używać suchej,
miękkiej tkaniny, nie wolno stosować wody ani chemicznych środków czyszczących.
G
Producent ani dostawca nie ponoszą odpowiedzialności za wyni kłe szkody (uszkodzenie sprzętu lub obrażenia użytkownika), jeśli urządzenie używano niezgodnie
z przeznaczeniem, nieprawidłowo zainstalowano bądź
poddano nieautoryzowanej naprawie.
3 Montaż żarówki
Reflektor jest sprzedawany bez lampy. Należy używać
jedynie żarówek o parametrach technicznych wymienionych w rozdziale 6.
Ponieważ żarówka znacznie się nagrzewa podczas
pracy, przed jej wymianą należy odczekać co najmniej
5 minut.
1) Odblokować jeden z zaczepów przytrzymujących
pokrywę w tylnej części obudowy (3), a następnie zdjęć
pokrywę.
2) Umieścić żarówkę w gnieździe w wewnętrznej części
obudowy.
3) Założyć ponownie pokrywę.
4 Montaż filtra kolorowego
1) Wsunąć jeden kolorowy filtr (nie dołączany) do ramki
(4).
2) Wygiąć górną klamrę (1) ramki tak, aby zabezpieczyć
filtr przed wysunięciem się z ramki.
3) Przymocować linkę zabezpieczającą (5) ramkę na filtr
do połączenia śrubowego (6), do którego przymocowana jest także linka zabezpieczająca pokrywę.
5 Monataż reflektora
Należy zamontować reflektor za pomocą uchwytu montażowego w wybranym miejscu (np. na statywie). Lekko
odkręcić śruby ustalające (2) przy uchwycie, ustawić reflektor pod odpowiednim kątem, następnie dokręcić śruby.
Aby włączyć reflektor, należy włożyć wtyk kabla zasilania
(7) do gniazda sieci elektrycznej (230 V~/50 Hz).
6 Dane techniczne
Zasilanie: . . . . . . . . . 230 V~/50 Hz
Żarówka: . . . . . . . . . halogenowa żarówka do reflekto-
rów, 230 V~/maks. 50 W,
trzonek GU 10 lub GZ 10
Wymiary
obudowa: . . . . . . . ∅ 70mm × 145 mm
kabel zasilania: . . 0,3m
Waga: . . . . . . . . . . . . 280 g
Z zastrzeżeniem możliwości zmiany.
Po całkowitym zakończeniu eksploatacji obudowę reflektora należy przekazać do punktu utylizacji odpadów, aby uniknąć zanieczyszczenia
środowiska.
UWAGA: Urządzenie musi być zamontowane w sposób bezpieczny i fachowy. Jeśli
ma pracować ponad ludźmi, należy je dodatkowo zabezpieczyć przed upadkiem (np. wykorzystując linki zabezpieczające. Do zamocowania linki wykorzystać uchwyty montażowe, długość takich linek należy tak dobrać,
aby w przypadku ich wykorzystania urządzenie maksymalnie spadło o 20 cm).
UWAGA:
Przed montażem lub wymianą żarówki
należy odłączyć reflektor od zasilania.
UWAGA: Reflektor zasilany jest nie bezpiecznym dla ży cia napięciem zmie nnym.
Aby uniknąć ryzyka porażenia prądem,
obsługę techniczna urządzenia należy zlecić
specjaliście, nie wolno również blokować
otworów wentylacyjnych.
PL
E
®
MONACOR INTERNATIONAL GmbH & Co. KG •Zum Falsch 36 •28307 Bremen •Germany
Copyright
©
by MONACOR INTERNATIONAL. All rights reserved. A-0754.99.04.06.2014
1
4
32
56
7
 Loading...