

IMG STAGE LINE MPX-20USB, 20.2860 User Manual

ELECTRONICS FOR SPECIALISTS ELECTRONICS FOR SPECIALISTS ELECTRONICS FOR SPECIALISTS ELECTRONICS FOR SPECIALISTS ELECTRONICS FOR SPECIALISTS ELECTRONICS FOR SPECIALISTS ELECTRONICS
MPX-20USB
Bestellnummer 20.2860
MONACOR INTERNATIONAL GmbH & Co. KG • Zum Falsch 36 • 28307 Bremen • Germany
Copyright
©
by MONACOR INTERNATIONAL. All rights reserved.
A-1486.99.02.01.2016
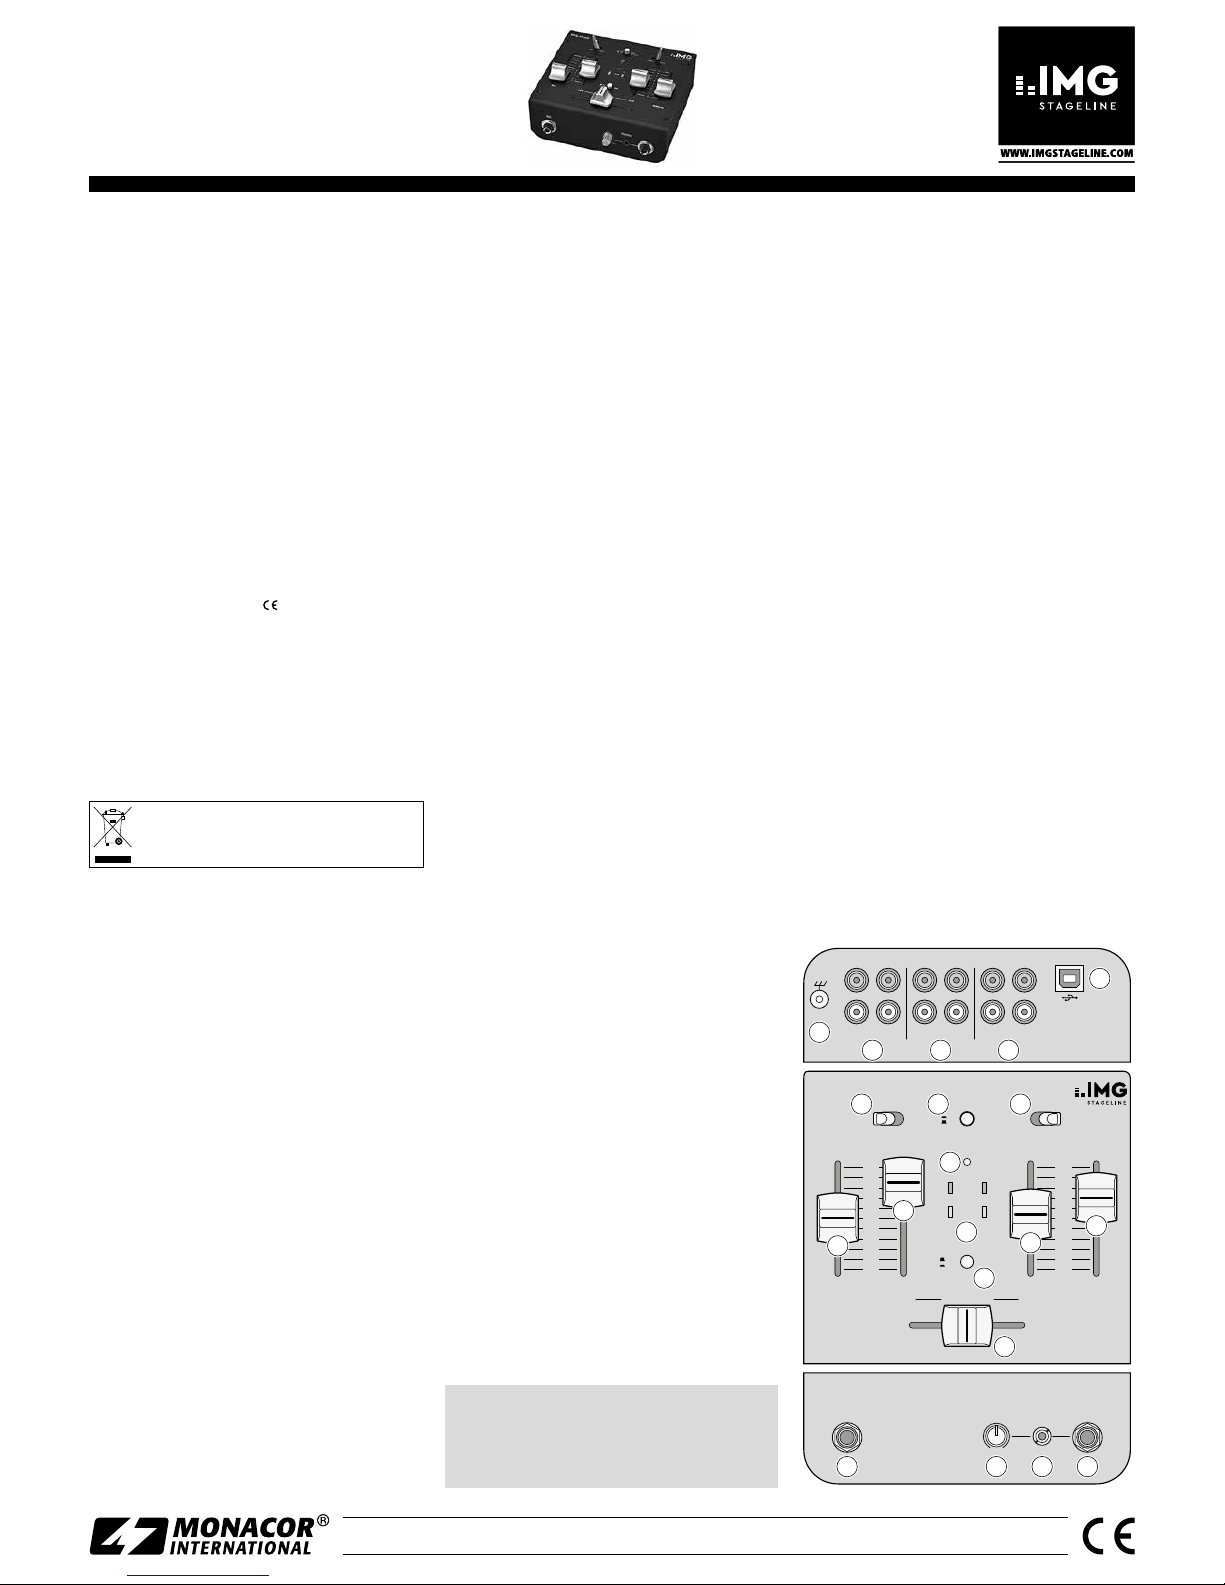
PFL
USB
TO CH2
CH 1
CH 2
ON
OFF
0
1
2
3
4
5
6
7
8
9
10
0
1
2
3
4
5
6
7
8
9
10
CROSSFADER
ON
+3dB
–3dB
L R
MPX-20USB
LINE2 PHONO2
CH2 MASTERCH1
LINE1 PHONO1
MIN MAX
MIC PHONES
MIC
GND
INPUT2
LINE2PHONO2RECMASTER
OUTPUT INPUT1
LINE1PHONO1
L
R
L
R
17 18 2019
16
15
14
9
10
11
12
13
6 7 8
2 3 4
5
1
Netzgerät über das beiliegende USB-Kabel mit der
USB-Buchse (5) verbinden und an eine Steckdose anschließen. Nach dem Anschluss der Stromversorgung
ist das Mischpult eingeschaltet und die Betriebsanzeige
ON (11) leuchtet.
3.1 Betrieb mit Computer
Für den Betrieb des Mischers mit einem Computer kann
die mit dem Betriebssystem mitgelieferte Audio-Software verwendet werden oder eine zu sätzlich installierte
Audio-Software.
1) Den Computer hochfahren und die USB-Buchse (5)
über das beiliegende USB-Kabel mit einem USB-Anschluss am Computer verbinden. Der eingeschaltete
Mischer wird vom Computer als USB-Audiogerät für
die Toneingabe und Tonausgabe erkannt.
Hinweis: Wird der Mischer nicht als USB-Audiogerät erkannt,
müssen die erforderlichen Treiber (Standard-Treiber des Betriebssystems) nachinstalliert werden, z. B. über die Betriebssystem-Original-CD. Nach der Installation den Computer ggf.
neu starten.
2) Das verwendete Abspiel- /Aufnahmeprogramm aufrufen und dort die erforderlichen Einstellungen für
die Tonwiedergabe über den Mischer bzw. Tonaufnahme vom Mischer vornehmen (☞ Anleitung des
Programms). Der Mischer kann dann anhand des
Kapitels4 bedient werden.
Findet keine Tonaufnahme bzw. Tonwiedergabe statt, in
den Systemeinstellungen des Computer-Betriebssystems
überprüfen, ob die USB-Schnittstelle für die Toneingabe
bzw. Tonausgabe angewählt ist.
Tipp: Ist der Mischer mit einem Computer verbunden sowie mit
Geräten, die über ihr Netzkabel geerdet sind (z. B. Verstärker),
können aufgrund von Masseschleifen Brummstörungen auftreten. Um diese zu beseitigen, den Mischer über ein Massetrennfilter (z. B. FGA-40 von MONACOR) mit dem jeweiligen Gerät
verbinden.
4 Bedienung
1) Die Signalquellen für die Eingangskanäle CH 1 und
CH 2 mit den Schaltern LINE / PHONO (6 und 8) wählen.
2) Mit der Taste USB TO CH 2 (7) wählen, welches Eingangssignal auf den Kanal CH 2 ge geben werden soll:
Taste ausgerastet = Eingangssignal der Cinch-Buchsen
INPUT 2 (3)
Taste hineingedrückt = Eingangssignal der USBBuchse(5).
Hinweis: Beachten Sie bei Aufnahmen über die USB-Buchse
die Gefahr von Rückkopplungen, wenn das Aufnahmesignal
des Computers als Eingangssignal auf den Kanal CH 2 geschaltet wird.
3) Zur Grundeinstellung den Fader MASTER (15) vorerst
auf ca. 2⁄3 aufziehen.
4) Den Crossfader (16) ganz nach links schieben und ein
Tonsignal auf den Kanal CH 1 geben. Den Kanal mit
dem Fader (10) aussteuern. Der Ausgangspegel lässt
sich an der Signalanzeige (12) ablesen. Die roten LEDs
+3 dB sollten nur bei Pegelspitzen kurz aufleuchten.
Leuchten sie permanent, den Fader entsprechend zuziehen.
5) Den Crossfader ganz nach rechts schieben und den
Kanal CH 2 genauso einstellen. Danach kann mit dem
Crossfader zwischen den Kanälen CH 1 und CH 2
übergeblendet werden. Sollen die Signale der beiden
Kanäle gemischt werden, den Crossfader in die Mitte
schieben.
6) Die endgültige Lautstärke des Ausgangssignals an den
Buchsen OUTPUT (4) und an der USB-Buchse (5) mit
dem Fader MASTER einstellen, ohne dass Verzerrungen
auftreten.
7) Für eine Durchsage über ein an der Buchse MIC (17)
angeschlossenes Mikrofon die Lautstärke mit dem
Fader MIC (9) einstellen.
8) Die Eingangskanäle CH 1und CH 2 können einzeln
über einen Kopfhörer abgehört werden, auch wenn
gerade ein Kanal mit dem Crossfader ausgeblendet ist.
3-Kanal-Audio-Mischer
Diese Bedienungsanleitung richtet sich an Benutzer ohne besondere Fachkenntnisse. Bitte lesen Sie
die Anleitung vor dem Betrieb gründlich durch und
heben Sie sie für ein späteres Nachlesen auf.
1 Einsatzmöglichkeiten
Der Audio-Mischer MPX-20USB eignet sich für beliebige
DJ-Anwendungen im professionellen und privaten Bereich. Er ist mit zwei Stereo-Eingangskanälen und einem
DJ-Mikrofonkanal ausgestattet. Zum Vorhören der Eingangssignale kann ein Kopfhörer angeschlossen werden.
Zur Verbindung mit einem Computer ist eine USBAudio-Schnittstelle vorhanden. Diese lässt sich sowohl
als Ausgang zur digitalen Aufnahme der Tonabmischung
als auch als Eingang zum Einspeisen von Audiodaten verwenden.
Die Stromversorgung erfolgt beim Anschluss an einen
Computer über die USB-Verbindung. Beim Betrieb ohne
Computer muss ein Netzgerät mit USB-Anschluss verwendet werden.
2 Wichtige Hinweise für den Gebrauch
Das Gerät entspricht allen relevanten Richtlinien der EU
und ist deshalb mit gekennzeichnet.
•
Verwenden Sie das Gerät nur im Innenbereich und
schützen Sie es vor Tropf- und Spritzwasser, hoher Luftfeuchtigkeit und Hitze (zulässiger Einsatztemperaturbereich 0 – 40 °C).
•
Verwenden Sie zum Reinigen nur ein trockenes, weiches
Tuch, niemals Chemikalien oder Wasser.
•
Wird das Gerät zweckentfremdet, nicht richtig angeschlossen, falsch bedient oder nicht fachgerecht repariert, kann keine Haftung für daraus resultierende Sachoder Personenschäden und keine Garantie für das Gerät
übernommen werden.
Soll das Gerät endgültig aus dem Betrieb genommen werden, übergeben Sie es zur umweltgerechten Entsorgung einem ört lichen
Recyclingbetrieb.
3 Inbetriebnahme
Um Störgeräusche beim Herstellen / Trennen von Verbindungen und eine zu hohe Lautstärke bei der Inbetriebnahme zu vermeiden, die Regler MASTER (15) und PHONES
(18) auf Minimum stellen.
1) Die Tonquellen an die zugehörigen Eingangsbuchsen
(2 und 3) anschließen:
– Buchsen LINE für den Anschluss von Geräten mit
Line-Pegel (z. B. MP3- / CD-Spieler)
– Buchsen PHONO für den Anschluss von Plattenspie-
lern mit Magnetsystem; die Plattenspieler-Masseleitung (falls vorhanden) an der Masseschraube GND
(1) festklemmen.
An die Eingangskanäle CH 1 und CH 2 lassen sich
jeweils zwei Tonquellen anschließen. Mit den zugehörigen Wahlschaltern (6 und 8) kann zwischen den
Tonquellen umgeschaltet werden.
2) Ein Mikrofon lässt sich an die Buchse MIC (17) an-
schließen.
3) Zum Abhören der Eingangssignale kann ein Stereo-
Kopfhörer (Impedanz min. 8 Ω) an eine der Buchsen
PHONES angeschlossen werden: 3,5-mm-Klinkenbuchse
(19) oder 6,3-mm-Klin kenbuchse (20).
4) An den Stereo-Ausgängen MASTER und REC (4) steht
das mit dem Fader MASTER (15) eingestellte Summensignal zur Verfügung. Hier kann der Verstärker für die
Publikumsbeschallung und z. B. ein Aufnahmegerät
angeschlossen werden.
5) Beim Betrieb ohne Computer muss die Stromversor-
gung des Mischpults über ein Netzgerät mit USBAnschluss erfolgen, das eine Ausgangsspannung von
5 V⎓ und einen Ausgangsstrom von 500 mA liefert
(z. B. das Modell PSS-1005USB von MONACOR). Das
Deutsch
Damit kann z. B. der nächste zu spielende Titel ausgesucht werden. Mit der Taste PFL (13) den Kanal wählen:
Taste ausgerastet = CH 1
Taste hineingedrückt = CH 2
Die Kopfhörerlautstärke mit dem Regler PHONES (18)
einstellen.
WARNUNG! Stellen Sie die Lautstärke der Audioanlage
und des Kopfhörers nie sehr hoch ein. Hohe Lautstärken
können auf Dauer das Gehör schädigen! Das Ohr gewöhnt sich an große Lautstärken und empfindet sie nach
einiger Zeit als nicht mehr so hoch. Darum eine hohe
Lautstärke nach der Gewöhnung nicht weiter erhöhen.
5 Technische Daten
Eingänge
(Empfindlichkeit / Impedanz)
MIC: . . . . . . . . . . 1 mV/1 kΩ
PHONO:. . . . . . . . . 9 mV/ 63 kΩ
LINE: . . . . . . . . . . 450 mV/17 kΩ
Ausgangspegel
MASTER, REC:. . . . . . 1 V
Kopfhörerimpedanz: . . . . . . . ≥ 8 Ω
USB-Schnittstelle: . . . . . . . . . USB 2.0, Buchse Typ B
Frequenzbereich:
. . . . . . . . . . 20 – 20 000 Hz
Klirrfaktor: . . . . . . . . . . . . . . < 0,1 %
Störabstand: . . . . . . . . . . . . . 63 dB (unbewertet)
Stromversorgung: . . . . . . . . . 5 V⎓ / 500 mA über
USB-Schnittstelle
Abmessungen:
. . . . . . . . . . . 150 × 70 × 140 mm
Gewicht: . . . . . . . . . . . . . . . . 700 g
Geeign. Betriebssystem
für USB-Betrieb:. . . . . . . Windows 2000, Windows XP,
Windows Vista, Windows 7,
Mac OS X
Windows ist ein registriertes Warenzeichen der Microsoft Corporation
in den USA und anderen Ländern.
Mac OS ist ein registriertes Warenzeichen von Apple Computer, Inc. in
den USA und anderen Ländern.
Änderungen vorbehalten.
ELECTRONICS FOR SPECIALISTS ELECTRONICS FOR SPECIALISTS ELECTRONICS FOR SPECIALISTS ELECTRONICS FOR SPECIALISTS ELECTRONICS FOR SPECIALISTS ELECTRONICS FOR SPECIALISTS ELECTRONICS
MONACOR INTERNATIONAL GmbH & Co. KG • Zum Falsch 36 • 28307 Bremen • Germany
Copyright
©
by MONACOR INTERNATIONAL. All rights reserved.
A-1486.99.02.01.2016
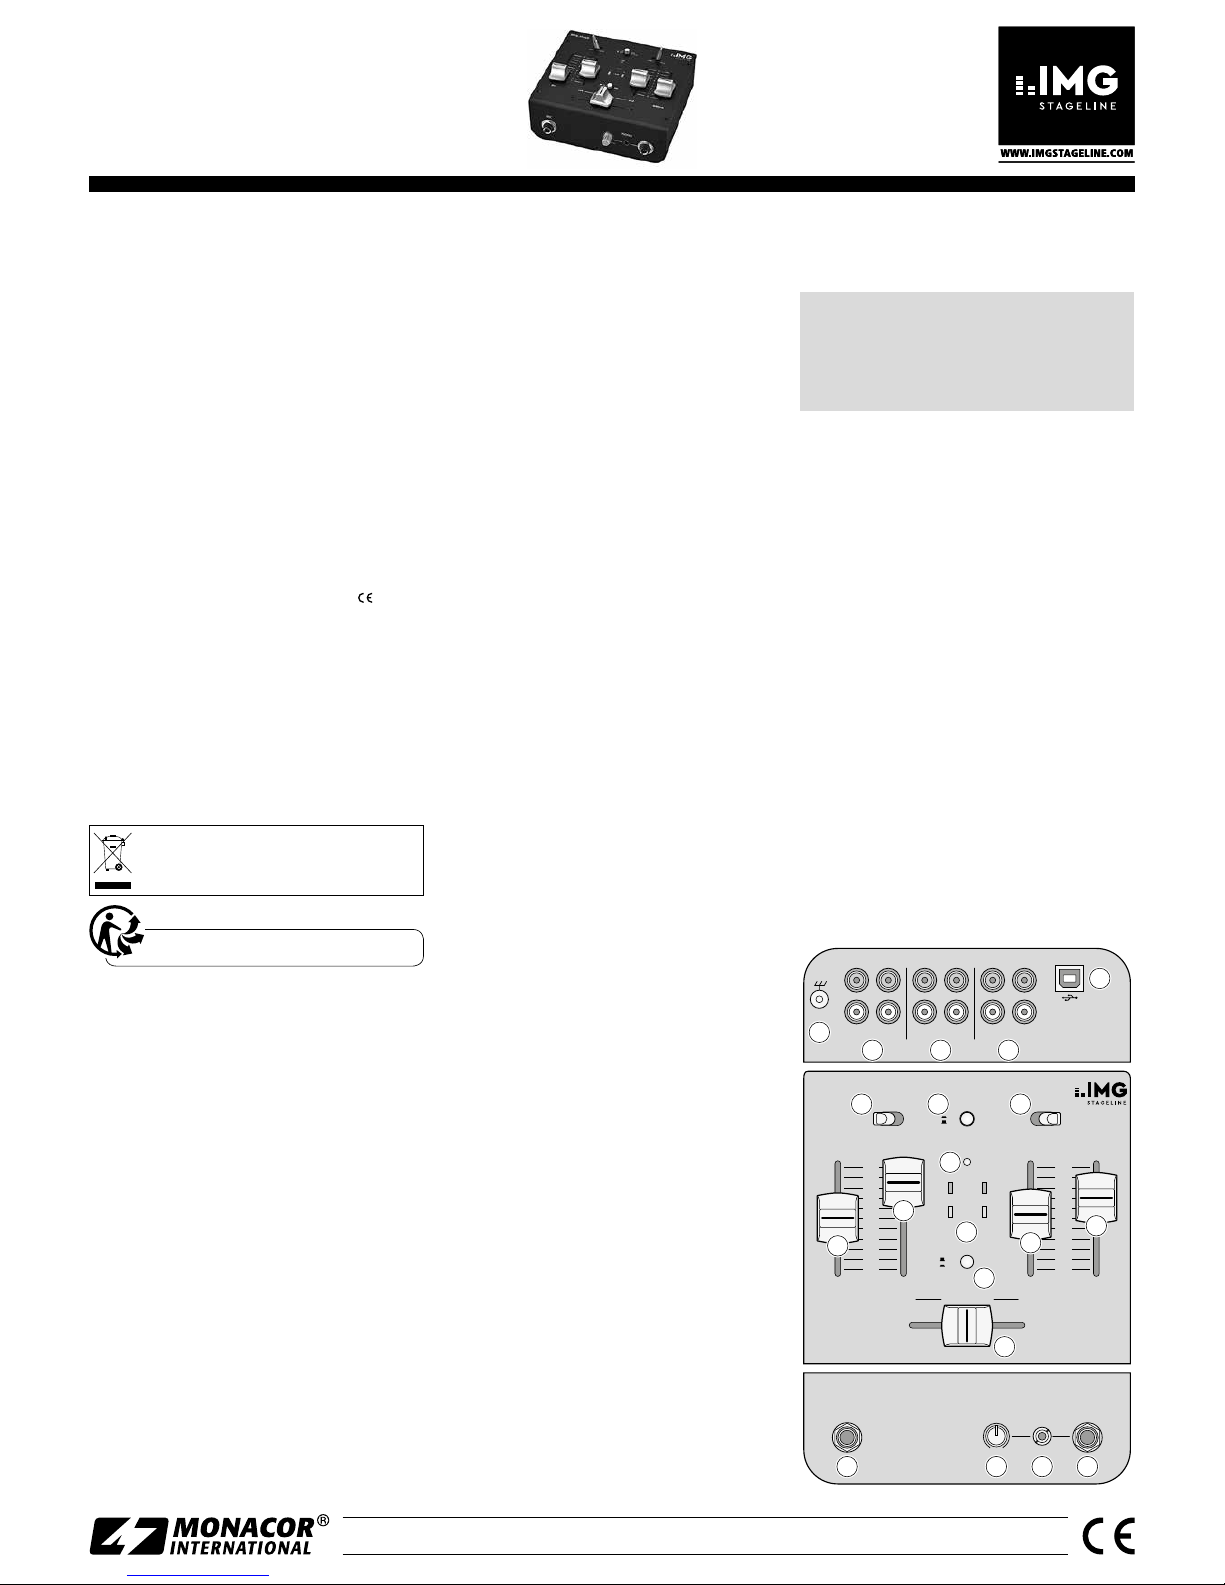
PFL
USB
TO CH2
CH 1
CH 2
ON
OFF
0
1
2
3
4
5
6
7
8
9
10
0
1
2
3
4
5
6
7
8
9
10
CROSSFADER
ON
+3dB
–3dB
L R
MPX-20USB
LINE2 PHONO2
CH2 MASTERCH1
LINE1 PHONO1
MIN MAX
MIC PHONES
MIC
GND
INPUT2
LINE2PHONO2RECMASTER
OUTPUT INPUT1
LINE1PHONO1
L
R
L
R
17 18 2019
16
15
14
9
10
11
12
13
6 7 8
2 3 4
5
1
3-Channel Audio Mixer
These instructions are intended for users without
specific technical knowledge. Please read these instructions carefully prior to operating the unit and
keep them for later reference.
1 Applications
The audio mixer MPX-20USB is suitable for any professional or private DJ applications. It is equipped with two
stereo input channels and a DJ microphone channel.
Headphones can be connected for prefader listening to
the input signals.
A USB audio interface is provided for connection to
a computer. The USB audio interface can be used both as
an output for digital recording of the audio mix and as an
input for feeding in audio data.
When the mixer is connected to a computer, the
power is supplied via the USB connection. If no computer
is used, a power supply unit with USB connection will be
required.
2 Important Notes
The unit corresponds to all relevant directives of the EU
and is therefore marked with .
•
The unit is suitable for indoor use only. Protect it against
dripping water and splash water, high air humidity and
heat (admissible ambient temperature range: 0 – 40 °C).
•
For cleaning only use a dry, soft cloth; never use water
or chemicals.
•
No guarantee claims for the unit and no liability for
any resulting personal damage or material damage will
be accepted if the unit is used for other purposes than
originally intended, if it is not correctly connected or
operated, or if it is not repaired in an expert way.
If the unit is to be put out of operation definitively, take it to a local recycling plant for a disposal which is not harmful to the environment.
3 Setting the Mixer into Operation
To prevent disturbing noise during connection / disconnection and an excessive volume when setting the mixer
into operation, set the fader MASTER (15) and the control
PHONES (18) to minimum.
1) Connect the audio sources to the appropriate input
jacks (2 and 3):
– Jacks LINE for the connection of units with line level
(e. g. MP3 / CD player)
– Jacks PHONO for the connection of turntables with
magnetic system; connect the ground cable of the
turntable (if available) to the ground screw GND (1).
Two audio sources can be connected to each of the
input channels CH 1 and CH 2. To switch be tween the
audio sources, use the appropriate selector switches
(6and 8).
2) A microphone can be connected to the jack MIC (17).
3) To monitor the input signals, connect stereo head-
phones (minimum impedance: 8 Ω) to the jacks
PHONES: 3.5 mm jack (19) or 6.3 mm jack (20).
4) The sum signal adjusted by means of the fader MAS-
TER (15) is available at the stereo outputs MASTER and
REC (4). These outputs can be used to connect the amplifier for PA applications and, for example, a recorder.
5) When operated without a computer, the mixer must
be supplied with power by means of a power supply
unit that is equipped with a USB connection and that
provides an output voltage of 5 V
⎓
and an output
current of 500 mA (e. g. the model PSS-1005USB from
MONACOR). Use the USB cable provided to connect
the power supply unit to the USB port (5), and then
connect the power supply unit to a mains socket. Once
the power supply has been connected, the mixer will
be switched on and the LED indicator ON (11) will
lightup.
3.1 Operating the mixer with a computer
To operate the mixer with a computer, the audio software supplied with the operating system or additionally
installed audio software may be used.
1) Start the computer and connect the USB port (5) to the
USB connection of the computer, using the USB cable
supplied. The computer will recognize the switched-on
mixer as a USB audio unit for audio input and audio
output.
Note: If the mixer is not recognized as a USB audio unit, install
the required drivers (default drivers of the operating system),
e. g. by means of the original CD of the operating system.
If necessary, restart the computer after installing the drivers.
2) Call up the reproduction / recording program used and
make the adjustments required for audio reproduction
via the mixer and / or audio recording from the mixer
(☞manual of the program). The mixer can then be
operated as described in chapter 4.
If no audio recording or audio reproduction is possible,
check in the system settings of the computer if the USB interface has been selected for audio input or audio output.
Hint: If the mixer is connected to both a computer and to units
that are earthed via their mains cable (e. g. amplifiers), hum interference may occur due to ground loops. To eliminate the hum
interference, connect the mixer to the respective unit by means
of a ground isolator (e. g. FGA-40 from MONACOR).
4 Operation
1) Use the switches LINE / PHONO (6 and 8) to select the
signal sources for the input channels CH 1 and CH 2.
2) Use the button USB TO CH 2 (7) to define the input
signal that is to be sent to channel CH 2:
Button disengaged = input signal of the RCA jacks
INPUT 2 (3)
Button pressed = input signal of the USB port (5)
Note: Please note that there is a risk of feedback with
recordings via the USB port when the recording signal of the
computer is sent as an input signal to channel CH 2.
3) To make the basic adjustment, first open the fader
MASTER (15) to approximately 2⁄3 of its maximum.
4) Slide the crossfader (16) to the left stop and feed an
audio signal to channel CH 1. Use the fader (10) to
control the level of the channel. The output level is
indicated by the signal LEDs (12). The red LEDs +3 dB
should only light up briefly for level peaks. If they light
up permanently, close the fader accordingly.
5) Slide the crossfader to the right stop and adjust channel CH 2 in the same way. Then the crossfader can be
used to crossfade between channels CH 1 and CH 2.
To mix the signals of the two channels, slide the crossfader to its mid-position.
6) To adjust the definite volume of the output signal at
the jacks OUTPUT (4) and at the USB port (5), use the
fader MASTER, making sure that no distortions occur.
7) Use the fader MIC (9) to adjust the volume for announcements via a microphone connected to the jack
MIC (17).
8) The input channels CH 1 and CH 2 can be separately
monitored using headphones, even if a channel has
been faded out with the crossfader. Thus, it is possible
to choose the next title to be played, for example. Use
the button PFL (13) to select the channel:
Button disengaged = CH 1
Button pressed = CH 2
Use the control PHONES (18) to adjust the volume of
the headphones.
WARNING! Never adjust the audio system and the headphones to a very high volume. Permanent high volumes
may damage your hearing! Your ear will get accustomed
to high volumes which do not seem to be that high any
more after some time. Therefore, do not further increase
a high volume after getting used to it.
5 Specifications
Inputs
(sensitivity/ impedance)
MIC: . . . . . . . . . . 1 mV/ 1 kΩ
PHONO:. . . . . . . . . 9 mV/ 63 kΩ
LINE: . . . . . . . . . . 450 mV/ 17 kΩ
Output level
MASTER, REC:. . . . . . 1 V
Headphone impedance: . . . . ≥ 8 Ω
USB interface: . . . . . . . . . . . USB 2.0, port type B
Frequency range:
. . . . . . . . . 20 – 20 000 Hz
THD: . . . . . . . . . . . . . . . . . . < 0.1 %
S / N ratio: . . . . . . . . . . . . . . . 63 dB (unweighted)
Power supply: . . . . . . . . . . . . 5 V⎓ / 500 mA
via USB interface
Dimensions:
. . . . . . . . . . . . . 150 × 70 × 140 mm
Weight: . . . . . . . . . . . . . . . . 700 g
Suitable operating system
for USB operation: . . . . . Windows 2000, Windows XP,
Windows Vista, Windows 7,
Mac OS X
Windows is a registered trademark of Microsoft Corporation in the
USA and other countries.
Mac OS is a registered trademark of Apple Computer, Inc. in the USA
and other countries.
Subject to technical modification.
MPX-20USB
Order No. 20.2860
English
ELECTRONICS FOR SPECIALISTS ELECTRONICS FOR SPECIALISTS ELECTRONICS FOR SPECIALISTS ELECTRONICS FOR SPECIALISTS ELECTRONICS FOR SPECIALISTS ELECTRONICS FOR SPECIALISTS ELECTRONICS
MONACOR INTERNATIONAL GmbH & Co. KG • Zum Falsch 36 • 28307 Bremen • Germany
Copyright
©
by MONACOR INTERNATIONAL. All rights reserved.
A-1486.99.02.01.2016
PFL
USB
TO CH2
CH 1
CH 2
ON
OFF
0
1
2
3
4
5
6
7
8
9
10
0
1
2
3
4
5
6
7
8
9
10
CROSSFADER
ON
+3dB
–3dB
L R
MPX-20USB
LINE2 PHONO2
CH2 MASTERCH1
LINE1 PHONO1
MIN MAX
MIC PHONES
MIC
GND
INPUT2
LINE2PHONO2RECMASTER
OUTPUT INPUT1
LINE1PHONO1
L
R
L
R
17 18 2019
16
15
14
9
10
11
12
13
6 7 8
2 3 4
5
1
Table de mixage audio 3 canaux
Cette notice d’adresse aux utilisateurs sans connaissances techniques particulières. Veuillez lire la présente notice avant le fonctionnement et conservez-la
pour pouvoir vous y reporter ultérieurement.
1 Possibilités d’utilisation
La table de mixage audio MPX-20USB est adaptée pour
des applications DJ dans le domaine professionnel et privé.
Elle est dotée de deux canaux d’entrée stéréo et d’un canal
micro DJ. Un casque peut être relié pour la préécoute des
signaux d’entrée.
Une interface audio USB est prévue pour une
connexion avec un ordinateur. L’interface peut servir de
sortie pour un enregistrement numérique du mixage
audio et d’entrée pour faire entrer des données audio.
L’alimentation s’effectue via le port USB si vous reliez
la table de mixage à un ordinateur ; pour un fonctionnement sans ordinateur, il faut utiliser un bloc secteur avec
port USB.
2 Conseils d‘utilisation importants
L’appareil répond à toutes les directives nécessaires de
l‘Union européenne et porte donc le symbole
.
•
L’appareil n’est conçu que pour une utilisation en intérieur. Protégez-le des éclaboussures, de tout type de
projections d‘eau, d’une humidité d‘air élevée et de la
chaleur (température ambiante admissible 0 – 40 °C).
•
Pour le nettoyage, utilisez un chiffon sec et doux, en
aucun cas de produits chimiques ou d’eau.
•
Nous déclinons toute responsabilité en cas de dommages corporels ou matériels résultants si l’appareil est
utilisé dans un but autre que celui pour lequel il a été
conçu, s‘il n’est pas correctement branché ou utilisé
ou s’il n’est pas réparé par une personne habilitée ; en
outre, la garantie deviendrait caduque.
Lorsque l’appareil est définitivement retiré du
service, vous devez le déposer dans une usine
de recyclage de proximité pour contribuer à son
élimination non polluante.
CARTONS ET EMBALLAGE
PAPIER À TRIER
3 Fonctionnement
Pour éviter tout bruit fort lors des branchements et éviter
un volume trop élevé lors de la mise en service, réglez les
réglages MASTER (15) et PHONES (18) sur le minimum.
1) Reliez les sources audio aux prises d’entrée (2 et 3)
correspondantes :
– prises LINE pour brancher des appareils avec niveau
ligne (par exemple lecteur MP3 / CD)
– prises PHONO pour brancher des platines disques
avec système magnétique ; fixez le câble de mise à
la terre de la platine disque (si prévu) à la borne de
masse GND (1).
On peut relier aux canaux d’entrée CH 1 et CH 2 respectivement deux sources audio. Avec le sélecteur
correspondant (6 et 8), on peut commuter entre les
sources audio.
2) On peut relier un microphone à la prise MIC (17).
3) Pour écouter les signaux d’entrée, on peut relier
un casque stéréo (impédance minimale 8 Ω) à une
des prises PHONES : prise jack 3,5 (19) ou prise jack
6,35(20).
4) Le signal master réglé avec le fader MASTER (15) est
disponible aux sorties stéréo MASTER et REC (4). On
peut relier ici l’amplificateur pour la sonorisation du
public et p. ex. un enregistreur.
5) Pour un fonctionnement sans ordinateur, l’alimenta-
tion de la table de mixage s’effectue via un bloc secteur
avec port USB, délivrant une tension de sortie de 5 V
⎓
et avec un courant de sortie de 500 mA (par exemple
le modèle PSS-1005USB de MONACOR). Reliez le bloc
secteur via le cordon USB livré au port USB (5) et à une
prise secteur. Une fois l’alimentation branchée, la table
de mixage est allumée, le témoin de fonctionnement
ON (11) brille.
3.1 Fonctionnement avec un ordinateur
Pour faire fonctionner la table de mixage avec un ordinateur, vous pouvez utiliser le logiciel audio livré avec le
système d’exploitation ou un logiciel audio installé en plus.
1) Démarrez l’ordinateur et reliez le port USB (5) via le
cordon USB livré au port USB de l‘ordinateur. La table
de mixage allumée est reconnue par l’ordinateur
comme appareil audio USB pour l’entrée audio et la
sortie audio.
Remarque : Si la table de mixage n’est pas reconnue comme
appareil audio USB, il faut installer les drivers nécessaires (drivers standard du système d’exploitation), par exemple via le
CD d’origine du système d’exploitation. Le cas échéant, redémarrez l’ordinateur après l’installation.
2) Appelez le programme de lecture / d’enregistrement et
effectuez les réglages nécessaires pour la lecture audio
via la table de mixage et / ou l’enregistrement audio
depuis la table de mixage (☞ notice du programme).
La table de mixage peut ensuite être utilisée comme
décrit au chapitre 4.
S’il n’y a pas d’enregistrement audio ou de lecture
audio, vérifiez dans les réglages système du système
d’exploitation de l’ordinateur si l’interface USB est
sélectionnée pour l’entrée audio ou la sortie audio.
Conseil : Si la table de mixage est reliée à un ordinateur et à des
appareils mis à la terre via leur cordon secteur (par exemple amplificateurs), des ronflements causés par des bouclages de masse
peuvent se produire. Pour les éliminer, on peut relier la table de
mixage à l‘appareil correspondant via un filtre séparateur galvanique (par exemple FGA-40 de MONACOR).
4 Utilisation
1) Sélectionnez les sources de signal pour les canaux
d’entrée CH 1 et CH 2 avec les sélecteurs LINE / PHONO
(6et 8).
2) Avec la touche USB TO CH 2 (7), sélectionnez quel
signal d’entrée doit être appliqué sur le canal CH 2:
touche non enfoncée : signal d’entrée des prises RCA
INPUT 2 (3)
touche enfoncée : signal d’entrée du port USB (5).
Remarque : Faites attention aux risques de larsen en cas
d’enregistrements via le port USB si le signal d’enregistrement de l’ordinateur est attribué au canal CH 2 comme signal
d’entrée.
3) Comme réglage de base, poussez le fader MASTER (15)
à 2⁄3 environ.
4) Poussez le crossfader (16) entièrement vers la gauche
et appliquez un signal audio sur le canal CH 1. Réglez
le canal avec le fader (10). Vous pouvez voir le niveau
de sortie sur le VU-mètre à LEDs (12). Les LEDs rouges
+3 dB ne devraient briller brièvement que pour des
pointes de signal. Si elles brillent en continu, fermez le
fader en conséquence.
5) Poussez le crossfader entièrement vers la droite et
réglez le canal CH 2 de la même manière. Ensuite,
avec le crossfader, vous pouvez faire un fondu
enchaîné entre les canaux CH 1 et CH 2. Si les signaux
des deux canaux doivent être mixés, poussez le crossfader au milieu.
6) Réglez le volume définitif du signal de sortie aux prises
OUTPUT (4) et au port USB (5) avec le fader MASTER
sans avoir de distorsion.
7) Pour une annonce via un micro relié à la prise MIC (17),
réglez le volume avec le fader MIC (9).
8) On peut écouter séparément les canaux d’entrée CH 1
et CH 2 via un casque, même si un canal est déjà sorti
avec le crossfader. Ainsi, le titre suivant à lire peut être
recherché. Avec la touche PFL (13), sélectionnez le
canal :
Touche non enfoncée = CH 1
Touche enfoncée = CH 2
Réglez le volume du casque avec le réglage PHO-
NES(18).
AVERTISSEMENT ! Ne réglez pas le volume de l’installation audio et du casque trop fort. Un volume trop élevé
peut, à long terme, générer des troubles de l‘audition.
L‘oreille s‘habitue à des volumes élevés et ne les perçoit
plus comme tels au bout d‘un certain temps. Nous vous
conseillons donc de régler le volume et de ne plus le
modifier.
5 Caractéristiques techniques
Entrées
(sensibilité / impédance)
MIC : . . . . . . . . . . 1 mV/ 1 kΩ
PHONO : . . . . . . . . 9 mV/ 63 kΩ
LINE : . . . . . . . . . . 450 mV/ 17 kΩ
Niveau de sortie
MASTER, REC : . . . . . 1 V
Impédance casque : . . . . . . . ≥ 8 Ω
Interface USB : . . . . . . . . . . . USB 2.0, prise type B
Bande passante :
. . . . . . . . . . 20 – 20 000 Hz
Taux de distorsion : . . . . . . . . < 0,1 %
Rapport signal / bruit : . . . . . . 63 dB (non pondéré)
Alimentation : . . . . . . . . . . . . 5 V⎓ / 500 mA
via interface USB
Dimensions :
. . . . . . . . . . . . . 150 × 70 × 140 mm
Poids : . . . . . . . . . . . . . . . . . . 700 g
Systèmes d‘exploitation
adaptés pour le
fonctionnement USB :. . . . Windows 2000, Windows XP,
Windows Vista, Windows 7,
Mac OS X
Windows est une marque déposée de Microsoft Corporation aux EtatsUnis et dans les autres pays.
Mac OS est une marque déposée de Apple Computer, Inc. aux EtatsUnis et dans les autres pays.
Tout droit de modification réservé.
MPX-20USB
Référence num. 20.2860
Français
 Loading...