

Page 1
MPR-6 Bestell-Nr. • Order No. 21.0680
ELECTRONICS FOR SPECIALISTS ELECTRONICS FOR SPECIALISTS ELECTRONICS FOR SPECIALISTS ELECTRONICS FOR SPECIALISTS ELECTRONICS FOR SPECIALISTS ELECTRONICS
Stereo-Mikrofon-Vorverstärker
Diese Anleitung richtet sich an Benutzer ohne besondere Fachkenntnisse. Bitte lesen Sie die Anleitung vor dem Betrieb gründlich durch und heben
Sie sie für ein späteres Nachlesen auf.
DeutschEnglishFrançais
1 Einsatzmöglichkeiten
Mit dem Stereo-Mikrofonvorverstärker MPR-6 lassen
sich bis zu zwei Mikrofone an einen Line-Eingang einer
Hi-Fi-Anlage, eines Verstärkers oder eines Mischpultes
anschließen.
2 Hinweise für den sicheren Gebrauch
Die Geräte (Stereo-Mikrofonvorverstärker und Netzgerät) entsprechen allen relevanten Richtlinien der EU und
sind deshalb mit gekennzeichnet.
WARNUNG! Das Netzgerät wird mit lebensgefährlicher
Netzspannung versorgt. Nehmen Sie deshalb nie selbst
Eingriffe an diesem Gerät vor. Durch unsachgemäßes
Vorgehen besteht die Gefahr eines elektrischen Schlages.
Verwenden Sie die Geräte nur im Innenbereich. Schützen
•
Sie sie vor Tropf- und Spritzwasser, hoher Luftfeuchtigkeit
und Hitze (zulässiger Einsatztemperaturbereich 0 – 40 °C).
Verwenden Sie für die Reinigung nur ein trockenes,
•
weiches Tuch, niemals Chemikalien oder Wasser.
Werden die Geräte zweckentfremdet, nicht richtig
•
angeschlossen, falsch bedient oder nicht fachgerecht
repariert, kann keine Haftung für daraus resultierende
Sach- oder Personenschäden und keine Garantie für die
Geräte übernommen werden.
Sollen die Geräte endgültig aus dem Betrieb
genommen werden, übergeben Sie sie zur
umweltgerechten Entsorgung einem örtlichen
Recyclingbetrieb.
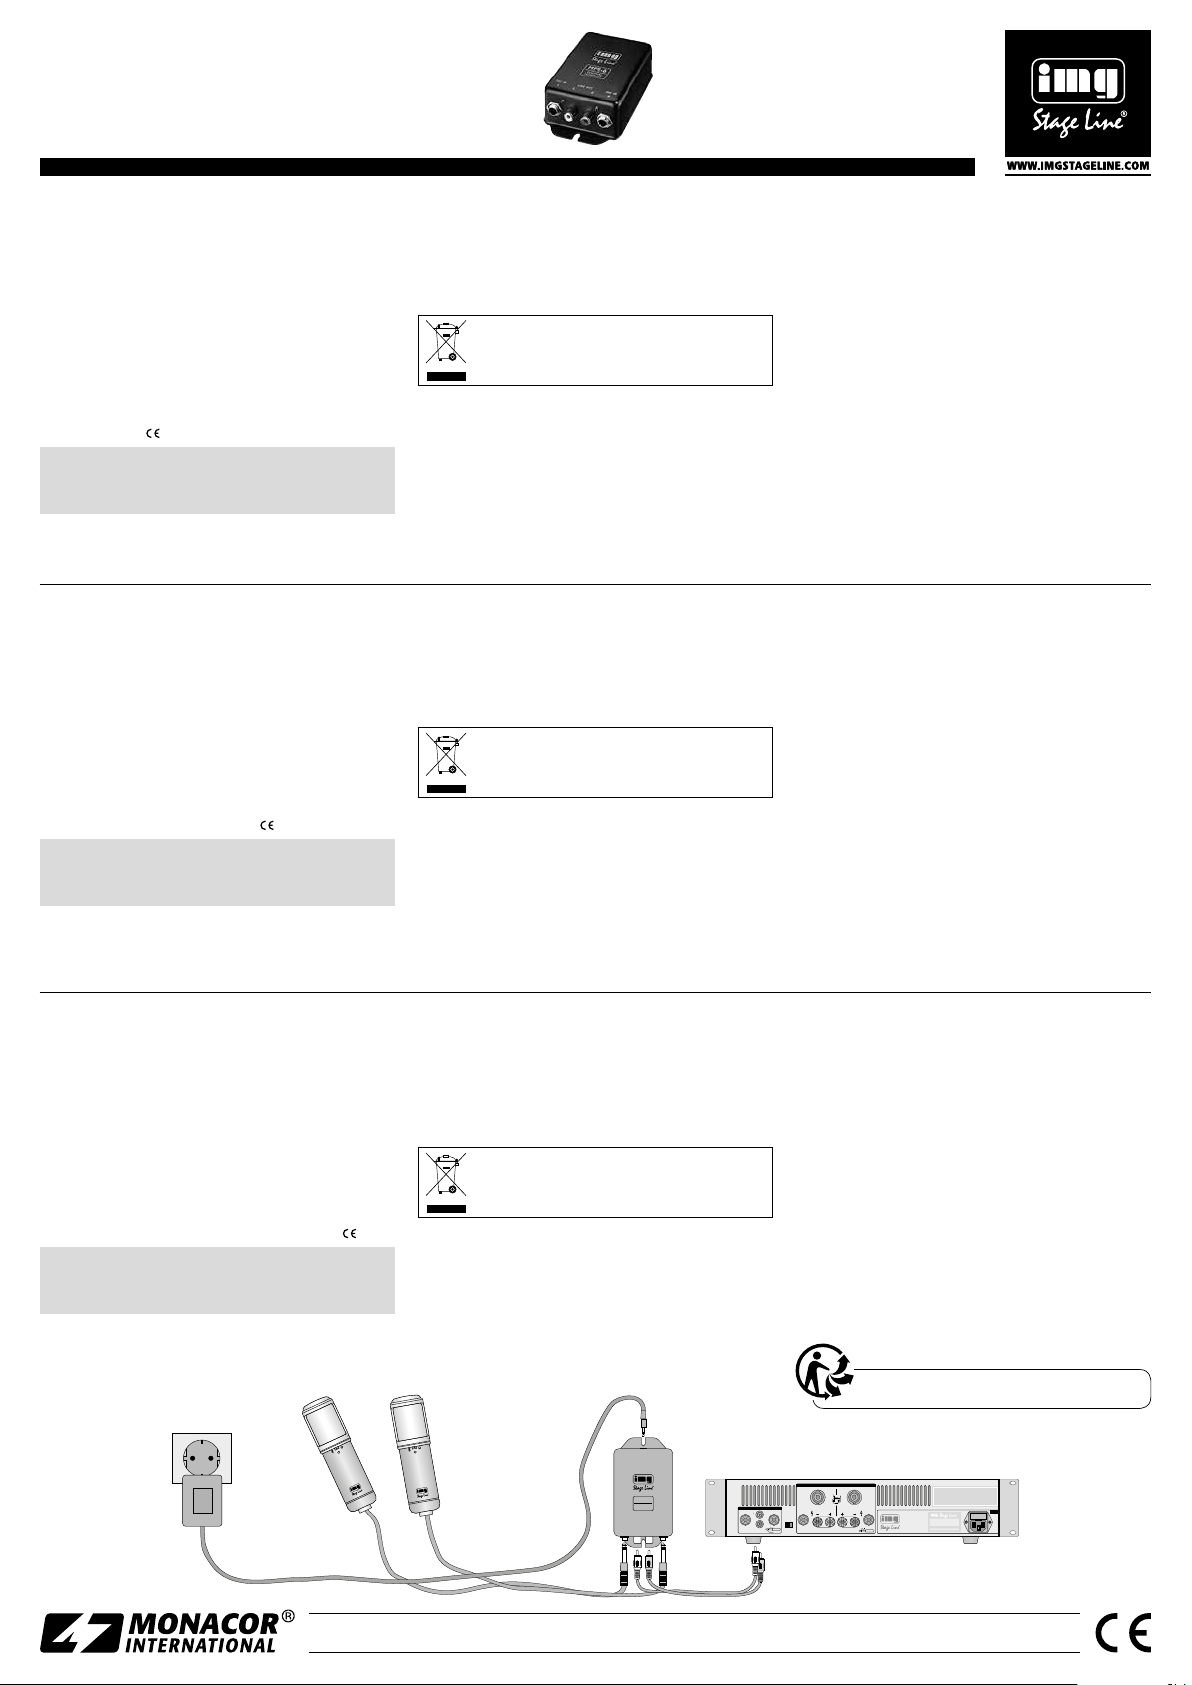
3 Anschluss (siehe Abbildung)
1) Ein bzw. zwei Mono-Mikrofon / e an eine bzw. beide
Eingangsbuchse / n MIC IN anschließen:
– Beim Anschluss von zwei Mikrofonen das Mikrofon
für den linken Kanal an Buchse „L“ anschließen und
das Mikrofon für den rechten Kanal an Buchse „R“.
– Wird nur ein Mikrofon an eine der beiden Eingangs-
buchsen „L” oder „R“ angeschlossen, so wird das
Mono-Mikrofonsignal auf beide Ausgangsbuchsen
gegeben.
2) Die Ausgangsbuchsen LINE OUT (weiße Buchse „L“
= linker Kanal, rote Buchse „R“ = rechter Kanal) mit
einem Line-Pegel-Eingang des nachfolgenden Gerätes
verbinden (mögliche Beschriftung dieses Eingangs:
LINE, AUX, TAPE, TUNER oder CD).
3) Das beiliegende Steckernetzgerät in die Buchse
12 V⎓ / 100 mA des Vorverstärkers und in eine Steckdose (230 V~ / 50 Hz) stecken. Wird das Gerät längere
Zeit nicht benutzt, sollte das Steckernetzgerät aus der
Steckdose gezogen werden, weil ständig ein geringer
Strom verbraucht wird.
4 Technische Daten
Eingang: � � � � � � � � � � � 7 mV max� / 10 kΩ, 2 × 6,3-mm-Klinke
Ausgang: � � � � � � � � � � 3,2 V max� / 47 kΩ, 2 × Cinch
Frequenzgang: � � � � � �5 – 40 000 Hz
Klirrfaktor: � � � � � � � � � 0,05 %
Störabstand: � � � � � � � �63 dB
Verstärkung: � � � � � � � � 53 dB
Stromversorgung: � � � � 12 V⎓ / 100 mA über beiliegendes Stecker-
netzgerät
Änderungen vorbehalten.
Stereo Microphone Preamplifier
These instructions are intended for users without
any specific technical knowledge. Please read the
instructions carefully prior to operation and keep
them for later reference.
1 Applications
The microphone preamplifier MPR-6 allows to connect up
to two microphones to one Line input of a HiFi system, an
amplifier, or a mixer.
2 Safety Notes
The units (stereo microphone preamplifier and power
supply unit) correspond to all relevant directives of the
EU and are therefore marked with .
WARNING! The power supply unit is supplied with hazardous mains voltage. Leave servicing to skilled personnel only. Inexpert handling or modification of the unit
may cause an electric shock hazard.
The units are suitable for indoor use only. Protect
•
them against dripping water and splash water, high air
humidity, and heat (admissible ambient temperature
range 0 – 40 °C).
Préamplificateur micro stéréo
Cette notice s’adresse aux utilisateurs sans connaissances techniques particulières. Veuillez lire la notice avant le fonctionnement et conservez-la pour
pouvoir, si besoin, vous y reporter ultérieurement.
1 Possibilités d’utilisation
Le MPR-6 permet de relier jusqu’à deux microphones à
une entrée Ligne d’une chaîne HiFi, d’un amplificateur
ou d’une table de mixage.
2 Conseils de sécurité et d’utilisation
Les appareils (préamplificateur micro stéréo et bloc secteur) répondent à toutes les directives nécessaires de
l’Union européenne et portent donc le symbole .
ATTENTION ! Le bloc secteur est alimenté par une tension dangereuse. Ne touchez jamais l’intérieur de l’appareil car, en cas de mauvaise manipulation, vous pouvez
subir une décharge électrique.
Les appareils ne sont conçus que pour une utilisation
•
en intérieur. Protégez-les des éclaboussures, de tout
type de projections d’eau, d’une humidité élevée et de
la chaleur (température ambiante admissible 0 – 40 °C).
230 V~ / 50 Hz
Netzgerät
power supply unit
bloc secteur
ECM-170
NE
For cleaning only use a dry, soft cloth; never use chem-
•
icals or water.
No guarantee claims for the units and no liability for
•
any resulting personal damage or material damage will
be accepted if the units are used for other purposes
than originally intended, if they are not correctly connected or operated, or not repaired in an expert way.
If the units are to be put out of operation
definitively, take them to a local recycling
plant for a disposal which is not harmful to the
environment.
3 Connection (see figure)
1) Connect one (two) mono microphone(s) to one (both)
input jack(s) MIC IN:
– For the connection of two microphones, connect the
microphone for the left channel to the jack “L” and
the microphone for the right channel to the jack “R”.
– If only one microphone is connected to one of the
input jacks “L” or “R”, the mono microphone signal
is fed to both output jacks.
Pour le nettoyage, utilisez un chiffon sec et doux, en
•
aucun cas de produits chimiques ou d’eau.
Nous déclinons toute responsabilité en cas de dom-
•
mages corporels ou matériels résultants si les appareils
sont utilisés dans un but autre que celui pour lequel
ils ont été conçus, s’ils ne sont pas correctement branchés, utilisés ou réparés par une personne habilitée ; en
outre, la garantie deviendrait caduque.
Lorsque les appareils sont définitivement retirés du service, vous devez les déposer dans une
usine de recyclage de proximité pour contribuer à leur élimination non polluante.
3 Branchements (voir schéma)
1) Reliez un (deux) microphone(s) à une (deux) prise(s)
d’entrée MIC IN :
– Lorsque vous branchez deux microphones, reliez
le microphone du canal gauche à la prise «L» et le
microphone du canal droit à la prise «R».
– Si un seul microphone est relié à une des deux prises
d’entrée «L» ou «R», le signal micro mono passe dans
les deux prises de sortie.
ECM-170
NE
Mikrofon(e)
microphone(s)
RL
MPR-6
MPR-6
MICROPHONE
PREAMPLIFIER
MIC IN
LINE OUT
MIC IN
L
L
R R
2) Connect the output jacks LINE OUT (white jack “L”=
left channel, red jack “R” = right channel) to a line
level input of the following unit (possible lettering of
this input: LINE, AUX, TAPE, TUNER, or CD).
3) Connect the supplied plug-in power supply to the
12 V⎓ / 100 mA jack of the preamplifier and to a mains
socket (230 V~ / 50 Hz). If the unit is not used for a certain period of time, the plug-in power supply should
be disconnected from the mains socket, otherwise
there is always a low power consumption.
4 Specifications
Input: � � � � � � � � � � � � �7 mV max� / 10 kΩ, 2 × 6�3 mm jack
Output: � � � � � � � � � � � � 3�2 V max� / 47 kΩ, 2 × RCA
Frequency response: � � 5 – 40 000 Hz
THD: � � � � � � � � � � � � � � 0�05 %
S / N ratio: � � � � � � � � � � 63 dB
Gain: � � � � � � � � � � � � �53 dB
Power supply: � � � � � � � 12 V⎓ / 100 mA via supplied plug-in power
supply unit
Subject to technical modification.
2) Reliez les prises de sortie LINE OUT (prise blanche «L» :
canal gauche, prise rouge «R» : canal droit) à l’entrée
niveau Ligne de l’appareil suivant (cette prise peut être
repérée : LINE, AUX, TAPE, TUNER ou CD).
3) Reliez maintenant le bloc secteur livré à la prise
12 V⎓ / 100 mA du préamplificateur puis à une prise
secteur 230 V~ / 50 Hz. N’oubliez pas de débrancher le
bloc secteur en cas de non utilisation prolongée car un
courant faible est en permanence utilisé.
4 Caractéristiques techniques
Entrée : � � � � � � � � � � � � 7 mV max� / 10 kΩ, 2 × prise jack 6,35
Sortie : � � � � � � � � � � � �3,2 V max� / 47 kΩ, 2 × RCA
Bande passante : � � � �5 – 40 000 Hz
Taux de distorsion : � � 0,05 %
Rapport signal / bruit : �63 dB
Amplification : � � � � � �53 dB
Alimentation : � � � � � �12 V⎓ / 100 mA (par le bloc secteur fourni)
Tout droit de modification réservé.
CARTONS ET EMBALLAGE
PAPIER À TRIER
Verstärker
amplifier
amplicateur
OUTPUTS (4Ω min.)
2–
1+1–2+
INPUTS
LEFT
RIGHT
L
LIFT GND
R
GND
SIGNAL
LEFTRIGHT
STA-750
1000W
PROPOWER AMP
MAINS
MONACOR INTERNATIONAL GmbH & Co. KG • Zum Falsch 36 • 28307 Bremen • Germany
Copyright© by MONACOR INTERNATIONAL. All rights reserved.
A-1040.99.05.01.2016
Page 2
MPR-6 Bestell-Nr. • Order No. 21.0680
ELECTRONICS FOR SPECIALISTS ELECTRONICS FOR SPECIALISTS ELECTRONICS FOR SPECIALISTS ELECTRONICS FOR SPECIALISTS ELECTRONICS FOR SPECIALISTS ELECTRONICS
Preamplificatore stereo per microfono
Queste istruzioni sono rivolte a utenti senza conoscenze tecniche specifiche. Vi preghiamo di leggerle
attentamente prima della messa in funzione e di
ItalianoEspañolPolski
conservarle per un uso futuro.
1 Possibilità d’impiego
Con il preamplificatore per microfono MPR-6 si possono
collegare fino a due microfoni con l’ingresso Line di un
impianto hi-fi, di un amplificatore o di un mixer.
2 Avvertenze di sicurezza
Gli apparecchi (preamplificatore stereo per microfono e
alimentatore rete) sono conformi a tutte le direttive rilevanti dell’UE e pertanto portano la sigla .
AVVERTIMENTO! L’alimentatore rete funziona con pericolosa tensione di rete. Non intervenire mai al suo interno; la manipolazione scorretta può provocare delle
scariche pericolose.
Far funzionare gli apparecchi solo all’interno di locali.
•
Proteggerli dall’acqua gocciolante e dagli spruzzi d’acqua, da alta umidità dell’aria e dal calore (temperatura
d’impiego ammessa fra 0 °C e 40 °C).
Per la pulizia usare solo un panno morbido, asciutto;
•
non impiegare in nessun caso prodotti chimici o acqua.
Nel caso d’uso improprio, di collegamenti sbagliati, di
•
impiego scorretto o di riparazione non a regola d’arte
degli apparecchi, non si assume nessuna responsa bilità
per eventuali danni consequenziali a persone o a cose
e non si assume nessuna garanzia per gli apparecchi.
Se si desidera eliminare gli apparecchi definitivamente, consegnarli per lo smaltimento ad
un’istituzione locale per il riciclaggio.
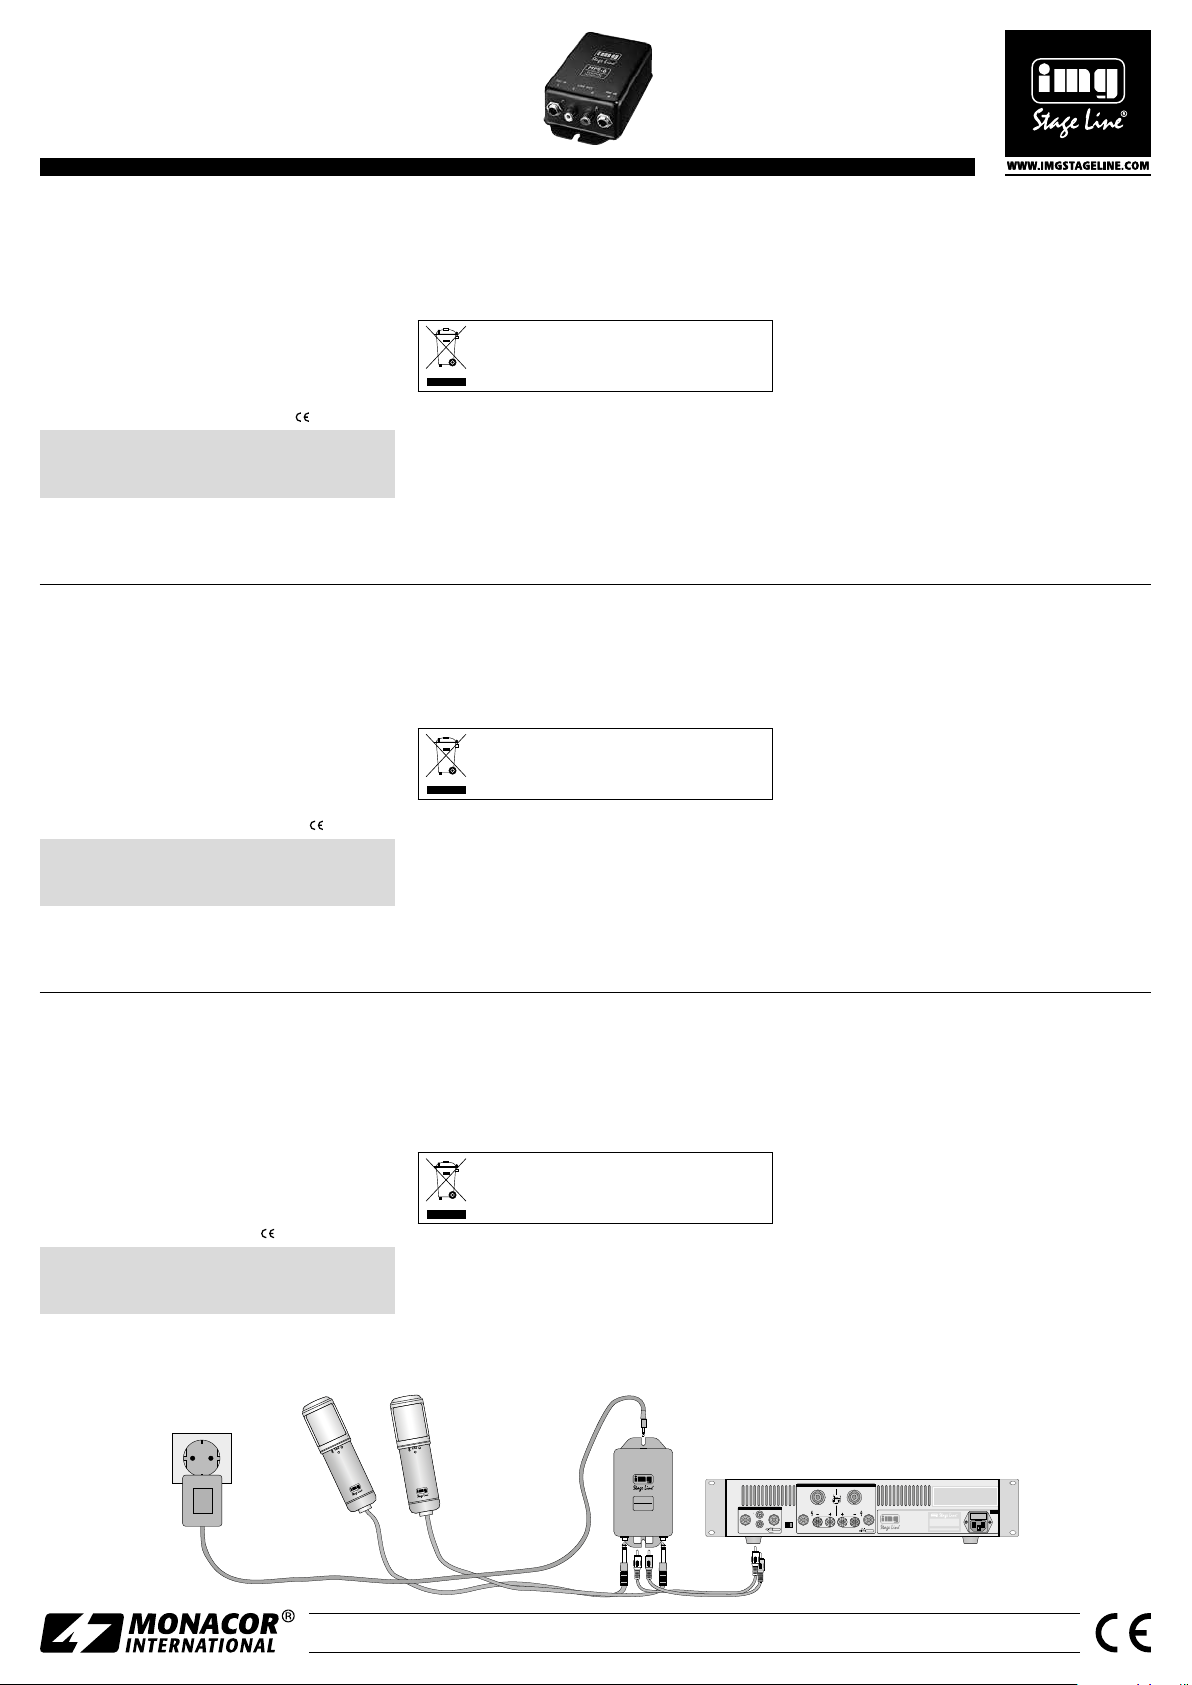
3 Collegamento (vedere la figura)
1) Collegare uno o due microfoni mono con la pre sa / le
prese d’ingresso MIC IN:
– Collegando due microfoni, usare per il microfono de
canale di sinistra la presa “L” e la presa “R” per il
microfono del canale di destra.
– Collegando un solo microfono ad una delle due prese
“L” o “R”, il segnale mono del microfono è presente
ad entrambe le prese.
2) Collegare le prese d’uscita LINE OUT (presa bianca
“L” = canale di sinistra, presa rossa “R” = canale di
destra) con un ingresso Line dell’apparecchio a valle
(può essere contrassegnato con LINE, AUX, TAPE,
TUNER oppure CD).
3) Collegare l’alimentatore in dotazione con la presa
12 V⎓ / 100 mA del preamplificatore e con una pre sa di
rete (230 V~ / 50 Hz). Se l’apparecchio non viene utilizzato per un certo tempo, conviene staccare l’alimentatore dalla rete in quanto consuma sempre una piccola
quantità di corrente.
4 Dati tecnici
Ingresso:� � � � � � � � � � �7 mV max� / 10 kΩ, 2 × presa jack 6,3 mm
Uscita: � � � � � � � � � � � � 3,2 V max� / 47 kΩ, 2 × cinch
Banda passante: � � � � � 5 – 40 000 Hz
Fattore di distorsione: 0,05 %
Rapporto S / R: � � � � � � � 63 dB
Amplificazione: � � � � �53 dB
Alimentazione � � � � � � 12 V⎓ / 100 mA con alimentatore in dotazione
Con riserva di modifiche tecniche.
Pre-amplificador micro estéreo
Estas instrucciones van dirigidas a usuarios sin ningún conocimiento técnico específico. Lea atentamente estas instrucciones antes de funcionamiento
y guárdelas para usos posteriores.
1 Posibilidades de utilización
El MPR-6 permite conectar hasta dos micrófonos a una
en trada Line de una cadena HiFi, de un amplificador o
de una mesa de mezclas.
2 Consejos de seguridad y de utilización
Los aparatos (pre-amplificador micro estéreo y alimentador) cumplen con todas las directivas relevantes por la UE
y por tanto están marcados con el símbolo .
¡ADVERTENCIA! El alimentador está alimentado por una
tensión peligrosa. No manipule nunca el interior del
aparato, en caso de manipulación inadecuada, podría
sufrir una descarga eléctrica.
Los aparatos están fabricados únicamente para una uti-
•
lización en interior. Protéjalos de salpicaduras, de todo
tipo de proyecciones de agua, de una humedad elevada
y del calor (temperatura ambiente admisible 0 – 40 °C).
Przedwzmacniacz mikrofonowy stereo
Niniejsza instrukcja przeznaczona jest dla użytkowników nie posiadających doświadczenia oraz wiedzy technicznej. Przed rozpoczęciem użytkowania prosimy o
zapoznanie się z instrukcją i zachowanie jej do wglądu.
1 Zastosowanie
Przedwzmacniacz mikrofonowy MPR-6 pozwala na podłączenie do dwóch mikrofonów do jednego wejścia liniowego systemu HiFi, wzmacniacza lub miksera.
2 Środki bezpieczeństwa
Urządzenia (przedwzmacniacz mikrofonowy stereo oraz
zasilacz) spełniają wszystkie wymogi norm UE i dlatego
posiadają oznaczenie certyfikatem .
UWAGA! Zasilacz urządzenia pracuje na wysokim napięciu. Wszelkie naprawy należy zlecić przeszkolonemu
personelowi. Nieprawidłowa obsługa grozi porażeniem
prądem elektrycznym.
Urządzenie przeznaczone jest do użytku jedynie
•
wewnątrz pomieszczeń. Należy chronić je przed działaniem wilgoci oraz wysokiej temperatury (dopuszczalna
temperatura otoczenia pracy to 0 – 40 ºC).
Para la limpieza, utilice un trapo seco y suave, no utilice
•
en ningún caso productos químicos o agua.
No podrá reclamarse garantía o responsabilidad algu-
•
na por cualquier daño personal o material resultante si
los aparatos se utilizan para otros fines diferentes a los
originalmente concebidos, si no se conectan o no se utilizan adecuadamente, o si no se reparan por expertos.
Cuando los aparatos están definitivamente
sacados del servicio, deposite los aparatos en
una fábrica de reciclaje de proximidad para
contribuir a una eliminación no contaminante.
3 Conexiones (ver esquema)
1) Conecte un (dos) micrófono(s) a una (dos) to ma(s) de
entrada MIC IN:
– Para la conexión de dos micrófonos, conectar el
micrófono del canal izquierdo en la toma “L” y el
micrófono del canal derecho en la toma “R”.
– Si solamente está conectado un micrófono en una de
las tomas de entrada “L” o “R”, la señal mono de
micro estará alimentada en las dos tomas de salida.
Do czyszczenia urządzenia należy używać suchej, mięk-
•
kiej tkaniny. Nie stosować wody, ani chemicznych środków czyszczących.
Producent ani dostawca nie ponoszą odpowiedzialno-
•
ści za wynikłe szkody (uszkodzenie sprzętu lub obrażenia użytkownika), jeśli urządzenie używano niezgodnie
z przeznaczeniem, nieprawidłowo podłączono bądź
poddano nieautoryzowanej naprawie.
Po całkowitym zakończeniu eksploatacji urządzenie należy oddać do punktu utylizacji
odpadów.
3 Podłączanie (patrz rysunek)
1) Podłączyć jeden lub dwa mikrofony do gniazd wejściowych MIC IN:
– W przypadku podłączania dwóch mikrofonów, pod-
łączyć mikrofon dla lewego kanału do gniazda“L”,
natomiast mikrofon dla prawego kanału do gniazda“R”.
– W przypadku podłączenia tylko jednego mikrofonu,
2) Conecte las tomas de salida LINE OUT (toma blanca L:
canal izquierdo, toma roja R: canal de recho) a la entrada nivel Line del aparato siguiente (esta toma puede
estar marcada: LINE, AUX, TAPE, TUNER o CD).
3) Conecte seguidamente el alimentador entregado a la
toma 12 V⎓ / 100 mA del pre-amplificador y después a
una toma sector 230 V~ / 50 Hz. Si el aparato no es utilizado por mucho tiempo, desconecte el alimentador
de red del zócalo porque continuamente un corriente
bajo está consumido.
4 Características técnicas
Entrada: � � � � � � � � 7 mV max� / 10 kΩ, 2 × jack 6,3
Salida: � � � � � � � � � 3,2 V max� / 47 kΩ, 2 × RCA
Banda pasante: � � 5 – 40 000 Hz
Tasa de distorsión: 0,05 %
S / N Ratio: � � � � � � � 63 dB
Amplificación: � � � 53 dB
Alimentación: � � � � 12 V⎓ / 100 mA vía alimentador de red entregado
Sujeto a modificaciones técnicas.
do jednego z gniazd wejściowych “L” lub “R”, sygnał
mono zostanie podany na oba gniazda wyjściowe.
2) Połączyć gniazda wyjściowe LINE OUT (białe gniazdo “L”= lewy kanał, czerwone gniazdo “R” = prawy
kanał) z wejściem linowym miksera lub wzmacniacza
(możliwe oznaczenia: LINE, AUX, TAPE, TUNER lub CD).
3) Podłączyć dołączony zasilacz do gniazda 12 V⎓ / 100 mA
na przedwzmacniaczu, a następnie do gnia-zdka sieciowego (230 V~ / 50 Hz). Jeżeli urządzenie nie będzie
przez dłuższy czas wykorzystywane, należy odłączyć
zasilacz od gniazdka sieciowego, gdyż nawet wyłączone urządzenie pobiera niewielką ilość prądu.
4 Specyfikacja
Wejścia: � � � � � � � � � � �7 mV max /10 kΩ, 2 × gniazdo 6,3 mm
Wyjścia: � � � � � � � � � � �3,2 V max / 47 kΩ, 2 × gniazda RCA
Pasmo przenoszenia: �5 – 40 000 Hz
THD: � � � � � � � � � � � � � � 0,05 %
Stosunek S / N:� � � � � � � 63 dB
Wzmocnienie: � � � � � � � 53 dB
Zasilanie: � � � � � � � � � �12 V⎓ / 100 mA z dołączonego zasilacza
Z zastrzeżeniem możliwości zmian.
230 V~ / 50 Hz
alimentatore rete
alimentador
zasilacz
microfon(i)
ECM-170
micrófono(s)
ECM-170
NE
NE
mikrofon(y)
RL
MPR-6
amplificatore
amplificador
wzmacniacz
OUTPUTS (4Ω min.)
2–
MPR-6
MICROPHONE
PREAMPLIFIER
MIC IN
LINE OUT
MIC IN
L
L
R R
INPUTS
LEFT
RIGHT
L
R
GND
SIGNAL
1+1–2+
LIFT GND
LEFTRIGHT
MONACOR INTERNATIONAL GmbH & Co. KG • Zum Falsch 36 • 28307 Bremen • Germany
Copyright© by MONACOR INTERNATIONAL. All rights reserved.
STA-750
1000W
PROPOWER AMP
MAINS
A-1040.99.05.01.2016
 Loading...