

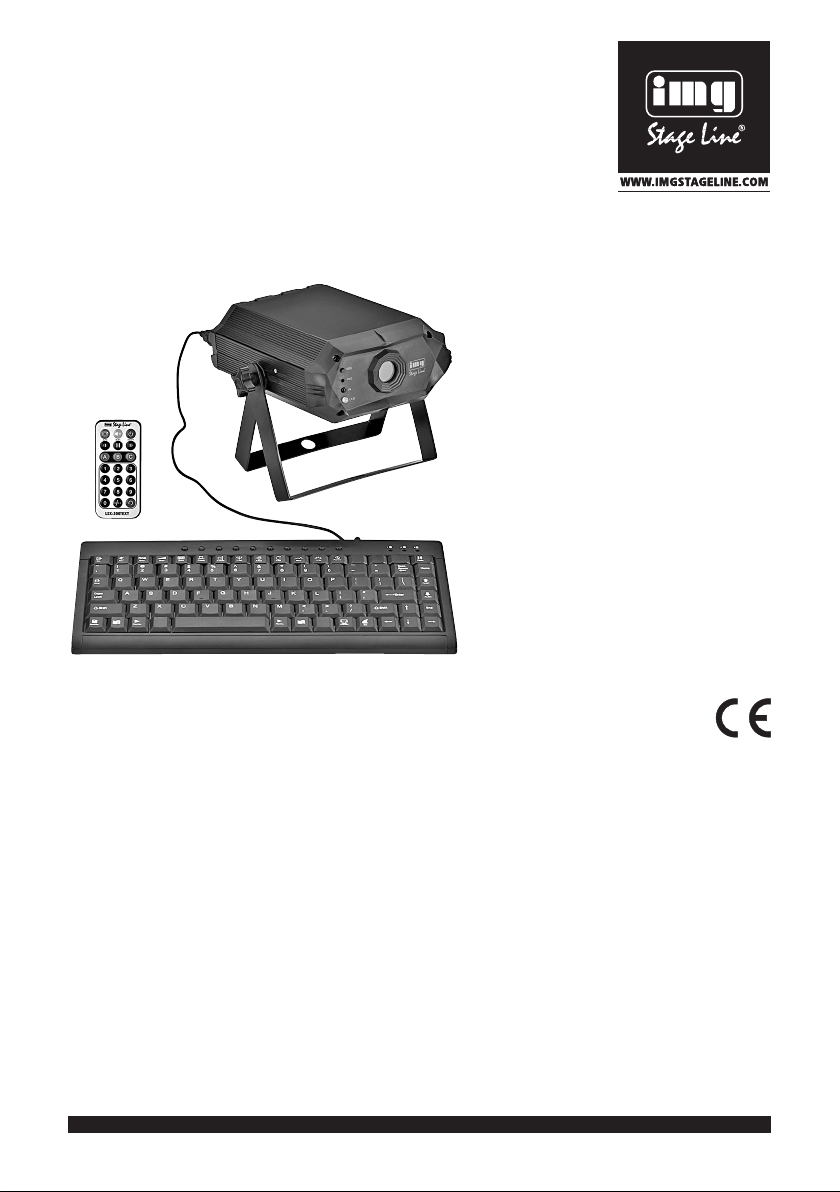
IMG Stageline LSX-300TEXT User manual
ELECTRONICS FOR SPECIALISTS ELECTRONICS FOR SPECIALISTS ELECTRONICS FOR SPECIALISTS ELECTRONICS FOR SPECIALISTS
LSX-300TEXT Bestellnummer 38.7020
BEDIENUNGSANLEITUNG
INSTRUCTION MANUAL
MODE D’EMPLOI
ISTRUZIONI PER L’USO
GEBRUIKSAANWIJZING
MANUAL DE INSTRUCCIONES
INSTRUKCJA OBSŁUGI
BRUKSANVISNING
KÄYTTÖOHJE
SIKKERHEDSOPLYSNINGER
Lasergerät zur Textprojektion
Laser Unit for Text Projection

2
ELECTRONICS FOR SPECIALISTS ELECTRONICS FOR SPECIALISTS ELECTRONICS FOR SPECIALISTS ELECTRONICS FOR SPECIALISTS
Deutsch . . . . . . . . . . . . . . . . . . Seite 4
English . . . . . . . . . . . . . . . . . . . Page 12
Français . . . . . . . . . . . . . . . . . . Page 20
Italiano . . . . . . . . . . . . . . . . . . Pagina 28
Nederlands . . . . . . . . . . . . . . . Pagina 36
Español . . . . . . . . . . . . . . . . . . Página 44
Polski . . . . . . . . . . . . . . . . . . . . Strona 52
Svenska . . . . . . . . . . . . . . . . . . Sidan 60
Suomi . . . . . . . . . . . . . . . . . . . . Sivulta 68
Dansk . . . . . . . . . . . . . . . . . . . . Sida 76
3

4
Deutsch
Lasergerät zur Textprojektion
Bitte lesen Sie diese Anleitung vor dem
Betrieb gründlich durch und heben Sie sie für
ein späteres Nachlesen auf. Auf der ausklappbaren Seite 3 finden Sie alle beschriebenen Bedienelemente und Anschlüsse.
Die Bedienung des Lasers ist einfach und
auf Veranstalter aller Art ausgerichtet. Während des Betriebs muss jedoch ein Laserschutzbeauftragter anwesend sein (
Kapitel 2.1). Treten Fragen auf, wenden Sie sich
bitte an Ihren Laserschutzbeauftragten.
Inhalt
1 Übersicht der Anschlüsse und
Bedienelemente . . . . . . . . . . . . . . . . 4
2 Hinweise für den sicheren Gebrauch 5
2.1 Hinweise speziell für Lasergeräte . . . . 5
2.2 Allgemeine Sicherheitshinweise . . . . . 5
3 Einsatzmöglichkeiten . . . . . . . . . . . . 5
4 Installation /Inbetriebnahme . . . . . . 5
5 Bedienung . . . . . . . . . . . . . . . . . . . . . 6
5.1 Text mit der Tastatur eingeben . . . . . . 6
5.2 Bedienung mit der Tastatur . . . . . . . . . 7
5.2.1 TEXT-Modus . . . . . . . . . . . . . . . . . . 7
5.2.2 AUTO-Modus . . . . . . . . . . . . . . . . . . 8
5.2.3 MUSIC-Modus . . . . . . . . . . . . . . . . . 8
5.2.4 CLOCK-Modus . . . . . . . . . . . . . . . . . 8
5.2.5 COUNTDOWN-Modus . . . . . . . . . . . 8
5.3 Bedienung mit der Fernbedienung . . . 9
5.3.1 Batterie auswechseln . . . . . . . . . . . . 9
5.3.2 Funktionsmöglichkeiten . . . . . . . . . . 9
5.4 Bedienung am Gerät . . . . . . . . . . . . . 10
5.5 Uhren-Akku aufladen . . . . . . . . . . . . 10
6 Technische Daten . . . . . . . . . . . . . . 11
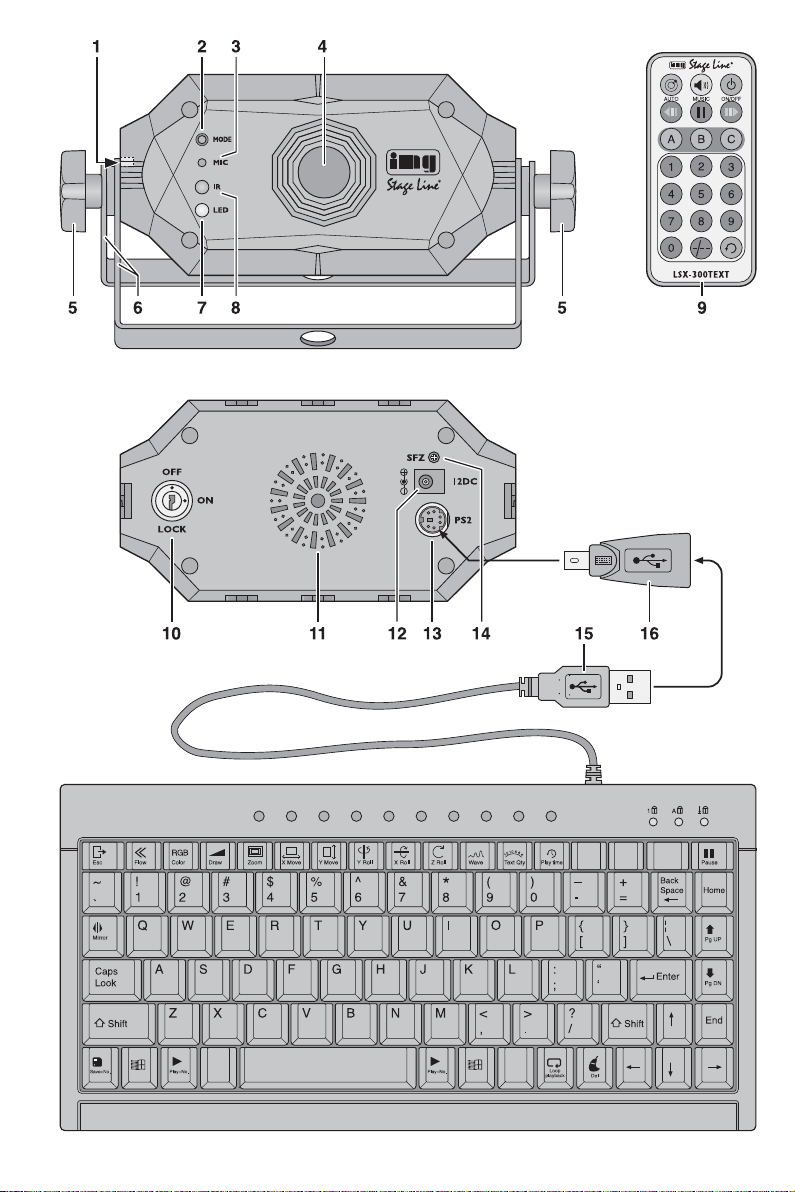
1 Übersicht der Anschlüsse
und Bedienelemente
1 Reset-Taste, auslösbar mit einem dün-
nen, elektrisch nichtleitenden Gegenstand (z. B. Kunststoffstäbchen)
2 Taste MODE:
zur Auswahl des Betriebsmodus die
Taste kurz drücken:
– Textmodus
– Showmodus (alle Themen)
– Showmodus (ein Thema)
– musikgesteuerter Ablauf
– Uhrzeit (und Datum)
Die LED (7) zeigt den Modus farblich an.
Zum Ausschalten des Geräts die Taste
2 s ge drückt halten; Wiedereinschalten
durch kurzes Drücken.
3 Mikrofon für einen musikgesteuerten
Wechsel der Grafiken
4 Austrittsöffnung für die Laserstrahlen
5 Feststellschrauben für die Montagebügel
6 Aufstell- und Montagebügel
7 LED zur Anzeige des Betriebsmodus
violett = Textmodus
rot = Showmodus (alle Themen)
rot blinkend = Showmodus (ein Thema)
blau = musikgesteuerter Ablauf
rot-violett wechselnd = Uhrzeit
blau-violett wechselnd = Countdown
8 IR-Sensor für die Fernbedienung
9 Fernbedienung (
Kap. 5.3)
10 Schlüsselschalter LOCK zum Ausschal-
ten der Laserstrahlen
(zum Sichern gegen unbefugten Betrieb
)
11 Ventilationsöffnungen für den Lüfter
12 Buchse 12DC zum Anschluss des bei-
liegenden Netzgerätes
13 Buchse PS2 zum Anschluss der Tasta-
tur über den beiliegenden Adapter (16)
14 Regler SFZ für die Projektionsgröße
(dünnen Schraubendreher verwenden)
15 USB-Stecker der Tastatur
16 Adapter zum Anschluss der Tastatur an
die Buchse PS2
5
Deutsch
2 Hinweise
für den sicheren Gebrauch
Das Gerät (einschließlich Netzgerät, Fernbedienung und Tastatur) entspricht allen relevanten Richtlinien der EU und ist deshalb mit
gekennzeichnet.
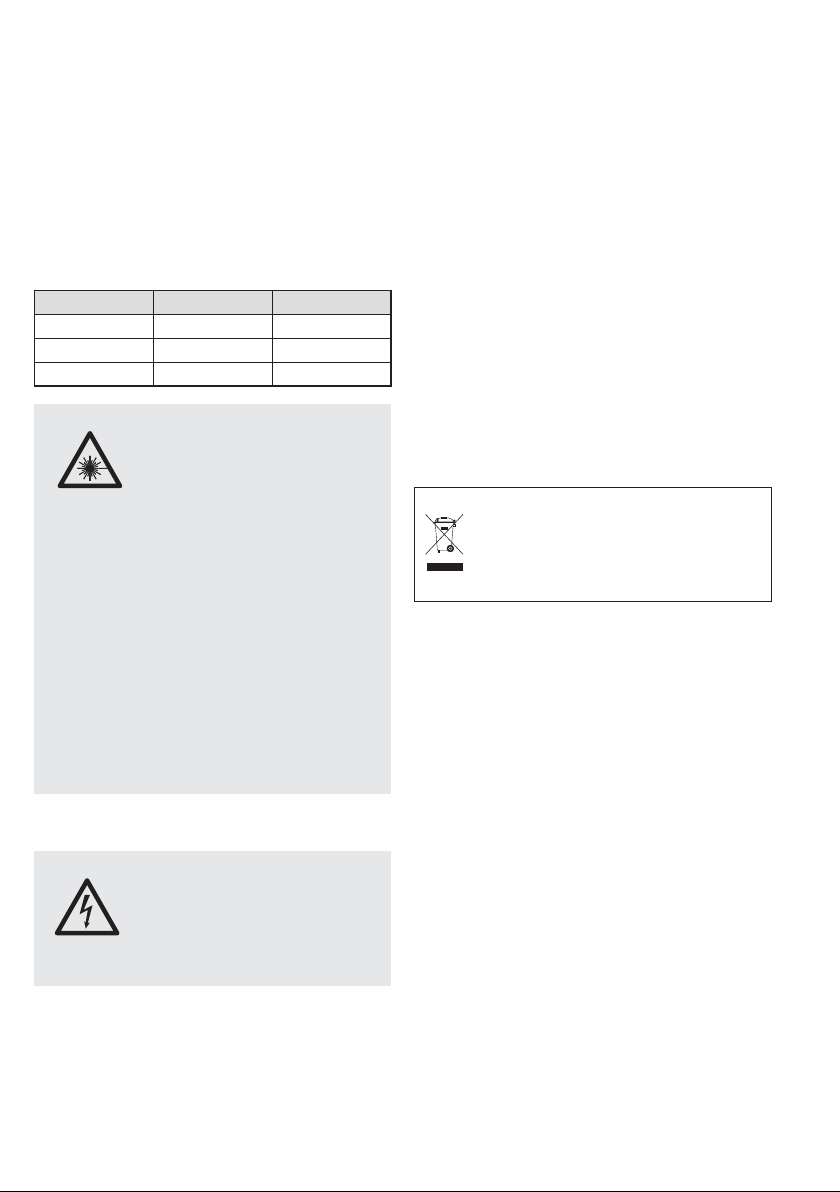
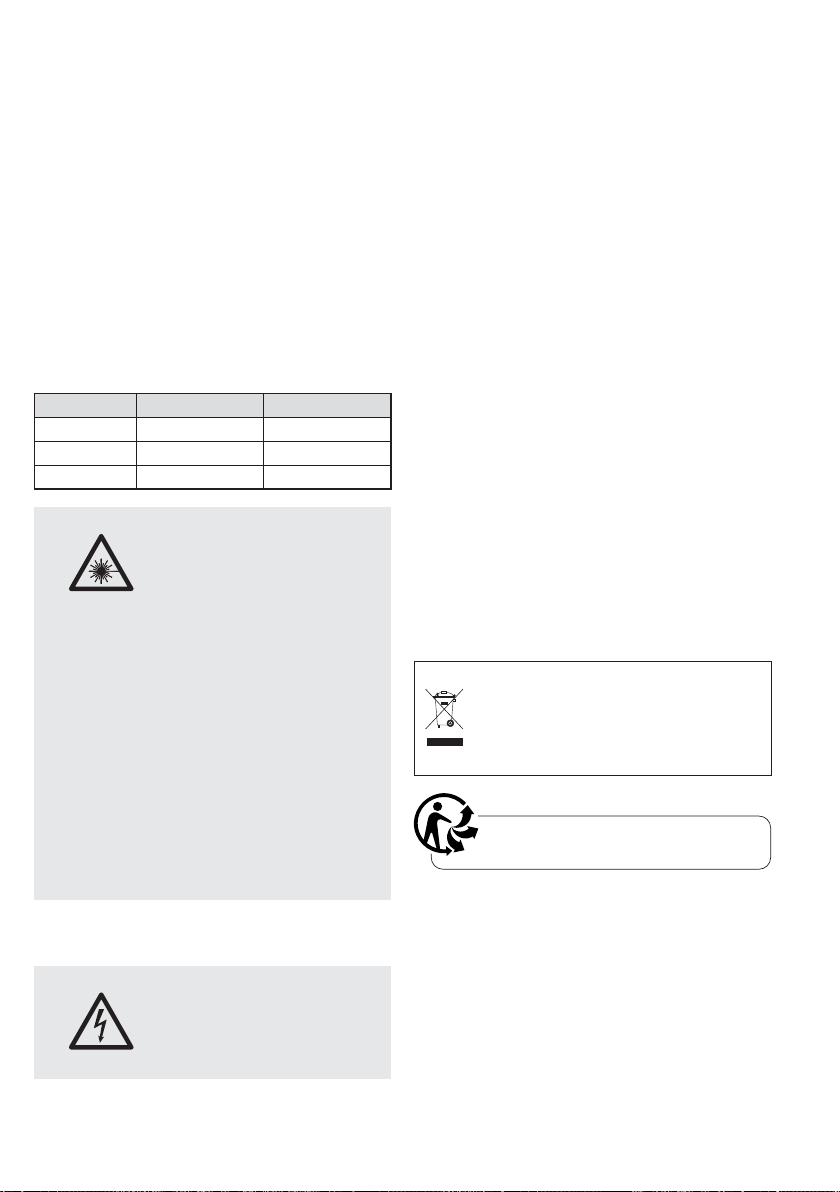
2.1 Hinweise speziell für Lasergeräte
Das Gerät entspricht der Laserklasse 3 B. Die
Laser haben folgende Leistungen und Wellenlängen:
2.2 Allgemeine Sicherheitshinweise
G
Verwenden Sie das Gerät nur im Innenbereich. Schützen Sie es vor Tropf- und Spritzwasser, hoher Luftfeuchtigkeit und Hitze (zulässiger Einsatztemperaturbereich 0 –40 °C).
G
Stellen Sie keine mit Flüssigkeit gefüllten
Gefäße, z. B. Trinkgläser, auf das Gerät.
G
Ziehen Sie sofort das Netzgerät aus der
Steckdose,
1. wenn sichtbare Schäden am Netzgerät
oder am Lasergerät vorhanden sind,
2. wenn nach einem Sturz oder Ähnlichem
der Verdacht auf einen Defekt besteht,
3. wenn Funktionsstörungen auftreten.
Geben Sie das Gerät in jedem Fall zur
Reparatur in eine Fachwerkstatt.
G
Verwenden Sie für die Reinigung des
Gehäuses nur ein trockenes, weiches
Tuch, niemals Wasser oder Chemikalien.
G
Wird das Gerät zweckentfremdet, nicht
sicher montiert, nicht richtig angeschlossen, falsch bedient oder nicht fachgerecht
repariert, kann keine Haftung für daraus
resultierende Sach- oder Personenschäden und keine Garantie für das Gerät übernommen werden.
3 Einsatzmöglichkeiten
Mit dem Lasergerät lassen sich beliebige
Texte, die über eine Tastatur eingetippt werden, auf eine geeignete Fläche projizieren.
Alternativ können auch verschiedene Grafiken zu unterschiedlichen Themen (wie z. B.
Geburtstag, Hochzeit, Jahreswechsel) oder
die Uhrzeit und das Datum projiziert werden
oder ein Countdown-Ablauf. Das Gerät lässt
sich z. B. auf Bühnen, in Diskotheken und bei
Verkaufsveranstaltungen einsetzen.
4 Installation / Inbetriebnahme
Das Lasergerät muss fachgerecht installiert
und sicher montiert werden. Die Person, die
das Gerät zusammen mit allen Zusatzkomponenten (z. B. Spiegel, Linsen, Projektionsfläche) zu einer Lasereinrichtung aufbaut, wird
rechtlich zum Hersteller dieser Einrichtung.
Beachten Sie unbedingt die Warnhinweise
im Kapitel 2.1.
WARNUNG 1. Das Gerät muss so installiert
werden, dass niemand direkt
in den Laserstrahl blicken
kann. Schon eine kurze Einstrahlung auf die Netzhaut kann diese
dauerhaft schädigen. Unbeabsichtigte
Reflexionen müssen verhindert werden.
2. Der Laserbereich muss während des
Betriebs abgegrenzt und gekennzeichnet
sein.
3. Es muss ein Laserschutzbeauftragter
schriftlich bestellt werden und während
des Betriebs anwesend sein (Berufsgenossenschaftliche Vorschrift BGVB2).
4. Der Betrieb des Lasers muss bei der
Berufsgenossenschaft und beim Gewerbeaufsichtsamt angezeigt werden.
Soll das Gerät endgültig aus dem
Betrieb genommen werden, übergeben Sie es zur umweltgerechten Entsorgung einem örtlichen Recyclingbetrieb.
WARNUNG Das Netzgerät wird mit lebens-
gefährlicher Netzspannung versorgt. Nehmen Sie deshalb niemals selbst Eingriffe an dem
Gerät vor! Es besteht die Gefahr eines elektrischen Schlags.
Leistung Wellenlänge
roter Laser 150 mW 650 nm
grüner Laser 50 mW 532 nm
blauer Laser 100 mW 450nm
6
Deutsch
1) Das Gerät mit den Montagebügeln (6) an
geeigneter Stelle festschrauben, z. B. mit
einer stabilen Montageschraube oder mit
einer Lichtstrahler-Halterung (C-Haken)
an einer Traverse.
Zum Ausrichten die zwei Feststellschrauben (5) der Montagebügel lösen.
Die Neigung des Gerätes einstellen und
die Schrauben wieder fest anziehen.
2) Alternativ lässt sich das Gerät auch frei
aufstellen: Die Montagebügel so unter
dem Gerät spreizen, dass sie als Ständer
dienen. Die Feststellschrauben danach
festdrehen.
3) Zur Texteingabe die Tastatur mit ihrem
USB-Stecker (15) über den Adapter (16)
an die Buchse PS2 (13) anschließen. Bei
Bedarf das beiliegende 5-m-Verlänge rungskabel verwenden. (Zur Projektion
gespeicherter Texte braucht die Tastatur
jedoch nicht angeschlossen zu werden.)
4) Zur Stromversorgung das Netzgerät an
die Buchse 12DC (12) anschließen und in
eine Steckdose (230 V~ / 50 Hz) stecken.
Damit ist das Gerät eingeschaltet; die LED
(7) leuchtet in der Farbe des zuletzt ge wählten Betriebsmodus.
5) Zum Einschalten des Laserstrahls den
beiliegenden Schlüssel in das Schloss
LOCK (10) stecken und den Schlüssel in
die Position ON drehen.
6) Die gewünschte Projektionsgröße mit dem
Regler SFZ (14) einstellen. Dazu einen
dünnen Schraubendreher zur Hilfe nehmen.
7) Sollte das Gerät einmal nicht wie ge wohnt
funktionieren, kann durch Drücken der
Reset-Taste (1) das Gerät zurückgesetzt
werden. Die Taste mit einem dünnen, elektrisch nichtleitenden Gegenstand (z. B.
Kunststoffstäbchen) durch die Ge häusebohrung betätigen.
5 Bedienung
Die Tastatur bietet die meisten Funktionen.
Mit der Fernbedienung sind viele, aber nicht
alle Funktionen steuerbar. Am Gerät direkt
lässt sich mit der Taste MODE nur der
Betriebsmodus auswählen und der Laserstrahl ein- / ausschalten.
5.1 Texte mit der Tastatur eingeben
1) Die Taste drücken. Es wird „1. TEXT“
projiziert, d. h. es ist der Textmodus angewählt. (Zum Anwählen anderer Modi siehe
Kap. 5.2.)
2) Den Textmodus mit der
Enter
-Taste bestä-
tigen; der zuletzt projizierte Text erscheint.
3) Den Text mit der Taste
Del
löschen und
neu eintippen.
WARNUNG 1. Weil die Sicherheitsbestim-
mungen von Land zu Land
abweichen, müssen unbe-
dingt die Bestimmungen des
Landes beachtet werden, in dem das
Gerät betrieben wird!
2. Wird das Gerät an einer Stelle installiert,
unter der sich Personen aufhalten können, muss es zusätzlich gesichert werden
(z. B. durch ein Fangseil am Montage bügel; das Fangseil so befestigen, dass
der Fallweg des Gerätes nicht mehr als
20 cm betragen kann).
3. Die Montagestelle so wählen, dass während des Betriebs eine ausreichende
Luftzirkulation gewährleistet ist. Die Lüftungsöffnungen (11) dürfen auf keinen
Fall abgedeckt werden. Das Gerät muss
einen Mindestabstand von 20 cm zu an grenzenden Wänden haben und 50 cm
zur Projektionsfläche.
4. Beachten Sie, dass sehr schnelle Lichtwechsel bei fotosensiblen Menschen und
Epileptikern epileptische Anfälle auslösen
können!
5. Die Lasereinrichtung darf nicht ohne die
Anwesenheit eines Laserschutzbeauf-
tragten betrieben werden. Dieser sollte
bei Abwesenheit das Gerät mit dem
Schlüsselschalter (10) gegen unbefugten
Betrieb sichern.
4) Es stehen verschiedene Effekte zur Verfügung, die sich auch kombinieren lassen.
Das Einschalten eines Effekts, das Um schalten auf eine Variante (Zeichen „ / “ in
der folgenden Tabelle) und das Ausschalten
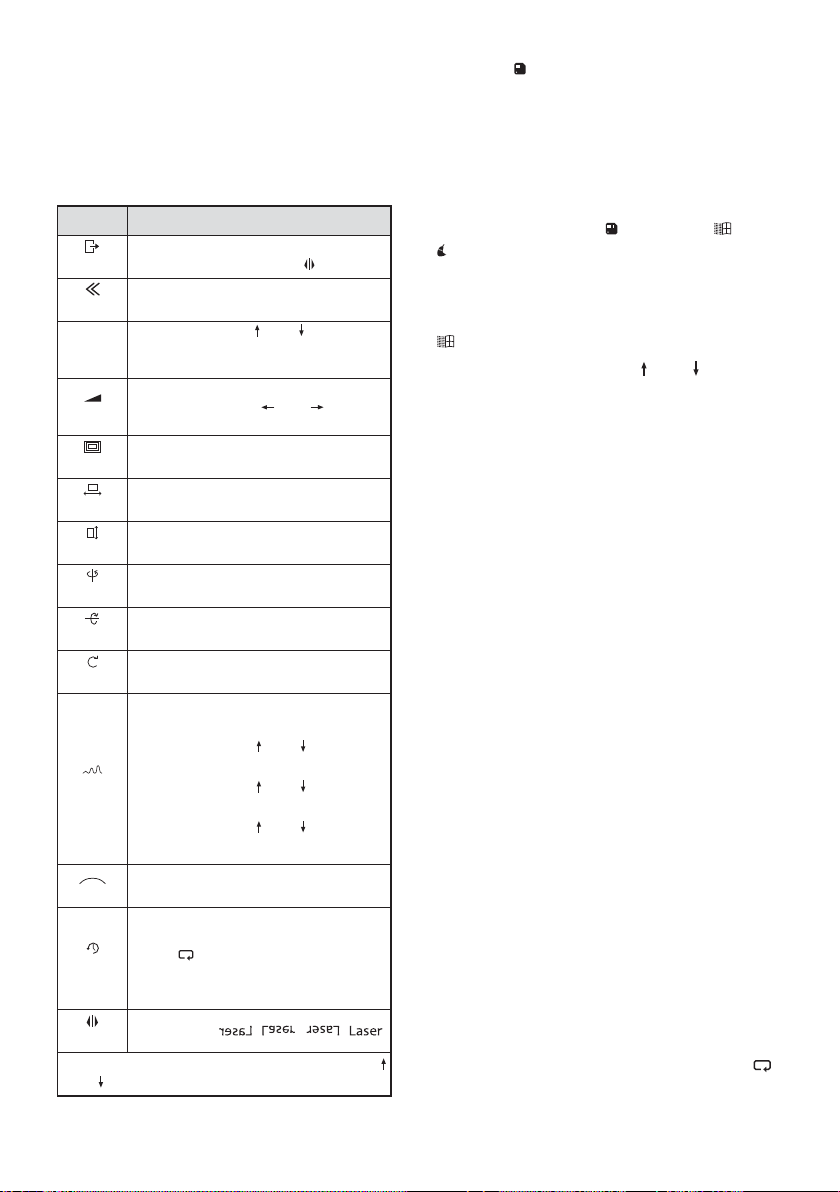
(nicht der Welleneffekt) erfolgt durch mehrfaches Drücken der zugehörigen Taste:
Texteffekte
5) Ist der Text fertig erstellt, zum Speichern
die Taste
Save + No.
gedrückt halten und
dann gleichzeitig eine Zifferntaste für die
Speichernummer (0 – 9) drücken. Durch
die Benutzung der Speichernummer 0 – 9
können 10 unterschiedliche Texte gespeichert werden.
6) Sollen alle gespeicherten Texte gelöscht
werden, die Tasten
Save + No.
, und
Del
gleichzeitig drücken.
5.2 Bedienung mit der Tastatur
1) Zum Wählen des Betriebsmodus die Taste
drücken. Es wird „1. TEXT“ projiziert.
2) Den Modus mit der Taste oder wählen:
1. TEXT = Texte eingeben oder abrufen
2. AUTO = Ablauf von Grafiken zu aus-
wählbaren Themen
3. MUSIC = musikgesteuerter Ablauf von
Grafiken zu auswählbaren
Themen
4. CLOCK = Uhrzeit und Datum projizieren
5. COUNTDOWN = Countdown-Ablauf
3) Mit der
Enter
-Taste den gewählten Modus
aufrufen.
5.2.1 TEXT-Modus
1) Zur Projektion von gespeicherten Texten
die Taste
▶
Play + No
gedrückt halten und
gleichzeitig die Zifferntaste (0 – 9) drücken, unter welcher der gewünschte Text
gespeichert wurde.
2) Die in der Tabelle Abb. 5 aufgeführten Text effekte lassen sich mit den zugehörigen
Tasten ein- / ausschalten. Sind Effektvarianten vorhanden, können diese durch weiteres Drücken der zugehörigen Taste ausgewählt werden.
3) Um auf den Text mit der nächsten oder
vorherigen Nummer zu springen, die Taste
⬆
Pg UP
oder
⬇
Pg DN
drücken. Ist unter
einer Nummer kein Text gespeichert, er scheint bei der Nr. auch keine Projektion.
4) Sollen alle gespeicherten Texte nach einander projiziert werden, die Taste
Loop playback
drücken.
7
Deutsch
Taste Texteffekt
Esc
alle Effekte aus,
außer Spiegelung (Taste Mirror)
Flow
Text durchläuft* buchstabenweise
den Projektionsbereich
RGB
Color
Farbe wählen mit oder / Farbwechsel*: gesamter Text / buchstabenweise / innerhalb der Buchstaben
Draw
Text wird ständig neu geschrieben*;
Schreibanfang mit und ein stellen
Zoom
Zoom*: groß ➞ klein / klein ➞ groß /
klein
➞ groß
X Move
Text läuft* um die X-Achse
vorwärts / rückwärts
Y Move
Text läuft* um die Y-Achse
aufwärts / abwärts
Y Roll
Text dreht* sich um die Y-Achse
rechts herum / links herum
X Roll
Text dreht* sich um die X-Achse
vor / zurück
Z Roll
Text dreht* sich um die Z-Achse
rechts herum / links herum
Wave
Welleneffekt
1. Drücken: Wellenhöhe mit der
Taste oder einstellen
2. Drücken: Wellenanzahl mit der
Taste oder einstellen
3. Drücken: Geschwindigkeit mit der
Taste oder einstellen
weiteres Drücken: wie 1., 2., 3.
Text Qty
1
2
1
0
8
6
4
Anzahl der Buchstaben, die projiziert
werden: 12 / 10/8/6/4
Play time
Projektionsdauer in Sek. eines Textes
bei der Funktion Loop Playback
(Taste , siehe Kapitel 5.2.1):
Dauer mit Zifferntasten eingeben und
mit Enter-Taste bestätigen.
Mirror
Spiegelung: / / /
* Die Geschwindigkeit lässt sich mit den Tasten
und einstellen.
8
Deutsch
5.2.2 AUTO-Modus
Der Ablauf eines bestimmten Themas lässt
sich mit einer Zifferntaste auswählen:
Themen für den AUTO-Modus
Zusätzliche Funktionen:
Pause
= Ablauf anhalten / fortfahren
Mirror
= Spiegelung: / / /
Esc
= zum Ablaufanfang springen
5.2.3 MUSIC-Modus
Bei diesem Modus wird der Ablauf der Grafiken durch über das Mikrofon (3) aufgenommene Musik oder andere ausreichend laute
Schallereignisse gesteuert. Bei jedem Schall ereignis, das eine Steuerung bewirkt, leuchtet die LED (7) kurz blau auf. Wird 10 s lang
kein Schallereignis registriert, schaltet sich
der Laserstrahl aus und die LED leuchtet
kontinuierlich blau. Mit dem nächsten ausreichend lauten Schallereignis schaltet sich der
Strahl wieder ein.
Die Auswahl der Themen erfolgt wie im
AUTO-Modus mit den Zifferntasten. Es sind
auch dieselben Zusatzfunktionen wie im
AUTO-Modus verfügbar (
Kap. 5.2.2).
Die Mikrofonempfindlichkeit lässt sich mit
der Fernbedienung einstellen, siehe Kap. 5.3.2,
Abb. 8, Taste MUSIC.
5.2.4 CLOCK-Modus
1. Die Uhrzeit kann alleine dargestellt werden
oder im Wechsel mit der Anzeige der Jahreszahl und der Anzeige Monat .Tag. Zum
Umschalten zwischen den beiden Darstellungen die Leerschritttaste kurz drücken.
2. Für eine gespiegelte Darstellung die Taste
Mirror
(mehrfach) drücken:
///
Datum und Uhrzeit einstellen:
1) Die
Enter
-Taste drücken. Es blinken die
Einer- und die Zehnerstelle der Jahreszahl.
2) Die Jahreszahl mit den Zifferntasten eintippen oder mit den Pfeiltasten und korrigieren.
3) Mit der Pfeiltaste auf die Monatszahl
springen und diese eintippen oder korrigieren.
4) Den Vorgang für den Tag, die Stunde und
die Minute wiederholen. Zum Zurückspringen auf eine vorherige Einstellmöglichkeit
die Pfeiltaste drücken.
5) Auf die Anzeige 12R oder 24R springen
und mit der Taste oder die 12- oder 24Stundenanzeige wählen.
6) Zum Speichern und zum Verlassen des
Einstellmodus die
Enter
-Taste abschließend drücken oder, wenn der Einstellvorgang abgebrochen soll, die Taste
Esc
drücken.
5.2.5 COUNTDOWN-Modus
Bei diesem Modus läuft eine Sekundenanzeige rückwärts. Beim Erreichen der Null wird
der Laserstrahl abgeschaltet.
1) Die
Enter
-Taste drücken, um die Rückzählzeit einzugeben. Die aktuelle Zeit in
Sekunden blinkt.
2) Die aktuelle Zeit ggf. mit der Taste
Back-
space
löschen und mit den Zifferntasten
die neue Zeit eintippen (max. 9999 s).
3) Die Eingabe mit der
Enter
-Taste bestäti-
gen. Das Blinken wird beendet.
4) Den Countdown mit der Leerschritttaste
starten.
5) Ein laufender Countdown lässt sich mit der
Leerschritttaste oder mit der Taste
Pause
unterbrechen und wieder fortsetzen.
6) Die aktuelle Rückzählzeit kann jederzeit
mit der Taste
Esc
wieder aufgerufen
werden. Zum erneuten Starten die Leerschritttaste drücken.
7) Die Projektion lässt sich mit der Taste
Mirror
wie bei den anderen Modi spiegeln.
Taste Thema
1 Jahreswechsel
2 Weihnachten
3 Liebe
4 Geburtstag
5 Party
6 Halloween
7 Musik
8 geometrische Figuren
9 Rechteck mit Wellenbewegungen
0 alle Themen nacheinander
9
Deutsch
5.3 Bedienung mit der Fernbedienung
Die Fernbedienung (Abb. 2) wird mit einer
Batterie geliefert. Vor dem ersten Betrieb die
Schutzfolie aus dem Batteriehalter ziehen.
Beim Drücken einer Taste die Fernbedienung
immer auf den Sensor IR (8) richten, sodass
dabei die LED (7) zur Bestätigung flackert.
Dabei muss Sichtverbindung zwischen Sensor und Fernbedienung bestehen.
Bei längerem Nichtgebrauch die Batterie
sicherheitshalber herausnehmen, damit die
Fernbedienung bei einem eventuellen Auslaufen der Batterie nicht beschädigt wird.
5.3.1 Batterie auswechseln
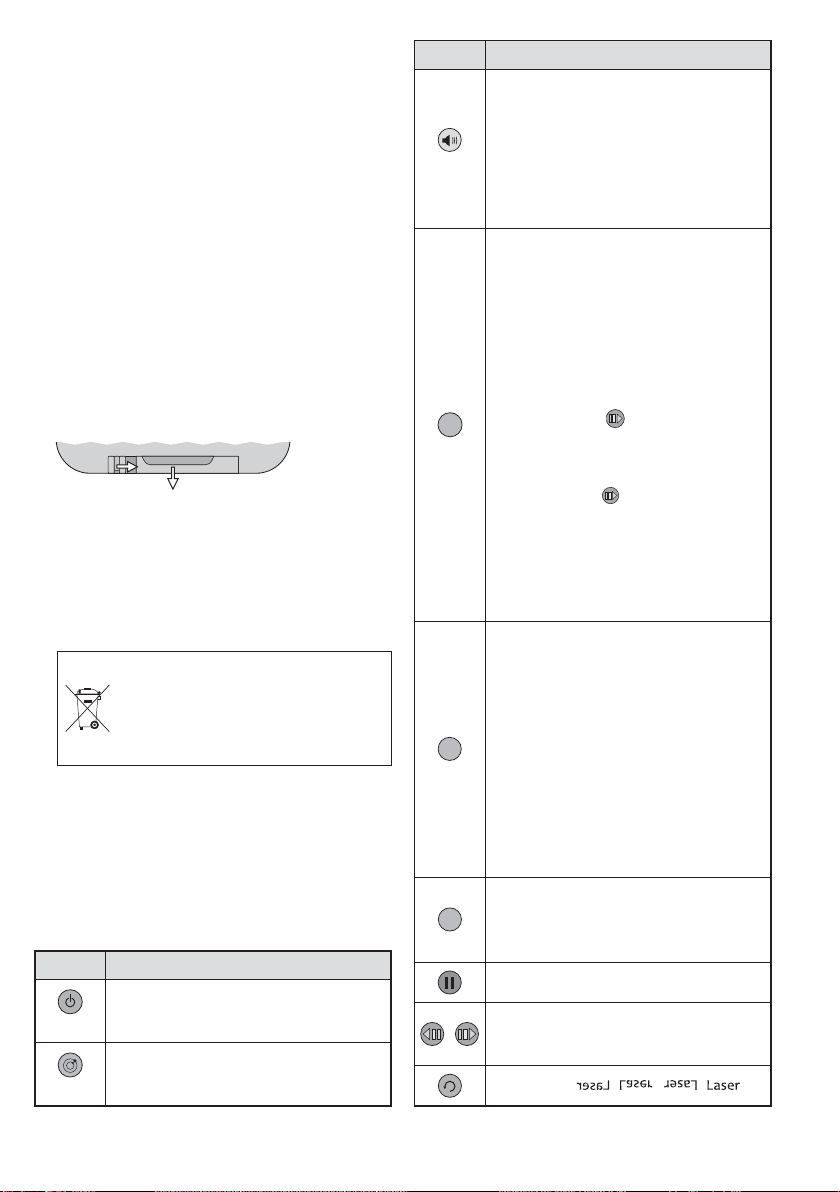
1) Die Verriegelung des Batteriehalters nach
rechts drücken (1. Pfeil in der Abb. 7) und
den Halter herausziehen (2. Pfeil).
Batterie wechsel
2) Die alte Batterie entfernen und die neue
Batterie (3-V-Knopfzelle vom Typ CR 2025)
mit dem Pluspol nach oben in den Halter
legen.
3) Den Halter zurück in die Fernbedienung
schieben.
5.3.2 Funktionsmöglichkeiten
Mit der Fernbedienung lassen sich alle Modi
wählen (Beschreibung der Modi siehe Kapitel
5.2.1 bis 5.2.5.) Die Bedienung ist jedoch
zum Teil abweichend von der mit der Tastatur
und kurz in der folgenden Tabelle erklärt.
Funktionen der Fernbedienung
Batterien dürfen nicht in den Hausmüll geworfen werden. Geben Sie
sie zur umweltgerechten Entsorgung nur in den Sondermüll (z. B.
Sammelbehälter im Einzelhandel).
1. 2.
Taste Funktion
MUSIC
MUSIC-Modus
Mit den Zifferntasten lassen sich die verschiedenen Themen auswählen.
Mikrofonempfindlichkeit einstellen: Taste
2 s gedrückt halten; dann mit einer Zifferntaste die Empfindlichkeit einstellen:
1 = am unempfindlichsten
9 = am empfindlichsten
A
CLOCK-Modus
Ein erneutes Drücken dieser Taste
wechselt zwischen der Anzeige nur der
Uhrzeit und der Uhrzeit im Wechsel mit
dem Datum.
Zum Einstellen von Uhrzeit und Datum:
1) Die Taste A gedrückt halten, bis die
Jahreszahl blinkt. Mit den Zifferntasten das Jahr eintippen.
2) Mit der Taste auf die Monatszahl
springen und den Monat eintippen.
Den Vorgang für den Tag, die Stunde
und die Minute wiederholen.
3) Mit der Taste auf die Anzeige 12R
oder 24R springen. Für eine 12-Stundenanzeige die Zifferntaste 1 drücken
oder für eine 24-Stundenanzeige die
Taste 2.
4) Zum Speichern der Einstellungen die
Taste A drücken.
B
COUNTDOWN-Modus
Zum Ändern der Rückzählzeit die Taste
B gedrückt halten, bis die Zeit blinkt. Mit
den Zifferntasten die Zeit eintippen.
Zum Starten des Countdowns die Taste
B drücken. Mit der Taste II lässt sich der
Countdown jederzeit unterbrechen und
wieder fortsetzen.
Zum erneuten Starten die Taste B ge -
drückt halten, bis die Zeit blinkt. Eine
andere Rückzählzeit eintippen oder
durch kurzes Drücken der Taste B den
Countdown starten.
C
TEXT-Modus
Nach dem Drücken dieser Taste mit den
Zifferntasten den gespeicherten Text
auswählen.
Ablauf anhalten / fortsetzen
Laserfarbe ändern
Zurück zu ursprünglichen Farbe:
Die Taste für den Modus drücken.
Spiegelung: / / /
Taste Funktion
ON / OFF
kurz drücken: Laserstrahl ein- / aus -
schalten
3 s gedrückt halten: Gerät auf Standby
AUTO
AUTO-Modus
Mit den Zifferntasten lassen sich die verschiedenen Themen auswählen.

10
Deutsch
5.4 Bedienung am Gerät
Durch (mehrfaches) Drücken der Taste MODE
lassen sich die folgenden Modi einschalten.
Die LED (7) zeigt den gewählten Modus farblich an.
– Textmodus (LED: violett)
– Showmodus mit allen Themen (LED: rot)
– Showmodus, ein Thema (LED: rot blin-
kend)
– musikgesteuerter Ablauf
(LED: leuchtet bei einem Schallereignis
blau auf)
Wird 10 s lang kein Schallereignis registriert, schaltet sich der Laserstrahl aus und
die LED leuchtet kontinuierlich blau. Mit
dem nächsten ausreichend lauten Schall ereignis schaltet sich der Strahl wieder ein.
Die Mikrofonempfindlichkeit lässt sich mit
der Fernbedienung einstellen, siehe dazu
Kap. 5.3.2, Abb. 8, Taste MUSIC.
– Projektion von Uhrzeit (und Datum)
(LED: rot und violett wechselnd)
Ob nur die Uhrzeit oder diese abwechselnd
mit dem Datum angezeigt wird, ist von der
letzten gewählten Einstellung mit der Tastatur oder mit der Fernbedienung abhängig.
Zum Ausschalten des Laserstrahls die Taste
MODE 2 s gedrückt halten, zum Wiedereinschalten kurz drücken.
5.5 Uhren-Akku aufladen
Im Lasergerät befindet sich ein Akkumulator,
damit die interne Uhr für die Zeitanzeige weiterläuft, wenn das Gerät ausgeschaltet ist.
Der Akkumulator wird automatisch geladen,
sobald das Lasergerät über das Netzgerät an
einer Steckdose angeschlossen ist.
Ein voll aufgeladener Akkumulator kann
die interne Uhr bis zu 2 Monaten aktuell halten. Sollte der Akkumulator einmal entladen
sein, müssen beim nächsten Betrieb lediglich
die Uhrzeit und das Datum neu eingestellt
werden.
WARNUNG Stellen Sie sich beim Betätigen
der Taste MODE (2) so neben
das Lasergerät, dass Sie nicht in
den Laserstrahl blicken können.

11
Deutsch
6 Technische Daten
Laser
Laserklasse: . . . . . . . 3 B
Leistung / Wellenlänge
roter Laser: . . . . . . . 150 mW/ 650 nm
grüner Laser: . . . . . 50 mW/ 532 nm
blauer Laser: . . . . . 100 mW/ 450 nm
Motoren für die Laserspiegel
Motortyp: . . . . . . . . . . Scanner
Motorgeschwindigkeit: 10 000pps
(Punkte pro
Sekunde)
Stromversorgung: . . . . . 12 V über beilie-
gendes Netzgerät
an 230 V~ / 50 Hz
Einsatztemperatur: . . . . 0 – 40 °C
Abmessungen (B × H × T)
Lasergerät: . . . . . . . . 185 × 75 × 185 mm
Tastatur: . . . . . . . . . . 300 × 12 × 150 mm
Fernbedienung: . . . . . 40 × 8 × 86 mm
Gewicht
Lasergerät: . . . . . . . . 1,2 kg
Tastatur: . . . . . . . . . . 325 g
Fernbedienung: . . . . . 16 g
Änderungen vorbehalten.
Diese Bedienungsanleitung ist urheberrechtlich für MONACOR®INTERNATIONAL GmbH & Co. KG ge schützt. Eine Reproduktion für eigene kommerzielle Zwecke – auch auszugsweise – ist untersagt.

Laser Unit for Text Projection
Please read these operating instructions
carefully prior to operating the unit and keep
them for later reference. All operating elements and connections described can be
found on the fold-out page 3.
The laser unit is easy to use and is
designed for event organisers of any type of
event. However, a laser safety adviser must
be present while the laser unit is being operated (
chapter 2.1). Please contact your
laser safety adviser in case of any questions.
Contents
1 Operating Elements
and Connections . . . . . . . . . . . . . . . 12
2 Safety Notes . . . . . . . . . . . . . . . . . . 13
2.1 Special notes for laser units . . . . . . . 13
2.2 General safety notes . . . . . . . . . . . . . 13
3 Applications . . . . . . . . . . . . . . . . . . . 13
4 Installing/ Setting into Operation . . 13
5 Operation . . . . . . . . . . . . . . . . . . . . . 14
5.1 Entering text with the keyboard . . . . . 14
5.2 Operating the unit with the keyboard 15
5.2.1 TEXT mode . . . . . . . . . . . . . . . . . . 15
5.2.2 AUTO mode . . . . . . . . . . . . . . . . . . 16
5.2.3 MUSIC mode . . . . . . . . . . . . . . . . . 16
5.2.4 CLOCK mode . . . . . . . . . . . . . . . . . 16
5.2.5 COUNTDOWN mode . . . . . . . . . . . 16
5.3 Operation with the remote control . . . 17
5.3.1 Replacing the battery . . . . . . . . . . . 17
5.3.2 Function options . . . . . . . . . . . . . . 17
5.4 Operation at the unit . . . . . . . . . . . . . 18
5.5 Recharging the clock battery . . . . . . 18
6 Specifications . . . . . . . . . . . . . . . . . 19
1 Operating Elements
and Connections
1 Reset button, can be activated by means
of an electrically non-conductive object
(e. g. small plastic pin)
2 Button MODE:
To select the operating mode, briefly
press the button:
– text mode
– show mode (all topics)
– show mode (one topic)
– music-controlled run
– time (and date)
The colour of the LED (7) indicates the
mode selected.
To switch the unit off, keep the button
pressed for 2 seconds; to switch it on
again, briefly press the button.
3 Microphone for music-controlled change
of graphics
4 Laser beam outlet
5 Setscrews for the mounting brackets
6 Brackets for setting up and mounting the
laser unit
7 LED to indicate the operating mode
purple = text mode
red = show mode (all topics)
red, flashing = show mode (one topic)
blue = music-controlled run
purple-red, alternating = time
blue-purple, alternating = countdown
8 IR sensor for remote control
9 Remote control (
chapter 5.3)
10 Key switch LOCK to switch off the laser
beams
(to protect the unit against unauthorized
operation)
11 Air vents for the cooling fan
12 Jack 12DC to connect the power supply
unit provided
13 Jack PS2 to connect the keyboard by
means of the adapter provided (16)
14 Control SFZ to adjust the size of the text
projected (use a thin screwdriver)
15 USB plug of the keyboard
16 Adapter to connect the keyboard to the
jack PS2
12
English

2 Safety Notes
The unit (including power supply unit, remote
control and keyboard) corresponds to all relevant directives of the EU and is therefore
marked with
.
2.1 Special notes for laser units
The unit corresponds to the laser class 3 B.
The lasers have the following power and
wavelengths:
2.2 General safety notes
G
The unit is suitable for indoor use only. Protect it against dripping water and splash
water, high air humidity and heat (admissible ambient temperature range: 0 – 40 °C).
G
Do not place any vessel with liquid on the
unit, e. g. a drinking glass.
G
Immediately disconnect the power supply
unit from the socket
1. if the power supply unit or the laser unit
is visibly damaged,
2. if a defect might have occurred after the
unit was dropped or suffered a similar
accident,
3. if malfunctions occur.
In any case the unit must be repaired by
skilled personnel.
G
For cleaning the housing, only use a dry,
soft cloth; never use water or chemicals.
G
No guarantee claims for the unit and no liability for any resulting personal damage or
material damage will be accepted if the unit
is used for other purposes than originally
intended, if it is not safely installed, if it is
not correctly connected or operated, or if it
is not repaired in an expert way.
3 Applications
The laser unit is designed to project any texts
entered via a keyboard onto a suitable surface. As an alternative, specific graphics
related to various topics (e. g. birthday, wedding, New Year) or the time and the date or a
countdown can be projected. The unit can be
used on stage, in discotheques or for sales
events, for example.
4 Installing /
Setting into Operation
The laser unit must be installed safely and in
an expert manner. The person who sets up
the unit together with all additional components (e. g. mirrors, lenses, projection surface) to create a laser effect installation is the
manufacturer of this installation from a legal
point of view. Make absolutely sure to
observe the warning notes in chapter 2.1.
If the unit is to be put out of operation
definitively, take it to a local recycling
plant for a disposal which is not
harmful to the environment.
WARNING The power supply unit uses dan-
gerous mains voltage. Leave
servicing to skilled personnel!
Inexpert handling or modification
may result in electric shock.
WARNING 1. Install the unit in such a way
that nobody can look directly
into the laser beam. Even a
short exposure to a laser
beam may permanently damage the
retina. Make sure to prevent any inadvertent beam reflections.
2. The laser area must be clearly separated
and marked while the laser unit is being
operated.
3. A laser safety adviser must be appointed
in writing and must be present while the
laser unit is being operated (regulation
BGV B2 of the German employersʼ liability insurance association).
4. The employersʼ liability insurance association and the health and safety executive
must be notified of the operation of the
laser unit.
Power Wavelength
Red laser 150 mW 650 nm
Green laser 50 mW 532 nm
Blue laser 100 mW 450 nm
13
English
1) Use the mounting brackets (6) to fasten
the unit at a suitable location, e. g. by
means of a stable mounting screw or a
support for lighting units (C hook) on a
crossbar.
To align the unit, loosen the two
setscrews (5) on the mounting brackets.
Tilt the unit as desired and then firmly
retighten the setscrews.
2) As an alternative, the unit can be set up as
desired: Spread the mounting brackets
below the unit so that they serve as a support. Then retighten the setscrews.
3) For entering texts, connect the keyboard
with its USB plug (15) to the jack PS2 (13)
by means of the adapter (16). If required,
use the 5 m extension cable provided.
(However, it is not necessary to connect
the keyboard for projecting saved texts.)
4) For power supply, connect the power supply unit to the jack 12DC (12) and to a
mains socket (230 V~ / 50Hz). This will
switch on the unit; the LED (7) will light up
in the colour of the operating mode most
recently selected.
5) To switch on the laser beam, insert the key
provided into the lock LOCK (10) and then
turn the key to the position ON.
6) Using a thin screwdriver, adjust the projection size desired by means of the control
SFZ (14).
7) If the unit fails to work as usual, it can be
reset by means of the Reset button (1):
Insert a thin, electrically non-conductive
object (e. g. small plastic pin) into the drill
hole of the housing to press the button.
5 Operation
Most functions are provided by the keyboard.
With the remote control, many (but not all)
functions can be controlled. At the unit, the
button MODE only allows to select the operating mode and to switch the laser beam on
and off.
5.1 Entering text with the keyboard
1) Press the key . “1. TEXT” will be projected, i. e. the text mode is selected.
(For selecting other modes, refer to chapter 5.2.)
2) Press the
Enter
key to confirm the text
mode; the text most recently projected will
appear.
3) Press the key
Del
to delete the text, and
then enter the text desired.
4) Various effects are available; they can be
combined, if required. Press the appropriate key repeatedly to switch an effect on,
WARNING 1. Since different safety regula-
tions apply in each country,
always make sure to observe
the regulations of the country
in which the unit is operated!
2. When installing the unit at a place where
people may walk or sit under it, additionally secure the unit (e. g. by means of a
safety rope fastened to the mounting
bracket; when fastening the safety rope,
make sure that the maximum falling distance of the unit will not exceed 20 cm).
3. Mount the unit at a location where sufficient air circulation is ensured during
operation. Never cover the air vents (11).
The minimum distance between the unit
and the adjoining walls must be 20 cm;
the minimum distance between the unit
and the projection surface must be 50 cm.
4.
Please note that fast changes in lighting
may trigger epileptic seizures with photosensitive persons or persons with epilepsy!
5. Only operate the laser unit with a laser
safety adviser being present. When
leaving the unit, the laser safety adviser
should use the key switch (10) to protect
the unit against unauthorized operation.
14
English
to go to a different variant (character “/ ” in
the following table) or to switch an effect
off (excluding the wave effect):
Text effects
5) Once the text has been created, save the
text: Keep the key
Save + No
pressed
and at the same time press a numeric key
for the storage location number (0 – 9). By
using the storage location numbers 0 – 9, it
is possible to save 10 different texts.
6) To delete all texts saved, press the keys
Save + No.
, and
Del
at the same
time.
5.2 Operating the unit
with the keyboard
1) Press the key to select the operating
mode. “1. TEXT” will be projected.
2) Use the key or to select the mode:
1. TEXT = to enter or retrieve texts
2. AUTO = to run graphics of selectable
topics
3. MUSIC = to run graphics of selectable
topics by music control
4. CLOCK = to project time and date
5. COUNTDOWN = to run a countdown
3) Press the Enter key to call up the mode
selected.
5.2.1 TEXT mode
1) To project saved texts, keep the key
▶
Play
+ No
pressed and at the same time press
the numeric key (0 – 9) to which the text
desired has been saved.
2) The text effects listed in table fig. 5 can be
switched on / off by means of the corresponding keys. If there are effect variants,
press the corresponding key again to
select them.
3) To go to the text that has been saved to the
following or previous number, press the
key
⬆
Pg UP
or
⬇
Pg DN
. There will be no
projection when a number is selected to
which no text has been saved.
4) To project all saved texts one after the
other, press the button
Loop playback
.
15
English
Key Text effect
Esc
All effects switched off
except mirroring (Key Mirror)
Flow
Text runs* through the projection
area (character by character)
RGB
Color
Select colour with or / colour
change*: entire text / character by
character / within the characters
Draw
Text is constantly rewritten*;
set text beginning with and
Zoom
Zoom*: big ➞ small / small ➞ big /
small
➞ big
X Move
Text moves* around the X axis
forwards / backwards
Y Move
Text moves* around the Y axis
upwards / downwards
Y Roll
Text rotates* around the Y axis
to the right / to the left
X Roll
Text rotates* around the X axis
forwards / backwards
Z Roll
Text rotates* around the Z axis
to the right / to the left
Wave
Wave effect
1stpress: set height of waves with
the key or
2
nd
press: set number of waves with
the key or
3
rd
press: set speed with
the key or
further presses: as 1
st
, 2nd, 3rdpress
Text Qty
1
2
1
0
8
6
4
Number of characters projected:
12/10/8/6/4
Play time
Duration of the projection of a text (in
seconds) for the function Loop Playback (key , refer to chapter 5.2.1):
Enter the duration with the numeric
keys, and then press the Enter key
to confirm.
Mirror
Mirroring: / / /
* Set the speed with the keys and .
5.2.2 AUTO mode
To select a specific topic, press the corresponding numeric key:
Topics for the AUTO mode
Additional functions:
Pause
= pause / continue
Mirror
= mirror: / / /
Esc
= go to the beginning of the run
5.2.3 MUSIC mode
In this mode, music picked up by the microphone (3) or other sound events of sufficient
volume will control the graphics run. The LED
(7) will briefly light up in blue for each sound
event controlling the graphics run. If no sound
event is received within 10 seconds, the laser
beam will be switched off and the LED will
constantly light up in blue. The laser beam will
be switched on again by the next sound event
of sufficient volume.
Use the numeric keys to select the topics
(as you do in the AUTO mode). The MUSIC
mode provides the same additional functions
as the AUTO MODE (
chapter 5.2.2).
Use the remote control to adjust the
microphone sensitivity (refer to chapter 5.3.2,
fig. 8, key MUSIC).
5.2.4 CLOCK mode
1. The time can be indicated on its own or
alternately with the year date and the
month.day. To go from one indication type
to the other, briefly press the space bar.
2. For a mirrored indication, press the key
Mirror
(repeatedly): / / /
To set the date and time:
1) Press the Enter key. The units digit and
the tens digit of the year date start flashing.
2) Use the numeric keys to enter the year
date, or correct it by means of the arrow
keys and .
3) Use the arrow key to go to the month
date, and then enter or correct it.
4) Repeat this procedure to set the day, the
hour and the minute. To return to a previous setting option, press the arrow key .
5) Go to the indication 12R or 24R and then
use the key or to select the 12-hour indication or the 24-hour indication.
6) To save the settings and to exit the setting
mode, press the Enter key, or to cancel
the setting process, press the key
Esc
.
5.2.5 COUNTDOWN mode
In this mode, seconds will be indicated,
running backwards. When the countdown
reaches zero, the laser beam will be switched
off.
1) Press the Enter key to enter the countdown time. The current countdown time (in
seconds) starts flashing.
2) If required, use the key
Backspace
to
delete the current countdown time, and
then use the numeric keys to enter the
time desired (9999 seconds max.).
3) Use the Enter key to confirm. The count-
down time stops flashing.
4) Use the space bar to start the countdown.
5) To pause or continue a countdown, use the
space bar or the key
Pause
.
6) Use the key
Esc
to retrieve the current
countdown time at any time. To restart the
countdown, press the space bar.
7) As with the other modes, the key
Mirror
can be used to mirror the projection.
16
English
Key Topic
1 New Year
2 Christmas
3 Love
4 Birthday
5 Party
6 Halloween
7 Music
8 Geometric shapes
9 Rectangle with waveform movements
0 All topics one after the other
5.3 Operation with the remote control
The remote control (fig. 2) is supplied with a
battery. Prior to initial operation, remove the foil
from the battery holder. When pressing a button, always direct the remote control to the sensor IR (8) so that the LED (7) starts flickering to
confirm reception. There must be no obstacles
between the sensor and the remote control.
If the unit is not used for a longer time,
remove the battery from the remote control as
a precaution so that it will not be damaged in
case the battery should leak.
5.3.1 Replacing the battery
1) Push the latch of the battery holder to the
right (first arrow in fig. 7) and remove the
holder (second arrow).
Replacing
the battery
2) Remove the old battery and insert the new
battery (3 V button cell, type CR 2025) into
the holder with the positive pole facing
upwards.
3) Push the holder back into the remote con-
trol.
5.3.2 Function options
All modes can be selected by means of the
remote control (refer to chapters 5.2.1 to 5.2.5
for a description of the modes). In some
cases, however, the operation is different from
the operation with the keyboard; therefore, it
is briefly explained in the following table.
Remote control functions
Batteries must not be placed in the
household waste. To protect the
environment, always take them to
a special waste disposal, e. g. collection container at your retailer.
1. 2.
17
English
Button Function
ON / OFF
Press briefly: to switch the laser beam
on / off
keep pressed for 3 sec.: standby mode
AUTO
AUTO Mode
Select the different topics with the
numeric buttons.
Button Function
MUSIC
MUSIC Mode
Select the different topics with the
numeric buttons.
To set the microphone sensitivity: keep
the button pressed for 2 sec.; then set
the sensitivity with the numeric buttons:
1 = lowest level of sensitivity
9 = highest level of sensitivity
A
CLOCK Mode
Press this button again to change
between the indication of the time and
the alternating indication of the time and
the date.
To set the time and date:
1) Keep the button A pressed until the
year date starts flashing. Enter the
year with the numeric keys.
2) Go to the month date with the button
, and then enter the month. Repeat
this procedure to set the day, the hour
and the minute.
3) Go to the indication 12R or 24R with
the button . Press the numeric button 1 for the 12-hour indication, or
press the button 2 for the 24-hour indication.
4) Press the button A to save the set-
tings.
B
COUNTDOWN Mode
To change the countdown time, keep the
button B pressed until the time starts
flashing. Enter the time with the numeric
buttons.
To start the countdown, press the button
B. Pause the countdown and continue it
at any time with the button II.
To restart the countdown, keep the button B pressed until the time starts flashing. Enter a new countdown time, or
briefly press the button B to start the
countdown.
C
TEXT Mode
After pressing this button, select the
saved text with the numeric buttons.
Pause / continue the run
Change the laser colour
to return to the original colour:
Press the button for the mode.
Mirroring : / / /
5.4 Operation at the unit
Press the button MODE (repeatedly) to
switch on the following modes. The colour of
the LED (7) will indicate the mode selected.
– Text mode (LED: purple)
– Show mode with all topics (LED: red)
– Music-controlled run
(LED: lights up in blue when a sound event
is received)
If no sound event is received within 10 seconds, the laser beam will be switched off
and the LED will constantly light up in blue.
The laser beam will be switched on again
by the next sound event of sufficient volume.
Use the remote control to set the microphone sensitivity, refer to chapter 5.3.2,
fig. 8, button MUSIC.
– Projection of time (and date)
(LED: red and purple alternating)
The setting most recently made by means
of the keyboard or the remote control
defines if only the time is indicated or if it
alternates with the date.
Keep the button MODE pressed for 2 seconds to switch off the laser beam; briefly
press the button to switch the beam on again.
5.5 Recharging the clock battery
The laser unit includes a rechargeable battery so that the internal clock for the time indication will continue to work when the unit is
switched off. The battery will be automatically
recharged when the unit is connected to a
mains socket via the power supply unit.
A fully charged battery will be able to
keep the internal clock up to date for up to
2 months. If the battery is discharged, only
the time and the date must be set during the
next operation.
WARNING When actuating the button
MODE (2), make sure that you
stand next to the laser unit in
such a way that you cannot look
into the laser beam.
18
English

6 Specifications
Laser
Laser class: . . . . . . . . 3B
Power / wavelength
Red laser: . . . . . . . . 150 mW/ 650 nm
Green laser: . . . . . . 50 mW/ 532 nm
Blue laser: . . . . . . . 100 mW/ 450 nm
Motor for the laser mirrors
Motor type: . . . . . . . . scanner
Motor speed: . . . . . . . 10 000 pps
(points per second)
Power supply: . . . . . . . . 12 V via the
power supply unit
provided,
connected to
230 V~ / 50 Hz
Ambient temperature: . . 0 – 40 °C
Dimensions (W × H × D)
Laser unit: . . . . . . . . . 185 × 75 × 185 mm
Keyboard: . . . . . . . . . 300 × 12 × 150 mm
Remote control: . . . . . 40 × 8 × 86 mm
Weight
Laser unit: . . . . . . . . . 1.2 kg
Keyboard: . . . . . . . . . 325 g
Remote control: . . . . . 16 g
Subject to technical modification.
19
English
All rights reserved by MONACOR®INTERNATIONAL GmbH & Co. KG. No part of this instruction manual
may be reproduced in any form or by any means for any commercial use.

Laser pour projection de texte
Veuillez lire la présente notice avec attention
avant le fonctionnement et conservez-la pour
pouvoir vous y reporter ultérieurement. Vous
trouverez sur la page 3, dépliable, les éléments et branchements décrits.
Lʼutilisation du laser est simple et conçue
pour des organisateurs dʼévénements. Cependant, pendant le fonctionnement, un responsable de sécurité du laser doit être présent
(
chapitre 2.1). En cas de question, adres-
sez-vous au responsable de sécurité du laser.
Table des matières
1 Eléments et branchements . . . . . . 20
2 Conseils dʼutilisation et de sécurité 21
2.1 Conseils spécifiques pour les lasers . 21
2.2 Conseils généraux de sécurité . . . . . 21
3 Possibilités dʼutilisation . . . . . . . . . 21
4 Installation / Fonctionnement . . . . . 22
5 Utilisation . . . . . . . . . . . . . . . . . . . . . 22
5.1 Saisie de textes avec le clavier . . . . . 22
5.2 Utilisation avec le clavier . . . . . . . . . . 23
5.2.1 Mode TEXT . . . . . . . . . . . . . . . . . . 23
5.2.2 Mode AUTO . . . . . . . . . . . . . . . . . . 24
5.2.3 Mode MUSIC . . . . . . . . . . . . . . . . . 24
5.2.4 Mode CLOCK . . . . . . . . . . . . . . . . . 24
5.2.5 Mode COUNTDOWN . . . . . . . . . . . 24
5.3 Utilisation avec la télécommande . . . 25
5.3.1 Remplacement de la batterie . . . . . 25
5.3.2 Possibilités de fonctionnement . . . 25
5.4 Utilisation sur lʼappareil . . . . . . . . . . . 26
5.5 Chargement de lʼaccumulateur
de lʼhorloge . . . . . . . . . . . . . . . . . . . . 26
6 Caractéristiques techniques . . . . . 27
1 Eléments et branchements
1 Touche Reset, déclenchable avec un
objet fin et non conducteur (par exemple
petite tige plastique)
2 Touche MODE :
Pour sélectionner le mode de fonctionnement, appuyez brièvement sur la touche :
– mode texte
– mode Show (tous les thèmes)
– mode Show (un thème)
– défilement géré par la musique
– heure (et date)
La LED (7) indique le mode par une couleur.
Pour éteindre lʼappareil, maintenez la
touche enfoncée 2 secondes ; réactivation par une brève pression.
3 Microphone pour un changement des
dessins géré par la musique
4 Ouverture pour les faisceaux laser
5 Vis de fixation pour les étriers de montage
6 Etriers de positionnement et de montage
7 LED pour indiquer le mode de fonction-
nement
violet = mode texte
rouge = mode Show (tous les thèmes)
rouge clignotant = mode Show (un thème)
bleu = défilement géré par la musique
rouge-violet en alternance = heure
bleu-violet en alternance = compte à re-
bours
8 Capteur infrarouge pour la télécommande
9 Télécommande (
chapitre 5.3)
10 Interrupteur à clé LOCK pour éteindre les
faisceaux laser
(pour protéger contre toute utilisation non
autorisée)
11 Ouïes de ventilation pour le ventilateur
12 Prise 12DC pour brancher le bloc secteur
livré
13 Prise PS2 pour brancher le clavier via
lʼadaptateur livré (16)
14 Réglage SFZ pour les dimensions de
projection (utilisez un tournevis fin)
20
Français
15 Fiche USB du clavier
16 Adaptateur pour brancher le clavier à la
prise PS2
2 Conseils dʼutilisation
et de sécurité
Lʼappareil (y compris bloc secteur, télécommande et clavier) répond à toutes les directives nécessaires de lʼUnion européenne et
porte donc le symbole
.
2.1
Conseils spécifiques pour les lasers
Cet appareil correspond à la classe 3 B ; les
lasers ont les puissances et longueurs d'onde
suivantes :
2.2 Conseils généraux de sécurité
G
Cet appareil nʼest conçu que pour une utilisation en intérieur. Protégez-le de tout type
de projections d'eau, des éclaboussures,
d'une humidité élevée et la chaleur (plage
de température de fonctionnement autorisée : 0 – 40 °C).
G
En aucun cas, vous ne devez poser d'objet
contenant du liquide ou un verre sur l'appareil.
G
Immédiatement débranchez le bloc secteur
du secteur lorsque :
1. des dommages apparaissent sur le bloc
secteur ou sur le laser,
2. après une chute ou un cas similaire, vous
avez un doute sur l'état de l'appareil,
3. des dysfonctionnements apparaissent.
Dans tous les cas, les dommages doivent
être réparés par un technicien spécialisé.
G
Pour nettoyer le boîtier, utilisez seulement
un chiffon sec et doux, en aucun cas, de
produits chimiques ou d'eau.
G
Nous déclinons toute responsabilité en cas
de dommages matériels ou corporels résultants si l'appareil est utilisé dans un but autre
que celui pour lequel il a été conçu, s'il n'est
pas monté dʼune manière sûre, sʼil nʼest pas
correctement branché ou utilisé ou sʼil n'est
pas réparé par une personne habilitée, en
outre, la garantie deviendrait caduque.
3 Possibilités dʼutilisation
Avec ce laser, il est possible de projeter des
textes au choix, tapés via un clavier, sur une
surface adaptée. On peut aussi, à la place,
projeter différents dessins sur des thèmes
distincts (par exemple anniversaire, mariage,
nouvel an) ou lʼheure et la date ou un compte
à rebours. Lʼappareil peut être utilisé sur
scène, dans des discothèques et lors de
manifestations commerciales.
CARTONS ET EMBALLAGE
PAPIER À TRIER
Lorsque l'appareil est définitivement
retiré du service, vous devez le déposer dans une usine de recyclage
adaptée pour contribuer à son élimination non polluante.
AVERTISSEMENT
Le bloc secteur est alimenté
par une tension dangereuse.
Ne touchez jamais lʼintérieur
de lʼappareil. Risque de décharge électrique.
Puissance Longueur d'onde
laser rouge 150 mW 650 nm
laser vert 50 mW 532 nm
laser bleu 100 mW 450 nm
AVERTISSEMENT 1. Installez le laser de telle
sorte que personne ne
puisse regarder directe-
ment le faisceau laser.
Même une brève exposition de la rétine
peut lʼendommager durablement. Il faut
éviter tout réfléchissement non souhaité.
2. La zone du laser doit être délimitée pendant le fonctionnement et repérée.
3. Un responsable de sécurité du laser doit
être affecté par écrit et présent pendant le
fonctionnement de lʼappareil (réglementation allemande BGV B2).
4. Le fonctionnement du laser doit être indiqué auprès de la caisse de prévoyance
des accidents du travail et de lʼinspection
du travail.
21
Français
4 Installation / Fonctionnement
Lʼappareil doit être monté de manière sûre et
appropriée. La personne qui monte lʼappareil
avec tous les composants (par exemple
miroir, lentilles, surface de projection pour
créer une installation laser, devient, d'un
point de vue juridique, le fabricant. Respec-
tez impérativement les avertissements du
chapitre 2.1.
1) Fixez lʼappareil via les étriers de montage
(6) par exemple via une vis de montage
solide ou un support pour projecteur (crochet C) à une traverse.
Pour orienter lʼappareil, desserrez les
deux vis de fixation (5) sur les étriers de
montage. Réglez l'inclinaison voulue puis
revissez les vis.
2) A la place, lʼappareil peut également être
posé librement : dépliez les étriers de
montage sous lʼappareil pour quʼils puissent servir de pieds. Vissez ensuite les vis
de fixation.
3) Pour la saisie de texte, reliez le clavier
avec sa fiche USB (15) via lʼadaptateur
(16) à la prise PS2 (13). Si besoin, utilisez
le cordon prolongateur de 5 m livré. (Pour
projeter les textes mémorisés, il nʼest pas
nécessaire de relier le clavier.)
4) Pour lʼalimentation, reliez le bloc secteur à
la prise 12DC (12) et à une prise 230 V~ /
50 Hz. Lʼappareil est alors allumé : la LED
(7) brille dans la couleur du dernier mode
de fonctionnement sélectionné.
5) Pour allumer les faisceaux laser, mettez la
clé livrée dans la serrure LOCK (10) et
tournez la clé sur la position ON.
6) En utilisant un petit tournevis, réglez la
taille de projection souhaitée avec le
réglage SFZ (14).
7) Si lʼappareil venait à ne pas fonctionner
correctement, on peut le réinitialiser en
appuyant sur la touche Reset (1). Activez
alors la touche avec un objet fin et non
conducteur (par exemple tige plastique)
via le trou dans le boîtier.
5 Utilisation
Le clavier permet les fonctions principales.
Avec le télécommande, de nombreuses fonctions sont réglables, mais pas toutes. Sur
lʼappareil directement, on peut, avec la
touche MODE, sélectionner uniquement le
mode de fonctionnement et allumer et éteindre le faisceau laser.
5.1 Saisie de textes avec le clavier
1) Appuyez sur la touche . “1. TEXT” est
projeté, cʼest-à-dire que le mode texte est
sélectionné. (Pour sélectionner dʼautres
modes, voir chapitre 5.2.)
2) Confirmez le mode texte avec la touche
Enter : le dernier texte projeté sʼaffiche.
3) Effacez le texte avec la touche
Del
et
retapez.
AVERTISSEMENT 1. Dans la mesure où les ré-
glementations de sécurité varient d'un pays à
l'autre, il convient de respecter les réglementations du pays d'utilisation du laser !
2. Si le laser doit être suspendu au-dessus
de personnes, il doit être en plus assuré
(p. ex. avec une élingue de sécurité sur
lʼétrier de montage : fixez lʼélingue de telle
sorte que la distance de chute de lʼappareil
ne puisse pas être supérieure à 20 cm).
3. Sélectionnez le lieu de montage pour
que, pendant le fonctionnement, une circulation dʼair suffisante soit assurée. En
aucun cas les ouïes de ventilation (11) ne
doivent être obturées. Lʼappareil doit être
positionné à une distance minimale de
20 cm des murs voisins et 50 cm de la
surface de projection.
4. N'oubliez pas que des changements très
rapides de lumière peuvent déclencher
des crises d'épilepsie chez les personnes
photosensibles et épileptiques !
5. Ne faites pas fonctionner lʼappareil sans
la présence dʼun responsable de sécu-
rité du laser. Sʼil doit sʼabsenter, il doit verrouiller lʼappareil avec lʼinterrupteur à clé
(10) contre toute utilisation non autorisée.
22
Français
4) Différents effets sont disponibles, ils peuvent également être combinés. Une activation dʼun effet, une commutation sur une
variante (symbole “/” dans le tableau suivant) et une désactivation (pas lʼeffet
vague) se font par plusieurs pressions sur
la touche correspondante :
Effets texte
5) Lorsque le texte est terminé, maintenez la
touche
Save + No.
enfoncée pour mémoriser et simultanément appuyez sur une
touche numérique pour le numéro de
mémoire (0 – 9). En utilisant les numéros 0
à 9, 10 textes différents peuvent être
mémorisés.
6) Si tous les textes mémorisés doivent être
effacés, appuyez simultanément sur les
touche
Save + No.
, et
Del
.
5.2 Utilisation avec le clavier
1) Pour sélectionner le mode de fonctionnement, appuyez sur la touche . “1. TEXT”
est projeté.
2)
Sélectionnez le mode avec la touche ou
:
1. TEXT = saisie de textes, appel de
textes
2. AUTO = défilement de dessins dans
les thèmes sélectionnables
3. MUSIC = défilement géré par la mu-
sique de dessins dans les
thèmes sélectionnables
4. CLOCK = projection de lʼheure et de la
date
5. COUNTDOWN = compte à rebours
3) Avec la touche Enter, appelez le mode
sélectionné.
5.2.1 Mode TEXT
1) Pour projeter des textes mémorisés, maintenez la touche
▶
Play + No
enfoncée et
simultanément appuyez sur la touche
numérique (0 – 9) sous laquelle le texte
souhaité a été mémorisé.
2) Les effets présentés dans le tableau du
schéma 5 peuvent être activés / désactivés
avec les touches correspondantes. Si des
variantes dʼeffets sont prévues, elles peuvent être sélectionnées par une autre
pression sur la touche correspondante.
3) Pour aller au texte avec le numéro suivant
ou le numéro précédent, appuyez sur la
touche
⬆
Pg UP
ou
⬇
Pg DN
. Si aucun
texte nʼest mémorisé sous un numéro, il
nʼy a pas de projection pour le numéro.
4) Si tous les textes mémorisés doivent être
projetés les uns après les autres, appuyez
sur la touche
Loop playback
.
23
Français
Touche Effet texte
Esc
Tous les effets sont désactivés,
sauf miroir (touche Mirror)
Flow
Le texte défile* via la zone de projection (caractère par caractère)
RGB
Color
Sélection de la couleur avec ou /
changement de couleur* : tout le texte/
caractère par caractère / dans les
caractères
Draw
Le texte est réécrit en continu* ;
réglez le début du texte avec et
Zoom
Zoom*: grand ➞ petit / petit ➞ grand /
petit
➞ grand
X Move
Le texte défile* autour de lʼaxe X
vers lʼavant / vers lʼarrière
Y Move
Le texte défile* autour de lʼaxe Y
vers lʼavant / vers lʼarrière
Y Roll
Le texte tourne* autour de lʼaxe Y
vers la droite / vers la gauche
X Roll
Le texte tourne* autour de lʼaxe X
vers la droite / vers la gauche
Z Roll
Le texte tourne* autour de lʼaxe Z
vers la droite / vers la gauche
Wave
Effet vague
1. pression : réglage de la hauteur
de la vague avec la
touche ou
2. pression : réglage du nombre de
vagues avec la touche
ou
3. pression : réglage de la vitesse
avec la touche ou
autres pressions : comme 1., 2., 3.
Text Qty
1
2
1
0
8
6
4
Nombre de caractères projetés :
12/10/8/6/4
Play time
Durée de projection en secondes dʼun
texte avec la fonction Loop Playback
(touche , voir chapitre 5.2.1) :
Saisie de la durée les touches num.
et confirmation avec la touche Enter
Mirror
Miroir : / / /
* La vitesse réglable avec les touches et .

5.2.2 Mode AUTO
Vous pouvez sélectionner le défilement dʼun
thème donné avec une touche numérique :
Thèmes pour le mode AUTO
Fonctions supplémentaires :
Pause
= pour suspendre / poursuivre le défi-
lement
Mirror
= miroir : / / /
Esc
= pour revenir au début du défilement
5.2.3 Mode MUSIC
Avec ce mode, le défilement des dessins est
géré via la musique enregistrée par le microphone (3) ou dʼautres sources de son suffisamment fortes. A chaque événement sonore, qui
entraîne un mouvement, la LED (7) brille brièvement en bleu. Si aucun son nʼest enregistré
pendant 10 secondes, le faisceau laser sʼéteint,
la LED brille tout le temps en bleu. Au prochain
son suffisamment fort, le faisceau se rallumé.
La sélection des thèmes sʼeffectue
comme en mode AUTO avec les touches
numériques. Les mêmes fonctions supplémentaires quʼen mode AUTO sont disponibles (
chapitre 5.2.2).
Vous pouvez régler la sensibilité du micro
avec la télécommande, voir chapitre 5.3.2,
schéma 8, touche MUSIC.
5.2.4 Mode CLOCK
1. Lʼheure peut être affichée seule ou en
alternance avec lʼaffichage de lʼannée et
du mois.jour. Pour commuter entre les
deux visualisations, appuyez brièvement
sur la touche espace.
2. Pour une visualisation en miroir, appuyez
(plusieurs fois) sur la touche
Mirror
:
///
Réglage de la date et de lʼheure :
1) Appuyez sur la touche Enter. La position
de lʼunité et de la dizaine de lʼannée clignote.
2) Tapez le chiffre de lʼannée avec les
touches numériques et corrigez avec les
touches flèche ou .
3) Avec la touche flèche , allez au chiffre du
mois et tapez-le ou corrigez-le.
4) Répétez le processus pour le jour, lʼheure
et les minutes. Pour revenir à une possibilité précédente de réglage, appuyez sur la
touche .
5) Sur lʼaffichage, allez à 12R ou 24R et sé lectionnez lʼaffichage des heures (12 ou 24)
avec la touche ou .
6) Pour mémoriser et pour quitter le mode de
réglage, appuyez sur la touche Enter ou,
si vous voulez interrompre le processus de
réglage, appuyez sur la touche
Esc
.
5.2.5 Mode COUNTDOWN
Avec ce mode, lʼaffichage des secondes
défile en sens inverse. Lorsque le zéro est
atteint, le faisceau laser est éteint.
1) Appuyez sur la touche Enter pour saisir la
durée du compte à rebours. La durée
actuelle en secondes clignote.
2) Si besoin, effacez la durée actuelle avec la
touche
Backspace
et saisissez le nouveau chiffre avec les touches numériques
(9999 s max.).
3) Confirmez la saisie avec la touche Enter,
le clignotement cesse.
4) Démarrez le compte à rebours avec la
touche espace.
5) Il est possible de suspendre et de poursuivre un compte à rebours en cours avec la
touche espace ou la touche
Pause
.
6) A tout moment la durée peut être appelée
avec la touche
Esc
. Pour redémarrer,
appuyez sur la touche espace.
7) La projection peut être, comme pour les
autres modes, affichées en mode miroir
avec la touche
Mirror
.
24
Français
Touche Thème
1 Nouvel an
2 Noël
3 Amour
4 Anniversaire
5 Fête
6 Halloween
7 Musique
8 Figures géométriques
9 Carré avec mouvements vagues
0 Tous les thèmes les uns après les autres
 Loading...