

Page 1
Professioneller Dual-CD / MP3-Spieler
Professional Dual CD / MP3 Player
CD-230USB
Bestell-Nr. • Order No. 21.2990
BEDIENUNGSANLEITUNG
INSTRUCTION MANUAL
MODE D’EMPLOI
ISTRUZIONI PER L’USO
GEBRUIKSAANWIJZING
MANUAL DE INSTRUCCIONES
INSTRUKCJA OBSŁUGI
SIKKERHEDSOPLYSNINGER
SÄKERHETSFÖRESKRIFTER
TURVALLISUUDESTA
ELECTRONICS FOR SPECIALISTS ELECTRONICS FOR SPECIALISTS ELECTRONICS FOR SPECIALISTS ELECTRONICS FOR SPECIALISTS
Page 2

Deutsch ...........Seite 4
English ............Page 8
Français ...........Page 12
Italiano............Pagina 16
Nederlands ........Pagina 20
Español ...........Página 24
Polski .............Strona 28
Dansk .............Sida 32
Svenska ...........Sidan 32
Suomi.............Sivulta 33
ELECTRONICS FOR SPECIALISTS ELECTRONICS FOR SPECIALISTS ELECTRONICS FOR SPECIALISTS ELECTRONICS FOR SPECIALISTS
2
Page 3

CD-230USB
1 2
3 4
14 15 16 17 18 19 20
5 6 7 8 9 10 11 12 13
27
28 29 30 31
USB SD
PITCH BEND
SEARCH
SCRATCH
CD
TRACK / FOLDER /
DSP/
BRAKE
TRACK
SINGLE
M
REMAIN
REMAIN
SEARCH
CD / USB /
PUSH
REPEAT
SD
SINGLE
TIME
PGM
PITCH
OPEN/
CLOSE
REV FWD
B
CD
OPEN/
CLOSE
REV FWD
A
USB SD
PITCH BEND
SEARCH
SCRATCH
TRACK / FOLDER /
S F
SEARCH
CD / USB /
PUSH
REPEAT
SD
SINGLE
TIME
PGM
PITCH
DSP/
BRAKE
ELAPSED
MP3
ELAPSED
TRACK
MS F
CUE
DSP /
REVERSE
OPEN/
CLOSE
CUE
CD
USB SD
REV FWD
IN
PITCH BEND
SEARCH
SCRATC H
Pitch
OUT
DSP /
REVERSE
Reloop
LOOP
PITCH
CUE
Pitch
Reloop
OUT
IN
LOOP
PITCH
➀
TRACK / FOLDER /
DSP/
BRAKE
DSP /
REVERSE
TRACK
SINGLE
CUE
REMAIN
REMAIN
S F
M
PITCH
SEARCH
REPEAT
TIME
CD / USB /
SD
SINGLE
PGM
PUSH
Pitch
Reloop
OUT
IN
LOOP
PITCH
➁
CD-230USB
B C D E F
A
CUE
BA
ELAPSED
M
REPEAT 1 ALL
PROGRAM
OPEN/
A
CLOSE
POWER
S F
B
REMAINTOTAL
PITCH
G
H
I
➂
SD/MMC
USB
MP3 USB
J
TRACK
K
SINGLE
L
M
FOLDER
N
ANTI-SHOCK SYSTEM SEAMLESS LOOP ANTI-SHOCK SYSTEM SEAMLESS LOOP
SD/MMC
21 22 23 24 25 26
USB
➃
AB
CONNECT TO
CONTROL UNIT
L
LINE
OUT
R
230V~/ 50Hz
CONNECT TO
CONTROL UNIT
L
LINE
OUT
R
➄
3
Page 4

Professioneller
B
Dual-CD / MP3-Spieler
Diese Anleitung richtet sich an professio-
Deutsch
nelle DJs und an technisch versierte Laien.
Bitte lesen Sie die Anleitung vor dem Betrieb
gründlich durch und heben Sie sie für ein
späteres Nachlesen auf. Auf der ausklappbaren Seite 3 finden Sie alle beschriebenen
Bedienelemente und Anschlüsse.
1 Übersicht der Anschlüsse
und Bedienelemente
1.1 Steuerteil
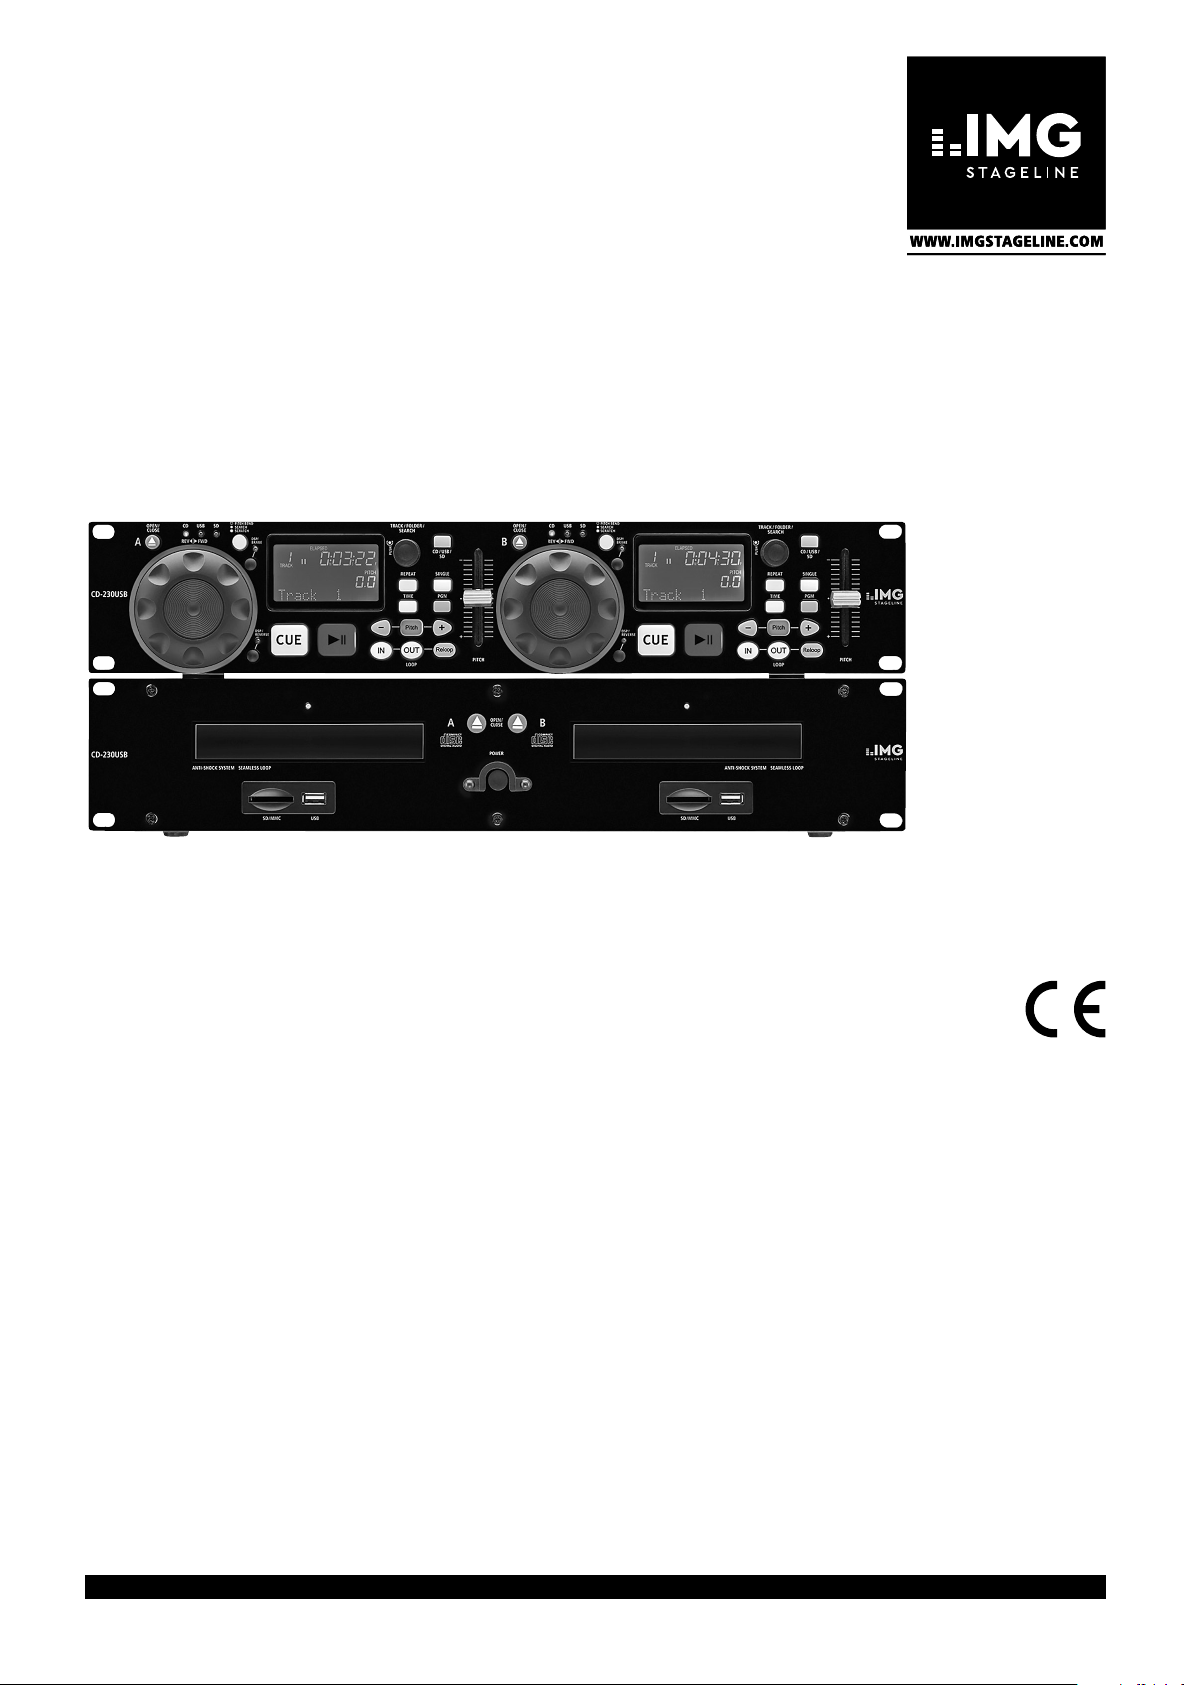
1 Bedienfeld der Abspieleinheit A
Details siehe Abb. 2
2 Bedienfeld der Abspieleinheit B
Details siehe Abb. 2
3
Taste OPEN / CLOSE zum Öffnen und
Schließen der CD-Schublade A
[wie die Taste (25) des Abspielteils]
4
Die LEDs zeigen an, welches Abspielmedium mit der Taste CD / USB / SD (11)
angewählt ist
5
Taste zum Umschalten der Funktion für
das Drehrad (14)
Die gewählte Funktion ist durch die
Leuchtfarbe der Taste ersichtlich:
Blau = Funktion PITCH BEND
Rot = schneller Vor- / Rücklauf
Wechsel Blau / Rot = Scratch-Funktion
6
Taste BRAKE zum Ein- und Ausschalten
der Brems- und Anlauffunktion
Ist die Funktion eingeschaltet, wird beim
Drücken der Taste das langsame Anlaufen oder Auslaufen eines Plattentellers
simuliert.
7 Display
Details siehe Abb. 3 und Kapitel 1.1.1
8
Taste TIME zum Umschalten der Zeitanzeige (G)
Die Angabe (F) über der Zeitanzeige informiert, was aktuell angezeigt wird:
– REMAIN: Restzeit des Titels
– TOTAL REMAIN: Restzeit der CD
(nicht bei MP3-Titeln)
– ELAPSED: gespielte Zeit des Titels
9
Drehknopf zum Anwählen von Titeln und
Ordnern
10
Taste REPEAT für die Wiederholfunktionen
1. Tastendruck: REPEAT 1
Wiederholung des aktuellen Titels
2. Tastendruck: REPEAT ALL
Wiederholung aller Titel
3. Tastendruck:
Wiederholfunktion ausgeschaltet
11
Taste CD / USB / SD zum Anwählen der CD,
des USB-Speicher-Sticks oder der Speicherkarte
Die Auswahl wird durch die LEDs (4) über
dem Drehrad angezeigt.
12 Taste SINGLE zum Umschalten zwischen
den Betriebsmodi Einzeltitelwiedergabe
und Gesamttitelwiedergabe; bei Einzeltitelwiedergabe wird SINGLE (K) angezeigt
13
Regler PITCH zum Ändern der Geschwindigkeit; der Regler ist nur in Funktion,
wenn die Taste Pitch (18) leuchtet
14
Drehrad zum exakten Anfahren einer
Stelle im Pausenmodus
Weitere Funktionen während der Wiedergabe sind mit der Taste (5) wählbar.
15 Taste REVERSE zum Rückwärts abspielen
16
Taste CUE zum Anspielen eines Titels und
für den Rücksprung auf den Titelanfang
oder auf einen zuvor gesetzten Startpunkt
17
Taste zum Umschalten zwischen Wiedergabe und Pause
18 Taste Pitch
– gedrückt halten, bis die Taste leuchtet
oder erlischt: Aktivieren oder Deaktivieren des Reglers PITCH (13)
– kurz drücken: Geschwindigkeitseinstell-
bereich wählen (4 %, 8 %, 16 %)
Tasten – und + für die Funktion PITCH
BEND
19
Tasten zum Abspielen einer Schleife (Endloswiederholung eines Abschnitts)
– Taste IN zum Bestimmen des Startpunkts
des Abschnitts
– Taste OUT zum Festlegen des Endpunkts
des Abschnitts und gleichzeitigem Starten der Schleife; zum Verlassen der
Schleife die Taste erneut drücken
– Taste RELOOP zum erneuten Ab spielen
der Schleife
20 Taste PGM zum Programmieren einer ei-
genen Titelfolge
1.1.1 Display
A Anzeige MP3
erscheint bei Titeln im Format MP3
B Anzeige USB
erscheint, wenn mit der Taste CD / USB / SD
(11) der USB-Anschluss (23) angewählt ist
C Anzeige CUE
erscheint, wenn der CD- / MP3-Spieler am
Titelanfang oder an einem gespeicherten
Startpunkt (Cue-Punkt) auf Pause steht
D Symbol für Wiedergabe oder Pause II
E Anzeige REPEAT 1 bei Wiederholung des
aktuellen Titels oder REPEAT ALL bei Wiederholung aller Titel
F Anzeige REMAIN, wenn die Restzeit des
Titels angezeigt wird
Anzeige TOTAL REMAIN, wenn die
CD-Restzeit angezeigt wird (nicht bei
MP3-Titeln möglich)
Anzeige ELAPSED, wenn die bereits gespielte Zeit des Titels angezeigt wird
G
Die Laufzeit eines Titels wird numerisch in Minuten, Sekunden und Frames
(1Frame = 1⁄75 Sekunde) angezeigt und
grafisch als Balken.
Position 8: Taste TIME
☞
Die letzten 30 Sekunden eines Titels signalisiert die Balkenanzeige durch Blinken
in ihrer vollen Länge.
H Anzeigefeld PITCH
zeigt bei aktiviertem Regler PITCH (13)
die eingestellte Abweichung (%) von der
Normalgeschwindigkeit an
I
Zeile für Textinformationen, z. B. Nummer
des Titels (Track 1) oder bei MP3- Titeln
durchlaufende Zusatzinformationen
(ID3-Tags)
J Titelnummer
K
Anzeige SINGLE für den Betriebsmodus
Einzeltitelwiedergabe
L Schleifenanzeigen A und
nur Anzeige A :
– wenn der Startpunkt des zu wieder-
holenden Abschnitts festgelegt wurde
– wenn eine Schleife gespeichert ist, aber
zurzeit nicht abgespielt wird
Anzeigen A und B bei Wiedergabe einer
Schleife
M Anzeige FOLDER
erscheint, wenn mit dem Drehknopf (9)
Ordner angewählt werden können
N
Anzeige PROGRAM im Programmiermodus und beim Abspielen der programmierten Titelfolge
1.2 Abspielteil
21 CD-Schublade des CD-Laufwerks A
22
Steckplatz SD / MMC der Abspieleinheit A
für eine Speicherkarte (max. 32 GB)
23 USB-Anschluss der Abspieleinheit A zum
Einstecken eines USB-Speicher-Sticks
24 Schubladenbeleuchtung
25
Taste OPEN / CLOSE zum Öffnen und
Schließen der CD-Schublade A
[wie die Taste (3) des Steuerteils]
26 Ein- / Ausschalter POWER
27 Anschluss für das Steuerteil:
mit der Buchse CONNECT TO MAIN
UNITB über eines der beiliegenden Anschlusskabel verbinden
28
Audio-Ausgang LINE OUT der Abspieleinheit B zum Anschluss an den Line-Eingang
z. B. eines Verstärkers oder Mischpults
29
Netzbuchse zum Anschluss an eine Steckdose (230 V/ 50 Hz) über das beiliegende
Netzkabel
30 Anschluss für das Steuerteil:
mit der Buchse CONNECT TO MAIN
UNITA über eines der beiliegenden Anschlusskabel verbinden
31
Audio-Ausgang LINE OUT der Abspieleinheit A zum Anschluss an den Line-Eingang
z. B. eines Verstärkers oder Mischpults
4
Page 5

2 Sicherheitshinweise
Das Gerät entspricht allen relevanten Richtlinien der EU und trägt deshalb das -Zeichen.
WARNUNG
Vorsicht! Blicken Sie bei geöffneter
•
CD-Schublade (21) nicht in den CD-Schacht.
Eventuell austretende Laser strahlen können
zu Augenschäden führen.
Das Gerät ist nur zur Verwendung im In-
•
nenbereich geeignet. Schützen Sie es vor
Tropf- und Spritzwasser sowie vor hoher
Luftfeuchtigkeit. Der zulässige Einsatztemperaturbereich beträgt 0 – 40 °C.
Stellen Sie keine mit Flüssigkeit gefüllten
•
Gefäße z. B. Trinkgläser, auf das Gerät.
Ziehen Sie sofort den Netzstecker aus der
•
Steckdose,
1. wenn sichtbare Schäden am Gerät oder
am Netzkabel vorhanden sind,
2. wenn nach einem Sturz oder Ähnlichem
der Verdacht auf einen Defekt besteht,
3. wenn Funktionsstörungen auftreten.
Geben Sie das Gerät in jedem Fall zur Reparatur in eine Fachwerkstatt.
Ziehen Sie den Netzstecker nie am Kabel
•
aus der Steckdose, fassen Sie immer am
Stecker an.
Wird das Gerät zweckentfremdet, nicht
•
richtig angeschlossen, falsch bedient oder
nicht fachgerecht repariert, kann keine Haftung für daraus resultierende Sach- oder
Personenschäden und keine Garantie für
das Gerät übernommen werden.
Das Gerät wird mit lebensgefährlicher Netzspannung
versorgt. Nehmen Sie deshalb
niemals selbst Eingriffe daran
vor. Es besteht die Gefahr
eines elektrischen Schlages.
Soll das Gerät endgültig aus dem
Betrieb genommen werden, übergeben Sie es zur umweltgerechten Entsorgung einem örtlichen Recyclingbetrieb.
3 Einsatzmöglichkeiten
Der CD / MP3-Spieler CD-230USB mit zwei
Abspieleinheiten ist speziell für den professionellen DJ-Bereich konzipiert. Hierfür sind
besondere Funktionen verfügbar, wie z. B.
Einzeltitelwiedergabe, verschiedene Abspieleffekte, Änderung der Abspielgeschwindigkeit bis zu ±16 %.
Mit dem Gerät können Audio-CDs, einschließlich CD-Rs und CD-RWs1, abgespielt
werden. MP3-Dateien lassen sich von CDs,
USB-Speicher-Sticks2 und SD/ SDHC-Speicherkarten2 (max. 32 GB) abspielen.
4 Gerät aufstellen
undanschließen
Das Steuer- und das Abspielteil sind für die
Montage in ein Rack für Geräte mit einer
Breite von 482 mm (19”) vorgesehen, können
aber auch als frei stehende Tischgeräte verwendet werden. Das Abspielteil muss immer
waagerecht betrieben werden, während das
Steuerteil beliebig, z. B. auch geneigt, eingebaut werden kann. Für den Rackeinbau
werden für das Steuerteil und das Abspielteil
jeweils 2 HE benötigt (1 HE = 1 Höheneinheit
= 44,45 mm).
Vor dem Anschließen von Geräten oder
dem Ändern bestehender Anschlüsse den
CD-230USB und die anzuschließenden Geräte
ausschalten!
1) Das Steuerteil und das Abspielteil mit den
beiden beiliegenden Anschlusskabeln verbinden:
Die Buchse CONNECT TO CONTROL
UNITA (30) der Abspieleinheit A mit der
Buchse CONNECT TO MAIN UNIT A der
Bedieneinheit A verbinden. Genauso die
Verbindung zwischen der Abspieleinheit B
und der Bedieneinheit B herstellen.
2) Die beiden Signalausgänge LINE OUT (28,
31) an je einen Eingang für Line-Pegel
z. B. eines Mischpultes oder Verstärkers
anschließen (mögliche Be schriftung: Line,
CD, Aux).
3) Die Netzbuchse (29) über das beiliegende
Netzkabel an eine Steckdose (230 V / 50 Hz)
anschießen.
5 Bedienung
Das Gerät mit dem Netzschalter POWER (26)
einschalten. Das Display (7) zeigt während
des Einlesevorgangs
CD eingelegt, erscheinen danach im Display
Informationen zur CD. Befindet sich keine
CD im Laufwerk, wird NO DISC (keine CD)
angezeigt.
1) Zum Einlegen einer CD die CD-Schublade
(21) mit der Taste (3 oder 25) öffnen.
Die CD mit der Beschriftung nach oben
einlegen und die CD-Schublade mit der
Taste wieder schließen.
Hinweis: Die CD-Schublade ist verriegelt, solange
eine CD abgespielt wird. Das Abspielen ggf. zuerst mit der Taste (17) beenden.
2)
Zusätzlich oder alternativ einen USBSpeicher-Stick2 in den USB-Anschluss (23)
stecken
und / oder
eine Speicherkarte2 in den Steckplatz
SD / MMC (22) stecken. Dabei muss die
abgeschrägte Ecke der Karte nach rechts
READING
an. Ist eine
und zum Gerät zeigen. Soll die Karte wieder entnommen werden, sie etwas hineindrücken, sodass sie ausrastet.
3)
Nach dem Einschalten sind immer die
CD-Laufwerke angewählt. Zum Umschalten auf den USB-Speicher-Stick oder die
Speicherkarte die Taste CD / USB / SD (11)
entsprechend oft drücken. Die LEDs (4)
über dem Drehrad zeigen die Auswahl an.
Hinweis: Das Umschalten ist nur im Pausen-
modus möglich. Mit der Taste ggf. auf Pause
schalten.
4)
Alle weiteren Bedienmöglichkeiten sind
in den Tabellen auf den folgenden Seiten aufgeführt. Nach dem Betrieb den
CD / MP3-Spieler mit dem Netzschalter
POWER ausschalten.
6 Pflege des Gerätes
Das Gerät vor Staub, Vibrationen, Feuchtigkeit
und Hitze schützen (zulässiger Einsatztemperaturbereich 0 – 40 °C). Für die Reinigung nur
ein weiches, trockenes Tuch verwenden, auf
keinen Fall Wasser oder Chemikalien.
Hinweis zu Tonaussetzern und Lesefehlern
Zigarettenrauch und Staub dringen leicht
durch alle Öffnungen des Gerätes und setzen
sich auch auf der Optik der Laser-Abtastsysteme ab. Sollte dieser Belag zu Lesefehlern
und Tonaussetzern führen, muss das Gerät in
einer Fachwerkstatt gereinigt werden. Diese
Reinigung ist kostenpflichtig, auch während
der Garantiezeit!
7 Technische Daten
Frequenzbereich: � � � � � � � 20 – 20 000 Hz
Klirrfaktor: � � � � � � � � � � � � < 0,1 %
Kanaltrennung: � � � � � � � � > 80 dB
Dynamikumfang: � � � � � � � > 90 dB
Störabstand: � � � � � � � � � � > 80 dB
Ausgang: � � � � � � � � � � � � 2 V (Line-Pegel),
Cinch-Buchsen
Anti-Shock-Speicher:
Stromversorgung: � � � � � � 230 V/ 50 Hz
Leistungsaufnahme: � � � � max� 30 VA
Einsatztemperatur: � � � � � 0 – 40 °C
Abmessungen (B × H × T)
Steuerteil: � � � � � � � � � � � 482 × 88 × 100 mm,
Abspielteil: � � � � � � � � � � 482 × 88 × 270 mm,
Gewicht: � � � � � � � � � � � � � 5,9 kg
� � � � bei CDDA 10 s
bei MP3 15 s
2 HE
2 HE
Deutsch
1
Bei CD-RWs kann es je nach CD-Typ, verwendetem
CD-Brenner und Brennprogramm beim Abspielen
zu Problemen kommen.
2
Aufgrund der Vielfalt von Speicher-Herstellern und
Gerätetreibern kann nicht garantiert werden, dass
alle Speichermedien mit dem CD-230USB kompatibel sind.
5
Page 6
Taste Position Funktion
Grundfunktionen
Deutsch
SINGLE 12
17
TRACK / FOLDER
SEARCH
CUE 16
TIME 8
— Alle Funktionen auf einem Blick —
REPEAT 10
PITCH BEND
SEARCH
SCRATCH
9
14
5
Modus wählen:
Bei der Einzeltitelwiedergabe spielt das Gerät einen Titel ab und schaltet am Anfang des nächsten
Titels auf Pause.
Abspielen starten [Anzeige (D)], unterbrechen [Anzeige II], fortsetzen
Titel anwählen
Den Knopf drehen, bis der gewünschte Titel angezeigt wird. Den Knopf drücken.
Ordner anwählen
1. Den Knopf drücken, sodass nach dem Loslassen die Anzeige FOLDER (M) erscheint.
2. Durch Drehen des Knopfes den Ordner auswählen und durch Drücken bestätigen.
3. Solange die Titelnummer (J) blinkt (ca. 5 s) durch erneutes Drücken des Knopfes auf den 1. Titel
des Ordners springen oder zuerst durch Drehen des Knopfes einen anderen Titel im Ordner
anwählen und durch Drücken bestätigen.
Zwischen 2 Bedienschritten nicht länger als 5 s warten, sonst springt das Gerät auf den vorherigen
Titel zurück.
Titel anspielen
1. Mit der Taste auf Pause schalten.
2. Mit dem Knopf TRACK / FOLDER (9) auf den gewünschten Titel springen.
3. Nachdem die Anzeige CUE (C) erscheint, zum Anspielen die Taste CUE gedrückt halten. Nach
dem Lösen der Taste steht das Gerät wieder am Titelanfang auf Pause.
Rücksprung auf den Titelanfang
Durch kurzes Drücken der Taste CUE springt das Gerät auf den Titelanfang zurück und steht dort
auf Pause. Der Titel lässt sich danach durch Gedrückthalten der Taste CUE anspielen oder mit der
Taste wieder starten.
Rücksprung im Titel auf eine bestimmte Stelle (Cue-Punkt)
1. Den Titel abspielen. Ist die Stelle erreicht, zu der zurückgesprungen werden soll, mit der Taste
auf Pause schalten. Die Stelle ggf. mit dem Drehrad (14) genauer anfahren.
2. Ist die Stelle bestimmt, das Abspielen mit der Taste wieder starten. Dabei wird der Startpunkt
automatisch als Cue-Punkt gespeichert: Die Taste CUE blinkt zweimal.
3. Zum Zurückspringen die Taste CUE drücken.
Umschalten der Laufzeitanzeige (G)
1. Restzeit des Titels* [Anzeige REMAIN (F)]
2. Restzeit der CD [Anzeige TOTAL REMAIN]
Restzeitanzeige jedoch nicht bei Titeln im MP3-Format möglich
3. gespielte Zeit des Titels [Anzeige ELAPSED]
Wiederholfunktionen
1. Tastendruck: Anzeige REPEAT 1 (E) = Wiederholung des aktuellen Titels
2. Tastendruck: Anzeige REPEAT ALL = Wiederholung aller Titel
3. Tastendruck: Wiederholfunktion ausgeschaltet*
Funktionen des Drehrads
Stelle im Titel auf 1 Frame (
fang, sondern ab einer bestimmten Stelle starten soll:
Ist die gewünschte Stelle während der Wiedergabe erreicht, mit der Taste
und durch Links- oder Rechtsdrehen des Drehrads die Stelle genau anfahren.
Hinweis: Ist das Drehrad auf die Funktion PITCH BEND* oder SEARCH geschaltet, wird die gerade angefahrene
Stelle ständig wiederholt. Bei Bedarf lässt sich der Ton stummschalten. Dazu die beleuchtete Taste (5) über dem
Drehrad drücken.
Um mit dem Rad die Funktion PITCH BEND* (siehe nächste Seite) nutzen zu können, muss die
Taste blau leuchten. Eventuell die Taste entsprechend oft drücken.
Für einen Vor- / Rücklauf die Taste so oft drücken, bis sie rot leuchtet. Dann das Drehrad vor- oder
zurückdrehen.
Um Scratch-Effekte mit dem Drehrad erzeugen zu können, die Taste so oft drücken bis sie abwechselnd blau-rot leuchtet (siehe auch „Effekte erzeugen“).
Einzeltitelwiedergabe* [Anzeige SINGLE (K)]
Wiedergabe aller Titel [Anzeige SINGLE ausgeblendet]
1
⁄75 s) genau anfahren, wenn z. B. die Wiedergabe nicht am Titelan-
auf Pause schalten
*Nach dem Einschalten des CD-230USB ist diese Einstellung oder Funktion angewählt.
6
Page 7
Taste Position Funktion
Geschwindigkeit ändern und Funktion PITCH BEND
Ändern der Abspielgeschwindigkeit
1. Die Taste Pitch gedrückt halten, bis sie leuchtet. Damit ist der Regler PITCH (13) aktiviert.
(Zum Deaktivieren* die Taste erneut gedrückt halten, bis sie erlischt.)
2. Durch kurzes Drücken der Taste Pitch den Einstellbereich wählen: 16 %*, 8 %, 4 %. Der Bereich
wird ganz kurz im Displayfeld PITCH (H) angezeigt, danach zeigt das Feld die mit dem Regler
PITCH eingestellte Abweichung von der Normalgeschwindigkeit an.
3. Die Geschwindigkeit mit dem Regler PITCH ändern.
PITCH BEND – Takt zwischen zwei Musikstücken angleichen
– Pitch + 18
BRAKE 6
REVERSE 15 Rückwärtsabspielen
SCRATCH 5
IN OUT Reloop 19
PGM 20
Wird auf beiden Abspieleinheiten je ein Titel mit ca. derselben Geschwindigkeit abgespielt, lassen
sich die Taktschläge der Titel zeitlich genau übereinander legen. Beim Überblenden von einem zum
anderen Titel wird dann der Rhythmus beim Tanzen nicht unterbrochen.
1. Zuerst die Geschwindigkeit des Titels, auf den übergeblendet werden soll, an die des laufenden
Titels angleichen.
2. Durch Gedrückthalten der Taste + oder – den Titel kurzzeitig schneller oder langsamer abspielen,
bis die Taktschläge mit dem des laufenden Titels übereinstimmen.
3. Alternativ lässt sich der Titel durch Drehen des Rads (14) schneller oder langsamer abspielen.
Dazu muss das Rad über die darüber liegende Taste (5) auf die Funktion PITCH BEND* geschaltet
sein (Taste leuchtet blau).
Effekte erzeugen
Brems- und Anlaufeffekt
Ist der Effekt eingeschaltet, wird beim Drücken der Taste das langsame Anlaufen oder Auslaufen
eines Plattentellers simuliert.
Scratch-Effekt
Die Taste so oft drücken, bis sie abwechselnd blau-rot leuchtet. Dann das Drehrad (14) entsprechend
vor- und zurückdrehen.
Schleife abspielen
Ein Abschnitt eines Titels kann als nahtlose Schleife beliebig oft wiederholt werden.
1. Ist während der Wiedergabe der gewünschte Startpunkt des Abschnitts erreicht, die Taste IN
drücken.1 Die Taste leuchtet und im Display wird A (L) angezeigt.
2. Ist beim Weiterspielen der Endpunkt des Abschnitts erreicht, die Taste OUT drücken.1 Der Abschnitt zwischen den Punkten wird fortlaufend wiederholt. Die Tasten IN und OUT blinken und
im Display wird zusätzlich B eingeblendet.
3. Um die Schleife zu verlassen und den Titel weiterzuspielen, die Taste OUT drücken. Die Schleife
bleibt aber weiterhin gespeichert, angezeigt durch die Einblendung A im Display und durch
konstantes Leuchten der Tasten IN und OUT.
4. Zum erneuten Starten der Schleife die Taste Reloop drücken oder zum Abspielen einer anderen
Schleife die Schritte 1. und 2. wiederholen oder zum Bestimmen eines anderen Endpunkts die
Taste OUT drücken.
Beim Erreichen des nächsten Titels oder Anwählen eines anderen wird die Schleife gelöscht.
1
Start- und Endpunkt exakt einstellen: Beim Erreichen des Punkts auf Pause schalten und den Punkt genau mit
dem Drehrad (14) anfahren. Dann die Taste IN bzw. OUT drücken.
Eigene Titelfolge zusammenstellen
Sollen nur ausgewählte Titel abgespielt werden, kann eine Titelfolge von max. 20 Titeln programmiert werden.
1. Mit der Taste auf Pause schalten und mit der Taste PGM den Programmiermodus einschalten:
Die Anzeige PROGRAM (N) erscheint und die Textzeile (I) zeigt den ersten Speicherplatz
2. Den gewünschten Titel mit den Drehknopf TRACK / FOLDER (9) auswählen. Dabei lässt sich nur
die Titelnummer auswählen und nicht ein Ordner. Die Nummer bei Bedarf zuvor beim Abspielen
eines Titels aus dem Feld TRACK (J) notieren.
3. Zum Speichern die Taste PGM drücken. Der nächste Speicherplatz P-02 wird angezeigt.
4. Die Bedienschritte 2 und 3 wiederholen, bis alle Titel der Titelfolge gespeichert sind.
5. Zum Starten der Titelfolge die Taste drücken. Mit dem Drehknopf TRACK / FOLDER kann auf
jeden Titel der Titelfolge gesprungen werden.
6. Zum Löschen der Titelfolge und Zurückkehren in den normalen Abspielmodus die Taste PGM so
lange gedrückt halten, bis die Anzeige PROGRAM erlischt.
und gleichzeitig damit die Tonhöhe (engl.: Pitch)
(Simulation des schnellen Vor- / Zurückdrehens einer laufenden Schallplatte)
P-01.
*Nach dem Einschalten des CD-230USB ist diese Einstellung oder Funktion angewählt.
Deutsch
Diese Bedienungsanleitung ist urheberrechtlich für MONACOR ® INTERNATIONAL GmbH & Co. KG
geschützt. Eine Reproduktion für eigene kommerzielle Zwecke – auch auszugsweise – ist untersagt.Änderungen vorbehalten.
7
Page 8
Professional Dual CD / MP3 Player
B
A
These operating instructions are intended
for professional DJs and non-professional
English
users with technical knowledge. Please read
these operating instructions carefully prior
to operating the unit and keep them for
later reference. All operating elements and
connections described can be found on the
fold-out page 3.
1 Operating Elements
andConnections
1.1 Control unit
1
Control panel for replay unit A
see fig. 2 for details
2
Control panel for replay unit B
see fig. 2 for details
3 Button OPEN / CLOSE to open and close
CD tray A
[like button (25) of the replay unit]
4
LEDs, indicating the replay medium
that has been selected with the button
CD / USB / SD (11)
5
Button to change the function for the jog
wheel (14)
The lighting colour of the button will indicate the function selected:
blue = function PITCH BEND
red = fast forward / reverse
blue / red alternating = scratch function
6 Button BRAKE to switch the start-up and
brake function on and off
With the function switched on, the slow
start-up or brake of a turntable will be
simulated when the button is pressed.
7
Display
see fig. 3 and chapter 1.1.1 for details
8 Button TIME to change the time indica-
tion(G)
The indication (F) above the time indication will identify the information currently
shown:
– REMAIN: remaining time of the title
– TOTAL REMAIN: remaining time of the
CD (except for MP3 titles)
– ELAPSED: time already played of the title
9 Rotary knob to select titles and folders
10 Button REPEAT for the repeat functions
st
press of the button: REPEAT 1
1
current title repeated
nd
press of the button: REPEAT ALL
2
all titles repeated
rd
press of the button
3
repeat function switched off
11
Button CD / USB / SD to select the replay
medium: CD, USB flash drive or memory
card
The LEDs (4) above the jog wheel will indicate the replay medium selected.
12
Button SINGLE to switch between the single title replay mode and the total title
replay mode; for the single replay mode,
SINGLE (K) will be shown
13 Control PITCH to change the speed; the
control is only operating when the button
Pitch (18) is illuminated
14 Jog wheel for precise selection of a spot
in the pause mode
During replay, further functions will be
available via the button (5).
15 Button REVERSE for reverse replay
16
Button CUE for shortly replaying the
beginning of a title and for returning to a
starting point previously defined
17
Button to switch between replay
mode and pause mode
18 Button Pitch
– keep pressed until the button is illumi-
nated or extinguishes: to activate or
deactivate the control PITCH (13)
– press briefly: to select the speed setting
range (4 %, 8 %, 16 %)
Buttons – and + for the function PITCH
BEND
19 Buttons to replay a loop
(continuous repeat of a section)
– button IN to define the starting point
of the section
– button OUT to define the end point of
the section and to start the loop at the
same time; to exit the loop, press the
button again
– button RELOOP to replay the loop once
again
20 Button PGM to program your individual
title sequence
1.1.1 Display
A Indication MP3
will appear for titles in the MP3 format
B Indication USB
will appear when the USB port (23) has
been selected via the button CD/ USB / SD
(11)
C Indication CUE
will appear when the CD / MP3 player has
been set to pause at the beginning of
the title or at a starting point memorized
(CUE point)
D Symbol for replay or pause II
E
Indication REPEAT 1 for repeat of the current title, or indication REPEAT ALL for
repeat of all titles
F
Indication REMAIN when the remaining
time of the title is shown
Indication TOTAL REMAIN when the remaining time of the CD is shown (not
supported for MP3 titles)
Indication ELAPSED when the time already
played of the title is shown
G
The running time of a title is indicated
numerically in minutes, seconds and
frames (1 frame = 1⁄75 second) and graphically as a bar graph.
item 8: button TIME
☞
The entire bar graph will flash while the
final 30 seconds of a title are being replayed.
H Field PITCH
when the control PITCH (13) has been activated, to indicate the adjusted deviation
(%) from the standard speed
I Line to show text information, e. g. num-
ber of the title (Track 1) or, for MP3 titles,
scrolling ID tags
J Title number
K Indication SINGLE for the single title re-
play mode
L Loop indications A and
indication A only:
– when the starting point of the section
to be repeated has been defined
– when a loop has been memorized, but
is currently not being replayed
indications
and B for replay of a loop
M Indication FOLDER
will appear when folders can be selected
with the rotary knob (9)
N
Indication PROGRAM in the program
mode and when replaying a programmed
title sequence
1.2 Replay unit
21 CD tray of CD drive A
22
Slot SD / MMC of replay unit A for a memory card (32 GB max.)
23 USB port of replay unit A to insert a USB
flash drive
24 Illumination for CD tray
25 Button OPEN / CLOSE to open and close
CD tray A
[like button (3) of the control unit]
26 POWER switch
27 Connection for the control unit:
connect to the jack CONNECT TO MAIN
UNIT B, using one of the connection cables provided
28 Audio output LINE OUT of replay unit B
for connection to the line input of an amplifier or mixer, for example
29
Mains jack for connection to a socket
(230 V/ 50 Hz) via the mains cable provided
30 Connection for the control unit:
connect to the jack CONNECT TO MAIN
UNIT A, using one of the connection cables provided
31 Audio output LINE OUT of replay unitA
for connection to the line input of an amplifier or mixer, for example
8
Page 9
2 Safety Notes
The unit corresponds to all relevant directives
of the EU and is therefore marked with .
WARNING The unit uses dangerous mains
voltage. Leave servicing to
skilled personnel. Inexpert handling may result in electric shock.
Caution! Never look into the CD mech-
•
anism when the CD tray (21) is open;
laser beams may be emitted causing eye
damage.
The unit is suitable for indoor use only. Pro
•
tect it against dripping water, splash water
and high air humidity. The admissible ambient temperature range is 0 – 40 °C.
Do not place any vessel filled with liquid on
•
the unit, e. g. a drinking glass.
Immediately disconnect the mains plug
•
from the socket
1.
if the unit or the mains cable is visibly
damaged,
2. if a defect might have occurred after the
unit was dropped or suffered a similar
accident,
3. if malfunctions occur.
In any case the unit must be repaired by
skilled personnel.
Never pull the mains cable to disconnect
•
the mains plug from the socket; always
seize the plug.
No guarantee claims for the unit and no
•
liability for any resulting personal damage
or material damage will be accepted if the
unit is used for other purposes than originally intended, if it is not correctly connected or operated, or if it is not repaired
in an expert way.
If the unit is to be put out of operation definitively, take it to a local
recycling plant for a disposal which
is not harmful to the environment.
3 Applications
The CD / MP3 player CD-230USB with two
replay units is especially designed for professional DJ applications, offering special
features such as single title replay, various
replay effects, change of the replay speed to
up to ±16 %.
With this unit, audio CDs (including CD-Rs
and CD-RWs1) can be replayed. MP3 files can
be replayed from CDs, USB flash drives2 and
SD / SDHC memory cards2 (32 GB max.).
4 Setting up /
ConnectingtheUnit
The control unit and the replay unit are designed for installation into a rack for units
with a width of 482 mm (19”), but they can
also be used as tabletop units. The replay
unit must always be operated horizontally,
whereas the control unit can be installed
as desired, e. g. also inclined. For rack installation, 2 rack spaces each are required
for the control unit and the replay unit
(1 RS = 44.45 mm).
-
Prior to making or changing any connections,
switch off the CD-230USB and the units to
be connected!
1)
Use the two connection cables provided to
connect the control unit to the replay unit:
Connect the jack CONNECT TO CONTROL
UNIT A (30) of replay unit A to the jack
CONNECT TO MAIN UNIT A of operating
unit A. Proceed in the same way to make
a connection between replay unit B and
operating unit B.
2) Connect each of the signal outputs LINE
OUT (28, 31) to a line level input of a mixer
or amplifier, for example (likely lettering:
Line, CD, Aux).
3) Connect the mains jack (29) to a socket
(230 V/ 50 Hz) via the mains cable provided.
5 Operation
Switch on the unit with the POWER switch
(26). During the reading process, READING
will appear on the display (7). After that,
when a CD is inserted, the display will show
information about the CD; if no CD is inserted, NO DISC will appear on the display.
1) To insert a CD, open the CD tray (21) with
the button (3 or 25). Insert the CD with
the lettering facing upwards, and close the
CD tray with the button .
Note: The CD tray will be locked as long as a CD
is being replayed. If required, stop the replay with
the button (17).
2) Additionally or as an alternative, insert a
USB flash drive
and / or
insert a memory card2 into the slot
SD / MMC (22) with the notched corner of
the card to the right and facing the unit.
To remove the card, push the card into the
slot until it disengages.
3)
After switching on, the CD drives are
always selected. To select the USB flash
2
into the USB port (23)
drive or the memory card, press the button
CD / USB / SD (11) the appropriate number
of times. The LEDs (4) above the jog wheel
will indicate the replay medium selected.
Note: A different replay medium can only be
selected in the pause mode. If required, use the
button to set the player to pause.
4) All the other operating options are listed
in the tables on the following pages. After
operation, switch the CD/ MP3 player off
with the POWER switch.
6 Maintenance of the Unit
Protect the unit against dust, vibrations,
humidity and heat (admissible ambient temperature: 0 – 40° C). For cleaning only use a
dry, soft cloth; never use water or chemicals.
Note concerning sound interruptions and
reading errors
Cigarette smoke and dust will easily penetrate through all openings of the unit and will
also settle on the optics of the laser sampling
systems. If this deposit should cause reading
errors and sound interruptions, the unit must
be cleaned by skilled personnel. Please note
that there will be a charge on cleaning, even
during the warranty period!
7 Specifications
Frequency range: � � � � � � � 20 – 20 000 Hz
THD: � � � � � � � � � � � � � � � � < 0�1 %
Channel separation: � � � � > 80 dB
Dynamic range: � � � � � � � � > 90 dB
S / N ratio: � � � � � � � � � � � � > 80 dB
Output: � � � � � � � � � � � � � 2 V (line level),
RCAjacks
Anti-shock memory:
Power supply: � � � � � � � � � 230 V/ 50 Hz
Power consumption: � � � � 30 VA max�
Ambient temperature: � � � 0 – 40 °C
Dimensions (W × H × D)
Control unit: � � � � � � � � � 482 × 88 × 100 mm,
Replay unit: � � � � � � � � � 482 × 88 × 270 mm,
Weight: � � � � � � � � � � � � � � 5�9 kg
� � � � for CDDA 10 sec�
for MP3 15 sec�
2 RS
2 RS
English
1
Depending on the type of CD, the CD burner and
the burning software used, problems may occur
when replaying CD-RWs.
2
Due to the large number of storage device manufacturers and device drivers, it cannot be guaranteed
that all storage media are compatible with the
CD-230USB.
9
Page 10
Button Item Function
English
Basic functions
Selecting the mode:
SINGLE 12
During single title replay, the player will replay a single title and will switch to the pause mode at
the beginning of the next title.
17
Starting the replay [indication (D)], pause [indication II], continue
Selecting a title
Rotate the knob until the title desired is indicated. Press the knob.
1. Press the knob so that the indication FOLDER (M) appears after releasing the knob.
TRACK / FOLDER
SEARCH
9
2. Rotate the knob to select the folder, then press the knob to confirm.
3. As long as the title number (J) flashes (approx. 5 sec.), press the knob again to go to the first
title of the folder, or first rotate the knob to select a different title in the folder and then press
the knob to confirm.
Do not wait for more than 5 sec. between two operating steps; otherwise, the player will return
to the previous title.
Shortly replaying the beginning of a title
1. Set the player to pause with the button .
2. Go to the title desired with the button TRACK / FOLDER (9).
3. When CUE (C) appears on the display, keep the button CUE pressed to replay the beginning of
the title. After releasing the button, the player will return to the beginning of the title and will
be set to pause.
Returning to the beginning of a title
CUE 16
Briefly press the button CUE to return to the beginning of a title and to set the player to pause.
Then keep the button CUE pressed to replay the beginning of the title, or press the button to
start the title again.
Returning to a previously defined spot in the title (CUE point)
1. Replay the title. At the spot to which you want to return, set the player to pause with the button
2. After defining the spot, restart the replay with the button ; this will automatically memorize
the starting point as a CUE point. The button CUE will flash twice.
3. To return to the CUE point, press the button CUE.
Changing the time indication (G)
1. Remaining time of the title* [indication REMAIN (F)]
— All functions at a glance —
TIME 8
2. Remaining time of the CD [indication TOTAL REMAIN]
indication of remaining time not supported for titles in MP3 format
3. Time already played of a title [indication ELAPSED]
Repeat functions
st
press of the button: indication REPEAT 1 (E) = current title repeated
REPEAT 10
1
2nd press of the button: indication REPEAT ALL = all titles repeated
3rd press of the button: repeat function switched off*
14
Functions of the jog wheel
Selecting a spot in the title with the accuracy of 1 frame (
from a certain spot instead of starting it at the beginning of the title:
When you have reached the desired spot during replay, set the player to pause with the button
and turn the jog wheel clockwise or counter-clockwise to precisely select the spot.
PITCH BEND
SEARCH
SCRATCH
5
Note: If the jog wheel has been switched to the function PITCH BEND* or SEARCH, the current spot will be repeated
continuously. If required, press the illuminated button (5) above the jog wheel to mute the sound.
To use the function PITCH BEND* (see next page) with the wheel, the button must be illuminated
in blue. If required, press the button the appropriate number of times.
For forward / reverse, press the button repeatedly until it is illuminated in red. Then turn the jog
wheel forwards or backwards.
To create scratch effects with the jog wheel, press the button repeatedly until it is alternately
illuminated in blue and red (also see “Creating effects”).
Single title replay* [indication SINGLE (K)]
Replay of all titles [indication SINGLE not shown]
. If required, precisely locate the spot with the jog wheel (14).
1
*This setting or function is selected after the CD-230USB has been switched on.
⁄75 s), e. g. for starting the replay
10
Page 11
Button Item Function
Changing the speed and function PITCH BEND
Changing the replay speed and the pitch at the same time
1. Keep the button Pitch pressed until it is illuminated. This will activate the control PITCH (13). [To
deactivate* the control, keep the button pressed again until it is no longer illuminated.]
2. Briefly press the button Pitch to select the setting range: 16 %*, 8 %, 4 %. The field PITCH (H)
will briefly indicate the range, then it will indicate the deviation set from the standard speed
with the control PITCH.
3. Change the speed with the control PITCH.
PITCH BEND – matching the beat between two music pieces
– Pitch + 18
When titles of approx. the same speed are replayed on the two replay units, the beats of these titles
can be precisely synchronized with respect to time. Thus, the dancing rhythm will not be interrupted
when crossfading from one title to the other.
1. First match the speed of the title to which crossfading is desired to the speed of the current title.
2. Keep the button + or – pressed to briefly increase or reduce the speed until the beats of the title
are synchronized with those of the current title.
3. As an alternative, turn the jog wheel (14) to increase or reduce the speed of the title. For this
purpose, use the button (5) above the wheel to switch it to the function PITCH BEND* (button
will be illuminated in blue)
Creating effects
Brake and start-up effect
BRAKE 6
With the effect switched on, the slow start-up or brake of a turntable will be simulated when the
button
REVERSE 15 Reverse replay
Scratch effect
SCRATCH 5
Press the button repeatedly until it is alternately illuminated in blue and red. Then turn the jog wheel
(14) back and forth as desired.
Replaying a loop
A section of a title can be repeated as many times as desired as a seamless loop.
1. When you have reached the desired starting point of a section during replay, press the button
IN.1 The button will be illuminated and A (L) will be displayed.
2. When you have reached the end of the section, press the button OUT1. The section between the
points will be continuously repeated. The buttons IN and OUT will flash and B will be displayed
additionally.
IN OUT Reloop 19
3. To exit the loop and to continue the replay of the title, press the button OUT. However, the loop
will be memorized. As an indication, the insert A will remain on the display and the buttons IN
and OUT will be permanently illuminated.
4. To restart the loop, press the button Reloop, or, to replay a different loop, repeat steps 1 and 2,
or, to define a different end point, press the button OUT.
When you have reached the next title or selected a different title, the loop will be deleted.
1
To precisely set the starting point and the end point: When you reach the point, set the player to pause; precisely
select the point with the jog wheel (14). Then press the button IN or OUT.
Compiling your individual title sequence
For replaying only selected titles, a title sequence of up to 20 titles can be programmed.
1. Set the player to pause with the button , and switch on the programming mode with the
button PGM: PROGRAM (N) will be displayed, and the text line (l) will indicate the first memory
location
2. Select the desired title with the rotary knob TRACK / FOLDER (9). Only a title number (not a folder)
can be selected. Prior to this and if required, make a note of the number that is indicated in the
PGM 20
field TRACK (J) while replaying the title.
3. Press the button PGM to memorize the title. The next memory location P-02 will be indicated.
4. Repeat steps 2 and 3 until all titles of the title sequence have been memorized.
5. To start the title sequence, press the button . The rotary knob TRACK / FOLDER can be used to
go to any title of the title sequence.
6. To delete the title sequence and to return to the normal replay mode, keep the button PGM
pressed until the indication PROGAM extinguishes.
English
is pressed.
(to simulate fast moving back and forth of a record)
P-01.
*This setting or function is selected after the CD-230USB has been switched on.
All rights reserved by MONACOR ® INTERNATIONAL GmbH & Co. KG. No part of this instruction manual
may be reproduced in any form or by any means for any commercial use.Subject to technical modifications.
11
Page 12

Lecteur
A
CD / MP3 double professionnel
Cette notice s’adresse aux DJs professionnels
Français
et à des amateurs avertis. Veuillez lire la présente notice avec attention avant le fonctionnement et conservez-la pour pouvoir vous y
reporter ultérieurement. Vous trouverez sur
la page 3, dépliable, les éléments et branchements décrits.
1 Eléments et branchements
1.1 Unité de commande
1 Panneau de commande pour le lecteur A
Voir détails sur schéma 2
2
Panneau de commande pour le lecteur B
Voir détails sur schéma 2
3
Touche OPEN / CLOSE pour ouvrir et
fermer le tiroir CD A
[comme touche (25) de l’unité de
lecture]
4
Les LEDs indiquent quel support de lecture
est sélectionné avec la touche CD / USB / SD
(11)
5 Touche pour commuter la fonction pour
la molette (14)
La couleur de la touche indique la fonction sélectionnée :
Bleu = fonction PITCH BEND
Rouge = avance / retour rapide
Changement bleu / rouge = fonction
Scratch
6 Touche BRAKE pour activer et désactiver
la fonction de freinage et de démarrage
Si la fonction est activée, une pression
sur la touche permet de simuler le
freinage et démarrage lent d’une platine
disque.
7 Affichage
Voir détails sur schéma 3 et dans chapitre1.1.1
8 Touche TIME pour commuter l’affichage
de durée (G)
La donnée (F) au-dessus de l’affichage
de durée indique ce qui est actuellement
affiché :
– REMAIN : durée restante du titre
– TOTAL REMAIN : durée restante du CD
(pas pour des titres MP3)
– ELAPSED : durée écoulée du titre
9 Bouton rotatif pour sélectionner les titres
et répertoires
10 Touche REPEAT pour les fonctions répé-
tition
1ère pression : REPEAT 1
répétition du titre en cours
2ème pression : REPEAT ALL
répétition de tous les titres
3ème pression
fonction répétition désactivée
11 Touche CD / USB / SD pour sélectionner le
CD, la clé de mémoire USB ou la carte
mémoire
La sélection est indiquée par les LEDs (4)
au-dessus de la molette.
12 Touche SINGLE pour commuter entre les
modes de fonctionnement lecture titre
par titre et lecture de tous les titres ; en
mode lecture titre par titre, SINGLE (K)
s’affiche
13 Réglage PITCH pour modifier la vitesse;
le réglage n’est actif que si la touche Pitch
(18) brille
14 Molette pour aller exactement à un en-
droit en mode pause ; d’autres fonctions
pendant la lecture sont sélectionnables
avec la touche (5).
15 Touche REVERSE pour une lecture arrière
16 Touche CUE pour lire les premières notes
d’un titre et pour le retour au début du
titre ou à un point de départ préalablement défini
17 Touche pour commuter entre lecture
et pause
18 Touche Pitch
– maintenez-la enfoncée jusqu’à ce que
la touche brille ou s’éteigne : ac tivation
ou désactivation du réglage PITCH (13)
– brève pression : sélection de la plage de
réglage de la vitesse (4 %, 8 %, 16 %)
Touches – et + pour la fonction PITCH
BEND
19 Touches pour lire une boucle (répétition
continue d’un segment)
– touche IN pour définir le point de départ
du segment
– touche OUT pour définir le point de fin
du segment et le démarrage simultané
de la boucle ; pour quitter la boucle,
appuyez une nouvelle fois sur la touche
– touche RELOOP pour une nouvelle lec-
ture de la boucle
20 Touche PGM pour programmer une suite
personnelle de titres
1.1.1 Affichage
A Affichage MP3
Visible pour des titres au format MP3
B Affichage USB
Visible si le port USB (23) est sélectionné
avec la touche CD / USB / SD (11)
C Affichage CUE
Visible si le lecteur CD/ MP3 est en pause
au début du titre ou à un point de départ
mémorisé (point Cue)
D Symbole pour la lecture ou pause II
E Affichage REPEAT 1 pour la répétition du
titre en cours ou REPEAT ALL pour la répétition de tous les titres
F Affichage REMAIN lorsque la durée res-
tante du titre est affichée
Affichage TOTAL REMAIN si la durée res-
tante du CD est affichée (impossible pour
des titres MP3)
Affichage ELAPSED si la durée déjà lue du
titre est affichée
G
La durée d’un titre est indiquée sous
forme numérique en minutes, secondes
et frames (1 frame = 1⁄75 seconde) et sous
forme de bargraphe.
position 8 : touche TIME
☞
Le bargraphe indique les 30 dernières
secondes d’un titre en clignotant sur toute
sa longueur.
H Champ d’affichage PITCH
Lorsque le réglage PITCH (13) est activé,
indique la déviation réglée (%) par rapport à la vitesse normale
I
Ligne pour informations de texte, p. ex.
numéro du titre (Track 1) ou, pour des
titres MP3, des informations défilantes
supplémentaires (tags ID3)
J Numéro du titre
K Affichage SINGLE pour le mode de fonc-
tionnement lecture titre par titre
L Affichages boucles A et
Uniquement affichage A:
– lorsque le point de départ du segment
à répéter est défini
– si une boucle est mémorisée mais pas
lue actuellement
Affichages
boucle
M Affichage FOLDER
Visible lorsque des dossiers peuvent être
sélectionnés avec la molette (9)
N Affichage PROGRAM en mode program-
mation et pour la lecture d’une suite de
titres programmée
et B pour la lecture d’une
B
1.2 Unité de lecture
21 Tiroir CD du lecteur CD A
22
Fente SD / MMC de l’unité de lecture A
pour une carte mémoire (32 GO max.)
23
Port USB de l’unité de lecture A pour
mettre une clé de mémoire USB
24 Eclairage tiroir
25
Touche OPEN / CLOSE pour ouvrir et fermer le tiroir CD A
[comme touche (3) de l’unité de commande]
26 Interrupteur marche/arrêt POWER
27
Branchement pour l’unité de commande:
Reliez avec la prise CONNECT TO MAIN
UNIT B via un des cordons de branchement livrés
28
Sortie audio LINE OUT de l’unité de lecture
B pour brancher à l’entrée ligne p. ex. d’un
amplificateur ou d’une table de mixage
29 Prise secteur pour brancher via le cordon
secteur livré à une prise 230 V/ 50 Hz
30
Branchement pour l’unité de commande:
Reliez avec la prise CONNECT TO MAIN
UNIT A via un des cordons de branchement livrés
31 Sortie audio LINE OUT de l’unité de lec-
ture A pour brancher à l’entrée ligne par
exemple d’un amplificateur ou d’une
table de mixage
12
Page 13

2 Conseils de sécurité
Cet appareil répond à toutes les directives
nécessaires de l’Union européenne et porte
donc le symbole .
AVERTISSEMENT
Attention ! Ne regardez pas le comparti-
•
ment CD lorsque le tiroir CD (21) est ouvert.
Des rayonnements laser éventuellement
émis pourraient causer des troubles de la
vision.
L‘appareil n‘est conçu que pour une utilisa-
•
tion en intérieur. Protégez-le des éclaboussures, de tout type de projections d‘eau et
d’une humidité d‘air élevée. La plage de
température ambiante admissible est de
0 – 40 °C.
En aucun cas, vous ne devez poser d‘objet
•
contenant du liquide, p. ex. un verre, sur
l‘appareil.
Débranchez l’appareil immédiatement
•
lorsque :
1. des dommages visibles apparaissent sur
l‘appareil et sur le cordon secteur,
2.
après une chute ou accident similaire,
vous avez un doute au sujet de l‘état de
l‘appareil.
3. des dysfonctionnements apparaissent.
Dans tous les cas, les dommages doivent
être réparés par un technicien spécialisé.
Ne débranchez jamais l‘appareil en tirant
•
sur le cordon secteur, tenez-le toujours par
la fiche.
Nous déclinons toute responsabilité en
•
cas de dommages matériels ou corporels
résultants si l‘appareil est utilisé dans un
but autre que celui pour lequel il a été
conçu, s‘il n‘est pas correctement branché
ou utilisé ou s‘il n‘est pas réparé par une
personne habilitée, en outre, la garantie
deviendrait caduque.
Lorsque l‘appareil est définitivement
retiré du service, vous devez le déposer dans une usine de recyclage
adaptée pour contribuer à son élimination non polluante.
CARTONS ET EMBALLAGE
PAPIER À TRIER
Cet appareil est alimenté
par une tension dangereuse. Ne touchez jamais
l‘intérieur de l‘appareil,
vous pourriez subir une
décharge électrique.
3 Possibilités d’utilisation
Le lecteur CD / MP3 CD-230USB avec deux
unités de lecture est spécialement conçu pour
une utilisation DJ professionnelle. De nombreuses fonctions sont précisément définies
dans ce but, p. ex. lecture titre par titre, différents effets de lecture, modification de la
vitesse de lecture jusqu’à ±16 %.
Avec cet appareil, il est possible de lire
des CDs audio, y compris CD-R et CD-RW1.
Des fichiers MP3 peuvent être lus depuis des
CDs, clés de mémoire USB2 et cartes mémoire2
SD/ SDHC (32 GO max.)
4 Positionnement de
l‘appareil et branchements
Les unités de lecture et de commande sont
prévues pour une installation en rack avec une
largeur de 19” (= 482 mm) mais elles peuvent
être directement posées sur une table. L‘unité
de lecture doit, dans tous les cas, être placée
à l‘horizontale ; l‘unité de commande peut
être installée comme souhaité, par exemple
de manière inclinée. Pour un montage en
rack, 2unités sont nécessaires pour l’unité de
commande et pour l’unité de lecture (1unité
=44,45 mm).
Avant d‘effectuer ou de modifier les branchements, assurez-vous que le lecteur CD230USB et les autres appareils reliés sont
éteints !
1) Reliez l’unité de commande et l’unité de
lecture avec les deux cordons de branchement livrés :
Reliez la prise CONNECT TO CONTROL
UNITA (30) de l’unité de lecture A à la
prise CONNECT TO MAIN UNIT A de l’unité
de commande A. Faites de même pour la
liaison entre l’unité de lecture B et l’unité
de commande B.
2) Reliez les deux sorties de signal LINE OUT
(28, 31) à une entrée pour niveau ligne,
par exemple d’une table de mixage ou
amplificateur (repérage possible : Line,
CD, Aux).
3)
Reliez la prise secteur (29) via le cordon secteur livré à une prise secteur 230 V/ 50 Hz.
5 Utilisation
Allumez l’appareil avec l’interrupteur secteur
POWER (26). L’affichage (7) indique pendant
le processus de reconnaissance
Si un CD est inséré, des informations sur le
CD sont visibles sur l’affichage. S’il n’y a pas
de CD dans le lecteur,
s’affiche.
1)
Pour insérer un CD, ouvrez le tiroir CD (21)
avec la touche (3 ou 25). Insérez un CD
avec inscription vers le haut, et refermez
le tiroir CD avec la touche .
Conseil : le tiroir CD est verrouillé tant qu’un
CD est lu. Arrêtez la lecture si besoin avec la
touche (17).
2) En plus ou à la place, mettez une clé de
mémoire USB2 dans le port USB (23)
et / ou
mettez une carte mémoire2 dans l’insert
SD / MMC (22). Le coin oblique de la carte
NO DISC
READING
(pas de CD)
doit être vers la droite et vers l’appareil. Si
vous souhaitez retirer la carte, enfoncez-la
un peu pour qu’elle se désenclenche.
3)
Après l’allumage, les lecteurs CD sont toujours sélectionnés. Pour commuter sur la
clé de mémoire USB ou la carte mémoire,
appuyez sur la touche CD / USB / CD (11)
en conséquence aussi souvent que nécessaire. Les LEDs (4) au-dessus de la molette
indiquent la sélection.
Conseil : la commutation n’est possible qu’en
mode pause. Si besoin, passez sur pause avec la
touche .
4)
Toutes les autres possibilités d’utilisation
sont décrites dans les tableaux sur les
pages suivantes. Après le fonctionnement,
éteignez le lecteur CD /MP3 avec l’interrupteur POWER.
6 Entretien de l‘appareil
Protégez l‘appareil de la poussière, des vibrations, de l’humidité et de la chaleur (plage de
température de fonctionnement autorisée :
0 – 40 °C). Pour le nettoyer, utilisez uniquement un chiffon sec et doux, en aucun cas
de produits chimiques ou d‘eau.
Remarques sur les coupures du son et les
erreurs de lecture
La fumée de cigarettes et la poussière s‘introduisent facilement dans les ouvertures du lecteur et se déposent sur l‘optique des systèmes
de lecture laser. Cela peut générer des erreurs
de lecture et des coupures de son. Dans ce
cas, confiez impérativement le nettoyage du
lecteur à un technicien spécialisé. Cette opération est à la charge de l‘utilisateur, même
lorsque l‘appareil est sous garantie !
7 Caractéristiques techniques
Bande passante : � � � � � � � 20 – 20 000 Hz
Taux de distorsion : � � � � � < 0,1 %
Séparation des canaux : � � > 80 dB
Dynamique : � � � � � � � � � � > 90 dB
Rapport signal / bruit : � � � > 80 dB
.
Sortie : � � � � � � � � � � � � � � 2 V (niveau ligne),
prisesRCA
Mémoire anti-chocs :
Alimentation : � � � � � � � � � 230 V/ 50 Hz
Consommation : � � � � � � � 30 VA max�
Température fonc� : � � � � � 0 – 40 °C
Dimensions (L × H × P)
Unité de commande : � � 482 × 88 × 100 mm,
Unité de lecture : � � � � � 482 × 88 × 270 mm,
Poids : � � � � � � � � � � � � � � � 5,9 kg
� � � � pour CDDA 10 s
pour MP3 15 s
2 unités
2 unités
Français
1
Pour des CD-RW, des problèmes lors de la lecture
peuvent survenir selon le type de CD, le graveur et
le logiciel de gravure utilisés.
2
En raison de la multitude de fabricants de supports
de mémoire et de drivers d’appareils, il n’est pas possible de garantir que tous les supports de mémoire
soient compatibles avec le CD-230USB.
13
Page 14

Touche Position Fonction
Fonctions de base
Français
SINGLE 12
17
TRACK / FOLDER
SEARCH
CUE 16
TIME 8
REPEAT 10
9
14
— Toutes les fonctions en un seul coup d’œil —
PITCH BEND
SEARCH
SCRATCH
5
Sélection du mode :
En lecture titre par titre, l’appareil lit un titre, commute sur le début du titre suivant et passe au
mode pause.
Démarrer la lecture [affichage (D)], interrompre [affichage II], poursuivre
Sélection de titre
Tournez le bouton jusqu’à ce que le titre souhaité soit affiché. Appuyez sur le bouton.
Sélection de dossier
1. Appuyez sur le bouton pour que FOLDER (M) soit visible quand vous relâchez le bouton.
2. En tournant le bouton, sélectionnez le dossier et confirmez en appuyant sur le bouton.
3. Tant que le numéro de titre (J) clignote (5 s environ), allez, par une nouvelle pression sur le bouton,
au premier titre du dossier ou en tournant tout d’abord le bouton, sélectionnez un autre titre
dans le dossier et appuyez pour confirmer.
N’attendez pas plus de 5 secondes entre 2 étapes sinon l’appareil revient au titre précédent.
Brève lecture du début d’un titre
1. Avec la touche , commutez sur pause.
2. Avec le bouton TRACK / FOLDER (9), allez au titre souhaité.
3. Une fois l’indication CUE (C) visible, maintenez la touche CUE enfoncée pour lire le début du titre.
Lorsque vous relâchez la touche, l’appareil est à nouveau sur pause au début du titre.
Retour au début du titre
Par une brève pression sur la touche CUE, l’appareil revient au début du titre et est en pause. En
maintenant la touche CUE enfoncée, on peut lire le début du titre ou démarrer la lecture avec la
touche
Retour dans le titre à un endroit donné (point Cue)
1. Lisez le titre. Lorsque l’endroit d’où le retour doit être effectué, est atteint, commutez sur
pause avec la touche . Si besoin, allez à l’endroit voulu avec plus de précision en utilisant la
molette(14).
2. Lorsque l’endroit est defini, redémarrez la lecture avec la touche . Le point de départ est automatiquement mémorisé comme point Cue : la touche CUE clignote deux fois.
3. Pour revenir au point Cue, appuyez sur la touche CUE.
Commutation de l’affichage de la durée (G)
1. Durée restante du titre* [affichage REMAIN (F)]
2. Durée restante du CD [affichage TOTAL REMAIN]
Affichage de la durée restante impossible pour les titres au format MP3
3. Durée lue du titre [affichage ELAPSED]
Fonctions répétition
1ère pression : affichage REPEAT 1 (E) = répétition du titre en cours
2ème pression : affichage REPEAT ALL = répétition de tous les titres
3ème pression : fonction répétition désactivée*
.
Fonctions de la molette
Aller à un endroit dans le titre avec une précision de 1 frame (
pas démarrer au début du titre mais à un endroit donné :
Lorsque, pendant la lecture, l’endroit souhaité est atteint, commutez sur pause avec la touche
et allez à l’endroit souhaité avec précision en tournant la molette vers la gauche ou vers la droite.
Conseil : si la molette est commutée sur la fonction PITCH BEND* ou SEARCH, l’endroit est répété en continu. Si
besoin, le son peut être coupé. Pour ce faire, appuyez sur la touche éclairée (5) au-dessus de la molette.
Pour pouvoir utiliser la fonction PITCH BEND* (voir page suivante) avec la molette, la touche doit
briller en bleu. Si besoin, appuyez sur la touche en conséquence.
Pour une avance / retour rapide, appuyez sur la touche jusqu’à ce qu’elle brille en rouge. Tournez
ensuite la molette vers l’avant ou l’arrière.
Pour produire des effets Scratch avec la molette, appuyez sur la touche jusqu’à ce qu’elle brille en
alternance en bleu et en rouge (voir également «Créer des effets»).
lecture titre part titre* [affichage SINGLE (K)]
lecture de tous les titres [affichage SINGLE disparaît]
1
⁄75 s), si p. ex. la lecture ne doit
*Une fois le CD-230USB allumé, le réglage ou la fonction est sélectionné.
14
Page 15

Touche Position Fonction
Modification de la vitesse et fonction PITCH BEND
Modification de la vitesse de lecture
1. Maintenez la touche Pitch enfoncée jusqu’à ce qu’elle brille. Le réglage PITCH (13) est alors activé.
2. Par une brève pression sur la touche Pitch, sélectionnez la plage de réglage : 16 %*, 8 %, 4 %.
3. Modifiez la vitesse avec le réglage PITCH.
– Pitch + 18
BRAKE 6
REVERSE 15
SCRATCH 5
IN OUT Reloop 19
PGM 20
PITCH BEND – adaptation du rythme entre deux morceaux de musique
Si, sur les deux unités de lecture, un titre doit être lu avec la même vitesse environ, on peut faire
synchroniser les rythmes des titres ensemble. Ainsi, pendant un fondu-enchaîné d’un titre à autre,
le rythme pour la danse n’est pas interrompu.
1. Tout d’abord, adaptez la vitesse du titre sur lequel le fondu-enchaîné doit se faire, au rythme du
2. En maintenant la touche + ou – enfoncée, lisez le titre brièvement plus vite ou moins vite jusqu’à
3. A la place, on peut lire le titre plus vite ou moins vite en tournant la molette (14). Il faut que la
molette soit activée, par la touche (5), sur la fonction PITCH BEND* (la touche brille en bleu).
Créer des effets
Effet freinage et démarrage
Si l’effet est activé, on simule, en appuyant sur la touche , le freinage ou démarrage lent d’un
plateau de platine disque.
Lecture arrière
Effet Scratch (simulation de la rotation avant / arrière d’un disque)
Appuyez sur la touche jusqu’à ce qu’elle brille en alternance en bleu et rouge. Ensuite, tournez la
molette (14) en conséquence vers l’avant ou l’arrière.
Lecture d’une boucle
Un segment d’un titre peut être répété aussi souvent que souhaité sous forme de boucle continue.
1. Si, pendant la lecture, le point de départ souhaité du segment est atteint, appuyez sur la touche
2. Lorsque le point de fin du segment est atteint en poursuivant la lecture, appuyez sur la touche
3. Pour quitter la boucle et continuer la lecture du titre, appuyez sur la touche OUT. La boucle reste
4. Pour démarrer à nouveau la boucle, appuyez sur la touche Reloop ou, pour lire une autre boucle,
Lorsque le titre suivant est atteint, ou lorsqu’un autre titre est sélectionné, la boucle est effacée.
1
Régler avec précision le point de départ et le point de fin : lorsque le point est atteint, commutez sur pause
et utilisez la molette (14) pour aller avec précision au point voulu. Appuyez ensuite sur la touche IN ou OUT.
Création d’une suite personnelle de titre
Si seuls des titres sélectionnés doivent être lus, on peut programmer une suite de titres (20 titres max.).
1. Avec la touche , commutez sur pause et avec la touche PGM, activez le mode de programma-
2. Sélectionnez le titre voulu avec le bouton rotatif TRACK / FOLDER (9). Vous pouvez également
3. Pour mémoriser, appuyez sur la touche PGM. L’emplacement suivant de mémoire P-02 est affiché.
4. Répétez les points 2 et 3 jusqu’à ce que tous les titres de la suite soient mémorisés.
5. Pour démarrer la suite de titres, appuyez sur la touche . Avec le bouton rotatif TRACK / FOLDER,
6. Pour effacer la suite de titres et revenir au mode normal de lecture, maintenez la touche PGM
et simultanément de la hauteur tonale (angl. : Pitch)
(Pour le désactiver*, maintenez à nouveau la touche enfoncée jusqu’à ce qu’elle s’éteigne.)
La plage est brièvement indiquée dans le champ PITCH (H), ensuite le champ indique la déviation
réglée avec le réglage PITCH par rapport à la vitesse normale.
titre en cours.
ce que le rythme coïncide avec celui du titre en cours.
IN1. La touche brille, A (L) est visible sur l’affichage.
OUT1. Le segment entre les points est répété en continu. Les touches IN et OUT clignotent, sur
l’affichage, B est en plus visible.
mémorisée, signalée par A sur l’affichage et les touches IN et OUT qui brillent en continu.
répétez les points 1 et 2 ou, pour définir un autre point de fin, appuyez sur la touche OUT.
tion : l’affichage PROGRAM (N) est visible, la ligne de texte (l) indique le premier emplacement
de mémoire
P-01.
sélectionner uniquement le numéro du titre et pas un dossier. Si besoin, notez le numéro du titre
dans le champ TRACK (J) pendant la lecture.
vous pouvez revenir sur chaque titre de la suite.
enfoncée jusqu’à ce que l’indication PROGRAM s’éteigne.
*Une fois le CD-230USB allumé, le réglage ou la fonction est sélectionné.
Français
Notice d’utilisation protégée par le copyright de MONACOR ® INTERNATIONAL GmbH & Co. KG. Toute
reproduction même partielle à des fins commerciales est interdite.Tout droit de modification réservé.
15
Page 16

Lettore
A
doppio CD / MP3 professionale
Queste istruzioni sono rivolte a DJ professio-
Italiano
nali e a utenti con conoscenze tecniche. Vi
preghiamo di leggerle attentamente prima
dell’installazione e di conservarle per un uso
futuro. A pagina 3, se aperta completamente,
vedrete tutti gli elementi di comando e i collegamenti descritti.
1 Elementi di comando
ecollegamenti
1.1 Unità di comando
1 Quadro di comando per il lettore A
per i particolari vedi fig. 2
2 Quadro di comando per il lettore B
per i particolari vedi fig. 2
3
Tasto OPEN / CLOSE per aprire e chiudere
il cassetto CD A
[come il tasto (25) dell’unita lettore]
4
I LED indicano quale mezzo di riproduzione
è stato scelto con il tasto CD / USB / SD (11)
5
Tasto per cambiare la funzione per la
manopola (14)
La funzione scelta è riconoscibile tramite
il colore della luce del tasto:
blu = funzione PITCH BEND
rosso = avanzamento/ritorno veloce
cambio blu / rosso = funzione scratch
6 Tasto BRAKE per attivare e disattivare la
funzione di frenata e di avvio
Se la funzione è attivata, premendo il
tasto , si simula il modo di avviarsi o
di fermarsi lentamente del piatto di un
giradischi.
7 Display
per i particolari vedi fig. 3 e il capitolo1.1.1
8
Tasto TIME per cambiare l’indicazione del
tempo (G)
La visualizzazione (F) sopra l’indicazione
del tempo segnala quale informazione è
attualmente visualizzata:
– REMAIN: tempo restante del titolo
– TOTAL REMAIN: tempo restante del CD
(non con titoli MP3)
– ELAPSED: tempo trascorso del titolo
9 Manopola per selezionare titoli e cartelle
10
Tasto REPEAT per le funzioni di ripetizione
1. pressione del tasto: REPEAT 1
ripetizione del titolo attuale
2. pressione del tasto: REPEAT ALL
ripetizione di tutti i titoli
3. pressione del tasto
funzione di ripetizione disattivata
11
Tasto CD / USB / SD per scegliere il CD,
la chiavetta USB oppure la scheda di
memoria
La scelta viene indicata tramite i LED (4)
sopra la manopola.
12 Tasto SINGLE per cambiare fra i modi di
riproduzione di titoli singoli e riproduzione
di tutti i titoli; con la riproduzione di titoli
singoli si vede (K)
13 Regolatore PITCH per modificare la velo-
cità; il regolatore è in funzione solo se il
tasto Pitch (18) è illuminato
14 Manopola per posizionarsi con esattezza
su un determinato punto nel modo pausa
Ulteriori funzioni durante la riproduzione
sono attivabili con il tasto (5).
15 Tasto REVERSE per la riproduzione all’in-
dietro
16
Tasto CUE per riprodurre l’inizio di un
titolo e per il ritorno all’inizio del titolo
oppure a un punto d’avvio determinato
precedentemente
17
Tasto per cambiare fra riproduzione
e pausa
18 Tasto Pitch
– tener premuto finché il tasto s’illumina
o si spegne: attivare o disattivare il regolatore PITCH (13)
– premere brevemente: scegliere la velo-
cità (4 %, 8 %, 16 %)
Tasti – e + per la funzione PITCH BEND
19
Tasti per riprodurre un loop (ripetizione
senza fine di una parte del brano)
– Tasto IN per determinare il punto d’avvio
– Tasto OUT per determinare il punto fi-
nale del loop e contemporaneamente
per avviare il loop; per uscire dal loop
premere nuovamente il tasto
– Tasto RELOOP per riprodurre il loop
un’altra volta
20
Tasto PGM per programmare una sequenza individuale di titoli
1.1.1 Display
A Indicazione MP3
si vede nei titoli nel formato MP3
B Indicazione USB
si vede se con il tasto CD / USB / SD (11) è
stata scelta la porta USB (23)
C Indicazione CUE
si vede se il lettore CD / MP3 si trova in
pausa all’inizio di un titolo o a un punto
d’avvio memorizzato (punto cue)
D
Simbolo per la riproduzione o per la
pausa II
E Indicazione REPEAT 1 durante la riprodu-
zione del titolo attuale oppure REPEAT
ALL durante la riproduzione di tutti i titoli
F
Indicazione REMAIN, se viene visualizzato
il tempo restante del titolo
Indicazione TOTAL REMAIN, se viene visualizzato il tempo restante del CD (non
è possibile con il titoli MP3)
Indicazione ELAPSED, se viene visualizzato
il tempo già trascorso del titolo
G
La durata di un titolo viene indicata
numericamente in minuti, secondi e frame
(1 frame = 1⁄75 secondo) e graficamente
come barra.
posizione 8: tasto TIME
☞
Gli ultimi 30 secondi di un titolo sono
segnalati dalla barra che lampeggia in
tutta la sua lunghezza.
H Campo di segnalazione PITCH
segnala, con il regolatore PITCH (13)
attivato, la deviazione impostata (%) dalla
velocità normale
I Riga per informazioni di testo, p. es. nu-
mero del titolo (Track 1) oppure per i titoli
MP3 informazioni scorrevoli supplementari (tag ID3)
J Numero del titolo
K Indicazione SINGLE per il modo di ripro-
duzione di un titolo singolo
L Simboli per il loop A e
solo simbolo A:
– se il punto d’avvio della parte da ripetere
è stato stabilito
– se un loop è stato memorizzato che però
attualmente non viene riprodotto
Simboli
di un loop
M Indicazione FOLDER
si vede se con la manopola (9) si possono
scegliere delle cartelle
N Indicazione PROGRAM nel modo di pro-
grammazione e durante la riproduzione
della sequenza programmata di titoli
e B durante la riproduzione
B
1.2 Unità lettore
21 Cassetto CD del drive CD A
22
Slot SD / MMC dell’unità lettore A per una
scheda di memoria (max. 32 GB)
23 Porta USB dell’unità lettore A per inserire
una chiavetta di memoria USB
24 Illuminazione del cassetto
25
Tasto OPEN / CLOSE per aprire e chiudere
il cassetto CD A
[come il tasto (3) dell’unità di comando]
26 Interruttore on / off POWER
27 Contatto per l’unità di comando:
collegarlo con la presa CONNECT TO
MAIN UNIT B usando uno dei cavi di collegamento in dotazione
28
Uscita audio LINE OUT dell’unità lettoreB
per il collegamento con l’ingresso Line,
p. es. di un amplificatore o di un mixer
29 Presa per il collegamento con una presa
di rete (230 V / 50 Hz) per mezzo dell’alimentatore in dotazione
30 Contatto per l’unità di comando:
collegarlo con la presa CONNECT TO
MAIN UNIT A usando uno dei cavi di collegamento in dotazione
31
Uscita audio LINE OUT dell’unità lettoreA
per il collegamento con l’ingresso Line,
p. es. di un amplificatore o di un mixer
16
Page 17

2 Avvertenza per l’uso sicuro
Quest’apparecchio è conforme a tutte le direttive richieste dell’UE e pertanto porta la
sigla .
AVVERTIMENTO
Attenzione! Con il cassetto CD (21)
•
aperto, non guardare mai nella fessura per
il CD. I raggi laser eventualmente uscenti
possono provocare dei danni agli occhi.
Usare l’apparecchio solo all’interno di locali.
•
Proteggetelo dall’acqua gocciolante e dagli
spruzzi d’acqua nonché da alta umidità
dell’aria. La temperatura d’esercizio ammessa è 0 – 40 °C.
Non depositare sull’apparecchio dei con-
•
tenitori riempiti di liquidi, p. es. bicchieri.
Staccare subito la spina dalla presa di rete
•
se:
1.
l’apparecchio o il cavo rete presentano
dei danni visibili;
2.
dopo una caduta o dopo eventi simili
sussiste il sospetto di un difetto;
3.
l’apparecchio non funziona corretta-
mente.
Per la riparazione rivolgersi sempre ad
un’officina competente.
Staccare il cavo rete afferrando la spina,
•
senza tirare il cavo.
Nel caso d’uso improprio, di collegamenti
•
sbagliati, d’impiego scorretto o di riparazione non a regola d’arte dell’apparecchio,
non si assume nessuna responsabilità per
eventuali danni consequenziali a persone
o a cose e non si assume nessuna garanzia
per l’apparecchio.
Se si desidera eliminare l‘apparecchio definitivamente, consegnarlo
per lo smaltimento ad un‘istituzione
locale per il riciclaggio.
L’apparecchio funziona con
pericolosa tensione di rete.
Non intervenire mai personalmente al suo interno!
Esiste il pericolo di una
scarica elettrica.
3 Possibilità d’impiego
Il lettore CD / MP3 CD-230USB con due unità
lettore è stato realizzato specialmente per usi
DJ professionali. A tale scopo sono disponibili
funzioni particolari, come p. es. la riproduzione di titoli singoli, vari effetti di riproduzione, modifica della velocità di riproduzione
fino al ±16 %.
Si possono riprodurre CD audio, compresi
CD-R e CD-RW1. I file MP3 possono essere
riprodotti da CD, chiavette USB di memoria2 e da schede di memoria SD/ SDHC2 (max.
32 GB).
4 Collocare e collegare
l’apparecchio
Le unità di comando e lettore sono previste
per il montaggio in un rack per apparecchi della larghezza di 482 mm (19”), ma si
possono collocare anche liberamente su un
tavolo. L’unità lettore deve sempre essere collocata in modo orizzontale, mentre l’unità
di comando può essere montata a piacere,
p. es. anche inclinata. Per il montaggio in un
rack, l’unità di comando e lettore richiedono
ognuna 2 unità di altezza (1 unità di altezza
= 44,45 mm).
Prima di collegare degli apparecchi o di modificare collegamenti esistenti, spegnere il
CD-230USB e gli apparecchi da collegare!
1) Collegare l’unità di comando e l’unità lettore usando i due cavi di collegamento in
dotazione:
Collegare la presa CONNECT TO CONTROL
UNIT A (30) dell’unità lettore A con la presa
CONNECT TO MAIN UNIT A dell’unità di
comando A. Nello stesso modo, effettuare
il collegamento fra le unità lettore B e di
comando B.
2)
Collegare ognuna delle due uscite per
segnali LINE OUT (28, 31) con un ingresso
Line, p. es. di un mixer o amplificatore
(scritte possibili: Line, CD, Aux).
3)
Collegare la presa (29) con una presa di
rete (230 V/ 50 Hz) per mezzo del cavo in
dotazione.
5 Funzionamento
Accendere l’apparecchio con l’interruttore di
rete POWER (26). Sul display (7), durante il
caricamento, si vede
un CD, sul display appaiano successivamente
delle informazioni sul CD. Se non è inserito
nessun CD, si vede NO DISC (nessun CD).
1)
Per inserire un CD, aprire il cassetto CD
(21) con il tasto (3 o 25). Inserire il CD
con la scritta rivolta in alto e richiudere il
cassetto CD con il tasto .
N. B.: Il cassetto CD è bloccato mentre viene
riprodotto un CD. Eventualmente fermare prima
la riproduzione con il tasto (17).
2)
In più o in alternativa inserire una chiavetta
USB2 nella porta USB
e / o
inserire una scheda di memoria2 nello
slot SD / MMC (22). L’angolo smussato
della scheda deve essere orientato verso
destro e verso l’apparecchio. Per fare uscire
la scheda, spingerla un po’ indentro per
sbloccarla.
3) Dopo l’accensione sono attivati sempre i
drive CD. Per passare alla chiavetta USB o
alla scheda di memoria premere tante volte
READING
. Se è inserito
il tasto CD / USB / SD (11). I LED (4) sopra la
manopola indicano la scelta.
N. B.: Tale passaggio è possibile solo nel modo
pausa. Eventualmente attivare la pausa con il
tasto .
4)
Tutte le ulteriori possibilità di funzionamento sono segnalate nelle tabelle delle
pagine seguenti. Dopo l’uso, spegnere il
lettore CD / MP3 con l’interruttore di rete
POWER.
6 Cura dell’apparecchio
Proteggere l’apparecchio dalla polvere, da
vibrazioni, dall’umidità e dal calore (temperatura d’esercizio ammessa 0 – 40 °C). Per la
pulizia usare solo un panno morbido, asciutto;
non impiegare in nessun caso acqua o prodotti chimici.
Note su possibili errori di lettura
Il fumo di sigarette e la polvere penetrano
facilmente fra tutte le aperture dell’apparecchio e si depositano sul sistema ottico della
scansione ai raggi laser. Se ciò dovesse provocare errori di lettura e buchi nella riproduzione, l’apparecchio deve essere pulito in un
laboratorio specializzato. Una tale pulizia è
a pagamento, anche durante il periodo di
garanzia!
7 Dati tecnici
Gamma di frequenze: � � � 20 – 20 000 Hz
Fattore di distorsione: � � � < 0,1 %
Separazione canali: � � � � � > 80 dB
Range dinamico: � � � � � � � > 90 dB
Rapporto S / R: � � � � � � � � � > 80 dB
Uscita: � � � � � � � � � � � � � � 2 V (livello Line),
prese RCA
Memoria anti-shock:
Alimentazione: � � � � � � � � 230 V/ 50 Hz
Potenza assorbita: � � � � � � max� 30 VA
Temp� d’esercizio: � � � � � � 0 – 40 °C
Dimensioni (l × h × p)
Unità di comando: � � � � 482 × 88 × 100 mm,
Unità lettore: � � � � � � � � 482 × 88 × 270 mm,
Peso: � � � � � � � � � � � � � � � � 5,9 kg
� � � � con CDDA 10 s
con MP3 15 s
2 U
2 U
Italiano
1
Nel caso di CD-RW è possibile che ci siano dei problemi nella riproduzione a seconda del tipo di CD,
del masterizzatore usato e del programma di masterizzazione.
2
Dato il grande numero di produttori di memorie e
di driver per apparecchi, non si può garantire che
tutti i mezzi di memoria siano compatibili con il
CD-230USB.
17
Page 18

Tasto Posizione Funzione
Italiano
SINGLE 12
17
TRACK / FOLDER
SEARCH
CUE 16
TIME 8
REPEAT 10
9
— Una sguardo su tutte le funzioni —
14
PITCH BEND
SEARCH
SCRATCH
5
Scegliere il modo:
Durante la riproduzione di titoli singoli, l‘apparecchio riproduce un titolo e si mette in pausa all‘inizio
del titolo successivo.
Avviare la riproduzione [Indicazione (D)], interrompere [Indicazione II], proseguire
Scegliere un titolo
Girare la manopola finché si vede il titolo desiderato. Premere la manopola.
Scegliere una cartella
1. Premere la manopola: lasciarla e si vede l‘indicazione FOLDER (M).
2. Girando la manopola scegliere la cartella e confermare con una pressione.
3. Mentre il numero del titolo (J) lampeggia (ca. 5 s), con una nuova pressione della manopola saltare
sul primo titolo della cartella oppure scegliere un altro titolo della cartella girando la manopola;
confermare con una pressione della manopola.
Fra due attività non fare passare più di 5 s, altrimenti l‘apparecchio salta sul titolo precedente.
Riprodurre l‘inizio di un titolo
1. Con il tasto attivare la pausa.
2. Con la manopola TRACK / FOLDER (9) saltare sul titolo desiderato.
3. Quando si vede l‘indicazione CUE (C), tener premuto il tasto CUE per riprodurre l‘inizio. Liberando
il tasto, l‘apparecchio si trova in pausa all‘inizio del titolo.
Ritorno all‘inizio di un titolo
Con una breve pressione del tasto CUE, l‘apparecchio ritorna all‘inizio del titolo e si mette in pausa.
Tenendo premuto il tasto CUE si può riprodurre l‘inizio del titolo oppure lo si può riavviare con il
tasto
Ritorno a un determinato punto (punto cue) del titolo
1. Riprodurre il titolo. Raggiunto il punto al quale si desidera ritornare, con il tasto attivare la
2. Se il punto è stato determinato, riavviare la riproduzione con il tasto . Il punto d‘avvio viene
3. Per ritornare premere il tasto CUE.
Passare all‘indicazione della durata (G)
1. Tempo restante del titolo* [Indicazione REMAIN (F)]
2. Tempo restante del CD [Indicazione TOTAL REMAIN]
3. Tempo trascorso del titolo [Indicazione ELAPSED]
Funzioni di ripetizione
1. pressione del tasto: Indicazione REPEAT 1 (E) = ripetizione del titolo attuale
2. pressione del tasto: Indicazione REPEAT ALL = ripetizione di tutti i titoli
3. pressione del tasto: Funzione di ripetizione disattivata*
.
pausa. Eventualmente, con la manopola (14) cercare il punto con maggiore sicurezza.
memorizzato automaticamente come punto cue. Il tasto CUE lampeggia due volte.
L‘indicazione non è possibile con i titoli nel formato MP3.
Funzioni della manopola
Con l‘esattezza di 1 frame (
non deve avviarsi dall‘inizio ma da un determinato punto:
Raggiunto tale punto durante la riproduzione, con il tasto
esattezza sul punto girando la manopola a destra o a sinistra.
N. B.: Se per la manopola è impostata la funzione PITCH BEND* o SEARCH, il punto attuale viene ripetuto continuamente. Se necessario, l‘audio può essere messo in muto premendo il tasto illuminato (5) sopra la manopola.
Per poter sfruttare la funzione PITCH BEND* con la manopola (vedi pagina seguente), il tasto deve
emettere una luce blu. Eventualmente premere il tasto ripetutamente.
Per l‘avanzamento / ritor no veloce premere il tasto tante volte finché si accende di color rosso.
Quindi girare la manopola in avanti o indietro.
Per poter generare con la manopola degli effetti scratch, premere il tasto tante volte finché si
accende alternativamente di colore blu e rosso (vedi anche “Generare degli effetti”).
Funzioni fondamentali
Riproduzione di titoli singoli* [Indicazione SINGLE (K)]
Riproduzione di tutti i titoli [Indicazione SINGLE spenta]
1
⁄75 s) posizionarsi su un punto del titolo, p. es. se la riproduzione
andare in pausa e posizionarsi con
*Dopo l‘accensione del CD-230USB è attiva questa impostazione o funzione.
18
Page 19

Tasto Posizione Funzione
Modificare la velocità e funzione PITCH BEND
Modificare la velocità
1. Tener premuto il tasto Pitch finché s‘illumina. A questo punto, il regolatore PITCH (13) è attivato.
(Per disattivarlo* tener premuto il tasto ancora finché si spegne.)
2. Con una breve pressione del tasto Pitch scegliere il campo d‘impostazione: 16 %*, 8 %, 4 %.
Il campo viene visualizzato molto brevemente sul campo PITCH (H) del display, quindi il campo
segnala la deviazione dalla velocità normale impostata con il regolatore PITCH.
3. Modificare la velocità con il regolatore PITCH.
PITCH BEND – Adattare il ritmo fra due brani musicali
– Pitch + 18
Se sulle due unità lettore si riproducono dei titoli con quasi la stessa velocità, è possibile far coincidere esattamente le battute dei due titoli. Durante la dissolvenza da un titolo all‘altro, il ritmo non
si interrompe per i danzanti.
1. Dapprima adattare la velocità del titolo verso il quale è prevista la dissolvenza, a quella del titolo
attuale.
2. Tenendo premuto il tasto + o – , riprodurre il titolo brevemente in modo più veloce o più lento
finché le battute fra i due brani coincidono.
3. In alternativa, il titolo può essere riprodotto più velocemente o più lentamente girando la manopola (14). In questo caso, sulla manopola deve essere impostata, tramite il tasto sovrastante (5),
la funzione PITCH BEND* (il tasto s‘illumina di colore blu).
Generare degli effetti
Effetto di frenata e di avvio
BRAKE 6
Se l‘effetto è attivato, premendo il tasto
piatto di un giradischi.
REVERSE 15 Riproduzione all‘indietro
(simulazione di girare velocemente in avanti e indietro il disco di un giradischi)
SCRATCH 5
Effetto scratch
Premere il tasto tante volte finché s‘illumina alternativamente di color blu e rosso. Quindi girare in
avanti o indietro la manopola (14).
Riprodurre un loop
Una parte di un titolo può essere ripetuta a volontà e senza interruzione come loop.
1. Se durante la riproduzione si raggiunge il punto d‘inizio desiderato, premere il tasto IN.1 Il tasto
s‘illumina e sul display si vede A (L).
2. Se durante l‘ulteriore riproduzione si raggiunge il punto finale della parte da ripetere, premere il
tasto OUT.1 La parte fra i due punti viene ripetuta continuamente. I tasti IN e OUT lampeggiano
IN OUT Reloop 19
e sul display si vede in più B.
3. Per uscire dal loop e per continuare la riproduzione del loop, premere il tasto OUT. Il loop rimane
memorizzato, segnalato da A sul display e dall‘illuminazione costante dei tasti IN e OUT.
4. Per riavviare il loop, premere il tasto Reloop, oppure, per riprodurre un altro loop, ripetere i punti
1 e 2, oppure per fissare un altro punto finale premere il tasto OUT.
Quando si raggiunge il titolo successivo o si sceglie un altro titolo, il loop viene cancellato.
1
Impostare con esattezza il punto d‘inizio e di fine: Raggiunto il punto, attivare la pausa e posizionarsi con
esattezza sul punto, aiutandosi con la manopola (14). Quindi premere il tasto IN opp. OUT.
Compilare una sequenza individuale di titoli
Se si devono riprodurre solo titoli scelti, si può programmare una sequenza di un massimo di 20 titoli.
1. Con il tasto andare in pausa e con il tasto PGM attivare il modo di programmazione: Si vede
l’indicazione PROGRAM (N) e la riga di testo (I) segnala la prima locazione di memoria
2. Scegliere il titolo con la manopola TRACK / FOLDER (9). Si può scegliere solo il numero del titolo,
ma non una cartella. Eventualmente annotarsi il numero dal campo TRACK (J) mentre si riproduce un titolo.
PGM 20
3. Per salvare, premere il tasto PGM. Si vede la locazione successiva di memoria P-02.
4. Ripetere i punti 2 e 3 finché tutti i titoli della sequenza sono memorizzati.
5. Per avviare la sequenza premere il tasto . Con la manopola TRACK / FOLDER è possibile saltare
su ogni titolo della sequenza.
6. Per cancellare la sequenza e per ritornare nel modo normale di riproduzione, tener premuto il
tasto PGM finché l‘indicazione PROGRAM si spegne.
e nello stesso tempo l‘altezza del suono (ingl.: pitch)
, viene simulato il modo lento di avvio e di fermata del
P-01.
*Dopo l‘accensione del CD-230USB è attiva questa impostazione o funzione.
Italiano
Con riserva di modifiche tecniche.
La MONACOR ® INTERNATIONAL GmbH & Co. KG si riserva ogni diritto di elaborazione in qualsiasi forma
delle presenti istruzioni per l’uso. La riproduzione – anche parziale – per propri scopi commerciali è vietata.
19
Page 20

Professionele
A
Dual-CD / MP3-speler
Deze handleiding richt zich op professionele
DJ‘s en technisch onderlegde leken. Lees de
handleiding grondig door, alvorens het appa-
Nederlands
raat in gebruik te nemen, en bewaar ze voor
latere raadpleging. Op de uitklapbare pagina
3 vindt u een overzicht van alle bedieningselementen en de aansluitingen.
1 Overzicht van de
aansluitingen en
bedieningselementen
1.1 Besturingseenheid
1
Bedieningspaneel van de afspeeleenheid A
Details zie figuur 2
2
Bedieningspaneel van de afspeeleenheid B
Details zie figuur 2
3
Toets OPEN / CLOSE voor het openen en
sluiten van de cd-lade A
[zoals de toets (25) van de afspeeleenheid]
4 De leds geven aan welk afspeelmedium
met de toets CD / USB / SD (11) is geselecteerd
5
Toets om de functie van de draaiknop om
te schakelen (14)
De geselecteerde functie wordt aangegeven door de lichtkleur van de toets:
Blauw = functie PITCH BEND
Rood = snel vooruit / achteruit zoeken
Wissel blauw / rood = Scratchfunctie
6
Toets BRAKE om de rem- en aanloopfunctie in en uit te schakelen
Als de functie ingeschakeld is, wordt bij
drukken op de toets het langzame
starten of stoppen van een platenspeler
gesimuleerd.
7 Display
Details zie figuur 3 en hoofdstuk 1.1.1
8 Toets TIME om de tijdsaanduiding om te
schakelen (G)
De melding (F) boven het tijddisplay informeert wat momenteel wordt weergegeven:
– REMAIN: resterende speeltijd van de
track
– TOTAL REMAIN: resterende speeltijd van
de cd (niet bij mp3-tracks)
– ELAPSED: de reeds verstreken speeltijd
van de track
9
Draaiknop om tracks en mappen te selecteren
10 Toets REPEAT voor de herhalingsfuncties
1ste keer drukken op de toets:
REPEAT 1
herhaling van de huidige track
2de keer drukken op de toets:
REPEAT ALL
herhaling van alle tracks
3de keer drukken op de toets:
de herhalingsfunctie is uitgeschakeld
11
Toets CD / USB / SD om de cd, de USBgeheugenstick of de geheugenkaart te
selecteren
De selectie wordt door de leds (4) boven
de draaiknop aangeduid.
12
Toets SINGLE om te wisselen tussen de
modussen Afspelen van een individuele
track en Afspelen van de volledige cd;
bij Afspelen van een indivi duele track
verschijnt de melding SINGLE (K) op het
display
13 Regelaar PITCH om de snelheid te wijzi-
gen; de regelaar functioneert alleen, als
de toets Pitch (18) oplicht
14
Draaiknop om in pauzemodus een bepaalde plaats nauwkeurig op te zoeken
Andere functies tijdens het afspelen kunt
u met de toets (5) selecteren.
15 Toets REVERSE om achteruit af te spelen
16 Toets CUE om een track kort voor te be-
luisteren en om naar het begin van de
track of een vooraf ingesteld beginpunt
terug te keren
17 Toets om te wisselen tussen afspelen
en pauze
18 Toets PITCH
– ingedrukt houden tot de toets oplicht
of uitgaat: activeren of deactiveren van
de regelaar PITCH (13)
– kort indrukken: Snelheidsregelbereik
kiezen (4 %, 8 %, 16 %)
Toetsen – en + voor de functie PITCH
BEND
19 Toetsen om een loop af te spelen (einde-
loze herhaling van een fragment)
– Toets IN om het startpunt van het frag-
ment vast te leggen
– Toets OUT om het eindpunt van het
fragment vast te leggen, en tegelijk de
loop te starten; druk nogmaals op de
toets om deze loop te verlaten
– Toets RELOOP om de loop opnieuw af
te spelen
20 Toets PGM om een eigen reeks tracks te
programmeren
1.1.1 Display
A Aanduiding MP3
verschijnt bij tracks met het mp3-formaat
B Aanduiding USB
verschijnt, als met de toets CD / USB / SD
(11) de USB-aansluiting (23) is geselecteerd
C Aanduiding CUE
verschijnt als met de cd- / mp3-speler aan
het begin van de track of op een opgeslagen beginpunt (Cue-punt) in pauze staat
D Symbool voor afspelen of pauze II
E
Aanduiding REPEAT 1 bij herhaling van de
huidige track of REPEAT ALL bij herhaling
van alle tracks
F
Aanduiding REMAIN, als de resterende
speeltijd track wordt weergegeven
Aanduiding TOTAL REMAIN, als de resterende speeltijd van de cd wordt weergegeven (niet mogelijk bij mp3-tracks)
Aanduiding ELAPSED, als de reeds verstreken speeltijd van de track wordt weergegeven
G
De speeltijd van een track wordt numeriek
in minuten, seconden en frames (1 frame
=1⁄75 seconde) en grafisch als een balk
weergegeven.
Positie 8: Toets TIME
☞
De laatste 30 seconden van een track
worden aangegeven door de balkgrafiek
die over de volledige lengte knippert.
H Weergaveveld PITCH
geeft bij actieve regelaar PITCH (13) de
ingestelde afwijking (%) ten opzichte van
de normale snelheid aan
I Regel voor tekstinformatie, bv. nummer
van de track (Track 1) of bij mp3-tracks
doorlopende extra informatie (ID3-tag)
J Tracknummer
K Aanduiding SINGLE voor de bedrijfsmo-
dus Afspelen van een individuele track
L Loopaanduidingen A en
alleen aanduiding A:
– als het beginpunt van het te herhalen
fragment werd vastgelegd
– als er een loop is opgeslagen, maar op
dit ogenblik niet wordt afgespeeld
Aanduidingen
een loop
M Aanduiding FOLDER
verschijnt, als u met de draaiknop (9)
mappen kunt selecteren
N
Aanduiding PROGRAM in de programmeermodus en bij het Afspelen van de
geprogrammeerde reeks tracks
en B bij afspelen van
B
1.2 Afspeeleenheid
21 Cd-lade van cd-drive A
22
Slot SD / MMC van de afspeeleenheid A
voor een geheugenkaart (max. 32 GB)
23 USB-aansluiting van de afspeeleenheid A
om een USB-geheugenstick in te steken
24 Ladeverlichting
25
Toets OPEN / CLOSE voor het openen en
sluiten van de cd-lade A
[zoals de toets (3) van de besturingseenheid]
26 POWER-schakelaar
27 Aansluiting voor het besturingseenheid:
verbind deze via een van de bijgeleverde
aansluitkabels met de jack CONNECT TO
MAIN UNIT B
28 Audio-uitgang LINE OUT van de afspeel-
eenheid B voor het aansluiten op de
lijningang van bv. een versterker of een
mengpaneel
29
POWER-jack voor aansluiting op een stopcontact (230 V/ 50 Hz) met behulp van het
bijgeleverde netsnoer
30 Aansluiting voor het besturingseenheid:
verbind deze via een van de bijge leverde
aansluitkabels met de jack CONNECT TO
MAIN UNIT A
31 Audio-uitgang LINE OUT van de afspeel-
eenheid A voor het aansluiten op de
lijningang van bv. een versterker of een
mengpaneel
20
Page 21

2 Veiligheidsvoorschriften
Het apparaat is in overeenstemming met alle
relevante EU-Richtlijnen en is daarom gekenmerkt met .
WAARSCHUWING
Opgelet! Kijk bij geopende cd-lade (21)
•
niet in het binnenwerk van de cd-speler,
want eventueel actieve laserstralen kunnen
oogletsels veroorzaken.
Het apparaat is enkel geschikt voor gebruik
•
binnenshuis; vermijd druip- en spatwater
en plaatsen met uitzonderlijk hoge vochtigheid. Het toegestane omgevingstemperatuurbereik is 0 – 40 °C.
Plaats geen bekers met vloeistof zoals
•
drinkglazen etc. op het apparaat.
Trek onmiddellijk de netstekker uit het
•
stopcontact,
1.
wanneer het apparaat of het netsnoer
zichtbaar beschadigd is,
2. wanneer er een defect zou kunnen optreden nadat het apparaat bijvoorbeeld
is gevallen,
3.
wanneer het apparaat slecht functioneert.
Het apparaat moet in elk geval worden
hersteld door een gekwalificeerd vakman.
Trek de stekker nooit met het snoer uit het
•
stopcontact, maar met de stekker zelf.
In geval van ongeoorloofd of verkeerd ge-
•
bruik, verkeerde aansluiting, foutieve bediening of van herstelling door een niet-gekwalificeerd persoon vervalt de garantie en
de verantwoordelijkheid voor hieruit resulterende materiële of lichamelijke schade.
Wanneer het apparaat definitief uit
bedrijf wordt genomen, bezorg het
dan voor milieuvriendelijke verwerking aan een plaatselijk recyclagebedrijf.
De netspanning van de
apparaat is levensgevaarlijk. Open het apparaat
niet, want u loopt het
risico van een elektrische
schok.
3 Toepassingen
De cd / mp3-speler CD-230USB met twee
afspeeleenheden is speciaal ontworpen voor
professionele DJ-toepassingen. Hiervoor zijn
bijzondere functies beschikbaar zoals Afspelen van een individuele track, verschillende
afspeeleffecten, wijziging van de afspeelsnelheid tot ±16 %.
Met het apparaat kunnen audio-cd‘s, inclusief cd-r‘s en cd-rw‘s1, worden afgespeeld.
Mp3-bestanden kunnen van cd‘s, USB-geheugensticks2 en SD/ SDHC-geheugenkaarten2
(max. 32 GB) worden afgespeeld.
4 Het apparaat opstellen
enaansluiten
De besturings- en afspeeleenheid zijn voorzien voor montage in een rack voor apparatuur met een breedte van 19” (482 mm);
ze kunnen echter ook als vrijstaande tafelmodellen worden gebruikt. De afspeeleenheid moet steeds horizontaal worden geplaatst, terwijl men de besturingseenheid in
een willekeurige positie kan inbouwen, zelfs
gekanteld. Voor de montage in een rack hebt
u voor de besturings- en het afspeeleenheid
telkens 2 rack-eenheden nodig (1 rack-eenheid = 44,45 mm).
Schakel de CD-230USB en de aan te sluiten
apparatuur uit, alvorens apparaten aan te sluiten of bestaande aansluitingen te wijzigen!
1)
Verbind de bedieningseenheid en de afspeeleenheid via de beide bijgeleverde
aansluitingskabels:
Verbind de jack CONNECT TO CONTROL
UNIT A (30) van de afspeeleenheid A met
de jack CONNECT TO MAIN UNIT A van de
bedieningseenheid A. Breng de verbinding
tussen de afspeeleenheid B en de bedieningseenheid B op net dezelfde wijze tot
stand.
2)
Sluit elk van de beide signaaluitgangen
LINE OUT (28, 31) aan op een ingang voor
lijnniveau bv. van een mengpaneel of een
versterker (mogelijke labeling: Line, CD,
Aux).
3)
Verbind de POWER-jack (29) via het bijgeleverde netsnoer met een stopcontact
(230 V/ 50 Hz).
5 Bediening
Schakel het apparaat in met de POWER-schakelaar (26). Tijdens het inlezen verschijnt de
melding READING op het display (7). Als er
een cd in de lade is geplaatst, verschijnen er
daarna gegevens van de cd op het display. Als
er geen cd in de lade is geplaatst, verschijnt
de aanduiding NO DISC (geen cd).
1) Om een cd te laden, opent u de cd-lade
(21) met de toets (3 of 25). Leg een cd
in de lade met het label naar boven en
sluit de cd-lade opnieuw met de toets .
Opmerking: De cd-lade is vergrendeld, zolang
een cd wordt afgespeeld. Beëindig het afspelen
evt. eerst met de toets (17).
2)
Steek bijkomend of als alternatief een
USB-stick2 in de USB-aansluiting (23)
en / of
steek een geheugenkaart2 in de slot
SD / MMC (22). Daarbij moet de afgeschuinde hoek van de kaart naar rechts
en naar het apparaat zijn gericht. Als u
de kaart er weer wilt uitnemen, drukt u
ze iets in, zodat ze ontgrendelt.
3)
Na het inschakelen zijn steeds de cd-drives
geselecteerd. Om naar de USB-geheugenstick of de geheugenkaart om te schakelen, drukt u een voldoende aantal keren
op de toets CD / USB / SD (11). De leds (4)
boven de draaiknop geven de selectie aan.
Opmerking: Het omschakelen is alleen mogelijk
in de pauzemodus. Schakel eventueel met de
toets in pauze.
4)
Alle andere bedieningsmogelijkheden
zijn vermeld in de tabellen op de volgende pagina‘s. Na het gebruik schakelt
u de cd / mp3-speler uit met de schakelaar
POWER.
6 Onderhoud van het apparaat
Bescherm het apparaat tegen stof, trillingen,
vocht en warmte (toegelaten omgevingstemperatuur 0 – 40 °C). Verwijder het stof met
een zachte, droge doek. Gebruik zeker geen
water of chemicaliën.
Opmerking in verband met klankstoringen en leesfouten
Sigarettenrook en stof dringen makkelijk in
alle openingen van de cd-speler en zet zich
ook af op de optische onderdelen van de
laseraftastsystemen. Mocht deze afzetting
tot leesfouten en klankstoringen leiden, dan
moet het apparaat door een gekwalificeerd
vakman worden gereinigd. De kosten voor
deze reiniging draagt de koper, ook tijdens
de garantietermijn!
7 Technische gegevens
Frequentiebereik: � � � � � � � 20 – 20 000 Hz
THD: � � � � � � � � � � � � � � � � < 0,1 %
Kanaalscheiding: � � � � � � � > 80 dB
Dynamisch bereik: � � � � � � > 90 dB
Signaal /
Ruis-verhouding: � � � � � � � > 80 dB
Uitgang: � � � � � � � � � � � � � 2 V (lijnniveau),
cinch-aansluitingen
Antischokgeheugen:
Voedingsspanning: � � � � � 230 V/ 50 Hz
Vermogensverbruik: � � � � � max� 30 VA
Omgevingstemperatuurbereik:
Afmetingen (B × H × D)
Besturingseenheid: � � � � 482 × 88 × 100 mm,
Afspeeleenheid: � � � � � � 482 × 88 × 270 mm,
Gewicht:
� � � � � � � � � � � � � 5,9 kg
� � � � bij CDDA 10 sec
bij mp3 15 sec
� � � � � 0 – 40 °C
2 rack-eenheden
2 rack-eenheden
Nederlands
1
Bij cd-rw‘s kan het afspelen naargelang het cd-type,
de gebruikte cd-brander en het brandprogramma
echter problematisch verlopen.
2
Door de verscheidenheid aan opslaggeheugenfabrikanten en besturingsprogramma‘s kan niet gegarandeerd worden, dat alle opslagmedia compatibel
zijn met de CD-230USB-speler.
21
Page 22

Toets Positie Functie
Basisfuncties
Modus selecteren:
Nederlands
— alle functies in één oogopslag —
SINGLE 12
TRACK / FOLDER
SEARCH
CUE 16
TIME 8
REPEAT 10
PITCH BEND
SEARCH
SCRATCH
17
14
Bij Afspelen van een individuele track speelt het apparaat een track af en schakelt het aan het begin
van de volgende track in pauze.
Afspelen starten [aanduiding (D)], onderbreken [aanduiding II], voortzetten
Track selecteren
Draai met de knop tot de gewenste track op het display wordt weergegeven. Druk dan op de knop.
Map selecteren
1. Druk op de knop, zodat na het loslaten de melding FOLDER (M) op het display verschijnt.
9
2. Selecteer de map door met de knop te draaien en druk om te bevestigen.
3. Zolang het tracknummer (J) knippert (ca. 5 sec), kunt u door opnieuw op de knop te drukken
naar de 1ste track van de map terugkeren of eerst – door met de knop te draaien – een andere
track in de map selecteren, en vervolgens bevestigen door erop te drukken.
Wacht tussen 2 bedieningsstappen niet langer dan 5 seconden, anders keert het apparaat terug
naar de vorige track.
Track kort voorbeluisteren
1. Schakel met de toets in pauze.
2. Spring met de knop TRACK / FOLDER (9) naar de gewenste track.
3. Nadat de melding CUE (C) op het display wordt weergegeven, houdt u de toets CUE ingedrukt
om de track kort voor te beluisteren. Na loslaten van de toets staat het apparaat weer in pauze
aan het begin van de track.
Terugkeer naar het begin van de track
Druk kort op de toets CUE; het apparaat gaat terug naar het begin van de track en staat weer in
pauze. Daarna kunt u de toets kort ingedrukt houden om de track kort voor te beluisteren of de
track met de toets starten.
Terugkeer naar een bepaalde plaats binnen de track (Cue-punt)
1. De track afspelen. Als de plaats waar naar moet worden teruggesprongen, is bereikt, schakelt
u met de toets in pauze. Ga met de draaiknop (14) eventueel nauwkeuriger naar de plaats.
2. Als de plaats is bepaald, start u het afspelen opnieuw met de toets . Daarbij wordt het startpunt
automatisch als Cue-punt opgeslagen: De toets CUE knippert tweemaal.
3. Druk op de toets CUE om terug te springen.
De weergave van de speeltijd (G) omschakelen
1. Resterende speeltijd van de track* [melding REMAIN (F)]
2. Resterende speeltijd van de cd [melding TOTAL REMAIN]
Weergave van de resterende speeltijd is echter niet mogelijk bij tracks in mp3-formaat.
3. Reeds verstreken speeltijd van de track [melding ELAPSED]
Herhalingsfuncties
1ste keer drukken op de toets: Melding REPEAT 1 (E) = herhaling van de huidige track
2de keer drukken op de toets: Melding REPEAT ALL = herhaling van alle tracks
3de keer drukken op de toets: de herhalingsfunctie is uitgeschakeld*
Functies van de draaiknop
U kunt een plaats in een track tot op 1 frame (
afspelen niet vanaf het begin van de track, maar vanaf een bepaalde plaats in de track wenst te
starten:
Als de gewenste plaats tijdens het afspelen is bereikt, schakelt u met de toets
u nauwkeurig naar de bewuste plaats door de draaiknop linksom of rechtsom te draaien.
Opmerking: Als de draaiknop op de functie PITCH BEND* of SEARCH is ingesteld, wordt de zo-even gezochte
plaats continu herhaald. Indien nodig, kunt u het geluid uitschakelen. Druk hiervoor op de verlichte toets (5) boven
5
de draaiknop.
Om met de knop de functie PITCH BEND* (zie volgende pagina) te kunnen gebruiken, moet de
toets blauw oplichten. Druk eventueel een voldoende aantal keren op de toets.
Om vooruit / achteruit te zoeken drukt u enkele keren op de toets tot deze rood oplicht. Draai
dan de knop verder of terug.
Om met de draaiknop scratcheffecten te kunnen genereren, drukt u enkele keren op de toets tot
deze afwisselend blauw-rood oplicht (zie ook “Effecten genereren”).
Afspelen van een individuele track* [aanduiding SINGLE (K)]
Afspelen van alle tracks [aanduiding SINGLE gaat uit]
1
⁄75 sec) nauwkeurig opzoeken, bv. als u het
in pauze, en gaat
*Na het inschakelen van de CD-230USB is deze instelling of functie geselecteerd.
22
Page 23

Toets Positie Functie
De snelheid wijzigen en de functie PITCH BEND
De afspeelsnelheid wijzigen
1. Houd de toets Pitch ingedrukt tot deze oplicht. Hiermee is de regelaar PITCH (13) geactiveerd.
(Om te deactiveren* houdt u de toets opnieuw ingedrukt, tot hij uitgaat.)
2. Door kort op de toets Pitch te drukken, selecteert u het instelbereik: 16 %*, 8 %, 4 %. Het bereik
wordt heel even op het displayveld PITCH (H) weergegeven, daarna verschijnt in het veld de met
de regelaar PITCH ingestelde afwijking ten opzichte van de normale snelheid.
3. Wijzig de afspeelsnelheid met de regelaar PITCH.
PITCH BEND – het ritme van twee muziekfragmenten op elkaar afstemmen
– Pitch + 18
BRAKE 6
REVERSE 15 Achteruit afspelen
SCRATCH 5
IN OUT Reloop 19
PGM 20
Als op beide afspeeleenheden telkens een track met ongeveer dezelfde snelheid wordt afgespeeld,
kunt u het ritme van de tracks tijdelijk exact gelijk laten lopen. Zo wordt bij het mengen van twee
tracks het ritme tijdens het dansen niet onderbroken.
1. Pas eerst de snelheid aan van de track, waarmee moet worden gemengd, aan de snelheid van
de afgespeelde track.
2. Door de toets + of – ingedrukt te houden, speelt u de track kortstondig sneller of langzamer af
tot het ritme met dit van de geselecteerde track overeenstemt.
3. Ook kunt u de track door draaien met de draaiknop (14) sneller of langzamer afspelen. Hiervoor
moet de draaiknop via de toets (5) erboven in de functie PITCH BEND* geschakeld zijn (toets
licht blauw op).
Effecten genereren
Rem- en starteffect
Als het effect is ingeschakeld, wordt bij drukken op de toets
van een platenspeler gesimuleerd.
Scratcheffecten
Druk enkele keren op de toets tot deze afwisselend blauw-rood oplicht. Draai de knop (14) overeenkomstig vooruit en terug.
Loop afspelen
U kunt een fragment van een track als naadloze loop afspelen zo lang u wenst.
1. Als tijdens het afspelen het gewenste beginpunt van het fragment is bereikt, drukt u op de toets
IN.1 De toets licht op en op het display verschijnt de melding A (L).
2. Als bij het verder afspelen het eindpunt van het fragment wordt bereikt, drukt u op de toets
OUT.1 Het fragment tussen de punten wordt continu herhaald. De toetsen IN en OUT knipperen
en een extra displaybericht B verschijnt.
3. Om de loop te verlaten en de track verder af te spelen, drukt u opnieuw op de toets OUT. De
loop blijft echter opgeslagen, wat door het displaybericht A en de continu oplichtende toetsen
IN en OUT aangegeven.
4. Om de loop opnieuw af te spelen, drukt u op de toets Reloop, of om een andere loop af te spelen, herhaalt u punten 1 en 2, of om een ander eindpunt te bepalen, drukt u op de toets OUT.
Bij bereiken van de volgende track of het selecteren van een andere, wordt de loop gewist.
1
Start- en eindpunt exact instellen: schakel bij zoeken van het punt in pauze en benader het punt nauwkeurig
met de draaiknop (14). Druk dan op de toets IN of OUT.
Eigen trackvolgorde samenstellen
Als er alleen geselecteerde tracks moeten worden afgespeeld, dan kunt u een reeks van max.
20tracks programmeren.
1. Schakel met de toets in pauze en schakel met de toets PGM de programmeermodus in: De
melding PROGRAM (N) verschijnt op het display, en de tekstregel (I) toont de eerste geheugen-
P-01.
plaats
2. Selecteer de gewenste track met de draaiknop TRACK / FOLDER (9). Daarbij kunt u alleen het
tracknummer selecteren en geen map. Noteer het nummer eventueel vooraf bij het afspelen van
een track uit het veld TRACK (J).
3. Om op te slaan, drukt u op de toets PGM. De volgende geheugenplaats P-02 wordt weergegeven.
4. Herhaal de bedieningsstappen 2 en 3 tot alle tracks van de reeks zijn opgeslagen.
5. Druk op de toets om de reeks tracks te starten. Met de draaiknop TRACK / FOLDER kunt u
naar elke titel van de track springen.
6. Om de reeks tracks te wissen en naar de normale afspeelmodus terug te keren, houdt u de toets
PGM ingedrukt tot het displaybericht PROGRAM verdwijnt.
en tegelijk de toonhoogte (Eng.: Pitch)
Nederlands
het langzame starten of stoppen
(simulatie van snel vooruit / achteruit draaien van een draaiende langspeelplaat)
*Na het inschakelen van de CD-230USB is deze instelling of functie geselecteerd.
Deze gebruiksaanwijzing is door de auteurswet be schermd eigendom van MONACOR ® INTERNATIONAL
GmbH& Co. KG. Een reproductie – ook gedeeltelijk – voor eigen commerciële doeleinden is verboden.Wijzigingen voorbehouden.
23
Page 24

Lector
B
A
Doble CD / MP3 Profesional
Estas instrucciones de funcionamiento están
Español
dirigidas a DJs profesionales y usuarios no
profesionales con conocimientos técnicos. Lea
atentamente estas instrucciones de funcionamiento antes de utilizar el aparato y guárdelas
para usos posteriores. Todos los elementos de
funcionamiento y las conexiones que aquí se
describen aparecen en la página 3 desplegable.
1 Elementos de Conexiones
yFuncionamiento
1.1 Unidad de control
1 Panel de control para el reproductor A
Ver fig. 2 para más detalles
2 Panel de control para el reproductor B
Ver fig. 2 para más detalles
3 Botón OPEN / CLOSE para abrir y cerrar
la bandeja de CD A
[como el botón (25) del reproductor]
4 LEDs, indicación del medio de reproduc-
ción que se ha seleccionado con el botón
CD / USB / SD (11)
5
Botón para cambiar la función para el jog
wheel (14)
El color de iluminación del botón indicará
la función seleccionada:
Azul = función PITCH BEND
Rojo = avance / retroceso rápido
Azul / rojo alternando = función scratch
6
Botón BRAKE para conectar y desconectar
la función de arranque y frenada
Con la función conectada, se simularán
los típicos arranques y frenadas lentos
de un giradiscos cuando esté pulsado el
botón .
7 Visualizador
Ver fig. 3 y apartado 1.1.1 para más
detalles
8
Botón TIME para cambiar la indicación
temporal (G)
La indicación (F) sobre la indicación temporal identificará la información mostrada
en ese momento:
– REMAIN: Tiempo restante de la pista
– TOTAL REMAIN: Tiempo restante del CD
(excepto para pistas MP3)
– ELAPSED: Tiempo transcurrido de la
pista
9 Control rotatorio para seleccionar pistas
y carpetas
10
Botón REPEAT para las funciones de
repetición
1ª pulsación del botón: REPEAT 1
Repetición de la pista actual
2ª pulsación del botón: REPEAT ALL
Repetición de todas las pistas
3ª pulsación del botón:
Se desactiva la función repetición
11
Botón CD / USB / SD para seleccionar el
medio de reproducción: CD, unidad flash
USB o tarjeta de memoria
Los LEDs (4) sobre el jog wheel indicarán
el medio de reproducción seleccionado.
12
Botón SINGLE para conmutar entre el
modo de reproducción de una sola pista
y el modo de reproducción de todas las
pistas; con el modo de reproducción de
una pista se indicará SINGLE (K)
13 Control PITCH para cambiar la velocidad;
el control sólo podrá utilizarse cuando el
botón Pitch (18) esté iluminado
14 Jog wheel para la selección precisa de un
punto en el modo pausa
Durante la reproducción habrá más funciones disponibles a través del bo tón (5).
15 Botón REVERSE para la reproducción in-
versa
16
Botón CUE para la reproducción breve
del inicio de una pista y para volver a un
punto de inicio definido previamente
17 Botón para conmutar entre modo de
reproducción y de pausa
18 Botón Pitch
– Manténgalo pulsado hasta que el botón
se ilumine o se apague: Para activar o
desactivar el control PITCH (13)
– Púlselo brevemente: Para seleccionar el
rango de ajuste de la velocidad (4 %,
8 %, 16 %)
Botones – y + para la función PITCH BEND
19 Botones para reproducir un bucle (repe-
tición continua de una sección)
– Botón IN para definir el punto de inicio
de la sección
– Botón OUT para definir el punto de fi-
nalización de la sección y para empezar
el bucle al mismo tiempo; para salir del
bucle, pulse el botón de nuevo
– Botón RELOOP para reproducir el bucle
una vez más
20 Botón PGM para programar su secuencia
de pistas
1.1.1 Visualizador
A Indicación MP3
Aparecerá con pistas en formato MP3
B Indicación USB
Aparecerá cuando se haya seleccionado el
puerto USB (23) con el botón CD / USB / SD
(11)
C Indicación CUE
Aparecerá cuando el lector CD / MP3 se
haya ajustado en pausa al inicio de la
pista o en un punto de inicio memorizado
(punto CUE)
D Símbolo para reproducción o pausa II
E Indicación REPEAT 1 para repetir la pista
actual, o indicación REPEAT ALL para repetir todas las pistas
F Indicación REMAIN cuando se muestra el
tiempo restante de la pista
Indicación TOTAL REMAIN cuando se
muestra el tiempo restante del CD (no
soportado con archivos MP3)
Indicación ELAPSED cuando se muestra el
tiempo transcurrido de la pista
G
El tiempo de ejecución de una pista se
indica numéricamente en minutos, segundos y frames (1 frame = 1⁄75 segundo) y
gráficamente como una barra gráfica.
objeto 8: botón TIME
☞
La barra gráfica entera parpadeará mientras se estén reproduciendo los 30 segundos finales de una pista.
H Campo PITCH
Cuando se ha activado el control PITCH
(13), para indicar la desviación ajustada
(%) de la velocidad estándar
I
Línea para mostrar texto informativo, p. ej.
número de la pista (Track 1) o, para pistas
MP3, desfile de etiquetas ID3
J Número de pista
K
Indicación SINGLE para el modo de reproducción de una sola pista
L Indicaciones de bucle A y
Sólo indicación A:
– Cuando se ha definido el punto de inicio
de la sección que hay que repetir
– Cuando se ha memorizado un bucle
pero no se está reproduciendo en ese
momento
Indicaciones
de un bucle
M Indicación FOLDER
Aparecerá cuando se puedan seleccionar
las carpetas con el control rotatorio (9)
N
Indicación PROGRAM en el modo programa y cuando se reproduce una secuencia de pista programada
y B para la reproducción
1.2 Reproductor
21 Bandeja CD de la unidad CD A
22 Ranura SD / MMC del reproductor A para
una tarjeta de memoria (32 GB máx.)
23 Puerto USB del reproductor A para inser-
tar una unidad flash USB
24 Iluminación para la bandeja CD
25 Botón OPEN / CLOSE para abrir y cerrar
la bandeja de CD A
[como el botón (3) de la unidad de
control]
26 Interruptor POWER
27 Conexión para la unidad de control:
Conéctela a la toma CONNECT TO MAIN
UNIT B utilizando uno de los cables de
conexión entregados
28 Salida de audio LINE OUT del reproduc-
torB para conectar a la entrada de línea
de, por ejemplo, un amplificador o un
mezclador
29 Toma de corriente para la conexión a un
enchufe (230 V / 50 Hz) mediante el cable
de corriente entregado
30 Conexión para el la unidad de control:
Conéctela a la toma CONNECT TO MAIN
UNIT A utilizando uno de los cables de
conexión entregados
31 Salida de audio LINE OUT del reproduc-
torA para conectar a la entrada de línea
de, por ejemplo, un amplificador o un
mezclador
24
Page 25

2 Notas de Seguridad
El aparato cumple con todas las directivas relevantes de la UE y por lo tanto está marcado
con el símbolo .
ADVERTENCIA El aparato utiliza un voltaje
peligroso. Deje el mantenimiento en manos del personal cualificado. El manejo
inexperto puede provocar
una descarga.
¡Precaución! Nunca mire directamente al
•
mecanismo del CD cuando la bandeja de
CD (21) esté abierta; el haz del láser podría
emitirse provocando daños oculares.
El aparato está adecuado sólo para utili-
•
zarlo en interiores. Protéjalo contra goteos,
salpicaduras y humedad elevada. Rango de
temperatura ambiente admisible: 0 – 40 ºC.
No coloque ningún recipiente con líquido
•
encima del aparato, p. ej. un vaso.
Desconecte inmediatamente el conector de
•
corriente de la toma si:
1. El aparato o el cable de corriente están
visiblemente dañados.
2. El aparato ha sufrido daños después de
una caída o accidente similar.
3. No funciona correctamente.
Sólo el personal cualificado puede reparar el
aparato bajo cualquier circunstancia.
No tire nunca del cable de corriente para
•
desconectarlo de la toma, tire siempre del
enchufe.
No podrá reclamarse garantía o responsa-
•
bilidad alguna por cualquier daño personal
o material resultante si el aparato se utiliza
para otros fines diferentes a los originalmente concebidos, si no se conecta o se
utiliza adecuadamente o no se repara por
expertos.
Si va a poner el aparato definitivamente fuera de servicio, llévelo a la
planta de reciclaje más cercana para
que su eliminación no sea perjudicial
para el medioambiente.
3 Aplicaciones
El lector CD / MP3 CD-230USB con dos reproductores está diseñado especialmente para
aplicaciones DJ profesionales, ofreciendo
características especiales como la reproducción de una sola pista, la reproducción de
varios efectos o el cambio de la velocidad de
reproducción hasta un ±16 %.
Con este aparato se pueden reproducir
CDs de audio (incluyendo CD-Rs y CD-RWs1).
Los archivos MP3 se pueden reproducir desde
CDs, unidades flash USB2 y tarjetas de memoria SD / SDHC2 (32 GB máx.).
4 Colocación /
ConexióndelAparato
La unidad de control y el reproductor están
diseñados para la instalación en un rack para
aparatos con un ancho de 482 mm (19”), sin
embargo, se pueden utilizar como aparatos
de sobremesa. El reproductor siempre tiene
que utilizarse horizontalmente, aunque la
unidad de control se puede instalar como
desee, también inclinado. Para la instalación en rack, se necesitan 2 unidades para
la unidad de control y para el reproductor
(1 U =44,45 mm).
Antes de hacer o modificar cualquier conexión, desconecte el CD-230USB y todos los
aparatos que hay que conectar.
1) Utilice los dos cables de conexión entregados para conectar la unidad de control
con el reproductor:
Conecte la toma CONNECT TO CONTROL
UNIT A (30) del reproductor A a la toma
CONNECT TO MAIN UNIT A de la unidad
de control A. Proceda del mismo modo
para realizar la conexión entre el reproductor B y el la unidad de control B.
2) Conecte cada una de las salidas de señal
LINE OUT (28, 31) a una entrada de nivel
de línea de un mezclador o un amplificador, por ejemplo (inscripción posible: Line,
CD, Aux).
3) Conecte la toma de corriente (29) a una
toma (230 V/ 50 Hz) mediante el cable de
corriente entregado.
5 Funcionamiento
Conecte el aparato con el interruptor POWER
(26). Durante el proceso de lectura, aparecerá
READING en el visualizador (7). Después de
eso, cuando se inserte un CD, el visualizador
mostrará información sobre el CD; si no hay
ningún CD insertado, aparecerá NO DISC
(no CD) en el visualizador.
1) Para insertar un CD, abra la bandeja del
CD (21) con el botón
CD con la cara con inscripciones mirando
hacia arriba y cierre la bandeja del CD con
el botón
Nota: La bandeja de CD se cerrará mientras se
reproduzca un CD. Si es necesario, pare la reproducción con el botón (17).
2)
Adicionalmente o como alternativa, inserte una unidad flash USB2 en el puerto
USB (23).
y/o
inserte una tarjeta de memoria
nura SD / MMC (22) con la esquina biselada hacia la derecha y mirando hacia el
aparato. Para extraer la tarjeta, presione
la tarjeta en la ranura hasta que se libere.
3)
Después de la conexión, siempre se seleccionan las unidades de CD. Para selec-
.
(3 ó 25). Inserte el
2
en la ra-
cionar la unidad flash USB o la tarjeta de
memoria, pulse el botón CD / USB / SD (11)
las veces necesarias. Los LEDs (4) sobre el
jog wheel indicarán el medio de reproducción seleccionado.
Nota: Sólo se puede seleccionar un medio de
reproducción diferente en el modo pausa. Si es
necesario, utilice el botón para poner el lector
en pausa.
4)
Los otros modos de funcionamiento
están listados en las tablas de las páginas
siguientes. Después del funcionamiento,
desconecte el lector CD / MP3 con el interruptor POWER.
6 Mantenimiento del Aparato
Proteja el aparato del polvo, de las vibraciones, de la humedad y del calor (temperatura
ambiente admisible: 0 – 40 ºC). Utilice sólo un
paño suave y seco para la limpieza; no utilice
nunca ni agua ni productos químicos.
Nota referente a las interrupciones de
sonido y los errores de lectura
El humo del tabaco y el polvo pueden penetrar fácilmente a través de todas las aperturas
del aparato y depositarse en las ópticas de
los sistemas de muestreo láser. Si estos restos
causan errores de lectura o interrupciones del
sonido, el personal cualificado deberá limpiar el aparato. Tenga en cuenta que habrá
un cargo por la limpieza, ¡incluso durante el
periodo de garantía!
7 Especificaciones
Banda pasante: � � � � � � � � 20 – 20 000 Hz
THD: � � � � � � � � � � � � � � � � < 0,1 %
Separación de canal: � � � � > 80 dB
Rango dinámico: � � � � � � � > 90 dB
Relación sonido / ruido: � � � > 80 dB
Salida: � � � � � � � � � � � � � � 2 V (nivel de línea),
tomas RCA
Memoria antichoque:
Alimentación:
Consumo: � � � � � � � � � � � � 30 VA máx�
Temperatura
ambiente:
Dimensiones (B × H × P)
Unidad de control: � � � � 482 × 88 × 100 mm,
Reproductor:� � � � � � � � � 482 × 88 × 270 mm,
Peso: � � � � � � � � � � � � � � � � 5,9 kg
� � � � � � � � � � � � 0 – 40 °C
� � � Para CDDA
10 segundos
Para MP3
15 segundos
� � � � � � � � � 230 V/ 50 Hz
2 U
2 U
Español
1
Dependiendo del tipo de CD, del grabador de CDs
y del software de grabación utilizado, pueden aparecer problemas al reproducir CD-RWs.
2
Debido a la gran cantidad de fabricantes de medios
de almacenamiento y de drivers, no podemos garantizar que todos los medios de almacenamiento
sean compatibles con el CD-230USB.
25
Page 26

Botón Objeto Función
Español
SINGLE 12
17
TRACK / FOLDER
SEARCH
CUE 16
TIME 8
— Todas las funciones de un vistazo —
REPEAT 10
PITCH BEND
SEARCH
SCRATCH
9
14
5
Selección del modo:
Durante la reproducción de una pista, el lector reproducirá una pista y pasará al modo pausa en el
inicio de la siguiente pista.
Iniciar la reproducción [indicación (D)], pausa [indicación II], continua
Seleccionar una pista
Gire el control hasta que se indique la pista deseada. Pulse el control.
Seleccionar una carpeta
1. Pulse el control de modo que la indicación FOLDER (M) aparezca después de liberar el control.
2. Gire el control para seleccionar la carpeta, luego púlselo para confirmar.
3. En cuanto el número de pista (J) parpadee (5 seg. aprox.), pulse el control de nuevo para ir a la
primera pista de la carpeta, o primero gire el control para seleccionar una pista diferente de la
carpeta y luego púlselo para confirmar.
No espere más de 5 seg. entre dos pasos; de lo contrario, el lector volverá a la pista anterior.
Reproducción breve del inicio de una pista
1. Ponga el lector en pausa con el botón .
2. Vaya a la pista deseada con el control TRACK / FOLDER (9).
3. Cuando aparezca CUE (C) en el visualizador, mantenga pulsado el botón CUE para reproducir
el inicio de la pista. Después de liberar el botón, el aparato volverá al inicio de la pista y se pondrá
en pausa.
Volver al inicio de una pista
Pulse brevemente el botón CUE para volver al inicio de una pista y para poner el lector en pausa.
Luego mantenga el botón CUE pulsado para reproducir el inicio de la pista, o pulse el botón
para iniciar la pista de nuevo.
Volver a un punto de la pista previamente definido (punto CUE)
1. Reproduzca la pista. Ponga el lector en pausa con el botón en el punto al que quiera
volver. Si es necesario, seleccione el punto con más precisión con el jog wheel (14).
2. Después de definir el punto, reinicie la reproducción con el botón ; esto memorizará automáticamente el punto de inicio como punto CUE. El botón CUE parpadeará dos veces.
3. Para volver al punto CUE, pulse el botón CUE.
Cambiar la indicación temporal (G)
1. Tiempo restante de la pista* [indicación REMAIN (F)]
2. Tiempo restante del CD [indicación TOTAL REMAIN]
Las pistas en formato MP3 no soportan la indicación del tiempo restante.
3. Tiempo transcurrido de una pista [indicación ELAPSED]
Funciones de repetición
1ª pulsación del botón: Indicación REPEAT 1 (E) = repetición de la pista actual
2ª pulsación del botón: Indicación REPEAT ALL = repetición de todas las pistas
3ª pulsación del botón: Se desactiva la función repetición*
Funciones del jog wheel
Seleccionar un punto en la pista con la precisión de 1 frame (
ducción desde un punto concreto en vez de empezarla desde el inicio de la pista:
Cuando haya alcanzado el punto deseado durante la reproducción, ponga el lector en pausa con
el botón
con precisión.
Nota: Si el jog wheel ha cambiado a la función PITCH BEND* o SEARCH, el punto actual se repetirá continuamente.
Si es necesario, pulse el botón iluminado (5) sobre el jog wheel para silenciar el sonido.
Para utilizar la función PITCH BEND* (ver página siguiente) con el jog wheel, el botón tiene que
estar iluminado en azul. Si es necesario, pulse el botón el número apropiado de veces.
Para avanzar / retroceder, pulse el botón repetidamente hasta que se ilumine en rojo. Luego gire
el jog wheel hacia delante o hacia atrás.
Para crear efectos scratch con el jog wheel, pulse el botón repetidamente hasta que se ilumine
alternativamente en azul y en rojo (ver también “Crear efectos”).
Funciones básicas
Reproducción de una pista* [indicación SINGLE (K)]
Reproducción de todas las pistas [no se muestra la indicación SINGLE]
1
⁄75 s), p. ej. para iniciar la repro-
y gire el jog wheel en sentido horario o en sentido inverso para seleccionar el punto
*Este ajuste o función se selecciona después de conectar el CD-230USB.
26
Page 27

Botón Objeto Función
– Pitch + 18
BRAKE 6
REVERSE 15
SCRATCH 5
IN OUT Reloop 19
PGM 20
Cambiar la velocidad y la función PITCH BEND
Cambiar la velocidad de reproducción y el pitch al mismo tiempo
1. Mantenga pulsado el botón Pitch hasta que se ilumine. Esto activará el control PITCH (13). (Para
desactivar* el control, mantenga pulsado el botón de nuevo hasta que no se ilumine.)
2. Pulse brevemente el botón Pitch para seleccionar el rango de ajuste: 16 %*, 8 %, 4 %. El campo
PITCH (H) indicará brevemente el rango, luego indicará la desviación de la velocidad estándar
ajustada con el control PITCH.
3. Cambie la velocidad con el control PITCH.
PITCH BEND – Igualar el ritmo entre dos piezas musicales
Cuando se reproducen pistas con una misma velocidad aprox. en los dos reproductores, los ritmos
de estas pistas se pueden sincronizar con precisión respecto al tiempo. De este modo, no se interrumpe el ritmo de baile cuando se funde una pista con la otra.
1. Primero iguale la velocidad de la pista que quiere fundir con la velocidad de la pista actual.
2. Mantenga pulsado el botón + o – para aumentar o reducir brevemente la velocidad hasta que
el ritmo de la pista esté sincronizado con la pista actual.
3. Como alternativa, gire el jog wheel (14) para aumentar o reducir la velocidad de la pista. Para
ello, utilice el botón (5) sobre el jog wheel para cambiarlo a la función PITCH BEND* (el botón
se iluminará en azul).
Crear efectos
Efecto de arranque y frenada
Con el efecto conectado, se simulará el arranque o la frenada lentos de un giradiscos cuando esté
pulsado el botón
.
Reproducción inversa
Efecto scratch
(para simular un avance rápido y retroceso rápido de un giradiscos)
Pulse el botón repetidamente hasta que se ilumine alternativamente en azul y rojo. Luego gire el
jog wheel (14) hacia delante y atrás según convenga.
Reproducción de un bucle
Se puede repetir una sección de una pista como bucle continuo las veces que quiera.
1. Cuando llegue al punto de inicio deseado de una sección durante la reproducción, pulse el botón
IN.1 El botón se iluminará y se mostrará A (L).
2. Cuando llegue al final de la sección, pulse el botón OUT1. Ahora se repetirá continuamente la
sección entre los puntos. Los botones IN y OUT parpadearán y además se mostrará B.
3. Para salir del bucle y continuar la reproducción de la pista, pulse el botón OUT. Sin embargo,
se memorizará el bucle. Como indicación, la indicación A permanecerá en el visualizador y los
botones IN y OUT se iluminarán permanentemente.
4. Para reiniciar el bucle, pulse el botón Reloop, o, para reproducir un bucle diferente, repita los
pasos 1 y 2, o, para definir un punto de finalización diferente, pulse el botón OUT.
Se borrará el bucle cuando llegue a la pista siguiente o seleccione una pista diferente.
1
Para ajustar con precisión el punto de inicio y el punto de finalización: Cuando llegue al punto, ponga el aparato
en pausa; seleccione con precisión el punto con el jog wheel (14). Luego pulse el botón IN y OUT.
Compilación de su secuencia individual de pistas
Para reproducir sólo pistas seleccionadas, se puede programar una secuencia de hasta 20 pistas.
1. Ponga el lector en pausa con el botón , y conecte el modo de programación con el botón PGM:
Se mostrará PROGRAM (N) y la línea de texto (I) indicará la primera memoria P-01.
2. Seleccione la pista deseada con el control rotatorio TRACK / FOLDER (9). Sólo se puede seleccionar
un número de pista (no una carpeta). Antes de esto y si es necesario, haga una nota del número
que se indica en el campo TRACK (J) mientras se reproduce la pista.
3. Pulse el botón PGM para memorizar la pista. Se indicará la siguiente memoria P-02.
4. Repita los pasos 2 y 3 hasta que se hayan memorizado todas las pistas de la secuencia.
5. Pulse el botón para iniciar la secuencia de pistas. El control rotatorio TRACK / FOLDER se puede
utilizar para ir a cualquier pista de la secuencia de pistas.
6. Para borrar la secuencia de pistas y para volver al modo de reproducción normal, mantenga
pulsado el botón PGM hasta que se apague la indicación PROGRAM.
*Este ajuste o función se selecciona después de conectar el CD-230USB.
Español
Manual de instrucciones protegido por el copyright de MONACOR ® INTERNATIONAL GmbH & Co. KG.
Toda reproducción mismo parcial para fines comerciales está prohibida.Sujeto a modificaciones técnicas.
27
Page 28

Profesjonalny podwójny
B
A
odtwarzacz CD / MP3
Polski
Niniejsza instrukcja przeznaczona jest dla profesjonalnych DJ i użytkowników posiadających pewne doświadczenie techniczne. Przed
rozpoczęciem użytkowania proszę zapoznać
się z instrukcją, a następnie zachować ją do
wglądu. Na stronie 3 pokazano elementy operacyjne oraz złącza.
1 Elementy operacyjne
orazzłącza
1.1 Panel sterujący
1 Panel sterujący odtwarzacza A
Szczegóły na rys. 2
2 Panel sterujący odtwarzacza B
Szczegóły na rys. 2
3 Przycisk OPEN / CLOSE do wysuwania i
wsuwania szuflady na płytę CD A
[tak jak przycisk (25) na mechanizmie
odtwarzacza]
4
Wskaźniki diodowe, sygnalizujące noś nik
aktualnie wybrany, za pomocą przycisku
CD / USB / SD (11)
5
Przycisk do zmiany funkcji pokrętła jog
(14)
Kolor podświetlenia przycisku sygnalizuje
wybraną funkcję:
niebieski = funkcja PITCH BEND
czerwony = szybkie przewijanie
niebieski / czerwony na zmianę = funkcja
scratch
6
Przycisk BRAKE do włączania i wyłączania efektu rozpędzania i hamowania płyty
gramofonowej
Aby wygenerować efekt należy przytrzymać wciśnięty przycisk
7 Wyświetlacz
Szczegóły na rys. 3 i w rozdz. 1.1.1
8 Przycisk TIME do przełączania pomiędzy
trybami wyświetlania czasu (G)
Wskazanie (F) nad licznikiem czasu pokazuje aktualnie wybrany tryb:
– REMAIN: czas pozostały do końca bie-
żącego utworu
– TOTAL REMAIN: czas pozostały do
końca płyty CD (za wyjątkiem płyt z
plikami MP3)
– ELAPSED: miniony czas odtwarzania
bieżącego utworu
9 Pokrętło do wyboru plików i folderów
10
Przycisk REPEAT do wyboru funkcji powtarzania
pierwsze wciśnięcie przycisku:
REPEAT 1
ciągłe powtarzanie bieżącego utworu
drugie wciśnięcie przycisku:
REPEAT ALL
ciągłe powtarzanie wszystkich utworów
trzecie wciśnięcie przycisku
wyłączenie funkcji powtarzania
11
Przycisk CD / USB / SD do wyboru nośnika: CD, pamięć USB lub karta pa-
mięci
Odpowiednia dioda (4) nad pokrętłem jog
sygnalizuje wybrany aktualnie nośnik
12
Przycisk SINGLE do przełączania między trybem odtwarzania pojedynczego
utworu [wskazanie SINGLE (K)] a trybem
ciągłego odtwarzania
13
Regulator PITCH do zmiany prędkości odtwarzania; regulator jest aktywny tylko
gdy przycisk Pitch (18) jest podświetlony
14
Pokrętło jog do precyzyjnego wyboru
punktu w trybie pauzy;
w trybie odtwarzania, dodatkowe funkcje
dostępne są po wciśnięciu przycisku (5).
15
Przycisk REVERSE do odtwarzania w przeciwną stronę
16
Przycisk CUE do krótkiego odtwarzania
początku utworu oraz do powrotu do
zapamiętanego punktu
17
Przycisk do przełączania pomiędzy
trybem odtwarzania i pauzy
18 Przycisk Pitch
– przytrzymać wciśnięty przycisk aż włączy
się lub zgaśnie jego podświetlenie: do
aktywowania i wyłączania regulatora
PITCH (13)
– wcisnąć na krótko aby wybrać za kres
regulacji prędkości odtwarzania (4 %,
8 %, 16 %)
Przyciski – oraz + dla funkcji PITCH BEND
19 Przyciski od odtwarzania pętli
(ciągłe powtarzania fragmentu utworu)
– przycisk IN do wyboru punktu starto-
wego pętli
– przycisk OUT do wyboru punktu koń-
cowego i równoczesnego rozpoczęcia
odtwarzania pętli; aby zakończyć odtwarzanie pętli wcisnąć przycisk ponownie
– przycisk RELOOP do ponownego od-
twarzania pętli
20
Przycisk PGM do programowania własnej
sekwencji odtwarzania utworów
1.1.1 Wyświetlacz
A Wskazanie MP3
pojawia się przy odtwarzaniu plików MP3
B Wskazanie USB
pojawia się po wybraniu nośnika USB (23)
przyciskiem CD / USB / SD (11)
C Wskazanie CUE
pojawia się po ustawieniu odtwarzacza CD / MP3 w tryb pauzy na początku
utworu lub w zapamiętanym punkcie
startowym (punkt CUE)
D Symbol odtwarzania lub pauzy II
E
Wskazanie REPEAT 1 dla funkcji powtarzania bieżącego utworu, lub wskazanie REPEAT ALL dla funkcji powtarzania
wszystkich utworów
F
Wskazanie REMAIN oznacza, że pokazywany jest czas do końca utworu
Wskazanie TOTAL REMAIN oznacza, że
pokazywany jest czas do końca płyty CD
(niedostępne dla płyt z plikami MP3)
Wskazanie ELAPSED oznacza, że pokazywany jest miniony czas odtwarzania
utworu
G
Numeryczny wskaźnik czasu w minutach,
sekundach i ramkach (1 ramka = 1⁄75sekundy) oraz graficzny w formie paska.
pozycja 8: przycisk TIME
☞
Migający pasek o pełnej długości oznacza
odtwarzanie ostatnich 30 se kund utworu.
H Pole PITCH
Po aktywowaniu regulatora PITCH (13),
oznacza ustawione odchylenie (%) od
standardowej prędkości odtwarzania
I
Linia tekstowa dla dodatkowych informacji np. numeru utworu (Track 1) lub
informacji ID tag dla plików MP3
J Numer utworu
K Wskazanie SINGLE oznacza tryb odtwa-
rzania pojedynczego utworu
L Wskazania pętli A oraz
tylko wskazanie A:
– po zapamiętaniu punktu startowego
pętli
– gdy zapamiętany jest cały fragment
pętli, ale pętla nie jest odtwarzana
wskazania
nia pętli
M Wskazanie FOLDER
oznacza możliwość wyboru folderu pokrętłem (9)
N Wskazanie PROGRAM pojawia się w try-
bie programowania oraz podczas odtwarzania własnej sekwencji utworów
oraz B podczas odtwarza-
1.2 Mechanizm odtwarzacza
21 Szuflada na płytę CD napędu A
22
Czytnik kart SD / MMC (max 32 GB) napędu A
23
Port USB napędu A do podłączania nośnika USB
24 Podświetlenie szuflady na płytę CD
25 Przycisk OPEN / CLOSE do wysuwania i
zamykania szuflady na płytę CD A
[analogicznie do przycisku (3) na panelu
sterującym]
26 Włącznik POWER
27
Złącze do podłączania panelu sterującego:
należy połączyć je z gniazdem CONNECT
TO MAIN UNIT B, za pomocą jednego z
dołączonych kabli
28 Wyjście audio LINE OUT dla napędu B do
łączenia z wejściem liniowym wzmacniacza lub miksera
29
Gniazdo zasilania do łączenia z gniazdkiem sieciowym (230 V/ 50 Hz) za pomocą
dołączonego kabla zasilającego
30
Złącze do podłączania panelu sterującego:
należy połączyć je z gniazdem CONNECT
TO MAIN UNIT A, za pomocą jednego z
dołączonych kabli
31 Wyjście audio LINE OUT dla napędu A do
łączenia z wejściem liniowym wzmacniacza lub miksera
28
Page 29

2 Środki bezpieczeństwa
Urządzenie spełnia wszystkie wymagania
norm UE dlatego zostało oznaczone symbolem
.
UWAGA
Uwaga! Nie wolno zaglądać do środka me-
•
chanizmu odtwarzacza CD przy otwartej
szufladzie na płytę CD (21); wiązka lasera
może uszkodzić wzrok.
Urządzenie przeznaczone jest wyłącznie
•
do użytku wewnątrz pomieszczeń. Należy
chronić je przez wodą, dużą wilgotnością
oraz wysoką temperaturą (dopuszczalny
zakres wynosi 0 – 40 °C).
Na urządzeniu nie należy stawiać żadnych
•
pojemników z cieczą np. szklanek.
Nie wolno używać urządzenia lub na-
•
tychmiast odłączyć wtyczkę zasilającą z
gniazdka
1. jeżeli stwierdzono istnienie widocznego
2.
3. jeżeli urządzenie działa nieprawidłowo.
W każdym przypadku, naprawę należy zlecić specjaliście.
Nie wolno odłączać urządzenia z gniazdka
•
sieciowego ciągnąc za kabel zasilania, należy zawsze chwytać za wtyczkę.
Producent ani dostawca nie ponoszą od-
•
powiedzialności za wynikłe szkody: uszkodzenie sprzętu lub obrażenia użytkownika,
jeśli urządzenie było używane niezgodnie z
ich przeznaczeniem, nieprawidłowo podłączone lub obsługiwane bądź poddane nieautoryzowanej naprawie.
Urządzenie zasilane jest niebezpiecznym napięciem. Wszelkie
naprawy należy zlecić osobie
przeszkolonej; nieprawidłowa
obsługa może spowodować porażenie prądem elektrycznym.
uszkodzenia odtwarzacza lub kabla zasilającego,
jeżeli uszkodzenie urządzenia mogło
nastąpić w wyniku upadku lub innego
podobnego zdarzenia,
Po całkowitym zakończeniu eksploatacji, urządzenie należy oddać do
punktu recyklingu, aby nie zaśmiecać środowiska.
3 Zastosowanie
Podwójny odtwarzacz CD / MP3 CD-230USB
został specjalnie zaprojektowany do profesjonalnych aplikacji DJ. Posiada wiele przydatnych funkcji, takich jak np. odtwarzanie
pojedynczych utworów, różne funkcje powtarzania oraz regulację prędkości odtwarzania
w zakresie do ±16 %.
Odtwarzacz pozwala na odtwarzanie
płyt audio CD (CD-R lub CD-RW1) oraz plików MP3 z płyt CD, nośników USB2 oraz kart
pamięci SD / SDHC2 (max 32 GB).
4 Przygotowanie do pracy i
podłączanie urządzenia
Obie części urządzenia: panel sterujący oraz
mechanizm odtwarzaczy przystosowane do
montażu w racku 482 mm (19”), ale mogą
pracować również jako wolnostojące. Mechanizm odtwarzacza musi za wsze znajdować się
w pozycji poziomej, natomiast panel sterujący można zamontować w pochylonej ramie
uchwytu montażowego. Obie części urządzenia mają wysokość 2 U (1 U = 44,45 mm).
Przed przystąpieniem do podłączania lub
zmiany połączeń należy bezwzględnie wyłączyć odtwarzacz CD-230USB oraz pozostałe
urządzenia.
1) Za pomocą dwóch dołączonych kabli sterujących połączyć panel sterujący z mecha
nizmem odtwarzaczy:
Gniazdo CONNECT TO CONTROL A (30)
mechanizmu odtwarzacza A z gniazdem
CONNECT TO MAIN UNIT A panelu sterującego A. Analogicznie w przypadku
mechanizmu odtwarzacza B i panelu sterującego B.
2)
Podłączyć dwa wyjścia sygnałowe LINE
OUT (28, 31) do wejść liniowych miksera
lub wzmacniacza (możliwe oznaczenie:
Line, CD, Aux).
3) Na końcu podłączyć dołączony kabel zasilający do gniazda zasilania (29), a następnie do gniazdka sieciowego (230 V/ 50 Hz).
5 Obsługa
Włączyć urządzenie przełącznikiem POWER
(26). Na wyświetlaczu (7) pojawi się na krótko
READING
płyta CD, po jej wczytaniu, wyświetlacz pokaże informacje o płycie CD. Jeżeli w napędzie nie ma płyty CD, pojawi się komunikat
NO DISC (no CD).
1)
Aby włożyć płytę CD, wysunąć szufladę
(21) przyciskiem (3 lub 25). Włożyć płytę
CD nadrukiem do góry i zasunąć szufladę
przyciskiem .
Uwaga: Podczas odtwarzania szuflada na płytę
CD jest zablokowana. Jeżeli trzeba ją otworzyć,
należy najpierw zatrzymać odtwarzanie przyciskiem (17).
2) Alternatywnie lub dodatkowo, podłączyć
pamięć przenośną USB2 do portu USB (23)
i / lub
włożyć kartę pamięci2 do czytnika
SD / MMC (22) ściętym rogiem w prawo,
w stronę urządzenia. Aby wyjąć kartę z
czytnika należy ją najpierw lekko wcisnąć.
3)
Po włączeniu, wybranym nośnikiem jest
zawsze płyta CD. Do przełączania między płytą CD a nośnikiem USB lub kartą
pamięci służy przycisk CD / USB / SD (11).
Wybrany nośnik sygnalizowany jest
. Jeżeli w napędzie znajduje się
zapaleniem się odpowiedniej diody (4) nad
pokrętłem jog.
Uwaga: W celu zmiany nośnika należy ustawić
odtwarzacz w tryb pauzy, wciskając przycisk .
4)
Wszystkie dostępne opcje sterowania opisano w tabelach na kolejnych stronach. Po
zakończeniu pracy, wyłączyć urządzenie
przełącznikiem POWER.
6 Konserwacja urządzenia
Urządzenie należy chronić przed kurzem,
wstrząsami, dużą wilgotnością oraz wy soką
temperaturą (dopuszczalny zakres wynosi
0 – 40 °C). Do czyszczenia używać suchej
miękkiej ściereczki; nie stosować wody ani
środków chemicznych.
-
Uwagi dotyczące zakłóceń dźwięku
i błędów odczytu
Wpływ dymu papierosowego oraz kurzu
może spowodować błędy przy odczycie płyt.
Niestety uniknięcie szkodliwych warunków
nie zawsze jest możliwe np. w dyskotekach.
W takim przypadku należy zlecić okresowe
czyszczenie urządzenia przez autoryzowany
serwis.
7 Specyfikacja
Pasmo przenoszenia: � � � � 20 – 20 000 Hz
THD: � � � � � � � � � � � � � � � � < 0,1 %
Separacja kanałów: � � � � � > 80 dB
Zakres dynamiki: � � � � � � � > 90 dB
Stosunek S / N: � � � � � � � � � > 80 dB
Wyjścia: � � � � � � � � � � � � � 2 V (poziom liniowy),
gniazda RCA
Pamięć
antywstrząsowa: � � � � � � � dla płyt audio CD 10 sek�
dla MP3 15 sek�
Zasilanie: � � � � � � � � � � � � 230 V/ 50 Hz
Pobór mocy: � � � � � � � � � � 30 VA max
Zakres temperatur:
Wymiary (S × W × D)
Panel sterujący: � � � � � � � 482 × 88 × 100 mm,
Mechanizm
odtwarzaczy: � � � � � � � � 482 × 88 × 270 mm,
Waga: � � � � � � � � � � � � � � � 5,9 kg
� � � � � 0 – 40 °C
2 U
2 U
Polski
1
Urządzenie może nie odtwarzać niektórych płyt CDRW, zależnie od typu płyty, nagrywarki lub użytego
oprogramowania.
2
Ze względu na dużą ilość producentów nośników,
producent nie gwarantuje kompatybilności odtwarzacza CD-230USB ze wszystkimi dostępnymi na
rynku nośnikami.
29
Page 30

Przycisk Numer Funkcja
Polski
SINGLE 12
17
TRACK / FOLDER
SEARCH
CUE 16
TIME 8
9
— Przegląd dostępnych funkcji —
REPEAT 10
14
PITCH BEND
SEARCH
SCRATCH
5
Podstawowe funkcje
Wybór trybu odtwarzania:
W trybie odtwarzania pojedynczego utworu, po zakończeniu danego utworu odtwarzacz ustawia
się w tryb pauzy na początku kolejnego.
Start odtwarzania [wskazanie (D)], pauza [wskazanie II], kontynuacja
Wybór utworu
Obracając pokrętło wybrać żądany utwór. Wcisnąć pokrętło aby zatwierdzić.
Wybór folderu
1. Wcisnąć pokrętło aż po jego zwolnieniu pojawi się wskazanie FOLDER (M).
2. Obracając pokrętło wybrać żądany folder. Wcisnąć pokrętło aby zatwierdzić.
3. Tak długo jak numer utworu (J) miga (około 5 sek.), wcisnąć ponownie pokrętło aby przejść do
pierwszego utworu w folderze, lub obracając pokrętło wybrać inny utwór z folderu, następnie
wcisnąć pokrętło aby zatwierdzić.
W przypadku dłuższej niż 5 sek. przerwy między kolejnymi krokami procedury, odtwarzacz powróci
do poprzedniego utworu
Krótkie odtwarzanie początku utworów
1. Ustawić odtwarzacz w tryb pauzy przyciskiem .
2. Przejść do żądanego utworu pokrętłem TRACK / FOLDER (9).
3. Gdy na wyświetlaczu pojawi się CUE (C), przytrzymać wciśnięty przycisk CUE aby odtworzyć
początek utworu. Po zwolnieniu przycisku, odtwarzacz ponownie ustawi się w tryb pauzy na
początku utworu.
Powrót do początku utworu
Wcisnąć na krótko przycisk CUE aby odtwarzacz ustawił się w tryb pauzy na początku utworu. Następnie przytrzymać wciśnięty przycisk CUE aby odtworzyć początek utworu, lub wcisnąć przycisk
aby rozpocząć normalne odtwarzanie.
Powrót do poprzednio ustawionego punktu (punkt CUE)
1. Podczas odtwarzania, przełączyć urządzenie w tryb pauzy przyciskiem w punkcie, do którego
zamierza się później wrócić. Jeżeli trzeba, ustawić precyzyjnie punkt za pomocą pokrętła jog (14).
2. Po ustawieniu odpowiedniego punktu, uruchomić ponownie odtwarzanie przyciskiem ;
wybrany punkt CUE zostanie zaznaczony w pamięci. Przycisk CUE mignie dwa razy.
3. Powrót do wybranego punktu jest możliwy za pomocą przycisku CUE.
Przełączanie wskaźnika czasu (G)
1. Czas pozostały do końca bieżącego utworu* [wskazanie REMAIN (F)]
2. Czas pozostały do końca płyty CD [wskazanie TOTAL REMAIN]
za wyjątkiem płyt z plikami MP3
3. Miniony czas odtwarzania bieżącego utworu [wskazanie ELAPSED]
Funkcje powtarzania
pierwsze wciśnięcie przycisku: wskazanie REPEAT 1 (E) = ciągłe powtarzanie bieżącego utworu
drugie wciśnięcie przycisku: wskazanie REPEAT ALL = ciągłe powtarzanie wszystkich utworów
trzecie wciśnięcie przycisku: wyłączenie funkcji powtarzania*
Odtwarzanie pojedynczego utworu* [wskazanie SINGLE (K)]
Odtwarzanie wszystkich utworów [brak wskazania SINGLE]
Funkcje pokrętła jog
1
Wybór punktu w utworze z dokładnością do 1 ramki (
danego punktu zamiast od początku utworu:
Po osiągnięciu żądanego punktu podczas odtwarzania, ustawić urządzenie w tryb pauzy przy-
ciskiem i obracając pokrętło jog precyzyjnie wybrać punkt.
Uwaga: Jeżeli pokrętło jog zostało przestawione na funkcję PITCH BEND* lub SEARCH, bieżący punkt będzie
powtarzany ciągle. Jeżeli trzeba, wcisnąć podświetlony przycisk (5) nad pokrętłem jog aby wyciszyć dźwięk.
Aby przełączyć pokrętło jog na funkcję PITCH BEND* (patrz następna strona), przycisk musi być
podświetlony na niebiesko. Jeżeli trzeba, wcisnąć przycisk kilka razy.
W celu szybkiego przewijania, wcisnąć przycisk kilka razy aż zostanie podświetlony na czerwono.
Aby wytworzyć efekt scratch za pomocą pokrętła jog, wcisnąć przycisk kilka razy aż zostanie pod-
świetlony na zmianę na czerwono i niebiesko (patrz także “Tworzenie efektów”).
*Ustawienie lub funkcja wybrane po włączeniu odtwarzacza CD-230USB.
⁄75 sek.), np. w celu odtwarzania od
30
Page 31

Przycisk Numer Funkcja
Zmiana prędkości odtwarzania oraz funkcja PITCH BEND
Zmiana prędkości odtwarzania
1. Przytrzymać wciśnięty przycisk Pitch aż zostanie podświetlony. Powoduje to aktywację regulatora
PITCH (13) [Aby wyłączyć* regulator, przytrzymać wciśnięty przycisk aż zgaśnie jego podświetlenie.]
2. Wcisnąć na krótko przycisk Pitch aby wybrać zakres regulacji: 16 %*, 8 %, 4 %. W polu PITCH (H)
pokazany zostanie na krótko wybrany zakres, następnie odchylenie od standardowej prędkości
ustawione regulatorem PITCH.
3. Zmienić prędkość odtwarzania za pomocą regulatora PITCH.
– Pitch + 18
BRAKE 6
REVERSE 15 Odtwarzanie w przeciwną stronę
SCRATCH 5
IN OUT Reloop 19
PGM 20
PITCH BEND – synchronizacja bitów pomiędzy dwoma utworami muzycznymi
Istnieje możliwość zsynchronizowania bitów z dwóch utworów muzycznych o tej samej prędkości.
Dzięki temu, możliwe jest przechodzenie pomiędzy utworami bez utraty rytmu np. podczas tańca.
1. W pierwszej kolejności należy zsynchronizować prędkość odtwarzanego utworu z prędkością
drugiego utworu.
2. Przytrzymać wciśnięty przycisk + lub – aby zwiększyć lub zmniejszyć prędkość odtwarzania, aż
do synchronizacji z bieżącym utworem.
3. Alternatywnie, obracając pokrętło jog (14) zwiększyć lub zmniejszyć prędkość utworu. Do tego
celu wykorzystać przycisk (5) nad pokrętłem jog, przełączając go na funkcję PITCH BEND* (przycisk
podświetlony na niebiesko).
Tworzenie efektów
Efekt startu i hamowania
Włączenie efektu daje wrażenie rozpędzania i hamowania płyty gramofonowej, gdy przycisk
jest wciśnięty
Efekt scratch
(efekt obracania płyty gramofonowej)
Wcisnąć przycisk kilka razy aż zostanie podświetlony na przemian na czerwono i niebiesko. Następnie
wytworzyć efekt obracając pokrętło jog (14) w przód i w tył.
Odtwarzanie pętli
Wybrany fragment muzyki może być odtwarzany wielokrotnie w formie pętli.
1. Po osiągnięciu żądanego punktu startowego pętli podczas odtwarzania, wcisnąć przycisk IN.1
Przycisk zostanie podświetlony, a na wyświetlaczu pojawi się wskazanie A (L).
2. Po osiągnięciu żądanego punktu końcowego pętli, wcisnąć przycisk OUT1. Fragment pomiędzy
zaznaczonymi punktami będzie odtwarzany w formie pętli. Przyciski IN oraz OUT będą migać, a
na wyświetlaczu pojawi się B.
3. Aby wyjść z pętli i kontynuować odtwarzanie kolejnych fragmentów muzyki, należy wcisnąć przy-
cisk OUT. Zaznaczony fragment zostanie zapamiętany. Wskazanie A pozostanie na wyświetlaczu
a przyciski IN oraz OUT będą nadal podświetlone.
4. Aby ponownie uruchomić odtwarzanie pętli, wcisnąć przycisk Reloop, zdefiniować ponownie
punkt startowy i początkowy, powtarzając kroki 1 i 2, lub zdefiniować tylko nowy punkt końcowy, wciskając przycisk OUT.
Po przejściu do kolejnego utworu zapamiętana pętla zostanie skasowana.
1
Aby precyzyjnie zdefiniować punkt początkowy lub końcowy pętli: po osiągnięciu żądanego punktu podczas
odtwarzania, ustawić urządzenie w tryb pauzy przyciskiem i obracając pokrętło jog (14) precyzyjnie wybrać
punkt. Następnie wcisnąć przycisk IN lub OUT.
Układanie własnej sekwencji odtwarzania
Aby odtworzyć tylko wybrane utwory, możliwe jest zaprogramowanie własnej sekwencji z max
20utworów.
1. Ustawić odtwarzacz w tryb pauzy przyciskiem , i aktywować tryb programowania przyciskiem
PGM: Na wyświetlaczu pojawi się wskazanie PROGRAM (N), a w linii tekstowej (l) pokazana
zostanie pierwsza komórka pamięci P-01.
2. Za pomocą pokrętła TRACK / FOLDER (9) wybrać żądany utwór. Możliwy jest tylko wybór numeru
utworu (nie folderu). Jeżeli trzeba, należy wcześniej zapamiętać lub zapisać numery utworów
pokazywane w polu TRACK (J).
3. Wcisnąć przycisk PGM aby zapamiętać wybrany utwór. Na wyświetlaczu pokazana zostanie
kolejna komórka pamięci P-02.
4. powtórzyć kroki 2 i 3 aż wszystkie żądane utwory zostaną zapamiętane.
5. Aby rozpocząć odtwarzanie zapisanej sekwencji, wcisnąć przycisk . Pokrętło TRACK / FOLDER
pozwala teraz tylko na przechodzenie do innego utworu w sekwencji.
6. Aby skasować sekwencję i powrócić do normalnego trybu odtwarzania, przytrzymać wciśnięty
przycisk PGM aż wskazanie PROGAM zniknie.
Polski
oraz równocześnie wysokości dźwięku
*Ustawienie lub funkcja wybrane po włączeniu odtwarzacza CD-230USB.
Instrukcje obsługi są chronione prawem copyright for MONACOR ® INTERNATIONAL GmbH & Co. KG.
Przetwarzanie całości lub części instrukcji dla osobistych korzyści finansowych jest zabronione.Z zastrzeżeniem możliwości zmian.
31
Page 32

Læs nedenstående sikkerhedsoplysninger
opmærksomt igennem før ibrugtagning af
enheden. Bortset fra sikkerhedsoplysningerne
DanskSvenska
henvises til den engelske tekst.
Sikkerhedsoplysninger
Denne enhed overholder alle relevante EUdirektiver og er som følge deraf mærket .
ADVARSEL
Advarsel! Undlad at kigge ind i CD-meka
•
nismen, når CD-skuffen (21) er åben. Der
kan udsendes laserstråler, som kan forårsage øjenskader.
Enheden er kun beregnet til indendørs
•
brug. Be skyt den mod vanddråber og
-stænk, høj luftfugtighed og varme (tilladt
omgivelsestemperatur 0 – 40 °C).
Undgå at placere væskefyldte genstande,
•
som f. eks. glas, ovenpå enheden.
Tag straks stikket ud af stikkontakten i
•
følgende tilfælde:
Alle rettigheder til denne brugsvejledning tilhører MONACOR ® INTERNATIONAL GmbH & Co. KG. Ingen
dele af denne vejledning må reproduceres under ingen omstændigheder til kommerciel anvendelse.
Enheden benytter livsfarlig netspænding. For at undgå fare
for elektrisk stød må kabinettet
ikke åbnes. Overlad servicering
til autoriseret personel.
1. hvis der er synlig skade på enheden eller
netkablet,
2.
hvis der kan være opstået skade, efter at
enheden er tabt eller lignende,
3. hvis der forekommer fejlfunktion.
Enheden skal altid repareres af autoriseret
personel.
Tag aldrig netstikket ud af stikkontakten
•
ved at trække i kablet, tag fat i selve stikket.
Hvis enheden benyttes til andre formål, end
•
den oprindeligt er beregnet til, hvis den
ikke er korrekt tilsluttet, hvis den betjenes
forkert, eller hvis den ikke repareres af autoriseret personel, omfattes eventuelle skader
ikke af garantien.
Hvis enheden skal tages ud af drift
for bestandigt, skal de afleveres på
en genbrugsstation, for at undgå
skader på miljøet.
Vedligeholdelse af enheden
Beskyt enheden mod støv, vibrationer og fugt.
Til rengøring må kun benyttes en blød, tør
klud; der må under ingen omstændigheder
benyttes vand eller kemikalier.
Note vedrørende læse fejl og
afbrydelse af afspilning
Cigaretrøg og støv kan nemt trænge ind
gennem alle åbninger på CD-afspilleren, og
kan sætte sig på laseren. Hvis dette skulle
medfører læse fejl, skal denne renses af en
uddannet reparatør. Rensning af laseren er
ikke omfattet af garantien på CD-afspilleren.
Ge akt på säkerhetsinformationen innan enheten tas i bruk. Skulle ytterliggare information behövas kan den återfinnas i manualen
för andra språk.
Säkerhetsföreskrifter
Denna enhet uppfyller alla relevanta direktiv
inom EU och har därför fått märkning.
VARNING
Varning! Titta aldrig in i spelmekanismen
•
då luckan (21) är öppen. Laserstrålen kan
skada ögonen.
Enheten är endast avsedd för inomhusbruk.
•
Skydda enheten mot vätskor, hög luftfuktighet och hög värme (tillåten omgivningstemperatur 0 – 40 °C).
Placera inte föremål innehållande vätskor,
•
t. ex. dricksglas, på enheten.
Ta omedelbart kontakten ur eluttaget om
•
något av följande fel uppstår:
Enheten använder högspänning internt. For att undvika
en elektrisk stöt, öppna aldrig chassit på egen hand utan
överlåt all service till auktoriserad verkstad.
1.
Enheten eller elsladden har synliga
skador.
2. Enheten är skadad av fall e. d.
3. Enheten har andra felfunktioner.
Enheten skall alltid lagas på verkstad av ut-
bildad personal.
Drag aldrig ut kontakten genom att dra
•
i elsladden utan ta tag i kontaktkroppen.
Om enheten används för andra ändamål än
•
avsett, om den kopplas in felaktigt, om den
används på fel sätt eller inte repareras av
auktoriserad personal upphör alla garantier
att gälla och inget ansvar tas heller för uppkommen skada på person eller materiel.
Om enheten ska tas ur drift slutgiltigt, ta den till en lokal återvinningsanläggning för en avyttring som inte
är skadligt för miljön.
Skötsel av enheten
Skydda enheten mot damm, vibrationer och
fukt. Rengör endast med en ren och torr
trasa. Använd aldrig vätskor i någon form då
dessa kan rinna in och orsaka kortslutning.
Notering ang ljud avbrott
och läs problem
Cigarett rök och damm kommer lätt in genom
enhetens intag och kan då givetvis sätta sig
på det optiska läshuvudet. Om detta sker och
förorsakar ljudstörningar och avbrott så måste
enheten rengöras av kvalificerad personal.
Var vänlig att notera att detta kommer att
fakturears även om artikeln befinner sig inom
garantiperioden.
Alla rättigheter är reserverade av MONACOR ® INTERNATIONAL GmbH & Co. KG. Ingen del av denna
instruktionsmanual får eftertryckas i någon form eller på något sätt användas i kommersiellt syfte.
32
Page 33

Ole hyvä ja huomioi joka tapauksessa seuraavat turvallisuuteen liittyvät seikat ennen
laitteen käyttöä. Laitteen toiminnasta saa
lisätietoa tarvittaessa tämän laitteen muun
kielisistä käyttöohjeista.
Turvallisuudesta
Suomi
Tämä laite täyttää kaikki siihen kohdistuvat
EU-direktiivit ja sille on myönnetty hyväksyntä.
VAROITUS
Huomio! Älä katso CD mekanismiin, kun
•
CD kelkka (21) on ulkona. Lasersäteiden
säteily voi vahingoittaa silmiä.
Tämä laite soveltuu vain sisätilakäyttöön.
•
Suojele laitetta kosteudelta, vedeltä ja
kuumuudelta (sallittu ympäröivä lämpötila
0 – 40 °C).
Älä sijoita laitteen päälle mitään nestettä
•
sisältävää, kuten vesilasia tms.
Irrota virtajohto pistorasiasta, äläkä käyn-
•
nistä laitetta jos:
Kaikki oikeudet pidätetään MONACOR ® INTERNATIONAL GmbH & Co. KG. Mitään tämän käyttöohjeen
osaa ei saa jäljentää miltään osin käytettäväksi mihinkään kaupallisiin tarkoituksiin.
Tämä laite toimii hengenvaarallisella 230 V~ jännitteellä. Välttääksesi sähköiskun, älä avaa
laitteen koteloa. Jätä huoltotoimet valtuutetulle, ammattitaitoiselle huoltoliikkeelle.
1. virtajohdossa on havaittava vaurio
2.
putoaminen tai muu vastaava vahinko
on saattanut aiheuttaa vaurion
3. laitteessa esiintyy toimintahäiriöitä
Kaikissa näissä tapauksissa laite tulee toimit-
taa valtuutettuun huoltoliikkeeseen.
Älä koskaan irrota virtajohtoa pistorasiasta
•
johdosta vetämällä.
Laitteen takuu raukeaa, eikä valmistaja,
•
maahantuoja tai myyjä ota vastuuta mahdollisista välittömistä tai välillisistä vahingoista, jos laitetta on käytetty muuhun kuin
alkuperäiseen käyttötarkoitukseen, laitetta
on taitamattomasti käytetty tai kytketty tai
jos laitetta on huollettu muussa kuin valtuutetussa huollossa.
Kun laite poistetaan lopullisesti käytöstä, vie se paikalliseen kierrätyskeskukseen jälkikäsittelyä varten.
Laitteen huolto ja ylläpito
Suojele laitetta pölyltä, värähtelyiltä ja kosteudelta. Käytä puhdistamiseen vain kuivaa,
pehmeää kangasta. Älä käytä vettä tai kemikaaleja.
Tiedote koskien levyn lukuhäiriöitä
sekä katkoksia äänessä
Laitteeseen kertyvä pöly, tupakansavu yms
aiheuttaa laitteeseen lukuvirheitä. Laitteen
saa avata ja huoltaa vain av-huoltoliike tai
sähköalan ammattilainen. Huomioi että kyseessä on normaalisti veloitettava huoltotyö
myös takuuaikana.
33
Page 34

MONACOR INTERNATIONAL GmbH & Co. KG • Zum Falsch 36 • 28307 Bremen • Germany
Copyright© by MONACOR INTERNATIONAL. All rights reserved.
A-1617.99.03.01.2019
 Loading...