

Page 1
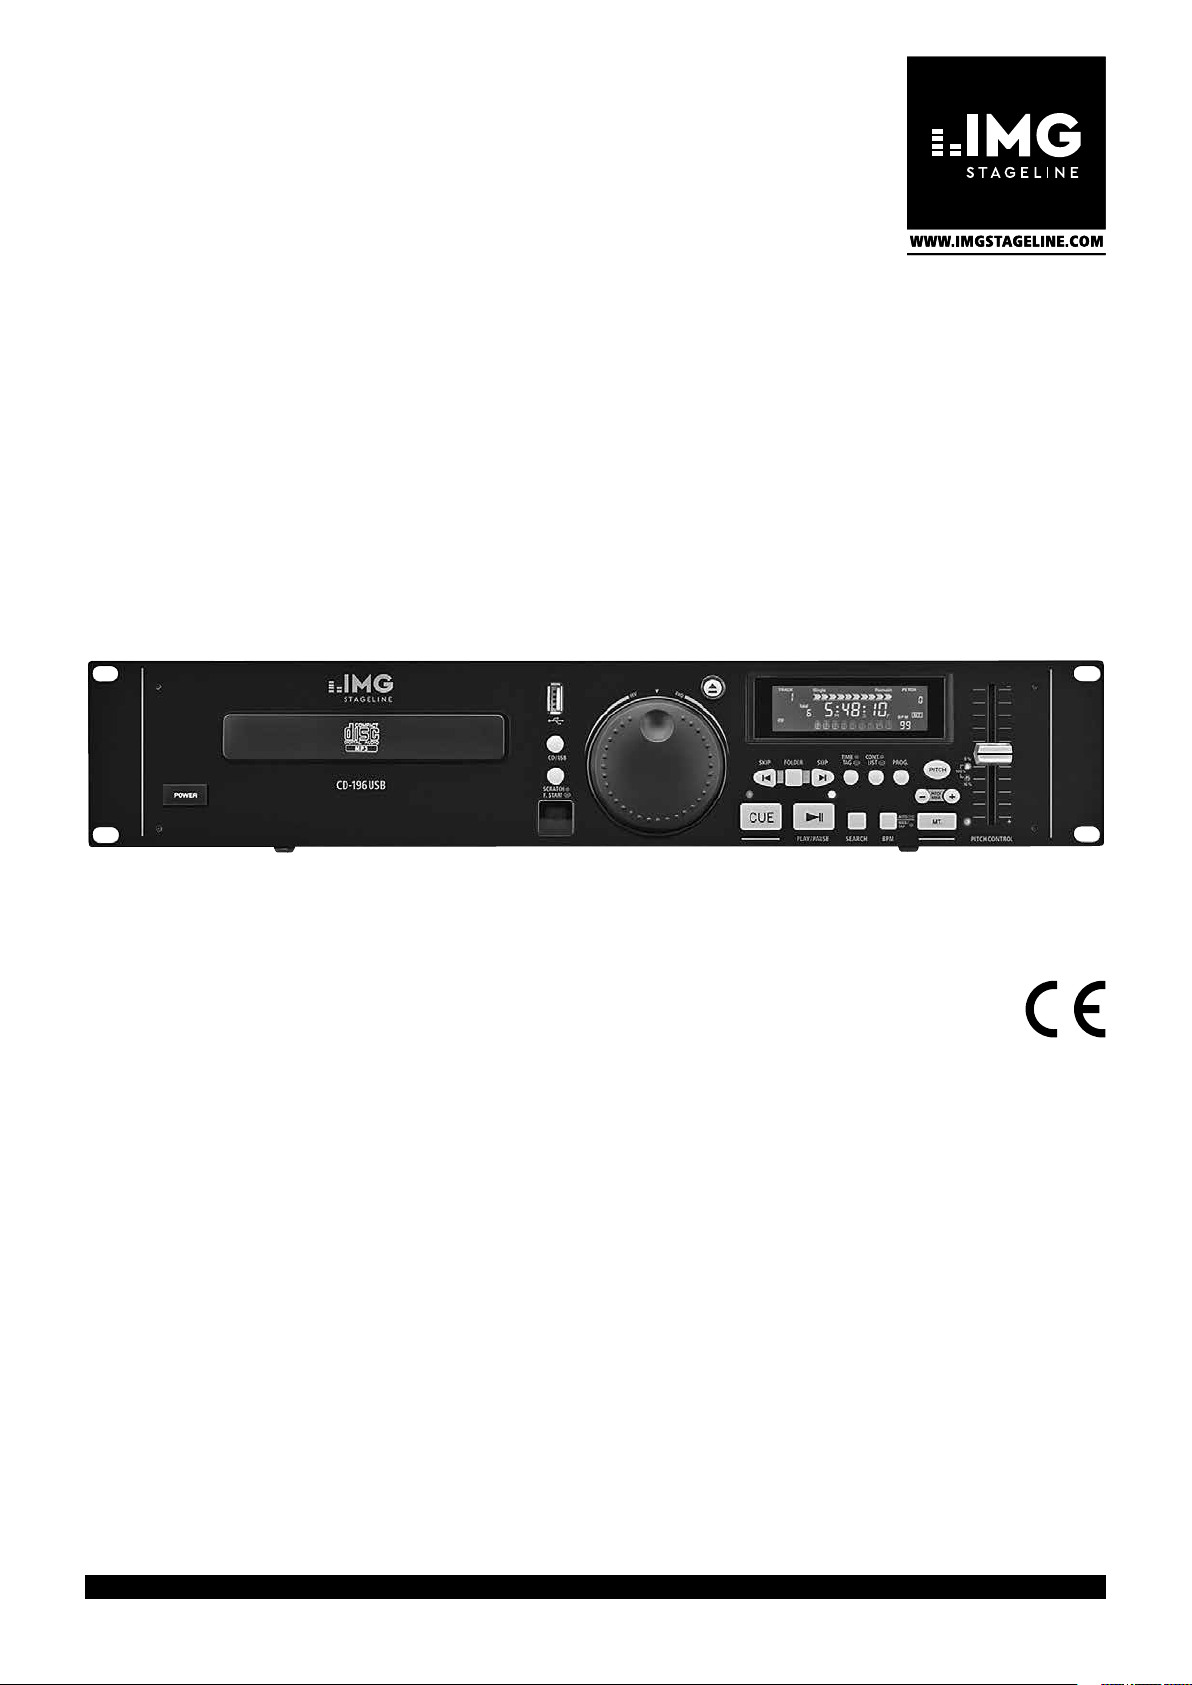
Professioneller CD / MP3-Spieler
Professional CD / MP3 Player
CD-196USB
Bestell-Nr. • Order No. 21.2890
BEDIENUNGSANLEITUNG
INSTRUCTION MANUAL
MODE D’EMPLOI
ISTRUZIONI PER L’USO
MANUAL DE INSTRUCCIONES
INSTRUKCJA OBSŁUGI
VEILIGHEIDSVOORSCHRIFTEN
SIKKERHEDSOPLYSNINGER
SÄKERHETSFÖRESKRIFTER
TURVALLISUUDESTA
ELECTRONICS FOR SPECIALISTS ELECTRONICS FOR SPECIALISTS ELECTRONICS FOR SPECIALISTS ELECTRONICS FOR SPECIALISTS
Page 2

Deutsch ........Seite 4
English .........Page 10
Français ........Page 16
Italiano.........Pagina 22
Español ........Página 28
Polski ..........Strona 34
Nederlands .....Pagina 40
Dansk ..........Sida 40
Svenska ........Sidan 41
Suomi..........Sivulta 41
ELECTRONICS FOR SPECIALISTS ELECTRONICS FOR SPECIALISTS ELECTRONICS FOR SPECIALISTS ELECTRONICS FOR SPECIALISTS
2
Page 3
1 2 3 4 5 6 7 8 9 10 11
FWD
REV
➀
23
24
25
CD-196 USB
CD/ USB
SCRATCH
F. START
PLAY/PAUSE
CONT.
TIME
LIST
PROG.SKIP FOLDER SKIP
TAG
AUTO
MAN./
TAP
SEARCH
BPM
12 13 14 15 16 17 18 19 20 21 22
29 30 31 32
OPEN/
PLAY/
CLOSE CUE
PAUSE CD/USB
2
1
5
4
8 9
7
FOLDER
0
PITCH BEND
SINGLE/
CONT
3
33
PROG.
6
TIME
34
SKIP
SCAN
35
A B C D F G H IE
TRACK
FOLDER
Total
CUE
CD
TITLE
USB
ALBUM
ARTIST
➂
J K L M N O P Q R
RemainSingle Cont. Elapse Total PITCH
M S F
8%
100%
16%
PITCH
BEND
PITCH CONTROL
MT
BPM
PG
➃
26
27
28
MT
CD MP3 PLAYER
➁
PITCH
36
LINE OUT
REMOTE
L
R
DIGITAL
OUT
www.imgstageline.com
37 38 39 40
230V~/50 Hz
3
Page 4

Professioneller CD / MP3-Spieler
Diese Anleitung richtet sich an professionelle DJs
und an technisch versierte Laien. Bitte lesen Sie
die Anleitung vor dem Betrieb gründlich durch
Deutsch
und heben Sie sie für ein späteres Nachlesen auf.
Auf der ausklappbaren Seite 3 finden Sie
alle beschriebenen Bedienelemente und Anschlüsse.
Inhalt
1 Übersicht der Bedien elemen te und
Anschlüsse . . . . . . . . . . . . . . . 4
1.1 Frontseite (Abb. 1) . . . . . . . . . . . . 4
1.1.1 Display (Abb. 3) . . . . . . . . . . . . . 5
1.2 Fernbedienung (Abb. 2) . . . . . . . . . . 5
1.3 Rückseite (Abb. 4). . . . . . . . . . . . . 5
2 Hinweise für den sicheren Gebrauch . . 5
3 Einsatzmöglichkeiten . . . . . . . . . . 6
4 Gerät aufstellen und anschließen . . . . 6
5 Bedienung . . . . . . . . . . . . . . . 6
5.1 Musikstücke abspielen . . . . . . . . . . . 6
5.2 Playlists laden . . . . . . . . . . . . . . 6
5.3 Anzeige der Titelinformationen,
Laufzeitanzeige und BPM-Anzeige. . . . . . 7
5.4 Betriebsart wählen . . . . . . . . . . . . 7
5.5 Anspielen eines Titels . . . . . . . . . . . 7
5.6 Schneller Vor- und Rücklauf. . . . . . . . . 7
5.7 Genaues Anfahren einer bestimmten Stelle . . 7
5.8 Rücksprung zu einer bestimmten Stelle
(Cue-Punkt) . . . . . . . . . . . . . . . 7
5.9 Geschwindigkeit mit oder ohne
Tonhöhenverschiebung verändern . . . . . .7
5.10 Pitch Bend – Takt zwischen
zwei Musikstücken angleichen . . . . . . . 8
5.11 Effekte erzeugen . . . . . . . . . . . . . 8
5.11.1 Scratch-Effekt. . . . . . . . . . . . . . 8
5.11.2 Leier-Effekt . . . . . . . . . . . . . . . 8
5.11.3 Stotter-Effekt . . . . . . . . . . . . . . 8
5.12 Eigene Titelfolge programmieren . . . . . . 8
5.12.1 Titelfolge speichern und abspielen . . . . . 8
5.12.2 Titelfolge überprüfen. . . . . . . . . . . 8
5.12.3 Titelfolge ergänzen oder löschen. . . . . . 8
5.13 Faderstart . . . . . . . . . . . . . . . . 8
6 Fernbedienung . . . . . . . . . . . . . 9
6.1 Batteriewechsel. . . . . . . . . . . . . . 9
7 Firmware aktualisieren . . . . . . . . . 9
8 Pflege des Gerätes . . . . . . . . . . . 9
9 Technische Daten . . . . . . . . . . . .9
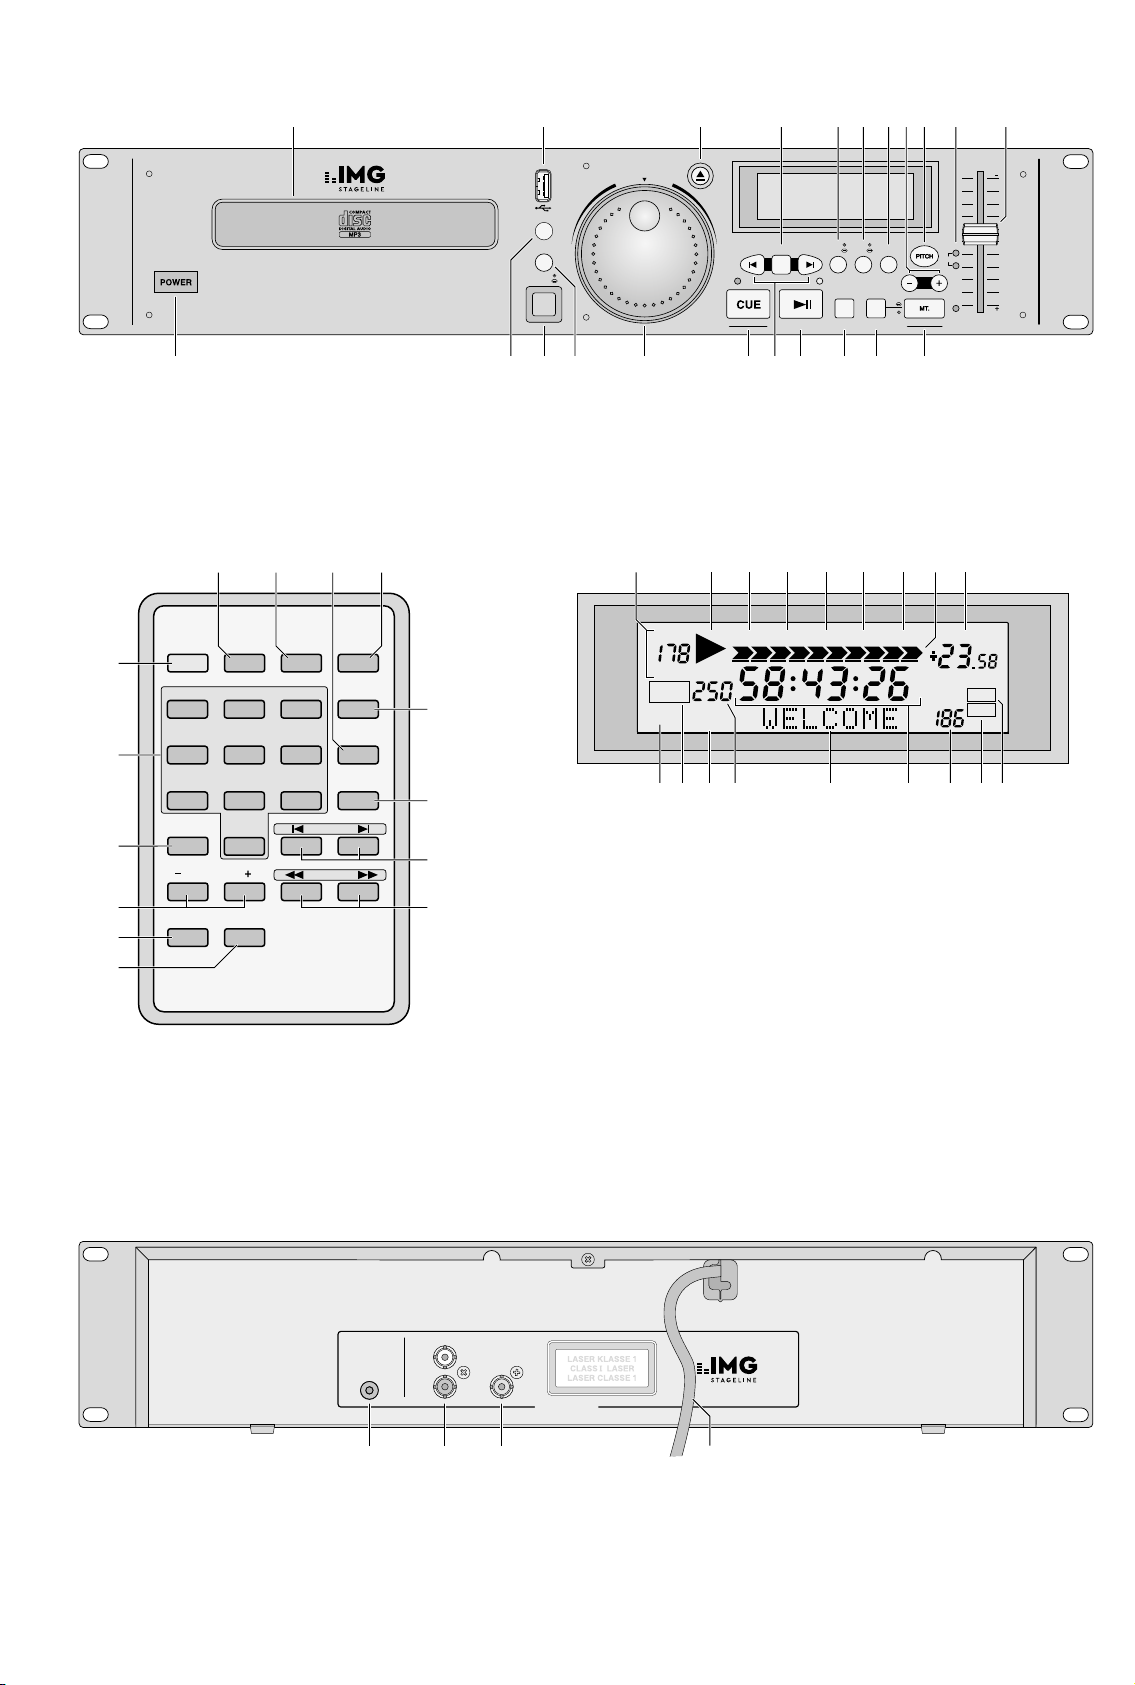
1 Übersicht der Bedien-
elemen te und Anschlüsse
1.1 Frontseite (Abb. 1)
Tasten mit Doppelfunktionen sind durch die
Symbole für „Taste kurz drücken“ und
für „Taste gedrückt halten“ gekennzeichnet.
1 CD-Schublade
2 USB-Anschluss zum Einstecken eines USB-
Sticks oder zum Anschluss einer Festplatte
3
Taste zum Öffnen und Schließen der
CD-Schublade
4 Taste FOLDER bei MP3-Betrieb
1.
für den Ordnerwechsel oder für den
Playlistwechsel (Laden von Playlists
Position6, Tas te CONT. / LIST)
☞
Die Taste FOLDER kurz drücken, die
Zeitanzeige (O) springt auf „FO-SEL“
um und „FOLDER“ (A) wird angezeigt.
Mit der Taste ❙◀ oder ▶❙ (18) den Ordner
(die Playlist) anwählen und mit der Taste
FOLDER be stätigen.
2. für den Partitionswechsel, bei Anschluss
einer Festplatte mit mehreren Partitionen
Die Taste FOLDER so lange gedrückt halten, bis die Zeitanzeige (O) auf „PA-SEL“
umspringt. Mit der Taste ❙◀ oder ▶❙ (18)
die Partition anwählen und mit der Taste
FOLDER bestätigen.
5 Taste TIME / TAG
1.
für die Zeitanzeige
Zum Umschalten der Zeitanzeige (H, O)
die Taste TIME / TAG kurz drücken:
bei der Anzeige „Remain“ (G)
Restzeit des Titels
bei der Anzeige „Elapse“ (E)
bereits gespielte Zeit des Titels
bei der Anzeige „Total Remain“ (F, G)
Restzeit der gesamten CD
(nicht bei MP3-Betrieb möglich)
2.
für die ID3-Tag-Anzeige bei MP3-Betrieb
Bei gedrückt gehaltener Taste TIME / TAG
mit der Taste ❙◀ oder ▶❙ (18) die Textzeile
(N) auf Anzeige des Titels, Albums, Künstlers (ID3-Tags) oder Dateinamens umschalten.
6 Taste CONT. / LIST
1.
für die Wahl des Betriebsmodus
Zum Umschalten zwischen Einzeltitelwiedergabe [Anzeige „Single“ (C)] und fortlaufender Wiedergabe [Anzeige „Cont.“
(D)] die Taste CONT. / LIST kurz drücken.
2.
für das Laden von Playlists
Bei gedrückt gehaltener Taste CONT. / LIST
mit der Taste ❙◀ oder ▶❙ (18) das Play listDateiformat („M3U Scan“, „WPL Scan“,
„XML Scan“) oder „Folder“ (= kei ne Playlist laden) wählen (☞Kapitel 5.2).
7
Taste PROG. zum Zusammenstellen und
Abspielen einer eigenen Titelfolge
(☞Kapitel 5.12)
8 Tasten PITCH BEND zur Anpassung des Tak-
tes des gerade laufenden Titels an den Takt
eines auf einem anderen Spieler laufenden
Musikstückes (☞Kapitel 5.10)
9
Taste PITCH zum Aktivieren / Deak ti vieren
des Geschwindigkeitsreglers (11) und zur
Wahl des Geschwindigkeitseinstellbereiches
(max. ±8 %, ±16 % oder ±100 % Abweichung
von der Normalgeschwindigkeit),
die gewählte Einstellung wird über zwei
LEDs angezeigt ☞Position 10
10 Anzeige für die mit der PITCH-Taste (9) ge-
wählte Einstellung:
– beide LEDs aus:
Geschwindigkeitsregler (11) deaktiviert
– LED 8 % leuchtet:
Geschwindigkeitsregler aktiviert,
Einstellbereich ±8 %
– LED 16 % leuchtet:
Geschwindigkeitsregler aktiviert,
Einstellbereich ±16 %
– beide LEDs leuchten:
Geschwindigkeitsregler aktiviert,
Einstellbereich ±100 %
11
Regler zum Ändern der Abspielgeschwindigkeit [ohne Änderung der Tonhöhe, wenn die
LED neben der Taste MT (22) leuchtet]; der
Regler ist aktiviert, wenn mindestens eine
LED (10) neben der Taste PITCH (9) leuchtet.
12 Ein- / Ausschalter POWER
13
Taste CD / USB zum Umschalten zwischen CD
und USB-Speichermedium: Das Gerät muss
dazu auf Pause geschaltet sein.
14
Infrarotsensor für die Fernbedienungs signale
15 Taste SCRATCH / F.START
1.
für die Scratch-Funktion
Zum Ein- und Ausschalten der ScratchFunktion die Taste SCRATCH / F.START kurz
drücken. Bei eingeschalteter Funktion
[Textzeile (N) zeigt „SCRATCH“] lassen sich
mit dem Drehrad (16) Scratch-Effekte erzeugen.
2.
für die Art des Faderstarts
Bei gedrückt gehaltener Taste SCRATCH /
F. START mit der Taste ❙◀ oder ▶❙ (18) die
Faderstartart („LOCK“, „CUE / PLAY“ oder
„TACT“) wählen (☞Kapitel 5.13).
16 Drehrad
1.
für den schnellen Vor- und Rücklauf, wenn
die Taste SEARCH (20) gedrückt wurde
2.
zum Erzeugen von Scratch-Effekten,
wenn die Taste SCRATCH / F.START (15)
ge drückt wurde
3. für die Funktion „Pitch Bend“ während
der Wiedergabe eines Titels
(☞Kapitel 5.10)
4.
zum exakten Anfahren einer Stelle, wenn
der Spieler auf Pause geschaltet ist
5. bei gedrückt gehaltener Taste ❙◀ oder ▶❙
zum schnellen Anwählen von Titeln, Ordnern, Playlists oder Partitionen
(☞Position 18, Tasten SKIP)
17
Taste CUE zum Anspielen eines Titels (☞Kapitel 5.5) und für den Rücksprung zu einer
zuvor bestimmten Stelle (☞Kapitel 5.8)
18 Tasten SKIP ❙◀ und ▶❙
1. für die Anwahl
– von Titeln,
wenn „TRACK“ (A) angezeigt wird
▶❙ zum Anwählen des nächsten Titels
❙◀ zum Sprung an den Titelanfang
Durch mehrfaches Drücken der Taste
❙◀ wird immer ein Titel weiter zurück-
gesprungen.
4
Page 5
– von Ordnern oder Playlists,
wenn „FOLDER“ (A) angezeigt wird
(☞Position 4, Taste FOLDER)
von Partitionen auf der Festplatte
–
wenn „PA-SEL“ (O) angezeigt wird
(☞Position 4, Taste FOLDER)
Wird eine der Tasten gedrückt gehalten,
lässt sich mit dem Drehrad (16) eine
Schnellanwahl durchführen.
2.
für die Auswahl zwischen mehreren
Op tionen bei gedrückt gehaltener
Taste TIME / TAG (5), CONT. / LIST (6),
SCRATCH / F.START (15)
19
Taste PLAY/ PAUSE
zwi schen Wiedergabe (LED über der Taste
leuchtet konstant) und Pause (LED über der
Taste blinkt)
20 Taste SEARCH, um das Drehrad (16) auf die
Funktion „schneller Vor- / Rücklauf“ umzuschalten
21
Taste BPM für den manuellen Zählmodus
des Beatcounters und zum Zurückschalten
auf den Automatikmodus (☞Kapitel 5.3)
22
Taste MT (Master-Tempo) zum Ein- und Ausschalten der Funktion für konstante Tonhöhe
(☞Kapitel 5.9)
▶
❙❙ zum Umschalten
1.1.1 Display (Abb. 3)
A
wenn „TRACK“ angezeigt wird: Nummer des
Titels (bei MP3-Betrieb: Nummer des Titels im
Ordner oder Nummer des Titels in der Playlist)
wenn „FOLDER“ angezeigt wird [nach dem
Drücken der Taste FOLDER (4)]: Nummer des
Ordners oder Nummer der Playlist
B Wiedergabesymbol
C
Anzeige „Single“: signalisiert die Betriebsart
Einzeltitelwiedergabe
D
Anzeige „Cont.“: signalisiert die Betriebsart
für fortlaufende Wiedergabe der Titel
E Anzeige „Elapse“: signalisiert, dass die be-
reits gespielte Zeit eines Titels angezeigt wird
F Anzeige „Total“: signalisiert zusammen mit
der Anzeige „Remain“ (G), dass die Restlaufzeit der CD angezeigt wird
(nicht bei MP3-Betrieb möglich)
G
Anzeige „Remain“: signalisiert, dass die
Restlaufzeit eines Titels angezeigt wird. Bei
der Anzeige „Total Remain“ wird die Restlaufzeit der CD angezeigt.
H Balkenanzeige zur Darstellung der relativen
Titellaufzeit
I Anzeige der Abweichung von der Normal-
geschwindigkeit in Prozent
J
Anzeige „CD“ oder „USB“: zeigt an, ob
eine CD oder ein USB-Speichermedium angewählt ist.
K
Anzeige „CUE”: erscheint, wenn der Spieler
am Cue-Punkt auf Pause steht
(☞Kapitel 5.4 und 5.8).
L
Anzeige „TITLE“, „ALBUM“ oder „ARTIST“,
wenn für einen MP3-Titel die je weilige
Titelinformation (ID3-Tag) in der Textzeile (N)
angezeigt wird
M
wenn „Total“ über den Ziffern angezeigt
wird: Gesamtanzahl der Titel (bei MP3-Betrieb: Gesamtanzahl der Titel im Ordner oder
Gesamtanzahl der Titel in der Playlist)
wenn „Total“ ausgeblendet ist [nach dem
Drücken der Taste FOLDER (4)]: Gesamtanzahl der Ordner oder Ge samtanzahl der
Playlists im gewählten Datei format
N Textzeile für zusätzliche Informationen
O Laufzeitanzeige, siehe auch Pos. E und G
P Anzeige der Taktschläge pro Minute
Q
Anzeige „PG“: signalisiert, dass eine eigene
Titelfolge gespeichert ist; blinkt während des
Programmierens und während der Wiedergabe der Titelfolge
R
Anzeige „MT“ (Master-Tempo): signalisiert die
Funktion für konstante Tonhöhe
(☞Kapitel 5.9)
1.2 Fernbedienung (Abb. 2)
23 Taste OPEN / CLOSE wie Taste (3)
24 Zifferntasten für die Direktwahl
– von Titeln
wenn „TRACK“ (A) angezeigt wird
– von Ordnern oder Playlists
wenn „FOLDER“ (A) angezeigt wird
(☞Position 4, Taste FOLDER)
von Partitionen auf der Festplatte,
–
wenn „PA-SEL“ (O) angezeigt wird
(☞Position 4, Taste FOLDER)
Die Tasten
25 FOLDER
26 PITCH BEND
27 MT
28 PITCH
29 PLAY/ PAUSE
30 CUE
31 PROG.
32
CD / USB
entsprechen den gleichnamigen Tasten am
Gerät
33
Taste SINGLE / CONT wie Taste CONT. / LIST (6);
aber das Laden von Playlists ist nur am Gerät
möglich
34
Taste TIME wie Taste TIME / TAG (5);
aber das Umschalten der ID3-Tag-An zeige
ist nur am Gerät möglich
35
Tasten SKIP ❙◀ und ▶❙ wie die SKIP-Tasten am
Gerät zur Anwahl von Titeln, Ordnern, Playlists oder Partitionen; zur schnellen Anwahl
die jeweilige SKIP-Taste gedrückt halten;
aber sie können nicht in Kombination mit
anderen Tasten genutzt werden
36 Tasten SCAN ◀◀ und ▶▶ für den schnellen
Vor- und Rücklauf
1.3 Rückseite (Abb. 4)
37
3,5-mm-Klinkenbuchse REMOTE für die
Fernsteuerung der Funktion Start / Pause von
einem Mischpult aus (Faderstart)
38
analoger Audioausgang LINE OUT mit
Line-Pegel (Cinch, L links / R rechts)
39
digitaler Audioausgang DIGITAL OUT (Cinch)
40
Netzkabel zum Anschluss an eine Steckdose
(230 V / 50 Hz)
2 Hinweise für den sicheren
Gebrauch
Das Gerät entspricht allen relevanten Richtlinien
der EU und trägt deshalb das -Zeichen.
WARNUNG
Vorsicht! Blicken Sie bei geöffneter CD-
•
Schublade nicht in den CD-Schacht. Eventuell
austretende Laserstrahlen können zu Augenschäden führen.
Das Gerät ist nur zur Verwendung im
•
Innen bereich geeignet. Schützen Sie es vor
Tropf- und Spritzwasser sowie vor hoher
Luftfeuchtigkeit. Der zulässige Einsatztemperaturbereich beträgt 0 – 40 °C.
Stellen Sie keine mit Flüssigkeit gefüllten Ge-
•
fäße z. B. Trinkgläser, auf das Gerät.
Ziehen Sie sofort den Netzstecker aus der
•
Steckdose,
1.
wenn sichtbare Schäden am Gerät oder am
Netzkabel vorhanden sind,
2.
wenn nach einem Sturz oder Ähnlichem
der Verdacht auf einen Defekt besteht,
3. wenn Funktionsstörungen auftreten.
Geben Sie das Gerät in jedem Fall zur Reparatur in eine Fachwerkstatt.
Ein beschädigtes Netzkabel darf nur durch
•
eine Fachwerkstatt ersetzt werden.
Ziehen Sie den Netzstecker nie am Kabel aus
•
der Steckdose, fassen Sie immer am Stecker
an.
Wird das Gerät zweckentfremdet, nicht richtig
•
angeschlossen, falsch bedient oder nicht fachgerecht repariert, kann keine Haftung für daraus resultierende Sach- oder Personenschäden
und keine Garantie für das Gerät übernommen werden. Ebenso kann keine Haftung für
durch Fehlbedienung oder durch einen Defekt
entstandene Datenverluste und deren Folgeschäden übernommen werden.
Das Gerät wird mit lebensgefährlicher Netzspannung versorgt.
Nehmen Sie deshalb niemals
selbst Eingriffe am Gerät vor. Es
besteht die Gefahr eines elektrischen Schlages.
Soll das Gerät endgültig aus dem Betrieb genommen werden, übergeben
Sie es zur umweltgerechten Entsorgung
einem örtlichen Recyclingbetrieb.
Deutsch
5
Page 6

3 Einsatzmöglichkeiten
Der CD / MP3-Spieler CD-196USB ist speziell für
den professionellen DJ-Bereich konzipiert. Viele
Funktionsmöglichkeiten sind genau auf diesen
Deutsch
Einsatzbereich ab gestimmt, z. B. Einzeltitelwiedergabe, automatischer Beatcounter,
Ge schwin digkeitsänderung ohne Tonhöhenänderung, Anti-Shock-Speicher.
Mit dem Gerät können Standard-Audio-CDs, selbst gebrannte Audio-CDs (CD-R)
sowie CDs mit Titeln im MP3-Format abgespielt
werden. Bei wiederbeschreibbaren CDs (CD-RW)
kann es jedoch je nach CD-Typ, verwendetem
CD-Brenner und Brennprogramm beim Abspielen zu Problemen kommen.
Über den USB-Anschluss lassen sich auch
MP3-Dateien von einer Festplatte oder einem
USB-Stick abspielen. Die Multi-Partition-Unterstüt zung des Spielers er laubt den An schluss
von unterschiedlich formatierten Festplatten
(FAT16 / FAT32, NTFS, HFS+).
Hinweis: Aufgrund der Vielfalt von Speicher-Herstellern und Gerätetreibern kann nicht garantiert werden, dass alle Speichermedien mit dem CD-196USB
kompatibel sind.
4 Gerät aufstellen und
anschließen
Der CD / MP3-Spieler kann als frei stehendes
Tischgerät auf einer ebenen, waagerechten Fläche aufgestellt oder in ein Rack (482 mm / 19”)
eingebaut werden. Für den Rackeinbau werden
2 HE (1 HE = Höheneinheit = 44,45 mm) benötigt.
Vor dem Anschließen von Geräten oder dem
Ändern bestehender Anschlüsse den Spieler und
die anzuschließenden Geräte ausschalten.
1)
Ist an Ihrem Mischpult oder Verstärker ein
Digital eingang vorhanden, diesen an die
gelbe Cinch-Buchse DIGITAL OUT (39) anschließen.
Bei Geräten ohne Digitaleingang den Stereo-Ausgang LINE OUT (38) – linker Ka nalL
und rechter Kanal R – über das beiliegende
Kabel mit Cinch-Steckern an einen Line-Eingang anschließen (mögliche Be schriftung des
Eingangs: LINE IN, AUX IN, CD).
2)
Der Spieler lässt sich über ein Mischpult
mit Faderstart-Funktion auf Start und auf
Pause schalten. Dazu die Buchse REMOTE
(37) über ein Kabel mit 3,5-mm-Klin kensteckern an die entsprechende Buchse des
Misch pultes anschließen. Der Spieler muss auf
die Faderstartart des Mischpultes eingestellt
wer den ☞Kapitel 5.13.
3)
Zuletzt den Stecker des Netzkabels (40) in
eine Steckdose (230 V / 50 Hz) stecken.
5 Bedienung
Das Gerät mit dem Netzschalter POWER (12)
einschalten. Das Display zeigt kurz „boot“ (Startvorgang) und WELCOME zur Begrüßung. Nach
jedem Einschalten ist automatisch das CD-Laufwerk angewählt. Befindet sich keine CD im Laufwerk, wird auf den USB-Anschluss gewechselt.
Ist auch kein USB-Speichermedium angeschlossen, wird „no dISC“ (keine CD) angezeigt.
Nach dem Betrieb das Gerät mit dem Schalter POWER ausschalten. Folgende Einstellungen
bleiben für den nächsten Betrieb gespeichert:
der gewählte Betriebsmodus ☞Kapitel 5.4
–
– die gewählte Laufzeitanzeige ☞Kapitel 5.3
– der gewählte Geschwindigkeitseinstellbereich
Kapitel 5.9
☞
Die Bedienung kann über die Tasten am Gerät
oder über die Fernbedienung erfolgen. Kapitel5
behandelt ausschließlich die Bedienung über
die Tasten am Gerät. In Kapitel 6 finden Sie alle
Informationen zur Fernbedienung.
5.1 Musikstücke abspielen
1)
Zum Einlegen einer CD die CD-Schublade
(1) mit der Taste (3) öffnen. Die CD mit
der Beschriftung nach oben einlegen und
die CD-Schublade mit der Taste wieder
schließen.
Zusätzlich oder alternativ kann ein USBStick in den USB-Anschluss (2) gesteckt oder
eine Festplatte (ggf. mit eigener Stromversorgung) mit dem USB-Anschluss verbunden
werden.
2)
Zum Umschalten zwischen CD und USB-Speichermedium die Taste CD / USB (13) drücken.
Der Spieler muss dazu auf Pause ge schaltet
sein; ggf. die Taste
wählte Datenträger wird im Display angezeigt: „CD“ oder „USB“ (J).
3) Nach dem Einlesen eines Datenträgers steht
der Spieler am ersten Titel auf Pause. Das
Display zeigt unter der Anzeige „TRACK“
(A) die Nummer des Titels (bei MP3-Betrieb:
die Nummer des Titels im Ordner) und unter
der An zeige „Total“ (M) die Gesamtanzahl
der Titel (bei MP3-Betrieb: die Gesamtanzahl
der Titel im Ordner).
Sind auf einer Festplatte mehrere Partitionen
an gelegt, zum Anwählen einer anderen
Partition folgendermaßen vorgehen:
a)
Die Taste FOLDER (4) so lange gedrückt halten, bis die Zeitanzeige (O) des Displays auf
„PA-SEL“ umspringt. Die Textzeile (N) zeigt
den Namen der aktuellen Partition an.
b) Mit der Taste ❙◀ oder ▶❙ (18) die Partition
wählen. Wird eine der Tasten gedrückt
gehalten, lassen sich die Partitionen mit
dem Drehrad (16) schnell anwählen.
c)
Zum Bestätigen die Taste FOLDER drücken.
Hinweis zu Partitionen mit mehreren Ordnern:
Wird nach dem Aufrufen des Partitionswahlmodus
die Partition nicht gewechselt, sondern die aktuelle
Partition mit der Taste FOLDER bestätigt, zeigt das
Display „FO-SEL“, die Einblendung „FOLDER“ (A)
und die Anzahl der Ordner (M). Wird jetzt eine der
SKIP-Tasten (18) gedrückt, wechselt der Spieler in
den Ordnerwahlmodus und der ge wünschte Ordner kann angewählt werden ☞ Bedienschritt 4.
4)
Sind bei MP3-Betrieb die Titel in verschiedenen Ordnern einsortiert, zum Anwählen
eines anderen Ordners folgendermaßen
vorgehen:
a) Die Taste FOLDER (4) drücken. Die Zeitan-
zeige (O) springt auf „FO-SEL“ um. Das
Anzeigefeld (A) wechselt von „TRACK“
auf „FOLDER“ und zeigt jetzt die Nummer
des aktuellen Ordners. Das Anzeigefeld
(M) zeigt die Ge samtanzahl der Ordner.
b) Mit der Taste ❙◀ oder ▶❙ den Ordner aus-
wählen. Wird eine der Tasten gedrückt
gehalten, lassen sich die Ordner mit dem
Drehrad (16) schnell anwählen.
c)
Zum Bestätigen der Auswahl die Taste
FOLDER drücken; das Display wechselt
wieder auf die Laufzeitanzeige (O) und
die Anzeige „TRACK“ (A).
▶
❙❙ (19) drücken. Der ge-
5)
Zum Starten des ersten Titels die Taste
(19) drücken. Während der Wiedergabe wird
▶ (B) angezeigt und die LED über der Taste
leuchtet konstant. Das Abspielen kann jederzeit mit der Taste
▶
❙❙ unterbrochen und
wieder fortgesetzt werden. Im Pausenmodus
blinkt die LED über der Taste.
Zum Anwählen eines anderen Titels die
Tasten ❙◀ und ▶❙ (18) verwenden:
Taste ▶❙ : Zum nächsten Titel springen.
Taste ❙◀ : An den Anfang des gerade laufenden Titels springen. Durch mehrfaches
Drücken der Taste wird immer ein Titel weiter
zurückgesprungen.
Wird eine der Tasten gedrückt gehalten,
lassen sich die Titel mit dem Drehrad (16)
schnell anwählen.
6)
Während der Wiedergabe einer CD ist die
CD-Schublade gesperrt. Für einen CD-Wechsel erst mit der Taste
▶
❙❙ auf Pause schalten,
dann zum Öffnen der Schublade die Taste
drücken.
Während der Wiedergabe eines USBSpeichermediums kann die CD-Schublade
je doch geöffnet werden.
7) Vor dem Ausschalten des Gerätes immer die
CD-Schublade mit der Taste schließen, um
das Laser-Abtastsystem vor Verschmutzung
zu schützen.
5.2 Playlists laden
Zum Abspielen einer bestimmten Auswahl von
MP3-Dateien lassen sich auf einem Computer
erstellte Playlists mit der Dateiendung „wpl“,
„xml“ oder „m3u“ in den Spieler laden.
Wichtig: Die Playlist und die dazugehörigen
MP3-Dateien müssen sich auf demselben Speichermedium befinden. Playlists müssen immer im
Hauptverzeichnis (root directory) ge speichert sein.
1) Der Spieler muss auf Pause ge schaltet sein;
ggf. die Taste
2)
Die Taste CONT. / LIST (6) gedrückt halten und
mit der Taste ❙◀ oder ▶❙ (18) wählen, nach
welchem Playlist-Dateiformat gesucht werden soll. Die Textzeile (N) zeigt die Auswahl
an: „M3U Scan“, „WPL Scan“, „XML Scan“
(Bei Auswahl der vierten Option „Folder“
wird keine Playlist geladen).
Nach dem Lösen der Tasten ist die erste
Playlist geladen. Das Display zeigt unter der
Anzeige „TRACK“ (A) die Nummer des Titels
in der Playlist und unter der An zeige „Total“
(M) die Gesamtanzahl der Titel in der Playlist.
Hinweis: Werden keine Playlists gefunden, zeigt
das Display „no FILE“. Dann bei gedrückt gehaltener Tas te CONT. / LIST mit der Taste ❙◀ oder ▶❙
entweder ein anderes Dateiformat anwählen oder
die Option „Folder“, um in den Ordner-Abspielmodus zurückzukehren.
3)
Sind mehrere Playlists vorhanden, zum
Anwählen einer anderen Playlist fol-
gendermaßen vorgehen:
a) Die Taste FOLDER (4) drücken. Die Zeitan-
zeige (O) springt auf „FO-SEL“ um. Das
An zeigefeld (A) wechselt von „TRACK“
auf „FOLDER“ und zeigt jetzt die Nummer
der aktuellen Playlist. Das Anzeigefeld (M)
zeigt die Ge samtanzahl der Playlists im
gewählten Dateiformat.
b) Die Playlist mit der Taste ❙◀ oder ▶❙ aus-
wählen. Wird eine der Tasten gedrückt
gehalten, lassen sich die Playlists mit dem
Drehrad (16) schnell an wählen.
▶
❙❙ (19) drücken.
▶
❙❙
6
Page 7

c)
Zum Bestätigen der Auswahl die Taste
FOLDER drücken. Das Display wechselt
wieder auf die Laufzeitanzeige (O) und
die Anzeige „TRACK“ (A).
4)
Die Wiedergabe des ersten Titels starten oder
einen anderen Titel der Playlist anwählen
Kapitel 5.1, Bedienschritt 5.
☞
5)
Um die Titel wieder ohne Playlist abzuspielen,
mit der Taste
▶
❙❙
auf Pause schalten. Die Taste
CONT. / LIST gedrückt halten und die Taste
❙◀ oder ▶❙ so oft drücken, bis die Textzeile
„Folder“ anzeigt. Nach dem Lösen der Tasten
ist dann keine Playlist mehr geladen.
5.3 Anzeige der Titelinformationen, Laufzeitanzeige und BPM-Anzeige
1.
Informationen zum Titel werden in der
Textzeile (N) angezeigt:
– bei Standard-Audio-CDs mit CD-Text der
Titelname
– bei MP3-Betrieb der Dateiname
Die Textzeile lässt sich auf die Anzeige folgender Informationen (ID3-Tags) umschalten. Dazu die Taste TIME / TAG (5) gedrückt
halten und mit der Taste ❙◀ oder ▶❙ (18)
wählen:
Anzeige (L)
TITLE = Titelname
ALBUM = Albumname
ARTIST = Künstlername
keine = Dateiname
Mit der Taste FOLDER (4) kann die Textzeile umgeschaltet werden zwischen der
Anzeige der jeweiligen Titelinformation
und der Anzeige des Na mens des Ordners
(bzw., wenn eine Playlist geladen ist, des
Namens der Playlist).
2. Die Laufzeit des Titels wird als numerische
Anzeige (O) dargestellt; die Se kunden sind
in 75 so genannte Frames unterteilt. Zusätzlich stellt die Balkenanzeige (H) die Laufzeit,
bezogen auf die Titeldauer, durch ihre Länge
grafisch dar (relative Zeitdarstellung). Die letzten 30 Sekunden eines Titels signalisiert der
Balken durch Blinken in voller Länge, wobei
die letzten 15 Sekunden durch schnelleres
Blinken angezeigt werden.
Die Laufzeitanzeige lässt sich mit der Taste
TIME / TAG (5) umschalten:
– Wird „Elapse“ (E) angezeigt, ist die bereits
gespielte Zeit des Titels angegeben.
– Wird „Total Remain“ (F, G) angezeigt, ist
die Restzeit der gesamten CD angegeben
(nicht bei MP3-Betrieb möglich).
– Wird „Remain“ (G) angezeigt, ist die Rest-
zeit des Titels angegeben.
3.
Nach dem Anwählen eines Titels ermittelt
der Beatcounter automatisch die Anzahl
der Taktschläge pro Minute (BPM = „beats
per minute“). Nach kurzer Zeit erscheint die
Anzahl in der BPM-Anzeige (P). Kann der
Beatcounter keinen richtigen Wert ermitteln
(z. B. bei ruhigen Musiktiteln), lässt sich der
Wert auch manuell feststellen:
a) Die Taste BPM (21) im Takt der Musik ei-
nige Male antippen (mindestens 4×). Die
Anzahl der Taktschläge wird angezeigt
und die Anzeige „BPM“ blinkt zur Kennzeichnung des manuellen Zählmodus.
b)
Zum Zurückschalten auf den automatischen Zählmodus, die Taste BPM ge drückt
halten, bis die Anzeige „BPM“ nicht mehr
blinkt.
5.4 Betriebsart wählen
Zum Umschalten zwischen Einzeltitelwiederga be [Anzeige „Single“ (C)] und fortlaufender
Wiedergabe [Anzeige „Cont.“ (D)] die Taste
CONT. / LIST (6) drücken.
1. Bei der Einzeltitelwiedergabe schaltet das
Gerät nach jedem Abspielen eines Titels auf
Pause.
Dieser Modus ist speziell für DJ-Anwendungen vorgesehen. Ist er eingestellt, steht
der Spieler nach dem Anwählen eines Titels
exakt an der Stelle, an der die Musik beginnt
(meistens nicht bei dem Zeitindex 0:00:00,
sondern einige Frames später, z. B. 0:00:15).
Diese Stelle wird automatisch als Startpunkt
(Auto-Cue-Punkt) gespeichert und im Display
durch die Anzeige „CUE“ (K) angegeben.
Nach dem Starten des Titels kann mit der
Taste CUE (17) auf diesen Startpunkt zurückgesprungen werden. Nach dem Spielen
eines Titels schaltet das Gerät exakt an der
Stelle auf Pause, an der die Musik des nächsten Titels beginnt. Diese Stelle ist dann als
neuer Startpunkt gespeichert.
2.
Bei der fortlaufenden Wiedergabe werden
alle Titel (bei MP3-Betrieb: alle Titel des Ordners oder der Playlist) endlos nacheinander
abgespielt, d. h. nach dem letzten Titel startet
wieder der erste. Während des Abspielens
und beim Anwählen von Titeln werden keine
Auto-Cue-Punkte gesetzt.
Hinweis: In einigen Fällen wird auch im Modus
„fortlaufende Wiedergabe“ ein Auto-Cue-Punkt
ge setzt (jedoch nicht framegenau bei Musikbeginn,
sondern bei dem Zeitindex 0:00:00), z. B. nach dem
Einlesen eines Datenträgers.
5.5 Anspielen eines Titels
Mit der Taste CUE (17) lässt sich ein Titel anspielen, solange diese Taste gedrückt gehalten
wird. Nach dem Lösen der Taste springt das
Gerät auf den Titelanfang zurück und schaltet
auf Pause.
1)
Der Spieler muss auf Einzeltitelwiedergabe
geschaltet sein: Anzeige „Single“ (C). Wird
„Cont.“ (D) angezeigt, die Taste CONT. / LIST
(6) drücken.
2)
Den Titel anwählen (Titelanwahl und Ord
neranwahl bzw. Playlistanwahl ☞Kapitel
5.1 bzw. 5.2).
3)
Durch Gedrückthalten der Taste CUE den
Titel anspielen.
4)
Soll der Titel abgespielt werden, die Taste
▶
❙❙ (19) betätigen.
5.6 Schneller Vor- und Rücklauf
Soll ein Titel schnell vor- oder zurücklaufen, erst
die Taste SEARCH (20) drücken. In der Textzeile
(N) wird „SEARCH“ angezeigt. Das Drehrad (16)
in die entsprechende Richtung drehen. Die Vorbzw. Rücklaufgeschwindigkeit hängt von der
Drehgeschwindigkeit des Rades ab.
Zum Ausschalten der Funktion die Taste
SEARCH erneut drücken (Anzeige „SEARCH“
erlischt). Im Wiedergabemodus schaltet sich die
Funktion 8 Sekunden nach der letzten Betätigung des Rades automatisch aus.
Hinweis: Im Pausenmodus wird nach einem Vor- oder
Rücklauf die momentane Stelle ständig wiederholt.
Um das Wiederholen zu beenden, entweder die Taste
CUE (17) zweimal kurz drücken (neuer Cue-Punkt wird
gesetzt, ☞ Kapitel 5.8) oder die Wiedergabe mit der
Taste
▶
❙❙ (19) starten.
5.7 Genaues Anfahren einer bestimmten Stelle
Eine Stelle im Titel lässt sich auf 1 Frame
(¹⁄ 75 Sekunde) genau anfahren, wenn z. B. die
Wiedergabe nicht am Titelanfang, sondern ab
einer bestimmten Stelle starten soll.
1)
Ist die gewünschte Stelle durch Abspielen des
Titels oder mit dem schnellen Vor- / Rücklauf
(☞Kapitel 5.6) ungefähr erreicht, mit der
Taste
▶
❙❙ (19) auf Pause schalten.
2)
Durch Links- und Rechtsdrehen des Dreh rades
(16) die Stelle genau anfahren. Zur akustischen Kontrolle ist die eingestellte Stelle
ständig wiederholt zu hören.
3)
Ist die gewünschte Stelle gefunden, die Taste
CUE (17) zweimal kurz drücken. Damit ist die
Stelle ge speichert und das wiederholte Abspielen beendet. Mit der Taste
▶
❙❙ kann nun
die Wiedergabe ab diesem Punkt gestartet
werden.
5.8 Rücksprung zu einer bestimmten Stelle (Cue-Punkt)
Um schnell zu einer bestimmten Stelle springen
zu können, lässt sich mit der Taste CUE (17) ein
Startpunkt (Cue-Punkt) speichern. Dieser wird
jedoch im Einzeltitelmodus beim Erreichen oder
Anwählen des nächsten Titels mit dem Start
punkt (Auto-Cue-Punkt) des nächsten Titels
überschrieben [ggf. mit der Taste CONT. / LIST
(6) auf Gesamt titelwiedergabe umschalten].
Hinweis: Der gespeicherte Cue-Punkt wird ge löscht:
– beim Anwählen eines anderen Ordners (bzw. einer
anderen Playlist)
– beim Umschalten zwischen CD und USB-Speicher-
medium
– beim Ausschalten des Gerätes
1)
Während des Abspielens mit der Taste
(19) auf Pause schalten, wenn die Stelle erreicht ist, zu der später zurückgesprungen
werden soll. Die LED über der Taste CUE (17)
blinkt.
2) Bei Bedarf die Stelle mit dem Drehrad (16)
genau anfahren (☞Kapitel 5.7). Nach dem
Drehen des Rades wird die Stelle ständig
wiederholt.
-
3)
Die Taste CUE drücken. Dadurch wird die
Stelle als Cue-Punkt gespeichert. Im Display
wird „CUE“ (K) angezeigt und die LED über
der Taste CUE leuchtet kontinuierlich. Um das
wiederholte Abspielen der Stelle zu be enden,
kann die Taste CUE erneut gedrückt werden.
4)
Das Abspielen mit der Taste
▶
starten.
5) Mit der Taste „CUE“ kann nun auf den Cue-
Punkt zurückgesprungen werden. Nach dem
Rücksprung wird CUE im Display eingeblendet und der Spieler steht auf Pause.
6)
Mit der Taste
▶
❙❙ die Wiedergabe starten
oder die Taste CUE so lange gedrückt halten, wie der Titel gespielt werden soll. Nach
dem Lösen der Taste CUE springt der Spieler
zurück auf den Cue-Punkt und schaltet auf
Pause.
5.9 Geschwindigkeit mit oder ohne Tonhöhenverschiebung verändern
Die Geschwindigkeit lässt sich mit dem Schieberegler (11) bis zu ±100 % ändern:
+100 % = doppelte Geschwindigkeit
−100 % = Stillstand
▶
❙❙
❙❙ wieder
Deutsch
-
7
Page 8

REMOTE
1)
Den Einstellbereich mit der Taste PITCH (9)
wählen. Die mit der Taste PITCH ge wählte
Einstellung wird über die beiden LEDs (10)
neben der Taste angezeigt:
Deutsch
– beide LEDs aus:
Geschwindigkeitsregler deaktiviert,
Titel läuft mit Normalgeschwindigkeit
– LED 8 % leuchtet:
Geschwindigkeitsregler aktiviert,
Einstellbereich ±8 %
– LED 16 % leuchtet:
Geschwindigkeitsregler aktiviert,
Einstellbereich ±16 %
– beide LEDs leuchten:
Geschwindigkeitsregler aktiviert,
Einstellbereich ±100 %
Zusätzlich zeigt bei jedem Drücken der Taste
PITCH die Textzeile (N) kurz die gewählte
Einstellung an: „Pitch 8 %“, „Pitch 16 %“,
„Pitch 100“ oder „Pitch off“.
2) Die Geschwindigkeit mit dem Schieberegler
einstellen. Das Display zeigt die prozentuale
Abweichung von der Normalgeschwindigkeit
oben rechts (I) an. Die Anzahl der Taktschläge
pro Minute (P) ändert sich entsprechend.
3)
Mit dem Verändern der Geschwindigkeit ändert sich auch proportional die Tonhöhe. Soll
jedoch die Tonhöhe konstant bleiben, die
Taste MT (22) drücken. Im Display erscheint
die Anzeige „MT“ (R) und die LED neben
der Taste MT leuchtet. Zum Ausschalten der
Funktion die Taste MT erneut drücken.
5.10 Pitch Bend – Takt zwischen
zwei Musikstücken angleichen
Beim Betrieb mit zwei CD / MP3-Spielern lassen
sich die Taktschläge von zwei Musikstücken mit
derselben Geschwindigkeit zeitlich genau übereinander legen. Dadurch wird beim Überblenden
von einem zum anderen Gerät der Rhythmus
beim Tanzen nicht unterbrochen.
1) Zuerst das Tempo des Musikstückes, auf das
übergeblendet werden soll, mit dem Geschwindigkeitsregler (11) an das Tempo des
laufenden Musikstückes angleichen. Dazu
mit dem Schieberegler die gleiche Anzahl
von Taktschlägen pro Minute einstellen, siehe
An zeige (P) unten rechts im Display.
2)
Die Taktschläge des Musikstückes, auf das
übergeblendet werden soll, mit den Tasten
PITCH BEND (8) genau über die des laufenden Musikstückes legen: Solange die Taste
+ oder − gedrückt gehalten wird, läuft der
Titel um 16 % schneller bzw. langsamer. Dadurch verschieben sich die Taktschläge im
Bezug zu den Taktschlägen des laufenden
Musikstückes.
3) Die Taktschläge können auch durch Drehen
des Drehrades (16) verschoben werden.
5.11 Effekte erzeugen
5.11.1 Scratch-Effekt
Zur Erzeugung eines Scratch-Effekts (imitiert das
manuelle Drehen eines Plattentellers) die Taste
SCRATCH / F.START (15) drücken und das Drehrad
(16) entsprechend vor- und zurückdrehen. Die
Textzeile (N) zeigt „SCRATCH“. Zum Ausschalten
der Funktion die Taste SCRATCH / F.START erneut
drücken.
5.11.2 Leier-Effekt
Falls die Funktion Master-Tempo (konstante Ton
höhe) aktiviert ist [Anzeige „MT“ (R) im Display
und LED neben der Taste MT (22) leuchtet], diese
mit der Taste MT ausschalten. Durch Hin- und
Herdrehen des Drehrades (16) wird die Abspielgeschwindigkeit abwechselnd erhöht und
verringert. Dadurch entsteht ein Leier-Effekt.
5.11.3 Stotter-Effekt
Der mit der Taste CUE (17) gespeicherte CuePunkt (☞ Kapitel 5.8) kann zum Erzeugen
eines Stotter-Effektes genutzt werden: Durch
mehr fa ches kurzes Drücken der Taste CUE entsteht ein Stotter-Effekt. Dieser ist dabei umso
eindrucksvoller, je geeigneter der Cue-Punkt ist
(z. B. Instrumenteneinsatz oder Anfang eines
Wortes).
5.12 Eigene Titelfolge programmieren
Der CD / MP3-Spieler bietet die Möglichkeit,
eine eigene Titelfolge mit max. 99 Titeln zu
programmieren. Bei MP3-Betrieb können die
Titel aus verschiedenen Ordnern oder Playlists
zusammengestellt werden. Die programmierte
Titelfolge ist jedoch – anders als eine Playlist –
nicht unbegrenzt abrufbar, sondern wird nach
dem Umschalten auf einen anderen Datenträger
oder Ausschalten des Geräts ge löscht.
5.12.1 Titelfolge speichern und abspielen
1) Falls ein Titel abgespielt wird, zuerst mit der
Taste
▶
❙❙ (19) auf Pause schalten.
2) Mit der Taste PROG. (7) in den Programmiermodus schalten. Die Zeitanzeige (O) springt
auf die Anzeige des ersten Speicherplatzes
„P-01“ um. Die Anzeige „PG“ (Q) blinkt
schnell.
Hinweis: Soll dieser Modus sofort verlassen werden, die Taste PROG. so lange gedrückt halten, bis
das Display wieder die Laufzeit (O) anzeigt.
3)
Den ersten Titel für die Titelfolge wählen
(Titelanwahl und Ordneranwahl bzw. Playlistanwahl ☞Kapitel 5.1 bzw. 5.2).
4)
Zur Bestätigung der Titelwahl die Taste
PROG. drücken. Der nächste Speicherplatz
„P-02“ wird angezeigt.
5) Die Bedienschritte 3 und 4 wiederholen, bis
die Titelfolge komplett ist. Sind 99 Titel gespeichert und wird versucht, einen weiteren
Titel zu speichern, erscheint „FULL“.
6)
Zum Abspielen der Titelfolge die Taste
drücken. Die Anzeige „PG“ blinkt langsamer.
Das Display zeigt die Num mer des Titels (A)
in der Titelfolge und die Gesamtanzahl (M)
der programmierten Titel.
Die Titel werden abhängig vom gewählten Betriebsmodus (☞Kapitel 5.4) abgespielt.
7)
Zum Zurückkehren in den normalen Abspielmodus mit der Taste
▶
❙❙ auf Pause
schalten und die Taste PROG. so lange gedrückt halten, bis die Anzeige „PG“ nicht
mehr blinkt.
Um die Titelfolge erneut abzuspielen, auf
Pause schalten und die Taste PROG. drücken,
sodass die Anzeige „PG“ wieder blinkt. Dann
die Titelfolge mit der Taste
Hinweis: Solange die Anzeige „PG“ blinkt oder konstant leuchtet, ist die Titelfolge abrufbar. Wird „PG“
nicht mehr angezeigt, wurde die Titelfolge gelöscht.
▶
❙❙ starten.
▶
5.12.2 Titelfolge überprüfen
1) Falls ein Titel abgespielt wird, zuerst mit der
Taste
▶
❙❙ (19) auf Pause schalten.
2) Wenn jetzt die Anzeige „PG“ (Q) blinkt, die
Taste PROG. (7) einmal drücken. Leuchtet
die An zeige „PG“ konstant, die Taste PROG.
zweimal drücken.
3)
Mit der Taste ❙◀ oder ▶❙ (18) die Speicherplätze („P-01“ … „P-99“) nacheinander anwählen. Der Name des jeweils gespeicherten
Titels wird in der Textzeile (N) angezeigt.
4)
Zum Abspielen der Titelfolge die Taste
drücken.
5.12.3 Titelfolge ergänzen oder löschen
1) Falls ein Titel abgespielt wird, zuerst mit der
Taste
▶
❙❙ (19) auf Pause schalten.
2) Falls die Anzeige „PG“ (Q) blinkt, die Taste
PROG. (7) so lange gedrückt halten, bis „PG“
nicht mehr blinkt.
3) Die Taste PROG. kurz drücken, sodass „PG“
schnell blinkt und die Zeitanzeige (O) auf die
Anzeige des nächsten freien Speicherplatzes
„P-…“ umschaltet.
4) Entweder zum Löschen der gesamten Titelfolge die Taste PROG. so lange drücken, bis
das Display wieder die Laufzeit (O) anzeigt
oder zum Hinzufügen eines weiteren Titels
den gewünschten Titel wählen (Titelwahl und
Ordnerwahl bzw. Playlistwahl ☞Kapitel 5.1
bzw. 5.2) und mit der Taste PROG. bestätigen. Zum Abspielen der er gänzten Titelfolge
die Taste
▶
❙❙ drücken.
5.13 Faderstart
Die Funktion Start / Pause der Taste
sich von einem Mischpult mit Faderstart-Funktion aus fernbedienen. Der Anschluss an das
Mischpult ist im Kapitel 4 be schrieben. Um den
Spieler auf die Faderstartart des Mischpultes
einzustellen, die Taste SCRATCH / F.START (15)
gedrückt halten und mit der Taste ❙◀ oder ▶❙
(18) „LOCK“, „CUE / PLAY“ oder „TACT“ anwählen. Die Einstellung wird in der Textzeile (N)
angezeigt. Nach dem Lösen der Tasten ist die
gewählte Faderstartart eingestellt.
LOCK = Steuerung über einen Ein- /Ausschalter
Für die meisten Mischpulte aus dem Sortiment von IMG STAGELINE muss diese Schalterposition gewählt werden. Mit dem Aufziehen des Faders wird ein Schalter im Mischpult
geschlossen, der das Abspielen startet. Beim
❙❙
Zuziehen des Faders öffnet der Schalter und
der Spieler schaltet auf Pause.
REMOTE
Abb. 5 Faderstart über Ein- /Ausschalter
TACT = Steuerung über einen Taster
Wird der Taster das erste Mal durch das
Aufziehen des Faders betätigt, startet das
Abspielen. Wird der Taster zum zweiten
Mal durch das Zuziehen des Faders betätigt,
schaltet der Spieler auf Pause.
Abb. 6 Faderstart über Taster
▶
▶
❙❙ (19) lässt
Start
Pause
1. × Start
2. × Pause
❙❙
8
Page 9

CUE PLAY = Steuerung über einen Impuls
Beim Aufziehen des Faders wird durch einen
kurzen Steuerimpuls des Mischpultes die
Wie dergabe ab dem Titelanfang (Auto-CuePunkt ☞Kapitel 5.4) oder ab dem mit der
Taste CUE (17) gesetzten Cue-Punkt (☞Ka pitel 5.8) gestartet. Beim Schließen des Faders springt der Spieler durch einen weiteren
Steuerimpuls auf diesen Startpunkt zu rück
und schaltet dort auf Pause.
REMOTE
1. × Cue Play
2. × Pause
Abb. 7 Faderstart über Steuerimpuls
6 Fernbedienung
Die beiliegende Infrarot-Fernbedienung wird mit
eingesetzter Batterie geliefert. Vor dem ersten
Betrieb auf der Rückseite der Fernbedienung die
Isolierfolie aus dem Batteriehalter ziehen.
Beim Drücken einer Taste die Fernbedienung
immer auf den Infrarot-Sensor (14) am Gerät
richten. Dabei muss Sichtverbindung zwischen
Fernbedienung und Sensor bestehen.
Die folgenden Tasten der Fernbedienung können
wie die Tasten am Gerät genutzt werden:
OPEN / CLOSE (23) [entspricht Taste (3)]
FOLDER (25)
PITCH BEND (26)
MT (27)
PITCH (28)
PLAY/ PAUSE (29)
CUE (30)
PROG. (31)
CD / USB (32)
Die Tasten SINGLE / CONT (33), TIME (34) und
SKIP ❙◀ / ▶❙ (35) lassen sich mit Einschränkungen wie die Tasten am Gerät CONT. / LIST (6),
TIME / TAG (5) und SKIP ❙◀ / ▶❙ (18) nutzen:
– Die Taste SINGLE / CONT kann nur zum Um-
schalten des Betriebsmodus genutzt werden;
das Laden von Playlists ist nicht möglich.
– Die Taste TIME kann nur zum Um schalten der
Zeitanzeige genutzt werden;
das Umschalten der ID3-Tag-Anzeige ist nicht
möglich.
– Die SKIP-Tasten ❙◀ / ▶❙ der Fernbedienung
können wie die Tasten am Gerät zur An wahl
von Titeln, Ordnern, Playlists und Partitionen
genutzt werden; zur schnellen Anwahl die
jeweilige Taste gedrückt halten.
Die Tasten können je doch nicht in Kombination mit anderen Tasten verwendet werden.
Die Zifferntasten (24) und die SCAN-Tasten ◀◀
und ▶▶ (36) können alternativ zu den Tasten
am Gerät genutzt werden:
– Die Zifferntasten können anstelle der SKIP-Tas-
ten zur Anwahl von Titeln, Ordnern, Playlists
und Partitionen verwendet werden. Die Anwahl erfolgt durch Eingabe der entsprechenden Nummer. Bei mehrstelligen Nummern die
je weiligen Zifferntasten nacheinander drücken,
z. B. bei Nummer 10 die Tasten „1” und „0”.
– Die SCAN-Tasten ◀◀ und ▶▶ dienen zum
schnellen Vor- und Rücklauf: Solange die jeweilige SCAN-Taste gedrückt gehalten wird,
läuft der Titel vor bzw. zurück.
Bei längerem Nichtgebrauch die Batterie herausnehmen, damit die Fernbedienung bei einem
eventuellen Auslaufen der Batterie nicht beschädigt wird.
6.1 Batteriewechsel
Lässt die Reichweite der Fernbedienung nach,
muss die Batterie ausgewechselt werden.
1)
Die Verriegelung des Batteriehalters nach
links drücken (1. Pfeil in Abb. 8) und gleichzeitig den Halter nach unten herausziehen
(2. Pfeil).
1.2.
Abb. 8 Batteriewechsel
2)
Die alte Batterie entfernen und eine neue einsetzen (3-V-Knopfzelle, Typ CR 2025). Dabei
darauf achten, dass der Pluspol der Batterie
im Halter nach oben zeigt.
3)
Den Halter zurück in die Fernbedienung
schieben.
Batterien dürfen nicht in den Hausmüll
geworfen werden. Geben Sie sie zur
umweltgerechten Entsorgung nur in
den Sondermüll (z. B. Sammelbehälter
im Einzelhandel).
7 Firmware aktualisieren
Die Firmware (Betriebssystem des Geräts) kann
aktualisiert werden, wenn im Internet eine neue
Version verfügbar ist.
1)
Wird auf der Homepage von IMG STAGELINE
(www.imgstageline.de) ein Firm ware-Update
für den CD-196USB angeboten, dieses herunterladen und auf einen USB-Stick kopieren.
2) Den CD / MP3-Spieler mit dem Netzschalter
(12) ausschalten.
3) Den USB-Stick mit der neuen Firmware-Version in die USB-Buchse (2) stecken.
4)
Die Taste PROG. (7) gedrückt halten und
das Gerät wieder einschalten. Die Taste
PROG. erst wieder lösen, wenn im Display
„UP dA t E“ an gezeigt wird.
5) Wenn nach dem Einlesevorgang in der Textzeile (N) „Ready“ erscheint, die Taste
drücken, um die Firmware-Aktualisierung zu
starten. Anhand der Balkenanzeige (H) und
der Textzeile kann die Aktualisierung verfolgt werden. Wird „Finish“ angezeigt, ist
die Firmware aktualisiert.
6) Das Gerät aus- und wieder einschalten.
Achtung: Die Firmware-Aktualisierung geschieht auf eigenes Risiko. Nach dem Update
kann die Funktionsweise des Geräts anders sein
als in dieser Bedienungsanleitung beschrieben.
▶
❙❙ (19)
8 Pflege des Gerätes
Das Gerät vor Staub, Vibrationen, Feuchtigkeit
und Hitze schützen. Für die Reinigung nur ein
weiches, trockenes Tuch verwenden, auf keinen
Fall Wasser oder Chemikalien.
Hinweis zu Tonaussetzern und Lesefehlern:
Zigarettenrauch und Staub dringen leicht durch
alle Öffnungen des Gerätes und setzen sich auch
auf der Optik des Laser-Abtastsystems ab. Sollte
dieser Belag zu Lesefehlern und Ton aussetzern
führen, muss das Gerät in einer Fachwerkstatt
gereinigt werden. Diese Reinigung ist kostenpflichtig, auch während der Garantiezeit!
9 Technische Daten
Frequenzbereich: . . . . . . 20 – 20 000 Hz
Klirrfaktor: . . . . . . . . . . < 0,1 %
Kanaltrennung: . . . . . . . > 75 dB
Dynamikumfang: . . . . . > 80 dB
Störabstand: . . . . . . . . . > 75 dB
Ausgänge
LINE OUT: . . . . . . . . . . 2 V
DIGITAL OUT: . . . . . . . 0,5 Vss S / PDIF
USB-Standard:. . . . . . . . 2.0
lesbare Dateisysteme: . . NTFS, FAT, HFS+
max. Anzahl von
Partitionen: . . . . . . . . . 16
Ordnern: . . . . . . . . . . 999 pro Partition,
in max. 8 Ebenen
MP3-Dateien . . . . . . . 999 pro Ordner
Anti-Shock-Speicher
Standard-Audio-CDs: . 8 s
MP3-Dateien: . . . . . . . 10 s
Stromversorgung: . . . . . 230 V/ 50 Hz
Leistungsaufnahme: . . . 15 VA
Einsatztemperatur: . . . . 0 – 40 °C
Abmessungen : . . . . . . . 482 × 90 × 270 mm
(B × H × T),
2 HE (Höhen-
einheiten)
Gewicht:
Anschlüsse
USB-Eingang: . . . . . . . Typ A
analoger Ausgang: . . . Cinch Links / Rechts
digitaler Ausgang: . . . Cinch
Faderstart: . . . . . . . . . 3,5-mm-Klinke
Änderungen vorbehalten.
. . . . . . . . . . . . 4,4 kg
Deutsch
Diese Bedienungsanleitung ist urheberrechtlich für MONACOR ® INTERNATIONAL GmbH & Co. KG geschützt. Eine Reproduktion für eigene kommerzielle Zwecke – auch auszugsweise – ist untersagt.
9
Page 10

Professional CD / MP3 Player
These operating instructions are intended for
professional DJs and non-professional users with
English
technical knowledge. Please read these operating instructions carefully prior to operating the
unit and keep them for later reference.
All operating elements and connections
described can be found on the fold-out page 3.
Contents
1 Operating Elements andConnections . 10
1.1 Front panel (fig. 1) . . . . . . . . . . . 10
1.1.1 Display (fig. 3) . . . . . . . . . . . . 11
1.2 Remote control (fig. 2) . . . . . . . . . . 11
1.3 Rear panel (fig. 4) . . . . . . . . . . . . 11
2 Safety Notes . . . . . . . . . . . . . 11
3 Applications . . . . . . . . . . . . . 12
4 Setting up and Connectingthe Unit . . 12
5 Operation . . . . . . . . . . . . . . 12
5.1 Replaying music pieces . . . . . . . . . 12
5.2 Loading play lists . . . . . . . . . . . . 12
5.3 Indication of the title information,
playing time and BPM indication . . . . . 13
5.4 Selecting the operating mode . . . . . . . 13
5.5 Short replay of a title beginning . . . . . . 13
5.6 Fast forward and reverse . . . . . . . . . 13
5.7 Precise selection of a certain spot . . . . . 13
5.8 Return to a certain spot (Cue point) . . . . 13
5.9 Changing the speed with or
without displacing the pitch . . . . . . . 13
5.10 Pitch Bend – matching the beat
between two music pieces
5.11 Effects. . . . . . . . . . . . . . . . . 14
5.11.1 Scratch effect . . . . . . . . . . . . . 14
5.11.2 Droning effect . . . . . . . . . . . . 14
5.11.3 Stutter effect . . . . . . . . . . . . . 14
5.12 Programming your personal titlesequence . 14
5.12.1 Storing and replaying atitlesequence . . 14
5.12.2 Checking a title sequence. . . . . . . . 14
5.12.3 Completing or deleting atitlesequence. . 14
5.13 Fader start . . . . . . . . . . . . . . . 14
6 Remote Control. . . . . . . . . . . . 15
6.1 Battery replacement . . . . . . . . . . . 15
7 Updating the Firmware . . . . . . . . 15
8 Maintenance of the Unit . . . . . . . 15
9 Specifications . . . . . . . . . . . . 15
. . . . . . . . 14
1 Operating Elements
andConnections
1.1 Front panel (fig. 1)
Buttons with dual functions are marked by the
symbols
for “keep button pressed”.
1 CD tray
2 USB port to insert a USB memory stick or to
3 Button to open and close the CD tray
4 Button FOLDER for MP3 mode
5 Button TIME / TAG
6 Button CONT. / LIST
7
8 Buttons PITCH BEND to adapt the beat of
9
for “press button shortly” and
connect a hard disk
1.
for the change of folder or for the change
of play list (loading of play lists ☞ item6,
button CONT. / LIST)
Shortly press the button FOLDER, the
time indication (O) goes to “FO-SEL” and
“FOLDER” (A) is shown. Select the folder
(the play list) with the button ❙◀ or ▶❙ (18)
and confirm with the button FOLDER.
2. for the change of partition, for connection of a hard disk with several partitions
Keep the button FOLDER pressed until
the time indication (O) goes to “PA-SEL”.
Select the partition with the button ❙◀
or ▶❙ (18) and confirm with the button
FOLDER.
1. for the time indication
To switch over the time indication (H, O),
shortly press the button TIME / TAG:
indication “Remain” (G)
remaining time of the title
indication “Elapse” (E)
time already played of the title
indication “Total Remain” (F, G)
remaining time of the total CD
(not possible for MP3 mode)
2. for the ID3 tag indication in case of MP3
mode
With the button TIME / TAG pressed,
switch over the text line (N) to the indication of the title, the album, the artist
(ID3 tags) or the file name with the button ❙◀ or ▶❙ (18).
1. for the selection of the operating mode
To switch over between single title replay
[indication “Single” (C)] and continuous
replay [indication “Cont.” (D)], shortly
press the button CONT. / LIST.
2. for loading play lists
With the button CONT. / LIST pressed, select the play list file format (“M3U Scan”,
“WPL Scan”, “XLM Scan”) or “Folder”
(=no play list loaded) with the button ❙◀
or ▶❙ (18) (☞chapter 5.2).
Button PROG. to compile and replay an
individual title sequence (☞chapter 5.12)
the title currently playing to the beat of
a music piece playing on another player
(☞chapter 5.10)
Button PITCH to activate / deactivate the
speed control (11) and to select the speed
adjusting range (±8 %, ±16 % or ±100 %
deviation max. from the standard speed),
the selected adjustment is shown via two
LEDs ☞item 10
10 Indication for the adjustment selected with
the PITCH button (9):
– both LEDs off:
speed control (11) deactivated
– LED 8 % lights up:
speed control activated,
adjusting range ±8 %
– LED 16 % lights up:
speed control activated,
adjusting range ±16 %
– both LEDs light up:
speed control activated,
adjusting range ±100 %
11 Control to change the playing speed [with-
out changing the pitch if the LED next to
the button MT (22) lights up]; the control is
activated when at least one LED (10) next
to the button PITCH (9) lights up.
12 POWER switch
13 Button CD / USB to switch over between CD
and USB storage medium: For this purpose,
the unit must be set to pause.
14
Infrared sensor for the remote control signals
15 Button SCRATCH / F.START
1. for the Scratch feature
To activate and deactivate the Scratch feature, shortly press the button SCRATCH /
F.START. With the feature switched on
[text line (N) shows “SCRATCH”], Scratch
effects may be created with the jog
wheel(16).
2. for the type of fader start
With the button SCRATCH / F.START kept
pressed, select the type of fader start
(“LOCK”, “CUE / PLAY” or “TACT”) with
the button ❙◀ or ▶❙ (18) [☞chapter 5.13]
16 Jog wheel
1.
for fast forward and reverse when the
button SEARCH (20) has been pressed
2.
to create scratch effects when the button
SCRATCH / F.START (15) has been pressed
3. for the function “Pitch Bend” during replay of a title (☞chapter 5.10)
4.
to precisely select a spot when the player
is set to pause
5. with the button ❙◀ or ▶❙ kept pressed for
fast selection of titles, folders, play lists
or partitions (☞item 18, buttons SKIP)
17
Button CUE for shortly playing the title
beginning (☞chapter 5.5) and for return
to a spot defined before (☞chapter 5.8)
18 Buttons SKIP ❙◀ and ▶❙
1. for the selection
– of titles,
when “TRACK” (A) is shown
▶❙ to select the next title
❙◀ to go to the title beginning.
If the button ❙◀ is pressed several times,
the unit always goes back one title.
– of folders or play lists,
when “FOLDER” (A) is shown
(☞item 4, button FOLDER)
– of partitions on the hard disk,
when “PA-SEL” (O) is shown
(☞item 4, button FOLDER)
If one of the buttons is kept pressed, the
jog wheel (16) allows a fast selection.
2. for the selection of several options with
the button TIME / TAG (5), CONT. / LIST (6),
SCRATCH / F.START (15) kept pressed
10
Page 11
19 Button PLAY / PAUSE
tween replay (LED above the button lights
up constantly) and pause (LED above the
button flashes)
20
Button SEARCH to switch the jog wheel (16)
to the function “fast forward / reverse”
21 Button BPM for the manual counting mode
of the beat counter and to switch back to
the automatic mode (
22 Button MT (master tempo) to activate and
deactivate the function for constant pitch
(☞chapter 5.9)
▶
❙❙ to switch over be-
chapter 5.3)
☞
1.1.1 Display (fig. 3)
A
when “TRACK” is shown: number of the
title (MP3 mode: number of the title in the
folder or number of the title in the play list)
when “FOLDER” is shown [after pressing the
button FOLDER (4)]: number of the folder or
number of the play list
B replay symbol
C “Single”: indicates the operating mode of
single title replay
D “Cont.”: indicates the operating mode for
continuous replay of the titles
E
“Elapse”: indicates that the time already
played of a title is displayed
F “Total”: indicates together with the indica-
tion “Remain” (G) that the remaining playing time of the CD is shown
(not possible for MP3 mode)
G
“Remain”: indicates that the remaining time
of a title is displayed. With the indication
“Total Remain” the remaining playing time
of the CD is displayed.
H
bar graph to indicate the relative playing
time of a title
I
indicates the deviation from the standard
speed in percentage
J “CD” or “USB”: indicates if a CD or a USB
storage medium has been selected.
K
“CUE”: appears when the player is set to
pause at the Cue point (☞chapters 5.4
and 5.8).
L “TITLE”, “ALBUM” or “ARTIST”: when the
respective title information (ID3 tag) in the
text line (N) is shown for an MP3 title
M when “Total” is shown above the numbers:
total number of the titles (MP3 mode: total
number of the titles in the folder or total
number of the titles in the play list)
when “Total” has disappeared [after pressing the button FOLDER (4)]: total number of
folders or total number of the play lists in
the selected file format
N text line for additional information
O
playing time indication, also see items E
and G
P indication of the beats per minute
Q
“PG”: indicates that an individual title sequence has been memorized; flashes during
programming and during replay of the title
sequence
R
“MT” (master tempo): indicates the feature
for constant pitch (☞chapter 5.9)
1.2 Remote control (fig. 2)
23 Button OPEN / CLOSE like button (3)
24 Numerical keys for the direct selection
– of titles
when “TRACK” (A) is indicated
– of folders or play lists
when “FOLDER” (A) is indicated
(☞item 4, button FOLDER)
– of partitions on the hard disk
when “PA-SEL” (O) is indicated
(☞item 4, button FOLDER)
The buttons
25 FOLDER
26 PITCH BEND
27 MT
28 PITCH
29 PLAY/ PAUSE
30 CUE
31 PROG.
32
CD / USB
correspond to the buttons of the same name
on the unit
33
Button SINGLE / CONT same as button
CONT. / LIST (6);
but loading of play lists is only possible on
the unit
34
Button TIME same as button TIME / TAG (5);
but switching over of the ID3 tag indication
is only possible on the unit
35
Buttons SKIP ❙◀ and ▶❙ same as the SKIP
buttons on the unit to select titles, folders,
play lists or partitions; for fast selection keep
the respective SKIP button pressed;
but they cannot be used in combination
with other buttons
36 Buttons SCAN ◀◀ and ▶▶ for fast forward
and reverse
1.3 Rear panel (fig. 4)
37
3.5 mm jack REMOTE for the remote control
of the function Start / Pause from a mixer
(fader start)
38
Analog audio output LINE OUT with line
level (RCA, L left / R right)
39 Digital audio output DIGITAL OUT (RCA)
40
Mains cable for connection to a socket
(230 V/ 50 Hz)
2 Safety Notes
This unit corresponds to all relevant directives of
the EU and is therefore marked with .
WARNING
Caution! Never look into the CD compart-
•
ment when the CD tray is open; laser beams
may be emitted causing eye damage.
The unit is suitable for indoor use only. Protect
•
it against dripping water, splash water and
high air humidity. The admissible ambient
temperature range is 0 – 40 °C.
Do not place any vessel filled with liquid on
•
the unit, e. g. a drinking glass.
Immediately disconnect the mains plug from
•
the socket
1. if there is visible damage to the unit or to
the mains cable,
2. if a defect might have occurred after the
unit was dropped or suffered a similar accident,
3. if malfunctions occur.
In any case the unit must be repaired by skilled
personnel.
A damaged mains cable must be replaced by
•
skilled personnel only.
Never pull the mains cable to disconnect the
•
mains plug from the socket; always seize the
plug.
No guarantee claims for the unit and no liabil-
•
ity for any resulting personal damage or material damage will be accepted if the unit is used
for other purposes than originally intended, if
it is not correctly connected or operated, or
not repaired in an expert way. Likewise, no
liability will be accepted for data loss caused
by operating errors or by a defect and for
any consequential damage of this data loss.
Important for U. K. Customers!
•
The wires in this mains lead are coloured in
ac cord ance with the following code:
blue = neutral
brown = live
As the colours of the wires in the mains lead
of this appliance may not correspond with the
coloured markings identifying the terminals in
your plug, proceed as follows:
1. The wire which is coloured blue must be
connected to the terminal which is marked
with the letter N or coloured black.
2. The wire which is coloured brown must be
connected to the terminal which is marked
with the letter L or coloured red.
The unit is supplied with hazardous mains voltage. Leave servicing to skilled personnel only!
Inexpert handling may result in
an electric shock.
If the unit is to be put out of operation
definitively, take it to a local recycling
plant for a disposal which is not harmful
to the environment.
English
11
Page 12

3 Applications
The CD / MP3 player CD-196USB has been specially designed for professional DJ applications.
English
Many functional features have precisely been
matched to this range of application, e. g. single
title replay, automatic beat counter, change of
speed without displacing the pitch, anti-shock
memory.
The CD-196USB allows to replay standard
audio CDs, audio CDs you have burnt yourself (CD-R) and CDs with titles in MP3 format.
However, problems in replaying rewritable CDs
(CD-RW) may occur depending on the CD type,
the CD burner, and the burning software used.
Via the USB port, also MP3 files from a hard
disk or USB memory stick can be replayed. The
multi-partition support of the player allows connection of hard disks of different formatting
(FAT16 / FAT32, NTFS, HFS+).
Note: Due to the large number of storage device
manufacturers and device drivers, it cannot be guaranteed that all storage media are compatible with
the CD-196USB.
4 Setting up and
Connectingthe Unit
The CD / MP3 player can be set up as a tabletop unit on an even, horizontal surface or be
mounted into a rack (482 mm / 19”). For rack
installation, 2 rack spaces (1 rack space =
44.45 mm) are required.
Prior to connecting units or changing any con-
nections, switch off the player and the units to
be connected.
1) If a digital input is provided at your mixer or
amplifier, connect it to the yellow RCA jack
DIGITAL OUT (39).
For units without digital input connect
the stereo output LINE OUT (38) – left channel L and right channel R – via the provided
cable with RCA plugs to a line input (possible
lettering of the input: LINE IN, AUX IN, CD).
2) The player can be started and set to pause
via a mixer with fader start function. For this
purpose, connect the jack REMOTE (37) via a
cable with 3.5 mm plugs to the corresponding jack of the mixer. Set the player to the
type of fader start of the mixer, ☞chapter5.13.
3) Finally connect the plug of the mains cable
(40) to a mains socket (230 V/ 50 Hz).
5 Operation
Switch on the unit with the POWER switch (12).
The display shortly shows “boot” (starting procedure) and WELCOME. Each time the unit is
switched on, the CD player mechanism is automatically selected. If there is no CD in the player
mechanism, the unit changes to the USB port.
If no USB storage medium has been connected,
“no dISC” (no CD) is displayed.
Switch off the unit with the POWER switch
after operation. The following adjustments remain stored for the next operation:
– the operating mode selected
– the playing time indication selected ☞chap-
ter5.3
– the speed adjusting range selected ☞chap-
ter5.9
The unit can be operated via the buttons on the
unit or via the remote control. Chapter 5 only
chapter 5.4
☞
refers to the operation via the buttons on the
unit. Chapter 6 includes all information about
the remote control.
5.1 Replaying music pieces
1) To insert a CD, open the CD tray (1) with the
button (3). Insert the CD with the lettering
facing upwards and close the CD tray with
the button
Additionally or alternatively, a USB memory stick can be inserted into the USB port
(2) or a hard disk (if required, with a power
supply of its own) can be connected to the
USB port.
2)
To switch over between CD and USB storage
medium, press the button CD / USB (13). For
this purpose, the player must be set to pause;
if required, press the button
selected data carrier is shown on the display:
“CD” or “USB” (J).
3)
After reading in a data carrier, the player
is set to pause at the first title. The display
shows the number of the title (MP3 mode:
the number of the title in the folder) under
the indication “TRACK” (A) and the total
number of the titles (MP3 mode: the total
number of the titles in the folder) under the
indication “Total” (M).
If several partitions are provided on a hard
disk, proceed as follows to select another
partition:
a) Keep the button FOLDER (4) pressed until
the time indication (O) of the display goes
to “PA-SEL”. The text line (N) shows the
name of the present partition.
b)
Select the partition with the button ❙◀
or ▶❙ (18). If one of the buttons is kept
pressed, the partitions can quickly be selected with the jog wheel (16).
c) To confirm, press the button FOLDER.
Note about partitions with several folders:
If the partition is not changed after calling the
partition selection mode but the present partition
is confirmed with the button FOLDER, the display
shows “FO-SEL”, the insertion “FOLDER” (A) and
the number of the folders (M). If now one of the
SKIP buttons (18) is pressed, the player changes to
the folder selection mode and the desired folder
can be selected ☞ step 4.
4)
If for MP3 mode the titles are sorted into
different folders, proceed as follows to select
another folder:
a)
Press the button FOLDER (4). The time
indication (O) goes to “FO-SEL”. The display field (A) changes from “TRACK” to
“FOLDER” and now shows the number
of the present folder. The display field (M)
shows the total number of the folders.
b) Select the folder with the button ❙◀ or ▶❙.
If one of the buttons is kept pressed, the
folders can quickly be selected with the
jog wheel (16).
c)
To confirm the selection, press the button FOLDER; the display changes to the
indication of the playing time (O) and the
indication “TRACK” (A).
5)
To start the first title, press the button
(19). During the replay, ▶ (B) is shown and
the LED above the button lights up constantly. The replay can be interrupted at any
time and continued with the button
the pause mode the LED above the button
flashes.
.
▶
❙❙
(19). The
▶
▶
❙❙. In
To select another title, use the buttons ❙◀
and ▶❙ (18):
Button ▶❙ : To go to the next title
Button ❙◀ : To go to the beginning of the title
presently playing. Each time the button is
pressed, the unit always goes back one title.
If one of the buttons is kept pressed, the
titles can quickly be selected with the jog
wheel (16).
6) During replay of a CD the CD tray is locked.
To change a CD, first set the unit to pause
with the button
▶
❙❙, then press the button
to open the tray.
During replay of a USB storage medium
the CD tray can, however, be opened.
7) To switch off the unit, always close the CD
tray with the button
to protect the laser
system against impurities.
5.2 Loading play lists
To replay a certain selection of MP3 files, it is
possible to load play lists with the file extension
“wpl”, “xml” or “m3u” created on a computer
into the player.
Important: The play list and the corresponding
MP3 files must be on the same storage medium.
The play lists must always be stored in the root
directory.
1) The player must be set to pause; if required,
press the button
2) Keep the button CONT. / LIST (6) pressed and
select with the button ❙◀ or ▶❙ (18) which
play list file format is searched for. The text
line (N) shows the selection: “M3U Scan”,
“WPL Scan”, “XML Scan” (When selecting
the fourth option “Folder”, no play list will
be loaded).
After releasing the buttons, the first play
list is loaded. The display shows the number
of the title in the play list under the indication “TRACK” (A) and the total number of
the titles in the play list under the indication
“Total” (M).
Note: If no play lists are found, the display shows
“no FILE”. Then keep the button CONT. / LIST
pressed and select with the button ❙◀ or ▶❙ either
another file format or the option “Folder” to return
to the folder replay mode.
3) If several play lists are available, proceed as
follows to select another play list:
a)
Press the button FOLDER (4). The time
indication (O) goes to “FO-SEL”. The display field (A) changes from “TRACK” to
“FOLDER” and now shows the number of
the present play list. The display field (M)
shows the total number of the play lists
in the selected file format.
b) Select the play list with the button ❙◀ or
▶❙ . If one of the buttons is kept pressed,
the play lists can quickly be selected with
the jog wheel (16).
c) To confirm the selection, press the button
FOLDER. The display changes to the playing time indication (O) and the indication
“TRACK” (A).
❙❙
4) Start the replay of the first title or select another title of the play list ☞chapter 5.1,
step 5.
5) To play the titles again without play list, set
the unit to pause with the button
the button CONT. / LIST pressed and press
▶
❙❙ (19).
▶
❙❙. Keep
12
Page 13

the button ❙◀ or ▶❙ repeatedly until “Folder”
appears in the text line. After releasing the
buttons, no more play list is loaded.
5.3 Indication of the title information, playing time and BPM indication
1. Information about the title are indicated
in the text line (N):
– for standard audio CDs with CD text: the
title name
– for MP3 mode: the file name
The text line can be switched over to the
indication of the following information (ID3
tags). For this purpose keep the button
TIME / TAG (5) pressed and select with the
button ❙◀ or ▶❙ (18):
Indication (L)
TITLE = name of title
ALBUM = name of album
ARTIST = name of artist
none = file name
With the button FOLDER (4) it is possible
to switch over the text line between the
indication of the respective title information and the indication of the name of the
folder (or, when a play list is loaded, the
name of the play list).
2.
The playing time of the title is displayed
as a numeric indication (O); the seconds are
subdivided in 75 frames. In addition, the bar
graph (H) represents the playing time, referred to the duration of the title, graphically
by its length (relative time presentation). The
last 30 seconds of a title are indicated by the
bar graph flashing in its full length, the last
15 seconds are indicated by faster flashing.
The playing time indication can be switched
over with the button TIME / TAG (5):
– If “Elapse” (E) is shown, the time already
played of the title is indicated.
– If “Total Remain” (F, G) is shown, the re-
maining time of the entire CD is indicated
(not possible for MP3 mode).
– If “Remain” (G) is shown, the remaining
time of the title is indicated.
3.
After selecting a title, the beat counter automatically determines the number of beats per
minute (BPM). After a short time the number
appears in the BPM indication (P). If the
beat counter cannot determine a correct
value (e. g. for quiet music titles), the value
can also be determined manually:
a) Shortly press the button BPM (21) several
times to the beat of the music (4 times as
a minimum). The number of beats appears
and the indication “BPM” flashes to show
the manual counting mode.
b) To switch back to the automatic counting
mode, keep the button BPM pressed until
the indication “BPM” stops flashing.
5.4 Selecting the operating mode
To switch over between single title replay
[indication “Single” (C)] and continuous replay [indication “Cont.” (D)], press the button
CONT. / LIST (6).
1.
For the single title replay the unit is
switched to pause after replay of each title.
This mode is especially provided for DJ
applications. If this mode has been adjusted,
after selecting a title, the player will be set to
pause precisely on the spot where the music
starts (mostly not at the time index 0:00:00
but some frames later, e. g. 0:00:15). This
spot will be automatically stored as a starting
point (Auto Cue point) and shown on the
display by the indication “CUE” (K). After
starting the title, it is possible to return to
this starting point with the button CUE (17).
After replaying a title, the unit will be set to
pause precisely on the spot where the music
of the next title starts. This spot will then be
stored as a new starting point.
2.
For the continuous replay all titles (MP3
mode: all titles of the folder or play list) are
played continuously one after the other,
i. e. after the last title the first title restarts.
While replaying and when selecting titles, no
Auto-Cue points are set.
Note: In some cases also in the mode “continuous
replay” an Auto-Cue point is set (however, not
exactly according to frame at the start of music
but at the time index 0:00:00), e. g. after reading
in a data carrier.
5.5 Short replay of a title beginning
The button CUE (17) allows the short replay of
a title beginning as long as this button is kept
pressed. After releasing the button, the unit will
return to the title beginning and is set to pause.
1) The player must be set to single title replay:
indication “Single” (C). If “Cont.” (D) is
shown, press the button CONT. / LIST (6).
2) Select the title (selection of title and folder
or play list ☞chapter 5.1 or 5.2).
3) By keeping the button CUE pressed, shortly
replay the title beginning.
4) To replay the title, press the button
▶
❙❙ (19).
5.6 Fast forward and reverse
For fast forward or reverse of a title, first press
the button SEARCH (20). “SEARCH” will be indicated in the text line (N). Turn the jog wheel (16)
into the corresponding direction. The forward /
reverse speed depends on the turning speed of
the wheel.
To switch off the function, press the button SEARCH again (indication “SEARCH” disappears). In the replay mode, the function will
automatically be switched off 8 seconds after
actuating the wheel the last time.
Note: In the pause mode, the current spot is constantly
repeated after fast forward or reverse. To stop the
repeat, either press the button CUE (17) shortly twice
(new Cue point is set, ☞ chapter 5.8) or start the
replay with the button
▶
❙❙ (19).
5.7 Precise selection of a certain spot
A spot in the title can be selected with the precision of 1 frame (¹⁄ 75 second) if e. g. for starting
the replay from a certain spot instead of starting
it from the beginning of a title.
1) When the desired spot is roughly reached by
replaying the title or by using fast forward /
reverse (☞ chapter 5.6), set the unit to pause
with the button
2) Precisely select the spot by turning the jog
wheel (16) clockwise and counter-clockwise.
For an acoustic check the adjusted spot will
be constantly repeated.
3)
When the desired spot has been found,
shortly press the button CUE (17) twice. Thus,
the spot will be stored and repeating will end.
The replay can now be started from this point
with the button
▶
▶
❙❙ (19).
❙❙ .
5.8 Return to a certain spot (Cue point)
To be able to quickly go to a certain spot, a
starting point (Cue point) can be stored with
the button CUE (17). However, in the single title
replay mode, this point will be overwritten with
the starting point (Auto-Cue point) of the next
title when the next title is reached or selected
[if required, switch over to total title replay with
the button CONT. / LIST (6)].
Note: The Cue point stored will be deleted:
– when selecting another folder (or another play list)
– when switching over between CD and USB storage
medium
– when switching off the unit
1) While replaying, set the unit to pause with
the button
▶
❙❙
(19) when the spot is reached
to which the unit is to return later. The LED
above the button CUE (17) flashes.
2)
If required, use the jog wheel (16) to go
to the precise spot (☞chapter 5.7). After
turning the wheel, the spot is permanently
repeated.
3)
Press the button CUE. Thus, the spot is memorized as a Cue point. “CUE” (K) is indicated
on the display and the LED above the button CUE lights up continuously. To stop the
repeated replay of the spot, the button CUE
can be pressed again.
4) Restart the replay with the button
5)
With the button CUE it is now possible to
▶
❙❙ .
return to the Cue point. After the return,
CUE is inserted on the display and the player
is set to pause.
6) Start the replay with the button
▶
❙❙ or keep
the button CUE pressed as long as the title
is to be played. After releasing the button
CUE, the player goes back to the Cue point
and is set to pause.
5.9 Changing the speed with or without displacing the pitch
The speed can be changed with the sliding control (11) up to ±100 %:
+100 % = double speed
−100 % = standstill
1) Select the adjusting range with the button
PITCH (9). The adjustment selected with the
button PITCH is shown via the two LEDs (10)
next to the button:
– both LEDs off:
speed control deactivated,
the title is played at standard speed
– LED 8 % lights up:
speed control activated,
adjusting range ±8 %
– LED 16 % lights up:
speed control activated,
adjusting range ±16 %
– both LEDs light up:
speed control activated,
adjusting range ±100 %
In addition, each time the button PITCH
is pressed, the text line (N) shortly shows
the selected adjustment: “Pitch 8 %”,
“Pitch 16 %”, “Pitch 100” or “Pitch off”.
2)
Adjust the speed with the sliding control. The
display will show the percentage deviation
from the standard speed on the top right
(l). The number of beats per minute (P) will
change accordingly.
3)
When the speed is changed, the pitch will
also change proportionally. However, for a
English
13
Page 14

constant pitch, press the button MT (22).
REMOTE
The display will show the indication “MT” (R)
and the LED next to the button MT lights up.
To switch off the function, press the button
English
MT again.
5.10 Pitch Bend – matching the beat between two music pieces
When operating two CD / MP3 players, the beats
of two music pieces with the same speed can
be synchronized precisely. Thus, the dancing
rhythm will not be interrupted when crossfading
from one unit to the other.
1) First use the speed control (11) to adapt the
speed of the music piece to which crossfading is desired to the speed of the current
music piece. For this purpose, set the same
number of beats per minute with the sliding
control, see indication (P) at the bottom on
the right of the display.
2)
Synchronize the beats of the music piece
to which crossfading is desired to the beats
of the current music piece with the buttons
PITCH BEND (8): As long as the button +
or − is kept pressed, the replay of the title will
be by 16 % faster or slower. Thus, the beats
will be displaced with respect to the beats of
the current music piece.
3)
The beats will also be displaced when the jog
wheel (16) is turned.
5.11 Effects
5.11.1 Scratch effect
For creating a scratch effect (corresponding to
manual turning of a turntable platter) press the
button SCRATCH / F.START (15) and turn the jog
wheel (16) back and forth accordingly. The text
line (N) will show “SCRATCH”. To deactivate the
function, press the button SCRATCH / F. START
once again.
5.11.2 Droning effect
If the function Master Tempo (constant pitch)
has been activated [indication “MT” (R) on the
display and LED next to the button MT (22) lights
up], deactivate it with the button MT. Turn the
jog wheel (16) back and forth to increase or
decrease the replay speed alternately. This will
create a droning effect.
5.11.3 Stutter effect
The Cue point stored with the button CUE (17)
(☞chapter 5.8) can be used to create a stutter
effect: When the button CUE is shortly pressed
several times, a stutter effect will be created.
The more suitable the Cue point (e. g. start of
an instrument or beginning of a word), the more
impressive the effect.
5.12 Programming your personal
titlesequence
The CD / MP3 player offers the possibility to programme an individual sequence of titles with
99titles as a maximum. With MP3 mode, the
titles can be compiled from different folders or
play lists. However, different from a play list,
the programmed title sequence cannot be
called without limitation but will be deleted
after switching over to another data carrier or
switching off the unit.
5.12.1 Storing and replaying
atitlesequence
1)
If a title is replayed, first set the unit to pause
with the button
▶
❙❙ (19).
2) Switch to the programming mode with the
button PROG. (7). The time indication (O)
goes to the indication of the first storage
location “P-01”. The indication “PG” (Q)
flashes quickly.
Note: To exit this mode immediately, keep the
button PROG. pressed until the display shows the
playing time (O) again.
3)
Select the first title for the title sequence (selection of title and folder or play list ☞chapter 5.1 or 5.2).
4) To confirm the title selection, press the but-
ton PROG. The next memory location “P- 02”
is indicated.
5) Repeat the steps 3 and 4 until the title se-
quence will be complete. If you try to store
another title after 99 titles have been stored,
the message “FULL” will appear.
6)
To replay the title sequence, press the button
▶
❙❙ . The indication “PG” flashes more slowly.
The display shows the number of the title (A)
in the title sequence and the total number
(M) of the programmed titles.
The titles are replayed depending on the
operating mode selected (☞chapter 5.4).
7)
To return to the standard replaying mode,
set the unit to pause with the button
▶
and keep the button PROG. pressed until the
indication “PG” stops flashing.
To replay the title sequence once again,
set the unit to pause and press the button
PROG. so that the indication “PG” flashes
again. Then start the title sequence with the
button
▶
❙❙ .
Note: As long as the indication “PG” flashes or lights
up constantly, the title sequence can be called. If “PG”
is not displayed any more, the title sequence has been
deleted.
5.12.2 Checking a title sequence
1)
If a title is replayed, first set the unit to pause
with the button
▶
❙❙ (19).
2) If the indication “PG” (Q) flashes now, press
the button PROG. (7) once. If the indication
“PG” lights up constantly, press the button
PROG. twice.
3)
Select the storage locations (“P-01” … “P-99”)
successively with the button ❙◀ or ▶❙ (18).
The name of the title stored in each case is
indicated in the text line (N).
4) To replay the title sequence, press the button
▶
❙❙ .
5.12.3 Completing or deleting
atitlesequence
1)
If a title is replayed, first set the unit to pause
with the button
2) If the indication “PG” (Q) flashes, keep the
button PROG. (7) pressed until “PG” stops
flashing.
3)
Shortly press the button PROG. so that “PG”
flashes quickly and the time indication (O) is
switched over to the indication of the next
free storage location “P-…”.
4) To delete the complete title sequence, press
the button PROG. until the display indicates
▶
❙❙ (19).
the playing time (O) again. To add another
title, select the desired title (selection of title
and folder or play list ☞chapter 5.1 or 5.2)
and confirm with the button PROG. To replay the completed title sequence, press the
button
▶
❙❙ .
5.13 Fader start
The function Start / Pause of the button
can be remote-controlled from a mixer with
fader start function. The connection to the mixer
is described in chapter 4. To adjust the player
to the type of fader start of the mixer, keep the
button SCRATCH / F.START (15) pressed and select “LOCK”, “CUE / PLAY” or “TACT” with the
button ❙◀ or ▶❙ (18). The adjustment is shown in
the text line (N). After releasing the buttons, the
selected type of fader start is adjusted.
LOCK = control via an on / off switch
This switch position must be selected for
most mixers of the IMG STAGELINE range.
By advancing the fader, a switch starting the
replay will be closed in the mixer. When the
fader is closed, the switch will open and thus
set the player to pause.
Fig. 5 Fader start via on / off switch
❙❙
TACT = control via a momentary pushbutton
When the momentary pushbutton is actuated for the first time by advancing the fader,
the replay will start. When the momentary
pushbutton is actuated for the second time
by closing the fader, the player will be set
to pause.
REMOTE
Fig. 6 Fader start via momentary pushbutton
CUE PLAY = control via a pulse
When the fader is advanced, the replay will
be started from the title beginning (Auto Cue
point ☞chapter 5.4) or from the Cue point
set with the button CUE (17) [☞chapter 5.8]
by a short control pulse of the mixer. When
the fader is closed, the player will return to
this starting point by another control pulse
and will be set to pause there.
REMOTE
Fig. 7 Fader start via control pulse
▶
❙❙ (19)
Start
Pause
1. × Start
2. × Pause
1. × Cue Play
2. × Pause
14
Page 15

6 Remote Control
The infrared remote control provided is supplied
with a battery inserted. Prior to the first operation, remove the insulating foil from the battery
support on the rear side of the remote control.
When pressing a button, always direct the
remote control towards the infrared sensor (14)
on the unit. There must be no obstacles between
remote control and sensor.
The following buttons of the remote control can
be used like the buttons on the unit:
OPEN / CLOSE (23) [corresponds to button (3)]
FOLDER (25)
PITCH BEND (26)
MT (27)
PITCH (28)
PLAY / PAUSE (29)
CUE (30)
PROG. (31)
CD / USB (32)
The buttons SINGLE / CONT (33), TIME (34) and
SKIP ❙◀ / ▶❙ (35) can be used with limitations
like the buttons on the unit CONT. / LIST (6),
TIME / TAG (5) and SKIP ❙◀ / ▶❙ (18):
– The button SINGLE / CONT can only be used
for switching over the operating mode;
it is not possible to load play lists.
– The button TIME can only be used for swit-
ching over the time indication;
it is not possible to switch over the ID3 tag
indication.
– The SKIP buttons ❙◀ / ▶❙ of the remote control
can be used like the buttons on the unit for
selection of titles, folders, play lists and partitions; for fast selection keep the respective
button pressed.
However, the buttons cannot be used in combination with other buttons.
The numerical keys (24) and the SCAN buttons
◀◀ and ▶▶ (36) can be used as an alternative
to the buttons on the unit:
– The numerical keys can be used instead of the
SKIP buttons to select titles, folders, play lists
and partitions. The selection is made by the
input of the corresponding number. In case
of numbers of several digits, press the corresponding numerical keys one after the other,
e. g. the buttons “1” and “0” for number 10.
– The SCAN buttons ◀◀ and ▶▶ serve for fast
forward and reverse: As long as the respective
SCAN button is kept pressed, the title is played
forward or backward.
6.1 Battery replacement
If the range of the remote control decreases, the
battery must be replaced.
1)
Press the locking of the battery support to the
left (1st arrow in fig. 8) and at the same time
remove the support downwards (2nd arrow).
1.2.
Fig. 8 Battery replacement
2)
Remove the old battery and insert a new
one (3 V button cell, type CR 2025). Ensure
that the positive pole of the battery shows
upwards in the support.
3) Slide back the support into the remote control.
Used batteries must not be placed
in the household waste; always take
them to a special waste disposal, e. g.
collection container at your retailer.
7 Updating the Firmware
If a new firmware (operating system of the unit)
is available on the Internet, the firmware of your
unit may be updated:
1) If a firmware update for the CD-196USB is
offered on the home page of IMG STAGELINE (www.imgstageline.com), download
and copy it onto a USB memory stick.
2)
Switch off the CD / MP3 player with the power
switch (12).
3)
Insert the USB memory stick with the new
firmware version into the USB port (2).
4)
Keep the button PROG. (7) pressed and
switch on the unit again. Do not release the
button PROG. until “UP dA t E” is shown on
the display.
5) After reading in, when “Ready” appears in
the text line (N), press the button
to start the firmware update. By means of
the bar graph indication (H) and the text line
the update can be observed. When “Finish”
is shown, the firmware has been updated.
6) Switch off the player and switch it on again.
Attention: The firmware update is made at your
own risk. After the update the way of functioning of the unit may be different from that
described in this manual.
▶
❙❙
(19)
8 Maintenance of the Unit
Protect the unit from dust, vibrations, humidity
and heat. For cleaning only use a dry, soft cloth,
never use water or chemicals.
Note concerning sound interruptions and
reading errors:
Cigarette smoke and dust will easily penetrate
through all openings of the unit and also settle
on the optics of the laser sampling system. If this
deposit should cause reading errors and sound
interruptions, the unit must be cleaned by skilled
personnel. This cleaning will be charged, even
during the warranty period!
9 Specifications
Frequency range: . . . . . 20 – 20 000 Hz
THD: . . . . . . . . . . . . . . . < 0.1 %
Channel separation: . . . > 75 dB
Dynamic range: . . . . . . . > 80 dB
S / N ratio: . . . . . . . . . . . > 75 dB
Outputs
LINE OUT: . . . . . . . . . . 2 V
DIGITAL OUT: . . . . . . . 0.5 Vpp S / PDIF
USB standard: . . . . . . . . 2.0
Readable file systems: . . NTFS, FAT, HFS+
Max. number of
partitions: . . . . . . . . . . 16
folders: . . . . . . . . . . . . 999 per partition,
in 8 levels max.
MP3 files: . . . . . . . . . . 999 per folder
Anti-shock memory
standard audio CDs: . . 8 s
MP3 files: . . . . . . . . . . 10 s
Power supply: . . . . . . . . 230 V/ 50 Hz
Power consumption: . . . 15 VA
Ambient temperature: . . 0 – 40 °C
Dimensions: . . . . . . . . . 482 × 90 × 270 mm
(W × H × D),
2 RS (rack spaces)
Weight: . . . . . . . . . . . . 4.4 kg
Connections
USB input: . . . . . . . . . type A
analog output: . . . . . . RCA Left / Right
digital output: . . . . . . RCA
fader start: . . . . . . . . . 3.5 mm connector
English
If the remote control is not used for a longer
period of time, remove the battery so that the
remote control will not be damaged if the battery should leak.
Subject to technical modification.
All rights reserved by MONACOR ® INTERNATIONAL GmbH & Co. KG. No part of this instruction manual
may be reproduced in any form or by any means for any commercial use.
15
Page 16

Lecteur CD / MP3 professionnel
Cette notice s’adresse aux DJs professionnels et
à des amateurs avertis. Veuillez lire la présente
notice avec attention avant le fonctionnement
Français
et conservez-la pour pouvoir vous y reporter
ultérieurement.
Vous trouverez sur la page 3, dépliable, les
éléments et branchements décrits.
Table des matières
1 Eléments et branchements . . . . . . 16
1.1 Face avant (schéma 1) . . . . . . . . . . 16
1.2 Affichage (schéma 3) . . . . . . . . . . 17
1.3 Télécommande (schéma 2) . . . . . . . . 17
1.4 Face arrière (schéma 4) . . . . . . . . . 17
2 Conseils d’utilisation etdesécurité . . 17
3 Possibilités d’utilisation. . . . . . . . 18
4 Positionnement de l’appareil et
branchements . . . . . . . . . . . . 18
5 Utilisation . . . . . . . . . . . . . . 18
5.1 Lecture de morceaux de musique . . . . . 18
5.2 Chargement de listes de lecture . . . . . . 18
5.3 Affichage des informations de titre,
deladuréeetBPM . . . . . . . . . . . 19
5.4 Sélection du modedefonctionnement . . . 19
5.5 Brève lecture du début d’un titre . . . . . 19
5.6 Avance et retour rapides . . . . . . . . . 19
5.7 Positionnement précis à unendroitdonné . 19
5.8 Retour à un endroit donné (PointCue) . . . 19
5.9 Modification de la vitesse avec ou sans
déplacement delahauteur tonale . . . . . 19
5.10 Pitch Bend – adaptation du rythme entre
deuxmorceaux de musique. . . . . . . . 20
5.11 Création d’effets . . . . . . . . . . . . 20
5.11.1 Effet Scratch . . . . . . . . . . . . . 20
5.11.2 Effet bourdonnement . . . . . . . . . 20
5.11.3 Effet bégaiement . . . . . . . . . . . 20
5.12 Programmation d’une
suitepersonnelle detitres . . . . . . . . 20
5.12.1 Mémoriser et lire une suite de titres . . . 20
5.12.2 Vérification de la suite de titres . . . . . 20
5.12.3 Compléter ou effacer unesuitedetitres . 20
5.13 Démarrage électrique . . . . . . . . . . 20
6 Télécommande . . . . . . . . . . . . 21
6.1 Remplacement de la batterie . . . . . . . 21
7 Actualisation du Firmware . . . . . . 21
8 Entretien de l’appareil . . . . . . . . 21
9 Caractéristiques techniques. . . . . . 21
1 Eléments et branchements
1.1 Face avant (schéma 1)
Les touches avec doubles fonctions sont représentées par les symboles pour «brève pression
sur la touche» et par pour «touche maintenue enfoncée».
1 Tiroir CD
2 Port USB pour insérer une clé USB ou pour
brancher un disque dur
3 Touche pour ouvrir et fermer le tiroir CD
4 Touche FOLDER en mode MP3
1.
Pour le changement de dossiers ou
pour le changement de listes de lecture
(chargement de listes de lecture, ☞ position6, touche CONT. / LIST)
Appuyez brièvement sur la touche FOLDER, l’indication de durée (O) passe sur
«FO-SEL» et «FOLDER» (A) est affiché.
Avec la touche ❙◀ ou ▶❙ (18), sélectionnez
le dossier (la liste de lecture) et confirmez
avec la touche FOLDER.
2. Pour le changement de partitions si vous
branchez un disque dur avec plusieurs
partitions.
Maintenez la touche FOLDER enfoncée
jusqu’à ce que l’indication de durée (O)
passe à «PA-SEL». Avec la touche ❙◀ ou
▶❙
(18), sélectionnez la partition et confir-
mez avec la touche FOLDER.
5 Touche TIME / TAG
1. Pour l’affichage de durée
Pour commuter l’indication de durée
(H,O), appuyez brièvement sur la touche
TIME / TAG :
affichage «Remain» (G)
durée restante d’un titre
affichage «Elapse» (E)
durée déjà lue du titre
affichage «Total Remain» (F, G)
durée restante de tout le CD
(pas possible en mode MP3)
2.
Pour l’affichage ID3-Tag en mode MP3 :
Lorsque la touche TIME / TAG est maintenue enfoncée, commutez avec la touche
❙◀
ou ▶❙ (18), la ligne de texte (N) sur
l’affichage du titre, album, artiste (ID3Tags) ou nom du fichier.
6 Touche CONT. / LIST
1. Pour la sélection du mode de fonctionnement
Pour commuter entre lecture titre par titre
[affichage «Single» (C)] et lecture continue [affichage «Cont.» (D)], enfoncez la
touche CONT. / LIST brièvement.
2. Pour charger les listes de lecture
En maintenant la touche CONT. / LIST enfoncée, sélectionnez avec la touche ❙◀ ou
▶❙ (18) le format de fichier de la liste de
lecture («M3U Scan», «WPL Scan», «XML
Scan») ou «Folder» (= aucune liste de
lecture chargée) (☞ chapitre 5.2).
7
Touche PROG. pour composer et lire une
suite personnelle de titres (☞ chapitre 5.12)
8
Touches PITCH BEND pour adapter le rythme
du titre en cours au rythme d’un autre morceau de musique lu sur un autre lecteur
(☞chapitre 5.10)
9 Touche PITCH pour activer / désactiver le ré-
glage de vitesse (11) et pour sélectionner
la plage de réglage de la vitesse (déviation
maximale ±8 %, ±16 %, ±100 % de la vitesse normale),
le réglage sélectionné est indiqué par les
deux LEDs, ☞position 10
10 Affichage pour le réglage sélectionné avec
la touche PITCH (9) :
les deux LEDs éteintes :
–
réglage de vitesse (11) désactivé
la LED 8 % brille :
–
le réglage de vitesse est activé,
plage de réglage ±8 %
– la LED 16 % brille :
le réglage de vitesse est activé,
plage de réglage ±16 %
– les deux LEDs brillent :
le réglage de vitesse est activé,
plage de réglage ±100 %
11
Potentiomètre pour modifier la vitesse de lecture [sans modification de la hauteur tonale
lorsque la LED à côté de la touche MT (22)
brille] ; le réglage est activé, si une LED (10)
à côté de la touche PITCH (9) au moins brille.
12 Interrupteur POWER marche / arrêt
13
Touche CD / USB pour commuter entre CD
et support de stockage USB ; l’appareil doit
être sur Pause.
14
Capteur infrarouge pour les signaux de la
télécommande
15 Touche SCRATCH / F.START
1. Pour la fonction Scratch
Pour activer et désactiver la fonction
Scratch, appuyez brièvement sur la
touche SCRATCH / F.START. Lorsque la
fonction est activée [la ligne de texte (N)
indique «SCRATCH»], on peut créer des
effets Scratch avec la molette (16).
2. Pour le type de démarrage à distance
Lorsque la touche SCRATCH / F.START est
maintenue enfoncée, sélectionnez avec la
touche ❙◀ ou ▶❙ (18), le type de démarrage électrique («LOCK», «CUE / PLAY»
ou «TACT») (☞chapitre 5.13).
16 Molette
1. Pour l’avance et retour rapide lorsque la
touche SEARCH (20) a été enfoncée
2.
Pour créer des effets Scratch lorsque la
touche SCRATCH / F.START (15) a été enfoncée
3.
Pour la fonction «Pitch Bend» pendant
la lecture d’un titre (☞chapitre 5.10)
4. Pour un positionnement exact à un endroit lorsque le lecteur est sur pause
5.
Lorsque la touche ❙◀ ou ▶❙ est maintenue
enfoncée, pour une sélection rapide de
titres, dossiers, listes de lecture ou partitions (☞position 18, touches SKIP)
17
Touche CUE pour lire les premières notes
d’un titre (☞chapitre 5.5) et pour revenir
à un endroit préalablement défini (☞chapitre 5.8)
18 Touches SKIP ❙◀ et ▶❙
1. Pour la sélection :
de titres
–
lorsque «TRACK» (A) est affiché
▶❙ pour sélectionner le titre suivant
❙◀ pour revenir au début du titre.
Par plusieurs pressions sur la touche ❙◀ ,
vous reculez toujours d’un titre.
– de dossiers ou listes de lecture
lorsque «FOLDER» (A) est affiché,
(☞position 4, touche FOLDER)
16
Page 17

– de partitions sur le disque dur,
lorsque «PA-SEL» (O) est affiché
(
position 4, touche FOLDER)
☞
Si une des touches est maintenue enfoncée, on peut effectuer une sélection
rapide avec la molette (16).
2. Pour la sélection entre plusieurs options
si la touche TIME / TAG (5), CONT. / LIST
(6), SCRATCH / F.START (15) est maintenue
enfoncée
19
Touche PLAY / PAUSE
entre lecture (la LED au-dessus de la touche
brille en continu) et pause (la LED au-dessus
de la touche clignote)
20 Touche SEARCH pour commuter la molette
(16) sur la fonction “avance / retour rapides”
21
Touche BPM pour le mode de comptage
manuel du compteur de beats et pour revenir au mode automatique (
22
Touche MT (Master-Tempo) pour activer
et désactiver la fonction pour une hauteur
tonale constante (☞chapitre 5.9)
▶
❙❙ pour commuter
chapitre 5.3)
☞
1.2 Affichage (schéma 3)
A Si «TRACK» est visible: numéro du titre (en
mode MP3: numéro du titre dans le dossier
ou numéro du titre dans la liste de lecture)
Si «FOLDER» est affiché [après avoir appuyé
sur la touche FOLDER (4)] : numéro du dossier ou numéro de la liste de lecture
B Symbole du mode lecture
C
Affichage «Single»: indique le mode de
fonctionnement titre par titre
D
Affichage «Cont.»: indique le mode de
fonctionnement de lecture continue de
tous les titres
E Affichage «Elapse»: indique la durée déjà
lue d’un titre
F Affichage «Total»: indique avec l’affichage
«Remain” (G) la durée restante du CD
(pas possible en mode MP3)
G
Affichage «Remain» : indique la durée
res tante d’un titre. Si «Total Remain» est
affiché, la durée restante du CD est mentionnée.
H
Bargraphe pour visualiser la durée relative
d’un titre
I Affichage de la déviation de la vitesse no-
minale en pourcentage
J Affichage «CD» ou «USB»: indique si un
CD ou un support de mémoire USB est sélectionné.
K
Affichage «CUE» : s’affiche lorsque le
lecteur est en mode Pause au point Cue
(☞chapitre 5.4 et 5.8)
L Affichage «TITLE», «ALBUM» ou «ARTIST»
lorsque pour un titre MP3, l’information
correspondante (ID3-Tag) est affichée dans
la ligne de texte (N)
M
Si «Total» est affiché au-dessus des chiffres:
nombre total de titres (en mode MP3 :
nombre total de titres dans le dossier ou
nombre total de titres dans la liste de lecture)
Si «Total» n’est pas affiché [après avoir appuyé sur la touche FOLDER (4)] : nombre
total de dossiers ou nombre total de listes de
lecture dans le format sélectionné de fichier
N Ligne de texte pour des informations sup-
plémentaires
O Affichage de la durée, voir position E et G
P Affichage du nombre de beats par minute
Q
Affichage «PG»: indique qu’une suite de
titres personnelle est mémorisée ; s’il clignote, une suite personnelle de titres est
programmée ou lue
R
Affichage «MT» (Master-Tempo): indique la
fonction pour la hauteur tonale constante
(☞chapitre 5.9)
1.3 Télécommande (schéma 2)
23 Touche OPEN / CLOSE, comme touche (3)
24
Touches numériques pour la sélection directe
– de titres
lorsque «TRACK» (A) est affiché
de dossiers ou listes de lecture
–
lorsque «FOLDER» (A) est affiché
(☞position 4, touche FOLDER)
de partitions sur un disque dur
–
lorsque «PA-SEL» (O) est affiché
(☞position 4, touche FOLDER).
Les touches
25 FOLDER
26 PITCH BEND
27 MT
28 PITCH
29 PLAY/ PAUSE
30 CUE
31 PROG.
32 CD / USB
correspondent aux touches du même nom
sur l’appareil
33
Touche SINGLE / CONT comme la touche
CONT. / LIST (6);
mais le chargement de listes de lecture n’est
possible que sur l’appareil
34
Touche TIME comme touche TIME / TAG (5) ;
mais la commutation de l’affichage ID3-Tag
n’est possible que sur l’appareil
35 Touches SKIP ❙◀ et ▶❙ comme les touches
SKIP sur l’appareil pour sélectionner des
titres, dossiers, listes de lecture ou partitions; pour une sélection rapide, maintenez
la touche SKIP correspondante enfoncée ;
mais ces touches ne peuvent pas être utilisées combinées avec d’autres touches
36 Touches SCAN ◀◀ et ▶▶ pour l’avance et
retour rapides
1.4 Face arrière (schéma 4)
37 Prise jack 3,5 femelle REMOTE pour la ges-
tion à distance de la fonction Start / Pause
d’une table de mixage (démarrage électrique)
38 Sortie analogique audio LINE OUT avec ni-
veau ligne (RCA L gauche / R droit)
39 Sortie digitale DIGITAL OUT (RCA)
40 Cordon secteur à relier à une prise secteur
230 V/ 50 Hz
2 Conseils d’utilisation
etdesécurité
Cet appareil répond à toutes les directives nécessaires de l’Union européenne et porte donc
le symbole .
AVERTISSEMENT Cet appareil est alimenté par
une tension dangereuse. Ne
touchez jamais l’intérieur de
l’appareil, vous pourriez subir
une décharge électrique.
Attention! Ne regardez pas le compartiment
•
CD lorsque le tiroir CD est ouvert. Des rayonnements laser éventuellement émis pourraient
causer des troubles de la vision.
L‘appareil n‘est conçu que pour une utilisation
•
en intérieur. Protégez-le des éclaboussures, de
tout type de projections d‘eau et d’une humidité d‘air élevée. La plage de température
ambiante admissible est de 0 – 40 °C.
En aucun cas, vous ne devez poser d’objet
•
contenant du liquide, p. ex. un verre, sur l’appareil.
Débranchez l’appareil immédiatement lorsque:
•
1.
des dommages visibles apparaissent sur
l’appareil et sur le cordon secteur,
2.
après une chute ou accident similaire...,
vous avez un doute au sujet de l’état de
l’appareil.
3. des dysfonctionnements apparaissent.
Dans tous les cas, les dommages doivent être
réparés par un technicien spécialisé.
Tout cordon secteur endommagé doit être
•
remplacé impérativement par un technicien
spécialisé.
Ne débranchez jamais l’appareil en tirant
•
sur le cordon secteur, tenez-le toujours par
la fiche.
Nous déclinons toute responsabilité en cas de
•
dommages matériels ou corporels résultants
si l’appareil est utilisé dans un but autre que
celui pour lequel il a été conçu, s’il n’est pas
correctement branché ou utilisé ou s’il n’est
pas réparé par une personne habilitée, en
outre, la garantie deviendrait caduque. De
même, aucune responsabilité ne saurait être
engagée en cas de pertes de données causées
par une mauvaise manipulation ou par un
défaut, ou en cas de dégâts résultants.
Lorsque l’appareil est définitivement re
tiré du service, vous devez le déposer
dans une usine de recyclage adaptée
pour contribuer à son élimination non
polluante.
CARTONS ET EMBALLAGE
PAPIER À TRIER
Français
-
17
Page 18

3 Possibilités d’utilisation
Le lecteur CD / MP3 CD-196USB est spécialement
conçu pour une utilisation DJ professionnelle. De
nombreuses fonctions sont précisément définies
Français
dans ce but, par exemple lecture titre par titre,
compteur automatique de beats, modification
de la vitesse sans modification de la hauteur
tonale, mémoire anti-chocs.
Il est possible de lire des CDs audio standards, des CDs audio gravés (CD-R) et des CDs
avec titres au format MP3. Pour des CD-RW (CDs
réinscriptibles), des problèmes lors de la lecture
peuvent survenir selon le type de CD, le graveur
et le logiciel de gravure utilisés.
Via le port USB, on peut lire des fichiers
MP3 d’un disque dur ou d’une clé USB. Grâce
au système de multi-partitions du lecteur, on
peut brancher des disques durs formatés différemment (FAT16 / FAT32, NTFS, HFS+).
Remarque : En raison de la multitude de fabricants
de supports de mémoire et de drivers d’appareils, il
n’est pas possible de garantir que tous les supports
de mémoire soient compatibles avec le CD-196USB.
4 Positionnement de
l’appareil et branchements
Le lecteur CD / MP3 peut être posé directement
sur une surface plane et horizontale ou installé
dans un rack (482 mm / 19”). Pour une installation dans un rack, 2 unités (1 U = 1 unité =
44,45 mm) sont nécessaires.
Avant d’effectuer ou de modifier les branchements, assurez-vous que le lecteur CD / MP3 et
les appareils à relier sont éteints.
1)
Si votre table de mixage ou amplificateur dispose d’une entrée digitale, reliez-la à la prise
RCA jaune DIGITAL OUT (39).
Pour des appareils sans entrée digitale,
reliez la sortie stéréo LINE OUT (38) – canal
gauche L et canal droit R – via le cordon livré
aux fiches RCA d’une entrée ligne (repérage
possible de l’entrée : LINE IN, AUX IN, CD).
2)
Le lecteur peut être démarré ou mis sur pause
via une table de mixage avec fonction démarrage électrique. Pour ce faire, reliez la prise
REMOTE (37) via un cordon équipé de fiches
jack 3,5 mâles à la prise correspondante de la
table de mixage. Le lecteur doit être réglé sur
le type de démarrage électrique de la table
de mixage, ☞chapitre 5.13.
3)
Reliez le cordon secteur (40) à une prise
230 V/ 50 Hz.
5 Utilisation
Allumez l’appareil avec l’interrupteur POWER
(12) ; l’affichage indique brièvement «boot»
(processus de démarrage) et WELCOME. Après
chaque allumage, le lecteur CD est automatiquement sélectionné. Si aucun CD ne se trouve
dans le lecteur, on commute sur le port USB. Si
aucun support de mémoire USB n’est branché,
«no dISC» (aucun CD) s’affiche.
Après le fonctionnement, éteignez l’appareil
avec l’interrupteur POWER. Les réglages suivants
sont mémorisés pour la prochaine utilisation :
– mode de fonctionnement sélectionné,
chapitre 5.4
☞
– affichage durée sélectionné,
chapitre 5.3
☞
– plage de réglage de la vitesse sélectionnée,
chapitre 5.9
☞
L’utilisation peut s’effectuer via les touches sur
l’appareil ou sur la télécommande. Le chapitre5
présente exclusivement les touches sur l’appareil. Vous trouverez dans le chapitre 6 des informations sur la télécommande.
5.1 Lecture de morceaux de musique
1)
Pour insérer un CD, ouvrez le tiroir CD (1) avec
la touche (3). Insérez le CD, repère vers le
haut, et refermez le tiroir avec la touche .
En plus ou à la place, on peut brancher
une clé USB au port USB (2) ou un disque
dur (si besoin avec alimentation propre) au
branchement USB.
2) Pour commuter entre CD et support de mémoire USB, appuyez sur la touche CD / USB
(13). Le lecteur doit impérativement être sur
Pause : si besoin, appuyez sur la touche
(19). Le support de données sélectionné est
indiqué sur l’affichage «CD» ou «USB» (J).
3) Une fois le support de données reconnu, le
lecteur est sur pause sur le premier titre. L’affichage indique sous l’indication «TRACK»
(A) le numéro du titre (en mode MP3, le numéro du titre dans le dossier) et sous l’indication«Total» (M), le nombre total de titres
(en mode MP3, le nombre total de titres dans
le dossier).
Si sur un disque dur, il y a plusieurs partitions, procédez comme suit pour sélection-
ner une autre partition :
a)
Maintenez la touche FOLDER (4) enfoncée
jusqu’à ce que l’affichage de durée (O)
commute sur «PA-SEL». La ligne de texte
(N) indique le nom de la partition actuelle.
b) Avec la touche ❙◀ ou ▶❙ (18), sélectionnez
la partition. Si une des touches est maintenue enfoncée, on peut sélectionner rapidement les partitions avec la molette (16).
c)
Pour confirmer, appuyez sur la touche
FOLDER.
Remarque à propos des partitions avec plusieurs dossiers : si après avoir sélectionné le mode
de sélection de partitions, la partition ne change
pas, mais si la partition actuelle est confirmée avec
la touche FOLDER, l’affichage indique «FO-SEL», le
message «FOLDER» (A) et le nombre de dossiers
(M). Si maintenant une des touches SKIP (18) est
enfoncée, le lecteur passe au mode de sélection de
dossiers, le dossier souhaité peut être sélectionné,
point 4.
☞
4)
Si en mode MP3, les titres sont listés dans différents dossiers, procédez comme suit pour
sélectionner un autre dossier :
a) Appuyez sur la touche FOLDER (4). L’af-
fichage de durée (O) passe à «FO-SEL».
Le champ (A) passe de «TRACK» à «FOLDER» et indique maintenant le numéro du
dossier en cours. Le champ (M) indique le
nombre total de dossiers.
b) Avec la touche ❙◀ ou ▶❙, sélectionnez le
dossier. Si une des touches est maintenue
enfoncée, on peut sélectionner les dossiers
rapidement avec la molette (16).
c) Pour confirmer la sélection, appuyez sur
la touche FOLDER ; l’affichage revient à
l’indication de durée (O) et «TRACK» (A).
5) Pour démarrer le premier titre, appuyez sur
la touche
▶
❙❙ (19). Pendant la lecture, ▶ (B)
s’affiche, la LED au-dessus de la touche brille
en continu. La lecture peut à tout moment
être interrompue avec la touche
prise. En mode Pause, la LED au-dessus de
la touche clignote.
▶
❙❙ puis re-
▶
Pour sélectionner un autre titre, utilisez
les touches ❙◀ et ▶❙ (18) :
touche ▶❙ : aller au titre suivant.
❙◀ : aller au début du titre en cours.
touche
Par plusieurs pressions sur la touche, vous
reculez toujours d’un titre.
Si une des touches est maintenue enfoncée, on peut sélectionner rapidement les
titres avec la molette (16).
6) Pendant la lecture d’un CD, le tiroir CD est
verrouillé. Pour changer de CD, passez tout
d’abord sur Pause avec la touche
pour ouvrir le tiroir, appuyez sur la touche .
Pendant la lecture d’un support de mé-
moire USB, le tiroir CD peut être ouvert.
7) Avant d’éteindre l’appareil, fermez toujours
le tiroir CD avec la touche
le système de lecture laser des poussières.
❙❙
pour protéger
5.2 Chargement de listes de lecture
Pour lire une sélection donnée de fichiers MP3,
vous pouvez charger dans le lecteur des listes de
lecture créées sur un ordinateur avec l’extension
«wpl», «xml» ou «m3u».
Important : Une liste de lecture et les fichiers
MP3 correspondants doivent être sur le même
support de mémoire. Les listes de lecture doivent
toujours être mémorisées dans le dossier principal (root directory).
1) Le lecteur doit être sur pause ; si besoin, appuyez sur la touche
2)
Maintenez la touche CONT. / LIST (9) enfoncée
et sélectionnez avec la touche ❙◀ ou ▶❙ (18),
quelle extension de fichier il faut rechercher.
La ligne de texte (N) indique la sélection :
«M3U Scan», «WPL Scan», «XML Scan». (Lors
de la sélection de la quatrième option «Folder», aucune liste de lecture n’est chargée).
Lorsque vous relâchez les touches, la pre
mière liste de lecture est chargée. L’affichage
indique sous «TRACK» (A), le numéro du titre
dans la liste de lecture et sous «Total» (M), le
nombre total de titres dans la liste de lecture.
Remarque : si aucune liste de lecture n’est trouvée, l’affichage indique «no FILE». En maintenant
la touche CONT. / LIST enfoncée, sélectionnez un
autre format de fichier avec la touche ❙◀ ou ▶❙
ou sélectionnez l’option «Folder» pour revenir au
mode de lecture du dossier.
3)
S’il existe plusieurs listes de lecture, procédez
comme suit pour sélectionner une autre
liste de lecture :
a) Appuyez sur la touche FOLDER (4). L’affi-
chage de durée (O) passe à «FO-SEL». Le
champ (A) passe de «TRACK» à «FOLDER»
et indique maintenant le numéro de la liste
actuelle. Le champ (M) indique le nombre
total de listes de lecture dans le format de
fichier choisi.
b)
Sélectionnez la liste de lecture avec la
touche ❙◀ ou ▶❙. Si une des touches est
maintenue enfoncée, les listes peuvent
être sélectionnées rapidement avec la
molette (16).
c) Pour confirmer la sélection, appuyez sur
la touche FOLDER. L’affichage revient à
l’indication de durée (O) et à «TRACK» (A).
4) Démarrez la lecture du premier titre ou sélectionnez un autre titre de la liste, ☞chapitre5.1, point 5.
5)
Pour lire les titres sans liste de lecture, passez
en pause avec la touche
touche CONT. / LIST enfoncée et appuyez sur
▶
❙❙ (19).
▶
❙❙. Maintenez la
▶
❙❙ puis
-
18
Page 19

la touche ❙◀ ou ▶❙ jusqu’à ce que la ligne de
texte «Folder» soit affichée. Lorsque vous
relâchez les touches, plus aucune liste de
lecture n’est chargée.
5.3 Affichage des informations de titre,
deladuréeetBPM
1.
Les informations sur le titre sont indiquées
dans la ligne de texte (N) :
– pour des CDs audio standards avec texte
CD, le nom du titre
– en mode MP3, le nom du fichier
On peut commuter la ligne de texte sur
l’affichage des informations suivantes (ID3Tags) ; maintenez la touche TIME / TAG (5)
enfoncée et sélectionnez avec la touche
❙◀ou ▶❙ (18) :
Affichage (L) :
TITLE = nom du titre
ALBUM = nom de l’album
ARTIST = nom de l’artiste
aucun = nom du fichier
Avec la touche FOLDER (4), on peut commuter la ligne de texte entre l’affichage de
l’information correspondante du titre et
l’affichage du nom du dossier (ou si une
liste de lecture est chargée, du nom de la
liste).
2.
La durée du titre est indiquée sous forme
d’affichage numérique (O) ; les secondes
sont divisées en 75 frames. Le bargraphe
(H) indique en plus la durée, en fonction de
la durée du titre, par sa longueur de manière
graphique (visualisation relative). Les 30 dernières secondes d’un titre sont indiquées par
le clignotement du bargraphe dans toute sa
longueur, les 15 dernières secondes par un
clignotement plus rapide.
L’indication de durée peut être commutée
avec la touche TIME / TAG (5) :
– Si «Elapse» (E) est affiché, la durée déjà lue
du titre est indiquée.
– Si «Total Remain» (F, G) est affiché, la durée
restante de tout le CD est indiquée (pas
possible en mode MP3)
– Si «Remain» (G) est affiché, la durée res-
tante du titre est indiquée.
3.
Une fois le titre sélectionné, le compteur
de beats détermine automatiquement le
nombre de beats par minute (BPM = «beats
per minute»). Peu de temps après, le nombre
est visible sur l’affichage BPM (P). Si le
compteur de beats ne peut pas déterminer de
valeur correcte (par exemple pour des titres
calmes de musique), la valeur peut être réglée
manuellement :
a)
Appuyez sur la touche BPM (21) au rythme
de la musique plusieurs fois (4 fois au
moins). Le nombre de beats est affiché,
«BPM» clignote pour indiquer le mode
manuel de comptage.
b)
Pour revenir au mode automatique de
comptage, maintenez la touche BPM enfoncée jusqu’à ce que «BPM» ne clignote
plus.
5.4 Sélection du
modedefonctionnement
Pour commuter entre lecture titre par titre
[affichage «Single» (C)] et lecture continue
[affichage «Cont.» (D)], appuyez sur la liste
CONT. / LIST (6).
1.
Pour la lecture titre par titre, l’appareil
commute sur Pause après chaque titre lu.
Ce mode est spécialement prévu pour les
applications DJ. Une fois le titre sélectionné, le
lecteur est exactement à l’endroit où la musique commence (généralement pas à l’index
temps 0:00:00 mais quelques frames plus
loin, par exemple 0:00:15). Cet endroit est
automatiquement mémorisé comme point
de départ (point Auto Cue) et signalé sur l’affichage par l’indication «CUE» (K). Après le
démarrage du titre, on peut revenir à ce point
de démarrage avec la touche CUE (17). Une
fois le titre lu, l’appareil commute sur Pause
exactement à l’endroit où la musique du titre
suivant commence. Cet endroit est alors mémorisé comme nouveau point de départ.
2. Pour une lecture en continu, tous les titres
(en mode MP3, tous les titres du dossier ou
de la liste de lecture) sont lus en continu les
uns après les autres, c’est-à-dire qu’après
le dernier titre, le premier titre redémarre.
Pendant la lecture et lors de la sélection de
titres, aucun point Auto-Cue n’est déterminé.
Remarque : dans quelques cas, un point Auto-Cue
est fixé en mode «lecture continue» (cependant pas
avec une précision de 1 frame au début de la musique
mais à l’index temps 0:00:00), par exemple une fois le
support de données reconnu.
5.5 Brève lecture du début d’un titre
Avec la touche CUE (17), on peut lire le début
d’un titre brièvement tant que la touche est
maintenue enfoncée. Une fois la touche relâchée, l’appareil revient au début du titre puis
commute sur Pause.
1)
Le lecteur doit être sur la lecture titre par titre:
affichage «Single» (C). Si «Cont.» (D) est affiché, appuyez sur la touche CONT. / LIST (6).
2)
Sélectionnez le titre (sélection de titre et
dossier ou liste de lecture, ☞chapitre 5.1
ou 5.2).
3)
En maintenant la touche CUE enfoncée, lisez
le titre.
4) Activez la touche
▶
❙❙ (19) pour lire le titre.
5.6 Avance et retour rapides
Si un titre doit être lu plus vite vers l’avant ou l’arrière, appuyez tout d’abord sur la touche SEARCH
(20). Dans la ligne de texte (N), «SEARCH» est
affiché. Tournez la molette (16) dans le sens correspondant. La vitesse d’avance ou de retour
dépend de la vitesse de rotation de la molette.
Pour désactiver la fonction, appuyez une
nouvelle fois sur la touche SEARCH (affichage
«SEARCH» éteint). En mode lecture, la fonction
se désactive automatiquement 8 secondes après
la dernière activation de la molette.
Remarque : en mode pause, après une avance ou
retour, l’endroit en cours est répété en continu. Pour
arrêter la répétition, soit appuyez brièvement deux
fois sur la touche CUE (17) [nouveau point Cue déterminé, ☞ chapitre 5.8] soit démarrez la lecture avec
la touche
▶
❙❙ (19).
5.7 Positionnement précis à
unendroitdonné
On peut aller à un endroit dans le titre avec une
précision de 1 frame (¹⁄ 75 seconde), par exemple
si la lecture ne doit pas démarrer au début du
titre mais à un endroit donné.
1)
Lorsque l’endroit voulu est atteint approximativement pendant la lecture du titre ou
avec l’avance / retour rapide (☞chapitre 5.6),
passez en Pause avec la touche
▶
❙❙ (19).
2) En tournant la molette (16) vers la droite ou
la gauche, allez précisément à l’endroit voulu.
Pour pouvoir effectuer un contrôle acoustique, l’endroit réglé est répété en continu.
3) Lorsque l’endroit voulu est trouvé, appuyez
brièvement sur la touche CUE (17) deux fois.
L’endroit est mémorisé, la lecture continue arrêtée. Avec la touche
▶
❙❙
, la lecture peut être
maintenant démarrée à partir de ce point.
5.8 Retour à un endroit donné
(PointCue)
Pour pouvoir aller rapidement à un endroit
donné, vous pouvez mémoriser avec la touche
CUE (17) un point de démarrage (point Cue).
Il est écrasé en mode titre par titre, lorsque le
titre suivant est atteint ou sélectionné, par le
point de départ du titre suivant (point Auto-Cue)
[le cas échéant, avec la touche CONT. / LIST (6),
commutez sur lecture de tous les titres].
Conseil : le point Cue mémorisé est effacé :
– lorsqu’un autre dossier est sélectionné (ou une autre
liste de lecture)
– commutation entre CD et support de mémoire USB
– arrêt de l’appareil
1) Pendant la lecture, passez sur pause avec la
touche
▶
❙❙ (19) lorsque l’endroit où il faut
revenir ultérieurement est atteint. La LED
au-dessus de la touche CUE (17) clignote.
2)
Si besoin, allez avec la molette (16) avec précision à l’endroit (☞chapitre 5.7). L’endroit
est répété en continu après avoir tourné la
molette.
3)
Appuyez sur la touche CUE. L’endroit est
mémorisé comme point Cue. Sur l’affichage
«CUE» (K) est indiqué, la LED au-dessus de
la touche CUE brille en continu. Pour arrêter
la lecture répétée de l’endroit, appuyez une
nouvelle fois sur la touche CUE.
4) Redémarrez la lecture avec la touche
▶
❙❙.
5) Avec la touche CUE, on peut maintenant re-
venir au point Cue. Après le retour, «CUE» est
visible sur l’affichage ; le lecteur est sur Pause.
6)
Démarrez la lecture avec la touche
▶
❙❙
ou
maintenez la touche CUE enfoncée pendant
la durée de lecture du titre. Après avoir relâché la touche CUE, le lecteur revient au point
Cue et commute sur pause.
5.9 Modification de la vitesse avec ou
sans déplacement de la hauteur
tonale
La vitesse peut être modifiée avec le réglage (11)
jusqu’à ± 100 % :
+100 % = vitesse multipliée par 2
−100 % = repos
1)
Sélectionnez la plage de réglage avec la
touche PITCH (9). Le réglage sélectionné avec
la touche PITCH est signalé via les deux LEDs
(10) à côté de la touche :
– deux LEDs éteintes :
réglage de vitesse désactivé,
le titre est lu à vitesse normale
– LED 8 % allumée :
réglage de vitesse activé,
plage de réglage ±8 %
– LED 16 % allumée :
réglage de vitesse activé,
plage de réglage ±16 %
Français
19
Page 20

REMOTE
– les deux LEDs allumées :
réglage de vitesse activé,
plage de réglage ±100 %
En plus, à chaque pression sur la touche
Français
PITCH, la ligne de texte (N) indique brièvement le réglage choisi : «Pitch 8 %», “Pitch
16 %», «Pitch 100» ou «Pitch off».
2) Réglez la vitesse avec le réglage ; l’affichage
indique la déviation en pourcentage par rapport à la vitesse normale en haut à droite (l).
Le nombre de beats par minute (P) se modifie
en conséquence.
3) En modifiant la vitesse, la hauteur tonale est
également modifiée proportionnellement en
conséquence. Si elle doit cependant rester
constante, appuyez sur la touche MT (22).
Sur l’affichage, «MT» (R) est visible et la LED
à coté de la touche MT brille. Pour désactiver la fonction, appuyez à nouveau sur la
touche MT.
5.10 Pitch Bend – adaptation du rythme
entre deuxmorceaux de musique
On peut faire coïncider le rythme de deux morceaux de musique avec le même tempo en
utilisant deux lecteurs CD / MP3 ; ainsi, lors du
passage d’un lecteur à l’autre, le rythme pour
la danse n’est pas interrompu.
1) Tout d’abord, adaptez le tempo du morceau
de musique sur lequel il faut effectuer un
fondu enchaîné, au tempo du morceau de
musique en cours avec le réglage de vitesse
(11). Pour ce faire, avec le réglage à glissières,
réglez le même nombre de beats par minute,
voir indication (P) en bas à droite sur l’affichage.
2)
Avec les touches PITCH BEND (8), positionnez
les beats du morceau de musique sur lequel il
faut effectuer un fondu enchaîné, avec précision sur les beats du morceau en cours:
tant que la touche + ou − est maintenue
enfoncée, le titre va 16 % plus vite ou plus
lentement. Ainsi les beats se déplacent selon
les beats du morceau en cours.
3)
On peut également déplacer les beats en
tournant la molette (16).
5.11 Création d’effets
5.11.1 Effet Scratch
Pour produire des effets Scratch (correspond
à la rotation manuelle d’un plateau de platine
disque), appuyez sur la touche SCRATCH / F.
START (15) et tournez la molette (16) vers
l’avant ou l’arrière. La ligne de texte (N) affiche «SCRATCH». Pour désactiver la fonction, ap puyez une nouvelle fois sur la touche
SCRATCH / F. START.
5.11.2 Effet bourdonnement
Si la fonction Master Tempo (hauteur tonale
constante) est activée [affichage «MT» (R) et LED
à côté de la touche MT (22) allumée], désactivez-la avec la touche MT. En tournant la molette
(16) dans un sens ou l’autre, la vitesse de lecture
est augmentée et diminuée en alternance. On
obtient ainsi un effet bourdonnement.
5.11.3 Effet bégaiement
On peut utiliser le point Cue mémorisé avec la
touche CUE (17) pour produire des effets bégaiements intéressants (☞chapitre 5.8) : par
plusieurs brèves pressions sur la touche CUE,
on obtient un effet bégaiement. Il est d’autant
plus puissant que le point Cue est adapté (par
exemple utilisation d’instrument ou début d’un
mot).
5.12 Programmation d’une
suitepersonnelle detitres
Le lecteur CD / MP3 permet de programmer une
suite avec 99 titres au plus. En mode MP3, on
peut composer avec des titres de plusieurs dossiers ou listes de lecture. La suite programmée
n’est pas, à la différence d’une liste de lecture,
appelable à l’infini, elle est effacée après la commutation sur un autre support de données ou
l’arrêt de l’appareil.
5.12.1 Mémoriser et lire une suite de titres
1) Si un titre est en cours de lecture, passez sur
Pause avec la touche
2) Avec la touche PROG. (7), passez en mode
programmation. L’affichage de durée (O)
passe sur l’indication du premier emplace
ment de mémoire «P-01». L’indication «PG»
(Q) clignote rapidement.
Conseil : si vous devez quitter ce mode immédiatement, maintenez la touche PROG. enfoncée jusqu’à
ce que l’affichage indique à nouveau la durée (O).
3) Sélectionnez le premier titre pour la suite de
titres (sélection de titre et de dossier ou de
liste de lecture,
4) Pour confirmer la sélection de titre, appuyez
sur la touche PROG. Le prochain emplacement de mémoire «P-02» est affiché.
5) Répétez les points 3 et 4 jusqu’à ce que tous
les titres de la suite soient programmés. Si
99 titres sont mémorisés, et si vous essayez
d’en mémoriser un autre, le message «FULL»
s’affiche.
6)
Pour lire la suite de titres, appuyez sur la
touche
▶
❙❙
. L’affichage «PG» clignote plus
lentement. L’affichage indique le numéro du
titre (A) dans la suite de titres et le nombre
total (M) de titres programmés.
Les titres sont lus selon le mode de fonc-
tionnement sélectionné (
7)
Pour revenir au mode normal de lecture,
passez en mode Pause avec la touche
maintenez la touche PROG. enfoncée jusqu’à
ce que l’affichage «PG» ne clignote plus.
Pour lire une nouvelle fois la suite de
titres, mettez l’appareil sur Pause, appuyez
sur la touche PROG. de telle sorte que l’affichage «PG» clignote à nouveau. Démarrez
la suite de titres avec la touche
Conseil : tant que l’affichage «PG» clignote ou brille
tout le temps, la suite de titres est consultable. Elle est
effacée si «PG» n’est plus affiché.
5.12.2 Vérification de la suite de titres
1)
Si un titre est lu, passez tout d’abord en
mode Pause avec la touche
2)
Si l’indication «PG» (Q) clignote maintenant,
appuyez une fois sur la touche PROG. (7). Si
l’indication «PG» brille en continu, appuyez
deux fois sur la touche PROG.
3)
Avec la touche ❙◀ ou ▶❙ (18), sélectionnez les
uns après les autres les emplacements de mémoire («P-01»... «P-99»). Le titre mémorisé
est affiché dans la ligne de texte (N).
4) Appuyez sur la touche
de titres.
▶
❙❙ (19).
chapitre 5.1 ou 5.2).
☞
chapitre 5.4).
☞
▶
▶
❙❙ (19).
▶
❙❙ pour lire la suite
▶
❙❙ et
❙❙.
5.12.3 Compléter ou effacer
unesuitedetitres
1)
Si un titre est en cours de lecture, passez tout
d’abord sur Pause avec la touche
2) Si l’indication «PG» (Q) clignote, maintenez
la touche PROG. (7) enfoncée jusqu’à ce que
«PG» ne clignote plus.
3)
Appuyez brièvement sur la touche PROG.
de telle sorte que «PG» clignote rapidement
et que l’indication de durée (O) commute
sur l’affichage du prochain emplacement de
mémoire libre «P-…».
4)
Pour effacer toute la suite, maintenez la
touche PROG. enfoncée jusqu’à ce que l’affichage indique à nouveau la durée (O) ou
pour ajouter un autre titre, sélectionnez le
titre souhaité (sélection de titre et de dossier,
ou liste de lecture, ☞chapitre 5.1 ou 5.2)
et confirmez avec la touche PROG. Pour lire
la suite de titres complétée, appuyez sur la
touche
▶
❙❙.
-
5.13 Démarrage électrique
La fonction démarrage / Pause de la touche
(19) peut être commandée à distance depuis
une table de mixage équipée de la fonction démarrage électrique. Reportez-vous au chapitre4
pour le branchement à la table de mixage.
Pour régler le lecteur sur le type de démarrage
électrique de la table de mixage, maintenez la
touche SCRATCH / F.START (15) enfoncée et avec
la touche ❙◀ ou ▶❙ (18), sélectionnez «LOCK»,
«CUE / PLAY» ou «TACT». Le réglage est affiché
dans la ligne de texte (N). Lorsque vous relâchez
les touches, le type de démarrage sélectionné
est réglé.
LOCK = commande avec un interrupteur
marche / arrêt
Cette position doit être sélectionnée pour la majorité des tables de mixage de la gamme IMG
STAGELINE. Lorsque le fader est ouvert, un interrupteur sur la table, démarrant la lecture, se
ferme. Lorsque le fader est fermé, l’interrupteur
s’ouvre, le lecteur passe sur Pause.
Schéma 5 démarrage électrique via un
interrupteur marche / arrêt
TAC T = commande par un bouton poussoir
momentané
Si le bouton poussoir momentané est activé pour
la première fois lorsque le fader est ouvert, la
lecture démarre. Si le bouton poussoir momentané est activé pour la deuxième fois en fermant
le fader, le lecteur passe sur Pause.
REMOTE
Schéma 6 démarrage électrique via un
bouton poussoir momentané
CUE PLAY = gestion via une impulsion
En ouvrant le fader, la lecture commence, via
une brève impulsion de commande de la table
de mixage, à partir du début du titre (point Auto
Cue, ☞chapitre 5.4) ou à partir du point Cue
déterminé avec la touche CUE (17) (☞cha
pitre5.8). En fermant le fader, le lecteur revient
▶
Start
Pause
1. × Start
2. × Pause
❙❙ (19).
▶
❙❙
-
20
Page 21

à ce point de départ, via une autre impulsion de
commande et là passe sur Pause.
REMOTE
1. × Cue Play
2. × Pause
Schéma 7 démarrage électrique via une
impulsion de commande
6 Télécommande
La télécommande infrarouge est livrée avec sa
batterie inséréé. Avant la première utilisation,
retirez la feuille plastique isolante du support
de batterie, situé sur la face arrière.
Lorsque vous appuyez sur une touche de la télécommande, orientez toujours le capteur infrarouge (14) sur l’appareil. Aucun obstacle ne doit
se dresser entre la télécommande et le capteur.
Les touches suivantes de la télécommande
peuvent être utilisées comme les touches sur
l’appareil:
OPEN / CLOSE (23) [correspond à la touche (3)]
FOLDER (25)
PITCH BEND (26)
MT (27)
PITCH (28)
PLAY/ PAUSE (29)
CUE (30)
PROG. (31)
CD / USB (32)
Les touches SINGLE / CONT. (33), TIME (34) et
SKIP ❙◀ / ▶❙ (35) peuvent être utilisées comme les
touches sur l’appareil CONT. / LIST (6), TIME / TAG
(5) et SKIP ❙◀ / ▶❙ (18) avec quelques restrictions :
– la touche SINGLE / CONT ne peut être utilisée
que pour commuter le mode de fonctionnement, le chargement de listes de lecture n’est
pas possible.
– la touche TIME peut être utilisée uniquement
pour commuter l’affichage de la durée ;
commuter l’affichage ID3-Tag est impossible.
– les touches SKIP ❙◀ / ▶❙ de la télécommande
peuvent, comme celles sur l’appareil, être utilisées pour sélectionner des titres, dossiers, listes
de lecture et partitions ; pour une sélection
rapide, maintenez la touche correspondante
enfoncée.
Cependant, les touches ne peuvent pas être
utilisées en combinaison avec d’autres touches.
Les touches numériques (24) et SCAN ◀◀ et ▶▶
(36) peuvent être utilisées à la place des touches
sur l’appareil :
– les touches numériques à la place des touches
SKIP pour sélectionner des titres, dossiers,
listes de lecture et partitions. Sélectionnez en
tapant le numéro correspondant. S’il s’agit de
numéros à plusieurs positions, appuyez sur les
touches les unes après les autres, par exemple
pour le numéro 10, appuyez sur les touches
«0» et «1».
– les touches SCAN ◀◀ et ▶▶ permettent une
avance et retour rapides : tant que la touche
SCAN correspondante est maintenue enfoncée, le titre défile vers l’avant ou l’arrière.
6.1 Remplacement de la batterie
Si la portée de la télécommande diminue, il faut
remplacer la batterie.
1) Appuyez le verrouillage du support batterie
vers la gauche (flèche 1 sur le schéma 8) et
simultanément, tirez vers le bas le support
(flèche 2).
1.2.
Schéma 8 remplacement de la batterie
2)
Retirez l’ancienne batterie et remplacez-la par
une neuve (pile bouton 3 V, type CR 2025).
Assurez-vous que le pôle plus de la batterie
soit bien dirigé vers le haut dans le support.
3) Replacez le support dans la télécommande.
Ne jetez pas les batteries usagées dans
la poubelle domestique, déposez-les
dans un container spécifique ou ramenez-les chez votre revendeur.
7 Actualisation du Firmware
Si une nouvelle version du Firmware (système
d’exploitation de l’appareil) est disponible sur
Internet, vous pouvez actualiser la version de
votre appareil :
1) Si sur la page d’accueil de IMG STAGELINE
(www.imgstageline.com), une mise à jour
Firmware est proposée pour le CD-196USB,
copiez le fichier téléchargé sur une clé USB.
2) Eteignez le lecteur CD / MP3 avec l’interrupteur secteur (12).
3)
Mettez la clé USB comportant la nouvelle
version dans la prise USB (2).
4)
Maintenez la touche PROG. (7) enfoncée et rallumez l’appareil. Ne relâchez la
touche PROG. que lorsque sur l’affichage,
«UP dA t E» est visible.
5) Une fois le processus de reconnaissance effectué, «Ready» s’affiche dans la ligne de
texte (N). Appuyez sur la touche
démarrer l’actualisation du firmware. Selon
les indications du bargraphe (H) et de la ligne
de texte, vous pouvez suivre le processus
d’actualisation. Lorsque «Finish» s’affiche,
le firmware est actualisé.
6) Eteignez l’appareil puis rallumez-le.
Attention : l’actualisation du firmware s’effectue à vos propres risques. Une fois la mise à jour
effectuée, le fonctionnement de l’appareil peut
être différent de celui décrit dans la présente
notice.
▶
❙❙
(19) pour
8 Entretien de l’appareil
Protégez l’appareil de la poussière, des vibrations, de l’humidité et de la chaleur. Pour le
nettoyer, utilisez uniquement un chiffon sec et
doux, en aucun cas, de produits chimiques ou
d’eau.
Remarques sur les coupures du son et les
erreurs de lecture: La fumée de cigarettes et
la poussière s’introduisent facilement dans les
ouvertures du lecteur et se déposent sur l’optique du système de lecture laser. Cela peut
générer des erreurs de lecture et des coupures
de son. Dans ce cas, confiez impérativement le
nettoyage du lecteur à un technicien spécialisé.
Cette opération est à la charge de l’utilisateur,
même lorsque l’appareil est sous garantie !
9 Caractéristiques techniques
Bande passante : . . . . . . 20 – 20 000 Hz
Taux de distorsion : . . . . < 0,1 %
Séparation des canaux : > 75 dB
Plage dynamique : . . . . > 80 dB
Rapport : . . . . . . . . . . . > 75 dB
Sorties
LINE OUT : . . . . . . . . . 2 V
DIGITAL OUT : . . . . . . 0,5 Vcc S / PDIF
Standard USB : . . . . . . . 2.0
Systèmes
données lisibles :
Nombre max.
Partitions : . . . . . . . . . 16
Dossiers : . . . . . . . . . . 999 par partition,
Fichiers MP3 : . . . . . . . 999 par dossier
Mémoire anti-chocs
CDs audio standards : . 8 s
Fichiers MP3 : . . . . . . . 10 s
Alimentation : . . . . . . . . 230 V/ 50 Hz
Consommation : . . . . . . 15 VA
Température fonc. : . . . . 0 – 40 °C
Dimensions : . . . . . . . . . 482 × 90 × 270 mm
Poids :
. . . . . . . . . . . . . . 4,4 kg
Branchements
Entrée USB : . . . . . . . . Type A
Sortie analogique : . . . RCA D / G
Sortie digitale : . . . . . . RCA
Démarrage électrique : jack 3,5
Tout droit de modification réservé.
. . . . . . NTFS, FAT, HFS+
dans 8 plages max.
(L × H × P), 2 unités
Français
En cas de non utilisation prolongée, retirez la
batterie, elle pourrait couler et endommager la
télécommande.
Notice d’utilisation protégée par le copyright de MONACOR ® INTERNATIONAL GmbH & Co. KG. Toute
reproduction même partielle à des fins commerciales est interdite.
21
Page 22

Lettore CD / MP3 professionale
Queste istruzioni sono rivolte a DJ professionali e
a utenti con conoscenze tecniche. Vi preghiamo
Italiano
di leggerle attentamente prima dell’installazione
e di conservarle per un uso futuro.
A pagina 3, se aperta completamente, vedrete tutti gli elementi di comando e i collegamenti descritti.
Indice
1 Elementi di comando ecollegamenti . 22
1.1 Pannello frontale (fig. 1) . . . . . . . . . 22
1.1.1 Display (fig. 3) . . . . . . . . . . . . 23
1.2 Telecomando (fig. 2). . . . . . . . . . . 23
1.3 Pannello posteriore (fig. 4) . . . . . . . . 23
2 Avvertenze di sicurezza . . . . . . . . 23
3 Possibilità d’impiego . . . . . . . . . 24
4 Collocare e collegare l’apparecchio . . 24
5 Funzionamento . . . . . . . . . . . . 24
5.1 Riprodurre brani musicali. . . . . . . . . 24
5.2 Caricare delle playlist . . . . . . . . . . 24
5.3 Indicazione delle informazioni sui titoli,
delladurata e indicazione BPM . . . . . . 25
5.4 Scegliere il modo di funzionamento . . . . 25
5.5 Riproduzione dell’inizio di un titolo . . . . 25
5.6 Avanzamento e ritorno veloce . . . . . . 25
5.7 Posizionarsi con esattezza su un punto
determinato . . . . . . . . . . . . . . 25
5.8 Salto ad un punto determinato (punto cue) . 25
5.9 Modificare la velocità con o senza
spostamentodell’altezza del suono . . . . 25
5.10 Pitch Bend – adattare il ritmo fra
due brani musicali. . . . . . . . . . . . 26
5.11 Generare degli effetti . . . . . . . . . . 26
5.11.1 Effetto scratch . . . . . . . . . . . . 26
5.11.2 Effetto di trascinamento (draggingeffect) . 26
5.11.3 Effetto bop (balbuzie) . . . . . . . . . 26
5.12 Compilare una sequenza individuale di titoli 26
5.12.1 Programmare e avviare
una sequenza di titoli . . . . . . . . . 26
5.12.2 Controllare la sequenza . . . . . . . . 26
5.12.3 Completare o cancellare unasequenza . . 26
5.13 Avviamento con fader . . . . . . . . . . 26
6 Telecomando . . . . . . . . . . . . . 27
6.1 Sostituzione della batteria . . . . . . . . 27
7 Aggiornare il firmware . . . . . . . . 27
8 Manutenzione . . . . . . . . . . . . 27
9 Dati tecnici . . . . . . . . . . . . . . 27
1 Elementi di comando
ecollegamenti
1.1 Pannello frontale (fig. 1)
I tasti con funzione doppia sono contrassegnati
con i simboli
per “tener premuto”.
1 Cassetto CD
2
Porta USB per l’inserimento di una chiavetta
USB o per il collegamento di un disco rigido
3 Tasto per aprire e chiudere il cassetto CD
4 Tasto FOLDER con funzionamento MP3
1.
per cambiare cartella oppure per cambiare playlist (caricare una playlist ☞posizione 6, tasto CONT. / LIST)
Premere brevemente il tasto FOLDER, l‘indicazione del tempo (O) diventa “FO-SEL”
e si vede “FOLDER” (A). Con il tasto ❙◀
o ▶❙ (18) scegliere la cartella (playlist) e
confermare con il tasto FOLDER.
2.
per cambiare la partizione, nel caso di un
disco rigido con più partizioni.
Tener premuto il tasto FOLDER finché
l’indicazione del tempo (O) passa a
“PA-SEL”. Con il tasto ❙◀ o ▶❙ (18) scegliere la partizione e confermare con il
tasto FOLDER.
5 Tasto TIME / TAG
1. per l’indicazione del tempo
Per cambiare l’indicazione del tempo
(H, O) premere brevemente il tasto
TIME / TAG:
con l’indicazione “Remain” (G)
tempo restante del titolo
con l’indicazione “Elapse” (E)
tempo già trascorso del titolo
con l’indicazione “Total Remain” (F, G)
tempo restante dell’intero CD
(non è possibile con funzionamento MP3)
2.
per l’indicazione tag id3 con funzionamento MP3
Con il tasto TIME / TAG tenuto premuto,
con il tasto ❙◀ o ▶❙ (18) cambiare la riga
di testo (N) per indicare titolo, albo, artista
(tag id3) o nome del file.
6 Tasto CONT. / LIST
1. per scegliere il modo di funzionamento
Per cambiare fra riproduzione di titoli singoli [indicazione “Single” (C)] e riproduzione continua [indicazione “Cont.” (D)]
premere brevemente il tasto CONT. / LIST.
2. per caricare delle playlist
Con il tasto CONT. / LIST tenuto premuto,
con il tasto ❙◀ o ▶❙ (18) scegliere il formato file della playlist (“M3U Scan”,
“WPL Scan”, “XML Scan”) oppure
“Folder” (= non caricare nessuna playlist)
[☞Capitolo 5.2].
7 Tasto PROG. per compilare e riprodurre una
sequenza individuale di titoli
(☞Capitolo5.12)
8 Tasti PITCH BEND per adattare il ritmo del
titolo attuale a quello di un brano riprodotto
su un altro lettore (☞Capitolo 5.10)
9 Tasto PITCH per attivare / disattivare il rego-
latore della velocità (11) e per scegliere il
campo di regolazione della velocità (max.
per “premere brevemente” e
±8 %, ±16 % o ±100 % di deviazione dalla
velocità normale); l’impostazione scelta è
visualizzata tramite due LED ☞posizione 10
10
Indicazione dell’impostazione scelta con il
tasto PITCH (9):
– entrambi LED sono spenti:
regolatore della velocità (11) disattivato
– LED 8 % è acceso:
regolatore della velocità attivato,
campo di regolazione ±8 %
– LED 16 % è acceso:
regolatore della velocità attivato,
campo di regolazione ±16 %
– entrambi i LED sono accesi:
regolatore della velocità attivato,
campo di regolazione ±100 %
11
Regolatore per modificare la velocità di riproduzione [senza cambiare l’altezza del suono
se il LED vicino al tasto MT (22) è acceso];
il regolatore è attivato se è acceso per lo
meno un LED (10) vicino al tasto PITCH (9).
12 Interruttore on / off POWER
13
Tasto CD / USB per cambiare fra CD e mezzo
di memoria USB: l’apparecchio deve trovarsi
in pausa.
14
Sensore a infrarossi per i segnali del telecomando
15 Tasto SCRATCH / F. START
1. per la funzione scratch
per attivare/disattivare la funzione scratch,
premere brevemente il tasto SCRATCH /
F.START. Se è attiva la funzione [la riga
di testo (N) mostra “SCRATCH”], con la
manopola (16) si possono generare degli
effetti scratch.
2. per il tipo di avviamento con fader
Con il tasto SCRATCH / F.START tenuto
premuto, con il tasto ❙◀ o ▶❙ (18) scegliere
il tipo di avviamento con fader (“LOCK”,
“CUE / PLAY” o “TACT”)
(☞Capitolo5.13).
16 Manopola
1. per l’avanzamento e ritorno veloce se è
stato premuto il tasto SEARCH (20)
2.
per generare degli effetti scratch se è
stato premuto il tasto SCRATCH / F.START
(15)
3. per la funzione “Pitch Bend” durante la
riproduzione di un titolo
(
Capitolo5.10)
☞
4. per posizionarsi con esattezza su un determinato punto mentre il lettore si trova
in pausa
5. con il tasto o tenuto premuto, per scegliere rapidamente titoli, cartelle, playlist
o partizioni (☞posizione18, tasti SKIP)
17 Tasto CUE per riprodurre l’inizio di un titolo
(☞Capitolo 5.5) e per il ritorno a un punto
determinato precedentemente
(☞Capitolo5.8)
18 Tasti SKIP ❙◀ e ▶❙
1. per la scelta
– di titoli,
se è indicato “TRACK” (A)
▶❙ per scegliere il titolo successivo
❙◀ per saltare all’inizio del titolo.
Con la pressione ripetuta del tasto ❙◀ si
salta indietro sempre di un titolo.
22
Page 23

– di cartelle o playlist,
se è indicato “FOLDER” (A)
(☞posizione 4, tasto FOLDER)
– di partizioni sul disco rigido,
se è indicato “PA-SEL” (O)
(☞posizione 4, tasto FOLDER)
Se si tiene premuto uno dei tasti, con la
manopola (16) si può eseguire una scelta
rapida.
2.
per la scelta fra varie opzioni con il
tasto TIME / TAG (5), CONT. / LIST (6),
SCRATCH / F.START (15) tenuto premuto
19 Tasto PLAY/ PAUSE
produzione (il LED sopra il tasto è acceso
costantemente) e pausa (il LED sopra il tasto
lampeggia)
20
Tasto SEARCH, per cambiare la manopola
(16) alla funzione “avanzamento / ritorno
veloce”
21 Tasto BPM per il modo manuale di conteg-
gio del beatcounter e per ritornare al modo
automatico (
22 Tasto MT (Master-Tempo) per attivare e di-
sattivare la funzione di mantenere costante
l’altezza del suono (☞Capitolo 5.9)
▶
❙❙ per cambiare fra ri-
Capitolo 5.3)
☞
1.1.1 Display (fig. 3)
A Se è indicato “TRACK”: numero del titolo
(con funzionamento MP3: numero del titolo nella cartella o numero del titolo nella
playlist)
se è indicato “FOLDER” [dopo la pressione
del tasto FOLDER (4)]: numero della cartella
oppure numero della playlist
B Simbolo di riproduzione
C
Indicazione “Single”: segnala il modo di
riproduzione di titoli singoli
D Indicazione “Cont.”: segnala il modo di ri-
produzione continua dei titoli
E Indicazione “Elapse”: segnala che viene in-
dicato il tempo già trascorso del titolo
F Indicazione “Total”: segnala, insieme all’in-
dicazione “Remain” (G), che viene indicato
il tempo restante del CD
(non è possibile con funzionamento MP3)
G
Indicazione “Remain”: segnala che viene
indicato il tempo restante di un titolo. Con
l’indicazione “Total Remain” è indicato il
tempo restante del CD.
H
Indicazione a barre che rappresenta il tempo
relativo del titolo
I
Indicazione in percento della deviazione
dalla velocità normale
J
Indicazione “CD” o “USB”: indica se è stato
scelto un CD o un mezzo di memoria USB.
K
Indicazione “CUE”: si vede quando il lettore
si trova in pausa sul punto cue (☞Capitoli5.4 e 5.8).
L
Indicazione “TITLE”, “ALBUM” o “ARTIST”,
se per un titolo MP3 è visualizzata la
relativainformazione (tag id3) nella riga
di testo (N)
M
Se sopra le cifre è indicato “Total”: il numero
totale dei titoli (con funzionamento MP3:
numero totale dei titoli nella cartella o
numero totale dei titoli nella playlist)
se non si vede “Total” [dopo la pressione
del tasto FOLDER (4)]: numero totale delle
cartelle oppure numero totale delle playlist
nel formato di file scelto
N
Riga di testo per informazioni supplementari
O
Indicazione del tempo, vedi anche pos. E e G
P Indicazione delle battute al minuto
Q
Indicazione “PG”: segnala che è memorizzata una sequenza individuale di titoli;
lampeggia durante la programmazione e durante la riproduzione della sequenza di titoli
R Indicazione “MT” (Master-Tempo): segnala
la funzione per altezza constante del suono
(
Capitolo 5.9)
☞
1.2 Telecomando (fig. 2)
23 Tasto OPEN / CLOSE come tasto (3)
24 Tasti numerici per la scelta diretta
– di titoli
se è indicato “TRACK” (A)
– di cartelle o playlist
se è indicato “FOLDER” (A)
(☞posizione 4, tasto FOLDER)
– di partizioni sul disco rigido,
se è indicato “PA-SEL” (O)
posizione 4, tasto FOLDER)
(
☞
I tasti
25 FOLDER
26 PITCH BEND
27 MT
28 PITCH
29 PLAY/ PAUSE
30 CUE
31 PROG.
32 CD / USB
corrispondono ai tasti con lo stesso nome
sull’apparecchio
33
Tasto SINGLE / CONT come tasto CONT. /
LIST (6);
ma la carica di playlist è possibile solo
sull’apparecchio
34 Tasto TIME come tasto TIME / TAG (5);
ma il cambio dell’indicazione tag id3 è pos-
sibile solo sull’apparecchio
35
Tasti SKIP ❙◀ e ▶❙ come i tasti SKIP sull’apparecchio per la scelta di titoli, cartelle, playlist
o partizioni; per la scelta rapida tener premuto il relativo tasto SKIP;
ma non possono essere usati in combinazione con altri tasti
36 Tasti SCAN ◀◀ e ▶▶ per l’avanzamento e
ritorno veloce
1.3 Pannello posteriore (fig. 4)
37
Presa jack 3,5 mm REMOTE per il telecomando della funzione Start / Pausa da un
mixer (avviamento con fader)
38 Uscita audio analogica LINE OUT con livello
Line (RCA, L sin. / R dx.)
39 Uscita audio digitale DIGITAL OUT (RCA)
40
Cavo per il collegamento con la rete
(230 V/ 50 Hz)
2 Avvertenze di sicurezza
L’apparecchio è conforme a tutte le direttive
rilevanti dell’UE e pertanto porta la sigla .
AVVERTIMENTO
Attenzione! Con il cassetto CD aperto, non
•
guardare mai nella fessura per il CD. I raggi
laser eventualmente uscenti possono provocare dei danni agli occhi.
Usare l’apparecchio solo all’interno di locali.
•
Proteggetelo dall’acqua gocciolante e dagli
spruzzi d’acqua nonché da alta umidità dell’aria. La temperatura d’esercizio ammessa è
0 – 40 °C.
Non depositare sull’apparecchio dei conteni-
•
tori riempiti di liquidi, p. es. bicchieri.
Staccare subito la spina dalla presa di rete se:
•
1. l’apparecchio o il cavo rete presentano dei
danni visibili;
2. dopo una caduta o dopo eventi simili sus-
siste il sospetto di un difetto;
3.
l’apparecchio non funziona correttamente.
Per la riparazione rivolgersi sempre ad un’officina competente.
Il cavo rete, se danneggiato, deve essere so-
•
stituito solo da un laboratorio specializzato.
Staccare il cavo rete afferrando la spina, senza
•
tirare il cavo.
Nel caso d’uso improprio, di collegamenti
•
sbagliati, d’impiego scorretto o di riparazione
non a regola d’arte dell’apparecchio, non si
as sume nessuna responsabilità per eventuali
danni consequenziali a persone o a cose e non
si assume nessuna garanzia per l’apparecchio.
Nello stesso modo non si assume nessuna
responsabilità per la perdita di dati e per i relativi danni consequenziali causati da impiego
sbagliato o da un difetto dell’apparecchio.
Se si desidera eliminare l’apparecchio
definitivamente, consegnarlo per lo
smaltimento ad un’istituazione locale
per il riciclaggio.
L’apparecchio funziona con
pericolosa tensione di rete.
Non intervenire mai personalmente al suo interno. Esiste il pericolo di una scarica
elettrica.
Italiano
23
Page 24

3 Possibilità d’impiego
Il lettore CD / MP3 CD-196USB è stato realizzato
specialmente per il settore DJ professionale.
Italiano
Molte funzioni sono previste esattamente per
questo campo d’impiego, come p. es. la riproduzione di titoli singoli, il beatcounter automatico,
la modifica della velocità senza cambiamento
dell’altezza del suono, la memoria anti-shock.
Con questo apparecchio si possono riprodurre CD audio, CD masterizzati in proprio
(CD-R) nonché CD con titoli nel formato MP3.
Nel caso di CD riscrivibili (CD-RW) è possibile che
ci siano dei problemi durante la riproduzione, a
seconda del tipo di CD, del masterizzatore usato
e del programma di masterizzazione.
Tramite i contatti USB si possono riprodurre
anche file MP3 da un disco rigido o da una chiavetta USB. La funzione multi-partition permette il
collegamento di dischi rigidi formattati in modo
differente (FAT16 / FAT32, NTFS, HFS+).
Nota: Dato il grande numero di produttori di memorie
e di driver per apparecchi, non si può garantire che tutti
i mezzi di memoria siano compatibili con il CD-196USB.
4 Collocare e collegare
l’apparecchio
Il lettore CD / MP3 può essere collocato come apparecchio da tavolo su un piano perfettamente
orizzontale oppure può essere montato in un
rack (482 mm / 19”). Per il montaggio nel rack
sono richieste due unità d’altezza (1 U = unità
d’altezza = 44,45 mm).
Prima di eseguire il collegamento di apparecchi
o di modificare dei collegamenti esistenti, spegnere il lettore e gli apparecchi da collegare.
1) Se il vostro mixer o amplificatore è equipag-
giato con un ingresso digitale, collegarlo con
la presa RCA gialla DIGITAL OUT (39).
Nel caso di apparecchi senza ingresso
digitale, collegare l’uscita stereo LINE OUT
(38) – canale sinistro L e canale destro R –
con un ingresso Line servendosi del cavo con
connettori RCA in dotazione (scritta possibile
sull’ingresso: LINE IN, AUX IN, CD).
2)
Il lettore può essere avviato e messo in pausa
per mezzo di un mixer con avviamento con
fader. Per fare ciò, collegare la presa REMOTE
(37) con la relativa presa del mixer usando un
cavo con connettori jack 3,5 mm. Sul lettore
deve essere impostato l’avviamento con fader
del mixer ☞Capitolo 5.13.
3) Alla fine inserire la spina del cavo (40) in una
presa di rete (230 V/ 50 Hz).
5 Funzionamento
Accendere l’apparecchio con l’interruttore
POWER (12). Il display indica brevemente “boot”
(avvio) e saluta con WELCOME. Dopo ogni accensione è scelto automaticamente il drive CD.
Se nel lettore con c’è nessun CD si passa al collegamento USB. Se manca anche il mezzo di
memoria USB, è indicato “no dISC” (nessun CD).
Dopo l’uso spegnere l’apparecchio con
l’interruttore POWER. Le seguenti impostazioni
rimangono memorizzate per l’uso successivo:
– il modo di funzionamento scelto
Capitolo 5.4
☞
– l’indicazione scelta per il tempo
Capitolo 5.3
☞
– il campo scelto per la regolazione della velocità
Capitolo 5.9
☞
I comandi sono possibili attraverso i tasti sull’apparecchio o tramite il telecomando. Il capitolo 5
tratta esclusivamente il comando tramite i tasti
dell’apparecchio. Il Capitolo 6 offre delle informazioni sul telecomando.
5.1 Riprodurre brani musicali
1) Per inserire un CD, aprire il cassetto CD (1)
con il tasto
rivolta verso l’alto e richiudere il cassetto con
il tasto .
In più o in alternativa si può inserire una
chiavetta USB nel contatto USB (2) oppure si
può collegare un disco rigido (eventualmente
con alimentazione propria) con il contatto
USB.
2)
Per cambiare fra CD e memoria USB premere
il tasto CD / USB (13). Il lettore deve trovarsi
in pausa; eventualmente premere il tasto
(19). Il supporto dati scelto è indicato sul display: “CD” o “USB” (J).
3)
Dopo il caricamento di un supporto dati, il lettore si trova in pausa sul primo titolo. Il display
mostra, sotto l’indicazione “TRACK”(A),
il numero del titolo (con MP3: il numero
del titolo nella cartella) e sotto l’indicazione
“Total” (M) il numero globale dei titoli (con
MP3: il numero totale dei titoli nella cartella).
Se un disco rigido ha più partizioni, per
scegliere una partizione differente, procedere come segue:
a) Tener premuto il tasto FOLDER (4) finché
l’indicazione del tempo (O) del display
cambia in “PA-SEL”. La riga di testo (N)
indica il nome della partizione attuale.
b) Con il tasto ❙◀ o ▶❙ (18) scegliere la par-
tizione. Se si tiene premuto uno dei tasti,
le partizioni si scelgono rapidamente per
mezzo della manopola (16).
c) Per confermare premere il tasto FOLDER.
Nota sulle partizioni con più cartelle:
Se dopo l’attivazione del modo di scelta della partizione non si cambia la partizione, ma si conferma
la partizione attuale con il tasto FOLDER, il display
indica “FO-SEL”, fa vedere “FOLDER” (A) e il numero delle cartelle (M). Se a questo punto si preme
uno dei tasti SKIP (18), il lettore passa al modo di
scelta di cartelle ed è possibile scegliere la cartella
voluta ☞ punto 4.
4)
Se con funzionamento MP3, i titoli sono
inseriti in varie cartelle, per scegliere una
cartella differente, procedere come segue:
a) Premere il tasto FOLDER (4). L’indicazione
del tempo (O) passa a “FO-SEL”. L’indicazione (A) passa da “TRACK” a “FOLDER”
e indica ora il numero della cartella attuale. L’indicazione (M) indica il numero
globale delle cartelle.
b) Con il tasto ❙◀ o ▶❙ scegliere la cartella. Se
si tiene premuto uno dei tasti, le cartelle si
possono scegliere rapidamente con l’aiuto
della manopola (16).
c) Per confermare la scelta premere il tasto
FOLDER; il display visualizza nuovamente
l’indicazione del tempo (O) e l’indicazione
“TRACK” (A).
5)
Per avviare il primo titolo, premere il tasto
(19). Durante la riproduzione, si vede ▶ (B) e il
LED sopra il tasto è acceso costantemente. La
riproduzione può essere interrotta e riavviata
in qualsiasi momento per mezzo del tasto
▶
❙❙ . Nel modo di pausa, il LED sopra il tasto
lampeggia.
(3). Inserire il CD con la scritta
▶
▶
Per scegliere un altro titolo usare i tasti ❙◀
e ▶❙ (18).
Tasto ▶❙ : saltare al titolo successivo
❙◀ : saltare all’inizio del titolo attuale.
Tasto
Premendo il tasto più volte, si torna indietro
sempre di un titolo.
Se si tiene premuto uno dei tasti, i titoli si
possono scegliere rapidamente con l’aiuto
della manopola (16).
6) Durante la riproduzione di un CD, il cassetto
CD è bloccato. Per cambiare il CD, avviare
dapprima la pausa con il tasto
premere il tasto per aprire il cassetto.
Durante la riproduzione di un mezzo
di memoria USB, il cassetto CD può essere
aperto.
7)
Prima di spegnere l’apparecchio, chiudere
sempre il cassetto CD con il tasto , per
proteggere dallo sporco il sistema di scan
❙❙
sione laser.
5.2 Caricare delle playlist
Per riprodurre una determinata scelta di file
MP3, si possono caricare nel lettore delle playlist
create su un computer con l’estensione “wpl”,
“xml” o “m3u”.
Importante: Una playlist e i relativi file MP3
devono trovarsi sullo stesso mezzo di memoria.
Le playlist devono sempre essere memorizzate
nella directory principale (root).
1)
Il lettore deve trovarsi in pausa; eventualmente premere il tasto
2) Tener premuto il tasto CONT./ LIST (6), e con
il tasto ❙◀ o ▶❙ (18) decidere quale formato
dei file playlist deve essere cercata. La riga
di testo (N) indica la possibile scelta: “M3U
Scan”, “WPL Scan”, “XML Scan” (scegliendo
la quarta opzione “Folder”, non viene caricata nessuna playlist).
Liberando i tasti, la prima playlist è caricata. Il display indica sotto l’indicazione
“TRACK” (A) il numero del titolo e sotto
l’indicazione “Total” (M) il numero globale
dei titoli nella playlist.
Nota: Se non si trova nessuna playlist, il display
indica “no FILE”. Quindi, tenendo premuto il tasto
CONT. / LIST, con il tasto ❙◀ o ▶❙ scegliere un altro
formato di file oppure l’opzione “Folder”, per ritornare nel modo di riproduzione delle cartelle.
3)
Se esistono più playlist, per scegliere una
playlist differente, procedere come segue:
a) Premere il tasto FOLDER (4). L’indicazione
del tempo (O) cambia in “FO-SEL”. L’indicazione (A) cambia da “TRACK” a “FOLDER” e indica ora il numero della playlist
attuale. L’indicazione (M) indica il numero
totale delle playlist nel formato scelto.
b)
Scegliere la playlist con il tasto ❙◀ o ▶❙.
Se si tiene premuto un tasto, le playlist si
possono scegliere rapidamente per mezzo
della manopola (16).
c)
Per confermare la scelta premere il tasto
FOLDER. Il display ritorna all’indicazione del
tempo (O) e all’indicazione “TRACK” (A).
4) Avviare la riproduzione del primo titolo oppure scegliere un altro titolo della playlist
Capitolo 5.1, punto 5.
☞
❙❙
5) Per riprodurre i titoli senza una playlist, attivare la pausa con il tasto
il tasto CONT./ LIST e premere il tasto ❙◀ o
▶❙
tante volte finché la riga di testo indica
“Folder”. Lasciando liberi i tasti, non è più
caricata nessuna playlist.
▶
❙❙ (19).
▶
❙❙. Tener premuto
▶
❙❙
, quindi
-
24
Page 25

5.3 Indicazione delle informazioni sui
titoli, delladurata e indicazione BPM
1.
Le informazioni sui titoli sono indiciate
nella riga di testo (N):
– nei CD audio standard con testo CD il
nome del titolo
– con MP3 il nome del file
La riga di testo può essere impostata per
l’indicazione delle seguenti informazioni
(tag id3). Per fare ciò tenere premuto il
tasto TIME / TAG (5) e scegliere con il tasto
❙◀ o ▶❙ (18):
Indicazione (L)
TITLE = nome del titolo
ALBUM = nome dell’albo
ARTIST = nome dell’artista
niente = nome del file
Con il tasto FOLDER (4), la riga di testo
può cambiare fra l’indicazione della relativa informazione sul titolo e l’indicazione
del nome della cartella (oppure, se è stata
caricata una playlist, il nome della playlist).
2.
La durata del titolo è rappresentata come
indicazione numerica (O); i secondi sono suddivisi in 75 cosiddetti frame. Inoltre, il diagramma a barre (H) rappresenta graficamente
con la sua lunghezza il tempo trascorso, in
relazione alla durata (rap pre sentazione relativa del tempo). La barra segnala gli ultimi
30secondi di un titolo lampeggiando in tutta
la sua lunghezza, e gli ultimi 15 se condi con
un lampeggio più veloce.
– L’indicazione del tempo può essere cam-
biata con il tasto TIME / TAG (5):
– Se è indicato “Elapse” (E), è indicato il
tempo già trascorso del titolo.
– Se è indicato “Total Remain” (F, G), è indi-
cato il tempo residuo dell’intero CD
(non con MP3).
– Se è indicato “Remain” (G), è indicato il
tempo residuo del titolo.
3.
Dopo la scelta di un titolo. il beatcounter
rileva automaticamente il numero delle battute al minuto (BPM = “beats per minute”).
Dopo breve tempo si vede il numero nell’in-
dicazione BPM (P). Se il beatcounter non è
in grado di rilevare nessun valore (p. es. con
musiche lente), il valore può essere determinato anche manualmente:
a) Premere alcune volte brevemente il tasto
BPM (21) nel ritmo della musica (per lo
meno 4 ×). Viene indicato il numero delle
battute, e l’indicazione “BPM” lampeggia per segnalare il modo di conteggio
manuale.
b)
Per ritornare nel modo automatico di
conteggio, tener premuto il tasto BPM,
finché l’indicazione “BPM” smette di lampeggiare.
5.4 Scegliere il modo di funzionamento
Per cambiare fra riproduzione di titoli singoli
[indicazione “Single” (C)] e riproduzione continua [indicazione “Cont.” (D)], premere il tasto
CONT./ LIST (6).
1. Con la riproduzione di titoli singoli, l’ap-
parecchio va in pausa alla fine di ogni titolo.
Questo modo è previsto in particolar modo
per applicazioni DJ. Con questo modo, dopo
la scelta di un titolo, il lettore si trova esattamente sul punto dove inizia la musica (generalmente non è l’indice del tempo 0:00:00,
ma alcuni frame oltre, p. es.: 0:00:15). Questo
punto viene memorizzato automaticamente
come punto d’avvio (punto auto-cue) e è indicato sul display con “CUE” (K). Dopo l’avvio
del titolo, con il tasto CUE (17) si può ritornare
su tale punto d’avvio. Al termine della riproduzione del titolo, l’apparecchio va in pausa
esattamente sul punto dove inizia la musica
del titolo successivo. Tale punto è memorizzato come nuovo punto d’avvio.
2. Con la riproduzione continua, tutti i titoli
(con MP3; tutti i titoli della cartella o della
playlist) sono riprodotti in successione e senza
fine; dopo l’ultimo titolo parte nuovamente il
primo titolo. Durante la riproduzione e la scelta
di un titolo non si fissano punti auto-cue.
N. B.: In alcuni casi, anche nel modo “riproduzione continua” si fissa un punto auto-cue (non
con l’esattezza di un frame all’inizio della musica,
ma sull’indice di tempo 0:00:00), p. es. dopo il caricamento di un supporto di dati.
5.5 Riproduzione dell’inizio di un titolo
Con il tasto CUE (17) si può riprodurre l’inizio
di un titolo finché tale tasto è tenuto premuto.
Liberando il tasto, l’apparecchio ritorna all’inizio
del titolo e va in pausa.
1) Il lettore deve essere messo su riproduzione
di titoli singoli: indicazione “Single” (C).
Se si vede “Cont.” (D), premere il tasto
CONT. / LIST (6).
2)
Selezionare il titolo (scelta di un titolo e scelta
di una cartella o playlist ☞risp. capitolo 5.1
e 5.2).
3)
Tenendo premuto il tasto CUE, riprodurre
l’inizio del titolo.
4) Per riprodurre il titolo, azionare il tasto
▶
❙❙
(19).
5.6 Avanzamento e ritorno veloce
Se un titolo deve avanzare o ritornare velocemente, premere dapprima il tasto SEARCH (20).
Nella riga di testo (N) si vede “SEARCH”. Girare
la manopola (16) nella direzione voluta. La velocità in avanti o indietro dipende dalla velocità
di rotazione della manopola.
Per disattivare la funzione, premere nuovamente il tasto SEARCH (l’indicazione “SEARCH”
si spegne). Nel modo di riproduzione, la funzione
si disattiva automaticamente passati 8 secondi
dopo l’ultimo azionamento della manopola.
Nota: Nel modo di pausa, dopo un avanzamento o
ritorno veloce, si ripete continuamente il punto momentaneo. Per terminare la ripetizione, premere due
volte brevemente il tasto CUE (17) [si fissa un nuovo
punto cue, ☞ Cap. 5.8] oppure avviare la riproduzione
con il tasto
▶
❙❙ (19).
5.7 Posizionarsi con esattezza su un
punto determinato
È possibile posizionarsi su un punto con l’esattezza di 1 frame (¹⁄ 75 secondo), se, per esempio,
la riproduzione non deve iniziare con l‘inizio del
titolo bensì da un determinato punto.
1)
Se tale punto è stato raggiunto all’incirca durante la riproduzione o con l’avanzamento / ritorno veloce (☞Cap. 5.6), con il tasto
(19) attivare la pausa.
2)
Girando la manopola (16) a destra o a sinistra, posizionarsi con esattezza sul punto
desiderato. Per un controllo acustico, tale
punto viene ripetuto continuamente.
3) Raggiunto il punto, premere due volte bre-
vemente il tasto CUE (17). In questo modo è
▶
memorizzato questo punto e la riproduzione
ripetuta viene terminata. Con il tasto
può ora avviare la riproduzione partendo da
questo punto.
5.8 Salto ad un punto determinato (punto cue)
Per poter saltare velocemente su un punto determinato, con il tasto CUE (17) si può memorizzare un punto d’avvio (punto cue). Tuttavia,
nel modo di riproduzione di titoli singoli, quando
si raggiunge o sceglie il titolo successivo, tale
punto viene sovrascritto con il punto d’avvio
(punto auto-cue) del titolo successivo [eventualmente passare alla riproduzione di tutti i titoli
azionando il tasto CONT./ LIST (6)].
N. B.: Il punto cue memorizzato viene cancellato
quando:
– si sceglie una cartella (o una playlist) differente
– si cambia fra CD e USB
– si spegne l’apparecchio
1) Durante la riproduzione, con il tasto
attivare la pausa quando è raggiunto il punto
sul quale si desidera tornare successivamente.
Il LED sopra il tasto CUE (17) lampeggia.
2) Se necessario, posizionarsi con esattezza su
tale punto servendosi della manopola (16)
(☞Capitolo 5.7). Dopo la rotazione della
manopola, il punto viene ripetuto continuamente.
3)
Premere il tasto CUE. In questo modo, il
punto viene memorizzato come punto cue.
Sul display si vede “CUE” (K) e il LED sopra
il tasto CUE rimane acceso continuamente.
Per terminare la riproduzione ripetuta, si può
premere un’altra volta il tasto CUE.
4) Riavviare la riproduzione con il tasto
5)
Con il tasto CUE si può ora saltare indietro sul
punto cue. Dopo il salto indietro, sul display
si vede “CUE” e il lettore si trova in pausa.
6) Con il tasto
▶
❙❙ avviare la riproduzione op-
pure tener premuto il tasto CUE per tutto il
tempo durante il quale si desidera riprodurre
il titolo. Lasciando il tasto, CUE, il lettore ritorna sul punto cue e si mette in pausa.
5.9 Modificare la velocità con o senza
spostamentodell’altezza del suono
Con il cursore (11) è possibile modificare la velocità di rotazione fino a ±100 %:
+100 % = velocità doppia,
−100 % = arresto
1) Scegliere il campo di regolazione con il tasto
PITCH (9). L’impostazione scelta con il tasto
PITCH è indicata tramite i due LED (10) vicino
al tasto:
– entrambi i LED spenti:
regolatore della velocità disattivato,
il titolo è riprodotto con velocità normale
– il LED 8 % è acceso:
regolatore della velocità attivato,
campo di regolazione ±8 %
– il LED 16 % è acceso:
❙❙
regolatore della velocità attivato,
campo di regolazione ±16 %
– entrambi i LED sono accesi:
regolatore della velocità attivato,
campo di regolazione ±100 %
In più, con ogni pressione del tasto PITCH,
la riga di testo (N) indica brevemente l’impostazione scelta: “Pitch 8 %”, “Pitch 16 %”,
“Pitch 100” o “Pitch off”.
▶
▶
▶
❙❙ si
❙❙ (19)
❙❙.
Italiano
25
Page 26

2) Impostare la velocità con il cursore. Il display
REMOTE
visualizza in alto a destra (I) la deviazione
percentuale dalla velocità normale. Il numero
delle battute (P) cambia in corrispondenza.
Italiano
3)
Modificando la velocità, cambia anche in
proporzione l’altezza del suono. Se l’altezza
del suono deve rimanere costante, premere
il tasto MT (22). Sul display appare l’indicazione “MT” (R) e il LED vicino al tasto MT si
accende. Per disattivare la funzione, premere
nuovamente il tasto MT.
5.10 Pitch Bend – adattare il ritmo fra due brani musicali
Usando due lettori CD / MP3, è possibile far
coincidere esattamente le battute di due brani
musicali con la stessa velocità. In questo modo,
nel caso di una dissolvenza all’altro apparecchio,
il ritmo per il ballo non viene interrotto.
1) Per prima cosa adattare la velocità del brano
musicale sul quale effettuare la dissolvenza,
a quella del brano attuale servendosi del regolatore di velocità (11). Per fare ciò, con il
cursore impostare lo stesso numero di battute
al minuto, vedi l’indicazione (P) in basso a
destra sul display.
2) Fare coincidere con esattezza le battute del
brano sul quale effettuare la dissolvenza con
le battute del brano attuale, servendosi dei
tasti PITCH BEND (8): finché si tiene premuto
il tasto + oppure −, il titolo aumenta o riduce
la velocità del 16 %. In questo modo, le battute si spostano rispetto a quelle del brano
musicale attuale.
3)
Le battute possono essere spostate anche
girando la manopola (16).
5.11 Generare degli effetti
5.11.1 Effetto scratch
Per generare un effetto scratch (che imita la rotazione manuale del piatto del disco), premere il
tasto SCRATCH / F. START (15) e girare la manopola (16) in un senso o nell’altro. La riga del testo
(N) indica “SCRATCH”. Per disattivare l’effetto
premere nuovamente il tasto SCRATCH / F. START.
5.11.2 Effetto di trascinamento
(draggingeffect)
Se è stata attivata la funzione Master-Tempo
(altezza costante del suono) [indicazione “MT”
(R) sul display, e il LED vicino al tasto MT (22)
è acceso], disattivarla con il tasto MT. Girando
la manopola (16) nei due sensi, la velocità di
riproduzione si riduce e aumenta alternativamente. In questo modo si ottiene un effetto
tipo trascinamento del piatto di un giradischi.
5.11.3 Effetto bop (balbuzie)
Il punto cue memorizzato con il tasto CUE (17)
(☞Cap. 5.8) può essere utilizzato anche per
generare un interessante effetto di balbuzie
(bop): premendo ripetutamente e brevemente
il tasto CUE, si ottiene un effetto di balbuzie.
Tale effetto è più pronunciato se il punto cue è
particolarmente adatto (p.es. l’attacco di uno
strumento o l’inizio di una parola).
5.12 Compilare una sequenza individuale di titoli
Il lettore CD/ MP3 offre la possibilità di programmare una sequenza individuale di un massimo di
99 titoli. Con il modo MP3, i titoli possono essere
compilati da varie cartelle o playlist. Tuttavia, la
sequenza programmata non è disponibile sempre – contrariamente a una playlist – ma viene
cancellata se si passa ad un altro supporto di
dati e dopo lo spegnimento dell’apparecchio.
5.12.1 Programmare e avviare
una sequenza di titoli
1) Se è in corso la riproduzione di un titolo, at-
tivare dapprima la pausa con il tasto
2)
Con il tasto PROG. (7) attivare il modo di
programmazione. L’indicazione del tempo (O)
passa all’indicazione della prima locazione
di memoria “P-01”. L’indicazione “PG” (Q)
lampeggia velocemente.
Nota: Se si vuole subito uscire da questo modo,
tener premuto il tasto PROG. finché il display visualizza nuovamente il tempo (O).
3)
Scegliere il primo titolo da memorizzare.
(Scelta di un titolo e scelta di una cartella o
playlist
4)
Come conferma della scelta del titolo pre-
risp. Cap. 5.1 e 5.2).
☞
mere il tasto PROG. Sarà visualizzata la locazione successiva di memoria “P-02”.
5) Ripetere i passi 3 e 4, finché la sequenza è
completa. Se sono stati memorizzati 99 titoli
e se si cerca di memorizzare un altro titolo,
appare il messaggio “FULL”.
6) Per riprodurre la sequenza, premere il tasto
▶
❙❙
. L’indicazione “PG” lampeggia più lentamente. Il display indica il numero del titolo
(A) nella sequenza e il numero totale (M) dei
titoli programmati.
I titoli saranno riprodotti secondo il modo
di funzionamento scelto (☞Capitolo 5.4).
7)
Per ritornare al modo normale di riproduzione, attivare la pausa con il tasto
premuto il tasto PROG. finché l’indicazione
“PG” smette di lampeggiare.
Per riprodurre nuovamente la sequenza,
attivare la pausa e premere il tasto PROG. in
modo che l’indicazione “PG” lampeggi nuovamente. Avviare la sequenza con il tasto
Nota: Finché l’indicazione “PG” lampeggia o è accesa costantemente, la sequenza è disponibile. Se non
si vede più “PG”, significa che la sequenza è stata
cancellata.
5.12.2 Controllare la sequenza
1) Se è in corso la riproduzione di un titolo, attivare dapprima la pausa con il tasto
2)
Se a questo punto, l’indicazione “PG” (Q)
sta lampeggiando, premere una volta il tasto
PROG. (7). Se l’indicazione “PG” rimane accesa costantemente, premere due volte il
tasto PROG.
3)
Con il tasto ❙◀ o ▶❙ (18) selezionare una
dopol’altra le locazioni di memoria (“P-01”
… “P-99”). Nella riga di testo (N) sarà visualizzato il nome del titolo memorizzato.
4) Per riprodurre la sequenza premere il tasto
▶
❙❙.
▶
▶
❙❙
▶
❙❙
(19).
e tener
▶
❙❙
❙❙
(19).
5.12.3 Completare o cancellare
unasequenza
1) Se è in corso la riproduzione di un titolo, at-
tivare dapprima la pausa con il tasto
2)
Se l’indicazione “PG” (Q) sta lampeggiando,
tener premuto il tasto PROG. (7) finché “PG”
smette di lampeggiare.
3)
Premere brevemente il tasto PROG., in modo
che “PG” lampeggi velocemente e l’indicazione del tempo (O) passi all’indicazione
della locazione successiva di memoria libera
“P-…”.
4)
Per cancellare l’intera sequenza premere il
tasto PROG finché il display indichi nuovamente il tempo (O) oppure, per aggiungere
un altro titolo, sceglierlo (scelta di un titolo
e scelta di una cartella o playlist ☞risp.
Cap.5.1 e 5.2) e confermare con il tasto
PROG. Per riprodurre la sequenza completata
premere il tasto
▶
❙❙.
5.13 Avviamento con fader
La funzione Start / Pausa del tasto
essere telecomandata da un mixer con funzione
di avviamento con fader. Il collegamento con il
mixer è descritto nel capitolo 4. Per impostare
sul lettore l’avviamento con il fader del mixer,
tener premuto il tasto SCRATCH / F. START (15),
e con il tasto ❙◀ o ▶❙ (18) scegliere “LOCK”,
“CUE / PLAY” o “TACT”. L’impostazione viene
visualizzata nella riga di testo (N). Lasciando i
tasti, il modo scelto per l’avviamento con fader
è impostato.
LOCK = Comando tramite un interruttore on /off
Per la maggior parte dei mixer del programma
di IMG STAGELINE si deve scegliere questa
posizione dell’interruttore. Aprendo il fader
si chiude un interruttore sul mixer che avvia
la riproduzione. Chiudendo il fader, l’interruttore si apre mettendo in pausa il lettore.
REMOTE
Fig. 5 Avviamento con fader tramite un
interruttore on / off
.
TACT = Comando tramite un pulsante
Se il pulsante viene azionato per la prima
volta aprendo il fader, la riproduzione si avvia.
Se il pulsante viene azionato per la seconda
volta chiudendo il fader, il lettore si mette
in pausa.
Fig. 6 Avviamento con fader tramite un
pulsante
CUE PLAY = Comando tramite un impulso
Aprendo il fader, per via di un breve impulso
di comando del mixer si avvia la riproduzione
dall’inizio del titolo (punto auto-cue ☞Capitolo 5.4) oppure dal punto cue stabilito con il
tasto CUE (17) [☞Capitolo 5.8]. Chiudendo
il fader, il lettore ritorna allo stesso punto
▶
▶
❙❙
(19).
❙❙ (19) può
Start
Pause
1. × Start
2. × Pause
26
Page 27

d’avvio in seguito ad un altro impulso di comando e si mette in pausa.
REMOTE
1. × Cue Play
2. × Pause
Fig. 7 Avviamento con fader tramite un impulso
6 Telecomando
Il telecomando a infrarossi in dotazione è consegnato con batteria. Prima della prima messa in
funzione, staccare dal portabatteria la pellicola
isolante che si trova sul retro del telecomando.
Premendo un tasto del telecomando, dirigere
il telecomando sempre verso il sensore a infrarossi (14) sull’apparecchio. Fra telecomando e
sensore, la vista deve essere libera.
I seguenti tasti del telecomando possono essere
usati come i tasti sull’apparecchio:
OPEN / CLOSE (23) [corrisponde al tasto (3)]
FOLDER (25)
PITCH BEND (26)
MT (27)
PITCH (28)
PLAY/ PAUSE (29)
CUE (30)
PROG. (31)
CD / USB (32)
I tasti SINGLE / CONT (33), TIME (34) e SKIP ❙◀ / ▶❙
(35) possono essere usati, con alcune limitazioni,
come i tasti CONT. / LIST (6), TIME / TAG (5) e SKIP
❙◀ / ▶❙ (18) sull’apparecchio:
–
Il tasto SINGLE / CONT può essere usato solo
per cambiare il modo di funzionamento;
non è possibile caricare delle playlist.
– Il tasto TIME può essere usato solo per cam-
biare l’indicazione del tempo;
il cambio dell’indicazione tag id3 non è possibile.
– I tasti SKIP ❙◀ / ▶❙ del telecomando possono
essere usati come quelli sull’apparecchio per
scegliere titoli, cartelle, playlist e partizioni;
per una scelta rapida, tener premuto il relativo
tasto.
Tuttavia, i tasti non possono essere usati in
combinazione con altri tasti.
I tasti numerici (24) e i tasti SCAN ◀◀ e ▶▶
(36) possono essere usati in alternativa ai tasti
sull’apparecchio:
–
I tasti numerici possono essere usati, al posto
dei tasti SKIP, per scegliere titoli, cartelle,
playlist e partizioni. Per la scelta digitare il relativo numero. Per i numeri a più cifre, premere
uno dopo l’altro i relativi tasti, p. es. per il numero 10 premere i tasti “1” e “0”.
– I tasti SCAN ◀◀ e ▶▶ servono per l’avanza-
mento e ritorno veloce: mentre si tiene premuto il relativo tasto SCAN, il titolo scorre in
avanti o indietro.
6.1 Sostituzione della batteria
Se la portata del telecomando si riduce, occorre
sostituire la batteria.
1) Spostare il blocco del portabatteria a sinistra
(1. freccia in fig. 8) e contemporaneamente
sfilare il portabatteria verso il basso (2.freccia).
1.2.
Fig. 8 Sostituzione della batteria
2)
Togliere la vecchia batteria e inserire una
nuova (batteria a bottone di 3 V, tipo
CR2025). Fare attenzione che il polo positivo
della batteria sia rivolto verso l’alto.
3) Rispingere il portabatteria nel telecomando.
Non gettare le batterie scariche nelle
immondizie di casa bensì negli appositi contenitori (p. es. presso il vostro
rivenditore).
7 Aggiornare il firmware
Se in Internet è disponibile un nuovo firmware
(sistema operativo dell’apparecchio), quello
dell’apparecchio può essere aggiornato:
1)
Se nella homepage di IMG STAGELINE
(www.imgstageline.com) è offerto un up date
del firmware per il CD-196USB, scaricarlo e
copiarlo su una chiavetta USB.
2)
Spegnere il lettore CD / MP3 con l’interruttore
di rete (12).
3) Inserire la chiavetta USB con il nuovo firmware nella presa USB (2).
4)
Tener premuto il tasto PROG. (7) e accendere l’apparecchio nuovamente. Lasciare il
tasto PROG. solo quando sul display si vede
“UP dA t E”.
5) Se dopo il caricamento dei dati, nella riga di
testo (N) appare “Ready”, premere il tasto
▶
❙❙ (19), per avviare l’aggiornamento del
firm ware. Sul diagramma a barre (H) e con la
riga di testo si può seguire l’aggiornamento.
Quando è visualizzato “Finish” il firmware è
aggiornato.
6) Spegnere l’apparecchio e riaccenderlo.
Attenzione: L’aggiornamento del firmware si
fa a proprio rischio. Dopo l’update, il modo di
funzionamento dell’apparecchio può essere diverso da quanto descritto in queste istruzioni.
8 Manutenzione
Proteggere l’apparecchio dalla polvere, da vibrazioni, umidità e calore. Per la pulizia usare solo
un panno morbida, asciutto; non impiegare in
nessun acqua o caso prodotti chimici.
Note su possibili errori di lettura:
Il fumo di sigarette e la polvere penetrano facilmente fra tutte le aperture dell’apparecchio e
si depositano sul sistema ottico della scansione
ai raggi laser. Se ciò dovesse provocare errori di
lettura e buchi nella riproduzione, l’apparecchio
deve essere pulito in un laboratorio specializzato.
Una tale pulizia è a pagamento, anche durante
il periodo di garanzia!
9 Dati tecnici
Gamma di frequenze: . . 20 – 20 000 Hz
Fattore di distorsione: . . < 0,1 %
Separazione canali: . . . . > 75 dB
Range dinamico: . . . . . . > 80 dB
Rapporto S / R: . . . . . . . . > 75 dB
Uscite
LINE OUT: . . . . . . . . . . 2 V
DIGITAL OUT: . . . . . . . 0,5 Vpp S / PDIF
Standard USB: . . . . . . . . 2.0
Sistemi di file leggibili: . . NTFS, FAT, HFS+
Numero max. di
partizioni: . . . . . . . . . . 16
cartelle: . . . . . . . . . . . 999 per partizione, in
8 livelli max.
file MP3 . . . . . . . . . . . 999 per cartella
Memoria anti-shock
CD audio standard: . . . 8 s
file MP3: . . . . . . . . . . . 10 s
Alimentazione: . . . . . . . 230 V / 50 Hz
Potenza assorbita: . . . . . 15 VA
Temperatura d’esercizio: 0 – 40 °C
Dimensioni: . . . . . . . . . . 482 × 90 × 270 mm
(l × h × p),
2 U (unità d’altezza)
Peso: . . . . . . . . . . . . . . . 4,4 kg
Contatti
Porta USB: . . . . . . . . . tipo A
Uscita analogica: . . . . RCA sin. / dx.
Uscita digitale: . . . . . . RCA
Avviamento con fader: jack 3,5 mm
Con riserva di modifiche tecniche.
Italiano
In caso di non uso prolungato, conviene togliere
la batteria per non danneggiare il telecomando
se la batteria dovesse perdere.
La MONACOR ® INTERNATIONAL GmbH & Co. KG si riserva ogni diritto di elaborazione in qualsiasi forma
delle presenti istruzioni per l’uso. La riproduzione – anche parziale – per propri scopi commerciali è vietata.
27
Page 28

Lector CD / MP3 Profesional
Estas instrucciones de funcionamiento están
dirigidas a DJs profesionales y usuarios no profesionales con conocimientos técnicos. Lea aten-
Español
tamente estas instrucciones de funcionamiento
antes de utilizar el aparato y guárdelas para usos
posteriores.
Puede encontrar todos los elementos de
funcionamiento y las conexiones que se describen en la página 3 desplegable.
Contenidos
1 Conexiones y Elementos
deFuncionamiento . . . . . . . . . . 28
1.1 Panel frontal (fig. 1) . . . . . . . . . . . 28
1.1.1 Visualizador (fig. 3) . . . . . . . . . . 29
1.2 Control remoto (fig. 2) . . . . . . . . . . 29
1.3 Panel posterior (fig. 4) . . . . . . . . . . 29
2 Notas de Seguridad. . . . . . . . . . 29
3 Aplicaciones . . . . . . . . . . . . . 30
4 Colocación y ConexióndelLector . . . 30
5 Funcionamiento . . . . . . . . . . . 30
5.1 Reproducir piezas musicales . . . . . . . 30
5.2 Cargar listas de reproducción . . . . . . . 30
5.3 Indicación de la información de pista,
tiempo de reproducción y de BPM . . . . . 31
5.4 Selección del mododefuncionamiento . . . 31
5.5 Reproducción breve deuniniciode pista . . 31
5.6 Avance y retroceso rápidos . . . . . . . . 31
5.7 Selección precisa deunpuntoconcreto . . 31
5.8 Volver a un punto concreto (puntoCue) . . 31
5.9 Cambiar la velocidad con o sin
desplazarelpitch . . . . . . . . . . . . 32
5.10 Pitch Bend – Igualar el ritmo (beats)
entre dos piezas musicales . . . . . . . . 32
5.11 Efectos . . . . . . . . . . . . . . . . 32
5.11.1 Efecto scratch. . . . . . . . . . . . . 32
5.11.2 Efecto droning . . . . . . . . . . . . 32
5.11.3 Efecto stutter . . . . . . . . . . . . . 32
5.12 Programación de su secuencia
personal de pistas. . . . . . . . . . . . 32
5.12.1 Guardar y reproducir
unasecuenciade pistas . . . . . . . . 32
5.12.2 Comprobar una secuencia de pistas . . . 32
5.12.3 Completar o borrar unasecuenciadepistas 32
5.13 Inicio fader. . . . . . . . . . . . . . . 32
6 Control remoto . . . . . . . . . . . . 33
6.1 Cambio de la batería . . . . . . . . . . 33
7 Actualizar el Firmware . . . . . . . . 33
8 Mantenimiento del Aparato. . . . . . 33
9 Especificaciones . . . . . . . . . . . 33
1 Conexiones y Elementos
deFuncionamiento
1.1 Panel frontal (fig. 1)
Los botones con funciones duales están marcados con los símbolos
brevemente” y con para “mantener el botón
pulsado”.
1 Bandeja de CDs
2
Puerto USB para insertar un lápiz USB o para
conectar un disco duro
3 Botón para abrir y cerrar la bandeja de
CDs
4 Botón FOLDER para el modo MP3
1. Para el cambio de carpeta o para el cambio de lista de reproducción (carga de
listas de reproducción ☞ objeto 6, botón
CONT. / LIST)
Pulse brevemente el botón FOLDER, la
indicación temporal (O) pasa a “FO-SEL”
y se muestra “FOLDER” (A). Seleccione
la carpeta (lista de reproducción) con el
botón ❙◀ o ▶❙ (18) y confirme con el botón
FOLDER.
2. Para el cambio de partición, para conectar un disco duro con varias particiones.
Mantenga pulsado el botón FOLDER
hasta que la indicación temporal (O) cambie a “PA-SEL”. Seleccione la partición
con el botón ❙◀ o ▶❙ (18) y confirme con
el botón FOLDER.
5 Botón TIME / TAG
1. Para la indicación temporal
Para cambiar entre la indicación temporal (H, O), pulse brevemente el botón
TIME / TAG:
Indicación “Remain” (G)
Tiempo restante de la pista
Indicación “Elapse” (E)
Tiempo transcurrido de la pista
Indicación “Total Remain” (F, G)
Tiempo restante del CD completo
(no es posible en modo MP3)
2.
Para la indicación de etiquetas ID3 en
modo MP3
Con el botón TIME / TAG pulsado, cambie la línea de texto (N) a la indicación
de pista, álbum, artista (etiquetas ID3)
o nombre de archivo con el botón ❙◀ o
▶❙ (18).
6 Botón CONT. / LIST
1. Para la selección del modo de funcionamiento
Para cambiar entre reproducción de una
sola pista [indicación “Single” (C)] y
reproducción continua [indicación
“Cont.” (D)], pulse el botón CONT. / LIST.
2. Para cargar listas de reproducción
Con el botón CONT. / LIST pulsado, seleccione el formato de archivo de la lista de
reproducción (“M3U Scan”, “WPL Scan”,
“XLM Scan”) o “Folder” (= ninguna
lista cargada) con el botón ❙◀ o ▶❙ (18)
[☞apartado 5.2].
7
Botón PROG. para compilar y reproducir
una secuencia de pistas individual (☞apartado5.12)
8 Botones PITCH BEND para adaptar el ritmo
de la pista en reproducción al ritmo de una
pieza musical que se está reproduciendo en
otro lector (☞apartado 5.10)
para “pulsar el botón
9 Botón PITCH para activar / desactivar el con-
trol de velocidad (11) y para seleccionar
el rango de ajuste de la velocidad (±8 %,
±16 % ó ±100 % de desviación máxima de
la velocidad estándar).
El ajuste seleccionado se muestra mediante
dos LEDs ☞objeto 10
10 Indicación para el ajuste seleccionado con
el botón PITCH (9):
– Ambos LEDs apagados:
Control de velocidad (11) desactivado
– LED 8% iluminado:
Control de velocidad activado
Rango de ajuste ±8 %
– LED 16 % iluminado:
Control de velocidad activado
Rango de ajuste ±16 %
– Ambos LEDs activados:
Control de velocidad activado
Rango de ajuste ±100 %
11 Control para cambiar la velocidad de repro-
ducción [sin cambiar el pitch si el LED junto
al botón MT (22) se ilumina]; el control se
activa cuando se ilumina al menos un LED
(10) junto al botón PITCH (9).
12 Interruptor POWER
13
Botón CD / USB para conmutar entre CD y
medio de almacenamiento USB: Para ello, el
lector tiene que ponerse en pausa.
14
Sensor IR para las señales del control remoto
15 Botón SCRATCH / F.START
1. Para la función Scratch
Para activar y desactivar la función
Scratch, pulse brevemente el botón
SCRATCH / F.START. Con la función activada [en la línea de texto (N) se muestra
“SCRATCH”], los efectos Scratch se pueden crear con el jog wheel (16).
2. Para el tipo de inicio fader
Con el botón SCRATCH / F.START pulsado, seleccione el tipo de inicio fader
(“LOCK”, “CUE / PLAY” o “TACT”) con
el botón ❙◀ o ▶❙ (18) [☞apartado 5.13]
16 Jog wheel
1.
Para el avance y el retroceso rápidos
cuando se ha pulsado el botón SEARCH
(20)
2. Para crear efectos scratch cuando se ha
pulsado el botón SCRATCH / F.START (15)
3. Para la función “Pitch Bend” durante la
re producción de una pista
(☞apartado5.10)
4. Para seleccionar con precisión un punto
cuando el lector está en pausa
5. Con el botón ❙◀ o ▶❙ pulsado para la selección rápida de pistas, carpetas, listas de
reproducción o particiones (☞objeto18,
botones SKIP)
17
Botón CUE para reproducir brevemente
el inicio de pista (☞apartado 5.5) y para
volver a un punto previamente definido
(☞apartado 5.8)
18 Botones SKIP ❙◀ y ▶❙
1. Para la selección
– De pistas,
cuando se muestra “TRACK” (A)
▶❙ para seleccionar la siguiente pista
❙◀ para ir al inicio de la pista.
Si se pulsa el botón ❙◀ varias veces, el
aparato siempre retrocede una pista.
28
Page 29

– De carpetas o listas de reproducción,
cuando se muestra “FOLDER” (A)
(☞objeto 4, botón FOLDER)
– De particiones en el disco duro, cuando
se muestra “PA-SEL” (O)
(☞objeto 4, botón FOLDER)
Si uno de los botones se mantiene pulsado, el jog wheel (16) permite una selección rápida.
2. Para la selección de varias opciones con
el botón TIME / TAG (5), CONT. / LIST (6),
SCRATCH / F.START (15) pulsado
19 Botón PLAY / PAUSE
reproducción (LED sobre el botón iluminado constantemente) y pausa (LED sobre
el botón parpadeando)
20
Botón SEARCH para cambiar el jog wheel
(16) a la función “fast forward / reverse”
21 Botón BPM para el modo contador manual
del contador de beats y para volver al modo
automático (☞apartado 5.3)
22
Botón MT (master tempo) para activar y desactivar la función para el pitch constante
(☞apartado 5.9)
▶
❙❙ para cambiar entre
1.1.1 Visualizador (fig. 3)
A Cuando se muestra “TRACK”: Número de
la pista (modo MP3: número de la pista en
la carpeta o número de la pista en la lista
de reproducción)
Cuando se muestra “FOLDER” [después de
pulsar el botón FOLDER (4)]: Número de la
carpeta o número de la lista de reproducción
B Símbolo de reproducción
C
“Single”: Indica el modo de funcionamiento
de reproducción de una sola pista
D
“Cont.”: Indica el modo de funcionamiento
de reproducción continua de las pistas
E “Elapse”: Indica que se muestra el tiempo
transcurrido de una pista
F “Total”: Indica junto con la indicación “Re-
main” (G) que se muestra el tiempo restante
del CD (no es posible en modo MP3)
G “Remain”: Indica que se muestra el tiempo
restante de una pista. Indica junto con “Total
Remain” que se muestra el tiempo restante
del CD
H Barra gráfica para indicar el tiempo de re-
producción relativo de la pista
I
Indica la desviación de la velocidad estándar
en porcentajes
J “CD” o “USB”: Indica si se ha seleccionado
un CD o un medio de almacenamiento USB
K “CUE”: Aparece cuando el lector se ajusta
en pausa en el punto Cue
(☞apartados 5.4 y 5.8)
L “TITLE”, “ALBUM” o “ARTIST”: Cuando se
muestra la información de la pista (etiqueta
ID3) en la línea de texto (N) de una pista MP3
M Cuando se muestra “Total” encima de los
números: Número total de pistas (modo
MP3: Número total de pistas en la carpeta
o número total de pistas en la lista de reproducción)
Cuando ha desaparecido “Total” [después
de pulsar el botón FOLDER (4)]: Número
total de carpetas o número total de lista
de reproducción en el formato de archivo
seleccionado
N Línea de texto para información adicional
O Indicación del tiempo de reproducción, ver
también E y G
P Indicación de los beats por minuto
Q
“PG”: Indica que una secuencia de pistas se
ha memorizado; parpadea durante la programación y durante la reproducción de la
secuencia de pistas
R
“MT” (master tempo): Indica la función para
el pitch constante (☞apartado 5.9)
1.2 Control remoto (fig. 2)
23 Botón OPEN / CLOSE igual que (3)
24
Botones numéricos para la selección directa
– De pistas
Cuando se indica “TRACK” (A)
– De carpetas o listas de reproducción
Cuando se indica “FOLDER” (A)
(☞objeto 4, botón FOLDER)
– De particiones en el disco duro
Cuando se indica “PA-SEL” (O)
(☞objeto 4, botón FOLDER)
Los botones
25 FOLDER
26 PITCH BEND
27 MT
28 PITCH
29 PLAY/ PAUSE
30 CUE
31 PROG.
32 CD / USB
corresponden a los botones del mismo nombre en el aparato
33
Botón SINGLE / CONT igual que el botón
CONT. / LIST (6);
pero la carga de listas de reproducción sólo
se puede hacer en el aparato
34
Botón TIME igual que el botón TIME / TAG (5);
pero el cambio a indicación de etiqueta ID3
sólo se puede hacer desde el aparato
35 Botones SKIP ❙◀ y ▶❙ igual que los botones
SKIP del aparato para seleccionar pistas, carpetas, listas de reproducción o particiones;
para la selección rápida mantenga pulsado
el botón SKIP correspondiente;
pero no se pueden utilizar en combinación
con otros botones
36
Botones SCAN ◀◀ y ▶▶ para avance y
retroceso rápidos
1.3 Panel posterior (fig. 4)
37
Jack 3,5 mm REMOTE para el control remoto
de la función Start / Pause de un mezclador
(inicio fader)
38
Salida de audio analógica LINE OUT con nivel
de línea (RCA, L izquierda / R derecha)
39 Salida de audio digital DIGITAL OUT (RCA)
40 Cable de corriente para conectar a un en-
chufe (230 V/ 50 Hz)
2 Notas de Seguridad
Este aparato cumple con todas las directivas relevantes de la UE y por lo tanto está marcado
con el símbolo
ADVERTENCIA
¡PRECAUCIÓN! Nunca mire directamente al
•
mecanismo del CD cuando la bandeja del CD
está abierta, el haz del láser podría emitirse
provocando daños oculares.
El aparato está adecuado sólo para utilizarlo
•
en interiores. Protéjalo contra goteos, salpicaduras y humedad elevada. Rango de temperatura ambiente admisible: 0 – 40 ºC.
No coloque ningún recipiente con líquido en-
•
cima del aparato, p. ej. un vaso.
Desconecte inmediatamente el conector de
•
corriente de la toma si:
1. Existe algún daño visible en el aparato o
en el cable de corriente.
2.
El aparato ha sufrido daños después de una
caída o accidente similar.
3. No funciona correctamente.
Sólo el personal cualificado puede reparar el
aparato bajo cualquier circunstancia.
Un cable de corriente dañado sólo puede re-
•
pararse por el personal cualificado.
No tire nunca del cable de corriente para
•
desconectarlo de la toma, tire siempre del
enchufe.
No podrá reclamarse garantía o responsa-
•
bilidad alguna por cualquier daño personal
o material resultante si el aparato se utiliza
para otros fines diferentes a los originalmente
concebidos, si no se conecta o se utiliza adecuadamente o no se repara por expertos.
Del mismo modo, no se aceptará ninguna
responsabilidad por la pérdida de datos provocada por errores de funcionamiento o por
un defecto y los daños consiguientes de esta
pérdida de datos.
Si va a poner el aparato fuera de servicio
definitivamente, llévelo a la planta de
reciclaje de la zona para que su eliminación no sea perjudicial para el medio
ambiente.
.
El aparato está alimentado con
un voltaje peligroso. Deje el
mantenimiento en manos del
personal cualificado. El manejo
inexperto puede provocar una
descarga.
Español
29
Page 30

3 Aplicaciones
El lector CD / MP3 CD-196USB se ha diseñado
especialmente para aplicaciones DJ profesiona-
Español
les. Muchas características funcionales se han
adecuado precisamente a este rango de apli
caciones, p. ej. reproducción de una sola pista,
contador de beats automático, cambio de velocidad sin cambiar el pitch o memoria antichoque.
El CD-196USB permite reproducir CDs de
audio, incluso CDs de audio creados por usted
(CD-R) y CDs con pistas en formato MP3. Sin
embargo, pueden aparecer problemas cuando
se reproduce un CD-RW, dependiendo del tipo
de CD, del grabador de CDs y del programa de
grabación utilizado.
Mediante el puerto USB, se pueden reproducir también archivos MP3 desde un disco duro
o desde un lápiz USB. El soporte de multiparticiones del lector permite la conexión de discos
duros de diferentes formatos (FAT16 / FAT32,
NTFS, HFS+).
Nota: Debido a la gran cantidad de fabricantes de
medios de almacenamiento y de drivers, no podemos
garantizar que todos los medios de almacenamiento
sean compatibles con el CD-196USB.
4 Colocación y
ConexióndelLector
El lector CD / MP3 se puede configurar como
aparato de sobremesa en una superficie plana
y horizontal o se puede montar en un rack
(482 mm / 19”). Para su instalación en rack, se
necesitan 2 unidades de rack (1 U = 44,45 mm).
Antes de conectar o modificar cualquier conexión existente, desconecte el lector y todos los
aparatos conectados.
1) Si su mezclador o amplificador tiene una en-
trada digital, conecte esta entrada a la toma
amarilla RCA DIGITAL OUT (39).
Para aparatos sin salida digital, conecte
la salida estéreo LINE OUT (38) – canal
izquierdo L y canal derecho R – mediante el
cable con conectores RCA a una entrada de
línea (marcada posiblemente como: LINE IN,
AUX IN, CD).
2) El lector se puede iniciar y poner en pausa
mediante un mezclador con función de inicio
fader. Para ello, conecte la toma REMOTE
(37) mediante un cable con conectores jack
3,5 mm a las toma correspondiente del mezclador. Ponga el lector en el tipo de inicio
fader del mezclador, ☞apartado 5.13.
3)
Finalmente conecte la toma del cable de
corriente (40) a un enchufe (230 V/ 50 Hz).
5 Funcionamiento
Conecte el aparato con el interruptor POWER
(12). En el visualizador se muestra brevemente
“boot” (procedimiento de inicio) y WELCOME.
Cada vez que se conecta el aparato, el mecanismo de lectura CD se selecciona automáticamente. Si no hay CD en el lector, el aparato
cambia al puerto USB. Si no se ha conectado
ningún medio de almacenamiento USB, en el
visualizador se muestra “no dISC” (no hay CD).
Desconecte el aparato con el interruptor
POWER después del funcionamiento. Los siguientes ajustes se mantienen guardados para
la próxima vez:
– El modo de funcionamiento seleccionado
apartado 5.4
☞
– La indicación temporal seleccionada
apartado 5.3
☞
– El rango de ajuste de velocidad seleccionado
apartado 5.9
☞
El aparato puede funcionar con los botones del
aparato o con el control remoto. El apartado 5
sólo hace referencia al funcionamiento con los
botones del aparato. El apartado 6 incluye toda
la información sobre el control remoto.
5.1 Reproducir piezas musicales
1) Para insertar un CD, abra la bandeja del CD
(1) con el botón
cara con inscripciones mirando hacia arriba
y cierre la bandeja del CD con el botón
Como opción o alternativa, se puede
insertar un lápiz USB en el puerto USB (2) o
bien se puede conectar un disco duro (si es
necesario, con alimentación propia).
2) Para conmutar entre CD y medio de almacenamiento USB, pulse el botón CD / USB (13).
Para ello, el lector tiene que estar en pausa;
si es necesario, pulse el botón
visualizador se muestra el soporte de datos
seleccionado: “CD” o “USB” (J).
3) Después de leer un soporte de datos, el lector se pone en pausa en la primera pista. En
el visualizador se muestra el número de la
pista (modo MP3: el número de la pista en
la carpeta) bajo la indicación “TRACK” (A)
y el número de pistas total (modo MP3: el
número total de pistas en la carpeta) bajo la
indicación “Total” (M).
Si hay varias particiones en un disco duro,
siga estos pasos para seleccionar otra par-
tición:
a)
Mantenga pulsado el botón FOLDER (4)
hasta que la indicación temporal (O) del
visualizador cambie a “PA-SEL”. La línea
de texto (N) muestra el nombre de la partición actual.
b)
Seleccione la partición con el botón ❙◀
o ▶❙ (18). Si uno de los botones se mantiene pulsado, las particiones pueden
seleccionarse rápidamente con el jog
wheel (16).
c) Para confirmar, pulse el botón FOLDER.
Nota sobre particiones con varias carpetas:
Si la partición no cambia después de abrir el modo
de selección de partición pero se confirma la partición actual con el botón FOLDER, en el visualizador
se mostrará “FO-SEL”, la indicación “FOLDER” (A)
y el número de carpetas (M). Si se pulsa uno de
los botones SKIP (18), el lector cambia al modo
de selección de carpeta y se puede seleccionar la
carpeta que quiera ☞ paso 4.
4) Si para el modo MP3 las pistas están en carpetas diferentes, proceda del siguiente modo
para seleccionar otra carpeta:
a) Pulse el botón FOLDER (4). La indicación
temporal (O) pasa a “FO-SEL”. El campo
de visualización (A) cambia de “TRACK”
a “FOLDER” y ahora muestra el número
de la carpeta actual. El campo de visualización (M) muestra el número total de
carpetas.
b)
Seleccione la carpeta con el botón ❙◀ o
▶❙
. Si uno de los botones se mantiene pulsado, las carpetas pueden seleccionarse
rápidamente con el jog wheel (16).
c)
Para confirmar la selección, pulse el botón
FOLDER; el visualizador cambia a la indicación de tiempo de reproducción (O) y a
la indicación “TRACK” (A).
(3). Inserte el CD con la
▶
❙❙ (19). En el
5) Para iniciar la primera pista, pulse el botón
▶
❙❙ (19). Durante la reproducción ▶ se mues-
tra (B) y el LED sobre el botón se ilumina
constantemente. La reproducción se puede
interrumpir y reanudar en cualquier momento con el botón
▶
❙❙ . En el modo pausa
parpadea el LED sobre el botón.
Para seleccionar otra pista, utilice los
botones ❙◀ y ▶❙ (18):
Botón ▶❙ : Para ir a la siguiente pista
Botón ❙◀ : Para volver al inicio de la pista
en reproducción. Cada vez que se pulsa el
botón, el aparato retrocede una pista.
Si uno de los botones se mantiene pul-
.
sado, las pistas pueden seleccionarse rápidamente con el jog wheel (16).
6)
Durante la reproducción de un CD se bloquea la bandeja de CDs. Para cambiar un
CD, ponga primero el aparato en pausa con
el botón
▶
❙❙, luego pulse el botón para
abrir la bandeja.
Sin embargo, durante la reproducción de
un medio de almacenamiento USB se puede
abrir la bandeja.
7)
Antes de desconectar el aparato, cierre siempre la bandeja de CDs con el botón para
proteger el láser contra impurezas.
5.2 Cargar listas de reproducción
Para reproducir una selección de archivos MP3,
se pueden cargar en el lector listas de reproducción con la extensión de archivo “wpl”, “xml”
o "m3u” creadas en un ordenador.
Importante: La lista de reproducción y los archivos MP3 correspondientes tienen que estar en
el mismo medio de almacenamiento. Las listas
de reproducción tienen que guardarse siempre
en el directorio raíz.
1) El lector tiene que estar en pausa; si es necesario, pulse el botón
2)
Mantenga pulsado el botón CONT. / LIST (6) y
seleccione con el botón ❙◀ o ▶❙ (18) qué formato de archivo de lista de reproducción hay
que buscar. La línea de texto (N) muestra la
selección: “M3U Scan”, “WPL Scan”, “XML
Scan” (cuando seleccione la cuarta opción,
“Folder”, no se cargará ninguna lista).
Después de liberar los botones, se carga
la primera lista de reproducción. En el visualizador se muestra el número de la pista en
la lista de reproducción bajo la indicación
“TRACK” (A) y el número de pistas total en
la lista de reproducción bajo la indicación
“Total” (M).
Nota: Si no se encuentran listas de reproducción,
en el visualizador se muestra "no FILE". Luego
mantenga pulsado el botón CONT. / LIST y seleccione con el botón ❙◀ o ▶❙ otro formato de archivo
o bien la opción “Folder” para volver al modo de
reproducción de carpeta.
3)
Si hay varias listas de reproducción disponibles, proceda del siguiente modo para
seleccionar otra lista de reproducción:
a) Pulse el botón FOLDER (4). La indicación
temporal (O) pasa a “FO-SEL”. El campo
de visualización (A) cambia de “TRACK”
a “FOLDER” y ahora muestra el número
de la lista de reproducción actual. En el
campo de visualización (M) se muestra el
número total de listas de reproducción en
el formato de archivo seleccionado.
b) Seleccione la lista de reproducción con el
botón ❙◀ o ▶❙ . Si uno de los botones se
▶
❙❙ (19).
30
Page 31

mantiene pulsado, las listas de reproducción se pueden seleccionar rápidamente
con el jog wheel (16).
c)
Para confirmar la selección, pulse el botón
FOLDER. El visualizador cambia a la indicación de tiempo de reproducción (O) y a
la indicación “TRACK” (A).
4) Inicie la reproducción de la primera pista o
seleccione otra pista de la lista de reproducción ☞apartado 5.1, paso 5.
5) Para reproducir las pistas de nuevo sin una
lista de reproducción, ponga el aparato en
pausa con el botón
▶
❙❙ . Mantenga pulsado
el botón CONT. / LIST y pulse el botón ❙◀ o ▶❙
repetidamente hasta que aparezca “Folder”
en la línea de texto. Después de liberar los
botones, no se cargan más listas de reproducción.
5.3 Indicación de la información de
pista, tiempo de reproducción y
de BPM
1. La información sobre la pista se indica en
la línea de texto (N):
– Para CDs de audio estándar con texto CD:
Nombre de pista
– Para el modo MP3: Nombre de archivo
La línea de texto puede cambiarse por la
indicación de la siguiente información (etiquetas ID3). Para ello, mantenga pulsado
el botón TIME / TAG (5) y seleccione con el
botón ❙◀ o ▶❙ (18):
Indicación (L)
TITLE = nombre de pistas
ALBUM = nombre de álbum
ARTIST = nombre de artista
Ninguna = nombre de archivo
Con el botón FOLDER (4) se puede cambiar
la línea de texto entre indicación de la indicación de pista o indicación del nombre
de la carpeta (o, cuando se ha cargado una
lista de reproducción, el nombre de la lista
de reproducción).
2.
El tiempo de reproducción de la pista se vi-
sualiza como indicación numérica (O); los segundos se subdividen en 75 frames. Además,
la barra gráfica (H) representa gráficamente
el tiempo de reproducción, en referencia a
la duración de la pista, mediante su longitud
(presentación temporal relativa). Los últimos
30 segundos de una pista se indicarán con
la barra gráfica completa parpadeando, los
últimos 15 segundos con un parpadeo más
rápido.
La indicación de tiempo de reproducción
puede cambiarse con el botón TIME / TAG (5):
– Si se muestra “Elapse” (E), se indica el
tiempo transcurrido de la pista.
– Si se muestra “Total Remain” (F, G), se in-
dica el tiempo remanente del CD completo
(no es posible en modo MP3).
– Si se muestra “Remain” (G), se indica el
tiempo remanente de la pista.
3. Después de seleccionar una pista, el contador de beats determina automáticamente el
número de beats por minuto (BPM). Unos
instantes después, aparece el número en la
indicación BPM (P). Si el contador de beats
no puede determinar un valor correcto (p. ej.
para pistas musicales suaves), puede determinarse el valor manualmente:
a)
Pulse brevemente el botón BPM (21) varias
veces al ritmo de la música (4 veces como
mínimo). El número de beats aparece y la
indicación “BPM” parpadea para mostrar
el modo manual.
b)
Para volver al modo automático, mantenga pulsado el botón BPM hasta que
la indicación “BPM” deje de parpadear.
5.4 Selección del
mododefuncionamiento
Para cambiar entre reproducción de una sola
pista [indicación “Single” (C)] y reproducción
continua [indicación “Cont.” (D)], pulse el botón
CONT. / LIST (6).
1.
Para la reproducción de una sola pista,
el aparato se pone en pausa cuando acaba
la pista.
Este modo está previsto especialmente
para aplicaciones DJ. Si se ha ajustado este
modo, después de seleccionar una pista el
aparato se pone en pausa justo en el punto
en el que empieza la música (normalmente
no el índice temporal 0:00:00 sino algunos
frames después, p. ej. 0:00:15). Este punto
se guarda automáticamente como punto
de inicio (punto Auto Cue) y se muestra en
el visualizador con la indicación “CUE” (K).
Después de iniciar la pista, se puede volver a
este punto de inicio con el botón CUE (17).
Después de reproducir una pista, el aparato
se pondrá en pausa precisamente en el punto
en el que empieza la música de la siguiente
pista. Este punto luego se guardará como
nuevo punto de inicio.
2.
Para la reproducción continua de todas
las pistas (modo MP3: todas las pistas de la
carpeta o de la lista de reproducción), se reproducen continuamente una después de la
otra, es decir, después de la última pista se
reinicia la primera pista. Durante la reproducción y cuando se seleccionan pistas, no
se configuran puntos Auto-Cue.
Nota: En algunos casos también se configura un
punto Auto-Cue en el modo “continuous replay”
(sin embargo, no en el frame exacto donde inicia
la música sino en el punto temporal 0:00:00), p. ej.
después de leer un soporte de datos.
5.5 Reproducción breve
deuniniciode pista
El botón CUE (17) permite la reproducción breve
del inicio de una pista mientras se mantenga
pulsado este botón. Después de liberar el botón,
el aparato volverá al inicio de la pista y se pondrá
en pausa.
1) Tiene que ponerse el lector en reproducción
de una sola pista: Indicación “Single” (C).
Si se muestra “Cont.” (D), pulse el botón
CONT. / LIST (6).
2) Seleccione la pista (selección de pista y car-
peta o lista de reproducción ☞apartado 5.1
ó 5.2.
3)
Si se mantiene pulsado el botón CUE, se
reproduce brevemente el inicio de la pista.
4)
Para reproducir la pista, pulse el botón
▶
❙❙
(19).
5.6 Avance y retroceso rápidos
Para el avance o el retroceso rápido de una pista,
pulse primero el botón SEARCH (20). Se indicará
"SEARCH” en la línea de texto (N). Gire el jog
wheel (16) en la dirección correspondiente. La
velocidad de avance / retroceso depende de la
velocidad de giro de la rueda.
Para desactivar la función, pulse de nuevo
el botón SEARCH (desaparecerá la indicación
“SEARCH”). En el modo de reproducción, la
función se desconectará automáticamente
8se gundos después de utilizar la rueda por
última vez.
Nota: En el modo pausa, el punto actual se repite
constantemente después del avance o retroceso
rápido. Para parar la repetición, pulse brevemente dos
veces el botón CUE (17) [se configura el nuevo punto
Cue, ☞ apartado 5.8] o bien empiece la reproducción
con el botón
▶
❙❙ (19).
5.7 Selección precisa
deunpuntoconcreto
Existe la posibilidad de seleccionar un punto en
una pista con la precisión de 1 frame (¹⁄ 75 segundo), p. ej. para iniciar la reproducción de un
punto concreto en vez de empezarla desde el
inicio de la pista.
1) Cuando esté a punto de alcanzarse el punto
deseado reproduciendo la pista o utilizando
el avance / retroceso rápido (☞apartado 5.6),
ponga el aparato en pausa con el botón
▶
❙❙(19).
2)
Seleccione con precisión el punto girando
el jog wheel (16) en el sentido horario o en
sentido inverso. Para una comprobación
acústica, el punto ajustado se repetirá constantemente.
3)
Cuando se haya encontrado el punto deseado, pulse dos veces el botón CUE (17). De
este modo, el punto se guardará y se acabará
la repetición. Ahora puede empezar la reproducción desde este punto con el botón
▶
❙❙ .
5.8 Volver a un punto concreto
(puntoCue)
Para poder ir rápidamente a un punto concreto,
puede guardarse un punto de inicio (punto Cue)
con el botón CUE (17). Sin embargo, en el modo
de reproducción de una sola pista, este punto se
sobrescribirá con el punto de inicio (punto Auto-Cue) de la siguiente pista cuando se llegue a
la siguiente pista o se seleccione [si es necesario,
cambie a reproducción de todas las pistas con
el botón CONT. / LIST (6)].
Nota: Se borrará el punto Cue guardado:
– Cuando se seleccione otra carpeta (u otra lista de
reproducción)
– Cuando se cambie entre CD y medio de almacena-
miento USB
– Cuando se apague el aparato
1) Durante la reproducción, ponga el aparato
en pausa con el botón
alcance el punto al que el aparato tiene que
volver más tarde. Parpadea el LED sobre el
botón CUE (17).
2)
Si es necesario, utilice el jog wheel (16) para ir
al punto preciso (☞apartado 5.7). Después
de girar la rueda, el punto se repite permanentemente.
3) Pulse el botón CUE. De este modo, se me-
moriza el punto como punto Cue. Se indica
“CUE” (K) en el visualizador y el LED sobre el
botón CUE se ilumina constantemente. Para
parar la reproducción repetida del punto, se
puede pulsar de nuevo el botón CUE.
4) Reinicie la reproducción con el botón
5)
Ahora se puede volver al punto Cue con
el botón CUE. Después de volver, se añade
“CUE” en el visualizador y el lector se pone
en pausa.
▶
❙❙
(19) cuando se
▶
❙❙ .
Español
31
Page 32

6)
Inicie la reproducción con el botón
mantenga pulsado el botón CUE mientras
se reproduzca la pista. Después de liberar el
botón CUE, el lector vuelve al punto Cue y
Español
se pone en pausa.
5.9 Cambiar la velocidad con o sin
desplazarelpitch
La velocidad puede cambiarse con el control
deslizante (11) hasta un ±100 %:
+100 % = velocidad duplicada
−100 % = parado
1) Seleccione el rango de ajuste con el botón
PITCH (9). El ajuste seleccionado con el botón
PITCH se muestra mediante los dos LEDs (10)
junto al botón:
– Ambos LEDs apagados:
Control de velocidad desactivado
La pista se reproduce a la velocidad estándar
– LED 8 % iluminado:
Control de velocidad activado
Rango de ajuste ±8 %
– LED 16 % iluminado:
Control de velocidad activado
Rango de ajuste ±16 %
– Ambos LEDs activados:
Control de velocidad activado
Rango de ajuste ±100 %
Además, cada vez que se pulsa el botón
PITCH, la línea de texto (N) muestra brevemente el ajuste seleccionado: “Pitch 8 %”,
“Pitch 16 %”, “Pitch 100” o “Pitch off”.
2) Ajuste la velocidad con el control deslizante.
El visualizador mostrará el porcentaje de desviación de la velocidad estándar en la parte
superior derecha (I). El número de beats por
minuto (P) cambiará según corresponda.
3)
Cuando se cambia la velocidad, el pitch
vuelve a cambiar proporcionalmente. Sin
embargo, para un pitch constante, pulse el
botón MT (22). El visualizador mostrará la
indicación “MT” (R) y el LED junto al botón
MT se ilumina. Para desactivar la función,
pulse de nuevo el botón MT.
5.10 Pitch Bend – Igualar el ritmo (beats) entre dos piezas musicales
Cuando utilice dos lectores CD / MP3, los beats
de dos piezas musicales con la misma velocidad
se pueden sincronizar con precisión. De este
modo, no se interrumpe el ritmo de baile cuando
se entrelazan de un lector al otro.
1)
Primero utilice el control de velocidad (11)
para adaptar la velocidad de la pieza musical
al crossfading que quiera a la velocidad de
la pieza musical actual. Para ello, ponga el
mismo número de beats por minuto con el
control deslizante, ver indicación (P) en la
parte inferior de la derecha del visualizador.
2)
Sincronice los beats de la pieza musical al
crossfading que quiera con los beats de la
pieza musical actual con los botones PITCH
BEND (8): Mientras esté pulsado el botón +
o –, la reproducción de la pista será un 16 %
más rápida o más lenta. De este modo, se
desplazarán los beats respecto a los beats de
la pieza musical actual.
3)
Los beats también se desplazarán cuando
gire el jog wheel (16).
▶
❙❙ o
5.11 Efectos
5.11.1 Efecto scratch
Para crear un efecto scratch (equivalente a girar
manualmente el plato de un giradiscos), pulse
el botón SCRATCH (15) y gire el jog wheel (16)
hacia delante y hacia atrás como quiera. En la
línea de texto (N) se mostrará "SCRATCH". Para
desactivar la función, pulse de nuevo el botón
SCRATCH / F.START.
5.11.2 Efecto droning
botón
▶
❙❙ y mantenga pulsado el botón
PROG. hasta que la indicación “PG” deje de
parpadear.
Para reproducir de nuevo la secuencia
de pistas, ponga el aparato en pausa y pulse
el botón PROG. para que la indicación “PG”
parpadee de nuevo. Luego inicie la secuencia
de pistas con el botón
Nota: Mientras la indicación “PG” parpadee o se ilumine constantemente, se puede activar la secuencia.
Si “PG” deja de visualizarse, se borra la secuencia de
pistas.
▶
❙❙ .
Si la función Master Tempo (pitch constante) se
ha activado [indicación “MT” (R) en el visualizador y LED junto al botón MT (22) iluminado],
desactívela con el botón MT. Gire el jog wheel
(16) hacia delante o hacia atrás para aumentar o
disminuir la velocidad de reproducción alternativamente. Esto creará un efecto droning.
5.11.3 Efecto stutter
El punto Cue guardado con el botón CUE (17)
(☞apartado 5.8) se puede utilizar para crear
un efecto stutter: Cuando el botón CUE se pulsa
brevemente varias veces, se crea un efecto stutter. Cuanto más apropiado sea el punto Cue
(p. ej. el inicio de un instrumento o el inicio de
5.12.2 Comprobar una secuencia de pistas
1) Si se reproduce una pista, ponga el aparato
en pausa con el botón
2)
Si la indicación “PG” (Q) parpadea ahora,
pulse una vez el botón PROG. (7). Si la indicación “PG” se ilumina constantemente,
pulse el botón PROG. dos veces.
3) Seleccione las memorias (“P-01” … P- 99”)
sucesivamente con el botón
nombre de la pista guardada se indica siempre en la línea de texto (N).
4) Para reproducir la secuencia de pistas, pulse
el botón
▶
❙❙ .
▶
❙❙ (19).
❙◀ o ▶❙ (18). El
una palabra), más impresionante será el efecto.
5.12.3 Completar o borrar
5.12 Programación de su secuencia personal de pistas
El lector CD / MP3 ofrece la posibilidad de programar una secuencia de pistas con un máximo
de 99 pistas. Con el modo MP3, las pistas se
pueden compilar desde varias carpetas o listas de
reproducción. Sin embargo, a diferencia de una
lista de reproducción, la secuencia de pistas programada no se puede abrir sin limitación pero
se borrará después de cambiar a otro soporte
de datos o desconectando el aparato.
5.12.1 Guardar y reproducir
unasecuenciade pistas
1) Si se reproduce una pista, ponga el aparato
en pausa con el botón
2)
Cambie al modo de programación con el
botón PROG. (7). La indicación temporal (O)
cambia a la indicación de la primera memoria
“P-01”. La indicación “PG” (Q) parpadea
rápidamente.
Nota: Para salir inmediatamente de este modo,
mantenga pulsado el botón PROG. hasta que en
el visualizador se muestre de nuevo el tiempo de
reproducción (O).
3) Seleccione la primera pista para la secuencia
de pistas (selección de pista y carpeta o lista
de reproducción ☞apartado 5.1 ó 5.2).
4) Para confirmar la selección de pista, pulse el
botón PROG. Se indica la siguiente memoria
“P-02”.
5) Repita los pasos 3 y 4 hasta que la secuencia
esté completa. Si intenta guardar otra pista
después de haber guardado 99, aparecerá el
mensaje “FULL”.
6)
Para reproducir la secuencia de pistas, pulse el
botón
▶
❙❙
. La indicación “PG” parpadea más
lentamente. El visualizador muestra el número
de la pista (A) en la secuencia de pistas y el
número total (M) de pistas programadas.
Las pistas se reproducen dependiendo
del modo de funcionamiento seleccionado
(☞apartado 5.4).
7)
Para volver al modo de reproducción estándar, ponga el aparato en pausa con el
▶
❙❙ (19).
unasecuenciadepistas
1) Si se reproduce una pista, ponga el aparato
en pausa con el botón
2)
Si parpadea la indicación “PG” (Q), man-
▶
❙❙ (19).
tenga pulsado el botón PROG. (7) hasta que
“PG” deje de parpadear.
3) Pulse brevemente el botón PROG. para que
“PG” parpadee rápidamente y la indicación
temporal (O) cambie a la indicación de la
siguiente memoria libre “P-…”.
4) Para borrar la secuencia de pistas completa,
pulse el botón PROG. hasta que en el visualizador se indique de nuevo el tiempo de
reproducción (O). Para añadir otra pista, seleccione la pista que quiera (selección de pista
y carpeta o lista de reproducción ☞apartado
5.1 ó 5.2) y confirme con el botón PROG.
Para reproducir la secuencia de pistas completa, pulse el botón
▶
❙❙ .
5.13 Inicio fader
La función Start / Pause del botón
controlarse remotamente mediante un mezclador con función de inicio fader. La conexión al
mezclador se describe en el apartado 4. Para
ajustar el lector al tipo de inicio fader del mezclador, mantenga pulsado el botón SCRATCH / F.
START (15) y seleccione “LOCK”, “CUE / PLAY”
o “TACT” con el botón ❙◀ o ▶❙ (18). El ajuste
se muestra en la línea de texto (N). Después de
liberar los botones, se ajusta el tipo de inicio
fader seleccionado.
LOCK = control mediante un interruptor ON / OFF
Esta posición del interruptor tiene que seleccionarse para la mayoría de mezcladores de
la gama IMG STAGELINE. Avanzando el fader,
se cerrará un interruptor en el mezclador al
iniciar la reproducción. Cuando se cierre el
fader, el interruptor se abrirá y de este modo
el lector se pondrá en pausa.
REMOTE
Fig. 5 Inicio fader mediante un interruptor ON / OFF
▶
❙❙
(19) puede
Start
Pause
32
Page 33

TACT = control mediante un pulsador
REMOTE
REMOTE
Cuando el pulsador se utiliza por primera
vez avanzado el fader, empezará la reproducción. Cuando el pulsador se utilice por
segunda vez cerrando el fader, el lector se
pondrá en pausa.
1. × Start
2. × Pause
Fig. 6 Inicio fader mediante un pulsador
CUE PLAY = control mediante una pulsación
Cuando se avance el fader, el reproductor
empezará desde el inicio de la pista (punto
Auto Cue ☞ apartado 5.4) o desde el
punto Cue ajustado con el botón CUE (17)
apartado 5.8) mediante una breve pul-
(
☞
sación de control del mezclador. Cuando el
fader esté cerrado, el lector volverá a este
punto de inicio mediante otra pulsación de
control y se quedará en pausa en ese punto.
1. × Cue Play
2. × Pause
Fig. 7 Inicio fader mediante pulsación de control
6 Control remoto
El control remoto incluido se entrega con una
batería insertada. Antes del primer funcionamiento, quite la lámina del soporte de la batería
de la parte posterior del control remoto.
Cuando pulse un botón, dirija siempre el control
remoto hacia el sensor IR (14) del aparato. No
puede haber obstáculos entre el control remoto
y el sensor.
Los siguientes botones del control remoto se
pueden utilizar como los botones del aparato:
OPEN / CLOSE (23) [corresponde al botón (3)]
FOLDER (25)
PITCH BEND (26)
MT (27)
PITCH (28)
PLAY/ PAUSE (29)
CUE (30)
PROG. (31)
CD / USB (32)
Los botones SINGLE / CONT (33), TIME (34) y SKIP
❙◀ / ▶❙ (35) se pueden utilizar con limitaciones
como los botones del aparato CONT. / LIST (6),
TIME / TAG (5) y SKIP ❙◀ / ▶❙ (18):
– El botón SINGLE / CONT sólo se puede utilizar
para cambiar el modo de funcionamiento;
no se pueden cargar listas de reproducción.
– El botón TIME sólo se puede utilizar para
cambiar la indicación temporal; no se puede
cambiar a indicación de etiqueta ID3.
– Los botones SKIP ❙◀ / ▶❙ del control remoto se
pueden utilizar igual que los botones del aparato para seleccionar pistas, carpetas, listas de
reproducción o particiones; para la selección
rápida mantenga pulsado el botón correspondiente.
Sin embargo, los botones no se pueden utilizar
en combinación con otros botones.
Los botones numéricos (24) y los botones SCAN
◀◀ y ▶▶ (36) se pueden utilizar como alterna-
tiva para los botones del aparato:
– Los botones numéricos se pueden utilizar
en lugar de los botones SKIP para seleccio
nar pistas, carpetas, listas de reproducción
o particiones. La selección se hace entrando
el número correspondiente. Con números
de varios dígitos, pulse los botones numéricos correspondientes uno tras otro, p. ej. los
botones “1” y “0” para el número 10.
– Los botones SCAN ◀◀ y ▶▶ sirven para el
avance y el retroceso rápidos: Mientras se
mantenga pulsado el botón SCAN correspondiente, la pista avanza o retrocede.
Si el control remoto no se va a utilizar durante
un largo periodo de tiempo, quite la batería
para prevenir daños en el control remoto por
derrame de la batería.
6.1 Cambio de la batería
Si el rango del control remoto disminuye, cambie
la batería.
1)
Apriete el cierre del soporte de la batería
hacia la izquierda (1ª flecha de la fig. 8) y al
mismo tiempo quite el soporte hacia abajo
(2ª flecha).
1.2.
Fig. 8 Cambio de la batería
2)
Quite la batería vieja y coloque una nueva
(pila botón de 3 V, tipo CR 2025). Asegúrese
de que el polo positivo de la batería esté mirando hacia arriba en el soporte.
3) Recoloque el soporte en el control remoto.
Las baterías gastadas no deben deposi-
tarse en el contenedor normal; llévelas
a un contenedor especial, p. ej. al contenedor de su vendedor.
7 Actualizar el Firmware
Si hay un nuevo firmware (sistema operativo del
aparato) disponible en Internet, puede actualizar
el firmware de su aparato:
1)
Si se ofrece una actualización de firmware
del CD-196USB en la página web de IMG
STAGELINE (www.imgstageline.com), descárguelo y cópielo en un lápiz de memoria USB.
2)
Desconecte el lector CD / MP3 con el interruptor POWER (12).
3)
Inserte el lápiz USB con el nuevo firmware en
el puerto USB (2).
4) Mantenga pulsado el botón PROG. (7) y co-
necte de nuevo el aparato. No libere el botón
PROG. hasta que en el visualizador aparezca
“UP dA t E”.
5)
Después de leerlo, cuando aparezca “Ready”
en la línea de texto (N), pulse el botón
para iniciar la actualización del firmware.
Mediante la indicación de la barra gráfica
(H) y la línea de texto se puede observar la
actualización. Cuando aparezca “Finish”, se
habrá actualizado el firmware.
▶
❙❙
(19)
6) Apague el lector y conéctelo de nuevo.
Atención: Las actualizaciones de firmware se
hacen bajo su propio riesgo. Después de la
actualización puede que el modo de funcio-
-
namiento del aparato sea diferente del que se
describe en este manual.
8 Mantenimiento del Aparato
Proteja el lector del polvo, de las vibraciones,
de la humedad y del calor. Utilice sólo un paño
suave y seco para la limpieza; no utilice nunca
ni productos químicos ni agua.
Nota referente a las interrupciones de sonido y los errores de lectura:
El humo del tabaco y el polvo pueden penetrar
fácilmente a través de todas las aperturas del
aparato y depositarse en las ópticas del sistema
de muestreo láser. Si estos restos causan errores
de lectura o interrupciones del sonido, el personal cualificado deberá limpiar el aparato. Esta
limpieza se cobrará incluso durante el periodo
de garantía.
9 Especificaciones
Banda pasante: . . . . . . . 20 – 20 000 Hz
THD: . . . . . . . . . . . . . . . < 0.1 %
Separación de canal: . . . > 75 dB
Rango dinámico: . . . . . . > 80 dB
Relación sonido / ruido: . > 75 dB
Salidas
LINE OUT: . . . . . . . . . . 2 V
SALIDA DIGITAL: . . . . . 0,5 Vpp S / PDIF
Estándar USB: . . . . . . . . 2.0
Sistemas de
archivos legibles:
Número máximo de
Particiones: . . . . . . . . . 16
Carpetas: . . . . . . . . . . 999 por partición,
Archivos MP3: . . . . . . 999 por carpeta
Memoria antichoque
CDs de
audio estándar: . . . . . 8 s
Archivos MP3: . . . . . . 10 s
Alimentación:
Consumo: . . . . . . . . . . . 15 VA
Temperatura ambiente: . 0 – 40 °C
Dimensiones: . . . . . . . . 482 × 90 × 270 mm
Peso: . . . . . . . . . . . . . . . 4,4 kg
Conexiones
Entrada USB: . . . . . . . Tipo A
Salida analógica: . . . . . RCA
Salida digital: . . . . . . . RCA
Inicio fader: . . . . . . . . Conector
Sujeto a modificaciones técnicas.
. . . . . . NTFS, FAT, HFS+
en un máximo de
8niveles
. . . . . . . . 230 V / 50 Hz
(B × H × P), 2 U
Izquierda / Derecha
jack3,5 mm
Español
Manual de instrucciones protegido por el copyright de MONACOR ® INTERNATIONAL GmbH & Co. KG.
Toda reproducción mismo parcial para fines comerciales está prohibida.
33
Page 34

Profesjonalny
odtwarzacz CD / MP3
Polski
Niniejsza instrukcja przeznaczona jest dla profesjonalnych DJ i użytkowników posiadających
pewne doświadczenie techniczne. Przed rozpoczęciem użytkowania proszę zapoznać się z
instrukcją, a następnie zachować ją do wglądu.
Proszę otworzyć niniejszą instrukcję na stronie 3. Pokazano tam rozkład elementów operacyjnych i złączy.
Spis treści
1 Elementy operacyjne i złącza . . . . . 34
1.1 Panel przedni (rys. 1) . . . . . . . . . . 34
1.1.1 Wyświetlacz (rys. 3) . . . . . . . . . . 35
1.2 Pilot zdalnego sterowania (rys. 2) . . . . . 35
1.3 Panel tylny (rys. 4). . . . . . . . . . . . 35
2 Środki bezpieczeństwa . . . . . . . . 35
3 Zastosowanie. . . . . . . . . . . . . 36
4 Przygotowanie do pracy i
podłączanie urządzenia . . . . . . . . 36
5 Obsługa . . . . . . . . . . . . . . . 36
5.1 Odtwarzanie utworów muzycznych . . . . 36
5.2 Odtwarzanie list utworów . . . . . . . . 36
5.3 Wyświetlanie informacji o utworze, czasie
odtwarzania i liczbie bitów na minutę BPM . 37
5.4 Wybór trybu pracy. . . . . . . . . . . . 37
5.5 Krótkie odtwarzanie początku utworów . . 37
5.6 Szybkie przewijanie w przód / w tył . . . . 37
5.7 Precyzyjny wybór punktu . . . . . . . . . 37
5.8 Powrót do poprzednio ustawionego
punktu (Cue) . . . . . . . . . . . . . . 37
5.9 Zmiana prędkości odtwarzania bez
lub ze zmianą wysokości dźwięku . . . . . 37
5.10 Pitch Bend – synchronizacja bitówpomiędzy
dwoma utworami muzycznymi . . . . . . 38
5.11 Efekty . . . . . . . . . . . . . . . . . 38
5.11.1 Efekt Scratch . . . . . . . . . . . . . 38
5.11.2 Efekt brzęczenia (Droning) . . . . . . . 38
5.11.3 Efekt stutter . . . . . . . . . . . . . 38
5.12 Układanie własnej sekwencji odtwarzania . 38
5.12.1 Zapisywanie i odtwarzanie
sekwencji utworów . . . . . . . . . . 38
5.12.2 Sprawdzanie sekwencji utworów . . . . 38
5.12.3 Edytowanie i kasowanie
sekwencji utworów
5.13 Funkcja Fader Start . . . . . . . . . . . 38
6 Zdalne sterowanie . . . . . . . . . . 39
6.1 Wymiana baterii . . . . . . . . . . . . 39
7 Aktualizowanie oprogramowania . . . 39
8 Konserwacja urządzenia . . . . . . . 39
9 Specyfikacja . . . . . . . . . . . . . 39
. . . . . . . . . . 38
1 Elementy operacyjne i złącza
1.1 Panel przedni (rys. 1)
Przyciski o podwójnej funkcji oznaczone są symbolem dla “wciśnij przycisk na krótko” oraz
dla “przytrzymaj wciśnięty przycisk”.
1 Szuflada na płytę CD
2
Port USB do podłączania pamięci przenośnej
USB lub twardego dysku
3
Przycisk do wysuwania szuflady na
płytęCD
4 Przycisk FOLDER dla trybu MP3
1. do zmiany folderu lub do zmiany list odtwarzania (wczytywanie listy odtwarzania
punkt 6, przycisk CONT. / LIST)
☞
Wcisnąć na krótko przycisk FOLDER,
wska zanie czasu (O) zmieni się na
“FO-SEL” oraz pojawi się wskazanie
“FOLDER” (A). Wybrać folder (listę od
twarzania) przyciskami ❙◀ oraz ▶❙ (18) i
potwierdzić przyciskiem FOLDER.
2.
do wyboru partycji na podłączonym twardym dysku
Przytrzymać wciśnięty przycisk FOLDER
aż wskazanie czasu (O) zmieni się na
“PA-SEL”. Wybrać partycję przyciskami
❙◀ oraz ▶❙ (18) i potwierdzić przyciskiem
FOLDER.
5 Przycisk TIME / TAG
1. dla wskaźnika czasu
W celu przełączenia wskaźnika czasu (H, O),
wcisnąć na krótko przycisk TIME / TAG:
wskazanie “Remain” (G)
czas pozostały do końca utworu
wskazanie “Elapse” (E)
miniony czas odtwarzania utworu
wskazanie “Total Remain” (F, G)
czas pozostały do końca całej płyty CD
(niedostępne w trybie MP3)
2. dla informacji ID3 tag w trybie MP3
Przy wciśniętym przycisku TIME / TAG,
możliwe jest przełączanie linii tekstowej
(N) na informację o tytule, albumie i wykonawcy (ID3 tag) lub nazwie pliku, za
pomocą przycisków ❙◀ oraz ▶❙ (18).
6 Przycisk CONT. / LIST
1. do wyboru trybu pracy
Do przełączania między trybem odtwarzania pojedynczego utworu [wskazanie
“Single” (C)] a trybem ciągłego odtwarzania [wskazanie “Cont.” (D)], wcisnąć
na krótko przycisk CONT. / LIST.
2. do wczytywania list odtwarzania
Przy wciśniętym przycisku CONT. / LIST,
możliwy jest wybór formatu listy odtwarzania (“M3U Scan”, “WPL Scan”, “XLM
Scan”) lub “Folder” (= bez wczytywania
listy) za pomocą przycisków ❙◀ oraz ▶❙
(18) (☞rozdz. 5.2).
7
Przycisk PROG. do programowania i odtwarzania własnej sekwencji (☞rozdz. 5.12)
8
Przyciski PITCH BEND do synchronizacji bitów odtwarzanego utworu z bitami
muzyki emitowanej z innego urządzenia
(☞rozdz. 5.10)
9
Przycisk PITCH do włączania / wyłączania
regulatora prędkości (11) oraz do wyboru
zakresu regulacji prędkości (±8 %, ±16 %
-
lub ±100 % od standardowej prędkości),
Wybrany zakres pokazywany jest za pomocą
diod ☞punkt 10
10
Wskaźnik sygnalizujący ustawienie wybrane
za pomocą przycisku PITCH (9):
– obie diody zgaszone:
regulator prędkości (11) wyłączony
– dioda 8 % świeci:
regulator prędkości aktywny,
zakres regulacji ±8 %
– dioda 16 % świeci:
regulator prędkości aktywny,
zakres regulacji ±16 %
– obie diody świecą:
regulator prędkości aktywny,
zakres regulacji ±100 %
11
Regulator prędkości odtwarzania [bez
zmiany wysokości dźwięku, jeżeli świeci
dioda obok przycisku MT (22)]; regulator
jest aktywny, jeżeli świeci przynajmniej jedna
dioda (10) obok przycisku PITCH (9).
12 Włącznik POWER
13
Przycisk CD / USB do przełączania między nośnikami CD a USB: przełączenie jest możliwe
tylko w trybie pauzy.
14
Czujnik podczerwieni dla zdalnego sterowania
15 Przycisk SCRATCH / F.START
1. dla funkcji Scratch
W celu włączania lub wyłączenia funkcji Scratch, wcisnąć na krótko przycisk
SCRATCH / F.START. Po włączeniu funkcji
[w linii tekstowej (N) pojawia się wskazanie “SCRATCH”], efekt Scratch może być
wytwarzany za pomocą pokrętła jog (16).
2. do wyboru typu zdalnego startu
Przy wciśniętym przycisku SCRATCH /
F.START, wybrać typ zdalnego startu
(“LOCK”, “CUE / PLAY” lub “TACT”)
za pomocą przycisków ❙◀ oraz ▶❙ (18)
(☞rozdz. 5.13)
16 Pokrętło jog
1.
do szybkiego przewijania po wciśnięciu
przycisku SEARCH (20)
2.
do tworzenia efektu scratch po wciśnięciu
przycisku SCRATCH / F.START (15)
3. dla funkcji “Pitch Bend” podczas odtwarzania (☞rozdz. 5.10)
4.
do precyzyjnego wyboru punktu w trybie
pauzy
5.
do szybkiego wyboru utworów, folderów, list odtwarzania lub partycji, po wciśnięciu i przytrzymaniu przycisku ❙◀ lub
▶❙ (
punkt 18, przyciski SKIP)
☞
17
Przycisk CUE do krótkiego odtwarzania
po czątku utworu (☞rozdz. 5.5) oraz do
powrotu do zapamiętanego punktu
(☞rozdz. 5.8)
18 Przyciski SKIP ❙◀ oraz ▶❙
1. do wyboru
– utworu,
jeżeli widoczne jest wskazanie
“TRACK” (A)
▶❙ do wyboru następnego utworu
❙◀ do powrotu do początku utworu.
Jeżeli przycisk ❙◀ zostanie wciśnięty
kilka razy, urządzenie zawsze cofa się
o jeden utwór.
34
Page 35

– folderu lub listy odtwarzania,
jeżeli widoczne jest wskazanie “FOLDER” (A) (☞punkt 4, przycisk FOLDER)
– partycji na twardym dysku,
jeżeli widoczne jest wskazanie “PA-SEL”
(O) (☞punkt 4, przycisk FOLDER)
Przy wciśniętym jednym z przycisków,
pokrętło jog (16) pozwala na szybkie
przechodzenie.
2.
do wyboru kilku opcji, przy wciśniętym
przycisku TIME / TAG (5), CONT. / LIST (6),
SCRATCH / F.START (15)
19
Przycisk PLAY / PAUSE
pomiędzy trybem odtwarzania (zapala się
dioda ponad przyciskiem) i pauzy (dioda
ponad przyciskiem miga)
20
Przycisk SEARCH do włączania / wyłączania
funkcji szybkiego przewijania dla pokrętła
jog (16)
21
Przycisk BPM dla manualnego trybu licznika
bitów oraz do przełączania na tryb automatyczny (☞rozdz. 5.3)
22
Przycisk MT (master tempo) do włączania / wyłączania funkcji stałej wysokości
dźwięku (☞rozdz. 5.9)
▶
❙❙ do przełączania
1.1.1 Wyświetlacz (rys. 3)
A
wskazanie “TRACK” wyświetlone: numer
utworu (w trybie MP3: numer utworu w
folderze lub numer utworu na liście odtwarzania)
wskazanie “FOLDER” wyświetlone [po wciśnięciu przycisku FOLDER (4)]: numer folderu
lub numer listy odtwarzania
B symbol odtwarzania
C “Single”: wskazanie trybu odtwarzania po-
jedynczego utworu
D “Cont.”: wskazanie trybu ciągłego odtwa-
rzania
E “Elapse”: wskazanie sygnalizujące wyświe-
tlanie minionego czasu odtwarzania utworu
F
“Total”: wraz ze wskazaniem “Remain” (G)
sygnalizuje wyświetlanie czasu do końca
płyty CD (niedostępne w trybie MP3)
G
“Remain”: wskazanie sygnalizujące wyświetlanie czasu do końca utworu. Wraz
ze wskazaniem “Total Remain” sygnalizuje
wyświetlanie czasu do końca płyty CD.
H
wskaźnik paskowy: do graficznego oznaczania czasu odtwarzania
I
wskazanie procentowego odchylenia od
standardowej prędkości odtwarzania
J
wskazanie “CD” lub “USB”: sygnalizuje
wybór nośnika CD lub USB.
K “CUE”: pojawia się po ustawieniu odtwa-
rzacza w tryb pauzy w punkcie Cue
(☞rozdz. 5.4 i 5.8).
L “TITLE”, “ALBUM” lub “ARTIST”: w trybie
MP3, sygnalizuje rodzaj informacji (ID3 tag)
wyświetlanej w linii tekstowej (N)
M jeżeli pojawia się wskazanie “Total” ponad
liczbą: całkowita liczba utworów (w trybie
MP3: całkowita liczba utworów w folderze
lub całkowita liczba utworów na liście odtwarzania)
jeżeli wskazanie “Total” zniknie [po wciśnięciu przycisku FOLDER (4)]: całkowita liczba
folderów lub całkowita liczba list odtwarzania w wybranym formacie
N linia tekstowa dla dodatkowych informacji
O
czas odtwarzania, patrz także punkty E
orazG
P licznik bitów na minutę
Q wskazanie “PG”: pojawia się podczas pro-
gramowania własnej sekwencji odtwarzania
i miga podczas jej odtwarzania
R
“MT” (master tempo): sygnalizuje włączenie
funkcji stałej wysokości dźwięku
(☞rozdz. 5.9)
1.2 Pilot zdalnego sterowania (rys. 2)
23 Przycisk OPEN / CLOSE taki jak przycisk (3)
24
Przyciski numeryczne do bezpośredniego
wyboru
– utworów
jeżeli wskazanie “TRACK” (A) jest wyświetlone
– folderów lub list odtwarzania
jeżeli wskazanie “FOLDER” (A) jest wyświetlone (☞punkt 4, przycisk FOLDER)
– partycji na twardym dysku
jeżeli wskazanie “PA-SEL” (O) jest wyświetlone (☞punkt 4, przycisk FOLDER)
Przyciski
25 FOLDER
26 PITCH BEND
27 MT
28 PITCH
29 PLAY / PAUSE
30 CUE
31 PROG.
32 CD / USB
są analogiczne z przyciskami o tej samej nazwie, znajdującymi się na urządzeniu
33
Przycisk SINGLE / CONT taki jak przycisk
CONT. / LIST (6);
ale wczytywanie list odtwarzania możliwe
jest wyłącznie na urządzeniu
34
Przycisk TIME taki jak przycisk TIME / TAG (5);
ale przełączanie między poszczególnymi in
formacjami ID3 tag możliwe jest wyłącznie
na urządzeniu
35 Przyciski SKIP ❙◀ i ▶❙ takie jak przyciski SKIP
na urządzeniu, do wyboru utworów, folderów, list odtwarzania lub partycji; dla
szybkiego wyboru, przytrzymać wciśnięty
odpowiedni przycisk SKIP;
ale nie mogą być używane w kombinacji z
innymi przyciskami
36 Przyciski SCAN ◀◀ i ▶▶ do szybkiego prze-
wijania
1.3 Panel tylny (rys. 4)
37
Gniazdo 3,5 mm REMOTE do zdalnego
sterowania funkcją Start / Pauza z miksera
(fader start)
38
Wyjście analogowe audio LINE OUT o poziomie liniowym (RCA, L lewy / R prawy)
39 Wyjście cyfrowe audio DIGITAL OUT (RCA)
40
Kabel zasilający do łączenia z gniazdkiem
sieciowym (230 V/ 50 Hz)
2 Środki bezpieczeństwa
Urządzenie spełnia wszystkie wymagania norm
UE dlatego zostało oznaczone symbolem
UWAGA
Uwaga! Nie wolno zaglądać do środka me-
•
chanizmu odtwarzacza CD przy otwartej
szufladzie na płytę CD; wiązka lasera może
uszkodzić wzrok.
Urządzenie przeznaczone jest wyłącznie do
•
użytku wewnątrz pomieszczeń. Należy chronić je przez wodą, dużą wilgotnością oraz
wysoką temperaturą (dopuszczalny zakres
wynosi 0 – 40 °C).
Na urządzeniu nie należy stawiać żadnych
•
pojemników z cieczą np. szklanek.
Nie wolno używać urządzenia lub natychmiast
•
odłączyć wtyczkę zasilającą z gniazdka
1.
2.
3. jeżeli urządzenie działa nieprawidłowo.
W każdym przypadku, naprawę należy zlecić
specjaliście.
Wymianę kabla zasilającego należy zlecić
•
specjaliście.
Nie wolno odłączać urządzenia z gniazdka
•
sieciowego ciągnąc za kabel zasilania, należy
zawsze chwytać za wtyczkę.
Producent ani dostawca nie ponoszą odpo-
•
wiedzialności za wynikłe szkody: uszkodzenie
sprzętu lub obrażenia użytkownika, jeśli urządzenie było używane niezgodnie z ich przeznaczeniem, nieprawidłowo zamontowane,
podłączone lub obsługiwane bądź poddane
nieautoryzowanej naprawie. Nie ponosi się
także odpowiedzialności za utratę danych lub
uszkodzenie nośników.
-
Urządzenie zasilane jest niebezpiecznym napięciem. Wszelkie
naprawy należy zlecić osobie przeszkolonej; nieprawidłowa obsługa
może spowodować porażenie prądem elektrycznym.
jeżeli stwierdzono istnienie widocznego
uszkodzenia odtwarzacza lub kabla zasi-
lającego,
jeżeli uszkodzenie urządzenia mogło nastąpić w wyniku upadku lub innego podobnego zdarzenia,
Po całkowitym zakończeniu eksploatacji, urządzenie należy oddać do punktu
recyklingu, aby nie zaśmiecać środowiska.
.
Polski
35
Page 36

3 Zastosowanie
Odtwarzacz CD / MP3 CD-196USB został specjal-
Polski
nie zaprojektowany do profesjonalnych aplikacji
DJ. Posiada wiele przydatnych funkcji, takich jak
np. odtwarzanie pojedynczych utworów, automatyczny licznik bitów, regulację prędkości odtwarzania bez zmiany wysokości dźwięku, efekty
oraz pamięć przeciwwstrząsową anti-shock.
Odtwarzacz CD-196USB pozwala na odczyt
płyt audio CD, także wypalonych we własnym
zakresie (audio CD-R) oraz płyt CD z plikami
MP3. Może jednak nie odtwarzać niektórych
płyt CD-RW, zależnie od typu płyty, nagrywarki
lub użytego oprogramowania.
Poprzez port USB, można również odtwarzać pliki MP3 z twardego dysku lub pamięci
przenośnej USB. Obsługa multi-partycji pozwala
na współpracę z twardymi dyskami o różnym
formatowaniu (FAT16 / FAT32, NTFS, HFS+).
Uwaga: Ze względu na dużą ilość producentów nośników, producent nie gwarantuje kompatybilności
odtwarzacza CD-196USB ze wszystkimi dostępnymi
na rynku nośnikami.
4 Przygotowanie do pracy i
podłączanie urządzenia
Odtwarzacz CD / MP3 przystosowany jest do
montażu w racku 482 mm (19”), ale może pracować również jako urządzenie wolnostojące.
Urządzenie ma wysokość 2 U (1 U = 44,45 mm).
Przed przystąpieniem do podłączania lub zmiany
połączeń należy bezwzględnie wyłączyć odtwarzacz oraz pozostałe urządzenia.
1)
Jeżeli Państwa mikser lub wzmacniacz posiada wejście cyfrowe, należy połączyć je z
żółtym gniazdem RCA DIGITAL OUT (39).
W przypadku urządzeń bez wejścia cyfrowego podłączyć wyjście stereo LINE OUT
(38) – L lewy i R prawy kanał – za pomocą
kabla ze złączami RCA, do wejścia liniowego
na mikserze lub wzmacniaczu (możliwe oznaczenia: LINE IN, AUX IN, CD).
2)
Odtwarzacz może być przełączany w tryb
odtwarzania i pauzy z poziomu miksera z
funkcją fader start. W tym celu, należy połączyć gniazdo REMOTE (37) z odpowiednim
wyjściem miksera, za pomocą kabla z wtykami 3,5 mm. Następnie należy ustawić typ
funkcji fader start w zależności od oznaczenia
na mikserze, ☞rozdz. 5.13.
3) Na końcu podłączyć kabel zasilający (40) do
gniazdka sieciowego (230 V/ 50 Hz).
5 Obsługa
Włączyć urządzenie przełącznikiem POWER (12).
Na wyświetlaczu pojawi się “boot” (procedura
startowa), a następnie WELCOME. Po włączeniu,
wybierany jest zawsze nośnik CD. Jeżeli w odtwarzaczu nie ma płyty CD, urządzenie przełączy
się na port USB. Jeżeli nie podłączono nośnika
USB, pojawi się komunikat “no diSC” (no CD).
Po zakończeniu pracy, wyłączyć urządzenie
przełącznikiem POWER. Urządzenie zapamięta
następujące ustawienia:
– wybrany tryb pracy ☞rozdz. 5.4
– wybrany tryb wyświetlania czasu ☞rozdz. 5.3
– wybrany zakres regulacji prędkości
rozdz. 5.9
☞
Do sterowania urządzeniem można wykorzystywać przyciski na obudowie oraz na pilocie
sterującym. W rozdz. 5 opisano sposób obsługi
za pomocą przycisków na obudowie. Rozdz. 6
zawiera także informacje o sterowaniu za pomocą pilota.
5.1 Odtwarzanie utworów muzycznych
1) Aby włożyć płytę CD, wysunąć szufladę (1)
przyciskiem
kiem do góry i zasunąć szufladę przyciskiem
.
Alternatywnie lub dodatkowo, podłączyć
pamięć przenośną USB lub twardy dysk (jeżeli trzeba, z własnym zasilaniem) do portu
USB (2).
2)
Do przełączania między płytą CD a nośnikiem
USB służy przycisk CD / USB (13). W tym celu
należy najpierw ustawić odtwarzacz w tryb
pauzy, wciskając przycisk
“CD” lub “USB” (J) na wyświetlaczu sygnalizuje wybrany nośnik.
3)
Po wczytaniu zawartości nośnika, odtwarzacz ustawi się w tryb pauzy na początku
pierwszego utworu. Wyświetlacz pokaże
numer utworu (w trybie MP3: numer pliku
w folderze) pod wskazaniem “TRACK” (A)
oraz całkowitą liczbę utworów (w trybie MP3:
całkowitą liczbę utworów w folderze) pod
wskazaniem “Total” (M).
W przypadku twardych dysków podzielonych
na partycje, możliwe jest przełączanie się
pomiędzy partycjami:
a)
Przytrzymać wciśnięty przycisk FOLDER
(4) aż wskaźnik czasu (O) zmieni się na
“PA-SEL”. W linii tekstowej (N) pokazana
zostanie nazwa partycji.
b)
Wybrać partycję przyciskami ❙◀ oraz ▶❙
(18). Przytrzymanie wciśniętego przycisku,
pozwala na szybkie wyszukanie partycji za
pomocą pokrętła jog (16).
c) Potwierdzić wybór przyciskiem FOLDER.
Uwagi dotyczące partycji z wieloma folderami:
Jeżeli nie nastąpi zmiana partycji po wywołaniu
trybu wyboru partycji, a bieżąca partycja została
zatwierdzona przyciskiem FOLDER, wyświetlacz
pokaże “FO-SEL”, wskazanie “FOLDER” (A) oraz
liczbę folderów (M). Teraz, po wciśnięciu jednego
z przycisków SKIP (18), odtwarzacz przełączy się na
tryb wyboru folderów. Możliwy jest wybór folderu
step 4.
☞
4)
Jeżeli w trybie MP3 utwory znajdują się w
kilku folderach, postępować zgodnie z poniższym opisem aby wybrać inny folder:
a)
Wcisnąć przycisk FOLDER (4). Wskaźnik
czasu (O) zmieni się na “FO-SEL”. Pole
(A) wyświetlacza zmieni się z “TRACK”
na “FOLDER” i pokaże numer bieżącego
folderu. W polu (M) natomiast pokazana
zostanie całkowita liczba folderów.
b)
Wybrać żądany folder przyciskami ❙◀ oraz
▶❙
. Przytrzymanie wciśniętego przycisku,
pozwala na szybkie wyszukanie folderu
za pomocą pokrętła jog (16).
c)
Potwierdzić wybór przyciskiem FOLDER;
wyświetlacz powróci do wskazania czasu
(O) oraz wskazania “TRACK” (A).
5)
Aby rozpocząć odtwarzanie pierwszego
utworu, wcisnąć przycisk
odtwarzania, na wyświetlaczu widnieje symbol ▶ (B) oraz świeci się dioda nad przyciskiem. Aby przerwać, a następnie kontynuować odtwarzanie wcisnąć przycisk
trybie pauzy dioda nad przyciskiem miga.
Aby wybrać inny utwór, wcisnąć przycisk
❙◀ lub ▶❙ (18):
(3). Włożyć płytę CD nadru-
▶
❙❙
(19). Wskazanie
▶
❙❙
(19). Podczas
▶
❙❙. W
Przycisk ▶❙ : do przechodzenia do następnego
utworu.
Przycisk ❙◀ : do powrotu do początku bieżącego utworu. Kolejne wciśnięcie przycisku
powoduje przejście do poprzedniego utworu.
Aby przejść o kilka utworów należy
przytrzymać wciśnięty odpowiedni przycisk
i obrócić pokrętło jog (16).
6) Podczas odtwarzania, szuflada na płytę CD
jest zablokowana. Aby zmienić płytę CD, wcisnąć najpierw przycisk
▶
❙❙
, aby przełączyć
odtwarzacz w tryb pauzy. Następnie wcisnąć
przycisk , aby wysunąć szufladę.
Podczas odtwarzania z nośnika USB, nie
ma konieczności przełączania odtwarzacza
w tryb pauzy zmienić płytę CD.
7) Przed wyłączeniem odtwarzacza, należy zawsze zasunąć szufladę na płytę CD, za pomocą przycisku . Pozwala to chroni laser
przed zabrudzeniem.
5.2 Odtwarzanie list utworów
Odtwarzacz może odczytywać listy utworów
MP3 w formatach “wpl”, “xml” oraz “m3u”
stworzone na komputerze dla odtwarzacza.
Ważne: Lista odtwarzania musi być zapisana
na tym samym nośniku co utwory MP3. Lista
odtwarzania musi być zapisana poza folderami
(root).
1) Przełączyć odtwarzacz w tryb pauzy przyciskiem
▶
❙❙ (19).
2)
Przytrzymać wciśnięty przycisk CONT. / LIST
(6) i wybrać odpowiedni format przyciskami
❙◀ oraz ▶❙ (18). W linii tekstowej (N) poka-
zany zostanie wybrany format: “M3U Scan”,
“WPL Scan”, “XML Scan” (po wybraniu
czwartej opcji “Folder”, nie zostanie wczytana żadna lista odtwarzania).
Po zwolnieniu przycisków, wczytana zostanie pierwsza lista. Na wyświetlaczu pojawi
się numer listy pod wskazaniem “TRACK”(A)
oraz całkowita liczba utworów na liście
odtwarzania, pod wskazaniem “Total” (M).
Uwaga: Jeżeli nie zostanie znaleziona żadna lista
odtwarzania, na wyświetlaczu pojawi się “no FILE”.
Należy wówczas przytrzymać wciśnięty przycisk
CONT. / LIST i wybrać inny format lub opcję “Folder”, za pomocą przycisków ❙◀ oraz ▶❙.
3)
Jeżeli dostępne jest kilka list odtwarzania,
postępować zgodnie z poniższą procedurą
aby wybrać inną listę odtwarzania:
a)
Wcisnąć przycisk FOLDER (4), wskaźnik
czasu (O) zmieni się na “FO-SEL”. Pole
(A) wyświetlacza zmieni się z “TRACK” na
“FOLDER” i pokazuje teraz numer bieżącej
listy odtwarzania. W polu (M) pokazana
zostanie całkowita liczba list odtwarzania
w wybranym formacie.
b) Wybrać żądaną listę odtwarzania przyci-
❙◀ oraz ▶❙. Przytrzymanie wciśnię-
skami
tego przycisku, pozwala na szybkie wyszukanie listy za pomocą pokrętła jog (16).
c)
Zatwierdzić wybór przyciskiem FOLDER.
Po wczytaniu listy, wyświetlacz powróci
do wskaźnika czasu (O) oraz wskazania
“TRACK” (A).
4) Rozpocząć odtwarzanie pierwszego utworu
z listy lub wybrać inny utwór z listy
rozdz. 5.1, krok 5.
☞
5) Aby powrócić do normalnego odtwarzania
utworów, przełączyć odtwarzacz w tryb
pauzy przyciskiem
przycisk CONT. / LIST i wcisnąć kilka razy przy-
▶
❙❙
. Przytrzymać wciśnięty
36
Page 37

cisk ❙◀ lub ▶❙ aż w linii tekstowej pojawi się
wskazanie “Folder”. Po zwolnieniu przycisków, żadna lista nie będzie wczytana.
5.3 Wyświetlanie informacji o utworze, czasie odtwarzania i liczbie bitów na minutę BPM
1.
Informacje o utworze wyświetlane są w
linii tekstowej (N):
– dla standardowych płyt audio CD z infor-
macją CD text: nazwa utworu
– dla trybu MP3: nazwa pliku
Istnieje możliwość przełączania między
kolejnymi informacjami (ID3 tag), jeżeli
są one dostępne. W tym celu przytrzymać
wciśnięty przycisk TIME / TAG (5) i wybrać
żądaną informację przyciskami ❙◀ oraz
▶❙(18):
wskazanie (L)
TITLE = nazwa utworu
ALBUM = nazwa albumu
ARTIST = nazwa wykonawcy
brak = nazwa pliku
Za pomocą przycisku FOLDER (4) możliwe
jest przełączanie linii tekstowej pomiędzy
informacjami o utworze a nazwą folderu
(lub, przy wczytanej liście odtwarzania,
nazwą tej listy).
2. Czas odtwarzania wybranego utworu po-
dawany jest numerycznie (O); każda sekunda
dzieli się na 75 ramek. Dodatkowo, czas
odtwarzania pokazywany jest graficzne w
postaci paska (H) o zmiennej długości. Ostatnie 30sekund utworu jest sygnalizowane
przez migający pasek pełnej długości, natomiast przez ostatnie 15 sekund miganie
jest szybsze.
Aby wybrać rodzaj pokazywanego czasu,
wcisnąć przycisk TIME / TAG (5):
– Wskazanie “Elapse” (E) sygnalizuje wyświe-
tlanie minionego czasu odtwarzania.
– Wskazanie “Total Remain” (F, G) sygnali-
zuje wyświetlanie czasu do końca płyty CD
(niedostępne w trybie MP3).
– Wskazanie “Remain” (G) sygnalizuje wy-
świetlanie czasu do końca utworu.
3. Po wybraniu utworu, automatycznie zostaje
określona liczba bitów na minutę (BPM). Odpowiednia wartość zostaje pokazana w polu
BPM (P). Jeżeli nie ma możliwości automatycznego określenia liczby bitów na minutę
(np. dla cichych utworów), można zrobić to
ręcznie:
a)
Wcisnąć na krótko przycisk BPM (21) kilka
razy przycisk w rytm muzyki (minimum
4 razy), aż wyświetlona zostanie wartość
oraz zacznie migać wskazanie “BPM”,
sygnalizując przełączenie na manualny
licznik bitów.
b)
Aby powrócić do automatycznego licznika
bitów, przytrzymać wciśnięty przycisk BPM
aż wskazanie “BPM” przestanie migać.
5.4 Wybór trybu pracy
Do przełączania między trybem odtwarzania
pojedynczych utworów [wskazanie “Single”
(C)] a trybem ciągłego odtwarzania [wskazanie
“Cont.” (D)], służy przycisk CONT. / LIST (6).
1.
W trybie odtwarzania pojedynczego
utworu, odtwarzacz ustawia się w tryb
pauzy po zakończeniu każdego utworu.
Jest to przydatne zwłaszcza w aplikacjach
DJ. Tryb ten jest automatycznie ustawiany po
włączeniu urządzenia. Po wybraniu utworu
odtwarzacz ustawia się w tryb pauzy precyzyjnie na początku muzyki kolejnego utworu
(zazwyczaj na 0:00:00, ale czasem o kilka
ramek dalej, np. 0:00:15). Punkt ten jest
automatycznie zapamiętywany jako punkt
startowy (Auto Cue), oznaczany wskazaniem
“CUE” (K). Po rozpoczęciu odtwarzania możliwy jest powrót do tego punktu, za pomocą
przycisku CUE (17). Po zakończeniu odtwarzania utworu, odtwarzacz ustawia się w tryb
pauzy na początku muzyki kolejnego. Punkt
ten jest zapamiętywany jako nowy punkt
startowy.
2.
W trybie ciągłego odtwarzania (w trybie
MP3: wszystkie utwory z folderu lub listy odtwarzania) odtwarzane są kolejno wszystkie
utwory. Po ostatnim utworze, odtwarzany
jest ponownie pierwszy. Nie są zapamięty
wane żadne punkty Auto-Cue.
Uwaga: W niektórych przypadkach, także w trybie
ciągłego odtwarzania zostaje zapamiętany punkt
Auto-Cue (jednakże, nie w punkcie rozpoczęcia
muzyki, ale zawsze przy indeksie czasu 0:00:00).
Dzieje się tak np. po wczytaniu zawartości nośnika.
5.5 Krótkie odtwarzanie początku utworów
W celu odtworzenia początku utworu, przytrzymać wciśnięty przycisk CUE (17). Po zwolnieniu
przycisku, odtwarzacz powróci do punktu startowego utworu i ustawi się w tryb pauzy.
1)
Ustawić odtwarzacz w tryb odtwarzania
pojedynczych utworów: wskazanie “Single”
(C). Jeżeli aktywny jest tryb “Cont.” (D), wcisnąć przycisk CONT. / LIST (6).
2) Wybrać żądany utwór (wybór utworu i fol-
deru lub listy odtwarzania ☞ rozdz. 5.1
lub5.2).
3) Wcisnąć i przytrzymać przycisk CUE, utwór
będzie odtwarzany tak długo, jak długo przycisk będzie wciśnięty.
4) Aby odtworzyć cały utwór, wcisnąć przycisk
▶
❙❙ (19).
5.6 Szybkie przewijanie w przód / w tył
Do włączenia funkcji szybkiego przewijania w
przód / w tył służy przycisk SEARCH (20). W linii
tekstowej (N) pojawi się “SEARCH”. Do przewijania służy pokrętło jog (16). Szybkość przewijania zależy od szybkości obracania pokrętła.
Aby wyłączyć funkcję szybkiego przewijania, wcisnąć ponownie SEARCH (wskazanie
“SEARCH” zniknie). Podczas odtwarzania,
funkcja zostaje automatycznie wyłączona po
8se kundach od ostatniego użycia pokrętła jog.
Uwaga: W trybie pauzy, po przewinięciu bieżący
punkt będzie ciągle odtwarzany. Aby to zatrzymać,
wcisnąć przycisk CUE (17) dwa razy (ustawienie nowego punktu Cue, ☞ rozdz. 5.8) lub uruchomić odtwarzanie przyciskiem
▶
❙❙ (19).
5.7 Precyzyjny wybór punktu
Każdy punkt ten może zostać ustawiony z dokładnością do 1 ramki (¹⁄ 75 sekundy), np. w celu
odtwarzania od danego punktu zamiast od początku utworu.
1) Jeżeli wybrany punkt jest zbyt szybko osią-
gany przy odtwarzaniu utworu lub szybkim
przewijaniu (☞rozdz. 5.6), należy ustawić
urządzenie w tryb pauzy przyciskiem
2) Precyzyjnie wybrać punkt przy użyciu pokrę-
tła jog (16). Dla ułatwienia wybrany punkt
będzie odtwarzany ciągle.
▶
❙❙
(19).
3)
Po wybraniu żądanego punktu, wcisnąć dwa
razy na krótko przycisk CUE (17). Wybrany
punkt zostanie zapamiętany i powtarzanie
się zakończy. Aby rozpocząć odtwarzanie od
tego punktu wcisnąć przycisk
▶
❙❙ .
5.8 Powrót do poprzednio ustawionego punktu (Cue)
W celu szybkiego odszukania ustawionego
punktu, możliwe jest zapamiętanie punktu startowego (Cue), za pomocą przycisku CUE (17).
Należy jednak pamiętać, że w trybie odtwarzania
pojedynczych utworów punkt ten nadpisywany
jest przez punkt startowy (Auto-Cue) każdego
kolejnego utworu [jeśli trzeba, wcisnąć przycisk CONT. / LIST (6) aby przełączyć się na ciągłe
odtwarzanie].
Uwaga: Zapamiętany punkty Cue zostaje skasowany:
-
– gdy zostanie wybrany inny folder (lub lista odtwa-
rzania)
– po przełączeniu nośnika USB na CD lub odwrotnie
– po wyłączeniu urządzenia
1)
Podczas odtwarzania, przełączyć urządzenie w
tryb pauzy przyciskiem
▶
❙❙
(19) w punkcie, do
którego zamierza się później wrócić. Zacznie
migać dioda ponad przyciskiem CUE (17).
2)
Jeżeli trzeba, ustawić precyzyjnie punkt za
pomocą pokrętła jog (16) (☞rozdz. 5.7).
Wybrany punkt będzie ciągle powtarzany.
3) Wcisnąć przycisk CUE. Wybrany punkt Cue
zostanie zaznaczony w pamięci, na wyświetlaczu pojawi się “CUE” (K), a dioda nad
przyciskiem CUE zacznie świecić ciągle. Aby
zatrzymać powtarzanie, wcisnąć ponownie
przycisk CUE.
4)
Uruchomić ponownie odtwarzanie przyciskiem
▶
❙❙.
5)
Powrót do wybranego punktu jest możliwy za pomocą przycisku CUE. Odtwarzacz
ustawi się w tryb pauzy w zapisanym punkcie
Cue, a na wyświetlaczu pojawi się wskazanie
“CUE”.
6) Aby powrócić do odtwarzania wcisnąć przycisk
▶
❙❙ lub przytrzymać wciśnięty przycisk
CUE dla krótkiego odtwarzania. Po zwolnieniu przycisku CUE, odtwarzacz ponownie
ustawi się w zapisanym punkcie Cue.
5.9 Zmiana prędkości odtwarzania bez
lub ze zmianą wysokości dźwięku
Za pomocą regulatora (11) możliwa jest zmiana
prędkości odtwarzania w zakresie do ±100 %:
+100 % = dwukrotna szybkość
−100 % = zatrzymanie
1)
Wybrać zakres regulacji przyciskiem PITCH
(9). Wybrane ustawienie PITCH sygnalizowane jest za pomocą dwóch diod (10) obok
przycisku:
– obie diody zgaszone:
regulator prędkości wyłączony
odtwarzanie z normalną prędkością
– dioda 8 % świeci:
regulator prędkości aktywny,
zakres regulacji ±8 %
– dioda 16 % świeci:
regulator prędkości aktywny,
zakres regulacji ±16 %
– obie diody świecą:
regulator prędkości aktywny,
zakres regulacji ±100 %
Dodatkowo, po każdym wciśnięciu przycisku
PITCH, w linii tekstowej (N) pokazane zosta-
Polski
37
Page 38

nie ustawienie: “Pitch 8 %”, “Pitch 16 %”,
“Pitch 100” lub “Pitch off”.
2)
Zmiana prędkości odtwarzania następuje po-
Polski
przez przesuwanie suwaka. Na wyświetlaczu
pokazywane jest procentowe odchylenie od
prędkości standardowej (l). Zmienia się również liczba bitów na minutę (P).
3) Podczas zmiany prędkości, zmienia się również wysokość dźwięku. Aby utrzymać stałą
wysokość dźwięku, wcisnąć przycisk MT (22).
Na wyświetlaczu pojawi się wskazanie “MT”
(R) oraz zapali się dioda obok przycisku MT.
Wyłączenie stałej wysokości dźwięku następuje po ponownym wciśnięciu przycisku MT.
5.10 Pitch Bend – synchronizacja
bitówpomiędzy dwoma utworami
muzycznymi
W przypadku korzystania z dwóch odtwarzaczy
CD / MP3, istnieje możliwość zsynchronizowania
bitów z dwóch utworów muzycznych o tej samej
prędkości. Dzięki temu, możliwe jest przechodzenie pomiędzy utworami bez utraty rytmu np.
podczas tańca.
1) W pierwszej kolejności należy zsynchronizować prędkość odtwarzanego utworu z prędkością drugiego utworu, za pomocą regulatora suwakowego (11). Po określeniu liczby
bitów na minutę dla obu utworów, ustawić
regulatory na obu urządzeniach tak, aby uzyskać takie same wartości tego wskaźnika (P).
2) Zsynchronizować bity obu utworów, za pomocą przycisków PITCH BEND (8): tak długo
jak przycisk + lub − jest wciśnięty, utwór
jest odtwarzany o 16 % szybciej lub wolniej.
Pozwala to na dokładne dostrojenie rytmu
utworu następnego i bieżącego.
3) Do synchronizacji bitów można wykorzystać
również pokrętło jog (16).
5.11 Efekty
5.11.1 Efekt Scratch
Włączanie efektu Scratch (efekt obracania
płyty gramofonowej) odbywa się przyciskiem
SCRATCH / F.START (15). Efekt uzyskuje się obracając pokrętło jog (16) w tył i w przód. W
linii tekstowej (N) pojawia się “SCRATCH”. Aby
wyłączyć efekt, wcisnąć ponownie przycisk
SCRATCH / F.START.
5.11.2 Efekt brzęczenia (Droning)
Jeżeli funkcja Master Tempo (stałej wysokości)
jest aktywna [wskazanie ”MT” (R) na wyświetlaczu oraz zapalona dioda obok przycisku MT
(22)], wyłączyć ją przyciskiem MT. Obracając
pokrętło jog (16) w tył i w przód zmniejsza się
i zwiększa prędkość odtwarzania. Powoduje to
powstanie efektu brzęczenia.
5.11.3 Efekt stutter
Do wytwarzania efektów dźwiękowych można
również wykorzystać punkt Cue, zapamiętany
przyciskiem CUE (17) (☞rozdz. 5.8): Przyciśnięcie kilka razy na krótko przycisku CUE powoduje
powstanie efektu wycinania. Im precyzyjniej
wybrany został punkt Cue (np. przy starcie instrumentu lub wokalu), tym ciekawsze efekty
można uzyskać.
5.12 Układanie własnej sekwencji odtwarzania
Odtwarzacz CD / MP3 pozwala na stworzenie
własnej sekwencji odtwarzania. Długość tej listy
może wynosić do 99 utworów. W trybie MP3,
utwory do sekwencji mogą pochodzić z różnych folderów lub list odtwarzania. Zapisana
sekwencja utworów zostaje skasowana np. po
przełączeniu się na inny nośnik oraz po wyłączeniu odtwarzacza.
5.12.1 Zapisywanie i odtwarzanie
sekwencji utworów
1)
Ustawić odtwarzacz w tryb pauzy przyciskiem
▶
❙❙ (19).
2)
Aktywować tryb programowania przyciskiem
PROG. (7). Wskaźnik czasu (O) zmieni się na
numer pierwszej komórki pamięci “P-01”.
Wskazanie “PG” (Q) miga szybko.
Uwaga: Aby szybko wyjść z trybu programowania, przytrzymać wciśnięty przycisk PROG. aż
na wyświetlaczu pojawi się ponownie wskaźnik
czasu(O).
3)
Wybrać pierwszy utwór do sekwencji (wybór
utworu i folderu lub listy odtwarzania
rozdz. 5.1 lub 5.2).
☞
4)
Aby zapisać wybrany utwór na liście, wcisnąć
przycisk PROG. Wyświetlacz pokaże numer
kolejnej komórki pamięci “P-02”.
5)
Kolejne utwory zapisywać na liście w sposób
analogiczny (kroki 3 i 4). Po zapamiętaniu
99utworów, przy próbie zapisania kolejnego
pojawi się komunikat “FULL”.
6)
Aby rozpocząć odtwarzanie zapisanej sekwencji, wcisnąć przycisk
“PG” miga wolniej. Na wyświetlaczu pojawi
się numer utworu (A) w sekwencji oraz całkowitą liczbę utworów z zapisanej sekwencji(M).
Odtwarzanie utworów z zapisanej sekwencji będzie następowało zgodnie z ustawionym trybem pracy (☞rozdz. 5.4).
7) Aby powrócić do normalnego trybu odtwarzania, ustawić odtwarzacz w tryb pauzy
przyciskiem
▶
❙❙ i przytrzymać wciśnięty przy-
cisk PROG. aż wskazanie “PG” przestanie
migać.
Aby ponownie odtworzyć sekwencję,
ustawić odtwarzacz w tryb pauzy i wcisnąć
przycisk PROG, aż wskazanie “PG” zacznie
migać. Uruchomić odtwarzanie sekwencji
przyciskiem
Uwaga: Tak długo jak wyświetlane jest lub miga
wskazanie “PG”, możliwe jest wywołanie sekwencji. Jeżeli wskazanie “PG” zniknie, sekwencja zostaje
skasowana.
▶
❙❙.
5.12.2 Sprawdzanie sekwencji utworów
1)
Ustawić odtwarzacz w tryb pauzy przyciskiem
▶
❙❙ (19).
2)
Jeżeli wskazanie “PG” (Q) miga, wcisnąć
przycisk PROG. (7) jeden raz. Jeżeli wskazanie “PG” świeci ciągle, wcisnąć przycisk
PROG. dwa razy.
3)
Wybrać komórkę pamięci (“P-01” … “P-99”)
przyciskami ❙◀ oraz ▶❙ (18). Nazwy zapisanych utworów pokazywane są w linii tekstowej (N).
4) Aby odtworzyć sekwencję, wcisnąć przycisk
▶
❙❙ .
▶
❙❙ . Wskazanie
5.12.3 Edytowanie i kasowanie sekwencji utworów
1)
Ustawić odtwarzacz w tryb pauzy przyciskiem
▶
❙❙ (19).
2)
Jeżeli wskazanie “PG” (Q) miga, przytrzymać
wciśnięty przycisk PROG. (7) aż przestanie
migać.
3)
Wcisnąć na krótko przycisk PROG. aż wskazanie “PG” zacznie migać szybciej a wskaźnik
czasu (O) przełączy się na pierwszą wolną
komórkę pamięci “P-…”.
4) Aby skasować sekwencję utworów, wcisnąć
przycisk PROG. aż wyświetlacz powróci do
wskaźnika czasu (O). Aby uzupełnić sekwencję, wybrać kolejny utwór (wybór utworu i
folderu lub listy odtwarzania ☞ rozdz. 5.1
lub 5.2) i potwierdzić przyciskiem PROG. Aby
odtworzyć sekwencję, wcisnąć przycisk
▶
❙❙ .
5.13 Funkcja Fader Start
Funkcja Start / Pauza przycisku
być również aktywowana zdalnie z poziomu
miksera z funkcją fader start. Sposób podłączania takiego miksera do odtwarzacza opisano w
rozdz. 4. Aby dopasować odtwarzacz do typu
wyzwalania funkcji fader start w mikserze, przytrzymać wciśnięty przycisk SCRATCH / F.START
(15) i wybrać “LOCK”, “CUE / PLAY” lub “TACT”
przyciskami ❙◀ oraz ▶❙ (18). Wybrane ustawienie pokazywane jest w linii tekstowej (N). Po
zwolnieniu przycisków, wybrany typ zostanie
ustawiony.
LOCK = sterowanie przez przełącznik on / off
To ustawienie musi zostać wybrane dla
większości mikserów marki IMG STAGELINE.
Otwarcie fadera powoduje zamknięcie przełącznika w mikserze. Zamknięcie fadera powoduje otwarcie przełącznika i przełączenie
odtwarzacza w tryb pauzy.
REMOTE
Rys. 5 Fader start przez przełącznik on / off
TACT = sterowanie przez przełącznik monosta-
bilny
Pierwsze zwarcie przełącznika wywołane
otwarciem fadera powoduje start odtwarzania, kolejne zwarcie wywołane zamknięciem fadera – odtwarzacz ustawia się w tryb
pauzy.
REMOTE
Rys. 6
Fader start przez przełącznik monostabilny
CUE PLAY = sterowanie impulsowe
Odtwarzanie wyzwalane jest po otwarciu
fadera, impulsem z miksera i rozpoczynane od początku utworu (punkt Auto Cue
rozdz.5.4) lub od punktu Cue ustawio-
☞
nego przyciskiem CUE (17) (☞rozdz. 5.8).
Zamknięcie fadera powoduje powrót do tego
punktu startowego i ustawienie trybu pauzy.
REMOTE
Rys. 7 Fader start przez sterowanie impulsowe
▶
❙❙ (19) może
Start
Pause
1. × Start
2. × Pause
1. × Cue Play
2. × Pause
38
Page 39

6 Zdalne sterowanie
Pilot zdalnego sterowania wyposażony jest w
baterię zasilającą. Przed przystąpieniem do pracy
należy usunąć folię zabezpieczającą na tylnej
stronie pilota.
Podczas używania należy kierować pilot w stronę
czujnika podczerwieni (14) na urządzeniu. Między pilotem a odtwarzaczem nie powinny znajdować się żadne przeszkody.
Poniższe przyciski pilota mają identyczne funkcje
jak odpowiednie przyciski na urządzeniu:
OPEN / CLOSE (23) [tak jak przycisk (3)]
FOLDER (25)
PITCH BEND (26)
MT (27)
PITCH (28)
PLAY / PAUSE (29)
CUE (30)
PROG. (31)
CD / USB (32)
Przyciski SINGLE / CONT (33), TIME (34) oraz
SKIP ❙◀ / ▶❙ (35) mogą być używane jak przyciski
CONT. / LIST (6), TIME / TAG (5) oraz SKIP ❙◀ / ▶❙
(18), ale z pewnymi wyjątkami:
– Przycisk SINGLE / CONT może być używany
tylko do przełączania między trybami pracy;
nie pozwala on na wczytywanie list odtwarzania.
– Przycisk TIME może być używany tylko do prze-
łączania wskaźnika czasu;
nie pozwala on na przełączanie między informacjami ID3 tag.
– Przyciski SKIP ❙◀ / ▶❙ na pilocie mogą być uży-
wane jak przyciski SKIP na urządzeniu, do wyboru utworów, folderów, list odtwarzania lub
partycji; dla szybkiego wyboru, przytrzymać
wciśnięty odpowiedni przycisk.
Przyciski te nie mogą być używane w kombinacji z innymi przyciskami.
Przyciski numeryczne (24) oraz przyciski SCAN
◀◀ i ▶▶ (36) mogą być używane jako alterna-
tywa dla przycisków na urządzeniu:
– Przyciski numeryczne mogą być używane
zamiast przycisków SKIP do bezpośredniego
wyboru utworów, folderów, list odtwarzania oraz partycji. Wybór następuje poprzez
wybranie odpowiedniego numeru. W przypadku numerów składających się z kilku cyfr,
wcisnąć kolejno odpowiednie przyciski jeden
po drugim, np. przyciski “1” oraz “0” dla
numeru10.
– Przyciski SCAN ◀◀ i ▶▶ służą do szybkiego
przewijania: tak długo, jak odpowiedni
przycisk SCAN jest wciśnięty, następuje przewijanie utworu w przód lub w tył.
Jeżeli pilot nie będzie przez dłuższy czas wykorzystywany, należy wyjąć z niego baterię.
6.1 Wymiana baterii
Jeżeli zasięg działania pilota zmniejszy się znacznie, należy wymienić baterię.
1)
Przesunąć blokadę pokrywy komory bateryjnej w lewo (pierwsza strzałka na rys. 8) i
zsunąć pokrywę w dół (druga strzałka).
1.2.
Rys. 8 Wymiana baterii
2)
Wyjąć starą baterię i włożyć nową (3 V bateria
pastylkowa, typ CR 2025). Upewnić się, że
dodatni biegun baterii znajduje się na górze.
3)
Wsunąć ponownie uchwyt na baterię do
pilota.
Zużyte baterie należy wyrzucać do specjalnych pojemników, nie do zwykłych
koszy na śmieci.
7 Aktualizowanie
oprogramowania
Istnieje możliwość aktualizacji oprogramowania,
poprzez stronę internetową:
1)
Na stronie producenta IMG STAGELINE
(www.imgstageline.com), wyszukać aktualną
wersję oprogramowania dla CD-196USB i
skopiować ją na nośnik USB.
2)
Wyłączyć odtwarzacz CD / MP3 przełącznikiem (12).
3) Podłączyć nośnik USB do portu USB (2).
4)
Przytrzymać wciśnięty przycisk PROG. (7) i
włączyć ponownie urządzenie. Nie zwalniać
przycisku PROG. aż na wyświetlaczu pojawi
się komunikat “UP dA t E”.
5)
Po wczytaniu, w linii tekstowej (N) pojawi się
“Ready”, wcisnąć wówczas przycisk
aby rozpocząć aktualizację oprogramowania. Postęp tego procesu pokazywany jest za
pomocą paska graficznego (H) oraz w linii
tekstowej. Po wyświetleniu komunikatu
“Finish” aktualizacja jest zakończona.
6) Wyłączyć i ponownie włączyć odtwarzacz.
Uwaga: Po aktualizacji oprogramowania, funk-
cjonowanie urządzenia może różnić się od opisanego w niniejszej instrukcji.
▶
❙❙
(19)
8 Konserwacja urządzenia
Urządzenie należy chronić przed kurzem, wstrząsami, dużą wilgotnością oraz wysoką temperaturą. Do czyszczenia używać suchej miękkiej
ściereczki; nie stosować wody ani środków
chemicznych.
Uwagi dotyczące zakłóceń dźwięku i błędów odczytu:
Wpływ dymu papierosowego oraz kurzu może
spowodować błędy przy odczycie płyt. Niestety
uniknięcie szkodliwych warunków nie zawsze
jest możliwe np. w dyskotekach. W takim przypadku należy zlecić okresowe czyszczenie urządzenia przez autoryzowany serwis.
9 Specyfikacja
Pasmo przenoszenia: . . . 20 – 20 000 Hz
THD: . . . . . . . . . . . . . . . < 0,1 %
Separacja kanałów: . . . . > 75 dB
Zakres dynamiki: . . . . . . > 80 dB
Stosunek S / N: . . . . . . . . > 75 dB
Wyjścia
LINE OUT: . . . . . . . . . . 2 V
DIGITAL OUT: . . . . . . . 0,5 Vpp S / PDIF
USB standard: . . . . . . . . 2.0
Formaty dysku: . . . . . . . NTFS, FAT, HFS+
Max liczba
partycji: . . . . . . . . . . . 16
folderów: . . . . . . . . . . 999 na partycję
w max 8 poziomach
plików MP3: . . . . . . . . 999 na folder
Pamięć antywstrząsowa
Standardowe płyty
audio CD: . . . . . . . . . . 8 s
Pliki MP3: . . . . . . . . . . 10 s
Zasilanie: . . . . . . . . . . . . 230 V/ 50 Hz
Pobór mocy: . . . . . . . . . 15 VA
Zakres temperatur: . . . . 0 – 40 °C
Wymiary: . . . . . . . . . . . 482 × 90 × 270 mm
(S × W × D), 2 U
Waga: . . . . . . . . . . . . . . 4,4 kg
Złącza
Wejście USB:. . . . . . . . typ A
Wyjście analogowe: . . RCA L / P
Wyjście cyfrowe: . . . . . RCA
fader start: . . . . . . . . . gniazdo 3,5 mm
Z zastrzeżeniem możliwości zmian.
Polski
Instrukcje obsługi są chronione prawem copyright for MONACOR ® INTERNATIONAL GmbH & Co. KG.
Przetwarzanie całości lub części instrukcji dla osobistych korzyści finansowych jest zabronione.
39
Page 40

Lees aandachtig de onderstaande veiligheidsvoorschriften, alvorens het apparaat in gebruik
te nemen. Voor meer informatie over de bediening van het ap paraat raadpleegt u de anderstalige handleidingen.
Veiligheidsvoorschriften
Het apparaat is in overeenstemming met alle
relevante EU-Richtlijnen en draagt daarom de
-markering.
WAAR-
SCHUWING
Opgelet! Kijk bij geopende cd-lade niet in
•
het binnenwerk van de cd-speler, want eventueel actieve laserstralen kunnen oogletsels
veroorzaken.
Het apparaat is enkel geschikt voor gebruik
•
binnenshuis; vermijd druip- en spatwater en
plaatsen met uitzonderlijk hoge vochtigheid.
Het toegestane omgevingstemperatuurbereik
is 0 – 40 °C.
Plaats geen bekers met vloeistof zoals drink-
•
glazen etc. op het apparaat.
Trek onmiddellijk de netstekker uit het stop-
•
contact,
1.
wanneer het apparaat of het netsnoer
zichtbaar beschadigd is,
De netspanning van het apparaat is levensgevaarlijk. Open
het apparaat niet, want door
onzorgvuldige ingrepen loopt
u het risico van elektrische
schokken.
2.
wanneer er een defect zou kunnen optreden nadat het apparaat bijvoorbeeld is
gevallen,
3. wanneer het apparaat slecht functioneert.
Het apparaat moet in elk geval worden hersteld door een gekwalificeerd vakman.
Een beschadigd netsnoer mag alleen in een
•
erkende werkplaats worden vervangen.
Trek de stekker nooit met het snoer uit het
•
stopcontact, maar met de stekker zelf.
In geval van ongeoorloofd of verkeerd ge-
•
bruik, verkeerde aansluiting, foutieve bediening of van herstelling door een niet-gekwalificeerd persoon vervalt de garantie en de
verantwoordelijkheid voor hieruit resulterende
materiële of lichamelijke schade. Zo kunnen
wij ook niet aansprakelijkheid worden gesteld
voor gegevensverliezen als gevolg van foutieve bediening of een defect, noch voor de
schade die hieruit volgt.
Wanneer het apparaat definitief uit bedrijf wordt genomen, bezorg het dan
voor milieuvriendelijke verwerking aan
een plaatselijk recyclagebedrijf.
Afstandsbediening
Als de afstandsbediening langere tijd niet wordt
gebruikt, neemt u de batterij er veiligheidshalve
uit, zodat de afstandsbediening niet wordt beschadigd bij eventueel uitlopen van de batterij.
Lege batterijen horen niet in het huisvuil. Verwijder ze voor een milieuvriendelijke verwerking uitsluitend als KGA
(b.v. de inzamelbox in de detailhandel).
Onderhoud van het apparaat
Bescherm het apparaat tegen stof, trillingen,
vocht en warmte. Verwijder het stof met een
zachte, droge doek. Gebruik zeker geen water
of chemicaliën.
Opmerking in verband met klankstoringen
en leesfouten: Sigarettenrook en stof dringen
makkelijk in alle openingen van de cd-speler en
zet zich ook af op de optische onderdelen van
de laseraftastsystemen. Mocht deze afzetting tot
leesfouten en klankstoringen leiden, dan moet
het apparaat door een gekwalificeerd vakman
worden gereinigd. De kosten voor deze reiniging
draagt de koper, ook tijdens de garantietermijn!
Læs nedenstående sikkerhedsoplysninger opmærksomt igennem før ibrugtagning af enheden. Bortset fra sikkerhedsoplysningerne henvi-
Dansk Nederlands
ses til den engelske tekst.
Sikkerhedsoplysninger
Denne enhed overholder alle relevante EUdirektiver og er som følge deraf mærket .
ADVARSEL Enheden benytter livsfarlig net-
spænding. For at undgå fare
for elektrisk stød må kabinettet
ikke åbnes. Overlad servicering
til autoriseret personel.
Advarsel! Undlad at kigge ind i CD-meka-
•
nismen, når CD-skuffen er åben. Der kan
udsendes laserstråler, som kan forårsage
øjenskader.
Enheden er kun beregnet til indendørs brug.
•
Be skyt den mod vanddråber og -stænk, høj
luftfugtighed og varme (tilladt omgivelsestemperatur 0 – 40 °C).
Undgå at placere væskefyldte genstande, som
•
f. eks. glas, ovenpå enheden.
Tag straks stikket ud af stikkontakten i
•
følgende tilfælde:
1. hvis der er synlig skade på enheden eller
netkablet,
Deze gebruiksaanwijzing is door de auteurswet be schermd eigendom van MONACOR ® INTERNATIONAL
GmbH& Co. KG. Een reproductie – ook gedeeltelijk – voor eigen commerciële doeleinden is verboden.
2. hvis der kan være opstået skade, efter at
enheden er tabt eller lignende,
3. hvis der forekommer fejlfunktion.
Enheden skal altid repareres af autoriseret
personel.
Et beskadiget netkabel må kun repareres af
•
autoriseret personel.
Tag aldrig netstikket ud af stikkontakten ved
•
at trække i kablet, tag fat i selve stikket.
Hvis enheden benyttes til andre formål, end
•
den oprindeligt er beregnet til, hvis den ikke
er korrekt tilsluttet, hvis den betjenes forkert,
eller hvis den ikke repareres af autoriseret
personel, omfattes eventuelle skader ikke af
garantien. Der ydes ingen garanti ved tab af
data som følge af betjeningsfejl eller en defekt
i enheden og for den skade dette datatab vil
udgøre.
Hvis enheden skal tages ud af drift
for bestandigt, skal de afleveres på en
genbrugsstation, for at undgå skader
på miljøet.
Fjernbetjening
Hvis fjernbetjeningen ikke skal benyttes i længere tid, skal batteriet fjernes, for at undgå skader ved eventuelle lækager fra disse.
Brugte batterier må aldrig smides ud
sammen med den øvrige husholdningsaffald. Aflever dem altid i gen
brugsstationens battericontainere.
Vedligeholdelse af enheden
Beskyt enheden mod støv, vibrationer og fugt.
Til rengøring må kun benyttes en blød, tør klud;
der må under ingen omstændigheder benyttes
vand eller kemikalier.
Note vedrørende læse fejl og afbrydelse af
afspilning: Cigaretrøg og støv kan nemt trænge
ind gennem alle åbninger på CD-afspilleren, og
kan sætte sig på laseren. Hvis dette skulle medfører læse fejl, skal denne renses af en uddannet
reparatør. Rensning af laseren er ikke omfattet
af garantien på CD-afspilleren.
-
40
Alle rettigheder til denne brugsvejledning tilhører MONACOR ® INTERNATIONAL GmbH & Co. KG. Ingen
dele af denne vejledning må reproduceres under ingen omstændigheder til kommerciel anvendelse.
Page 41

Ge akt på säkerhetsinformationen innan enheten
tas i bruk. Skulle ytterliggare information behövas
kan den återfinnas i Manualen för andra språk.
Säkerhetsföreskrifter
Denna enhet uppfyller alla relevanta direktiv
inom EU och har därför fått märkning.
VARNING
Varning! Titta aldrig in i spelmekanismen
•
då luckan är öppen. Laserstrålen kan skada
ögonen.
Enheten är endast avsedd för inomhusbruk.
•
Skydda enheten mot vätskor, hög luftfuktighet och hög värme (tillåten omgivningstemperatur 0 – 40 °C).
Placera inte föremål innehållande vätskor,
•
t. ex. dricksglas, på enheten.
Ta omedelbart kontakten ur eluttaget om
•
något av följande fel uppstår:
1. Enheten eller elsladden har synliga skador.
2. Enheten är skadad av fall e. d.
3. Enheten har andra felfunktioner.
Enheten skall alltid lagas på verkstad av utbildad personal.
Enheten använder farlig nätspänning. For att undvika en
elektrisk stöt, öppna aldrig chas
sit på egen hand utan överlåt all
service till auktoriserad verkstad.
En skadad elsladd skall endast bytas på verk-
•
stad.
Drag aldrig ut kontakten genom att dra i el-
•
sladden utan ta tag i kontaktkroppen.
-
Om enheten används för andra ändamål
•
än avsett, om den kopplas in felaktigt, om
den an vänds på fel sätt eller inte repareras
av auktoriserad personal upphör alla garantier att gälla och inget ansvar tas heller för
uppkommen skada på person eller materiel.
Likaså accepteras inget ansvar för dataförlust
orsakad av användningsfel eller en defekt och
för följdskador av denna dataförlust.
Om enheten ska tas ur drift slutgiltigt,
ta den till en lokal återvinningsanläggning för en avyttring som inte är skadligt för miljön.
Fjärrkontroll
Om fjärrkontrollen inte ska användas under en
längre tid, ta ur batteriet som en försiktighetsåtgärd, så att fjärrkontrollen ej att skadas i händelse av att batteriet läcker.
Förbrukade batterier får inte slängas
bland hushållssopor. Lämna alltid in
dem hos uppsamlingsställen (som t. ex.
batteriholkar eller hos er återförsäljare).
Skötsel av enheten
Skydda enheten mot damm, vibrationer och
fukt. Rengör endast med en mjuk och torr
trasa, använd aldrig kemikalier eller vatten vid
rengöring.
Notering ang ljud avbrott och läs problem:
Cigarett rök och damm kommer lätt in genom
enhetens intag och kan då givetvis sätta sig på
det optiska läshuvudet. Om detta sker och förorsakar ljudstörningar och avbrott så måste enheten rengöras av kvalificerad personal. Var vänlig
att notera att detta kommer att fakturears även
om artikeln befinner sig inom garantiperioden.
Ole hyvä ja huomioi joka tapauksessa seuraavat turvallisuuteen liittyvät seikat ennen laitteen
käyttöä. Laitteen toiminnasta saa lisätietoa tarvittaessa tämän laitteen muunkielisistä käyttöohjeista.
Turvallisuudesta
Tämä laite täyttää kaikki siihen kohdistuvat
EU-direktiivit ja sille on myönnetty hyväksyntä.
VAROITUS
Huomio! Älä katso CD mekanismiin, kun CD
•
kelkka on ulkona. Lasersäteiden säteily voi
vahingoittaa silmiä.
Tämä laite soveltuu vain sisätilakäyttöön. Suo-
•
jele laitetta kosteudelta, vedeltä ja kuumuudelta (sallittu ympäröivä lämpötila 0 – 40 °C).
Älä sijoita laitteen päälle mitään nestettä si-
•
sältävää, kuten vesilasia tms.
Irrota virtajohto pistorasiasta jos:
•
1.
laitteessa tai virtajohdossa on havaittava
vaurio
2. putoaminen tai muu vastaava vahinko on
saattanut aiheuttaa vaurion
Laite toimii hengenvaarallisella
jännitteellä. Välttääksesi sähköiskun, älä avaa laitteen koteloa.
Jätä huoltotoimet valtuutetulle,
ammattitaitoiselle huoltoliikkeelle.
Alla rättigheter är reserverade av MONACOR ® INTERNATIONAL GmbH & Co. KG. Ingen del av denna
instruktionsmanual får eftertryckas i någon form eller på något sätt användas i kommersiellt syfte.
3. laitteessa esiintyy toimintahäiriöitä
Kaikissa näissä tapauksissa laite tulee toimit-
taa valtuutettuun huoltoliikkeeseen.
Virtajohdon saa vaihtaa vain valtuutettu
•
huoltohenkilö.
Älä koskaan irrota virtajohtoa pistorasiasta
•
johdosta vetämällä.
Laitteen takuu raukeaa, eikä valmistaja,
•
maahantuoja tai myyjä ota vastuuta mahdollisista välittömistä tai välillisistä vahingoista,
jos laitetta on käytetty muuhun kuin alkuperäiseen käyttötarkoitukseen, laitetta on
taitamattomasti käytetty tai kytketty tai jos
laitetta on huollettu muussa kuin valtuutetussa huollossa. Myöskään mitään vastuuta
mahdollisista käyttövirheiden, tai muun vian
aiheuttamista tietohävikeistä tai välillisistä vahingoista ei oteta.
Kun laite poistetaan lopullisesti käytöstä, vie se paikalliseen kierrätyskeskukseen jälkikäsittelyä varten.
Kauko-ohjain
Jos kauko-ohjainta ei käytetä pidempään aikaan,
irrota patteri varmuuden vuoksi, jotta kauko-ohjain ei vaurioituisi mikäli patteri sattuisi vuotamaan.
Käytöstä poistettavat patterit on vietävä niille tarkoitettuihin keräyspisteisiin, eikä niitä saa hävittää muun
sekäjätteen mukana.
Laitteen huolto ja ylläpito
Suojele laitetta pölyltä, värähtelyiltä ja kosteudelta. Käytä puhdistamiseen vain kuivaa, pehmeää kangasta. Älä käytä vettä tai kemikaaleja.
Tiedote koskien levyn lukuhäiriöitä sekä
katkoksia äänessä: Laitteeseen kertyvä pöly,
tupakansavu yms aiheuttaa laitteeseen lukuvirheitä. Laitteen saa avata ja huoltaa vain
av-huoltoliike tai sähköalan ammattilainen. Huomioi että kyseessä on normaalisti veloitettava
huoltotyö myös takuuaikana.
Suomi Svenska
Kaikki oikeudet pidätetään MONACOR ® INTERNATIONAL GmbH & Co. KG. Mitään tämän käyttöohjeen
osaa ei saa jäljentää miltään osin käytettäväksi mihinkään kaupallisiin tarkoituksiin.
41
Page 42

MONACOR INTERNATIONAL GmbH & Co. KG • Zum Falsch 36 • 28307 Bremen • Germany
Copyright© by MONACOR INTERNATIONAL. All rights reserved.
A-1270.99.02.05.2016
 Loading...